Transcripts
1. Introduction and Supplies You Will Need: Hi friends, how are you? I hope you're having
a great deal today. I'm excited about sharing
this project with you. This is a drawing and
watercolor painting project that I designed
especially for kids. Students do not need to have any drawing or
painting experience at all to be successful
with this project. I will guide students step by step through all the steps
that they need to take. Today we are going
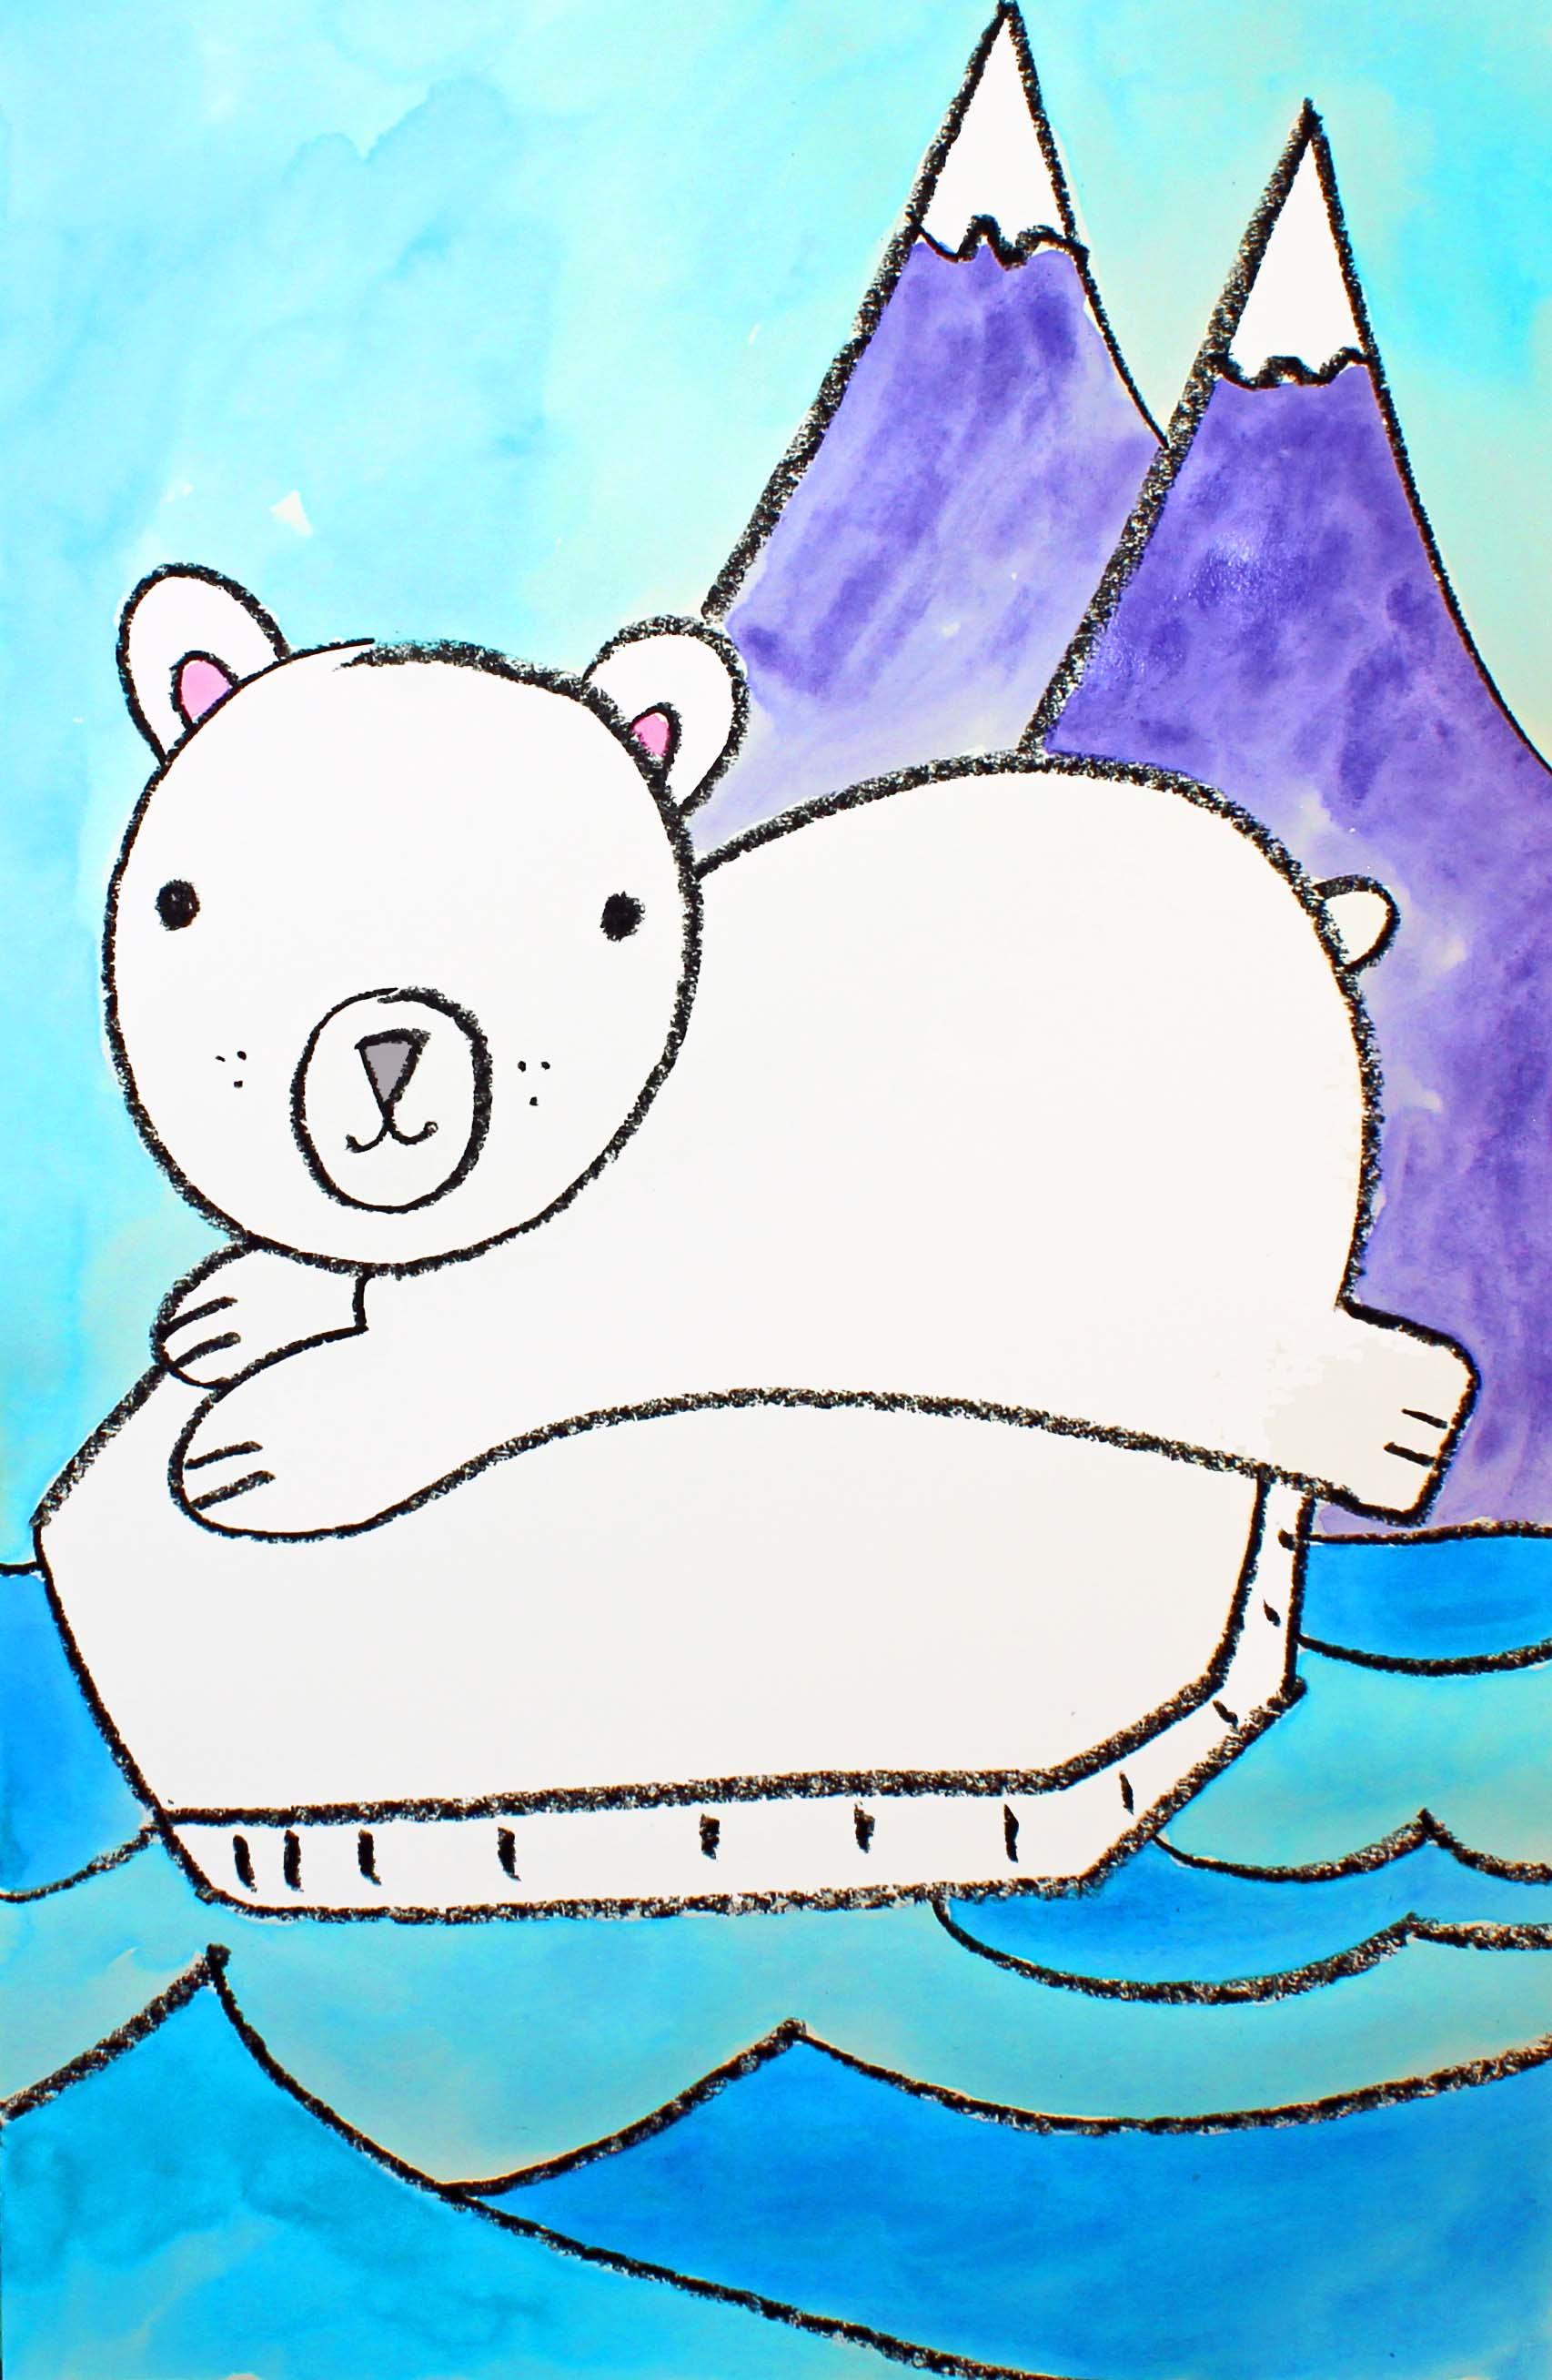
to be creating this cute little polar bear who's floating along
on an iceberg. Let's talk about
the supplies and the materials that you will
need for this project. The first thing
that you'll need is a sheet of watercolor paper. You will need a set of watercolor paints
and a paint brush. I'm going to use this
size paint brush, but just use what you
have available to you. You will need a cable
with clean water. You will need a
black oil pastel or a black crayon and
a paper towel. Go ahead and gather all of
those supplies and materials. And I'll see you back
here in the next video.
2. Step 1: Draw a Polar Bear Design: In this step, we are going to
draw our Polar Bear design. Let's get started. The first thing
that we're going to do is we are going to pick up our black oil pastel
or black crayon. We're going to come
a few inches down, or several centimeters down, from the top of our sheet of
paper on the left hand side. We are going to make a circle, a medium sized circle,
about that big. That's going to be the
head of our polar bear. Now let's give some features
into our polar bears face. Let's start out with the ears. They have roundish ears. We're going to make
some small ears, and those are just curve lines. Then inside those curved lines, we're going to make
smaller curve lines to add a little bit of
detail to those ears. Now down here,
towards the bottom, we're going to make an oval. Then we're going to
add a small nose, which is a triangle. And a little mouth,
little smiling mouth. Let's add some eyes. You could make any type
of eye that you'd like. I like to just make these
circle eyes, little dots. All right, there we go. There's our polar bears face. If you'd like to
add a little bit of detail like some dots here, some types like to do that with my polar bears to give a
little bit more interest. Now what we're
going to do is make the body of our polar bear, and our polar bear is
going to be on an iceberg, flat on an iceberg. Let me show you how
we're going to do that. We're going to start out
right underneath this ear, and we're going to
make a curved line, going up just a little bit and then coming down like
this about this far. All right, so this is going
to be the back in the bun, bun area of our polar bear. Now let's move to the front. We're going to
make a little line right underneath
nose in the mouth. And then we're going
to make a paw. We're going to make a paw
coming down like this. And this is going to
be just a curve line. We're going to come up. Then what we're going to do
is we're going to come back, creep along like
this. All right? It's just a curve line going towards the
back of our bear. All right, now what we're
going to do is we are going to make the back leg and foot. We're going to come
out from this line, come over, come down, and then attach it to this line that we just
made, this curve line. Now let's go back to the
front and we're going to make another line right here. And it's going to be a
curve line like this. And this is going to be the
front paw of our polar bear. We have 123 and then the other foot is
hiding in the back. Okay, let's add a little
bit of detail to those. Front paws curve little lines and he's coming along nicely. Let's not forget
the little tail. They have very small tails, comparatively speaking,
compared to their bodies. All right, so there's
our little bear. Now we're going to give him
some background details and this little bear is going to be floating on a small
drift of ice. Let's make that. Now what we're going to do is
we're going to make some straight lines and
they're going to come out and then down
and then back up. Okay, let me show
you what I mean. We're going to start
at this top paw. We're going to make a
straight line coming down, already attached to this line. We're going to make
another line coming down. And then let's make
another line coming over and then another
line coming up. Then let's finish up
with another line coming up onto the foot
of our polar bear. All right, to give a
little bit of detail to this little
drifting piece of ice, we're going to
make a line that's following along here
with this line, with this line, and
with this line. Let me show you what I mean. Here, here, and here. And then inside the, inside that space,
we're going to make some more lines like this. All right, Now what we're
going to do is we are going to create some water. This little piece of ice
is drifting on the water. I'm going to make some
water right here. Then what I'm going to do is I'm going to make some
more water down here. And they're going to
be different shapes and different levels of water. I'm going to make one
little line here, then I'm going to come up, and then come down to the
bottom of my piece of paper. Then I'm going to
make another line, coming up like this
and coming down. Then maybe I'll make
something over here as well, this. Do you see what I'm doing? I'm just creating something
that looks like water. I have little curve lines that are showing you where there are different levels of water. All right, friends,
Keep in mind if yours does not look exactly
like mine, that's okay. We want your artwork to look
like your artwork, right? We don't want it to
look exactly like line. All right. Now
we're going to make some mountains here in the back. So we're going to start at the edge of our piece of paper, we're going to come up with a curve line and then
we're going to come down. Then we're going to make another mountain behind this one. We'll come up and
then we'll come down. Then let's put some snow at
the top of the mountain. That's just a squiggly line. Now take a look at your artwork. If there's anything else
that you'd like to add, go ahead and add it right now. I think I'm going to add some little paws here
to this back foot. But otherwise, I think
that I'm finished. When you're finished, what
we're going to do is put our oil pastel or
our crayon down. Then in the next step, we are going to start
painting our design.
3. Step 2: Paint the Design: In this step, we are going
to paint our design. Let's get started. The first thing
that we're going to do is we're going to add a drop or two of water into
each of our pans of paint. What this will do is it, we'll soften up our
paint just a little bit. They will be easier for us to I really encourage my students to take a moment to do that. It doesn't take that long
and it really does help. Now that our paints
are softening up, let's turn our attention
to our design. Here we have our
little polar bear floating along on
a piece of ice. What we're going to do
is we're going to start by painting some small details, the ears and the nose
on our polar bear. And then we're going to go ahead and paint the rest
of the background. Keep in mind that the polar
bear is going to stay white and the piece of ice is going to
stay white as well. Everything else will be painted. Oh, except for the snow right here on the top of
these little mountains. Let's get started by painting some details on our polar bear. I'm going to paint the
inside of those ears pink. If you don't have
pink, you can use red or any other color
that you'd like. Make sure that you
just use the very, very tip of your paint brush so that you don't get your
paint all over the place. Now I'm going to use a
tiny amount of black, tiny, tiny, tiny, and get
most of that water off. If you need to take some of the water off with your
paper towel like this, you can go ahead and do that. Because we want this
to not smear around on the nose and
mouth of our bear, of our polar bear. Okay? So I made just a light light
black, which is really gray. Now what I'm going to do is I'm going to paint this sky right here blue and the mountains
purple down here. I'm going to use different
shades of blue for the ocean. Okay, let me start up
here at the top and I'm going to paint this area blue. All right. Now as you can see, I painted my sky blue. And now I'm going to move
down here to the ocean, to the sea, and I'm going to use different
shades of blue. I have two different shades
of blue in my palette, but if you only have
one, that's okay. You can just use
different amounts of paint and water to
create different looks. Let me show you what I mean. If we put a little bit of water here and a tiny
bit of blue paint, the paint is going to
be pretty light, right? I'm going to paint
this space right here, this really light blue. I painted that space with
a really light blue. Now I want another shade of
blue for a different space. I'm adding a little
bit more blue to the paint on this section. I'm going to add some blue. And it's going to
be a little bit darker because I
used more paint. Do you see how that works? I'm going to go ahead
and finish painting the rest of the ocean with
different shades of blue. I'm going to use a lot
of water on some of the areas and a lot of
paint on other areas. All righty friends. So the last thing
that I'm going to do is I am going to paint
these mountains purple. I'm going to paint this mountain a little bit lighter
purple than this one. And I'm going to add more water, my purple paint for this one. And a little bit more paint for this one right
here, this mountain. I'm going to put some
water in one of my wells. Then I'm going to add
this purple right here. Then I'm going to test it out
to see that looks awesome. This is a little bit
lighter because I added more water sometimes. When you look at things
off in the distance, they're a little bit lighter. Okay, Then the next
thing I'm going to do is paint this one right here. And this one's going to
be a little bit darker. I'm adding a little bit more
paint just a little bit. All righty friends, I
think I'm finished. Remember we're keeping our
polar bear white and we are keeping our
ice white as well. I hope that you had a lot
of fun with this project. I will see you next time.
 Em Winn, Teacher, Art Instructor, Artist