Transcripts
1. Introduction and Supplies You Will Need: Hi friends. How are you? I hope you're
having a great day today. I'm excited about sharing
this project with you. This is a drawing and
watercolor painting project that I designed,
especially for kids. Students do not need to have any drawing or painting
experience at all. To be successful
with this project. I will guide students
step-by-step through all the steps
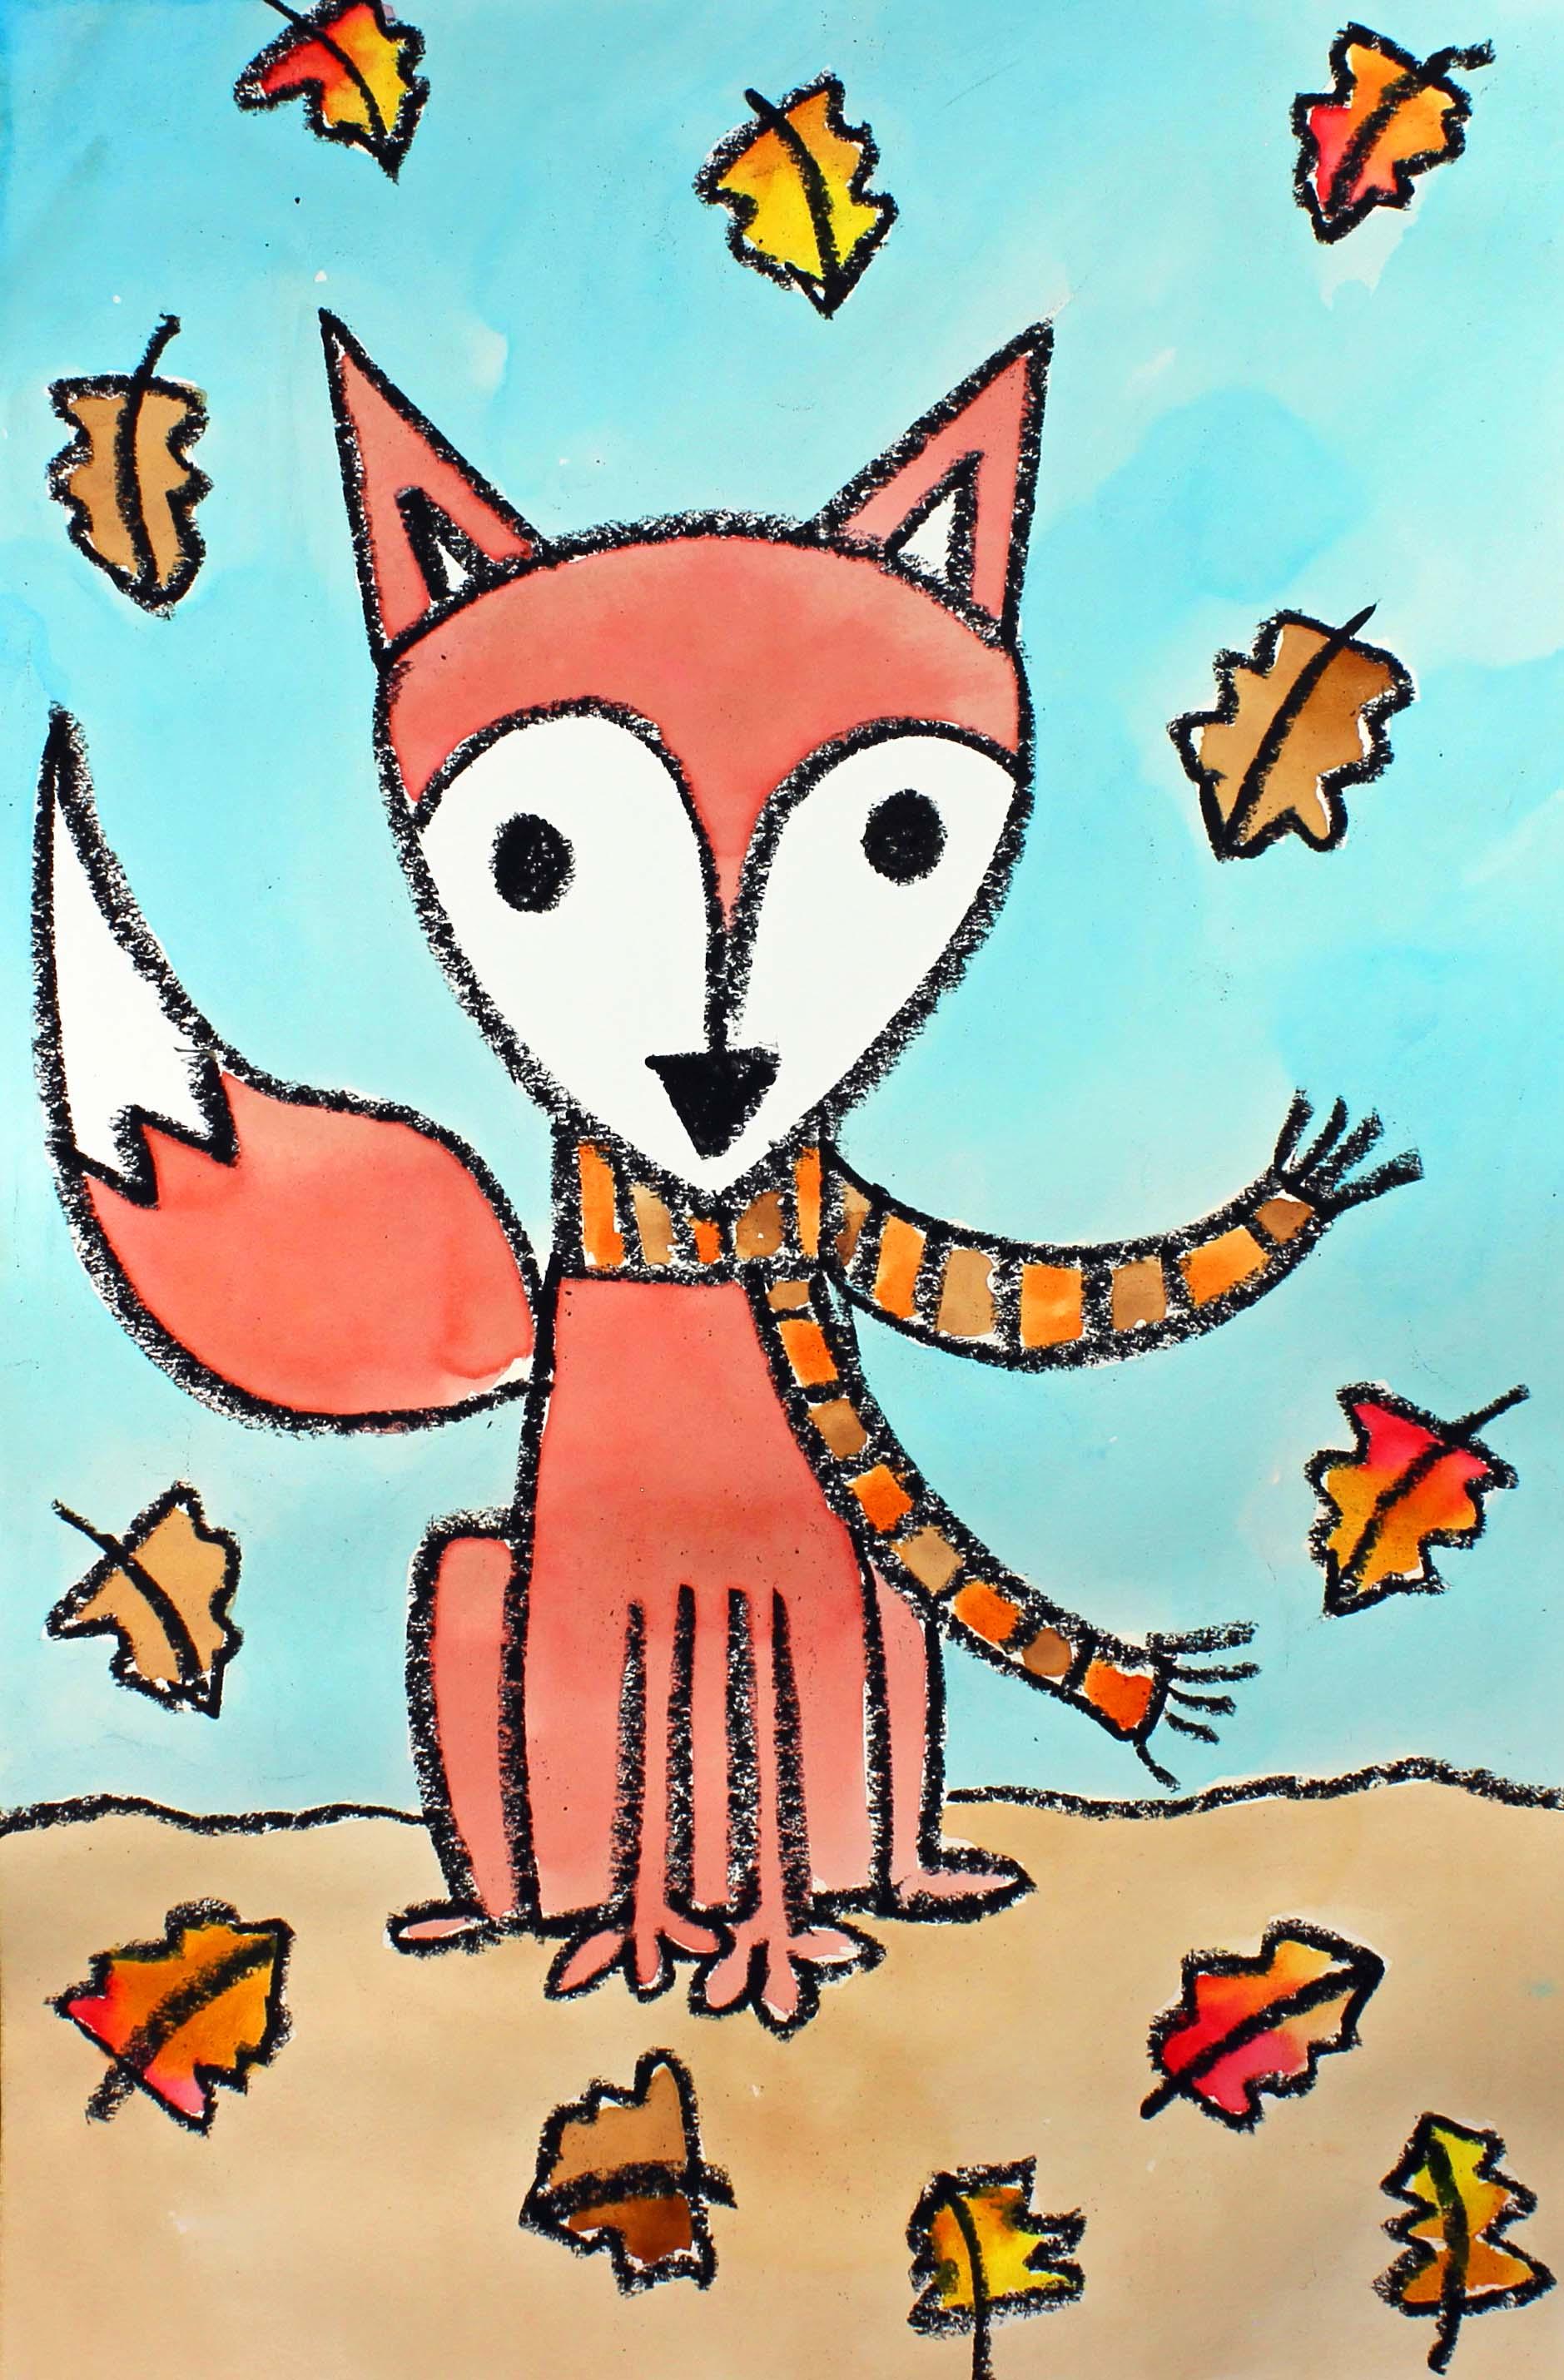
that they need to take. Today, we are going to be
creating this cute fox who's wearing a scarf during
the fall season. Let's talk about
the supplies and the materials that you will
need for this project. The first thing
that you'll need is a sheet of watercolor paper. You will need a set of watercolor paints
and a paintbrush. I like to use a paintbrush
about this size, but just use what you
have available to you. You will need a cup or a
bowl with clean water. You will need either
a black oil pastel or a black crayon
and a paper towel. So go ahead and gather all of those supplies and materials. And I'll see you back
here in the next video.
2. Step 1: Draw a Little Fox Design: In this step we are going
to draw our fox designs. So let's get started. Go ahead and pick up your
oil pastel or your crayon. And what we're going to
do is we're going to come down from the top
of your piece of paper. And what we're going
to do is we're going to make a curved line. This is going to be the
top of our fox's head. Now we are going to come
down from the top of our fox's head with two
curved lines that meet. And this will create the fox's
head and face right here. Now we're going
to make some ears on the top of her fox's head. And they're going
to be triangles that are upside-down v's. And let's add a little bit of detail inside of
those triangles. Now let's add a
little bit of detail onto the inside of this space. Let's make a small nose, a triangular nose
down at the bottom. Paper and we're going
to fill that in with our black oil pastel or crayon. Then what we're going
to do is come to each of the cheek
areas and we're going to make a
curved line that goes up and then comes
down to the nose, goes up and then comes
down to the nose. Let's add some eyes. For our fox. You can add any type of
eye that you'd like. I'm just going to
add some dots here, some large dots,
circles filled in. There we go. Now what we're going
to do is we're going to create a scarf right here underneath the
chin of our fox. So I'm going to
make a line down, a line down coming from the side of the chin and
then close that up. And then coming out
one of the sides, either this side or this
side, it's up to you. What I'm going to do
is I'm going to make a curved line coming out from this part of our scarf and another curved line that follows along that
first curve line. Close that up. And then let's add
some lines here for a little bit of
fringe on our scarf. Now let's make the other end of the scarf coming down this way. So curved line, curved line. Close that up and add a
little bit of French. If you'd like to add a little pattern
inside of the scarf, you can go ahead and do that. I think I'll just
add some stripes. Stripes on a scar. You can add any type of
design that you'd like. If you have space
inside your scarf. Now let's create the Fox's body. So I'm going to come down
from the scarf and I'm going to make a straight line. And then the other side
make a straight line. Then I'm going to make
two more straight lines. These are going to be
the front legs for Fox. And then I'm going
to make some toes. And then I'm going to close
up that space at the bottom. My fox is pretty thin. If you're fox is
bigger or smaller, or taller or shorter. That's a good thing. We want your Fox to look
like you're fox, right? Just like We want my fox
to look like my Fox. Alright, now let's
go back over here. And this is the back knee. And then we're going
to make a foot. Alright, so this is the knee, the leg and the foot. And then this area right here
is where my other knee is, but it's blocked. That scarf. So we're just going to
go around it like this. Perfect. Alright, let's remember to put a tail on our fox. So if you have your scarf
coming out this way, then your tail will
be over on this side. And if you have your scarf
coming out on this side, then your tail will
be on this side. Okay? So to make a tail, I'm going to go up
with a curve line. It's almost like a
really long ***. Then I'm going to come down
and then add a zigzag line. There we go. If your tail
is lower, that's fine. If it's higher, it's fine. That's just where I
wanted to put my tail. Alrighty. Now that we
have our fox completed, what we're going to
do is we're going to make the forest floor. So we're just going to make a line and it's not going to be super straight because
it is the forest floor. Okay? Now what we're going
to do is we're going to make some leaves falling down from the trees
above our little fox. Let me show you how I
like to make leaves. But you can make any type
of leaf that you'd like. Going to start about right here with a slightly curved line. And then I'm going to
come up and I'm going to, it almost looks like an
arrow in the beginning. And then I just make some zigzag lines until I almost
reached the bottom. And then I do the same
thing on the other side. That's a very easy
way to make a leaf. So these leaves are
going to be pointing downwards because they're
falling off the trees. Okay, So let's go ahead
and make a few leaves. So I have a slightly
curved line, arrow. And then I just do
my six sack lines, zigzag lines, just like that. Remember if there's
a different type of a leaf that
you'd like to make. Go ahead and do that. I'm going to make one here. They're not going to be
really close together. Zigzag, zigzag, zigzag. Maybe I'll make some down here. Arrow zigzag, zigzag. My stem on this one needs
to be a little bit longer. There we go. 12. Maybe I'll make one here. Arrow zigzag, zigzag. It's okay if they're
not all the same sheep. Maybe I'll make one more here. So just take a look
at your artwork and you get to decide where you'd like to
put your leaves. I think I'd like to put
some leaves down here at the bottom on my
forest floor as well. So I'm going to go ahead and do that. There we go. I think I'm really happy with the placement of
all of my leaves. So I have some leaves coming
down from the trees above. And then I have some
leaves that have already landed on the ground. I think I want to actually
add one more right here. Sometimes when I
look at my art work, there are things
that I want to add, little drawings
and I just do it. You don't think
too much about it. I just do it because I
think that I looked nice. Alright, if you do have
oil pastels on your hands, that's a normal thing. Just go ahead and take your
handy-dandy paper towel. Get as much off as you
can of the oil pastels. If you don't get all of your oil pastels off of
your hands, that's okay. That's normal because they usually don't come
off all the way. Just do the best that you can. If you're using crayons, that usually doesn't
happen as much. Actually, my oil pastel broke as well as I was creating
one of these leaves. And that's normal as well. Because oil pastels are really soft and they're made with oil, they will break very easily. So when we come back
in the next step, we are going to
paint our design.
3. Step 2: Paint the Design: In this step we are going
to paint our design. So let's get started. The first thing that
we're going to do is we're going to add a drop or two of water into
each pan of paint. And what this will do is it will soften up
our paints a little bit so they will be
easier for us to use. So I do encourage my students to take that step
because it really does make things a lot
easier. Here we go. Now that our pizza
or softening up, Let's turn our attention
to our design. So here we have a little fox with this scarf on getting
ready for the fall. The temperatures
are cooling down. And so he is enjoying
this fall day. The leaves are falling
on him and that's what happens with leaves a lot
of times in the fall. So it almost looks like the leaves are
raining on him, right? He's having a great time. So when we're thinking about
the colors for our design, Let's think about the
fall colors which are red, orange, yellow. If you want to use a little
bit of green and brown, and maybe even some
blue for the sky. It's completely up to you. But what we're going to do
is focus on the fall colors because our fox is a
reddish brown color. And then we have our leaves that are falling off of the trees. And they're usually brown, maybe orange, a tinge
of red and some yellow. You get to decide on the
colors of the leaves. Let me show you how to
make the color of our fox. So we're going to put
a small amount of water into one of
our pans of paint. We're going to add some red. And then to this red, we're going to add some brown, a small amount of brown. And this will create a
color that is a brick red. It's not a really true
bright red. Brick red. So that's nice. I might even want to add
a little bit more brown. Little bit more
brown. There we go. So I'm going to paint the
upper part of my fox's face, but the lower part, I'm going to leave white. Alrighty, there we go. Now we have our fox painted. What we're going to do
next is we're going to paint our scarf. So I'm going to choose I want to stay within
those fall colors. So I think I'm going
to use some orange and maybe a little bit of
brown, orange and brown. There we go. Now I'm
going to paint my leaves. So I'm going to paint them, some of them orange, some of them brown, and some of them
yellow and maybe even mix a little bit
of color together. Alrighty friends.
As you can see, I have some brown leaves, I have some yellow
and orange leaves, and I have some red
and orange leaves. I like the way that those colors look when they're mixed
together a little bit. So now we have all of
our leaves painted, we have our fox painted
and our foxes scarf. What we're going to
do in the next step is paint the background.
4. Step 3: Paint the Background: In this step we are going
to paint the background. So let's get started. You get to choose the
colors that you would like to use to paint
the background. That would be this
sky and the ground, the forest floor that
the fox is sitting on. I'm going to use
a light brown for the forest floor and then a light blue for the background. But you get to choose
the colors that you'd like to make
a light brown. I'm just going to add more water to this
brown right here. And that should
lighten it up and make it really pretty light. Test it out. I think I'd like it a little bit
lighter than that. I'm going to go ahead
and mix more water in. Remember, if you'd like
a color to be lighter, you add more water. If you'd like a color to be darker than you add more paint, remember to push
your paint around. You don't need to paint one area over and
over and over again. Go ahead and feel free to push that paint around on
your piece of paper. Alrighty friends. So I'm going to
speed up this video. And I will see you back
here in just a minute. Already friends, I'm
finished painting my design. I'm very happy with the
way that it turned out. I hope that you have a lot
of fun with this project. I will see you next time.
 Em Winn, Teacher, Art Instructor, Artist