Transcripts
1. Welcome to Class!: [MUSIC] My love of texture
is deep and it's real. When used with intention, texture can take
flat illustrations to new depths adding
beautiful dimension. Now with animation features
and apps like Procreate, you can take those textures even further with motion
right on your iPad. Hi everyone. I'm Tracey Capone. I'm an illustrator,
photographer, and top teacher
here on Skillshare. Together in class,
we're going to animate texture in Procreate. All the basic concepts of
frame-by-frame animation in Procreate are the same regardless of what
you're animating. In this class, we're going to take
some approaches to our animations that
quite literally push Procreate's boundaries and take a little planning
and consideration when setting up the animations. We'll walk step-by-step through all of those together in class. I've created thousands of
textures over the course of my career and while I'm not
a motion designer by trade, being able to animate
those textures has allowed me to create fun
textured gifts stickers, as well as textured
animations for my classes, social media, and illustrations. I'm going to share all my
tips and tricks on how to create your own animated
textures using Procreate. We'll start by looking at the various ways to add texture, as well as how to use
Procreate's adjustment tools when they need a bit of a boost. Next, we'll create
a simple animation using a single texture
on a single shape, which is the building block
for all other animations. Then we'll take that
animation a bit further by creating an
animated background, which is one of those
boundary-pushing scenarios I mentioned previously. We'll move on to animating multiple textures and blending them seamlessly using masks. Finally, I'll walk you through a more complex multi-layered
animation and show you how I plan out and set
up my animations using all the principles
we covered in class. The best part? What you learn in class can
be applied to just about any object you animate and Procreate, not just textures. When you join this class, you'll receive a set of
handmade textures I've created, as well as the flat
illustrations I'll be animating. You're welcome to
follow along using those or create your own. Now, this class is
beginner friendly, but it does assume some
familiarity with Procreate. If you're brand new to the app, I recommend starting with
any of the amazing beginner Procreate classes you'll
find here on Skillshare. Are you ready to
push the boundaries of Procreate's
animation feature? Do you want to add
a little movement to your favorite textures? If so, grab your iPad, come join me in class, and let's get started.
2. The Class Project: [MUSIC] The project for
this class is to create your own animated
texture illustrations using the methods
we cover in class. Save your animations in GIF
format and upload them to the projects and resources page on the browser
version of the class. I'd love to see what you create plus sharing your project
and leaving a review, not only help others
see what they'll learn when they take the class, it also helps more
students find the class. Next up, we'll access
the downloads for class. I'll see you there [MUSIC]
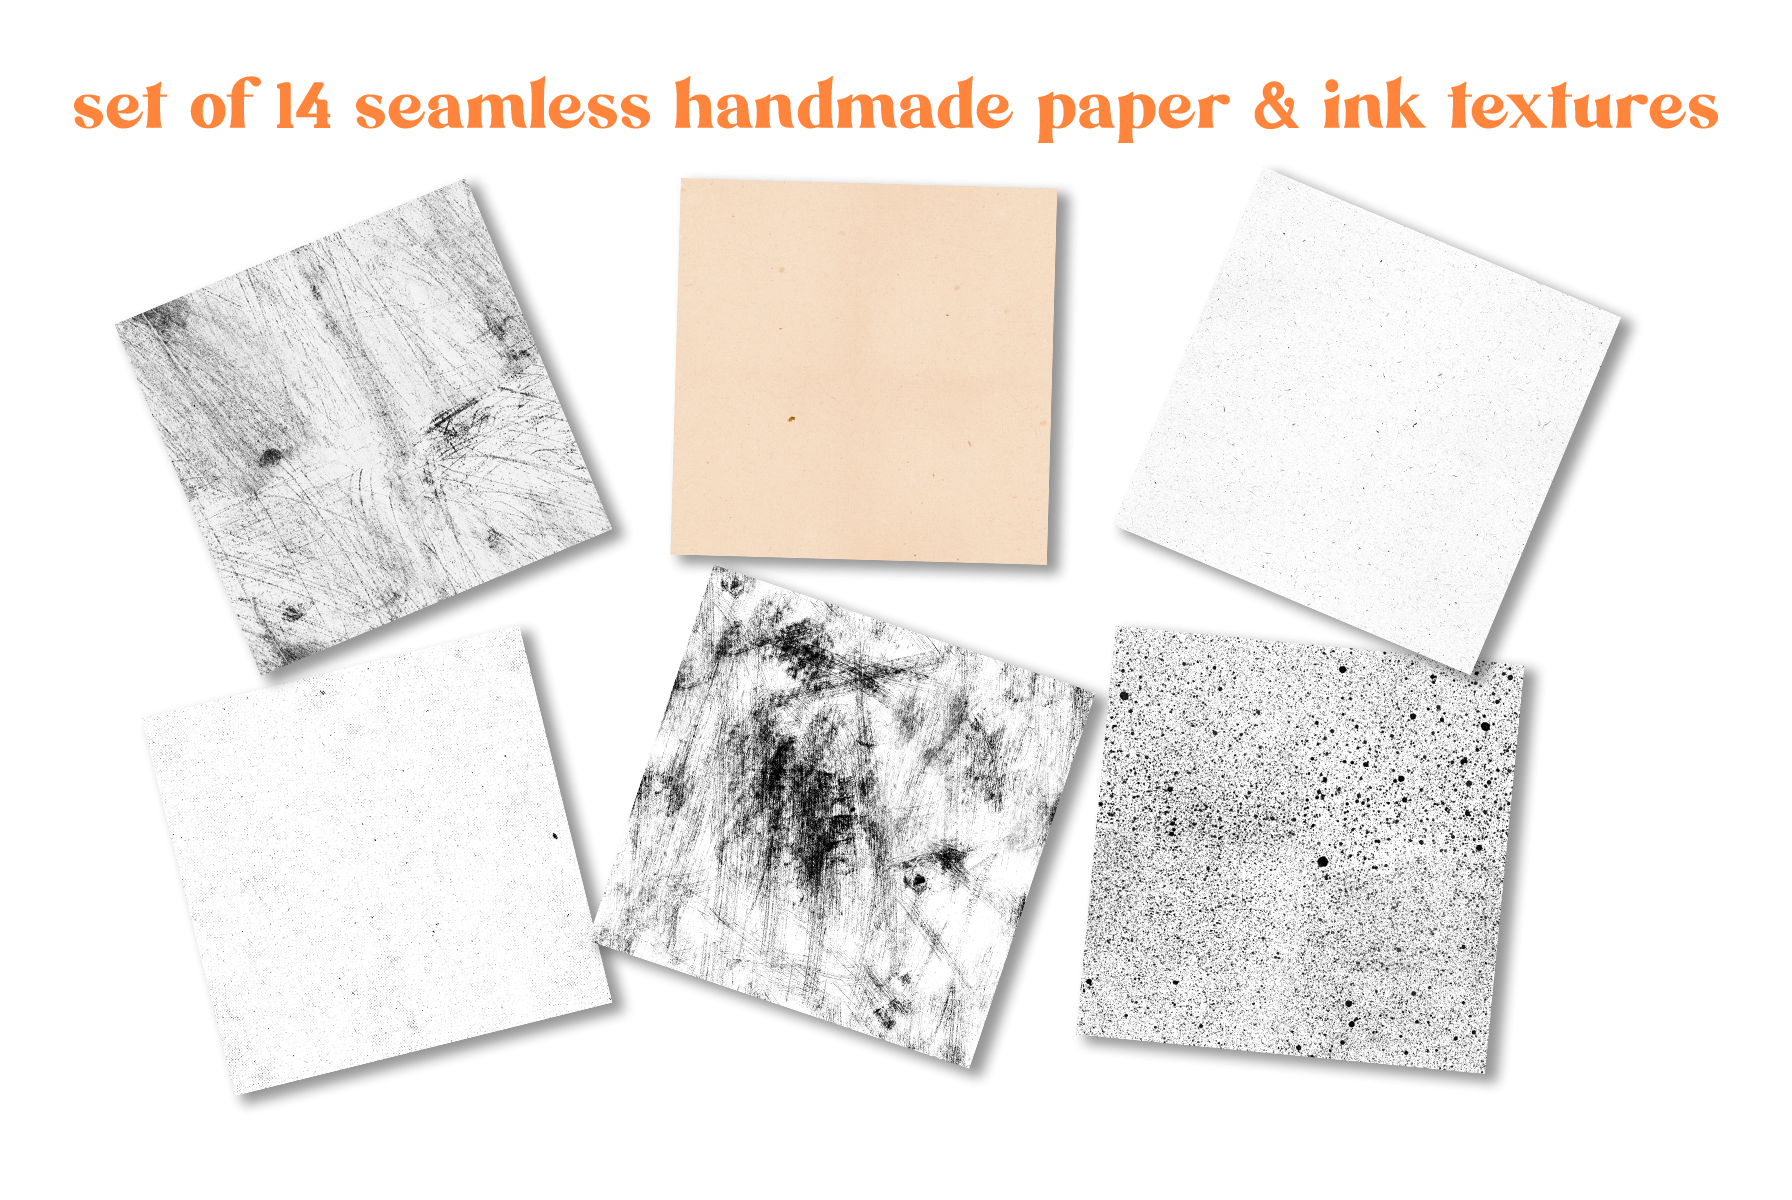
3. Downloads & Resources: [MUSIC] The downloads for this class include a set of seamless handmade paper textures that I've created
just for the class. I've also included
the flat illustration files I'll be animating
in the upcoming lessons. You're welcome to use
those or your on. Finally, I've included a link to an interactive
guide I've created, which goes through
the ins and outs of the animation features
in Procreate. You'll find a description of all the tools and how they work, as well as short-form
tutorials throughout. The link to the downloads
can be found in the projects and resources
section of the class. Just be sure you're accessing Skillshare through a browser, and not through the app. You'll need a password
to access the downloads, which I'll put up on
the screen right now. [MUSIC] Next up, we'll
look at ways to pull in, create, and adjust textures
for animation in Procreate. I'll see you there. [MUSIC]
4. Creating & Adjusting Textures in Procreate: [MUSIC] In this lesson, we're going to look
at ways that you can add texture to
your animation, such as texture image files, brushes, and adjustment layers. We're also going to look at ways that you can
adjust the textures themselves if they don't quite read the way
that you want them to. Let's take a closer look. There are a few different
ways you can either pull in or create texture layers
for your animations. The first and most
straightforward is to pull in an image file
in the Actions menu. I'll head up to the wrench icon and make sure Add is selected. Now my textures are in my files, but you can also pull them from your photo app on your
iPad or take a photograph. I'll select "Insert a file" and choose one of my textures. Now when you pull it in, the Transform tool is going
to be active and you can size this up and down
however you need to. We'll touch more on this
in the next lesson, but for now just make sure that your texture is
larger than the shape that you're adding it to but not larger than your canvas, otherwise Procreate is
going to automatically delete anything that stretches
outside of the bounds. Now I'm going to go
up to my Layer panel, select "My layer" and tap it, and choose clipping mask. This is a nondestructive add, which means that I can
grab my Transform tool and freely move this
around within the shape, and that's the start of the frame-by-frame
animation for the texture. Now one final thing I'm
going to do is change my blend mode to something
like color burn. I think I'm going to leave
the opacity where it's at. Another way to add
texture is to create your own on a blank layer
using a textured brush. I'm going to add a
blank layer above my shape layer and
I'm not going to clip it into place just yet. I have pure black
chosen as my color, but you can select
whatever color you'd like. I'm going to choose the
rusted decay brush that's built into Procreate's
industrial category. I'll just start adding texture
across the entire layer. I'm going to vary my
pressure settings to give myself a little more contrast on top of what the brush
itself provides. Now don't worry about
going to the edges of the canvas because
now that we're done, we're going to grab
the Transform tool and I'm going to size this down. Again, I want this to be larger than the shape
that I'm adding it to but not larger than
the canvas itself. I'm going to size
it until I have enough room to move
around within my canvas. I'll go back up to
my Layers panel, clip this into place, and while I'm here
I'm going to change my blend mode to overlay. Once again, I have a
nondestructive texture that I can freely move around within my shape and easily animate. A third way to add
texture is to use some of the creative adjustments that are built into Procreate. Again, I'll go ahead and add a blank layer above
my shape layer, but I'm not going to clip
it into place just yet. I'm going to drop
white into that layer, but you can choose
whatever color you'd like. I'm going to head up to the Adjustments panel
and choose glitch. I want to drag this all
the way up to 100 percent. I'm going to bring the zoom down to somewhere between 50 and 60. Now these are the
settings that I like. However, try out the
different settings at the bottom here and see
what works best for you. I'll go ahead and accept this. Now I could use this as is. I can clip it into place, change the blend mode, and animate it like
any other texture. But what I'm going
to do instead is stack another adjustment
on top of this. With that same layer selected, I'm going to go back
up to my adjustments, and this time I'm going
to choose halftone. Now, I know that I like
the screen print setting, but again just try out
different combinations to see what works best
for your creation. I'll just drag this up. Let me just zoom in here so
you can see what's happening. Now, wherever there
were glitch artifacts, the halftone is
concentrating in those areas and I'm getting this
spotty, dotty texture. Now again, I want to
use my Transform tool, and I'm going to size this down so that it's larger than the shape but not
larger than the canvas. I'll go back up to
my Layer panel, click this into place, and I'm going to change this to overlay to get this
nice dark pink. Now once again, I have a
nondestructive texture added to my shape that I can easily
move around and animate. If you pulled in your texture and you've played with
the blend modes and opacities and it's still not reading quite the
way that you want, try using an adjustment
on the layer. The top 4 adjustments here, hue, saturation, and brightness, color balance, curves, and gradient map, are all going to help you tweak the strength or
color of your texture. Let's take a look at
a couple of examples. I've pulled in this image
of a gel plate texture that I created and I really
like the texture, but the color is a
little bit intense. Keep in mind if you
pulled a texture with color depending on what
blend mode you use, it's potentially going to impact the color of the shape
that you're adding it to. For example, if I go into that layer and I change
this to overlay, you can see that I'm getting
some of those oranges and yellows in
addition to the pink. If you want the texture without the potential
color shift, try using a hue, saturation, and brightness
adjustment on it. I'll go ahead and tap
that and I'm going to drag my saturation
all the way down. Now I have the texture, but I don't have any
of that color shift. The only problem is it lost a
little bit of its contrast. With that texture
selected again, I'm going to go back up
to my adjustments and this time choose a
curves adjustment, and I'll just drag this
down a little bit here and up here so I'm giving
it a slight S curve. That's going to give me a
nice contrast in my texture, but again it's not impacting the color of
the shape beneath it. Let's look at the curves
adjustment in another example. I'm going to pull in the kraft paper texture that I provided with class and I'll
just clip this into place. I'm not going to
worry about sizing it down for this
particular exercise. I want to change the blend
mode to color burn because I liked that it gives me
that dark red texture. The problem is it
knocked out a lot of those finer details and the texture as soon as I
changed the blend mode. I can bring some of that intensity back by
adding a curves adjustment. So with that layer selected, I'll go back up to
my adjustments, choose curves, and on
the Gamma channel, I'm going to drag down
on the left side here. As I do that, you can see that
it's bringing up more of that fine detail. One final thing to note, if you're going to make any of the adjustments that
we just talked about, make sure that you
do it before you duplicate your texture for
the frame-by-frame animation. That way you make
sure to capture the exact same adjustment
in every frame. Otherwise, you're going
to have to go through your entire layer panel and make sure that each
texture is adjusted exactly. Otherwise, as you run
through the animation, you're going to see a very
different look on each frame, and that's great if that's
what you're aiming for. But if not, it's a good idea
to do all of that upfront. This is one of the
reasons that I find it very helpful to set up your layers before beginning
your animation process. This allows you to think through the process and make
sure that everything is in place before you
pull the timeline in and begin creating
your additional frames. Texture can be
added by pulling in an image file via the
Actions menu or by creating your own
texture layer using brushes and adjustments
built into Procreate. Regardless of how you
add your texture, make sure that the layer is larger than the
shape that you added to but not larger than
the actual canvas. Always use nondestructive
clipping masks to attach your texture layer to your shape layer so
that you can move your texture freely
with each new frame. When you're using the
creative effects in the Adjustments panel
such as halftone, don't be afraid to
experiment and add more than one because you never know what
you'll come up with. Remember, texture with color can potentially shift the
color of your shape. If you want the texture
without the color shift, desaturate your layer with a hue saturation and
brightness adjustment. Finally, if your texture
needs a contrast pump, try adding a curves adjustment
to give it more depth. Next up, we're
going to start with a simple texture animation. I'll see you there. [MUSIC]
5. A Simple Texture Animation: [MUSIC] In this
lesson, we're going to create a simple frame-by-frame animation where we animate a single texture
inside a single shape. This is the building
block for all of our upcoming
animations in this class. Let's get started. I have a screen-sized
canvas setup here. There's no need to start
with a really large canvas. We're going to be sharing this online and not printing it. Whenever I create an
animation in Procreate, I always begin by
setting up my layers first before I even turn
on animation assist. This allows me to map everything out and make sure that
my layer hierarchy and groupings are correct
so that everything runs smoothly once I
turn on the animation. Now, because the timeline is directly tied to
the layers panel, anything that I add here, whether it's a
duplicate layer or group or even a new one, it's automatically
going to appear in the timeline once I turn
on animation assist. In the previous lesson, we talked about the various ways to add texture to your shape, whether it's adding
an empty layer and using an adjustment or a textured brush or pulling an image violin via
the Actions menu. Regardless of which
method you choose, just a few reminders, make sure that your texture is larger than the shape
that you're adding it to. This is going to give
you plenty of room to move around the shape frame by frame either by
dragging your texture manually or using
the flip functions in the Transform tool. This is also going to help
you avoid any patterning. Because the more room you
have to move on your texture, the more random your
movements can be. Finally, while the
texture needs to be larger than the shape
that you're adding it to, you want to make
sure that you have enough room to move
within the canvas. Because if you move
your texture layer outside of your canvas, as soon as you release
that Transform tool, everything outside of the bounds will automatically be deleted, and this is going to be
important piece to remember in the next lesson where we create an animated texture background. For the purposes of this lesson, I'm going to use an image file. I'll go up to Actions and
add and insert a file, and I'm going to use the
kraft paper texture. I'll go ahead and
size this down. But again, I want to make sure that is larger than the shape. I'll clip it inside of my shape, and I'm going to change the
blend mode to color burn, and that knocked away a lot
of that texture, again, I can just go ahead and
add a curves adjustment. Now, I mentioned previously that I don't typically turn on my animation assist until after my layers
are fully set up. However, for this lesson, I wanted to set it up ahead
of time so that you can see what happens when we
begin duplicating our layers. The first thing to note is that frames are added to
the timeline either by duplicating a layer or a group of layers
with an exception. Let's go up to the Layers panel. I'm going to select and
duplicate my parent layer. Now, it created a new
frame at the bottom, which is great, but it didn't duplicate the clipped texture.
I'm going to zoom in. Watch what happens when
I scrub on the timeline. If I scrub back and forth, it's not moving, it's blinking because there's
no texture on this frame, but there is texture
on this one. Let's go ahead and back up. This time I'm going to
duplicate the texture. Again, keep an eye
on the timeline. I duplicated the texture, and while it intensified
the texture, it didn't give me a
new frame because the parent layer being
duplicated will add a new frame, but a clipped layer will not. Let's go ahead and
back up again. I need to group those two layers together and duplicate
the entire group for the texture to
follow the shape. I'll go ahead and
duplicate this group. Now, you can see that
the texture didn't get intensified because
it's inside of a group. I'll go ahead and
grab this texture, and with my Transform tool, just move it slightly. Now, if I scrub on the timeline, you can see that I have movement
because there's texture on both frames and the second
frame was slightly moved. At this point, the rest of the animation works
exactly the same. We're going to
duplicate our group, select the texture
and move it slightly. Now before I do that, I
want to note something, I did change the name
of my group to frame 1, frame 2, and I'm going to
change this one to frame 3. I highly recommend,
especially when you're working with more
complex animations like we will be
later in the class, that you keep track
of your layers and groups and you rename
them wherever possible. That way you know
exactly which layers need animation and which
ones you're working with. I haven't animated
this third frame yet, and I can see that because if I scrub my timeline, it holds. I'm going to go in, select my layer, grab
my Transform tool, and I'm going to
make the canvas a little bit smaller here. I want to move this as randomly as
possible because again, we're trying to avoid
any patterning. I moved down into the
right the last time. I'm going to move maybe to
the left and up a little bit, and I think I'm going
to flip that vertical. You can use any
combination that you want. In fact, the more
combinations you use, the more random your
movements will be. I'll go ahead and release that, and now when I scrub
through the timeline, I have three frames of movement. I'm going to add
one more, I think. I went over and up
and then I flipped, so I think this time I'm
going to flip horizontal and maybe go down into the left. I want to make sure that I
don't go past that circle, it's right here, and now I can scrub
through my timeline. Now you can add anywhere
between three and six, works very nicely with this
simple type animation. In fact, I think I'm going
to go ahead and speed this up and add two more frames
of random movement. [MUSIC] I have a total of six frames here and I can
scrub across on my timeline. I'm going to go ahead
and hit ''Play'' and just see how it's running. I do like this, however, the way that I
moved things wasn't quite as random as
I thought it was. You can see a circular
pattern forming here, and where you're going
to see that is with the bigger bits
within your texture. There's a couple of ways
that I can handle this. I can go into my layers and I can drag my texture
around some more. Or with a simple
animation like this, the easiest way is
just to take some of your frames and randomly
move them around. Now, one thing
about doing it this way is that's going to knock out the order of the frames in your layers panel
so you're going to need to renumber them. But it's a really quick and easy way of getting
rid of some of that patterning without
having to do a lot of rework. Now, there's a couple
of more things that I wanted to show you. The first is if you
duplicate a frame, I'm just going to go
randomly duplicate a frame, and you forget to
move your texture, when you scrub through
on your timeline, you're going to see it hold, and if you do it slowly, it's a lot easier to see it. You can see it's holding
on these two frames, which means I didn't
move my texture. I just need to find that frame, go into my layers group, grab that texture and move it. I'm actually going to delete that because I don't
need it in this case. The second thing that I
wanted to show you is what I mentioned in the
lesson previously. If you're going to make
adjustments to your texture, make sure that you adjust the texture before you
create your frames. Because if I go in, for example, to frame 6 here and I add a curves adjustment
and hit ''Play'', you can see that it's
not automatically going to make the adjustment
to every frame, just frame 6, so it's
going to be very obvious. Again, it's really
important that if you're going to
adjust the texture, you do it upfront. I have all six frames set up here and I think they're
running very smoothly. I liked the frames per second, but if I didn't, I could go into my settings and I
can change that. I could also change
my playback mode, but I'm really happy with how
both of those are running. I'm going to go ahead
and call this one done. Setting up your layers
before turning on animation assist
allows you to map out your animation and ensure
your layer hierarchy and groupings are correct before
your timeline is present. Your timeline and layer
panel are directly tied. So for the most part, whatever you add
in the layer panel will automatically show up in the timeline once
animation assist is on. Frames are added by duplicating
a parent layer or group of layers but not a
single clipped object, so be sure to group
your texture with its parent layer
before duplicating. For a more effective
frame-by-frame animation, make sure your texture layer is larger than the shape
you're adding it to. This will give you
plenty of room to move around more freely. Just be sure that
your texture layer stays within the bounds of the canvas as Procreate will permanently delete anything
that goes beyond it. When moving your texture around across a
series of frames, the more random the shifts, the less patterning will occur, so use a combination of both the vertical
and horizontal flip as well as manually
dragging your layer. If you do see patterns
during playback, try adjusting the order of
your frames in your timeline. A simple reorder can
make a huge difference. Next up, we're going to take our simple animation of a level by animating across
an entire background. I'll see you there. [MUSIC]
6. Animating a Textured Background: [MUSIC] In this lesson
we're going to take animating texture on a
shape a step further, and animate texture on
an entire background. But because of the way
procreate is set up, this isn't as straightforward as animating texture
on a regular shape. Let's go ahead and
take a closer look. For this lesson, I'm going
to create a background that I can use on an
Instagram story post. I need a tall, narrow
rectangle and I'm going to animate the texture
frame-by-frame like we did in the
previous exercise. Now the difference
with this animation, is that we need the texture to extend across the entire canvas. But remember for an
effective animation, the texture has to be larger than the shape
it's being clipped to. But procreate cuts
off anything that goes outside the
bounds of the canvas. We'll need to give
ourselves room to work. Now I've already set
up a canvas here at 3500 by 3500 pixels at 72 dpi. This is going to be
more than I need, but it'll give me enough room to move my texture
around effectively. What I'm going to do is create a template within my canvas, so I know exactly where my
texture is going to be. Of course I have a
separate layer here. I'll grab my selection tool, and I have rectangle
and color fill on. I'll just drag out a
tall, narrow rectangle. Now I'm not going to worry
about the exact dimensions because instead I'm going
to grab my transform tool, tap one of the corners, and I'm going to release
the link between these two, and key in 1080 by 1920. That's going to give me
the exact size that I need so that I know exactly where I'm going
to animate my texture. I'll go ahead and release that. At this point adding
texture works exactly the way it did in
the previous exercise. You can add it with
an empty layer, and a built in brush
or adjustment. Or you can pull an image file
and via the options menu, I'm going to go ahead and
create one using one of the artistic brushes
on an empty layer. I will add a layer, and again, I'm not going to clip
it into place just yet. I'm going use white, black, and gray to add a
variety of dark, and light areas across my layer. I'll select my gouache brush and I'm going to
start with the white, and I'm just running it
around the canvas again, varying my pressure and
building up in certain spots, just to give myself
a little variety. I'll grab my gray, and I'm layering this. You don't have to hit every
spot on the canvas because even the empty areas
provide their own texture. The black, I'm going to
use sparingly because it can really be jarring, not liking either one of those. Let's try that again. Then you do one final layer of white just to lighten
up some areas. Then I'll grab my
transform tool, and I'm going to size this down, again so that it's
larger than the shape, but not larger than the canvas. I'll clip it into place, and I'm going to change
my bland mode to overlay. Alright, I like how that looks, but I think it could have
a little more intensity. I'll add a curves adjustment, and I'm just going to
drag down on that. I think I'll just, maybe
create a slight S-curve here. At this point, the
animation process works exactly the same
as the previous lesson. I'm going to
duplicate my groups, and as I duplicate them, I'll move my texture frame-by-frame to give myself
some nice random movement. I'm going to speed it up since you've already seen
me do that once, and I'll see you
on the other side. [MUSIC] I have my six frames in place, and I've manually scrubbed. I'm actually going to
turn on play here, and turn my frames per
second down to about, I think three that tends to work best for this
particular one. I'm not seeing any
weird patterning, but I feel like it's moving
across so maybe there is. I'm going to randomly move
some of my frames around. Now you may have seen I added all of my groups first
before renaming them. I moved my texture, then I went back and
renamed my groups, and then turn my
animation assist on once everything was in place. Let's go ahead and
hit Play again. Alright, I like
that much better. Now at this point, the
animation itself is done. I could export this as is, but if I export it now with the canvas site
at the size as that, even if I turn the background
off, which I'll do, I have this transparent
padding around my rectangle. While that's not a
problem with Instagram, I can just zoom in if I wanted to use
this shape elsewhere, like on my Skillshare profile, I would be left with a ton of unusable space around my shape. Before you export it, I'm going to crop into
the shape itself, and remove any
excess background. I'll go up to my actions menu in canvas and choose
crop and resize. I'm going to go up
to my settings, and I'll change my
settings to 1080 by 1920. My dpi, is fine and I'm going to turn snapping
on, and hit done. Now you can see that the
crop box moved down here so I'm just going to
drag it up to my shape, and I had centered my shapes, so I knew exactly
where I was going. I need to crop in a little
bit more because I can see some of my background
peeking out of there. It's not a perfect snapping. I'm going to hit settings and I want to lock
that into place, and I'm going to
re-sample my canvas, so that when I pull my
corners in just slightly, it's going to keep
it at 1080 by 1920. Had I not re-sampled my canvas, as I scrunched in, it would change the size, but keep the ratio so
I wanted to stay at a nice 1080 by 1920. Now I can go ahead,
and hit done. I'm left with just
the background, with no extra canvas. As you can see, the animation works exactly the way
it's supposed to. [MUSIC] Because this
animation pushes the texture outside of
the bounds of the canvas, the original canvas
size should be set to larger than the one
you intend to export. Once you have your
canvas in place, make a template the exact
size you plan to export, so you have boundaries
to work within. That template will ultimately
become your final canvas. The frame-by-frame
animation process works the same as any other animation, once the canvas is
set up properly. You don't need to crop away the excess canvas
from the one you plan to export but if you don't, you're going to be left with a permanent transparent
padding around your animation. To avoid that padding, once you've created
all of your frames, go to the Canvas settings and the actions menu and
choose Crop and Resize. Set your bound to the exact
size you plan to export, and adjust your animation so
it sits within those bounds. Next up, we're going to animate multiple textures on a single shape
seamlessly using masks. I'll see you there. [MUSIC]
7. Animating Texture with Masks : [MUSIC] In this lesson,
we're going to create a multi-texture
animation, and blend those textures seamlessly using
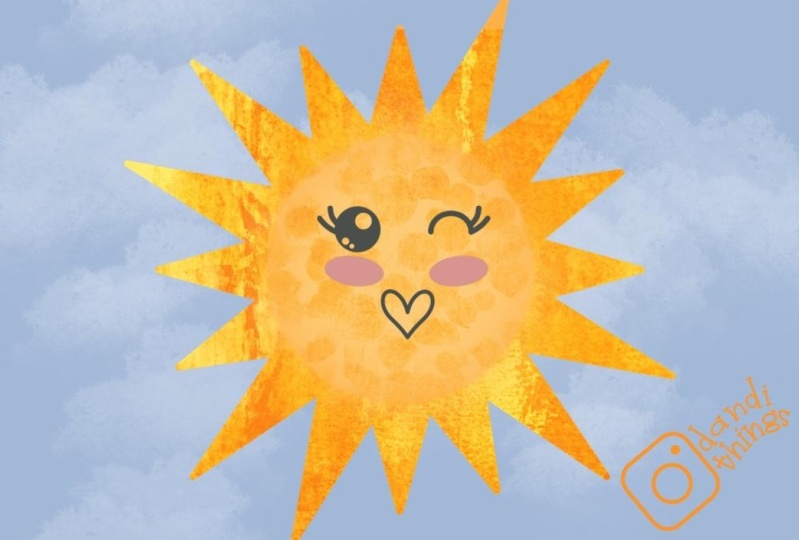
masks. Let's get started. This is the final animation
that we'll be creating. By using masks to
animate our texture, we can add two or more
textures to what appears to be the same shape and
animate them separately. While we will be animating
these textures separately, we're also going to create a nice seamlessly
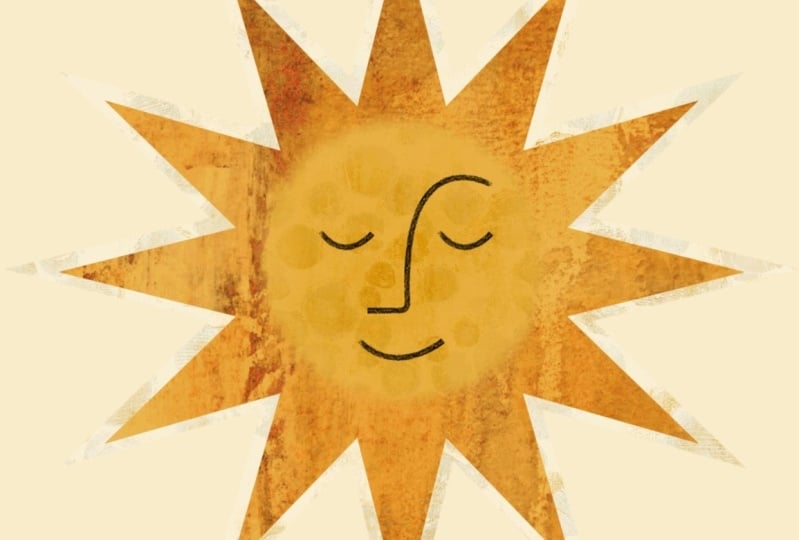
blended transition between the two with masks. I provided the flat
illustration file that I'll be animating in this
class with the downloads. You're welcome to use that and follow along or create your own. I have this broken
down into two layers, a foreground and a background. A foreground element, the face, is going to be a
static foreground, which means it doesn't have
to be animated and therefore doesn't take away from our layers that are
available to us. We are going to use one copy of the sun
layer as a background. Again, it'll be static, which means it doesn't
need to be animated and therefore doesn't take
away from our layers. But I'm going to duplicate this twice because we're going to use two duplicates to create the middle section, and
then the outer rays. I've turned off my
foreground, and background layers because
we don't need them for the animation process and I renamed my other two
layers, middle and rays. This layer is going to be
the center where the face is going to sit and this is
going to be the rays. They're each going to
have their own texture, which I'll go ahead and add now. For the rays, I'll select it and go up to add
and insert a file, and I'm going to use
the what's left behind texture that I
provided with class. I want to make this
a little taller. Again, I need to make
sure it's larger than the sudden shape and then
I'll clip that into place. Then I want to use the lichen texture for
the middle section. I'm going to make this a lot smaller because I actually want those little dotted parts
to be a lot smaller. I just need it to be
larger than the center. I'll make this a
little bit taller and I'll clip this into place. Now right now, this looks a
little bit funny because we have one texture sitting
on top of the other, and this is where the masks
are going to come into play. I want to add empty masks
to both of my layers. With the middle layer selected, I'll tap mask and I'll select my rays layer and
do that as well. Now you can see that
the textures that we added have remained
clip textures, which is perfect
because we're going to be animating those. What I need to do now is
to create a shape that I can use to add
to these masks so that I can cut away anything
outside the center for this layer, and
cut away anything inside the center for the rays. Technically, I can draw
right onto my layer masks, but I want a little more
control over what I'm creating. So instead, I'm going
to add a layer. I want to create a circle shape on this
layer that I'm going to then copy and paste into
each of those layer masks. I have my monoline
brush created. If you want to create something
with texture, you can. However, we're going to be blurring them out so
you're going to lose that. I'm just sticking with
something pretty smooth. I have black selected and I'll just create
a perfect circle. Create the circle, and hold
and then tap my finger down. I'm going to fill
this with black. Now because this is
on its own layer, I'm just going to center
this up a little bit, just makes it easier. I want to three finger
swipe down and copy, and at this point I
can delete that layer. I don't need it anymore. I'll tap my layer mask
for the middle part. Three fingers swipe
down and paste, and you can see it's
created a mask there, and I'll do the same
thing for the rates. At this point, it's knocked
things out that I don't want because I need to invert at least one
of these layers. I'm going to go up to my
layer mask from the middle, tap the layer mask
itself, and hit "Invert". That's going to give me
that nice center with that texture and
it's going to knock everything out inside of
the circle from my rays. We have our masks in place, but they're a little
too perfect to crisp. So as soon as I animate these, there's going to be
a very distinct line of demarcation between the two. I want to fix that by blurring my masks out a little bit
with a Gaussian blur. I also want to
adjust the level of my texture with blend modes and possibly a
curves adjustment. But remember what
we talked about in the previous lessons. If you're going to make any
adjustments to your layers, you want to make sure
that you do it on the initial group of layers before you begin
duplicating them. Otherwise, you're
potentially going to see a difference as the
animation runs through. Let's start with
the blend modes. I'm going to change
the one for the middle to soft light and I'll
add a curves adjustment. Just going to drop this
down a little bit. I want to change this one too. I think I'll go with
overlay for this one and maybe drop the
opacity just a touch, but also add a curves
adjustment just to bring out some of those darker
areas a little bit. I like the blend
modes and opacity, but again I still have
those really crisp masks. I'll go in to my layer
mask for my middle, go up to my adjustments, and choose Gaussian blur. I'm going to bring this
up to about nine or 10. You're going to see
this little inner shadow type thing form
when you do that. I'll do the same thing
with my layer mask. You want to make sure
that you've chosen the layer mask and
not anything else. Again, I'll add a Gaussian blur. Now I have that nice
transition between the two, but what it's also added is this faint gray mark
around the edges, and that's where the
blurs are having. This is what the
background is for. So if I turn this on, you can see that
disappears and I have that nice seamless
transition between the two, and I'm ready to begin grouping these and
animating them. Whenever you're working with multiple layers of texture
or regular layers, it's a really good idea to
be as organized as possible. We renamed our layers, but we also want to group them so we can
keep track of them. What I'm going to
do is select all of my ray layers and I'll group them and then rename this rays. Then I'll do the same
thing with my middle. Then I want to do
one final grouping to create the actual frame. I'll select those two groups
and group them together. I've duplicated my
original frame group three times and I renamed
them one through four. At this point, I'm ready
to begin animating them. Now, since this is a little
bit more complicated, I'm actually going to turn on animation assist at this point. I want you to see
what's going to happen with the foreground and
the background elements. So if I turn on
animation assist, you can see that a bunch of
stuff gets knocked out, and that gray comes back again. The reason for that
is the background and the foreground aren't
designated as that. I'll go ahead and
tap this frame and turn that to foreground and
now that face comes back, and then I'll tap
the bottom layer and hit Background, and now
that gray mark is gone. It's really important to note though that your foreground
and your background have to be either the top most layer or the
bottom most layer. It can't be included in-between. At this point, the
animation process runs exactly the same
as the others did. The only difference is I have two textures with each
frame rather than one. Let's just start
with this first one. I'll go into Frame 2, I'm going to flip this and
maybe move it up and over, and then I'll go into my rays texture and I'll flip it horizontal and
maybe down and to the side. I'm going to speed up going through three and four, and I'll see you
on the other side. [MUSIC] I've adjusted my textures for all four groups, and if I scrub through
this, I like how it looks. I don't think I need to
add any more groups. If I needed to, I could
certainly just continue duplicating and doing that. Let's hit "Play" and
see how it looks. I think this is
reading quite nice, so let me just zoom in here. It has a nice transition. I'm not seeing any funny spots where the transition is
different because again we did those blurs with the
very first group and didn't do them after
we duplicated everything. The animation part is done and I'm almost ready to export. But one final thing I decided
to do is I'm going to add a blush on either side of his cheeks and I need to
add that to the foreground, but watch what happens
when I add a new layer. It's going to knock
everything out because that's set
as my foreground, but it's not tied to that. I need to select both
of these and group them, and I'll rename
this foreground. As soon as I group them, everything underneath it comes back because that new layer became part of the
foreground element that's marked down here. I'm going to select that layer. I just have an air
brush selected, and nice little pink color. I'll just draw some
little blush here. Now one final thing, my canvas is really large and I really don't need it
to be this large. I only had that in place so that I had room to
move my textures. I want to crop into
this a little bit. This is going to be a little bit different than the previous one. I'll go up to my Actions
menu and crop and resize. In my settings, I already
have my DPI at 72. When you turn snapping on, I want to key in 1,000 by 1,000 and I'm just
going to hit "Done". I'm not going to resample this because I'm not going to be
pulling this in anymore. I'm just going to
move this up into the middle and hit "Done". With the previous
background texture, I needed to scrunch
in a little bit more just to make sure that the entire background
was clipped away, but I wanted to to
maintain the exact ratio. In this case, since
I didn't need to do that, I didn't resample. Let me turn my
background color off. Let's hit "Play". I really
like how this is looking. It's all set to export as a GIF and I can
load it onto Giphy. When animating with masks, it's best to plan out
your layers ahead of time regardless of complexity. This is going to allow you to determine how many
masks you'll need, where they need to be placed, and if any adjustments
are necessary upfront. During the planning phase, also determine how many
duplicate shapes you'll need and duplicate them
before you do anything else. Duplicating before you add
anything means you'll have a clean layer with
no unnecessary masks and adjustments to remove. When creating your
masks, keep it simple. If you can create
your transition using a duplicate and inverted
copy of an existing mask, that will save you
time in the long run. If you see gaps created by
the blur in your masks, add a duplicate of the main shape as the background
layer to fill them in. Finally, determine what layer or layers will be your
background and foreground in advance and turn them
off while you create your animation so they don't
interfere with your masks. Remember to set them as
foreground and background in your timeline once you
turn on animation assist. Next up, we're going
to take a look at a more complex
texture animation. I'll see you there. [MUSIC]
8. Complex Animations Pt 1: Setting up the Canvas: [MUSIC] Over the
next few lessons, we're going to talk about
complex texture animations, where we animate
multiple textures across multiple layers. We'll begin by discussing canvas setup and
layer availability, which can help direct the
course of our animation. Next, we'll create a
texture and animation plan, so that we can balance
layer availability with our final vision. Finally, we'll add our textures, group our layers, and create our animation.
Let's get started. I've provided the flat
illustration that I'll be using over the next few
lessons with the downloads. You're more than welcome to
use that and follow along, or create your own
complex animation. This is the final animation that we'll be creating
over the next few lessons. It's a multi-layered
illustration and we'll be adding
multiple textures, some will be animated, and others are going
to remain static. In this lesson,
we're going to focus on setting up our canvas to prepare it to add and
animate our textures. A few important notes
when it comes to your canvas and these
more complex animations. The first, is I always work on a duplicate of my original
flat illustration. That way as I'm
adding my layers if I find that I'm running into trouble or I need
to shift gears, I don't have to do a lot
of backward and remove textures or worry about lost
layers to consolidation, I have a beginning point
I can easily go back to. The second is that
the number of layers Procreate provides depends on
the iPad you're working on, as well as the size
document you're working in. When it comes to these complex
multi-layered animations, you may find that if Procreate doesn't provide enough layers, you need to forego some of your planned approaches or consolidate layers
wherever possible. We're going to be creating
multiple groups of layers with multiple textures
within those groups. Keep in mind, each of those groups needs
to be duplicated to create the animation and that's going to chew away at
your available layers. This is why planning and setting up your
initial layers before you begin the actual
animation process is extremely helpful. That way, you'll know pretty
early on in the process before you get to that third or fourth duplicate layer group, that you won't
have enough layers available and need to
adjust your approach. One final note, as our
iPads might be different, we may get a different number
of layers to start with, regardless of whether our
canvas size is the same. Throughout the next few lessons, I'm going to be consolidating
layers wherever possible, and also targeting as many as I can for the foreground and
background elements, so they don't have
to be duplicated. Let's start by changing our canvas size to give ourselves
more room to work with. Right now my canvas
ends right about there, and that's not going
to give me enough room to animate my
background textures. I'll go up to Actions menu, and under Canvas hit
Crop and Resize. Now if I go into Settings, I have 1,000 by 1,000
pixel canvas at 300 DPI. The first thing I'm going
to change is my DPI to 72. I created this at 300, but I'm not going to print it, I'm going to share it online, so 72 is just fine. Now, that's not going to change the number of layers
available to me. However, it will impact
the final file size. The next thing I want to do
is give myself that padding, so I'm going to change
this to 1,500 by 1,500. That's going to give me enough
room to move my textures without taking away too
many available layers, so I'll turn Snapping on. I want to move my canvas
into place over the center, and I'll go ahead and hit Done. Let me turn my background on. I'm going to change my
background color to something that I'm not
using in my animation, just so that I can easily
see my textures. That's it. My canvas is all setup and ready to begin
adding my textures. Next up, we're going to create a texture and
animation game plan. I'll see you there. [MUSIC]
9. Complex Animations Pt 2: Texture Plan: [MUSIC] Now that my Canvas
is in place and it's been extended so I can begin
adding my textures, I want to plan out my
animation and set up all of my layers before I
turn on animation assist. Let's start by talking about which layers are going
to be foreground and background elements as they're static and won't
need to be animated. I know that I'm going to add
texture to my sky layer, and I'm actually going to use the masking method that we
covered in the last lesson. Where I animate two
different textures in the background
just to give it a little bit more depth
and that means I'm going to need a total
of three sky layers, and one of those layers is
going to become the background that's going to fill in any gaps left by blurring my masks. Now that background doesn't need to be animated
across the timeline, I can actually set this
bottom-most layer as background and then these two
sky layers are going to be added to
the animation group. Let's take a look at our
foreground elements next. I know that I'm going to
be animating texture on my three frame layers so
they need to remain as is. My stars and my moon
are going to have a bloom adjustment added
to them to light them up, but I'm not going to be
animating any texture on them. These two can become part
of my foreground group. I'm going to select both
of them and pull them out, and I'll drop them
just below my frame. Now the frame is
also going to have static texture added to it, which means that I
can designate this as part of my foreground
layer as well. That's another layer
that doesn't need to be duplicated and therefore won't take away from my
layers available. Finally, I am going to add
texture to my rocket ship, but while I will be animating
the flames beneath it, I'm not going to animate
the ship itself, so I can take all four of
these layers and group them and I'll rename
this group foreground. That leaves everything from the yellow flame down to
this second sky layer. That's going to become part
of my animation group. I'm going to add something
to my illustration. In addition to the
animations and textures, I want to create a
paper-cut effect. Now that means that I'm
going to need to create duplicates from every layer
except my sky layers, to a form that drop shadow, and the drop shadows
that are added to my flame layers are going to become part of that
animation group. Now, while the duplicates won't need texture and they
don't need to be animated, they are going to
need to stay with their original layers so the
drop shadow effect works. Therefore, I can't designate
any of them backgrounds. This is one of those
scenarios where as you're setting up if you decide
to add something, you need to take a look at
the layers available and decide if you're
going to be able to accommodate the idea. If not, you might
need to shift gears. You can find the number
of layers available under the Actions
menu in Canvas, and then Canvas
information in layers. Now, I know in my case, I have plenty of layers
available to me. But if I was
concerned about that, what it would do is take a look at how many layers
I already have. Determine how many more
layers I need to add, and don't forget we're
going to be adding drop shadows plus texture, and then consider how
many layers are going to become part of that
original frame layer. Let's say I have a
total of 10 layers in my original frame and I know I want to create three frames. That's going to be a
total of 30 layers. I need to decide if I have enough layers available
to me to create that. If not, I might need
to shift gears. I'm going to go ahead and
create my duplicates here. I know that I can accommodate the drop shadow and I'm just going to duplicate everything again except for the sky layers. Then with black selected, I'm just going to
two-finger swipe to turn on Alpha lock
in to fill the layer, make sure that you undo that. [MUSIC] Right now I have all of my background layers behind the original layers, I just need to create
drop shadows out of them. I'm actually going to
do that off camera, but all I'm going
to do is let's, for example, take the rocket. I'm just going to
move that down, and to the right, I
want to determine which way I want my shadows to run, and then I'll go up to my adjustments and use
a Gaussian blur on it. I'll just bring it out to about, I think six or seven and then change my blend
mode to multiply. I'm going to do the rest of
the layers off camera in the interest of time and I'll come right back
once that's done. All of my drop
shadows are set up for the paper cut
effect and of course, it's added some layers, some of which are going
to need to be duplicated, but I should be able to accommodate that
without any problem. Before we wrap up this lesson, let's take a look at
the layers outside of the foreground and
background element and talk about a
texture plan for those. For my flames, I mentioned
that I'm going to add a texture to those
and animate them. I'm going to end up clipping textures to these three layers, and then for the sky layer, I want to do what we did in
the last lesson where we added masks and created
seamless textures. Let me go ahead and create
a mask that I can use. I have my monoline
brush selected in black and I'm using
a pretty big one. I'm just going to go ahead
and create a swirl here and maybe here. Try that one again. I'll just do one
across this way. That's all on one layer. I'll three-finger swipe down and copy and I can
turn this off. I don't need it. I'm going
to add a mask to both. I'll go ahead and three-finger
swipe down and paste. Now, you're not going
to see any change because we haven't added
texture to it yet, and I'm going to leave
it as is and not blur it until the
texture is in place. Let me go ahead and add to this one and I need
to invert this one. All of my layers are now set up to begin adding
texture to them, grouping them, and
animating them. In the next lesson, we're going to keep going with this illustration and add our textures. I'll
see you there.
10. Complex Animations Pt 3 Adding Texture (Animated Texture in Procreate): In this lesson, we're going to focus on adding our textures, both static and
animated to our layers. I'm going to start
from the top-down, beginning with my
foreground elements. I mentioned previously
that I'm going to add a static texture to my frame, which means that I can
clip it into place, set my blend mode and opacity, make any adjustments I need to, and then I can merge the
two layers together, which is going to
save me a layer. I'll go ahead and pull my
texture in and I'm going to use the handmade paper 28. Now, I don't need to size
this up because again, it's going to be static
and not animated. I do, however, need to
clip it into place. It's really important that if you're going to merge layers, especially if you have
something like a cutout here, you want to clip it
first and then merge it. Otherwise, if I had just
pinched it together as is, the texture would stay
exactly as it was. I will go ahead and
change my blend mode. I think I'll change
it to multiply. I'm not going to make any
further adjustments to this, but I am going to go ahead
and pinch these two together. With my stars and my moon, I'm going to add a
bloom adjustments. I'm not going to add textures, but I am going to go up to my adjustment layers bloom
and I'll just drag this up. I want them to be lit enough
that you can see them, but not so much that they take
all of the attention away. I'll just adjust my
burns settings and size. Then I'll do the same
thing with my moon layer. Then finally for my rocket, just like with the
frame, I'm going to add a static texture to it. This time I'm going to use
the craft paper texture. Size this down. I'm going to clip it into place
and change the blend mode to, I think, darken. I don't want a ton of texture. All of my foreground
elements are all set. Now that my foreground
elements are in place, I need to add the textures to those that I plan to animate. I'm going to start
with my flame layers. For the flames, just
like previously, I'm going to pull textures in. But in this case
I'm simply going to clip them and not merge them. I'll start with my yellow flame. I can go up and add
and insert a file. I'm going to use this
grunge scratches. I'm trying to size this down. It's a rather small layer. But again, I still
need it to be larger than the shape itself
so I can animate it. I'll clip this into place and change the
blend mode to color burn. I think I'm going to boost
this with a curves adjustment. With my orange flame, I'm going to use the craft
paper texture again. I'm going to add a curves
adjustment to it this time just to make it a little grittier than
it was on the rocket. I'll clip it into place. Again, I'm going to change
this to color burn. Then finally I will
choose my blue flame. I'm going to use the
newsprint and light texture. I want to make sure it's
larger than the shape. I'm going to give it a
curves adjustment again. Finally, I'm going to change my blend mode to color burn. Now that we have our
flame layers in place, let's take a look at
our two sky layers. In the previous lesson, we added masks to our layers. In this lesson
we're going to add our textures and clip
them into place. For the bottom one, I'm going to add the
halftone texture. I want to create a
starry effect out of this. The sinus is down. It needs to be larger
than this canvas, but again, smaller
than the main one. I'll clip it into place. I want to invert this
because I want all of these bits to get a
little brighter when I change this to add. Then I'm going to
boost it further with a curves adjustment. But this time instead
of dragging down, I'm going to drag up. For my other layer, I'm going to add an empty layer. I'm going to use white and the aurora brush from
the artistic category. I'm going to create clouds. I'm going to use pressure in certain spots just to build up. It's like that
background lesson. Then I'll drag this in,
clip it into place. I'm going to change my
blend mode to overlay. Our textures are in place, but our masks are too
perfect into crisp. We need to use a Gaussian blur again to blend our
textures together. I'll start with this mask. I'm going to go up to
adjustments and Gaussian blur. I'll just drag it up to
about eight or nine. Then I'm going to do the same
thing with the other one. Again, we have that background layer
that's going to remain a static layer that's filling in any gaps
behind these too. All of our textures are
in place and we're ready to begin grouping our layers
and finishing our animation, which we're going to do next. I'll see you there.
11. Complex Illustration Pt 4 Grouping and Animating Layers (Animated Texture in Procreate): We are almost there
with this animation. In this lesson, we're
going to focus on grouping and animating
our textures. Let's start with the
foreground group. Now, this is pretty
much already set. We have it grouped together. Again, this is a static layer, so we don't need to do
anything to animate it. If you want, you can group your original layers
with their drop shadows. But since everything is
already set in this group, I'm going to leave that as is. Our background layer
is also all set, so I don't need to do
anything with those. What we want to
focus on, however, are our flame and sky layers. Let's start with our sky layers. I just mentioned that the background layer is going to get designated as one once we
turn on animation assist. But what we want to do is take the other sky layers
and group them with their mask as
well as their texture. I'm going to go ahead and group
this and rename it stars. I'll do this one and group it and I'm just going
to rename it aurora, and then I'll do the same
thing with my flames. You don't technically have to do this because we're going to be grouping everything
together at the end. But again, if
you're dealing with something really
complex like this, it's a really good idea to stay as organized as
possible because you're going to have to go into each of these groups and
adjust their textures. If you already have
them grouped off, it just makes it a lot easier. This is the final
one and I'm all set. I just need to take
these five groups then, group them together, and I'm going to
rename this Frame 1. Now at this point,
it's going to work exactly as it did in
the previous lessons. I'm going to take this
Frame 1 layer and I'm going to duplicate it three times. I'll change the names
of each to 2, 3, and 4. At this point, I'm
going to turn on my animation assist so we can
begin animating our layers. Now the first thing I
want to do, of course, is designate my background and my foreground layers just
to bring everything back. I'll tap and turn on foreground, and then tap and
turn on background. Now one thing you'll notice now that I've turned
the background is I have this red color shift here. This isn't a problem
with the layers. What this actually is, is if I go to my settings, my onion skins are on. Procreate designates colors for any layers before and
after the current one, and that's what's
showing up there. Now I don't need onion skins for this particular animation, so I'm just going to
turn them off and you'll see that
completely disappears. Now that everything is
grouped and designated, I'm going to go in, and
starting with Frame 2, I'm going to begin
shifting my texture. I'll start with my yellow flame, going to work from the top down. I'll go ahead and select
my Transform tool. Again, I want to be as
random as possible. I'll close that and go
into the orange one. I like to close
the groups that I created just so I
know that I'm done. Then finally, I need to do
the two sky layers as well. If I scrub back and forth, see, I have a nice
animation starting there. Now, I'm going to go ahead
and speed this up for three and four
because it's going to be the exact same process, so I'll see you on
the other side. [MUSIC] Now that our shifts are done, let's go ahead and hit
play and see how it looks. Now, first of all, that's
a little too fast. I'm going to bring this down
to about five, maybe four. I'm not seeing any patterns. But if I needed to, of course, I could stop this and I can just drag my frame layers around. Or if I wanted to, I could scrub through slowly
and see if I can find a problem spot and then go into my layers and make a change. Now that I have
everything in place, I want to adjust my canvas size back down to the smaller size. I'll go up to my canvas, crop and resize,
and in settings, I'm going to change this
to 1,000 by 1,000 pixels. I don't need to do
anything to the DPI. I'll turn on snapping
and I just want to drag this up into the middle
and I'll hit Done. I'm all set. I just
need to turn off my background layer because
I don't want to export that. Let's go ahead and hit Play. Everything is running exactly as expected, and that's it. We have a multi-layered
illustration with multiple animated textures that's all ready for export. Always work on a duplicate of your original flat illustration. That way if you run
into difficulty, rather than removing a lot of textures or worrying about
consolidated layers, you have a fresh starting
point to go back to. The number of layers
Procreate provides depends on your iPad and
the size of your document. It's important to take this into consideration
when you're planning and executing
your complex animations. If you find you don't have
enough layers available, you'll either need to
shift your plans or consolidate layers
wherever possible. Designating foreground and
background elements will go a long way in conserving
your available layers. If you don't need to
animate or duplicate them and they can sit either above
or below all other layers, include them in your foreground
and background instead. Merging your layers is
another way to save layers. If it's going to be static, clip it in place, make your adjustments,
and merge your layers. Just be sure to click the
layer before you merge it so it takes on the shape
it's being added to. Finally, organization
is key when it comes to animating multiple textures
across multiple layers. You don't have to create subgroups within your
animated frame groups, but they do go a long way in keeping you
on track while animating. Next up, we're going
to take a look at the export options for exporting your
textured animations. I'll see you there. [MUSIC]
12. Export Options: [MUSIC] In this lesson,
we'll take a quick look at the animated export
options in Procreate and which will work best for your animated texture
illustrations. Let's get started. For this class, I'm going
to give an overview of the two best options
for exporting your textured animations
specifically. However, if you'd like
a detailed breakdown on all of the export options, you can find it in
my other class, Animation Basics in Procreate, which I've linked in
the about section. You'll also find a
full breakdown in the interactive guide that
I provided with class. The most versatile and therefore common export option
is the GIF format. Now, this format is going to allow you to upload
your animation to sites like Giphy and use them
in your Instagram stories, messaging, or even
on some sites like Skillshare who accept
GIFs as image uploads. This is a more archaic
and lower-quality format. However, in most cases, you're going to be using GIFs at such a small size that
doesn't create issues. To export a GIF, I'll go up to the actions menu and make
sure share is selected. I'll scroll down to the
animated export options. I'll select animated GIF, and I'm given a few
options to change. You can choose between max
resolution and web ready, which is going to impact
the size of your file. You'll see the size up
here at the top-right. If I tap web ready, you can see that it's
significantly smaller. Now personally, I
only use web ready if I know I need a
really small file. Otherwise, I stick with
max resolution as long as it doesn't create a really
large, cumbersome file. You can also change your
frames per second here rather than going back into
the settings in your canvas. Dithering and per frame
color palette are going to impact the
colors in your animation. If you find they're not
reading quite right, you can try turning them on. Now personally, I rarely use
either as I find they either adjust the colors too much
or have no impact at all. When you're exporting a
GIF that doesn't go to the edges of the canvas
like this sticker, you're going to be given
the option to turn your transparent
background on or off. If I turn this off, you can see that the
color background that I chose in my canvas
is now showing up. That's what's going
to get exported. Now, if you're working
with a canvas that's the exact size of what
you're being exported, such as our background textures, this option isn't even
going to be provided. Finally, the alpha
threshold is going to set the padding around the
edges of your illustration. GIFs don't handle
transparencies well and don't accommodate partial
transparencies like drop shadows at all. A padding is added around
your animation so that the actual illustration isn't degraded by what's
called anti-aliasing. If you've ever seen a GIF on
Instagram or in messaging that has a thin
white line around it or looks choppy
around the edges. That's what alpha
threshold is adjusting. Now, while this matters
when you're creating a GIF sticker like we did here, it doesn't matter when it comes to exporting a full background. As again, there's no
need for transparency since the entire canvas
is being exported. Now personally, I find
Procreate handles transparencies even on stickers like this really cleanly, so I keep my alpha
threshold relatively low. If I pull this all the
way up to 100 percent, you can see it's creating some issues with my
actual illustration. I'm going to bring
that back down. If I need to, I can
always come back in and adjust it and re-export. The other common
export option is MP4. Now, this is the
required export option for Instagram posts, not stories or reels, but the post within your
feed and for Facebook, because their file sizes
tend to be rather small. You're not given a lot of options to adjust when
it comes to MP4s, you can change your max
resolution to web ready and of course adjust your frames
per second, but that's it. You're not going to see any
transparency options with MP4s because they use
what are called JPEG encoding and therefore
don't accommodate transparencies of any
kind, full or partial. Now, this isn't an option that I would use for a
sticker because unless the animation goes to the very edges of the canvas, it's going to export
with a white background, even though you don't see it
here in the preview window. At the end of the day, the
best option is going to be the one that works for
your particular scenario. In other words, where
do you plan to post it? What does the site accept? Do you need transparency or not? Next up, we're going to wrap up class with a few final thoughts. I'll see you there. [MUSIC]
13. Final Thoughts: [MUSIC] We've reached the end of class and I'd like to thank you for trusting me with
your time and creativity. I hope you enjoy creating your own animated
textures in Procreate. I'd love to see what you create, so be sure to share
your project to the class projects
and resources page. Remember sharing your project
and leaving a review not only help future students see what they learn when
they take the class, it helps more students
find the class. If you share your
project on social media, tag me at the handle
on my screen as I'd love to share
it on my own feed. I have lots of new
classes in the works, so hit my profile
and hit follow, so you're always notified
whenever I post a class. You'll also find my
entire lineup of existing classes in digital
illustration in photography, information about my
Facebook group dedicated to all things digital texture where you
can share your work, ask questions, learn
tips and tricks, or share your own, all in a friendly non-judgmental
environment. You'll find a link to my YouTube channel where I share lots of short-form tutorials that complement my Skillshare lineup. Finally, you'll find a
link to my newsletter. When you sign up, you'll receive my big gritty grungy texture
pack and regular freebies. If you have any questions
about what you learned in class or you'd like
feedback on your approach, please let me know in the
discussion section below, or by emailing me. You'll find the email on the
about page of the class. Thanks so much for joining me
and happy creating [MUSIC]
 Tracey Capone, Illustrator, Photographer & Designer