Transcripts
1. Trailer: Hello. Would you like to learn how to make video games in Python? If you do, you're in the right place because that is exactly what I am going to teach you. And here's what we are going to make. We're going to start with the pygame module, which is the most popular way to create gangs and Python bytes cell. And we will start with a very simplest shooting range game. And what a game is fairly simple. It is going to teach you all the basics of video game development. So we will talk about how to animate something on the screen. You would talk about how to create objects on the screen. We will talk about how to get user input and lots more. But once we're done with that, we're getting to a much better game, which is going to bend asteroid shooter game. And here things are getting much more interesting. We're going to have a spaceship with lives and the laser and some Shields. We have spawning meteors that can move around on the screen. We have different stages of the level and quite a bit more. So a much more developed game that will teach you so much more. And once we're finished with the pygame module, we are starting with the really cool stuff because then we are migrating 2D could DO gaming engine, which uses GD script, which is basically Python, optimized for video game development. And in here, we're going to create two more games. The first one is going to be a futuristic style for our game. And in here, things are going to look so much more interesting. We have really fancy graphics with player animations. We have different stages. We have so much more and the screen and district, if you're a really good foundation to create any kind of more complex game. And finally, we come to the really good part where we are going to create a 3D shooter, where you are going to shoot at vegetables just to keep things clean. But even with that, we have all the things you need to create a really cool shooter. We have particle effects and we have cool lighting. We have lots of different objects. We have weapon animations. We have other things for good-looking video game. Once you're done with these four games, you are going to have a solid foundation on video game development and feel this tutorial. I want to explain every single line of code. And if I'm introducing a new concept, I will use illustrations to make it more clear so that you won't have any problems understanding. Also, every single stage of the game will be uploaded. So you can constantly double-check and what stage you are. And if you find out off this interesting, I'm really looking forward to seeing you in the course. And if not, I'm wishing you all the best for whatever journey you like to take.
2. Requirements: Hello and welcome to the first video in this series. Before we are getting into the actual game development, I would like to talk about the requirements for this course and do let me stress this here, that this is not a course to teach you Python itself. Instead, we are going to use Python to create a video game. So we're expected to know at least a little bit of Python. So let me talk about what you should know before getting into this course. You have to know how to use variables and how to influence variables. So how to add or subtract values or multiply values. The really simple stuff you shouldn't have to use if statements as well as for and while loops. So all the really basic stuff of Python, you should also know how to create a function and how to call it. And the same for a class. So you should be able to create a class and to create an object from their class. And we're also going to use inheritance. So you should know at least a little bit about it. But don't worry about this part too much aisle. We'll talk about this in more detail and become to it. So if you now to create a basic class, you should be good to go. And besides that, you should also be able to use pip to install new modules. And that's really it. If you are completely new to pay from, I would recommend you check out if free video on YouTube. There are plenty that are going to teach you all of this in about an hour. So if the boring stuff out of the way, let's talk about video games in the next video.
3. How games work: Hello and welcome to the first major part of this tutorial series. And for now, we're going to talk in fury about how video games work, which I think is going to be really important to understand later on what we are doing. And fortunately, the fundamentals of video games are the same. It doesn't matter if you look at a video game from today or from a video game from the 19 eighties, the same principles still apply. So let's talk about them. And to understand this the best, I think it's good to use an example. So on the screen right now, you can see Super Mario World, which is a fairly old video game, but quite good to illustrate the basic elements. And so right now, you can see one image or one frame of our game. And this one image is composed out of several different elements. For example, we have Super Mario itself, we have a background, we have some UI elements, and we have a floor and quite a few more elements. And essentially what happens in the game is that these elements are slowly being put together to create one image. So out of these individual elements are individual pieces in the beginning and only inside of the game are they being put together. And none of them are anything special now, all just basic pictures. And he could literally go on the Internet right now and download all of the assets for this game and make it yourself. Obviously, if you were to publish it and tender would have very serious ward review, but you could just download them and use them yourself. There's nothing particular about these images. It's literally just basic pictures. They're just being put together in a certain way to create a game. So really nothing fancy. But the really important point for video games is that this image isn't just created once. Instead, it is being created multiple times per second. And for example, Super Mario World had a frame rate of 60, meaning that the game was creating this image 60 times per second. So roughly every 17 milliseconds that the game put all of these elements together and display them to the player. So while we are seeing a static image, the game is really busy putting off these images together and displaying them to us. But obviously right now, we are only showing a static image, which isn't particularly useful to make a video game. So what we have to do is to add interactivity to all of this. And this happens with code, and there are lots of different things that we can do. So for example, imagine right now in the game, you have to press right on the controller. In the game, we would get the update that Mario has to be moved to the right. And now what happens inside of the game is that instead of having married in the middle of the screen, we are moving him slightly to the right and changing the image we're displaying. And on off. This still happens at 60 frames per second. So what happens so fast that for us, it looks like a moving image. And all of this is called the game loop. And what happens in here is that we are running some kind of code that places different elements on the screen. So when a player has to be where enemies have to be, what you, i elements have to be displayed and so on. And then all of this is being displayed to the player at a certain frame rate. And we are going to create our own game loops very soon. But the fundamental thing you have to understand, instead we are just painting a picture on the screen and refreshing this picture of multiple times per second. And while we're refreshing it, we are changing the position of different elements on the screen. And this is really all the video game is, that you put an image on the screen and you refresh wettest image have to be depending on what the players pressing or maybe depending on some other code. But there's nothing inherently special about this process. And there are lots of different ways to create this kind of logic. What we are going to see in this tutorial is to use pygame and a good dog gaming engine. And I will talk about them in the next video. I will see you there.
4. Python game tools: Hello and welcome back. In this video, I will be talking about the tools you have to make video games. And there's one major problem I really want to talk about, that Python is not great for video game development. And if you are a new Python developer, you might have already noticed some parts of this. That, number one, you can't really display information in a pleasing way. All you really have is to console, which can only display text, which is not very good for video games. Also, if you wanted to make a video game, you couldn't really get player input. All you have is the input function, and this one stops to cold when it's being run. So you couldn't have real-time video game. It would always stop the code when you get input, which would break basically any kind of video game. So standard Python isn't good for video games. But to fix these problems, we have a couple of modules that can help you with that. And the one we're going to use and discourse is called pygame, which is one of the oldest and most popular modules to make video games. And this one has lots of tools to display information and also to get user input, which is basically all we need to make a video game. And PyGame very explicitly uses the logic I have talked about in the last video, that we are creating a game loop. And inside of this game loop, we are working with some code to place elements on the screen and work with them. But we're going to come to that later on. And just to mention it, PyGame is not the only module in Python to create video games. A couple of alternatives would be piglet and Python arcade. And there are just as good as pygame. And I would recommend you to check them out at the end of this video that can be quite nice. But ultimately, all they do is implemented logic I talked about earlier. And all you're going to see is that you're importing a Python module and then you are going to write some code. And this is actually bringing us to the next problem I would like to talk about. Looking at an editor to make a video game is not very efficient. So when you make a video game, you want to see what you are doing, right? When you're setting up the game. You don't want to look at lots of lines of code and somehow guess where elements are on the screen. And for that purpose, you have video game engines, and these allow you to make your game much more efficiently. So what those effectively are is a GUI editor where you can drag and drop different elements. You can give them cold very easily. And you can see on the screen immediately what we are doing. And for that, in the second half of this course, we are going to learn about the good dog gaming engine, which does exactly that. So you can't see any code. Instead, you can see all the different elements of the game, which makes it really easy to create a level and to see how different elements work together, which makes a video game development so much easier. And that's going to bring us to the final problem that I do want to talk about in this video, that Goodall does not use Python. Instead, it uses GD script and what it sounds like a different language. It isn't really. So let me put an example of GD script on the screen right now. If you know at least a bit of Python, you should be able to read this. And gt script is insanely similar to Python. And if you can use one language, you can use the other language. Some keywords might change and a bit of logic might be different. But fundamentally, you use the same principles. There's not much change going on. And the reason we are going to use GD script is because GD script is optimized for game development, which primarily means that it runs much faster than Python. And this is quite a common problem for Python itself, that Python is a very flexible language, but it is not a fast language. So while it can do lots of things very easily in Python, the consequence of that is that Python doesn't run as fast as other languages. But GD script alleviates that problem. That a removes some of the flexibility. But as a consequence, our code is going to run quite a bit faster, which is essential to create a video game loop. But don't worry about all of this too much just yet. We are going to talk about this in much more detail later on. For now, just be aware, we're going to start with pygame and create two games and there. And then we come to Goodall in much more detail later on. But with all of that done, let's actually start our first game.
5. Installing pygame: Hello and welcome to the first game we are going to make. And it's going to be this one. We are going to create a simpler shooting range game where you should add targets and then it is appear. And along with that, we have some animations and we have generally a couple of images on the screen that make the entire thing look quite nice. So nothing particularly fancy, but I think a good start for game development. And for all of this, we are going to use the pygame module, which is a very powerful module that is quite nice to develop in. However, it does not come with Python preinstalled, but we have to install it ourselves. And for that purpose, I'm going to use PIP. And installing it in that way is super easy. If you are using a Windows computer, open the PowerShell. If you're using Mac OS, open the terminal. And for both of them, you should be seeing something like this. And all you have to do in here is type pip installed PyGame. Then you should see a short piece of text. And then ideally you see PyGame successfully installed. And if that comes up, you are good to go. You should be having PyGame installed. And if you don't see this kind of message, something probably went wrong on your system somewhere. But let me know in the comments and I'm really happy to help. But none of with pygame installed that's first tested to see if it's working. So here you can see my code editor. I'm using Sublime, but any code editor is fine as long as it can run Python, which is basically all of them. And to check if we have installed PyGame, or we have to do is type import pygame and build or execute this code. And if I do that, I can see PyGame 1.9.6 and hello from the pagan community and a link to the website. And if you're getting to this stage, you have installed PyGame successfully. So if this one done, we can actually start working on it, which is going to happen in the next video, I will see you there.
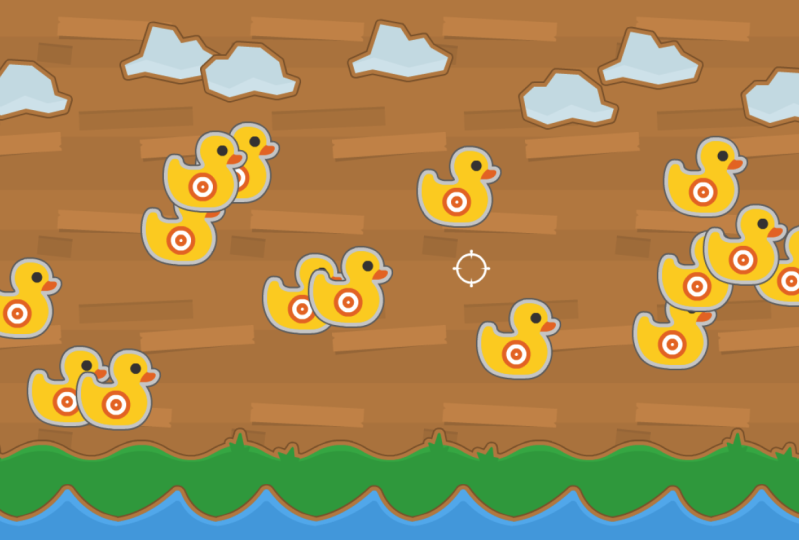
6. Shooting Range 1: Intro to Pygame: And with that one done, let's actually talk about the game we're going to start making. And it's going to be this. It's a fairly simple shooting range game, and you just click on ducks and they disappear. You can keep on doing it to some animations. We have some background art. If you click on those, they don't disappear. And I can just keep on clicking it, eventually finish and we get a wind message. And that's pretty much the entire game. And it's not exactly a sophisticated game. However, it does teach you all the basics you need to create basically any kind of game and PyGame. So let's start building this thing up. And we first start by talking about getting a blank screen. And this will already cover quite a bit of theory on how to draw things and PyGame, The first thing we need is actually quite simple. That PyGame always needs to be initiated and uninitiated. And anything between these two states is where our game happens. And both of these can be achieved very easily. All leaders PyGame dot init to initiate a module and PyGame dot quit two ended. And for now you don't really have to know more about these commands. Does, do be aware that you have to include them. But for now, focus on what happens inside of them. And the most important thing that happens inside of it is that we create a display surface. And the display surfaces basically Window did play a perceives when the game is being played. And this one is done with a very simple command, it just this one line of code. And then this display services being continuously updated in the game loop. And this game loop isn't actually anything complicated. It's literally just a Python while loop that runs endlessly. So it's sad to wild true. And we only break it from the inside of that. And these two elements already are going to create our basic game window. But there's one more element we need and that is to get some player input, because right now our game just continuously updates. We literally counter anything. We cannot even close it, which is kind of a problem when you run the game right now. So what we have to do is to look for what's called events and PyGame. And polygamy events are mostly just player inputs. So it could be the move of a mouse or could be a click of a button. And it could also be the click off the little accident top of the window to close the gate. And if we didn't include this, we would not be able to close our game. But those are the four elements need to create the most basic kind of window. You need to initiate and quit pygame. And inside of that Ukraine, a display surface. And then you update this surface continuously in a game loop. And in this game loop you look for events that could, for example, be player input. There are two more elements that are kind of important, but for now they're not exactly necessary. So let's start talking about the basics. And then we covered these two elements at the end of this video. So here I have a completely empty sheet of code. And the first thing we need is to import pygame, which should be quite obvious line, if you want to use pi m, you have to import PyGame. This works like any other Python module. And now our very first line is to initiate pygame, which happens with pygame dot init. And this is all we need to do for now to initiate pygame. And later on we're gonna close PyGame. But for now, once it's initiated, that's basically all we need. And the next step is to create our display surface. And this one is to be stored in the variable. And this variable is usually called screen. You could literally give it any name. It doesn't really matter. Just make sure it's something that captures what you want to express and screen. In this case, it makes a lot of sense. And the line we need to create a display surface as PyGame like display, dot set mode. And inside of that, we need a tuple with two pieces of information, and that is the width and the height of the window we're going to create. And in my case, I want this to be 1280 by 720 pixels. So the window we're going to create is one hundred and two hundred eighty pixels wide and 720 pixels high. And with that, we have our display surface. And I could actually run the code right now already. So I run the code, we can see a window for a very short period of time. And basically what happened there is that Python creates this display surface. However, it doesn't know for how long it's supposed to be open. So it opens it for one frame. And since we don't tell it to keep it, open, it, close it after this frame again. And what we need to keep it open is the game loop. And the game loop is literally just a while loop. It is set to wild true. So usually in Python, a while loop just runs like something. While x is greater than, let's say four. And then once this condition is false, then this loop would stop running. But if you have well true and this loop, whatever happens in here, is going to be continuously updated. And as you break the while loop from the inside of it and in here are displaced surface is going to be continuously updated and as one line that need to update the display surface. And that is pygame, dot-dot-dot display, dot update. And basically what this one does is that it takes anything that came before it, this while loop and draws it on this display surface. So this one. And you could run this already, but you shouldn't because you would not be able to close it. And to close it, we need one more thing and that is the events. And this is just a for loop. And how does usually looks as for event in PyGame, dark, event dot get. So effectively what happens is that when this while loop starts to run, PyGame starts look for all the events. So this is all the different user inputs that are possible. This could, for example, be moving the mouse, or could be clicking a button, or could be clicking your mouse buttons, or it could be closing the window. And this is also something we have to actively check for. And to check for the closing button of the window we need if event dot type equal to PyGame thought, quit. So basically when we look for a different events, we can check whether different type of events at a type could, for example, be mouse button down, where you click your mouse button. And quit is just the X button at the top of the screen. And if that was being pressed, we want PyGame dot quit. And that is the line I talked about earlier that we have to appreciate PyGame at the end to close it. So in the beginning we have initiate and at the end we have quit. So these are the two lines would have program has to run in between. And that is literally the most basic setup you can have with pygame. If around again now, we can see a black screen. We can move it around and we're organic, close it. That's about it. And there is an error message. And that brings us to another part that you kind of need. If I'm PyGame is being closed. This PyGame dot quit doesn't fully close it. And what we need instead is says and sys dot exit. And we're gonna extend this in just a second for now, just follow my lead to horrendous game. Now again, we still see a black screen. If we close it now it kills us properly. And basically what happens is that says is another module that's inbuilt into Python so you don't have to install, you can just input it by itself. And Cisco to some access to system commands. And what happens is that PyGame dot quit only ends PyGame as a module. It doesn't enter code by itself. For that we need syst dot exit. So this one actually closes our program that we're running. This one doesn't close the program. They just closes PyGame, so doesn't close all of it. But with all of the up and down, we have our basic game and we have a black screen that we can move around and we can close. And even though discretize showing black red now, this black screen is being continuously updated in our game loop. So in our while loop here. But there's one more problem I do want to talk about. And that is that the speed of this update is very uncertain right now. So we wouldn't know if this screen is updated at 60 frames per second or a 120 frames per second, or 1000 frames per second, or let say one frame per second. And this can be a problem. And let me explain why. When we run our game, the framework determines how often the calculation is done. So let's say we want to move a picture from the left to the right. So we move the image to the right by five pixels on each frame. Now, if we do this a 100 times per second, or ten times a second really matters. Because if you do this operation a 100 times in 1 second, or ten times in 1 second gives you vastly different pixel measurements. So effectively, the game would run at different speeds depending on the speed of the computer to running on. So we basically have to make sure our game runs at the same frame rate no matter what happens. And we can do that. And to do that, let me close this. We need another variable that I'm going to call Clock. And clock leads PyGame, datetime dot clock. And make sure that this clock is capitalised, at least for the first letter. This is really important. And this line creates what's called a clock object. And a clock object can be used for lots of different things. One of them is that it determines the speed of the game or the frame rate more specifically. And all we need for this is clock in our game loop at the end, dot-dot-dot tick. And now, and to give our gamma frame rate, and I'm gonna give it a 120. And this line basically determines that our games is never going to run faster than a 120 frames per second. So effectively our clock stops to gain when it tries to run too fast. Still a possibility of the game running slower than a 120 frames per second. And this would happen if the game is too busy and at too many elements on the screen that the computer cannot keep up. But that is an issue with game design. That you have to design a game in such a way that never gets too busy and they're never too many elements on the screen. And we will talk about some strategies on how to achieve this later. But for now, let's run the game. And now we have our most basic setup for PyGame. It doesn't lead to anything, but that's going to come in the next video. I will see you then.
7. Shooting Range 2: Surfaces: So another way of a basic window, let's talk about how to put stuff on it. And to do that, we need one more concept and it is called a surface. And be aware here so far, we talked about a display surface. And this is kind of different from a regular surface, but they do have a lot of things in common. So let's talk about them. The display surface as what we have seen in the last video. And this is the windowed player sees at the end when the game is a rendering. And that can only be a single display surface. Now, irregular surface differs from this in two important ways. The first one is that you can have as many surfaces as you want. So what as only one display surface, you can have hundreds of normal surfaces. And the second one is that a surface is only displayed to the player if it is being directly put on display surface. So you could have a 100 surfaces. If they are not being placed on the display surface, they are not visible to the player. And if you want a simple analogy, think of it like making a poster. It really big poster you present to people in the end, that's a display surface, and each surface would be a posted note you put on this main poster. You could have hundreds of post-it notes. If they're not under post that a would not be seen in the end. And these surfaces are basically what you need to put images on your screen. There are some other ways by using surfaces is the primary one. And let's do an example for now. We want to important image and place it on our display surface. And importing an image is very easy. You just need one line of code and then you store this image in the variable. But the image you have inputted is automatically on a new surface and PyGame. So you have it available, but it is not visible to the player. And to make it visible, you have to place it on the screen for another command. So placing images on the screen takes two lines. You first import the image and then he put the image on the display surface. And with that one done, let's go back to the code and actually important image. So here I'm back in my code. And when we set up the game, I'm going to create a new variable and are going to call this one would underscore BG. And now when it aligned to import the background image. And this one is done with pygame si.umich.edu load. And in there we need a string with the name of the file we want to import. In my case, this is what underscore bg dot PNG and a file ending is really important. And another important thing, a script of this game and the image have to be in the same folder for this line to work. That if this image wasn't different folder, then your code, this would not be working at PyGame would give you an error. So make sure you have it on one folder. But with that bond, we have imported in image ever run again. Now, we couldn't be seeing anything because we first have to place this image on our display surface. And this happens again in our game loop. And the line we need is first screen. So we are referencing our display surface up here. And then we have to command blood. And blood takes two arguments. The first one is the service we're going to put on. So this in my case is what? Bg. And the second one is the coordinates where we want to put it. And the second argument is to position where we want to place this surface and be aware to coordinate what you place. It is the top left of the surface you are placing. So my case, this has to be 00. So we place the top-left of this surface on the top left of our screen. And if I run this now, here we have a wooden background. It doesn't look very good and it's a very repetitive. But we are going to improve this and just a bit. And I guess one thing you might have found weird that 00 is the top left. So before we go on for about, let's talk about the coordinate system of pagan. Because this one is a little bit weird. And to understand the coordinate system in PyGame, think back of your math classes in high school, that if you wanted to draw a graph, you needed a coordinate system that has x coordinates on the horizontal plane and y coordinates on the vertical plane. And the origin of this coordinate system is in the bottom left. So if you put a point on 0-0, you on the bottom left corner. In PyGame, this is slightly different. You will still have a coordinate system where x is on the horizontal plane. So if x gets larger, you move to the right. However, the y-coordinates are different. And what basically happens is that why is inverted? So at the origin is in the top left. And if you want to go down, you have to increase y. And if you want to go up, you have to decrease y. And admittedly, this does feel quite counter-intuitive that it just fits unnatural to increase a number and go down. But in most games, this is the default coordinate system that for some reason the standard became that the top left is the origin of the coordinate system. It is slightly confusing, but you are going to get used to it quite fast. But you are going to make some mistakes of it as well. And let's visualize in this coordinate system what I have done in our game just now, I've inputted an image and I've put the top-left of this image on the coordinate 00. So basically what I have done is to put the top left of the surface on the origin of our coordinate system. And since the dimensions of this image are the same dimensions as our display surface, this one covers the entire display surface. And what all it comes down to is that we have a background image and with step one done, let's import one more image and to import another image when you'd have a variable. And this one I have called land Vg and asked us before PyGame dot image dot load. And now I need another string of the name of the file I want to import. And this one I have named land underscore BG, and we still need PNG. So now we have another surface and we have to place it in our game loop. And here's something that's already quite a problem. And let me just use the same line as before and screened upload. And I want to place land BG and for now, let us pass it again at 00. So what we now expect us to see our land image and our wooden image. But if we run this, we can only see our Wouldn't image. And the reason is quite simple. And the problem is that this image covers this image. So this image, what it exists on the screen is behind our Wouldn't background. And basically what happens is that when Python goes through the while loop, it first draws this image that address this image. And then updates it all. So if this image covers the entire screen, then this one would never be seen because always covered by a wooden background. And all we need to fix this is move this one after our wood background. And if I run this now, we can see our land. So just be aware that the order of your code does matter in terms of how stuff is being drawn on the screen. But alright, we don't want our land despite how high up we wanted Rava fervor down at the bottom of the screen. And this one is very easily done. All we need is to change this 0 to, let's say, let's put it at 600 and let's see how that looks. And yeah, this one's getting better. Could almost be a little bit less. Let's go with 560. And yeah, that looks much better. And let me just explain what happened here. That when we place this land image, we place the x-coordinate on 0. So it starts at the point right on the left of the screen. But the y-coordinate is 560, which basically means that we have put 560 pixels from the top and place the image there. Which basically means we have moved it down. And that's basically it. Lets keep on going and add another one. And I have water, BG. And this one is also PyGame dot image dot load. And this one is water, BG and PNG still required. And this one is the water. And we want screenshot blood and water BG. And now again, we want to place this on the same x-axis, so at 0. But there's one needs to be a little bit further down than the land one. So this one I'm going to put, let's say 600. So if we run the code now, we have all water and this one right now feeds a little bit too high. So that's pull it down a little bit further down. So let's say 640. And Gim. There we go. Now we have free images drawn on top of each other. So we have effectively imported three different images and we have drawn on the screen after each other, sort of being put on top of each other in the game. And that is already quite a good start. And with depth and done, let's do our first exercise. And the exercise is going to be that you place a couple of clouds at the top of the screen. And this is going to need two steps. The first one is that you have to import clouds. And in the game folder, there are two files then Cloud one and cloud to import both of them. And in the game loop, you screened opted to put lots of clouds on the top of the screen. And for that, you will need to move both the x and the y coordinates. So far we haven't moved the x-coordinate. So try to experiment with this and see how far you get. And the end result should look something like this. But you can move the cloud so ever you want their specific position doesn't really matter. Pause the video now and see how far you get. Alright, now let's do together. The first one we need is to import both clouds. And I've caught them killed one enclosed tube. So I'm gonna call them the same and decode variables. So we have Cloud one and we input them in the same way as usual. So PyGame dot image dot load. And I called Cloud one dot PNG and cloud to play game dot image dot load and Cloud two dot PNG. So now we have the surfaces of the clouds. We have to put them on the screen now. And this one I'm going to do after all our background images. And all we need for this is screened dot. Then one of the clouds. So Cloud one. And now we need to coordinate and let us put one at the coordinates 150. So we move this surface 100 pixels to the right and 50 pixels down. So if we run this now, we can see one cloud in the top left of our screen, and that's all first cloud. So now we just need to repeat this process a couple of times. So I do again screenshot doublet. This I want to place clout to. And for the coordinates, I'm going with a 170. And AT. Let's run this now. We can't see both clouds on top of each other with cloud to being on top. So this covers using the x coordinates. But there's one thing I haven't specifically covered yet. And that is Teddy can reuse the surface as many times as you want. And let me demonstrate. So I can use screenshot bled and use Cloud one again and place it on the coordinates 60410, completely random numbers. They're just somewhere at the top. If I run this now, we have our first cloud twice. We have one cloud here and one cloud here. And they are the same image. We just put them twice on the screen, would just perfectly possible. You can reuse a surface as many times as you want. In fact, when we later put the targets on the screen, because it's all the same picture that's putting the screen multiple times. And let's do a couple more clouds. Let's say screenshot. Again. Let's use again ClO2. And I wanna place this one. Let's go quite a bit further to the right. So 1090, run this again. We can see another cloud. And let's do one McLeod a bit more in the middle, which would be screened. Choose Cloud one. And let's put this 412551 off that London. We have lots of clouds at the top. You couldn't move them wherever you want, but do make sure they're quite far up on the screen. So do you have placed in the middle 40 actual targets? But with aloft upon done, you have a basic idea of how to put images on your screen. And all you really need is to important image and then place it on the screen and the different coordinates. And always run by you place a top left of your image. How ever? Right now, all of this as entirely static, which is very boring to look at. So let's animate this and that's gonna be the next video. I will see you then.
8. Shooting Range 3: Animations: Hello and welcome back. And in this video, we are going to take this static image and add some animations towards it. And specifically, we're going to take the foreground land and water. And at some basic animations, which basically means we are slowly moving it up and down at certain intervals, which is actually really simple thing to do. So let's jump right in. And to understand how to animate something in PyGame, You have to have an understanding of the game loop and how PyGame draws within that game loop. And let me use the land background as an example. Right now, the background is being put under position 0560 on every single cycle of that loop, disposition is always the same. And as a consequence, when we see it on the screen, it looks static, but it doesn't have to be. We could give it a different position every time. And how we animate things and PyGame is that we incrementally changed as number so that it moves a couple of pixels fervor, up or down. And D small changes to us look like a moving picture. So all we basically do is instead of putting this one servers on the same position on every cycle of the loop, we add a slightly different position on every cycle of the loop, and as a consequence, we get an animation. So let's implement all of that right now. So here I'm back in my code, and here I have our land background that's being put on the screen. And what I want to do for now, instead of this 560, I want to have a slightly changing number on every single cycle off the loop. And to achieve that, I first have to declare a variable that I'm going to call land position. And this is going to be the y position. So let me add y and the end as well. And this is going to be 560. So exactly what we had here before. So let me replace this with the variable lamp position y. So this Das right now at the exact same thing. If I run the code, we still have static land. So no change there. How ever what we can do now, we can take this land position y and add plus equal to one on every single cycle of this while loop. So if I run the code now, we can see our land slowly going down. Obviously, it is never coming up again because this number is always increasing. So it never turns around. But by itself, this is the way to animate stuff and PyGame, obviously a very simple example, but it is the way to go. And here, it is also important to note that just as I've explained earlier, if you add numbers to it, you move downwards and PyGame. And if you subtract numbers so minus equal one, then we go upwards. So here we can see our land going upwards. And this is the coordinates of Smith explained earlier that if you want to go down and PyGame payoff to add numbers to the y axis. If you want to go up, you have to decrease the number on the y axis. So this is quite an important thing to remember and also quite an easy thing to get wrong. All right? What I want to do now is that this isn't continuously moving in one direction. Instead, I want to give it some boundaries so that if this lamp position y. Gets smarter than certain position, it should reverse the speed of this direction. And for that, we are going to need another variable that I'm going to call land speed. And for now it's going to be one. And this land speed is going to replace this variable here. So LAN speed. And right now, this is going to have the same result. But what we can do now is changed to speed of this, so that when the land position y exceeds a certain number, then we can reverse this land speed and multiply by minus one so that it is moving in a different direction. And all we need to do that is if land position y is smaller or equal to, let's say 520, then we want land speed multiplied by minus one. And let me run this not just to illustrate what happened. So we're going up and now were going down. And let me illustrate what happens here. When we start with lamp position y minus equal land speed on every single frame, lamp position y is going to be slightly smaller, so it won't be blood. The land background on the screen is gonna get slightly higher on the screen. But obviously by itself, this would go on continuously. We have to limit all of this. And how we do that is with the if condition that if land position y is smaller or equal to 520, then we want to reverse the speed, which we're going to if land speed minus equal one. So if this condition is met, then the land speed will increase the y position and the land is going to go downwards. And via Dad, we have one boundary. But obviously after this one, I will able to continuously go downwards. So we have to add a second boundary to it that if it exceeds a certain number, than want to go back negative again. And this we can also do very easily that or land position y is greater or equal and let's say 600. Then we also want to multiply the landscaper minus1. And if I run this now and it's going upwards, it's going downwards, and it's going to continue like this forever. And we have slightly moving image. So that's actually quite simple. And I hope the logic here makes sense. And you can actually try this for yourself. And that is going to be the exercise at what I've done with the land. I wanted you guys to do for the water to water moves slowly up and down. And you can play around with this quite a bit. You can give it a different speed, you can give it different parameters in terms of how far up it can go. It's entirely up to you. But what I want you to achieve is that this water is moving up and down continuously. Tried as now and see how far you get. And after you done, we're doing it together. Alright, How did it go if you achieved AS well done? If you didn't, then let me know why you couldn't achieve it into comments then I'm happy to help you. But let's turn it off this together. So here I'm back in my code. And the first one I'm going to need is two variables that mimic these two. Instead right now we're gonna do it for the water. So I'm going to call it water position y. And to what her position why we had so far is down here. And let me add some space is 640. So there's going to be 640. And also give it a water speed. And what is speed for now let's say this one is a little bit faster. Let's go with 1.5. But these numbers are entirely up to you. You can put in anything you want in here. Really just focus on what you think looks good. That's the only thing that really matters here. But alright, with that Pandan, back in our game loop, what I want to do is replace this x and at 40 with water position y. And then before that, I want to add water position y plus water speed. So if I run this now, we should already seen animation and we do. But obviously the water's just going downwards, which doesn't help us all to much. So again, we need to copy this kind of logic here that the water's moving up and down continuously. And let me add it right below. So if water position y is smaller equal, let's say in this case we go 600. Or water position y is greater or equal than, let's say 680. But again, these numbers entirely up to you, play around with them and see how it looks like. Well, okay, if that is true than water position speed minus equal one. And if I run this now, then it, Yeah, it's working. And I think the top water position is actually quite high. We could actually set this a little bit lower. So instead of 600, let's say we put us at 620, is might be looking better. Yeah, this doesn't look better. But okay, so I hope that was manageable. And as one important thing I do want to talk about, and that is that you have to use smaller equal, or greater equal when you do comparison operators and PyGame or in any video game for that matter. And what you absolutely want to avoid is equal to operators. So what you should not be doing is water position y is equal to 620 for example. And the reason for that is quite straightforward. That for our water speed, we are adding 1.5 pixels to the y position on every single frame. And because of that, it is quite unlikely that we're ever going to hit exactly 620. It is much more likely would hit something like 619.5. And if that is the case, this if condition would not trigger, so the water would continue to go upwards. And this is something you see all the time and video games that you are moving pixels quite fast on the screen. And it can happen really often that you don't hit pixels exactly. So if you missed them by one pixel and objects overlap just slightly. And if you use equal two operators, then you will really often miss the exact collision between objects and they don't make sense. And in the next video, we are going to add our mouse cursor to all of this. I'll see you then.
9. Shooting Range 4: Mouse and rect: Hello and welcome back. In this tutorial, we're going to add a cross a two hour game. So you can actually see the mouse in the game, which is already quite a big improvement to it. But to achieve all of that, we have to cover a new concept. And that is we rectangles and dead, two reasons why rectangles are becoming really important. So let me go through them. And this is also going to be a really good opportunity to explain what rectangles do and PyGame, so far, we always inputted an image and put it on the screen. And this worked fairly well. And we could import a crosshair and put this in a certain position. And this could even be the mouse position, at least roughly, and this would be a start. However, there's one problem with that. At when we place our image, we always place the top left of the image in a certain coordinate. And there's no other way for us to place the image. So if you wanted our crosshair to follow the mouse, this would have some slight and accuracy because there would always be a slight difference between the position of the mouse and dissenter of the crosshair. So that's the first problem that we need more control on where to place our surfaces. The second problem is that we cannot check collisions with surfaces. And here's what that means. What we basically going to do when to finish game is that if the mouse position overlaps with the position of a duck and we click the mouse. Then we check if these two objects are colliding with each other. So if the position of the mouse and the duck position are in the same position. So this would basically be shooting at the duck. But for that, we have to be able to check collisions and surfaces. We cannot do that. So the second problem is that we have to be able to check collisions and rectangles solve both of these problems. So they are incredibly useful for general game development. Let me explain what they are. A rectangle or rect, as it is called an PyGame is basically just the rectangle. It's not that complicated to be honest. And Allah rectangle really does, is that it draws a rectangle around the surface. And then this rectangle can be used to place the service in a specific position. And also to check collisions with other rectangles or specific points on the screen. So it's basically a frame you can put around to surface to get more control over the specific surface. So let's implement all of this. And then I explained rectangles and more detailed when we work on it in the code. So here we are back in our code. And the first thing I need is to impart a crosshair. And I do this and start off the code, and I just call it crosshair. And we're going to import it in the usual way, sort of pygame dot image to load. And I caught a file cross haired dot PNG. So now we have a cross here. What we want to do now is put this on the screen on the exact same position where our mouse is going to be. And to do that, we have to check the position of our mouse, which we can do in the event loop. So here, now, right now, we are only checking PyGame but quit. So if the game is being closed, now we have to add another event dot type. So now we're checking for different kind of event. And what we want to check is pygame dot mouse motion. And what most motion is is that whenever you move the mouse, this event is being triggered, which is basically all the time. And inside of this, we want to check exactly where the most east and then we use that information to place this crosshair. And there are two different ways we can check the mouse position. The first one is to use this event. So position B, event dot POS. So event dot pause just gives you the position of where this event happened. And what is event happened is just wherever this mouse motion happens to be. So this would be one way to get almost position. Another way would be PyGame dot, mouse dot, get underscore PaaS. And this would be a more general way to get your most position. And this would work even outside of this if statement. But in my case, event pause is the easier way. So now we have the position of our mouse. Now we need to figure out how to place this crosshair on this position. And we could do something like screen, dot, split, crosshair and event pause. This one would work and to swiftly looking quite similar to something like this. Because event pause gives you a tuple of an x and a y position. So this greened up blood would work at least in theory. But the problem here is the first problem I talked about earlier, that Demos position would be in the top left of the crosshair, which would be very inaccurate for the game and quite frustrating. So we have to solve this in another way. And how we're going to solve this is we're going to create a rectangle around our crosshair surface. And we placed the middle of this rectangle on our screen. And then later on in the code, we take our surface and put it on this rectangle, which is sounding quite complicated, but let me go through it step-by-step. The first thing I want to do is to create a cross hair undiscovered, right? So this is a new variable. And what we want to do, and this one is to take this surface and put a rectangle around it, which we're gonna do with crosshair, underscore, get wrecked. So now we have drawn a rectangle around the surface. You wouldn't be able to see it, but you can use it to place the surface. And every surface has a couple of positions on where you want to place it. And the one that we to use right now is center, which is right in the center of the rectangle. And this center gets event dot. So now, instead of putting the image on the screen immediately, instead we're drawing a rectangle around the surface and putting this rectangle around the center of our mouse. But if we're under gave now, we would not be able to see anything. And the reason for that is quite simple. We first have to use this crosshair rectangle to place the surface itself. And this happens again forbidden here in our game loop. And let me place it below the clouds. And we still use screen doublet. And we want to bled our crosshair. So this one crosshair. So just one stays just the same. But now, instead of having one specific position like for Cloud one, we want to use the rectangle and this can be used immediately. So cross their underscore wrecked. And if I run this now, we can see our Coursera. But it works quite well. And do note here that the cross it is appears below the clouds, but this above the water and the land. And the reason for that is because in the code it happens before the clouds, but after the water and the land. And this is basically using a rectangle. So let me go over the logic here of what we just did, because this one probably is quite confusing to you right now. The first thing we did was to import the crosshair picture. Is that something you have seen before? And this is, I think, quite simple. So now we have our image on a new surface, but we don't immediately put it on the screen. Instead, if we draw a rectangle around it, and the center of this rectangle is on our mouse position. And this rectangle also has the same positions as our crosshair surface. And then in the game loop, when we put this surface on the screen, we don't put the top left on a specific position. Instead, we're using a rectangle with the same dimensions as the surface. Place it on a specific position on discrete. And we have not been checking collisions as going to come in the next couple of videos. But rectangles are also required for collision checking. But before we're getting to that, we first have to put some ducks on the screen. And this is also going to involve rectangles. And I will see you there.
10. Shooting Range 5: Adding Targets: Hello. In this tutorial, we are going to place our ducks on the screen so that we have some targets to shoot at. And we are going to do all of this also with rectangles. So the process is going to be kind of similar competitive last video. And I think that's going to be a perfect way to practice a rectangles and a little bit more detail, because rectangles usually takes some time to understand and PyGame, let's jump right in. Let's begin with a recap on how we imported the cross here and the last tutorial. We first import it in image, and this image was put on a new surface. In next step, we put a rectangle around the surface and we put the center of this rectangle somewhere on the screen and deposition was whoever our mouse happened to be. And then in the game loop, use this rectangle to put the surface and a specific position. And that way we ensured that the center of our surface is always going to be on the mouse position. And for our ducks, we are going to follow quite a similar process. We are still going to import a single image. That part stays the same. And we're also going to put a rectangle around the resulting surface. So these two parts stay exactly the same. But now instead of putting this rectangle on a specific position on the screen, we want to put it on a random position on the screen. And also, we don't want to create a single rectangle. We want to create a list of rectangles so that we have multiple targets. And then in the game loop, we're going to cycle through this list and put a surface on each rectangle. Let's actually implement the logic for our ducks. So here I'm back in my code. And a very first thing I want to do is to import a picture of the duck. And I'm going to call the variable duck surface. And is going to be PyGame dot image dot load. And I called the file Dr. PNG. And as always the code and to file have to be in the same folder. So now we have our surface. And next up, I want to put a rectangle around it. But I don't want to create just from one rectangle. I want to create multiple rectangles and store them in the list. So the first thing I need is a list that I'm going to call dark list. And this is just going to be an empty list for now. Or we're going to append lots of stuff in just a bit. And now we want to create a duck rectangle. And this rectangle, we gotta just as before, dark, surface dot get rect. And dissenter of this rectangle is going to be random x and random y. So obviously these two wouldn't work right now there just to illustrate that we wanted to put this center off this surface in a random position on the screen. And the first has to be a random x integer is second value has to be random white integer. So we have to figure out a way to create random numbers and PyGame or in Python in general. And to do all of this in Python, we need to input and never module. That is called random. And random gives us lots of different ways to create random numbers. And to my case, I'm going to use rand range and it's quite a simple function. All it really does is that it takes stop physician and an end position, and then it takes a value in between. So we effectively take a random point from a range and let me create some new variables to store them. It's so R1, so ducked position x is going to be random.random range. And I wanna put these values between, let's say 5300. So why did I choose those values? Well, a la main display surface has a width of 100,280. So I basically put the targets somewhat in the middle of that. And the main reason for that is that our targets should not be going outside off the screen because I would look a little bit weird. And to achieve that, I put a little bit of a distance between the edge of the screen into area where targets can be. So the furthest to the left, the centre of a target could be exposition 50. The furthest to the right. A target could be, would be one hundred, two hundred. So that way it Target could basically never go outside off the screen. And we have to approach the duct position y end. Quite similar wastes. So when he'd random.random range. And now we need a position from the top of the screen to place the targets. And here we have to be a bit more careful because the bottom of our screen is covered by water and land, and on top of our screen is covered by clouds. So we need to be a bit more specific here. And in my case, by trial and error, I found a hundred and twenty and six hundred work best. So they would take a 120 pixels from the top and also 600 pixels from the top. So at this roughly 500 pixels, this is what all the targets are being drawn on the vertical axis. And now inside of our surface, we just need to duck position x and position y. So now we are creating one duck rectangle. And we wanted to append this dark rectangle to the doc list. So doc list, dot append, and duck rectangle. So now we would have one rectangle, which is a good start. But we want, let say, 20 rectangles. So this one wouldn't be good enough. We have to repeat this operation 20 times. And to achieve that, we need a for loop. So let me attend all of this. And what I want is for duck in range, let's say 20. So now we're repeating this operation 20 times. And let me explain how to follow up your works that we look for, for duck in range 20. And this range 20 gives us 20 different numbers, starting from 0 going all the way to 19. And this doc is then going to be 01234 all the way until it reaches 90. And we're not going to use that value whatsoever. All we really care about is that this operation is being repeated 20 times. And if we do that, we're going to create 20 different rectangles and placed them on random positions on the screen. And at the end of that, we have a list with Office 20 rectangles and we can loop over them. So that's basically all we need to create all the rectangles. But obviously, when we run the game, we can't see anything right now. And that is because we have to put a surface on this rectangle. And this is going to happen in our game blue. And I'm going to do this below our crosshair sorta crossover goes above the ducks. And now all we need is for dark, wrecked in dark lists. And just as usual, screen dot doublet. And I called this duck surface and dark rect. So if I run the code now, we can see all of our ducks. And obviously I should have drawn him behind the water because this looks quite weird right now. And it's quite a good way to illustrate why the order of the Cold War really matters. Because having these ducks in front of the land looks really weird. But if you look at the top, they are behind the clouds and this is quite nice. So it just gives some depth to our screen. But okay, to put other ducks behind the land, we just put, let's say here. So they're right on top of the wooden background, but behind everything else. And let me move out of this. If I run this now, we can see that we have some ducks behind it as well. And they're roughly in the middle and they're all randomly distributed. And that's basically all you need to create our ducks on the random position on the screen. I hope that made sense. And if you are still confused about rectangles, just let me know in the comments and I'm happy to help you more of that. But with DEP on done, we can come to some actual collision mechanics that we can actually click on the ducks and then they disappear. I will see you then.
11. Shooting Range 6: Collisions: Welcome back. For this tutorial, we are going to create our collision mechanics so we can actually shoot at the ducks, which is already getting quite far towards having a finished game and we're actually quite close to finishing it. So let's jump right in and create a bullet shooting mechanic. And let's talk about what we are going to do specifically. They talked about this a tiny bit in an earlier video, but let's go over this and full. Right now on our screen, we have two different kinds of rectangles. On the screen itself. We have lots of ducks and around each dark das or rectangle. And then around o a mouse, we have another kind of rectangle, and that is for the cross there. And effectively what we are going to do is to check if the cross, a rectangle and a duck rectangles are overlapping and we are pressing the mouse. Then we are going to destroy the docs that is overlapping with the mouse. And this would give the illusion that we have shot at the dock. So what we are effectively looking for is a collision between the crosshair rectangle and what doc rectangles. And this is done with the method collide wrecked and other collide wreck does is it checks if two rectangles have been colliding or overlapping, which is basically the same thing. So let's go into our code and actually implement all of this. So here we're back in our code. And the very first thing I want to look at is that we can check for mostly, which happens fervor in the event loop. And we already checked for mouse motion. And to check for mouseclick, it works in quite a similar way. So if event dot type equal to PyGame dot mouse button down. So this checks if any mouse button has been pressed on. And instead of that, we need to give it some functionality to check what is going to happen if we press the mouse button. And in the simplest possible terms, what we want to do is if our cross her rect is collide correct. With it dark, wrecked. So we're checking our crosshair and we want to check if it's colliding with another rectangle, that is the duck rectangle. So anything that's in this list, this would not be working because they're all in this list. So what we first have to do is loop over this doc list, kind of like we have done just before in the game loop to draw them. So basically what we do when we click the mouse button, we want to loop Ford dark in dark list. So when we click the mouse button, we are looping for every single duct rectangle in the doc list. And then if our cross here collides with any of these dark rectangles, then we want to do something. And what this line here returns is ever true or false. So if there's an overlap that is going to return true, if not, then it returns false. Then what we can do is if this line is true, now we want to do something. And for now just to check if this is working, let's just print duck hit. And if I run this code now, we can click on a duck and we can get ducking down here. But there's a problem with that kind of logic right now. Because we don't know which doc has been hit, because we'd just go through the entire list. And if any of these tax has been hit, we print something. But we don't know exactly which doc has been hit. Which we kinda need to know because let's say we wanna click on this dark here. And then when we click on it, it should disappear. But to make it as appear, we have to know which dock we have been shooting at. Which fortunately we can do quite easily. And to do that, we need enumerate. And this goes right here. And if you're new to Python, you might not be that familiar with enumerate, but it is incredibly useful to loop over a list. Basically what a numerate does is that it gives you an index of what item you are looking at in the ductless. And you have to add this index in the beginning. And now this line here would work. And basically what happens is that this enumerate gives us the item that we're looking at or the index. And then this index can also be looked over. So then let's say on the first doc item, this one's going to be 0 and this duct rectangle is going to be the first rectangle in this list. When we come to the second one, this index is going to be one, and then we have another duct rectangle. Then our next item, this is going to be two and then this is going to be another rectangular. And that way we can always tell exactly on what number we are inside of our loop. And to check if this is working, we can just print the index. So if we run this now, applique on a duck, we know distance is number 12. If I click on another duck, duck, number nine, if I click on this one, we have Doug aid through lots of different ones. So now we have a method to check which DAC we are looking at, what shooting at Robert. And we can use this to lead the duck from the list and then it disappears from the screen. So basically all we need to do is if we are clicking the mouse button down on a specific duck, we want to remove this duck from the list. So then when we come to the actual game loop and we draw off them, this doc is not going to be drawn anymore. And to delete a duck from a list, or we need Dell doc list. And now nifty index of what we want to delete. So what happens in here is that we delete from the list a certain index, the index we get from here. So whatever duck We have been clicking on, and this should be working already. So if I do this now, and yeah, we can click on a duck and they are disappearing. There's one problem with that, that, Let me illustrate this with these two ducks. If I click on this, okay, that example, let's say I click on these two ducks. Audi's free vaccine offering disappear. And the same for this one. And for these as well. That right now, if our crosser rectangle overlaps with multiple ducks, all disappear. And let me illustrate this. So I'll cross a rectangle is not 1. Instead it is quite a large area of the entire rectangle around to crosshair. And because of that, it's quite possible that it overlaps with multiple ducks at the same time. So they would all trigger collide wreck being true. And this isn't ideal. But in our case is our game is that simple? We don't worry about it too much. Just do be aware. This can be a problem. But alright, now we only need one more step to actually finish the game. And that is to add a wind condition that if all dogs have disappeared, then we want to write you win on the screen, or really.
12. Shooting Range 7: Displaying text: Hello and welcome back. And in this video, we keep them working on our game. And the one major thing that is missing right now is that once we are fit, all the ducks lab meters go through it really fast. Then, well, nothing really happens. You just see this screen by itself and the game never ends. So what we are going to end for this tutorial is some kind of text in the middle of the screen that says you have one day game. Nothing particularly fancy, but at least some kind of closure. So there are two things we have to cover in this tutorial. Number one is that we have to add text to PyGame. And number two is that we want to show this text only after certain condition has been met. And that condition is that all the ducks have disappeared. And that's basically it lets come right in. So let's start working on the first problem that we want to display some text. And to display text and PyGame, you need a couple of steps. But if you have paid attention in the last few videos, quite a bit of this should look familiar. So let's go through it step-by-step. The very first step you need is to create a fund object. And oldest fund object contains the font itself and the text size. If you don't know what a font is, it's basically the styling of a text. So really famous fund for example, is Times New Roman, or it is also Aereo. And there are hundreds of different fonts. And text size is well, haulage to Texas. So that's gonna be the first step. And in the second step, you use this font to render text, which basically means you're writing new texts. And this new text is going to be put on its own surface. And from here on out, things should be looking quite familiar. Because this new surface you can just put on the screen or you could put a rectangle around it and then put this rectangle on the screen and pass the surface into it. So let's implement this. And for now, I'm just going to show text. I'm not going to worry about showing this text only after certain condition has been met. So here we are back in the code. And the very first thing we need is to create a font object. And this one needs to be stored in a variable. And I'm going to call mine game fun. And to create a font, we need PyGame dot font, font. And make sure the second Fund has the first letter capitalized. That is quite important. Right? Into this, we need to pass in two arguments. The first one is the font we want to use, and the second one is to text size. And in my case, for fun, I'm going to go with none. Which basically means that we're gonna use the default font pygame has. And then when your text size, and in my case, I am going to go for, let's say 60 were quite large text. Now we have a fond, and now you'd use this font to render text. And this is also going to add a new variable. And this variable is going to store an entire surface with the text on it. So I'm going to call this text surface. And how we render the font as you first have to font. Then render. And number two, pass and free arguments. The first one is the actual text we want to render. So let's say for now, because it's just going to be test. Next up. We have the information if the text is anti-aliasing or not. And all this means is if the text is a bit sharper or not. And you could write true or false in near the impact is going to be quite minor. But in my case, I'm going to go with true. And finally, we're going to need a colour. And in my case, I'm going to go with white and to create a color. When he was caught an RGB tuple. And let me first pass on the color and then I'm going to explain. So I've passed in three numbers into this tuple. And these three numbers stand for the different colors. The first one, this one here is the amount of a we have. And this could be anything between 0255. And this number determines how much red we are going to have in our RGB tuple. If there's almost 0, we would have no record whatsoever. So it would be black. If this one is 255, we have the full amount of red. And the second one is the amount of green we have in our tuple. And this works just like we've read before. If didn't a 0 data's the absence of green. If this one is 255, we have the full amount of green. And then if you go lower, so let's say if we go a 130, you have about 50% of green, but i want for green. And then finally, we have the blue colors. And same principle again. If you have 0, you have no blue. If you have 255, you have the full amount of blue. And if you have something like 200, you have something like 70% of fuel. And if you mix the full amount of all the free colors, you get a white color. And basically what RGB means is red, green, and blue. And this is how you create most colors that you just combine the most basic colors. You put them together. Now we have a surface with our taxed. And the only thing left to do is to put this surface on our actual game. And this atlas fervor down again in the game loop. And let me put it right at the top above everything else. And this is again screening of blood. And for now I'm just going to put in a random position, but we are going to work on putting it right in the middle in just a bit. And I called it taxed surface. So we need to surface again. And now a position where we want to place it. And let's say for now, we're just going to be three hundred and three hundred. And unless I made a mistake, now we should be seeing text. And there we go. We can see test. And this is a good start. But there are a couple of things we do want to change. Number one is that this shouldn't say test. It should instead say something like you one. Number two is that I want this text right in the middle of our screen. Because right now it looks a little bit of, and the final one is that we should only show disk taxed once all the ducks have been shot. So let's work on these things one by one. And the easiest one is to change the text. So if I go up and here we created a text. And I just needed to change this test to u1 or really whatever kind of information you want to pass in here, any kind of string is going to work. And with that we're done. Let's work on the condition that this tax is only going to be shown once all the ducks had been shot. And effectively what we want in terms of game logic is that if this doc list is empty, then we want to show it taxed. Because if this list is empty, we noted all dogs have been shorter. And in our game loop, this can be done really easily. So here we are drawing all the ducks and we check if this list has anything in there. So right afterwards, we can add an if condition. If the length of our doc list is equal to 0, or you could even be smaller or equal to 0. Both would work. Obviously, you can't have a list with fewer non-zero entries that just wouldn't exist. So both would be fine. It doesn't really matter. But now we check if there is no doc in our doc list, which means there's no Duck left on the screen. And once we have that, we can only done raw our screen. So this part here. And let's actually try this now. So our code runs as well. Let me just chewed old ducks. And there we go. We can see our text now only once all the ducks have been shot. So that's a pretty good start. So there's one thing left. And that is that this text should not be on a position for three hundred and three hundred. Instead, it should be right in the middle of the screen. And that is going to be your challenge right now. That I want you guys to use a rectangle to place this text surface right in the middle of the screen and pause the video now and try this for yourself and see how far you get. And once you are done, we're going to have a look at this together. Alright, How did it go? I think there should have been quite doable by let's go through it together. So here I'm back in my code. And the first thing I need is an actual rectangle around this surface. And I'm going to call this texts underscore wrecked. Otherwise we get this with texts Surface dot get wrecked. And this will be giving us a rectangle around the surface. And well, all we really need to do to put it in the middle is to add Center. And now many dimensions of our screen, which are 1280 by 720. So we just need to divide these two by two. And then we have the millivots screen. So this will be 640 and run at 60. So now we have a rectangle, and the center of this rectangle is right in the middle of our screen. And then when replaced this surface right here. Now we don't want to place the top-left on position three hundred and three hundred. Instead, want to place it on text rectangle. And that is pretty much it. So let me try this again and I'm going to make one little change that we only have one dark side change this range to one source, only one dot on the screen right now, remove it. We have u1 right in the middle of the screen. And that is basically it for the most basic kind of game. There's going to be one more video.
13. Shooting Range 8: Refinement: Hello and welcome to the final video on this game. And we're only going to add some final touches to it. So nothing major's going to happen in this video. And the two things I want to work on in this video is to hide the mouse and to improve the collision mechanics. So let me explain what that means. The first one might have been confusing for you because whenever court is videos, I don't record the mouse. So obviously you couldn't see the actual mouse pointer in the game. But when you type the code yourself, you should be seeing your mouse cursor, which looks a little bit distracting. So we're going to add some code to our game to hide our mouse cursor, which is literally going to be one line. It's super easy to do. And the second one is that our collision mechanic can be improved quite a bit. So let's jump right in. So here we are back in our code. And let's say I'm gonna add this right at the top. And what I'm going to add is one line to hide the mouse. And all we need to address any kind of mouse functionality. Mpeg-1 is pygame dot mouse. And what we're looking for a set underscore, viz, a bill. And this one needs to false. So now when you run the code yourself, you should not be able to see the mouse cursor. You would only see the crosshair. But if you go outside you can see our mouse cursor again. And that's already it for the first, quite an easy thing to add. And without London, let's go to the second I will collision mechanic and and let me go down. It is right here at right now, which like our crosshair rectangle, if this one is colliding with any of the duck rectangles. And instead of checking the entire rectangle, what I want to check is only our mouse position. So let's get rid of all of this for now. Well actually let's put it all into a common so you can have a comparison. And what have you so far is collide wrecked, but there's another commodity check collisions and that's collide point. And collide point checks if one rectangle has been colliding with a specific point on the screen. And a specific point we want to check is the one most cursor or the position of almost cursor to be more precise. And it can be done actually really easily. So the first one is the duck rectangle. And what am I doing this rectangle is to check collide hot. And now you tell it which point we want to check for. And in our case, we can just use events again just as before. And that is already all we needed. So let me get rid of this common enough. And if around the game now, and let me click Close to the mouse, this wants to works, but if I click closer, now, it only really works. Gonna click right on the duck. Obviously you still click on the rectangle around the duck with the click right above the tail, the sum would still work. But now let's say here we have a couple of ducks right on top of each other. If I click on the deck on top, on this one is going to disappear. And I really have to be a bit more precise now. And here's another good example of these two ducks. If I click on the right, this one's all you want to disappear. And on the left, this one's also going to disappear. So with this one line, we have improved the collision or the bullet shooting mechanics quite a bit. But alright, that's basically our entire first game. So congratulations, you have made your very first game. And Python, obviously, it's quite a simple one. But in our next game, we are going to make a much more complex game. So I'll see you then.
14. Meteor Dodger 1: Intro: Alright, hello and welcome back to our second game and PyGame. And in this game, we're going to make a spaceship shooter that is going to look like this. You control a spaceship and you can show that meteors. And the basic point of the game is that they do meteors and you try to survive as long as you can. And once you have been hit five times, the game is over and you get a high score. It's pretty simple as games goal. But we are covering quite a few more topics. So for example, we cover a health system. We are going to cover a bullet shooting mechanic where can actually see the bullet. We're also going to cover different kinds of timers that is going to become quite important. And most importantly, we are going to cover sprites. And sprites are one of the more fundamental concepts and pygame that are going to help us organize all the other elements in our code. So let's talk about those in this video in particular. So what's a sprite? Now to understand what that is and why it is important, let's look at our last game. In here. Even to draw a very simple graphic, you need to add lots of different code. You have to import a surface, you have to put a rectangle around it. You have to move that rectangle if you wanted to. And then you have to draw on off this inner game loop, lots of different steps. And you have your code scattered all around to program. And really it's not very convenient to work with. And a sprite is basically had to organize on of this better. So instead of having four different elements all across the screen, you put all these four elements into one class, and then you only call this class to draw this object, which makes our code significantly more organized. But the basic logic is still the same. You're still creating a surface and a rectangular onto surface. But no, both of these elements are inside of a class. And then you draw all the elements from this class. So the point of the sprite class isn't that you have less CO2, right? Instead, the point is that you have code that is more organized and easier to work with. But sprites have quite a few other advantages besides managing your code better. And one of them is that you have groups of sprites. So when you draw a sprite, it don't just draw despite itself. Instead you put destroyed intragroup and then it can draw every sprite inside of that group. And groups would also allow you to update lots of sprites simultaneously. And we are going to use this later on. But basically, every sprite and pygame has an update method inbuilt. If you're on update on a group, oldest sprites inside of that group will run their update method themselves. So having sprites and groups is a really easy way to create lots of different elements on your screen and moved them simultaneously with very few lines of code, something that you could do and the previous approach, but that would take much more code. And that's basically it for sprites. They are there to make a code a bit more organized, and we are going to use them quite extensively in this game. So let's actually go into the code.
15. Meteor Dodger 2: Sprites: Hello and welcome to the first proper video on OS spaceship game. And in this video, we are going to cover two major things. The first one is that we are going to create a basic setup for our code. And this is the easy part because we have already seen all of this in the last game. And I'm going to reuse most of the logic for the basic setup. But the second part is more important that we want to use a sprite class to create Alice's spaceship. And for now it can't move it kind of redo anything. We just want to display a sprite class that has a spaceship in it. So these are two things for this video. Let's start with the first one, or basic setup for pygame. And for that, I'm going to start with the same setup we had earlier. So here I'm back in my code and this should look fairly familiar. So on the first line I input PyGame ANSYS. Next up I initiate pygame, and then I create a display surface so we can see something on the screen. Next up recreate a PyGame Clock object, and this one later on we're going to use to control the frame rate all the way down here. And after that, we create our game loop. And then the game loop we check for events. And the only event we check for right now is that the game is being closed. And then we uninitiated pygame, and we'll just close the entire program. And then at the end of the game loop, we use update to draw the frame. So all of this we have seen in the last game, and I'm going to assume that you have at least the basic idea of how all of this works. If you're confused about this chapter first video in the last game, this one explains all of this in more detail. But there's one more thing I do want to add to it that when we run this game right now, it is completely black. But for our background, I don't want it to be black. Instead, I wanted to be a dark purplish color. And this we can change quite easily. And all we need to do is to take this entire surface and fill it with a color. And we can fill any servers with a plain color very easily. All we'd just an a off the surface, then dot fill, and then an RGB tuple of the color we want to fill it with. And this is working Wolf of display surfaces and those surfaces, so we can use it on both. And in my case, I want to fill my screen with the RGB tuple 40 to 4551, which is let me show you it. Dark, ish gray properly color. And yeah, that's our basic setup for now. Now we come to the second part and that's to create our spaceship. And this is going to happen when a sprite class. So let's talk about Sprite classes in general. And the first thing is that you have to create a class first. So we always into class keyword and then the name of the class we want to create. In my case, this is going to be spaceship and a sprite class. And PyGame always has to inherit from a specific class in pygame that is called PyGame dot sprite, dot sprite. And this is a fairly empty class, but has some functionality that our sprite classes need. So it's basically a template that we can add quite a bit of detail to. And then in this class, we first have to make sure we get all the functionality from this class we inherit from buf super.onCreate. Then we have to give it a surface, and then we have to give it a rectangle. And these are the basic things that we have to create in there. So let's implement this for now. So here I'm back in my code. And the very first thing I need is to give me some whitespace. And I want to create a class that I'm going to call Spaceship. And this class takes inherit from PyGame, looks bright. Dot sprite. Now when creating this class, we need deaf underscore or double underscore in it. And the thing that always needs a self. So then when we use this class to create an object, we have to pass certain things into it. And there are a couple of arguments I want to be able to pass in later. The first one is path. And this is going to be a path to a file that has an image of the spaceship. Then I want x position and y position, and then I wanna speed. So x and y pulse is going to be where the spaceship is going to be put on the screen. And speed. If I type it correctly, It's going to be how fast it can move. And now we need to create the actual attributes of this class. And the first thing we need to create a surface. And in a class does this for some reason called self dot image. So this image is just a surface. And this surface we create an insanely recruited earlier. So PyGame dot Image.all load. And I want path. So then whatever file name be passing here, we're going to load this image and we're gonna put it on a surface. And this surface is by convention called image. So now we have a surface and now we need to put a rectangle around it. So self-direct is going to be self dot, image, dot get, right. And you have seen this before. The center is going to be at exposition. If I'd have correct expos and bypass. So now we have a class that has a surface and a rectangle. But there's one thing I forgot, which I do all the time, that we need super dot in it. So that when we inherit from this sprite class, we got all its functionality and this is really important. So this is the most basic kind of sprite class. You can create an pygame that at least has some kind of functionality. So now how can we put it on the screen? Now, obviously, the first one we need, and I put this a bit further down here. We have to use this class to create an object. And I'm going to store this in a variable I call spatial on a lowercase. And we used the Spaceship class. And the first thing is that we need the path to the file. And I have called mind space ship dot PNG. And now we need to put it on a certain position on the screen. And for now I'm gonna put it in the center of the screen. So as always, at 640. And I'm not going to put it in the middle of the y-axis, are going to put it a little bit further down. So let's say 500. So when the middle of the horizontal and slightly on the bottom of the vertical axis. And let's run the game now. And we get an error that i forgot the speed of our spacial, which is very good at fixed that say for now we want to speed of ten, but not as run it. And we can see that we can't see anything. And that's for a reason that is bright and PyGame is only drawn inside of a group. So we have to take this spaceship and put it into a group and then tell the group to draw oldest sprites inside of the screw. And there are two kinds of groups that we can have. The first one is just called group. The second one's called Group single. And group singlets, what we are going to use for now. And the only difference between these two is that group Single can only take a single sprite, whereas regular group can take any number of sprites. And in our case, since we only have one spaceship, we're gonna put it into group single. So here I'm back in my code and I want to create a class that I am going to call space ship Group. And we create a group of pygame dot sprite dot group. And in my case that is groups single. And it does not need any arguments. And now I just need to add our spaceship to the spaceship group. So here we created a group or a single group. And here we added this spaceship tutors group. And that's all we need to do. So now we have a group with this spaceship inside of it. And now in our game loop, we have to tell PyGame to draw this spatial Group on every single frame, which happens with a spaceship group. Draw. And now and you tell it on what service to drawn, which in my case is screen. So now if I run the code, we should be able to see it. And there we go. We have our spaceship. And all of this might seem quite extensive to put just one image on the surface. But when you look at the code in the game loop, this is what you really want things to be cleaned because this is where the game logic happens. And this is where spreads work incredibly well. Because in the game loop we have one line that draws all the objects inside of this group. And if we are to normal grouped as could be hundreds of different objects. And later on when we come to the meteors, we are going to have hundreds of different objects inside of this. But in the code, we just have one line to draw all of them. And yeah, at the top here, all of our spaceship is inside of one class. And in the next couple of videos, we are going to give it more and more methods to give it more abilities. But in the rest of the code, nothing is going to change or well, very little is going to change. And this is Wes, brides are incredibly useful that you create one object and all the logic of this object is concentrated with in this class. So it's all in one class that is very easy to manage. Alright, in the next video, we are going to move this thing. I will see you then.
16. Meteor Dodger 3: Spaceship movement: Hello, in this tutorial, we are still going to work on our spaceship game. And specifically, we are going to give our spaceship the ability to move. And we're still going to use sprites to move it. And in this tutorial, I think you're really going to see why sprites RB useful. So let's jump right in my basic approach to moving the spaceship, It's quite similar compared to what we have done the last game of the crosshair. I just wanted to put the spaceship wherever our mouse cursor happens to be, which is essentially the easiest way to move something on the screen. And we're still going to use a rectangle to move to Spaceship. But this time, that's the rectangle is going to be inside of the class. And I think it's best to explain all of this work directly doing it. So let's jump right into code and apply all of this. So here I'm back in my code. And what I want to do is give this class a method that can move the entire spaceship. And this I am going to call update. So I'm going to define a new method. And there's always this in itself inside of it. And now we want to use the rectangle of this class. So to think we have created earlier. And this time we can't use Event pause because event pause can only be used inside of the event loop. So in here, which we are not doing right now. But I have talked about this a little bit earlier, that instead of event on pause, we can use PyGame dot, mouse, dot-dot-dot, get undressed, got plus. And this gives you the same result. The only difference is that this guideposts works all the time, whereas this event pause only works when you use events. But the result for both is the same. You get the position of your mouse. So now we have the position of our mouse. And I want to set this to the center of our rectangle. And that is pretty much all we need to move the spaceship. Let me run the code right now and nothing's going to happen just yet. So here we have two spaceship and you can't see it moving, even though I'm moving my mouse. You can't see that on the screen, but just trust me. And the reason for that is that this update method is not being called. But we can call it very easily via our group down here. And let me do this right now and the next pen afterwards. So we have spatial proof and all we need is update. So if I run the code now, we can see our spaceship is following the mouse. So why did that work? Because we didn't call this up benefit immediately. Instead, we called update on the group itself, not the sprite. So let me explain how that works. Essentially, every spread class in pygame has an update method, except by default, this update method doesn't really do anything. You have to give your own functionality. But the reason why this update method is special is because whenever you call update on a group, every sprite in this group is also going to run the update method and it has, and this would allow you to update lots of different sprites simultaneously. So for example, when we look at the meteors later on, we're going to update hundreds of different meteors at the same time. And all of this would be done by updating the group all these meteors are in. So this update method for sprites is incredibly useful to just update lots of different sprites at the same time with just one line of code. But alright, that's a fairly rudimentary movement mechanic. So now our spaceship can move. But there's one problem. Let's say for run it again, we can move our spaceship kind of outside of the screen, which looks a bit weird. So I wanted to add a tiny bit more cold to constrain our spaceship to the screen so we couldn't move outside of it. And this we can also do quite easily inside of this class. So I want to add a new method, I'm going to call screen constraint. And it needs self-aware. And we're still going to move our rectangle. But now we are going to use a new attribute of the rectangles that I haven't talked about earlier. So under screen right now, you can see all the attributes of a rectangle. So we have left, right, top, bottom, lots of different points on this rectangle. And we can measure all of these points and we can move all of these points. And if you move any of these points, you move all of them simultaneously. So what we have seen so far is that we always move to center. And if you move the center to the right by let's say 20 pixels, you also move the top rate by 20 pixels, or the bottom left, always stay relative to each other. And what I want to do to constrain the spaceship on the horizontal axis is to measure the left and the right point of the rectangle. And if the right point gets too far to the right out and put this spaceships right point on the right of the screen. So essentially whenever we go too far to the right, the game puts us back on the right side of the screen. And then the same thing for the left side. So let's implement this. So here I'm back in my code. And what I want to measure as if self.age direct dot left is greater or equal than 1280. And of course, I mean the right is greater or equal than while 80. So 1280 is the dimension of our screen. So this is the right side of the screen. And if the right side of our rectangle, so this spatial rectangle is greater than that. Then we want to constrain it because at this point we noted has gone outside of the screen. And I wanted to do is self.age, correct? Right, is equal to 1280. So basically what happens is that whenever this point goes too far to the right, then we wanna put it on the right point. So effectively we can never go outside of it. And now we just need to call this method inside of the update method. So self.age screen constraint. And now let's try this. So I run the code. We can still move the mouse. If I go to left, we can go outside. But no, if I go to the right, we are stuck here. And if I move my mouse outside, it stops moving obviously. But I can never go further to the right than this point. So that works quite well. That brings us to the challenge for this video that I want you to implement the same mechanic for the left side. So pause the video now and try to sell. How did it go? I think it should be fairly easy, but let's see how we can do it together. So here I'm back in my code. And what I want to do is to check if self.age correct dot left is smaller or equal than 00 is the left side of our screen. And if that is the case, I wanna go self.age direct dot left is equal to 0. And that's pretty much it. Let's run now. So the right side still works, and not a left side also works. And to understand what a zeros coming from, you really have to understand the coordinate system we are working with. At the top left of the screen is position 00. So the left side of the screen is always 0. And so is the top of the screen there both 0.05. and then the right side of the screen is always discrete dimension, as is the bottom. So on our screen, The left side is 0, the top side is 0, the right side is 1280, and the bottom is 720. And helped them make sense. And in the next video, we are going to add our first Meteor. I'll see you then.
17. Meteor Dodger 4: Creating a meteor: All right, welcome back. In this tutorial, we are going to create our first Meteor for the spaceship game. And you should actually already know how to do this. Because we are going to follow pretty much the same approach we have done with the spaceship. So we're still going to use the sprite for one Meteor. And then we're going to move this material in a certain direction, mostly downwards, but we're going to give it a bit of a left and a rightward movement. That is mostly going to be random. And since you should already know how to do this, Let's start this tutorial with a challenge right away. That in the tutorial folder they have three files. Could Meteor one, Meteor, and Meteor free tried to use any of these files to put one Meteor somewhere on the screen. It doesn't really matter where it is, just trying to put it on the screen by using sprite. So pause the video now and try this yourself. Once you're done, I am going to go through this in proper detail. All right, let's try it together now. So here I'm back in my code, And here we still have to Spaceship class and it's getting quite a bit larger. But let's close it for now because we don't need it. And what I want to do is to create a new class that I'm going to call Meteor. And Meteor also needs to inherit from pagan cults bright dot sprite. And then inside of this class, we have to define an init method, then itself, and a few more parameters. And the first one I need is the path. So that is going to be the path to the file off the meteor. I want an x position and y position. And this will be enough to displace it on the screen. But I also want an x Speed. And why speed? So the wind speed is basically how the media is going to move downwards. And the expert is there to move it left and right by a tiny bit. But why speed should be the larger one? But, alright, now, we need to properly used all of these arguments to actually create our sprite and is always test starts with self dot image. And let's start for now with pygame dot image dot load. And I'm just going to stick with Meteor one dot PNG. Then our self-taught direct, this going to be self.name, image, dot, get wrecked and center. I've really kind of type is going to be our x position and our y position. So this, if I opened our spatial began, is essentially the same thing we have done here, except again, I forgot a super init method. I do that all the time. Now, it's basically the same. So we have created a class, we've created classy as well. We have our super init method so that this Meteor can properly inherit from the sprite class and gets audits functionalities. Then we create a surface that we called image. This one, again is just a picture, just like here. I could actually just call this path. Then we put the picture in there when we create the object. And then we have a rectangle, just like here. So all of these things should be fairly obvious by now. And let's actually use it. So forbidden in the code I'm going to create, let's call it Meteor one. And this is Meteor. And I want to pass in Meteor one dot E and G. Then I, let's say we're going to put it at position four hundred and four hundred. And we also need to speeds. We haven't implemented them yet, but we are going to that in just a second. Let say for now I just gonna put in 11 because they don't matter. So now this should be all we need. Now we have a meteor or an object of a meteor. Now we need, let's call it a meteor group. Group, and this is pygame dot dot group. And this time we use a normal group, not a group single, because I want to put multiple sprites and psi of this group. Now when you meet your group, dot dat and meet here one. So now we have our medial inside of a meteor group. And I want you to do now is to draw this meteor group. So Meteor Group dot withdraw and just happens under screen. And I really wanted to emphasize that all of this is incredibly similar to what we have done before. So here we brought a group. Here we create a group and add a sprite to it, just like we have done before. And here we have two classes and they look really similar. If you compare this and this, it's basically identical. Couple of small details are different, but this doesn't really matter. So if I run the game now, we have our Meteor. Obviously we can't do anything with it just now, but we have it on the screen. So I hope you manage this yourself. And if not, let me know in the comments why you struggled. And you finish this video off. Let's move this meteorite and this gets us to another challenge. So we have two challenges in one video that I want you to create an update method for this Meteor and make it move downwards for now, by the way, Speed. And pause the video now and see how far you get. Alright, how did that go? So let's do it together now. So here I'm back in my code and I'm standard Meteor class. And what I want to do is to create an update method just like photo spaceship, except now for the meteor that just moves it downward. So I gonna create update and has always it needs self. And we still have to target self.name. So we're moving the rectangle. But now we can't use Center like we have done before, because Center is expecting two arguments. So when we have used get PaaS here, this gives us an x and a y position. But now we want to have an x speed and the wind speed. So it immediately moves downwards at quite a fast pace. But by the Expedia doesn't move all that much. So we basically need to separate the X into Y speed, which we can do. And this we do by center x. So this one would give us only a single point, and that's the position of the spaceship on the horizontal axis. And this one we can also move. So this one, if we wanted to plus equal self.age x speed. And now we can do the same thing for y. So self.age direct dot center y plus equals self dot y speed. And just to be clear, when we use Center, we get an x and a y position. When we use Center X, we only get the x position of the center. Center. Why we only get the y position of the center. And then obviously we can both measure and move both of these points. But that's pretty much it. Now we just need to call update on our Meteor group. So Meteor Group dot update. And now if I run this, we are getting an error. And that is because I didn't create attributes out of these two arguments. But we can do it very easily. So it has a self.age speed equals speed. And then we have self.age, high-speed equal to y speed. So now they should be working. And there we go. Ok, obviously is moving incredibly slowly and it starts in the middle of the screen. So that's not exactly great. But we can change that barely easily. So now we can still started on x being 400. But instead of studying under y being 400, we can put this two minus a 100. And let's say to y speed, which is this one, shouldn't be one. Lets put it down at ten. Let's see how that looks. But run the code now, the media should start from the top and is moving downwards. So that works. It's almost too fast. Let me try this again, and let's make this a bit slower so we can actually see what's happening. So here we can see the meteor starting at the top and going to the bottom. So now we have one Meteor. But obviously that isn't exactly great because we want to have hundreds of meteors. So in the next video, we are going to create a mechanic that spawns a ton of meteors all the time.
18. Meteor Dodger 5: Timers: Hello and welcome back. So far, our game has a spaceship and one meteoritic goes from the top to the bottom, which is a start, but isn't very exciting just yet. So for this video, we are going to add lost my meteors with timers, which is actually going to be surprisingly easy. So let's jump for it in the logic for or meteors right now is that we are creating a meteor in a certain position with a certain speed. Then we add these media to a group and then we update this group. And this works as intended, and we are getting one Meteor. But that is basically at, we're only getting one Meteor. So here's how I'm going to change this. Instead of creating one Meteor, I am going to create a timer that triggers multiple times a second. Every time it triggers, it creates a new Meteor that we put into the group. And then this media we created is going to be in a random position with a random speed. So effectively we have lots of different meteors and multiple places. And the one new thing we need for that is a timer and pygame, which we can create quite easily. And I think the best way to explain it as by actually doing it. So let's jump right into the code and let's create our timer. So here I'm back in my code and let me close to two classes for now because we don't need them. And here's the logic we had so far that here we create a meteor, here we create a group of meteors, and here we are adding to one Meteor, shoot a group of meteors, which works fine by itself. But for now, all we need is to Meteor group by itself. And then in the time and we're actually going to create a meteors and self. And to create a time and PyGame, we need two things. The first one is what's called a user event, and a second one is an actual timer, and let's create them right now. The first thing I want to create is a material event. Just spelling it correctly. Here we go. So 40 meteor event, I want to create PyGame dot user event. And this has to be all in uppercase letters. And once we have that, we have a user event. And this is basically an event like the events we have in our event loop. So far all our events were user input, like moving a mouse or closing the game. But the user event could also be triggered by a timer. And this could be disused event. And to trigger it every couple of milliseconds, we need to add another line of code. And that is to add a timer, which would get by tag m dot time, dot set timer. And now we need the event, which in my case is meteor event, and dominate the length of the timer, which in my case is 250. And this is 250 milliseconds. So this timer is going to trigger every 250 milliseconds, or four times per second. So in 1 second you have one hundred, ten hundred milliseconds. And with that, we have one event that triggers four times per second. And now we can use this in our event loop. So if event dot type equal to meteor event, and now in here we can add lots of different code. And just to test this, let's just print something. So let's print meteor that run the code. Now we got meteor or quite often, and as keeps on happening over and over again. And that is exactly what we needed. And now we just need to create a new Meteor inside of this meteor event and had destroyed a group. And then this group is going to update automatically with this line and this line. So we don't actually need to change anything in the game loop. We just need to add a new Meteor in here, and the rest is going to happen automatically. And since I want quite a few random things, The First we need is to import the random module again, just like we have done before, because we want to have a random speed and a random picture for the meteor. So we need some random numbers, and that's basically it. So let's come to create the Meteor. And basically what we need is that our Meteor is still going to be graded by the meteor class. I call it a meteor, yep. And immediate class Levy orbit. Again, we need D's different arguments. So we need a path, an exposition of y, position and speed and why speed. So let's go through them one by one. And I'm going to create them in separate variables just to make it more obvious about what's going to happen. So the first thing I want to have is a meteor path. And for Meteor path, we have free different files that we want to choose randomly from its Meteor one media to a meteor free, all of which are PNG files. Effectively, what we need to do is to choose a random item from a list, which we can do if random.choice. So RAN them dot-dot-dot choice. And what random.choice does is you pass in a list or tuple and a pigs, one of these items. So we pass in Meteor one dot PNG, meteor to dot PNG, and meteor free dot PNG. And with that line, we get one image of our Meteor and it picks one of these free at random. And that's our first argument, 40 Meteor. So we have Meteor path. So that's number one. Next step, we need an exposition and a y position. So why we wanted to media to start this, we can do quite in similar way compared to what we have done with the targets and the previous game. We can use random.random range. And let me choose a random x position. And we need to random dot rand range. And I'm going to use the entire width of the screen. So 01280. So 1280 is to avoid screen, which is this width and a 0 is the left side of the screen, and this is the right side of the screen. And an ex post is going to take a random number in between. And that will be our next argument. So random x plus. And we are going to do quite a similar thing for the y position. So random y position. And the only difference is going to be at the Y position should start above the screen. So it should have negative starting positions. I wanna go with minus 500 to something like minus 5050. And there are two things you do want to be careful about with this line. The first one is that the media should not start at the 0. Because in the worst case, the bottom of the media might start exactly on the screen, which isn't ideal. So we start on minus 50 immediately when it first sponsor is never going to be on the screen. It's a small detail, but it is quite noticeable. But the other point is, why can't we start all the meteorites at point minus 50? Why do we have to give them a range? And the point here is a variance that we want to meet yours to look a bit more organic. If they are starting the same y position, it is going to look a bit static. So forgive them, arrange. It is going to look a bit more organic and a bit more chaotic, exactly what we want. But with that, we have random lied position. And now we need two more things. We need the x speed and a y speed. And those can be done in basically the same way. So random x speed. I want random.random range here for the speed. We want them to be able to go left and right. So we don't want to start at 0, we wanna start at minus 11, or you can make them larger, but I think this is already quite a bit. And basically what it means, we can navigate minus1, 0 or one. So if we get minus1, the media's going left. If we get one, Demeter's going right. If we get 0 to Meteor is going straight downwards. And we can do the same logic or random wave speed. Instead. In this case, we want to start at not even 0. Lets say we start with four, so to always move downwards, and then the highest one is going to be ten. And yeah, that's pretty much it. So random y, random Expedia and random. Why speed? I hope I have to write honor, it looks good. And now we have a meteor with all the required arguments and it's going to be completely random. And now we just need to add this meteor to ometer group. So Meteor Group dot app and leaky or, and what is now going to happen is that every 250 milliseconds, we are going to create a new Meteor with all of these random attributes. And in our game is going to look like we have a meteor storm. So let's try all of this and we are getting an error. And the reason is that I made a spelling error, that meteor should not be in all uppercase letters. If I try this now. And as another typo, and it's up here, writing and talking at the same time can be quite hard, but now it should be working. Let's hope it does. And here we go. Now we have a perfect setup and we can see lots of meteors that go and pretty random directions. And you can actually experiment with this quite a bit. So this 250 might even be a bit too low. Let me change this to a 100 and let's see what happens. And this actually looks quite a bit better. So it's a lot more stuff going on the screen. And we have lots of different meteors. And that is already quite a good start. But there's one more thing we do have to worry about. And that is that this meteor group is going to get larger and larger because we are creating a new Meteor every 250 milliseconds. And to illustrate all of this, let me change this to a very low number. Let's say one that we are creating a 1000 meters per second. If I run this now, it's going to get crazy. And the game is slowing down and noticeably. So it gets very laggy. And in a second, you can barely see my ship anymore. So we can basically see that the frame rate is dropping very hard and it's very hard to look at. And the reason is that we have more and more elements on the screen and even when the meteors leave the screen still being processed. So I don't disappear. And PyGame studies to render them. And at this point or frame rate is basically dead. And this is quite a common thing in video games that you have to make sure not to much happens on the screen, so the frame rate stays okay. And one key thing for that is that you disappoint elements once they're leaving the screen. So what we want to do is for this Meteor, once it leaves to screen, we want to destroy it. And this is really easy to do with sprites. And we can do this in the class itself. And the command we need to respond. A sprite is kill. And if we applied this on a sprite is pride is going to get deleted from all the different lists. So even if it's in two different list is going to get deleted from all of them. Which is perfect in our case because it makes it very easy to make sure it is bright, doesn't exist anymore. And we're going to do is now an update method. And other logic we need is self.age rec center. Y is greater or equal to, let's say 800. So all the logic we really need is that if any of these meteors that's creative bite his class is outside of the screen, so it's greater than 720. And let's give it some space just to be sure. And if it's outside of this range, then it is definitely not going to be on the screen anymore. So we can safely destroyed. And that is self.age, kill. And that's all we need. So now whenever any of these sprites goes beyond this range, it's going to get destroyed. And that makes it quite easy. So if I run the game now, it is still going to get really Leggett because spawning 1000 sprites and a second is gonna get crazy. But let's actually try this and see what happens. So here. And yet you can still see a slowdown. So killing the sprites once outside of a screen is helpful, but is not a one-stop solution. So it's tough to make sure you don't have too many sprites on the screen at any one time. Obviously in most games that is not going to be a problem because you're never going to have this many sprites and you're not going to need them. But it is something to be careful about. But already if I move this down, let's say to a 100, then our game is going to run very smoothly. And this looks very nice and smooth. And yeah, that's basically it. Obviously for now we can't do anything and if we collide, nothing happens, which is going to take some more code to fix. But next video, we're going to give our spaceship and Lazar, I'll see you then.
19. Meteor Dodger 6: Lasers: Hello and welcome back. Right now, our game looks like this. We can move the ship around and we have lots of meteors, which is a fairly good start. But obviously it's still fairly passive. And to change that, we are going to have laser today's tutorial. So whenever you click the mouse button, we are shooting a laser, which is actually quite a simple thing to do. So let's jump right in. So to major difference in this tutorial compared to the last game is that we can actually see the bullet or laser or whatever you wanna call it. And for that, we are going to need a bit more logic. But it's actually not that complicated. Effectively. Only to do under code is that whenever we click a button, we want to create a new bullet or legs are in a position of our spaceship, then this laser is moving upwards in a straight line. And we have all the tools to create all of this. There's nothing new we need to learn. So let's jump right in. So here we bag and what we have seen so far. And for now, I'm going to close the spatial class and our Meteor class because we're not going to need them. And instead, I'm going to create a new class that I'm going to call laser. And just as before, this one has to inherit from PyGame, looks bright but sprite. And in here, we still want to do is same thing we have done before. So I can just copy from our Player class. We'll copy this and paste it in here. We still want a path that's a file to a laser. We want an x and a y position and we want to speed. So all of these stay exactly the same. And we still want to load the file and we want to put it in a specific position. There's one difference though, that this time I don't need X into Y position. All I need is POS. Because when I'm going to credit later on in the event loop here, I'm going to pass in D Event position of our mouse. And this one contains x and the y position. So we can just use this one. So I can remove all of these things and we just need posts. And then this one also gets itself Godspeed. And it's just going to be speed. And I realized in our player glass artist spatial class, this speed was never used, so we can just remove it. I don't actually know why I included it. It's kinda pointless. So let's remove it here. And then when we create a class that's also remove it, it's ten here. So no change, we just remove a useless and variable. And now we want to move this laser in the same way we move to Meteor, this one. Except now instead of moving it downwards with some x variance, we want to move it just straight upwards. So I'm gonna create a new update method that needs self as usual and introduce update method self-direct dot center. Why? Because we want to move it on horizontal axis and this one gets minus equal self.age, speed. So basically what happens on every frame, we moved the center of the rectangle on the vertical axis by the amount of speech we pass into it in the negative direction, so it goes upwards. And that is literally all we need for the laser class. It's actually quite a simple one. So let's close it. And now we actually do create this class when you click a button. And before we can do that, we first need to group for the lasers. So down here, I create what I call laser group. And just as before, this is pygame dot sprite. And then in our game loop, I'm going to draw this. And here's something you do want to be careful about, that I want to draw the lasers below the spaceship. So I have to make sure that the layers are being drawn before the spaceship group. And this is quite important. Otherwise it would look, I've always said would look a bit silly. So laser group got drawn, draw after spoke directly and screen. And then we also have to update it. And let me actually give some space between these different groups that should make it a lot more readable. Iraq spaceship. Like this. There is a group DOT update. So now we are drawing our lasers and we update in the laser. So the only thing now left to do is to create a laser whenever we click the mouse button. And this happens back here in the event loop. And that is actually going to be your challenge that I want you to add a new if statement that if we click the mouse button, then we want to add a laser sprite to laser group. So pause the video now and try this yourself. Alright, how the depth goal? It should be quite straightforward I think, but let's do it together. So here I'm back in the code and I want to add a new if statement that if event type is equal to PyGame Mao's button down. We have seen the exact same thing in the last video. And I hope it's still a bit familiar. And when we click this button, I want to create, let's call it a new laser. And Disney laser is created by the laser class. And then just laser class. I'm going to pass in a file that I called laser dot PNG. And now into position for this laser. And this is the position of this event. So wherever must happen to be when we click the mouse button, this is going to be disposition and it is going to be an x and a y position. So it gives us all we need to place the laser. And finally, we need a speed. And let's say for now, I am going to go with five. And let's see what it looks like. And that's basically all we need. Let's try to run this now. You can some of our game, and if I click a button, nothing happens. And the reason why nothing happens is because let me close this. I only created laser. I didn't add it to the group, which is quite a silly thing to do. So we have laser, Group dot add new laser. So now it should be working. Fluid has to move around. If I click it now with a laser, it counted aquifer anything yet, but that comes later. But we have a laser to start with and I think it's quite slow. Usually lasers are bit faster. Let me close it and let's put this to 15, but a bit faster, and yet it fits much better. And alright, this gives us laser. There's one more thing we need to do that just like with the meteors. We have to kill the sprite once against too far up. And it's the same principle as before. If every time we create a laser, we are creating a new sprite. It needs some processing time. And Somalis, as we have, the more difficult it is for our game to run. So just as with the meteor class, we need if self dot dot, let's use center y. And this time we need is smaller or equal because we are looking at the top of the screen. And let's go with minus 100. So we have a bit of space above the screen. And if that is the case, I'm gonna go self.age kill. So whenever we're bullet goes too far up on the screen, it gets destroyed. So that would never have too many bullets on the screen. And that's the same logic we had with the meteors, that we want to destroy them once I go outside of the screen in order to make sure that it is never too many meteors at the same time and our game runs smoothly at all times. But art, that's another good step towards the game. And the no next tutorial, we are going to add health or shields starship. I'll see you then.
20. Meteor Dodger 7: Shields: Hello and welcome back. And for this tutorial, we're going to add some health to ownership or some Shields, however you want to call it. It's the same principle really. And specifically what we are going to do is to give our ships on health and to display the amount of health we have in the top left of the screen. And again, we're not going to learn any new tools. All of this can be achieved with the same tools we had earlier. So let's jump right in. And the logic 4000 eigenstates actually quite symbol that we have an icon that represents one health and it's a simple surface. And you want to multiply this by the amount of health we have. And that's really all there is. We can do all of this regular code actually. So let's go right into that. So here we are back in my code and I've minimized all the classes so we can focus on the important stuff easier. And what we want to look at is our spatial class. So I opened this one and here we have to add two more attributes. The first one I called self.age, shield surface, and this is just a picture, nothing special. And this is peg m dot image, dot load, Image.all load. And I call the image shield dot PNG. And here's one thing you do have to be careful of when it comes to sprites, that in a sprite to surface that is drawn is self dot image. You can't have most surfaces in the class, but only images being drawn automatically on the position of the rectangle. So when you input something besides the image, you have to make sure you don't call it image by accident. It's honestly quite an easy thing to avoid is to make sure that only the image is actually being dropped dramatically in the end. But we can draw more elements inside of a sprite class. So effectively what we are going to do in the end is that our sprite class draws an image and to shield surface both at the same time. Besides our shield surface, we also want self-taught. That's called health and dust by now that start with five. But you could have any number of health in here. And that's all we need for start. Now need to create a new method that actually displaced this amount of health. And I'm going to call this display health. And in here, we need to follow to display all the different surfaces. And basically what I want to do is to draw all of them automatically into four loop. So if we draw the amount of health we have, and we draw each health Eigen in a specific position, so we offset them in the exposition. And offers can be done inside of one for loop. But we are going to need to enumerate method again. But let's start a slug. The first thing I want to do is for, let's call it shield in self.age, health, and disk right now is not going to work because you can't use a for loop on an integer, which is what the health is. So we have to put this thing inside of a range method that we can't actually loop overt. So this, instead of being one integer, is going to be arranged object that goes from 0 to four, which is exactly what we need for our shield. And inside of this, we want to just draw the shield. So what do we want to do is screen the outlet and we want to draw our self.age shield surface. But now we need to position for each different shield and we have to offset them. In the exposition. We know the y position, just one. It's the same for all five of the different shields. And, but the exposition is going to be a bit more difficult. So I want my first shield to be on a position 50, the next one on the position, let's say a 100, next one position a 150. So what we need is an index for each of the different shields inside of the for loop. And for that the enumerate method is perfect. So I am going to add this enumerate. Surprisingly hard to write. So now our follow-up gives us two pieces of information. The first one is to arrange objects or somebody from 0 to four. And then the enumerate method gives us the index of that position. So now we need an index, and this is what we are going to store it at two pieces of information. And now we need to work on the position of each of the different shields surfaces. And we already know to y position, I'm going to put this at ten. So each field is offset by ten pixels from the top. This one is easy and the same for all of them. And know for the horizontal position, I want index and as called as times 40. And basically what happens here is the first index is going to be 0 because this index is the first one. So it is going to be 0, is second one is going to be one. So then this is going to equal to 40. And then the next one is going to be number two. So this one's going to be 80, and so on. And you can add this to us, may shoot as you want. And this should actually work already. What obviously we have to call this method inside of an update method. So self.age, display health. And let's try and see how this goes. And here we go, we can see some shield at the top left of our screen. We can however, see that a top left is a bit too far to the left. So I want to add a tiny bit of an offset to each of them. And so I just add plus ten for each of them. And yeah, this looks a bit cleaner. So here now we have five different shields on the top left of our screen. They don't actually do anything yet because we can't collide with any of the meteors. But for now, that's a pretty good start and also can make this as long as you want. So I can change this to 50. This would still work. Now we have a crazy amount of health. And alright, that's actually pretty good so far. In the next tutorial, lets actually get the collision started. I will see you then.
21. Meteor Dodger 8: Collisions: Hello and welcome back. So far, our game looks like this. We have our ship and we have lots of meteors falling down. And we also have some health at a top left. But nothing is really happening because we have no collisions whatsoever. And this is going to be the topic of this video. Or we're going to add two kinds of collisions. One is a collision between a meteor and our spaceship, and two, as a collision between our laser and meteor. And that is bringing us to a new topic, and that is collision between sprites. Let's have a look at that. So far, we have only seen one way to check for collisions and there was collide erect. But obviously we can't use it because we don't have rectangles, we haven't highest sprites. But sprites have a similar method. It's called Sprite collide. And here's how it works. Spread collide takes three arguments. The first one is one's priority. You want to check for collisions. A second argument has to be a group of sprites that you want to check collisions with. And the third one is called Duke hill. And if this one is set to true, any spread within the group that is colliding with the sprite we're checking for is going to disappear, which is actually really useful for us. And then this method returns a list with all the sprites that have been collided with. And this one method is actually all we need to get all of this started. So let's jump right into the code and let's implement all of this. So here I'm back in my code and I minimized lots of stuff to make it easier to observe. And what we want to go is inside of our game loop. So somewhere in here. And we want to check for collisions. And let me give some space. And I should add a comment just to make it clearer. Just an edit bitmap consistently. But, but I guess but a later Never Give me one to check if a collision between our spaceship and meteors happened. And once we're done with that, we're going to check for collisions between the laser and the meteors, but step-by-step. So to check for collisions between our spaceship sprites and or meteors, we first need PyGame looks bright, dot sprite, collide, collide, add. Now need to go for the arguments. The first one is that we need one sprite we want to check for, and this is our spaceship. And this I'm gonna get with spatial Group dot sprite. So does the one's pride that we have created here. And this is the one we actually want to check for if any collision with this thing happens. And then later on, if this one has a collision that we wanted to reduce our health and dissolve first argument. So now we need a group of sprites and now against this is our Meteor group. And then finally, we want to check for the Duke Hill argument. So do we want to remove the meteor if it hits the spatial or not? And in my case, I think it's quite a good idea. So I set it to true. So all of this is running. Anytime our spaceship collides with immediate, we're getting a list of two sprites. And we can use this as an if statement actually. And let me explain how this works. If no collision happens, this one is going to return an empty list. And empty lists in Python are not triggering if statements. However, once there's one element inside of this list. Once we have a collision, then the if statement is going to trigger. And basically what we are doing is that Python can convert different data types. So when we use an if statement, we don't necessarily have to use True or False. Python can automatically convert different data types to true and false. And empty lists are always going to be fault. And A-list with any value is going to be true, which we are going to use in our case. So if there's any item in this list, then we want to run some code. And for now, let's just see if this works and we want to print collision. So let's run the code and that's a lot of those working ad wherever collision intermediaries also disappearing. And this works really well. So down here we can see all of our collisions. Cool. So this is working. But now we have to do something more useful in this line. And what I want to do is anytime our spaceship is hit by a meteor, I want to reduce the amount of health of our spaceship by one or by a certain amount. It doesn't really matter, it doesn't have to be one. And to get this, we have to go to our class and add a new method. And the method I want to call, let's call it get damage. It needs self as always. And I also want to add it damage amount so that we have a bit more control about how much damage is being done. And now whenever this is R1, we want self.age minus equal damage amount. So I, whenever this method is triggered, we want to reduce this amount or felt by certain number, whatever we pass into here. And with that bag and our spread collide if statement, we just have to run this. So we want spaceship group and we want the sprite inside of it. And in here we want to get damage. And now we need to reduce the amount of health. And let's just start display one. And that's actually all we need. So let's actually run this. And yet, you can see on the top left, the shields are disappearing. If they're completely gone, nothing changes. That's gonna come later. But for now, this is working. And here's why this works. Let me go to our spaceship. Plus. So effectively, on every single cycle of the loop, we are displaying our health again from scratch. And this method here, or this method here, always looks for the amount of health. And by default it's five. But if a reduces, this line here is only going to run four times or three times or whatever our health is. So if you reduce the health in this amount and this one automatically updates, which is really nice and makes our life quite a bit easier. So this one's perfect. And this is already the first step to getting a more functional game because now we have basic collision mechanics and we could even pass a different number in here. Let's put this to form. So we get a lot of damage if we get hit and if we get hit once, then although health disappears. So this is looking quite nice, but I think one is the better value for this. Now we need to implement a lazy mechanic. And this one is going to look at little bit different because we have different requirements. So basically all we need to do is if a laser hits a meteor, we just wanna get rid of the Meteor. We don't have to calculate anything from that Meteor. So we did calculate damage fatwa spaceship. We don't have to do anything like that for all laser. And to destroy a media, we can just use a do kill argument from our spread collide method. So we don't actually need an if statement. But there's one more thing that's different. For our spatial collision. We have a specific sprite because we have a group single. But now for the lasers, we have irregular group that we want to check with, a never regular group. And in a normal group, you cannot access a specific sprite immediately. Instead, what you have to do is to cycle with a for loop for every single sprite inside of the group and then check specific things from this for loop. So that's a lot of talking. Let's implement this and I think then it's going to make a lot more sense. So what I want to do is for laser, in laser, THE rubric called it. So laser group is this one here. And we have all the lasers in this group. And we want to look at every single laser or every single laser sprite inside of this laser group. And for every single laser, we wanna check this method here that if any single lasers bright intersects with any of the sprites into Meteor group. And devalue returned from this method doesn't matter to us. So all I need is pygame dots, right? Dot sprite collide. And I want to look for the laser. Then as before, I want o Meteor group. And I want this to be true. So now if any latest pride inside of the laser group intersects with any spread into Meteor group, then we are going to destroy the sprite as colliding with the laser. So let's try to us. And I can shoot at the meteors. And the laser is quite strong and we can destroy multiple meteors. And that's fine for our game. I think it doesn't make too much of a difference and add our edge that's pronounced progress. But obviously, if we lose all our health, nothing changes. So we need some kind of game over screen. And that is going to come in our next tutorial. I'll see you then.
22. Meteor Dodger 9: Game over and score: Hello and welcome back. For this video, we're going to add a game over screen to our game so that when you lose all of your health, their game ends, which is how it's supposed to work. And that brings us to kind of a new topic and pay gap. We are not going to learn any new tools, but we are going to create different stages and our gain, which is quite a useful topic. So effectively, we are going to have two stages in our game. We have to stage, we have seen so far, that is our game. And besides that, we also going to have a game over screen. And in the next video, we are going to add a score to the screen by let's do the step-by-step. So in this video, we will cover how to add different stages to our game. And all of this is happening in the game loop. Let me put it on the screen. So here is effectively the entire logic of our game. And really all we want to do is if you want to go to a different stage, is to run some different code in here. Well, obviously, but specifically what that means is that I want to put all of this code into a specific function and then only run dysfunction if a certain condition is met. And if a different condition is met, then I want to run different code. So basically our different game states are just an if statement. So to we are drawing an updating certain sprites. If a certain condition is true and if that condition is not true, then we're going to draw something else. And more specifically, that if we have our player health above 0 and we add wrong domain game, and if it's 0 or lower than we are going to draw a different kind of logic. And I think implementing on-off test is going to extend it the best. So let's jump right it. So here I am back in my code. And down here I have all of our game loop. So this is what the actual logic of our game happens. I'm going to ignore the background image because this one doesn't really matter and it's not supposed to change. So this one here is what he actual game happens. And all of this I want to put into a dedicated function. So let me copy the entire thing and create a new function. With deaf that I'm going to call main game. It does not have any arguments. And I'm going to paste all of my code in here. So now we have a function with voluntary game. And I call this function main game on every single cycle of the loop. So if I run this now, we should not be seeing any change. And it looks pretty similar. I can still shoot by laser and I can still lose on my health, but still nothing happens. So that works as intended. And let me remove the whitespace. Alright? And now we only want to run this function if a certain condition is true, which are my specific case means if the health of our spaceship is greater than 0 and we can check very easily. All we need is if spatial Group dot spread. So again, spread we have created and I called this health is greater than 0. So if you have at least 1 of health, if this is true, then we want to run our main game. And let's try this. So what I'm expecting now is if we lose all our health and let me get to one here. Now, we can't see anything. And let me explain why this happens. So let me close this. Right now. We are always trying our background screen no matter what happens. But the entire rest of the logic. So all of this, like drawing or a spaceship, or lasers or meteors. Only happens if the health of the player is above 0. And if we get hit by too many meters, this is not the case anymore. So if that is the case, then pi games only drawing the background image. And now we can add an else statement. Else. And what I want in here is some kind of end game or game over screen. And this is going to run inside of a different function. So I call this end game, does not need any arguments. And in here for now, what I want to do is to print game over. So nothing fancy, but we are going to add a score later on to this. So we are back to creating texts and PyGame. And for that, we need a font first that I'm going to create in our main game set up under init and the clock because it fits better in there. I call this game font. Is it's PyGame. Again dot fond, fond. And again for simplicity, I'm using none, but you could import different fonts. We can have a look at this later actually. So now we have a font. And I think there's a perfect flight challenge. What I want you to do is to print Game Over on the screen. In the middle of the screen, you have sync basically descend kind of texts. And the last game to have a look at this, if you can't remember, but pause the video now and try it yourself. Alright, I hoped I'd worked out, but it's tried to give an L. So again, for text, the first thing we have to do is take this font and render it. And then this new render text is going to be on its own surface. So let me call it text surface. And this one's gonna be game fund dot-dot-dot surrender. And now I need to pass on some information. The first one is the text we wanted display, which in my case is GameOver. Then we need to tell PyGame if disk Texas enter aliased or not, which in my case, I want this to be true. And finally, what we need is the color of the text. And I'm going to go with white. This is to 55 to 55205. So we have the full amount of read, the full amount of green, and a full amount of blue. And if you combine the full amount of all of these colors, you get quite in the same sense that if you put 000 and here you get the absence of our colors or black. But now we have a text surface. Next step to make it easier to put this text in the middle of the screen. I needed texts rectangle. And this one is text, Surface dot get wrecked. And dissenter is going to be half of whatever is in here. So this is 640. And so now we have a surface without text with a rectangle in the middle of the screen with the same dimensions. And now I need to put this surface in, sign off the rectangle. And this happens with screen doublet and disservice. I want its text surface. And this has to be under Text wrecked. And now this should be good to go. Let's try it. So let me get rid of all my health and we have GameOver. So it is working actually quite well. And in our next video, we're going to add a score to this. I will see you then.
23. Meteor Dodger 10: Reset: Hello and welcome back. In this video, we are going to improve our game over screen. And specifically we're going to add two things to it. The first one is an actual score, so you have a bit more of an incentive to play well. And the second is when we are on our game over screen and click a button, then we reset the games we can play again. And let's start with the easier part. And that is to reset our game when we click a mouse button in our game over screen. And we can do that straight in their code. Let's have a look at that. So here we are back in our code and it looks as usual. And to restart our code, we have to go down in the event loop. And here we are checked for all our input. And we only have really one kind of input in here and that's mouse button down. And if this one is being pressed, then we should laser. But this laser's only rendered in the main game loop. So clicking this button when we end the end game screen doesn't really do anything. So we have to add some functionality here that if we click a mouse button and we are now a game over screen, and then we want to execute some code. And this we can do quite easily. So let me just copy the entire line actually, to be the easiest. So now we check for mouse button down, but we also want to check for something else. And that is, our spaceship group looks bright, that health is smaller or equal than 0. So what this basically means is we are checking if we afflict the mouse button and if our player health is 0. And what we have done in the last video is that if this condition is true, then we are automatically at a game over screen. So this one would only triggered if the game is over. So these two conditions together make sure that we can check for mouse button click that is only registered when the game is over. And all we have to do in here is to give our spaceship its health back. So as always, spatial group that's bright, dot Health. And I set this back to five. And now if we run this to shut the working, so this works fine, let me just throw myself. So when a game over screen, now click the mouse button again and we're back. But you have seen there was one problem and let me try it again. That we have a crazy amount of meteors at the same time. They have made it again kinda hard to play. And this should make sense if you think about it, that when we enter game, we still have lots of meteors in our Meteor group. And this one here, because we don't emptied his group. So when we start the game again, this group already has lots of meteors inside of it, which we don't want. So what we have to do in this condition besides resetting our player health, we also have to empty the meteor group. And it's one. We can also do very easily with Meteor Group dot empty. And all that empty does is it empties the media group or any group that's applied upon. So if I run the game now and let me just turn myself as usual, an onclick again, again. Now, we slowly have meteors coming in again. So the game properly starts and have some time to prepare. Which was much better. So making good progress. And with that, we can start the second part of this video. And that is that a high score to our game. And the logic for it is quite simple, but there's one thing we do have to take care of by, let's go through it step by step. The first thing I want to do is to create a simple variable that starts at 0, and I'm going to call this score. And in our main game loop, I'm going to add one to this number every single cycle of the loop so that it continuously increases. And then when the game is over, I'm going to display the resulting number. And then when we reset our game, this one goes back to 0. So let's start implementing all of this. Yeah, I'm back in my code and the first thing I want to do is to create a variable to track the score. And I'm going to call it score. And it's going to start at 0. And now every time a la main game loop is running, I want to add one to this number. And this is where we have one problem. That if we do something like Libyan example, score plus equal one, this would not be working. Or the simple reason that in our main game loop, we have a local scope. But our score, this one here is in the global scope. And this is generally an issue in Python or any programming language that you have to be aware of, that you are working at different scopes. And you really have to make sure that you're addressing the right variable. Because if you were to run this, again, would not know what score variable we are talking about because it didn't initiate it in this local scope. So in the scope of this function. So what we have to do is get this score out of our local scope. And there are two ways of doing it. The first one is to just declare this score as a global variable. And we can just do it like global and score. And this would be working. But it also wouldn't be good practice because ideally you want to avoid global variables. And instead what we can do, we can use the return statement. So every time this function is run, it returns the integer one, which we can then use later on in the code. When disliked, he has run to add to our score. So score plus equal men gain. So whatever's being returned from this man game, which is always going to be a one, is going to be added to OS score. So every time off to this running OS gauze increasing, which is exactly what we want for our game. And with that, we have an increasing score. So let's actually print it just to make sure this is working. So below omega M. And it's gonna print score just for testing purposes. And now from the game, we can see it doesn't update, but here it is increasing. So this we can use as a score. So the family we go to higher this number is going to become. So now we have our score variable. We just have to display it. And this is going to happen in our end game loop. And in here we already have some text. All of this year, all of this. He actually, and I just want to copy out of this and use it for another line. And this one is going to display our score. So let me rename some variables. So it is going to be score surface. And we worry about the content of this in just a second. And then we have outscore erect. And because this can obese direct and all of that is going to be scores surface and score rect again. And now we have to worry about the position of these two pieces of text. Because right now they're right on top of each other, which isn't ideal. So we're going to move the game over screen a little bit higher. So I'm going to reduce the y-dimension, true, let say 320. That's there it goes. And then I increase this one to 400. So now they're on top of each other, but still in the middle of the screen. And now we have to change this game over screen. And I'm going to do this with an F string, which looks like this. And now in this F String, we can combine text information like this or strings with our variables. And what I want to write a score. And now in curly brackets, here we can add any kind of variable. And then Python automatically combines them into one string that gets displayed, which is ideal for our use case. And this is basically all we need. So let's try and run this and let's see how far we get. And then we go wherever score. And I think that distance between the two is a bit too large. So let's reduce it a touch. Essentials differently and 40, and let's say 380. And let's try it again. And let me just destroy myself. And yeah, this looks much better. We're going to update to fund later, but for now, the functionalities there, although deaths one problem. And let's restart the game now. So here at the game looks the same again, but now the score gets much higher. And the problem here is that we never reset our score. So I think in the first one off the scheme we had something like 200. And now in our second rounder must have had something like 300. And we just added those two numbers together. So I run our game again. This is going to continuous, so our number is going to get even larger. And Domo I play, we always get a higher number. So to score count as a bit broken. But we can fix it very easily. And all we have to do is in here when we reset our game to set score back to 0. So that whenever we picked a mouse button in the end screen, we reset our score. Let's try this now. And we have 228. And let's try it again now. And let me try to stroma service Basilica. We have 217, so when notices working, and that's perfect. So now we have an end screen that shows a score and we can restart our gain, which is quite a nice update. So we're getting much closer to a finished game. In the next video, we're going to add some laser charging mechanic. I'll see you then.
24. Meteor Dodger 11: Laser charge: Hello and welcome back. Right now, our game is working kind of decently. However, I think we are a little bit overpowered. And what I mean by that is here's our game. And we can just fire or laser as fast as we can click the mouse, which makes it really easy to get rid of all the meteors and makes the game just very easy. So instead, what I want to do is that our laser charges for 1 second before we can fire it, which forces you to be much more deliberate when shooting laser. But when implementing this, we also have to add another thing. And that is that we have to tell the user or the player that our laser is ready. Because if we only have account after 1 second, the player never really knows when the laser is ready. And in our game, what that means is when our lasers ready and we are going to give our player ship a slight yellow outline. So you can tell it's ready to fire a laser. And let's start by creating a timer. And we've already seen a basic time afforded meteors. However, for the laser, we are going to need a different kind of timer because we want to wait exactly 1 second after we have shutter laser, we don't want to repeatedly count something. So our setTime or from the earlier tutorial is not going to work. Instead, we have to use a method and PyGame that's called getX. And what getText us. It gives us the time since our game has launched, Austin's PyGame ended was called to be more specific. And we can call dysfunction whatever we want in our game. And from this we can create a timer. And basically how this works is that we are measuring two points. We're measuring 1 once and time. And let's call this point a static point. And then from this point, we keep on measuring our current time and measure the distance between those points. And if the distance is greater than a certain time, let's say 100, then we want to run a certain function. So it's essentially a basic if statement that if our current time minus L aesthetic time is greater than a thousand, then we want to run a certain code which we can implement fairly easily. So let's jump into court and implement this. The first thing I'm going to need is some kind of laser timer. Let's call it lays a timer. And by default, this is going to be 0. And in this variable, we're going to measure when our laser was shot. And when our laser sharp, we can get from this event here. So when we click our mouse button in dimen game, then we're shooting a laser. And in here we wanna measure when does laser was shot. So lays at time I called it. And to get the ticks, we want PyGame dot get ticks. And it doesn't have any arguments. And this one tells us when the laser was shot. And let's actually print it just to illustrate this laser timer. Let me run the code. And now on the bottom, you can see that we've shot the first lays up after about 1 second. Then we're shooting one Lays after four seconds, then after six seconds and so on. So this gives us the time window, a laser shot, which is a pretty good start. So let me get rid of this print statement again because we don't need it. So now we have a static point in time. The next thing we're going to use to continuously measure our time and then subtract this static time from that time. And then if the difference gets greater than 1000, then we want to recharge to laser. And to recharge your laser when you have a variable that I'm going to call laser, active. And by default let's put it to false. And the entire time mechanic, I'm going to put into our main game loop because that's where we are shooting our laser. And let me put it right after here. And I'm going to call it as laser timer. And this is just an if statement. And here we want to check if Pi, game dot time dot get ticks. And since this is going to run on every single frame, this is going to continuously update. And from this one and subtract our laser timer. And now if this is greater or equal to 100, and again, we are measuring in milliseconds. So 100 milliseconds is 1 second. Now we want to do something, and for now, let's just print. Let's call it test. So nothing happens and I shoot a laser and we can see test lots of times. And the reason for that is after 1 second, this one is becoming true. And then this one triggers all the time. So we can tell it's working. And what I want to do in here is laser actively colder, it is going to be true. And then in, when we run this one here, then our laser is going to be non-active anymore. So I'm going to add laser active is equal to. So basically what happens is whenever we clicked a button to shoot a laser, a laser schooling to get faults. And in a second we're actually going to make this work. But the idea is if this one is false, we can't shoot a laser. And then when we are running this line here, and after 1 second, it becomes true and we can shoot a laser again. And the only thing we need to make this work is that this only works when you click a mouse button and laser active is true. And this freakin out with a simple if statement and laser active. And now debts, essentially all we need. So now we can only shoot a laser if you press the mouse button and laser active is true. And then when, when this is executed, we create a laser and laser activist set to false so we can't shoot anymore. And then we get the time. And then further up here, we are checking if the current time minus time we clicked on our laser is greater than 100. And if that is the case, laser active gets back to true. And if I run this, I can't shoot and even not a 1 second icon shrewd. That's for a reason. And the reason is that all of this is in a local scope. So this laser active is a local variable that does not, that is not equal to this global variable. And it's kind of a similar problem compared to the scope we at earlier, where we had to maneuver around us with the return statement and just have demonstrated we can also use to global one if we can just declare our lays act of a global variable. And now there should be working. So let's try it. And I can shoot a laser and I keep on clicking, I think can heared. We unissued once the while. We can't tell whether lasers ready, which is not great, but it comes in a second, but it is a more delayed and slower laser. And just tests is a bit more. Leds decreased as number two, let's say 200. So now I keep on clicking. We only shoot about five times per second or every 200 milliseconds. So this one is actually working quite nicely. And you could basically keep it like this. I think this will be working maybe a little bit slower, but I don't want to do that. I wanna keep it at 100. So you only shoot a laser at a very deliberate moment. But I do have to tell the user that a laser is ready, which is going to come now. So let me close our main game and offers is going to happen in our spaceship class. And let me explain the logic first. Like an any spread class self.age image is the surface that is actually being shown to the user. And in our case, we immediately assigned this to whatever file we are loading. But I want to change this. And what I want to do instead is to create two surfaces in our class that are not immediately shown. And I call them charged an uncharged, and each of them carry one surface with a different version of the ship. The uncharged One is the default one that charged one is the one for yellow outline. And if our lasers charged, we're gonna show one of the yellow outline. And otherwise we are showing a normal one. And that's what we're telling our users that a laser is charged. And that is quite a handy function for sprites. There, whatever surface you put on self dot image is going to be shown to the user. You can move this around quite easily. But again, lots of talking. Let's actually implement this. So here I'm back in the code and I want to update this line here. And let me add some space before. And I want to create a couple of new surfaces. The first one I called self.age uncharged. So that's our default one. And this is the one we're actually going to load by default. But then I also want a new file that I'll call self.age charged. And this one is pygame dot image dot load. And you can find a file into our folder. I call this one spaceship dot charged. And of course PNG. And if you want some flexibility, this one clause will be declared when you create your object. But in my case, I just want to keep it simple. So now we have two surfaces, 140 passive ship and one for the active ship. So when lasers charged, and by default, our self dot image is going to be self.age charged. So if I run the game now, nothing is going to change. We still have all uncharged ship, so this one is fine. We can still show a laser. So this one is working. And really what happens in here is that we are loading our image so far on self that uncharged. And then when we first create a sprite, self dot image becomes selfless, uncharged. So there's pride a player sees is the uncharged ship. But now, but now we can create some more methods to change this. And I want to create too. And the first one I'm gonna call it charge, does not get any arguments beside itself. And self.age damage is self.age charged? I call it charge. Yeah. And then another method that I call discharge. And this one is self.delegate equal to self dot uncharged. So if you run these methods, we're going to change the look of our ship. So now under code, we just have to implement this. And let me start by John costs going to this line. So if we shoot the laser, our ship is going to discharge. So we're going to call spaceship group, don't sprite as usual. And now we want to call discharge. And then when our lasers ready. So in our main game loop, when this is ten minutes run, we want to set our special group dots, bright dot charge, I think I called it and yeah, charge naming methods can be really difficult. Now whenever any of these if statement is true, we are changing the look of our ship. So let's try this. Let's see if it's working. Yeah. So you can see the yellow surrounding when he gets ready and I shoot a laser, we get to a normal ship. And otherwise we have all yellow outline that tells us that our lasers ready. So that's pretty good and it seems to work quite well. And we can still die and restart the game. And this works pretty well. So almost got, and we're making good progress. And in the next video we're going to add some more details to all of this. I will see you then.
25. Meteor Dodger 12: Refinement: Hello and welcome back. In this video, I'm not going to change anything major anymore. The only thing I'm really going to do is to add a custom font to our end screen. So it doesn't look like a generic object. Instead, we're getting a futuristic font. And for that, we have to talk about how to add fonts and PyGame, it's actually super easy. The first thing we are going to need is a file that actually stores the information of our fund. And these kind of files are called true type font files or a TGIF and short. And there are a couple of websites that gives you lots of different fonts. Probably the biggest one is called the fund, and there are thousands of funds on there. And from this website, I've chosen one phone called lazy by comps move. And this is a fairly futuristic kind of font. And I've put this font inside of our game folder. So it's in the same folder as our code. And that is quite important part once we have that, we are good to go. So now here we are back in our code. And right now, this is the line where we are creating our game fund. So we are initiating PyGame fond, fond. And right now our font is none with a font size of 40. And the only thing I need to get a new fund is to change this nun, the name of the font in my folder, which are my case, is laser by com, smooth dot t, t f. And with that, we're done. So let me run the code now, and that's soap. I didn't make a typo. This is good, so let me get hit. And here we go. We have a much nicer looking fund. And now again, I can just click and get destroyed again. And we're good to go. So this looks pretty good. And I think at this point, our game is pretty much done. So I hope you enjoy this game. And in our next game, we're getting to a much more fancy-looking game. I will see you then. Okay. Yeah. Okay. Okay.
26. Getting Godot: Hello and welcome back to the second major part in this tutorial series. And what we're going to start doing is to use the good dog gaming engine for game development. And we're going to learn about Godot in much more detail in the next few videos. But for this video, I just want to download it and talk about GD script in a tiny bit more detail. The first thing we need is to download Goodall because Good dog is not a model of Python. Instead, it's its own entire program. And how you get it is to go to good DO engine.org, all one word. And when you are on this website, you go to download. And once it's loaded, then you have all the options that you can download. So there's Windows, Mac OS, and Linux. And what you'll most likely want to download is the standard version with 64-bit. And when you click on it, you download the file and you do not have to pay for any of this, just to mention that. And once the download finishes, you should be seeing the file in your download folder. And from there, you just have to unzip it. So Extract All In my case for Windows, and extract it in the same folder. And now we're opening a new folder. And in there, you'll have good. Oh, you don't even have to install it. All you have to do is double-click on it, then it loads for second, and then we get the program manager. So that's all you had to do to get Godot to run. And in here, you can see a couple of things. The first one is this very large empty space that is going to show your projects later on. And if you look at the right of this, you can see scan, you project import and a few more that we can't use right now. What we want to do for now is to create a new project. And in here, we have to create a new folder. And this folder is going to contain our entire game. So all the acids we have our game are going to be in here and then go to asses what is project needs to be. So here we can select a path and I want to rename again to blade Fraga, but you can name this whatever you want. It really doesn't matter. And once you have that, you have to create on create folder to set up the game. So I click on create folder and now we get a nice checkmark that our game is ready to go. And we have OpenGL ES free and OpenGL ES two. And you don't have to worry about them at this stage in any meaningful way. All it really means is that OpenGL ES free is a more modern standard that can give you better results, but it's not as widely supported as OpenGL Cl2. So especially on websites, OpenGL tends to be more common. In our case, none of that is going to matter. So I'm going to stick with OpenGL ES 3 and click on create and edit. And now we can see an entire screen that we are going to be talking about in the next video. So don't worry about this for now. We're going to come back to this. And just to emphasize here, when we're using Goodall, we are not using Python itself. Instead, we are using g script. And what is too are very similar. There are some differences that you want to be aware of. And I will talk about them while I'm make our game. But about 95% is pretty much exactly identical. And if you're interested, there has an entire website about why GD script is made into weighted it is. And this talks and quite a bit of detail about how it is optimized for video games. And I will not go into this in too much detail. Just be aware we're using GD script and does some differences. So be aware of that. And one more thing before we get into our game at one year of good or running. You have this little thing running in the background and do not close that one. If you close this window, you also go into clothes could DO so. Be aware of that. And I'm going to ignore this window entirely, but you can use it to diagnose your game. But I am not going to worry about it whatsoever. But there was lots of stuff. Let's actually get into our video game and that's going to happen in the next video.
27. Blade Frogger 1: Intro: Hello and welcome back. Now that we have started our game, this is what we can see. We have quite a few GUI elements. So let's talk about how all of this works first before we start our game. Cause I think that's going to be really important to understand later on what we are doing. The first and most obvious thing we see is right in the middle of our screen, And that is called the viewport. And in here, we are going to see our game later on. And right now we have a 3D viewport. And if you hold down the middle mouse button and move around, you can rotate in this space, which already looks quite cool. And we're not going to worry too much about this viewport for now. Instead, I want you to look at the top of the screen. And right now we have 3D selected, but we are not making it free to game. We're making a 2D game. So let's click on 2D. And here we can see a two-dimensional space. And this is where we will develop our game for now. And our next game is going to be friday. And this is already the first major advantage of Goodall. When you create your game, you can literally see how the game would look like when you started, while you make the game. Whereas for pagan, For example, you can only see the code of your game. You can't actually see how the level would look like. And this already makes developing games so kudos so much easier. But alright, now we have 2D and 3D workspaces. And if you look one step further, you see script. And if you click on that, you can see, well right now you can't see anything. But later on in hears gonna come our code. So all the interactivity and the actual code we're writing goes in here. And there's one more tab called acid lip, but we're not going to use it. By what happens in here is that you can load add-ons to Godot, but we're not going to do that. And this is a bit more of an advanced topic, so don't worry about it. And for this game, we are only going to look at script and 2D. And if you want to switch between them a bit faster, you can use F1 for 2D, F2 for 3D, and F3 for script. So that makes it much easier to switch between them. Now we can see our game, but how do we actually create a game? And to do that, we have to cover two more fundamental concepts in Goodall. And those are called scenes and nodes. So let's talk about those. The most basic building block in Godot is called a node. And notes can be lots of different fields. In node could, for example, be a picture, or it could be a timer, or it could be a 3D object. It could also be a collision object, or I could just be some texts. There are literally hundreds of different nodes that could do has. And all of these basically create our game. So for example, a game character could consist of several nodes. So it might have a picture that represents the player, and it could have a collision box around it. And notes can do quite a few different things. We could, for example, change the properties of our nodes. And we can also make nodes communicate with each other. So for example, if we have a timer node. Timer runs out. We can tell another note that this time has run out, which is what you are going to do in Goodall quite often. So these nodes are basically what creates our game. Well, let's say all the elements inside of our game. But by default, none of these are going to be shown. And to show them, we need our second concept, and that is a scene. And scenes in Godot are basically the counterpart to surfaces and PyGame in the sense that a node is only displayed to the player if it is placed on a sea. But syncing Goodall are quite a bit more powerful than surfaces and PyGame. And they're doing quite a few different things. And we are going to go for all of them in a bit more detail later on. But the important thing for now that you have to remember is that a node and Goodall is only shown if you put it on the scene. And he can put scenes inside of each other. So you could have a scene inside of another scene. But with all of that covered, let's actually look at the GUI elements of Godot. So now we're back in our editor and we can still see our viewport. But what I haven't talked about is this tab above the viewport. Right now, it says empty. But if we saved it, we could give it any name. And each of these tabs will be a c. So this right now, but we have open is a scene that is not being saved. And if we click on this plus icon, we would add a new scene. Now we've never seen and we could also save it. So we could create lots of different scenes by just opening new tabs and McDonald's and close them because we don't need them. So this is how you create seeds. You just add new tabs and then you can save them. So now how can we add notes to the C? And for that, we have to look on the top left. And there we can see our scene tree. And this is where we are going to add our nodes. And Qdot already gives us some basic nodes. We have a 2D scene, a 3D scene, a user interface and other nodes. And if you click on over notes, you can see all the different nodes could DO has. And this becomes especially obvious if you open or a sub folders. There, it gets quite extensive. So there are loads of different nodes you can use. And we will go through quite a lot of them. But usually what you do to select nodes is to use the search function. And here, for example, if I wanted to sprite, I just type in sprite and then goto gives me a sprite. So this is the easiest way to go on about this. So from this part here, you will be adding new nodes. And an important thing here is that every scene always has to have a root node. And this root node basically determines what the scene does as an overall scene. So for example, if you put just a picture as the root node than every other element in this scene would be relative to this picture. It sounds a bit weird, but it starts to make sense quite fast. Then we get a bit more into our game. Don't worry too much about it. But let's actually do an example. But now I want to select another node. And I just want to add a picture to our game. And pictures in Godot are being added with a sprite, which I still level. So I click on sprite and I'm going to click on Create. And now we can see in the top left we have our sprite. And to add a picture, we have to look at the right. And here we can see our Inspector. And what the inspector does is that it gives us all the attributes of our node. So right now we have a sprite selected and Indian spectrum. We can see all the attributes of this particular sprite. And there are lots of different things in there. For example, if you look at transform, they would see position, rotation and scale. And he could influence all of them inside of this inspector. Or you could use code to influence them. But let's actually add a picture to this. And to add picture, obviously we need a file of a picture. And for the files in the bottom left, we have our file system. And this is where we can see all the files in our game folder. And right now because we didn't import anything, we only have an icon now P&G that comes automatically with every good DOE project. And it's just a logo of Godot. But if you want to add this icon to our sprite, We have to drag and drop this icon into the texture in our inspector. And if I do this, we can see a picture right inside of our game. And if you select this by left clicking on it, then you could even move it around just like any other element. And if you now look in our Inspector, it already shows us where the position is. And now we can also rotate it. Or we can change the scaling of it. And just compare how much easier all of this is compared to PyGame. Because I'm PyGame. To just achieve this state, you would have to write quite a few lines of code. And even better if we now actually want to run this game, we wouldn't have to write any code for that. All we have to do is click on this little icon at the top. It says play. It wouldn't work right now because we have to save our scene first. So let's actually do this. And to save a scene, just click on Control S, like in any other program. And here we can see the folder we have created earlier. And I want to create a new folder that is going to be for the player. So I right-click and create a new folder. And then we'll do call this player. And inside of this folder, I want to rename this to Claire. And then this is going to be its own file that is called T SCN, which is short for scene. So each scene in Godot is saved as its own file, which really hubs to organize our game in a modular way. But alright, let's save all of this. And now we look at the tab on the top, you can see player. So that's the name of OSC now. And now, if I click on play, Godot was going to give me one more notification that it wants us to select a main scene. And this is another interesting concept in judo. So think back and PyGame, we had one display surface that was always displayed to the player. In Goodall disk works differently that each scene could be displayed by itself. But because of that, could DO does not know which scene is supposed to be shown when we run our game. And because of that, it wants to know what's the main scene. Which basically means that what's seen as being loaded when you start running the game. And for us, since we only have one scene, there's going to be the Pliocene. So I double-click on that and node loads. And now we can see our game. Obviously right now, we can't do anything because we haven't added any code for that. But we did get to working stage of a game within a couple of seconds. And we did not need to write a single line of code. Which is really nice. So let me close this. And one important thing is that the game we have been seeing was this blue rectangle here. And you can change quite easily how large does boxes. But for now, we're not going to worry about this too much. And that's going to be one more concept I do wanna talk about before we get into the actual game. And that is that our notes inside of the scene are organized as a tree. And let me illustrate this in a bit more detail. So if this sprite selected, I click on this plus icon at the top left, which says add child node. And you can also use control a for the same purpose. And if you click on it, you are going to get to the same menu we had before. And what I wanna do for now is at another sprite node. And what we can see now, it's worth one sprite and as another sprite below it. And they're connected via this line. And if I double-click on it, we can rename them. So let's call this child sprite. And this one we can name player. So now we have a player's sprite and a child Spark. And what child spread means is that whenever we change this player sprite, this child sprite is also going to be affected in the same way. Now what does that mean? Well, let me illustrate. So today's Charles pride. We also going to add this Eigen picture. And now we can't see a difference. But now let me drag this finger away. So now we have two pictures on our screen. We have the child node and we have to play a node if the child's broke being a child of the player. And now if we move the player, we would also move the child node. And this would also apply if we rotated it or if you change the scale. So every time we are changing the parent node, we are also changing its child. So let me remove all of this to normal. And this is why it's important that what the root node is foreseen business where every other node is being influenced. But a simple reasons that every other node besides the root node we're adding to all seen, they are all going to be connected to our original root node. But alright, this was a lot of theory. So in the next video, we are actually going to start making a game character. And I will see you then.
28. Blade Frogger 2: Player character : Welcome back. In this tutorial, we are going to start creating our player character. For now. It is not going to move or not really do anything. We're just going to create a main setup for it. And in the next video, we are going to make it move. But the important part I want to cover for this tutorial is how to create a main game character by combining different nodes. And that should be quite a straightforward things. So let's jump right into our code editor and let's have a look at this. So here we are back in what we have created earlier, and it really doesn't do all too much right now. And we also don't have too many pictures that we could be using. So let's start working on these ones they want. The very first thing I want to do is to import some images that we can use for our game. And doing that is actually really easy. So here you can see the folders I have laid Fraga is our game folder. And then I have a folder called Blade Fraga assets. And this is where all the resources are. And to import these into our game, all we have to do is drag them into the folder we have created earlier. So microbes, I literally just drag it in there. And now whatever turned to good, oh, it loads all of them. And now we have Blade for gases. And if I dropped down, we can see audio car formed level player and screens. And if you have more of them, we can see quite a few different images, which is all we needed. So that's a good start. So now we have all the resources that we need. So now we can start creating our main game character. And to start that, let me first delete the child sprite because we're not going to use it. So I just right-click on it and delete node and then go double checks. And I do want to leave this one. So now we're back to our Player sprite. And the first thing I want to do is replace this icon with an actual image of the player. And for that, if you look on the bottom left, the file system, there's a whole folder with player, and there are quite a few images in here. What they basically are is a walk cycle that we have walked on one walked on to worked on free. And they're basically different images of the walk animation. And if we play them fast enough after each other, it looks like our main characters walking. But alright, now to import this one, I just have to drag this walk down into the texture sludge of our sprite. If I do this, now we can see omega and character. And there's one mistake I made. So let me zoom in quite a bit. That if you look at this, it looks very blurry and doesn't really look all too good. And this isn't because the image file is low quality. This is because we imported it in the wrong way. And to change import settings, if you look at our scene tree, yes, an input tab. And if you click on it, you can see lots of different things for importing. And one important thing is if we become preset, that says 2D pixel. And this is the one we need to have selected. So if I have this one selected and click on re-import. Now looks much better and like proper pixel art. And the problem we have right now is that we have lots of different images that all look like this. And then we would need to re-import manually, which would be quite labor intensive. So that's not good. By what it can do is if you click on preset again, now we can set default for texture and as, as 2D pixel. So let me just select it again. Set default for texture. So now every time you're going to import something, it is going to be imported in that way. So instead what I'm going to do is I'm going to delete this entire folder by right-clicking on it and clicking on delete, and then remove this entire thing. And now play has survived because we are using this picture. So let's get rid of this one and also delete player and remove all of this. So now we're back to our default. But now, if we are doing the same step again and reinforcing the folder again, like this. Now when we do import all of this, then it's going to import it in the proper way. So let's now trailed off this again. And now it looks like a proper pixel art. And even if you use a different image, they all look like proper pixel art. And this is a fairly common problem in good tool that when you import something, you have to import it in the right way. And this can really be confusing in the beginning. But alright, I hope that made sense. So now we have our player character and let me move it back to position 00 by clicking on this eigen. So now we have our player in the top-left. And on that note, actually, just like in PyGame, the coordinate system starts at position 00 in the top left. So if you want to go down, you have to increase why? And if you want to go up, you have to decrease why? This works very similar to pi it. Now we have to figure out how to create a properly functioning main player character. And to figure out what kind of notes we need, we have to figure out what our main player character is supposed to be doing. And there are a couple of things that we need to do. The first one is that our main character has to be visible. So we have to have some kind of image that we can show to the player. That part should be quite obvious. The next part is that our main character has to be able to collide with something because we wanted to be able to collide with cars. And the first one is that we can control our player and make it move around. So these things are really important parts that we have to address. And in terms of nodes that we need, the collision One is a really important one because we need a specific node that can account for collisions. And Godot has a couple of nodes that can work with collisions. The one we're going to work with for now is called the kinematic Body 2D. But there are a couple more that we are going to discover later on. But for now, since this node is going to be so fundamental to our game, we have to make this the root node. So here I'm back in our code editor. And the first thing I want to do is change this bright note to a kinematic Body 2D node. If you right-click on it, you can change type. And this is changing the spread node to whatever we want to have. And in my case, I want a kinematic Body 2D. And if I click on this, everything disappears again. Because a kinematic Body 2D does not hold any images. It also can't collide with anything. The best way to think about kinematic Body 2D is that it is an atom in a physical space. So it can be affected by physical forces, but by itself is not visible. And it cannot collide with anything because it's too small. But both of these we can address quite easily. So let's start by making all of this visible. To make it visible, I want to add another node. So I press control a, and now I add a sprite again. And you can see in a recent tab we can see sprite. So I had this one again. And now I add our player character again. So I'll walk down animation. And now we can see our player. And the important part now is that this bride is a child of our player node. So if we move our play a note around, we're also moving the sprite. And later on, when we control our player, we are only controlling this specific point in space. We don't actually control the image that the player sees. Now we have an object that can be affected by physics and that the player can see. But the one thing left is that we cannot collide. And Qdot is actually complaining about this. So when you look next to our Player sprite, there's a warning icon. And this one says that this node has no shape, so it can't collide or interact with other objects. And consider adding a collision shaped 2D or collision polygon to the child to define its shape. So let's do that. So we have to play a selected, I'm going to add another node that is called collision shaped 2D. And now Godot gives us another error message is shaped must be provided for collision shaped 2D. And that we can do really easily. All we have to do is go back to the inspector and there's a slot called Shape. And if we click on the drop-down icon, we can see a couple of options. And what we are basically trying to do is to create a shape that encapsulates our player in the most appropriate way. And in our case does is just going to be a rectangle. So let me click on this. And now we can see a faint blue icon above our player. So let me zoom in on this. This bluish box here is the actual shape of our player. So this is the box that is going to actually collide. And there are a couple of red dots around it. And you can use these red dots to change the size of the rectangle. So I can move it up, for example. And I can move it a bit further to the right. And what I'm trying to achieve is that this blue box encapsulates the player entirely. And I think this looks pretty good. And move out of the Upon than we actually have our main player. So now we have a physics object that we can move. We can see it, and it can collide with other objects. There's one more important thing I do want to talk about that the order of these nodes doesn't matter. And let me just illustrate what this means. Right now this sprite comes before the collision shaped 2D. And because of that, this collision shaped 2D is above the sprite. But if we changed it, so if I move the collision shaped below the sprite, then our sprite would be in front of it. And basically what that means is that if a node is further down in the century, it is above another node in the actual game. So it's basically inverted. But alright, there was quite a lot of different concepts. So let's do an exercise to make sure that you have understood how all of this works. And what I want you guys to do is to create a new node for the car. And what I wanted you guys to do for the car is to make it quite similar to the player. So that we have a kinematic note that collision shape and it's pride all inside of a new scene. And you can find the car images in the car folder. So it should be doable. But pause the video now and see how far you get. So let's create a car. But before we come to that, I made one mistake. And really sorry about that. That right now, if you're trying to save the scene, we're gonna get an alert. Era was saving. And a reason for that is that last time we used to play a note, we also deleted the Player folder so that good old doesn't know where to save it. But to change that, we just have to create a new folder that says player. So this is what we originally had it. And if we have that, now we can save our player. Because now it has afforded to save it. And here we can see our play a scene, the one scene we have open right now. Let's actually get to the car now. And to get the car, I have to create a new scene, which I do by clicking on this plus icon. And I'm going to add another kinematic Body 2D. So kinematic Body 2D. And to make sure you're not adding a kinematic body. So the red icon here, because this one would be a three-dimensional kinematic body, which we don't need for this game. We wanted two-dimensional one. Let's click on Create. And let's rename it to car. And let's save this one. So I click on Control S and go to our main folder. And I right-click and create car. And could do already suggests the name of the root node as the file name of the scene. So I click on safe because I like the Carnegie. And now we have to do the same thing we have done before. We have our kinematic body. And I want to add another node. So I click on the plus and add a sprite. And now into the sprite, I am going to add, you can choose any of the cars. I'm going to go with yellow one dot PNG. I drag it in there. And it's quite a large file, but for now, don't worry about it. We can change this one quite easily later on. So now we have an image and around us image we want to add a collision box. And for that, we need a collision shape. So now we have a collision shape. And what we wanna do is add a shape around it. And again, I think a rectangle is the best shape for this. So let's click on it. And now we need to use the red dots to make it roughly the same size. And yeah, it looks about right. Could actually do it a bit less because if you just touch on parts of it, that should be fine. Or if you just click on the blue box, you can move the entire thing wherever you want. And if you hold shift, you move it in one axis. So right now I hold shift and I move it up and down, or left or right. And in my case, I just want to have roughly drop it into the middle. We are going to change of this a little bit later on. But for now, this one is fine. So now we have a car that starts as a kinematic note, as a picture and as a collision shape. So that's a pretty good start. And let's say this one. And now we can also see our car folder and L are Player folder. So we're making pretty good progress. And in our next tutorial, we are actually going to make our player move. I will see you then.
29. Blade Frogger 3: Player Movement: Hello and welcome back. In this video, we are going to make our main character move. And this is also going to be the part where we're going to add some code to our game, which is another major step for Godot. But I think it's best to explain what I am doing it. So let's jump right back into our code editor and let's have a look at this. So here we're back in our editor and I have our player seen open. And what we want to do is to move this play a note around whenever we press a button on the key. So if we press right on the keyboard, we want to move this thing to the right. And the same for all the other keys. And for that, we are going to need a script. So we have to add a script to this note. This is always how cold works and good goal. A piece of code always has to be connected to a node. You cannot have code by itself. But to add code to a node, you need this gigantic top that says attach a new or existing script to a selected node. And if you click on this, we get a new menu that we can choose the language. So we can choose GD script, Visual script on native script. But we are going to stick with GD script because it's basically Python. Then it needs to inherit for something. Don't worry about this for now. Then we have a template and as default, empty and no comments. And for now default is fine. But later on you want to move to Mt. All it does is it gives us some suggestions for the code, but don't worry about it for now. Then we have built-in script. And oldest one is asking if you want to save the script as its own file or as part of the node. In our case, I leave it as off by the good switched it on, it really doesn't matter. And then we need to path. And in my case, I want to have the player script inside of the Player folder because that's where it makes the most sense. But had moved up and down. Let's click on Create. And automatically, UDL brings us to the script folder. And in here we see a couple of comments about how to declare variables. We can see a function, and we can see another function and comments. And I think for now, you don't need any of this because I'm going to explain all of this in detail. So I'm going to lead all of us. Besides the first-line, they extends kinematic Body 2D. And the line like this has to be in every single script. And basically what is happening is that whenever we are creating a script on a node, is that we are giving the node more power. But to do that, we have to start from the node. So it is white descript always has to extend from an existing node. And usually good DOE does all of this automatically so you don't have to worry about it. But right, there are a couple of things you do want to be aware of for good Door. The first one is that the naming conventions are slightly different compared to Python. Not too much dog. So for example, in Python, if you wanted to create a new variable, you just write something like a equals 200. In Goodall, This does not work because we need a specific keyword to create a variable. This keyword is called var, which basically tells Godot that we wanted to create a new variable and the value of this variable is going to be 200. So it kind of works like Python. We just need to add one more key word. But that is literally it. However, they are two different kinds of variables. In Buto, we have the normal variables and we have constants that are created by using the keyword const. Slab. Use cons b equals 200. And they're both credit and quite similar ways. And the only difference is that a variable can change its value in the duration of the game, whereas a const only be changed in court. So once the game is running, this constant is not supposed to change while the game is running. So just could be something like a gravity or some variable that never changes in our game. And domain reason why this exists is that if a variable doesn't need to change, it can run a little bit faster, which is something that is really valuable for a video game. And for our game, we actually need one constant and that is the speed of the player. So let me just call it speed. So what we're doing here is we create a constant, so variable that cannot change, and that is speed, and that is the value of an integer of 200. And since our game is so simple, this could also be a variable. It really doesn't matter for our purposes. But now what we want to do is to create a function that is being called on every single frame of the game. Because this is what we need to get keyboard input that we have to check on every single cycle of the game loop. If something is pressed, and if that is the case, then we want to move the player in that direction. And this brings us to functions in GD script and functions and gt script up basically identical to functions in Python. With the one difference is that you use a different keyword. So instead of defining test foreign, we wouldn't need to keyword Funk. And once we have that, everything works in the same way. So let me just add a pass. This would be a valid function for GD script, which left a keyword to create a function. We have the name of the function, and we could create parameters for the function. Then we have a double colon, and then the next line indented, we create some code for this function. This is entirely identical to the one difference being that we have a different keyboard would really doesn't matter too much. So now, how can we call dysfunction constantly? And for that GD script as a couple of inbuilt functions that do this kind of purpose. And what we need is func, underscore process and ignore delta parameter for now. This one doesn't matter. And gt script is very picky four arrows. So if something doesn't work, it immediately gives an error, which can be quite helpful but can also be very annoying. Now we have the underscore process function. And you can see this as an inbuilt function into Judith script because it starts with an underscore. And this applies to all the inbuilt functions. If something starts with an underscore and gt script is an inbuilt function with a specific purpose, namely that you only have to create them. You don't have to call them. Qdot is going to call them for you. And in the case of process, GD script is going to call dysfunction on every single cycle of the game loop. So this function is going to run all the time. And let me actually demonstrate this. So instead of this function, I want to print our speed constant. And once you have declare that you can just use the name of the constant auto variable. And if around the game now, by clicking on this icon or by pressing F5. Now we can see our game again and the top left we can see our player character. But now if we go to the bottom, there's an output name. And if we click on that, we can see that good Au Prince 200. So to speed constant all the time. So we know this is working. And now to stop our game, we can either click on this icon here on the top right, or we can press F8. And now again stops and we could clear the console. Now we have a function that runs all the time, so we're making pretty good progress. Now we need two more things to make our player character move. The first one is to get keyboard input. But the second one is that we have to store this keyboard input and apply it to our player character. And the best tool we have to stop keyboard input for movement is called a vector salami create 1 first inside of this function. So I'm going to call this velocity. And velocity is going to be a vector two dot 0. So what does that mean? Let me talk about vectors first. That comes first. What I'd say vector two is just a two-dimensional vector, which is opposed to a vector F3, which is a three-dimensional vector. So what's a two-dimensional vector? Well, basically, a vector in 2D space is an arrow that moves in an x and a y direction. So if you have a vector with x being five and y being ten, it moves five units to the right and ten units downwards. And to vector we created so far is a vector 0, which is a vector with coordinates 00. So it's not really an arrow, More like a point. And what I want to do is whenever we press a button, then we are creating an arrow from this vector. So if you are pressing to the right, I want to get x being one. So we have an arrow pointing to the right. And then we're going to apply this arrow to our game character and move it to the right. And generally, vectors can do quite a few more things and you see them all the time and video game development. But by itself, a vector is literally just an arrow that you can move around in a 2D or 3D space, which is basically how you move any video game character. Now let's get some input from our player. And to get input, we need the input name. And then the command is action pressed. And what this one does is it looks for keyboard input. And in here could DO, gives us quite a few options. And these are predefined, but you can create your own. But what all of these are, are key maps. So for example, you, I left, let me select it. That UI, not home, left. You, I left is effectively a left key on our keyboard. And we could give this one a different name. We are going to come to this kind of stuff later on. But for now, don't worry about it. All you really have to know for now is that this entire line ensures that if we are pressing the left key button, then this entire line is gonna return true. So we can use it in an if statement. And if statements work just like in Python. That if all of this is true, we wanna do something. At what we wanna do is target our velocity vector. Target the x and subtract one from it. By default, this factor two is going to be 00. And if we press left, we want to have a minus 10. So it is vector points to the left. So now we could get keyboard input from the left key. But obviously we have more than the left key. So I'm going to start a new if statement. If input is action pressed, and let me now go with you. I up. So this is going to be the upkeep. And in here, I again want to target our velocity, but this time we're going to target y. And again here the coordinate system is inverted. So if you want to go up, you have to decrease Y. So it's gonna be minus equal one. So now if you press left, we would have a vector pointing to the left. And if we pressed up, we would have a vector pointing upwards. And that brings us to our challenge. What I want you guys to do is to finish this keyboard input setup. And specifically what you have to do is create an input for the right key and for the down key. So pause the video now and try to do this yourself. And specifically you should create two more if statements. Let's start with you i, right? And you lie down and then change the vector in the appropriate way. And once you are done, we are going to do this together. Alright, how did that goal? And again, if you're completely lost, let me know in the comments. I'm really happy to help. So let's finish all of this. And to save me some typing, I'm just going to copy these two lines. Paste them here. And I want you right? And you lie down. And now we have to change the vectors for x since we want to move to the right now, this has to be positive. And for UI down, since we know moving downwards, we have to increase y. And that finishes our keyboard input. But if I run the game now by pressing on F5 again, I could press all the key buttons, but nothing happens. And there's a reason for that. Well, obviously. But before I explain that, let me actually demonstrate that this input is working by just printing our velocity. So if I run the game now and open the Output tab, I can now press, Let me go back to the game. If I press now left, right, up or down, you can see that the input is changing. So we know our game or the input of our game is working. But the reason why it doesn't apply to the player. Because this vector is not being applied to the game character. And for that, we need another function. Let me clear all of this. For that, we need another function inside of this process. And to function we need this called move and slide. And when we call this method, Godot gives us a hint that the arguments we have to pass inside of this method. The first one is a linear velocity or a vector two. And wherever vector to it is our velocity. And if around again now, by pressing F5 again, I can now press. And we can see our player moving incredibly slowly. But for that, we have our speed constant. And here's another really nice things about vectors. That if you multiply a vector by a single number, you multiply every single dimension of the vector. So right now, our vector has an x and a y part. If we multiply the vector by 200, we will multiply both the x and the y part of it. So inside of the movements like function hominid is to multiply it by speed. And this would apply to both axes. Snow is run the code again, and now we have a moving character. But there's going to be one more problem. And let me demonstrate this and you might be able to see it. So right now, I'm just moving to the right. And this works at one particular speed. But now let me move to the top right. And now if I do this right after each other, you can see that our player character, if you have keen eyes, moves a little bit faster. So now we have one speed. If you move just to the right, and if we move up, we move a tiny bit faster. And this happens for a specific reason that if we only move horizontally or vertically, we are only applying one access to our player. So if you're moving to the right, we are only adding the x values. However, if we moving to the right and up, we adding both the x and the y parts of our axes. And which happens to make the game character a little bit faster. And if you've paid attention high-school, this can be calculated with Pythagoras theorem, the guy with the triangles. And we really want to make sure that our player moves at the same speed all the time. And again here, this is o vectors are incredibly useful because we can tell a vector to always have the same length. So right now, if we just moving up or write, our vector has a length of one. However, if we move both left and right, then our vector is going to be a bit longer than one. And then especially if you multiply this by 200, then you can actually tell the difference. So what we want to tell our velocity vector is that it always has to have a length of one. And this process is called to normalize a vector. And normalizing a vector just means that it always has a length of one. And this is also why I always added one to each side of the vector. That length of one is the easiest one to work with. And to normalize a vector, we just need a method is called normalized. So here I'm back in my code and all I want is velocity, the odd normalized. And this makes sure that if you press left end up than this vector has a length of one. And then we can multiply by speed and we are going to have the same speed. And now if we run our game, we can move in any direction. And we always move at the same speed, which is making the game much more consistent, which is quite nice. So we are making pretty good progress. Now we can move our player. But obviously it looks pretty boring because, oh, a player is not walking. And this is going to be the subject of the next tutorial. I will see you then.
30. Blade Frogger 4: Player Animatino: In this tutorial, we are going to animate our player so that whenever we are moving our player, it is going to have a walk cycle, which is a surprisingly easy thing to add because we have a dedicated note for that. But before we're jumping in, let me explain how animations work just to make sure you know what's going on. Basically, animations are just arrange of images that play after another. And this is how old animation movies work as well. Just print five images and you play them fast after each other. And if the image only changes a tiny bit and it moves fast enough, and for us it looks like it's a fluid animation. And this is also if we are going to do in our case, that we have different images of our player. It shows him in different stages of the walk animation. And if you play all of them fast enough after each other, that is going to look like it is walking. And yeah, that's pretty much it. Let's jump right in. And that's actually do all of this. So here we are back in our project. And what I want to do is change this bride to be an animated sprite. And an animated sprite is actually its own node. So let me delete this note. So I do want to delete a sprite and I add another note. And this one is called animated sprite. And now when we have our animated sprite, good, OK. gives us an error message that is bright. Frame resource must be created in the frames property. So if we look in the inspector, we have a frames property. And if we click on this, we can create a new sprite frames. So let's click on that one. And if we click on it, nothing happens. For something to happen. We have to click on the sprite frames again. So let me click on this one again. And now we can see sprite frames in the bottom of our screen. And let me extend it a bit. And here we can see a couple of things. The first one is animations, and we have a default one, and then we have animation frames. And right now this one is empty. And let me demonstrate how this works. So for example, this default one, I want to have walked down. And now this is an animation. And this animation is going to have several animation frames. So each stage of the animation, and to get to the animation frames, I have to open the blade Fraga assets folder and go to our player. And here we have walked down one to walk down nine. And I select all of them by holding Shift and selecting the first and the last one. And notice drugging all of them in here. And now we have all the files in there. And here is where the cool stuff happens. So I'll have to do is Indian specter click on plane. And if that's the case, we can see all walking animation. And all we have to do is that in the code, we want to make sure that this is only being playing when we walk in downwards. So let me stop it for now. And we'll step one done. Let's add another one by clicking on this plus icon for new animation. And this one is going to be walk up. And for woke up, woke side, I have woke up its again from one to nine and a district all of them in there. And now if the player walking up so I can click on playing again. And now we can see a walk-up animation. And just to make sure you've understood this, here's going to be your exercise that I want you to add another animation tutors. Would it player walks to decide and be aware here, we only have one sidewalk animation. It doesn't go far left or right. It's only sidewalks. Why did is he going to see in just a bit, but pause the video now and try to add another animation that's called Walk side. And then add the walk site animation frames to it. All right, welcome back. I hope that worked out, but let's do it together now, and it's actually quite simple. So again, you have to click on the animations I can for a new animation and then rename it to walk side. And now drag all of the work side frames in there. And wherever side, what animation. And again, I can click on play it. And then we have a sidewalk animation. So this one's quite nice. Here's the reason why we only need one sidewalk animation. That right now our play as moving to the left. But Indian specter using entry called flip H. And if we click on it, the players moving to the right now, we also have a flip v, But this doesn't do too much unless you create a completely different kind of game. But we can very easily flip the character around, which makes our work quite a bit easier. But here's a problem. Now, if I run the game, this one isn't being animated. So we have to add some code that we want to play different animations. Ueno, a player moves in a certain direction. And for that, let me go back to the code and let me close the sprite frames so we have more space. So here we are back code we had before. And what I want to do is to create a new function, just like in Python, except for different keyword bunk. And I'm going to call this player animation. And this Play Animation is going to need one parameter, the direction the players moving in, specifically this velocity here. So I'm going to call this velocity. And then for now, we're not going to add anything, we just add a pass. But now inside of this process function, I'm going to call this function. So player animation. And I'm going to pass velocity in there. So now in here, we have to tell this animated sprite to play a certain animation if we are moving in a certain direction. But right now we have another problem that our code is on the player node. And all the methods we have written so far directly influenced the player node. So for example, this movement slight function is a part of the play a note. And when we call it like this, it only applies to the player node. But we have to figure out how to target other nodes that aren't this note itself. And specifically what we want to do is target the animated sprite node. And we will need a tiny bit of code to do this while it's very little code. And there are two things to do this. The first one is get note. And here Goodall already tells us the names of the sprites we can target. So we would want to get animated sprite. And this would be one way to target another node that's a child of this player node. However, there's an easier way that you can use the dollar sign. And then the name of the node you want to target. So this works kinda like good note and I want to animate it sprite. That if we add this kind of line here, we're telling GD script that we don't want to target denote descriptors on. Instead we want to target another node with this particular name, animated sprite, which is this note here. And now we can work with this node. And this node has a couple of methods. The one that is going to be most useful for us right now is play. And then the name of the animation we want to play. So for open display frames again, these are the names of our animation. We have walked down one side and walk up. So if we click on play, walk down. And if I now run our code, our character is always going to play the walk down animation. Which does work well if we're walking down, but if you walk into level to the right or up, this doesn't help. So we have to change this one. So let me go back to the script. We need some if statements now that we only want to play to walk down animation if this velocity has a certain value. So we know the players walking down. And a specific condition we need is if velocity dot y is greater, then 0. And if that is the case, we know the players moving downwards. And we can have l if velocity is smaller than 0. And then we know our animated sprite and we want to play Walk up. And here's another thing that's really similar to Python, that you can use both double and single quotation marks. Good old doesn't really care. But by default, Godot always double quotation marks. And when I write code, I use by default single quotation marks. But it really doesn't matter what I made one mistake that this has to be Y, because we only want to check the y-axis of this vector. So now if we run this game, so if I move down, we're playing this animation. And now if I move up, we're playing a different animation. And it looks like our players moving. But there are two more problems. So if I move left or right, it doesn't change anything. And if I stop pressing any button, our player keeps on moving. So these are the things we have to work on. And let me add some more lines. And now we want to add another L If statement that if velocity dot x is unequal to 0, so if we are moving in any direction, left or right, and if that's the case, I want to use our animated sprite again and play Walk side. And let's try this one. So we can still move down and up. But now if I move left or right, and we're moving left or right. And this works if we're moving left. But if we are moving right, we are basically moonwalking, which isn't intended right now. So this is what we have to change. And here, let me open the animated sprite. What we want to do is if we are moving to the right, Philip H is true. And if we're moving to the left, Philip H is false. And we can influence this flip H in the code. And if you hover over this in the inspector, then good old tells you how this property is called in the code. So if you have over flip H, It tells you it is called Flip age. All right, and let me go back to the script. And in here, all we have to do is target our animated sprite again. And I want to target flip H. And here we can be a bit tricky because I want to do is velocity dot x is greater than 0. So this is a bit more of a sophisticated line, well, slightly more sophisticated. Basically what happens here is that this velocity dot x is greater than 0, is going to return either true of false. So if velocity or x is greater than 0, we are moving to the right. And this would then flipped the animated sprite on the horizontal axis. But if we are moving to the left than this flip ax is going to be smaller than 0. And as a consequence, our plate will be moving left and it would not be flipped. So let's try all of this now. And now, I can move to the right, I can move to left, I can move down, and I can move up. So this is working quite well. The only thing left to do is if I stopped moving, our player keeps on playing the walking animation. So let's work on this. And all we have to do is add a final else statement. So if you're not moving down, if we're not moving up or if you're not moving sidewalks, what, what else are we supposed to do? And what we are supposed to do is target our animated sprite again and stop the animation. And this is almost working. But let me demonstrate why there's a problem. So let me walk through, right? And basically the animation stops on the last frame that was plane. So this might look occasionally a bit silly. So we can see here that sometimes we are moving halfway into walk animation, which looks a bit weird. And instead, what we want to do is to have to play a move to a neutral standing position. And this neutral starting position is always the first frame and the walking animation. So I'm gonna do is animated sprite. And to target individual frames, we need frame. And this is going to be 0. And now if I run this, it is should be working. So now I keep on walking. And whenever I stopped walking, how a player character always goes back to the same neutral position. And this makes it look quite nice. And just to demonstrate in a bit more detail what I have done here. So let me close this. So here we can see our 2D game. And on the right Indian spectrum, we can see frame and frame. If we move this up or down, we can see all the different animations in the frame animation. And what we have done in the code is that whenever the player stops moving, we switched this frame to 0. And this is the standing animation. But if we didn't do this, we might end up with animation like this one I guess would apply. Looks like he's moving in the middle of a moving animation and stops. Which would look a bit weird. But instead, if we always move it to 0, then we are back to a standing animation. And alright, with all of that code, we have written 30 lines of code. And we have quite a bit decent game already. Like we can move around with a walking animation. And we really didn't have to do all that much. And most of what I talked so far is just setting up good goal. If you're already know how to set up Goodall. And it can get to this stage and a couple of minutes to really easy to get here. And this is really a nice feature of Godot. It's really easy to get started and to write some code and get results immediately. Something that would take you much longer to do in PyGame, for example. But alright, we're making good progress. For the next tutorial, we're going to work on the car more. I will see you then.
31. Blade Frogger 5: Creating a car: Alright, next round. In this video, we are going to create one car. And specifically, we're going to move it from the right side of the screen to the left side of the screen. And then we're also going to create a main level seen where we are going to spawn this numerous times. Sounds a bit complicated, but it's ultimately quite an easy concept that is kind of comparable to the meteors we created earlier. So let's go through it step-by-step. And here we are back in our project editor and we have our Pliocene Oldham, which we don't need renown. And instead, I want to open the car scene. And for that, I just go on the bottom left to the file system, opened the car folder and we saved our cursing and you double-click on it. And now we can see the tap in the top of the viewport and their wave up player and our car. And we can switch between them quite easily. So here we have our car. And just like the player, it has a kinematic body, a sprite, and a collision shaped 2D, which is fine by itself, but it's not exactly what we need. And we will have to change this a little bit. And let me explain why. When we are calculating collisions, it is going to be quite a bit of processing time. And so what do we want to do is to use the tools that need the least amount of processing power to get the job done. And for that kinematic body is not the right type. Because all we effectively want to do is check if our player is inside the area of this car. And for that, we don't even have to check complex collisions. We really just have to check if the player shape is inside of this area. And for that, we have another kind of physics body is not even the physics body, but a body that can work with physics objects. And that's called an area 2D. And area to deed doesn't really calculate collisions. Instead, it checks if a physical body, like the kinematic Body 2D ortho, a player is inside of its area, and that is going to be perfect for our car. So let's implement that one. So in our car, we have our kinematic Body 2D and we want to change that to an area to denote. So I right-click on it and go to Change type. And now I type area 2D, this one down here. And it says 2D area for detection and 2D physics influence sounds perfect. So change. And now nothing obvious changes. We get a different icon, but that's about it. And for most of this video, this change isn't going to make too much of a difference, but we are going to see a massive difference later on in terms of how this works. But for now, the really important thing you have to remember is that calculating a collision between this car area 2D and this kinematic Body 2D is going to be significantly easier to calculate, which makes our game more efficient. So that's perfect. And right now we want to move this car. And for that, I want to add some code to it. So just as before, I'm going to attach a script to it. And we're going to leave all of these the same, except for default is now going to be empty. So we can see what the difference is. And besides that, I want to save the script in the same folder as the car or the Carson. And let's create. So here you can see the difference that when we go over the template empty, then we only see extends area 2D, and otherwise everything is empty. And you can also switch very easily between the different scripts. So here's our player script, and now here's our car script. And each of them are separate files. So that makes the entire thing very modular. But alright, now the first thing I want to do is to actually create a variable that I'm going to call it car speed. And this by default, I'm going to put it 250. And this is going to be a variable because I want to add some variability later on. That may be some cars are going to be 230, some costs are 280, but they're all roughly around this number. And I could have just called this speed because this variable and this speed variable are going to be independent of each other. But I think car speed is a bit more descriptive, but both would be fine. So now we have a speed of our car, and now we have to apply this speed to the actual car note. And for that, again, we are going to need our underscore process delta. And this is where delta actually becomes important. And let me explain in just a bit. So here you might be tempted to create another vector and then apply this vector to this area to D. That would not work. Because actually let me show you. So does movements like function is only applicable to this kinematic body to denote off the player. It would not work with an area to denote. And more generally, each node has its own specific methods. And area to D does not have a moving slight function. But we don't actually need it because all we need to do is take two position. If I can type correctly, we take two position of this player and then take the x position of the player. And add to what's this on every single frame of our game. And then the speed is going to be car speed. And this should actually already be working. So let me go back to the 2D view. And if you just want to run this one scene, you can press F6 and is only executes the scene we have open right now. Whereas if we pressed F5, it would always jump to the Pliocene. So right now I press F6 and I would open the Carson and move, let me move a bit to your left. And we can't really see anything. And I think that is because I am quite an obvious thing. So right now the car is in the top left of the screen, and we're also moving it to the left. So obviously leaves the screen immediately. And that actually brings us, are another really nice topic. Let's say I want to move this car somewhere to the right of the screen and I can just drag it. But now I have a problem that had only direct a collision shape. The actual car and image of the car are still on the top left of the screen. Which is, well, not great. Ended would break the game. But we can fix that very easily. And as this little icon in the top of the screen that says makes sure the objects children are not selectable. And if I click this, then we have this icon next to the node. And now if I move it, I can only move the parent node. I cannot move the children nodes. And this ensures that all off these always stick together. And I think just to make sure that we can see what's going on, let me lower the speed by quite a bit. That's i divided by a 100. So right now, 250 is quite fast, but that is not going to be a problem in the actual game. And you're going to see why in just a second. So now let me press F6 again and let's see what happens. So we're gonna again, and we can see our car driving. That looks right. So now let's actually talk about what is delta. And delta is an incredibly useful object to make sure the game runs smoothly and consistently. Remember Beck and pygame that recreated a clock object that makes sure that our game runs consistently. So at a game doesn't run much faster at some points and really still at other points. Delta does something kind of similar with a bit of a difference that in PyGame, Buddhist maxed out the frame rate. So at our game could never run faster than a 120 frames per second, for example. In Goodall, this works a little bit different, that a game can run as fast as it wants to be. So we could have a game that runs at 500 frames per second. Or we could have again that runs at 200 frames per second or 50 frames per second, or let's say ten frames per second. If you have a very slow computer. So Godot has to account for different frame rates and for that deltas being used. And all the delta really does is it calculates the difference between two frames. So it's a very, very small number. And to hire our frame rate, the smaller this number gets. And then we can apply this number to any change in position. So what do we effectively have to do is multiply our car speed by delta. And this would ensure that the frame rate doesn't affect how fast game runs. Because if wherever higher frame rate, then this is going to be applied more often. But the number that is being applied is smaller because delta gets smaller. Whereas if Offering Rate gets lower than this entire line would be applied less often. But the number that is being applied is gonna get larger because delta is going to get larger. So you don't have to understand this in too much detail. Just be aware that when you want to change to position or even the scaled or rotation of anything and Goodall, then you have to apply delta. So let's run this entire thing again and see what happens. And this looks like a decent speed. And it doesn't matter what frame rate we have, it would always run at this kind of speed. Now, you might have a question and let me go back to the code and open the player that when we used moving slide, We did not apply delta even though we have it in our process function. And a reason for that is ultimately quite simple, that moving slide automatically applies delta. So if we apply delta in here manually, we would apply delta twice, which would make things unnecessarily slow. So that's why we don't have to do it here. Just change the position of something immediately like this, then you always have to apply delta. And I hope that makes sense. Delta can be a bit of a tricky thing, but ultimately it's just the thing you use to make the game run consistently. Now we have a car moving from the right to the left. So that's a pretty good start. And now we have another problem. We want to move this car and this player into the same scene. And that brings us to a completely new topic. And that is instancing. And instancing means that he put one scene inside of another scene, which is an incredibly easy thing to do. So what I'm going to do is I'm going to create a new scene that I'm going to call level and enter the scene. We're gonna put the Pliocene and the car seat. And I think this can be demonstrated best by doing. So, let's create a new scene by clicking on this icon on the top. And I have to add a new node. Now here we have two choices. We could add a 2D C, and this will be perfectly fine. Alternatively, we could also add the most basic kind of note that it's just called node. And this node is also fine. And I am actually going to use this one. So this node, when look at the inspector, does not have a single property. And let me actually compare this to a node 2D. So if we click on 2D scene, we will get this kind of node. And this node has a few more attributes. So we could use Transform, position and scale. That would be x0 and dx, but that's about it. So these two nodes are quite similar. And the only difference is that no two D has a few attributes, but we don't need those attributes. All we really need from this node is to hold some other elements. So I'm going to use this one and I'm going to ignore note 2D. And okay, so no 2D. And I'm going to rename this level and it's going to be our main level. No, I'm going to save it and I'm gonna create a new folder for this so level, and they're going to save it as levels see. Alright, now we have our level and this is its own scene. Now how do we get the kerosene and play a scene in there? Well, next are the plus icon that we already know. There's another icon that's kind of a chain link, I think. And this is the instancing icon. And if you click on this, we can see all the scenes in our game. And the first one is our Pliocene. So let me open this one. And now we can see as a child to the level scene, we have our Pliocene. This icon here, this little film icon, tells us that this is an instance scene. And if I click on it, it opens our placing by itself and display. A node can do all the things the original scene can do. So in this scene, we would still be able to walk around with our player in the animation would also still work. And let me actually demonstrate this. So I click on F6 to just run this particular scene. And I can still run around. This works exactly the same as the original player scene. And this is a really powerful concept that basically what we have done is we have put everything for the player inside of one scene and then only put the scene inside of the level C. And this helped us to organize our code that allows a player is just this icon here. And then if you want to change it, we can just make changes inside of the player. And if we have multiple levels, we could instance the same player in all of them. And then if you want to make it changed to player, this would apply to every player scene inside of another scene. So this is ideal. And now let's do the same for the car. So car here. And now we can also see the car. And now let me run the game again by pressing F6. Then we should see both an organ and this works pretty well. So that's a really nice start. And I think that's enough topics for one video part. In our next video, we're going to add the collision between our player and the car. I will see you then.
32. Blade Frogger 6: Collisions: Welcome back. In this video, we are going to create a collision between our car and our player. And to enable that, we have to learn a new concept and that is called signals. And with signals, we can make two different nodes communicate with each other. And in our specific case, this means that if the player is inside of the area of the car, then we want to do something. And that can be achieved really easily by using a signal on the area to denote off the car. And let me demonstrate as right into code. So here we are back in our code editor. And what I want to do is that if the player is inside of this car area, that I want to run some code. And for that, I'm going to go to the car seat. Let me zoom in a little bit. And I got to have the car or the area to denote selected. And now next to the inspector, there's a tab called node and click on that. And he can see signals and groups. And both of these help you to make sure that nodes are communicating with each other. The one we're going to use is signaled. And let me expand this a touch so you can see the entire text. And here we have a couple of options. We have, for example, area entered area, exited, area shape entered and pervert on here, we have body entered and body exited. And what we want is body entered. And this one tracks if, for example, a kinematic body has entered. So let me double click on it. And now Google is asking us to connect a signal to a method. And what this specifically means is going to be visible in just a second. But for now on the arrow to denote of our car, we have a script. And what this one is specifically looking for is a node with a script and you can only connected to a node with a script, which in our case we have slum click on Connect. And let me minimize this again. So now in the code for our car, we have a new function. And this one is called on car body entered. And this has this little green icon next to it that tells us it's a signal. This works in somewhat similar way compared to the process function. So the process function is called on every single cycle of the game loop. The NCAR body entered function is only going to run when a body enters this area 2D. Could body like our kinematic Body 2D of the player. And then inside of this, if that's the case, we want to do something. So for now, let me just print Qu lesion and see what happens. So now I go to lever scene and let me omit in 2D. And lets run this by pressing on F6 again. And now if I touched with the car and I opened the output, we can see collision. We know descriptors executing when our player is colliding with the car. But obviously we don't just want to display a message when the player collides with the car in separate, I want to do is to go to a game over screen. And this can always green is going to be another scene by itself. So let me save all of this and create a new scene. And in this scene, we are going to use a user interface. Or now, don't worry too much about it. Cycles going to create it. And I'm going to call this, let's call it game screen. We're gonna talk about this in much more detail later on. But now I just want to change our scene to this scene when the players collided with a car. So I first going to save our game. And I'm going to create a new folder that are going to call game screen. And I'm gonna save it in here. And now we have to go back to our code soil from the script. And now in this function, when our players colliding with the car, we want to change to our game screen C. And this is really easily done, but we're gonna need to commands for it. The first one is get tree. And this GET tree gives us the node tree. And from there we can have quite a few more commands. And command we want is if I can type change c, And now we need to name off the scene, we wanna change too. And in my case, we can just drag and drop it. We want to game scene in our file system. And I can literally just drag and drop this game scene in there. So now whenever dysfunction is executed, we are running this C, and let's try this. So I click on F6 again. And this doesn't work because I was in my game scene, I have to be in my legacy. It can be quite a tricky thing to move between them. So right now it might look a bit confusing. We have the script file are car open, but the actual seem we have open is our level. So to better illustrate this, let me go to a 2D view. And here we can see the actual game you want to have open. It can really be a bit confusing. But right now let me try this again. And now we can see that we are in the upper scene. Okay. It's not totally visible, but trust me, we are in that scene. Okay. Before I finish this video, we are going to make one more change. And that is that we are going to change the scene that it's gonna run by default. Right now, our play a scene is the default scene, which isn't really useful. And I want our level seem to be the main scene. And for that, we have some options at the top. And the one tab I need is Project and then project settings. And here you have a ton of different options. And to what I need is the second entry that's called r1. And in here, R1, we can tell Goodall which scene is the main scene. So which thing is going to be run by default with the game? I had? Let me get rid of this one. And if we click on the folder icon, you get to the game. And in here, I want to go to level and select our level scene. And that's all we had to do. No, I close this one. And now every time, even if I am on my game screen, I can press F5. And to run our actual game as it's supposed to be played by player. And there we go, this still works. So we're making pretty good progress. And in our next video, we're going to work on spawning more than one car. Was see you then.
33. Blade Frogger 7: Spawning cars: Okay, welcome back. And in this video, we are going to add multiple cars. Right now on our game, we have one card that Muslim right to the left, which isn't ideal. So instead, I want to add some code to add multiple cars to our game That makes it, that creates an actual game. Specific concept we are going to learn is how to create an instance is seen inside of code. So not inside of the game editor, but inside of our actual code. And it's surprisingly easy. So let's jump right in. So here I'm back in my level scene. And since we want to add our cars and here, this level scene is going to need a script which we can do very easily. Click on its name icon again. And I leave all of this. I actually wanna change this to empty, but it's changed us to no comments, just so you can see how it looks like. But besides that, it has to be in the same folder as our level or what it doesn't have to be, but it helps for organization and at Create. And now we can see by default as Fang underscore ready and pass, so doesn't do anything. So we can actually get rid of this. And I usually have an empty new coach, IID. And now we want to achieve a couple of things, but they all boil down to that every couple of seconds, we want to create a new car and instance this car inside of our main level scene. And since the car's already driving to the left, the cars don't have to be moved. They're doing that by themselves. So actually before we write any code, we have to create a new node. And this is going to be a time Anode. So with the level selected, I'm going to add a new node. And this node is going to called Timer and double-click on that. And now this is well a timer. And if you look at the inspector, We have a couple of options. The first one is wait time, so this is the length of the timer. Then we have one-shot sources, time are going to run once or multiple times. And then we have autostart. So does the timestamp by itself or do we need some other co2 started? We do want autostart. We don't want one-shot because we will multiple cars. And for the wait time for now, let's go with two seconds. I think 1 second is a bit too low. And now we have a timer. But here's the problem where we are going to need a signal again, that this timer, when it triggers, doesn't tell the level that it is triggered. And for that, we will need a signal. This brings us to your exercise because I haven't done an exercise in bit. So the exercise for you is to add a signal to this timer and add a function to our level scene. And pause the video now and try this yourself. Alright, How did that goal? It's quite a new concept and so don't worry too much if you didn't manage. But let's try to give a noun. So this timer with its elected, I again go to a new tab next to the inspector. And here, the timeout doesn't have too many signals. The one we need is called timeout. And this is emitted when a timer reaches 0. So perfect. So I double-click on it. And here we could select a couple of notes. We can select the car, the player, or the level. And a can be selected because they all have a script. But I want to add this to our level. And you could also rename this function, but usually just standard name is best. So I leave it as it is and click on Connect. And I let me remove some whitespace. So now we have a function inside of our Level script that runs every two seconds. And just to test if this is working, let me print timer timeout. And I press on F5, and I opened the output. And now we can see time a time out and time attempt again. And this runs about every two seconds. So yeah, looks about right. Cool. And let me close this again. So now we know dysfunction is running. And let me try this to pass again. So that covers the first step. Now we need to go to the second step that whenever this time AS R1, we wanna create a new instance of our car. And this is going to take a couple of steps. And let me give freedom in theory first, and then we're going to implement it. The very first step is that we have to preload the kerosene, that we have it available and our scene in the first place. But this Carson is only the scene itself. Think of this one as a blueprint to actually create the Cardiff is visible to the player. We have to create an instance of this car scene. And this will be our second step. That from the Carson, we are creating an instance. And this would create an actual node of the scene, just like we have done for the player or 40 original car. But this would still not be visible for the simple reason that this instance scene is not attached to the node tree. And this will be the next step. We have to attach the instance scene to our existing no tree of the level scene. And for now, that is all we are going to need. So let me implement all of this. So here we are back in my code. And the very first thing I need is a constant because it's not going to change. And I'm going to call this car or an uppercase letters, so we know it's a constant. And this is the standard that I forgot to do for our player, that this speed usually is written on an uppercase letters, but it's not a necessity. It's just good practice. But don't worry about it too much. So for a car, we want to assign some value. And what we wanna do is preload our car scene. And when we type preload, Qdot gives us lots of things we can preload. And what I want to preload, we have quite a bit of stuff in our folder is card dot Carson is one here. And this would preload our Carson said we have it available to work with, would not be visible so far, but we can use it. And this would cover the first step. Now we have to get to the next step. And this is to create an instance of the scene. And this happens inside of our timer function. And in here, I'm gonna create a new variable that I'm going to call Carr and lowercase letters, so that we know they're connected, but still separate entities. And this car needs uppercase car, got instance. And this instance creates an instance of this pre-loaded scene. It's kind of descriptive. So every time the timer times out, we creating a new instance of the scene. And I would cover in a second step. And now for the first step, we have to add this car somewhere to our tree. And for now I'm going to add it to our level node, sort of right at the beginning. But we are going to change depth on later on. But all I need is at underscored child and then car. And that is all we need. So these three steps are the minimum. You need to load a new scene into another scene with code. And let's see if this is working. So I press F5 again and we can see our first car, and then we can see a second car and third car and so on. So this is working quite nicely. And for each of them, if we could add in anything, then we come back into our game over screen that we can't really see anything yet. But art is working quite well. And I think for now, this is a good place to enter video. So in the next video, we're going to make this a bit more fancy with more functionality. I will see you then.
34. Blade Frogger 8: Better car spawning: Welcome back. In this video, we are going to improve our corresponding mechanic. And right now we'll always find a car in the same position and our cock and also only go to the left, which well isn't ideal. So let's work on this part that I want to achieve two things in this video. One is that we can place the starting position of our car a bit more flexibly because we want to start it in multiple positions. And well, that's gonna be the main game. And the second part is that I want to give our card the ability to move to the right as well. So basically when we placed the starting position of the car to the left of the screen, then is moving to the right, replacing the start position on the right of the screen than our cars going to Dr. left. And this should be happening automatically, which we can do. Fortunately, slats actually jump right into our project, I think is going to be the best way to work on it. So here we're back in our code and a close quite a few scenes. So we only work on our level scene because that's all we really going to need. Actually, we also going to need about Carson's that's opened up on as well. Okay. So if a level scene and are causing, these are the two important things we need for now. And the first thing I want to do is add a start position. And for that, we are going to use a new node. So I click on our level scene again, and I'm going to add a new node. Note when IIP is called position 2D. So now we have a position 2D and I'm going to name it car start one. And a naming convention here is going to get a touch more important. So I would recommend to follow my naming convention. So now we have a new note, but we can't see it because this node isn't supposed to be viewed by when I hover over it in the viewport, you can see our player node and cast dot one. And if I move it, I have cards at once selected. And this is just 1 in space. But this point in space we can use very easily as a way to determine it position. So let me put it for now somewhere in the screen so we know where it is. So let's say here. And for now, all I want to do is when this car is spawning and our scene, I want to put it on the position of this cost D21. And for that, I'm gonna go back in our code. And I can do that really easily. Actually, wanting to do is to click on the icon of our script. And if I click on it, we're back in our code. And all I have to do in here is offline instance the car. I have to set the position of this car, which I can do really easily. I just need car dot position is equal to. Now we have to select the Evernote. So I need a dollar sign again. And I want to add car, start one. And don't forget dot position. So let me open the 2D view again that if I click on Cast dot v1 in the transform, we see position and we can target disposition and also changed his position. But in our case, we just want to target the position so we're does not happens to be. And where does not happens to be. I just want to put the car once it spawned. And this is actually all we need for now for this to work. Let me try again. So this is the first curvy instance, but now every other car is going to be spawned. The position here where we initially set up our costs dot OneNote. So this one's working quite well. And I could actually get rid of this car one scene, or I could just make it invisible and he can toggle visibility. And, and we don't see it anymore. But we could actually remove the entire thing. I just keep it here for now just to make sure we can work with it easier, okay? And now we have a cost start. And I can move this to somebody on the right of the screen. Doesn't matter too much where it is right now. Let me put it say here. So for honor code now, we don't see our first car anymore. But after about two seconds, we can see our first car. And if they collide, we go to the game over screen. So well done. This is working well. But now we can probably already tell the main problem of this that if we moved, discussed that one to the left, it would not work. So if I run the code now, we would never see a car because the car always starts on the left of the screen. So no good. So how could we fix that? And here we have to write a tiny bit more code. And for that, let me go back to the car and open the code for the carp. So here we are now a cost script. And let me illustrate what I wanted to do. I want to add a new variable that I'm going to call direction. And by default, this direction is going to be one. And then when we change the position of this, I also want to multiply this where if the i direction. So by default, this is not going to do anything visible because if you multiply a number by one, the number stays the same. However, if this is minus one, then it would reverse the direction, which is exactly what we want because this would move the car to the right. So effectively what we want to do if the position of the car is too far to the left, then this one is negative one. If the position of the car is to the right, then this has to be one. And we only want to check this one's to senior spin loading. We don't wanna check this on every single cycle of the game loop. So this function wouldn't be good for that. Instead, we are going to need a new function. And this new function is called func underscore. Ready. And ready is a really nice little function because it runs, only wants to seen as loaded and only then it runs. And you might actually be able to do this yourself. So I'm going to put this as a bit of a tougher challenge. And to cold in here is that if the position of the car is to left of the screen, and then I want the direction to be negative one. And otherwise, I just want to keep direction S1. And don't worry if you can't manage this. It is a bit more of an advanced thing, although it is a very simple if statements. But pause the video now and try it yourself. Alright, welcome back. I hope you manage, but don't worry if you didn't. So let's try to give an up. So inside of our.ready function, what I want to check is if position dot x is smaller than 0, then I want direction to be multiplied by minus one. Or actually, I could just set it as minus one. And if that is not the case, I want direction to be one. And that is literally all we needed. And here's actually one more thing that is a little bit different compared to standard Python, that the scope of these functions is a bit more forgiving. So right now, even though we are in a local school and we're changing a variable from the scope, outside of the scope, then this would still work. And this is why you have to VAR keyboard that you telling Goodall or GD script very specifically, that in this case I am not creating a new variable. Instead, I am influencing and existing variable. And via that you can ignore it as scope. And this would not be working in standard Python, but it's really useful for game development. But art, let's see if this is working. So I go back to our level scene and let me run the code again. And what Apple does start. Yeah, there we go. So now the cars are moving to the right because they're starting somewhere on the left of the screen. And let me close this. And now I move the starting position back to the right and run this thing again. Add now our cars should be moving to the left. There we go. So this is working quite well and that's pretty good progress. But obviously let me illustrate this, that we have one big problem right now. So if our cost us from the left, Dan, we have cars that drive backwards, which would be a bit weird. So this is going to be the topic of our next video. That we want to move the cars, that we want to flip the cars if they're moving to the right. And while we're at it, we can also add some more variability because right now all the cars are also of the same color, which isn't ideal lever. So there's going to be topic of our next video. I will see you then.
35. Blade Frogger 9: Car variations: Hello and welcome to the next part of this tutorial series. In this video, we are going to add more variability to our car. So to two things we're going to work on is number one, that whenever correspond it is going to be a random car and we have a choice of four different options. And then the second part is if all caused moving to the right, we are flipping the image horizontally so that it looks like it's driving in the proper direction. And let's do all of this, write new code. There's nothing particularly new debt we have to work on, at least not yet. But, alright, here we are back in our editor. And I want to go isn't to our Carson. So here we are now a court scene. And what I want to do first is to make sure that this sprite is not just one car. It can be a random pick of four different cars. And if I open in our assets, the car that we have gray one, gray to yellow, and yellow to and I want to pick one of these cars whenever the cars being spawned. And the easiest way to achieve that is to use an animated sprite. And let me be clear here, we are not actually animating the car. Instead, what we are going to do is best explained by doing. So, let me get rid of this breadth-first by just deleting the node. So now we count seawall car anymore. And instead, I want to add a new note by clicking on the note and adding an animated sprite. And this one again gives us the error message that it wants a sprite frame, which we can add by going to the right here and use bright frame. And then I click on it. And now we have our sprite frame editor. And what I'm going to do here effectively is that I'm going to create for animations. And calling them animations is a bit misleading. They are basically an animation of one picture, so it's still image. But what I'm going to do, let me start with gray one. And gray one is going to be this one image. Then I'm gonna add R2. And great, who is our second car? Then I'm going to add yellow one. And the yellow one is the car we had already. And then we have yellowed two. And u2 is going to be the other car. So now we have four different images that we can select very easily. And if you remember from a tutorial quite a while back, this is kinda what we have done with the player. If we move in a certain direction, we are picking one animation. And here you can trick a DOE and little bit of a well, tricking it is a bit overstating it. But what you can do is just put one picture in here and then Godot would just always pick the same picture. So it would look like a still image. But this makes it very easy to cycle through different animations or pick one at random. So if this one done, now we want to add some code that whenever discourse being spawned, we wanna pick one image from this animated sprite. Let me go back to the code now. For that, we need at such more code. And let me start by creating a new variable or a new constant rather. That I called Car list. And this is going to be the names of all the cars we have. And in here, just like in Python, we can create a list. In Goodall, this is called an array, but it does basically the same thing. And here we have to add the names of our animations. And I called the gray one. I have great t2. Then I have yellow one, and I have yellow. So these are the four possible animations or pictures of a car. And whenever the car is being spawned, I went to pick one of them when the car's ready. So we have to work again in this function here. So let me give some white space. And now I want to create a new variable that I call current car. And the value of this current, current is a random item from this list. And this brings us actually to a new topic. How do you get random numbers and gt script? In Python, this is quite easy by importing the random module, but we can't import modules into GD script that just not hold works. Instead, GD script has inbuilt ways to create a random numbers, but this looks a bit different compared to Python. But let's go through it step-by-step. So first, I want to assign it a new value. And what I want to do is get our car list and use indexing to pick one value. So if you put an a one and here, this works just like in Python, extra slack with 0. So 0 would be this item, one would be this item, two would be this one, and so forth. So this is exactly the same as in Python. But now instead of having one specific number in here, I want a random number, four or more specifically, I want a random integer. And to get a random integer and gt script, we need Rand I and then double colon. So this gives us a random number. But now we have to limit how large this random number can be. And for that, we need the percentage sign. And what this line does is it limits how large to random number can be. And in our case, the maximum size of our number has to be the length of this list, which we can get very easily. So all I want is Car list dot sighs. And since this number is not going to change, but could also just put a number in here. But I think this is a bit more flexible. And note this current car is going to have a random item from this list. There's one more thing we do need that right now we have just picked random item. We didn't apply it to the animated sprite, which comes next. And here's going to be another challenge that I want you to select this animated sprite and set the current animation. And there are a couple of ways. I just want you to have a look at this and see how far you get. And before you start that, let's talk about one other faking. Good. Oh, that's really helpful. That if you look at the top, there's a help function. And if you click on search that you can see all the different nodes and methods inside of Godot. And if we type in here animated sprite, you can see how animated sprite. And if I click on it inside of our code editor, you see animated sprite and all the methods and all the attributes at has. And this would work for any node in Godot. And this is incredibly useful to just check whatever is going on. And for example, here, if you click on play, This is the one we used earlier. Play, play the one down here. So earlier we use play and stop. And have a look through this and see if you can find something that is really helpful. And pause the video now and see how far you get. I hope you manage this. And I would really recommend if you want to get really good at Goodall, this help function is incredibly useful. And just read through it. And it really often helps to find new functionalities of existing nodes. So this part here, really useful that can only recommended. But right back in our car script, I want to first target our animated sprite. And here we do have a couple of options. The first one we could do is play and then use current car. And just for testing purposes, let me put this car in the middle of the screen, but further to the right. So we can just launch this scene and see immediately how it looks like. And for that I press F6. And now we have a gray card with weapons. So we can kinda see it's working. But there's going to be one problem. And to illustrate that, let me show you. So again, we have the same car. And if I press it again, we have to send code over again. And we are always going to have the same car. And the reason for that, let me go back into our code view is that random numbers in Goodall, just like in Python, are not perfectly random. Instead, what it does is it picks always the same kind of random numbers. So right now, the first item of this random list is always going to be one. So great to the car is going to be picked. And no matter how many times you're running our game, it is always going to give us the same numbers, which is not what we want. But we can change that very easily with one word actually. And what we need is random mice. And this one, once this function is run, it gives us new random numbers. So now if we run our code, now we have a different car to start. And if Iran began, we have a different car. And this one is working quite well. So this seems to be working. And just for completion sake, if you checked out this animated sprite besides using play. So this one, that is one here, we could have also used this animation here. Well, we can just set the animation that is currently on. And just to illustrate this, we can set, instead of play current curve, we can use animation equals, and that's an attribute. Current car. And this would give us the same result. So if I run this now we're pressing F6, we still see different cars and let me run it multiple times. Okay, bad example. I've got the same car and now we have a different card. So you have different ways to achieve the same outcome. And in this case they are basically identical. In some situations. One might be better in other situations and never might be better. But, okay, we have one more thing to do. And let me illustrate what we are going to do now. I go back to our level scene and right now our cost dots from the left of the screen. So if I run, this might seem a pressing F5. Our cars are going to drive to the right. Driving backwards. We have more variability, but it doesn't look good. So what I want to do is if the costs are from the left of the screen, they should be facing to the right. And for that, I go back to our cart scene and open the script. And this is bringing us to our next challenge. And you should actually be able to do this already. So the challenge is going to be this if the car is starting from the left. So on this line here, then the car supposed to flip on the horizontal axis, and it's not supposed to be. So tried to implement this now and stop the video. And otherwise, I'm going to continue in a second and softest myself. All right, welcome back. So this should be a fairly easy challenge because let me open this script for our player again, and that this player is player here. So we basically have to do what we have done for the player. This line here that we need to flip H attribute and want to set this to true or false and specific situations. And for car, this is very easy to do. So if it's awesomer left, so if position x is smaller than 0, then I want to flip out. I have to target animated sprite first and then flip H. And in this case, it just needs to be true. Oh, and there's one more difference compared to normal python, that injury script, the Booleans are written all lowercase letters, whereas in Python the first letter is capitalized. So this is one easy way to get a mistake. But that is literally all we had to do. So let me run the same code again. I press on F5 and now the cars should be driving to the right. Cool does is working. And no, let me go back to the 2D scene of our level and move this course dot forever to the right. And let's try the same thing again. Now all cars are still facing in the right direction. So I will make him quite a bit of progress. So things are going quite well and we are already getting quite close to a finished game. And in the next video, we are going to create an actual level around us. I will see you then.
36. Blade Frogger 10: Level setup: In this video, we are going to start building our level. And this is going to include a couple of things. The first one is that we are going to give a camera to our player so that we can move around in our level. And besides that, we are going to create multiple starting points for our cars so that we don't just have one line of cars. We have, I think six or seven and total, it doesn't really matter whatever you want to have for your game. And there isn't really any completely new concept. The one thing we need is a player camera. So let's start with that one. So here we are in our editor. And the first thing I want to do is to add a camera to our player. Let me illustrate a problem here. That right now we can move around. And oh, there's one thing I forgot. So right now the game ended even though we didn't collide with a car, at least seemingly. The problem here is that this car, even though it's not visible, it is still working into court. And that's why the game just ended. But we can change that very easily. We just have to delete this node and notice should be working. So let me just write a program now so we can move around our player character and we have our cars. But what if we wanted to move up in the screen, or further down or further to the right or to the left. And for that, we need a camera that follows our player. And let me close this game here. And a player camera is very easily edit. And specifically what I want to do is to add a camera to this instance player scene, which is perfectly valid thing to do. And for that, I'm going to add a new node. And what I want to add is a camera 2D. And make sure to not add a free to camera. That's completely different thing. I want a 2D camera. And now this 2D camera is a child of the player. So whenever moved to player, we're also moving the camera. And you can already tell that there's a camera on the player because there's a frame around the player now in the game does isn't shown by default. To make it work in the game in the inspector, you have to click on Current and yes. And then you can tell now it's a solid line. And now let's just run the game again. And now. So by now because we have the same background, you can't see that it's moving, but now with the cores in there, we can see that we can move around the cars and we can move up their character, and the game is going to follow it. And this is going to be much more obvious later on when we have an actual background and it's not all gray. But for now, this is working quite nicely. And when you have this camera, you can work with this quite a bit. The two things that you usually want to use as offset and zoom. And zoom is the easy one that you can make this smaller or larger depending on how much you want to play it to see. In my case, I am happy with one. And for the offset, you can just move the camera up or down, depending on where you want to play at two path is visible of field of view. But in my case, a standard values for both of them are perfectly fine. So now if a player cameras so we can move around an LSC. But for that to really make an impact, we have to create multiple starting points and also multiple timers. So we are effectively going to create several pairs that we have a timer one and a cost of one. Then we have a timer to and cars dot T2 and so on. And each of them is going to be one car lane. And this means that we are going to have quite a few more notes. But I, let's work through this step by step. The first thing is that I want to have multiple stock positions. So I'm going to add a new node, that's going to be a plane node. And let me add it here. And this, I'm going to call start positions. And for now we have one stock position that is called Cars dot one. And now if I duplicate this, Qdot automatically renames it. And let's say I wanna go with five start positions. And now if I hover over it, we can see all of these five and we can place them somewhere on the game. Doesn't matter too much for now. Let me just move them around so they are separate entities. So now we would have lots of different entities and cars dot positions, which is a nice start. So we can minimize this so our scene doesn't get too overloaded, so it looks nice and clean. And next up, I want to have multiple timers so that we can control in a very fine way how often or how difficult Elaine is going to be and to keep his organised, are going to add a new node. And I put the timer inside of this node. And this is going to be car timers. And now I want to have the same amount of timers as i have cars or car stock positions. I'm gonna copy this time u1 and the naming of the time. It doesn't matter too much. So I'm not going to worry about the first one in too much detail, actually just call it one. And that's fine. And now each of these nodes have their own signal, but they don't have the corresponding script in the coat. So for now I'm going to remove the signal from them, which if I have them selected and to signaled selected, I just right-click and disconnect all. And then good O double checks. And we do want to do it. And I'm going to disconnect all besides the first one because this is the one we already had and we know this one is working. And actually let me make one more change. So I go back to the code for a level editor and we are going to create five of these functions in just a bit. But I don't want to repeat all of this code over and over again. So I'm gonna put all of this, let me cut it out for now. And I'm gonna create a new function that I'm going to call Car spawn. And I'm going to put all of this information in there. And then I call karst bone. And this is the same result, but we can reuse it quite easily. And we can minimize this one. And this is going to be a good start. And actually the naming convention here got a bit messed up because we renamed this one. So let me actually get rid of this one is well, and let me go back to our kerosene and remove this signal here as well. So now we have five timers. It all have a wait time of two seconds and they all start automatically. And now for all of them, I want to connect them to our level seen what it called now a lever scene. And this is going to be a bit more labor intensive, but it's not too bad. So I created the first timer that I wanted to have the second signal. Then I'm going to create the third one. Then I click on number four and number five. So now we have the five different timers. And all we really need to do is to call costs borne in them with one more difference. That the cast dot one is not going to be in a stock positions anymore. So we have to change that one. That this one here is not just cars, that one. Instead it is start positions and then cast out one. But there's one more problem that if we called dysfunction now, so this is going to be cast bond. If we call dysfunction in all of the timer's, it would always spawn into first composition. So we have to add some more code to make sure it doesn't respond in the first composition that we can control them which car position it spawns. And for that, I'm going to create a parameter that I'm going to call start pulse for a start position. And now what we have to do is to create a naming convention of our car starred note. And specifically what that means is that I want to create a new variable that I'm going to call it cars start, node, name. And this one is going to be a string. And a string is going to be start, position and the car start. So exactly what we have so far. But now we wanted to have this dot position being added esta number towards it. And this works very similar compared to pipeline. So I want to create a string and then our start position. So what I'm passing in here is going to be an integer. And then inside of this line here, it turns this integer into a string and adds up to our car start. And now, instead of creating always the same, I want to get it note and pass in our car. Start node name. And that should be working. So now when I got the car, this one is going to be costs 0.1. This one is going to be car spawned two. This one is going to be correspond free. This one is going to be correspond for and title. And then this one is going to be car spawned five. And another thing I do like to do is just like in Python, do whitespace is a bit more forgiving. So we could do something like this that makes our coat think a bit more readable. Because if you have only one line in the code, this is much easier to read. And all right, this I think, should be working. And because we already have code in our card for all the direction, we don't have to worry about that whatsoever. We just have to spawned the car in a specific position. So let's try to run our level now and see what happens. So now, I would expect lots of cars being spawned. Hence that we are getting an error. And the error is that start position, I made a typo because there's a start positions, plural. And now let's try to think again. And there we go. Now we have lots of cars being spawned. And the whole thing starts to get quite a bit more complex. So we're making quite a bit of progress. And for now, I'm going to leave all of these positions where they are right now. But later on when we create more graphics, I'm going to lay out all of these in the bid morphological way. But now there's one more thing I do want to do because the players starting at the top left is a bit confusing. Instead I want to play or to start somewhere in the middle of the bottom. And that brings us to our next challenge because I want you to add some code that whenever this level sin as being loaded, I want to put the player in the middle of the bottom of the screen. And for that, I would recommend to use a position 2D node. And this should work in very similar ways compared to the cars. So pause the video now and try this yourself. All right, welcome back. I hope you manage this. And it should actually be quite easy if you're following so far. So let's try it together. So in our level scene, I gonna open the code for our level. And the first thing I have to do is to add underscore ready. And now we have to add some code in here. For now I just gonna put him pass. And in him, we could approach this in a couple of ways. The one thing that you could do is to add a position to denote to our level and then put the position of the player wherever that position happens to be. This will be one way. And let's actually try it this way. I think because I gave it a challenge like that. So I'm going to add a new position to denote that. I'm going to call player start, pause. And then this, we're gonna put it wherever we want to play it to start, let's say roughly here. And now, whenever the level scene is ready, I want to get the player position is going to be player start pos position. And that is basically it. So let's try this now. And yeah, now we are below all the cores and we can see on off this working much better. There is not too much variability, but we are going to take care of that in a bit. And this is already starting to resemble a game by quite a bit. So pretty good start. And I did make one typo that he's annoying me right now. So I add an uppercase letter L that didn't belong in there. Ok, cool. Now we have a player start position and a bit more of a developed level. So things that are coming together quite well. But right now, all of this is quite monotonous. So in the next video, we are going to make all of this a bit more varied.
37. Blade Frogger 11: Car variation 2: Alright, welcome back. And in this video, we are going to add more variability to our game. And this means to specific things. The first is that the speed of the car is, is going to get some variation. So at all the costs driving at the same speed is going to change that we have some cost being a bit faster, other cost being a bit slower. And a second one is that the timer's also get some variation. So at sometimes a cost that's after two seconds, sometimes a cost that's after 1.5 seconds. So these two things, if applied to all of the cars, is going to make our game look much more organic. And we already know how to create random numbers, which is all we need. So let's jump right in. And here we are back in our I'd ever seen and I closed everything else. And S1 thing I forgot to mention in the last video that when you want to position the player in the middle of the bottom of the screen. What I have done is to use a player start position. But you could literally just direct a player in the bottom middle of the screen and deceased and going to be the start position of the player every time this is running. And let's actually do that. And again, here's the problem. If I just move this book drag-and-drop, I would move the camera, not the player. So let's undo this. And I have to go to the Player and click on the same idea again, that I can not select the children's object. And now I can just drag and drop the player to the position where I want it to be. Approach wherever right now is a bit overkill, but I think it's fine. So you see both approaches. Now let's actually work on the cars. And I'm going to start with the easier one. I wanted to open the court scene and work on a cold. And what I want to do is that this 250 showed change a bit more. That sometimes it's going to be 230, sometimes it's 270. So they're all roughly around the same speed because they'll go too fast or too slow. But there's a bit more variation. And this would bring us to a new way to approach a random numbers. So far we have seen random integer or rent ie. But now I want to use a random number inside of a range. And for that, we have the method rand range, which picks a number between a lower and an upper limit. And that's really all it does. And in they're ready function. So when the cars being spawned, then I want to create a random value for this car speed. And I want car speed equals rand range. And in here, we have to get from Ann to, in my case, let's go with two hundred and thirty and two hundred seventy. So the original value does 250 doesn't actually matter too much. But let's try to snuff. So I click on a five and see if we see a bit more variation. So we can already see the yellow car is a bit foster non-gray cars a bit faster and is already looks better. So this is getting there. And yet this already looks quite a bit more organic. And we can play around with this. And let's go with two hundred and twenty and two hundred and eighty. Might be even better. So you do also have to be careful that the cars, sometimes, if they were going on for too long day, might crash into each other. Which we do well to avoid. But I think there's a still fine. Okay. Yeah, I think this is good. So now we are ready, have different speeds, follow-up cars, which is a pretty nice start. Next up we can go to our level code. And here I want to add a bit more code that after the spawn of a car, I want to change the wait time for timeout to a random number. So just to illustrate this, let me go to my level scene. And here we have our car timers. And for each of them, the wait time is two seconds. And I want to make this a bit more of a random number. So sometimes this can be 1.5, sometimes this can be 2.2. somewhat in that range. And for that, let me go to the script part again. We will have to add a bit more code in here. And the first thing we have to do is to get the name of the timer that emitted a signal. Which is going to work quite a similar way compared to what we have done here. And this is going to bring us to the exercise for this video that I want you to look at this code and replicate this except for the timers. So that whenever a time AS being emitted, this function tells us which time has emitted a signal. So pause the video now and see how far you get. So what it still together. So I won't create a new variable. And this one I'm gonna call timer note name. And in here we need a string again. And this string will be called Car, time Merced. And then forward slash and timer. And then we want to add another string, and it's going to also be start position. So here's what a naming becomes really important, that this is cost one and is as time u1. So they have the same integer. And here we have time at two time referee and also Cars dot TH2 and cost-free. So these two integers are connected by that number, and that's what a naming doesn't matter quite a bit. And now that we have the name of the node, we can change the timer and let me actually move this a bit further down so we keep it a bit more organized. And if you want to move code in JavaScript, you can press alt and down. And then he moved the entire life. And I want to have all of this below the stuff for the car. So now we have selected the name of the node. What I want to do next is get node again. So get note, then timer, node name. And then the attribute we need to address is wait time. And here, just as before, we have to use rand range. And now we have to select some values from a lower to an upper range. And in my case, I am going to go with 1.62.2. I am literary choosing these numbers at random. Basically, what is happening here is that whenever dysfunction is being run, we first create a new car and put it in a random position. But after that, we are also getting the name of the timer decorated the signal. And then we're going to change to wait time every time it triggers. So I don't know the next time it runs, it's going to be a different timing. And let's see if all of this is working. So I press F5 and we don't get any error. And yeah, we do see a bit of a difference, not too much, but I think this already works out. We could probably make the range a bit larger, but yeah, you can already see between these two cars, they asked boarding at quite different time zones. And yeah, I think that's actually working quite well. Alright. With that, we have a bit more variation. And I think now we're at the stage where we can add the actual graphics to our game, which is going to improve the look of it so much. And this is going to be in our next video. I will see you then.
38. Blade Frogger 12: Graphics 1: Welcome back. We are actually almost unnoticed project, although it doesn't really look like it. And the main reason our game doesn't look very well right now is because we didn't add well all that many of the graphics to it. And that's going to come in this video that we're going to add lots of the graphics, which is going to make our game looks so much better. And for that, we are going to see an entirely new concept. And let me explain this before we get into more detail on this. How we're going to create and most of our graphics is with a tile map. And a tile map does something very specific. It basically creates a map of tiles. Well, it's quite obvious, but Godot gives us lots of options around this tile map. What we can basically do is get a picture with all the elements we want to use. And then we can arrange them in a tile map as we see fit. And we can also repeat Different tiles very easily. And with that, we can build up our game incredibly easily and incredibly fast. And it doesn't sound like much in theory. So let's actually implemented and that I think you can see how powerful this concept is. So here we are back in our editor, and right now I only have two level signal because that is all we are going to need for now. And we have the usual notes. And I'm going to add a new node that is called tile map. I already had it open. And let's create this and are ready when he had his title, you can see tiles on your screen. And if you look in the inspector, These are called cells, and they have a certain size. They are 64 pixels by 64 pixels by default. And in our case, we don't want them to be that big. We want them to be 32 by 32 pixels. And if you change them, you can see that all the tiles on the screen are gonna get smarter as well. So now we have titles, but that doesn't help us too much to make your game look better. But to change that, we have to look at tile set. So this entry here, and if we click on the drop-down menu, we can create a new tile set. So I click on that. And again, nothing happens. For something to happen. We have to click on this again. And now we can see our tile set editor. And in here we can edit our actual tile set. And this is working kind of similar compared to animated sprites. And the first one we have to do is to add a graphic on image. And this, I do have to when you open our asset folder and go to level, then we can see a couple of images. And the first thing I want to add is sidewalk, undiscovered dark. And let me drag it in here. And now we can see in the editor that we have this image here. And if you want to zoom into it, you have to hold control and a mouse wheel. So it's kind of different compared to the viewport. I don't know why they're so different. It just is. And now in here, we can pick specific elements from this. And there are different ways to approach this. We have a new single tile in your auto title and a new atlas. The one I'm going to choose is an atlas. And let me demonstrate what it does. So when we click on it, it first asks us to define a region, which in my case, I'm going to pick the entire thing. And once we have that, we can close our toolset and click on tile map again. And now what effectively happened? Ecuador separated this image into separate parts, and then we can direct all of them someone to screen. This is a very easy way to build up our floor. And you can see where the order of these nodes are really important. Because right now at the tile map is below our player in the node tree. And as a consequence of tile map is drawn above our player. What is it's very easy to change, does have to drag our player above it or the tile map above it and no tree. And that we can create overflow already. And I'm going to create the entire area that we want to work in with this background. And it's going to be a basic pavement. So I'm going to call this one pavement. And a couple of ways to make out of this easier. So let me just draw, at least in rough terms, a line around our entire level. It doesn't have to be too specific to. One important thing is that it has to be a close loop. And this looks pretty closed. Okay? And now we look at the top of the viewport, that different options. And the one I want is the bucket fill. And if I click on this, I can fill an entire area. And now very easily we have an entire background. And if we run our code now, we can see a repeating background texture. And this already helps a bit and it gives us a bit more context of where we are. But it doesn't help us too much to really get a sense of the level we have to add allo roads or districts. And for that, we have an entirely separate image that's called Street underscore PNG. And this we also have to separate. So Indian spectrum again, I click on tile set and this opens the editor again. And here I want to add this street also in there. So now we have two images in here. And this is also going to be an atlas. And basically what an atlas does is it automatically separates this image into specific titles that we can then later use. We could also create a single tile that would just pick one specific area from this. Or we could create an auto title and auto tilde's We are not going to use in this tutorial series. But that can be incredibly powerful to automatically arrange things in a certain order. Takes a bit more time to set up, and it's not strictly necessary for our code. So I want to do is to create a new atlas. And now I have to select a region again. And I select the same thing as before. And again to zoom out. And I read and get the entire thing. And I missed a few of the things here. My first goal and a much easier way to approach all of this is to have snapping enabled. And this gives an outline of this thing already. So now I can focus on this and select things much easier and much more precisely. And now we have our tiles, and this is exactly what we needed. So now I can close this thing again. And now when I click on pavement again, we have our streets as well. So I guess now pavement would be a good name. Instead, I want this to be let's call it ground that fits roughly. And I still have fill selected, which would look very silly right now. I want a single tile. And now I can start creating our roads for the game. And here you can just drag and create the entire game. And it just left-click on the screen where I want this title to be with the tile selected. And here I made a mistake. And let me zoom in. And to remove this, I just right-click it and then it disappears. Although it also creates the tile below. So I have to recreate all of this. And then we go. And now we can use all of this to slowly build up our game and add more and more stuff to it. And this is going to take a bit. So I'm going to speed this part up. But I would recommend in a process of you doing this, try this yourself. So watch me doing it for a bit. But after that, trai off this yourself and see how far you get. The one important thing you do have to do is that a car needs about two of these rows to be fully there. So I'm going to have two rows for a car, then the middle line, and then another two rows. So it's going to look something like this. And you can add a bit more variation to this as well. But for now we're gonna go for this one. Okay, so this is already a good start. But you might have already noticed that this process is quite labor intensive and to bit well time-consuming. One thing that is really helpful is that it can copy and paste these different elements. So let's say right now, I want to have five different lanes for our course. So far, I have three. I have one with two lands on it and then another one that's an individual Lane. And what I want to do is copy the entire bottom lane. And for that we can use this icon at the top. That's called Select. And what I'm gonna do here is select this entire road. And now if I press control C, Godot copies the entire thing and already shows me where it would be placed, which makes things so much easier. And I am going to place it. Let's put it here so the player can have bid offer rest in this area. And to get rid of it, just right-click it. And now we copied the entire thing and saved quite a bit of work. And it's already gets us the entire background for our level. And I'll have to do now is change the start position of the cars to match the streets a bit better. So let me move them around a bit. And this is Carsten F1. Do line up the numbers, but that's really just me being a bit fussy about it. So cost-free, let's say could start from here. This would be Carsten to, this would be curse dot phi. So the last one and cars dot four. And this should be all we needed for this part. So let's run the code now. And moment of truth. There we go. I didn't line them up perfectly. And you can also see one particular problem that we're going to work on in a little bit. But the obvious problem is that the car order, how they are drawn is very random. So we do have to work on that. But for now, we're roughly meeting this. I have to set up all of these a bit higher. Ooh, this is bit higher, disa fingers also a bit higher. And you can really see that game development or level designer in game development is its own job. So I create a really simple level. But you can go crazy on this and create a most complex levels in the wild. But let's try this again now. And all I want is that the cars are roughly on the street. And yeah, this looks about right. That we go up a bit. Yeah. This looks good. Okay. So now we have to cars driving an hour street. But the problem now is that all of these cars are overlapping quite heavily. And this we can fix actually really easily to reason on why this is happening is that when we're adding all the cars that are being added to the level. But is specific drawing order of these cars is random. So Agosto cares about is that the cows are being added when the timer finishes. But we want to have some more reasonable and logical and physically accurate way of drawing all of them. And there is a very specific node for that, that is called Weiser. So let me edit it right away. This is called Why sort. And what Weiser does, let me actually open the editor or the help function y sort. And it sorts all child nodes on the y position. So what this effectively does is if a car is above in the Y position, that car is being drawn below the one that comes below, the y position. Sounds a bit abstract. So let me actually add all the cars to it. So what I effectively want to do, and let me go to the code for our level is that when a chorus being spawned, I want to add this as a child, not to the level node, but instead to the wise sort node, so that this one automatically sorts the cars in the right order. So all we have to do is target our y sort. And then a child as a car. And that's actually all we needed. So let's try this again. And let's hope this is working out. And moment of truth. And yep, this looks so much better. And now we actually get the concept of depth that it looks like we have some dimensionality to our game, that some things on top of each other. And this makes the game actually look quite nice. And to finish this video, there's one more thing I would like to add, and that is a wall around the level because right now the player can just walk to the left and to the right. And the actual wall we're going to add later. For now, what I want to add is a picture of the wall. And that is going to be your exercise. And I want you to create a new tile map Cornwall and introduce warm. And there's a file called Interior worlds beige. And I want you to use this file to create a wall around our level. So pause the video now and try this yourself. This should take you a couple of minutes. All right, welcome back. So I already have the file opened up we need it is still in the level folder and it's called interior walls, beige dot PNG. And what I want to do is to add a new tile map. And I'm going to call this walls. And in here we're going to have most of all waltz. And just as before, we first have to create a tile set. So I click on tile set, new tile set, and then click on the tires that again to open the tires at editor. And here I drag and drop the interior walls in there. And let me zoom out a bit. I'm going to create a new atlas. Then I'm going to switch on snapping. I was already on. I'm just going to select all of the regions I'm going to need. And that's all I need to do. Now I can close this one. And now here I have all the tires I need. They look a bitch. This one looks better. Okay. And there's one more problem. So if you look at our game right now, the cell size is too large, so we have to change that one, which we can do with cell. This one supposed to be 32 times 32. Now we're smaller cells. And if it perfectly, and I am going to start by creating the bottom wall, which is created with these tiles here that have the T-shape in the middle. And I'm going to create this roughly here and start drawing the wall. And again, this is a process that does take a few minutes. So I'm probably going to speed up this video. And then you can see it in the speed of use who doesn't get too boring. But again, level design M is its whole, entire job. And these things can take awhile, which is why you have people that are paid entirely to do this job. And the app that's really, we can say there's no way to do this in a fast way. But if you use the fill tool, this tends to make things a bit faster. Ok. And actually here we have one problem that the tile map we have selected here has mostly an empty field. So when we're going to put this on there, it is going to cause a problem that it only would he fills part of it. So what we have to do is to create multiple world tile sets and should have planned this a bit better, but alright, so what I want to do is copy isn't tyre walls by clicking control v. And now we have watts to that. I'm going to rename to walls side. And these are going to be the side walls. And now I can draw on top of each other. So this is going to be the wall, let's call it Wall bottom. And then we have wars side. Now, we can just draw a bunch of these right on top of each other. And now we have to well, for the bottom and awards for the side, The one thing I need is a wallet at top. And since this one is going to be quite similar to the wall at the bottom, I am just going to copy this one and call it will top. And now for this one, I'm just going to select the entire thing we created earlier. And now instead of copying it, I press Control X, cut it. And then I'm gonna move it. Visit here. And with that, we have the basic outline of our game. So if I run the code now, we can see our basic wall. Obviously it doesn't stop us right now, and also we have to finish Street. And furthermore, the camera can move too fast. And these are things I am going to fix in our next video because this one our finger ready is getting quite long. So I'll see you next video.
39. Blade Frogger 13: Graphics 2: This is going to be the second part of adding graphics to our game. And we are actually making huge progress to getting a finished game. In this video, we are adding some more refinements to our game. So we're going to finish the street and then we're going to work on the camera that the player cannot see outside of that level, or at least not too much. And besides that, we also going to create proper waltz around the level, sort of play icon, walk outside of it. And we're going to add a few more buildings to add a bit more detail. None of which is going to be particularly difficult. So let's jump right in. So here we are back in our code view and let me minimize everything. And the first thing I want to do is to finish the roads because they looked weirdest right now. So let me open this and properly formatted. Then we go. And now I'm just going to direct them out a little bit further. This doesn't have to be too perfect because to play as not going to see it anyway. So don't worry about it too much. And let me add one more there. And again, this is a process that can be quite labor intensive and quite time-consuming. So for your own game, you really want to spend more time on this process because this is what the player sees and it is hugely important for how the game looks in the end. And since I'm just explaining concepts, I'm not worrying about it too much. And OK, we are slowly getting there. And there we go. Now what you could also do if you scroll down a bit, there are few imperfections that make the whole thing look a bit better. And let me just add a couple of those. I'm not going to be too picky about it. But all of these little details, if you add them together, really give the impression of variability. So if the game look too perfect, then it just would look weird because nothing in the real world looks that perfect. So this is something you do want to be aware of that just add some imperfections. And when you create graphics, this is quite important. And you might already see that just by adding Anopheles imperfections, it does add quite a bit of detail that make the game look more alive. Alright, now we have the streets that look good enough. Next up, I want to influence the cameras that we can't look outside of the screen. And for that, we can add a limit to our camera, which happens on the camera node and the inspector on that limit. And right now we have minus, i think this is a 100 thousand Dan for the left at the top and 100 thousand photos right into bottom. And this we just have to change. So the first thing is that this point here at the origin is going to be 00. So if we go to the left, this is going to be, let's say about point negative 100. And a really cool way to measure this is this little icon here, which is called a ruler mode, which accounts are pressed R. And if that is selected, you can measure specific pixels. So if I drag it from the starting point, this point here is about at say 75 or negative 75 to religious gives you a length, not the actual position, but for the camera. Left is going to be negative 75. And let's try this. So her honor code now and I moved to left and the cameras stops moving, but I'll play, it keeps on moving. And we can never see outside of the left side of the screen. And that's a pretty nice way to go on about it. And with that, you already see a challenge coming. I think that change all of these attributes so that the player can't see outside of this box. And try this now and see how far you get. And really I would recommend use the ruler. It's really going to help you. Okay, welcome back. I hope this worked out. So let's go through it step by step. The first thing I want to do is look at the top one because that's the next one on the line. And again, I used a ruler from the starting position. And I have to go up about, let's say this is 200 pixels. So top. And again in Goodall, negative as upwards, so it is going to be minus 200. Then we have to look to the right next. And he, again, I am going to use my ruler. And this is about 100,150, let's say 1150. We can check off this later on. And then for the bottom, I used a ruler again. And I wanna go slightly outside of it. And this is going to be, I think 900 should be fine. Okay, so the one thing left is that I wanted to do this to that same minus 300. And we're going to add a bit more detail to the top later on. But first of all, I want to improve the ground and add a bit more to ground at the bottom. And again, this ray does not have to be specific. So now we can see the ground at the bottom as well. And yeah, let's add a few more here. And the fill function is quite flexible in terms of how it works. So it gives us a rectangle already. Okay? And there's one more mistake I made that this one is root here. Okay? So all of this seems to be working. Now. All we've really have to do is add more detail to all of this. And I think we can do this in this video because it's quite simple, although again, a bit time consuming. So let me save this entire level. And now we have to add a few more scenes. And let me start with one scene. This scene is going to be a building. So an entirely static object that doesn't do anything, but we want a player to be able to collide with it. And this brings us to a new kind of node. And that one is called a static node. And a static node can work with collisions. So it's kind of working like a kinematic Body 2D. But esthetic note is static, kinda like the name applies. So it can't move by itself. But besides that, it works exactly like the player. So here my new scene, I want to create another node. And what I want to add is aesthetic Body 2D and its aesthetic body for 2D physics. So I create this. And the first thing we have to do is to add as, right. And this is going to get an image that is come from our asserts. And here I call, I put it in levels. And the first one I want to add is a barrel. And the barrel is, I think in the objects dot PNG file. So let me drag it in here. And then we can indeed see the barrel. But we can also see lots of other things. So we have to isolate this barrel, which is very easy to do. I want you to do is Indian spectrum go to region. And here we can enable region. And once that's done, we can't see anything anymore. And we can work with this. If you click on the bottom on texture region. And if you click on this, you can see the image again. And let me expand this a bit. And now I have to select one of these elements or specific area of this. And this is done by just dragging a rectangle around what we want to select. And let me move a bit further and there. And it doesn't have to be too specific because it's not a collision box. But I think this looks alright. And now in the actual code view, we can see this barrel as well. So we can close this one and we can see your barrel, which looks fine. Now next step, we have to add a collision shape again. Just like for our player. So collision shaped 2D. And for this, again, I want to check a new collision box, which is a rectangle and roughly make this fit. And here's one important thing that we are going to change, that I'm going to leave some space at the top and at the bottom. And you are going to see in a second why I'm going to do that. But for now, just trust me. So now we have an image and a sprite and body itself. And let me rename this to barrel. And now if a barrel, let me save the scene into put it into level. So now we have a barrel inside of our level folder. And now I want to instance this into the actual level. And as always, I instance the file. And now I'm going to add the barrel. For now. I'm just going to put it as a child of the level scene. So we have it right at the bottom. And you can see it. And the top part here of the game. And let me move it down the touch. And here's, let me actually run the code. So right now, if I'm in front of the barrel, we have a graphical glitch. But if I'm behind it, we have this nice effect that it looks like the player is behind the barrel, which makes the game look quite nice. So what I want to add is that if the player is in front of it, it looks like the player is above. And we already have the functionality in our game for all of this. And that's the reason why the collision box is a bit smaller than barrel itself. Because I want to play it to overlap with this a little bit to create the illusion of depth. And now all we have to do is to sort these two nodes and the way that they are drawn into correct way. And we already have the functionality for this with the Y sort. And really all we have to do is put our barrel and our player in there. And once that's done, we are getting an error message because now our player is being set in the wrong way. But that can be fixed very easily. Or we have to do is add y sort. And now the player. And now let's try this again. Now to play us on top, not a players behind. And this would also work for the cars, except there's one problem. So let me open the cars again. So here's our car and let me show the collision in a proper way. So for the car to collision Box accounts for the entire height of the car, which is not exactly what we want. Because when the player, for example, is right at the bottom, we don't want to triggered so that we create the illusion that the players slightly in front of it. And to create that, all we have to do to make the collision box a bit smaller. And let me make it able to select the children again. And now if I put this a bit larger, this one should be fine. So let's write off this now. And now, we can even be slightly ok, there was too much. But I think you get the principal that now, if we were even slightly below the car, then this would still trigger well. And you can play around with this, it an immense amount of detail. But I think for our game to this fine, since I'm just illustrating to main principle. But alright, now we have one barrel. And in the same principle, I want you guys to do a bit more work. And specifically what I want you to do, let me open the level folder again. There is a picture called Building dot PNG. And I want you to take this file and just like with the barrel, create an entire building around this. So pause the video now and try it yourself. And let's work on this together. So I'm going to create a new scene. And I'm going to add another note that again is going to be a static Body 2D. And I'm going to call this building. And this building does this before. It's going to get a sprite and a collision shape. And integer sprite, I'm going to drag into building. And here, just as before, we're going to see quite a few different elements. And all I really want is this glass building on the left. So I'm going to use to reach and feature again, enable it, go to texture region. Let me enlarge this. And I want to select just this area here. And a useful feature in this part is to snap mode, that it can snap pixels, which especially for pixel art, is incredibly useful. So let me select exactly there, and this should be good. And let's close this. And yeah, this looks good. So it's not the cleanest thing and you can work with a tile set quite a bit more to make more sophisticated buildings. But again, for our case, you get the principal. You can't add a lot more labor to this. Ok? Now, this needs a collision shade. And just as before, I'm going to add a new rectangle shaped 2D. And I'm going to create the entire width. But 40 hide. And let me properly selected. I'm going to use, let's say this much. It's fine. Actually, we can make this a bit like this, that you have more space in the back. And that's all we need. So let's save this file and we have a building. And now beckon our level. We can just sprinkle this building in wherever we want. And it's all gonna be added to, to why SOT one. So in the y sword, let's add the building. And, and we have to building up here. And here you can see a problem that right now our building is below our waltz. So whenever I try to drag the building, I'm going to end up clicking on the walls, which is an incredibly annoying thing. And to fix that, when you have to building selected, use this icon here or the movement or the W key. And if I click on that, we only going to move the selected item. So now I can move our building and place it wherever I want. And let me copy this thing a couple of times. So we have a few more buildings. It's not going to fit there. And when I made the game and made loads of these buildings and just place them all over the screen. It doesn't have to be too specific. We just creating a rough outline and the player isn't going to see it too much. Anyway. Let me add one in here as well, and a couple on the top. Just one slide to decide. And we can actually do the same thing for the barrel. They don't just want one barrel. I want lots of barrels all around the screen so that we can have a bit more of a fleshed out, gave him some in the middle of the screen. And this starts to resemble a much more developed games and have it run it again. Doesn't tire thing really starts to get more extensive. Oh, and there's one thing I forgot, the wall around the game. Let's work on that now. Ok, now we have a rough outline of the game. Now let's actually create a wall around it. I think I forgot that in an earlier tutorial. Sorry about that. So what we have to do for this is in our level to create a new note. And this has to be a static Body 2D. And to the static Body 2D, we have to add again a collision shape. So collision shape. And a collision shape is going to be a new rectangle. And we can see it right there at the top. And I just want to drag it wide, wide. And this ray doesn't have to be too specific because the play I can't see it anyway. And we place it roughly here. And this would be one of the constraints of the player. So to play, I would never be able to move beyond this point. And now if we copy this, we can just drag it to the bottom. And so now we have the top and the bottom wall. And now let me create one more or static body 2D. And let's add a collision shape. And just as before, we're going to add a rectangle, place it roughly where it needs to be, and then expanded. And just looks fine. And let's move it there. So there's nothing really fancy about this process. All we really want is to create a wall around our player. And then. Well, make our player constraint in this way. Now, there's going to be one problem and let me run the code. You might not even be able to see it, but nothing's happening and the game is ending. And the reason for that is, let me go back to our code. And the important part is now a QR code. This line here, that if anybody is colliding with the car, then we want to end the game. And aesthetic Body 2D is a body for dysfunction here. So whenever a car is colliding with any of these walls to game is ending. And there are couple of ways we can get around this. The most useful one that you have to learn about our collision layers and masts. And let me go to the car itself and click on the area to denote here. And when you look at the inspector, there's one tab called collision. And it sort of collision. We have a layer and a mosque. And let me talk about what they're doing. Every object that has collision mechanics has these collision layers and masts. So all player would have them as well, just like our worlds would have them. And these layers allow us to organize which objects can collide with each other. And a layer is basically on which layer in object is positioned on. And a mask is what layers it can interact with. So we can have, for example, that a player is one layer and the player can interact both of her car layer and to wall layer. But then the car and a wall layer cannot interact with each other whatsoever. And this is exactly what we are going to set up. And to set this up, we have to do a bit of groundwork. And the first thing we have to do is go to Project and project settings and go all the way down to 2D physics. And here we have all the layers that we can have, and they are 20 and total. And the first one I want as player, correctly spelled, of course. Then we have car and then we have wall. So these are the free layers that are possible in our game. And let's close this. And now, when you click on these three dots next to the layer, you can see all the layers. And right now it's as layer 123. And it should be saying player, wall and car or play icon will. And all we have to do is go to another scene and go back to the scene. And now if we click on it, now we can see them. It's a bit weird and good old sometimes elements only refresh when you change the scene and then come back. But right now, our car is only on the car layer. And it cannot interact with the wall, but it can interact with the player. And here also, it can't interact with itself. So cars wouldn't be able to collide with each other. Which in our case doesn't matter too much. But well, it could be a nice thing. But right now we have to go to our player, which we haven't looked at in quite awhile. Note, let's go back to Player. And here we have our kinematic body, and this one also has a collision. And for the layer we are on, the player layer. And for the mask, we want to be able to collide both of a car and wall. So this one is working as well. And now for the really important part, we come back to our level. And here we have to look at these four elements. And for the collision, they are on the wall layer, on the player layer. And I can only interact with the player, they cannot interact with the car, and this has to be the same for all of them. So wall and player. And same for here, does it still wall layer? And this is also to wall layer. So now we basically put each of the collision objects on their own layers and set constraints in terms of what layer can interact with another layer. Which is especially when you create a more complex games that prerequisite for things to work properly. And if you don't do this, you might end up with very weird behavior like we had in our game. Alright, let's hope I did this correctly. And let's try this again so we can see our corresponding. So it's a good start. Now if her walk against the wall, we can still collide with all of them. But one, I forgot to set up the barrels and the buildings, but they seem to be fine. So now we can collide with the wall and with the barrels into cars. And if we wanted to occur, the game ends. So now everything is working well. Cool. I think this video is already getting quite long. So let's leave it at that. I'll actually and there's one more thing I do want to add. That's a logo at the top wall. What we kind of have the end zone. And this is going to be just a picture really quick, is going to be a sprite that I'm going to call logo. And here we just drag in the logo or logos PNG. And then we have these four elements that's used to Red Bird. And again here. But that we enabled that region and select the bird does really not have to be precise. And now we have Albert, let's close this and let's move to.
40. Blade Frogger 14: Score and Game Over: Okay, welcome back. In this video, we are going to add a proper score and we're going to improve the game over screen. And we'll step on down. We're actually really close to finishing the game. It's only going to be two videos left for a finished thing. So let's work on it. Right now. Our game is kind of playable, but there's no point to playing it. So what I want to do that whenever you are reached the top part of the screen, you get 1. And then it will be put back to the bottom of the screen. And then the more often you achieved as the higher your score is going to get. And if you get hit by a car, disco gets put back to 0. So let's implement this. And this is bringing us to a few more concepts. And let's go through them step-by-step while we actually create all of this. So here we're back in our level scene. And the first thing I want to do is that I think our player start position is too high. Let me put it there. And let's put, and let's put the player roughly there again. So just feel it's better. Okay, and now we have to add a score to the top of the screen. This brings us to adding text to a level. And adding a text is just another node that is called label. And the label is a very simple way to display text. There's another way that's called a rich text label. That is for more advanced kinds of texts. But in our case, we just want a simple text. That's all we need. So now we have texts and we can see it in the top here. In the inspector, we can write some text him for now. Let's call it test score. And by default that's going to be a problem. So let me move it a bit further down. And let me run the game. So now we wonder Game Over Score is well in the middle of the screen and it doesn't move, which can be fine for some purposes. But we want the score to always be in the top part of the screen. So how could we do that? And again, for that, there's a very specific node that can do this kind of thing. And it's called a canvas layer. And what the canvas layer does, it's basically looks at the entire screen and puts elements relative to the screen, not to our position on the screen, but we make the labor that child of that. And now if I run the game, we can't see our score anymore. Do achieve it. No, I don't. We have to move our test score to the original position. So somewhere here. And now we can see it right at the top. And it's offset, which is also getting a bit annoying. And let me hide all the elements to make this a bit more obvious. What is going on. There we go. So this blue rectangle is what the canvas layer it's looking at is as the original part of our game. And we wanna put this test score somewhere in the middle of this, which we can do roughly by hand. But Goodall has a couple of nice features that make our office a lot easier. And the most important one is when you look at the top, there is now a layout feature or the Layout tab. And if you click on that, it gives us lots of options of where to place elements. And this is only available for UI elements. And the one I want is sent at all. And now we place this element right and the top of the screen. And you might have also seen these rain little needle eigenfunctions. Their purpose is to make the item responsible to the screen size. So if our screen size increased, they would keep this element in the middle of the screen. But in my case, I don't really care about resizing our screen. So I just move it a bit further down. And now if we run our code, we can't see anything because I made everything invisible. So let's return all of this to visible. And now if her test score at the top of our screen. So that's a pretty good start. And another thing I do want to add is for our game over screen. Here. I also want to add our text. So just as before, I'm going to add a label. And for now I'm just gonna call it test score and place it. Let's say for now roughly in the middle. We're going to organize this a bit more in a second. Okay, so now we have a test score both in our game over screen and an hour level. And for now, they are entirely unconnected, but we're going to add a connection between these two later on. For now, we have to add an actual score. And to do that, we have to add a bit more code. And this is going to happen again in our level code. And here the actual logic is surprisingly easy. What I want to do is let me go back to a level. He said, if our player gets high enough, then want to give it a score. And let me use the ruler just to illustrate this. So if our player gets higher than, let's say this line here, then we're just gonna assume he succeeded. And this line is at about, let's call it 80 pixels. So if the player position is greater than y equals 80, then we're gonna give it a score. And that we can do very easily. So to our level code, we have to add Fung underscore process. And, and here I want to run some code that if y saw George, and here we have quite a few elements in there already. We're going to look for, okay, I could have just typed this button. I'm determined to finish this player dot y. And here again, going up is decreasing the number, so smaller or equal than 80. And if that is the case, for now, let's just influenced this label and right success. And for that, we have to target our label. And to change the text, we need the text parameter. And this is going to be success. And let's try this. And Iran, and we are getting an arrow. And a reason it doesn't do it is we need to first get that position. And then to y. Now let's try this again. And now we can move up. And okay, now we can see and the top of the screen, success. And that looks pretty nice. I want here you see another problem that the top wall is above our player. But then we can change really easily that this top wall will top has to be below the y sort. These buildings. We are just going to move epic for vote. I even had one extra. And again, you can spend much more time to refining all of this. I am not going to worry too much because it really doesn't matter for our game. Okay, but now we are ready seed the code that we can influence this test score if we get high up on the screen. And let me minimize all of those because why sort is getting quite large. Okay? Now we have to add the actual score to our game, and that brings us to an entirely new concept. And let me expand a problem first that we want to have a score inside of our level scene and inside of our game over screen. So how can we create a variable that is global to both of these? And good O has a very specific concept for that. And basically what we can do is have one scene with code attached to it that we are loading into every single scene that is ever being loaded. So that will automatically load once seen whenever we start any scene and then Goodall and 2D scene, we can have different variables like the score that are being global to every single scene. And especially for more complex games, this is becoming quite a big part. And let's say you want to have a global health indicator while you want to check if a global storyline has been reached. So this is another really important part. And to start this, we first have to create a new scene. So I create a new scene. And I'm gonna create an empty node. And this node I'm going to call, it's called a Global and all uppercase letters. And I'm going to save this global scene, put it in the main folder. And now this global node also get script that I also call global. And in here a variable that is called score. And by default it is going to be 0. And now I want to have this scene available in literally every other scene by default. And to achieve that, we have to go to Project and project settings. And there's a file called auto load. And auto load loads a scene automatically, kinda like the implies. The first one we have to do is to select our scene, so does global scene. And then we can give it a name. So global, I'm just gonna leave it at that and we can add it. And here Singleton is important to have this enabled because this makes it easier for us to use the scene. But for now, this is all I need. So I can close this. And this is literally all I have to do. So now we can go back to our level and Quebec in our code. And let's say just as a start, when this thing is r1, I want to use the global score to influence the text. I'm going to select our label node dot text. And it's going to get score double colon. And then I'm going to add STR. And here we can use the global keyword. So the way we named the file earlier, and now we can just select the score. So this variable here. And if I run the code now, this should actually be working. And we're going to expect to score 0, perfect. So we know that this is working. Now what we need to do is whenever the player reaches the top area, then we want to add one to this. And this is going to happen down here. And really, all we have to do is get global dot score plus equal one. And let's try Office. So let me run straight up. And now we left success being played here. So let me get rid of this because we don't need it anymore. And we want to constantly get the global scope. So not just when the function is ready, but instead on every single cycle of the game loop. So but now distribute working. So we start with score 0 and hope I achieve it there. Okay, now we get score reaching because every time we are above that line, which I guess is a good start, but not the point of the game. So let's change this. And basically what I want to do is whenever the player reaches this top line, I want to reset the position of the player. Which can also be done very easily. So I use the dollar sign again, was sort slash player dot position is equal to play a staff position, dot position. And let me remove this 11 forbidden. So what's happening now is that whenever we are reaching disposition, the player's gonna be reset to the start position and we're going to add one to the global score. And let's try this. This should be running actually. So everyone straight up. And now we have School one and we are back in the boardroom. And now we can play the game properly. That's a bit more difficult. And there we go. We have a score two. And this score is global, so it's available in every single scene. So let me close this. And when I go to the game screen, I can also influence this test score. And to do that, I have to add another script that is going to be empty and it's going to be in the same folder. So let's create it. And here's going to be your challenge. Now, add some code to make this label showed a score that to play I had when he crashed with the car. And pause the video now and try this yourself. All right, how did it work out? There are actually two different ways of approaching this. So obviously, we are going to need a function. And now you might have to question, do we need ready or do we need process? And ultimately both would be fine. So we could ever create a score when distinctness ready or on every single cycle off the game loop. I am going to go with process for the simple reason that later on I'm going to add some code that we are checking for keyboard input. So that we have all of this in one function, which makes things a bit more efficient. Now what I wanted to do. Is target. Our label dot text is equal to score and plus string. And again, global score. This one is available everywhere, including this one. And let's try this. So I press F5, which level again? And let me move up. I hope I'm an edge. There we go. So now we have one score. And when we come to our game over screen, we have a score of one as well. So things are working quite well. Now, the only thing really left to do before we come to refinement is to just to give us the ability to return to the game now. And for that, we have to check for keyboard input here. And this again happens into code that I want an if statement. If input is action pressed. And now we have to check a specific kind of keyboard input. And I want to go down with the Space key, which is UI select. And actually just to illustrate how this works, let's customize this key. And to customize a key or to create a new one, we have to go to project, Project Settings. And then we have an input map. And you can see all the names we have seen earlier. For example, here is UI select. And this could ever be to Space key, or it could be a button on a game controller, select the Xbox, Nintendo console, or a dual Shock controller for PlayStation. And these are all the ones we have seen earlier. So for example, there's also used up and UI, right? And he's on the right and the up key. And here we can also create our own action and a corresponding keyboard input. And let me create one that I called start game. Then I click on Add, and now we have a new action. And here with this plus icon, we can add an event. And for this event we can add a key. And now we have to press a key wanted select and my case space. And now we have created a new keyboard input map. So I can close all of this. And now instead of u I select, I can call this GameStart. And this is the preferred way if you actually want to create a more complex game. Because you want to have all the control about what buttons to what. But that's really the principle. So it's not too difficult. But alright. Now, if this one is pressed, we want to restart our game. And to do that, we need get tree. We have done this before actually and change scene. And we want to go back to our level scene. And let's try this. Let's see how far we get. So let me run up again. Now we have school one. Let me down. Now I have a score of one. Now I press space and we are back here. And this is working pretty well. So now I can actually play this game. And OK. You might want to work on the balancing, but there's one more thing that the score doesn't reset. And this is also very simple thing to change. So all we really have to do is if we are restarting to game by pressing this button, we also want to get a global score and set it back to 0. So we are starting from 0 again. And that went done. We actually have all the basics and let me try this. So now we have score one. This is also shown in the game over screen. If I start again now by pressing space, we could back to score 0. And this is working. And with all of the Upon done, we actually have all the basics for our game. And this finishes this video. And all we're going to do for the next video is add a few more details to make the game look nicer. So I will see you then.
41. Blade Frogger 15: Refinement: Welcome back to the final part of this game and would basically finished do remain game. The only thing we really have to do now is to add some more details to make it look nicer. And the specific things I want to add is a Custom Game fund, some sounds. And to make the game over screen look a bit nicer. And I also want to image of a bar to our main game. I had that in the trailer and the game doesn't look nice without it. So there's gonna be another thing we are going to add. And that is literally at, let's go through it step-by-step. So let's start with the font. And again, just like in PyGame, to first bring if you want a custom Fund, is that we need a file with a custom font. And in our game folder, I have the Blade Runner fund, which is going to look quite nice with our game, I think. So let's actually implement this for right now. So here we're back in our main game level. And what I want to do is for this labeled here, I want to give it the Blade Runner font, and I already have it open in our file system down here. So in acids fond, we have Blade, RMS, underscore dot pdf. Very strange named, but doesn't really matter. So how do we apply a custom font to this font? There are a couple of steps. So when we scroll down in the inspector, you have custom fonts, which sounds quite appropriate fast. And in here, we have to create either bitmap font or dynamic font. We want it dynamic font. Once we have clicked that, nothing happens except that the text is appears. But don't worry about that. Now, if you click on this dynamic font again, you get some more options and do important one is font. And here we have font data and interfere. We can drag our font data. And now we can see test score in the bladder on a format. You could also go with settings and increase the size. Let me make mine a touch larger. And let's see how this looks in game. And score of 0 just looks quite right. And scores one. Yeah, I'm quite happy with that. So this'll be our first fund. And I just realized in our game, these positions are a bit too far to the left. Let me move all of them a bit further to the right. So d counts into corresponding, into the level. Ok, now we have a better font and we can do the same or our game over screen. So game over screen. And is it going to be your challenge for now that this test score is supposed to be in the Blade Runner fund. So pause the video now and try to implement this yourself. So here's the test score, and I want to create a custom font again. So I opened the asset folder and go to fund, and here's our file and an Indian specter. Let me close all the other stuff. I go to custom font. I click again on dynamic font. Then I click on dynamic font again. I go to fund. And here I drag and drop our Later on in there. And this is I think could get a bit larger. Let's put it to 26. Yeah. And you can play around with the colors a bid. You can also add more custom colors here. So if you click on this, this will be black. It's up to you. Play around with this as you see fit. And this is all we need for domain fund. So now let me kill myself. If we go and we have a score of 0. So this one starts, look better. Cool. So this is taken care off the fonts itself. Now what I want to do is to improve the look of our game over screen. This would be the second part of this tutorial. And the game over screen right now it looks terrible. We just don't have too much. And first let me put this back to the centre. So right in the center. And before going on, The first thing I want to do is to create a new label, is going to show the title of the game. So for that, let's add a new label. And I'm going to call this blade Fraga. And here, just as usual, I'm going to create a custom fund, new dynamic font. You do lots of this stuff very automatically at some point. And I'm going to drag the font and there. And now I'm going to create the size of this fond and make it quite large. Only has one strange thing that upper-case letters in this font can look a bit weird. So here we use an uppercase letter, which is the icon of a guy with a gun, which is weird. But if we change this to a lowercase letter, it just shows a B. And let's call this title. So now we have these two funds and we can roughly place them in the middle of the screen. And now with these layered elements, we can place all of this in quite an easy way. There are a couple of ways to reduce a bit more specifically, but in our case, our game is so simple, we don't have to worry about it. Oh, let me just move it by hand. And again, holding shift moves the object only in one axis. And I think does looks decent enough. So now let's give this a background image. And to give it a background image, we need a texture wrecked. And this is basically a picture, although it is different from a sprite. And these differences are important that, uh, text direct is a UI element. It's just that to show an overlay and a picture of, let say, Players Health or some coins. So you can't really move it on the screen freely. Instead, you can place it in very specific ways with of a UI elements is sprite, on the other hand, is supposed to be right in the game, so something that can be moved by the player. Now you could use a sprite for an UI element, but it's not optimized for that. So even though those two notes do something seemingly similar, they have very different purposes. So just be aware of that. But anyway, here we have our text direct and in our screens on our assets and screens folder, we have a file called sidewalk texture. And I'm gonna place this inside of this. And now we have just an image of the sidewalk. And now what we want to do if this is to cover the entire background, and we could just drag it, but nothing would happen. But this node has a few attributes to make all of this easier. So if you look at the inspector, we have one that's called expand. And if I click on it, it drags out the entire thing and scaled it. And let me move it behind our label. It's not, we don't want to scale it, instead we want to tile it. And appropriately we have stretch mode. And right now it's set to scale on expand. But instead what we want is Tile. And with tiled, it just tilde's the entire thing. So this is really all we have to do. And it's still a fairly basic picture, but I think as a game screen, it looks fine for now. So I'll, we'll consider this one has finished. So dead leaves us one thing left to do, and that is to add sound. And sound really makes a game more immersive and disk changes how to game field's drastically. And I wonder some to be played at every part of the game. So what we can do is when we go back to our global scene. So I selected here and the file system. And what I want to do here is to add an audio stream player. And you might notice, we have an audio stream player in audio stream player 2D and an audio stream player 3D. And you might be wondering, why do we have one in 2D. And 3D isn't sound always the same no matter what the dimension. And the answer here is kinda Yes, but not really. So what these two notes are doing is that they have positional arguments for the sound. And what that basically means is to favor away to sound is the less loaded gets. Whereas for the audio stream player does sound always has the same volume. And in our case, we don't care what the volume at a distance. We just want the sound to be played in general. So let's click on this one. And we have an audio stream player. And now in our game asset folder, let me close all the other ones. We have an audio folder, and in here we have two files. We have cyberspace and that's the background music and aware of Windows RDD. And it has a sounded supposed to be played well, who went around? And let's start with the background music. Or we have to do is drag this file into the stream. And by itself, nothing is happening. However, when I now click on plane, you should be able to hear it. And you are even going to be able to hear it inside of the game engine, which gets really annoying. So instead what I wanna do is click on autoplay, sorted. It starts whenever we start the game and we cannot hear it inside of our game engine. But let's try it now. Let's start our game. And we have our game and we can hit assault. So this works quite well. So almost done. The one last thing is that if we are reaching this top area here, let me highlight it with the ruler. So if you're reaching this area up here, then we want to play to win sound so that a player knows who succeeded. And this is going to be quite easy to add because we already have an if statement, this one here, that if our player is in this position, we wanna play a certain sound. And for that, let me remove or close all of the other ones. So all we have to do is add another audio stream player in here. And I'm going to call this when sound. And this one sound is going to get windowed, OGG. And there's going to be one important thing that when you have this windowed OGG and you have an audio stream player, if it starts playing, it never stops playing. And the reason for that is that when you input the file, there's a loop file checked. So all you have to do is uncheck this and reimported. And you've got to go. Now this file or the sound is only going to play once. And that the last bit of code for disk. If this condition here is true, then we want our, I called it when sound. And we just wanted to play. And it's going to play only once. So let's wrap up this, not so we can here and we can see the background and what we can hear the background music and offices working really well. So if I crash into a car and you can see our title screen and your score. And if I started again, all of this goes back. And we have the music. Again. Let me try to actually finish the game. And there we go. So this is working pretty well. And we have fully finished game. So that's actually quite cool. And obviously you can add quite a bit more. And the most important thing I would recommend to work on the layout often level, because right now it's very scars and I just added some elements. You can spend hours and refining this data by itself with really nice setup for Locke follows that one gun. We can actually started working in a 3D game. There's going to be much better. We're just going to get much better funded. So I will see you then.
42. Introduction to 3D: Alright, hello and welcome to the final part in this tutorial series. In this part, we are going to make our 3D game. And before we actually jump into the 3D game, I want to talk about how Frida game assets are being made. And while this isn't exactly necessary to know, I fingered is going to be really helpful for you to understand how these acids are made. So you have a better understanding of what's going on. And as will be a fairly short video. So let's start talking about how 3D models are being made. It's actually quite simple and they have reconnected concept you have to understand. These are called vertices, edges and surfaces. And how every freedom model is essentially made is that you are putting points in a three-dimensional space. And each of these points is called a vertex. And if you're connecting two vertices, then you have an edge. And if you are connecting three edges, you are getting a surface. And surface is what you can actually see. And if you have lots of surfaces, then these can create an entire module that we can't see. And let me give an example. So here we can see a particularly impressive 3D model. So this guy looks amazing and you can zoom around and seen from different sides. So wide a nice figure. And let me show you how it's made. So here we can see all the vertices of this model. And if I zoom in, we can see each of these points and we could select it. We could even select multiple. And I try to move them, but the model is quite large. But here we can literally just move them around and create our own freedom model. Now for this particular example, because the model is so large, it's all very slow. But this is effectively what's happening here. That if I zoom in and here we have one vertex, and this vertex is connected to this vertex and this vertex. And they're connected by edges. So this edge here and this edge here. And then out of these free edges combined, they are creating a surface. And then we have a crazy amount of services for this model. I had, I don't even know how many surfaces they are, but quite a lot. And then each of these surface gets a specific color. And when you bring them altogether, they are creating a very sophisticated model. And that's really how every fruity model works. Now this particular model is not suitable for video games, and it was not made for video games for the simple reason that there are way too many vertices. And this is a consideration for video games that you want to have the least amount of vertices because that makes your game run faster. And let me show you a different model. So here we have a model that's completely white. And if I show you the vertices here, we have substantially less because they are all squares and they take up much more space. So this model is much more optimized for game development because we have fewer surfaces that are easier to work with. And the first model I showed you would be impossible to run a game. This one would be working fine. And this one probably has less than a quarter of the surfaces of the last model. And now you might be wondering, if we're reducing the amount of geometry. Aren't we going to lose some detail? And you would be right if we have less geometry, so less vertices and edges and surfaces, we are going to have less detail. But that is usually accounted for by having very specific kind of textures. And for that, let me show you. So here we are on a different program. It's called substance painter. And substance painter is focusing on creating textures for video games. So the colors we see on the objects. And right now, you can see what looks like a frog, but it doesn't look as great as it could be right now. Because all the colors are fairly flat. But you can change this very easily by just applying different kind of colors to it. And let me show you what this means. But right now, the frog looks pretty boring. But now if I add a few more textures, now we have a frog that looks substantially better, but I did not change the underlying geometry. Instead what I did, I applied a couple more texture to it. And this is what you see all the time in video game models that you have a fairly low geometry model. But on this model, you apply lots of different textures that make it look more three-dimensional. And let me show you some examples of this. So what you're seeing right now is called a normal map. And I think on here you can already tell quite a few details. And this one here, but we caught a curvature map and this one would help us to get much better edges. And each modal can have lots of different textures applied to it. And if you apply all of these textures, give them modern, much more detailed and it would actually have. And this is what you see in video games really often that most of your game objects are fairly low poly, and for most of the details there just painted on. And this is giving models more detail while still making it easy to calculate them into video game, which makes games much smoother. But this also means when we are opening an object in a video game engine, this object is going to have lots of different textures that we have to work with. In our case, we are only going to work with very basic ones. But just be aware of that a very simple 3D object can have lots of different textures applied to it. But okay, there was some detail. Let's go and how actual 3D game I will see you then.
43. Vegetable Rain 1: Creating a 3D object: And hello. And in this tutorial, we are going to create our first 3D object. In Goodall. It is not going to be anything fancy. We are effectively going to create a cube in good dough. But this is going to be a good start to talk about the fundamentals of 3D that I talked about in the last video. So let's jump right in and let's have a look at Godot in 3D. So here we are back in our Godot editor, and now we're looking at our 3D scene. And let's first talk about how to navigate in this, because that's quite important, how to lay out elements later on. So if you ultimately mouse button and move your mouse, you are rotating around the scene. If you use the mouse wheel, you can go in and out or zoom in and out. And if you hold shift, you can pan around. And this should already help you quite a bit to just orient yourself in this 3D space. And I would really recommend to use a mouse. You can theoretically use a touchpad, but it is going to be much less convenient and using a mouse. So just to be aware of them. But alright, now, how do we create our first object to the scene? And for that, I'm first going to create a 3D scene. So I click on 3D scene and the century. And now we have what's called a spatial node. It doesn't show any information. But what we can see now, it's called a Friday gizmo. And this one has a couple of different things. So you can see arrows on the outside. You can see a couple of circles. And then we can see d's areas here. And these help you to orient the object in space. So the arrows here, they move in a certain direction so you can drag and drop them and as move to things. And let me move back to 0. And if you use any of these areas in the middle, then you are moving into axes at the same time. So here we have the x axis and here we have the z-axis. And if you use the green area, then you move both in x and z. So this makes it easier to move around. And then the circled around it. They are there to rotate the object. And you can rotate anything in all the three dimensions you have. Let me bring this back to 0. And for that, I can go to our Inspector and then we have our transform tab, and then there we have translation, rotation degrees and scale. And they wanted to put a rotation degrees back to 01. Thing you do want to be aware of here is that in 3D the position is called translation. So the name is slightly different, but that's really all there is. All you really have to remember is that in 2D you have a position. In 3D, you have a translation. And translation has an X, Y, and Z coordinate. So you can move in a three-dimensional space. And alright, with all of that London, now we have a basic 3D scene. So that's a pretty good start. But we can't see any object yet. And for that, we are going to need another node. So let me click on Add Node. And what I want to add is called a CISG box. I already had it pre-selected. So if you want to get it just type C as G. And now you actually can see quite a few different objects. And CISG stands for constructive solid geometry. Which is a really fancy way of saying that could do, creates geometry for us. And these nodes can do some really fancy stuff. But in our case, all we want is a box. But you could have different objects in here as well. But first, we want to Box. And with that being added, now we can see our box. And now it's going to make much more sense to use a 3D gizmo. Because now we can actually see when we rotate staff, that this box can be moved around in 3D space. And we can move around it. And let me reduce all of this back to 0. And this brings us to our first object. So now we have a free dequeued. It doesn't look too fancy, but it's a pretty good start. And what I want to do with this freely box is to turn it into the floor of our game. So let me rename it. Let's call a platform. And obviously our platform doesn't have to be a cube. That has to be a box that somewhat flat. So I click on these retinal dots to change the dimension of this box and I make it roughly flat. And if you look at the top of the inspector, there you can see width, height, and depth. And in here you can also change all of these attributes. And I want that we have to be ten, the depth to be ten, and the Hive doesn't really matter. So let's put at 0.1. And now we have a box that is ten units wide, ten units deep, and 0.01. unit PSI. Kind of ideal platform that we have. So this would be our very first object. But now, here's one question you might be asking yourself, why is this box blue? And in reality, it actually isn't blue, it's white. But let's talk about that. So with this platform selected, I can click on material. And if I click on the drop-down menu, we have a new spatial material and a new shader material. Both of these can give this box in new color. For now, let's look at spatial material. And now we get a little sphere that is white, and this shows the color of this object. And here you might be even more wondering why justice when white wise this one blue. So let's click on this sphere again. And here we can see lots of different colors. And this is why I talked about in the last video in a bit more detail, that every object in 3D can have lots of different textures applied to it. And we can influence all of them in Goodall. So the easiest one to talk about would be albedo. And this is just a colour. And in here we have white. And if I click on it, we can change the color to something red. They are still going to be a blue tent around that are going to talk about this in just a second. But for now, I want this to be a rough, greenest shade. So let's change it to something like this. And I deselected it. Let me open it again. But in here, there's lots of other stuff you can address. For example, we have metallic and this is how shiny does. So if I make this fold, then we would have a much bigger reflection. And you can kind of see this, but we don't want to offload to be italic. There could also be roughness that we could influence and lots of different things in here. And out of these. Could be influenced and I can't give you quite fancy looking objects. Now, why is this thing blew? And the reason is, if we look in the background is that our Skybox, all the fingers see around it is also blue. And if you've ever studied color theory, you might remember this, that the surrounding color influences the object we have. So what basically happens is that the light we get from this Skybox is being reflected by our object. And since the light we're getting is slightly blue, object is also going to be slightly blue. And for now, we are going to ignore that. But later on we can change how the light is going to look. So don't worry too much about it. Alright, we've done, we have a plane green platform that should become our level later on. And this is bringing us to our first exercise that I want you guys to create a couple more CISG boxes and place them around our level so that they are creating some walls around it that the player cannot cross. So pause the video now and try to create them. All right, well, welcome back. I hope that wasn't too difficult, but let's try it together now. So the spatial mode selected and actually we can rename it to level. I want to add another CISG box. So I double-click on it again. And now we can see another box. And this box, I gonna make a bit thinner by using the red dot. And I'm going to make it wider. And that looks about right. And now I use the blue arrow to move it to the right. And this would be our first wall. The color I am not going to touch because it's not going to matter because later on we're going to hide this wall to the player cannot see it anyway. So now wave are first of all, and let me rename it to Wall. And I copied the entire thing and just move it to the other side of the platform. Roughly. That looks alright. Then I copy this platform again. Move it roughly to the middle. And now I use the green line around it to rotate it. And if you hold control pressed, Daniel, move in 15 degree increments, which makes it very easy to get to 90 degrees. And now use the red arrow to move it to the bottom of the platform. And that looks about right. And no, I copy it again by pressing control D. And now use the red arrow again to move it here. And that looks about right. Now we have a platform with some walls around it. Obviously very basic, but a pretty good start to get ready for more sophisticated objects. And before we get that, I'm going to clean up a tiny bit. So I'm going to move all of these worlds into our platform. And then I can hide them, which makes our century look quite a bit nicer. And then I'm going to save our level. And I'm going to create a new folder for this level that I'm going to call level and save it in here. And now we're good to go. And in the next tutorial, we're going to add some better looking objects to this. I will see you then.
44. Vegetable Rain 2: Level setup: Welcome back. In this video, we're going to import the trees and to grasp oh, a level so that we can create some static objects that are going to make our game look much prettier. And I really want to emphasize here that creating a fruit dimensional static object is really similar compared to creating a 2D static object. We are still going to start with a static node. Then we need something to make this object visible, and then we need to collision shape. So what a specific notes are going to look a bit different. The fundamental principle is exactly the same. So does nothing really new you have to learn. If you paid attention when we made the last game, all of this should feel quite familiar to you. But let's jump right into our game and let's have a look at this. So here we are back in our game. And the first thing you might have noticed is that we don't really have any kind of objects to work with. So let's import them. And for that, here's our vegetable rain folder, and here are all my assets. And all you have to do again is to direct the assets into the folder. And when I go back to Goodall, notice importing for quite a bit. And now we have all of our assets. And here we will not have to re-import all of this later on. All of this is by default imported in the right way. And now we have lots of different stuff. The one thing we are going to work with the most right now is this world folder. And let me actually make it a bit larger. And what you can see in here is quite a few different things. We have a couple of scenes which you can see by having to seeing icon on the left. Then you have some objects that have an x here, which is an era when Godot imports them. So these two objects both work in the same way. They are both scenes. And I don't know why Das and acts, but you can't save Lee ignored. It is not going to make a difference. And what else we have is called the material. So we have a wood bark material, we have grass material, we have dirt material, and we have elifs green material. And these are going to give the colors of these objects. And let's start with a really simple one. I want to look at grass large. So this one, and to get this thing into our scene, or we have to do is drag and drop it into our scene. And then goto creates the node four it automatically. And now let me minimize all of this again, so we have more space, something like this. So now when we look into our scene, we can see some grass. Right now. It's floating in the air. So if I move it down a bit, now it's on the ground and let me hide the platform walls so we can actually see what's going on. Alright, here we go. So here's some grass and it is looking really simple. So that is really all you need to import it. You can literally just drag and drop stuff in there. And then Godot imports it. And that is all that was needed. So now we have our grass. And if you look in the same tree. You can see our grass large. But now what you might notice is that good or important this as a new scene. So let me click on it just to see what's going on. And here we can create a new inherited or old anyway. And if you click on new inherited, you are going to create an entirely new scene, which I don't want. So I click on Open anyway. And in here we can see a whole new scene. And this grass large is actually important bid. So this is where we have our mesh and this is where all the information is being stored. And these two nodes we could safely ignore, but good OK, creates them when it's importing different objects, but it doesn't really have any measurable impact. We can just safely ignore all of this. So here's our grass. And when look at mesh, you can click on it. And there you can see lots of different attributes as well. And it tells us the surface and there we can see our material. And if you click on that, we could even change the color of this. So I can change all of this and make our grass look different. But I don't really want to goes, I'm happy with this grass. So let me close the scene and I don't want to save it. And with that one done, let's create our first static body. Because right now the graph that we're having is not going to have any collision buddy. So the player can walk through it perfectly fine, which is what we want for grass. But for the trees, we want them to have a collision body. And just to reiterate things that our trees are going to take three important notes. We have to start with the static body. Then we have to give it an object so we can see the tree. And then we have to give it a collision shape. But that is literally all we need. And this is still very similar compared to what we have done in 2D. So here we're back in our editor and let's create a new scene. And I want to create another node that is called static body. And I select this one. And I'm going to rename this scene to tree one. So now we have our static body, and in our file system, we have tree blocks, tree, default, tree, fad, and tree. Ok. And I'm going to turn all of these into static bodies. And let me start with Tree block. So if I drag it into the view port, we can see our tree block. And right now it's quite often Center. So I go to transform and in translation, I enter 0000. And now it's in the center. And I think right now it's probably quite small. So let's double the size of this thing by going to scale and typing a tool into all of them. So now our tree is twice as large. And yeah, I think that looks a bit better. And the last one we are going to need is to create our collision body and aesthetic body actually complaints about this, that this node has no shape, so we have to give it one. So with the tree selected, I'm going to give it a coup lesion shape, just like we have done earlier. And here, again, we have to click on Shape and give it a new shape. And now we could either go with box shape or capsule shape, both of which would be okay. But since we haven't used it before, let's go with capsule shape. And that gives us a capsule. And here again, we can use the red dots to move it. And there's something slightly annoying that this by default snaps to different increments. So we go from 0 to one to two. But this can be changed very easily by just holding down Shift. And then you can move it much fine. So I move it roughly to the width of the tree trunk. And I think that looks about fine. And now if you move on the red circle, you can rotate this thing. And we're holding control. I can perfectly move this to 90 degrees. And then I used the green arrow to move it up ever so slightly. And this log's fine, possibly a bit large, but I think it's OK. One thing to keep in mind, we only really care about having a collision shape for the tree trunk. We don't care about the leaves at the top because the player can't jump. So to play as only ever going to interact with the tree trunk, the leaves doesn't matter. So we are just going to ignore them. They are going to be visible. But you can't just walk through them, kinda like in real life actually. But this is all we need to follow a tree. So we can minimize all of this and save it. And I'm going to create a new folder that I'm going to call treats. And click on OK and save our tree in here. And now we have a safe tree. And with that, we can go back to our level scene and minimize all of this. And now we just have to create an instance of this tree in our level scene. And this happens in the same way. I click on the instance I can, and now I select tree one. And with that, we have our tree. And we could move it in this level scene and move it roughly where it would look nice. It's entirely up to you where you want to place it. And we are going to create quite a few more trees and a second. So this looks nice. With that one done. Let's create another tree. So I create a new scene. Again, I click on adding an Evernote and is going to be a static body. Dan is going to be 3-2. And today I'm going to add tree default. And I add it to our scene. And again, it is off-center. So I changed the translation to 000, and I changed the scale to 2.52.52.5 to make it quite a bit larger. And now the last thing I have to do is to add our collision shape. And this again is going to be a capsule. So use the red dots to move it roughly into position. It really doesn't have to be perfect or players not going to notice if there's a slightly too large or too small and make it a bit larger and move it up. And this looks about fine. Okay, maybe bid large, tiny bit smaller. Okay, just looks fine now. So now I save this scene as well as tree two and move it in folder and save it. And now another lever scene, I'm going to create an instance of this second tree. And here we go. So now I can move this thing around. And again, Godot likes to snap to different objects. If you hold Shift down, this is not going to have many more. And let me rotate it ever so slightly to make it look nicer. And maybe a bit too much like this. So now we have two different trees that a player could collide with. And this is bringing us to our next exercise. That we have two more trees in our scene folder. We have three fad and tree. Ok. I want you guys to create two more trees in the same way. We have a static body with this object and a collision shape, and then an instance of it in our main level scene. So pause the video now and try all of this yourself. So I create a new scene. I create again of a node and I click on static body. And in here I add our tree fat. And I move this tree FAD to the center of our scene. And I'm going to scale it up by quite a bit. So now we have our tree and now we need our collision shape. And again, I'm going to go with capsule shape. And I move it roughly into position. There we go. And rotate it to 90 degrees, move it up. And here's one thing for a tree fat I didn't really mention. The trunk is really small. Sort of player is probably going to collide with the green stuff first and then a trunk later. So for this tree, I am going to create a collision shape around the green parts. But it would also be fine to just have the tree trunk. But then the player could move inside of this. And this might look weird later on. But I think ultimately both versions would be fine. And in this case there's quite an air gap above the tree into collision shape. It is not going to matter since our player cannot jump. So I am just going to ignore it. But alright, let me rename this tree and save it. And then let's create the final tree, which is again going to be a static body. Then I'm going to add the tree as well, centre ij. It's quite an annoying between Ecuador doesn't do this automatically. And then let's scale this one up. And let's make this 2.42.42.42.4. So now we have our OK. And I'm going to add our collision shape to it, which is again going to be a capsule shape. And I make this roughly the same size rotated and move it up. And this is probably too wide yet is definitely too wide. And okay, this one looks better. And I'm just going to call it a tree form, but you could call it OK. It's up to you. It really doesn't matter. Ok, and now we have our last tree. Now back in our lever scene, I'm going to instance both of these. And you can instance two objects at the same time if you have both selected. So click on open, and now we have both trees and let me separate them. Alright, this is already making our level look quite a bit nicer. And obviously you can copy these objects to make our game look nicer. So let me copy our OK. And let me move it somewhere here. Then we can copy the little tree and move it somewhere here. And here, it is perfectly fine for trees to overlap. And this is what you see quite often in video games that things just overlap. And well, that's fine, but doesn't really cause any harm. And it can make things look a bit more chaotic and natural. So I'm literally just going to place the trees randomly and our level and see what things are looking good. And this one is quite nice looking tree. So let's copy this one a few more times. And let's put it here as well. Let me rotate it a couple more times. And I think this space here is going to need a bit more of a tree. And okay, these are all the bits to lined up. And again, this is why I talked about in the last video. For video game development. You can spend hours or even days creating a level. In my case, it's not really too important how it's laid out because it's just a tutorial. But in your case, I would recommend to spend a bit more time to create a level you really like. But in our case, I think this is a pretty good start. And let me put all off the trees into one node. So with our level selected, I'm going to create another special note that I call trees. And that plays all our trees in there. So it is cleans up our scene tree quite considerably. So there's one more thing I would like to do that right now. We do have grass, but it only covers one very specific spot. So the first thing I want to do is to add another type of grass, which is grass leaves in our file system. By going to add this to our level. And it is going to end up down there. Let me lift it up and place it in there and move it on the level itself. So now we have at least two kinds of grass. For now, I'm just going to put next to each other. So I want these two types of graphs to cover the entire ground. And only really I'm going to do for that is just copy them quite a few times. And this is going to end up with quite a few different notes of grass. So the first thing I'm going to do is to create another node that is going to be kind of a folder that I'm going to call wrath and a copy both of these graphs nodes in there. And now all I want to do is with both selected, I click Control D to copy them and I'm going to move them. Let's put it roughly like this. And now what we have to do is just copy all of these things quite a few times. And sometimes copy just a single one, move it around a bit so that you have a bit more chaos in our scene. Sort of grass looks more natural. And this is probably as well. Ok, so now we have a very basic spot of grass. And this, I want to copy again with all of them selected and move all of these objects around together. And this, I just keep on doing until we covered the entire ground in grass. And this is not the most efficient way of doing this. But I think for our little level, this should be alright, celebrity copy all of this a few more times. So if you look at this right now, it looks fairly chaotic, sort of play a wouldn't really notice if this is just copy and pasted. Again. I copy all of them. And we can just drag and drop them through a level, maybe rotate down ever so slightly. And to all of this a few more times. And this is already getting quite close to a proper grass covered floor. And last one, I think. Copy it one more time. Why should we rotated? Ok, now it's going to be last one. All right, and here we go. Now, our entire floor is covered in grass. And this is looking quite nice already. So we have a very low poly GameScene. And here's one thing you don't want to be aware of that right now. We already have quite a large amount of grass. So I didn't count how many nodes we have, but probably a few 100. And this is something you really want to be aware of for your game. That the more freely objects you have, the more difficult your game is going to be to run. And especially on slower hardware, this might become a problem later on. But in our case, all of this is very simple geometry, so it should not be a problem. But for more complex projects, this is really something you want to be aware of. It in some scenes. You want to be very careful how many objects you are adding. Because if you are too many objects, the game might not be run as fast as it needs to be. So something to keep in mind, but in our case, not a problem. So with that, we have our basic level. So let's save this one now. And in our next tutorial, we are going to create our player character. I will see you then.
45. Vegetable Rain 3: The player character: In this tutorial, we are going to create our player character. Or rather, we are going to start creating our player character. Because it's going to be slightly more complex. Although in the most basic sense, it is going to be still quite similar compared to what we have done in the last game. We are still going to create a kinematic body and give this kinematic body is shaped to collide with other things. One difference now is that our player by itself is not going to be visible. And a reason for that is that we are playing as the character. And since we are looking from the first-person view, we are never going to see the player character. So we can safely does not have a player character visible in our scene. So the only thing really visible from our player are going to be the two guns that He's wielding. But we're coming to that later on. For now, let's start by creating our player character. So here I'm back in my level scene. And what I want to do is to create a new scene. And in here is going to be our player character. And the first one, the need for that is to create a new node. And what I want is a kinematic body. And this time, make sure the kinematic body, not a kinematic Body 2D because we are working in the three-dimensional space. So I click on Create and rename this to layer. And let me save the scene right now into new folder that I call player. And click on Save. Ok. So now we have our player scene and one thing we absolutely have to add is a collision shape. So I click on adding a child node and I want to add a collision shape. And this works in the same way compared to the trees. So we click on shape and we are going to add a capsule shape. And now I'm going to eyeball how large this has to be. It obviously has to be upright. So let me move it up. And here, when I click on capsule, we can see the radios, the hydrogen and the margin. And let's make this roughly two dimensions of a human being. So lets go height for tomb, for roughly two meters, quite large, but I guess it's better than one. And for radios, let's make it a bit wider, I guess, slightly. Ok. Let's go with 0.5. Yeah, this looks about right. So what I'm looking for is that this shape is roughly resembling a human being. It really doesn't have to be precise. So this dimension here is roughly to lift of a shoulder width of a normal human being, which I think looks okay. So this is going to be the body of our player and it doesn't need to be visible because we're never going to see it. And for the next part, we have to give this one some eyes. Sort of we can see from this perspective. And for that, we are going to need a camera. So if the player selected, I am going to create a camera. And here you have a couple of different cameras. But we don't have to worry about it. We just want a normal camera. So I click on Create and change the name to eyes to display what it means. I don't want to add this one straight to our player. Instead, I want to create another node, which is going to be a special load that is going to be our head. And our eyes are a child of this head. And you're going to see why I'm doing this later on. The main reason is that how the player looks around, easier to achieve if we had Node and then the ice node. But I'm going to explain this later on in quite a bit more detail. But now we have our player had and our eyes. And I want this to be roughly where our players had would be. Let's put it roughly here. It looks about OK. And one thing left to do with the cameras elected is there we have to make this our current camera. So it we want to run the game can see from this node. And that is the basic outline for our player. So let me save it and beckon our level. I am going to create an instance of this player. So player, I'm going to add it. And now we can see it in our level C or well, you can't see it, but you can see the camera icon, which is good enough. And now when I press on F6 and we're running the scene, I can see our level C and it feels like we are a bit too large, I think. Yeah, let's make our player a bit smaller. So I click on collision shape again. And I'm going to change the height to 1.5 and move this entire thing a bit down. And move to hat down as well. And let's save all of this. And let's turn off this again. And yeah, this looks a bit better. I guess we're going to be a really tall player character. But yeah, it's good enough. Or maybe we have really small trees which do exist. Ok, that's a pretty good start. But now obviously our player can't move, which is going to be quite an important aspect. So let's give our player characters some movement. And for that, the first thing I have to do is to give it a script. So again, with the player's selected, I'm going to click on attach a new script. And for template, I'm going to go with empty and everything else is fine. So I click on Create. So now we have our script. And inside of the script, I want to create a few constants. The first constant is going to be the speed of our character, which I'm going to set to 24 now. And then I want another constant that is going to be gravity. So just in case the player is falling down by some weird instance, he is actually going to fall down. Although we do want to avoid that. So now we have two constants that determine how fast the player can move or how fast things move in general. And before we get into the actual movement. We have to add another thing that if you have a first-person shooter, you can't use the left, right, up or down arrows instead, what is usually being used as a WASD key layout. But a simple reason that your hand's reach those too much easier when you're right-handers under mouse cannot access these keys by default. So we have to create some new key mappings. So let's start with that. I am going to go to project, project settings and input map. We have been here in the last game, wants to create one keyboard layout. But now I want to create a few more. So I want to create a forward action. I want to create a backward one. Then I want to go left ward, if that's a word and rightward and forward with it being selected, will actually doesn't have to be selected. I click on the plus icon. And there we have key. And with key, I press on w. And that's all we need. Sample backward. I click on the plus again and click on S. Then for leftward, I click on a and four right ward, I click on D. So now we have a WASD keyboard layout, which is a fairly nice start. But now we are going to approach a problem with our player. And it's this one. We want to be able to look around the level by moving the mouse around. But then when we move forward, we want to move in the direction that we are facing. So we have to add some code to make sure that could do who knows what direction is forward. So what I'm going to do for the rest of the video is that number one, we give our player the ability to look around on the screen. And number two is that we are moving relative to the direction that we are looking at. And that is going to get slightly more complex. So I will go through it as slowly as I can. So the first thing, as always, we need a function for process to check on every single cycle of the game loop that we want to do something. And here, just as before, I wanted to create a variable that is going to be velocity. The velocity. And last time we created a vector toward, to this time, we need a vector F3. And again, by default it is going to be 0. But now we also need a variable that is called direction. And this direction is going to be the direction of this head here. So wherever our head is facing, this is where we want our direction to b. And this is getting us to a new concept. So let me first select our head. And in here I want to run the function get global transform. And then in there I want the basis. So this is quite a large line, but let me talk through what it actually does. So we are starting with our head. This one should be quite simple. We are selecting a specific node, then we are going to get global transform. So this basically gives us this transform tab here. Basically meaning what is our position of rotation and our scale. And then Basis stores all of this in a certain format that we can use very easily. So all this line really does is that it is giving us an easy way to work with the rotation of our head. But right now we cannot rotate our head. So this is always going to be the same position. But we are going to change this in just a bit. For now. This is going to be static, but don't worry too much about it. So if that been done, we can start working on getting our input. So if input is action pressed, just as before, let's start where if forward. And we want to start with velocity plus equals direction dot z. So we want to get a specific aspect, the z-axis office and added to our velocity. Let me visualize this in our scene. So here, right now, we're looking in this z-direction and we want to move in this direction when we press the forward ki. So this one seems to be going okay. So this is our first one. Then we go for second one. If import actually let me copy this entire line, that's going to be easier. So instead of going forward, we want to go backward. And this just means we want to subtract from the direction z. Then let me copy all of this again. Now we want to go, let's say rightward. And here, to achieve that, we have to subtract direction x. I copy this line again, and now we are going leftward. And for that, we have to add to our direction. And I think it's gonna be quite valuable to explain this in a bit more detail. So let me go back into our scene. And here we can see our player character. And let's go through the axis and how they work. The easiest one to explain this to y axis, and that's the green arrow. And with our plex elected, let me open the transform. So when I go up and why we are increasing y, and if I go down we are decreasing Y. So this works as you would expect, that if you want to go up, you have to increase. Why? If you're going down, you have to decrease why? Their next axis is the x-axis, and this is the right one. And here again, if you want to go to the right, you have to increase. If you wanna go left, you have to decrease. And then the last one is the z-axis, which is the blue arrow. And if you want to go this way and this way, but it doesn't really, I guess is forward and backward. And there's one mistake I didn't notice. And when you look at the arrows, they always point in the positive direction of this axis. And the mistake I made is for us forward is going to be negative Z. So in this direction z, that is going to be negative and this is going to be positive. And this can be quite confusing. So I would recommend to play around with the dimension quite a bit. You will get used to it quite fast. But in the beginning this can be quite confusing. With that point done. Now we just need to move and slide function, just like we have done in our 2D game, and use our velocity variable dot normalized. So this has the exact same thing we have seen earlier. And we want to obviously multiply this by speed. So our velocity is still going to be a vector that is going to be influenced by all of these. And then we are multiplying it by speed after having normalized it. So this works in exactly the same way compared to the 2D game. And with all of that point done, this should actually be working unless I made a mistake. Let me save the scene and click on F5. Though I can actually see already one mistake. This is going to be backward. So let me press on F5, and now we have to select a main scene. So I click on Select. I go to our main level and click on our level scene. And now it is working with an arrow. And if I press a button, we can move around. I did mess up the positive and the negative direction. So we're moving in the opposite way that we're pressing the button. So if I press right, we're moving left. If I press left, we're moving right. So even after I'm working with this for a while, it is still easy to get messed up in the dimensions. By itself just seems to be working. And we can also move into trees. And the collisions are working as well, which is pretty nice. So let's close all of this. And let's go back to our player. And here I want this has to be positive and it has to be negative. And now let's try this again. Yep, now just feels much better. And yeah, this seems alright. So that's a pretty nice start actually. I think this is also a good way to end this tutorial. And in our next tutorial, we are going to give our player the ability to look around. I will see you then.
46. Vegetable Rain 4: Player camera: In this tutorial, we are going to keep on working on our player. And the important thing I want to work on is that our player can look around in the scene. Which basically means that our players going to look at wherever we move our mouse, which does bring us to quite a few new concepts. But I think to explain all of this, it is going to be best to do all of this right now or level. So let's jump right in and let's have a look. So here we are back in our level scene, and I want to go back to my player. And here we have our player and I want to go to the script. And here we need the new kind of function that is called func underscore input. This needs an event. And this is actually kind of similar compared to PyGame or an event is just any kind of user input. And this could even be something as simple as moving your mouse, which is what we want to check for. But input effectively is triggered whenever any kind of event occurs. So whenever we move our mouse, dysfunction is going to be triggered. So that's a pretty useful function for us. And what we want to do inside of this function is to look for a specific event, which is if event is input, event Mao's motion. So this should be looking quite similar to PyGame and we're looking for specific event. So we just use an if statement to check if this kind of event happened. And input event mouse motion is literally just the most moving. So if this is true, we want to do some things. And to get our player to look into mouse direction, we have to work on each of the axis individually. So we have to rotate around the y axis and we have to rotate around the z axis. So we have to separate the x and the y axis in terms of how we are rotating. And let's start with the easier one that is going to be the y rotation. So let me illustrate this in our editor. The first thing we are going to work on right now is that we can rotate around the y-axis. So we can look around and rotate around ourselves. And the line to achieve that is going to be quite confusing. So let me write it first and then I'm going to explain. So here's the entire line and let me save it. And let's actually see if this is working. So it seems to be working quite right. But if you look at this function yourself, you're probably massively confused. So let's go through it step-by-step. We're still starting with our head. So that's what we want to target. Then we rotate y. And this should also still makes sense that we want to rotate that thing. And so we use the rotate y, which rotates us in the y direction. So this one still make sense. Next up, we have degree two radiance or deck to read. And all this means is that when we are running this function in here, it is returning a degree, but we want to work in radiance. So what this effectively does is it takes a degree and turns it into a radiant, which is what dysfunction needs. But don't think of this in too much detail, it is not that important. So in here, we have to really weird part that we want to get event dot relative 0.8x. Why do we look at the x position here and use that to rotate y? And even more important, and why is that working? And let me explain what this means here. When we are looking at this one here, we look for our most position. So we look for the event, its position, and then its specific exposition. So well, we're moving in the x position. And this entire thing is two-dimensional because our most motion is not in a 3D space, it is in a 2D space. So what input mouse motion is looking for looks something like this. So just the 2D scene where we only have a y-axis and an x-axis. And when we move our mouse left or right, we are changing the exposition. Sort of fervor. We're getting to the right. The greater the x is going to be the favorite. We're getting to the left, the smaller the axis going to be. And this is what this line he is looking for. And we want to use this two-dimensional position to change the three-dimensional position of our head or rotated depending on that. And for that, we have to get the rotation of our y. And I hope that makes sense. The really important thing to take away is that this one here looks at a 2D space and we are applying the position from this 2D space to a 3D rotation. And this is why you have different dimensions in here. And the final thing is that we are multiplying this by a very small number just to make it a bit smaller. And that's really all it is so that our player doesn't look around too fast. But that's literally all of this. So let me write again. And now we can look around and even more important, when we move forward, this is relative to the way we are looking. So if I look in different directions and press forward, our movement is relative to where we are looking at. And this I think works quite nicely. So things are working. Let's go for the other kind of rotation, which is going to be, to be able to look up and down. And for this one, we are going to approach this in the same way with one small difference though. So let me type it in and explain why I type. So we want to get our head and now our eyes. So we don't just rotate the head. So this note here, we are actually rotating our camera. And I'm going to explain in a second of why that is. But for now, just accept that we are rotating our i'ts not our head. And now we want to rotate around the x axis. And this is the up-and-down axis. And again, this function is going to need a radiant, but we are going to work with degrees. So we need to read. And in here, we want to check for event daughter productive. And this time we want to check if r goes up and down, which is going to be y. And now again, I want to multiply this by negative 0.3 to make it a little bit slower. And let's try this first to just make sure I didn't make a mistake. So we can move left and right. And now if I look up and down, this is still working and our game seems to be working fine. This looks alright. And yep, I think our player character might be a little bit too large, but we can work on that later on. Okay, so what happened here? I think all of this still makes sense. This is incredibly similar to all of this and we are just changing the direction. So we're looking up and down and we using the y-direction on our 2D view port. But now, why did we address the eyes and not the head itself? And I think this is best explained by actually addressing our head. So let me run this game now. And now. If I move around, the two different rotations effect each other. So at, if we moving up and down, we're both messing up of the direction and this breaks everything. And this is why we separated the x and the y rotation in the way we did. Because if we didn't, our rotation would be a mess which is very nosy aiding. Let me return to this. So if these two lines, we are rotating two objects separately. So it had, has its own rotation and our player camera has the other rotation. And they do not influence each other in a meaningful way. And via that, we can make sure that both of them work in a proper way. And there's one more problem I need to address that we run the game again. So now I can look around. Our player stops moving. And I could get full screen. And this one is working. But if I get to the end of the screen, our player stops moving, which also isn't ideal. And we can fix that very easily. And specifically, what we need to do to fix this is to change our mouse behavior. So what I want to do is when our player character's already that I want to constantly capture mouse input. And for that, we are going to need our.ready function. And in here, we have to get input and set mouse mode. And in here we have a couple of different options, so we could make it almost hidden or visible. But the thing I want is captured. And what this one does is that it always looks for on mouse input. So even if we're outside of the window, Goodall would still look for the mouse input. So let me use this one. And now if I run the scene again, we cannot see our mouse anymore and we can't go outside effectively. And this starts to look so much better. And now you do want to be aware because he can't see a mouse. You can't close the window anymore. So your mouse is always going to be connected to this window. And if you want to close the scene, you have to press on F8. So, alright, now we have our player that can look around. And I think this is a good place to end this video. So in the next video, we are going to give our player some guns. And across there, I will see you then.
47. Vegetable Rain 5: Adding guns: Welcome back. In this video, we are going to start giving you a player, some guns. And this is going to bring us to quite a few new concepts. And I think it is going to be best to explain them when I actually apply them. So let's jump right in and let's go through it step-by-step. Here we are back in our levels seen, but we don't really care about our level right now. What we care about is our player. And where we want to do is to give it a shotgun. And shot can, can be found in our vegetable rain acids under shotgun. And here we have our shotgun file. It's called dot FBX, which is a different way compared to what we have stored in files. So we used to have a GLB. Now we have FBX. And just like for pictures, you have different ways to store 3D files. And let us direct this file into our player character scene. So you can't see the shotgun and let me centre it. 2000 and it is quite large. So let's make it a bit smaller, 0.20.20.2. And really what we are going to do in a bit is to roughly move this inside of our player character, Alice keeping the middle, and just keep it there. And now if we run our game, we can see our shotgun. Right now. It doesn't rotate with the player. We can fix that very easily by making it a child of our eyes. So now we can see our shotgun right in front of us. And what I'm going to do in a second is to move the shotgun to decide of the player. So it looks like we are holding it. But there's one more important thing that you might have already noticed that this shotgun doesn't have a color. And a reason for that is that when it was imported, these materials have not been applied. And you can also see they're all white. So something has gone wrong Monday import. And I think that's going to be a really good way to illustrate how to give this pink color and hold works. So on the shotgun, I'm going to click on this open Editor icon. What we are getting here is good old telling us that since it was imported, it can't be modified. And to make changes to it, we have to create a new inherited scene. But I want to open it anyway, and I'm going to save the new file later on by itself. So click on open anyway. So now we have our shotgun. And in here we have quite a few different things. The first one we have is just the shotgun spatial node. Then we have what's called shotgun armature. And this one has bones that can be animated and connected to that. We have an animation player. And here's something already really cool that this armature can be animated. So if I click on this plus icon here, we have a shooting animation, which we can play from our player perspective. So this is already really cool that we have animation that we can just play right away in 3D space. So no matter where we are looking at, this animation always works. So this is what these two nodes are, four. Then we have our shotgun armature and our animation player. Then we have a couple more notes that don't really have any information, but they help this armature to work. The really important one is this shotgun node. Because in there is our actual shotgun sort of thing we can't see. And this is what we have to address to give this some color. So in here, if I click on material, we have 012345. And these are all the different parts of the shotgun. And for each of them, they can get a material. And here again, we have the option between a shader material and a spatial material. In this entire tutorial, we are only going to use spatial materials. And they are the simplest way to give a color to an object. It's shaded material is much more powerful. Gear can actually write some code in there to make an animated and to give it quite a bit more functionality. So for example, if you want to create moving water, you would be using a shader. Bye to my case, is spatial material is perfectly fine. And now by just applying this, you can already tell that this metal part started to have some colors. And this we can change. So if I click on this sphere again, here we have all the options we had before. And the first thing I want to work on is the albedo color. And I want to make this, let's turn it into a bit of a gray color. Um, yeah, looks about fine. Oh, and I deselected it. So I go back and again, click on the material. And now we are back. And I also want to make it more metallic. So are going to give it a bit more of a metallic look. You can work on the specular up. This is basically how much light is reflected. And we can work on the roughness. So if we make it like this, then we can see all the metal and you can see the preview here. This one is quite nice. It shows a very distinctly how it's going to look. And yeah, this is starting to get quite a bit nicer looking. Obviously, we still have the blue ten for everything. But we are going to work on this soon. Ish. Alright, with that one done, we are going to create all the parts of the shotgun. And this is going to be your exercise that I want you to go for all of these textures and create a color for it. Really choose whatever you want. You can make it pink shotgun if you want. It's really up to you. But what you have to learn is how to create immaterial and a special material in particular that make our shorthand colorful. So pause the video now and try this yourself. Welcome back. I hope you made some fancy shotguns by let's do together now, you might have wondered why didn't start with 012? The reason is you can't really see these. So let me start with this special material here. And I'm not even sure what this might be, the bullet actually. So let me change the albedo to, let's go with black. And the, I can't really see it. I'm not sure you might be working on the bullet with one, same for two. This is another node you can't receive. So I'm just going to go with black or at very least a very dark grey. Then we can go to node number two. And here again, special material. And I'm going to go with albedo. And here you can see this is going to be the trigger, which we are not really going to see. So I just keep this black and well, it really doesn't matter. Choose whatever you want. So now I go back and non-number free is something you are going to see. And this is going to be the holding part of the shotgun. I have no idea how it's called. And this one. I was also the actual handle. And this one, I think that the original is going to be some dark brownish color. Let's go with something like this. And we could make it a bit more rough just to make it look a bit nicer. Gap should be fine. And now for the final one, we have the actual metal but at the front and never spatial material. And this one, I also want to be metallic. So we're going to add the metallic dandy albedo is going to be a grayish color. Yeah, something like this. And then I also want the roughness to put it down to make it reflect more light. And there we go. Now we have created custom materials for our shotgun, which does make it look nicer. And now I'm going to save this scene. And if you just press Control S, Goodall gives us an alert that it doesn't know the file format. And this is okay. What we have to do is either go to Save Scene S or control shift in s. And then we are creating a new scene to save this one. So control shift as and I am going to save this. Let's go out of acids. Let's put it into our Player folder. I think it fits nicely there. So now we have saved this as a proper scene so we can get rid of this shotgun that was imported and instead go to our Player folder and import our actual shotgun. And Ashoka has to be a child of the eyes. And now let me move it back to the center of the screen. Oh, and one thing I forgot is that this thing is way too large. So we've our shotgun selected, I'm going to make it smaller. Let me go out of here. So to make it smaller, beckon our shortcut scene. I click on transform. And in here we have scale. And let's go with 0.20.20.2. And here, let's just double-check that the animation still work because this one might be dependent on size. So I go to animation player and let's play it. And this looks fine. Okay? Any animation player we haven't seen so far, and we're not going to create our own. But an animation play up plays an animation and you can create lots of different parts of the animation, which happened in here. If I scroll down a bit more, each of these points is called a keyframe. And keyframes basically create different positions of our shotgun in this case. And then we transition between these points. And desk can be quite extensive. And this one, he has still a fairly simple animation, but this can be much more complex. So we're not going to worry about it too much. We just use a predefined one. So let me save this scene again. And now we have a much more reasonably sized shotgun. Cool. Oh, but there's one thing I forgot that this shortcut is very much of centre, which doesn't really matter, but it kind of annoys me right now. So I'm going to move the shotgun roughly to decenter. And let me save it again. And now that feels better. And now all I have to do is to move this shotgun roughly to wet a player would be holding it. So roughly on the side. And here's one thing you can do in the 3D scene. And if you go to a top left, is what's called perspective. And you can look at different perspectives and you have lots of other things, oh, sorry, demographic that the one thing we can do is top view. And here we can see the player from the top. And what we can do is roughly moved this thing too. I think this would be fine. Okay. Yeah. Just looks okay. And if you just move, you move out of it again. And another thing you can do in perspective, you can go to cinematic preview, which is a fancy way of saying we want to look from the camera. So if I click on this, we can see our gun and we can still move it. So if I have to shut down selected, we can use the inspector to move this thing. So I'm gonna move it a bit down. And I want to give it a rotation around x to move it up ever so slightly. Let's go worth 15. And let's rotate it bit more inwards. And yeah, I think this looks okay. And now what I want to do is to copy the shotgun. So now we have shotgun too. And this I want to move to the other side of the player. So we are going to give it, I think this is an x translation. There we go. And I am going to rotate it a bit more so that it roughly looks like we're pointing in the middle of the screen. And I tried to make them roughly equal. And I think we have a slight skew in one direction. And you can play around with this for ages and really make sure that these two are aligned properly. And if you work with these numbers in a bit more detail, you can probably figure this out in very exact details. But in my case, I am not going to worry too much. And I think this looks fine by itself. So let's run this game again. And yeah, just looks okay. And we can't press anything yet, so we can't do anything with the guns, but we can see them and they look quite right. So we are making progress. The one thing I do want to do in this game, the one thing I do want to add is that we need to have a crosshair so that we actually know what we are pointing at. And this is super easy to add. And we've actually added something similar and an earlier tutorial. So if you think back to our last game, we have to add the score 40 in-game screen at the top. And for that, we use the Canvas node. And we are going to do the same thing, except now we don't add text to it. Instead, we're going to add a Crosshair image to it. But I've always does exactly the same. So too our player, I'm going to add a canvas layer, and this works both in 2D and in 3D. Today, I want to add a texture wrecked. And when we click on texture, texture x only work in 2D space. What we are going to do is that this 2D layer is going to be put on top of our 3D scene. And this is why our cross there's going to be. So when you look at this scene tree, you can still see our 3D scene. But now we have a 2D part of our 3D scene, which can get a touch confusing, but I think if we could use to it, it is quite workable. So what I want to do in our asset folder, in the shotgun part, we have a crosshair 009. And this I am going to add into the texture part of our texture wrecked. And this gives us a crosshair. And now this crosshair I want to put in the middle of the screen. And I click on layout and click on Center. And now it is going to be right in the center of our 2D view port. And now if I click back on player while you can't see it, but if I run the game. So now what's basically happening is that this crosser is going to be put on top of our camera node, which is a 3D camera. So the problem is that the shotguns and across there look like they're pointing in different directions. And we can fix this in two different ways. Either we're going to move the crosshair up or we're going to move the shortcuts down. Both would be fine. It depends on what game you want to play. I think in my case, I want to move the shotgun standard do seem quite high up right now. But you can also just move to cross help. But again, with the player selected and just click on both of the shotguns with transform and translation. I just going to move them down and touch. And now let's run the game again. And yeah, you could rotate them a bit more. And I'm going to move to shotguns a bit more to decide, but I think this one is fine. So one shotguns selected. I'm going to move it a bit outside of the screen and same for the other shotgun. And yeah, I think this one starts to look better. Could even move it a bit further to the right, but I think this is okay. And yep, we are making some progress. So now we have some guns. We can't use them yet, but we are making pretty good progress. And I think this is a good place to end this video. But in our next video, we are going to finalize the player, which means that we can shoot our gun and we can fall off our level. So I will see you then.
48. Vegetable Rain 6: Gravity and shooting: Welcome back. In this video, we are going to finalize our player, which is going to consist of two important parts. Number one is that I want to make sure that the players actually moving physically accurate, which primarily means that a player can be affected by gravity and is going to be constrained by the level. But the other more important part, when I want to click the button, I want to actually be able to shoot something. And this we are going to address in the second half of this tutorial. So let's jump right in. And the first part is going to be quite easy. Here we are back in our level scene, and now we can actually see our player, or at least we can see the shotguns OR players holding. So that already makes it easier to tell where it is. The more important part right now is that our player can just move outside of this level. And also there's no gravity affecting our player, which is the reason why we can't fall down. Let's work on these issues step-by-step. The first thing I want to do is to apply gravity to our player. And for that, I'm going to open our play a scene and go to the script for player. And in here, what we have to do is to get this velocity and apply gravity to it. Which means we want to decrease the y-coordinate, which is other gravity really as you move downward. So all we need is to address our velocity and the y part. So we are moving up and down, and this time we want to take away from y. So here the coordinate system works again in the way you would expect that if you want to go down, you have to decrease y. And we have gravity constant called gravity. And this is all we need. So that's run the game. And now we should be falling for your level. And while, Okay, we know gravity is working, but obviously we don't just want to fall downwards, we want to be constrained by floor. And for that, let me go back to the level. And here's something we haven't done earlier that when I click on the CISG box or the platform, then we have what's called US collision, which uses collision. It's self-explanatory. So if I run the code now, then we have a collision. So now we can move on the platform. But if we work offered, we are falling down. So now we have a working floor. However, when I go to the waltz around it, now, the US collision tap doesn't exist anymore. And the reason for that is what I forgot earlier, is that when you have a wall as a child of another CISG box, then the US collision doesn't work anymore. So what I have to do is to stop making them a child. So I make them their own notes. And now when I click on them, you with US collision again and fall off them, I can just select US collision and then it all works again. So now when I run the game, we should not be able to walk outside of the level again. So let's walk outside and I can't vote got suddenly more. Now, this is how level is being constrained. And yet seems okay. This works quite well and we can't walk outside. And yeah, really might be that our level has become too small, but we can work on this later. Okay, now we can't walk outside of our level anymore, although there are too many boards and platforms. So I'm going to put all of them inside of a spatial mode. So let's put all of them in there. And this is going to be our, let's call it level. And this is going to be the first part of our game that now the player is being affected by gravity, but he can't move outside anymore. And since we can't jump gravity isn't all that important. But I just wanted to have it included to make sure that when you want to create a jump mechanic that you have it. So if you wanted to create the Anjum mechanic, you would just have to move this velocity in the other direction. But alright, in my case, I don't care too much about jumping. What I do care about is that we are able to shoot our gun. And this will consist of two important parts. Number one is that we have to get some player input. In my case, when I press the left mouse button, I want to shoot. So it is the first one we have to work on. Number two is that we want to play the animation when the button is being pressed. And number three is that we have to check in front of our player if this is actually colliding with anything. And this is bringing us to quite a few new concepts. So let's work through this step-by-step. Number one is the easiest part that we have to get the keyboard input of our left mouse button. And we have already done something similar. So this is going to be your exercise that I want you guys to create a new input that this time is for a left mouse button. So pause the video now and try this yourself. Alright, welcome back. I think this should have been quite doable, but let's do it together now. So I'm going to go to Project and project settings. And here go to input map. And now I have to create a new action. And this new action I'm going to call shoot. And now there's one thing that is new now that we used to use the key. But I want to have a mouse button, which will I click on this button. And now we have a menu that we can select from. And we have lots of different mouse buttons in there. But I'm happy with left mouse button, so I click on Add. So now we have the left mouse button off our mouse called chute. And with that one done in our code, I can get another input is action o. And now another new concept that I want, just pressed or not pressed and connects penance. And second for now let's call it should. And for pass or we don't get an error. So what is the difference between this action pressed and is action just pressed? And the difference is surprisingly simple, is actually pressed, checks if a button is being consistently pressed. So if you press on a button and keep it pressed, is action pressed but continuously trigger? And opposed to that, is action just pressed only checks if a button has been pressed down. If the button is being hold on and just pressed is not going to trigger. So more specifically in our game, for all our gun, we only want to be able to shoot when we press the mouse button. We don't want to be able to continuously shoot. Whereas for the movement, if we keep on pressing one button, then we do want to continue moving in that direction. So this is why it is action press makes sense for this case, was for shooting the gun is actually just pressed, is more appropriate. Now in here, let's test if this is working. So I want to print should and open the Output tab. And now when I click the mouse button, we get shoot. And if I hold down the mouse button, this is not going to trigger. This one is working well. So this is finishing up the first concept that we are able to get our mouse input. The next one is that when we are pressing this button, we want to play an animation that our shotgun shooting. And let me open the shotgun. Seen. What I want to play is this animation. So quite a short animation, but quite nice. So whenever I press the mouse button, I want to play this animation. And this is bringing us to a new concept. So when I go to the inspector to note, we used to use signals. Now we are going to use groups. And when you click on groups, we only going to recede and manage groups. So let me explain how groups work. What we have seen so far are signals. And signals work in a very specific way. That OneNote is emitting a signal and another node is receiving its signal. So you're only working with these two nodes. And this is somewhat comparable to sending a text message from one person to another person. And groups work in kind of a similar way. And if you want to keep in this metaphor, a group is basically a group chat where you can write into one group inside of this chat and then you address lots of different people. And more specifically for Google is that groups are basically a list of different nodes. And then it can make all of these nodes execute a specific kind of method that you can define yourself. So here we are back in my code. What I want to do with this shotgun node selected, I'm going to put this into a group that I call Shot gun and click on Add. And now you can see this icon next to our note that this node is inside of a group and nothing else is going to happen. And I also want to give this node is script that it can play this animation player. And this is going to make sense in just a bit. So let me click on attaching your script. And it's also save it in the Player folder. When I clicked on default with enclose all of this and also close our animation player. So what I want to do is to create a new function that I called Shoot animation. It does not need any arguments. And all I want to do is to target the animation player. And click on play. And inside of this clay, I click on double quotation marks. And now we have all the different animations that this shotgun house and all I want is via W bullet. But there's also a reload animation if you really want to play with this. But this is all we need. Now we have a function that is able to play this animation. But how can we trigger this animation? And this is where the group that we just created comes in. Basically what we are going to do is that from our player that whenever we are clicking our mouse, we want to target older notes with this group and make them play this function or make them execute this function. And this is very easy to achieve. So inside of our shotgun script, when we click our mouse button, let me minimize this. I want to get the tree of our game. So all the nodes. And I want to call a group. And a group I want to call is called shotgun. And now all the nodes inside of the shotgun group. I want them to execute a function. And a function I want them to execute is this function here, should animation. So let me copy this entire thing and paste it in here. So effectively what happens is when we are pressing our mouse button, we are calling the group shotgun until every node inside of the shotgun group to execute the shoot animation function. And this should actually be working. So let's run our game and let me shoot. And there we go. We haven't animation. And this is getting quite nice. So this is the second step then, that now when we press on a button, we have a shooting animation. And this brings us to the final bit that we have to actually get some mechanic that we can tell what we are shooting at. And this is going to bring us to a whole new concept. And this new concept is called a re-cast. And a re-cast is what the name implies. We are casting a ray and all it really means is that whatever the player's looking, we are pointing a very long line. And then this line is going to be aligned with our crosshair. And whenever we are clicking on a mouse button, we want to tell if this line is intersecting with another object. And if that's the case, we know we have shot this particular object. It does sound a bit complicated. Let be implemented and that it is going to make sense. So here we are back in our player scene. And what I want to add is a ray cast note. He has also a 2D equivalent, but we are working in 3D space. And let me create it. And right now you can't see anything. But if I click on the re-cast node and goes all the inspector, we can see costs two, and right now it's pointing in negative one. So it's pointing downwards, which I don't want. So put this to 0. And since we are looking in the negative z direction, I want to move it in a negative z direction. So let me go with minus 50. And you still can't see it. Well, you can't see it kind of that right now. It's right under Z-axis. So instead what I want to do is to move it upwards. So I click on transform and in translation, I move it up across the y-axis. And now you can see it quite a bit better. That really all it is is one very long line. And this line can be used to check if something is colliding with this line. And if that's the case when we press the mouse button, we have effectively shut it. So that's really all it is. And you could be moving this line a bit to the front, make sure it doesn't intersect with our shotguns. But I think this is okay. Do we have to make sure that this line intersects with our crosshair? But I want to do is that our head has the same height SLR re-cast. So what I want to do is in our translation, I just copied the 1.9 from overhead and paste it into our re-cast so that they are on the same height. And then I make the re-cast it child of our ice. With that point on, we can go to our play a script, and now we can work with this ray cast. And what I want to do is to create a new object. I'm going to call for now variable, let's call it target. And for now is going to be null. So it's not going to be anything. However, after we've pressed the button that this target is going to be whatever our re-cast is intersecting with. So I select the rake has node. And inside of this function, we have a method that's called get cool, lighter. And what this one does is that it checks whatever object is colliding with the ray we are casting. So this one is quite nice. And let's actually test this. So I want to print our target. And now let's actually test this. So I'm going to open our output and run the game. And now let me click on nothing. We get object nor. And now let me click on the tree and we are still getting object no. And the reason is that for a re-cast it has to be enabled. So now let's try this again. And now let's say when I click on the level, we're getting our CISG box. And it is very, very unreliable right now. We're going to work on this in just a bit. And here's one thing I also want to be aware of. When you click on the trees at the top, it says Object null. And only when you click on the actual shape of this object, you are going to get the actual body. And is also the reason why when we click on the grass, we always get to CISG box because the grass doesn't have any collision, so it can't be intersecting with our re-cast. Alright, for now, this seems to be working quite well. And I think this video's already getting quite long. So I'm going to finish it now. And for our next tutorial, I'm going to add the actual objects flying around the scene. I will see you then.
49. Vegetable Rain 7: Adding vegetables: In this video, we are going to start working on our vegetables that are going to fly around our level, which is going to start creating our very basic game. So let's jump right in and let's start working on it. So here I'm back in my basic game, which I don't want right now. I want to create a new scene. And in here, we first have to think about what kind of node we are going to need. And we have a couple of requirements. We do want it to be able to collide with anything. So we need a node with collision mechanics and it also has to move. So we couldn't use a static node, but also the collisions don't have to be too complex. So kinematic body node might be a bit of an overkill. And there's a nice little Middleground and it's called a rigid body node. And rigid body nodes, usually in video games, are used for objects that can't move themselves, but can be moved by other things like the player. So what I want to create is going to be a rigid body. So I click on Evernote and click on or type in rigid body. And there's also a vehicle body that is connected to it. But we just want to rigid body. And a rigid body. And a rigid body has quite a few attributes that are really useful. For example, by default, it has a gravity, so we don't have to edit ourselves, which is super useful. But alright, lets add more stuff to it. The first thing is I want to add an object to it that we can actually see it. And for that, in our vegetable rain assets, and we're vegetables. Here we have quite a few different vegetables. We have, for example, at the half who have a broccoli and quite a few more things. And just for testing segue, I want to add, let me at the corn. This one looks quite nice. So the corn, and I'm going to put it in the center of the screen. And here we have our corn. And since I do want really large objects, I'm going to scale this up by, let's say, 12 times. So it's proper huge. And then I'm going to add another node for the collision shape. So I can just type in shape and we get a collision shape. And I am going to put, let's put a collision shape around it that I am going to rotate by 90 degrees and move it up. And use the red dots to put this thing around it. And again, this doesn't have to be true, precise, but you do want to be, let's put it like this. So this is very forgiving for the player, but I think this looks fine by itself. And it also couple of other objects in here that are a bit less of a predictable shape. So I just want to have a round shape that is roughly encompassing all of these objects. But right now we have our rigid body. And I am going to call this LED should table. And let me save it. And I am going to save this one in our last two level. Although you could also make it on folder, that doesn't really matter. So now we've all vegetable. Let's create one instance in our level to see how big it is and where it is quite large. But I think that should be okay. So it has run our game now. And that way they can receive it is falling down and we can't see it anymore. So let me close the game and let me actually move it right in our game. So let's try this again. And now we can see a giant corn and we can shoot at it. But it doesn't do too much yet. But you can see it is working and we can actually move it ourselves. And there's already quite a bit of basic physics. So this is working. But obviously we don't want this in our level, so I can delete it. Instead. I want to do something else. And this is going to be very similar compared to what we have done earlier, that I want to use code to spawn this scene in our game. And then spawned in a specific position and give it some movements so that flies above our level. And this is really similar competitor cars we have created in the last game. So quite a few of these things I am going to talk about, we'll look really similar, which is a very good start because we don't have to learn all too many new things. So here we are back in our game. And what I want to do is add our level. I am going to add two new things. The first one is going to be a timer, and a second one is a position. Note. And this time it has to be a position 3D. So I'm going to create both of these. And here, just like in the last game, I'm going to call this timer one. And I'm going to call this start one. And then each of them are going to be put in their own. Let's call it a folder node. So we have our, let's call it timers, and we have positions. So this is going to be incredibly similar compared to what we have done before. And this could actually be an exercise for you because I think you are going to be able to do this. But I want you guys to add a script to our level node and Indus script add some code to spawn a vegetable inside of our level. And it should be on the position of the start OneNote. And pause the video now and try it yourself. And just as a reminder, let me add a picture of the code from our 2D game. I think this is going to be quite helpful. Don't worry if you can't figure this out yet, this is going to be quite a bit more advanced. Alright, so let's do together. So here I'm back at my level editor and I'm going to create a new script to our level scene. And it's going to be empty, and it's going to be in the same folder. So as always, the very first step is I have to create a constant that I'm going to call ventured table for our vegetable. And this is going to preload vegetable C. So this is going to give us a blueprint of what we're going to need. And we are going to use this scene to create a specific instance of this object. And specifically to create this object, we want to use the timer. So whenever this time is running out, we want to create a new instance of this object. So let me go with two seconds for a timer and go with autostart. And then in the node, I am going to use a signal for timeout and attach it to a level. In this, I want to create a function that is something like spawn a vegetable. And since we are going to reuse this a couple of times, just like in the last game, angular to create a specific function for this. So I'm going to call this function spawn vegetable. But now this isn't going to need any parameter. So now inside of this, I want to create an instance. We're just going to be new variable of this vegetable scene. So I create a new variable that is gone and get vegetable dot instance. So we are taking this scene and creating one specific instance. And the final step is that we have to add this vegetable instance to our scene or to our node tree. And this is all we need. Now whenever the time is running out, we want to spawn our vegetable. And let me try this. But I do want to make sure that our start position is somewhere above the scene. Okay, let's try now and let's see if this is working. And oh, yep, there we go. We have, after every two seconds we get a new piece of corn. So we do know this is working, so nice. Ok, but we don't want to span all of these in the middle of the screen. Instead, I want to spawn them roughly on the site somewhere. And emax should have fly above our scene. And for that, rigid bodies are also incredibly powerful. So let me go back to the code right after we have created our vegetable instance, we can work with this vegetable instance. And this is going to be a rigid body. And rigid bodies have one exceptionally useful method as called add force. And at force basically adds a force to this vegetable, kinda like the name implies. And this force we can use to throw around to vegetables. And it needs two arguments, both of which have to be a vector free. The first one is going to be the force. So in what direction do we want to throw it in? And let me open a level scene. So in our case, our node is starting and disposition and we want to move in the positive z direction and the positive y direction. So moving to the right and upwards, at least from this point of view. So tunas at force, I want to add a vector F3. And this vector x is going to be 0 because we don't want to use it for the y. Let's go with 500 just attested, and also 540 Z axis. And then we have our second one. And this is called position, but you can better describe it as this is what gives the rotation to this object. So it is going to be never vector F3. And in this vector we can determine in what way it is rotating. And this has to be very small numbers. So this is, let say 0.10.2 and just 0. And this is all we needed. So let me run the game again now. And now we should be seeing, oh, there we go. And we might have to give it a bit more force. And something might have gone wrong because we are still spawning in the middle of the screen. Are right. We don't add the child to our level node. We have to edit to us dot one position. So let me targets start one position, start one dot child. And notice should be working. So there we go. Now we can see that we have corn flying above or seen, I think it's a bit too close to our game. So I'm going to increase the numbers ever so slightly. So this one is going to be, let's say a thousand, and this one is going to be 800. So let's try it again now. And where does it start? There we go. Yeah, and this does feel quite a bit better that we have all of these nodes flying above or level. And yeah, we can't shoot at them. And nothing happens yet that will come later. But our interest is, is working in the basic outline. Obviously, we don't just want to have one starting position. We want to have multiple starting positions. And as a consequence, I am going to remove to signal here from our timer and copy this timer. Let's go with five times. And also I'm going to copy the start position couple of times so that we have five and total. And here we're going to do same thing we have done in the last tutorial, that we're going to add a signal to each of these timers and then make them move wherever this starting position happens to be. And for that, let me just move our starting positions somewhere. The crossover level doesn't have to be specific. And this is going to be the starting positions. Where are our vegetable is going to start from? And let me add one in the corner and just looks about right. So now what I want to do is to give each of these time AS a signal that I'm going to connect to our level. Now, each of our timess has a timeout. And now I want to change this spawn vegetable function to make sure that they can address different notes. And also I want to have the ability to influence these numbers here so we can determine where our vegetable is starting and also in what direction it is going in. We are going to need four different arguments. The first one is position, then we have x, y, and z. And a function then for the vector F3 is going to be x, y, and z. And then we're also going to need the starting position node. And this happens just as before. I'm going to create this start pause name. And this one is going to be positions slash start, string of position. So this is exactly the same thing we have done earlier. So shouldn't look too different. And now later on, we don't want to have one generic node. We want to get, get node and add our start, pause. And one thing I forgot to mention earlier that I usually use get node here instead of using the dollar sign. And a reason for that is that does get node can work with just a string. Whereas the dollar sign versions have to use a specific name. You can't just add a string via variable. So this is why get node only works for this. But right now this should be working. So for our first timer, I want to move this in the direction 1041540 y. And then I think I had 804 z. So let's try this now. So in theory, we should be getting the exact same result. And there we go. So this seems to be working. And I might have to remove some trees later on. This is getting a bit annoying, but okay, so we know that this is working and let me prove the whitespace so it is easier to see. And this is bringing us to the exercise that I want you guys to finish all the other timer functions. You have to figure out in what direction do vegetable has to fly, which is going to require a bit of walking around it. But pause the video now and try to figure this out yourself and see how far you get. And once you're done, I'm going to do this myself. So let's do together now. So on our timer to time out, I again want to spawn a vegetable and this is going to be positioned to. And now let's have a look where this node happens to be. So stop position one. And here we can see the positive x arrow and a positive Y arrow. So this is the direction we have to go in. So this has to go, let's give it 900 for X and 700 for Y. And we could technically goal of 0 for z, but we could also make this 50. So this is moving slightly in this direction. So let's try this now. And we should be having two objects flying in space. And we know this seems quite a ride. Might be flying a bit low. So let me increase the y to, let's say 1400. Yep. It's beers like it's going a bit too far in one direction, but this is something we can adjust for later on. We could, for example, just move this one a bit further away from it. But OK, let's go with node number three. This one is moving in the negative Z direction and still in the positive y-direction. So, or this one here, function free. We want to spawn vegetable position three. And 40 x, Let's go with a 150, then one hundred two hundred four y. And for z we have to go with negative, let's say 1000. So let's try this one. And now we should be seeing three objects flying around. And yep, we do. So this is already getting quite somewhere. Now we come with number form, gets negative x and number five goes positive x and z. So negative x and positive x and z, o back. And remember, so let's spawned the other vegetable. This was number four and this one was negative x. So negative, let's say 950. And everybody just choose random numbers. The specific ones don't matter too much. And let's say just to have some Z variability, we go with 50. And finally was born vegetable number five. We have positive x and positive z. So positive x and positive z. Let's go with 850. And let's see how all of this working. Okay, now we should see quite a few different things and okay. And they are even colliding in the middle. And yeah, this looks okay. And we might have to move them a tiny bit because I think desk too much collision that is getting too predictable. So let me move them a bit further from each other. So here again, you can just play around with this for days. And all I'm really looking for us. They don't always collide in the same position in the sky so that they don't look a bit more. Yeah, I guess this is going to be so let's move this quite a bit further away from each other. And I'm really looking for, is that auto stem don't collide too much with each other. Okay, next try. And yeah, does this getting somewhere? But I think those two nodes here, they are too much intersecting, so let me move them to the side. And last attempt, I think now should be working. Yep. Okay. So this seems to be good at one thing left to do is to give the time us a bit more variation. So I'm gonna change this time at one, this time out to 1.2. This timer to let's say 1.6, this time a true 1.4, and this time our two 1.5. So you could give them cold, draft them even more random. But I think in our case, just adding the numbers is fine. Okay, let's try this now. And yeah, I think this is looking like lots of chaos from vegetables. Go. So I think this is a pretty good point to end this video. And in the next video, we're going to add a bit more randomness to all of this. And in the next video, we are going to add a bit more randomness to this and also giving each of them a particle effect. I will.
50. Vegetable Rain 8: exploding vegetables: Welcome back. In this video, we are going to improve the vegetables. And specifically this means when we are creating the vegetable, it is going to be a random vegetable. It's not always going to be corn. And more importantly, if we have shot a vegetable, we are going to play a particle effect. So a different kind of seeded vegetable being destroyed, which really makes the game looks so much better. But let's start with a really easy one that I want to give our vegetables a bit more variation. Here we are back in our level scene and I want to open again our vegetables that I saved in the level folder. So here's our vegetable. And right now, the actual vegetable is this coin here. So we could toggle the visibility and this is what we actually see. And we can add lots more things to it. So in our vegetable assets, in vegetables, Let me just add all of the different vegetables to the scene. And I am aware Nivea avocado nor an Apple is a vegetable, but well, it's a programming tutorial, not a biology tutorial. So let's just ignored. And we have a mushroom or it's not a vegetable nervous, a coconut. Okay, paprika is a vegetable oil. Okay. Now we have a bunch of different things on top of each other. And let me put them inside of a spatial node. Let me call it object, just not to confuse the names, okay? And our place, all of them inside of it. Okay? And even the corn. Now we have all of the different vegetables inside of the object node. And corn is the original one. So let me hide all the other ones for now. Now we can see our coin again. And what I want to do effectively and again, is when our scene is ready to move to vegetable, I want to only display one of these randomly. So at all of them are hidden except for one. But before that, I have to make sure they all have roughly the same size. So I go no, center them one by one. And this is something you can do yourself already. It is go for each of them and just make sure they are roughly large enough. And this is going to take a bit of time. So I'm probably going to speed this up. Try this for yourself and make sure each of them is roughly equally in size. Okay. Slight intersection, I think is salary Stig doesn't actually fit in there all too well for the simple reason that it's really long but very thin. So it might be very frustrating to hit. So I'm just going to deleted. Okay. Non can continue. Okay, and now we have lots of different vegetables that all are roughly equal in size compared to our corn. Now we want to add some CO2 or vegetable that when it spawned. Let me open empty scene. So whenever this scene is ready, I want to make one of these visible. So we need our.ready function. So function whenever this scene is ready. And now what we have to do effectively is pick one of the children off the object node and make that node visible. And that can be achieved fairly easily. So let me start by targeting our object. And what I want to get is get a specific child. And a child is supposed to be picked at random. And for that, we need our random integer. So good child doesn't pick a node by name depicts a child by integer, which is why we can use a random integer. And here again, we can use the mod sign. And all we need is our object. And now we need to get the number of children in there, which is good child count. So all of this is going to pick one of the child nodes of object. And now with that note, We can continue working. And all we have to do is visit bill. This equal to true. So a fairly long line and it could break this up into two. But by itself I think is, is all right. And let's see if this is working. I just run the scene. And we have an apple, we have lots of different stuff go. So this does seem to be working and it is starting to come together. But now what I want to do is to give this vegetable a particle effect. So that when it is hit by a gun, it is going to play an animation. It is going to be created by Ecuador itself. And let's work for this step-by-step. And when we come to the important part, I am going to explain this with a graphic. Alright? So too our vegetable note, I want to add what's called particles. And you have CPU particles, but I just want particles and is called a 3d particle emitter. And when we add this, we get this yellow box, but by itself, we can't see anything. And the first thing we need to see something is go to draw passes. And in pass one, I want to add a certain kind of mesh. And what I want to add is going to be a cube mesh. And now we are able to see our cube and we could influence the size of it. But I think for now, this one is fine. And we still can't see or too much. And to see something, we have to add a process material. And right now the process material is empty. And here again we can add a shader or particle. I'm going to add a particle. And once I've selected that, we can start to see something. But right now it looks fairly terrible. And we're going to improve this in just a bit. But for now, when you click on drawing, that you can un-click local coordinates. And first nothing really happens. However, now. If I move this thing left or right, now we can see what it does. And this is already a basic particle emitter. So let me switch it off just to make it a bit less busy. And let's talk about how particles work. So when he went to MIT particles in Goodall or an any video game engine, you effectively have two elements. You have a particle emitter and an actual particle. And other really happens is that a particle emitter keeps on emitting particles. And in our case, the particle is going to be a cube that we can customize quite a bit. So let's actually customize this, which we can do very extensively. So here we're back in our editor. And here again, we already had our particles material. Again, you could be using a shader for this, but particles material is going to be the easier one. And be aware, this is not as spatial and material. So when I go, for example, to our drawing passes and select the cube, this one, when I click on material, this one has a spatial material. And a spatial and material is different from a particle material. So don't confuse them, but it's quite easy to keep them apart because they call differently. But alright, just click on particle material. And here you can see quite a few different options. There's time trail and so on. And each of them can be used to affect how this thing is working. So let me switch it on again. And now we can see our particles. And I'm going to start with gravity, because I don't want these things to fall down by themselves. I just want them to move in, let's say all directions. So now gravity, because I switched it off, nothing is happening. They are still going to be new cubes being spawned as particles, but you can't see them because they're on the same position. And to make them visible angrily to change the initial velocity. So how fast are they going to be when we're just spawning them? And even if you increase this even slightly, this is going to be quite fast. Let's change this to ten. And velocity random, you can also change that sum r but faster and some are slower. And yeah, just starts, look better. Now I'm going to go to direction. And direction. We can put to 0 and then it goes into position zeros, so in here. But I want them to go into every direction. And for that, I can go to spread and just connect this to a 180. And now we're spawning it in every direction. So making progress, and this is already starting to look a bit better. The one thing that is really start to look cool is only come to color. And here we can give each of them is specific color. Or we can go with a color ramp, which is going to look really good. And if I click on this, I click on new gradient texture. And then after we click on it again, and then click on gradient and new gradient, and click on this one again as well. Quite a few things to click on. But now in here, I can set the gradient forties colors. And what I want to do is to set a red color to, let's say yellow, orange color. Let's make this a bit more error range. And let's move it roughly here. All right, and now we want discovered to be applied to all of these cubes. And by default you're not able to see this. And to see it, you have to let me close all of this. We have to go back to our cube that we created earlier and give it a material. And this has to be a special material. Then we get the sphere we have already seen. And here for vertex color is used as albedo. And now we get the colors. So effective, what happens is when a cube as being spawned is going to be red and a February it gets, is, is going to go into yellow. And I think this is getting somewhere. We can make some refinements to this later on, but I think for now this is ok. Cool. And let me go admitting to ofs or the scene doesn't get too busy. And what I also want to do is to increase the amount of particles. So right now we're spawning eight particles per second. I think it is. I want to go with somebody like 40. And let me illustrate this. Now, we are getting somewhere. And another important thing if I click on time, because I'll click on one shot. So this is then going to look more like an explosion. And if you have one shot selected, emitting after it finishes, goes back to off. So I always have to click on. And this looks like a decent animation. So here, writing Godot, we can create a very basic explosion animation. And you can play around with this so much and make it so much more powerful. That is going to be our basic animation. And in our next video, we are going to apply this to our actual vegetables so that when our vegetables are being shot, then we want to give them the explosion particle and also destroyed a vegetable itself. And, and I think there's video already got quite long. So I will see you on the next one.
51. Vegetable Rain 9: Vegetables and the player: All right, welcome back. In this video, we are going to bring the vegetables and the guns together so that whenever we are shooting at a vegetable and we are hitting the vegetable, and the vegetable is going to explode and disappear. And this is already a massive step two, what's getting a better video game or an actual video game that is at least somewhat interactive. So let's jump right in and let's do all of this. So here we are back in our code editor. And i have our vegetable open, and I have our level open. And I also want to have our player senior. So play a scene. And there's going to be one function I want to add, and this I'm going to call function hit. And this function is basically symbolizing when our vegetable is being hit by the player with the gun. And when this head is being triggered, we wanna get our particles and started so that we get something that looks like this. And then once it's finished, it stops playing automatically. So we don't have to do this ourselves. And now we have to connect this function to our player. So here we're back in our play a scene. And what I want to do is if I'm clicking this function and we are hitting our vegetable, then I want to execute this function. And this is going to take some cold, obviously. And the first thing I want to check is if there is a target. So when we are running dysfunction here from our re-cast and we're hitting something that we don't have null in there. So if this exists in the first place, then we want to do something. But here we have another problem that we might be hitting a tree or the level. So we only want to run some code if the node we are hitting has this hit function. And this we can also check. So what I want to check is if Target has fit and the method we want to check for it is hit. So now we only want to run some code if the target were hitting has a function called hit. And if that is the case, I want to execute target dot hit. So a bit convoluted, but this is still an, ultimately a fairly simple function and this should actually be working. So let's tried. So here I can shoot on things and we are getting an arrow. Non-existent function starred in particles. This is the mistake I made. We don't need start, we need emitting is true. So that when I opened the particle, decimating, when you hover over it, it says emitting. It doesn't say start. So you have to use an attribute and set this to true. But again, once this is finished running, then this is going to be set to false again. So now this should be working. Sorry about that. And okay, now we are, when I hit any of them, we are getting particle effects. And this is working quite well, except I'm really bad at playing shooters. But okay. Yeah, this looks pretty good. Except now the problem is Lebur shredded coconut. You can still see the coconut doesn't disappear. So this is something we have to work on. So what we want to do is after one of these nodes has been hit, we want to destroy it. And to destroy something in good all you need to command queue free. And this one literally just destroys to note immediately. But we couldn't just run it immediately like this. And let me demonstrate why. So here we have economic game, and if I shoot at something, let's say this apple, it disappears immediately. And we are not going to see any of the particles. And the reasons should be fairly obvious that all of this is one node and the particles are part of the node. And so when we are destroying the entire node, immediately after playing the particles, we are also destroying the particles and this is why you can't see them. So instead, what we are going to need is to play this Q free after a couple of seconds. And this means we have to add a timer to our vegetable node. So I'm going to add a timer. And this is called the trivial deaf timer. And this I'm going to set to 1.5 seconds. And this needs to be a one-shot variable, and it does not need to be autostart because we only want to trigger this once we hit the vegetable. Okay? So now if this one selected, I'm going to create the timeout signal. And only after dysfunction has finished running, we want to run Q3. And now whenever our vegetables it, we wanna get our vegetable deaf timer and start a timer. So effectively what happens here is whenever our vegetable said, we're playing particles for a second, then we're going to wait for about a second, and then we're going to destroy the node. So let's try this now. And we can see something, and now we can, yep, see it's disappearing. Does looks good. Okay. It's very hard to see. There. You can see Pepper disappearing. Same for the coconut. It seems to be working. Yep, I think there's good. Okay, cool. So we are making progress. And I think it's actually a pretty good place to stop this video. And in our next video, we are going to make the level quite a bit nicer. I will see you then.
52. Vegetable Rain 10: Adding lights: We are actually getting really close to finishing our game. We essentially have all the game mechanics. The only things really left to do is to update our game levels who looks a bit better and to add proper lights to it. So let's work on all of that. Here we are back in our levels scene. And I think what became quite obvious is that we had too many trees. So all you have to do is just delete some of the trees that the game gets a bit less busy. And we can see all of the targets easier. So let me move all of this site and let me add a bit more rotation. And the most important thing I'm looking for is that we have something in the middle that the player has a bit of space to look upwards. And soda trees kinda form a circle around him. Along with that, there's another thing I do want to add, and this is when you look at our asset folder and come to weld, we have a couple of rocks or quite a few different rocks. And a problem right now is that our player is constrained by an invisible wall, which looks very unrealistic. So instead, I want to place rocks around the level and also few and site of the level so that it looks like the players be constrained by rocks and not by an invisible wall. And these rocks don't need a collision because the collision is handled by the invisible wall. So the rocks are there to just create the illusion that we are walking inside of the rocks. But this doesn't actually happen. But let's actually import some rocks. So all we need to do is to direct a rocks into our scene and move them roughly on the y-axis so they're resting on the level. And this work, I can also move down a bit. And I'm first going to move all of them in there. And then I'm going to place them properly. And you can see that when you drag an object into Godot, a tries to tell what position to put it in. And right now we have so much grass that it's very hard for to tell. Okay, but we're almost done. This is the last rock, okay? So now we have a couple of rocks and all I want to do is to move them randomly around the level and especially around the edges of our level. And well, this is again just laying out some elements. So I am going to speed this up, but all I'm going to do is to move them in position. So shouldn't be too hard. But obviously try to lose yourself first. So pause the video now and try to achieve all of this yourself. And remember, you can also resize to rocks and rotate them, which is going to make them look a bit more organic and more varied. And I did also noticed I made quite a few of them children of each other, which gets a bit confusing. So let me make all of And the order again, most probably on the level. Okay. So now we have the entire area around our level. And the one thing I do want to do is to just add a few more rocks in the middle of our level so that it looks like the rocks are bit more random. And again, I really just copy and paste lots of different rocks and move them in different positions. It really doesn't have to be anything too fancy. But let's try out off this now and let's see how this works. So now we can see quite a bit more immediately and we can still shoot at our level. And okay, we almost get too many vegetables flying in. But I think that's okay. We can adjust that later anyway. But now we can see lots of different stuff, even some collisions. And you can move a bit more freely and the level that you can see actually what's going on. So I think that's okay. Alright, and with that, I just want to clean up our level because this is getting very busy. And here you can see the grass by itself takes up a huge amount of different stuff. And we could actually move all of the rocks inside of the grass knowledge because they're doing basically the same thing. So let's call this grass and stones. And to never open this note again because it's massively large. Okay, so now we have a pretty fleshed out game level. So what we have to work on now is the lighting. And this is where the game is really coming together. Because right now we have the standard light, which doesn't look too good. And there are a couple of ways to achieve this. The first one is to just add a light to our scene. So if I have level selected, I'm going to add what's called a directional light. And you have a few more options, but direction of light is the easiest one. So this simulates a sun basically. And by default, let me lift up the note. You can see a son and a big arrow. And what that basically means is that wherever this arrows pointing, this is where the light is going. And I want to move this node up a bit and pointed down. And you can already see directly and the level is creating light. So it actually changes how everything is looking. So Khurana, again, now the colors have changed quite dramatically. And this is also going to affect all of the sponsoring saltiest vegetables as well are going to be affected. And now we can really tell that the floor is far too bright. So let's update that one. And I put this into level and platform. And I want to make this thickness will be a bit more bluish. And so this works better. So you only really want to work on the colors, wants the lightest, at least somewhat finalized, because colors change drastically when you change the light. Bertha Wright and I think this starts to look better. Yeah, I think this is alright, not perfect. And I would probably want to spend a bit more time on it. That by itself does. Okay. So let's close it and let's work on the lighter a bit more. Because in the light, we can do quite a few more things. The first one is the color of the light and the energy. And energy is the easiest one to more energy you have, the more light you have. So you could make this super bright where everything becomes very, very bright and you can't see anything anymore. So we don't want that. But we can change this to like something 1.2. It's really up to you how you want it to look like. But color is really what changes how the game looks. Because now we can change this to something like red and add a nice touch to our game. So if I make this really read, then in our game, things are going to have a red area around it. And this is usually making the game, at least in this case, look a bit more like we're playing around dawn. So if you'd like to go for it. So especially in our guns, because they are very reflective. You can see this red color a lot. And I think I'm going to keep the red light. I think it looks quite a ride because ago of negative. Then you go with the opposite color. And you can go with couple of more options to speculate how much reflection areas, but I don't really worry about it too much. But one more thing is we can enable a shadow. And in our scene, this might get quite busy, but that's the outlooks, notes, the working out fine. Yeah. So now we can sometimes see a shadow if it's moving above us. And this is adding quite a few touches that make the game look nicer. But also be aware here that this, because we already started with quite a few objects and now a scene might end up making the game a bit slower. So especially if add shadows, this is going to make the game slower. But in our case, I think this is still okay. Okay, so let's close it now. So now we have a basic light, but we still have the massive blue area around us. And we can also influence this. Let me minimize everything, even the folders. And one thing we haven't talked too much about it yet, and this is in the file system default environmental tress. And let's actually click on this. And what this one does, it's the environment. So in this case, it's the Skybox and we can't actually influence this. And in a 2D scene, this doesn't really do anything, but in 3D, it influences things massively. And background is the one you want to work on the most. And right now we have mode sky, and for Sky wherever procedural image. So Godot creates a procedural image by itself from what we have seen right now. But we could, for example, changed this to custom color. By default, this is going to turn everything black. Which let me run the game now is, well, let's say it's an interesting look. Bad horror movie ish, I guess. But, um, yep, not ideal. So black is probably not the best color if you want to make a game. But instead, what we can go for is, let's go with a nicer kind, a nicer shade of blue. And here, again, you really have to play around with this and see how things are looking. So don't make it too dark. And let's see how this is looking now. Okay, we do have to work on this a bit more. And here also that the particles look very different, but we are going to work on this in a bit. And I think the red light is a bit too strong. So let's go with light and let's make all of this. Yeah, there we go. Direct light was too much. But I do want to have a bit of a red light, but don't make it too overpowering. So this is starting to get a bit better. And I think I want to turn this a bit more into an orangey color, let's say bit too bright ish. And let's put the power back to one. And let's try it now. And let's see. Yeah, we're slowly getting there. I mean, there's still quite a bit of work to be done, but you can play around with this yourself if you really want to spend much more time on this, and I would recommend to do so. Ok, so we have a directional light and we can change our environment. And I think for the environment, I want to go over something a bit brighter to make it look nicer. Yeah, it just fits better. Ok, but now when I play the particles, it looks very dark and I wanted to be glowing. And this we can also work on. So if I click again on environmental, we can go with ambient light. And right now this is black. But let's change this to white. And you can already see immediately the color changes is, is making everything quite a bit brighter. And we could, for example, go and again with something yellowish. And notice from the game again. And let's shoot something. And now all it's very bright. And this is, well, quite a big change. So now we actually have proper lighting. And I think this is really starting to get there. And let me just explain it. That right now the background is how this entire light box looks like. I think it's quite obvious right now. But ambient light is basically how much is being reflected. And we can also change the sky contribution. So how much impact the sky's going to make. And if you change this, I think in our case to cut as a quite symbolized, not going to change too much. But if I change the energy too high, then you are going to notice this. Let's actually write this up a lot and see how bright everything gets. And especially in our gun. And you can see it as very drastically that this slide is really overpowering now and looks really weird. So let's change this back to sweat it before fink. One is usually fine for this. And there are quite a few more options in here. We can, for example, work with glow. And let's run this now. Let's see what it does. And doesn't do too much and it makes our gun look, I think a bit weird. But you can see there. Now we can see on our gun does really nice glow effect, which looks really cool. And yeah, I think just looks actually find, let's keep it. And obviously you can only really see the glow if you have an object that can reflect the globe, which our gun has, but nothing else now a level. So this would be an important thing here to remember. Ok, I think in terms of lighting disks fine. And this is pretty much setting us up for the last video in the series, which is where we're going to add sound to all of this. I will see you then.
53. Vegetable Rain 11: Adding sound: Okay, welcome back. In this video, we're going to finish up our game. And the last thing we have to add some sound effects. So I want to add background music and I want to add some sound effects for guns so we can hear them. And this brings us to another topic, African earlier, that our gun needs to have a cooled on timer so that we can't shoot on constantly. We can only shoot about once a second. But this is also really easy to add. So let's work through all of this step-by-step. So here we are back at our level scene. And what I want to add is a music to it. So if the lever seen selected, I add another note that I am going to choose from audio stream player. And you could be choosing audio stream player 3D. And we are going to do that in a bit. But for now, audio stream player and click on Create. And now in our asset folder, there's audio. We have town.org and shotgun. And town Judy is tobacco music. So I direct this one into a stream. And if I now click on playing, you should be able to hear it. I put on the Becker music, bid less loud photo recording so it doesn't have a poll my voice, I hope you can hear it, but it is definitely there. But we don't want to hear it in our editor. We only want to hear it in the game. So I click on auto-play and playing is off. So this already gives us o background music super easy to add. And now I wanna go to our Pliocene layer and add an audio note to this. And you can already tell that our node setup is actually getting really complex. And we are getting towards making actually better games that are including quite a few more elements. So let's add the oddest trimmed player freedom. And this one from the assets is going to get our, would I put it audio acids Audio, our shotgun sound. And now we only want to play this sound when we click the mouse button. So I go to the script. And the script here again, we have our shoot function and initialed function. I just want to play the sound and let me put it. I think right below calling the group. You can also add a sound to the actual shotgun. It really doesn't matter. So I want to get audio stream player and click on play. And that's all we needed to add to sound. So let's try this now. And here you can see what's going wrong if you don't have a timer that every time I press, you can hear the gun sound. And it doesn't line up with the animation. So let me close all of this. So now we have to have a cool down timer. And we could be doing this in different ways. We could be adding a timer to our shotgun or we could be adding a timer to our player. And I think getting the timer to all play out is going to be slightly easier. So I'm going to go with that. And actually, you should be able to do this yourself. So I am going to challenge you. Try to add a timer to the player yourself. And this time I should restrict us that we are only able to shoot once per second. So once you're clicking the button, desert timer running down and only wants to, time has run down and you can shoot again. So pause the video now and try this yourself. Ok, welcome back. Now let's try this together. So to our player, I'm going to add a timer node. I already had it selected. And this time I note, I'm going to call cooled down. And then this time a node, I'm going to add a signal which also had opened already that it's called timeout. And it is going to be connected to our player. So now we have a cool hour timer and is going to be, if I go to the inspector, has a wait time of 1 second and has to be a one-shot. So we don't want to repeat it constantly. Okay, and now in our editor we have to make this work. And the way I'm going to approach this is this in our startup variables, I'm going to create a new variable that I'm going to call gun ready. And by default, this is true. And then in this line here, when we press the button, it says to be pressing the button and gun ready. So we are only able to shoot our gun if we're pressing the button and if the Ghana's ready. And then afterward pressing the button, this is going to be set to false. So right now we can only shoot once because after we have shot, then discount already is going to be false and we cannot shoot again. So we have to change some code to make this work again. And for that we have are cooled on function. So once the Quran function is finished, we want gun ready to be true again. And the last thing we need is that discount ready also has to start to cool down timer. So cool, like dollar sign, cool down, dot start. So let me go through it again. That right now we can only shoot if we're pressing the button and if Gan ready is true, which by default it is. However, once we've pressed this button, Gan ready is going to be set to false and we are starting our cooled on timer. So for the duration of this timeout, we are not able to shoot again. However, once the timer has rundown, Ghana readies being set to true again and were able to shoot again. And with all of that one done, this should be working, so let's try it. So I keep on pressing as fast as I can. But we're only shooting about once a second. Yeah, I think this is working quite nicely. So we can shoot at everything pretty reliably. And we can, we should wants a second and we have lots of vegetables. And yeah, this looks good. Oh, and there's one thing I did forget. So that's going to be one more video before we finish this game. I will see you there.
54. Vegetable Rain 12: Improving the performance: And that is that we are spawning objects all the time. So we're spawning lots of different vegetables, objects. But we only destroy these objects if they're hit with a gun, which only applies to very few of them. So most of these objects are going to be in our scene forever, which eventually is going to make our game quite slow. So we have to add some code to make sure that our game keeps on running smoothly. Which means that we have to destroy these vegetables, let's say once they go too far down and we will never able to see them again. And this is super easy to do. So let's implement this. So here we are back in our code editor and could DO has a nice feature to show you how much is going on in a scene. But to do that, I first have to go to our player code. And here I want to disable this line here for now so that we can see our mouse again. And then we have to add pass to this function. So good, oh, doesn't give us an error. So this line here just make sure that our mouse was always captured. But I want to use my mouse outside of the game. And I show you in a second what this means. So let me run the game again. And here we can see the usual thing. But now if I go outside back into our editor, you can see local, and this is what we have seen so far. But while the game is running, you also see this remote. And remote is showing us all the nodes going on in our level. So if I open this and I am going to and I am going to positions and open positions that you can see. I slept again running. But here you can see Godot adds more and more rigid bodies. I think. And I retell that, yep, our game, because we have so much going on, is starting to lag. And for the simple reason that we have so many objects in our game, that again, is actually starting to slow down. So especially when I shoot something that good old really struggled to maintain all of this, which obviously makes the game unplayable. So we have to fix this. And we can fix this fairly easily. And let me leave these two lines in here just for now. So what I want to do when I go to the vegetables, which under level folder, I go to vegetable. And here I want to run our func underscore process. And what I have to do in here is look at our translation. Translation dot y. So the vertical position of the vegetable and our scene. And if this one is, let's say smaller than negative five, then I want to destroy it with Q free. Just like we have done earlier when we have shot at the vegetable. And minus five might be a bit restrictive by finger's going to be OK because the player is not going to look at it too much. So now our game runs smoothly and let's keep on playing it for a few seconds. And let's see how it's going to look after I played forbidden. And I think this looks much better. So you can't see that eventually all these vegetables are just going to disappear. And yeah, I think this is getting much better. So this game keeps on running smoothly. And the player can't really tell the difference, except right at the end. But you could even add some objects in there and hide this with there. Okay, there we go. And yeah, I think this makes the game playable and this is working out nicely now. So I hope you enjoyed this game.
55. Outro: Alright, now we have made all the four games for this course and we are pretty much done. And I think at this point, you should have a fairly decent understanding of how to approach different games with the different game engines. And if you've got to this point, really well done, I am sure you have learned a lot. And what I do want to talk about is where to go next. So here are some resources. If you want to go fervor, and let's start with pygame. And the best resource I would recommend for PyGame is a guy called us laggard, and he published a couple of books on PyGame itself with lots more game examples. And if you want to get good at PyGame, check out his tutorials. They are really good. Also, I make YouTube tutorials on PyGame quite often. I usually do one per week and check those out if you're interested. And for Godot, you have quite a few more resources. The most immediate one I would recommend is called GD quest, which is an entire site dedicated to could do, which has lots of tutorials, both free and paid ones. And they can get so much more. Also, the good dog website has lots of examples and tutorials. And if you'd like to shoot her, there's a tutorial on the Godot website or much better first-person shooter. So check this one out if you're really interested. Also on Udemy, there's another course that is quite good on Godot. So check this one out as well if you're interested. But generally both for Godot and PyGame, The best way to learn them is to make lots of video games. And what I would recommend if you want to get good at Ivo of them, just make lots of games. And you already know all the basics you need and just using dose, you can get really far. So for example, in PyGame, just using a sprite, so a surface and a rectangle. You can do so many different things. It's quite a powerful concert actually. And sinful Goodall, make more games. And then when it come to a specific problem, just use Google and try to find a solution. And in this approach, you are going to learn more and more nodes and more and more approaches that are better. And via that, you are going to expire capabilities over time and become a really good developer. But that is pretty much it. So I hope you enjoyed this entire tutorial and thank you so much for checking it out. And I really hope you get something useful out of it.
 Christian Koch