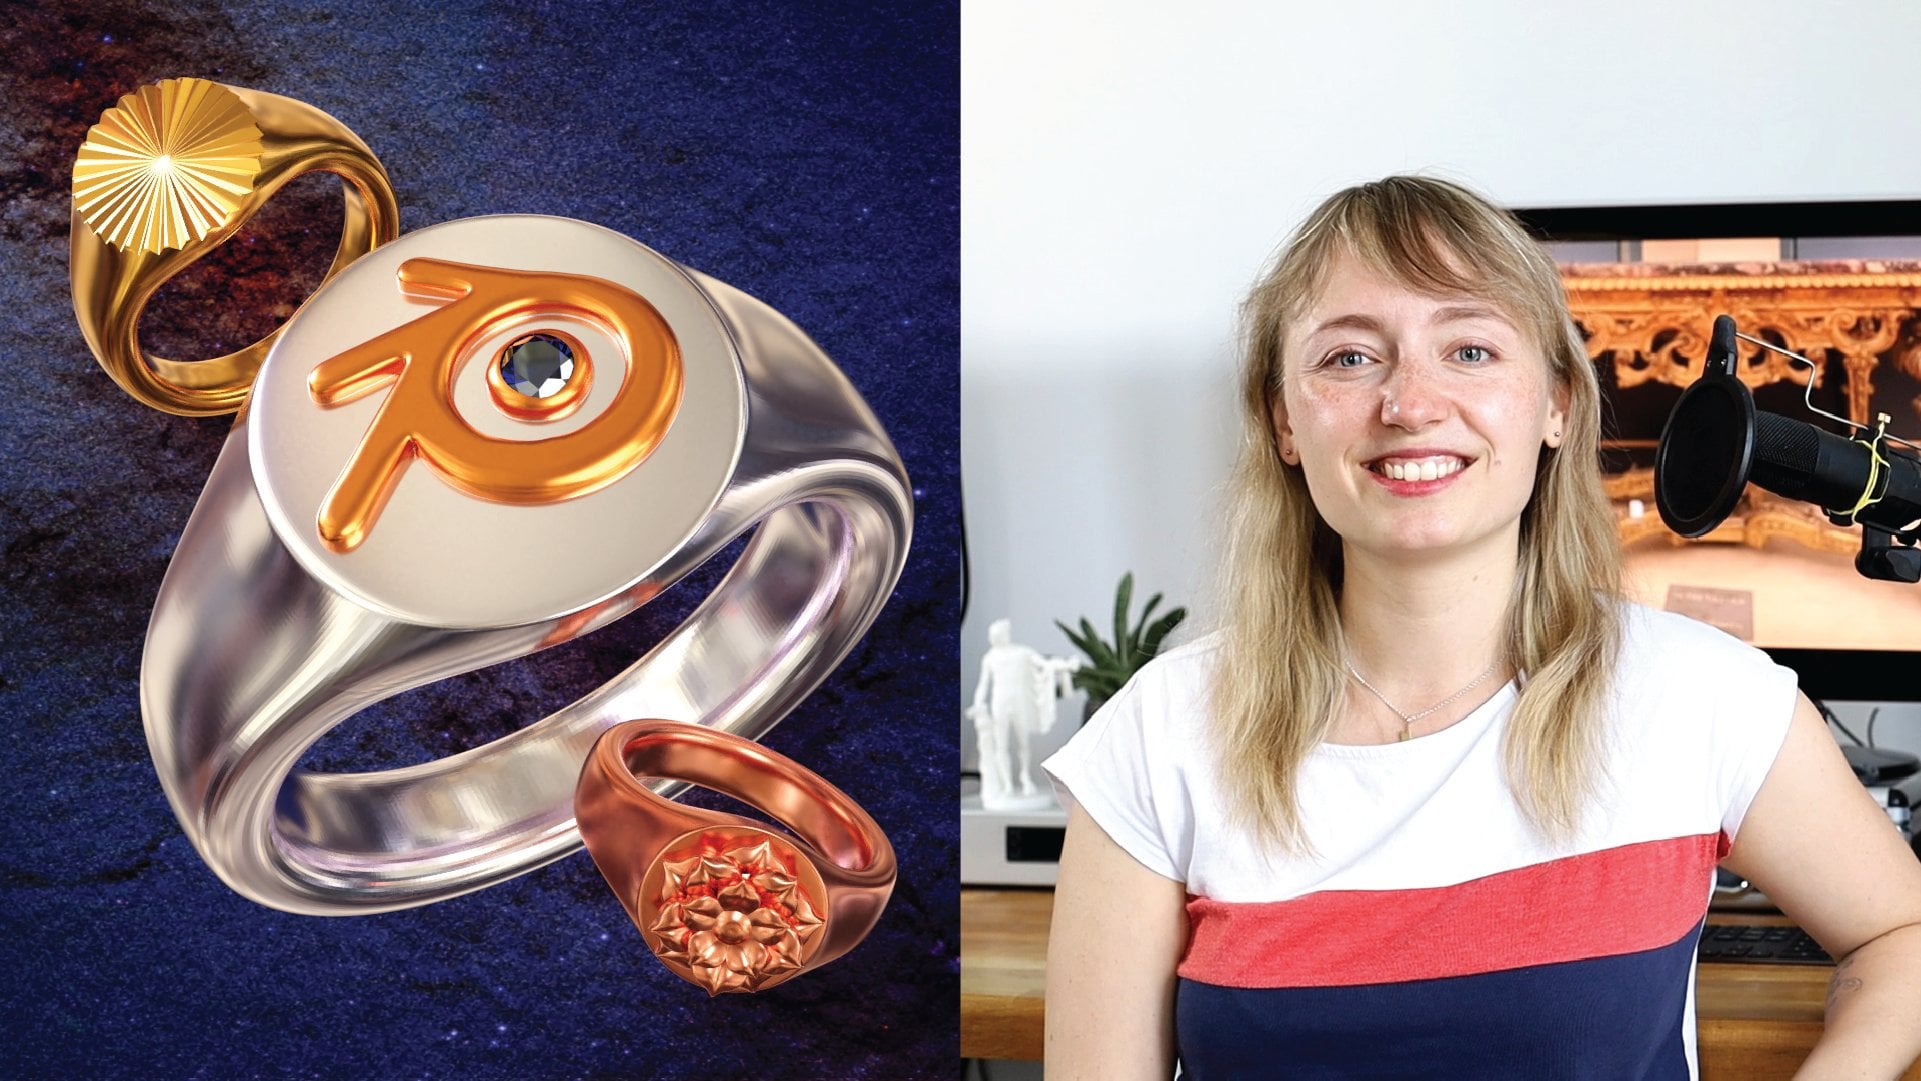
Transcripts
1. Welcome: Hi there. My name
is Gesa Pickbrenner. I'm a 3D jewelry
artist, educator, and by now a curve modeling
enthusiast in Blender. Curves can seem
intimidating at first. Is there a thing
as curve anxiety? With the tips I share, you'll find they're actually
really straightforward. So welcome to my class. We'll start with
the fundamentals of curves, what they are, what makes them unique, and how to control
those snaky dudes. You can use these techniques in jewelry and
architectural design, but also for any project where you want lovely
ornamental shapes, swirling wires, tentacles,
hair, the list goes on. By the end of the class, you'll be able to
confidently use curves for any basic modeling
task in blender. You'll also have
skills to create delightful ornamental
designs that look pretty complex but are actually
not that hard to make. Whether you're a
beginner in Blender or you've already
whipped up a few models, this class has
something for you. All you need is Blender, a mouse with a scroll wheel, and ideally a numpad
on your keyboard. By the end, you'll be confidently
using curves to model beautiful designs and you'll
have created a stunning ornamental
ring to show for it. Share your project
in the gallery and don't forget
to leave a review. I'd love to know how
it went for you. So let's jump right in and model something
amazing together.
2. Project Overview: Hello again. In this project, we are really getting into the magic of curves in blender. I'll guide you
from the basics to building intricate
ornamental shapes, and by the end,
you'll feel right at home using curves in
your own projects. We'll first explore
how to tweak and shape curves to get
smooth flowing lines. And afterwards, once we are a little bit
more comfortable, we'll be creating our
own ornamental ring, complete with diamond like
stones and all the sparkle. For this class, you'll need blender, which is free and
easy to download, a mouse with a scroll wheel, and if possible, a
keyboard with a numpad. If you don't have a
scroll wheel or numpad, check out my beginner's
class for some workarounds. You'll walk away with a
stunning ornamental ring, a full rendering,
and the skills to turn your designs into
3D printable pieces. Once you're done, be sure to share your project in the
gallery for feedback, and don't forget to leave a review to let me
know what you think. Alright, let's
beat curve anxiety in Blender once and
for all and get you started on creative
intricate designs in Blender right now.
3. Settings: A. Before we dive into
all the fun stuff, let's tweak some blender
settings for your convenience. Let's just quickly go into our preferences under
Edit and preferences. Let's switch a few
things around in here. First, if you like, you can bring up the
resolution scale of the interface of blender. This might be easier for you to see if you have a big screen. I've set it to 1.5
so that you are all able to see something
in the recording. So let's go to navigation and we can hear change to
orbit around selection. This makes manipulating
stuff a lot easier. Also, switch off outoperspective,
because with jewelry, I have found it a
little bit annoying if our view always changes
back to perspective mode. I find orthographic mode a lot nicer for these small
scale jewelry projects. So under key Map, set space bar action to search. Usually, you can press space to turn on the playback
of the timeline. But in our case, since we don't do
any animation today, searching will be
much more useful. Also, down here, select
tab for pie menu. Even though with curves, we don't need to switch between any other mode except
object and edit mode. I find having the
pie menu with Tap to be very comfortable in general
when working with blender. So we might as well
activate it now. The system, you can bring
up the undo steps a little but if you want to go
back for quite a few steps, 60 usually is enough. Also, if you want to
render something today, you might want to check
out the render device, which you can use for cycles, and you might choose your GPU if you have one to
find the correct setting, you can just do a quick
Google search for your GPU and then find out
which of these work best. Also under safe and load, you can check if your safe
versions are set to one, and this just means that for
each safe file you create, Blender will keep
the file before that one as a blend one file. There you will find
an earlier state of your project, of course. Last but not least, let's
go to add ons first. If you have it, enable it. And if not, make sure to
download the JewelCraft add on. You will find all the links in the resources of this class. Once you have downloaded
the add on file, you can just put
it in some folder. I like to keep a
designated add on folder, and you can click Install. And here on a blender add ons, you will find a zip file and
just click Install add on. And then you can activate it, and then the Jewell Craft add on should be automatically
installed. Preferences save
automatically, by the way, this is this little
setting here. And then if you go
into the end menu, you should find the
Jewel Craft add on here. If the units of your file
are not yet correctly set, then up here, it would say
set units automatically. And then you could
click that and it would choose these
settings for jewelry. For me, this would be metric millimeters and a unit scale of 0.001 for millimeters because 0.001 of a meter
is 1 millimeter. Well, and that is everything you would need to do to be
prepared for this class.
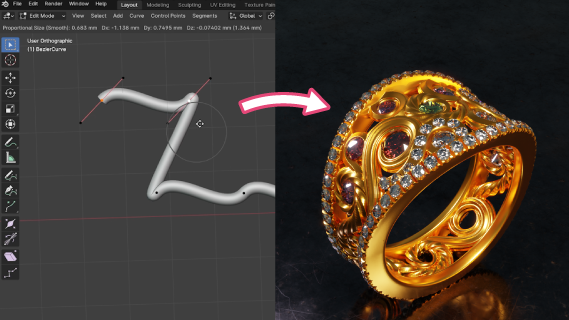
4. Curve Introduction: In the next lessons,
we're going to overcome our potential curve
anxiety with the basics. If curves have felt mysterious or tricky before, don't worry. By the end, you'll have a solid handle on what they
are and how to shape them into basically anything that
is wire shaped, I guess. So grab your mouse and
let's get bending. Curves are ideal
to make any kind of elongated smooth
shape and blender, including hair, pipes, limbs, tentacles and nice jewelry
wire and ornaments. Add curves like any
other object with Shift A. I have a
lot of objects here, which are part of the
extra objects add on, which you can also enable, but they are not
necessary for this class. So at curves like any
other object with Shift A. There you have lots of options. However, the curves
I like to use the most are busier
curve and circle, as well as path. Let's first create
a busier curve. All curves are
different to measures as they initially don't
have any geometry. They are like empty paths
floating in the three D air. Since they don't
have any geometry, they are not visible in the
rendering at this stage. In all curves, we
can switch from object to added mode with tab, and then you can move the
control points around with G. The curve will follow. To add some geometry
to this curve, you can go into the
curve menu under geometry and give it
some bevel depth. The standard profile is round, and we will explore
the others later. Now, this geometry will be
visible in the renderings. Let's switch to flat shading
by right clicking on the curve and shade flat so that we can see the individual
segments better. I also switch to mud cup in the three D shading settings
and turn on cavity, which will make things even
more accentuated and clear. This new geometry won't
have super high resolution, and we can change that
in two different ways. You can increase the resolution of the profile of the
curve, which in this case, is just round, so a circle by going here and
increase the resolution. You can just click and drag, and this will increase the overall roundness
of the curve. You may notice that
the resolution along the length
is also a bit low, so we can see these
individual joints here, and we can increase that
under active spine. And if you increase
the resolution here, the curvature will
become much more smooth. And there we can also switch between flat and smooth
shading directly. So in added mode, we can work a bit
more with this curve. We can, for example, use
E to extrude segments. You can also select a portion, duplicate it with Shift D, and then move it somewhere else. If you want to
connect these two, select the endpoints
and press F. Also, you can select two or
more control points and subdivide them by right clicking
and choosing subdivide. If you want to get rid of those extra subdivision
points again, which you can also use to
change the shape even more, then you can just press X
and say dissolve vertices. The curve will stay connected, even if you choose
delete vertices. If you delete a segment, the curve will get
discontinued and you can connect it again with F. You can also scale the individual
control points with S and rotate them with R. So
since this is a busy curve, they have some handles on the individual vertices
or control points. And you can select these
handles and move them about. And this will make the curvature more dramatic or less so. Usually, they both move in alignment to each other
like one straight stick. When hitting V, all
right clicking, you can choose different
versions of handles. Automatic will actually convert the handles into a
tangent of the curve, which will always keep a constant curvature no matter how you move
the control point. Vector will make
the handles point towards the next control point
even when moving this one, but it will not
keep a curvature. It will just become a
very pointy corner. Aligned is the standard. The handles are aligned
to each other and do not change position when
moving the control point. Using aligned, you
are able to influence the shape and direction much more than with the
first two options. Then there is free. If you want sharp
or smooth corners and the most bit of control,
you should use free, since this allows you to move the handles independently
of each other, and they won't change their placement when
you move the curve. Toggle free align
lets you switch quickly between
free and aligned. Another important feature of curves is to be found
in the end menu. If you select a control point, you can scale the thickness of the control point under radius. You can also do this with the shortcut d S or
options for Mcuses. Then another cool feature is
the tilt value of the curve. The tilt value lets
you turn the surface. For this, I will go back to shade flat so that you
can see that better. And this is, of course,
especially interesting if we would like to change
the shape of the curve. For example, when going to geometry and set this to chute, and if you tilt it, it will just give it a very
interesting shape. And you can do that with
individual control points or all of them at once. You can also offset
the curve from its placement if you
need that at some point. I usually keep that
at zero so that the control points are
directly below the curve. Now, of course, the ornaments
shouldn't be all around. You already know
that you can use the extrude function to
give this stretched look, but you can also go
to the bevel option, and there we have some more
potential profile shapes that we can give our curve. The standard setting
is the round setting, and you can change the
depth and the resolution. Can also select full caps
to close the end caps. You can also switch to profile. This way, you can influence
the shape a bit more. I will just increase the
resolution like I did before under active
spine like that. Think of this straight
line as one quarter of the cross section
of the curve here. So that is this line here. You can only see this part here. If you know just that, you can see that
you can influence the whole shape in this way. And that, of course, gives us interesting options to play
with the shape of the curve. You can add some more points. Also, you can change
the control points here just as you
can with a curve. So you can choose a line or free or just this pointy vector. And, of course, you
can always tilt and twist and turn or
give this another radius. The third option for
bevel shapes is object. If you select this, first, everything vanishes
because we don't yet have an object
plugged in here, but this is where it can
really be the most creative. So we can use another object as the profile for the curve. So let's do that.
In object mode, create a new circle. I get a bit smaller,
bring it over here. And now we will call
this bevel object. And then we can plug this
into bevel for curve. And already here, this is
a little bit too huge, so we can scale down the circle. Then if we change the circle
in edit mode like that, for example, we can influence the whole shape of our curve. And, of course, we can play
around with this a lot. We can make the handles
free so that we can, for example, give this
little drop shape. This can be quite useful for
hair because you can even duplicate some areas and put
them on top of each other, remember with Shift D.
And then this could look like strands of hair if you
make that small enough. Like that. So you don't only
have to have one curve. You can create multiple
curves as part as this one, and then they can float
next to each other, and it will look like that. And here, of course, you can
always change the tilt and the radius and just play around with all
these options. Okay? So that would be another way of playing with this
profile of the curve. And you can already see that this differs quite a bit from the standard round boring thing that you get in the beginning. Besides the Bezier curve, there are some other
curve options. So you could go to Shift
A and choose curve, and we could, for example, choose a nerves curve. Let's move that a little
bit out of the way. So nerves curve it's a little
bit different to BZ curve, since you can see, when you move these control points, there
is this little curve. Let's give this a little bevel so that we can see it better. So if you move these
control points, the curve approximates the placement, and
you can press E, and then the curve will follow, and you can make it follow
these control points. So you don't control the curve as directly as with the handles, but the advantages here
that it is pretty much guaranteed that you always
get a nice curvy shape, whereas with a Bzier you can sometimes if you
talk a little free, of course, you can mess
up your nice curve. Okay, so this is
the nerve's curve, and you may notice that
the end of the curve does not align with this
last endpoint. So then we have the path. And let's move that here, go to Edit mode, and
also give it some depth. The path is very similar
to the nerves curve. You can see that it also
follows the control points. I approximates the
position between them, but the endpoints
align with the curve. So you directly influence
where the endpoint is placed. However, you can go to the nerves curve and
go to active spine, and then you can go to endpoint, and this will basically make
the nerves curve into a path because now the endpoints are aligned with the control points. So the path and the nerves curve are very similar
in functionality, and really it is up
to you which one you prefer and which
one you want to use. So these are the three
basic curve types. So you have the nerves
curve, the path, which basically also interchange with each other if you
turn on endpoints, and you have the Bzercurve which behaves a little
bit differently, and you have a little
bit more control over the overall shape
through these handles. And of course, you can also give these different profiles which works just the same as
with the Bzier curve. So you can also use
the same Bbo object. And it will have the same
effect, which is pretty neat, so you can influence the
shape of multiple curves with one bevel object
without having to create a new one each time. Just make sure that
your bubble object is a nice curve that you can just park somewhere around here. One final thing about curves, you can change the start and end point mapping of them here. This is a neat little
function often used in animation to grow
all kinds of wires, tentacles and such stuff. You can catch a glimpse of it in action in my intro slide. And that's it as an
introduction to curves. That's basically all
you need to know, to be able to successfully follow along
with this whole class.
5. Curves (Bonus): Taper Object: As a little bonus for
the curve introduction, let's talk about
the taper object. We already have the profile
object or bevel object. Now we can also add
a taper object. For this, I will switch back to round because it will
make it more clear. If we add a Bezier curve, and let's put that
into this curve. So now you can see this here becomes more or
less like a graph. And if you look at
it as if there was a coordinate cross
next to it like that, you can see, this is
the start of the curve, and this is the
end of the curve, and in the center,
it becomes bigger. So you can directly influence the radius of the curve
in different locations. Can you see how now it kind
of has a dent in the center, and we can move that around. So this is kind of
like as if you had a graph and you're drawing the radius of the curve
along the path of the curve. So that would be another way you can influence the thickness of your ornaments without having
to use the weight function. What you can do is you can
choose multiply or add, and then it will interact
with the weight that you already gave these
individual control points. So that's an interesting
way of playing around with all these values. So I encourage you to try that out so that you get a good feel for how to use a taper
object on a curve. I find this a neat
little feature, although I won't use this in this particular project
because for me, the mean radius,
the scaling with old S is more than sufficient
to build nice geometry. But it's good to know that
you have the option to influence the radius of your
curve like that as well. Also, the taper object is
interesting to combine with the offset and extrude
function because now the geometry behaves
a little bit different.
6. Ring Band(s): Alright. Now that
we are a little bit more familiar with
these snaky dudes, as I like to call them, it's time to get hands on and start crafting our ring band. In this lesson, we'll take our newfound curve
knowledge and apply it to build a solid
base for our design. It's the foundation for all
the Bling that's coming up. So if you start a new file, usually you have a cube and
the camera and the light, and for now, we can
just delete these or at least the cube by
selecting it and hitting X. And I have created a new collection where I
put my camera and my light, just a surrendering base, we can turn that collection off, and I will add all my models in a new collection
called model. And if you want to
create new collection, you can just right click in here and create new collection. This is basically
like a folder in your finder or explorer or
like a layer in Photoshop. It is there to keep
everything organized and enable you to hide and unhide
multiple objects at once. Okay, so I will create my
curves in my model collection. And if you download
the basic file, you will have the
three collection setup that I do here as well. This has served me very well
with multiple projects. Okay, for now, let's press seven on your numpad
to go into top view. Or, no, go to one on your
numpad to go into front view, hide all the render setup. And let's press Shift A and
give this file a new circle, the one here at the top. And then align it with a view. That's why I wanted
to go into front view with one on your numpad, to just have it aligned to view not having
it skewed somewhere. And then we can scale
this up a little bit, depending on how big
we want to have it. And then you have
another option. Let me just hide this
here for a second. If you included the
Jewel kraft add on, you can just go to the
Jew Kraft addon in the end menu and go to Curve and you can choose size curve. Here, you will have
a lot of options to choose your preferred ring size. In Germany, usually, we use the circumference
as a reference, so I use 52, which would be six in USA and L and a
half in Britain. So let's create 52 se circle. I was a little bit too big here. But that's the ring size circle. I would just call it ring band. Because I promise you that this would be a
class about curves, and we will do as much of the modeling purely with curves. So I will delete
the other circle I create and just continue
with this ring band. Let's hide the end menu. Let's go into the
curve functions. Let's go to geometry, give it some round beveling, and also give this
some extrusion. Now, we could use
this right away as a basis for a flat ring band, but I would like to build
bends to the left and right of my ornaments so that the ornaments float in
the middle between them. For this, of course, we can use the tilt value of
the curve in the end menu. So go into Addit mode with Tub, go to item and make sure that all the control
points are selected. You can just do this with A and then set the mean til 290. This will give us this
flat space disk here. Of course, we can make the
extrusion a little bit less dramatic and just give it some shape that
you initially like, and you can always change
that later, of course. So now, since we want
two of those circles, we want to have a mirrored
version on the other side. So first, I would move it in object mode with G and
Y a little bit along Y. And then I would give
it a mirror modifier. So initially, nothing happens because this thing
mirrors across itself, which is the origin. Okay? So that's why we
don't see anything happen when we turn on the
mirror in any excess. So it would be
helpful if we want to mirror it across the center
to create a helper object. And I pretty much
always just do that with Shift A and
creating an empty. And an empty is a helper object that does not show
in any render. It is just there to assist
you with any modeling or animation or stuff like that to make things follow along it, or to just use it as a mirror object for
our mirror modifier. So let's just call
that thing mirror. Let's now plug it in here. And maybe still there's
nothing happening, and this is why it is
still mirroring across X. And since it is metrical across X, you won't
see anything. But if you now turn on Y, you will see that it
appears on the other side. You can turn off X, so that
we just mirror it across Y. And if we now move it across Y, you can make your ring
broader or narrower. You could in theory also use the offset settings in the
curve properties here, and this would move
the ring bend as well. But if you go to Edit mode, you will see that this moves the curve away from
the original handles, and this can get sometimes
a little bit confusing. By the way, if you want to
stop trying out some values, you can just right click
out of there and it will snap back to
its original value. So I would just suggest
to move this object mode. And it will just mirror
across the mirror object in the center. Awesome. So that's our basic ring
band. Let's save this. Save us and super
nice. Congratulations.
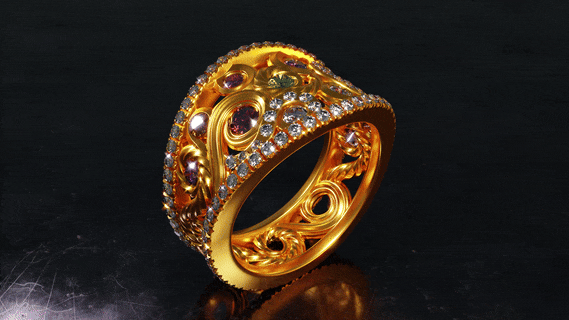
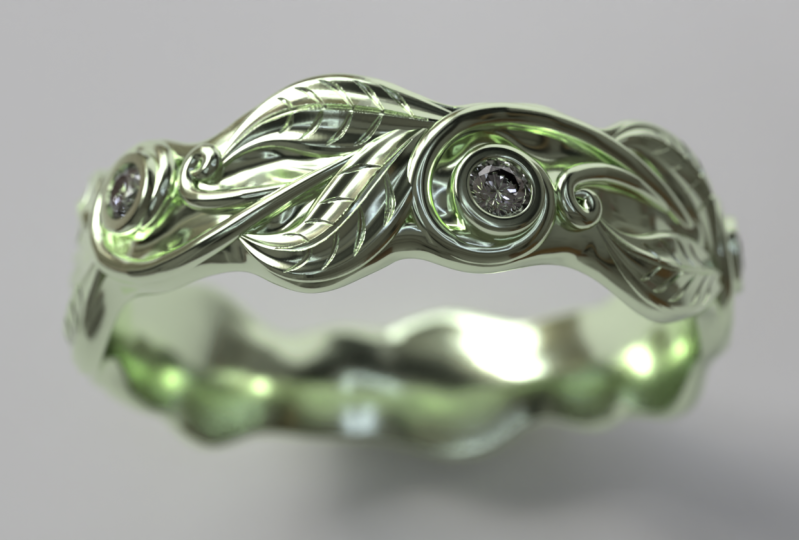
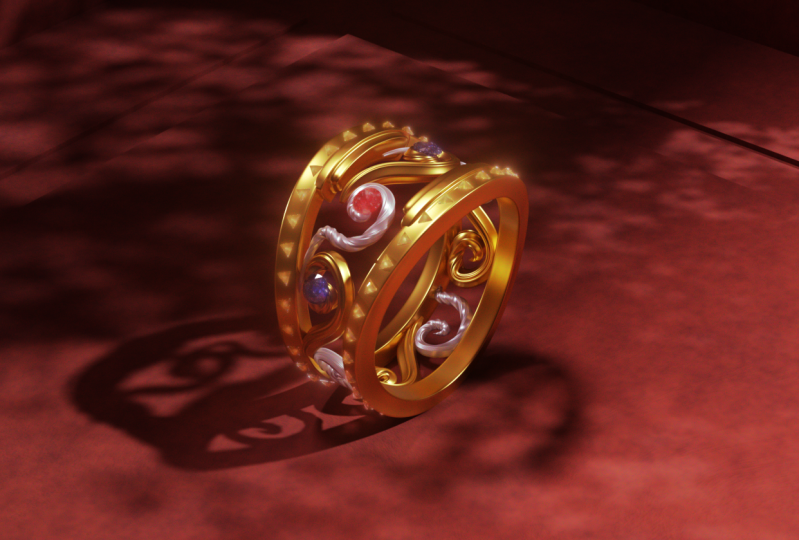
7. Ornaments: Now, we're adding some flare. In this section, we'll finally create the ornament to
sit on top of our ring. The cool thing is
that with curves, we stay very flexible
pun intended. Right until the end, you can develop your design organically, improvising and adjusting
throughout the whole process. So let's get ready to add
some beautiful twirly shapes. Let's hide the ring
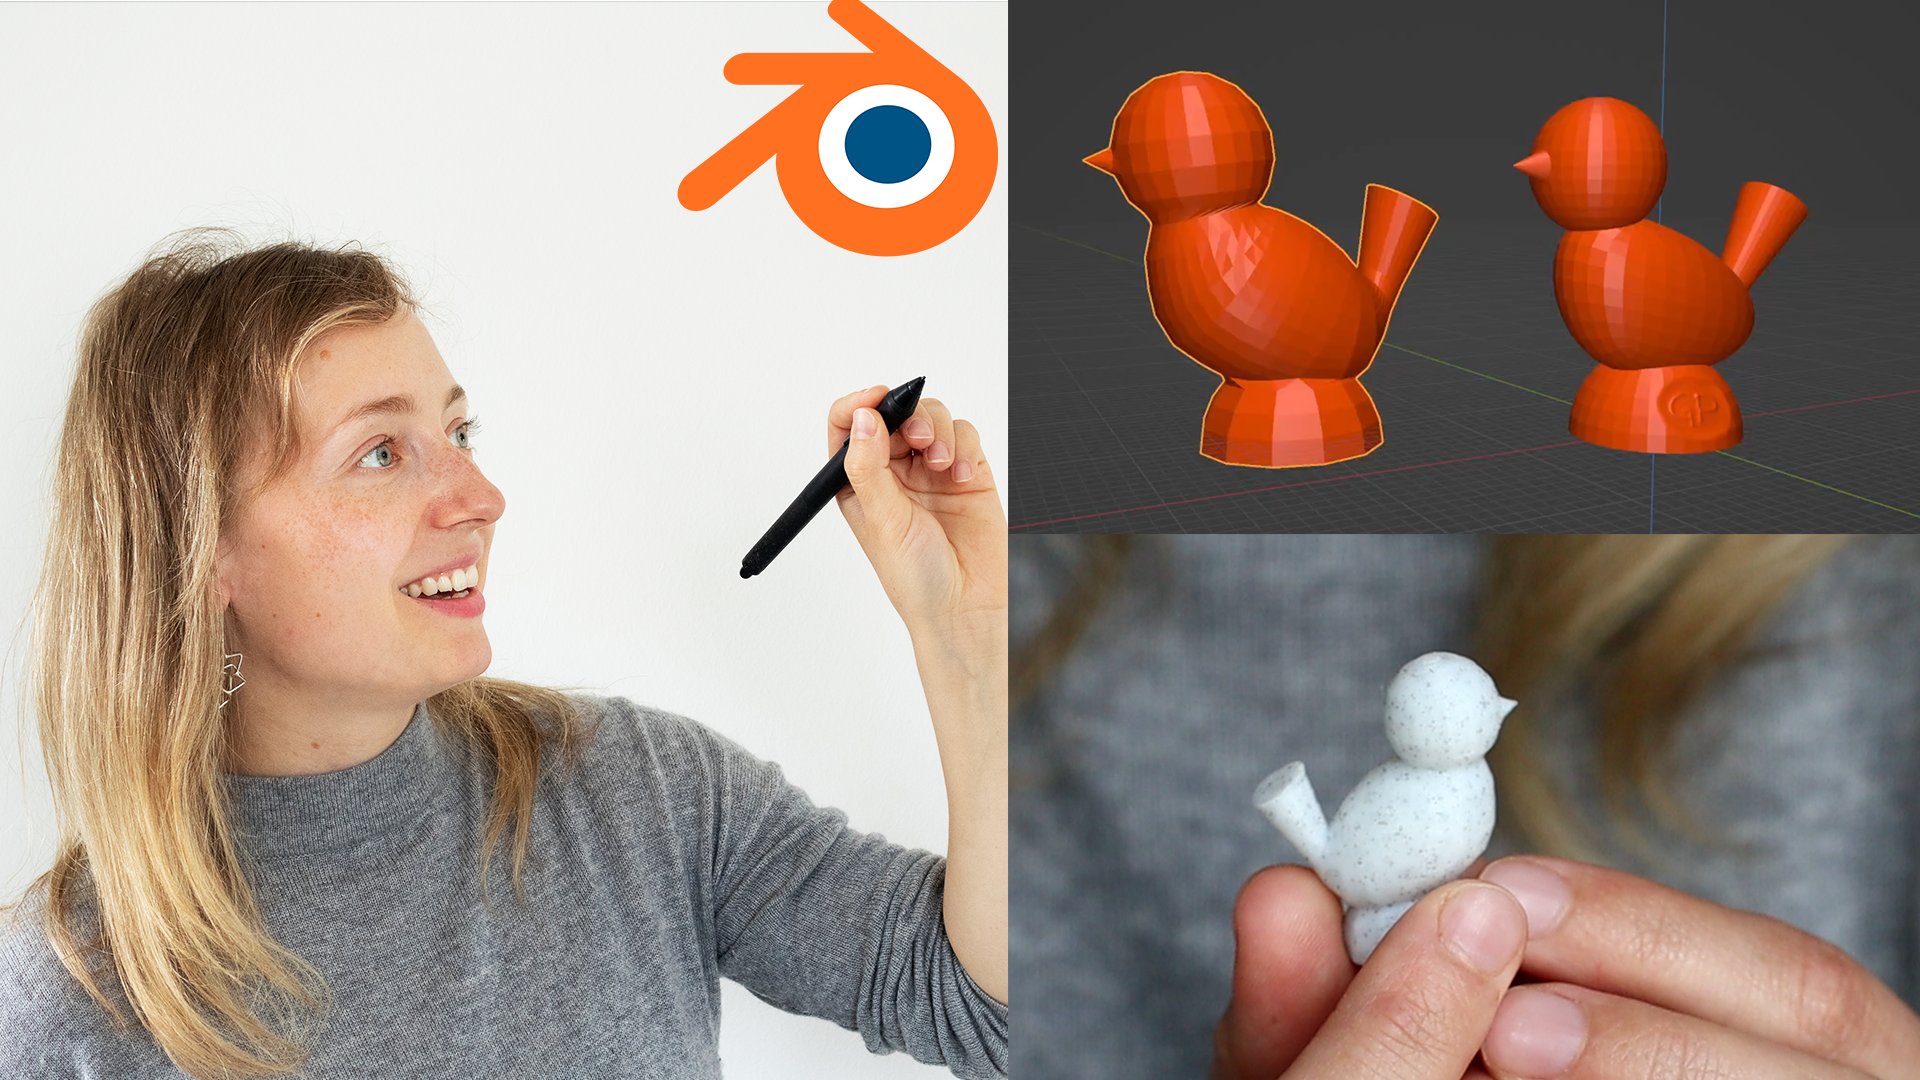
circle for now to focus on the ornament. Let's go to seven on the numpad to look at
everything in top view, and let's press Shift A and
give ourselves on your curve. I think for now, I
will go with a path. Of course, you're welcome to use any other version that you like. Let's bevel it like before. Let's fill the caps, that shaded flat so that we
can see a little bit better. Give it enough resolution so that it looks nice and curvy, and then you can turn
it back to smooth. So let us build our first
nice ornament for our rgment. And for that, let's start
with a simple spiral shape. So just to recap, use
G to move the points, use E to extrude them,
R to rotate them. Well, if there were handles,
you could rotate them, d S to scale individual
pieces down. You can also do that in
the menu under item. And of course,
Control T to tilt, which will be useful if we
have a different profile. For example, we could use such profile for
our first curve. So I would just use
a basic spire shape where the curve kind of
intersects with itself where it becomes a little
bit thicker towards the end and then kind of tapers off and becomes smaller again. And of course, you can
always still change during the course of this class and you don't have to worry about
making it perfect right away. I also think about maybe putting a stone into the hole
here at some point. So keep that in mind if
you want to work with stones or with
other decorations, you can incorporate
these as well. And we will talk about
this in this class. And just to show
you the difference, if I wanted to build
this with a Bzier curve, we could just add a Bse curve, scatter it up in added mode. Increase the resolution a
little bit to keep it smooth. Let's see what kind
of profile we gave it like this little wave here. We can also til this, of course, until it looks nice,
as we want it. So you see with the busy curve, this is absolutely also
possible to build. You just have to be a little bit more careful with the alignment of the handles and to see that everything
looks smooth because it's pretty easy to get some
jagged places like here. So that just takes a little
bit more trial and error. And busy curves are generally a little bit more tricky than the three D space, but that's why we first start in two D so that we don't have to worry about the three D space
version of these curves. If you feel you have too
little control, of course, you can always subdivide
here so that you can adjust it in finer increments and just make the shape
exactly as you want it. But as you can see, it
is a little bit more tricky to get it to
be completely smooth. So that would be my quick
attempt at the same shape. So you can maybe see why I choose the path because
it automatically just creates a very smooth
curvature along the whole curve here. Exactly. So let's hide that or get rid of it
if you build along, and let's bring that
back into the center. Let's start with our nerves per, and you can call that ornament. And you can save once more. I create another safe file so that I can keep
track of the lessons, but you can just save
over the basic ring band. All right. Well done.
8. Curving Ornaments: Alright, time to take our ornament and give it the perfect curve
to fit our ring. This is where we really
bring the design together, bending our detailed piece to wrap beautifully
around the ring bend. It's a very satisfying step, and it'll really make
the ring come together. So let's dive in. Now we will be using a
curve to curve or curve. Ha. Unhide the ringmen. So we could just use
Shift D, make copy, delete the mural, and to bring it back into
the absolute center, we can do Shift S and
selection to cursor. Now this curve is back
in the center and we can use it to wrap our
ornament around it. If you go to the curve data, let's get rid of the extrusion
and let's get rid of the depth profile so that it
is just a naked curve again, let's call it
ornament, ring curve. Now, let's go to the modifier
tab on our ornament. We can hide the
end menu for now. Let's now give our
ornament a curve modifier. We can just go into
the Modifier tab, click on Modifier and
search for curve, and that should
bring it right up. And then you can select the ornament ring curve
with eyedropper or you can just click in here as well and select the ornament. And that should curve our
ornament around the curve. If this looks kind of awkward and not the
way you want it, you can also change
the deformation axis. And in this case, we can try it out
a little bit until we find a variant that we like. For me, it's minus
X because this gives me the shape that I wanted curves around the ring
band in the right way. We can just scale the ornament
down in object mode a little bit and can look at it from here and
we can move it. And if you now go
into Edit mode, you will see that it
flips back around and now lays back
on the floor again. Toggle this little button
here in the curve modifier, which says Edit mode, and then you will see both
the deformed geometry as well as your original curve. Because it can be
confusing to look at the curve in three D and
work on it in two D, you can turn off a curve
modifier visibility at any time to have a
look at the original, then make your
changes and then turn the modifier back on
to see it on the ring. Another useful thing to do is to open up a second viewport. You can do this while holding plus here and then pulling
out another viewport. And then get into a nice
three quarter view here. Let's had the end menu
and the T menu as well. Also, you can scroll down to
the right here a little bit, and you can turn
off the overlays. And in this way, you get
a nice unobstructed view directly towards your curve. To alter the ornament shape, you can then switch back visually into the
first viewport, press seven, and then
just move this a little bit away maybe
so that you have it a little bit easier, and
this is not in the way. You can follow this here, and then you see the result
of your work as well as the original
curve on the left. What you can also
do, you can hit slash on your numpad to isolate the curve if you want to and
both viewports separately. This can maybe help you to
find the perfect shape. If you move the curve along
the z axis at some point accidentally and it lost its nice curved shape
around the ring, then there's an easy way to fix. You can just select all. You can scale around the three D cursor. If you now use a Z and zero, it will become flat
at the height of the three dcursor In this way, you will ensure that
this just follows the flow of the curved
ring band very nicely. Now, feel free to alter your first ornament
in any way you want. Don't be afraid
to make mistakes. It will still be possible to
change the geometry later.
9. Arrays: Alright, here's a little
blender trick that's going to make life a
lot easier arrays. Maybe you know them,
maybe you don't. You see how easy it is to
create repeating patterns that add complexity and
detail without extra work. Hey, so let's jump in and get
this ornament looking lush. Now, if you want the next ornamental curves
on the ring to have a different shape and only
use this specific one once, you can just select it in edit mode and use Shift
D to make a copy. Then move it along
X with G and X. To put it next to the
original on the ring band. And now you can just change the shape into any other
shape that you want, or you can also first turn off proportional editing if
the stuff moves together, which it shouldn't right now, and then you can just
move this a little bit out of the way
and you can alter it and scale it with old
S and make it smaller. So these two correspond
to each other, and maybe you want to alter
this one a little bit, make this a little
bit smaller here and give it another shape or if you want to only
select one of those, you can press L and
R and X and 180, and this will just
rotate at 180 degrees. Of course, to make this into
its own object because right now these are two curves
inside one ornament object. You can just by having one of
these completely selected, can do that by hovering
over it and pressing L, and then you press
P and separate it. And now you have two of these and they are
completely separate. You can select them here
or in your outliner, then we can go into Edit
and then we see it stand alone because now we have turned it into its
own curve object. In this way, you
are very free to just alter the shapes
in anyway you like and make them correspond
to each other and maybe make the smaller and so on. But that would be the
way if you wanted to adjust them all individually. I will just make a quick
copy that I have this one. The other way you can do that, I will just delete those again
or maybe just hide them. These kinds of designs of ornamental designs
often look very interesting if they have
some kind of repetition. This creates a certain rhythm
along the whole ring. Okay? So this is why we
will now create an array of these along the ring bend so that there's an identical copy repeating
four times along the ring. First, select the curve.
Collapse this curve modifier. And we are object mode, but it doesn't really matter
where you add modifiers, you can just add them and
you can add an array. And this will already create a copy right next
to this one here. And now you might notice that the array modifier got added
after the curve modifier. So that means that first
the ring curve object here gets applied to this
ornament and after that, the array gets created. But we can reverse
the order by taking this array modifier
and dragging and dropping it before
the curve modifier. And you will instantly see
that this changes a lot. You can also turn off the
curve modifier for a moment to see the result without
any other modifier. So right now it looks like that, and we could, for example,
increase the count to four. Right now, we have
the relative offset, which always calculates
the offset relative to the first object. So 0.6 would mean they
overlap somewhat, and 1.1, for example, they would have 10% distance of the original
object between them. So let's overlap
them a little bit so that it looks
nice, like that. And now, of course, we can turn the curve
modifier back on, and you'll see that it wraps very nicely around
the ring band. And if you now click and
drag the offset again, you can, of course, put
them where you want them. You can hold shift
to have more control about sliding this,
and of course, you can also just
click on these arrows to change the distance
in increments. But I always like the
sliding function, and as always, you
can right click to bring it back to
where you started. If you now go back
to Added mode, you will see that there's still only one curve, your
original ornament. If you now go back to
top view with seven, look at the changes that you
make here on the other side, and if you now change this, all four will
change their shape. And of course, you can
just bring them closer together and make more of them. And then you will have a
nice and easy way to bring the ornaments all the way around the ring band with
very little effort. Okay, so let's say you
have that now and get into this view into front
orographic with one on your NMPad and we can press all set to make it transparent. This also corresponds to this little button
at the top menu. And then we can put it maybe around 90 degrees
from each other so that we have one of these ornaments roughly at
each quarter of our ring. Then turn transparency back off. Don't worry for now about
making absolutely perfect. You can still make all
the adjustments later on.
10. Arrays #2: And, of course, just as with the curve modifier or
the mirror modifier, we can use a helper object to give our array
more precision. Okay? So let's say you
wanted to place them absolutely perfectly at 90
degrees from each other. And for this, we can switch from relative offset
to object offset. Right now, we don't
have any objects, so all the four pieces are
just on top of each other. But if we now switch
to front view, and let's make this a
little smaller for now, and we add a helper object just as before we
can use Shift A and empty and plain axis
let's call that array, empty or something like that. And then select the
ornament again. Okay. And then now put
the array empty in here. And right now this creates
a very strange effect, which can always
happen if you use an empty for modifying an array. We need to make sure that the transformation scale of our curve is so that it does not affect
the array in any way. For this, we can go to control A and we apply all
the transforms. Notice the numbers here. Some of these will
change if you do that. Okay, so now the scale, especially the scale
is very important. It has changed to one. So that means it's
now at 100% of its basic scale.
It's not scaled. I anyway, if we scale it, it
will change its shape again. You can already see this will
affect the array modifier. As long as it's at one, it will just sit on top
of each other here, those four pieces in
the array that we have. And if you now select
the empty again, which sits here in the center, and you notice it also has
zero rotation for now. So now let's just quickly hide the ringment for a second so that we see
it in this view as well. If you now rotate
the empty along Y, you can see that
we need the Y axis to rotate this like so. So imagine the
empty is our axis, and we want to rotate it like on a wheel
around the empty. So if we rotate
this now around Y, you will see that
this absolutely makes this thing go bonkers. So for this to work, we need to put the
curve modifier above the array modifier because now we turn the array
off and the curve off, first, it gets curved and
then the array gets applied. If we do it the
other way around, it will just mess up
the whole modifier. This is a little
bit more advanced, but if you want absolute 90 degrees angles
from each other, you will have to do it that way. Okay, so turn the array back on, make sure the array
empties in here. Then select it and
now rotate it along. You can choose the
exact number in here. So if you go to 90 degrees, this will make sure that all these ornaments are exactly 90 degrees from each other. So now, suppose you
wanted to have more, let's say you wanted to have eight ornaments and you wanted to place them all exactly the same distance from
each other on the circle, then you can just
select the empty again. And then you can 0.300 60/8, and that would
make the ornaments perfectly placed
from each other. Okay? So that would
be the way to do it. Turn the ring Band back on. That would be the way to do
it if you wanted the array in a perfect distance
from each other. Okay? So if you've come
that far, let's save. Now, if you use that
method with the empty, make sure that you only adjust your ornament and
added mode, or else, if you don't do that, your
placement of the array will get screwed and you can make some other
interesting shapes. Okay, so that's important. So for now, I will continue
with a simple version. I will continue with a
version which is only fob, and we will use the
relative of it, and I will put it
above the curve mode. And in this way, we don't have perfect distance
from each other. But it is just a very simple
and straightforward way to work with arrays and curves. Okay? So we will continue with a simple version without
the empty of the array. Okay, so that being said, now we should be somewhere
that looks similar to this.
11. Vary Profiles: Alright, it's time to add
a twist. I can do that. In this lesson, we'll
mix things up by changing the curve profile
of our second array. You'll see how just
a small change can completely transform
the look and feel. Ready to give it
a go? Now, you've come that far. What next? Of course, as mentioned, you can just repeat
the whole ornament throughout the design
and just create kind of these maybe Greek
style repetitions or make any kind of
pattern that you like. But if you want others which are shaped differently, of course, you can also copy and paste the arrayed version of
the ornament. Okay. To make a copy of these
four basic objects, we can just press Shift D, and then right afterwards,
we can press X, and this will move
our original object, which you remember is still
lying flat on the X axis. And in this way, you
can just place it so that the pattern is filled
in between the original. And now, of course, if
you go into Edit mode, you can just adjust
the shape and make this into any kind of different
ornament that you like. And since you have
relative offset, depending on how big
you make the ornament, it will change the placement
of the rest of the array. So if you want to
avoid that, of course, you can go to constant
offset and just give this a constant offset so that it ignores any adjustment in shape. You can always navigate around the ring on the right side to see the result that you have. So since we copied this second object from
the first ornament, of course, it has
the same profile. As the first one. But of course, we can give
this one a new profile now. We could give it
an object profile or just simply a square profile, and this way change the look
of the second ornament. And of course, you can also
press Control T to tilt it or S to change individual thicknesses
of the control points. Of course, these two
options can as always be found here in the item tab, and a suggestion for an
option that can be nicely combined with tilting
on the new curve, you could select the last point, and then you can turn on
proportional editing, which can also be
found up here with O, turn on connected only. Now tilt this last point with
Control R. Now, initially, it doesn't look like much is happening because
you need to increase the influence by
scaling the circle. Now if you tilt this
last point and kind of turn it as if you would screw your mouse pointer
around a clock, you can increase or
decrease the influence, and then you can adjust the
tilt for all of these points, and that gives it a nice
twisted wire look or something. If you change the profile, of course, you can play
with it very nicely. You can also use proportional
editing to scale up more than one point at the
same time along the curve, while only influence the others
to a certain degree or to move them and make the
others follow more or less.
12. Render Setup: Alright, O ring design is
already looking Gorgeous. It's time to get
it camera ready. In these lessons, we'll cover everything you need to
know about setting up your render from
lighting and camera angles to finalizing
your composition. We'll make sure your
ring looks amazing. Ready to sparkle on screen. Let's bring this design to life. Let's now give our object
some nice materials. We will opt for the
standard metal material here and some simple
background plan. First, select the ring bend, go into the material options
and add a new material. Ramp up metallic to one and change the color
to a nice gold. To see the color, it is best to use the
second viewport without overlays and switch
to viewport shading. And this will give you a
preview of the materials. Now, select all the other curves by clicking and shift
clicking and then lastly, select the ring bend
with the material. Now press Control L and
say link materials. So if you now change
this material, you can change them
all in an instant. Then in the unshaded viewport, add a plane with Shift A, scale it up with S,
and in front view, move it down with that so that it becomes a backdrop
for our ring to sit on. Give the plane a new
material as well. You can call it
background or something. So let's now open
a third viewport and change to the shader editor. And up here, change to world, and there you should
see the background color of our world. And if you want to see the
changes you make in here, it is best to switch to
the next shading option, the viewport rendered shading. And right now, we can't
see anything or not much. But if you change the color, you can make it at least brighter. But much better than
the simple color would be a sky texture note. And for this, we can
hear in the notes, we can press Shift A and texture and
choose a sky texture. And if you select them both with shift and click, we can press F, and this will illuminate our scene with a nice
sky background texture. To see a more intricate
version of our rendered view, we can go to render and we
can switch from EV to cycles. And there it looks already
much more realistic. Can also turn on GPU compute. You can also go into
the material and turn down the roughness a
little bit so that it looks really shiny. Remember, you can also
go into the preferences under system and switch your
cycles render device on. Now, you should have
seen the background light up with a nice
atmospheric glow. If you switch to perspective view with five on the numpad, you will even see
the dark bottom of the texture and the
nice bright lit sky. Let's go back to
orthographic mode. Of course, in the shader, you can increase or
decrease the strength. The sun rotation, and
even the atmosphere. Also the elevation. You can also switch between different types of sky textures, but I really like
the Nishita one. It looks quite realistic. So the background plane, of course, doesn't
have to be white. You could also
make it very dark, and this will change the whole
atmosphere of the scene. You can also make it
metallic and decrease the roughness to have kind
of a glossy backdrop where the ring is mirred can also lower this further
so that the ring has kind of floating aesthetic compared to the way that it sits
on top of a plane. And so you have many
options to play around with the placement and the
color of the backdrop. I like this particular scene here just because you
can see the shadow, and this just gives it a little bit more of
a realistic touch. So I will just leave
it at that for now. And of course, you could
also, if you, for example, wanted to give one of these
ornaments another color, you could click on new material while having the
ornament selected. By the way, you can
close this shader window here by right clicking and
join areas and then go down. Then you can create a copy of this gold material
and call it silver, and then you can
make that white. Then you would have
another material in here, or you make both of them white. In this way, you have a
variation of this design. Pretty neat. A small tip, if you like to experiment with
fancier materials, you wanted to give this
ring a wooden surface as a backdrop or pillow or something to present
your jewelry, you can download the
blender kit add on. It's this here. And if you turn that on, you will get a ton of
free and paid materials. So you will get a
little menu up here and sometimes they will
send you advertising. But you can, for example, if you have the plain selected, you could search for wood and
you could go to material, and then you could just
search for a nice surface that suits your
idea of your scene. For example, this one. And let's just bring up the Shader
window once more. Here you can see this material has been automatically added, and it has all the
different textures and alpha maps and all that stuff that you need to create
a beautiful material. Up here on the left, you
can change the rotation, and that will change the
rotation of the texture. In this way, you can adjust it even more or change the scale, can also hold down and
move your mouse done, then you can change the whole
scale at once so that it looks even more
realistic size wise. So yeah, that would
be an option, how you could play with
backdrops and materials. And there's also a ton
of other stuff in there. For example, if
you need a pillow, you can go to material
and you can go to pillow, and then you will find a pillow. And some of those are paid, but some of them are free, well, it's very
much worth a try. You can just close this here if you don't need it
and close this here, or if you don't
need it altogether, you can deactivate the add on. It will keep the materials that you added with it in there without having this big kind of menu up here all the time. Yeah. Okay, so that's just a little tip for creating
nice realistic scenes. Let's go back to the
white background just to keep things simple. And I would just switch to
the world Shader once more. Here's also an end
menu, by the way, and make this a little
bit darker just a little bit because now let's make
this a little smaller. Close this back up. You can also create hold your mouse pointer here until it becomes a plus and then make it swallow
the other viewport. Now the next thing
that we can do, we can add two or three lights to emphasize the
highlights on this thing. Let's first make this
plane transparent in this viewport so that it
does not obstruct or view. For this, we go to
object properties and viewport display and
switch this to wire. And then in the render, it
is still visible as before, but here in this viewport, it will just become a square.
13. Lights: Now, let's add the lights. Switch top you, and
let's impart a light. And let's import in light with Shift A and choose
an area light. Move it a little
bit out of the way. And with this
little yellow spot, here you can make this
bigger. Can move it a bit up. And then, of course, we can
point it towards our ring. Right away, this should
not have a lot of effect because usually these lights get imported with very, very weak strength, just to show you the difference
with or without lighting. Let's create the shader
viewport once more. By the way, if you don't want to open up the Shader
viewpod like that, you can just switch to the
shading workspace up here. But then we can't work on
the layout at the same time. I like to just create
my own workspace plus shader down here. If you go to the world and you just disconnect these
two for a second, then you see the true
intensity of this light. If you just type one in there, it will instantly
light up very bright, so we will have to give
it some value 0-1. Why not 100 milliwatts, 0.1. The sky shader is for an
even environmental glow. The lights are to make it pop. You can use the plain
shaded viewport to add and move around all the stuff and see the result in the render
preview next to it. You can press Shift D and just copy the light and then
rotate it to the other side, or you can take this little yellow dot and
point it towards the ring, and then you can see it update
in real time on the right. There's a little fun
bonus that you can use to make it easier
to move the lights around without losing
the focus on the ring, which would be to give
the light a constraint. And you can say track two, and you can say the target
would be the ring band. And now, if you move
the light around, it will always focus
on the ring band. I probably won't do that
here too much because I like to have some more control about how the light points. And in this way, it will always
point at one exact spot. But if you want to do that, and give the light an object
constraint that could help you to just make the lights focus on
the ring all the time. Okay, so I will get rid
of that again and you see the light jumps back to its position without
the constraint. Well, in this way, you can also then once you're satisfied
with the lighting situation, you can also turn
the background back on to get a feel for how
these two look together. And maybe you realize
that the light is too strong and you can turn
it down a little bit, or you notice that the background sky
texture is too strong, and of course, you can
turn it down as well. And always make sure to double check how it looks
with and without the sky texture to just get the best possible
outcome in your render. I always look for beautiful, well lit scene and the
details should be visible, but depending on what
effect you want to achieve, you might need more or less
lights or you might want to get rid of the
background sky texture altogether because you
want to have a more moody, atmospheric candle
lit kind of scene, and you can also lower the light temperature
a little bit, make it a little bit reddish. And in this way,
you can, of course, control the way that the whole scene looks and
the whole feel of the scene. And if you notice, by the way, that this on the right
here updates very slowly, you can go into the
render settings and you can decrease the
previous samples for cycles. So you could say, okay, I want SMAx samples on the viewport only
200, for example. So if you move around here, it will only render 200
samples instead of 1024. Of course, you can
also turn denoise on, and the actual render denoise
is turned on automatically. I usually like to
have three lights, which I kind of locate in a 120 degree pattern
around the model. And we can play with different
light temperatures here. You can play with some
colorful accents if you like. So everything is possible. And of course, you
can always turn off the sky texture to
see the effect. And this, for example,
gives it a more LED like lighting
situation as if it was lit by some colored LEDs and not so much a
natural lighting. If you want to have
some more control over how the background color affects the ring
and also be able to kind of play with the
visibility of the shadow, then you can create
a half or full box, and you can do this with a plane Vs you can scale that
up a little bit, maybe exclude Z by pressing and shift z
and then scale that up. Then you can take an edge or two edges of the plane and
just pull it up with E and Z, and you instantly notice
that this took away this shadow that the sun
from the sky texture casts. You might notice
when I move this, you can see the
shadow moving from the big white plane
that we just created. Then of course, you can rotate this along and you
can also play with the different ways this affects the surface
color of the ring. Of course, this becomes even
more visible if you change the background color
of the plane this way, you have a lot of control over the mood of
the scene as well. One more thing, if
you want to hide the sharp edge in the
corner of the plane, you can just give
it a subdivision surface modifier, like that. Of course, it should be rammed up a little bit, maybe to two. Then ddt mode, you can add more edges with control R and pull them
down a little bit, and that will give
this edge of the plane a little bit more
definition, also along here. And maybe along here. And this way, you
can hide the corner, but not so much that it
is super, super curved. And then you can also right
click and say, Shade Smooth. And that will make this
edge a lot smoother. And if you select here, these edges with all click
and you move them up, you can control how edgy
this plane becomes. Okay. So that is a way to be able to influence the
background visibility. Alright, so that looking
quite nice already. Let me just quickly save an
incremental version that will just save
another version of your file with a
number behind it, or it will increment any
number that it finds. So if you have, I don't know, cool ring number one, it will make co ring number
two next to it. So now, finally, we will need a camera to be able
to actually render that. And a very easy
way of doing that. I mean, we have a camera here, and you could just press
Control Zero to fly into it, and then you would
see the camera view or you could do
this on this side. Or what you can
actually also do, you can zoom out press five, so as to get out of well. If that happens
and you don't know where you are, you
can press Shift C, and that should
bring you back to a nice placement in the scene. It will also bring the three
D cursor back to the center, which might be cool
for you as well, because then you can
rotate the lights around the three D cursor. Okay, but what I wanted to say, so if you want the camera to jump exactly to that
view that you're currently at and you want to see what you're
seeing right there, then you can press
Control A zero. And if this happens and
you can't see anything, it might be that the
clipping settings of a camera are set too low. So here under the
camera settings, you might set these end
settings to, I don't know, something like 10,000,
and that should bring you into view where the
ring is visible again.
14. Render Adjustments: By the way, if you use my blind file that
comes with a class, then there's a light in the
rendering collection already. You can just delete that
because I didn't use it for the setup here, but you can click
and Shift click all the three lights that
you might have built, and you can put them in
the rendering setup, and you can also select
the background plane and put it in the
rendering collection. You can also press M to put it in the rendering collection
with a shortcut. And then the model will be in the model collection that you
can also hide all at once, and all the rendering
stuff is in the rendering
collection so that you can instantly turn
it on and off. This way, you also get
a good look at how the scene looks just
with the sky texture. So that is handy, and you have the camera now at the
position where you want it. But of course, if
you want to move it around a little more, you can either do that here. So you can move the camera so that it moves around
the ring like that. And by the way,
you can also give the camera an object
constraint, so Track two, and then you Pie pad
the ring band here, and now if you move the camera, it will automatically
stay focused on the ring, and you might like that. In this way, you can move the
camera around in here and still get a good look on
the render scene in here. Another thing you can do is
you can go into the end menu, go to view and say
camera to view. And now, if you navigate
around the ring and here, well, it doesn't
work with Track two, so you have to
turn off Trac two. But if you no navigate in here, like pressing G and Z to move the camera around or
R and Z to rotate it around the three Dcursor or
any other movement that you can then you will automatically make the
camera follow your view. You have multiple options on moving the camera
around either from the outside like this or
from the inside like that, if you have turned
on camera to view, or you just say track two, and that way you can just
move it around here and the ring will always
stay in focus. Another thing you can
do with a camera. No matter if tract
is turned on or not, you can always use G and Z Z to move the camera
along its local Z axis. That's very nice for
zooming in and out. Also, you have some options in the camera settings over here. So first thing you can
do is you can switch between perspective
and orthographic, and then you can change
the orthographic scale. Or you have the
perspective view where you actually have some
perspective going on. In perspective, you can
change the focal length. So the smaller the
focal length is, the further away you seem to be, and if you then use G and Z Z to move in
with your camera, then the look becomes
more dramatic. You can see that the perspective
is now emphasized a lot. Okay. If you take this
focal length to say 100, that is a very long camera lens. And in this way, the
perspective aspect of the scene is
not as emphasized. Okay? So you have
a lot of options to adjust the look
of your scene. I already talked about the
clip start and end setting. So if your scene looks cut
off when you move around, just increase the
clipping end settings. And now, if you're more or less satisfied
with the whole scene, you can just press F 12 or you go to render
and render image. Now, the first thing you
might notice is that we have some extra objects
floating around in here, which you might not want. So, if things look
different than the scene that you actually
see when rendered, you can just press Escape
to stop the render, but you can just
also click on the X up here to close this window. And then you just have to take a little look at
your collection, and you might want
to take a look at what is visible in
the render view. If this is something like
the Bezier curve, of course, it will be visible in the render view if this
camera icon is turned on. So here, this just means
you hit it in the viewport, and you also have to
press that to make sure that it does not
come up in the rendering. Here everything seems fine. So let's try that again,
Render image RF 12. And that actually
looks pretty nice. That's exactly how we wanted
to look for this scene. And I just notice here
that I would like this area of the ring a
little bit more lit up. Okay? So I would like some light bouncing off of this edge. So I just close that once again. And since I'm looking through
the camera moles from here, I might want to bring
that down a little bit, that light, and I might also
want to rotate it around. So that is this pinkish light. So maybe I want to turn that
pink tone down a little bit. But actually, I quite like it, and I would also like
to rotate that to come down a little bit and
a little bit to the left. And of course, if you
rotate the light, you can also press R and XX or the G and XX or the respective axis to move
it along its local axis, this might help you to
move it around a bit more skillfully if you don't have the track to
modify or turned on.
15. Composition Nodes: In the render settings, you also have some options. You can increase or decrease the sample count for your scene. I like to put it somewhere
around here for jewelry. By the way, you can click
on this little icon on here to bring up the
image right away. And you can always press Escape, and then it will stop at
the sample where it's at. So in this way, you get a nice clean looking scene without any of these fireflies. There's a light
noise that sometimes occurs in scenes with a lot
of reflections in them. One other tab that you
might want to check out is down here under
color management, and you can say you want the
look to be high contrast, and that will make your
color a little bit sharper. And you can also turn it to low contrast to have a little
bit more of a dreamy look. But I like high contrast
that really gives it a bit of a punch and medium
high contrast, depending on the scene. And by the way, this applies to all the cameras in the scene. Let's say you want to try out the scene from
the other side, you can press Shift D,
and then you selected. And then you can rotate it around the ring and see
it from another angle. And if I now go to the
scene format settings, this will apply to both cameras. You can change the scene
format, for example, to square, and then you could
zoom in a little more, and then you would
have a square scene, which would be perfect
for Instagram and such. And if I switch this camera now to the other one,
which you can do, you can instantly fly into the L by clicking on the little camera I can hear on the green one. This will make it
the active camera. And then you can, of course, try out different things
and change the focal length and everything corresponding
to the individual camera. And if you just want to
make a quick test render here under output, you can set this to 25%. And if you now press render, it will make a small
version of your scene, which of course will
take much less time. And it will help you
to quickly check out your scene and
if everything is as it should be before
committing to the 400%. This is especially
useful, of course, if your PC is a little
bit on the slow side. And once your image is rendered and the sample
count is finished, I will just wait
for it to do so. So it actually takes
quite a bit of time with 4,000 samples
with such a setup. But there we go, and
this is now finished. Make sure if you want to save this image to now
save a version of it, because otherwise it will get overwritten by the next
rendering that you do. So you can just go in
here and you say renders, and you might call
that something. And then if you go to the composition workspace up here and you click on use Notes, you will see that you have
your render image here, and you can now put some
cool stuff on top of it that blender will visually apply
to it once it's rendered. You might already
know that, but one of my favorites is
the glare node, and you can put it in here. And I really like the fog glow, and I like to turn
down the mix value a little bit towards minus
one, but around -0.7. And then if you now bring up the render image
again, just open that. Then you will see that
Blender has applied this fog glow on top of
your rendered image. If that's a little
bit too strong, you can turn down
the size to seven, or you can say, I want high quality, and let's see if that changes. And you'll see this has toned
down the glow a little bit, but it now looks a little
bit like shiny and you can, of course, also say, I want
simple stars and this. Now we'll apply simple
stars to your image. And you can save a
version of that, as well, you might call it like
stars or something, underscore stars so that you know that this is
a different version. Alright then if you are
satisfied and you have saved all the versions of this render that you want, you can close it. If you haven't
rendered anything new, you can go to render and say, view render with Fleven and this will show
you your last render. And you can still change the composition notes on this
while it's in that state. Only if you now render
a second scene, let's say you switch to the camera and you want to
do a second version of that, and you render that one, then this will override
the initial version. And now it's lost and you have to work with a new
image. All right.
16. Evolving the Design: Hey, I hope you also have a
fundamental render setup now. Beautiful. And now it's time to take our ring
to the next level. In this lesson, we'll
explore ways to evolve the basic
design we've created. Let's see how far we can
push the digital artistry. I will now adjust the shape of the outer ring
main curve so that more ornaments fit into
the middle of the ring. Also, adding more ornaments and gemstones to give
the ring a swirly, dynamic and playful appearance. Finally, I will play around more with the
render settings. These next lessons represent a typical iterative workflow of generating a basic design, improving on it, and making
it into something truly unique and eye catching with
each further refinement. Let's first bring the upper control point outwards along Y. Then select both the
middle control points and bring them in slightly. Now switch to side
view with three. There we can switch to
individual origins as the pavtPointT rotate both the control points to adjust the curvature
of the ring bend. You can also move the
lowest point outwards and maybe even tilt
it a little bit. I tilted only the
upper control point because quite frankly, I forgot about the lowest one. To have a really
nice flowy shape, it would have been even better
to tilt this one as well. Now, let's copy one
of the ornaments and move it along X and Y to
grow our composition. I delete the array here from this particular ornament so that it is easier
to work with it. And also because I
just want to have it as a standalone
part of this design. Here, we should switch back to median point as the
pivot point for scaling. To get a better overview of this more and more
complex project, let's switch to the four viewpot
mode with Control Alt Q. In this way, we get a
much better overview on the design as a whole. Be aware that the
views in the left, lower left, and lower
right viewports are fixed. You can only navigate
in the upper right. Since the design
has naturally and spontaneously evolved
during the filming, hence reflecting a real
artistic workflow, I will time lapse through many of the following
video material. For example, modeling
every single ornament and later adding the stones. If you want to watch
it in real time, find the link to the
YouTube video in the resources to take a closer
look at how I did this. S. So if you want to switch back
to the normal view, you can just do that with
Control old Q again, and then you can turn
the render settings back on and get another
viewport out of there. And there you go. And then you can also go into the camera. Make sure you have
the camera selected. Sounds fantastic. Now, after experimenting
with all kinds of setups and
lighting situations, I just settled down on this
for now, and of course, you're very welcome
to change it all up and switch it around
the way you wanted to. Okay, I will bring
the plane back into wireframe mode so
that I'm free to move around here without
obstructing my view. And I will also save
a new copy. Alright.
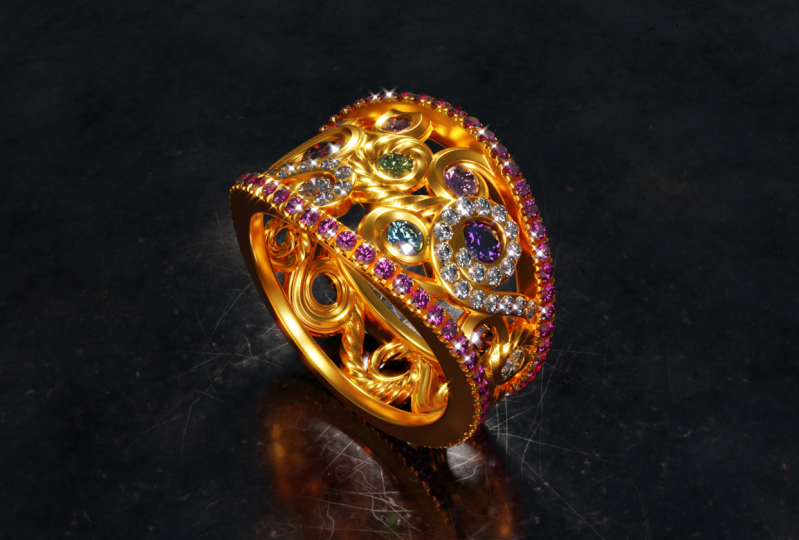
17. Gem Stones: Time to add some more sparkle. In this segment, we'll
work on setting stones, including a side pavil
and an ornament pavl. Ready to add somebling. Now, it might be
that you want to add any kind of nice gemstone. And I highly suggest
for that to again, use the jewel craft add on. Let's say we wanted to fill some of these holds with stones, and we can have all
kinds of different cuts. But for this particular design, I think a round one works well. And maybe 2
millimeters from now, we can switch this up
later. No problems. And we could, for example, choose a garnet which
has a nice red color. So it will be imparted into the viewport already with
a red color visible here, which you can find in
the material settings, it has a base color of red, but it is also in the viewport
display set to red so that we can distinguish
the colors even when the rendering settings
are not turned on. And you can also see
the beautiful stone. Just notice that I want to change the shape here
a little bit so that this piece is not
visible. There you go. All right. And now you can just bring up this stone somewhere
where you want it to be, for example, here in the center. So you can bring it up
here or say you want to place it in this hole, and then we can set
the pivot point to median and we can scale this up. And we can just place it
somewhere in here so that it looks nice and it is filling
up this empty space here. And of course, now we can create more gems from this one
if we want more garnets. Okay. And if we want more
stones, of course, we can add more gems and of
different colors, obviously. So if you want to have
some just simple diamonds, we can get this as well. And then we can plug it in here. We can always copy material and just style it ourselves
into a different color. Maybe we want to
have some blue gem here instead of a green gem. So we don't have to
kind of religiously follow the samples
which are there. Can just build our own
little collection. So in this way, we can build
a little sky of diamonds. Of course, this one is green
here because the sapphire still has inherited the
green plur from the emerald, but we can change
that here so that we can see the correct
color as well. And in that way, we can
fill up the whole ring. Just be aware that if you put stones on the bottom of a ring, they will most likely break
very quickly because you will smash the ring
against stuff inevitably. So it is useful to just fill up the upper half of the
ring with stoves. Otherwise, you might not be
happy about it for so long. But of course, for rendering, you can just do
whatever you want and just get crazy with
your fantasy and ideas. The colors are quite strong, so maybe you want to tone
them down a little bit, so they look a little bit more realistic in this whole setup. Maybe you want to do
some monochrome design where all the stones are more
or less in a similar color, or you want to go
for a rainbow look, so everything is possible. Also check out another
camera view from time to time just to see stuff
from the other side. Now, we can also build prongs and cutters for our stones with a
jewel craft add on. For example, here, they
overlap quite a bit, and it might be nice to cut
some hole for the stone so that it is not interfering
with the metal so much. But for now, I would
just leave it like that because we would
have to transform our ring from a curve to a mesh, but then we will
lose the ability to easily manipulate the shape. So for now, let's
leave it as it is. So now I'm selecting
all the silver pieces because I want to
make them gold again. I'm not so happy with
the silver color. So I just select all of them, and then at last, one that is already golden, Control L, and link materials. And then they should
all be golden.
18. Pavé Prep (& Tidy Viewport): That's easy, right?
We can add gems. We can just move them around until they look
nice on our design. But what if we wanted to make the stones follow an ornament or maybe the
side of the ring? So for that, let's try
something different. Let's first hide all the
render stuff to be able to work in here and go
into the shaded view. Not the stones are all not the correct color
corresponding to here, but it doesn't matter to me. Now, what if I wanted
to give the edge of our ring complete
diamond encrustation all around this ring. Okay. Let's give this an object profile so that we have the best control
about how it looks. Let's insert a new curve. Yeah, let's use a circle. Let's bring this over here. Let's call the circle. Maybe first let's clean
up and here a little bit. Let's take all the
stones and press M in the three D report and give
them their own collection. That, and then we
could also hide them completely if we wanted to. Let's do that for now because the colors are a
little distracting. Let's call this ring bevel
shape, something like that, and also take all the
ornaments and put them in their own collection and
call them ornaments. Okay. So that is a little
bit more clean, and let's put the
collection into the model collection
and the stone, as well. So they are all on the model, and the ring bevel
shape, of course, goes in here because
this is part of Ring band, which is this one. Which one is this
one? Ah, that's the ring curve for
the ornaments. If we scale that up, you see
it will mess up everything. That is part of this curve. So this is part of the
ornaments, as it is called, and here is another ornament that I haven't used,
so I will delete it. Here's another one
that I haven't used, so I will delete it. That is called viewport hygiene, and I feel it just
makes thinking about your whole design
so much easier if you have tucked it away in the boxes and you can turn
them on and off at will. So let's save that.
19. Ring Band Pavé: Finally, let's go
into the ring band, which is right now only a curve. And you can also see
that it does not get rendered as long
as it is a curve. It is not visible at all, only once we give
it a round shape, it will be visible again. But we want an object, so
let's call it in here. And now, of course,
it's just a circle. I want to make this a
little bit more square. Change the pivot point
to individual origins, and then I just scale them up, and that will give them
more of a square shape. And, of course, that is
a little bit too chunky. So I will scale it along g here we have to do
the median point again, so as to make it smaller
like that. Okay. So in this way, we've
given this whole outer curve a different style,
a different definition. And what we could
also do, of course, we could scale this
one thing down a little bit at the
top or at the bottom, because right now it is kind of squished in the middle here. So let's bring that
in a little bit. And let's bring that
in just a little bit. So that is more or
less a round it off square as a basic shape. And now maybe some of
those ornaments poke off, poke out here, and of course we can bring
them in a little bit. Just make sure that it all looks nice and clean in
the way you want. Also, the stones are
still sitting in their respective
place. Nice one. Alright, so now we
have this outer edge, and what we're now going to do, I hope will be a lot of fun. Let's get into the Jewel
Craft addon again. Let's create another gem. Let's keep it at 1
millimeter in diamond, okay? It will come up
here in the center. Now, our ring bend is
still a curve, right? Originally, this is just a
little curve that has handles. Now, what we can do is
we can select the stone. We can select the curve, and we can choose
distribute on curve. So for now, this looks not like much, but
what we can do now, we can open up this little panel and bring up the
quantity of the jams. So they seem to be a little
bit in the wrong place. So fortunately, we can offset those and we
can bring them out, and we can rotate them
or rather tilt them 180 degrees so that
they poke not outwards, except you want that maybe, but that they show their
beautiful upper edge towards us. And then, of course, we can
increase the count even more. So in this way, we can encrust this whole
edge with diamonds. And I think that's pretty cool. Okay, once you're satisfied, let's just click somewhere
else and this menu disappears. So now we have a bunch of
diamonds, and those are a lot, but as you might
see in the render, the problem with those is that the metal is cutting
through the diamonds, okay? They are intersecting
each other, and that is why the
diamonds do not sparkle as nicely as the ones which are just set into these holes which
are already there. So to fix that, we would have to
convert this curve because we can't cut
something out of this curve, yet we would have to
convert it to a mesh. So for now, you'd have to be satisfied with how that looks, but we will fix that in the end. So now we have added
stones in those holes. We have added a whole array
of stones on the edge, and we will, of
course, copy that over to the other side in a bit.
20. Ornament Pavé: So, let's say we want to encrust one of the
ornaments with stones. I mean, that's not
far fetched, right? Could very well
look pretty cool. So maybe we want to encrust
this ornament with stones, and maybe we just hide
our garnet for a second. Wait. That's the other side. So let's hide our
garnet for a second. And now let's go in
here, go on a curve. And let's give this the same object profile
as the ring band. Let's see if that already
works. Ring bubble shape. Nope, that looks
absolutely hideous. So let's just give
it a profile again. So we have some options here, pre made options, but they
all not as I want them. I mean, this looks pretty
nice as well, right? But I probably going to give
this its own shape, okay? So I will create another by
the way, all these rounds, if you want to select
them all at once, you can go to select Select Link or Shift L and
click Object data. And this will select
all those tones which were created together, and then you can put them into another new collection called
St stones or something. All then you can just clean
up in your report once more. Select the bevel
object again and call that Ornament bevel shape. Let's now insert the
ornament bevel shape. So that is a lot too big, so let's scale it
down a lot like that. And my aim here was to have a clean surface where we
could put all those stones. Now, this is interfered by this nice little
ornament here, and we have a few options
what we could do. Of course, we can shorten that ornament or we can just scale it down so that it
does not get in the way, and then we don't have
to delete anything. We can just get rid of it by
scaling it down like that. And the same goes
for this piece here, which is kind of in the
way a little bit as well, and we can scale it
down with old S. That just makes it so easy to
move stuff out of the way. This one is a little bit trickier because when
we scale it down, the whole shape gets
lost a little bit. But for that, we can just take our ornament that we
want to work on now and maybe just slightly
bring that up around z. Okay? So that it has its own space above
the rest of them. Okay, and then we can adjust
the shape a little bit. And once you're pleased with
that, and we think, Okay, now I want to put some
diamonds on there, you might guess how
that is going to go. So first, let's create
a new gem, a diamond. Let's select the curve, and let's say
distribute on curve. The thing is, they
get distributed on the curve that is lying flat. Not on the curved version. You might remember
that this curve has a curve modifier and
it's originally there. Okay, so that does not work. So what we have to do here is we actually have to apply
the modifier, okay? And that might change something
about the looks of it, probably the tilt
or the scaling, but we can just bring it
back to how we want it. And we can also scale this
up a little bit again or do some other stuff that helps us bring it back
to its original shape. And also, of course, we can adjust the shape
of our little curve here. And if I zoom in here, I can make it a little bit
broader because right now it is pretty flat. Like that. Alright, so that
looks cool to me. And now I think we can
work with this curve. Our diamond still sits
here, so we can select it, and we can select the curve, and let's do
distribute on curve. So now, it should
look very different. It looks kind of crazy here, but as you know, we
can adjust all of it. So first, let's set
the tel to zero. Let's set the offset lower, maybe tilt it in
to this direction. I think we need to
tilt them 90 degrees. We might have to offset, that's the wrong 90 degrees. We might have to
offset them like that. So I'm just going there by eye. I don't have a recipe for that. Then we can increase the count. And here, this distribution
percentage comes into play. You can already see the result here and
it looks quite nice. However, of course, they are
still sunken into the metal, and we need to do something
about that eventually. So we can change the distribution because
not all the way to the end, there are going to be stones. There might be not enough space. So we can change
the distribution until it is kind of here, maybe. By the way, if you now move the curve up a little bit
because I noticed that I would like to have
this piece here come up a little bit
towards the outside, you see that the stones
move with it. Okay? So you can adjust the shape of the ornament and the stones
will act accordingly, which is pretty damn neat. All the stones have gotten a follow path constraint, okay? So it's similar to when I set the camera to always look
at the ring or the light, always to point at the ring, they have gotten this
follow path thing here. If you want to now redistribute those stones because
you notice that here, they overlap a little bit,
and we don't want that. We always want a little bit
of space between the stones. You can just select all
those rounds again. You can always do Shift L and select Link and
then select the curve. And then you can click
on Redistribute. And this will give you
the same menu again. And I just have to recommend
the add on again and again. If I go in here, I want to change the end because
the stones here, they are not visible, okay? And this way, I
notice that I need less stones than I initially
thought, maybe 18. And now we can also change the beginning of the
curve a little bit, and always, you can
click redistribute if you need the new
placement of the stones. And maybe we also want to
change the offset a little bit. And maybe you need
to adjust those a little bit by hand,
because, of course, if you scale the different parts of the curve with
d a differently, the offset of the stones will be different
according to that. So maybe you have to
move some of the stones. Make sure you always only
move them in object mode. And now you have a really
nice pave on your ornament. Okay? So let's select those all and also give
them their own collection, call it ornament
stones or something. There you go, and we can turn
on the side stones again. And in that way, we can
really build our design, and we can give
the other curves. Of course, we could give
them now the same profile. The bevel. Okay. And we could give this
one the same as well, and then we could put
stones on there as well. And it would be pretty easy. You can just select
one of those stones, Shift D, delete the
follow path constraint. This should put it
back into the center, select the next curve,
distribute on curve. Okay? And then just work with the offset and everything until it is where
you want it to be. Well, where is it actually?
Oh, it's down there. Of course, because I forgot
to apply the curve. Okay. So that's just important to note for you that
you need to apply the curve modifier
and put the curve actually where it is so
that we can adjust it here. And then we can do
the same distribute on curve like that. Put it up like that.
Increase the count, change start and end
positions like that. Decrease the count again. And in that way, build
your own wonderful design. And here as well, we might have to adjust
the curve a little bit. We have to bring
it up a little bit so that it is not
instructed by the rest. Just bring it up slightly
like that, and there you go. Nicely done.
21. Backup Stone Curves: Okay, to make sure
that when we convert these curves and do
stuff with them, and the stones,
you might recall, there are connected
to the curves, right? They have a constraint that makes them follow the
path of the curve. So we need to make a backup of these curves so that we don't
accidentally convert them, and then the stones will
lose their placement. Okay? So let's call this ring ring
meant stones and just make a copy of it and click right away so that the second
ring bend doesn't move, so now we have a
copy on top of it, and let's just call
that ring bend. Okay? So we have
a ring bend with stones, and this one is the one. You could also give it
a different profile. Or we could just
hide it altogether, so that we don't
accidentally confuse that. And then we can just hide it. Maybe you can see that in
the transparency view. So this is the curve now that has the stones
attached to them so that we don't confuse
it with a ring bend. Then the next one, we will just also find in the outliner let's call it ornament stones 001. Let's also make a copy Shift D and immediately
left click without moving your mouse and also
call that just ornament. So that is now our backup, and that is the ornament
with the stones. And as with the ringnt, we can just hide the bevel here. So now we only have this
as a basis for our stones, and then we can
hide that as well. And just as well
with this one here, ornament stones 002, and make a copy, Shift D,
immediately left click. Make sure that you
have the correct one, hide the bubble so that you can discriminate between them. And then the one that is now empty without any
stones attached, you can just give it a
name without stones, and then you hide the curve
with the stones as well. So now all of the visible curves are not connected to
the stones anymore. And that's very important
for the next step. So make sure that all the curves where the stones are connected to are hidden and have
a replacement in place.
22. Remesh Modifier: Here comes one of
my favorite tricks, the remash modifier. In this lesson, I show you an insanely quick way
to turn our curve based self intersecting
mess design into a solid, cohesive, three D printable
mesh from mess to mesh. Just a simple
modifier that makes our model watertight
and ready to three print in seconds or minutes depending on how
quick your PC actually is. This trick is a game changer
when you're working with complex curves that need
to be three D printed. Well, it's not for
rematching and game design. It's not like we're building a new topology that is usable for textures
or stuff like that. It's perfect for jewelry
and other printable designs where booleans are just
very, very time intensive. So let's jump in and watch this modifier do its
literal three D magic. So you've come this far. You have built your dream
ornamental ring design, and hopefully you learned
something along the way. So this next step
is super important. If you have placed the stones somewhere and they look dull, just as they do here on our design with the
ornament and on the side, and maybe also some of which
we placed on the holds. This means, basically, we
need to cut some holds into this ring for the stones
to look realistic. And you also maybe would want to do this
if you eventually would want to three D print your ring depending on how
you want to process it, you might want to have
a hole where the stones are sitting pre
drilled, so to speak. So, in any case,
we would have to do something with this ring
to make this possible. In short, we will convert these curves to mesh
and then combine all of them to be then able to boll those stone
holes out of there. There are multiple
ways to do so, but I will show you one of the easiest and by far,
the quickest one. Make sure you save
a new version of your latest creation
since this process is destructive and will
not allow you to make changes on the
curves as before. Maybe call the Safe file
VauxlRmsh or something. Because that is what we're
going to do with this ring. First, let's hide the stones for a second. Also hide the render. And maybe right click in
between those join areas and hide the render view
completely for now. By the way, you might
have noticed that I have some
statistics down here, and this is quite helpful if you want to know
how many words and trees, if you want to keep
track of them, and how many objects there are, also how much memory
your file is using. And you can also
turn statistics on the overlays then they
will appear here. But if you want to
see those statistics down below on the right, you can just right click on this lower bar and turn
on the scene statistics. Select all the curves that you use on the ringmn
the ornaments, the outer edges, and so on. So you can go into the outliner right click and say
select objects, then you have selected
all the ornaments, and then shift and click
on the outer edges. Now, right click somewhere
and choose convert to mesh. This will instantly apply all the modifiers and
convert all those curves. You might notice if you
select this piece here, it hasn't got any
modifiers anymore. It is also not a curve
anymore because now there's this mesh data tub
and not the curve data. It also has become a mesh. You can see all those triangles
here on the ornaments. They are not curves anymore, and that also means if
you go into Edit mode, you will see that this geometry
has now become a mesh, and they have individual
vertices and they are not easily changeable and malleable
like the curves ware. Okay? We will need
to do a second step, so reselect everything here. And now press Control J. Now, this whole thing here has become combined
in one object. If you go into edit mode, you will see they are all there. You can edit them
all individually. But if you hover over
one of them and press L, this means select all linked to this one word that
you hover over there, you will see that these are
still individual pieces. They are not yet combined. Okay? So this is one object, but there are many
different measures in here, which you could, if you select one of them, move individually. So this is one big object, and the finst step
that we have to do to make this actually into one watertight three D
printable and Blab mesh, you go to the modifiers
and you go to remesh. And this instantly looks
quite different because our vaxer size is
quite high still. It's not very fine grained. But if I turn that
off for a second, you may notice that
all these pieces, they kind of overlap themselves
and each other. Okay? So they all are stuck
inside each other. And if I turn the
remash modifier on, you might note that this all has now become continuous surface. So all these self intersections and these overlapping parts, they have just become
one giant mesh. So if we take this down a
little bit to, let's say, 0.05, you will see that the
details become much finer. And if you go to 0.02, be careful because at
some point it will take quite a while for blender
to calculate that. You will see that it
nearly looks as before. And if you now going
into the render view, you will see that it also
has become quite nice and glossy and all the pieces
are now stuck together. Alright, if you are happy
with how that looks, you can go and save
another version of that. The thing is, if you now
notice that here are some kind of jagged curves. They are not as finely
detailed as you like. You can just repeat
that process and you go back to the file as
it was before when we still had all the individual curves and make sure that you say shade flat so that you
see the actual surface. And then you could give this
subdivision surface modifier before you convert
it into a mesh, and then the surface
will be much smoother even after
you remash it. Okay? So if we go back
to the remshed version, I feel this still
looks quite nice. I'm happy with that.
You might also notice that now you
have a lot more. You can turn on the
statistics here as well. A lot more triangles,
faces, edges. Before the remshing, this is
like only a tenth of that. So this object has become
much bigger now than before. But of course, we can deal
with that later as well, because we could now
export it as an STL. So that would give
you a printable file. Okay, so you could just
get yourself a new folder. I call it SDL
selection only to not export anything
else I might float around there and
then export STL. But that would make
the STL quite big. It will also take a long time to generate it. And
there you have it. So it's nearly half a gigabyte, and that's pretty big. Of course, we could just
open that in a slicer now. If you have, for example, the Prser slicer,
which is awesome. And I always use it
for three D printing. And there you have it. So it is completely
printable right now. And that's the cool thing
about this technique. But if you don't want to
have such a big file, we have one trick,
and of course, you might know this already if you followed
me for some time. But if not, let's check it out. So first, to reduce
the file size, let's first apply
the remesh modifier and then give it a
decimate modifier. So now we have baked
this kind of this shape. Now we want to retain the shape, but we want to have
a lot less vertices. Notice we have around
8 million triangles. And if we turn that down to
a ratio of 0.2 or something, so we just bring it to 20% of how many vertices
and triangles there are, while Blender still tries
to retain the look of it. That also can take quite
a bit of time. All right. But now you see that
we have brought this down 8-1 0.6 million, and the ring, fascinatingly, still looks the same,
which is really nice. And then we can apply
this decimate modifier. And this also brings
down the file size, which can be quite
important if you're working with such big objects. Well, it's not that
big in the real world, but big in the sense of how
complex the geometry is. Then it's nice to be able
to decimate it so that you can keep your file size low. 1 minute later.
And there you go. And now, if you export that, just to prove my point, if you export that STL, maybe with a decimate
at the end of its name, and you export the SCL, it will not only
be much quicker, but it will also
be much smaller. There you go. So it's now only
20% of the original size, and maybe you can go
even lower to 10%. But reducing the vertices
always takes some time. So keep that in mind. Okay.
So now that we've done that, and it all seemed
to have worked out, we have one single
piece of ring, which is also mashed together. By the way, if you have
some problems because somewhere something
stuck through the surface, which shouldn't, you can actually just go into sculpt mode and maybe go over there while holding Shift with any brush and
smooth it out. Okay? So that would
be a very quick way of fixing such minor arrows without having to go through all the previous stuff again.
23. Cutting Cutters: It's time to cut the cutters. In this lesson, we're going to cut some holes with our cutters. We'll use custom cutters
behind the stones to make room for them so that they can really sparkle in three D, and, of course,
maybe use this for three D printing and
prepared for jam setting. If you now unhide
all the stones, they should still sit in
their correct position. This is thanks to
the safety copies we created of the stone
curves prior to meshing, joining and re
mashing everything. Let's bring back the
second three D view part so that we have the
render look available. The stones still look
relatively dull. So what we have
to do, we have to cut out holds for those. So first, let's select all
the stones on the ornament. Let's say we want
cutters for those. Okay? We could create prongs. As you see, this foot results in this kind
of look with prongs, and we could adjust their
placement and everything. But for now, I think
I just want to cut out some holes for them. Okay? So we select cutter. When bringing in the cutters, you have lots of
options, but for now, we can just stick with
the standard settings. You can even create your
own presets in here. The most important thing is that these cutters are created
in the same size as the diamonds so that
we can use them to cut perfectly sized stone
holes out of material. One important feature is
the so called hole part, which is the lower
end of the cutter, and is meant to create a
slightly smaller drill hole below the part where
the diamond sits. In the real life, these are drilled into the object
to let in light, safe material, and also make the piece of
jewelry easier to clean. So you can decide for yourself if you want to have
these in here or not. Okay, so let's cut some holds here, and then let's go there. Select linked,
select those stones, give them cutters, and the settings are the
same as you used before. So this should result
in the same only that we need to make them
a little bit longer here because the material
is thicker here. Alright. Let's select
the stone curves and make them always visible
above everything else. Under the object settings, we can also do that
with the second one, and then we always see this
stone curve like that. And for the side ringing, we can hide the extrusion, and there we can
put it in front, and then we see all those
curves all the time, which is handy for working
with them like that. And like this, if we move that, all those stones will move with it and also the cutters, okay? So the cutters will
follow the stones. So that's pretty neat. If we want to cut all those
cutters out from the ring, we will need to select
them individually. So select select linked object data, then
we select the ring. And then we will use an add
on which is called Bool tool, which is native to blender. So if you want to
find the boll tool, you can go to the
preferences and to the add ons and
just type Bool. There you will find that
and you can activate it. And if you want to have a
nice name instead of just dt, which it has by default, then you can just call
it Bultol and here. And there you have
it. And here we can just create the brush boolean, which will not apply all
the cutters at once. Make sure that the ring
is the active object by selecting it last and
then it will glow orange. If we use difference, it will just create a bunch
of modifiers on the ring. My notice right now it has none, and if we now choose difference, it will take some time If that happens and it does
not respond anymore, then close the program. And usually blender is so cool because I haven't
made a safe for a while, but if I go in there
and open that once more to file and recover auto saved. And that shows me that
just 4 minutes ago, it did an auto save for
me, which is awesome. And I will just
click on recover. So one of the potential
problems I noticed is that the cutters very
slightly overlap, and this can become a big
problem with booleans. If stuff overlaps, generally tends to screw up
the whole process. One potential solution
would be that we go in here and we
select the stones. If you can't select them here easily then press Alt and click, and then you can say, I
want to select the stone, which is always called
round if you create it with a Jewel craft addon and then of course, the
cutter will follow, and then you can
manipulate it slightly so that it does not overlap with the
neighboring cutter anymore. So you really have to zoom in here quite a bit to see that. But that is one solution
that may or may not work. The second thing
that we can do is we can just redistribute this
whole thing on the curve. So what we need to do
here is we need to select all the stones and our curve, which you might
recall is the curve that all of the stones
are connected to. Okay. So first, let's
select one of the stones, and if that's hard,
then you can all click and choose the round. Select linked object
data or Shift L. And then shift select
our stone curve. And you can also shift select
the stone curve so that you can select it with this
selection menu like that. And now let's go into the Jewel Craft addon and
instead of distribute on curve, we will choose redistribute. Nothing should
immediately change, but you will get back this menu, which we used in the first place to distribute all those stones. And you might recall that we can manipulate the start and end
point of our distribution. And of course, we also have the option to take 1 stone
out of this configuration. And in this way, we have a lot more
space and the cutters, as you can see, they
don't overlap anymore. So that would be the most
straightforward way to fix problems regarding
non ideal distributions. Just reselect the stones, and since the cutters are
connected to the stones, they will always follow them wherever they get distributed
by this function. Unfortunately, the
brush Boolean function, which basically creates
a lot of modifiers, depending on how many
objects you have, will make blender crash in
case of these many objects. And really, you have
to think about what you want to achieve
in this situation. So if you want to have more flexibility and you want to keep those bullions as
modifiers so that you, in theory, can
move all of these, and the stonehlls will move. If you want that,
then of course, it would be good to create modifiers for each
of these cutters. And you can do that with
a brush boolean tool, or you can just go into
the modifier menu and get yourself a boolean modifier
and then select the cutter. Okay, so the effect
would be the same. If you press slash, we're
having only the ring selected, you will see that you have your stone hall pulled
out of your ring. And, of course, because it's just a modifier,
it's reversible, and you could select
the cutter and move it somewhere else or move the whole configuration
with a curve. The downside of that, it is not really useful to have so
many boolean modifiers, because first, you always
have to turn them off to move your objects because otherwise it will get very, very slow. And if you try
moving all of these at once while having all
the booleans turned on, it will take forever, probably, so I wouldn't
recommend that. What we can do instead that is a non reversible
operation, so watch out. What we can do instead
is we can just join all of these
cutters into one object. So we can click Select, select Linked Object data, select all of these cutters, and then press Control J. Now I can move that
as one object. But obviously, if I try
to move the stones, the cutters will somewhat
move with them because this whole cutter object is still parented to
one of the stones, but they have lost the individual connection
to each stone. In essence, this is now
not useful anymore. You want to
redistribute anything. So you should be very
sure that you want the stones and the cutters
in this exact place. Of course, you can still go
into Edit mode and select one of those and then move it somewhere else and
move the stone with it. But of course, it's
not as easy and straightforward as just moving everything
together, right? Now you have this as
a complete object, as one single object. And now, of course,
you still have the option of making
this into a modifier. And if you try that now, when all of these are
joined into one object, just click the ring and
you say difference. It will still take some time, but blender will
actually not crash, as it will if you
try to make all of these individual objects
into bully and modifiers. Because now we have
only this one modifier. If we select the ring and
isolate it with slash, you can see that
all of the cutters have been cut from this
object. Very beautiful. And it is still reversible in
the sense that we can just turn off the modifier and
it will just disappear. The next option, of course, would be to just apply
the modifier or to just use the auto
Boolean function if I delete the modifier. Bring back the cutters, which have been transformed into this brush because we use
the brush Bullion function. But we can just
remove the brush, and then this big square will
turn back into the cutters, and then we can shift
select the ring. And if we now do autoblean, this is the exact same as if we now would
create a modifier, put those cutters in there, and then apply the modifier. It just saves us some steps. Is, of course, the most
final option because we can't even move
those holes anymore. Don't have any modifiers. This has now become a permanent
part of this geometry. So you really should only use auto Boolean or
apply the modifier if you're 100% sure that this is where you want
those stone holes to be. But of course, in handling this whole object and maybe rotating it around
or doing other stuff, it is the most
straightforward thing because you don't
have to keep track of any other object that is connected to a ring of
any Bolian objects. You can just handle it as one singular object and no bully and swell.
Slow anything down. So you are very flexible
in how you approach this. And for this particular
kind of design, I will probably go just with
the auto boolean because I just want holds at
this particular place, and I'm pretty sure that I
won't adjust it anymore, at least not for this project. So now, why did we do all that, of course, so that our
rendering looks nicer. So if you switch to
the render view, you should already
see that these stones here, let's hide the tea menu, that these stones
here and also hide the overlays already look a lot more glistening and not
as dull as these on the side. Okay. So last but not least, now we have cut holes from
this part and from this part. Now we still need to take care
of the stones on the side. And, of course, all of
these stones need cutters. So let's do the same as before, select Linked object data, select all of these stones. And give them cutters. And there they are very nice. If you want to ring
manto folds as well, you can increase the
depth of the cutters, but I don't want that, so
I just leave it like that. And, of course, we need
cutters on both sides, and the easiest way really is to join them and then
mirror them over. You're sure that you
don't want to adjust the placement of the stones anymore because just
as with the ornaments, right now, you can move
them all individually. And that's nice and all, and
you should definitely keep a safety copy of the
version where you have not joined any
of these cutters. But for bowling them,
it's really easier to just make them
into one big object. So I will just
select all of them. I will join them, and
then I will give them a mirror modifier
and bring them onto the other side across why. And in this way, we can just cut from both sides
at the same time. And, of course, the
same with the stones, but first let's take
care of the cutter. So we have made this
into one big object. Let's select the ring,
and let's see if a boll tool helps us here as
well. So choose difference. Alright. So now we have even more holes in our ring
bend, which is awesome. But now, of course,
we still need to mirror the stones
over a bunch of them. Let's select the first one. Let's give it a mirror modifier. Let's use our Mirror
empty to mirror it over. And now, how do we
mirror all these others? Do we join them as
well? Well, we could. But in this case, maybe we want to give them
individual modifiers, and that's also very easy. So select the linked
ones, object data. Make sure that the one
with the miror modifier is the active one and then Control L and
copy modifiers. And this will give all of
them a mirror modifier.
24. Rendering Stones: Okay, if you've come this far, you're
really into it, right? Then I have some
cool stuff for you. Let's make some finer tricks to our render and add
a pop of color. We are just lightning refined
materials and add a bit of custom coloring to really
make the design shine. It's the finishing touch to make everything look truly polished. And if you're a perfectionist, then this will be just
right up your alley. So buckle up and
come with me into the world of jewelry
perfectionism and blender. And now, of course,
the whole reason why we did all of that, let's get into one
of our camera. And let's turn the
rendezvous back on. Okay. Now the second thing, of course, let's turn all
the background back on. And let's also turn the special
stones back on. Oh, my. And that already
looks so different to the version before that I'm absolutely falling
in love with it. And that, ladies and gentlemen, is how you render such a complex piece of jewelry with all the stones
glistening and glittering. Of course, same goes
for these stones. You can give them
individual cutters and cut them out of the design. Yeah, you can see that the
surface is kind of jagged. This is because
it's shaded flat. We can, of course, shade
this thing smooth. So the whole ring
bend, let's try it. Let's shade it smooth. That can sometimes mess
with the bullions, but in this case, I think it
still looks very much fine. Can see some of
those edges here. They might look weird. But for that to be completely avoided, the stone also got shaded
smooth shaded flat again. For that to be
completely avoided, you would have to
subdivide it further before doing all the re
mashing and stuff like that. So there's not so much
that we can do here now, but I think it still
looks very, very nice. And, of course, we could give
this one a cutter, as well, and we could cut
it from the ring. And that would hide the
cutter automatically and also give the stone enough space so that the metal
does not overlap with it. And there you go. And this should make it sparkle just that little bit more, and it would just look better. So here's the cutter again, here's the ring and boll
tool and difference. And there you go. And the fire
is already much brighter. Cool. So let's try
rendering this ones more. And of course, this
will take longer, especially if you
have lots and lots of samples because that is just now a more complex
piece of jewelry. And I also feel that this could use a little movement
of the camera. Oh, it also looks nice
from that point of view. Okay, I think I want this look, but for the other side. So let's bring back the
shader for the world, let's rotate the
sun a little bit. Oh, i. And let's rotate
the plane a little bit. And you can play around with
the lighting so much on air. You can really make shine. Just make sure that you
try out lots and lots of different ways of lighting compositing this
thing. It's so cool. If you can just give the different looks
and different starts. This one is also
pretty cool, I think. Can also make it
float, of course. Okay, let's try that one. Well, if that's not
a nice final result, that just sparkles like
Christmas or more.
25. Recolor Ring Parts: Just in case, let's say you wanted the inner
ornaments to be white, just as they were before. Let's isolate it. Let's
go into edit mode. And now your task would be to carefully color all the pieces which are not the
outer ring band. And unfortunately, there
is no set recipe for that. But first of all, make sure that you are in
transparency mode. And then you see to paint on
all of these inner vertices. And that might take you a
while, and that's okay. Just be careful that you
don't color the outer part of the ring man. Like that. I mean, that could be good
enough, but, of course, you can go make sure that you do this in transparency mode
because otherwise, you might not
select all of them. But once you have kind of
the selection that you want, then you can create
a new vertex group, which is found here under data, and you can call it ornaments
and assign the selection. Let's just turn on the shader
so that we see the color. Just to test it, you can
click DeSelect and select O. Now we have the
selection assigned, and then you go to color and
then you click on plus here. So this means this object
now has two colors. And but only one is visible. And for this, we will search
for D we have some silver? No, we didn't. So let's
give it gold as well. But let's copy that, and let's call it silver. So now we have one color
which is called gold and one color which is called
silver. Let's make that white. And now let's press a sign once you still have all
these vertices selected. So in that way, you can already see
where you missed some parts of the ornament, and you might want to re select the parts where you failed
to select properly. And always be careful
that you don't accidentally select the back. But if you re select that and you can click
a sign there you see it also go much
further in here, turn off transparency, to really be careful to
not select anything else, and then click Assign once more. Like that. And also,
I think down here. So for this, you might
need to zoom in a lot and just work on it a little bit
until it looks really good. Now you can update the vertex group to make sure that you have the
new selection in there. And then, of course,
you can just render it once more
in the new version. And maybe this time
from the other side, experiment with the lights. I had turned off this
light all the time. So we can still, why is this not
because I isolated it. So we can move
that a little bit. We can play around
with the visuals. If these stones look dull, feel free to also
give them cutters. As you might have noticed, I don't always give
all the pieces the same treatment just depending
on what I aim for here. And if I aim for a
nice render view, might not cut out all the
holes for the stones. Let's try rendering
it once more.
26. Wedges and Channels: Now, here's a time laps of how
I continued with the model to create the wedge and channel
cutouts below the stones. See this result in the animation
I created from the ring. This was basically
the same workflow like with the whole cutters. You can add them in
the jewelry craft menu in exactly the same way. They are also
initially parented to the stones and can be moved with them when moving the curve. However, when it
came to booling, those, there were some problems. Lender had difficulties
to bool all of them at once when
joined into one object. So I first created all the
wedge and channel cutters, and then I joined the
first quarter amount of them with Control J, and then I tried booling. If that worked, I selected
the next quarter amount, tried bowling again, and so on. A bit tedious, but
that's Booleans for you. One thing initially
threw me off. All wedge cutters and the channel cutters as well are initially linked
to each other. So that's why you
can select them with Shift L and say linked, and then they will
all be selected. Also, what that means
is that when you have selected one and you go into edit mode and adjust the
shape or move and scale it, all linked objects
are scaled and moved and rotated in the same
way, which is super neat. However, when I joined some of them with Control
J into one object, this link resulted in all the others also suddenly consisting
of multiple cutters, and this looked
like a total mess. So this took some
time to figure out. The solution was to
unlink them all prior. You can unlink objects
by selecting them all. Then you go to the menu
point object relations, and there you go to
make single user, and there you choose
Object and data. So that's a little bit hidden. But in this way, they get all disconnected
from each other. And if you change one, then the others won't
follow suit anymore. And once I finally got
them to bool as chunks, I mirrored them over and everything looked
fine and dandy. Oh, my. The sparkle.
27. Thank You!: Congratulations. You made it to the
end of the class. I hope you're feeling as excited about
curves as I am now. We've covered a lot
of ground here, so let's quickly recap
what we've learned. We started by diving
into curve fundamentals, getting comfortable
with profiles and different curve types. From there, we built
our ring band and added some beautiful
intricate ornaments using paths and bezier curves, depending on what you've chosen. You learned how to repeat elements effortlessly
with arrays, gave those arrays a unique
twist with different profiles, and then, hopefully, curved your ornament perfectly
into ring shape. We took things to the next level by setting up our render, adding lighting, and
refining our design for that polished, really
professional look. And finally, we learned
the quick trick of using the remesh modifier
to make this, well, giant self
intersecting mess into a 3D printable piece without having to bool anything. Alright. I hope this class has opened up new possibilities
for you in Blender. If you're proud of
what you've created, share it in the project gallery. I'd love to see how you brought your own
style to the design. And if you enjoyed the class, leaving a review helps
others find it, too, and also helps me to improve, so everyone wins. Yes. And finally, thank you so much for joining
me on this journey. I'm excited to see what
you'll create next, keep exploring, keep designing. Follow me here on Skillshare to get updated with the
latest class information, and I hope to see you in
another class very soon. Happy modeling.
 Gesa Pickbrenner, 3D Jewelry Artist & Designer