Transcripts
1. Introduction and what you will learn: Ai videos are making
bigger waves than ever. For example, Opmei announces Sura leaving entire
industries stunted. According to Opmayi, Sa is
not just great for videos, but can also understand physics. In the future, Sa is expected to serve as a world
simulator for robotics. And even the gaming industry
is moving in this direction. Whole sectors will be transformed by such
technologies in the future, be it the front end
and shape the future. Do you want to understand which AI tools are right now a viable, how you can use them and
how to create such videos? Then this course is for you. Imagine how it feels like to generate AI videos that
have the potential to reach a cinema screen or simply generate some attention
on social media. I'm sure your friends
would be envious. In this course, we will
look at everything, the basic invo on AI videos with the
technology behind them. Creating videos with Moon
Valley, stable diffusion, runway, hyper, and many more. Everything about I avatars and their applications in marketing, sales, customer acquisition, and for explainer videos or online content using tools like Cubicle and technologies that can even turn you
into Spider Man. Many case studies and of course, practical applications
with video editing. We will even look
into the future of I, data protection and ethical
concerns of the technologies. And by the way, if you
ask yourself who I am, my name is Arnie and I teach I classes before GBT
even was a thing. I am relatively
long in the game. I also have a small
German Youtube channel, and that's what I do. The sooner you sign up, the greater the chance to
be ahead of competition. And of course, I can
answer questions quicker. So don't test to date. Click the button now, because your future starts
today and not tomorrow.
2. Silly Question: What Is Actually a Video: In this video, I want to talk about how all of this works. A lot of people already know
that AI can make pictures. We have a lot of different
tools out there. We have mid journey. We have stable diffusion. We have Ali, we
have Adobe Firefly. And I am relatively sure a lot of other tools will
come around the corner. All of these tools, yes, they can make pictures. We make these pictures with a technique that's
called diffusion. We use a diffusion model
to generate pictures. And that's the one part, because if we can make pictures, we can also make videos. In order to get that, we need to understand
what the video is. Yes, that's a stupid question. A video is simply a lot
of pictures in a row. One picture and another
picture and another picture. Maybe you remember, like
from the old, old films. If you take, for
example, a paper, okay, I don't have a paper right now, but you will get it. Sometimes you have some paper
and you do it like this. If you see all these
papers one after another, the picture starts to move. So maybe you saw
something like this. Maybe you see 30 FPS or 60 FPS, or maybe also 25 FPS. What all of this means, this simply means
frames per second. If you see, for example, a video with 30 FPS, it simply means that there
is a sequence where you see 30 different pictures
in one single second. That's a nice little video. The video that you
see right now, this is in 25 frames per second. That stuff that you already
see right now in this video. These are simply pictures. Yes, you see simply 25 pictures per second and that's
why I am moving. These are just pictures
that are moving. So if we understand
that AI can make picture out of the noise
with a diffusion model, don't worry, we take a look
at the diffusion model. Later in the next lecture, we will take a deep dive. We just need to understand
that the AI can make pictures. And if the AI can make picture, the AI can also make videos. And yes, we have a lot of different things with we can make pictures and also videos. And you need to understand
that the hard part is of course to make a
video that is consistent. Maybe you have tried
it a few times. Maybe you tried
to make a picture and then you try to
make a picture again, but a little bit different. It's tricky sometimes,
it takes you a lot of effort to make a picture
that is somewhat similar. Now think about it. How hard is it to make 25
pictures that are nearly completely the same so
that we can make all of this frame one after another
that this video moves. Yes, this is hard. But we have tools. And these tools, they work
better and better over time. I also have to admit, we don't only have
diffusion that works here, we have also things
that are called guns. These guns work relatively similar than diffusion,
like I said. In the next video,
we will talk about the applications in more detail. But just remember we
can make pictures out of the noise and
we can also use guns. And these things can do a
lot of really cool stuff. We can really dialed down
videos if we know what we do. We need to understand what
Lauras are, what sets are, how all of this works, and then we can make
really standing videos. I have to tell you
in some tools, we don't even need to know the seat and we
don't need Alora. It depends a little bit on
the tool that we are using. If you ask yourself what we can make with all
of these tools, that possibilities are
completely endless. We can make AI avatars. We can make stuff that
is called lip sync. So we can animate our lips, for example, to a
different language. We can animate pictures
to different voices. We can take other videos, and we can animate all
over them with lip sync. We can create videos
out of thin air. So we can make
videos out of text, but we can also make
videos out of videos. And we can make videos
out of pictures. It's called text to video, Image to video, and
video to video. You will learn how
all of this works. You just need to
understand that a video is simply a lot of different
pictures, one after another. And that's why all
of this works. If we use, for example,
video to video, we use all the frames
from our video, all the different
pictures from our video. We simply throw a prompt on these frames and we can make them like a
little bit nicer. If we go with text to video. We make these pictures
one after another out of thin air and
then we have our video. If we start with a picture, we use this picture as a reference picture and
we make similar pictures. That's the concept that what you need to understand
in this video, you have simply learned that the video is just
a lot of pictures. This is important to
understand because we know that AI
can make pictures. And if I can make pictures, it can also make videos. Yes, sometimes it can
be a little bit tricky, but I promise you this will
also get easier over time. In the next video, we will take a closer look behind
the doors of difusion. Laura's checkpoints,
seats, and much more, because we will need
it over the course.
3. Diffusion Models, Loras, Seeds, and Checkpoints: You have learned
what a video is. Yes question. In this video, we will dive a
little bit deeper. Because we will learn what
the diffusion model is, what sets are and why
we need the sets, what Lauras and Checkpoints are, and how we can make
consistent videos. All of this will make
sense after this video. Maybe we can also talk
a little bit about gas. We start, of course, with
the diffusion model. In order to explain
the diffusion model, I like this article. We make it really damn
simple because we go onto this picture and we just use this single
picture to explain it. Yes, we have also
the possibility to dive into code
and do whatsoever, but I like to make it simple. What's a diffusion model? A diffusion model is
simply a computer. This computer is trained
on pictures and text. You can see it. Here you have a picture and you have text. In this text stands exactly what you can
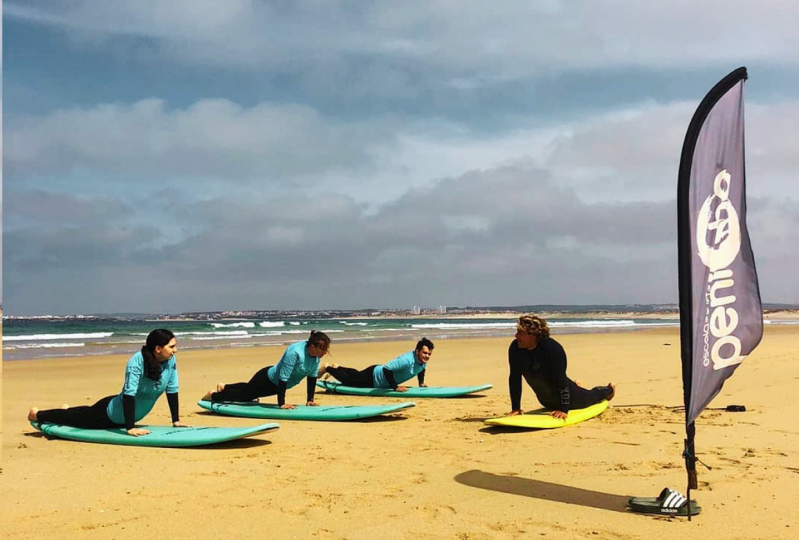
see in this picture. For example, you see a beach
with sand, blue ocean. There's a mountain. There's
some green on the mountain. Maybe the sky is blue. This is how I would describe this picture with
my bad English. After that comes the magic, because we add some noise. We add some noise, but we still tell the computer
what's in this picture. A beach with sand, blue ocean, and so on. And we do it again.
A beach with sand, blue ocean, and so on. And we do it again and again and again until we have just noise. We simply start with a
picture and a description. We give the description and the picture over and
over and over again, and we add noise
over this picture. We do this until we only have
noise and the description. In this process, this computer learned how this
picture look like. Then you can simply
take this prompt, take this text and you
tell the computer, like a beach with sand, blue ocean, a mountain
with some green, and the sky is blue. And you can simply throw this into the computer,
into the noise, and the computer will give
you pictures back because the computer has learned how this picture
has to look like. And now comes the fun part, because we don't do
this with one picture, but we do this with like
a gazillion pictures. We do this over and over
and over again with like nearly every single picture
that we can find on the web. In this process,
the diffusion model learns how these
pictures look like. I will show you one quick
example in mid journey. This right here is the
example of a diffusion model. And yes, I have made a lot of pictures with these
diffusion models. We have here like cat woman
and some older pictures. So we can make the
pictures however we want. You also see that these
pictures are really consistent because of the tricks that you will learn
in this video. But we start with
something like this. A small white dog
sits on a wood floor. If we simply tell
this the computer, the computer will start to calculate how this
needs to look like. And he will calculate this
out of the noise in no time. You will see how this will look. You can see it right here. We start with noise and the computer starts to
denoise the picture. We get our pixels
where they should be. So you can see we have a small white dog that
sits on a wood floor. We have every single
thing that we told the computer
into this picture. This only works because
the computer is trained on such a large
amount of pictures. And he has also the
descriptions of these pictures and he understands how these
things need to look. I always like to tell all the
people something like this. Just imagine you look
up into the sky. The guy next to you
simply tells you, can you see the
apple in the sky? But first you can see the apple. And you say, no, I don't
see an apple in the sky, Dude, like what's
wrong with you? Then the sky shows
you see this cloud, cloud, this looks like an apple. And then you start to
see the apple because your brain is also like
trained on apples. Your brain knows how
apples need to look like. Now you start to see the apple. Maybe you see a
red apple because our brain is trained
on red apples. Apples are normally red, but there are also
yellow apples. If the guy next to you doesn't tell you that you need
to see a yellow apple, you will most likely
see a red apple. You need to understand
this because you also need to be specific
with your prompts. If you don't tell
the diffusion model, you want to have a yellow apple. The apple will be most
likely red. But don't worry. We will talk about
prompt engineering for AI videos, of course, in the next video, because you understand what a
diffusion model is. So that's checked. Now you need to
understand what a set is. I can explain the
set, really simple. The set is simply the first starting noise
of the diffusion model. The set is always a number. It can be a number
between one and like a real big number,
something like this. The first starting point of this diffusion model is
always the set If we tell, for example, our diffusion model like this white dog and so on. And then we add a seat, maybe the seat 55. The difusion model
will start with a specific focus point of
this picture generation. You know what happens
if we do that, If we add a seat over and
over and over again and simply play a little
bit with the text that we give the
diffusion model, right? We get more character
consistency. That's how easy
all of this works because we have always
the same starting point. You see, we start with a picture that is already
a little bit the noit. That's our first starting point. Because we do that, our
characters get more consistent. Don't worry, you will
see all of this, of course, and action
over the course. The seat is simply the first starting point
of the picture and you get more character
consistency if you use a seat. And then we should go to look what Lauras and
checkpoints are. In order to do that,
we go into paint. Because I like to
paint like a real pro. I need to tell you
this is like not 100% right how I show it. But we want to make this simple. We have a lot of different
difusion models. One diffusion model
is stable difusion. Stable diffusion is gigantic. And we will use
stable diffusion to generate pictures
over this course. Not only pictures
but also videos. Of course, stable diffusion
has different models. We have stable difusion
1.5 for example, but we have also stable
diviusion three, this is the newest version. We have also stable
difusion X L. You see we have a lot of different
stable difusion models. If we create a picture, for example, stable
difusion three, the pictures will get
a little bit random, just like if we
don't use a seat. But we can add a seat and get
more character consistency. But we have also more options we can use like a small piece
of stable difusion three. This right here, I, I want
to call it checkpoint. Not only I like to call this checkpoint because
these are checkpoints. Now what is a checkpoint? A checkpoint is simply a smaller part of stable
difusion three, for example. This checkpoint is
specifically trained, for example, on people, on men, on women, on cars, on what you
ever can think of. So this checkpoint, this is
a little bit fine tuned. We will also, by default, make more consistent characters if you use a checkpoint
in stable difusion, the gigantic stable
difusion three model, this is trained on like a
lot of different pictures. If you use a checkpoint, the checkpoints are trained
on more specific things. There is a checkpoint that
is called Jagger out. You don't need to know this, I'd just like to
throw it in here. This chagger out checkpoint can make really, really
realistic pictures. And the coolest thing is that we can even
go down smaller. This right here is called
Laura and disluras. You can also train them. You can train luras.
Really specific. One last time. Stable
difusion three is the gigantic program
with stable diffusion. You can make
pictures, of course, on stable diffusion you
can use a checkpoint. And one checkpoint is, for example, this
chugga out checkpoint. And a chugga out checkpoint can make people
really, really good. And then we have also Laura's. Laura's. You can really dial
down Laura's in detail. You can train
Allora for example, on one single person, you can train Allura on my face. Allura that is
trained on my face will make pictures that
look something like this. You can see it's
really easy to create character consistency if we
really dial down our things. If we use Allura, we will make
character consistency really easy because it's trained on a lot of
pictures that are nailed down to the character
that we want to create. So what is a diffusion model? Check, What are seats checked? Lauras and checkpoints. Checkpoints, of course,
are also checked. How can we make
consistent videos? Of course you understand it. Now we need to use a diffusion model in order
to be more consistent. We can't take a seat because it's the first
starting point out of the noise If we want to
nail this down even more. And if we work with
stable diffusion, we can use checkpoints
and in optimal cases As, and we can make consistent
characters with all of these. Before I talk about gains, I will also talk about
consistent characters. If we have other
options, of course, we can use reference pictures, and stable diffusion
is perfect for this. We can use a reference picture and we can forget all of these. Yeah, maybe the
diffusion model not, but all of the
other stuff we can forget if we simply use
a reference picture. It's called image to image in stable diffusion and you
will learn about it. We have also some tools that
do all of this automatical. That's also something
that I want to show you in this course because we
start with the easy stuff. And the easy stuff does
all of this automatically. Before this lecture is over, I want to talk just a brief
moment also about Gans. Because Gans, Gans
are simply like, similar to diffusion models. The diffusion model creates
the picture out of the noise. You have already learned that. And again, does it a
little bit different with again you also
vet computer pictures, but you tap always to pictures. The computer tells you, hey, this picture is not
similar than this picture. And then you feed other and
other and other pictures until you have two
pictures that match. As soon as the two
pictures match, the computer understands
how it works and it can create similar
stuff with these guns. We can make really, really enormous good
deep fakes for Lip. Think this is perfect. Something from Alibaba that
uses guns look like this. When I was a kid, I feel
like you heard the thing. You heard the term don't cry. You don't need to cry. Crying is the most beautiful
thing you can do. I encourage people to cry. I cry all the time, and I think it's the most healthy expression of
how you're feeling. And I sometimes wish I just could have been
told you can cry. There's no shame in that. There's no in how
you're feeling. And also you don't need to
always be justifying it. Because I think I was constantly trying to come up with reasons why rather than just being
accepted for what it was. You see the works
really, really amazing. One last time. You
have learned in this video what a
diffusion model is. It creates pictures
out of the noise. You can use sets because the seat is the first
starting point of the difusion model
and you will get better character consistency
if you use a fixed set, remember always
use the same set. You can also use
checkpoints and lower as these are fine tuned
models of stable refusion. You need this to make
consistent videos, but you have also
the possibility to use stuff like image to image or if you have the option to use automatical solutions
this is perfect. Then you have also
Gans and gangs are like similar to diffusion models but a little bit different. You have learned a
lot in this video. In the next video,
we will talk about the prompt engineering for AI videos because this
is really important. And then we have all the theory done and we start to
create our own videos. Come on, this was
the hardest part. It only gets better
from here on.
4. Prompt Engineering for AI Videos: In this video, we talk about prompt engineering
for AI videos. And of course, you
already know it. If you want to make good videos, you need to have a good prompt, good input, that you
will get a good output. You also understand that
pictures and video, they are nearly the same. We need to use the same prompts for pictures and for videos, but you have to be specific. Let's just take a look at these. You need to consider
a few things. You need to consider the
subject, the medium, the setting, the lightning, the color, the mood,
and the compositions. For example, the subject
could be a person, an animal, a character, a place, a object,
or something else. The medium could be a photo, a painting, an illustration, a sculpture, a doodle, or whatever you want. The setting could be indoors, outdoors, on the moon, underwater, or wherever you want to see the stuff happening. The lightning could
be soft, ambient, cloudy, neon studio
lite or something else. The colors could be
vibrant, bright, colorful, black and white, pastel, and so on. The mood could be also, of course, calm, merry, energetic, also angry if
you want the compositions. It could be a
portray a close up, a bird's eye view
and much, much more. Of course, also a point of view. And then you can also
include a movement, for example, a person
is walking and so on. An example would look
something like this. An illustration of
a dog on the moon. Neon lights colorful. The dog is energetic,
full body view. Then you can also
include a movement. What does this dog do? Illustration of a dog, let's just say
walking on the moon. I hope you get it. Of course. We can also make pictures out of this
prompt just to show it. I copy this prompt. And now I will go into
Microsoft Copilot. And you can do that too, because in Copilot we can make pictures
completely for free. First, we start with
a picture of later, we will also make videos. This is just that I can show
you this in more detail. This right here is
Microsoft Co Pilot. Right now I am in Co Pilot Pro. Yes, this is German,
but don't worry. Like in English it looks
completely the same. Even if you don't have
the pro, this will work. You can ask something like this. Make a picture of these. Then we include our prompt. You will see that we will get something that is
really specific. Now, while this
thing is creating, I want to go back on these. You don't necessarily have
to include all of these. Our prompt could
also be this, dog. Yes, dog. This is a prompt. And you can totally
make pictures and videos out of this prompt. But do you remember what the diffusion model
is and what it does? If you are not specific
with your prompts, your output will also
not be specific. The diffusion model is
trained on a lot of dogs. If you don't tell
the diffusion model, you want to have an
illustration or the dog should be on the moon or
wherever you want to see this, then you will not be specific. If we simply copy this word
like I could also retype it, but I want to copy
this because I'm lazy. Then we go back. Now you
see the first thing. Of course, this is
really, really specific, but if I only type in dog, I have absolutely
no clue what I get. Okay? I have to admit
it, I have to tell, at least make pick of this. Then I include the dog. Let's just go back on these. You see how specific this is. This is, without a doubt, an illustration of a dog. Of course, the dog is walking on the moon.
You can see this. We have our neon lights. It is colorful. The dog is also energetic, like you can see how
much fun this dog has and it is a full
body view of this. And if we press on these, you can also see it
a little bit bigger. All of these pictures, they are really specific because
our prompt was specific. Don't worry, yes, these
are only pictures, but I want to show
you these with pictures because it is
easier to show you. If you are specific, you get specific output. If you are not specific, you will not get
specific output. Here you can see
that, for example, make a picture of a dog. And of course, we have
a picture of a dog, but it could be a photography. It could be colorful, it could be whatever. Now we have like a little dog, we have some butterflies
around the dog. It is colorful. It
looks something like a sticker with
white background. We are not specific and if we let this prompt re run again, we will get also other pictures
that are not specific. Maybe we get a photo, maybe we get something else. We simply don't know
is this a problem? Yes and no. If you don't
know what you want to make, you can totally run with these. Just tell the diffusion model. Make a dog and you
will get a dog. But if you have
something in mind, you need to take this
into consideration. Most of the time, you want to create something
that is specific. You have something in your head. If you have something
in your head, you need to think
about the object, the medium, the setting, the lightning, the
color, the mood, the composition, and of
course, also the movement. And I have to tell you, yes, you can make this even bigger, especially the part
of the compositions. You can also include stuff
like shot from slightly above. You will get a shot that
comes from slightly above. You can also include
the warm eye view. The warms eye view is
something like this. When a warm looks up to you, you can simply play a little
bit with all of this, but you need to be specific
if you want to have specific output and if you don't want to have
specific output, just go with a word. You will get a dog. In the next video, we
will take a look at Zora because Sa is the future
in video generations. And then we will try to
create our own videos. But like I said, first
I want to show you Sa, because Sa is enormous.
5. SORA by OpenAI: Overview The Future of AI Videos: This video, I want to
introduce you to Sa, because Sa is
completely awesome. Sa is the tool from Opmei, the tool that can create
videos out of text. The fun part is that Sa
is also a word simulator, or at least it should be a
word simulator in the future. More on that, of course,
later in the course. And I will also show you some concept of this research
paper in this video. But first, we take a look
at the videos from Sa. This right here comes
directly from Sa. This is the introduction video. They simply want to show us what Sura can do without
any modifications. Here you see the prompt, A cartoon kangaroo,
basically nadisco. You see this thing
is dancing and this looks really good
and enormous coherent. Then the next prompt, the golden retriever
puppies in the snow. You also the playing
of this puppies. This looks enormous good. Also, stuff from the nature
works of course really well. You see the camera
zooms in and you can imagine how all of this will go into future because you can create stuff
out of thin air. You can make stuff
that is not realistic, but you can also make
stuff that is realistic. You see longer prompts with
a lot of descriptions. You can also see that I think this model
understands physics. Yes, you can see all
of the generations. They seem that the
model understand physics at least a bit
because all the people, they move like they should move every time you see
something in nature, all of these moves
really coherent. There are basically ships
in black coffee and they are floating around like this
model understands physics. Also the people, they
are looking really nice. This thing looks
also really good and also the cat is nearly
as it was real. You may be also thinking
that Mahmud are back in civilization because all
of this looks enormous. Now enough with the videos, let's just take a look
at the research paper. Because Sra has the potential
to be a world simulator. They tell us right here, we explore large scale training of generative models
on video data. Specifically, we train text
conditional difusion models jointly on videos and images
of variable durations, resolutions, and aspect ratio. We leverage a transformer
architecture that operates on space time batches of video and image latent codes. Our largest model, Sa, like the stuff that
you already saw, is capable of generating a minute of high
fidelity videos. Our results suggest that scaling video
generation models is a promising path
towards building general purpose simulation
of the physical world. This sounds awesome
because Op Mai tells us they will scale these models and these models understand physics. This is really promising. Maybe you think why these models should
understand physics or what should we do after these models can
understand physics? We can do all of
it because we can basically just like
simulate other worlds. Maybe you saw the
dog from Chim Fun. Chim Fan is a guy from Nvidia and he talks
about Isaac Chim. I just want to explain
it real quick. Here at Invidia, they made a model that can simulate words. In the words, they train
robots to do stuff. They can train these
robots really, really fast as soon as the robot can do stuff
in the simulation, it can also do stuff
like in the real world, you should probably see
the Stat dog for yourself. I just did this really,
really quick here. But they try to simulate the physical world
to train robots. If Sra can do this on
a really high level, we can do all of it. We can train robots
in the simulations. Now, back into this paper here you have also a lot of examples. And here is how this works. Basically, yes, this is
just a diffusion model. You make pictures, you make
a lot of different pictures, but they also work similar
than a large language model. Here you can see it. We take inspiration from LLM models with acquired generalized
capabilities and training on the
Internet scale data. He simply tries to tell
us that these models, they work similar to a
large language model. An LLM is for example ChetchPD. Chechpd makes
tokens out of text, basically makes these
pictures smaller, it chunks it down into patches. This is basically the
same stuff as tokens. And then these models
can be more efficient. At a high level, we
turn videos into patches by first
compressing video into lower dimensional
latent space and then basically decompressing
all of it into patches. Here, you can dive
deeper if you want, but I don't think
we need to do this. You can also see that they
use this diffusion model. They start out of
the noise and they start with the
denoising process. Here you can also see the difference between
that computing power, the first video here, this is base computing power, excuse me, for my slow internet. But I think you can see
it the first video, this is the slow
computing power. Then the second
video here you can see four, the computing power, and the video starts to
work like a lot better, a lot more coherent. Then here, the last
video, this is 32, the computing power you see, they need really a lot of computing power to
scale these models. Sam Altman from Pm, I even tried to raise $7,000,000,000,000
for computing power. He wants to make chips. If you see this that you need like 32 x the computing power, you also understand that this thing needs
a lot of compute. You can also make
different resolutions. You can make stuff
for Instagram, for Facebook, for Youtube, for whatever you want. Also, the coherence under
water is really good. You can also start
with pictures. You can start with a
picture like the Sheba, and you can animate it. This looks really
good and really nice. The second animation
is also good, and the cloud that tells
us sa is really amazing. Here is one of my favorites. This is enormous. We start first, we start with the small little wave and then
we go into this big wave. This wave is really cool, at least in my mind, extending of generated videos. Of course also possible, we can make endless loops. You can see this for
yourself on the web page. We can start with input videos and we can lay prompts over it. Just imagine what
these things can do. You can create whole
films with these. This is completely
mind boggling. You can also see
you can start with a video and then make other
stuff into the video. Here you see it gets into
something really funny. You can even play
Minecraft if you want, because all of this is generated out of text.
Just look at it. This is really coherent, this is how the Game
Minecraft looks like. I think this is
completely mind boggling. This is Sra, and of course I know right now we
can not use it. But I am relatively confident that we can use this
relatively quick. And as soon as we can use this, I will make updates. Sra is more than just videos. Just think about
the applications. If you want to
create a whole film, you can do it with Sra, just like one or two people. If you have a narrative, you can create whole
films with these. It was never possible until now. If you want to make
a film without a I, you have to hire a
gazillion people and you need to spend millions
and millions of dollars. Right now, maybe you can
do it with a strong ChPU and Sa or at least as
soon as we have access. But don't worry, we will take a closer look at the tools
that we can use right now in the next videos
because we can really make a lot of
stuff even without Sra. But I think S is the next level or is
the next cool thing. Because it can also
understand physics. It has the possibility
to simulate whole world, at least if we believe
what Omai tells us.
6. Section 2: Easy Tools for Video Generation: In this section, I
want to show you the easiest tools that you can use to generate your videos. We will use stable
video diffusion. Run ML B collapse, Moon Valley, AI, hyper big Sors. And you will also get a nice overview of
the coolest tools, for example, Kyber
and much, much more. Yes, there are a lot of
different tools out there. No, you don't need to use every single
tool under the sun. I just show you the
best in the best tools, we will go a little bit more
in detail and of course, I will update this section over time because I assume that we will get new tools that are better and better
over the next days, weeks, and months
and the next video. This is a really nice
little video because you can nearly forget every
single thing about sets, about prompts and so on. Because in the next video, I will show you stable
video diffusion. And stable video diffusion is
the easiest tools from all, it's open source,
it runs on stable, stable diffusion is
from stability AI. And you can use this
completely for free. Every single thing that you
have to do is to upload a picture and you get the video
completely automatically. Yes, you don't have control, but you can use it and
you should use it. Like I said, this
is the easiest tool and then we dive into
the other stuff, have fun over the section and try to make all of this
work for yourself.
7. Stable Video Diffusion: Free Image to Video Tool!: In this video, I want to talk about stable video diffusion. Stable video diffusion is a
project out of stability, AI. Yes, all of this is
from stable diffusion. And you already know the
code is open source, so we can use this
totally for free. Now, you can install
automatic 11, you can install comfy. Yes, all of this is
relatively complex and you need a lot of time and
you need a strong CPU. But in this video, I will show you how we can use
this right now, completely for free, without
installing anything. And we don't need any GPU
power on our PC whatsoever. But sometimes we have
to wait a little bit. This is the only downside. We can simply use a free
hugging phase space. Yes, hugging phase gives us access to stable
video diffusion. We can try this out and we
can generate some videos. Now, the videos are not
completely out of this world, at least not right now. We don't have a lot of
control for all of these. We can simply upload
a picture and stable video
diffusion will create up until 25 frames, I think. But the frames
will get animated. And I am 100% sure that all of this will
get much, much better. Remember, this is
the worst version that you will ever
get access to. Just go on hugging face and
play a little bit with these. Now I will show you how this right here is the
hugging face space. You simply go over on hugging face and type in stable
video diffusion. You can also just Google It or use the stuff
from my description. Everything you have to
do then is of course, just upload an image and
then press Generate. I already did that. And you see right now we have 200 seconds of
generation behind us. And they expect that we
need to wait 264 seconds. And sometimes this
even takes longer. As soon as I started
to upload this image, I immediately get a request. Hey, a lot of people are
using this stuff right now and you don't even have
to upload your own pictures. You can also use
pictures from down here. You can simply search for
pictures that you like, You simply press on them. And then you can create
your small little videos outside of stable video
diffusion with one simple click. Like I said, you don't
have a lot of control, at least not right now. But I am sure this
will come and I am sure that we will be on top
as soon as we get control. Just try this a little bit
out until we get control, and I hope that we get
access in like 5321. Let's just play this and see
what we get out of these. You see also this rocket
launch is awesome. We can zoom in into this video. The rocket launches completely, so the rocket goes
outside of the picture. I think this looks
completely awesome. Stable video diffusion is one of the coolest image to video tools out there
is completely for free. The code is open source and you should totally try this out. Yes, you don't have a lot
of control out of these, but the image is unbelievably
coherent and you can make enormous good videos outside of stable
video diffusion. Now you have even the possibility
to make longer videos. First, I would recommend
to download this video, and then you can simply
slow it down a little bit. You go into your favorite video editor and
you slow it down. Then you have an
eight second video. Then you can use the last frame, re upload it right here and
generate another video. You can do this over and
over and over again, and you are able to generate really nice and coherent
videos completely for free. Of course, you can also make
videos outside of these. I think I need to
try a video also of these because like this
is a nice little video. Just let's see what
we get out of these. You see? Yes, it's somehow coherent and the thing
right here is burning. The building is burning behind. This gets a little bit deformed. Let's just take a look off this generations because
I think I am also somewhat cautious to see
how they look that somehow. Okay, let's just see what
we get out of this video. This is a complete mess. I think, I think the rocket launch was some of the best
things out of these. Not bad. Now let's just see
what we get out of the. Yeah, it gets deformed and she looks like
really, really bad. I think this is
also a cool video. In this video, you saw
stable video diffusion. This is based on
stable difusion. Who would have thought
it's completely for free to use because
the code is open source? The company behind stable
difusion is called Stability. They give us every
single thing for free. Yes, you can install
everything locally, but you don't need to. We don't need to
use our own GPU. Just go on hugging face
and try this stuff out totally for free without
installing anything. I am sure we will get a lot of control outside of these
tools in the future. Right now it's for playtime
at least that's how I see it. We can play a little bit, we can explore a little bit, but I think this is really are nice and possible future for
the whole video generation. I think we will
be able to create small videos maybe
in the future. Sometimes in the future
you are able to look entire films that are created just from
pictures and text. I am really, really
cautious to see how the future unfolds
before our eyes.
8. Moonvalley AI: Free Text to Video Tool on Discord: In this video, I want to
talk about Moon Valley AI. Moon Valley AI is a tool and we can make video out of text. We can really start with
just text and we get videos. And these videos are
relatively cool. They are somehow coherent. They are two to 4 seconds long. And the coolest part is this
is completely for free. At least right now, we can
make videos however we like. We can make really hundreds of videos
completely for free. But of course, we have
also one or two downsides. First, the generations
are relatively slow, and second, the interface
is in this court. For everybody that
doesn't know this Court, this Court is simply
a jet application similar to Whatcepp Moon. Al AI is a viable in this court, but it's for free. Let's just take a
look at the web page. This right here is the web page. And you see also here
they are hiring. If you want to work
in the sector, maybe just talk
with Moon Valley. Ai. Moonvalyai is a
groundbreaking new text to video generative AI model. You can see two videos
of them right here. I think the tiger looks somehow good and also this fish is okay. Just remember this
comes only from text. I think this is good. Of course, they have
a lot of examples. You can see them for yourself. But what we will do right now is press this button. Try the beta. This pop up will appear. Yes, you need to give
confirmation that you want to add Moon Valley
AI into your discord. You simply press on this button. If you don't have
a Discord account, yes, you need to create one. If you need help to create your Discord account,
just hit me up. But I don't want to bore anybody in this
video. We skip these. We simply press here that
we want to accept here, everybody on this court. And then we go onto
this Court into web application and we
are in the right server. So here we are in Moonwalytai. Here you can also see the
stuff directly from Moonwaly. Yes, it's free, even Moonwaly
tells us free to use. Make your first
video on MoonwalI. Navigate to as such a room, you can always press on this and you are in a room
and you can make similar videos than the guys that made the videos right here. You can see a lot of people are already creating
videos here. And you can also see that
most of these videos, they look relatively good. First, you can always go
back on the left side here. Here you can see this guide. So you can go back and
how you can create video, use the create command and provide the prompt
you like to utilize. And then some example prompts. So you can always
see for yourself how all of this works here. You have a lot of
epic use and so on, but I want to make this fast. We simply press
on this new room, and then we see
for ourselves what other people make and
what we can make. Here you always see a lot of different prompts and a
lot of different ideas. This right here is the set. You see a lot of
different creations. And you can always see what these people type in
to get the creations. If you like, you can
always press play. And see for yourself what all of this means and what
you get right here. Here, you also see this
right here, negative prompt. Now you know what a
prompt is and you know what you need to
describe in a prompt. But I have to tell
you this right here works with stable
difusion in the background. Stable difusion is somehow special because in
stable diffusion, you can also type in
your negative prompt. In your negative prompt, you can simply type in the stuff that you
don't like to see. For example, text, watermark
letters, two hands, two faces, three hands, many fingers, crooked fingers, crooked feet, and so on. You also see some
brackets right here. If you put stuff in brackets, this only means that the weight of these words
is a little bit higher. I have to tell you,
you don't need to be that specific in
the negative prompt. You can also just
go and copy all of this negative prompt and throw
it into your generation, even if you want
to make animals. Because stuff like
crook tens and many fingers and
crooked feet and so on. All of this works completely
perfect In this models, you just need to type
in a few words that you don't want to see in
your negative prompt. You don't have to be that specific in the negative prompt. This is just a nice
little support for the diffusion model. Now we start to
create ourselves. We type in Create. Here, you can always see
prompt style duration. If we press on it, we first start with the prompt. Of course, let's just
make a simple prompt, but we take this
into consideration. Let's just say we want to make an illustration of
a ghost on Mars. Neon, like, vibrant
color of let's just say calm ghost and it should
be a full body view. Don't worry if we
have some typos here. Typos are completely no problem because these diffusion models
understand what we want. Now we press here on style, and here you see
what you can use. Comic book fantasy, Anime
realismus, or Red Animation. I think this should be somehow
fantasy then the duration. And if you press on it, you can always use a
long or short duration. But the waiting time,
of course, increases. If you want something short, you wait two to 5 minutes, medium, four to eight, and long eight to 12 minutes. This is the only
downside from this tool. I think we should make medium
just to make this a little bit easier then then we have
a lot of different options. Image camera, model, version, negative, prompt, end seat. If I press on image, I can upload images
if I really want to. But right now I don't want
to upload a reference image, I simply delete this. But if you want to
upload these images, you can totally do this
if I press on it again. So I simply delete the image. If I press on it again, I can press on camera. Should the camera zoom in? Zoom out, pan, left pan, right, up or down. I think the camera
should zoom out. Then we have the model version. We can use version
one or version two. Version two is the default. Version two works better. Then we have the
negative prompt. You remember what we can
include in the negative pront. We can also just copy
the stuff from the guy above us because we
simply need a few words. And all of it will work seamlessly if I
press on it again. We can also use a seat
if I press on it. Let's just say we want
to have this set, that the video is a
little bit more coherent. And then this is the last thing right here, This is the image. But like I said, I don't
want to use an image, I don't want to mix this up. The only thing that
is left is to send this out and then
Moonwaly tells us, we're working on your video. We will notify you
when it's ready. Here we have our prompt ID. We will get notified as soon
as this video is ready. And there we have our video. You'll see this is the prompt. Then the model is
the fantasy model, The length is medium. We have our seat. This right here is
the negative prompt. We zoom out. We use version two, and we have the prompt ID. And this is what we get
out of Moon Valley. I, I think this
looks somehow cool. Let me just make this big. I think this looks somehow cool. We have every single thing that we have included in our prompt. This looks really spacy. This looks like a guy on Mars. I think this looks like a cool, nice little AI video. Let me know what you think. Of course, you can do a lot of different stuff in this
tool, Moon Walley. Ai is relatively nice. Of course, you can
simply see for yourself what other
people are making. Just let yourself inspire you by the generations
from other people. There are really a lot of people that make a lot of cool stuff. You should totally look at these and make cool stuff
for yourself. In this video, you have
seen Moon Walley, AI. Moon Valley. Ai is really cool because this is
completely free forever. At least right now, you can make as many videos as you like. The only downside is that you
have to work in this court. But come on, we
can get over this. We have unlimited generations. The generations are
relatively good. We can work with text, we can use prompts, we can use negative prompts. We can use sets. We can use different camera
options like zoom in, zoom out, pan, left pan, right pan up, pan down. You can also include your own pictures if you
like, as a reference. I didn't show you
this because this is your nice little thing that
you should do at home. Just go in the tool, upload a picture from your computer
and use it as a reference, and let me know what you get.
9. RunwalML: Everything You Need to Know: Let's just talk about Runway ML. Runway ML is a nice
little tool we can make videos out of text. Runway can do text to video, it can do image to video, it can do video to video, and you can also
edit your videos. So Runway ML can do all of it and you can start
totally for free. Yes, if you want to make
really a lot of videos, you need to upgrade your plan, but you can start
totally for free. And I think we should
totally do this. Runway ML is a leader
in this industry. So first you go
onto the website. So on Runway L here, you can also see that
you basically need the subscription if you want to make really a lot of stuff, but I think you don't
need it to start. You can upgrade your
plan if you want, but I think we should
start completely for free. I want to close all of this. Bring your imagine to life with Chen two On the left side, you can see what
runway ML can do. We can go on Runway Watch here. We can simply watch
the stuff that is created from Runway Dot Ml. You can see all the generations that other people have made. Some of them are really good, some of them are, yeah, Maybe not that great, but I like a lot of
these generations. Let's just see what these
clouds have to offer. I think they look nice. Can you see the face
inside of the cloud? The cloud starts to merge into like persons or whatever
you want to call this. Here you see hands and this
looks really, really awesome. I think some of these
videos from Runway Watch, they look really, really cool. The generations are
stuff that you can expect out of Runway Dotel, and this is stuff that is
nice and easy to create. You can simply type
in a text prompt. But of course,
Runway ML has also some generations that I
personally don't like that much. For example, this right here, sometimes you get a little
bit like special results, I want to call it. But most of the generations, they look really, really nice. You can also go on assets. Here on assets you have
favorites and you have all here are just
the generations that you have already
made with Run ML, you have the video
editor projects. As soon as you have
edited your own projects, they will appear here. You can generate videos, you can edit videos, you can generate audio. You can also make images free D, AI training and much, much more. But let's just go
back on home because here on home you see a
lot of different things. Video to video, text to image. You can also remove
the background. You can do text to image. You can do image to image. Image to image is also
relatively nice, and of course, you can also do text to speech. This is also a nice feature
that Runway ML can offer. If you scroll down a little bit, you see also some tutorials. They show you like
really, really quick, how Runway ML works and you can discover and remix the
stuff from runway. But let's just start
with video to video. This simply means that
we can upload a video, we can drag and
drop a file here, and then we can edit our video. We can simply lay
prompts over it. We drag and drop our video inside of this nice little box, and then we are
basically ready to rock. I have to admit it. This thing takes a little bit until it's uploaded
here on the right side, you can see what you can do as soon as all of
this is uploaded. You have you and the
style reference. You can use image, a present, or a text prompt. You can type in stuff. Or you can also use
pictures just like here. If you press on these pictures, you have a lot of
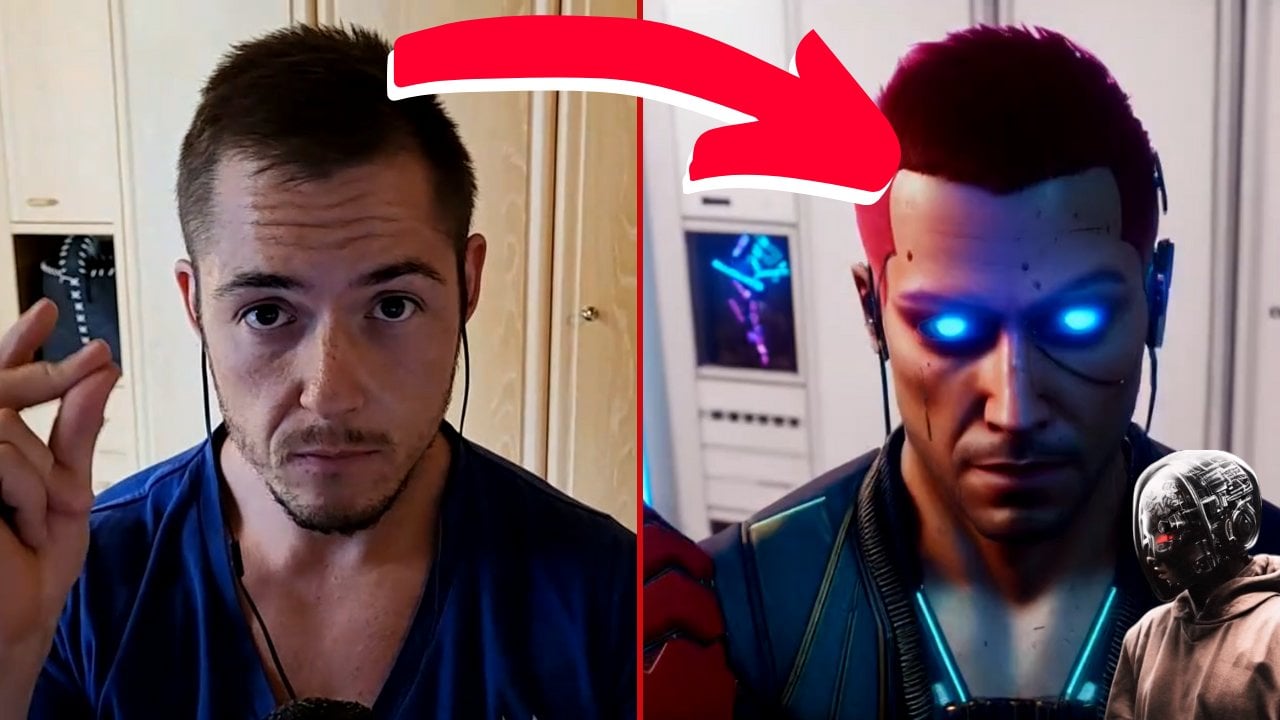
different options, but you can also upload
different pictures. Let's just assume we want
to have the Cyberpunk City. As soon as I use this image
as a reference for my video, we will lay prompts or we will lay this style
over my video, and we can simply make
myself into a Cyberpunk. We have also the style strength. The higher the
style strength is, the higher of course, the cyberpunk city will be. I normally I use stuff
like between 20% sometimes up to 60% But I have to admit if
we use a high style, just like 55% we get nearly just Cyberpunk City and
you see also the set. So the seat is always important. You already know what a seat is. We use a fixed seat. This works automatically and
because of the fixed seat, we have coherent videos. This is really important. Learn how Chen one works. So we can also press on these. Then we are on the website. Here on the left, you see the original video
and the image prompt. If you scroll down, you
can see you can use the style to structure
consistency. So you can use the style weight, style weight of one versus
a style weight of 15. The higher the style
weight, the stronger. Of course, is the style
you can use different. Also the set is a little bit different in every
single generation. You understand what the seed is. We need to use a fixed set. We have the frame consistency. The higher the
frame consistency, of course, the different
the videos will look like. With consistency five, you see a little bit of flickering
and you can use up scales. The up scales are also really nice because you can even change resolution and you can
remove watermarks. But in order to do that, I think you need to pay for this tool and you can also
mask different stuff out, so you can do really a lot of different things
inside of Runway ML. And here you have a
nice little comparison from the original to the other. Now you can see my
video is uploaded, and as soon as we have
uploaded every single thing, we have like a four
second video generation inside of Runway DoteML. If we kick, click, play, you can see that I move here, so all of it seems to
work relatively fine. And now we can lay
our picture over it, because we want to have
a nice little preview. If I press preview, we can see just some pictures, how all of this looks, as soon as it will be generated. So you can simply see, yes, we are relatively strong, so we have really strong
cyberpunk view right here. If I decrease the strength
just a little bit, I think the human touch should
be a little bit bigger. But I have to admit, if we use such a
strong cyberpunk view, this is always
relatively strong. But like you see, it gets a little bit better. Let's just decrease it to
23% Preview one less time, I think this is nice. Now we can see that here, there is also a human
in the cyberpunk city. I press generate this video, now we need to
wait a little bit. This takes like somewhat
between 1 minute, sometimes also 5 minutes. You see 21% So this needs a little bit
of work until it's done. But I think it's worth the wait because the
video, they look cool. Now we can press play and you see I move relatively seamless. I won't play the audio
because this is German, but we can also use
different styles. You can see we can make
myself green, for example. And if we press preview style, you see that I get
changed immediately in a thing that looks
somehow like damn frog. But I think this looks cool. But we can also make myself into a bad cartoon
if we really want. So we can use whatever we want. If we press preview style, we can always see how I
would look as a bad cartoon. I think the bad cartoon command like this, looks really nice. You can always press preview before you make
your presentation. If you press some prompts, you can also describe just
what you want to see. Let's just say you want
to get into a real frog. You can always try different
prompts of course. Or maybe you want to
be king of the rock. Let's just say rock as a king. We press preview styles and
then we see what a rock king, what a real rock king
would look like. Come on, this is hilarious. We can make myself
into a rock king, and I think this looks
also relatively nice. If we want to generate this, we can totally do this. I can always transform
myself in whatever I want. Now let's just go
back to runway, and now we test text to
image or image to video. We can use text and we can
make videos out of text. We can simply also drag
and drop stuff right here. So we can upload
pictures if we want. And we can also
animate our pictures. But first, I want to start with a nice little text prompt. Inside the eye of a storm. Calm and peaceful in the middle, but harsh on the outside. I think this is somehow okay. Maybe the prompt is not perfect. Let's just see if we get an eye, a real Y, or if we get
a tornado or something. But you can also see you
can use different sets. You can up scale, you
can remove water marks. But in order to do that, you always need to
upgrade your plan. But I think right now
it's not really worth it. But we need to try this out
before we pay for this stuff. You can use different
resolutions, 16 by 99 by 16. You can use different styles. Should it be a three D cartoon, should it be like
three D rendered, You can simply search for
yourself, what you like. Let's just say Thriller. I think thriller looks okay. You can also press on camera, and here you can use
different camera movements. Do you want to make the horizontal axis move a little bit more or
the vertical axis? You can also pan into different
directions. You can zoom. You can also role, so you can always see on the left side how
all of this behaves. Even the role, I think the
role looks really cool. If we want to pan is also a little bit interesting to see. You can always play
with all of this. Camera motions just increase
or decrease it a little bit. I have to admit, if we use really strong camera movements, the video will be a
little bit of a mess. But I think it's worth
trying to do a little bit. Let's just press safe and
then we can run all of this. But before we do that, I also want to show you
the motion brush, because you can also brush with the tool over the pictures. But just if you upload it, let's just press
Generate and see what we get out of this
nice little prompt. I would assume that
we get maybe a real, or we get the storm that
I had in mind previously. Remember the prompt engineering? We also need to make good prompts if we want
to have good outputs. I think it's maybe a
little bit of work, I think, yes, damn it. We have I, but I think also, this looks like relatively cool. Just remember, you need to
take into consideration, if you want to have
specific output, you need to be specific
with your input. Yes, we have like an I, I think we have a real
storm going on right here. Maybe I should use the word
tornado or something else, but I think this is totally
fine so that you can see that we really need to
be specific with our words. If we don't be that
specific like we get an eye because
the diffusion model sees any in the prompt and is trained on ice and generate ice. The camera movements are strong. But we can also upload
other pictures. This, for example,
is a picture that I have made with another
diffusion model. We can do a lot of different
stuff with pictures. We can use a motion brush and paint over it and
we can animate it. So in simple terms, we can make pictures
move that we upload. I think moving pictures is
also relatively nice feature. Let's just see what we
can get out of her. You see we have a woman
with like pink hair. This is like an AI influencer. We delete our
prompt and we make, let's just say waves. I think waves work. And if we use the motion brush, we can paint over different
stuff from this picture. We can use just the
hair, for example, if we want more motion in
the hair or if we want more motion in the
clothes or in the waves. Just let's animate
the real waves. But I have to tell you
this motion brush, this is not always
completely perfect. Sometimes we also animate
the whole pictures. We can also increase and decrease the movement
of the axis. And we can always delete the stuff if we
don't like something. If you think you don't want
to have something right here, you can always include
it or exclude it, just like you want. You have also different brushes. You can use this brush
or another brush. You can always play with
all of these things. But I think we should
try to animate also, like this small
piece of this hair. So you can also decrease the auto direction and you can simply take it into manual. Let's just play it done. Always remember,
none of this will be completely perfect,
but it should work. We should be able to animate it. Let's just include wind. And then we press Generate, and we see what we
get out of this. Picture. I think maybe
like the whole picture, it should move, and maybe it moves also a little
bit too strong, because this is
always a bit tricky. Damn. And there we have it. These are really
windy waves, you see. The whole picture is animated. Think it looks
really, really nice, but it is of course
not coherent. And now I get flagged. I don't know why I get flagged, but I want to work
with another picture. Now, I uploaded this
picture right here. If we press on motion brush, we can always
animate our picture. I think we should use
it a bit sparingly. We simply increase the strength
here just a little bit, and I just use the hair
and then we press done and we see if we can make this a little
bit more coherent. Sometimes it can be
a little bit messy. If we want to animate pictures, we decrease this things also, and then it will be
a lot less strong. We press safe, so now we
have just a little bit of movements and it should
work a little bit better. You can always
press on the tools again and repaint the
things that you like. Let's just press Generate. I think the moves should be
a little bit more gentle now because we have decreased the
strength really by a lot. It's always important
to make this not too big because if you
increase it really a lot, you get the strong movements just like in the
last generations, and this makes it really bad. And now you see the
movements are gentle. Because we have decreased it. Yes, we have a little
bit of flickering. Yes, the eyes get a
little bit deformed, but degeneration is
like ten times better. So you need to be a little bit
gentle with the movements. If you are not gentle,
it's totally okay. You get good outputs also
with not gentle movements, but the outputs get
a little bit like strong and they are not perfect. If you want to
have gentle moves, you can be a little
bit more coherent. Let's just try another picture. I uploaded this picture again. This is also a nice
little picture from like a influencer. We press on the motion
brush and we can also brush this
stuff for ourself. If you want to have really,
really gentle moves, just brush over
it with your hand and tone to use the
automatic selection tool. And then you can animate
also really small stuff, but I think you get the idea. The less you animate, the more coherent
the pictures get. The more you animate, the more camera
movements you include. The stronger the
animation get and the messier all of it looks. Let's just go back
to the dashboard. You have seen video two video, you have seen text video, and also image two video. We can also remove background. This is also a nice little tool. If we press on it, we
can simply drag and drop a video from ourself or
from whoever we want, and then we can remove
the background. This is also a nice feature, I want to upload this
nice little dancing lady. This is a video,
I think, from Ps. As soon as this
video is uploaded, we can edit this
video a little bit. I think now it should work. We simply press on
to timeline and then we will get our video on our
timeline and we can edit it. And there we have our video. And now we can mask
different stuff here, let's just try to mask this
thing in the background. If I use this thing, if I mask all of this thing, we should exclude
everything else. But except this thing, then we simply have like a
video without background. We only have this
thing that I masked. I think this is a
nice little tool. Like normally, yes, we mask, of course persons out. You see the person is dancing
and we can of course, also include our person. So let's just include the person and the thing
from the background. We press done masking. And then we will
have just our person and the thing from the
background that we have masked. And every single
other thing will be excluded. So you can see it. It works really, really good. I think the person
is dancing and we also have like this
light or whatever, this is in the background. And the rest of it
is a green screen. So you can edit
your videos really, really nice with it
if you really want. You can also include like different backgrounds
because now you have a green screen. You can always press export
if you want to download these pictures and you can press press play if you
want to see it. Once again, you can basically include this in
every single background where you want and you
have a girl dancing and this light in
a new background. Like I said, this
is a beta feature, so none of it will be
completely perfect, at least not right now. But you can also use
different other things. You can include assets. You can include,
for example, text. You can include
whatever you want. So this is basically
a video editor, but I have to
admit, I don't like to edit my videos
in this editor. I just use it to mask out
different stuff of videos. Let's just go back
on home because I think this remove
background tool, you can try it but
it's not perfect. And here you see text to image. I have to admit the text image works in other
tools a lot better. We can use stable diffusion. We can use mid journey. We can use Ali, we can use Adobe Firefly Text to image is not
perfect in run way ML. And that's why I don't use text to image at all in this tool. If we press on it, you can see basically just what we
can make the pictures, they look somehow, okay. But I don't really
love these pictures. And they are also cherry picked. You can simply describe with
a prompt what you want. You can use different aspects, ties, resolutions,
different styles. You can generate pictures, but I don't love it. In this tool, you can
do the same thing basically also with
image to image. You can upload an
image if you want and you can make similar images. And also this doesn't work
that great in runway, but you can also go
to text to speech. If you go to text to speech, you can simply press on it. And then this works
like somehow, okay? Because you can create
a nice little voice. The voice is called Kathy, at least right now you can
see it in the left corner. You can simply type in
what you want to hear. And then you will get
your speech pack. If you press on this right now, you can simply type in, for example, hello, I am Kathy. Because like she
is called Kathy. Then we press Generate, and in no time
whatsoever we will get our audio back and you can
use this audio forever. You want Hello? I am Kathy. Hello, I am Kathy. You hear this looks like relatively okay. If you want to download it, you can totally download this. But I have to admit I like
11 laps more than one way ML for this text to
speech generation. You can make this longer. You can also make like stuff
in chat PT and paste it in. Let's just go back to dashboard because we take a closer
look at 11 laps later. And 11 laps is a bit better. But you saw that you can make video to video inside of Run ML. You can make text to
video and also image to video so you can make every
single thing that you like. With this tool, you can remove
backgrounds if you want. Like I said, I don't use
this Aton in this tool. But if you want,
you can do this. Text to image is not perfect. Image to image is
also not perfect. The text to speech, this works somehow, okay. But I have to admit, I don't use it a lot
because I like 11 labs. You have seen Runway. Mel can do all of it. You can make text into speech. You can make image into image. If you want to try
it, just go over it, text to image, I would say
just use another tool. The remove background
is somehow okay, but the text to video,
this works really good. And also the image
to video works good. You can use the motion
brush and much, much more. The video to video is awesome, because you can lay
prompts over your videos. So this was basically runway Ml. Runway dot Ml is a
nice little tool. You should totally try
this out because you can start totally for free. Do it.
10. PikaLabs Text to Video, Video to Video, Image to Video, and Video Editing: Let's talk about collapse. Because collapse is a tool
that works really good. You can make basically the
same stuff as in Runway Dol. You can use text to video, video to video, image to
video and match much more. And you can also
edit your videos. Let's just take a look how all of this is in the interface. But first we go to the web page. If you go on their web page, it looks something like this. You see immediately trip. But if you scroll
down a little bit, first you go outside
of this window and then you can see
what's on their web page. You can press Create, but you can also see the
stuff that is generated by a. You can do text video, and it looks
something like this. They try to always
make raccoons. Don't ask me why, but I
think raccoons are nice. Come on, you see, you can also make
image to video, and if you press on it, your
images will start to move. Also image to video works relatively nice inside the beak. I think the generations are also a bit better
than in runway, and you can do video to video. You can see, you can
change your videos, and this looks really,
really awesome. If you scroll down
just a little bit, you see also this lip sync. Yes. You can also do lip sync, and you see it right here, the lips, This
looks somehow okay, but I have to tell you,
this is not perfect. If you do this like
with real humans, the output is not that good. I want to show you
later in the course, of course, an alternative
that makes better lip sync. But this is cool. Modify region. And modify region
works relatively nice. You can simply modify
stuff from your images, from your videos, not
only from your images. And some things works awesome, other things are not perfect. But you can see these examples, they are completely awesome. You can also expand your canvas so you can
change the resolution. You can make stuff
in 16 by nine, in nine by 16, in one by one, in
whatever you like. You can out paint
different stuff. Of course, you can also extend the video length if
you really want to. You can simply extend a video over and
over and over again for 4 seconds until you have something that
is decently long. Here you can basically
see a lot of examples if you want your ideas. Ps command Tripka, let's
just try this thing out. Let's just see how all of this looks in the real interface. And of course, you need
to make an account. You can either sign
in with Google or sign in with this Court
just like you want. As soon as you are in, you can go onto
the Explorer Page. This right here is
the Explorer Page. You can simply see
what other people have made and you can also
make similar stuff. It's really easy to
make similar stuff. You can always
copy their prompt. If you go with the mouse
over these pictures, you can see how
all of this looks. This robot, for example, is moving relatively coherent. I think the videos, they look good from collapse. You can also download
these videos if you like. You can totally use this video. You can copy, for example, this prompt if you want, or you can simply see
again, a raccoon. These raccoons, I think
they look hilarious. I think I understand why they always try to use
these raccoons, because, come on, the
raccoons are nice. You can also make
other stuff here, like New Year from Japan. At least I think
this is New Year. And you can see
also some dragons. And if you press on these, you can simply copy this prompt. And you can also
throw it down into the prompting box and make
the stuff for yourself. As soon as you press Generate, you create the same video as the guy that made this video. Yes, all of this will be
a little bit different, but I want to show
you something else. We want to start
with image or video. So we can simply press on these, and here we can upload
videos from ourself. And I think we should upload again this nice
little dancing woman, because this is a
really enormous, hard video to process. You can modify region, you can also expand the
canvas if you want, and you can do lip sync. But like I said, this
is a really hard video. But let's just try modify a region because we
want to do hard stuff. You see we have here
this generation box and we can move this around, You can make it bigger, you can make it smaller. I want to try something that is really hard for
this diffusion model, because this woman, she
moves like really fast. I want to create a
new hoodie for her. I think she should wear
something that is maybe red. First, we need to try. To take the box in
the right place and we throw in a
nice little prompt. Let's just think,
I want to make it, a model is dancing
in a red hoodie. Then we need to accept that
it maybe not works perfect. We need to make
this a bit bigger because we need to have every single thing
in the frames here. Let's just press generate. Come on. I think this
will not work perfect. Like I said, I want to
show you hard stuff here. We have our generation. Yes, it doesn't work perfect. But this is the stuff that I want to show you,
not always perfect. Let's just take a look at this. So here you can see it. Yes, it works, but it is
of course not perfect. She has a red hoodie. It works somehow. Okay. She's again, dancing, so no problems here. But the movements, they are really too harsh for
this technology. You need the movements
a little bit more gentle if you want
to have good videos. But like I said, I also want to show you the downsides
that we have right now. It would be really easy for a nice little slow motion
video to generate the clothes, or to add, for example, a hat, or to add some sunglasses. So I want to show you the
challenging stuff so that you can see that it doesn't
work perfect all the time. We will get there eventually, but right now we are
unfortunately not there. But we can try to
expand the canvas. In order to do that, we delete every single
thing right here, and we press Expand
Canvas. And here we are. So you can see we can simply press on
different resolutions. And then we can expand the
canvas however we want, 16 by 94 by 34 by five,
Whatever you want. You can also place it
wherever you like. I want to do also here, the really hard stuff. This is a realistic video and I want to place
it in the middle. If you use illustrations, this works really, really easy. You need to insert
also a prompt. What maybe model is dancing
in a let's just think, what is this exactly? Just a room command. So we include a room. I press Generate, and then
we will get something. But I think also this
will not be perfect. Like I said, if you
use an illustration, this will work perfect. You have seen the
videos from Pka itself, but I want to push
it to the limit. Let's just see how
the generation went because I want to
show you the hard stuff. Yeah, let's just
make a full screen. I think this looks somehow okay, but it's of course not perfect. You can see on the
left hand, the right. We have out painted our
pictures without any doubt. But of course it's not
completely perfect. But that's the stuff
that I want to show you. You need to understand this. If you want to make
realistic stuff. This technology right now, it's nearly there, but
it's not completely there. You see, all of this works, but it's not completely perfect. Maybe you ask yourself, why does this guy
show us all the time, the stuff that
doesn't work perfect? You can also make better stuff. I want to show you this
because you need also to understand the
downsides of these models. If I simply show you stuff on illustrations that
works seamlessly, you maybe get false information. I want to be as
transparent as possible. I want to push these models to the absolute limit so that you understand what you
can and cannot do. You already saw the
presentations from Ka. They look awesome. You can make similar stuff, Make a raccoon in the space that tries
to catch something. If you want to make
videos or just maybe try the painting with something that moves
relatively slow, all of this will work
really, really good. But if you want to
go to the limits, also the tools
come to the limit. I want to show you this. But of course in the future
we will get to this point and then I will
update the course and we can make entire films. Maybe just with some prompts. Let's just go back here
because we can do lips. We can also lipsyn this video, but I think this
video right here, this would be an absolute
mess to Lipsynch. We need to Lipsyn
something other. Let's just think, I think
we should lip sync myself. This is also really,
really hard for K. We have other tools that make better Lipsyncs in
realistic characters, but I want to show you these. This works relatively easy. You just need to upload a video. I uploaded a video from myself, and you can also
see it right here. For best results,
use lips with front facing human video and
clear high quality audio. So we can simply upload an audio that is high quality and
we can make lip sync. But in order to get an audio, we need, of course,
to make an audio. I like, for example, 11 laps to create an audio. So we want to animate
this video with lip sync. If I press on these, you can see we can
lip sync the audio. And we can simply see for ourselves what we
want to use here. We can use Rachel, for example, or Drew or somebody else. I think we should use Rachel. And we can press Generate
Video after we input our text. This is like not from 11 laps. And if we press generate voice, we will get a voice.
But it is voice. This is not really great. We can totally make this voice. But like I said, the
voice is not optimal. In order to get a good voice, we should go to 11 laps, just Google 11 labs. And then we can simply
press on the first link. And then we are on the
web page from 11 Labs. And here we can create audio
that is a lot better than the audio here from K.
We can go into 11 labs. And here we can
type in our prompt. For example, give
me more attention. I have a nice voice. Come on, this should look great. We use like a British girl, because I want to
be a British girl. Come on, I just like to use funny stuff because the
world needs to be funny. This is how it sounds. Give me more attention. I have a nice voice. Then we can simply
download the stretch, and as soon as this
trach is downloaded, we can upload it, of course, into Pka. If we upload it, we can simply drag and
drop it right here, and then attach and continue, and we will get our output. Maybe you ask yourself why I'm doing always such stupid stuff? Yes, I animate myself
with a voice from a girl. I think this stuff is funny. If I want to make
like serious stuff, maybe nobody will remember. And I want that you remember. That's why I make
always silly stuff. I also think that this
doesn't work perfect. If we want something
that works perfect, we need to make an illustration. And like an easy text, but I want to make
a male speaking in a voice that is English. And of course that's a girl. And it later in the course, I also show you stuff that makes really enormous
good lip sync. We can also use Hagen
and a cop notebook. This is a lot better
with lip sync, but I want to show you
also this right now in, even if K is not perfect with
this here, you can see it. Now we can create everything, or now we have everything. Let's just see for
yourself. You see my lips. They move completely different. And this is how it looks. If I make it big. So you see my lips are
moving completely different. Yes. This is now
without the voice. I will show you the voice later. I just want to show
you that the moves, they are moving completely
different. It worked, yes. And maybe this is like
not perfect right now, but I want to show you how this looks and how it
sounds right now. Give me more attention. I have a nice voice. Give me more attention. I have a nice voice. So you see, yes, it worked. It's not perfect, but I
want to show you all of it. I don't like to show you
always the positive things. I want to show you
every single thing because this is important to me. You see we can do really a lot of different stuff
here with Peak, we can do modify region and modify region worked like okay. If you take other
pictures, it works better. You can expand canvas and
make your pictures pick. You can do Lipsy. Yes, the Lipsync is not optimal. But we have also, of course, another tool that can
do Lipsys a lot better. We have Hedren and we
have a Cop notebook. And I will show you this
stuff of course later. Not all of it is perfect. If you press on Explorer, you can see always for yourself, what other people have made. Here are, for example, some Lip things that work, maybe a little bit better. You see always the
prompt down here, so you can search for yourself for the
stuff that you like. You can always
delete your stuff. And you can simply re
run a prompt from here. If you find something
that you really like, you can simply search it. Lip sync. Works with all
of this like somehow. Okay, let's just copyDse, because now I want to
show you something cool. We press retry, we
are simply here, and then we get our nice little video
immediately as an output. Here is our video. We simply retry this here. You see the video?
Yes, this video looks like really good, I think. We can also do other stuff. Let's just start with
this nice little prompt. Free de animation. Acute boy is
standing in a house. Spring festival, interior,
Lunar New Year Holiday, wipe snow outside, land tours. You see this is the prompt. This is the same
prompt as previously. And now we can also
change the resolution. If you click retry, you get always exactly
the same stuff. But you can also change
like frames per second. If you just copy the prompt, you can go down until eight frames and up
until 24 frames. Of course, the video will
be better with 24 frames. You can also change
here different stuff, so you can pan, you can tilt, you can rotate, you can zoom. You can simply press
on these things and all of it will get
included in this picture. Let's just presume
rotate and also the pan. And then you will get an output
that is relatively cool. I think at least you can
go on the parameters. You can also include
negative prompts and sets. On the negative prompt, you simply type in what
you don't like to see. For example, ugly, bad, blurry out of frame, and so on. So you can include what
you want if you like. You can also include a set. Remember, it will
get a little bit more coherent if
we include a set. So this is a nice little trick. The consistent with the text, the consistency with the text. You can increase or
decrease it how you like. The prompt will get executed more precisely if
you increase this, but it's possible
that the output gets a little bit lower resolution. Let's just try to generate this. I think the generations
work relatively fast here, so we simply wait like one to 2 minutes and then we
get our whole generation. And the coolest part
is we can also upload a video from ourself and
lay these prompts over it. So we simply try this
with our Lip Sing video. The second generation was, yes, it was okay. But like the eye is broken,
It's completely broken. Maybe the consistency of the prompts was a
little bit too high. But you see the
camera movements, they work completely fine. Just the eye, or
maybe both eyes, they need a little bit of a fix. They are of course not perfect, but I assume that this stuff
will get perfect over time. Now you see what we get. If we lay prompt over my video, this works really nice. We lay this prompt over my video from previous,
from the lip sync. I think this looks
relatively cool. The original versus
the generated. Let's just make the speak, you see the cartoon stuff. This works always a lot better. In this video, you saw collapse. Collapse is right now, an all round tool that
works relatively nice. You can make videos out of text, so you can do text to video. You can make video to video. You can do in painting, you can do out painting. You can also animate pictures and make
videos out of these. So you can basically
do all of it. I have to tell you, yes, I showed you always the
stuff that is not perfect. I want to use a girl
that is dancing like really aggressively so that you see the flaws in these models. I also want to show you a lip sync that it
doesn't work perfect. I assume that all of this
will get perfect over time. But right now we
are not there yet. But we will get there. If you want to have
perfect outputs, just do stuff with animations. You can lay prompts over
videos just like you saw. And this looks really good. If you want to paint stuff, do stuff where the motion is a little bit gentle and slow. If you want to outpaint stuff, just try a little bit. Of course, if you want
to do a Lip sing, I will show you a technology
that can do perfect Lip sys. Also, right now, K is
not the tool for that, but I think BK is cool because
you can try K for free, at least for a little bit. Try yourself a little bit out. Have fun with these tools.
11. Haiper AI: Supported by Google Deepmind: Hyperai is another
video generating tool that works really nice. You can make videos out of text. Let's just see how
all of this looks. We will make this
relatively fast. I go on this side so
that you can see more. You go on hyper, and here you can explore. You can see what you can make. First, I want to show
you that you can create videos in HD. You can animate images in HD, but you can also
repaint your videos. But the repainting, yes, I have to tell it you
can't do it right now, but this will come
relatively soon. You can also make
normal videos and normal animations
out of your images. The only difference is
here HD and not HD. If you go right here, you can also extend your videos
and also this comes soon. Now I'll show you this web page. Why is this web page even relevant if we don't
have all the features? Because this web page is
supported by the mind. I assume that this web page will get better and
better over time. And the second thing is
this is totally for free, at least right now, you can
test it completely for free. Here are some videos. The videos are good. The videos are coherent. You see this dragon, This looks really good here, a robot with the
Earth in the hand. I think this is a cool video. This is also the right
time for this video here a girl in a car and you see also realistic videos
work really nice. This glass pony or
whatever this is, maybe not a pony, it's a horse, but
also this looks cool. Here the sky on the moon
with a husky or Shiba, this dragon out of bubbles. You can see we can make
really, really good pictures. And I am stunned
by the coherence and also by the quality
of these videos. You can see the videos, they look not completely real, but the realisms in these
videos is really nice. Even this right here, so these two people
that kiss each other, I think this looks awesome. Also, this car
looks really nice. Now I want to show you how
we can make this stuff. Before we make stuff, I will also show you
that we can of course, like this and then
you will find it. If you press on this button, you like it and then you
have it in your collections. You can also download it
and you can also of course, share it on social media
or wherever you like. If you press on such a picture, you are here and you can
see it in full screen. And you can also see the prompt. A supercar driving in
heavy rain and camera behind it while the car
driving through traffic. I think this is like
exactly this video. You have always the ID. You don't need to
worry about the ID, but the deceit is important. If you want to recreate exactly this video,
yes, of course. You can also download this, but if you want to recreate
exactly this video, you can, for example,
copy these prompts, you simply press on copy. Then you can also
use the seat and you will get exactly
the same video. But this is not what we
want to do right now. If you think this is cool, you can also of course it here. Now I want to close this window and I want to
show you the other stuff. If you press here on creations, you see the things
that you have made. Right now, there are
some generations. Here is a lion in the jungle, and here are three
people on the moon. And if we press play, you can always see how
the video looks like. The videos maybe not optimal. If you go on favorite, you see the stuff
that you have shared, that you have liked, for example, this car. And you can also get
on your profile, you get a nice little
starting guide. You can get help if you
press here on more, you can log out teams and conditions and the
private policy. If you want to have more details about the private policy, let me know or click
on this button. Of course, if you don't
like the dark mode, you can also make it bright. But I hate it when it's bright, I want to work with
the dark mode. Now we go on creations, and we do something for ourself. We can simply go down here. And now we can, of course,
describe our video. And I want to run with a prompt that is
really, really easy. We don't describe every
single thing exactly. I want something like this. Iron Man climbing Mount Everest. And here we can use some genres. We use old film, watercolor, cyber punk errand, Lego,
bluer, background, Chi. Ask me what this thing is, maybe I should
Google this or ask ChatGPT, Steampunk
and Impressionism. But I think I don't want
to use something of these. I simply want to press Create. And we use HD if
you press on the. You can also use
like smaller models. So you can make, for example, your normal text
prompt without HD, but I think we should use HD. If you press on
this button here, you can either share it publicly or you can
also leave it private. I want to share this publicly. This is completely okay for me. If you press on these, you can use different
length of this video, 2 seconds or 4 seconds, or most likely 4 seconds
are just coming soon. But I want to use a seat. I think we get a better
output with a seat then. We simply press Create. There we have it. Let's just see how our Iron Man looks like. I think this looks really good. It's really, really coherent. He is on Mount Everest and you can clearly see,
this is Iron Man. And now I have to tell you, copyrights can be a
little bit of an issue because it's maybe not that
optimal to create Iron Man. Iron Man is a
creature from Marvel, and I think, yes,
it's completely okay if you just make it
from time to time, but don't try to make entire films or entire
videos out of Iron Man, and like try to sell
them or whatever. I think you should get these. So maybe it's not
perfect to create Ironman and like make
a movie out of it. But of course we know this. You can also rate
it if you like it. I think this is great. You can share it. You can do whatever you like
with the generations. In this video, I
showed you hyper. I showed you this tool because I think this has
great potential. This comes from deep mind and right now it's
completely for free. They will add longer videos, they will add more features. Maybe as soon as
you see the course, you can do a lot
more in this tool. Of course, I will bring updates as soon as more as possible. Have fun trying this tool out.
12. PixVerse, Morph Studios, and LTX Studios: In this video, I want to
talk about pigsworse. Pigsworse can also
create videos, and right now it's
completely for free. After you have seen Bigsworse, I also want to give you a nice little outlook about two tools that
are really cool. Because until now, yes, you saw a lot of different tools that can make good videos. But the thing is these
videos are always short. Of course, we need tools
that can make longer videos, can make coherent videos, or can loop different
videos together. If you can loop different
videos together, you can also create
standing art. This right here is Pick worse and Pick Works Works really, really similar to
all the other tools. Here you can see some
of the generations. I think this is a
nice generation also. This cat looks, at least at the first glance,
really, really good. You can always crow
down a bit. Come on. This tiger is also nice, so you should totally look
about all these generations. This is somehow like maybe
a husky. They are cute. Come on. You can also
make realistic things. I think this woman
looks really good. Yes, maybe we have
a little bit of flickering going on
when she blinks, but also this bird
looks really realistic. Yes, even with fast
movements like this, you see this tool can
make really good videos. And the coolest part
is this is right now, at least totally for free. You can test all of this out. Of course, if you
want to recreate some pictures of here
or some videos of here, you can always press on them. We can press on this video and you can see it
here for yourself. I think the jelly fishes. Yes, they look awesome. The prompt is Jellyfish rises. This is a nice prompt. So this is really, really easy. You can go to create, you can upscale, you can retry, You can of course,
also copy the prompt, Copy the seed and the
strength of the motion. Now the thing is this is not from a simple plain text prompt, but this is from this picture. He uploaded a picture
and he animated these. You already know how all of
this works and you can also get stuff from stable video
diffusion that is similar. What I want to do right now
is to simply copy these. And then we press Go Create. And we make a similar picture, but we will do it
out of plain text. We don't want to include
like new images. Okay, right now this
image is included. You can see you can
always retry this, but I want to
exclude this image. I simply want to go to
text and of course, just like in Runway
and be aka you can always upload
your own images. But I want to go to text and then I can simply
insert my text. Jelevish Rises. Then we can use a
negative prompt. Let's just make it sim ugly, blurry And that's it. Come on. Inspiring
prompts to al clips. You can go with the mouse
always over these things, and you can read it yourself. By turning on this feature, your prompt will be
analyzed to find the most related and
appropriate prompts. You can include this. And then you get maybe a little bit better prompts and this gets completely
automatically update. I want to include this. Then we can also use a style, do we want to have a realistic style enemy three
animation and CG style of aspect ratio. I think I want to use
realistic aspect ratio in 16 by nine so that you can see it
better in this course. Then you can play with the. If you want, this makes
no big difference. But if you use, for
example, this seat. And then we press, we will get our nice little
generation of course. And then if we do this again, we can also make completely
the exact same picture, or the exact same video
if we use the same seat. But now I want to wait
until we get our output. Here we have our jelly fishes. You see the two pictures
or the two videos? I think at least they
look really cool. We have good movements, we have a really coherent
picture right here, and the same stuff also here. And we can make it be
the resolution is good. We have a little
bit of movement. So all of it looks really cool. I at least, so you
should totally try this web page out because on this web page you
can make videos, at least right now,
completely for free. And now I want to show you two tools that can
make longer videos, that can clip and loop
different videos together. The two things that I
want to show you are, first of all, and more
studios is really cool. More studios works really nice, but I don't have access. You should totally enter
your e mail address right here and just hope
that you get access, because more studios is cool. I want to show you their
introduction video right now. What's your AI Filmmaking
workflow? Text to Video. Image to video. Video to video. How about idea to video? Introducing Morph
Studio, an all in one AI powered
film creation tool with an easy to use
storyboard format. You can easily create
and edit shots together based on
text or images, and generate videos
in different styles. More studio helps you
connect your ideas, test different versions, and export to any post
production software. We believe in a
sharing community. Users can upload their
workflows to the gallery and allow others to access
them for their own projects. Welcome aboard the
ship to the future. Join the waiting list today. So you see more studio
is cool and you can expect similar stuff
out of LTX Studios. Also at LTX Studios, I have made it into
the wait list, but right now I can't get in. So you can simply press join the wait list and we
together hope that we can get access more
studios and LTX Studios. They are really, really nice. They are really awesome. There's a lot of demand
and I can't get in. As soon as I can get in, I will make updates
immediately in this course. I hope you get access. You should totally try this out. And if you don't get access, just play a little
bit with Pix Worse. Of course, later in this course, I will also show you
how you can edit your normal videos out of Pka, out of Moon Valley, out of wherever you want, with a nice little
editing program. And then you can also
string your videos together and make something
that is a bit longer. See you in the next video.
13. More Tools Overview, InVideo, Fliki, Kaiber, Lalamu, and More: In this video, I
want to give you just a quick little overview of some tools that are also
somehow okay, somehow nice. I have to admit it, there are so many tools out there right now and I really think not all of these
tools will make it. Some of these tools
will not be around in one year or in two years because
like there are too much. I don't think that all
of these tools can run profitably over time because they always need a lot of GPUs. The best tools they
will stay there, and the worst tools they will get washed out of the market. That's why I want to give you
an overview of some tools. I have to say it,
I don't know it exactly what tool will take off and what tools
will not take off. Because this is also
about marketing and about a lot of
different factors. But you need to try
this for yourself. You need to see
what's out there. And I think like
one or two tools that I show you right now, maybe they are not
around forever. One tool is in video AI. This tool is okay. You can use it if you want. You can simply go on their web page and
you can try it out. The second tool is Flicky. In Flicky you can make
also like similar stuff. Then in the tools that
I already showed you, there's also a demo. Like you can see for
yourself all these demos, I don't want to waste your time. Then another tool is L Lamu and Lala Tu is especially good
about Lisin technologies. But I have to tell you, I will show you something
for Lisin that is better than Lalamu and that is
completely free to use. The last thing that I want to show you, this is
really awesome. This is Kyber. I think Kyber will stick
around for a long time. Kyber was one of
the first tools, was one of the best AI
video generating tools. And in Kyber, we will
make a deep dive later because even Linkin Park has made their music
video with Kb. Of course later in the course, I will also show you how you can use stable
difusion like a pro. After that, I will also show
you how you can use Kyber. Because Kyber, this is
really, really good. This was just a quick
overview about four tools. I am relatively confident that Kibi will be around
for a long time. I need to be honest, I don't know if the other
tools are around forever, but maybe I'm wrong. Maybe one tool takes
completely off. And of course I will
show you that tool. And you know what, As soon
as we get a of course, I will update the course.
14. End of Section 2: Over the last few
lectures you have seen really a lot
of different tools. We started with the easiest one with stable
video diffusion. You can upload a picture
and you get a video. It's instant and it's completely
free. It's open source. You have seen Moon, well the AI and you can work
also for free. But in this court then
we have Runway and aka the two things are at
least right now, the big dogs. But of course you need a
subscription if you want to make a lot of stuff
in runway. And aka Hyper AI from Deep Mind
is also a nice tool. And right now it's
completely for free. Big worth works good. The cool stuff
would be of course, LM Studio and Morph Studios. I hope we get
access really soon. You saw also an overview
of some other cool tools, and especially Kyber
is a tool that we will take a closer look
later in the course. You have seen a lot
of different tools. I have something for you
that you should try. Just go in one tool, just 11, that you like
and make a video. You'll know that learning is doing and you get
better by doing more. Start to make your own prompts. Start to make your own videos. Just play a little bit around until we create whole
videos and we got into a completely
pro with all of these AI videos.
That's basically it. Just create a video. And in the next section
we talk about I avatars because also the
things are enormous. See you in the next section.
15. Section 3: AI-Avatar: This section is all
about AI avatar tools. We will look at the big players. And I have to say it right now, the biggest player, or at
least the best player, is right now, Hagen. Because you can clone yourself. You can make yourself speak in other languages and you can do a lot of different
stuff with Hagen. You should totally look
into the tool we take. Also look at DID synthesia Eli and
that's basically, these are the big players. Yes, there are a lot more tools, but these are right
now, the best tools. We will take a closer look why you should take a look at these. Because like big companies, they use these tools all the
time to save a lot of money. And maybe you should too
in this manner have fun. In the next video, we
will take a close look at Hagen because Ag is awesome.
16. Heygen!: In this video, I want
to talk about Hagen. Hagen is hands down the
best AI avatar tool. You can clone yourself. And you can let yourself
speak whatever you want, but you can also
animate pictures. You can make whole presentations for social media and
much, much more. And you can even let yourself
speak in other languages. All of this is really, really cool and you can at
least test it for free. Yes, if you want to make
more stuff inside of Jen, you need a subscription. That's the only downside
from this tool, but Hagen is awesome. Let's just take a look
at their website. Every single thing starts
right here at their website. If you go in the left corner, you see the use cases. You can make product marketing. You can also make
content marketing, learning and development,
and of course, personal videos you can see. You can make a lot of
stuff with this tool. This works really awesome. We have more features. We have AI avatars, AI voices. We can also video translations. We can make personalized
video streaming. Avatars are also a nice
little possibility. And we even have
say, beer included. If somebody works in say, beer, we can press
on the pricing. And that's basically the
only downside you see. If you press on this link, you are on this web page, you can start totally for free, but your credits will be
gone relatively fast. You can basically have one
free credit, one seat, 120 public avatars,
and 300 voices. Like I said, this is
the only downside. But you can update your plans, so you can make a creator plan, a business plan or
an enterprise plan. It depends a little bit
how much stuff you want to make and if you want to
pay annually or monthly. Of course, annually is
a little bit cheaper. You can always see
this for yourself. And I go back on
the main web page because here I want to
show you some cool things. We can here see in this demo
how all of this looks life. This right here is
the CEO of Hagen. So we can see how all
of this looks in life. If we press on these, hey there, welcome to Hagen, where you can easily create fun, high quality videos using
our AI advertiser invoices. In just a few clicks, you can
generate custom videos for social media presentations,
education and more. So you see this looks
really awesome. And if you scroll down
just a little bit, you also see that we can make
a lot of different stuff. And we simply press get started, and then I will show you
how all of this works. Of course, you need to enter your e mail address or you can also make your
account with Google. You have on the left side home, then templates, avatars,
voices, video and assets. And of course, you can
make video translations. This are really off webinars. You have, again, the pricing, the labs, the tutorials
and the news. So you can do a
lot of stuff here. You can also create
an instant avatar, but this is in the pat feature. And the instant avatars, they look like the stuff
that you see right here, for example, Matthew
or the Hagen CEO. All of these are AI avatars. These are clones
from their people. If you press on Edward, it looks something like this. Welcome to the new era of
video creation with Hagen. Simply type your
script to get started. You see these clones, they work really, really well. You can also make them in
portray or however you want. You can also, of course,
create an instant avatar. This right here is prices. You need an instant subscription if you want to create
your own avatar. But the thing that I love
most is the video translate. Just press on it, because
you can test these, at least right now for free. Here, you need to
upload a video. I just want to upload some simple words and then
we can translate our speech. We can simply press on what language this
guy should talk. In this example, me
like I normally, I speak German, I speak English. I also speak Italian. Let's just search
for a voice that I want to have myself, English. You can hear my
accent right now, so we search for French. Come on, I don't speak French. I have no idea if this
will come good or not. Number of speakers, we
speaker for example, and then we simply
press translate. This video, I have to
tell you right now. I personally, I
don't speak French, but I have done this
a lot of times, and normally we get output
that is really, really good. I have tried these with German, with English, with Italian. These are all languages
that I personally speak. Yes, I normally
speak just German. German is my main language. English and Italian
are not that great. You can probably hear it, but I have no clue how this
thing works with French. I can't really tell you if
the output is good or not. Maybe you can tell me if the
French speak is good or not. We press and
translate this video, you see it costs us
a half of a credit, and that's basically
half amount of the credits that you
have on this tool. This gets expensive
relatively fast. You can test just
for a limited offer. Let's just press Submit. And then when all is done, it's look something like this. You will get an E
mail in this email, you will have your video. You will get this e mail in
like five or 10 minutes. This E mail is of
course, from Hagen, and we can simply press
on our video and see how all of this looks
right now. Video. So video. So maybe you can
tell me how this is. Yes, I think it's French, but I have no clue if
this is right or not. We just need to believe it. You can also of course,
download this video. And I would assume that you should download it
because you have not unlimited things here to download. Let's just go back. You see also that
you can of course, make a lot of different
things right here, you can always press on
photo avatar, for example. Here you can use
different avatars. You can use Felix or Elliott
or whoever you like. You can make whole
presentations. You can also go on
this templates. And here you get
complete templates. And you can simply see for yourself if there is something
that you really like, that you really love. Let's just press on
this business report. And then I want to edit
this business report a bit. You can always look for yourself
how all of this sounds. Welcome to this versatile
business presentation template. Use this introductory slide to present your company and
individuals involved. I think this looks relatively
good and of course, we can edit every
single slide of these. Let's just add it to this stuff. We are here in this editor and
we can animate everything. We can move him
around, for example. And we can not only move him, we can also move
the text around. And we can, of course, also insert other stuff. And you have just a
normal video editor where you can simply
delete all what you want. Let's just place him in the right corner and delete
this business report. Let's assume that
you want to make something in German,
We'll come in. This means welcome, like nearly as in English,
your company. We can also delete maybe
your company and say Nadu. This means hey you. You can simply
insert all the stuff that you like and you can
even change the speaker. So let's just say you
want to have Brianna. And then you can simply
click on her and insert her. And this whole presentation
will look relatively nice, at least in my mind, because we can edit every
single slide that we want. We can insert everybody
that we want. We can make all of this
customized to our content. It all depends on what you need. You can give titles. You can give subscriptions.
You can edit stuff. You can insert text. Here on the left
side you see You can insert also different text. So different styles, you
can insert elements, you can insert stickers,
icons, images, videos. Let's just throw this
dicktok thing in here. You can make it bigger or
smaller or whatever you like. This right here is like
a **** slide from God. You can also go back, of course, let's just assume that you
don't like this at all. Then you can always see
for yourself if you find other templates or
maybe other avatars. Let's just assume you want to make something completely new. Let's just see if we
find someone here. I think we should use
Elliott AI marketing. I think this guy looks awesome. Edit avatar and we
can create with him. Now this thing is inserted
and we can also edit him a little bit if you want him square or maybe in a circle. You can edit every single
thing how you want it. The speaker is
Sarah, right here. I think this is okay.
So we save this. Now we have Elliott saved, but the speaker is
Sarah, of course. I think this should be funny. We press on him and
make create landscape. I want to have the 16 by nine, then we get back in our studios. And here we can insert every
single thing that we like. We can go to script. Here you can see the script. The script is welcome to the new era of video
creation with Hagan. Simply type your script to get started of this will
be set by Sarah, even if this Elliott
guy is a male. But you can of course, delete all of this and make
it how you want. Let's just listen
to him or to her, however you want to call this. Welcome to the new era
of video creation. I think this is funny. Come on Sarah, as
Elliott is really good, but of course you can
always delete this. You can, for example, delete the text right here and insert the text
that you like. Of course, simply delete it. You can also use like not Sarah, and let a male speak. You can customize all of this however you want to
customize these things. If we go back one more time, you see you have a lot
of different speakers. And the cool part is you can also upload your own
photos if you want. You can make everybody
speak that you want. You can even use
like, for example, pictures out of a
diffusion model, out of mid journey
stable diffusion, firefly or something else. And we have also I scripts. The AI scripts are really nice because they are enormous
easy to use here. Works sketchy between
the background, we type in a topic
Telestar Hagen aven solte. This is completely
German erstellen script. Um Hagen vendenzolte. This simply means make a script. Why I should use Hagen? And of course this is in German, but you see this LLMs, they can of course, use every single language
that you want. We can simply use that language, so it's of course
German. What's the tone? Should it be professional? Just okay, and press Generate. And then we get a
complete German text and with seven sections. And you can use every
single section, You can simply
press Create Video. And then you have every
single thing also in German. Even if you don't speak
any word in German, If you press Create video, we will have every single
thing here inserted. And the speaker speaks,
of course, German. Right now, you don't
have to speak German for yourself because like this tool can make all of this in German. You can always edit
it how you like. You can insert, for example, like the speech view
or whatever this is. Yes, I think a beach view. Let's just make it
a bit bigger if you want to insert
this right here maybe. And also like a Whatsapp sign or something else like
this businessman, this German businessman is
always a viable at Whatsapp, even if he makes vacation. And he will tell you that
he is always a viable, like the Germans here. And of course, you can press
on instant avatar and you can create such things
like the gen coded. But in order to do
that, you need, of course, to press
create instant avatar. And this is a paid feature. This is the only downside. I personally, I don't
pay for this feature. I had this feature, but I don't see myself
using this feature a lot. But I need to show
you this because this is the best AI feature. When we talk about AI avatars, Jen can create all of it and
you should know about Ag. And, and you can test
it completely for free if you want to make a
lot of stuff inside of Ag. And of course you need
to pay, by the way. Later in the course,
I will also show you a free cop notebook where
you can also clone yourself. Where you can insert
different voices into different bodies,
into different bodies. All of this can also work
completely for free. But of course if you want to create such an AI
avatar with yourself, you can totally do this. You press Create instant avatar. Then you need to upload at least 30 seconds of voice
and video from yourself. You press Create,
and then you get something that
looks exactly like the Hagen CEO or like Edward and Blake and
Matthew and Lea. And you can simply
make yourself into such an AI avatar and
you can make text. And all of this will look
like you would speak, Yes, this works relatively nice. And after that, you
have your own AI avatar here on the left if you
really want to use this. In this video, we talked
about Hagen because Hagen is the best tool if
we talk about AI avatars hands down, the best. But it's not cheap. That's the only downside. But you can test it for free. And I think you should
totally test it if you want to create
content for social media. If you need to make like
videos for your employees, if you want to make
like something funny, maybe you want to tell your wife or your
man happy birthday. In another language, you can do all of it
inside of Hagen. You can test it for free. But like I said, it
gets a little bit expensive if you want to do
a lot more with this tool. So have fun trying this out.
17. Overview of the Most Important AI Avatar Tools: D ID, Synthesia, Elai: We have a lot of
different AI avatar tools out on the marketplace. We can use most of them in
almost every single tool. You can make something for free, at least a starting trial. You can in most tools like five to ten generations
completely for free. In this video, I want to
give you a quick overview. Did you see, first of all, of course, what's on the market? And second what you can
and probably should test. I want to show you the three
biggest tools right now. Did synthesia and
maybe also Eli. These three tools are
right now after Hagen, at least the best tools, if you talk about I avatars. The first tool that I want to show you is called Synthesia. At Synthesia, you can make
similar stuff then in Hagen, but the only downside is
you can't clone yourself. You are limited to the
original AI avatars. Here I want to show you
their quick introduction. Hey, I'm Alex. One of over 160 AI avatars
available in Synthesia. In a few clicks, you can create a free video
just like this one. You see this is like
the quick introduction. It looks relatively nice. Everything you have to do is
to press create an account. Then of course, it depends
what you want to do. You can make a starter
kit for $20 a month. The creator kit for
nearly $60 a month, And an enterprise plan. But of course, you can test
every single thing for free. At least if you start out
here on this web page. In order to do
that, you can go on to features and of
course the use cases, They are similar to Hagen Learning and
Development, Sales enablement, marketing, information
technology, customer service,
service or enterprise. If you press on all features, you will see what we can
create inside of Synthesia. Right now, my credits
are gone for Synthesia, but I want to show
you a video that I have created a few days ago. Kinzgndoibstst videos
are heightened. You can see this
comes from Synthesia. The generations are completely
the same as in Hagen. You simply type in
the text that you like and you can
use their stuff. The next tool is DID, DID. I think it works a
little bit better. You simply go onto ID. And here you can see
every single thing. Also here you can
start a retrial. And here you can also animate
like your own AI avatars. You can also make
a picture like in michen or from another
diffusion model, and you can animate it. Here you have a nice little
small introduction video so that you can see how
the stuff from DID looks. Creative reality studio
saves businesses money, time and hassle, and makes videos and presentations
more engaging. Making videos has always
been complicated. But with creative reality
studio, it's simple. And anybody, anybody,
anybody, can be a presenter. Choose from one of 270
voices across 119 languages. Just upload an image,
add your text, and in moments you'll have a video ready to
download or share. Start your free trial and superpower your
training content, presentations, sales,
marketing and more. That's basically, you saw every single thing that
you can do inside of ID. In this small little
presentation, everything you have to do is to simply press, Start free trial. You can type in your text
just like you saw in the presentation and then
you have your AI avatar. Yes, I have to tell you, all of this works in Hagen. A little bit better,
at least right now. Welcome to the employee
assessment training. My name is Ava, your AI trainer. The last thing is li at ALI, you can do like the same
stuff as in synthesia. And the DID, if we press
play on this button, you'll see in a quick glance
what this is all about. Welcome to L. Have
you ever imagined being able to create amazing
videos with real people? Now, with the help of AI, you can create
engaging videos with the real presenters in
minutes just from text. Say goodbye to costly studios
equipment, and real actors. Just follow these three steps. Choose a presenter
from the library, add some texts and
visuals for slides, and here we go, Hey, my name is Cody and I am your
digital video presenter. You can also create videos
by simply leaving a link to your blog or website using our generate
from text feature. And here is your result. Videos that don't
get many views or engagement need to be
promoted in different ways, such as through social
network postings or e mail campaigns. Moreover, you can create
your personal avatar and use it in hundreds of videos
in more than 65 languages. This is how your CEO can
speak multiple languages. I can now speak
Spanish, binaries, and can say hello to all my
French customers interested. Sign up and try it for free. Now, bye bye from Eli. This is how I sound in English. What do you think you see? Also, Li or li? Maybe I have pronounced
it wrong previously. Can do such videos. These AI avatar tools are here and I think they
are here to stay. I don't want to bore you, that's why I just took you to a brief overlook over
all of these tools. They all work like
nearly the same. You chose a character or your upload a
character yourself, then you type in text and you get your nice little AI avatar. And you can always make slides. I have showed you every
single thing in Hagen. I think Hagen is the real deal. I think Hagen is the best
tool at least right now. And all other tools are behind Hagen and they work
completely the same. That's why I don't want
to steal your time. So just try one of
these tools out and I think you can create
standing videos. And if you want to be like
really, really smart, go into Hagen DID Synthesia and Eli and make all
your three generations. And you have like 20 or 30
videos completely for free. Just make an account. Type in your text and you're
ready to rock.
18. Case Studies: Why You Should Use AI Avatars: Maybe you ask yourself, why I show you this
AI avatar tools. Let me tell you. They
are not just a joke. And the biggest
companies on Earth, they use these AI avatar tools and they save money with these. Yes, you can build also a social media brand
with these tools. You can create
videos for yourself. Or if you have a business, they can help you scale
faster and save some money. Let's just look at some of the case studies from Synthesia. And of course all of this is for all these
AI avatar tools, ID, Hagen, and so on. But Synthesia has
nice case studies. They have over 1,000 reviews, 4.7 out of five
stars in the case, that is delucoson BS H develops 70% more
efficient trainings. If we press on this link, you see the following. If we scroll down, you can see it right here, that BSH is the largest
manufacturer of home applications in Europe
with over 60,000 employees. One of the leading companies
in the industry worldwide. If you scroll down a bit, you can see how
all of this works. The challenge science SH, is a global company with knowledge spread
across the world. Sabina and her team
wanted to ensure that everyone in the organization had access to that knowledge. However, it was important
that this was done in an efficient way to
make expertise a Bible. Regardless of time and space, dedication of learning
was an obvious choice. The team at BH
didn't want to rely on boring PDFs or slides
to click through. And then they took Synthesia. You can see it right here. They wanted to make videos. Normally, videos cost a lot
to make you are not flexible, and the translation is, of course, really hard to scale. Then the solution was
simply Synthesia. She created a script, then she inserted
it into Synthesia, chose a navatar and basically added some
slides, and that's it. If you scroll just
down a little bit, they have reached over 30,000
views with the trainings. They have over 30% increased engagement
in this E learning. They saved 70% in
production cost. So this is really awesome. I think all of these companies
will use such tools. And of course, there are
like a lot more here. We have Xerox, we have Zoom, we have also U, we have Latam, we have Sim Corp. Let's just take a look at Sim
Corp, for example. They have over 3,000 people and they are in the
investment space here. You can always read the
challenge resolution and so on. So they simply all save
money with these tools. They make stuff five x faster. And that's of course,
enormous, even zoom. I think everybody knows zoom, or at least most of
the people know zoom. Zoom is a big company, it's even publicly traded. All of these companies, they have saved time like up to 90% You see this
is really, really cool. That's why I also show
you the AI avatar tools. Maybe you have a Youtube
channel or you want to start a Youtube channel
and you want to make education on
your Youtube channel. These AI avatar tools can really help you if
you have a business. They can also help you. They can help you
in a lot of ways. You need to be just a little
bit creative and I am relatively sure that you can create some videos that
will help you out. Use Hagen use. Did use synthesia. Use Eli. I think most of
these tools work fine.
19. Recap of Section 3 and a bit of Homework: Over the last videos, you have saw the best
AI avatar tools. We started with Hagen
because Hagen is awesome. I gave you detailed
instructions how to use Hagen and then
we took a brave look in DID synthesia and also in Eli because all
of these tools work. Similarly, we just
took an overview. You have also seen
that big companies save a lot of money
and so should you. And maybe you ask yourself for what you should
use these tools, you can use them to boost
your social media reach. You can use them for SEO. You can use them to make
like product descriptions. Maybe you want to sell a watch. Just use such an AI avatar
tool to describe your product. You need to be a
little bit cautious. You need to think for a moment, but I am relatively
sure that you will find the right
place for these tools. Just think for a moment, Where could the video help? Maybe the AI avatar tools can help you generate
your perfect video. Maybe you also understand what learning is learning is doing. And you get better
by doing more. I would really recommend
you to just go in one tool and make
a nice little video. Do it just for fun. You also remember
that sharing is caring and that we can
learn better together. Do me a favor, just share this course with one
of your friends. If this course helps you out, I am relatively sure that
this guy will describe the value that he gets out from this course to you
because you told him. So the status of you rises. I think this is a win win win
situation for me, for you, for everybody in this community, and especially for
the guy that you sent this link.
Thank you for that.
20. Section 4: Ai-Video like a Pro: This section will make you in AI video pro because you will learn the most advanced
features tools and much, much more how you can create
standing AI art or I videos. You will learn what Github is because on Github we
will borrow some code. We need this code to
run it in Google Cop. You will also learn what
Google Cop is because we use Google Cop to run the code
to create our videos. As soon as you know what
tab in Google Cop is, we start with the coolest parts, because we will also
make deep fake. So you learn how to
deep fake a voice. You will learn how you can
use a to Lip in Google Cop. This is completely
for free and you can make lip sync just
like in collapse, but like I said,
completely for free. Unlimited generations. We will do complete face
swaps of our AI videos, of course also in
Google Cop and in art because C art is
completely awesome. And right now also
for free to use, all of these tools work
with stable difusion. So you know, all of
this is open source. Then we will take a look at two of the coolest
Cop notebooks, the Forum Diffusion
and stable P Fusion. Also the two tools, the two extensions work
with stable diffusion and you can make
amazing animations. With these tools, you can
change your videos so you can overlay it with prompts and you can do
enormous cool stuff. You can even download your own Lauras and
make enormous videos. All of this will be awesome. I think you will
even learn how to create your own AI music video. And of course we will also take a small look at Kyber
because also Kyber is, first of all, it's
an alternative. It's easy to use but
you need to pay. But I think Kyber is also cool. You learn some valuable
stuff in this section. I hope you will
look through this.
21. Introduction to Github: The next web page I want
to show you is Github. And Github is awesome at Github. There are a lot of developers, it's something like a community. A lot of developers
share their code, so Github is just
like a library. We can go and borrow code
from good programmers. I myself, I'm not a
good programmer and for that reason we can also
borrow some code from Github. There are a lot of cool people and they are doing
amazing stuff. They put together
entire Colab notebooks and we can work with
them totally for free. More on Google Cop
of course later. But in this lecture we will
make an account on Github, because you will
need this later. Github is an absolute
amazing web page typing Github in Google and
press on the first link. Most likely you will be on a web page that looks
something like this. And of course you
need to sign up with your e mail address or you
can also sign up with Google. Please just click sign up. Then you need to follow
all the instructions after you have created
your whole account. The web page will look something like this here on Github. We can do a lot of
different stuff. Just take a look at the whole web page
in the left corner, you press on this button, You can go to Home Issue, pull, request projects, and so on. If you simply press on home, this is the web
page where you are in the right corner. You can also search for
specific projects if you like. You can create new projects on this button if you
have some issues. This is the button for
you pull requests, and here are the notifications
if you have something new. If you click on this
Explorer button, the web page will look
something like this. And here you can
search for the newest, hottest topics on Explorer. There are always some cool
videos and much, much more. You can go on trending and find the trending new stuff from all the programmers
on this web page. So for example, movie, web, and much, much more. You can search for the
collections for topics. Just take a quick look
at this web page. And if you are a little bit overwhelmed right
now, don't worry. Because this is just the
introduction to Github. We will use Github later
and just to search code, so you don't need to worry to do anything fancy on
these web pages. We simply search for the right cop notebooks
later in the course. But I think right now is the right time to
introduce you to Github, because this is a lot
easier than it looks. We just need to try to search the code that we will use
inside of Google Cop, because we also talk
about Google Cop. I will show you what
Google Cop exactly is. In the next video, we will
combine Github and Google Cop. We simply search for
Cop notebooks on Github and we can run
this completely for free. That's awesome. See
you in the next video.
22. Introduction to Google Colab: In this video, I want to
introduce you to Google Cop. I already told you quickly
what Google Cop is. Google Cop is simply the
cloud solution from Google. They borrow us some
GPU and CPU power, or even TPU power, to make it easy. They simply borrow us some
power that we can run code, we can run different code so we can run code to make pictures. The pictures need a lot of power or a lot of GPU to render. And all of this code we
can have from Google Co. If you ever wonder what code you should run in Google
Cop, of course, you can either borrow
your code from Github, you already know what Github is, or you can make code
yourself in chat GPD. Give me the code for
Snake for example. You can of course
write code in chat PT. Like no, this is not a
complete course on chat ChpT. I just want to give you
a quick overview here. You get code from chat PT. You don't need to understand
all of this code, but you can totally
make code inside of chat chPT and we can
run this in Google Cop. Like I said, this
course will not be about installing Python or running snake inside of Google Cop or playing
games with Google Cop. This is just an example
because later we just borrow all of
this code from Github, because on Github are
such nice Cop notebooks already completely done so that you don't need
to know all of this. I just want to show you what Google Cop is in this
nice little lecture, so don't worry about this code. This is just an example. Now let's just take a look
what Google Cop is in detail. You can simply Google Google Cop and then press on
the first link. And something like
this will open up. I use a lot of different
Google Cop notebooks and we will take a closer look
at Ats of Google Cop. But first you can see what
Google Cop is exactly. For that, we simply
press new notebook. Yes, this is German,
but don't worry, Simply press new notebook, and then you are in an empty
notebook. There we are. And here you can see you
have basically nothing but in this environment you can run everything. Here works. For example, Biton
code and much more. Everything you have to
do is to simply include the code into the small
cells and then press play. Right here we go back into Chachi PD because we
already have code. We have code for
Snake right now. We also need to
install this Pi game. We copy the code. We go back into our Google Colab notebook. Here I include the code, and then I can simply
press run on this cell. And we will run this cell, and everything
will get installed into this small Google
Colab notebook. So first you see we
have here some Rams. And we need, of course, to connect to our Rams
Right now it's connected, and requirement
already satisfied. So Pi game in and so on. So everything is installed. Right now, we have
installed our Pi game. We use the GPU from
Google to do this. You can see right now, this
is completely for free. Yes, you can update
this if you want, but for now we work with
the free stuff here. The second thing we can do is to simply press code
in the left corner, and then we get our second cell. In the second cell, we
can execute our code. First, we have
installed some stuff. I click copy code, We go back into our notebook, and then we include
our code right here. We can simply press play on this button and the
code will get executed. And now the code did its job
and we only get a linch. Why we only get a linch? Because in Google Cop you
can absolutely run code. But you can't make this because you need a desktop
variation of these. You can go on this link and you can see everything
yourself right here, if you want to make a
desktop app out of these. I just wanted to show you how
to run code in Google Cop. If you want to have code that
is working in Google Cop, of course, we can also do that. We can make, for
example, another code, give me the code for
guess the number, and there we have the code
for guess the number. And this can absolutely
run in Google Cop. We go back into our
Google Cop notebook, we can simply delete
all of this code. I think we have also
no problem if we use these cells right here or we use a completely new notebook. Now for guess the number, we don't have to install anything into this
Colab notebook. We can simply include this code right here
and press Play. And then the code
will get executed, and then we are ready to play. Of course, we need to
connect our Ram first. And here we have
our little game. So guess the number 1-100
Let's just do it Strategic. I use 50, okay, This is too high. So we do it. Strategic Again, we
do 25 too high. 13 too high. Again, seven too low. It's 7-30 And now we just need to try.
And there we have it. Congratulations. You
guessed the right number. We have made our
small game in Python, and we let it run in Google Cop. In this video, you have
learned what Google Cop is. Google Cop is simply a
cloud solution from Google. They borrow us some Apu power and we can run code
in this environment. This is especially
cool because we can also borrow code
from other people. You have seen how to run this, so we can include code
and then press Play. And then we can make new
cells include other code, and press Play again. And we can do this
over and over again. This right here, for example, is the Google Colab Notebook. That's called the Forum
Stable Diffusion. With this cool notebook, we can make pictures first. This seems a bit overwhelming, but don't worry, because we
will do this step by step. This is easier than it looks because we can't just
borrow all of this, so we don't have to
type in a number. We can simply go into this notebook and
fill out everything, and we get this
notebook from Github. And that is the synergy
of all of these. So you can go to Github and simply search for
Google Cop notebooks. If you press on these
and you search, for example, for
devorum Google Cop, you will find a nice little
Google Cop notebook, and you can press on the link, and then we can run the code
in a Google Cop notebook. Here we are again. This
is also stable diffusion. The Devorum version, we can simply search for code on Github and we can find dire
Google colab notebooks to run the right code. Again, in this video, you have learned what
Google Cop Notebook is. It's from Google. You can borrow GPU and you can run code. The coolest stuff
is that we can also borrow code from
Github and let it run. We can simply press play
on this button and we don't have to write a
single line of code. That's the bower of Google Cop in
combination with Github. That's the synergy and that's why I showed you both of these.
23. Stable Diffusion [Wrapfusion] in Google Colab: Stable rape fusion. That's also a cool tool
that I will show you how to use in this
course, step one. Of course, you know it, you need a file. We do basically the
same stuff as soon as the frame comes around
where we want to transform. I cut the video
and then I extract the part where I want to
be transformed afterwards. Of course, I go one step back, because we need that later. Now I have the file. I put it simply into a folder because we
need that file later. The next step is we
need to go to Patrim. We work in a Cop notebook, But the Cop notebook we will get only access if we subscribe
to someone on Patri. He give always the
newest versions and he gives tips and so on if
you have any problems. There's also a discord
server for me. I think this is really nice. Here I am into patrian and the name of the
guy is X L E L A, or most likely L
x S. If you read it from behind, he
is really active. He gives some updates
every few days. And right now we are in version 0.20 That's only a preview. We need to be a power member. If we want to have this, I'm not a power member, I just spend that
$1 But we can have stable B fusion version 19.8 You need to download
your version that you like. Sometimes the newest versions
don't work that well. A version that I always
liked using was the version 0.16 You can also simply
press on this file. If we press on this file, you can download it
on your computer. The next step is to click
on the Cop notebook. I will link you everything. This right here is
a normal notebook. You need to go to uploads and
you need to find your file. Right now I use version 0.16 because this works always,
really, really nice. We upload here our version
and then we are ready to go. Now this cop notebook, maybe looks a bit overwhelming
because it is really, really big and there's
code included and so on. But this is really easy to use. We don't have to do a lot. First step, I like
to go to run time. We need to make sure that we use GPU and I like to
use a stronger GPU. So change run time. The version 100 U works fine. Also the 100 U works
fine, this works for me. If you use four U, this will take like forever. Then we scroll down to set up. We need to press play
on the first cell. Of course, we need
to give permission because this will get
access to our Google Drive. We give permission right here. Then we need to
scroll down a bit. We need to go to basic settings. What's the batch name? We just call this test. But we've do these
because I think I already have a test then. What's the width and the height? Simply the resolution. My video is in 169. This resolution
works fine for me. Now we need to go to
Video Input Settings, and of course, we need
to give our path. We click right here as always. Then we can upload
our video right here, or we can even upload
it in our drive. But this right here
works fine for me because I just want
to make this video. I don't want to have
this in my drive. This is totally fine for me if it gets
deleted afterwards. As soon as this is uploaded, I called it wrap me, we press the three dots. We press copy path. We delete this path right here and we put our path
here in this field. This field is the next
important field, extract frame. If we put one right here, every frame will get reworked. Every frame will get extracted and reworked with our
prompts afterwards. If you put two right here, the video will rendered in
the half amount of the time, but I want to have every
frame rendered in this video. Then we scroll down if you like, you can store every frame
in your Google Drive, but you don't have to do that. But I'd like to do this if we want to work in
Blender afterwards. For example, after that
you can scroll down even further until you get
to this code here. It's also really easy. Everything you have to
do is instead of CPU, we use CPU in this field. He is Model path and
control net models. These are simply
the default models that we have right here. I want to make the
short and easy. So we use the default models, but you can also go to Cvti.com if you need to
have a specific look. You can download models for
free right here on CVI. Upload them into
your Google Drive, and then you can give the path to the model
that you uploaded. But like I said, I want to make the
short and easy. We use the default models,
that's basically it. If you scroll down
a bit to non GUY, it comes right here. You can also delete the prompt
and use different prompts. But right now I want to use the default prompt because we can change the
prompt afterwards. Everything we need to do right
now is simply run and run. All now the Cop Notebook
will do its stuff, but this takes a bit of time. If you scroll up to the top, you will see that every cell will get automatically
activated. The Colab Notebook
does simply stuff. It installs different
stuff, it downloads stuff. This takes a while. This took about 5 minutes. If we scroll down,
you can see that the program is doing
his stuff right here. So it extracted some frames. And then at some point, you will see a preview
under the cell. Do the run. This is the cell that is nearly the last cell in
this Collab Notebook. If you like this
output, perfect. If you don't like this output, you can press Stop right here. Then you can scroll up until you see here
the prompting box. Until you can put whatever you
like in the prompting box. You simply include the things that you want to
see in this prompt. In the negative prompt, you want to include what
you don't want to see. Text, naked, nude logo, cropped to heads and so on. This works all
really, really good. I think this cyber bunk look, I really like this. I want to transform
in such a cyberpunk. The only thing that I want to change is I don't
want to be a woman, I want to be a man. Remember, you can
always copy prompt. You can ask Chachi BD for stable diffusion
prompts and so on. So now we press play again. Down here we have
another prompt. Now the only thing
that we need to do is press Play
again, right here. And then we should transform
into a Cyberpunk man, instead a cyberpunk woman. And perfect. Now this works
really, really fine for me. As you can see, now we turn
into the cyberpunk man. You can also see this
takes a lot of time. I think this will take maybe up to an hour because
this is not accurate. Sometimes you can
really wait a lot. These are right now, 142
frames, just from experience. Sometimes you need
to wait for an hour, you need to drink a coffee. You can see right here all the images they
will get stored into my drive content
drive, my drive stable. B, Fusion images out, I go into my drive, now I go into AI stable be fusion images out
the test order. Here you can see
the frames come. Now we have now our
third or fourth frame. And the frames will be
collected in this folder. But we can also make
a video as soon as all of this is
done. I see you. As soon as the
video is rendered, just make a coffee. And now we have it. This is right now,
the last frame. And now we want to create
our video from our frames. All the frames are now also collected in
our Google Drive. And we can also use the frames and put them in
Blender, for example. But I like the
easy way I want to create the video inside
this cop notebook. That is really easy. All you need to put right here is the right frames per second. Remember, if you have
a video with audio, it's important that you use the same frames per second
in this video right now. Because if you use a higher
or lower number of frames, the audio will not
be synchronized. My video has 25 frames, and for that reason, we need to put 25
also right here. Then we are basically
ready to render. We click Create Video right
here, and then we go. But I already showed you
how you can do that. Simply press play and
you will get your video. In this video, I will
show it in Blender. We need to go into our drive. We go into our folder
where all the frames are. I want to delete
the first frame, and then I download
all of these frames. These are 141 frames. If we scroll down, I already downloaded them and
I saved them into a folder. Remember, you don't
have to do that, but I just want to
show this in blender because I think maybe it's
valuable for some people. Then we go into blender. We need to make
sure that we go to the video sequencer and it
all should look like this. Then we aim for a resolution
that is perfect for us, 1,900.25080 is perfect. The frame rate, I
set it to 25 frames, just like I told you, and the
output should be a video. Now we press Ad, and we search for our frames. We press image or
image sequence. We need to find them. So these are our images. And if we press A, all of them get selected. Simply press A on
your keyboard and then press a image strip. Now they are basically all
added into your blender. Then we need to make sure
that we save them in appropriate way so you can
leave them into this folder, or you can create
a new folder right here or search for a
folder on your desktop. Just do how you like it, Maybe we do it into
perhaps accept it. Then we need to adjust
our frames right here. Frames start, one is okay, but the end is at 141. And the last thing we want to do is into the
left corner press, render and render
animation here. You can also see the process, if you like, I will see you
as soon as this is rendered. This is normally relatively
fast and now it's rendered, everything will get
automatically into the folder that we
set, the folder wraps. Just remember, you can also do this directly in
the Cove notebook. Just press play. But I think for some people it's may be
cool also to know blender. The next thing is really easy, we go back into shortcut. We include our video right here, and then we just throw
it on our time line, directly over our video. And it's basically done. You can see, as soon
as I clap right here, the next frame steps in, and I will get into this
cool animated stuff. Let's take one
less look at this. I think this is really good. Perfect. Now we want
to export this, and basically it's done. In this video, we took a
look at stable web Fusion. It's a Cop notebook behind the Colab Notebook
Works Stable diffusion, it's relatively easy to use. Just use a video clip where you want to overlay your prompts. As soon as you have
found your video clip, you need to go into
the Colab notebook, but you only get access if you download it from
Axle on Patrion. As soon as the
notebook is opened, just connect it, press
a few play buttons. If you really like, use
different models from CV Ti and then you
simply press all, of course give the
paths and so on. Just like I told you, this will need a bit of time. Maybe you need something like an hour or so
to render these. After it's rendered,
you can make a video of it directly into
the Cop notebook. But in this video
I wanted to show you that it's also
possible in Blender, you can download all
your frames and you can make your frames into a
video also in blender. Then we just throw
it into shortcut. And it's basically
done relatively easy, but you need to do a few steps. You need to go to Patrian. It's a bit of work, but thanks to this
tutorial, it's easy. And remember, as soon as it starts to render
your first frame, you can always post this
and adjust your prompts. You can put anything that
you like into this prompt. You can also transform,
for example, into a turtle or whatever
you like. Just try it out.
24. Overview of Deforum Diffusion to make Ai Animation: I have to tell you right now, this is not a complete course on the forum stable diffusion, because the forum is a really big extension
on stable diffusion. But I need to include the coolest stuff about the
forum stable diffusion. If somebody has more
questions, just hit me up. I have also a whole course on
the Forum Stable Diffusion, where I go in detail on every single step
in this notebook. But like I said,
I need to include the coolest stuff
inside of this course. I think if you just try a little bit with
different parameters, you are also able to
create standing AI videos. Even if you just look
the next few videos. Now, what is the forum? You already know what
stable diffusion is. Stable diffusion is
the open source model that will create pictures. For us, the forum is
similar but different. The forum is simply
an extension that runs on stable difusion
with the forum. We can create a lot
of different frames, and if we use a lot of
different frames step by step, one after another, we can create whole videos
with stable difusion. I want to show you how we can create music videos
with Devorum difusion, and also how we can create animations with
Devorum Difusion. I have to admit that
this is not so easy to use and you need a little bit of time to render all of these, but it's completely awesome. So in this video,
I will give you a quick overview of
this Colab notebook. Then we will create
a small music video, and after that we will make
a small three D animation. Like I said, you need to try
with these a little bit. I would assume that this gets also easier to use
in the future. Let's just see what
we got right here. We have a cop notebook, and of course all of this
works completely the same. You need to make sure that you connect to the right run time. It would be if you are
in a three cop notebook, as always, the run time t four, just use the three version
and connect with it. As soon as you have chosen
the right run time, you need to press again
on run time and run all. Now every single cell will
get executed right here. This notebook will ask
you a few times if you want to give permission to
use the code from Github, and if you want to connect
your Google Drive, you need to give permission. If you give permission, a folder that it's called, AI, will be automatically
created in your Google Drive. If you press on this folder, there are all the models
and all the stuff. All of this will get
downloaded completely automatic here in this
nice little folder. You can also upload
stuff yourself. You can upload, for example, screenshots here, for
example, a few screenshots. I use the screenshots to
start my animations because later we need to give a
path to our screenshots. You need to upload your
screenshots right here if you want to make advanced stuff
right here in this notebook. If you want to make animations
out of your own frame, you always need to give the
path to your screenshot. Of course, you will learn later where to give your path exactly. But first before
you give your path, you need to upload your screenshot right
here in such a folder. That's basically it. That's the standard
thing that you need to do before we can use
this coded notebook. Now let's take a brief look on the interface because
I want to give you a quick overview before we start with our first generation. If we scroll down a
small little bit, you see that we
use a Nvidia GPU. We use the environment
and we have the set up. Now, you know, every time we
press play on such stuff, we simply start to
install different things. The default settings work
really well in this notebook, but you can do a lot more. You can press simply Play step by step in all
of these cells. The Model Path is just simply
the stuff that you use. Of course, you can also give permission to
your Google Drive, you have to give permission
to everything right here. The model set up we use Da. This right here is
the inferience. We use a model checkpoint
that is automatically set up. This protogon model
works completely fine. It's easy to use, of course I have to tell you, you can also use other models. In this Colab notebook, I would assume that you should start with the default settings. If you scroll down a little bit here you have the stuff that you can and probably should
change the animation mode. If you press on it, you can use 23d Video Input and
Interpropolation. If you use two D, you make
simply static animations. You animate frame by
frame, just normal. If you use three D,
you can activate camera movements that go
in every single direction. If you use video input, you can make similar
stuff as in B Fusion. But I have to admit, B Fusion works better
if you use video input. And this right here,
I don't use it, this doesn't work that nice. Here you can type in how many
frames you want to create. The border, we always
use this at replicate. Then we have the
motion parameters. This right here is the angle. If you animate the angle, you can rotate your animations. If we use the zoom, we can zoom in or zoom out to
our animations translation. X, yz3d is three D rotations. They are also cool
because on X and Y Xs we can simply go up
or right and left. The translation said,
this is the zoom. If we use the three D animation and then we have the rotations. The rotations simply rotate as you can probably think
if you use this, don't worry, I will give you a blueprint in the next video. Every other single
thing right here. You don't really need
to understand this because the default settings
work really, really well. Like I told you, this
course will get much too big if I include every
single thing right here. But if you want more info, just hit me up and I will
include more lectures. If somebody needs to
learn this in more depth, then we can scroll
down even further. Because here we have
the prompt here, we need to type in
what we want to see. For example, here you see zero double point,
and then a prompt. Now if you type
in here a prompt, you will get this prompt executed from frame
zero until frame ten. And of course, you can also
include negative prompts, as you always know
in stable difusion. Now you can new
stuff right here. You type in the frame number and then simply include
the new prompt. For example, do we have from the frames zero to
ten a beautiful lake? Then we start with a
portrait of a woman, and then we start with a dog. This right here is
how this works. Then you go down and we
have the load settings. On. The load settings, we can work with the
default settings, no need to change
stuff right here. Then we have the
image settings here. You need to give width and
height to your resolution. 512 x 512 is of course
a square image. The bit depth output, we simply leave it at eight. We can play with the set
if you want the sampler. I always work with oiler. The steps work
really fine at 50. You can also go down the
scale at 70 is perfect. Then we scroll down
even more here. You can give a batch
name, stable fund works. So you can also work right here with the default settings. Then we have the set behavior. You can use it, but you
can use a fixed set. If you use a fixed seat, you need to change this number. Minus one is always
a default seat. You can use, for example, a set. If you use fixed set right here, you should change this number. Then if you scroll
down even further, this right here,
we don't need it. But this is important
if you want to make an animation that
starts with your own frame, you need to use in image. If you need to check
this, the image strength, this is simply how strong the first frame will be
replicated with the second frame. So if you put right here, 0.8 the second frame will
be 80% of your first frame. Don't worry, you will get this as soon as we start
to animate it. Then here you need to give
the path to your input image, to your int image. Out of these, we start
our animation here. You can also put in
a mask if you like, but we don't need it. The other stuff will leave
at the default values. Now if you are overwhelmed, you need to do
this step by step. You need to try
this a few times. Like I said, I can also add
lectures in this course, or you just hit me up. If you need more information
about this notebook, then we scroll
down even further. Because all of this you don't really need
the rest of these. Here you see create
videos from frames. Here, your video will
be created basically, that's basically the overview of this big, big Cop Notebook. In this video, you
saw an overview of the Cop Notebook that can create videos with
stable fusion. We can animate
every single frame. Like I said, this
is a big notebook. This was just the overview. Over the next two
or three lectures, you will see how we
can use this notebook. Because we can
create music videos, three D animations,
and two D animations. You need to play a little bit with this notebook, like I said. So have fun trying this stuff out because
this is awesome. Like I said, if you
need more information, please hit me up. By the way, I think this
article will also help you if you go on stable diffusion
art.com slash deforum. You have this quick guide. This quick guide is completely
awesome and they show you everything that you can do with stable diffusion deforum. These are basically the
animations that we can make. With these, you can simply
scroll down and they will describe you every single
thing. What do they do? For example, the zoom, the angle translation, x
translation y much, much more. First, of course,
what is the forum? Then they tell you
also how to use it. So you can use it of course as a deforum extension
on automatic 11, 11 on the stable
diffusion webby. Or you can use also other interfaces like
Windows Mac or Google Cop. Like I said, we Google
Cop because this is the easiest tool and we don't need any cheap U
on our computer. They simply tell you every
single thing how this works. And if you scroll down, they tell you also how
the parameters work. Here you see this is the
stuff that we can create. This is, for example,
two animation. This is relatively easy
to create, but of course, if you want to make music
videos and three animations, this gets a bit more advanced. Here you see the two
demotion settings always with an example. For example, the zoom. If you put in values like this, you get a negative zoom. And if you want to zoom in, you need to put in
values like that. Then of course you
have the angle. The angle rotates,
translation X, translation y. As you can see here,
the perspective flip. So you can see we can do really amazing and wild
stuff in the notebooks. Then the three D
motion settings. This is the most advanced
stuff, but this is really, really cool because
we can rotate with our camera in every single
direction however we want, we can combine all of these. Rotate, zoom out, and much more. Here you see the three
D rotation x 3y3d. I think this quick guide will totally help you and show you nearly every single
thing that is important for this notebook, of course. Also the next few
videos will show you exactly how you can
create this stuff. You can see also in
this video how we can zoom in and transform
and much more. The notebooks are
completely awesome because this AI animation is stuff that not everybody
is able to do, but you will be able after
the next few videos then hey, they have some tips
and much, much more. So you see this is a really, really cool guide on this super cool notebook on the extension of stable
diffusion that's named De Forum.
25. Mkae AI Music Videos with Deforum Diffusion: Suicide or audio to keyframe string generator. This thing blew my mind. As I explored it the first time, there is the possibility
to use a specific music or a specific soundtrack
and to extract the key frames from specific
parts of this music. For example, just
download the music, which of course you will need to have the
permission to use. You need to use copy free music, maybe from the Youtube
audio for example. You can download it and you
can upload it in a tool where you extract a
specific part of that song. For example, I already downloaded a song
and you can go to I, lala, I is my favorite tool
for extracting these things. And it works really easy. But you have to make a subscription if
you want to do more. Here there is a possibility
to test this thing. And I think you can test
it for about 10 minutes. After 10 minutes, you need
to make a subscription. If you don't want to make
any subscriptions at all, you can use phonic mind. On phonic mind, it's
basically the same thing. You just upload your music and then you can extract
what you want to hear. Let's just make an
example here on Lala AI, but it works in every
tool nearly the same. You can also run local
things on your computer. The first thing you need to do is of course upload your song. So we simply press
Select New File. We can drag and drop
our file right here. As soon as this is
uploaded, it starts. Then you need to select
what you want to extract. And in most cases, the drums work best. Let's extract the drums
for this specific example, and we make it only 30 seconds
so that it is not too big. As soon as everything is done, we need to go to our audio decree frame
string generator here, of course, we need
to upload our file. We can drag and drop our files of only the drums
right here in it. And you see it, we have
34 seconds of our song, and we have here our key frames. All key frames are here listed. The first thing you need to check is the frames per second. You need to know how many
frames you want to create. For example, if you take 24
frames per second right here, you will get an animation
that has 800 frames. If you take 12
frames per second, your animation is
of course, shorter. It is only 408 frames because the soundtrack
is 34 seconds. And if you time this 34 by 12, you get the 408 frames. If you time it per 24, of course you got
a lot more frames. The next thing right here, that's the function we work
in our example with the zoom. And the default settings work perfectly
well for the zoom. But what does this formula mean? Let's just make a quick example. We have one plus x to
the power of four. What does this
mean? For example, if we go into the forum, and let's take the
zoom for an example. The zoom is a multiplier. Of course, this right here
would be a static zoom. No zoom at all. And you can
multiply it by this value. And you will zoom slowly in
if you work on other things, like maybe the y
axis or the X axis. But I like the zoom the most
you need to change this. You could change this to only x, to the power of four, because x is always the rump
and to the power of four. But because zoom
is our multiplier, we need to work with this one plus x to the power of four. We simply multiply this, and every time the Ram hits, we will get a zoom. You can see it right here. For example, at frame 403, we don't have any zoom. 404, we don't have any zoom, but at 405 we have a zoom that will be exactly
when the ramp hits. If we work with our
zoom, of course, you can also change this
x to the power of two. And you may be think
that x to the power of two makes smaller
adjustments in the zoom. But that is not right
in this formula. Smaller is bigger. And I tried to explain to
you why in our example, x is smaller than one. If you multiply x with something and x is
smaller than one, a higher value to multiply
means a lower number. Let's just make a quick example. So that right here
is our example. If the drum doesn't hit
at all, we have zero. If the drum hits really strong, we have 0.3 If the drum
hits just a little bit, we have 0.1 And our
formula will go like this, one plus 0.3 to
the power of four equals 1.081 And if you
take the same formula, but with a lower multiplicator, we get the following one
plus 0.3 to the power of two equals to 1.09
As you can see, the value of the
zoom is higher if the multiplicators or this
thing right here is lower. So you just need to remember, if you take the power of two, your output will be stronger
than to the power of four because we work with values that are
smaller than one. That was basically
the explanation. Let's assume we want
to have a strong hit. So we work with
the power of two. Because we work in the zoom, we can leave the rest the
same, just send it up. And you can see it
also right here. For example, on frame 405, we have a zoom of 1.15 If we take it to
the power of four, our frame 405 is 1.02
so a smaller value. If we take to the
power of three, of course it will get
right in between. I think I want to work with the power of three in
this basic example, because I think that zoom
makes the most sense for me. And now we are ready. We have uploaded our zone. We choose a frame rate
of 12 frames per second. We choose this formula
because we work in the zoom. The zoom is a multiplier and we took it to
the power of four. We have our 408 frames and
we simply press copy string. Now we go into our collapse. We put it right
here into the zoom, and you can see we are
basically ready to go. I want to work with a two
D animation right here. So we simply choose two
D. We take our frames. Our max frames are 408 frames, as you know, border
replicate works good for me, the angle we put at zero. And of course we put also the other translations at
zero because I don't want to have any movement at all for the translation x
and the translation y. Let's make something funny. Right here, we want to
rotate to the whole video. But the zoom hits only
when also the drum hits, the other Xs will get
ignored because we use to the animation noise and
strength is right with this. The next thing we
need are the prompts. I want to simply delete this
prompt or this activated. And I want to have
the same prompt for every frame
of our animation. Just the rump should
animate this thing. Our prompt is an epic
battle ground city, basically in a cyber bank style. Of course, I just copy
this from Lexica. Our image settings
are fine because in the course I think this
resolution works fine. Scale is okay. The
steps are okay. We don't use, of course, any It image, so we don't need. The next thing that is important to me is this right here, the frames per second
for our video. We need to choose
the same rate for frames that we had in
our key frame generator. If you take here 12, you also need to make the
animation with 12 frames, or it doesn't work at all. If you just take one
frame more right here, the whole animation
will not work. It will work, but it is not at the exact same time
as the rump hits. So now the only
thing we have to do is to render all the
max frames at 500. Right here work fine for me because the other
frames don't get animated run all and
we are ready to go. Everything worked well. And I just downloaded the file and uploaded
it into shortcut. I took also the audiophile, and let's just see what we get. I want to play the
whole song right now and really nice. Our drums and
our animation are perfect. It works really, really good. And it was relatively
simple to create. We just took our audiophile, we traded the drums, then we had to upload it into our key frame
string generator. We need to choose the right
parameters for the zoom. It's a multiplier,
and we need to take one plus x to the
power of 23 or four. It depends a bit how strong
you want to have your zoom. You need to take a lower number, If you want to have a
higher value at the zoom, we need to take the
right frame rate. And then we are ready to go, just download your animation, upload it into a video editor, and just synchronize it
with your audio file. And you can see it
also right here, the audiophile is exactly the same length
as our animation. So it works really, really well. No need to tweak this
thing because I am happy. I'm sure you can also make really good animations that are synchronized with
your audio files. So good luck with that. Super.
26. Create 3D Animation in Deforum Stable Diffusion: We've seen a lot of
different stuff. Let's just use this stuff, let's just use this knowledge
to create a full project. I have something in mind and
I already started something. Just take a look with me. I sit here in my kitchen and I just try to drink a coffee. No, normally I
don't wear glasses. That is just for the video. I nearly didn't see
anything with the glasses. I put on my glasses. I drink the coffee, I see something in the
papers and I do write this, this right here, That
is our last frame. I want to start our animation
from this frame on. Maybe I could include
something right here. Something like AI is
going to take ba, the water or something, and as soon as I see it, I spit out my coffee. From here on, we want
to start my animation. We take a screenshot of this
picture and we'll load it up in Google in our F. You
already know how to do that, so let's go in Google Colab and we want to make
our animation. Our animation should be in three D. I think the right frames
are something like 300. I think that is more than
enough for a video like this. And maybe I even
can take this video for the intro or promo
for this course. We will see how this goes. The next thing we want to
animate is all of this angle. Of course, I put a zero because we don't want
to rotate at all. The zoom, we don't need to zoom. You already know if we
want to zoom in three D, we need to animate
that translation. Set the first xs that I want to animate is
the translation x. And now we need to think
what we want to see. You know, we start with
our key frame like this. We need to start to
animate our prompts. I think I want to
get into a zombias always and maybe after
that we tweak our prompts. We need to take a look
what we want to see, the first thing is
of course, our axis. How they should behave. I think I want to animate
my axis like this. This right here is our object. I want to start
zooming translation x and translation y does nothing
but we start to zoom in. And then the three D rotations
rotate up to the right. I think we should change prompts as soon as we start
to rotate up. I think that should
look relatively nice. And I want to take keys, string generators, to make
my animations faster. Just for the C of this tutorial. I will also animate the x x, but I think that wouldn't be
necessary in our example. But just let's do it. We can always tweak
if we don't like it. So the first thing we want to
animate is the x x. I need my 300 frames from minus ten until plus
ten, and let's go. But the x x, I think they should be relatively even
until frame 150, at 150 starts our magic, and the x x should
go to the right. Maybe just a little bit. Something like that.
I think that is fine. So just copy string
And we put this at our x axis translation y. I don't need that at all here. I want to start exactly at zero. The translation said,
that's something we need. The next thing I want
to animate is the zoom. I think I want to
have a zoom that starts really slowly
and increases a bit. We start at frame zero. We go, I think, until frame 150. After frame 150, I want to
increase the zoom drastically. Maybe 23, and it should
happen until frame 160. After that, the
zoom should slowly be much slower until the
end of our animation. That right here is our zoom. Copy the string, and
under translation set. The next thing are the
three D rotations. I want to rotate to the
right at frame 150, we go back right here. This time we need lower values minus three until plus three, because, you know, this axis
behaves much, much more. I want to also have, of course, the 300 frames, we start at zero, and we should go maybe
until frame 150. With zero rotation right here. But after that we start
to go upwards and maybe until a value of 1.55 in. That is fair. Or let's just play with one right
here. Copy string. And at our x axis, same thing I want to
do with our y axis. And now the only thing that
we need is our rotation. I think I want to
have a rotation. Or we can even let this
deal and maybe re run it if we think we need
a rotation afterwards. And the next thing we need
to take is the noise. I think we can start
with a noise of 0.2 But at frame 150,
some magic happens. We want to increase this
after frame 150 a bit, maybe to 0.04 Then I think
that strength is right for us. We could work with
HSV in this example. I think that makes sometimes
the better outputs. We need, no video input at all. The rest of this is fine. And now let's go to the prompts in what
we want to transform. I found a prompt on Leonardo and I want
to transform in this. I hope that works. Just copy prompt. We go back into coap, we put it right
here at frame zero. We also have a negative
prompt, minus, minus neck. We need to copy our
negative prompt and we put it right here. That is our positive prompt. And we want to change prompt
as soon as we rotate. Remember we start to rotate upwards and to the
right at frame 150, and also the zoom starts
to be more quick. I want to change prompts
maybe at frame 160 or 170, so that maybe new
things appear as soon as we zoom
out of our frames. So I want to activate
this prompt right here, maybe from frame 100, let's say 165 to start with, we need to tweak
if it's not good. What we want to
see right here in the background of us,
in the background, something like should appear, copy prompt at frame 165, we want this writing
at my first prompt. I want to add right
here a plate girl on a dark throne drinking coffee because I spitted out my coffee, and basically that's it. Load settings are fine, our resolution works well. The seat doesn't really matter, but we have a seat. Oiler, 50 steps. We need to lean a bit
heavier into our prompts. Maybe eight prompt
settings are fine. We want to name this. Spitting my Coffee.
We use the seat. Here it seat I think works also. Well, we need to use an Init, so we activate the in. The strength is
0.9 That is fine. And now we need to
connect our Google Drive and give the path
to our Init image. We do that as always. We click right here. We connect our Google
Play this cell. Give permission if
it doesn't appear. We need to refresh. We go to my drive AI. Now we need to take
the right screenshot, start keyframe, copy path. We need to put the path
right here and we can go on. What's next? We
don't use any mask, we don't use these
things at all. But I want to have
24 frames because my camera also shoots
with 24 or 25 frames. I think we are ready to go. The next frames down
here are to 500. I think all the rest
is relatively fine. Yes, the prompts
change right here. The only thing that we need
to do right now is go render. Simply run all or just run here, the animations After that run the prompts and now run the load settings and
we are ready to go. I see you as soon as
everything is rendered. And here we have our video. Let's just take a look. I transform. The transformation is good and smooth.
We start to zoom. Think we should rotate
right now to the right. Also the prompts right here. They are really nice, I think. Now we change prompts
and rotate to the right. Yes, change prompts
to the right. I think more noise. Should start kicking. Yes, more noise so we can
create the stuff faster. I think the whole animation
is relatively good. Of course we can and probably should tweak that if we want. Maybe the camera
rotations are a bit too harsh at the ending and a bit
too slow at the beginning. We could simply tweak
that if we like, but I don't want to tweak this. I think that is relatively
good. I downloaded it. We uploaded in our shortcut. I tried to put it right
here on my video. I think that transformation should also be
relatively smooth. Let's just take a look. Now I spit my coffee. And now I should transform. And you see the transformation
is really smooth. And then I'm relatively
quickly, this lady. Yes, I think the video
is relative good. Let's take a look at the whole video first
with my stupid glasses, and I can't see anything,
but that's okay. Start to spit and
now I transform. The lady is really good. The zoom is also okay. It's not too fast. That's relatively good. Also the rotation,
I think I like that it's maybe a bit
too fast at the end, but I want to simply
leave this as it is. We can always tweak
it if we want, but I want to leave it as it is. I think that's
really, really nice. And you can see, thanks to the increased noise
at the ending, we can create the stuff faster. Stable division keeps up
with creating our new stuff. We can also make this longer, or animate this further. We can do whatever
we like with this. Now we got to a full project. I think you know what
you have to do now. Exactly, start
your own projects. It's relatively simple. Just make a video and it
doesn't matter what video. Start with animation, something like a clap or
something like that. And then start your animation. Take your last keyframe. Upload it in your Google. Give the path and use
the tweak the prompts. Tweak the camera access. Use keyframe generators and you can and will create
relatively good stuff. We did exactly what
we want to do. Our object was right in
front of us. We zoomed. After that, we rotate upwards
and into the right corner. And the zoom was faster
and we rotate even faster. We did exactly what
we want to do, thanks to this course, you can also do exactly
what you want to do. If we want to tweak this, maybe we could decrease the speed a little bit
of the last frames. We could also change the prompts
a little tiny bit later, and the outputs are
really amazing. But I think this output
is relatively good. We should probably just overlay a little bit of music over
this and we are ready to go. So let's go create
your own animation.
27. Kaibe: A solied and easy alternative to Deforum Stable Diffusion and Wrapfusion: Let's talk about Kyber. Kyber is really
easy to use and I just want to give you
a quick overview here. You see as soon as
you go to Kaib, of course you need to make
an account and login. Then you can press
on Products Gallery, Kyber Studios, my
video and about. If we press on products, you can see what you
can make in Kyber. You can do audio recivity. And you know we already done
this with Devorum Diffusion, I think in the forum, this works a bit better. And of course Devorum is free. But you can totally just
press try now and you will make awesome animations
also with Kyber by the way, linking bark mate the
whole music video with Kyber with this tool. If you scroll down
a little bit more, you see that you can also
make animations where your words take shape and
still images come to life. Of course, you can
simply animate pictures. If you scroll down just
a little bit more, you can also transform. This is basically just like the to the table divorum diffusion. This is basically the animation with devorum diffusion and with the combination of the music just like we
saw this right here. This is basically just
like stable red fusion. Change the look of your videos
with just a few clicks. You can always press and try now and make all of this happen. Like I said, all of
this is nice in Kyber, but you have to pay
relatively fast. And now I want to show you some stuff that I have made with Kyber because we can test
these completely for free. But in my mind, it's
better to learn to use stable diffusion
because open source and free is always nice to have. If you go to Kyber, you can go to the gallery and see what other people
did with Kyber. But I want to show you
what I did with Kyber. So we go to my videos. I've simply created two videos. Because I must admit
it, that was for free. I don't want to pay for this because the control
is not that good, the interface is
really easy to use. You simply upload a
picture of you and you can type in these prompts and you can type what
you want to see. Camera, for example, zoom in. And you can also
include a rotation if you want and you
see the output. So the output is
relatively good, but you don't have a lot
of control and you can only do this in
two D in my mind. It's really not
worth it right now. But the other feature
is relatively good. You can also overlay your
pictures with prompts. As you can see right here, I simply uploaded a
video from me where I am basically just handling
around in my room. And you see what Kyber did
to it with overlaid prompt, amend dancing in the
style of illustration, highly detailed simple
move and so on. And it was really, really easy and it is intuitive. You can't just upload it. The prompts are
nearly created for themselves because you just have to type in two or three words. The rest is the
prompt magic from Kyber and you get your
video at the end. And you can also
animate whole videos. I think Linking Park did their music video
completely with Kyber. In Kyber, you can work. It can be a bit expensive if
you need to do a lot of it, but you have not the
best control in my mind, you should work with Devorum diffusion and
there's also P diffusion. P diffusion is another
Collab notebook. And in my experience, P difusion makes good outputs, but it can only overlay
prompts over your videos, but you can use
control net and stuff. So P diffusion is
relatively nice, but I won't dive into it
because I'm not an expert in P diffusion wrap diffusion is easier to use than devorum, but I think also you
have more control in devorum and you can make
cooler stuff with devorum. In no other thing, you can make such good three D creations.
28. Animate Images with D-ID: Let's assume that you
have already made a few pictures in micherny or
in another diffusion model. These are really easy to use because you know how
to write prompts. This right here for example, is the Mitchy web page. And if you simply type in
some prompts, for example, a woman on the beach, you will get some pictures. As soon as you get
these pictures, you can animate
them with the ID. You already saw the ID in the beginning of AI
avatars from this course. And now I want to show
you how we can use the ID to animate some pictures. Right now, I want to wait until I have my picture and then we will create
something from DID. I think I will make
a few more because I am not satisfied
with these pictures. So you will see what we get
as soon as we animate it. If you ever have questions
about how to make normal pictures in mid journey or other AI tools,
just let me know. I can totally include some
lectures about these. First of all, you can also use the Colab Notebook, a too Lep. But I must admit, this doesn't work that well. It works sometimes,
but sometimes not. But ID is a cool alternative. Did is a tool, an online tool. And you can use
it, first of all, for free, but just
for 20 credits. But you can play
a bit with this. I think you should try this. If you really, really love it, you can make a subscription. But the free trials
are for everyone. So first of all, you go to Studio.d.com and then you
basically land on this page. If you choose to register
with your Google account, then you press
Create Video Here, you have some nice options. We can of course, also use the pre designed
speakers right here. But we want to let our mid journey picture speak
because we have made it. So we press at, we simply include our picture right
here, and there we have it. Here is our picture. And now we can do really
a lot of different stuff. We can also just type in the text that we
want to have here, so we can type in the text. We search, for example, for Rachel or another speaker that is for free because
she is like for premium. So we could use Jenny. But what I really, really
like is to use 11 labs. Now we go into 11 labs
and we make our audio. Now we are back into 11 labs. And I think Elon is not the
optimal voice for our girl. Okay, now we do
something really funny. We use the deep mail voice, but we want to make two videos. First of all, we want to
have the deep mail voice. I want to have this text. Hello. I am really glad
that I've hit puberty and my voice finally sounds the
way I feel generate this. I played a bit with points like always and then we simply
download our voice. Next step we go back
into ID and we simply upload audio and we include our voice from 11
laps if you like. You can also record
your audio right here, or you click here or
do your simple drag and drop and include
your audio right here. This is really fast and
everything that we need to do right now is
generate video. This works also really fast. You can see this costs
only one credit. We have 20 credits
left right now. In something like 20 seconds, we have our video and I want
to see how this all goes. Hello. I'm really glad that
I finally hit puberty. My voice finally
sounds the way I feel. I think this is
really nice and now I make a second one
with a girl voice. We search for a girl right here. I don't want to have
the British girl. I think I want to have Bella. I'm American Soft and that's
basically cool, I think. Or even Charlotte Cheese. For video games,
we use Charlotte. And then we delete this right here and we include this text. Hello, I'm Alice. I'm really glad that Arnie
brought me to life and 11 laps recommends to switching to multilingual
version one. We do that and now
we press Generate. Now I download also this, we create a video again, here in ID, we simply upload again our
voice generate video. Now we are basically done. This only lasts
for a few seconds. This is like really fast. Let's just see how this looks. Hello, I'm Alice. I'm really glad that
Annie brought me to life. Okay, I think this maybe is a little bit better
than the first one, if you like some of these, just press the three
dots and download them. You can do this, of
course, with both. In this video, we took
a look at the ID. The ID will animate every
picture that you like. It could also be a photo of you, a photo of some other guys. Or like we did a
picture for Miurny. I think with mure pictures this is like really,
really nice. Because they are really good looking and you can create
everything that you like. You can also make
cool cyber punk men's or cyberpunk
women's and animate this. You don't have to
do realistic stuff. You can even try to animate
a dinosaur with this, but I think it's not perfect. Maybe it's better to
stick with humans, because I tried it a few
times and the outputs are not that good if they work
and they don't work always, but you can try it. Ai is here for trying, so you should try
different stuff. Just as a quick tip, some cyber bank woman's
worked good for me. Here is a German one. Hey, Fred Blangbert. I hope you can create
such cool things in the ID and 11 labs
and mid journey, you can combine it all.
29. Faceswap in Seaart ist faster as Google Colab and Midjourney: We have good news. Art has added the feature of face swap. That means you can do your
face swaps also inside of art. And maybe you can even skip
either the Google Co Notebook and also of course the face
swap both inside of journey. So stay tuned because I think this works
really, really good. This right here is Spider
Man or it's Arnie Man. It depends a bit
on what you see. I have made this little video, you can see this is my
face swapped on Spider Man and it works really good. And now I will download these. I press download, and
then this video is mine. If you wonder how
you can create this, this is really easy. You simply have over to
art tools face swap. Then you need to search
for the right video or photo that you want
to swap yourself. Here you have a lot
of different videos. You can simply press on this video and try
to swap your face. Right now, I will
delete this video. For example, I press here on this button
and I confirm it. And now we can simply choose
a video that we like. For example this. You can either make a video swap
or an image swap. You can search either for
pictures where you want to do your face swap or you can also search of videos where
you can make a face swap. Let's just say you want
to swap this video, you simply press
on, Oh yes, here. And let's assume you
really like this video. And now you can simply
swap this with your face. You press on this button and
then you upload a picture. I have uploaded the
terminator and me, because I think essentially
this is the same person. Then you simply press on the
thing that you want to swap, and then you press Create, and then you are ready to go. This is really the process, and in 2 minutes,
you have your video. And the same thing
is, of course, also true with pictures. You can also do
this with pictures. You go on image, you use
the image that you like. For example here the
Superman I use here my face. And I press Create and then my face will get
swapped with Superman. And there we have it. This
is Superman with my face. And I also want to download this picture and
then you are ready. You can do everything
that you like. So have fun, try to
do a little bit of face swap because
the art has made the entire process
seamless and even easier than it was already
before I forget it. You can of course, also make
your own custom template. You press some custom template, you can upload your video, and then you can face swap your uploaded video with the stuff that you
upload right here. And the same thing
is true for image. You can upload images and videos as the target
video and target image, and then of course your
source image in this corner.
30. Conclusions of Section 4: Over the last video, you have learned really a lot of stuff. And most of it is really, really cool and awesome. You have learned how
to make deep fakes. First of course is to clone
our AI voice in 11 laps. Then we use the cop notebook A to Lip to make our
deep fake video. That's basically
our first project. Then you have seen
that you can also do Facewaps in Google Cop. Yes, all of this works
also of course, in C art, and you have already seen a lot of cool face swaps
over this course. Face swap videos work in
different kinds of manner. You have seen that we can
make a picture talk with DID Rep. Fusion is a
completely awesome tool. And we can animate our
videos in Google Colab. This works really, really fine. And then we have also the
forum Stable diffusion, and the Deforum is a
bit more technical, but I gave you the
blueprint, a quick overview, how to make music videos and
how to make three D videos. Like I said, this is not
a complete course on stable difusion devorum because this is a really,
really big tool. But you can do most of the cool stuff if you try it a little bit
out for yourself. You can basically make
whole music videos and three D animations with these if you don't want
to do this right now. We have also Kyber. Kyber is an easy alternative and you can try
this out for free. I think it's not really worth
the subscription unless you are not willing to learn Devorum Diffusion
and Rep Fusion. Basically, my little
homework for you would be just to try
some of these out. If you don't want to go
into the technical details, just go into Kyber and
make some cool animations. Or you can also try to make
a nice little deep fake. Because I think deep fakes are awesome and they are really, really easy to create. So have fun creating
your own deep fakes and AI animations
with AI voices, AI videos and much, much more. All of this is completely
awesome. I love AI. I hope also you love AI. If you do it, just share this course or leave
me a nice review. This would mean the world to me. And maybe it will
also help you because the right people come in this course because
of your rating. And if you share it,
people will always assume the value that they get out of this course with you. So a win win situation
for all of us.
31. Section 5: Your Project and more Tools: In this section, I will show you some examples and
stuff that you can do. You will learn that you can use different tools and you will also see how you can make
your own whole project. Because we start first with
the terminator example. You will see a cool video. I think the video is awesome. And then you learn how you can make such videos for yourself. If you combine a few tools and you edit the videos
just a little bit. You also see things like
Victory Box or Cap Cut, Adobe Firefly with Adobe Express
Canva and also Opus Pro. So this section is nice
because after this section, you know how to make and
edit some videos. Have fun.
32. Your Project: Create, Cut & Edit Videos with Pika, Shotcut and CapCut: In this video, I will
show you how we can make such videos that you have
shown in the previous video. Yes, I will make this a lot
quicker and a lot shorter. But you can of course,
make really a deep dive. I'll just show you
how the process works and then your
creativity is asked. Of course, you can do
this however you want. You can make entire
films with this process. I just beg for mercy that
you forgive me because I don't want to show you
how we our long video. Because like we are a
week in this lecture, we do this really fast. Step one of course, we go into a program where
we can create videos. For example, hyper AIP collapse, Runway ML, whatever you want. Let's just assume we want to make something
like this car. Or we can of course, also make something on
the Moon or on Mars. I think stuff on Mars should
work relatively nice. I want to make something
that is similar than this. Let me just see if we use
hyper or we use collapse. I think I should just try hyper. And if it works good for us, if it doesn't work
like we take k lapse. So we can insert here a
prompt or we can of course, also copy this thing. But I think I want to
make something in Ka. You already know how Ka works, so I don't want to bore you. The next step is of course to go into an editing program
just like this. This is shortcut
and we give names. Project X should work. We press Create and then
we insert our videos. We simply drag and drop every
single video right here in. I have made three
videos inside of collapse because I think this
works like relatively cool. You see we have this
astronaut and of course every single video
editing program works. You can use shortcut, you can use Da Vinci, you can use whatever you like. The process is always the same. You can go even on Cap Cut, because P Cut is a video editing program that works really good
for a lot of people, this is completely free to use. So you can simply
search for P cut on the Internet and you
can download these, install it, or even
use it on the Web. You find also a lot of tutorials about Cap Cut and if you
need more, just Hymup. I can always include a lecturer to how you
can use all of these. But like I said, all of these works normally
completely the same. You always insert your videos. Then of course,
you need to go to your videos and you
simply right and drop them down to your time line as soon as the
videos are on the timeline. I like to make them bigger
by pressing the plus sign. And then we can
play these videos, or we can insert
our other videos, we r and drop the second
video also on the timeline. And then it depends a
bit because we can use the magnet and we can
simply play them together. And then the third video. And then we have
like three videos that tell a nice little story. First, we are in
this space shuttle, then the guy goes outside
of the space shuttle. Last but not least, he is satisfied that
he is on Mars and he can explore a nice
little new planet. I think the story
line is decent. I will exclude my
face so you can see every single bit
a little bit better. We can always make like
stuff black in the middle. We deactivate this
nice little magnet and then we can always
have the black overview. So you can see we have
separate scenes and this works similar in
every single video editor. Right now we have a video, but I think it's better
to make this seamless. So I think this
works a lot better. We can always play a little bit how all of
this should look like. This is always a
creative process. Video editing like, you can spend a lot of time
on these and you should always look if this
looks right for you or not. I can't tell you what's optimal, because everybody likes
different videos of course. But the process is
always the same. We have a 12 second
video right now, but you can make these videos, of course, as big as you want. Now we need a story line. I like to make story lines in Chachi Pt because in Che
Chi PD it's really awesome. I just start with something
in German so that you can see we can always also
translated in English. This is basically the stuff
that we need from ChechiPD. Chechipd should
basically make her script about an astronaut
in a space shuttle. Then the guy goes outside
of the space shuttle. And last but not least, he goes into the golden hour. So the sun goes under
and he conquered Mars. That's basically what I told
ChechipT here in German. But of course, I
will translate these in English so that everybody
can understand this. Like German is not so nice for most of the people
in this course. I think we simply translate
these in English. And this is also really easy. You can also do this vice versa, if you have, for example, a script in English, but you'd like to make something
in German, just do this, vice versa, and you will
get the right answers. Right now, I want to
have this in English. We go into 11 labs and
we create our text. We go to text to speech. Then we simply use
the right stuff. Multilingual should work, The British girl is not optimal. We have here Adam. Adam is a voice that everybody
loves on social media. And we simply delete
this stuff right here, we go back into ChachiPT, and now we insert our speech control center
shuts is ready for Mars. Landing is our first sentences. I simply include
this into 11 laps, make some points because
this is a nice little past. And then we use incredible
to be standing here. I think this is a nice
second phrase here. Also the I need to include some points for
a pause at the end. And then we insert
the last thing, a moment for entity. Then we insert also this. I think this should work. So we simply press
Generate here in 11 laps. And we get something like this. Control center shuttle is
ready for Mars landing. Incredible. To be standing
here a moment for eternity. I think this sounds
relatively nice. I want to download these by pressing here on
the right button. We download it and
then of course we can insert it in our video
editing program. We simply go back in Shortcut
or Da Vinci or Cap Cut. We insert our nice little audio, then we need to insert
also an audio file here. And we simply drag
and drop it down. And this is a little bit short, I can see it right here. We need to edit these
a little bit better. But first, let's just see
how this looks right now. Control center
shuttle is ready for Mars and Incredible
control center shuttle is ready for Mars landing. Incredible, to be standing
here a moment for eternity. So generally speaking,
this should work, but we need to make this
a little bit better. So we need to cut the audio, cut some parts, and we
listen from time to time. Like I said, this is a process that needs
a bit of creativity. Let's just see how
this looks right now. Control shuttle is
ready for Mars landing. Incredible. To be standing
here a moment for eternity. I think this looks
decent. Of course. You can also include music, You can include different stuff. You can make this longer, shorter, a lot better. Like I said, this is just
a quick quick tutorial that you can see and understand
how the process works. Let's just see how this looks. If we add a little bit
of music or something, control center shuttle is
ready for Mars landing. Incredible to be standing
here a moment for eternity. Like you see, this is a starting point and you
know how to do this. This is of course, not
a complete project. This is just how
you should do it. But I think, yeah, maybe it's a complete project, so it makes all sense. We can totally post
these on social media. This is a complete video with
a nice little story line, if you want to call it that
way, this should work. Maybe you get some
clicks with these. You also saw that you can make
entire films out of these, just like the guys from
the Terminator remake. But I have to tell you,
they made a whole film. You can watch this
in the cinema. The stuff that we saw was
just the introduction. Yes, you need to
work a lot on these if you want to make
really awesome videos. But you also saw like
stable diffusion and we can make P fusion and we
can make music videos. We can do a lot of stuff. If you want to make
something like we did here, just try it out. Make some videos with
labs with run way, Emil with hyper, with
whatever tool you like. Then we insert these into
a video editing program. We make something in 11 labs, like a nice little story line. We insert also some music. If you don't know where
you can find music, you can find music totally for free on the Youtube library. You can simply search for music and you can insert this music. Like I said, this is
a creative process. You need to play a little bit with all of these and you can really spend a lot of time on these if you want
to make this perfect. If you don't want to spend
a lot of time on these, I want to show you in the next video something
that is also really awesome. In the next video,
I will show you a tool where you
can simply type in some text and you get your whole videos
back from the tool. So stay tuned for
the next video. But I think this is also
like the real deal, because you can be really, really creative and you can die down on every
single section, just like you want.
33. Pictory & WOXO for the Lazy ppl, Complete Videos with One Click: In this video, I will
show you two tools that make videos
completely automatically. You just have to
type in some text or a story line and you
get your full video. We talk about Victory and Oxa. I think these two tools, they are completely awesome. Victory is more like for bigger videos and
Vox is for shorts. You can make Youtube
shorts and much, much more With these two tools, let's just take a look how
these things look like. I think I should blend
myself out that you can see a bit more. Hello Arnold. Which content would you
like to repose into videos? This is the first thing
that you see after you have created an
account into victory. And you can see that you
can make script to video. You can start typing or copy paste your script and
then you can make your video. You can always see for what
this stuff is recommended, recommended for
educational videos, listical videos,
coaching videos, and step by step guides. Then we have also
article two videos. This is really practical
because you can also just insert a link. Maybe you have a
block or something and you will get a
video out of these. This is recommended for blocks, press releases, or
any HDML article. You have edit videos using text. You can, of course,
input video from various sources and then you
can edit these videos also. This works like okay,
I would assume. I think you should
totally try all of this for yourself so
that you can see this. This is recommended
for add subtitles, automatically cut
portions of video, create video highlights, and
add logo intro and outro. So you can make, for example, a Youtube video and you can add your Intro
ultra, and a logo. You can also insert subtitles. You can cut this video and you can create
video highlights. Now, I have to tell
you if you want to cut your videos
and make a highlight, it's not always perfect,
but you can try it. Like I said, this is always the worst version that
you will ever use. It's always worth taking a look. You have also visual two videos, drag and drop files
or Browse Compute. You can simply upload a visual
and make it into a video. You can create a
slide show video using images or
short video clips. I think I just want to show you one simple thing
inside of these tools, because you should totally
try this out for yourself. We simply start typing or
copy based your script. I want to show you
this right here. Of course you can
do all of these. We simply press proceed
here on script to video, and then we can
enter a video name. Let's just make this funny. We go into Che
ChiBT because I am not smart enough to make
something for myself. Make a short, funny script
for a 32nd video about AI. For example, we sent this out and I think we
will get something. We even have a
title, so come on, this title is of course
better than my title. Then we have the scenes
and we can always just copy these and see
what we get out of victory. So we copy, of course
first this title. We go right here in and
I want to insert it. Start typing, We
don't want to type, we simply want to
insert our new script. I think we should just
copy all of this. We can also make this like
in a story line so we don't have to make all these
scenes or something else. We can also just tell chipped, make a quick story out
of these if you like. You don't have to tell like every single scene
what you want to see. But you can do it. We just want to do it
like this without. I just want to see
if Victory finds the scenes themselves
because like, yeah, this is prescripted. And I want to test also the creativity of this
tool. Just a little bit. We have this nice
little script right now in the non
distant future robo, a state of the art
I kitchen assistant decides to tackle the challenge of cooking spaghetti carbonara, a favorite among humans
with confidence and so on. So I simply want to copy these. You see, now it gets, of course, a lot harder for victory to
find the right things here. For this video, we
simply want to insert this and then I think
we are ready to rock. We simply press
Proceed right here. First we prepare our storyboard. This works also relatively fast, So you can see creating scenes, we get 12 scenes. We have right now 789, You can always see
what we do right here. We find relevant visuals, we add I voice narrotation. We can record your own voice, we can add our logo, and we can download
all of these. Right now, I think we have just the standard stuff you see right here,
the scene duration. We have 14 second long scenes. The video is 2 minutes
and 35 seconds long. And we can take a
look at this video. Of course, we can
take just a preview. So if we press on preview,
we can see all of this. And if you press right here, we can do it. I think we should download this video because
like safe, safe. As soon as we have it, we can
always look at this video. And now I want to make
a nice little preview. So we simply press on preview. You saw the video and
Pigtory has not nailed it. I have tried this
quite a few times, Most of the times Pi story has nailed the pictures
a little bit better. Of course, we can also include
the voices and much more. You saw that we can include nearly every single
thing that we like, but of not every single
thing is always perfect. We have more like the
cooking stuff and less like the AI stuff. But like I said, this will be for always the worst version that
you will ever see. Now I want to show you Warsaw, because Warsaw works really, really awesome, especially
if you want to make shorts. So we can always
download this videos. We simply press and download. And you can also
edit all of these, so you can insert other text. And to do much, much more, you can go on visuals, audios, styles, text, branding
elements, and format. You need to play a little
bit with these videos, but you can make videos
really, really fast. And you can start for free. And now I want to show you
Bokaw, just like I said, also here on walks you have, I already have an account. Simply press login. You can always make
your account with Google or with your e
mail and a password. I want to continue with
Google because like I said, I already have an account. And this right here, this
looks nearly as Adobe Express. If you are familiar
with Adobe Express, also in Adobe Express, you can make similar stuff, but I think Voca works
a little bit better. You can make mobile
videos, Tiktok videos, Youtube shorts in Star reels, Facebook reels,
and videos for X. You have different
topics, languages, voice over text styles,
and background music. I want to make this
really, really fast. We make Youtube short. Right now we press
on Youtube short, and now you see
this three prompts. Of course, you can always enter your prompt or new
RL for yourself, but I think I just want to
show you something from these. Produce two videos highlighting innovations from the
Industrial Revolution. Integrate our line
art background. We press on this prompt, we simply make generate. So you see the prompt is
inserted right there. Then we press Generate and
we will get our video. This is also relatively fast, You see this are the two videos. This will amount to
roughly 1 minute. After 1 minute, we
have our two videos. There we have it. I think
this took like 30 seconds. Let's just see what we get. I press on the first one. Welcome the fun facts about the Industrial Revolution
in the late 18th century. The spinning jenny revolutionized
textile production. But steam engine
powered factories and transportation
reshaping industry. The cotton gin mechanized cotton processing,
boosting production. The telegraph transformed
communication, connecting people
across distances. To wrap up the
Industrial Revolution was a time of innovation and progress. Welcome the fun facts. In the late 18th, the
first video looks awesome. Let's just take a look
at the second video. Welcome to the impact of the Industrial Revolution
on transportation. The invention of the steam
engine revolutionized travel, powering trains and boats. The creation of iron and steel allowed for the
construction of stronger, faster locomotives and ships. The telegraph facilitated
communication, improving coordination and
safety for transportation. To conclude, the
Industrial Revolution transformed transportation
shaping the modern world. The second video is awesome. I think you should totally try these two tools,
Victory and Vox. Like you can start
to deliver and you can do a lot of
stuff on both tools. I just showed you a
glimpse of these, but these are really, really intuitive to use. You just press on stuff that you like and you get
stuff that you like. Maybe the stuff that you get is not always the
stuff that you like, but that's just the things that we need to deal
right now with I. But we would assume that all
of this will get better. Remember, the version
that you try right now will be the worst
version forever. All of this just started, all of this gets
better day by day. In no time whatsoever. We will can create entire
short videos and we can simply post them on
social media all day long. At least I hope so.
34. Opus Pro for YouTube Shorts, Instagram or TikTok: In this video, I want
to talk about Opus pro. Opus Pro is really
easy and nice to use. You can simply upload a long video and you
get shorts out of it. If you have, for example,
a Youtube channel, or you make podcasts or
something like this, Opus will help you make
some shorts out of these. Now I will show you
how this works. First thing you
go on Opus Clips, you can simply type
it into Google. Or of course, you can
use the links that I gave you. One long video. Ten viral clips
create ten x faster. This is the stuff
that they tell you. Every single thing you
have to do is either drop a video link
or upload files. That's really every single
thing that you have to do. If you press on upload files, I will upload something
from this course, maybe like the last video, and then we will see what
we get out of these. Yes, I have a Youtube channel, but the channel is in German. And I think you will understand more if I upload
an English video. And by the way, if this is
your first trial, of course, you need to enter
an e mail address or you need to
login with Google. I already have an account, so I go with Google. Here you see I already
made a few videos, but right now I want
to show you these. You can simply upload
a video like I told you previous or
you can insert a link. Now you see that we
fetching our video, we have right now, 20% analyzed. We can also say that
we use this for personal preferences or
for whatever we want. Let's just see what we
get out of our video. And there we have it. So you see Opus
pro dido grade job we have here, our first trailer. Then the second one, the third we have all in total, something like ten videos. Let's just see how
this one looks. Yes, this is a whole
Kino presentation. It's named Terminator
Two remake. You see we have the shorts. Yes, I have to admit, it works. Not perfect, but also this
will get perfect over time. You can always insert
your own text, the subtitles, they are
really, really nailed down. And sometimes also the
camera movements work. That's just a tool that
I want to show you, because sometimes it works
relatively good. Try this out.
35. Canva: In this video, I want
to talk about Canva. We do this really quick because Canva has also included
some cool AI stuff. Runway ML, for example, is included in Canva. This right here is the
web page from Canva. I have to tell you I
am not a pro in Canva, but I do make my thumbnails
for Youtube, for example, in Canva, and I do
some stuff right here, let's just put it that way. You can always press
on magic studio. And here you find all
the coolest AI tools. I think you should try this out. And here you see you
have some AI features. For some of them
you need to pay, but others are free. I want to show you text to video because this
is about AI videos. We simply press
on text to video, and then here we can simply test all of this
completely for free. We want to try this
out. Here we are. Yes, there are a few
words in German, but don't worry like we can
make them totally in English. First, you can always
edit all of this stuff, you just click on these. And then you can insert also your English text, for example. Test this. I think this
is good right now. Now we want to make a video. If we simply press on these, you can insert five words and then you will get
a nice little video. Let's just say teddy
bear in the pool. Having a good time. Now we press Generate. You see this is
powered by a runway. In one or 2 minutes, we'll get our nice
little video where a teddy bear is
chilling in a pool. That video we can
insert right here. We can include videos that
look something like this. You already know the
videos from Runway. Yes, they are relatively
nice and we can totally do this all
inside of Canva. Of course, we would
make this in English. First of all, let's just add something like we get a teddy. I think we should do
something like this. I like to chill. What do you like if you
also like chilling? Join me. I think I don't
need to that letter. I think it should look okay. Something like this. I think this looks good. Now, we wait until
we have our video, because I want to delete this video and I want
to insert our teddy. Of course, you can make your
second file also right here. So you can make
here, for example, stories for Instagram
and much more. There we have our video. I want to insert our
video right here, and we will have our teddy in the nice little story
right down here. I think this looks okay. So this is a teddy
that tries to chill. I think this is nice. So we have our first thing right here and we can do this
over and over again, and then we have
Instagram stories. In this video, I
simply wanted to show you that Canva has
AI integrated. You can create your
AI videos inside of Canva because Runway ML
is included in Canva. If you make stuff, for example, for Instagram and
you want to make AI videos also for Instagram, just do it in Canva because you can do it in one single tool. And I think that's nice.
36. Adobe Express: In this video, I want to
talk about Adobe Express. Because Adobe Express is also a nice little tool that
helps us edit our videos. It's especially practical
if you already have videos. You want to just edit
them a little bit, maybe for an Instagram post. Let's just take a
look at the platform. And by the way here, we can also work
with Adobe Firefly. We can include text effects
and much, much more. We use the diffusion model from Adobe to help us a little bit. First of all, we go
at Adobe Express. Here you can scroll down U C. You can use different
text effects and much, much more, but you can
also press on video. Here on video you will get
a lot of different things. You can make Instagram
reels, for example. You have always stuff
that you can use. You can make the
normal Instagram reel. And I think we
should totally start with these as soon
as you are here. Of course, we can include stuff because this is right
now completely empty. I will simply upload I think a small Youtube
video from me. This is about
stable Brad Fusion. You already saw
stable Brad Fusion. We can make a small little video that works relatively
nice on Instagram. I think at least maybe I will
also go post this video. You see, we can simply
insert this video. Yes, the resolution is, of course not right here. You see, this is how it looks. I transform myself. You already know how
stable re, fusion works. We can make this, for
example, a bit bigger. We can also make it
here a bit bigger, that all of it is a bit
more in the center. I think this looks
somehow, right? Yes, come on. Of course we can. And probably should
include also other stuff. As soon as I am in the center, I think this is okay. We can also include text and a background and
much, much more. We go on the left side, we press on elements, and here on elements, you can also search
for the stuff. I think we should
type in technology. And the first one,
this is okay for me. We simply press on these
and it gets inserted. You see, I think this
looks somehow okay. And now we can go on
and edit this a little bit further because I think we should also make some text right here or something
after the text. I think this looks a lot better. We simply press on
text on the left side, and now we need to
search the right text. I think we should use the
ifilight text in down here now we can search for the stuff that we like,
maybe the bubbles. No, I think this
right here is cool or something else.
Let's just see. Yeah, I don't like this stuff. Let's just use this one. Of course we need to accept. This comes from Adobe Firefly. We will generate our
text via Fusion model. Now we can simply delete this old text and
insert the new text. This works like relatively good. As soon as we type our stuff, we get it P fusion. That's the technology behind the tool that I
show in this video. You see the text also looks
like relatively cool. We can make this bigger, we can make this smaller, and we can place it right here. I think here it looks
relatively cool. We simply can also insert
something down here, maybe like a tube
blinker, something, because it's a little
bit empty without these. Let's just edit it
a little bit more. Maybe this right
here, down a bit. Yeah, the center
is somehow okay. The Rep Fusion, also a little, a little bit bigger. I think we can also insert
an animation if we like. Let's just make the text
a little bit cooler. We use something like
this right here. I think this is cool. Come on, The rep Fusion
needs to slide in. We slide in our Rep Fusion and then we have
something really cool, at least in my mind. Then we can also download
this and we can also post it on social
media if we want. If we press on the, we can really post it all
over social media. We can time our posts, we can share it on Instagram
always automatically. We can either edit it a little bit more or we'll
add it how it is. I think this looks also okay, right here, how it is. Let me know what you think. I will play these right now. Stable B fusion and cool technology in a
mal sin wold test. Of course, this is German, but it looks okay down here. We probably should
add something. It's a little bit
empty down here. Maybe we can insert a Youtube
link or something else. I think we should also make a new one with a
deep fake video. This is most likely the
best deep fake video you will ever see.
Arnie is incredible. So we did basically the
same stuff with this video. So deep fake tutorial. This right here is of
course Zealand mask. You already know how to make these and here in
Adobe Fire Flight, we can always edit
all this stuff. I think also this looks
like really cool. So first we start with
the Tom Cruise deep fake. This is a deep fake profile
from **** Doc with a lot of views and we simply include
the stuff from my video. Let's just take a look. Deep, deep fakes. This is most likely the
best deep fake video you will ever see.
Arnie is incredible. So you have seen,
it's really easy to create such stuff
for Instagram. You can just go
into Adobe Firefly. You can press Create
Instagram real. And you can include your videos, a background that maybe
some text effects with Ad with the Difusion
model from Adobe. And if you want, you can also automatically post
these on social media. I think you should know that
all of this is possible. Of course, if you make
your videos like with walk or puss or other stuff, you can always go into Adobe
A Fly, into Adobe Express. You can edit it a little bit
and then you can post it. Have fun trying all of this out.
37. Recap of Section 5 and a bit of Homework: Over the last videos, you have sewn really a lot. We started with a
nice little example, and you see that people making
real films out of these. You have sewn the
introduction of the Terminator to remake. And I think if you are
really, really ambitious, you can make either
the trailer or also like the whole
film if you like. And I have to tell you, the guys that make this film, they did it over a long time. I think they took a few months for this film and this
where a whole team, they have a behind the
scenes and much, much more. So, if you want to make something really cool
right now at this minute, it will take some
time. As soon as Sa. Comes around the corner, I think this will change
dramatically because with Sa, we can make enormous
videos up to 1 minute and it should be
really, really coherent. Sa will make every single
thing like a lot easier. You have also seen how you
can make these videos. You simply go into pica or
in the tool that you like. Maybe as soon as you
see this course, of course, updates will follow
as soon as we have access. There are like some guys that say we have Sra in a few months. Let's just hope
that we get access. But you have seen how
the process work. You make a small video, then you make another small
video that is similar. And you do this over and
over and over again. Then you go into your favorite
video editing software. You can use Shortcut, Da Vinci, Resolve the programs from Adobe, but you can also use
things like Cap Cut. Cap Cut is completely for free. You can download it
and you can also use it in the Web and
the applications. They work nearly every single
time, completely the same. You can just cut some
parts of the video. You can insert a
little bit of audio, for example, from 11 laps, and then you are ready to rock. Maybe some music from
the Youtube library. And I think you get
what all of this means. That means that you
can make videos. And of course you also
saw like stable difusion, kyber and all the other tools. So you are nearly unlimited. The only limitation
is your imagination. I think you can make
really cool stuff. You also saw that you can
use victory or walk Saw. These two tools are easy to use and they are Fast Opus Pro, you can make long
videos into shorts. You also learned that Canva
has a runway integrated, and you can make stuff for
social media with Canva. And of course, you can also use Adobe Express for your
videos on social media. I think there's
something for everybody. Maybe you remember
what learning is, learning is doing, and you
get better by doing more. If you do something,
you will learn. Learning is same circumstances
but new behavior. You know that you can
make videos with a I. So you should totally do this. Just do something with a I, just make a video with
a I. I think this will completely blow your mind as soon as you see that
this gets better, like nearly every single day. Do me a favor, go in a
program that you like, maybe it's Axa or
whatever you want, and just make one
small little video and I think you will do great. You may also remember
how we can learn better. We learn better together, and we can accomplish
these if you share discourse. Thank you.
38. Section 6: The Future of Ai-Video and Copyrigths: In this section, we need to
have a serious talk because first we start that AI
videos are not just a joke. I think you will be surprised
what's possible or how the view chair cook eventually
unfold these AI models. They can simulate the world. And these simulations, we can
use them to train robots. And these robots can come
into the real world. The next video will be
cool, but then of course, we also need to make a reality check and see
what we can do right now. We need to see if
copyrights are important. Of course they are important. But how and where, we need to look
what we can create, what we can not create, what happens with our data. I want to make a broader
look because yes, this is about AI videos, but I want to show you also this like in ChechePT and
all these AI tools, because this is
important and I get a lot of questions
around this topic. Then of course, we make
also some speculation. Because first we learn how these AI videos can make
something that can train robots. And that eventually
comes AGI in the future. Because we talk of this, we also need to talk
about AGI in general. What happens if AI becomes
better or smarter than humans. And then of course, also ethics and downsides of this topic. This section, this is
a little bit broader. We need to look
at all of this on a broader field because it's
not just about AI videos, it's about AI in general. It's about copyrights,
AGI and the future. So have fun in this section, I think you will
really enjoy it. And you will understand on a deeper level what's going on. Why is every single really, really big company all over? I just think about it.
39. More Than Just Videos, The Future of AI Videos and Robotics!: In this video, I want to talk about the future of AI videos. Because I think the
future is much, much, really much bigger
than a lot of people think. As soon as sa got introduced, a lot of people had a
little bit of fear. People on social media
said that this is most likely the worst thing that
can happen to humanity. And they simply think of these because they
are maybe scared that people can make videos with just text and they
will be obsolete. But we need to see
the bigger picture. First of all, of course, you can learn how to use these tools and take
this as an advantage. I think that is the smartest
move that you can make. You already took
the right decision because you are
staying in the loop. You see how these technologies work and I think you
are in great favor. But we also talked about
that all of these models, all of these AI video tools, they can somehow like
simulate reality. In this video, I want to bring
a whole holistic picture. Then you maybe understand
why this is the real deal. A lot of people talk about the AI video tools
as world simulators. Opi has the goal to simulate the world with their video
generation tools with Sa. The goal is really to
simulate the world. I already told you this at
the beginning of the course, and now you will grasp why all of this will
be so important. Before we make the picture full, I will also show
you the right here. This is research from Google. Google introduced
us to a paper named Genie Generative
Interactive Environments. Here is the Genie team, and here you can basically
see what they are doing. You have a still picture and
then you can simply type in a prompt and you
can play a whole game. That's basically how this works. So we can also simulate like video games with
simple text prompts. I hope you understand that
we can do a lot of things. I think the gaming
development world will be a lot better, a lot faster with
tools like these. If we can just prompt our games, of course, we will make
these games enormous fast. Here you can see a lot of
different environments. We always start just
with a picture, then we throw a prompt in
and we get our output. This is basically how maybe the video generation
will look in the future. You see a lot of
different pictures and then they start to move. As soon as we inject a prompt. This is really bigger
than you think. They have a lot of examples. And later you also
see this right here. The future of generative
virtual words. Finally, while we
have focused on results for platforms
on this website, Gini is a general method and can be applied
to multiple of domains without requiring any additional domain knowledge. Basically, they trained a
smaller model and they tried to simulate the world so
that RT one can learn. Rt one is the robot that
comes from deep mind. They basically try to simulate a world in this simulated world. This robot can
learn to do tasks. We can not only
make video games, but we can also like
simulate words. In this simulations,
we can train robots. As soon as these robots
are trained in simulation, they can also do stuff
in the real world. This is the genie paper, this comes from Google Deepmind, and RTX is the robot
from Google Deepmind. They have good results right
now with this technique. Of course, we have right now, stuff like Unreal
Engine. Unreal Engine. We can also make videos, and it's relatively easy
to create these videos. These videos are, of
course, also for games. None of this is completely
new because in Unreal Engine, we can also like simulate
words with games. Sa is probably maybe also
trained on such data. We don't have to take necessarily data
from the real world, but we can also take data, for example, from Unreal Engine. If we train such video models
on Unreal Engine stuff, this is just from
the video creation. Then we can really
simulate all of these words without ever
going into the real world. Now I will show you the most promising things from Envidia. Vida has something
named Isaac Sim and they have also
Isaac Jim here. This is the web page from Vida. This is the video and I think the best thing is we
see the video later. They have simply Isaac Bac Jim, Isaac Sim and much, much more. They always post
the newest updates. You can see they have a lot of research here and
they also show these like we have some
Nvidia days from time to time and they always
bring us the newest. Explanations of why they do this and why all of
this is important. I think we should look
just at this video. And after that video, we understand why
all of this is much, much bigger than you
think right now. Let's just play this video. Successful
development, training, and testing of
complex robots for real world applications demand high fidelity simulation
and accurate physics. Built on in Video's
Omniverse platform, Isaac Sim combines immersive, physically accurate
photorealistic environments with complex virtual robots. Let's look at three very
different AI based robots being developed by our
partners using Isaac Sim. Fraunhofer IML, a technology leader in
logistics uses in vida. Isaac Sim for the virtual
development of Obelex, a highly dynamic indoor outdoor autonomous mobile robot or AMR. After importing over 5,400 parts from D and rigging with
omniverse physics, the virtual robot moves just as deafly in simulation as it
does in the real world. This not only accelerates
virtual development, but also enables scaling
to larger scenarios. Next, Festo, well known
for industrial automation, uses Isaac Sim to develop
intelligence skills for collaborative robots or cobots requiring acute awareness
of their environment, human partners, and tasks. Festo uses Cortex and
Isaac Sim tool that dramatically
simplifies programming Cobot skills for perception. Ai models used in this
task were trained using only synthetic data generated
by Isaac Replicator. Finally, there's
animal, a robot dog, developed by a leading
robotics research group from ETH Zurich and Swiss Mile using to GPU Accelerated Reinforcement
learning animal whose feet were
replaced with wheels, learned to walk
over urban terrain within minutes
rather than weeks. Using Invidias Isaac
Jim training tool, the locomotion policy
was verified in Isaac's Sim and deployed
on a real animal. This is a compelling
demonstration of simulator training for real world deployment from training, perception and policies
to hardware in loop. Isaac Sim is the tool to
build AI based robots that are born in simulation to work and play in the real world. You see this is really bigger
than we initially thought. Let's just put this
in perspective. Vida make something
makes a simulation. In this simulation,
we can train robots. This works really well. All of it started with a
project that was named Voyager Voycher is a project
that can play Minecraft. With this project, they basically
showed that we can have a computer that plays Minecraft just like
a normal person. There's also a really strong
dog out there from Jim Fan. This is a senior
developer from Nvidia. He simply tells us
the whole story. We basically started
with Votre Digital. This is, this is the computer
that can play Minecraft. And how does this guy
learn to play Minecraft? They simply give him an
explanation what he should do, and then he uses
reinforcement learning. He writes code for himself
and then he gets rewarded. It turns out that this
code comes from ChechPT. It's a paper out there
that's called Eureka. And with this paper, they also show that Chet CPT can reward these machines
better than humans can. By the way, reinforcement
learning from human feedback is
normally the thing that we have to do to reward these robots.
They learn by doing. If they do something right, they get rewarded by humans. And then they know, hey, this was right, I need
to do more of these. It turns out that a ChechPlso, I can write this
reward code basically. They have shown that a computer can learn
to play Minecraft. And then they took it a step further and they tried to
simulate the real world. And here they try
to train robots. They do basically the
same stuff and as soon as the robots can be good
in this simulation, can do stuff in the simulation, they can also do the real deal. So they can go out of the simulation and they can
do stuff in the real world. This is enormous and that's
why I video is so big. If we have models that
can simulate the world, we can do stuff
that is enormous. We can train every single
thing in a simulation. And then we go outside of the simulation and have the
stuff in the real world. And that's why AI
videos are so big, and that's why a lot of
people fear AI videos. But we learn how this
technology works, so at least we
understand why we have no chance against machines.
Come on, it's funny.
40. AI is here, what can we do rigth now: You saw the applications. They are really gigantic. Of course, we need
to ask ourselves, is this all the right direction? What happens if we
go to like the AGI? What if machines get smarter
and better than humans? Will there be stuff left to
do for us humans right now? I have to tell you, nobody
really knows that questions. So we focus on the stuff
that we know right now. I want to talk also about copyrights and
all of this stuff. What happens if you create
something with these models? Can you really do
whatever you want? Can you upload it on Youtube? Can you like sell it? Can you do whatever you want
with all of this stuff? And that's what we will
look in the next video because you have seen that we
can create a lot of stuff. We have used like 11 labs, we have used Chat GPT. We have used all these AI
video generation tools. So we use also diffusion models. And that's why we also need
to look at copyrights. In the next video, we'll
look at copyrights. What happens if you create stuff with artificial
intelligence? I want to make this a
little bit broader. We look also on the stuff that you can create
with Chat PT, on the stuff that you can create with any diffusion model. Because this is all the same. As soon as you start
to create AI videos, you have stuff from
a diffusion model. This make the
pictures and videos. Of course you have
stuff from maybe ChachPT because Chat
ChPT writes your story. You have also stuff
from 11 labs. This makes your voice and that's why we need to
look at copyrights. Can you create every single
thing that you want with AI? And of course, what happens
if you upload some pictures? That's the stuff that we
will look next later. Of course, we will also see how this can unfold with this AGI. But I have to tell
you right now, we don't really know. All we know is that
the progress is there and that we should use AI.
41. Copyrights: What can you make?: In this video, we talk
about copyrights. What happens if we create
stuff with I? Can we sell it? Can we do whatever we like with all this AI stuff? Of course. In the next video,
we will also see how all of this works
with our stuff. If we upload, for example, a picture of our face, what happens with this data if we upload like text
from our business? Is this safe? But like I said, first we need to start. What happens if we
generate output with I. Can we really use it? And the best article
is here from AI. So we start with text. And don't worry, we will do the same thing with pictures
also in this video. If we scroll down to the bottom, you see the copyright
shields and Op tells us this Openai is committed to protecting
our customers with built in copyright
safeguards in our system. Today we're going
one step further and introducing
copyright shield. We will now step in and
defend our customers and pay the costs incurred if you face legal claims around
copyright infringements. This applies to generally
available features of ChechiPT Enterprise and
our developer platform. In simple terms,
OpmayI tells us, don't worry, we
will cover these. You can use our text
wherever you want. And if somebody claims this
is copyright protected, we will protect you.
This is really nice. But keep in mind what
they said exactly. Just if you are a user of ChechiPT enterprise or
if you work via the API. If you work in the standard
ChechiPT interface, most likely they won't step
in if you get legal claims. But the possibility that you get legal claims is also relatively low because they
are not interested to pay legal claims
like every other day. They must seem really confident
that this is no problem. And here comes the but also
Openai has legal claims. For example, the New York Times, The New York Times made
legal claims against Openai, that Opi trained on their data. They trained on data that
was behind the paywall. Now they say some
things sometimes and in the end of the
day, opemyy got natus. But like I said, we need
to be a bit cautious. Now op Maya tells us
this is no problem. I am not a lawyer. And for that reason, we need to assume
that this is correct. But what is with pictures? What is with pictures
out of stable diffusion, out of mid journey, out of Adobe Firefly. These are the big players. Let's just take a look. This right here is the
fastest thing from Micherney, and this comes from the
Michurney Help Center. Michurney subscribers own all
the images they've created, even if their
subscription has expired, and they are free to use those
images however they like. There are two small exceptions. If you upscale an image
of another user that upscale is owned by the
original creator, not by you. It will be appear in their
gallery on the website instead of yours and you need
their permission to use it. This is number one
And number two, if you're a business grossing more than $1,000,000 a year, you need a pro plan. That's basically it. If you're grossing more than
1 million a year, you should take the biggest plan and then you are ready to rock. Marnie, also tell you
more stuff right here. If you go on content and writes. Also mine tells you
this right here, Please consult your own lawyer if you want more information about the state of current intellectual
property law in your era, Basically, yes, They say you can do whatever you like
with the pictures, except with these two rules. If you do more than
1 million a year, just use the big plan and don't steal stuff
from other guys. That's basically it
right here in mine. But we have one small exception. Let's just assume we make a picture of Donald
Trump that eats Nutella in a BMW and Mickey
Mouse is also in this car. This is not the smartest
move to do if you want to sell this picture because
there are a lot of companies, and also companies have the
copyrights of disguise. Mickey Mouse is owned by, I think at least by Disney. Nutella is owned by Ferrero. Donald Trump. I don't think that Donald Trump
would like these. Bmw is also a company, and you can't use the company
names in your content, Just do any stupid stuff. Come on, we don't have
to talk about this, but we need to take this
into consideration. Yes, you can make
pictures of Donald Trump, of Elan Mask, of BMW, if you can of the Mickey Mouse. But don't try to sell this, So don't go out
there and print like Mickey Mouse on one
gazillion shirts. This is not a smart move to do. I don't think that Disney
will love you if you do that. And that's also basically
it about Journey. And here comes Adobe Firefly. Because Adobe Firefly is
a little bit special. Yes, you can basically
use it commercially. But this article, this
here, is the special thing. If we scroll down a bit, this right here, I want to
show you generative AI. As with any, AI is only as good as the data on
which it's trained. Mitigating harmful
outputs starts with building and training on
safe and inclusive datasets. For example, Adobe's first model is trained on Adobe
stock images, openly licensed content, and public domain content where
copyrights has expired. So Adobe tells you you
can sell everything whether you make with Adobe
Firefly, for example. You don't need to worry
about copyrights because like you can't make
pictures of Mickey Mouse. Because like Mickey Mouse is
protected by the copyrights. And most likely the Adobe models are not trained on this stuff. This is the coolest thing
about Adobe Firefly, so you don't need to
worry about this. And then you have
stable diffusion. And you know, stable difusion
is completely open source. That means you can simply
do whatever you like, but always take into consideration to don't
do stupid stuff. So think of Mickey Mouse. Don't try to do these things, but you can create
whatever you like. Then you have also the
tools like 11 Labs, the video creation we talked of about a lot of this stuff. And always do the same
things theoretically. You can use every single
thing that comes out from AI and you can
make money with these. You can use it commercially, But don't do stupid stuff. So don't make like
deep fake voices and deep fake videos
of Donald Trump, how he does like stuff that is not correct and try
to sell these videos. So just work normally and then we will
not get in trouble. And like I said, I
am not a lawyer. This is the stuff that
the company tells us. And that's basically
also what I do, and that's basically also what I can recommend from my position. In the next video,
we need to take a closer look what
happens with our stuff. What happens if we upload data? Will this data be spreaded
all over the world?
42. My own safety: will my data be in the Web?: In this video, we
will talk about your data because
also this is really, really important
and here are a lot of nuances and just like I said, I am not a lawyer
and I am relatively sure that this stuff
will change over time. But as you know, I
will include updates. If this happens first, let's just start
what happens if you are in this normal
GBT interface. Let's just assume
you are a business, or you have a business, you have employees
and much, much more. But you need to take
into consideration, if you type in stuff right here, I can and probably will
train on this data. This means if you type in here stuff from your business
and you don't want that, pay trains on this data
and you don't want that. For example, this data shows up somehow somewhere in a
feet of other people. Then don't type it in. This is really, really
important to me, so you need to take this
completely in consideration. But, but, but we can do a lot
of stuff to make this safe. Number one, you simply
press on your profile, you go to my plan. And this right here,
this is the team plan. If you use the team
plan, you are safe. You can simply make an account. Yes, this is a bit
more expensive, but you can also bring in other
people from your company. And I will not train your data, but I want to make
this crystal clear. If you have the normal GPT plan, pay can and probably
will train on your data. If you have the team plan Pi
will not train your data, but you have more options, you have this other
option and you can simply press again on
Settings and Data. This time here you can
press on data controls. You can deactivate, chat
history and training. Now in theory, hope I will no
longer train on your data, but this is not 100% confirmed
and you should always press and learn more because this stuff can and
probably will change. But we have another solution to make this completely private. We have this open
I playground and every single thing
that you do in this playground will
be completely private. Openai will not train on your Data API and
playground requests will not be used to train models and always press learn
more because like I said, this thing can and
probably will change here. You make API calls and you need to pay per do you need
a billing account? And of course you can make the billing account
right here on settings and usage and you can and probably should also
give rate limits, keep that in consideration. You already learned this, but I want to make
a summary so that we understand how
all of this works. By the way, every single thing that you do over there API, so if you train a
chat bot and much, much more, your data
will be completely safe. And if you want to build
a GPT that is private, do it here on the assistant
API, press on Assistant. And here you can, of course, also upload your files. Also upload your knowledge and
Pi will not train on these and that's basically
how you can work completely safe with Chat GPT. There's also the
possibility to use the Che GPD Enterprise Plan. Yes, they have a few plans, Che GPT teams and Che GBD enterprise if
you want to work in a normal GPD interface or if you don't want to do this
work over their ABI. Now let's talk about
all this other stuff. So not large language models, even if large language
models is maybe the thing that can
do the most damage. But let's just talk
about pictures. What happens on mid journey? What happens if you
create pictures or if you upload pictures
from your own face? This gets interesting because every single picture that you create can and probably will
be in this Explorer page. And people can and
probably will find these. People can and probably will take your prompts and run them themselves and then they
have your pictures. Yes. That's simply
how it works now. Yeah. You can also make a strong strong plan
in mid Tourney. If you don't want to do this, just use the strongest plan
and you are protected. You can physically
the only thing that you can do inside
of mid journey. If you want to be
private in mid journey, use the strongest subscription. And always make your
own discord server or work on their web page. If you work on their webpage
or on your own server with the strongest plan in the private mode, you are safe. That's at least what
Micherney tells us. And like I told you, please read for yourself. Just go on the articles on mine. On the Q and A, I am relatively sure you will
read the same stuff. But we have also other tools like for example,
stable difusion. Of course, stable difusion
is open source here, you have absolutely no problems. We have worked most of the
time in a Google Cop notebook. Every single thing
that you upload in a Google Cop notebook will get deleted as soon as
your session is over. So don't worry about privacy in Google co lap And with
stable diffusion, this is basically the only
thing that I can tell you. Stable diffusion is safe. That's just something that you need to keep in consideration. We work here like
on the Internet, and if you post something, if you throw something into
the Internet, into the cloud, the possibilities are high
that other people see this. Now, what's my solution
for all of these? I only use stuff in I
tools that is okay for me. I type in only stuff that is no problem for me even
like to post on Facebook. I only use pictures that
are also no problem for me. If I want to upload
a picture into Che PT Journey or another tool, I always think about it. Would this be okay for
me to post on Instagram, to post on Facebook, to post on Linkedin? If yes, no problem. If no, I don't do it. These are simply
the rules for me. You need to search the rules
that work for you because copyrights are a little bit crucial and they
change all the time, and I am not a lawyer. You need to keep this in mind. Now let's forget all
the copyright stuff. Just have someone
using I tools and don't think all the time
about lawyers and copyrights. At least I don't do
this all day long.
43. Will AI take all Jobs?: In this video, we will talk simply a little bit about AGI. So artificial general
intelligence. The point as soon
as AI is better in most tasks as humans
about maybe a super AGI. So the point where AI is
better than all humans combined what happens with chop outlook into the future
and what all of this means. And of course I don't
have a crystal ball now. First the brightest heads of the entire world do
not know what happens. All the CEO's of these
companies like Sam Altman, El, and Mask, the
Microsoft CEO Nadella, Mark Suckerburg from Meta. All of these heads,
they don't know what exactly happens
in the future. But all of them think AI
is the next big thing. All of them think AI
will change the world. All of them say AI will change every single
job on this planet. And not everybody says
the same stuff Now, Some of them think AI will
change everything radically, and others just think that AI will simply change
the job a little bit. We simply don't know it exactly. Also, humans are not good
to see in the future. If you asked the people
a few years back, what jobs will AI replace, everybody would have
said blue collar jobs. Right now, the
completely opposite is happening because AI
takes white collar jobs. The creative stuff like writing, making illustrations, painting,
making photos, and so on. In all of these, the cases, AI gets better and
better and better, and is also better than
like 99% of the people. At least. Ai is a lot
better than me in writing, in painting, in making pictures. We simply don't know
what happens exactly. But we will know that AI
will change a lot of jobs. And our job is to
adapt to these. We simply need to learn to use. I, Sam Altman, the CEO of Pei, just told us, yes, jobs will change, but jobs
will absolutely not go away. A programmer can now program like roughly three
times as fast, but the demand for
code also goes up. This is a good thing
because we need this code, and all these programmers simply can become
more efficient. Of course, we need to
learn how to use this. The same thing may
be also with FSD, With full self driving, maybe I don't know when, but maybe as soon
as this get online, people will just be
more productive. They can go at work
and as soon as they are in their car
they can be productive. They can do stuff on their
phone, on their laptop, or even like chill and the watch some Netflix or whatever.
You get the point. Yes, AI will change a lot, but we don't know exactly what happens as soon as AI will hit. Yes, jobs will be replaced. Jobs will be different, but we don't know exactly
how and when this happens. Yeah, maybe some jobs, they go away completely. I think maybe of a
voice over artist. I don't really
think, to be honest, that we need him
right now because a lot of tools like 11 labs, they are nearly just at
the edge at matching them. Yes. Right now they
are maybe not better, but they are, of course,
faster and cheaper. If we use stuff like Adobe
to enhance the quality. Also, the quality is
pretty damn good. I think like voice over artists, they are not needed
like forever. But this is no problem if
you are a voice over artist, just hit me up and let
me know what you think. Now, I don't want
to say anything negative about your
job, if you are one. I'm just be cautious to
understand what you think about the situation because
everybody thinks different. Of course, basically the
same thing with programming. Programming will
change radically, especially if we
reach a point where AI can program and
improve on itself. Also, right now, there are studies out there that show that GPT four can make
good rewards for GPT. Basically, this is like the
basic concept that we learn, so the reinforcement learning
from human feedback. And we have basically
studies that show that GPT can reward these AI models better than humans
can reward them. They learn better. If we let GPT to decide when
and how to reward them, just go a little bit further. This machines will do this
completely on their own. In the future, this stuff
starts to get better. What happens as soon
as we reach like super AGI GI that is smarter
as all humans combined. Now first of all, I don't know if this happens,
when this happens. And nobody can tell
us these also, nobody knows what happens. We can't really imagine that. We can't figure it out. Because like this, AI would
be smarter than all humans. This AI would think about stuff that we are
not able to think. Yes, this is scary, but maybe everything
will turn out so damn good that we can't even
imagine it right now. All of this is pure speculation. Don't let anybody tell you that he knows what comes
in the future. You simply can't know if
this stuff all plays out. If we reach a super
intelligence, nobody ever on this planet
will know what happens. Because the superintelligence
will be smarter than every single one of the humans that try to tell
you what happens. So you can't know it. It's just physically and
mentally, it's not possible. We have also like Algos also
right now, this star thing. The star thing was
around in 2023. I think there was basically an algorythmus that was able to understand math like on a deep level and it was all just speculation,
to be honest. But what if Algo comes around the corner that
understands math? Like really, really, damn good. Maybe that understands math on a whole other level than humans. This Algo can simply break the Internet, break,
block, chain, break, crypto, break
the stock market, like break every single thing. So we simply don't
know what happens. But until up on this point, every single thing
on Earth got better, Everybody has to eat at least most of the
people on the world. So let's just talk general. So more people in this world have to eat than ever before, I think, I hope. And basically we need to
believe this because we are optimists that all of
this gets better and better. People like El and
Mask also talk a lot about a basic
universal income. So AI can work on its own. Ai will create value and
so humans can work less. And there are still
resources for all of us. Maybe we go back
just a little bit, like a few hundred years ago, people just did stuff to
have something to eat. The rest of the day they
simply laid around, had some fun, and so on. Now people are
working like 2047, Maybe we can slow down
a little bit also. This would be nice,
wouldn't it be? Let's just see with bright
eyes what the future brings. At least I am optimistic. And let me know,
what do you think?
44. Ethical AI use and the Downside of AI: In this video, we talk about ethics risks and also
the downside of AI. I will simply show you
some bullet points and you can also let me know what
you think of all of these. First of all, what's
an ethical AI? So guidelines for ethical AI. Of course, all the
companies that develop AI, they try to do it ethically. Openai, Meta, Google and so on. They all try to be ethic, they try to use training
data, that is okay. They try to make the
models in such a way that they are not biased or at
least not that biased. We have learned that
models are always biased, but they try to do their best. But what's especially important, at least for me, transparency, fairness, non harm,
accountability and privacy. And what you can
basically do so that it's more or less what
these companies can do. But what you can do, just
work with common sense. You already heard it. Just make stuff that
doesn't harm people. That is my advice
for ethical AI. We don't have to overthink this, the companies will do
a lot and we just work with common sense and
don't do any harm. Let's just talk one
more time about data protection because I got a lot of questions about these, even if we just covered these. Data encryption
and anonymization is of course really,
really important. This is also done
by the companies. Yes, it's possible that
ChechiPT trains on your data, but of course they
try to do this private and not
public, your content. I just want to tell you you need to be cautious because
like you'll never know. Pay attention to
security when creating. I like if you make a chat board, if you do something,
always try to use passwords wherever possible. This is also like
just common sense if possible and if
you don't want to do stuff on the
Internet in the Cloud, whatever, install
things locally. If it's possible, no
connection to the Internet. Don't no worries. Use things like
ChachiPT Enterprise or ChchPT Teams or at least
disable the chat history. This is also some stuff that you can do if you don't want to share your data and of course you can work
through their API. We already covered
these, but like I said, I got a lot of questions, so we need to address this. Again, before we talk about straight the risks and
the downsides of AI, I want to talk about
something that is like in between autonomous vehicles. This is an enormous potential. We can not only save time, but also save human lives. If we get to a point where
an autonomous vehicle drives better than all
humans or than most humans, we will save human lives. But of course, it's not
easy and it's challenging. And we have more challenges than just the challenge to get there. Because legal framework and ethical use cases
in decision making. This is, I can't describe
how hard this is, just think about this yourself. Just think, for example, if an AI needs to decide
what it should do, maybe you are in your car, maybe you with another guy. So there are two
guys in the car. And then there's another
guy on the street. And the AI needs to
decide either to basically like kill the guy
and smash into this guy. Or go into the
ocean or wherever, or into another car. And like risk the life of
you and the guy next to you. Now what the AI should
do in this use cases, let's just assume that
the AI knows exactly either you need to die or
another one needs to die. Or let's assume the AI
needs to decide if a, a little child has to
die or two older people. This is stuff that
nobody can really tell. I think this is enormous
difficult to get. This is really enormous
hard to solve. All this decision making
is really hard to solve. But we can also make decisions
that are a bit easier, or at least that are not
deciding life and death, for example, in the
business world also. Here we have really
big downsides. Let's just say we use AI
for data analyzing and to support decisions such as risk management or
optimizing supply chains. What if the AI gets it wrong? Yes, this is possible. Let's just say you analyze
really large amounts of data, you don't control it, and then you are in
complete trouble. Yes, even if the AI will be
better than most humans. As soon as this stuff happens, people will hate AI because like nobody wants to
pay with their money. Machine learning assists also in predicting
customer behaviors, aiding in understanding
market strategies. And the same thing right here, of course this can help. This will help basically
this helps also right now, just think about Netflix. They know exactly
what you consume, and then they will give
you similar stuff. Think about Youtube, but what if these machines make
the wrong decisions? All this is also a
downside of the AI. Now let's go straight to the
risks and downsides of AI, amplification of
existing discrimination when trained with biased data. This is huge speak
and you also saw it. We can make a choke of men but we can't make
a joke of woman. I personally, I have no problem with like
jokes about men, of course also harmful purposes. For example, deep fakes. You know how to make them. Police do this with common sense cyber attacks or for surveillance,
for example. Incorrect decisions that could lead to financial
or physical harm. Wrong investments or
medical instructions, car causing accidents and so on. We already heard this. Just think about if an AI
starts to be a surgeon. If I like tries to fix your hand and an
AI makes mistakes, all of these are
enormous problems. These problems are
not easy to solve. This right here, this is
for me, like this is big. People get lazy. Nobody talks about this. I think of myself here because as soon as I have to
drive with my car, I am always lazy. I just used the
navigation from Google. I don't know where I need to go, I simply used my Nave. If I think back a few
years when my dad, like he was used to drive, he always knew where to get. He doesn't need it a navi, like because there was no navi in that time. People just
knew where to drive, when to drive, and how to drive. I myself, I am completely lazy. I'm not interested to learn this stuff because like the
navido does everything, we get completely lazy. And if such a technology
doesn't work, like I don't know where to go. Yes, this is also big, this is also a downside. Same thing basically also
with all these AI tools, like if you never ever
write an e mail again, you don't know how to do it, you can't do it without
these AI tools. Laziness is also a big thing. And that was basically
all the stuff that I wanted to tell
you in this video. Yes, maybe a little bit boring. Yes. Maybe a little
bit different. But I think we need
to address this also. The downsides of AI
there are there and we need to take all of this in
consideration if we use AI. To summarize the use
AI just ethically. So just use common sense, don't do any harm. And keep in mind that
there are downsides. If you use AI for
every single thing, you can do it without AI. Ai, of course, is biased
and can make failures. Not every single thing of
AI is completely true, and every single
AI tells you that even chachiPT like down here, they tell you, hey, our output, it's totally possible that
all of this is wrong. Take this in consideration.
45. Recap and a Work Assignment!: So this section was a
little bit special. First you saw how AI videos can eventually simulate words. And we can use the
simulation to train robots, and that can eventually lead to AI that is
really, really smart. Then we took a look
at the copyrights, what you can create,
what you can not create, and is your data safe. We also took a look at AI, or AGI in general, and the downsides of AI. This section was a little
bit broader and of course, you also know what learning is, learning is doing, and you
get better by doing more. Learning is same circumstances
and different behavior. And what you can learn
from this section, first of all, of course, just take a quick look
at the copyrights. Don't do any stupid stuff. You know that you
should not create stuff that is
copyright protected, like Mickey Mouse or even
people don't do that. You know it, you don't do it. You have learned, you have
also learned that AI and AGI is potentially big in the future and you
know what you can do. To stay in the loop, just play a bit
with these tools. You are on the edge
here because you understand how all
of this works. That's the best
thing, and basically that's the only thing
that we can do, and that's my recommendation. Please stay in the loop, play a little bit
with these tools and just take a look
at the copyrights. Don't do any stupid stuff and you also know how
you can learn better. You learn better together. Please share this course
with someone where you think he would
benefit from this course. This is really cool, because not only
I have a benefit, so you have a benefit and
the guy that comes in. Because if you tell
this guy to come in and he gets a value
out of this course, he will describe the value
to you, Your status rises. Thank you for that. I hope we
will learn better together.
46. My Thanks and What Comes Next: Congratulations, you did it. You gave me your
most valuable asset on this planet, Your time. Thank you from the bottom
of my heart for this. This is the last lecture
and you have done it all. We have started with the
basics of AI videos. What's a diffusion model? How all of this works? And much more. We even
covered what a video is, it's simply a lot of frames. Then we took a look
at the easiest tools. We started to create our
AI videos in collapse, in runwaML, in hyperim. After that, we took a
look at AI avatars. They are cool and they
can scale your business. We started to get a pro
because we used Google Colab, stable difusion, and much, much more to make deep fakes, to use stable P fusion
deform diffusion. And this is really
the hard stuff, but we can do enormous
things with these. Animations are cool. We took a look at how you
can use all of these. So you can even make your own projects just
like determinator video. Just combine these tools like Ka and edit it a little
bit in shortcut. Cap cut, Davinci resolve
or whatever you like. Then we even took a
look in the future, you have seen these models. They can really
simulate the world. And these simulations, we can
use them to train robots, and this is maybe the future. We can also make video
games like this. This is cool research and I think we should
totally look at these. You have really seen it all. You also saw what you
can make and what you cannot make and what
happens with your data. You know every single
thing that you need to know about AI videos. I have a little bit
of homework for you. Please just stay in the AI is here to stay and we
need to learn about it. If we learn about it, we can really take advantage and not just cry
that it's there, but you took the right decision. Because you are in discourse, you are a learner. You also know what learners do. Learners use the
same circumstances but use different behavior. They use AI tools. They also know that we can
learn better together. I have two things that
you can do for me, for you, and for all
the guys out there. Leave a nice five star
review and we are all happy. Thank you for that. And
if you share the course, more love goes out in the world. Thank you.
 Arnold Oberleiter