Transcripts
1. Trailer: Hey, My name is
Jeremy, a full-time brand designer and
content creator. And in this class, I want to be showing you three Ai tools that I use in my
personal workflow when working on projects, I'll show you how to
create stunning images in midjourney and Adobe Firefly and using ChatGPT for Copywriting and
crafting brand messaging. I'll be showing you how to
use Advanced Prompts to craft specific Images in
the style that you want. I'll also be talking
about how to use generate a film and how to
craft cool 3D texts that you can use on
your designs will also be exploring
different ways on how to prompt ChatGPT to create
email newsletters, Copywriting headlines
for content, or even generate IDs when you're working
on a brand projects. I'll also be giving
some tips and tricks, practical activities
that you can take in some extra resources
that you can download to follow along with the closet is classes and be
grateful beginners or intermediate that wants to
learn how to get better at these air tools and not just
do the surface level stuff, but dive a bit deeper into advanced prompting and actually
getting better results. So if you're a
designer or creative, a market or a person who creates content and its cost is
going to be great for you. If this sounds FUN, then
enroll in the class today and start learning how you can
leverage AI for your business
2. Creating 3D Text in Adobe Firefly: In this lesson, we'll
be talking about how to image craft in Adobe Firefly. Now, Adobe Firefly is still
in beta and Adobe is still working on expanding on the
tools that are currently has. At the moment, they currently
have a few generators. They have text to
image generator. They also have
generated recolor, generate a fill, text
effect and text to image. Those are the main generators
they have right now, one of the key things
that you need to remember is when
you're prompting, you never want to be vague, but you'll want to
try and be specific. It's all about keywords. Now, let's jump in and start to play around and I'll show you
what I mean there to go on. You just go to firefly.adobe.com and you'll have
access to this page and you can see there's a lot of different stuff coming in
the future, which is cool. And so we're gonna be playing
around with texts effects, text to image, and genetic fill. We're going to be playing
around with generic color. So let's go to text
effects on the right side, and we'll have a prompt
bar at the bottom here. Let's just put in cosmos there. And what I'm going to do is
to start to type something. Now, when you're
doing prompting, I've tested this and
you don't have to add commas after the each
and every keyword. So you just want to write all
the keywords that you want. I'm going to type in
trance, parent glass. Press Enter and
you'll see generate. Sometimes it takes a
little bit longer. And so you can see it's
actually generated these texts. Now what I prefer to do off the bat is I go to
the right-hand side. You've got all your
parameters and you're tools. I'm gonna go down some color and I'm gonna change the
background to black. Artists prefer to see
because I can see the edges. And so if I want
to say this image, I want to know if,
if I'm want to Photoshop it or how
much detail there is. And so I like to add the background color, one
of the things as well. Down the bottom you'll get
four different variations of the same prompt or the image. So you can see I
put one prompts, but it will give me four
different variations. So maybe I liked the second one, I'll click that and
it should pop up. Or maybe you like maybe
the third or fourth one. You can click on that and
it should load up as well. So it gives you a few options. Now you can see there's
actually a lot of artifacts and I'm details on the edges. But what if I don't want that? You go to the right-hand
side and you can see this is matched shape. So basically it's kinda confined the actual image of visual into the actual size or the boundary of
the letters prefer not to have it on
medium or loose. I'll show you what
loose looks like. You can see it as
all these details. This effect only works for
floral type of elegant design. So let's say Go flora are all Victorian,
victorian vintage. So you can see it adds all these nice little
flourishes and details on the
outside and the ends. So it works for
this type of style, but for everything else. Sometimes it doesn't
work too well. I prefer to have the
matte shape on tight and basically it will just keep
everything nice and clean. So you can see there,
there's no flourishes here. It just keeps everything nice within those
letters and shapes. Now you've got other
default sample prompts on the top
right you can see here, I can click on flowers. You've got wires,
balloon doughnuts like who doesn't like donuts. And you can play around
with that if you're struggling to come
up with some ideas. I can also change the fonts
and maybe I want to go to our farm to pretty sure Adobe fonts will probably inject some more fonts in
there later on. Now that looks pretty dope. Look at that. That's amazing. And you can see that the
keyword is just donut, so we can start
typing other things. So maybe I can go
doughnut space. And I want to tap a
color, let's say pink. And we can type PFK-1. Why I'm typing pink in this prompts section
is that it's actually better to put the color in the prompt bar instead
of on the right-hand side, you can see we've
got color here. So before I change
the background color, but you can also take
change the texts cards. So if I click on this rectangle here and I got to
change the color, sometimes it doesn't work. So that's what I
prefer to type it in the Prompts box because I'm gonna get a more accurate image. So you can see
I've put in green, but it didn't change
the actual color of the doughnut text. So what I'm gonna
do is I'm going to turn the text color off. And once again, I'm gonna click generate here
at the bottom. And now you can see it's added
that pink doughnuts there, which looks a lot better. Now what if we wanna do some really interesting
and funky designs? What I recommend doing is
using uncommon keywords. So to find ids is I usually
go to your work for them.com and other goods side is Creative Market and you can go to the Text Effects section. So for example, if I
gotta you work for them. It's just a graphic design
store that sells like asset. And I typed in texts
effect in the search bar, I can see all these
cool text effects. So we've got chrome, we've got glossy 3D, messy print, iridescent Chrome. We've got Anna glyphs, 80s metal Photoshop, Text
Effect disorder, glossy. There's all these different
effects that we can try out. Let's try iridescent
chrome effect. So I'm gonna go back to Firefly. I'm going to change the text
on the right-hand side. On the left-hand side, you
can actually change the text. And I'm going to
type iridescent, boom, that looks really cool. And we can see a
different variation. It looks super cool. We can obviously
write this result. I can also give feedback if I want, but I
don't want to take that. I can go to Options. I can also love heart or I can also download from
the top right corner. If I say I liked this text, I can click Download
and it should download. And then I can go editor in
Photoshop or whatever I want. We've already talked
in two keywords. What if we go a
little bit deeper? So what if I go glow and we'll click Enter
and it should generate. And let's see the
different results. You can see it made it a
bit more loose, liquidy. I can go and change the shape, match shaped and medium.
Let's see what that does. But as I mentioned before, you might not get
good results there. I can turn off the black
as well if I want to see what it looks like on
just white or transparent. Now, what if I type
something like alien? Now, one of the advanced
things that you can do with prompting in Firefly is there's something called style tags. They've got outline strength, they've got iterations,
they've got stylized in a few other ones. But there's only one
that actually really worked well and that's
called iteration. So I'm going to show
you what I mean, dinosaur fossil red. And you can see we've got
these cool result, right? What I wanted to add
now is I'm going to add the iterations tags. So this is what
you want to type. You want to type in square
bracket iterations equals 60. The values that it
can go from is 0-60. But the best thing is to do 60. And basically, what
it means is that it does multiple passes
over the same image, so it doesn't
multiple iterations. Instead of just giving
you the first result or the first-generation
that it comes up with. It we'll go over that
same result multiple times to get a better result. So I'm just going to
get rid of that bit. And I'm going to
make sure you type this and click
Generate and just pay attention to the
facts and see if there's more details
that you can see. It's a lot more crisp, there's a lot more details. The shadows, the
lighting, you can see. There's some bones in there. I think it looks
really, really cool. I'm going to type in
carbon-fiber nano waves. Spaceship, futuristic
iterations equals 60. Boom, that's looking
pretty amazing. Let's look at that. Love the detail. There's so much
texture in there. It's got like these scales, but it looks like
metal allo lawyer or a burn material, carbon-fiber. It just looks really cool. So what I do recommend
is make a list of different types of materials
that are in the real-world. You can go on ChatGPT and
make a list or go on Google. And you want to use that
as part of your keywords, and that's how you
get a nice effect. Another little trick
as well is that if you click Backspace, obviously on my mouse, I've
got a little button here. I can go back and you
can see it will go, just go back to the last
thing AI-generated. If I forgot to say something, I can always just go back and
I can get forward as well. And you can see that it's saving the cookies on the website. So that's a little
trick as well. So let's go back here. And one of the cool
effects that I like is this fridge effect
or this ice effects. So let's go type something like frozen ice age,
something like that. The iteration 60, I'll
change the texts on the fly. Let's go maybe all caps. I'm going to change
the match shape because I don't really
like the artifacts. Cool, boom, lookout, awesome. That looks like it's
so clear and amazing. And then all I can
do is actually got a background, make
it transparent. Click a little
download button again. I can go into Photoshop and
start to generate things. Now I want to show you
one last style tag that is really good
when it comes to faces. So let's type in something
like and I'm going to first generate and
then I'll show you what we're going to do. So I've created stone pillar,
but it's not what I want. So I'm just going
to get rid of that. You can see in this
text we've got some Roman gods with faces. So this is a facie on the left. We've got a mangled
one here on the right. And then there's a
bit of a chin in a nice bead here on
the right powder. We actually fix this. Or you gotta do is
copy this style tag. I'm going to copy and paste it. Obviously, you can type
it in, save it somewhere. I will have it in the
resource section. We've got fixed dashed
face equals order, equals 100, do order, third order does it itself. And then 100 is just saying the maximum input or the
maximum iteration that will do. So I'm going to click generate. So pay attention to the phases. Let's see if it improves
it or it makes it worse. So you can see on
the right here, it's actually showed
that some of the eye, which is kinda cool, This
looks a bit the same. This looks like it hasn't been more detail, bit more chiseled. So let's try it again on
this one so we can see all these faces and, or refresh. So you can see it has changed, its altered, it, it's improved. It, it's basically
allows the face to come up to emphasis, emphasize the face
a bit more and give more details as
you can see here. Let's give another example. Let's type in. Cool. So we can see there's
a variation there. So I'm going to
generate it without the face order and
then we'll test it again with the face order because they pay attention
to the faces here. And that's how you
create some really great 3D text designs in Adobe Firefly
3. Creating Images in Adobe Firefly: Next up, we're going
to try text to image. Now let's go and
click Generate here, chromatic distortion, grunge backgrounds, grain,
colorful, beautiful. So we've got these nice
backgrounds that would fit nicely with some abstract
Art or the poster design. You can use it as a texture. We need bring it to
Photoshop and overlay it. Once you can do is on the right side you've got
all your paramaters. We've got aspect ratios, styles, color, tone,
lighting, and composition. So you might have already played with some
of these before. Now one of the cool things
is that you can actually change the ratio to widescreen. And this will just
add more resolution, a bit more pixels to the canvas. It doesn't make it like for
K resolution or anything, but it just gives a bit
more pixels to play with. So if I click that,
ignite a bit more wider. And one of the cool things with Firefly is as you can
tell it to find similar. So if I, for example, maybe I like this one, the top right corner on the left side and you can
see it says show similar. I'm going to click on that
and it would generate the other three
squares iterations that are more aligned with
that image that I liked it. So it's going to show me more
of this image that I want. You can see that it's come
up with another few ideas. Now this is really cool.
Bottom one is nice. Maybe want to download that. I'll click Download
bot can say that. Don't want to zoom in. I can actually just
click on the image and it will pop up with a
light box type of thing. And I can use my arrow
keys left and right just to look at it really
fast and like okay, maybe I like this, maybe I
want this on or whatever. Now, I'm going to
show you something else that works really well. It has inbuilt genital fill inside of the text
image generate up. So I'm going to type
something like elegant gold, Palais, marble, table, English,
United Kingdom castle. Let's see what that's
going to generate. But before I click
Generate, I don't want Art. I wanted to change the
content type to Photo. With Adobe Firefly, it's
important that you change the content type
or else you'll get a different result than
what you're looking for. So it's instant, I
want to actual photo. So if I change it, it
should automatically start generating with my
new prompts there. So we've got a few options. You've got marble gold plate, that's the United
Kingdom. Maybe just made. I don't know if
that did anything. If it made, sort of see how it's got like flourishes
on the plane. Maybe that sort of gave
it that elegant feel. What I want is I want
to show similar. I want to see if I get rid
of United Kingdom castle. And and then I'll kick show similar because I
wanted to find a shot that has a top-down
view in this image. I'm going to, I like
this image the best compared to these are
some of these other ones. So we're gonna use this. And what I'm gonna
do is go to the top-left and you can see there's a second button
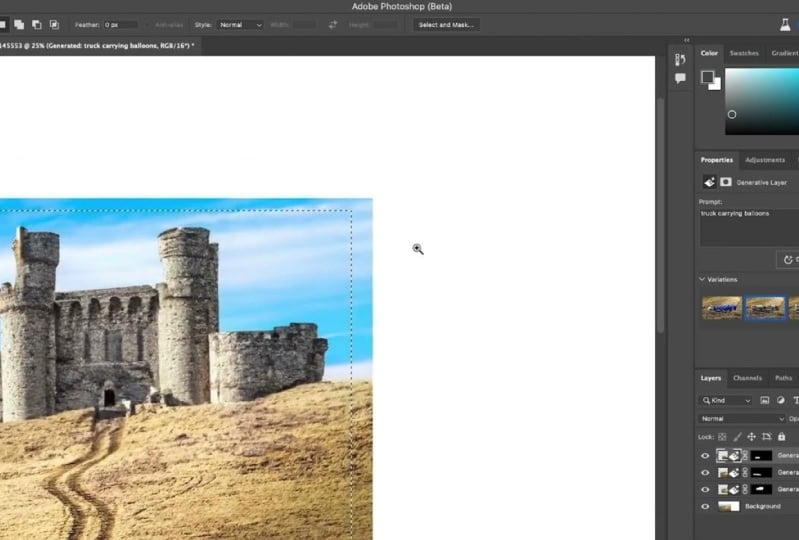
that says generate a field. It's got to start
with the dotted line. I'm going to click on that now. It's going to open up page here, which is a generative field
page for this image is, and I can actually add or
remove things really easily. So for example, if I want
to reroute something, I got to the left
side, you've got insert, remove and pen. Pen just allows you to move
the image on this artboard, remove a lemma to
prove something. So all I gotta do is paint
and then I can say Remove. Now you can see
instead of actually removing the breaded,
actually added something. So what you wanna do is done the bunny you've
got to add and subtract. So if you want to get
rid of this bread, I'll click, Make sure
you have subtract them. I can adjust the brush
settings as well as maybe want to make the
brush a little bit bigger. So at the moment I think
there's actually a bug and the Beta way you can't
actually remove this. So you can see I'm
trying to paint but it's not registering,
so you want them. Another thing I can do is
click on Background and I will actually remove the background,
which is kinda cool. So I can click Remove
or if I click CLI, it will cancel that action. Then now it's adding some
different backgrounds here. It'd be cool if I could actually
prompt it, but I can't. So I like this with black on that looks really cool
when I click Create. So now we will look
like it's sort of vintage mixed with
elegant, which is cool. And now I want to
click on Insert. So on the left side
I'm gonna click Insert and maybe we want a knife. I'm just going to
drag paint like this. And then the prompt box will come up on the
bottom and I'm going to type in gold knife. Press into the generated images were removed because they
Violet use a guidelines. So maybe they think it's
something to do with violence to the Ai is
still being improved. So that was about it. So let's click Cancel. And let's type in spirit and
said, awesome. So boom, it's dropped a spoon. I don't know what topics
within that ease that looks futuristic. But anyway, that's
a nice spirit, but maybe I made it too thin
so I can click more or keep. If I keep kit, that's cool. Maybe I want to
add some veggies. So let's draw around here. Type in carat. We've got some weird one,
potato carrots here. I can a type key. Let's maybe go. Not stake, maybe meatballs or something. So let's just add some salts.
It got the Prompts wrong. So Ai is not perfect. You're going to have
instances like this. Maybe we're happy with that. All we gotta do is go to
the top right corner, click Download, and it
should download it pretty, pretty simply, the texts, the image generator in
conjunction with generating fill. And this tool is powerful
that you can use it for really anything. Let's
try something else. Let's try to loading or in
forest dramatic lighting. It's putting a forest in
the orb as the cutree, the, OH, so you really
have to be specific. Now what if we wanted to Customizes, make it
a bit more in depth. I'm gonna get a color and tone. I'm going to click
environment color. I'm gonna go to lighting, and we'll want to go
dramatic lighting. And then the composition. You can actually
play the composition and use this to your advantage. So maybe we want a
narrow depth of field. The more you customize it, the more power you give it to craft something really
unique and specific. So now you can see it
looks really different. So the shallow depth
of field means that the foreground and
background will be blurry. And so it's just focusing
on a small part in the middle of the main
subject, which is this old. So you can see out of this
nice blurry foreground, which is really cool. And some of the effects
are really nice. It's sort of more vibrant color around it with the yellow
and The Blues popping. So I think it made
a big difference. And that dramatic
lighting you can see the outsides are
really more dark, so it's creating contrast and
the always really bright. So now what if we wanted
to change the style? You can always go
to styles here. I'll click on All and then I can see maybe we want to
a different theme. Maybe you want it pixel Art, or maybe we want it
geometric, or a painting. There's so many different
effects you can do. Let's go bioluminescent
and we'll click fantasy, and we'll
click Digital Art. Let's click that. Now at any stage, if you don't want to actually use any of these styles anymore, you can just go to the bottom
and click the X so I can delete styles or I can
click CLI or styles. So now once more,
let's look again and see what we, The difference is. So it's added some more
details of these flowers, some lightening coming through. A lot more details. Some leaves actually has
this painted effect. So it's more like artsy, sort of like oil painting
as you can see here. So that's really cool. If I don't want any
of these styles, I can always click
Clear styles and it'll delete all
that really easily. Now let's do one more. We'll type amazon frog leaf. Amazon frog leaf. And I'm going to
change the composition to macro photography. And we'll just turn
the lighting to non-color tone will give
it a, give it a warm tone. Beautiful look at that. It looks like a real, someone took a real photograph. But it's, hey, AI-generated. It looks really nice color.
We've got simple lighting. You've got the sunlight here in a frog. This one's a nice one. Macro photography
is Monday the lens it's like has a zoom in effect and it's really close up for small,
really tiny things. Now, what if we change
this to a graphic? And we did pixel lot, we'll see what it
comes out with. Okay, Cool. So still having that
sort of close-up shot, a little bit of blurs,
adding some effects. This is like a half-life, half frog, your hybrid. This one is kinda cool shot. So what if I change
the content type to none? What will it do? You see there? I changed the content
type to none. And so Adobe Firefly
prioritizes the content type. If you select Photo,
graphic, or Art, it's going to
prioritize that over the movements are the
themes you select. So if you wanted to use more of the things that techniques
like low poly since weight or that you wanted to make sure you click on None and then use a lot or
whatever you wanna do. So now you can see the frog is coming up with
a pixel artifact. Whereas before it
was just doing it as a generic sort of graphic. It looked a bit like Outlook
to half, half like a photo. So now let's try out
generate a filled by itself. I'm going to click Generate,
it's in the middle. And what I'm going to do
this time it's actually drag and drop an image
of myself in there. So I want to image you. I'm going to drag
and drop it into here and we can add some stuff. So once again, just like before, I'm going to paint
like this and I'm going to type in red cowboy hat. So cool. We've got a nice hat looks like or something of my
head is very bold there. But anyway, it's funny. I can I can keep that. Let's paint on my shirt. Let's just type in suits it. What does, if you more
specific like saying black suit or red suit,
make a difference. A nice, looks like I'm going
to a wedding or something. That's cool. Let's keep that. Now. Let's click on Invert. Now let's click on Background. It got rid of it,
so that's cool. So you can actually use this to color images so you don't have, they'll manually in
Photoshop and I want to generate something,
let's say castle. Cool. So did a background,
one is blurred, one is sort of got
me in the archers. That's kinda cool.
4. Midjourney Basics: Now I want to give
you some extra tips that will help you if you finding yourself
in some Creative Block or you're getting
stuck first up, if you want to get
great results, you have to constantly
refine your Prompts. Any don't expect
the good results on the first or second prompts. You may want to keep going Depot through iterations,
create variations, try different words, play
around with it until you get the desired outcome that you want and
expect to get results. The first few tries,
you got to actually spend a bit of time
finding those images. Now if you are finding
yourself getting stuck, the best thing to do is go on Google images or go on a
stock site like Shutterstock or Adobe Stock and look at the keyword description
or the alt descriptions. This will allow you to get some ideas on the
top of words to use. So if you're trying to
create a specific scene, but you don't know exactly
what lighting to use or what location
go onto the sides, look upset and keywords, lookup photos that
are similar for what you're trying to go for already on the Internet, on these sites. And just use that
as inspiration. So then you can
put those keywords into the prompts to help you. Now, you gotta keep
in mind that if there are images already out
there from artists, photographers, There's so
many stock sites out there. There's so many images on
the Internet gonna make the prompting a
lot easier because midjourney is trained on data and so it
extracts that data from where the Internet and
whatever else is out there. It's going to use
it as inspiration or use it as a reference point. So sometimes you might create, come with a credit concept, but it's, it comes out and
not looking how you want it. And it's because an
artist or photographer, somebody hasn't done that yet in that specific style or shot or whatever up
to keep that in mind. Now when it comes to creating consistent images or characters, midjourney is not built specifically liked
that say you can use something called seeding or you can do
advanced prompting, which is image prompting, where you can just Upscale and image that you like
and then download that image dropping
into midjourney and then copy the link
as I've showed you, as I showed you in
one of the modules. And use that as that image as a reference point for creating more images just like that, you could also use the
remix tool as well. By the remix tool
is not always the best I've found
in my experience. So just keep that in mind. Version five does have
some limitations. It starts to ignore inputs
after a certain length. So if you start getting
a lengthy prompt, it starts ignoring the keywords. So I do recommend trying and
keep your Prompts short. It doesn't have to
be super short, but you give enough
detail to play with, but that's another thing to keep in mind when
using midjourney
5. Midjourney Set Up: Now in this lesson, I'm
going to be showing you Advanced Prompts and creating
Images in mid journey. So first things first,
you want to add the midjourney bot to
your own discord server. I'll quickly show you how to
do that. It's pretty simple. You just want to go to the
mid journey discord channel, go down to one of the
newbies newcomer rooms. As you can see here, I'm going
to click on one of them. And then you gotta do
is you can see the bot. I'm going to left-click
on the midjourney bought in any of the image, people have been
using it, whatever. I'm going to click on
the icon, the logo, and click Add to server
as you can see here. And then it will pop
up with this box. All you gotta do is go down to select the server to server. And I'm going to select a
Jeremy Mura Art Studio. And I can click Continue. And then we're gonna do is click Authorize and or add
it to your own server. So you actually don't
have to generate inside the midjourney server. It's actually better to
do it on your own server. So I'm gonna go over here
and you can see here, the midjourney bought on the right-hand side is
actually in my server. And now I can do dash, imagine prompt and I can type in a prompt and
start using it now, or the Advanced
Prompts and commands, I will put it in a
nice little Notion, boards, they can use
it as a reference. And I will also be putting some of the prompts
that I've used as well, so you can practice
with that as well. So all these files will
be in the document in your project section so
you can download for free and it's going to help
you follow along as well. Now before creating an
image in midjourney, you want to think about
these key variables. Number one is the
setting, atmosphere, and mood of your overall image. What's the color gonna be? What's the style? Am I going for? Photo realism? Am I going for
more abstract Art, more artistic, a
digital painting style? Am I looking to
create some 3D icons? Are objects. Maybe I just need
some UI Inspiration. You really need to ask,
what's the overall setting, what's the goal and what type of image am I looking to create? Next is using descriptive words. It's all that being specific, being descriptive, and
describing what you want. With this, you'll get
better with time. You will know how
to input better prompts until about
using visual language. Because at the end of the day, Ai reads the prompts and it uses words to translate
that into images. And then you go
through a process of iterating and iterating and iterating and changing and moving thing and
trying things out. And that's, and then eventually you'll
get better results. Next is the type of shot. Are you looking for
a wide angle shot? Maybe you're looking
for a close-up. If you're trying to
get like a face of a anime character or something, what type of shot is it? You can actually use Prompts
based on a DSLR camera. So you can see some examples
in the reference sheet, but there's heaps
of different stuff. So if you wanna do macro
photography or maybe close-ups, wide angles, you can really
play around with that. So what is the shot
style of your scene? What angle is it? It's gonna be a
full portrait shot. You want them to share the
face or the full body. These are some of the
questions you wanna be asking next, is the lighting. Lighting? Is it is
it dramatic lighting isn't maybe a studio
lighting shot. Maybe you're doing a
product shot of like say, cosmetics or a t-shirt or maybe it's a product or tea or whatever it is you
want to ask yourself, what type of lighting is it
because then you might need a studio lighting or
maybe is it outside shot? Do you want sort of a
rim light or sunlight? You want it to be bright.
That's another thing you need to consider as well. I want to quickly
show you some of the midjourney settings so
you get familiar with it. So I'm gonna type dash
and type settings. Click Enter, key is the
model you'll be using. You want to be using
the latest model, which is the
five-point to model. That's the one that I'm
using is the latest version. They started from version one. But now we've got a lot of updates,
which is really great. So that's the thing
you want to be using. You've also got things like
raw mode, you've got stylize. I typically style as a
medium because I can customize it with my
specific prompts, which I'll show you how to do. We've got public mode, which basically shares it
to you at the community, which is cool because then
people can learn a fat. We've got remixed mode, which basically
allows you to remixed a prompt that you've
already created. So then you can get
a similar result, but just changing
the actual content or the context of the image
got high variation mode, which you've got also
variation modes as well. So if you want to make the full images or
different from each other, it adds a bit more variety. You've got turbo
mode, fast mode, relaxed mode, and
reset settings. So I typically use fast mode. I do pay $10 a month
for midjourney. You can look at their plans, so I do recommend getting just the $10 a
month. That's fine. You will have plenty of
space to play with and plenty of hours to
generate because it's all based on hours. And so you've got the
three modes as well. Typically I leave
mine on fast mode. You do get more
hours and you can pay for the higher plants, but I just pay for
the 10-dollar plan. I think that's more than enough. Unless you're a crazy user
and you're generating thousands of images,
I think that's fine. Relaxed mode just
means it's going to use slower computation
on the server, so take longer, but it
saves your fast hours. So typically you can use relaxed mode and when
it's a little less quiet, when there's not that many
people on the off-peak hours. And then you can use fast mode when there's more people online. So there's the basic
settings to use, but we can always change
it on the fly as well. For example, I can type
dash and I can type remakes And if I press Enter, you'll see remixing
mode is turned off. So it makes it really easy to
on the GRC and it's due it, I don't have to go
into the Settings and click and change the option. So you can see here,
it will change stuff. But I like to keep it simple. Now if you're someone
that struggles to actually create the Prompts, then you can use these two
tools that I do recommend. Number one is IMIA prompt.com. So this is what it looks like. It's a really cool tool and
it works with version 5.2. So go to the top right
corner, click builder. And it will actually give you or the prompt parameters
here that you can play with. The second one is called
mid journey prompt tool. It's called prompt
dot noon shot.com. So prompts help that
you can see he also you can type start
something in here. It will generate
the text and you can actually change the styles. Now this one are, I think
they've updated to the new 5.2. So I think I'm at the moment
is a little bit better. So it's really cool. You can type in the
text T So we can say laws, transparent
texture, detail. And I can add text,
which is cool. I can also upload an image here. It's going to
ask you via e-mail. And the cool thing
is that I like seeing the filters here. So we've got basic elements. So it gives you the
timeframes that you can use. Classical realism. Mongol Empire, That's pretty cool.
Digital Art style. So we've got 3D
abstract black design, isometric, low poly pixel lot. So this is good to
get specific look. So for maybe creating
a pixel lot game, we want to be working
with pixel out. We don't want to get a 3D thing. So I'd use pixel lot and say
just use this for reference. So in case you don't know
what to actually say, this is a good little
thing to show you how, what to do. Even
architectures, great. Maybe you want a specific look
in Arabic interior design. You'll click on that and
it'll generate that. And then all you gotta go
to the top left click, Copy, copy and paste
that super easy. Now while that's generating, want to trade the
other tool as well. So maybe for this, I want like a 3D star, 3D space ship, metal alloy. Like we're something like that. And The thing is here, I can actually get a sense of what type of camera
angles I want. So you can put depth of field, different cameras and maybe
I want a wide-angle lens. I can click that. I can click Continue. Maybe the lighting
is gonna be dusk. I'll click Continue
and you can see it's automatically adding
these prompts into here. As you can see, if I want
to specific materials, maybe it is like metallic. I'll add that in. As you can see there. I can copy that, copy that in and drop that
in and super easy, you can see the example of what we did before
and that's pretty cool. If you're ever unsure, you can actually
go here and just look at the examples I gave you. So it gives you an idea of
visual picture of like, okay, this might look
like, but for now, but it's gonna go
straight into creating a logo background or an, a nice textured background. So
6. Backgrounds and Stunning Art: So I'm going to start off with typing something like this, liquid abstract backgrounds
five or minimal Bakelite. Then what I wanna do is
actually want to change the ratio to make it wide
and stuff just square. So I'm gonna go dashed as AR, which is aspect ratio,
and I'll type 16 by nine. Beautiful. So we've got this
really cool background that we could use
for presentation. Maybe it's for on the
backend of a logo, we're doing a futuristic
tech travel logo. We got this really cool design. Now one of the cool things with the new version is
we can change this. So what I'm gonna do,
I'm going to copy and paste the same thing. Instead. This time I'm gonna
go dash dash C, which stands for chaos. Now chaos basically makes
the initial grid of images, the first of all images more
varied from each other. So you can see this one is like very, they're all very similar, similar tone color,
the shape centered. And so the chaos is going
to make a difference. So the maximum value
you can put his 100, the lowest is going to be zero. So I'm gonna put say at five. Make sure that you do
imagine then paste it in and we'll see how varied
the results will be. So you can see now
the results are way different than the
initial promptly put in. So it's going to
give you a lot of variation which are
life because then I can get some different
visuals that I can play with. Like the bottom one on the
right looks really cool. So then I can go, Okay, let's Upscale that number four
or I can click variations. Once you Upscale an image of the cool thing is they
give you heaps of options. Now, in the new version, you've got very strong
and very subtle. So all I'm gonna do
is click very strong and we'll start to
generate some more images based off this image. And if you want
somewhat Images but just a little bit similar, not too different than
just click very subtle. You've also got the zoom-out
options and customer Zoom. You can also make it a square. So if I click Make square, it will make the 16 by nine ratio back to a one-by-one,
which is super cool. And then you've also got
your planning options now. So you can see I've
got the arrows left, right, up and down. So if I click one of them, it will basically
expand the image. And it will use the pixels
based on 500 pixels, pixels on whatever
side you select. So if it's left or
use the left side of the image and it will
basically expand the canvas. That's all it will do. So it's really handy, especially for creating
fantasy scenes or concepts, aren't it works really
great for that. You can see the
variations is created. So based off the initial ones, it's given me some
really nice forms here that cover the whole scene. The gradients have
beautiful colors, nice iridescent
Chrome feel to it. I'm really digging these, especially these three right
here on the right side. Here, these are
really cool based on the initial one from this. So it's really
great tool just to create a lot of
different variations. Now if you don't like
any of these variations, I can click the little
arrows right here. And it will basically remastered
or recreate that image. And it'll be, it'll just change out,
make it look different. Now you can see on this texture,
maybe I liked this one. I can click zoom-out times two. I'll actually zoom itself
out from the image. Now, if you want
some more details, they want to expand it a bit more than will actually
make it bigger. It doesn't make the pixels
of resolution bigger. It just makes the overall image expand out from the
initial I'm design. So here's the effect of
clicking the Ramos that button. As you can see, they look
pretty similar than before, but the lighting is different. You can see emphasizing
more on this sort of like peachy brownie
color gradient. And they've moved around the forms and the
waves of the image. So it still looks great. The details there,
the quality is there. It's just changed and made it a bit more
variable than before. So that's when you click
the ramus, the bottom. Now let's look at
the results from the zoom-out. By
clicking zoom out. You can see now we see a
lot more forms happening. It's increased the
overall image size and I really like what it's
done here if we compare it. So you can see here, it feels
like there's a lot missing. We're just focusing and zooming. And once part of the fabric, It's still great
as a background. You could use it,
but we start to see more in the overall
picture as you can see. Now a zoomed out
and it's extended all the forms created
or that extra detail. And it just looks
amazing like look with a quality we're
getting with this, especially the one on the bottom left here,
that looks really cool. Even this one on
the side as well, it looks nice into
these interwoven like smoke slash fabric. It's very elegant,
it's really cool, and we can definitely use
this as a logo background. So another technique
that I love to use to get better results is to find images online and use
it as a reference image. So midjourney bot can
actually use that as a reference point to create an image that you
want similar to that, for example, what I'd
like to do is I'll go to dribble or sites like be hands, but I know dribble is
very visual based. For example, if I type in
like logo or backgrounds, you can see you'll get a
lot of these nice designs. These ones are really nice from You can see all of
these great ones. This one's from my friend. He's a great designer. This one's really cool. So you can look for any type
of designs that are similar. You want to try and
find ones without fonts because fonts will mess
up the overall design. So for example, I've got some examples here
that I'll show you. I've got a couple
of, you can see this design is one example. Here's another example of
a really cool background. So here's some examples
that I really love. Look with the background, looks amazing with
that logo there. It's really good for
like futuristic brands, but you can use it
for any type of brands if you use
the right materials. Some of them really
simple, as you can see. For example, this one here. What I can actually do
is I'm going to drag and drop that into
midjourney and press Enter. Now, it's just load that. Once I do this, I'm going to
right-click on the image. And what you want to do
is you want to copy link. Now, if you're on the web
and you find a nice image, make sure that it's an image. Like for example, let's
say you liked this image, you just right-click and
click copy image address. So that's how you'd
get the link, but you can do it
this way as well. Just remember copy link. And then I'm gonna
go to imagine, and I'm going to
paste the link at the front and then
I can do a comma. It's going to use the link and basically scan my image and use that image as
a reference point. And then I can do a prompt like golden background text jaw. And then I'll put the
ratio 16 by nine. Okay, so you can
see the detail he, it's really similar to
how this looks like. A liquid to the background
is really liquid. And it's got like these
nice little highlights. And just like the sort
of overlapping shadows, you can see that within these designs
here. So that's great. Let's try one of
these other ones. So for example,
let's try this one. Same thing and we're not trying
to copy the exact design, we're just trying to use that the reference point and then start to build off that. So we've got this. I'm gonna go Glossy
Material, background, text jar, abstract,
abstract lines in by nine. I won't do chaos. I will just go. As for stylize, which makes it, which focuses and emphasize
more on like form in color. It makes it a bit more Adi, so we'll go like maybe 500. And so once again, if I
get back to use image, you can see that it added some texts right in
the corner there. And that's because it's sort
of extracting from this. So try and find images
online that don't have any texts because
midjourney isn't really good with
type or text yet. But these are really slick. Look at the, the contrast, the detail like it looks
like liquid gold or a honey. You could use this
as a background for an ad or just for like a mood board as well,
that could work. Alright, let's
click. Really loving the top right and the
top left looks awesome. It looks like
something from like a marvel secrets or something,
but it's really sharp. It's got sort of this
vector type of style, but it looks like metal or
something like metal alloys. I love the lighting
and you can change the lighting and we can
always go back here. So I'm gonna go into
dribble and type in Cinema 4D or 3D blender or 3D. And you should get
some 3D objects that we can use as examples. So there's plenty of
different stuff we could use as a reference image. This looks very cool. That's right crip, right-click
copy image address. Let's go dash, imagine,
paste that in. Then I'll say 3D. Let's do like say
coffee machine. Coffee machine 3D covers
you on a marble bench. Black matte finish when
all tend to have blue. Then we'll go four by three. So now I'm going to
click on that image and look how amazing that looks. So if you look at
our initial image, you can see it's
got the same color, style and the glossiness, the material, the
lighting is similar. As we can see that it's
added the tint of blue. It doesn't look like a
coffee machine to be honest, but its future. I talked futuristic Sarah, It's got that feel to it. But this is what looks
like an ion or something, but it looks pretty cool. So it's all about selecting the right images and then
using that to your advantage. All right, let's type in
isometric town on Dribble. And let's see if we can find
something we can work with. So this is a cool like
little isometric design. Let's copy that. You can go 3D or Cinema 4D. You can also do different
types of 3D software. So if you type in say 3D, S max or Houdini or Blender 3D, these are gonna give
you different results. So you can type in Cinema
4D or Cinema 4D render. And that should give
you different salt. Asymmetric. I submit trick. Let's go. Asymmetric town. Because the colors,
dramatic lighting, and boom, there we have it. Look at that beautiful, obviously because I put 3D, it's got a different style. It's not like a flat
vector like this one. Because if we typed flat
vector and probably do it in this style
or maybe type to flat cell shading or basic shading or something
that might change it. But based off that we created this really cool town when
we tablet dramatic lighting, you can see it's got
a little contrast, which is really cool.
7. Realism and 3D Product Shots: I'm gonna take it a step
further and show you how to use ChatGPT to write out a prompt that will give us a lot more detail and
create a amazing picture. So what do you wanna do
is you want to type, act like you're a midjourney. Typography generate Up, right, using a natural
descriptive language. So that's the main part of
the prompting want to add. Now I'm going to scroll down. And then I just wrote,
right a prompt that I can put into midjourney
for this concept. And then I typed out a new like I was thinking
of like Alexa, like a gigapixel type of thing, robot in your house, smart home, that type
of thing, right? So I'll just write this mantra that talks to your
smart home and connects through five G using
a Otis 55 lens. So one of the key things is
you want to specify the lens, especially for
product photography or real life Shots
of photography. You want to specify a
specific camera lens or if it's like macro
photography or wide angle, or prime limbs or close-ups, whatever it is specifying those things will actually
make a difference. I've also mentioned his
studio style lighting. We're looking for a nice
render with a scene. Audience of the product is
taken through his males who wants to improve productivity
and the daily lives. So pretty simple prompt,
nothing too crazy. And then it gave me some text. It is a lot of text. So
then what I asked it is to condense it and then focus
on keywords or the concept. I copy this text. Okay, I'm gonna go
into midjourney. I'll show you what it created. I pasted that text in here, and I just made the aspect
ratio is 16 by nine. And you can see this
is what it created, so it looks pretty realistic. It looks like a real photography shot in the studio
shooting dislike, cool robot thing looks amazing. I created a variation of that, but this time I
put style role and I put stylized for 525. So it gave us lots
of variations here. This one on the top
left looks kinda cool. It looks like maybe it's gonna
be in a vacuum thing or I like how it's in a kitchen with the lighting
looks really good. The other ones are
kinda cool as well. Very realistic lighting. I'll let the
backgrounds as well in the shadows are look
really, really solid uses. You can see they're
traded small variations. So very clear, high detail, love this matte finish on it, the lighting on
the lens as well. It's looks at a realistic in the background is like
perfectly blurred. So you get that
really cool effect. I did another variation of it. As you can see here, the
results pretty solid. And then I Upscale
the top right one so you can see that
looks pretty sleek. What I'll do is I'll
get rid of the texts. I'll check into Photoshop. It takes like 2 s
and I'll just like Content-Aware Fill
that AI-generated field and it won't fix it. So that was just using that prompt them, as
you can see here. Using ChatGPT to create
more of that nice Writing. So you can see here, I said you condense it too
much, also be more natural. So here they're condensed it, but then I use this one as
well for the later variations. So this one talks about more of the scene and that's where we get more of the as
you can see here, this one here, which is pretty
close to the first one. Now let's do another example. This time. I said, the idea is to
capture a jaguar in a jungle landscape with Sony
FE 400 millimeter lens. So this is a different lens. And if you didn't know
lenses, you can literally just go on Google and typing. I'm like, best Sony lens
for, let's say wildlife. Wildlife photography. And you can just like copy and paste one of these ones, right? Super cool. Then I said volumetric
lighting late afternoon. If you didn't know,
you could just go and search like
different types of lighting to get some
more ideas as well. So Soapbox backlighting,
low key light background, light,
split lighting. There's so many different ones. So just doing quick search, you're gonna get a lot of
different IDs you could put into the prompt and then
it ready long prompt, as you can see,
it's pretty long. And then I just gave
us a lot of detail or descriptive words to describe the scene, which is really cool. But then I just said
short in this prompt and then I copy this one. Okay, It's because eventually to a less jangled late afternoon Sony lens capture Magic Jaguar
buffed in dapple sunlight. The white aperture of the lens brings sharp Vegas,
blurred jungle. Use the volumetric focus on the patron's aim to
encapsulate the real power, the beauty of the wild
capture visuals already. So maybe this last
time probably is uses. But anyway, so I copied
and pasted that. This is what it created. So it looks hyper-realistic. It looks beautiful. I think these bottom two ones look really nice, like look, it's got this sort of the blood
leaves in the foreground. As you can see there.
You've got the light coming through and shining on
the face of the jaguar. This one, top brand
has got nice shadows. You can see it's very
sharp, like high detail. It looks like a real shot, which is like crazy. And so I made a couple more
variations of that one. And so here's the one with
the The longer prompt. As you can see Added a bit more
stylized effect. As you can see,
they're using old. The first prompts you can
see it's pretty long. It's made the top right
one is like a paint style. I think the rest of
photography's photography style. So it's, it does look different compared to this one a bit where we can see we've
got the main lens in there. So pretty similar. That's just the
variation of that. I really loved this one. I think this works really well. You can see there. Now, I did a, and this almost regret to I did a version just to show you an example of what
would happen if it was typed in Gigya and
lush jungles sunlight. So instead of putting
all these details, I just put a basic Prompts. It basically gave me Art style that's more
like a painterly style. And you can see it
still looks cool, but it just doesn't
look a real photograph. Doesn't look realistic. It's more of a more paint. Does a beautiful, it
looks love the sunlight. You can see that the
sunlight coming off the back of this one here.
It looks beautiful. Lots of leaves and
trees and plants. And the lighting
looks really cool. So I think that looks good. These ones are a couple
more variations as well. I did variations as
you can see there. So beautiful. And then I did another version using the same short
prompt as before, but I did style rock. Star Rogers makes focuses on a hyper realism and makes it focused on like
real photographs. So you can see this one
looks really good as well. I love this side angle
one is a bit different and the bottom one
here is nice too. So you can see you
didn't really need a crazy long prompts. But compared to the first ones, I feel like the lighting
is just a bit better. If you look at this one,
I just I don't know. It looks more details like the lighting just
looks more like the details of different the way the layout is and the
way the leaves are there. Now, one more quick
tricky can do is actually typed dash, shorten. And I can post that same prompt. So I can go back to one
of these big Prompts, post it into the
short-run feature. And what it's going to do,
he's going to give me options. So we just get, it
only focuses on the most important keywords, which they call them tokens. So you will see you get rid of all the use of stuff and just shorten it to
the main stuff. So I can select, say
maybe I just want like number three, I'll pick that. I can just leave it the
same work and change it. But if I submit, it would
create something with that. And he was an option. I just did with the same lens, but all I said was captured
and majestic Jaguar. That was a showdown prompt,
as you can see here. The results are, it's, there's no more
sunlight, there's no more of the jungle, the leaves. So we took it all that detail, we subtracted from it
and we shortened it. And this is what you get. So difference more
of electricity, straight up photography,
like font on shot. And so it just goes to
show that the more detail you put and this is the
most specific you are, it's going to produce
better results. And this one was one of
the short and Prompts. This one looks really cool
to that one is moving. Love that. And this is the one
that we just did now. So that's shorter
and Prompts we did. Number three. It looks great. Now I'm going to show you
another great resource. Now there's a midjourney
reference shape made by this discord name Randall and
4785, as you can see this. So they've created the pages of references that you
can use for keywords. So we've got characters,
you've got landscapes, like heaps, so many, right? You've got artists. You
can put the artist's name, as you can see, codons, comics, sci-fi, whole
bunch of stuff. But I wanna go to print media. And I wanna do something FUN. I love the blueprint will atomical drawings like there's
a really, really cool. So you can see to give us example of a woman
or of a forest. So I can go, let's go
anatomical jarring of a, Let's go over a T-Rex. Say, you can use
this cheat sheet to create amazing
things, characters. So you can see, this
looks pretty cool. So what if you could go copy? And so we can go a
me go in the style, in the style of Pascal Campion. So it gives you, if you
look at the top says character by cartoon
character and comic books. So it gives you a
different version. So we can go in the style of pascal or we
can go in the character. I'll just type
this. Now, you want version and the
character of Petsko do. Okay. Let's see what it
comes out with. Bone because the
atomical drawing of the T-Rex, as
you can see there, I didn't really specify unlike full body or anything like that. And this was what it's given me. So to midjourney, we can see
this is what it's created. A duck in a pond on a
farm. Looks beautiful. I look up a little detail. I, Art is just amazing. And think of all
those artists and all those credit to them and their style and they
ease of expertise
8. More Advanced Prompts: What I want to show you now
is how to do a multi-pronged. This is an advanced technique. Now this allows
midjourney bought to consider two separate
concepts in one prompts. So when you just type
out something is just 0, recognizing it as one concept. But when you use to semi-colons, it allows it to consider
the first chunk has one separate concept and a
second as a different concept. You can also add a number to the first or second prompts when you're
doing multi prompts. And to put more emphasis
on more importance on that specific word that
you're trying to focus on. For example, I find
13 floating in space. So that's one concept
and then we've got this other concept here. I'll also do a version
with the same one but without having semi-colons. So let's analyze the
difference here. We've got the first one
that is a multi prompt. So you can see it's
got the iPhone 13 floating there and then the Aztec pattern as a
separate thing and it's created that pattern
on the iPhone case. And I didn't even
mention the case. I didn't even mention
a background. This one is really interesting
on the bottom right, like that just looks super cool. And these patterns
are really detailed. I though the detail on
that, it looks amazing. If you look at this version, this doesn't have
the semi-colons, can see that it's got the
phones in different angles, different backgrounds,
It's all a bit different. Whereas this one has a consistent
theme with the iPhone, straight for like a head. Obviously this offends
a bit different Scott, the different model. Sorry, it's got the front face, but you can see you'll
get different results. Now what I'm going to do is
do more of a fantasy one. I'm going to type
in tremendous see fantasy style landscape,
lush mountain. We have causal on
top of the hill. Dragon flying around around it. Let's go. Fire breathing
dragon flying around it. Then we'll go 16 by nine. Okay, chaos and stylize
will go like 500. Now we're gonna do this.
Type the same thing, but we'll do it with putting emphasis on two different
of the concepts. So I'm gonna do face our
landscape, lush mountain, fantasy landscape with causal
to CMYK semi-colons there. And then I'll say
fire-breathing dragon. And then I'll just copy the same thing like
that, fantasy landscape. And now let's see the results. So we've got the results
from the first one. So if we click on that, you can see pre-core
made this one. You can see this
one's like a focus on a fiery castle, on Flames. There's no dragging.
We can see the dragon. This one turned the dragon too. Like, I don't know,
it's like hiding in the Cloud or it is the Cloud. I'm not sure. The
bottom-left sort of ignored the castle and
focused more on the landscape. And then this on the
bottom-right, pretty clear. I don't see a causal, but it's a dragon bringing
down the village. Pretty cool and the details,
it looks really good. Now let's see on the second one. So now you can see I'm getting totally different style
of images because we've separated the two
concepts with the semi-colons. And so now it's focusing the drag if fiery
dragon is one concept and then the other concept is a lush mountain side,
top of landscapes. On the bottom left
you can see we've got this lush landscape, so
we've got that correct. And it's got the fiery
dragon, which is cool. The other ones you
can see there's not really landscapes more
we can see the sky, but it's an emphasis
on the Dragon, which is really, really cool. So now what I can do is
add more important or emphasis on to say the
cost when landscape. So this time, I'm going
to copy my prompt. This time I'm going to say, I'm gonna put for you
to put more emphasis on that instead of the
fire-breathing dragon. Now another cool thing
is that you can actually do a negative Prompts white. So actually typing dash, dash, no, and then topping up the keyword will actually get
rid of that from the image. For example, if I
say dash, dash, no, and then space and put trees, it should get rid of the trees with the same prompt as before. And then I'm going to
type dash, dash know, and I'll say no trees. Okay, So now you can
see this iteration. It's put a lot of emphasis on the actual castle
and the landscape. And now it's going to get
rid of the dragon, right? So just putting that number emphasizes them on the concepts. So maybe, I'll probably Laura, maybe just do one instead of putting full we're
gonna just put one. This one you can see I
did the no trees on it. And you can see
there is no trees. It's, there's lots
of clouds, smoke, flame, fire, mist, fog. You can see it works. If you don't want
something in an image, you can actually
get rid of it by doing that negative
weight prompt. I didn't know dragon,
they'll probably cut the dragon out. Right. So it's always good to
specify what you want, like full body or like just a portrait or headshot that will help a specific character into the doll of the
shot that you want. This one, you can see it on the castle is emphasis on
one instead of four now, and we've actually
got this detail. So you can see that the first to have the dragon in the background like this
one and the landscape. You can see that we've
got some characters. So what it is starting
to emphasize a bit more, unlike wide shot with
the mountain, obviously, it's not like lush, but it's got like it's
extremely amount has just a cool and the bottom one's still have that
dragon as the focus. So I'm gonna show you
the cool pen feature. I want to Upscale this
nice landscape image here. They're very large,
mountainous area. It looks like it's got some asian inspired architecture
which is cool. And what you can actually
do is just tap the arrows and it's going to
expand the canvas. So I'm going to click
on the right arrow, and it's basically going
to use the pixels on that side of the edge,
around 500 pixels. And it's going to use that
to generate the rest. So you can see here it's
completely expanded that image. Now I've got this
really cool castle on the side, which looks amazing. And so that's the cool thing
about the pen feature. You can get this food like ultra-wide image and expands upon that sort of
concept or story-lines. I'm going to Upscale
that and say, Look what you get, You
get the pen item again. You can also turn it back to a square as well if
you wanna do that. But I want to actually pen
even further so I could actually get keep going
right or maybe I wanna go left and I can click left, and it will do the left
side of that image. I can also do a version
where I zoom out. So I'm gonna click zoom
out and it'll generate another one image
with that as well. So this is the zoomed
out image by pressing to zoom nine can see we've
got this beautiful, just well that
we've crafted here. And it zooms out so you can see, if we zoom really close, you can see the little castle there and the cost that we created on the
right-hand side there. Then it's Cradle is
beautiful, lush environment, trees and the lighting of clouds, Everything
is generated. I think it's really cool. Now I can see that this version with the pan left
and has expanded
9. Image Inspiration for Creative Block: I'm gonna go on Twitter
and I'm going to show you how to search for all descriptions to
use it for our prompt, you can find that his people
on Twitter that do stuff. So you can always type
in like midjourney or Ai at AI-generated
Art, etcetera. So for example, maybe I want
to do something like this. Looks really cool, right? Or you gotta do is
on the Alt button. As you can see, it's like a
overlay, a little the text, they're a little badge thing on the bottom left of the image. And I'll say all, you just click that and it'll pop up with
the image description. Then. So you can see now I can see
the exact prompt to use. So I can just copy this prompt. And I can go to midjourney, paste that in and I'll
probably most likely get a similar result. So as you can see,
if I go back to midjourney, Walla, super cool. It's pretty similar to this guy is image here,
as you can see there. Love in that data
looks super cool. Let's go ahead and
maybe try another one. I typed midjourney Art into
Twitter as you can see. And there's heaps
of different stuff. This looks really cool, that looks pretty detailed. I'm going to click on
the Alt here and you can see he's prompt,
pretty short prompt. So it's just a quick
way of getting some ideas, testing out things. So we can see here the bottom left one looks pretty realistic, similar to that image
we just saw right here. But this is a quick way
to get those ideas. Now let's go to Adobe
Stock real quick. So maybe I'm looking for a viking boat or something
like that or like helmet, I can click on this image. And so on the image you can see all these keywords up the top right of evil warrior,
berserk, Viking, tattooed, skin, axes, concept,
historical further, right, so I can
use some of these keywords like maybe I want to copy this first word. You can also go down here and
look up similar keywords. So you can see
Viking background, human, skin, authentic,
traditional. So that's pretty cool. We can
use some of those keywords. So let's get back to
midjourney real quick. Type this. I'm
going to type weed. We can do movie. I never wore berserk Viking
Magic. That was pretty quick. So nice. We've got a nice Adobe stock. We're not trying to
exactly copy this, but we're trying to
get those keywords. So you can see, we
didn't say territories, but this is tied to
that guy with a bid. And so there's dread,
so that's pretty cool. So you stock image sides, use Google if you
have to, and Twitter. And it's really going
to help you get those ideas flowing in those keywords going
on in your mind.
10. Using AI to Upscale Images: I'm going to show you
the best app that I use to Upscale my
midjourney Images, then I use topaz Photo
Ai. It's really great. I will include a link
in the project section. So first up, It's an
app, you download it. This one, it looks like
I'm going to select my images that I've
downloaded from midjourney. If you didn't, how
to download image, just click on image, right-click and click Save
Image and just drop it in. So we obviously know
that midjourney, the resolution is
always pretty low. That don't do for K resolution. Or even to K, It's usually
around like 1,000 pixels. I think if you scale the images when you pan or zoom out effect, it doesn't really adjust the
resolution or the pixels, so it doesn't
necessarily increase it. So that's what we
have to Upscale it. So I've got this 3D image here. I'm going to zoom in for you. And it's already
added an Upscale for of three-point to X. On the right-hand
side you can see I've got all these tools we can Upscale, remove
noise, sharpen. We can preserve texts as well. If you're doing like a
graphic design thing, I've got my images on
the bottom left so I can left-click on the bottom-left. They don't have all
my images here, which is super cool. So if I zoom in here, you
can see all the detail. I'm going to Upscale
this to four times. It adds in using as an AI model, you can see it automatically selected low-resolution for me. It sort of adding
that extra detail. I can also click and sharpen on shopping and it would
sharpen the image as well. To the left side is before, the right side is after. So if I zoom in
really, really close, you can see all the
little details there. And I can drag and move around. I can do it on a
texture as well. So I've got a texture here. Maybe I'll click on graphic on the AI model and maybe
it's a little grainy. I can always suppress the noise. I can drag that up
and you can see the difference so
much shop, so much. Look at the rocks,
the little details, the lighting looks a
bit better as well. So it's really that simple. I can change the view
on the bottom-right. So if I want the side-by-side, I can do that if I
wanted to just as one image and I can
drag this like that. You can see all the details
that are popping there. Or I can just do single-view and I'll show me that
before view there. But I can obviously
zoom out as well. I'm in my mouse wheel, we
can do on the bottom right. It also works well with faces. So this is an Ai image, but I also did this one as well. You can see it's turned
on recovering face. So this actually
fixes up the face. So if I just switched here, obviously it was
already pretty smooth if I bring the strength down. So you can see those pixelation, their issues there as well. And so it's actually
fixed the face. It looks really detailed. If I bring the strength
up, it looks really good. I can scale it as well to max. Let's go to max at SUID. Then we can see the difference. Then even look at
the hair as well. You can see that. So as these details in using Ai, once you're done, I can
actually go to the top. I can go, I can crop
the image if I want. So maybe I want to just
zoom in on her face. I can press Enter. I can select the subject
as I want and just adjust. I can adjust the feathering. So it's similar to Photoshop. It's got the refined brush here. So I can like, if I just want, add stuff like maybe
the light or whatever, you can select portrait
or landscape, etcetera. It's also got the
phases there as well. So it will highlight the face and we can turn that off and on. So once you've done, all
you could do is click Done the bottom-right,
save for images. I can rename it. I can say to a specific folder, I'll just leave it on that. And the format you
can select JPEG or typically leave it,
it exports super-fast. It tells you how many
megabytes as well, what it's gonna be,
the resolution it was, it was 1,400 pixels by 100, now going up to 5,000, 6,000, duck and close that. Then you can see here, I've got my images. As you can see, they're
super great, super big. I can zoom in really
far because it's, the pixels are crazy big
compared to the old ones, which is pixelated and messy. So that's how I
scale up my images. This is the best
platform I've found, is obviously other
free tools out there, but I think this gives
you a really good control
11. Intro to ChatGPT4: In this module, I'm gonna talk
about how to use ChatGPT4. We're going to be
going through some of the principles, techniques, and frameworks that I
use on a regular basis to create texts when
it comes to content, or if I'm working
on a logo brief or creating some strategies
or getting some ideas. It's really helpful to learn how to actually do
this in ChatGPT. You want to make sure
that you use ChatGPT4. I've found that it's
a lot more coherent. The quality of the responses
are better as well. So it costs around
like $20 a month. You can click on the settings,
on the bottom-left corner, click Settings and beta. And obviously you can
pay for your plan. And one of the beta
features you want to do is turn on plug-ins. They used to have
the browser feature, but currently they took it down. So you have to use a plugin to be able to scan
links and stuff. What we're gonna do is
when to start a new chat, click on ChatGPT, ChatGPT4, and then put my mouse I've written,
I'll click on plugins. So some of the plugins
I like to use, you can see I've got link radar, which allows me to
read PDF links. It can scan Word docs and
PowerPoints, which is cool. There's one called Scala Ai, which can look up scientific
research articles, scientific PDFs, which is cool. And then also you've
got key mate.ai Search. So this one's really great
for searching up links. So if I paste in my website, you can actually extract
information from that. You can also click on
the plugin store and you've got all these
different plugins. There's always new
ones coming through. If you click on
papilla, you'll find the ones that are most
popular right now. And you can even create
automations as API, but I'm not going to talk
about that in this course. Now there are four key
things that I think that when I'm about to do a prompt. Number one is
setting boundaries. They want to think of the topic. What is the topic
I'm going to be? What is the context, what I'm actually talking about? You also want to think
about the word count. How many words is
it a long article? Is it an Instagram post or a long blog or something
that I'm creating, or maybe it's like a resume CV. You got to specify how
long you want it to be. What is the actual topic or the ID that you wanted
to talk about? Next, you need to think
about the tone of voice. What is the output of the
tone of voice gonna be? It's gonna be casual. Is
it going to be informal, friendly, witty, more Ron,
positive or persuasive? You're really going to tell it what type of tone of
voice you can do. You want to write it
in a specific style, maybe JK Rowling or
a famous writer, you can actually tell it
to do that and it will probably be more poetic
or be more professional. So you need to really
think about these things. Next is the specifics. What is the specific
goal we're trying to achieve with this
piece of content, with this article or
post or whatever doing. What is the goal that
we're trying to achieve? Next is the format. What type of format
are we creating? So think about it. Is it an
Instagram post, a tweet? Is it a blog? Is it for a website copy, is it for generating
headlines or text? Think about what
the actual format will be and then think about
the method or the framework. How should ChatGPT work to achieve the goal that
you want it to achieve? And I'll go through a
couple of frameworks that are really useful later on. Next, we have the contexts. So the best thing to think
of is the target audience. Who is my audience? Who am I targeting for
this specific posts? Who's going to read it? Try
and don't make assumptions. You want to try and appeal
to a specific audience. For example, my
audience is mercy, Graphic and brand
designers that are 20-35 and then males. So that's my target audience. So whenever I write,
come up with ideas, I'm always thinking about them. You can see about the
purpose of the text. So what are you trying
to achieve with this specific texts as well? So it goes similar to the goal. Also, you want to
talk about the point of view or what perspective
you're coming from. Is it a your writing
from a first-person perspective or third-person? Is it someone who
is an outsider, like a viewer, or is it
someone that is more direct? So you have to specify
what point of view. And then lastly, examples. When you feed an
example to ChatGPT, it can actually write better. For example, I can just copy and paste something
from my website. I would like, Oh,
can you write in a similar tone of voice to this? And we'll actually
extract my tone of voice based on the block of
tests I've sent it. It can also work. For example, maybe I copied an old
Instagram posts that I did, copied the caption
and I paste it in. And I can say, Hey, write a
similar caption to this post, but tweak this distance really good when you give
it some examples. So if you want to think of a
template in simplified form, It's basically four main keys. It's the topic, the audience, the content goal, and
the writing style. If you just think of
those main things, then it will help you start
to get better with prompting. So few of the frameworks
that I love to use, especially when you're Market or a content creator and you're
selling digital products. And this could help you. One is called Pass, which is pain agitate solution. And then you've got FAB, which is features and
benefits, which is cool. These are great to highlight a specific problem
that an audience might have and
then your product, you're positioning your
product as the solution. So we could write
something like this.
12. Messaging, Tagline, Copywriting with ChatGPT4: So first, I'm just going
to give the contexts and topic Brian
role in his voice. So just that simple, just framing the
conversation contexts. I told it came back and edited this bit out of the framework, their explain the problem, and let's see what it does. And also one key thing as well as that you
can actually tell it to format with
paragraphs dot points. So that's another thing as well. Sometimes it might just
give you a blob of text but specify that as well, which I forgot to do. Awesome. So now it gave me the headline subheading body copy
and a call to action. So let's pick me read it. Translate your portfolio
for mediocre to magnificent with the tenants
visuals on a bootcamp. Pretty good bit long, but it's pretty simple. Revamp your portfolio to seven days snapchat
to happen in clients. That's great. What a couple of body copy or you are
talented Arizona stuck in the route of mediocrity is
your portfolio fill with student work that doesn't
affect that you potential. We feel your paints
frustrating, isn't it? You've got skills
credit either dry but your preferred is
not cutting it. In all alone. Me dishonest
face the same struggle. They had the talent, but their
portfolio screams amature. So it's talking about the pain, the frustrations
that the annoyances, and then it's agitating it. So it's like, yeah, those times where you can find clients, this is talking about, it's using that framework which
is really good positions. My course, right, this
imaginary course as a solution. So then it goes, what
if there was a way out introducing the
bootcamp game changer for grad designers like use
this course is undertake your portfolio from Myrtle
while and just seven days. As you read that
right, in one way, you transmit Propylaia
and with it, your career. You'll learn how to showcase
your skills, creativity. You ready to break free from
the cycle of mediocrity? Now the cool thing is,
is that you can keep iterating on the prompt like
the first one is permanent, not going to be the best. You see this is a
pretty solid just based on that first pond
because we gave the contexts, we gave it all the information. So now I can say instead right above texts in a more funny, funny, and formal tone of voice. And another cool
trick is that you can actually tell it
to use metaphors, use analogies, add quotes. So what a lot to do is use a, use an analogy, can relate
with graphic designers. Use an analogy to tell a story throughout the text that can relate with
graphic designers, with young graphic designers. So if you look at the headlight, is changed it so it
made it more funny. Tenure portfolio from a doodle
diary to a design delight. So it's using
alliteration, which is nice. That's pretty cool. Sub headline wave, goodbye to your students,
scribbles seven taste. So you can see the wideness of the finest is coming through. It's known as more of
1 mol and positive. It's more like trying to be
a bit more funny. Body copy. Hey there, Picasa of pixels is your portfolio currently more of a kindergarten Art class. Then I love Ray. Ray expedition. We get it. It's like
showing up to a black tie that in your pajamas, not
the best look, right? You stuck in a
student work swamp. And it's about appealing
as a week old sandwich. Sandwich. It fully leans into that
persona, is you can say, and obviously like,
I'll probably cut like a lot of this app because it doesn't
sound like me, so you need to tweak things. You can't just
leave it warranties sketch pads because you
got to lifeboat for you. Your golden ticket out
of the doodle land. You can see it's using
this analogy of a, a young student who's
like a dude law. He's like an artist
type of thing. We've got a quote as the legend. Designer Paul Ramsay wants
design assisting with. That's why it's so complicated. But don't worry when heated on complicate things for
you, That's really great. Then added the dot points, what you'll learn normal
feeling like a small, efficient, a big part animal
louisiana and clients. Are you ready to start
by your students, pupils for designer delights. You can see that
recurring theme of like Dude law, scribble law. But you actually want
to not be a hobbyist, but you want to
become a designer. So that's the recurring
an allergy there, design. And then they include
another quote, design can be, design can be
aesthetic design as simple. That's why it's
complicated. Let's call uncomplicated together. And
we're all on the course. There's to Prompts we did, has created a great piece of texts that now I can
go jump into Figma, illustrator or
whatever and start creating a landing page or
design using this text. And I can just took it as I go, I can keep tweaking
it if I wanted to. I can say short in the texts. I can say, I can tell
it to reset the tags. I can tell it to summarize, I can tell it to go, go deeper. I can tell it to
include examples. There's so many more
things that you can do to manipulate this in a better way. Alright, so now let's feed it some client example and that's sort of create a brand strategy
and a brief around that. So this is really
good for designers. Let's come up with something
like I said, reset texts. Now it's going to
ignore the past text because if you didn't do that all sort of think
on what you did before. Let's add a fresh what would
I like it says to me now, so I'm going to say,
I have a client. I have a client named a
waterproof waterproof Sketchpad So I talked about
the client name. I just said come up with a
strategy, gives some steps, give uncommon strategies that target audience and the goal. I didn't say how long to
write it or make a list. You can say make a list with
ten points are five points. So you could be, I wasn't
that specific, so cool. So now what it's gonna
give me something, give me IDs to implement a
campaign that we talked about. So product is a campaign. As you can see, social
media platforms, popular target audience,
Instagram, TikTok, and YouTube use
cookie-based just sneak peeks of the product
boot anticipation. So it's about building hype.
You could use Tagline, the future of credit
is always here. That's kinda generic,
but I'd probably say, Hey, let's work on a Tagline. Expand upon this,
come with ten ideas. Influence of partnerships,
just cool to implement a marketing.
Yep, that's common. And AR app competition
has an auditor. Audits can submit the Ai
artwork credit using sketch it. See that's a good idea as well. This will engage your audience, but also showcase the
capabilities virtual Art Gallery's create a virtual garbage
truck isn't the best works great and sketch it,
that would be pretty cool. Pop up installations, organized
pulverised sessions in major cities where artists
can use a sketch at live. That's another great id. Or
even like collaborations, like even thinking of like
maybe collaborating with like Art Gallery's or stuff like Comic-Con or like there's Otzi festivals and
stuff like that. Podcast sponsorships, Ai
filters on social media. Yeah, that's another good one. Snapchat and
Instagram, pre-order incentives and a launch event. So boom, there's a ton
IDs that if you like, straight off the bat like this, will start to get your mind, your creative juices flowing. If you want to take me some time to sit
down and think like, okay, write down a list,
but it just generates it in less than a
minute, which is great. So this is a great start. But say, well, we can
actually tweak this. I could say, I like some ID three and to say I
like ID3 and to R12. So now what I did, I said such a way for potential
collaborators. It's now using that plugin
that we set up before. It's gonna go on the
internet and actually search for websites. And obviously ChatGPT4 is not always 100% accurate.
So keep that in mind. I'm pretty sure we all know that mentions Banksy, Yoko Ono. Lot of these other
artists that I'm probably don't know about
adults giving lot. And if I just right-click
and click New Tab, it's going to using Wikipedia. So like how it generates. It's just trying Wikipedia
which is not great. So we have to be more specific. Gave me the artist,
but I didn't answer my first questions. So sometimes it's not
gonna get it right. You have to tell
time, say things a bit slower on the
brand strategy. Now, we have limited resources. How can we approach this? So I'm telling it to focus on the specific ones over
here as you can see. And I told her to put it in a table and that's
one great thing. I can copy and paste
this and bring it into a dock or Notion or whatever. Okay, So it put it in a table. But the strategy, so as you had the specific content during
the process is launch it, promote awareness, best
interests go into prizes, potential name sketching, ICA, Art Challenge sketch
at greens creations. For this one, sketch
a green challenge. It got audits of the month, so it's giving us
potential names and then approach with
limited resources, reach out to emerging
artists who are passionate about
eco-friendly up. They are likely to collaborate a low cost or
even for free for exposure. I don't always recommend, I
don't recommend doing that, but anyway, leverage
user-generated content. It's cost-effective
because the chemistry of the process can be your own products or digit
recognition. So beautiful. Now what I can say
is like, okay, now create a content brief for, I'll tell it to
create a brief that I can send to these collaborators we influences that I'm
going to work with. But hypothetically, so I love how bordered the details
he said brand sketch it, you gave us a product. Whatever musculature with
hologram technology, target audience,
creative artists, illustrators, the campaign goals, brand
awareness, promote. You could probably
ask her the product. Sadly sketch it
because I'm on brand. Key messages, awesome
content requirements, awesome keywords,
payment terms is just, it just made up oldest
averages, great. Bonus, passionate. I certainly believe that
creditor go hand in hand. That's pretty generic.
So I'd probably craft brand values
a bit differently. Timeline, product livery, consecration and
pre-filled content launched easy for weeks. Awesome. Look how easy that
is just to create a brief. You can create logo briefs, you can create IDs. So I can say, now, generate a mood board. We'd descriptive
language that I can input into Midjourney to
create promotional images. So let's come up with
a mood board here. Color palette,
imagery, textures, pencil shavings,
fluid, watercolors, image of close-ups
of water for feature Maybe splash the water. It's giving us a color. It is maybe electric
blue, red, and yellow. So very bright. Layout,
dynamic engaging. The line should be
bright and clear, Cool. So then I could say, now it will change based on that prompt there
futuristic approach. You can see the colors
of different now. Now it's saying electric
blues, neon pink, silvers. Holographic Art
floating above it, close-ups of the water
feature I've mixed services, pixelated textures,
sleek Jeremy, metric fonts, dynamic,
symmetrical layouts. That gallery was
in high contrast. Your anti-clotting,
holographic AR feature, aim for mood that's starting, that's featured in generic. So you can see we
can keep going, keep pushing it and pushing it, just telling it the right things and decided Craig, great. I get better results
with ChatGPT. Crafting the right Prompts
is the right questions, fitting it the
right information. And you can create some
really great stuff. So I can go now let's focus on taglines, slogans,
and messaging. Based on the above information, based on all the above, All the, all the
above information. Make a list of, I've slogans and taglines
and ten headlines. The website and social media. I can say use brevity
and persuasive language. So brevity means like
short and sharp. Use brevity. Brevity
and precise language. And make it punchy. You get your future job, you on boundaries, you sketch
it. That's pretty cool. Credit you meet innovation, that one's generic, boring. Bring it out to life. Less generic is all
scheduling feature curvy here that one's
needs tweaking. I liked this one though. Now it's who's really good? Headlands website instead of the future, unless
you creativity. Ought me signaling GI Joe
will be on the canvas. This is cool, that's
cool, that's cool. New dimension of Art. Bring you measure its life, features in your hands. Power, experience,
power, holographic God. So there's a few of these are really great and I'll just start to pick the ones I
like and I taught two. And then I'll tell it to
rework it, refine it. Use different keywords.
Like I can say, cut out the word
technology or cut out. Don't use the word Art. I can say like don't use
the word, sketch it. And try again. So I'll
get rid of the word sketching now so you can
see it's simplifying them. Job on boundary is a
feature of credulous here and it's waiting
for use to seize it with thrilled to announce
the less competition is all about pushing the limits of your imagination and stepping into the new
dimension of this, your chance to check
is your talent mock, make your mark in the
power of religion, enduring with your
season as well, but encourages competition is, is your Canvas get
ready, create, innovate. When you take your
creativity 3D, head over to a website, sign up. Easy and includes some. Whenever you say
Instagram, it always includes even though
edges and hashtags, you can tell it to
get rid of that, but it's pretty good job. So we've created everything. We've got slogans,
the brand strategy. They've got some examples of
who we can reach out to you. Obviously, these people are just random people
from Wikipedia, so that's probably
not effective. You'd have to be really
specific in that. Gave us the brief we can
send to the creators, give us ideas for mood boarding, for imagery, and The whole lot. So the more use it, the more you start to
learn what it's good at and you can get better and
better at making Prompts
13. Animating Your Images: I'm gonna show you
how to animate any of your midjourney images or
any Ai image you create. You want to use runway. So gotta runway ml.com. It's a great software
that allows you to create animated videos using
video to video, text to video, or
image to video. So I'm just going to quickly
login here and you've got all your options
on the left-hand side, as you can see here, or you can just click on one of these. So what I'm going to use his text or image to video,
I'm going to click on that. And what you want to do,
you want to click on this little icon here. You see it's got a
little image icon and you can drag
and drop any file. So I'm just going to load
up one of my files here. I'm going to drag and drop in, or you can click and load it up. You can see I've
already loaded up, pop previous ones here. As you can see, it's
going to load in. Now once that's done, you can see the image
on the right-hand side. And all I gotta do
is click Generate. I don't have to add a prompt or anything because it
will mess it up. So I'm going to click Generate and it's going to use my credit. So I'm using the free plan. So in the top-right corner
you can see if I click, you'll get more credits. You pay $12 a month. And so I just use the free one. You get 100 and around
120 credits per month. And for every five credits
It's basically 1 s. Alright, in all I gotta
do now is just click the Play button and it
will play the animation. So it's all randomized. You can't really change or affect any of the animation,
but it's pretty cool. Like if you put in a lot
of different images, you can get a lot of cool stuff. And then the cool thing is
you can actually save it. So I can download by pressing this little
icon on the top right. Then it will save a video. You can also report the
content or you can expand it. So if I click Expand button, I can see in full screen. And obviously you can
see the little details. It's not 100% urate and sharp. And then other day
It's pretty cool. Air can do, it's gonna get
better and better with time. He was another one
AI-generated as well using an Xbox controller. Just really simple like
Product Shots a lot. How did the lighting pretty
well and it fades out there. I think it was really cool. So now there are a few other
things to mention as well. Down the bottom left, if I click this little time clock icon, currently Generation to
only offers 4 s of video. So what it is pretty short,
you can't go beyond this. So keep that in mind. Also, I click this
little icon here. You can see if I wanted
to generate something based off his exact
design that I have here, you can click the seed number
so I can copy that seed and you can put it into
a prompt later down the track so I could
paste it and do a prompt, etcetera, Upscale and remove watermark is upgrade as
well, which is typical. So you'd have to
upgrade your plan
 Jeremy Mura, Brand and Web Designer