Transcripts
1. Ai Course Introduction: Tired of spending hours
on renders and still not getting the visual quality
your project deserves, there is a faster, smarter way, and it's powered by AI. Hi, I'm Amer Sawalha. And in this course,
I'll show you how to turn sketches, cat drawings, mood boards, and ideas into stunning visuals in
minutes, not hours. You learn how to convert cat drawings into
photorealistic renderings, replace furniture
with AI precision. Generate mood boards and
conceptual sketches, transform two D inputs
into three D models, edit materials,
lighting, angles, and even remove
elements instantly. Thousands of designers
and architects are already transforming their
workflow using these tools. Are you ready to join them? Join me now and future
proof your design process?
2. 01_Flux kontext website sign up: Alright, guys. So the first software that we will be using, it's a website called
Flex Context App, okay? And I want you to pay attention to the name
of the app itself here. And if I want to sign
up into this really, really great website,
how do I do this? So first, I want to explore the pricing of what they've got, and they've got the
basic P and MAX and they vary in the amount of renderings that you guys can do. So each rendering roughly
takes five credits, and the basic gives
you 100 renderings. This one gives you
almost 250 renderings, and this one gives
you 600 renderings, which is more than what you can imagine doing in one
month. But I don't know. Maybe for large corporates, they really need this amount
of renderings per month. So you've got it right
here, and of course, if you need more, you can
contact them and get more. Or you've got the one time. And the one times
gives you 200 credit, 602,000 credits and each for really decent
prices as well, but you don't get the access to more advanced
models and features. So if you want to log in to
this website or a sign up, it should be straight forward. You have to, you know, type your email and, you know, choose a password, and
then you're good to go. Select a payment plan,
pay for whichever you want to get as a package,
and proceed forward. So for us to be able to
apply on our examples, we need to render with flux. Of course, they give
you four credits, but four credits is not enough to do anything
because the minimum is five. So that's what I recommend. I recommend subscribing
to this website, so we can proceed forward with our testing and our
rendering edits.
3. 02_Angle Change Interior Front view: Alright, guys, so welcome
to the first lecture. We will be discussing in this
lecture the different types of AI websites that
we will be using. So we will be covering almost as mentioned in
the introduction, 20 architectural
interior workflows. And these are very
beneficial for us to be able to move really forward
with our concepts, with our renderings, with
our CAD, so many things. So first thing first, I want to talk about
the flux context. So the Flux Context
guides is a main website, and it can be integrated
into other websites. So I can go to
other websites and find flux as an option for
us to be choosing among. The one I'm using now it's
called fluxcontxdt app, and this is the one that
I'm currently using. Flux Context is produced
by Black Forest Company. And as I mentioned, if you go to Google and type
in Flux context with a K, we can find so many websites that is delivering
the flux context. This assures the idea that
I mentioned to you guys, is that it's available
in so many websites. The one that we will be using, though, is called the Flux app. So make sure that
this one it is, so you guys can follow along
and make sure that you are using the same website with the same tools
and everything. It varies from a
website to another. But for now, we will
be using this one, so make sure you use this one. For flux contexts, it
needs a subscription, guys, for us to be able
to move forward with it. It's a cheap subscription. We can use it for
so many tokens, more than what we
need, and they've got different types of subscriptions
that we can enroll in. It depends on the activity that you guys are
planning to do. All right, what does Flux do? So basically, here's
some explanation is that B image contexts from A. The bird is now sitting in
a bar and enjoying a beer. So this is the rendering
that is generated, and A, assuming that
it's the bird only. Then you've got C
image context from B. So this image from this one, there are now two
of these birds. So the prompt is there are
now two of these birds, and these birds are right
here drinking beer. Again, we've got D. So from C, watch them from behind. So now, since we
generated two birds, we got two birds from behind. And E from C, the two birds characters are now sitting in
a movie theater. So I think you guys now grasp
what does flux Context do? It edits images, but with
preserving the original image. So this is like the
revolutionary part of the AI is happening is now usually AI guys renders
something with the same idea, but it doesn't render the same concept and
the same output. So in this case,
we've got a website that basically renders
someone calls it 90, 95%. But in my perspective, this is very good and can
be used in our workflows. So what can we learn from flux? So there are so many products
we can do from flux. Some of them is doing
interior angles, exterior angles, image edit, inserting materials, element
addition and removal, day and night and close up. Also, we will be discussing in a GPT, what we will be doing. So in GPT, we're going
to do CAT to Maquet, CAT to rendering,
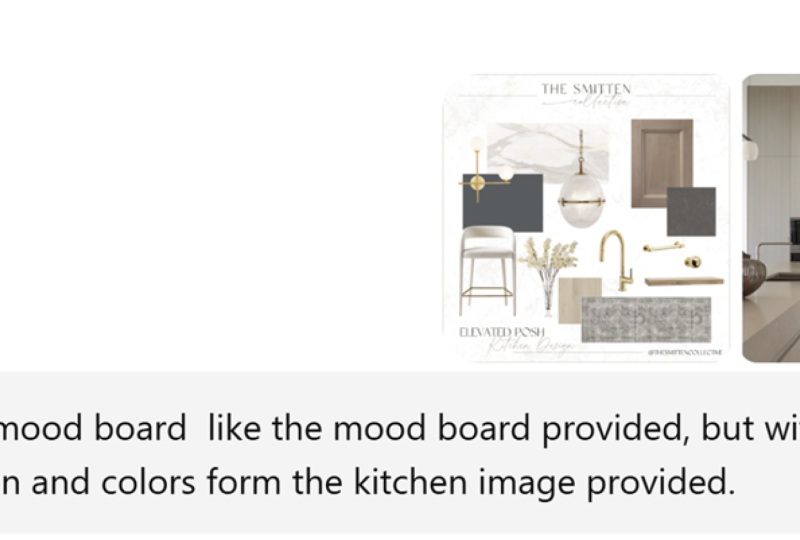
CAT to sective. We'll be doing elevation to CAD, empty room plus moodboard, furniture replacement,
furniture to CAD, moodboard extraction,
and render to sketch. And I've got some image editing, we will be using rea. So we'll do Crea for concept generation and
image enhancement, and I've got some others, I'd actually call it bonus for us to use image to three D, so we can now generate
a three D model from an image and
watermark removal. So you guys can imagine
how much we can do with these tools. So first thing first,
we'll do the flux, and I'm going to start
with the interior angles. So I've got this image right
here, it's surrendering. And I can see that we've got the bed from an isometric view, and we've got the windows. We've got also some walls, and we've got some
tiles here as well. So I want to be able to create a different angle from
this image. Revolutionary. Right. So let's jump into it. So what I will do is that I will drag and drop
my image here, and I've saved the
prompts for you guys, so you can copy and
paste the prompt itself. So here, Control C, Control V, and I'll do generate a new
view of this render from a front elevation where the camera shows the
bed from the front, and I can add
preserve all details. And I'll do create. And
as you guys can see, each image requires five tokens, and if I enable add more images, such as here, so I
need ten tokings now, but we're going to
add only one image. And what's great is
that the aspect ratio, I can match my aspect ratio. So I've got the aspect
ratio, I believe, 16 to nine, and it's
already going to match. But I have the flexibility
to be able to use whichever aspect ratio I want
to use, and there are many. So whichever product
I'm rendering for, this is the great website to be able to use because I don't want to just be able to create a front or higher
elevation view. I want also to be able to control the aspect ratio
because it's very important. So I'll do Create now. And I'm going to wait
for it for it to render and see what I can get. And here, as you guys see, it's already using the tokens. So that's a front elevation
of the same rendering, and it's helping
me a lot visualize my design. The way I want it. So now I can download
this and guess what it downloads with
pretty decent quality. So if I double click
on it and I zoom in, I can see that the
quality is very good. Yes, if I zoom in a lot, I've got some pixels here, but guess what? We
can enhance this. So this is not a
problem. But we all know that from any three D software,
whenever I'm rendering, so I need to at least if I'm
using a real time software, which is revolutionary as well, I can just insert the camera and render
it, but I have to wait. In all softwares,
I have to wait. But in this AI website, I don't have to wait,
and it preserves pretty much most of the
details that I have. So this is great. I'm
going to do Control X, and I'll do Control
V, and I'll do here zero, two, underscore, and I'll go here, copy my prompt, which I added, by the way, preserve all details
with it and put it here. I've already got a
rendered image here, but the prompt does not
say preserve all images. So the AI suggested that I have a window here and it's
showing the rest of the view, but this does not go the
original design, right? So I need to do it in
a way that is as close as possible to the details that are available in my design. So this one does not have
the preserve all details. It has generated, let's say, somewhat called 90% close
image to what I'm looking for. But with the prompt adding
that preserve all details, now I've got all the details that are already in
my original design. So you can see that this is
the power of flux context. So I will be distributing
the lectures among each exercise so that we have
short lectures and concise. I hope you guys really
benefit from this one and see you guys
in the next ones. I'm really excited because
what's going to happen next is so many life easoning
tools. See you guys.
4. 03_Interior front view result enhancment: Okay, so in our
previous lecture, we did a front view
for the bed from sort of an isometric
view for the bedroom. So I've got a chapter that I will be talking about
image enhancement, but I want to jump into it a little earlier
because I want to give you a perspective on what you guys can do
in your workflow. So for instance, here, I've got the rendering
that I have, okay? And I want to somehow
make flux give me a better result
already, right? Because we all agree that when we zoom to a certain limit, it starts to pixelate, even though it's like a 1.5 something megabyte
image, even here, so I can do either
or I can enhance the original image and generate the new one
with an enhanced result. Or I can take the
enhanced result. I can take the one
that is generated and enhance its result.
So let's see together. I've got a website here
that is called crea.ai, and it's pretty famous in
the AI websites out there. So we need to do
an account in Kea, and Kreas considered somewhat a free website because
it has a subscription, but it gives you a lot of opportunities to
be able to test with so many features
before you decide to subscribe to this software. So I need to sign in from here, I'll do Logout for you guys to see how you
can create an account. So you can do a signup
when you do a sign up, it's going to ask
you for your email. It's going to ask
you for a password, and it will ask you
for verification at best and you
can come back with the code and then you are
already created an account. But we'll do a login for now and I'm just going
to log in with my email and it's already
has saved the password, and maybe it's going to ask me for some verification here. I'm already logged into Crea. So this is the main interface of Create has so many products. The one that we will
be using is enhancer. So we'll open the
enhancer from here. And, you know, I've got
the history that I've done already some tools on the image. If you want to do
video enhancement, if you want to do
real time, edit, and if you want to check assets. And here tells you upscale
and generate new details for images up to 22 k.
That's a huge number. And videos up to eight K.
That's also a huge number. And you guys need to consider that you need to subscribe to be able to get to these numbers. I'll do Upload, and
from flux here, I'll go to interior angle, and I'll choose
the latest result that I was able to
generate from Flux. And I'll do open. It's
going to take some time. All right. And then
here it gives me more things that I can control. So AI strength, resemblance,
clarity, and sharpness. And the more I play
with these numbers, the more I'm going to
get different results. And here I can type in some prompts to
describe the image, so maybe I can get
more accuracy. But what I will do
for now is just enhance because the
defaults are already great, and I will see what is the result that's
going to come up with. I'm really excited about this
because crea.ai is one of the really good websites
that are free to use, and it can generate really, really good quality renderings, especially if I want
to enhance them. So let's see what
can happen now. Great. So it has already
enhanced the image and it gives me somehow
before and after, and you guys can
already see the result. There you go. So now the
result is much better here. This one looks
pixelated compared to the new one,
even the greenery. Look at the greenery here. It's really awesome, guys. I even love the
rug, the details. It's really cool,
really, really cool. So now I can consider that this is the final output
image, for example, for the one that is
generated from Flux. So I can take the edited one
from Flux, put it in Crea, and now I can download
my rendering and I can do I can take this image, Control X, and I want to go
to where I have my course, and I'll go to flux
interior angles, and I'll do Control B here. But what I will
do is I'll do 03, and then I'll do here,
underscore enhanced. So you see how my image is evolving the more
I'm adding prompts. So here I ask for
preserved the details. Therefore, I got a
preserved detail shot, and now I've enhanced
this shot to make it really stand out as an
ultra realistic rendering. So all of this combined
guys can give us the work that can save
for tens of hours, literally tens of
hours with no joke. I hope you guys benefit
from this lecture, see you guys in the next.
5. 04_Change Angle Exterior Aerial: Alright, so now jumping
to the next exercise is that we've got this exterior
image really wonderful, and we want to be able
to make two other views. One is from a bird's
eye perspective, and the second one is
a front perspective. This is the bird's eye, you guys can see that if you
want to achieve this on three DS Max or any
three D rendering software, it's going to take us so long to be able to
do it this way. But in AI, it's
doing it in seconds. Yes, I agree that there
are some imperfections, but according to the time, this is wonderful and any other unperfection can be fixed. So this is the front view. So we'll see together how
to create all of these. So we'll go to flux, and now we're going to
remove the previous image. We're going to do this image. I'm sorry, we're going to
add this into the drag drop. We're going to
delete the prompt, and then we're going
to take this prompt is change the view angle to an aerial view control V, and I want to ask it to
reserve or image details. Let's see, it's still uploading. I think that image
up to 5 megabytes maybe image here
no image is fine, so it should upload. Guys, anything in
this course that will take long time with you is that this could be because of your
Internet connectivity. So the better Internet
connectivity that I have, the faster the process will go. So I'm going to just,
you know, reload. I'm signed out, so
I'll sign in now. It's going to assign me
automatically into my account, and I'll import this one, and I'll take this prompt, Control D. Either the
Internet connectivity is low or I need to
refresh the page. Aerial view and preserve
all image details. Generate. Let's see
what flux will give us. Great. So the image is rendered. I've got all my
details preserved. I'm going to download this one. And I'll do Control X. I'll come here, ControlV and I'm going to compare
between this one, which has preserved most of the details, as
you guys can see. And here, this one hasn't
preserved all the details. So the word preserve all details is very
important because it tends to help us get the same details of
the original image. So technically, I've
got three houses here, and this image, because I haven't prompted preserve
details has one, two, three, four, five but this one here
has one, two, three, so it has preserved
all the details and already had rendered
this house for me here. So preserve our details is very important for us to be using
whenever we are prompting. Okay, good. So now I
will take this prompt. And I will put it here. So I will be prompting from
the original image, right? So if I want to edit on
anything in this image, then I upload this image
and prompt it again, which we will see in the
materials edit section. But for now, change
the view angle to a front view and
preserve all details. Generate. So the
difference between this one and this one is
the preserve all details. So Control V and
preserve all details. Great. It has gave us something, but not the thing that
I was hoping to get. It should be something
similar to this. So what I will try instead. Of course, if I keep on trying, it's going to keep on
rendering different images, front view and
preserve all details and building orientation
and spacing. Let's see what happens if
we generate again now. Is it going to be accurate
or is it going to require me to give it the top view, the aerial view,
and it's going to generate the front view
from the top view. So now we'll see. So it has generated something, but it's not the
same that I want. Sometimes the
website, I need to, you know, refresh the website, so I'm going to Control
C, refresh the website, upload this image, and I'll
do this prompt. Sorry. So it's going to be change
the view angle to front view. Pretty simple, pretty
straightforward. Let's see what it
can get us generate. So, guys, there are some
flux websites out there that is part of other
websites that can generate up to four
images in the same time. So you guys can check and see rather than waiting one by one, you can wait up
to four together. Okay, so it has gave us something. It's not
the same thing. So maybe it needs
more data details. So I'll upload this
image instead. Wait, let me do the exact one. Generate the view angle
to our front view. And let's see what's
going to give us. So it has uploaded, and I'll do Create now. Wait to see what we
will get from flux. I already has rendered this one. But let's see. This is somewhat convincing one. Maybe we can change
the view angle to front view elevation or orthographic elevation. I'll take this one and
I'll do create again. So till it's render, I'm
going to go and check it out. Pretty good. I can prompt
for having a human eye shot. So not to take it from Avove, but this one is also pretty great, pretty straightforward. Again, this is AI. We can't expect from AI
to understand everything. Sometimes we need to
really be detailed with it for us to generate
really cool renderings. So this one is good. I'll remove the front
view and I'll do human change the view angle
to front view human eye. Let's create. So
I'm doing this on purpose with you guys
to see what can we stumble upon while we
are in this process and how can we work around it rather than just giving you the
image itself and how it turned out without understanding really the logic behind it. So it has gave us something that is front but not really front. So the human eye
didn't really work. So, again, I can refresh the
page and upload it again. And I can prompt the same prompt and see what other result
can flux give us. So control, we generate. Yeah, I'm spending my
coins on you guys. Yes, for us to be
able to see really, how can we get the
desired result as close as possible to
what we're looking for. So now it has gave us something. I can add preserve all details
to see what we can get. I like this one, as well,
but I want to kind of give it like the really front view
of the three cottages here. Preserve all details, generate. All right, so it gets us somewhere close to what
we are looking for. I'm pretty sure that if
we prompt even more, then we will be getting
the exact result. But you need to know
that, again, this is AI, so it will get us as close as possible to what we
are looking for. Course, maintaining
simplicity with a prompt and being straightforward
is very important so that we can kind
of achieve we can kind of teach the AI
that we're looking for exactly this
result or that result. So I need to keep on testing and prompting till I get what
I'm really looking for. And there are some
different applications that I can do through. So this is to give
you a glimpse of how wonderful results
can be created through just one image,
and I can create, like many renderings
for the same project, and it's talking
the same identity, talking the same
visual fidelity, and stalking even the same
design that is out there. So I hope you guys benefit
from this lecture, see you guys in the next ones.
6. 05_Close up shot: Alright, next. So now we will talk about close up shots and how to
create close up shots. So I've got this rendering, and I was able to achieve this close up look
from Wonderful, guys. And I've got this image, and I was able to generate
this close up shot. So for this demonstration, I'll take this image, and I'll show you guys how to
produce this close up shot. So same thing. We're going to go to Flux
Context, but this now, I will reload and
refresh the page. So just to make sure
that it has cleared the cache of previous workflows. So now I'm going to
drag and drop my image, and I'll take this prompt
and paste it here, which states that make
a close up shot for the vases with a depth of field blur to everything
else except the vases. Generate. And there we go. It has generated the image
that we are looking for, and it's pretty great. So I'm going to
download this one. And, of course, guys, any image that I can take from Flux, I can put it in Crea and I can generate a
higher quality one. So we will talk more about
rea as we've talked before, but we're going to do a couple of other examples, not this one, but for you guys to grasp on how can we do a close up shot. So I'll do another example. I'm going to remove this one. I'll put this one, and I'm going to copy
and paste the prompt because I made sure that I'm describing the
image in each prompt. So for now, it's the juice jar, not the vases with focusing on the jar and blurring
everything else. We can even focus on
something different now. So for example, I want
to focus on the shelves, okay, and plates in the shelves. So I'm not sure
how is it going to look because the background is going to be really
busy with the plants. I can Describe, let's see, I'm going to do the plates for
the demonstration of that. It focuses on what I
ask it to focus on. So make a close up shot of
the plates on the shelves. Focusing on the on the plates and blurring everything else without
the coma. Let's see. Okay, I did. I did. Perfect. That's great. So I can take this image. I can put it part
of my mood board. And whoever sees this image will be able to tell
that this is here. Around here. So this is great. This is how we can
make a close up shot. Okay, I'm sorry, I
mentioned it close up shot. Okay. And I can have details such as blur and
high quality focusing. So this is revolutionary, guys. Usually, I need to create
a camera inside TDS Max, put all the depthal field and, you know, the aspect ratios
and the aperture and everything for me to be able to get something that is this good. So now we've got a tool
to make close up shots. I hope you guys
benefit from this one. See you guys in the next ones.
7. 06_Night shot from a day shot: Alright, so talking
about something new, a new workflow, a
new application, we will be talking
about day and night. So this is the day shot, and this is what I was
able to achieve in a night shot and even this one. So each one differs. I'll show you guys how
did I prompt this one. So I'll remove I'll
do refresh page. This is what I
recommend personally, so it does not take anything
from the previous workflow. I'll upload this image, and I will take this prompt, make this a night shot, and I'm going to
show you how we can tweak our night shots to get as close as possible to what we
are trying to achieve. So I'll do generate now, and I'll see simple
make this a nightshot. So sometimes I need
a complex prompt. Sometimes I need a
really simple prompt to describe what
I'm looking for. Because the more
I complicate it, the more I'm going to, you know, get this jittery results that I'm not looking for or
this additional objects. So it's not really always necessary to be
specific, detailed. Sometimes it is, but
sometimes, you know, having a simple prompt
can do the job. So there you go, guys. We've got a night shot, and if I want to post produce
this one on Photoshop and be able to achieve just this
one without editing it, without anything else,
then it's going to take me a good amount
of time to be able to, you know, have the lights, you know, extract the
sky is the easiest. But, you know, have the GI
effect on everything else. This is going to take
me a decent amount of time to be able to
produce a night shot. But in our case, it was
a couple of seconds. So, great. I like it, but the problem is that I
believe it's a bit dark. So what I can do is that I can
take a new prompt now with the difference the
differences here is that the shot with a
high light intensity, also add lighting to the
street polls and a blue sky. So I'll do Control D here. And what I will add
different since we're experimenting
together is that I want to go and
tell it that I want also Light the
neighboring building. Let's see what we can get. So
when I prompted that I want even higher intensity
and light up the street, this is what I got. This was the previous one. I got a higher intensity one and even more beautiful
one and more realistic. But now I want to tell it to
light even this building. So let's see what's going
to come up with. Great. Great. It hasn't lighted the
building that is near to it, but it has definitely
light up the street, and it has came up with really beautiful colors
for a night shot. Really realistic. So this is the last one I was
doing on my own, and now we've got this. So to compare,
they're very close, 'cause, like, it's the
same prompt, same image. But I believe that this is less saturated. I like this one more. So you guys can see with
just a couple of clicks, now we can get a night shot. And usually, if I want to do
this in a three D software, I need to flip the
entire setup and the entire lighting and
assign lighting to objects and do the ambient
light for us to be able to get night rendering. And usually when I'm doing this, I need for me personally, I take a copy of the
file and just name it night shot to be
able to, you know, produce as many
nightshots as possible, rather than, you know, flipping between day
and night all the time to render day then night, then night then day, and
it takes a lot of time. But this one takes really, really short amount of time. So this is how we create a
nightshot from a Dayshot. I hope you guys
benefit from this one, see you guys in the next ones.
8. 07_Add and Remove elements to our rendering: How can we remove all
the furniture that we have in the interior and
get a clean interior space? So for the future,
in another tutorial, we will learn how
to get a mood board and furnish this space. Or this is called
element removal. We're going to be also
discussing Pardon me a second. We're going to be
also discussing how to make element addition. So how can we add an element to our rendering
rather than deleting it? All right, so I
will refresh flux, and I will take this
rendering, put it here. And I'm going to prompt empty all room
furniture like this. I'm just going to remove
the file numbering. Empty the room of all furniture. Create. Okay, so this is what I got. You know, it has
removed only the chair, but I will remove empty the room from all furniture and see
what we will get. And this is what we've got. You see, guys, just a small
word affected what we get. So don't get frustrated. You know, keep on trying
and save your prompts. So every time you want to just
do what you have in mind, you've got the prompt for it, so you don't have to waste
credits for it, but it's fine. For me, I am using my credits for you guys to understand
how can we deal with AI. So that's the first one on how to empty the room
from all furniture. Let's see how we can
add to our room. So now I will remove this one. I'm not going to download this because I've already
have it here, and I'm going to
delete the prompt. And from here, I'm going
to put this image, and I'm going to ask it to add an Abs carpet to our interior. I'll take this, copy, paste, add an Abis carpet horizontally
on the floor between the two hallways
matching the vibe of the interior
without the comma. So generate. And there we go. Now we've got a carpet in
the middle of the hallway. The difference between
this image and this image is that I just prompted for
the carpet differently. Here, I asked it to have a carpet horizontal
on the floor between the two hallways matching
the vibe of the interior? No, but this one I ask for an abstract, simple white carpet. So I'm going to do it for
you guys. An Arabisq. It's already here. Add a modern white
Arabisqu. You guys see. So this is the only
difference that I've done to be able to
achieve different carpet. Look. And you can measure
anything upon this. So you can add a couch. You can add a chair, you can add walking people. Whatever you guys are
aiming to achieve, you can achieve it through
prompting it correctly.
9. 08_Edit our rendering material and adding people: How to change this material in this image to this
material right here. So I've changed
it from bricks to concrete with just
some prompting. So let's explore together
how powerful this is. So I'll refresh flux
context and sorry. And I will navigate to
where I've got the image, and I'll drag and
drop my image here, and I will ask for change the bricks into
gray precast concrete. And generate. Let's
see what we can get. Perfect. So we've changed
the entire material of the whole image with just one prompt and
maybe 5 seconds. Usually, if I want to do
this in a three D software, I need to assign this material
to every single object, make sure that the
UVs are correct, and then rendering the image, and maybe I can
get some mistakes and re render and
so on and so forth. Then I need to put it in
a retouching software such as Photoshop and edit it. Okay, great. So we have changed
the whole scene material. What if we want to
add more people? So if I want to achieve this, I need to put it on Photoshop and add person by person and then do the motion
blur for the person, and then after that, do the
shadowing of each person, which can take really long time. Maybe it can take
up to an hour to get it with this quality
and the seamlessness. With our tool now, AI tools, especially flux, we can achieve this. So what I will do
is I will remove this image because I want
to update this one now, I'll put this one, and I will prompt for Make
it busy with people walking, add Motion blur to them so
they don't look unrealistic because motion blur I AI is your best friend whenever
you want to add people. It can add really sharp people, but then you have to
enhance them a couple of times to get them with
the correct faces. But when you do the motion blur, it kind of helps the AI to
generate a realistic one. So I will create now
and see what flux will give me adding people and
adding motion blur to them. And for the result, there you guys go. I love it. I literally love it, guys. We'll download it and
see how's the image. There we go. It has added
people with their shadows. They look realistic, and
they look as they are, you know, has been
shot with a camera. So I just saved in
this video alone around two to 3 hours of work in just 3
minutes, literally. So using AI is like 1% of the time that I need to do to be able to achieve
the same result. And maybe sometimes AI can give us even better results
than the one that we get. Of course, if we are
professional three D renderers and
three D modelers, we can achieve amazing results. But compared to the timing, this is like a whole cutting
edge different story. I hope you guys benefit from this one, see you
guys in the next.
10. 09_Assigning Materials: Now we will talk
on how to change our white flat
three D model into a fully materialized rendering. So you guys can see I've
already have materials, I have lights, I have
a really nice shot. Even I've got fair chairs, and usually if I want
to achieve this, it's going to take me a
lot of rendering time, and I have to have
an exceptional CPU and GPU to be able
to achieve this. Taking you guys to the timeline, this was this, this, this, and then latest this is the first thing
that I began with. Then I've added some materials, then I've added the carpet, then I've added even
more materials, and then I've added lighting. So how can we achieve this? So I will take the image
itself and I will put it here, and then I'll ask
it for this prompt, which states that make the floor epoxy concrete,
counter white marble, table wood, cupboards,
white laminate, glass lights, and burgundy
for the dining chairs. Great. Burgundy fare
for the dining chairs. So I can do it
this step by step, or I can have the
whole prompt going on. So what I've added here is that I've talked
about the carpet. So here is also abstract, and that is white. Here, make the circular rug
under the dining table one. So I can add this space. I can add this as well. And what did I do different here is that circular chandelier, make the circular
chandelier glass sphere with lighting inside them, turn on the lights of the spots, and the group fall ceiling, make the accessories
on the bright, silver, blah, blah, blah, blah. So I can even copy this one and I can Enter and I can paste. I can put all my
prompts at once, or I can do one by one. So we'll test first is
that to do all in one, again, I'm going
to mention to turn on the lights and create. Let's see if it can achieve all my thoughts with one trial. Then I'm going to save
you guys the time of doing three or four trials to achieve whatever
we're looking for. V, I did with a big
percentage, it did. This is what I have now. It's really great.
It's really wonderful. I can add this and
continue prompting. Let me delete this one. And ask you to turn on the light in the hidden
ball ceiling groove. What else? Make the fridge on the
left silver metallic and make the cupboards reflective laminate. What else? Give variation to the
books and accessories. Give a material variation for
the books and accessories. Let's do create and see
what we will achieve. There you go. So it has
let me download it. It has lit the false
ceiling and has added the metallic fridge. It has made the cupboards
reflective and has, you know, brightened
the image a little. So to put them next
to each other in context, this is
what I have now. So it has changed the fridge, and it had turned on
the fall ceiling light, and it has gave maybe not
much focusing on the books. Maybe if I take the image itself and just
prompt for the books, then I'll be able to achieve
a variation of the books, but I love it. I love it. This was this, guys. Literally, this
is revolutionary. Usually I need to
do it on Photoshop. And if I do it on Photoshop, then it's going to look
quite close to this one. And even if I want to
do it on three D and be able to show the progress,
for example, for instance, I want to do an animated
video on how did I materialize every
single element on this? So I can prompt for element by element
and then after that, in the end put them in a
sequence together and show how did I change the whole
material of everything here. So this is really powerful. This is one of the applications
and the workflows. I hope you guys really
benefit from this one, see you guys in the next ones.
11. 10_Rendering or photo to a real 3D maquet: Alright, so we're
going to talk now on how we're going to
do this aerial image to three D maquete that we can sell for real estate properties
and developments. So how can we achieve this? We're going to refresh flux, and then I'm going to
put the base image, and I will take this prompt, copy it and paste it here. Make this a three D Maqette model for a real
estate showroom, make it look like
a real generate. Let's see what flux can give us. And there we go. That's
a three D maquete. So just with a
click of a button, we can achieve a
really good result. And with few more prompting, we can remove whatever is extra and that we
don't need or want. And of course, we can
enhance this image after. I want to show you guys how the enhancement of the image can be done, so you
don't have to do it. So this is the base image or
this is the generated image, and this is the enhanced one. Not much of details. I believe even the enhanced one
has hidden some details. And, of course, the
three D Maquetes usually take efforts
for it to be perfect, but I can tell my idea, right? If I'm, you know, debating
this with a customer, I can just show him and be like, do you mean this, and they'll be able to
tell me yes or no. When usually I take whole longer time to be able to actually generate this and
convince them of the idea. Now we're going to
apply the same thing for a house, a CAT plan. So this is a CAT plan,
as you guys can see, and then we're going to
turn it to this rendered three D form maquet that it's like a cross
section for the house, that we can see it
from a plan view. So how do we achieve this? We take this prompt Control
C and then Control B here. Make this a three D Maquette model with extruded walls and windows placed in a meeting room with a person pointing at it. Let's see what
flux will give us. There you go. Amazing. I can see that our ambitious
cat plan has been turned into a three
D Maqute that I can as well sell it to clients or real estate
development companies. I don't know how long did I
save you guys in this video, Usually days, but I hope you benefit from this one and see you guys
in the next one.
12. 11_CAD to Rendering: Hello, guys. So we finished
the first chapter, where we talked about
flux and now, you know, diving even deeper into more architectural and
interior design workflows that would save
us a lot of time. So we're going to talk
about Chachi Pit now, and most of us know Chachi
PT for writing emails, fixing contexts,
applying for a job. But now with the latest
updates, four point oh, we've got, you know, changes
on a whole different level. It can save us
thousands of hours. So let's jump into the
first application of this, and we're going to
do CAD to rendering. So basically what we will learn
is how to have two plans, convert them into a three D realistic
rendering, such as this one. Who said that one day we will be able to
achieve this from Chachi PT and even have an aerial rendering of it
and can enhance it later on. So what we will do
is that in CHATT, what I recommend
you guys is to buy the plus because if you
don't buy the plus, then you'll be able to
generate one image per day, which will take you months to be able to finish a project. So rather, when we have the
plus, we have the priority, and it's much quicker and it's infinite amount of
edits and renderings. So that's number
one. Number two, Focus on this point, guys. Please, whenever you
want to achieve, for example, things that are relevant to
the same project, then we do it in a chat. If you want to achieve a new
result or a new project, we do it in a different
chat because then ChachiPT will remember the old chat and start combining
two chats together. So each project open
it on a new chat on hatchiPT so that you guys don't mix results
with older projects. So I'll take these two
images drag drop here, and I'll copy and
paste this prompt, which states make an editorial photographic ultra realistic three D rendering for this plan and elevation. Note that this is in Hajia Sofia Mosque
in Istanbul, Turkey. So I've also give Chat
ChiPT the landmark that I'm trying to render
and where is it located? So it will now combine
real world data with plans that I have and
try to mix them together. So if I know the project,
it's even better. And now I do enter. So I wait for haipit and see
what Cha hipit will give me, and now it's
generating the images. Usually, Chachipit takes
more time than Krea, but if I have fast Internet
and I've got plus, then there should be no worries, you know, achieving a
much quicker result. So it's going to
take a bit of time. So I'm pausing the video
for you guys to not wait so long rather than jump to
the final result directly. And Bola. We've got our image, and now we can download it
and check how great it is. I mean, come on, guys.
This is amazing. This is, like, a high fidelity rendering that if we need
to do this on three D model and render it's going
to take us a lot of time and even look
at the variation of materials and to achieve them to make it look this realistic. This is brilliant and
amazing. Okay, great. So now we will ask it to give
us an aerial view of this. So I'll jump back here
and give me a bird's eye. Enhance, give me a bird's eye. So, okay, give me a bird's eye. No need to tell it
for this because it's already open in
one singular chat, and we've done one prompt
for the same building. So no need to, you know, even highlight more things
unless I want to, for example, tell it to show me the garden or the existing context
of this building or, you know, make it look
like a building in the middle of the
desert, stuff like this. Then I can prompt even more. But if I want just the
perspective of this, then I can just give him give me a bird's eye or give me an
aerial view of this rendering. And there you guys go. We've got Bird's Eye just with a click of a button for the same structure,
for the same everything. So this is really powerful
whenever I've got. You know, I finished
my planning. I've finished somehow
architectural drawings, but I want a three D rendering. So, you know, this is amazing for the quick result
that it gets us, guys. Usually, the quickest
result was back then was maybe Lumian, but the result looked really horrible at first because
you need to, you know, if you want to get a
really good result from Lumian inscape, these real time
rendering softwares, then you have to put the
same amount of work, the one that you do on
three DS Max and any other, you know, unreal
complex softwares, but really high
fidelity software. So now it's a game changer. Now, if the client is coming to our company and we need to
show him something ASAP, then somebody can go inside a laptop and just
generate renderings. This is revolutionary, guys. I hope you guys
benefit from this one, and I'm really
excited to share with you the rest of what we can do.
13. 12_CAD to Sective: Alright, so now we've
got a CAD image, and we want to create a sectv
with worshippers inside, assuming that this is a mosque, or I can do a sectv in any building and just give
the activity of the people. Having that this looks similar to what I
was resulting here. So what I will do is that I will drag and drop
my image here, and I'm going to
copy this prompt. And basically, the prompt says, Make an editorial photographic ulterial three D rendering. Cut sectiveOh, I'm sorry. Cut sective showing
worshippers inside. Let's see what Cha
ChiPit can give us now. Alright, so this
is what we've got. And this is also really cool
and really interesting, and I love it, but this is
not what I'm looking for. One thing, guys, you need
to consider when dealing with ChachiPiT is in
flux, for example, it had the option for us to match or change the
input of the rendering. But in ChachiPT, it
suggested itself, that this rendering
should look like this, which is not what
we're looking for. First, the result is not
what we're looking for. And second, you know,
it hasn't preserved. You see every time it's
giving us a different ratio. And maybe this is good, maybe this is not for us. So just in case we need
to be specific about the ratio that we want Chat
GPT to render the image with. So now, it has gave us interior of the highest
Sofia mosque in Turkey, you know, because we started the whole conversation
about this, you know? So if I want to have the sective in isolation of what
I've already done, then I suggest that
we do a new chat, and from this new chat, I can do this CAD and I can Control C and
control V my prompt. And just generate the prompt and see what we get out of this. Again, I love the interior
option that it has gave me, and it saved me a lot
of time to render this. And usually, I need to
look for people that are worshipping either three D model or I can look them online, and then I need to arrange them. So it saved me tons
of time already. But in our case now, we want just the sective
of the rendering. So I've done a new
conversation to do it, and I'll wait for it to finish. After this, if I don't
like the aspect ratio, I can also change this. Perfect. This is what I've got now and I'm going
to download it, and it is the same
as the sective. So as I told you guys, whenever we have it as a
different conversation, then it will give us the
result that we're looking for. So let me refresh, and this is what I have, and I can even enhance it further. But easily, if I'm an
architecture student, I can put this as
a sective and just have the lines darkened
and there you go. It's a rendered sective.
Usually, I need to do this as a three D
model and then cut it to be able to achieve a sective and it's not even rendered, then
I need to render. So you guys can imagine
how long it would take. So I hope you guys benefit
from this tutorial. See you guys in the next ones.
14. 13_Elevation to CAD: Guys, interior designers
go to love this. So how can we achieve an interior elevation
cad elevation from a three D rendering image? So, pretty simple,
pretty straightforward. This one is tricky a little, so we need to focus
and follow along. Great. So I'll open a new
conversation with ChachiPT. I'll upload this one, and I will do Convert convert the
interior perspective view into two DCAD elevation, without any perspective lines
using clean black outlines, keep all design details
without any changes. Let's go. Let's see
what we can get. So I hope that it changes the result or it reads
the result well, but the first result that I got from Chachi
Pitti was this one. Even if you get this
one, don't give up on this guys because you can even, you know, prompt different
to get this result. And I will show you what
you need to tell ChachiPit. But the thing is that, you know, you got to take it step by step. So as I told you guys, it has gave us the exact image that we are not looking for. So what I've done
is that, you know, I've talked to Chat
ChiPT even more, and this is what I told it. You know, I can
easily give you the prompt from the beginning, but I want you guys to understand that
this is not perfect. You need to find your way around to be able to really make it
understand what it needs. So I told it, No,
this is very bad. I need a much
higher quality one. Besides, this is
a three D trace. I want it to be a two D and
no need to draw the tiling, type in tiles and
add dimensions. Let's go. Let's see what
it will come up with. So now it's going to
analyze it even more, you know, and see
what it will give us. So this is what we got now. It's a much cleaner
and higher resolution, and it talks more logic than
the one that we had earlier. And of course, we can
submit this as a CAT, but we can't submit the
previous result as a cat. I can't go to a client and
be like, There you go. That's a cat that you're
looking for. No, this is not. And, you know, as I mentioned, it's called a three D trace. What we need is a two
D cat. Okay, great. So we've got this, and
I'm going to download it. So now we're going to jump
into the point where, how can we convert
this to an actual cat? So I will go into a
new tab and ask for Convert To image to CAD AI. So there is a website,
free website that can convert our JPGs to CAD. So JPG I'll pick from here
CAD and I can do DXF, and I'll choose File. I'll go to the downloads
and I'll make this bigger. I'll take this one,
and I'll do Convert. And let's see Convert result. So it's converting and
it's going to take a little while for it to
convert. Not so long. Again, depending on
the Internet speed and depending on the
complexity of our drawing. Now we can download this file, and we've got our
downloads here, and we can double click on this one and open it
with Autocad just once and see Autocad will read
from this converted file. Okay. Z O. So this is it. So I press Z then A Z for Zoom, and then A for A. When you click Zoom, it's going to ask you all
center dynamic extents previous scale, et cetera. So I'll do A, and then I've got our drawing and it is CAD. So this can help us a lot, even when we're doing
three D modeling. Is that I'm generating a cat or the base cat from the
image rather than, you know, drawing on top of it from CAT and
then taking it to, for example, three DS
Max and extruding it. Usually, I can also generate
details from this process. So this process saves
us a lot of time, guys. I'm going to call this
course the time saver in AI. I hope you guys benefit from this one, see you
guys in the next.
15. 14_Empty room + mood board: Alright, guys, so now we're
going to talk about how to do this mood board into an empty space through
HathiPT and actually generate a three D rendering out of just the mood board
and an empty space. So the empty space image
I've got is this one, and now I'm going to
open a new conversation, and I'm going to give
ChachiPT these two, and I will copy this prompt where it
states the following. Furnish this empty room
with mood board items, preserve the camera angle, proportions and existing
openings materials, openings and materials. So now Chachi PT will
combine this space and the proportions of
it, the aspect ratio, and we'll add the elements of this moodboard into
this rendering, resulting in this image. So let's wait for it till
it generates our image. As you guys can see, it has
already generated the image. I can download the image now and check how is it looking.
And there you guys go. It has rendered our mood board inside the empty space
with proportions and aspects of the same this area and give us a really clean
and neat rendering. And if we need any
other details, we can just specify and ChaiPT
will generate it for us. So there you go,
guys. Now you can do a three D rendering
out of a mood board. No need to put them inside
DS Max and render them. Of course, that's a
different pipeline, but now we can generate
it in seconds. So this is really powerful.
16. 15_Furniture replacement: How can we have these two chairs replaced by these two chairs and
maintaining this rendering. So this one is
furniture replacement. So I can love the shot, but change a couple
of things inside it. No need to change
the whole thing. How can I do that? So
first thing first, guys, I've managed to mark the image here, and
how do I do this? Is that I double click
and I go to edit, and then I go to Markup, and I can mark the objects
that I want to replace. Then I can do save
options and save a copy, and it's going to ask
me where to save, but I got it already here. So I don't want to
save it. I've got it already marked for me here. And I've also marked
the chairs that I'm interested in
changing too, right? So now I'll take
these two images, I'll open a new conversation. I'll take these two images
and I put them here, and I will copy and
paste this prompt, which states, replace
the two orange chairs under the stairs with the two gray chairs and replace the exterior view with the
city of Hamburg Skyline. Let's see what we can get. Lilly Renders, I want to show
you guys how it turned out. It turned out exactly
how I wanted. So it replaced the gray chairs
with the orange chairs, and it has given me somewhat a skyline of Hamburg or any
other view that I want. And Voila. There you guys go. We've got our rendering, and it's exactly how
I want it to be. But the thing is
that it's imperfect. Why? Because I've got, you know, the skyline is already here. So I can tell ChachiPT
that no, or I can tell it. It's great. But the skyline is over laying the interior
of the building. So concise Concise it
to the window only. And of course, it
can fix it for us. So it's like a whole
conversation. We concise. It's a whole conversation, so I can keep on going with Chachi Pitt as long as
it's the same project, as long as I want and
as much as I want, as long as I have the plus. If I don't, then as
I mentioned before, everything's going
to take longer, and I'm not going to
have the privilege of having a couple of images to
generate for the same thing. Alright, so I've got the result. And now Chachi Pitt
has decided that, you know, it's an
L shaped window, but the original one, you know, it's kind of tricky, but the
original one is cupboards. So what I will do is that I'm
going to download this one. This is how we fix this. And I'm going to do edit
and I'll mark it up. And here, I'm going
to mark up the blue. And I'll save options,
save as a copy. I'll pick the
downloads, save here. Okay, just override it. That's fine because
it's here already. And I will fresh, take this and tell
Chat TPT is that the blue highlight should
continue as a wall cupboard. The glass is only on the left. Please keep everything,
but fix this i And now Chachi Pit will try to give us
even more results. So this is unrealistic. This is more realistic because, you know, it's a
window continuing. But now I want it only the window to be on the bright side. I don't want this
part. So let's see if Chachi Pitt is smart
enough to change it. But as I told you guys, this is how we can
achieve replacing models. You know, the main course of this lecture is
to teach you guys how to replace models rather than to make
an image perfect. But, you know, I'm trying to
give you perspectives on how we can make our image
as perfect as possible. All right, it has finished, but it didn't fix our problem. So I'm going to download this
one and try to that GPT, I'm going to upload
this image again. Wait, wait. Let's do
something. Let's do something. I'll download this
one, the previous one. Let's say, I'm going
to download this one. And I'm going to refresh. I'll double click on it, and I'm going to mark it with something that is more visible. So let's mark it with orange. So there is a contrast, and I'm going to do this. I'll save it. I'll
overwrite this one. Refresh. I've got it here. I'm going to drag and drop
this Wever the orange is. This is not a window. This is a wall. Or I can say the orange
markup is not a window. It is a wall. This should fix the error. If it didn't fix the error, then I'm already happy with what I got replacing
the furniture, giving the perspective for
the client. So let's see. And as I mentioned before, guys, this is already
achieved by me. So if I go to the original
file, it's already achieved. It has fixed it for
me the way I want it. And, of course, the more
we add into the prompt, the more it will change
stuff in our rendering. So it's completely achievable
even from the first time. But Chachi PT is
giving us, you know, all the other possibilities
that could be there. So let's see if
it can fix it for the last time testing
on this image. Now it has closed
the entire window. Thank you, Chat, TPT. This is not what
we're looking for. But as I guys told you, this is a tutorial to
show you how you can change furniture or
specific elements. So now what I want to do next is that I'm going to take
the original image and retype the prompt in a new
chat so it can work because now we are far away from what
we're trying to achieve. You know, here we
have a middle table. And we want this kind of to
stay the way it is, you know. So now the setup
is different and now I have to deal
with the orange wall. So usually what I do is that
I do a new conversation, and I put everything
there again, and I try to prompt it brand new so I can get the exact
result that I'm looking for.
17. 16_Furniture to CAD: How can I get the CAD
side view and front of view of this chair with
a prompt through Chachi PT? Great. So I'll do a
new conversation, and I'll drag and drop my image, and I'll take this prompt
and paste it here. Extract front side and
top two DCAD views of the hairs from the
perspective image with a clean black line
and correct proportions. But I want to point
something out is that if we do the side and the
front and side and top, then the top will be cropped. So it can take only two
views at the same time. Hopefully, in the new upgrade of hachPT it will
understand this. So I will remove
the top view side, so front and side to decad and I'll see what
ha TipiT will give me. And then after that,
I'm going to prompt for the side and the top,
so I get them all. And then after that, I can
put them into Convertio and get cat drawings for
it to be able to, you know, put it in an interior or fix it in a certain
way inside my scene. So let's see what we will
be getting from hatchiPT. Okay, so it has
gave us a result, but this is not the result
that we are looking for. So I will be creating a
new conversation again. Or let's just go back to the
conversation that we have. Okay, here, I'm
going to tell it. I'm going to put
the image again, and I will copy the prompt, but I will change some
things in the prompt is that I will say
extract front and side two DCAD views of the chair from the three
D perspective image. With clean black lines
and correct proportions, maintaining the
details of the hair. So again, this is what we got, and this is not what
we're looking for, but Chachi PT sometimes, you know, run into errors. So I'm going to
refresh Chachi Pit and I'll do a new conversation, and I'm going to
give it the chair, and I'll do extract from this three D perspective
image of the chair, two D cad, front and side view to not through with clean lines, clean black lines and
correct proportions. I'll do a twist. So you are a professional architecture
and interior drafter, and you got to extract from this three D
perspective image of the chair a two D cad Let's see if now by giving a title
for the AI in Chat TPT, it could generate our
two D from our three Ds. So let's see if we're
going to get that now. Great. So now I've got
the correct drawings, but it's not a full image. So the image is this is correct, but the image is cropped. Regenerate the views without
changing the design. But this time, make the two ortho graphic views fit into one image. Okay, so now it's better. You know, it's exactly fitted the two views into our image. And now we can take
this and put it in convirtio and get our
two D cad drawings. I hope you guys benefit from this lecture, see you
guys in the next one.
18. 17_Mood board extraction: Alright, so now I will
do a new conversation, and what I want to do now
is that I want to extract a moodboard from this
rendering in this style. So I'm going to take
these two, drag it drop, and I'll do this prompt saying extract furniture,
moodboard from image. Extract furniture,
moodboard, from image, such as the reference
mode board provided. Let's see what we can get. Perfect. This is what we got. But this is the mood board because the first one was
giving us a network error. So let's just refresh
Chat ChiPT again. And see if I'm going
to get the result now. If I'm not going
to get the result because of loss in connection, then I will re ask for it again
and see what we will get. Okay, so I've left it
and it's taking forever, so I'm going to refresh
this page again. I'm going to copy.
Oh, it's gone. Okay. And, I'll copy this
one because this is wrong. It has give me the
exact same one here, and I will do Control V, and I will take these two
again, put them here. Wait for them to upload. Push. Let's see if it's
going to work now. It should work now
because the first one was hanging because of
Internet connectivity. Rated furniture
moodboard, material, textures, furniture
elements, accessories. Yeah, pretty much. So would you like visual layout, extract moodboards similar
to reference? Yes. So there we go. Now we've got an accurate mood board for
the images that I provided. It comes with different
styles, and I can, you know, specify which
moodboard do I want more? Do I want an
accessory moodboard, a furniture mood board, or a materials moodboard? And accordingly, Chachi PT
will provide me with that. Again, all the imperfections of the process I've
recorded for you guys to know that we don't usually get result from the
first instance. We get it after
trying and, you know, teaching Chachi PT what
we're trying to achieve. So here are different results. You know, I've got
a result here, and also I have another result
for the furniture here. So you can specify the style of the moodboard that you need and what type of
moodboard do you need. I hope you guys
benefit from this one, see you guys in the next.
19. 18_Render to sketch: How can we achieve this
sketch from this image? In a really quick
and short tutorial. So any image I provide, I can give the prompt of make this sketch a black
pen architecture sketch with some notes written
above, and there we go. It has generated
the image that we are looking for, and
then I can ask it, make it an artistic
watercolor sketch, and it has generated
the watercolor sketch. So as you guys can see, it's pretty simple,
pretty straightforward, and the sky is the
limit with what we can achieve with Chat GPT. I hope you guys benefit
from this chapter, see you guys in the coming ones.
20. 19_Concept generation and image enhacement : Alright, so we're
back to Korea again, and we want to talk about
how we can generate a concept from any
image that we want. So actually, this
part is a prompt to image rather than its
image to another product. So I can go to image here, and here are some examples
of prompts that I generated, and the quality is amazing. So you guys can see
here I've prompted for a modern apartment
building that is infill architecture
with large windows. And here I've prompted for generate a modern resort cottage with large windows that are on an island in the
middle of the sea. And it's pretty decent and pretty like the visual
fidelity is crazy, guys. So describe an image. So I want or generate a civic building
that is governmental, modern with large windows
in the middle of the city. For example, let's say this is the project that I've got,
and I want to generate this. Now, it actually gave
me some branders. So to give you guys a glimpse, I can do generate a newseum building Artistic Museum, building that is modern with large windows in the
middle of the city. Let's see how does
this one look like. And guys pay attention to this is that this
is completely free. So no need for you guys to be looking for other websites to, you know, subscribe to them and be able to
generate concepts. This one actually
generates concepts, and also you can choose the
aspect ratio that you're looking for to generate the concept and also
the resolution and all. So you can get many, many, many options from this, not just writing a prompt and
getting an image from it. All right, so it's loading, but it's taking a long time, so I would refresh. That's actually, is it? It is generated. So it had
generated concepts for me. And now if I want to take it
on a really exotic scenario, so I can copy and paste
this prompt or put it here, but remove Oh, this
is actually, okay, so I need to write it
generate a modern resort, cottages that are on an island
in the middle of the sea. On a green island in
the middle of the sea, and I want to do three by two. And now this one is faster, so it's generating in real time. Let's check the images. Wow. This is really nice.
As a concept, guys, if you guys have no idea what you're going to do
with your project, I mean, you can generate a couple of
things to get approval from your client or your boss and you have a direction
to go through. So are you looking for modern? Are you looking for
contemporary or are you looking for somehow a modern but a traditional
type of architecture? So you can name it all. You can even have like an
island look and you can ask for an aerial shot or front
shot or an isometric shot. So it's unlimited to
what you guys can do. And for the image enhancers, as we mentioned before, you can enhance any images, any videos, you can
edit in real time. And I want to show
you take you guys through the history of the
main things that I've done, and you guys can see how rea can do you a huge favor editing
your images here as well. So I've tried to,
you know, edit. Some images, they
do drastic changes and really beautiful ones. Some images are minimal changes, like, not really worth it to do. But as you guys can
see here, you know, some minimal changes here as
well, some minimal changes. But really cool ones. Really having all
these tools can give us power to what we're
trying to create. So here, for example, you know, the aerial view this
is the previous one. This is the one
that we've edited. So it gives you a
really good capture on your final result and
what you want to do with it. So here, for example,
this is the previous one. This is the enhanced one. And let's keep on going. You can even, you know,
enhance your face. Here are some other
projects that I've done, and I was able to enhance. You know, sorry about that, but they're really
confidential ones. Here, for example, a sample. Of what you can do
with your own image. So rea usually is a really good destination
to stop by and, you know, explore
what you can do. You can do a lot. You
can do image generation, you can do video. You
can do real time. You can do enhancer,
can edit images, even video lip sync. This is new. You can train Crea. You can do three D objects,
and you can do assets. So I hope you guys have a glimpse of what
is Crea and how we can enhance our images and even generate
concepts for our images. This leads us to
the final chapter where we're going to talk about how to remove watermarks and
how to generate an image, a three D from an image. See you guys in the
next coming lectures.
21. 20_Water Mark and Image to 3D model: Alright, guys, so this leads
us to the last chapter of our course where we're going to cover
image to three D, and we're going to cover
watermark removal. So please note for the
watermark removal, we don't advise
you on any type of plagiarism or stealing images
from Google, from websites. We advise you to buy the images professionally if you're
willing to take them. But this part of the course is for the people that
already have license, but they want to you
know, remove watermarks. And this is an example. I've got this image, and I've got a watermark, and here is another image
where I remove the watermark. And basically, I
need to hover over AIE's website, and from here, I need to AI tools, and let's see is a
watermark removal. Mmm mm. Okay, great. So I
need to hover down and go start for free here. And then I need to get my image the one that has
watermark uploaded here. It's processing. And Voila, we've got the image
with no watermarks, guys. At least this can take us
5 minutes on Photoshop. And at the best case scenario
on the worst case scenario, it could take us an
hour on Photoshop. If the watermark was hard and coming on objects that
are complex, then, I need to be giving up on the details of the
image for us to be able to achieve this
clean watermark removal. So again, we don't advise you to do this for items that
are not purchased, but for items that you
have guys license on, you can use this tool
to easing up your life.
22. 21_Image to 3D model: And our last lecture of discourse is the image to
three D. So basically, we will learn how
to get this image and put it and get this
three D in return. So, guys, one thing we need
to know is that our images, preferably, they must have a white Alpha background so
we can get an accurate model. And how do we actually do this
is that we get rendering, and then we extract
this bed from. So for instance, I'm going
to go back and I'll go to flux and I'll go to
interior angles, and I'll take this I'll go to Chat TPT and
I'll do a new chat. And I'm going to drag
drop this image, and I will ask for I
need the bit only in a white Wther white background white
Alpha background to be able to use it in
an AI image 23d website. Let's see what we get. So it has cut our bed from our image. And usually this takes time, especially when we're trying to achieve this on Photoshop. And it has made it an
PNG type of thing. So if we open it,
this is what we get. So I assume that we
can use this as well. It's not only the white ones. So let me download this image. And now I'm going to go to
a website called three D three. This is it. And I should create an account signing up into this website,
creating an account, and then it will give
us like 300 credits, which is enough to
do almost 30 models, more than enough to show you the capabilities
of this website. So I'll do generate
a three D model. And I'll do image
23d, upload an image. I'll take this one and open. And here I've got
some parameters, so I can do a private, smart lo poly generate
in parts or auto. And each of these requires
a certain amount of tokens. So I'll do generate for now. I'll see what we get from the generation of a PNG that does not have
a white background. So as we can see, it is generating the three
D model from here. And if we have the
plus or the premium, we can speed up the process to get this image much faster. So about 30 seconds, and I should get a three
D model where I need more than 30 seconds
to navigate to a freelancing website and
look for a three D modeler, and assign him to a job. So you guys can imagine
how much time this is, you know, short cutting on us. Okay, great. So here
is our three D model. So we click on the
icon here and we get our three D model in the
viewport to check it out. And it has exactly
modeled Tippet for us. Relatively good quality, not
the best quality out there, but I mean, it does
the job, right? And I want to explain
a further feature here that we can also
take, but not always. We can just, you know, play with it and see if
we can get a good result is that we can generate
textures for this bed. So I've hovered over texture, and I'll do generate texture, and now it will take
a couple of seconds to generate the texture for
us according to the image. So we can use either an Alpha
PNG image or we can use an Alpha white
background to generate the three D model.
Either or works. And the first thing that it does is that it generates
a three D model, and then we can ask
for the texturing. But the problem here is that three D repo
usually gives us the three D texture
as a stitch texture. And this is not always
the best scenario for three D representation softwares because there is many
mistakes that could be happening and
also many errors, and maybe the
stitching texture is, is definitely not the
best optimized texture, but for a really quick, really, really quick texturing, it does an amazing job. Now if I want this model, I can do Export and from export, I can specify the file name, so I'll do BD and I can choose from USD FBX OBJ
STL, GLB, and TMF. I'll do FBX and I'll do Export. And now it's exporting. It's collecting all
the data together. And now it's downloading. So here I've got the FBX model. It's already downloaded. I can do OBJ, for example, and Export, and it will also export for me. So I've got all the
different types, international types of exports
that I can generate from this website and use it in my three D software
either was RevetT D SMAx, ketchup, blender,
Maya, you name it. And here I've got a three D
tripo and I can do extract, and when I do an extract, it's going to give me the bed, the materials, and
the stitch texture. As I mentioned, it's going to look this way whenever
I'm assigning it. So maybe this is not
the best practice, but for a quick one, it's
an amazing practice. I hope you guys benefit
from this lecture, and this whole entire
course, really, guys, I've given you
more than 20 workflows for you to be using
inside your project. That would save you
thousands of hours. Was a pleasure, and
I'm really looking forward to see you guys
in my upcoming courses where we can be talking about so many advanced AI tools and even unreal engine courses and even three D
modeling courses and texturing courses coming from
an architecture background. All of these is a must to cover, and I'm really excited
to cover for you guys. So if you have any questions, please write me in the comments, and I'll be more than
happy to answer them. Otherwise, good luck
with your journey, and it's been a pleasure again, see you guys in our
upcoming courses.
 Amer Sawalha, Immersive Design, VR/AR, Unreal Trainer