Transcripts
1. Intro: A Hello, everyone. I'm March Molgic, and welcome to this course
in Ab After Effects. This is going to be advanced
techniques in After Effects. I hope you enjoyed
laying with me on the other courses like
introduction course fundamentals. In this course, we're going
to start working on projects, which will involve more
advanced techniques, more advanced effects as well. We're going to look at effects
like creating rain and snow and animated bars
with animated values. And much much more. So I welcome you to this course. I hope you're going
to enjoy it and follow along and
create your projects. Feel free to share
your projects. If you create something
that you want to share. Let's all get feedback. Let's all share together. And if you have any
questions, let me know. And once again, I welcome you to this course.
Thank you for joining me. Let's start creating
some content. Let's start working together and progress through more
advanced techniques inside a Dobby after effects. So I'm Mark Mogi
and thank you for joining me and
let's get started.
2. Scale and Fit on Screen: Let's have a look at
placing videos or images onto screens
as an example, and using a cap in
effect at the same time. I'm going to import
some more content here. So from a desktop, I'll import these three
videos in here, and I'm going to put
them into a bin as well. This will be say Corner
pin as an example, and we'll start with this
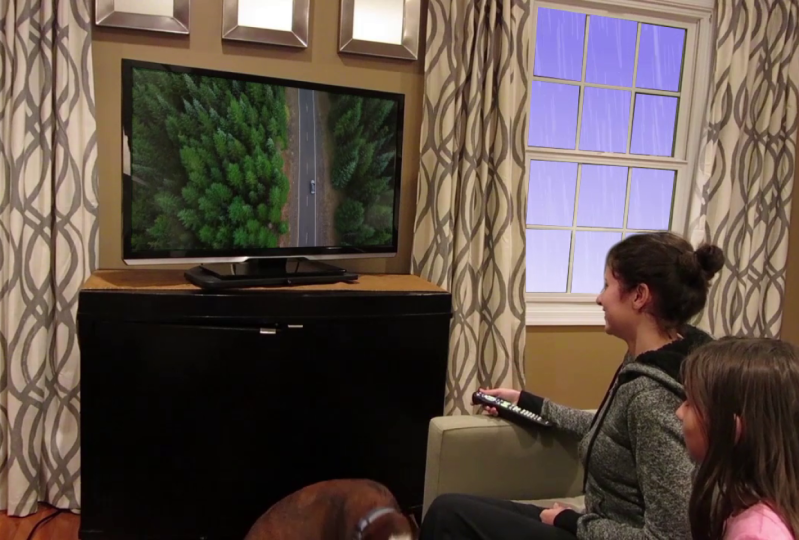
Corner laptop first. I'm going to make a new
composition from this video. Make a new composition here. Corner laptop, that's fine. And let's see want
to place a video or an image animation on
top of this video. So take this content
aware video, I'll drop it into the comp. It's much bigger, needs
to be scaled down. If you go to the timeline and open the transform
properties or scale. So just need to press
S on a keyboard for scale or keep it
key it proportions, make it smaller F now, I'll just try to
place it roughly. I needs to be a
little bit smaller. Say something like
that. I I zoom a bit closer here in the
composition window. This can go a little bit lower. We just lock the background. There we go. This could be a little bit
bigger. Maybe 31%. There we go. It's about well, it's a bit too wide. It doesn't really fit exactly. So let's say 30. And I guess what I would
need to do here. I I'm just a lower is make
it a little bit wider, but actually distorting it. I'm going to break the chain, and I'll make it a bit wider. Because just a little bit, you wouldn't see
difference in quality. So I I zoom out. Let's
say this looks okay. There's a video on the
screen of this monitor here. DVs appears at the end because this composition
is a bit longer. I would just shorten the
work area even shorter. So the video stays there. And that's not too difficult. That's worked quite well, but what about this video here? The Quality VA movie. If I make a new composition
from this video, Again, I'm going to
lock this layer, and I'll drop the same video, the video called
content aware in here and I'll make it smaller, S for scale, or scale it down. We'll move it here.
Now, the challenge we have in here is
the perspective. Because this doesn't fit at all. So we need another solution
for this example in here.
3. Corner Pin Effect: So we can do in
this case is we can use a orapin effect
on this video here. So I'll go to the effects
panel on the right hand side. God be just quicker. I'm going
to do a search for Corner. Hg. We got a corner pin thetort, and we'll apply this
effect onto this layer. Now, because I have this
layer already selected, I'll just double on effect to apply it to apply
it to the layer. And the corner pin appears
in the control panel. If a control panel
opens automatically. Now, got this corners, upper left upper right,
lower left, lower right. If you want to adjust them
in a more easier way, is you can click on these
icons to set the con pins. I can say, click here and move that where the corn is
supposed to be maybe there. Oh, what I do is, I'll just move these circles
in the corners. So this goes say,
this goes down. Of course, we're distorting
the video in here, but we're trying to make
it fit on the screen. So we'll have to be
slightly distorted anyway. Something like that. And if we just shorten the work area, we'll have the video
playing on a TV screen. I guess we could
could make here. Just to make it look a bit
more realistic is make this video start a bit later when she's pressing the remote. I'm going to move
this entire layer to start maybe later nt. Is black initially. Maybe a little bit more. And we can make this
longer now as well. Not technique we can use. If we don't want to
distort this video, not technique can
use with masking. This is a different approach. I'm going to keep
this one for now. And I'm going to just
hide it and lock it. Actually, let me just
rename this one. This is the cont corner, so I know what this one is. I'll lock it for
now and I'll drop the same video once again, the co blue contin here we go. Make it smaller because it's
too big again, so scale. I'll put it on top of the TV and make it just a
little bit bigger. Let me just undo. I forgot about the shift key. Here we go. Keep proportions for now, maybe something like that. Maybe just a little bit
narrower, not too much, just a bit because we
actually distorting it here. Just a little bit. Another technique will be to use a mask for this video here.
4. Corner Masking: With the mask, what you do is if we move this video
behind the TV. So we need to move it
underneath the Cort V video, or unlock the corn
TV because we're going to make a mask
on this cont V video. With the ity V layer selected. We need to create a
mask. When you keep the layer selected and use
one of the shape tools, they create a mask
automatically. Make sure you have
the layer selected because this is not a
straight rectangle, I won't be using any of
these tools in here. I'll just use the pento instead. And with the pentol, I
just in a little bit. We'll just click in each corner, line this and here as well. And go back here. It's like using
penol in photoshop. When you go back to
where you start that you see a circle
next to your cursor, so you click to close the path. Now, by the default,
it's going to make the mask visible
and hide anything else. So if you go to your
layer properties and open the mask
properties here, we've got this at mode. We actually want to do is we
want to subtract instead. What's going to do is is
going to hide the mask. And what we can see here
is what's behind it. So if I play it, you
get a similar effect. It's just at this time.
Just move this layer again. Just at this time. You see the video behind and
it's not in perspective. Oh, I move the wrong layer. Just do this layer here. I'm also not getting
this black anymore. Yes, because we've masked out the screen on the
TV, we've removed it. You may be getting
different kinds of colors because what you see here is what's behind the Corner
TV video, which is nothing. And what this is is your
composition background color. If I go to composition
menu, composition settings, I'll just need to change
the background color to be black. And I click. Okay. So it's initially black, and then it shows the video. What you could also do
with the video here is we could make it fade in. On this video, this
one at the bottom. If I press T four pasit Is the key frame
initially make it 0%. And then a moment
later, make it 100%. The video will actually fade in instead of just appearing. The way the image would
appear when you turn on your TV or just fade in
just really quickly. So I did this animation, which is about half a second maybe just looking
at timeline in here. So you get these
different techniques. Different ways you
can create content, and you can drop the content on something like on a TV
screen, for example. In a similar way, you could add multiple masks on
the same videos on this corner TV video. We could do more masks
here on the window, for example in here. So say I could drop another
video here, anything. So I could import something. Say if I go to my
folder here. Let's see. For example, tracking,
we have lots of videos in here to choose from. I I drop, say maybe this one, for example, and I'll import it. I'll drop it behind the
video in the background, drop it maybe here. It's probably too big, so I need to scale it scale. And I'm just going to
hide Cat V for a second. Here we go. That's the video. It's definitely way too big. I want it to be somewhere
on the right hand side, somewhere. This will do for now. And then turning the
background back on CorVV file. And with the layer selected. I'll create some
additional masks in here. So I'll switch back to the pen. G if you like key but shortcuts. I'll create a mask. Normally, you just create a
mask for each window pane. Again, doesn't do
anything by default. So we're going to go here, we're going to change to subtract, and you can see the video behind it. Then I'll do another one. So click here. Every time you create a new shape of the pen, you're creating a new mask. And again, subtract. If I do one more. Sathing
the bar in mind is when you use the penol If you get too close to any of the
other anchor points, you can't create a
new one because this allows you to move
them or readjust them. That. Usually start on a far side like far
right in this case. You can always adjust
it as another mask. And again, we'll change
the mote to subtract. When change the
mode to the mask, you can also do it for
multiple mask the same layer, you can select all the
masks and change them all. But because we create
masks one by one, I'm just doing it for
each of them one by one, and then I can just
take the video behind tracking cars
and reposition it. I'll probably use the
position property in the timeline here and just reposition it or scale it if
it needs to be even smaller, and then just moving it into place. Maybe
something like this. Again, this will just play because the video
in the background. As if the street is
behind this window. So. There's just a number of techniques we can
use with corner pin and maskin as well,
depends what you want. It may look okay, depends
on the perspective. If the T was turned
even more sideways, Corner pin would be the best
choice because just maskin wouldn't do it unless you apply corner pin to this video anyway, tracking cars or content aware. Cause you can. You can apply corner pin to layer at any time.
5. Linear Wipe Effect: L et's have a look at some
of the effects we can apply when animating
logos in after effects. So I've imports for there called logos with a few logos in here. Okay. Let's say if we start
maybe with maybe this one. So I'm going to make a new
composition from this logo. It doesn't matter
what the dimensions are right now because
we're just looking at the logo animations
and effects. And we know we can make
the logo fade in fade out, that's easy, but we can also
apply some animated effects. So for example, we've
got to ft spanel, and search for wipe. We're not looking at
the animation presets, we're just looking for
the actual effects, and we have in the transition, we have quite a few of them,
but what I want to show you here is the linear wipe.
And the radial wipe. These two in here. So I I
apply linear wipe first, I'll drag and drop
it onto the logo. I linear wipe effect appears in effect control spanel here, and we can we can
make the logo or the NE image show appear in the linear way
from one side to the other. What is transition
completion here, which is set to zero,
F start changing it. You get this like
a curtain in here. So I could animate
from 100% to zero. So say I could go to
100%, set the key frame. Move the current time indicator. Let's say I'll give it maybe one half seconds and then set the transitional
pent to zero. If I shorten this comp, it's going to make the logo appear from one
side to the other. If you want it
faster, we can always just reveal the key frames here, on a keyboard and move the keyframs closer
together, so it's faster. What I would also do here is add some favor to make it
softer on the edge, make a bit more blurry,
quite a lot of favor. If you wanted to animate
from left to right, not from right to left, you can change the i angle. Instead of 90 degrees, we'll have it -90, this side. So do -90 degrees. It goes from left
to right instead. So the linear wipe
can be used to reveal a video an
animation, a logo. You can obviously change wipe and goo to
anything you want. You could actually
run like this. S -45, for example, to reveal from the corner. A Alternative would be to
use the radial wipe int.
6. Radial Wipe Effect: With radial wipe, it will
run around a circle. I'll use the same logos. I'm just going to disable linear wipe effect
by clicking on the FX pattern here
for disable it. It's still there, but it's
just not playing anymore. I hit space bah in happens. Instead, I'll apply radial wipe. I'll just double click because I have they
already selected. Let me just collapse
this here for a second. And the sections
are very similar. The main thing is the wipe, they want to be clockwise
or counter clockwise. You get the same
transition completion. It goes like this. Say again, I'll do 100% at the beginning,
or key frame it. Then I'll go by a second and set it to zero. I'll
do some favors. If I move back a little bit, and then add more fervor to
make it nice and smooth. Again, I probably want it to be counter clockwise,
not clockwise. I goes this side from
like a clock in a way. Another thing I want to
draw your attention to here is the wipe center. It's always in the center of
the composition by default. But if you have
something which is not in the center of
your composition, you can move the wipe center. So you could click
on this icon here and then click where you
want the wipe center to be. So it doesn't run around the
center of your composition, but somewhere on the side. That's something you get in
here as well. Radial wipe.
7. Light Wipe Effect: Another interesting
effect we can apply is the light wipe. I'm show something interesting
about the light wipe. So I've turned off the
radial wipe and linear wipe, so they disabled at the moment,
so there's nothing here. If I apply light wipe. One of the features
we have in here, we can make this image, this logo animation
open through the. So I can sell it to
doors instead of round a round by default. So what it does, it just
gives you this circle, so you could do
something like this. Which is quite nice, but
it's also a one for dose, and it does this. But what I'm going to do is, I'm going to change the
direction to 90 degrees. I looks like really the dose, and you can do this
for the animation. Secret key frame it
from the beginning, completion 100%, and say just over a second
later, completion zero. You could reveal a video, an animation or a logo, as well with a light
wipe, as well.
8. Ball Action Effect: It's another interesting
effect it can apply to a logo animation to make
it a PR or disappear. I'm going to use a
different logo this time. Let's see, maybe
this one, Me logo. I'm going to make a
new composition from this logo. We go. This logo is a PNG file with no background behind,
so work perfectly. Actually, in this case,
I'm going to clear the effect filter in here, and I'll go for the menu
because now what I'm looking for in this
case, I'll go effect. It's all grayed out because the lanes to be
selected here we go, and then effect, remember
it's all context sensitive. And if we go to simulation, we could do something
like a ball action, which gives you these balls. What we can do is we
could say scatter them. So I could do like
an explosion no way. I I set it to zero initially, and I'll put a
keyframe for scatter, and then say 2 seconds later, just shorten the
work area as well. Actually, let me just
make it short as I go to composition
composition settings, and I'll make the
duration say 5 seconds. And at 2 seconds will
increase the scatter a lot. We can do rotation on
both axis x and y. We can also add some
twist a bit as well. We can change the bowl sizes, so we can make them
bigger or smaller, make them a bit bigger. Actually, this could be
key from it as well. Let me just leave it for now. And then if I just play it, you get this logo almost
exploded in a way. O, obviously, you could
play it in reverse. You can make it appear
out of these balls. Mm hmm. So initially,
it could be like this, and then the logger
would appear. If you want to do
something like that, I'm show how we can do it
really quickly and easily. I'm going to duplicate this slab because I want to keep it. So go edit, duplicate. I'll hight one of
them and lock it, on this one, if I press U to reveal the key frames
with the properties. Basically, what I want
to do here is one to swap these keyframes.
That's easy. You can just click on the
words cutter in this case, which highlights both keyframes. Right click one of them
doesn't matter which one. Key from assistant, and
time reverse keyframes. This will swap them
over. Now it's going to make the logo
appear, like that. Mm hmm. I've seen this kind of animation sometimes at start of some films where they reveal the logo of a company did some special
effects, for example. Something similar like this, a? So this was the effect
simulation and bowl action. You also go bubble
babbles here as well, a?
9. Pixel Polly Effect: It's another example. So I'm going to again,
duplicate this layer. Go add it duplicate. I'll height and
lock the other one. This one, actually
I want to remove this effect, so the
layer selected. I just actually I'm going
to delete CCB action. Instead, I'll go to effect also simulation and pixel poly, which is nice for explosions
in a way with pixel ply. E. W Pixel poly. This is actually
animated automatically. It does this. It's exploding. And we can customize the
way it's been exploded. So for example, we can customize the force of the gravity. I can make it say a bit higher, to make it go lower or
lower to make it go higher. So travel a longer
or shorter distance. We can also adjust
the force as well. So make it a bit higher
when it's exploding. You can change the
shapes in here as well. But textured polygonis
is quite nice. We could just make the
spacing maybe a bit smaller. Put them closer together. As just the randomness
of the direction. So it's a bit more
random. Here we go. And this can be key from S
its maybe initially as it is. Here, put a key frame. And then a moment later, I increase direction randomness. Here we go. It is
actually more random. If you want create in fact as
if something is exploding, typically, you wouldn't a key
frame direction randomness. You set it back to, I think
it was ten by default. This is just mo
explosion in a way. And you could make it
spinning if you wanted to. And you can change the
center of the force. It's always in the center of decomposition by default again. You can always change
it if you want it to be on the side if
you have an object, not in the center again.
10. Creating Realistic Rain: It's one more effect,
making things rain and snow,
animating, obviously. If I go back to our
Corn open videos, I'll take this to
do continual video. I'll make a new composition
from this video. Shot of Paris. Under effect menu
and simulation, we have the CC rainfall
and CC snowfall. We can make it rain or snow. I'm going to use
rainfall in this case. It's the both animated. So just by applying it, you'll see some rain or snow. Then obviously, you
can customize it. So for example, you can customize number of
drops or decisive drops. So let's say, initially, I'll leave it as maybe there are there
are no drops at all, and I'm going to key frame it. And then say a moment
later, I may be here. There will be lots of them. I'm also going to
key frame the wind. Once it starts raining, a moment later, the rain will go at an angle
as if it's windy. It doesn't rain straight,
more like this. If I play it from the beginning, starts raining, and
then the wind picks up. Maybe we can make the
raindrops actually bigger. So we can see them
better. Say maybe five. And maybe we can keyframe
the d d in size as well. And then towards the end, we'll make it really big. And even more drops. So it's pouring down.
11. Creating Realistic Snow: I'll be very similar
with the snow. If I disable rainfall, and a snowfall instead,
infect simulation snowfall. Again, this will be similar, it's going to be
animated automatically, and then we can
just key frame it. So say at the beginning, I'll put a key frame for
number of flakes and the size, and I'll set number
of flakes to be down to say just 1,000. And then a moment later, I'll change the number
of flakes to say 20,000 and make them bigger. So you can actually
see them better. Here we go. And it
starts snowing. This is a very popular effect, very often used or
both rain and snow. If you look on any films, we can see like a rainy
scene on a snowy scene. If you see that the rain or the snow doesn't bounce
off someone's body, for example, it's effect
in after effects. Because it looks very
realistic, it looks very good. You can obviously make
it wiggle as well. You could change the
color if you wanted to, you can add the wind like
we do the rain as well. Is the wind here as well. And you can k frame all of
these different properties. You could even change
the blend bat as well, but lightning is just fine.
12. Create a Bar Chart: Let's create an animated graph, an animated bar chart, and an animated
pie chart as well. We don't need any
content for this. I'm going to make
a new composition. I'll call it animated
chart or bar chart. It doesn't matter
what size we use. I'll make it a standard full HD, HDTV 1080 $0.24 per second. Square pix $0.24 per second, 5 seconds is enough, actually 5 seconds fine. Maybe a lighter background, maybe we can sample
something here. That's fine. We'll put some text here. So say this will be the
headline, say I know. Do you agree with put three
dots or leave it finer, okay? Put it right here is
the line panel to align it right in the center. That's fine. Now, for animated bar, we're going to have two,
one for yes, one for no. I'll draw rectangles
with shaped tool. Just make sure you don't
have any layers selected, so it creates a shape layer. So dislike the layer already, I clicked away on the
pasteboard, I'll draw rectangle. I'll put it here aside
because I'm going to show you an animated pit as well on the right hand side
or a bit more. So I'm going to draw
it here for now. I don't worry about the fill
color and stroke for now. I can always change it. I I draw it here. Quite a big one. Then I'll switch back to selection tool,
select it and change it. I'm going to change the fill
to something different. And stroke. I'll put it back to one pix sur. It's just a tiny stroke here. And we want to make sure that the anchor point is right
in the center of the shape. I'll go to layer menu, transform center cha
point in layer content. And I'm going the
anchor point tool to move the anchor
point to the bottom. So this doesn't come up, so
I'm going to click away, click on the shape again
and as the anchor point. I'll drag it right to
the bottom because we want to scale this
bar vertically. Now let's animate it. On the timeline here, open the transform section here, and I want this to be the
end of the animation. So say it 1 second. Is the key frame four scale. Then at the beginning of zero. Going to disable the link
between width and height, and we just want to change
the height to be just 1%. Need to do this
when it's animated. I will just grow, it will rise. I'll do one more for
the other one like no, I'm going to dis select all the layers or
d rectangle again. Actually, just make it easier. We could duplicate this
layer, add it duplicate. Okay. I'm just going to
remove the key frames, so press U and I'll
delete key frames. Then I'll move the layer, so press P for position, and I'll just move it horizontally
and change the color. So a different color. Little different and I
want it to be shorter, press S for scale
and make it shorter. Maybe something like that, for example, and I
will animate it. Say at 2 seconds. This will be the final
state for the scale. At 1 second, it will be
just 1% for the height. At the moment here, we get this. Because the second
bar is shorter, shod animate in a short amount of time because otherwise
it will be slower. We need to move the
second k f closer to the first one to speed up a bit. You can always change the
speed of the animation. Now want some text
for the numbers. So put some text here. We have percentages separately. So just type in percentage
as a separate layer. Let me just mean maybe
should be a bit bigger. Character. Put it somewhere. Let's see how big its to be some way to put
another text here. Let's say 60, for example,
and I'll move that. I'll aligned them both
with the aligned panel. I think this looks okay. Just to make things easier,
I'll duplicate this as well. Add it duplicate,
these two duplicates, which I'll move to the right and down actually using the
roches on the keyboard to make it easier to move them. There we go. And
this is going to be remaining or even say f. And this belongs to this layer and this belongs
to this layer here. We put these separately
because these will animate. The percentages want. We don't want them to
appear at the beginning. They want them to appear later. So the 60% may start after
half a second, maybe. Same with the percentages. And then 35 maybe
after a second. So these two layers,
select it together, make them both start later. So don't appear here yet. Now I want to animate them, and we're going to use in
effect to animate them in here.
13. Animate a Bar Chart: Now we'll do here is on the layer which we want to
animate, so this 60 here. We're going to add,
this is the layer. I'm going to add an effect
called slider control. If I go to effects panel, and just type in slide
got a slider control. I'll apply to the
effect. It's got one option for slider
with the numbers in here. Now we need to apply
it to this layer. No change anything here yet. We'll open the layer properties. We're looking for
the source text, which is here, source text. We're going to hold old key and click on the stopwatch
next to Sauce text. Old click, as we call it. You got these
expressions in here. But don't worry I won't be
typing anything in here. Are going to do is, we're
going to take this, it's called a pick
whip, and we'll drag and drop it onto
the slider property in effect control spanel. We'll just drag this and drop it here onto
the slider control. And then we'll just click away. Don't press a because ana will just move to
a new line here. And now if we change the
value, this is changing. So we could set it to
think mine was 60, and we'll key from
the slider control. If I go back to the
end of this animation, which will be here, I'll set a key frame, and here because this is the
beginning of this layer, I'll set it to zero to
make it animate 0-60, as the bar is rising. Now, when we play it, I will
just play. There we go. And the same for the
other one in here. So sl the layer at
slider control. Open the layer properties, looking for source text. Old click on the stopwatch, and then drag the pick whip to the slider control
here, click away. It's there. Now, at the
end of the animation, this should be 45, and
I'll key frame it. Then at the beginning, I'll set it two, zero, zero. Now, this is supposed to
happen. That's normal. If you get that, what
you're going to do is here in your expression in here, going to put a cursor
at the end in there. I will add dot value. Looking for value dot two fixed. You get a job down
so you don't have to type everything to fixed, no put a zero between
the brackets. This will give you just
integers, full numbers. Or the same for the other.
Collapse this layer, go to 60, and here,
type at the end, dot value dot two fixed, and then zero between
the brackets. And click a way to accept it. Gives you integers full numbers. If you want to have
a decimal point, you can set the value here to say one for one
decimal point, two for two decimal
points, and so on. But that's how you can make
a nice animated bar chart with numbers, animating. O the percentage symbol, you could just make it
appear, fad in, fade out. You know what to do here.
14. Animate a Radial Chart: Here's another idea
for animated charts, animated results. If you want to do like a circle, example, I'm going to
dissect all the layers. I'll draw an oval or
circle of the lip tool. What I want to do here
is for this example, I want to have no fell. So click on the word fill, and I'll set it to no fill. But I want to have a
really big stroke. No sure how big yet. I'm
going to draw a circle first. You know, much
bigger, truly fi one. You know, and then you can
have a value inside in here. So it just a bit bigger. Go. Switch back to
selection tool. And I want to reveal the circle. So we know you know what
we're going to use here. We're going to use our radial y. No animation preset, radar
wipe from transition. Got the layer selected.
I'm going to double click and no
transition completion. This is supposed to happen
because as you know, the wipe center is always
in the center of the comp. Oh, this one of you and
I forgot to mention. So first of all, wipe center, we need to go to the
center of the shape here. This is running from
the center this, and we want it to
animate counter clocki from 100 to
certain values. I'll set 100 in here. Then a moment later I s. Let's say if you want
it to be say 65%, you just do 45. 45 will give you
55%. It is animated. Bar. H here. Just a different way of
animating a bar chart in here. D. And we can have, you know, a text in here. So this could be say 55. I'm just going to type it in
this case, 55% selection to. I'll just put it
right in the middle. And this will appear
towards the end. That's another
approach for animating statistics info graphics
for the clients.
 Marek Mularczyk