Transcripts
1. Skillshare intro: Our IT folks and welcome to Skillshare. So this is an exciting thing. You actually found one of the biggest baddest Affinity Designer courses out there for the iPad. So we've taken eight hours worth of material and we've chunked it down today, eight projects, specific projects that you can utilize. And so there's eight volumes total in this thing. We would recommend that you take them in order. We start off with the basics of shapes and then we move up to things like pixel. But if you feel uncomfortable and you want to learn a little bit about a certain functionality, feel free to take the volume that matches your skill level. So we're very excited to be here on skill share and we hope that you learn a lot from Affinity Designer. And if there's anything we can do to help you along your journey, when it comes to infinity, hit us up in the comments and we will respond. All right, thank you very much. Have a good time.
2. Nodes Volume 1- What are they : All right, gang. Welcome back to affinity Designer. So this is one of the most important concepts that we're gonna get down now. We're switching modes from shapes into what it called curves and lines. So a curve or a line in vector art is made up of notes. So I've just got a common workspace here. You see, there's nothing really special about the workspace. The size doesn't matter. I'd like you to come over and grab your pencil tool. Now, when you come over and grab your pencil tool, let's go ahead. Let's crank up the with a little bit. You see, in the lower portion there of the context toolbar is coming up and just draw any old shape . Okay, Now you'll see the shape that's created is made up of nodes. These little round pieces here and the little Red square piece. These are the nodes that you adjust. So in order to make this a little more personable, let's go ahead now and fill this thing now, in order to fill it, you notice down here in the context toolbar, we use use Phil, and then I'm gonna go ahead. I'm gonna make mind red And now we've been following along there. If you've been following along in the course, we've been creating some animated eyes. If you haven't, I've included him in the download file, so you can go ahead and just place them in. I'm gonna come over here and I'm gonna go over to my download file, and I'm going to come over to the sheet that we've been working with and with the I selected that I want to use I'm gonna come over here now and I'm going to hit the three dots. I'm going to copy those. I'm going to come back. And now that I'm in my document, I'm going to go ahead and pace those and I'm going to go ahead and move them right inside of here and move him down. All right, Now, the reason I did that now you know how to swap assets from one to document to another Infinity designer. All right, now we're setting a profile here. Let's go ahead and move the eyes inside of this shape. Congratulations. We've now made a character. We're going to call him Bob The Blob. So let's go ahead now renamed a Layer. Let's call this instead of eyes one. Let's call this. Let's make sure we're on the right layer. Here we go, Bob. All right. You'll notice that, Bob, when we come over to our node tool, So now go to the no tool again. Bob is made up of nodes, and if you grab your pen and you move it, the nodes move in all sorts of different directions. Okay, Now, these little blue things here, these are called handles and the handles affect the node. So almost the node positions, Um, and then the handles tell the math what to do on either side of the node. So Bob here can take on any type of shape we want. Now I'm gonna zoom on in here and you'll see how Bob has a little red square there. That's where the nodes terminate. So now nodes have properties, So let's go through some of the properties of a note. When you click on this round area here, let's go down to the context toolbar. I'm going to change it to what is called a sharp note. Now watch what happens when I get sharp. You'll see. Now I'm tapping on the sharp node and you'll see what has just happened to this node notice the handles disappeared because it's forming a perfect 90 degree type handle. So when we click on a note, it turns blue. So the first lesson I need you to see is you can change the types of notes. So this is pretty cool. So Bob could become any sort of shape that Bob wants to become right? That's why we call him Bob the Blob. So the thing that I want you to see right off the bat here is that you can create any shape , say around shape and you can still get to a square shape when we end. All right, now you'll see here. When we talked about this little termination point, you see how it's offset right here between the red node and the blue. Watch this. If I come over, you see how those two things connect. Vector art wants to form closed paths. It wants to form shapes. And so you see where the red is in the pill. Once I do this, it forms what's called a closed path. And now notice. Once I've closed the path, the node becomes a square node. And if I wanted to change it, watch this smooth note so you can go from smooth to sharp, sharp to smooth, depending on what you wanted to do. And you really want to be working enclosed paths. So now we can adjust, Bob anywhere we want Looks good. All right. Bob's taken on a whole different form here. Now, let's say that we wanted to delete a note. Let's go up to the top of Bob. Grab any node you want here. You see how that turned blue? And now I'm gonna go ahead, come down to my trash can, and I'm going to delete now. Notice what happened? The node just disappeared. I can come over to this one and I can delete. Now, if I wanted to add a note, I could come in. And all I have to do is tap with my apple pencil and I can add a brand new note anywhere I want so I can add a lot or I can subtract. Um, so let's go ahead and cut this lesson here. In this lesson you put together Bob The Blob. You learned how to create a curve which is different than a shape. You learned that curves and lines are made up of nodes. You learned the different types of nodes a sharp versus around. You learn how to add a note and you learn how to subtract. Note. Alright, folks, let's go ahead and get into part two of this and I'm gonna show you how to work with S'more notes. All right, see the next one?
3. Nodes part 2- Adding and deleting : All right, gang, welcome back to affinity designer. So working with nodes is an absolutely essential skill and doing any sort of vector art. So what I'd like to do, I'd like to demonstrate for you that you can get from any place out there from where you're at. So let's go ahead. Let's grab a shape. Let's go ahead and make a simple rectangle. All right? I'm gonna put a finger on there so that we go into a square and then I'm gonna go ahead and choose something a little bit different. Let's go ahead and choose a trap. Is oId all right? So we're gonna drag a trap is weight into existence. And now it's challenged on folks. What I'd like you to do here is I like you to try to take the Bob that you made this closed path and I'd like you to try to fit Bob into making him into a square or making him into a trap. Is oId using the nodes and the techniques you have? This is going to be crucial in order to understand exactly how to manipulate them. And you get really good at it coming up all right. So go ahead and pause the video, and then I'm gonna come right back, and I'm gonna do it myself. Alright, folks, let's go ahead and get back into it. So first thing I'm gonna dio I'm gonna hold both of these. I'm to select these, and I'm gonna go ahead and turn them black so I can see what I'm doing. All right. Second thing I'm gonna do here, I'm gonna grab Bob, and I'm going to duplicate Bob's. So in order to do that, we come to our three dots and I'm gonna find my duplication duplicate. All right, now, my move tool. I'm gonna bob in a position. Put Bob over top of the hoops. Don't put him inside foot, Bob. Over top of this square. All right? And now I'm gonna come in here with my node tool, and now we're going to select the node tool, and I'm going to start deleting points delete. I'm gonna move this square over just like that. I'm going to take this point and I'm gonna delete it. I'm gonna make that into a square, and I'm gonna match that up there. I'm gonna turn this into a square in a match that up. But first, I'm gonna delete this, and I don't need that. So I delete that I delete that I don't need that. This is now going to become a square just like that. And elite and elite and the lead. All right, Look at that wacky Bob turning into a square. That is exactly how you do it. Now, let's go ahead real quick. We can make him into the trap inside. We're gonna grab Bob over here. I'm gonna duplicate Bob one more time cause I got plans for him coming over here and of duplicating Bob. And then I'm gonna move Bob over. We're gonna move, Bob Blob a top here. We're gonna come over to the nodes, and we're to start with a square node. Snap. Their I don't need that. Don't need that. Don't mean that. One of the things affinity designer does quite frequently is it puts way too many nodes in where you really don't need him. All right, folks. So we've successfully fit Bob into two boxes. Bob's now the way he wants to be there. Let's go ahead and let's go ahead and delete those out. right. We're gonna go ahead, right? Swipe right. Swipe right. Swipe right, swipe. All right, let's go ahead and turn into the trash can. Bringing back bomb. And now the last thing that I want to show you before we cut this video, I'm gonna go ahead and I'm gonna bring up a triangle, and we're gonna go ahead and again. There's a set of eyes in what we were doing before. I'm gonna go ahead and bring up my set eyes. And if you don't have him, certainly there in your downloads and we're gonna go ahead and we're going to come over here and we're gonna copy those. And we're gonna bring him back in, and we're gonna paste them, and we're gonna go ahead and set it for our next area. All right, So now, once we've got him here, go ahead, move him into the shape. And now let's go ahead and turn the triangle of different color. Let's go ahead and make this a green triangle. Let's go and make it darker green. And we're to call this team to the triangle. So the next lesson, what we're gonna do is I'm gonna show you how Teen of the Triangle and Bob the Blob are going to going to go surgery and come together here to make this really weird shape. All right, folks, seeing the next one.
4. Nodes Part 3- Breaking and Joining : All right, folks, welcome back the designer. So we've included this file in your downloads. If you're just joining us And the purpose of this video is we're actually going to take Bob the Blob and team to the triangle, and we're going to begin combining them in doing some surgery to turn to shapes or two curves in tow. One. So let's explore that for just two seconds. Let's go over to the layers panel and you'll see here that I have a triangle. It's a shape now. A shape. Before you can adjust the nodes on, it needs to be converted to curves. Let me say that again. A shape is not a curve. A shape is a unique object in affinity. Designer to convert the curves. You come over to the little three dots over here and you'll see the convert to curves. Option here on the right hand side, about halfway down. Click on that Now what just happened over in the layers panel? You see how team to the triangle now became a curve. Now, when we use our no to tool, I have a lot of nodes that I can work with. Now we've talked about the types of nodes we've talked about the position of nodes. Now I'm gonna show you how to manipulate notes. All right, so you'll see in the context to a bar. There's some options. Break close, smooth joint and reverse. So now I'm gonna show you what these mean. Let's go over to team to the triangle, and we're gonna grab this little note in the lower left hand corner of your triangle. And now we're gonna break the curve. Now, it doesn't seem like anything happen there. Watch this. Now I can manipulate thes two areas. The curve broke there. So when you go to break a curve, let's do this with Bob. Now let's grab Bob's lower point here. You see how that turned blue? And let's break the curve there. Now you see how that went? Read. And now Bob is what is called an open path. Now let's make some weird type of situation here where Bob's point and team to the triangles point get dangerously close together. Put your finger on the page, selecting both with your no tool. And now you see the red and the blue points air right together. We're gonna click and drag with our pencil. And now watch this. We're gonna hit. Join now, what just happened? You'll notice that the two shapes now became one. This is key, Affinity Designer is not going to keep both shapes. Now let's see what happened to our assets. Notice the teen of the triangle just disappeared. So anything that was nested inside of there is history. Bob is now consumed Tina into this weird type of thing. And now we're in a click with their no Dual. Were to select that one were to select this one. You see how these both went blue? And now I'm gonna close the path How? Well, Bob the Blob unfortunately just consumed his buddy Tina. And now all you've got is a weird Bob the Blob. All right, So you see that Bob Cannibalistic Bob right there. Now, the last thing that I want to show you here before we kind of end this When you go into here, if you decide that you're going to reverse. Now let's take a look at this Notice where the red dot is. I'm moving around. That's the end point of your stroke. Now watch this we're gonna just show you this. You come over to the stroke, it's crank up the width and then you turn down the profile. Now you clearly see where the beginning of the stroke is, where it's thick and then where it ends, where it's then. That's what we did with the profile here. Now, the minute you hit reverse in the context to a bar notice, the stroke direction is reversed. So if you're drawing a certain way and you want that stroke profile, you can always reverse the direction. If maybe it's not exactly where you want it. And then the last thing that you can do, you can grab an area that may be a little bit jagged here. And if you were to hit smooth notice here that it will try to smooth out a lot of the bumps in the curve so it will add a bunch of notes. I personally don't ever do this for this very reason. I think affinity designer as way too many nodes that I spent half my data leading them All right, so you know, versus you know what joint is? You know what smooth is? You know what clothes and break our all right folks. I think that's good enough on the nodes. Let's go ahead and cut this lesson and actually get into a project here where we teach you all about stroke with see the next one.
5. The importance of line weight in design : all right. Going welcome back to the course. So we took a look in the last lesson at the pen tool. And we've been talking about lines. So the last real technical tactical lesson that I want to show you is how to use the stroke profile in order to tell the story of your design. Because we're gonna be doing that in the very next project we're going to start. So let's go ahead here, and we're gonna grab the pencil tool, which is what we've been talking about. We're gonna change the color over the black, and I'm gonna go ahead. I'm gonna make this a 20 point stroke. This is gonna be a very thick stroke. Now, I'm gonna go ahead and turn my controller off, go over to none, and I'm just gonna pull a line just like that. Beautiful. All right. Now, if we go over to the stroke panel, here's what I want to show you. You can adjust the width from the stroke panel. We've been doing that all day, but the difference between an amateur artist and a professional artist, the professional artist uses the width or the weight of the stroke in order to tell the story. I come from a tattoo art background. And so, over the years, let's say this person carries the tattoo for 60 years. If you do the Leinart write, the liner will tell the story of where you're supposed to look in the tattoo design. So in order to do that, we're gonna change the profile. And that is a simple is grabbing one of these little handles and you'll see at the end of the line, it made it. Then now you can drive the other handle down the same way, and the entire thing becomes thin. You can move this up so that the end is thick. Or if you wanted to do something relative usually unique, you can add a node, and you can create a stroke in which there is thickness in the center. And now watch this. We can shift the note around until we get just that right. Look where we want it. So we're gonna move all of these back up to the top, And now, to delete a note, just long, click on it and delete known Add node Move Note. I don't like it. Delete the note just like that. All right, so that's a little bit on how to adjust the stroke profile. Now, sometimes you're gonna have a situation where let's turn, sculpt off. You've got a line of a certain width, and then you bring in another line of a certain width, and maybe this with is not quite the same. So let's go ahead and turn that down. Maybe it's a little bit here and now when I try to move these two things together, you see, I've got my note tool selected. You see how I get kind of that weird rounded corner here. If I've got that selected, I can come into the advanced menu and I can change the type of cap. Now. There are a lot of ways forward right with this, so even that the cap it's hanging out a little bit so I might change the cap even a little bit more. You could bury the note inside the cap. You could change the type of joints, and then you could align the stroke to the outside, to the inside or squarely in the center. We covered that in the shape lesson, So if we're doing this what I would probably do. I would keep the cap at the round, and then I might go through just a little bit here, and I would then increase the width of my line until it kind of looked right about where I wanted to be. So there's a whole science to the primary, secondary and tertiary lines when you draw. But what I need you to understand for the purposes of this course because we're at the four minute mark, is that you want the line wait to tell the story off the drawing. Okay, again, line. Wait till the story of the drawing and the viewer should be able to look at your line, wait and tell what is important right off the bat. All right, that's a little bit on stroke. We took a look at the stroke panel and I showed you how to adjust something called the Stroke Profile. Let's go ahead and get into a project, folks, and do some pin striping
6. Make a pinstripe design volume 1 : all right, gang, And welcome back to affinity designer. So I thought since we were dealing with line and curve in this section that we might do something kind of fun. As a tattoo artist, I had a very deep appreciation for custom culture, low brow art. So the Ed Roth stuff, the old pinstripes stuff really kind of stood out to me. And so I thought, maybe we do something is we were talking about the width of lines that kind of related to that. So let's go ahead. Make a very simple pinstripe using line with Now. Anybody that's ever pin striped by hand knows that this is a huge pain in the backside. But with affinity designer, it is super simple in your downloads. For this lesson, I have included an image, so we're gonna go ahead and place this image. I've already imported it into my photos. And when I say an image, I mean a rough sketch. And when I say rough, I do mean rough. So this is my rough sketch, and I'm gonna work with my move tool, and I'm gonna center it up kind of in the middle of this page. So whatever your sizes. Just go ahead and center it up to the middle of the page roughly. And I think that that's good enough for right now, I'm gonna go ahead and shrink that down just a little. All right, So you get it kind of where you like it. Now I tend to work on one side. You really only have to work on the right side, because after this, you're gonna duplicated and flip it. So the very next thing you're going to do here now is you're going to come into your layer structure, and we're gonna go ahead and hit in the three dots. We're gonna drop the opacity of this bad boy and then coming back, we're gonna go ahead and we're gonna lock this thing down. All right, so we got it on lock now, coming over to my pencil tool. I'm gonna make sure that use Phil is not on. And I'm gonna go ahead and turn the stroke up right now to probably let's go a solid eight . And the stroke color I'm going to use is going to be black now. I want the stabilizer on. The stabilizer is key to making this work. Now with stabilizer on, I'm gonna come down here and I'm going to begin sketching now. You see that? It wanted to fill on, even though I said turn it off. We're gonna fix that. Okay? Come back over here, Phil. Off. There we go. Now, you may want to continue your stroke past here. I'm gonna show you how to do that. Authentic designer has this really cool thing called sculpt. Now watch this with sculpt on. I'm able to pick off right where I left off. And now when I stopped drawing it will act as though I didn't even stop it all. All right, there we go. That looks really good. All right, so we're in good shape. Now we come over here. Let's figure out where we want to start this next one. Let's go ahead and start this line over here and again. These air just rough outlines. If you'd like to sketch out your own, you certainly can. All right. So I think that that looks pretty good. Now, here's where the magic happens. We're gonna come down here and we're gonna go to our stroke, and we're gonna go ahead and crank down that profile, and we're gonna go ahead and up the width a little. Now, if you wanted to make it a little bit thinner, say at the end there a little fatter in the middle. You could absolutely do that. I'm gonna go ahead and crank this up just a little bit like that. And I'm gonna go ahead and crank this up just a little bit like that. That looks good. Now, let's check out the other curve. I'm gonna come over here to the stroke. I'm gonna crank up the with that stroke a little, and I'm going to taper that stroke down also. All right, So fairly happy with that. Let's go ahead and crank up the with a little bit more on this. And the cool thing is, you can adjust the width and the way that the stroke looks all the way throughout. You can add more nodes. You can delete more nodes. So this pin striping is actually a whole lot of fun. All right, so now we're in good shape. Let's go ahead. Now grab our pencil tool and let's go ahead and change of color a little bit. I want to make it instead of black. Now, I want to make this new one Red. You know, we're going to draw the stroke first. Keep it black. All right, let's draw the stroke first. All right? I'm gonna start over here, and I'm going to come down and have a stabilizer Is a lifesaver, folks. Okay, Now, you see that I'm kind of running short there, so I'm going to use my sculpt function to just pick right back up where I left off. All right? Looks good. All right, we're in pretty good shape. Let's go ahead and change this color up here, all right? And let's go ahead and change these stroke profile down on it. Now you notice here how some of the raid goes above and some goes below. That's actually really cool. I like that a lot. Now, I'm gonna go ahead and make this super large, and I'm going to go ahead and make that super small so that there's a pretty significant drop off, and now I'm gonna go a little bit off book, and then what we're going to do here is we're going to come over here and we're gonna swing down just like that? No, I think that actually looks really good. All right, so let's go ahead and take a look at what we got here. We've got in our layer. We've got curve one curved to curve three, anchor four. So let's go ahead. Select. Swipe, swipe, swipe and group. Alright, folks, let's go ahead and cut this one here and now we'll take a look at the next one. All right? See the next one?
7. Make a pin stripe volume 2 - Finishing the design : All right, folks. Welcome back to Ben Strike projects. So I think that we're pretty good done with this photo. So let's go ahead, unlock it from over the layer and let's go ahead and just delete it out, leaving only the piece we were working with. All right, that looks pretty good. So now we're gonna come over to our layer, and we're gonna go ahead. And with the three circles selected, we're going to duplicated, and now we're going to transform it. Flip it. Oops. Make sure your move tool selected right at always helps and then position it. All right. That looks really good. All right, so there you've got a pretty good pinstripe. Now, that's one way to do it. Now I want to show you something different. You can do so if you're barely hanging on. Stay with us. You're done with the pinstripe. If you want to learn the basics of symbols, we're gonna talk about that in a different lesson. But why don't we go ahead and go a little bit early? I'm gonna come over to this group. I'm gonna delete it now. The symbols are right here. And symbols, folks. Really say whatever you do to one you do to another Soto, add a symbol. Come over here. We've got that right half selected, right? Add symbol from selection. Now watch this we duplicate. And now we come down to our transform and we flip. And now we move just like you did before, right? You're saying? Well, what's the difference, Jeremy? The difference. Now you'll see the faint orange line here. I'm gonna come over here and I'm going to lock down this layer that we've got selected. Okay, That way we can't mess with it. And now this symbol there are original. Watch this. We're gonna go inside, make sure you're inside. This is key to making this work. Let's grab our pencil tool. And let's say that we wanted to add one more swoosh. Right? So if we come down here, notice now if we add one more swoosh, it now messes with the other side. It actually completes it. This is what symbols really are good for folks. What you do, the one you do to the other. So if you wanted to, you could theoretically create your design mirror that right hand side work Onley in your original symbol and you could modify your pin stripe. All right, that's a really quick lesson on how to use symbols. We've got more to come, so don't worry about it right now. But symbols are powerful. Way to achieve symmetry and affinity designer, especially when doing something like pin striping. All right, I'd love to see how you got along. There's an assignment folder at the end of this. Go ahead and drop your pin stripes in. I'd love to see what you guys come up with. This is one of those freedom things. Play with it. Do something with it. Create with it. All right, folks, let's go ahead and get into the next lessons. We're gonna show you all about things like the pen tool in the vector brushes coming up.
8. Pen tool basics : All right, gang, Let's go ahead and talk about the pen tool for a second. Now the pen tool has a use. I can't say that I use. It is often is a pencil tool for what I do illustration wise, but it does have a use, so let's go ahead and talk about it in your downloads. I've included a file, so let's go to the document menu Place image. I've already put the file into my photos, and then we're gonna click and drag this thing out. This image actually comes from our pen tool boot camp. So this has a lot of the different things you're going to encounter when doing pen tool style art. So let's go ahead now and let's grab of the pen tool. Let's go ahead and hit de Select. This is right above the magnet. So we've de selected and now I want the pen tool to be read, and I want it cranked up to seven point to point. So it's gonna be a bold red so that we can see what we're doing over top of it. And now I'm just gonna tap tap tap tab one single tap between these nodes creates a solid straight line. So if you want a straight line, all you have to do is tap to places. An affinity designer will connect the dots literally. Now watch this. Let's say now I want to go to under this hilly looking one over here. Whoa, What just happened, right? That's not what I wanted to do. How do I terminate a line? Let's use the two finger on you. This is he. You must de select the line you were working on before moving to the next one. So hit the ec's down here. You see how in flashing it? All right, so we're gonna try this now with the 2nd 1 dot dot, dot, dot, dot de select. And now you see, a new line is created, de select new line is created. I know this seems rather ridiculous, folks, but nothing is worse than being frustrated because the line is continuing on, so that de selection step is absolutely the differentiator. Now, let's take a look. We know how to do a straight line. Now, let's take a look at this hilly looking one here. Now, I'm gonna put a dot here. That's my anchor point. Ah, I broke my own rule and I forgot De select. All right. And now it's going to be just a matter of judgment where you put these nodes, you can always adjust. Um, I'm gonna put a node right about here, and I'm gonna pull out with my pencil. And the thing that I like to do is the node where my pencil is looking forward. That's the direction that my next point is going to go. So my next point should theoretically be right about here. My next point should be right about here, and I'm pulling out and making these sweeping arcs with my pencil. So if you get here saying you don't quite put it in the right spot, never fear the no tool is here. You can go ahead and shift these around. You can change the location of them and you can move them with the no tool after the fact. So it's extremely forgiven. Now you modify with the no tool exactly like we showed you in other videos. And now I think that it's worth mentioning. Watch this. If I take this note and I try to move this handle. You see how it runs both sides of the equation. The left handle and the right handle. Put your finger down. You see the blue dot that's created. And now you can manipulate Onley one handle by using the one finger on the opposite hand. This is crucial because sometimes you want to only a just half of the note. Let's show you how this works with this whole wave thing here in order to get this really crisp wave pattern. Take one dot Here. Let's go ahead and grab our pen tool. Take a dot. Here, take it out here. Pull it out Now. Put your finger down. Put the no down release. The node released the finger. Next step. Finger down, No doubt. Released The node. Released the finger. Next step. Finger down, No doubt. Release the node. Released the finger. I missed that one. And next step finger down. No down. Released. The node released the finger. There we go. So sometimes you don't actually hit it first time. Every time. That's okay. We're gonna come up here, We're going to adjust the note, and then we're going to adjust it so that we're following our guideline. Now you see here, I'm going to go ahead and adjust this because I like this and I need to change that to around a note. So as soon as I change that to a smooth note, there we go. Sometimes you gotta just him and get him a little bit closer to where you want it. Folks, depending on what the ark is you're looking for, I always tend to set my points and then I'll go through and adjust my nodes after the fact . All right, so that's pretty much how it's done. Remember, if you want to only a just one of the arms in the equation make sure you use that finger. And by all means, make sure you de select before moving on to the next line. Alright, folks, let's go ahead and get into an actual project and show how to use this thing
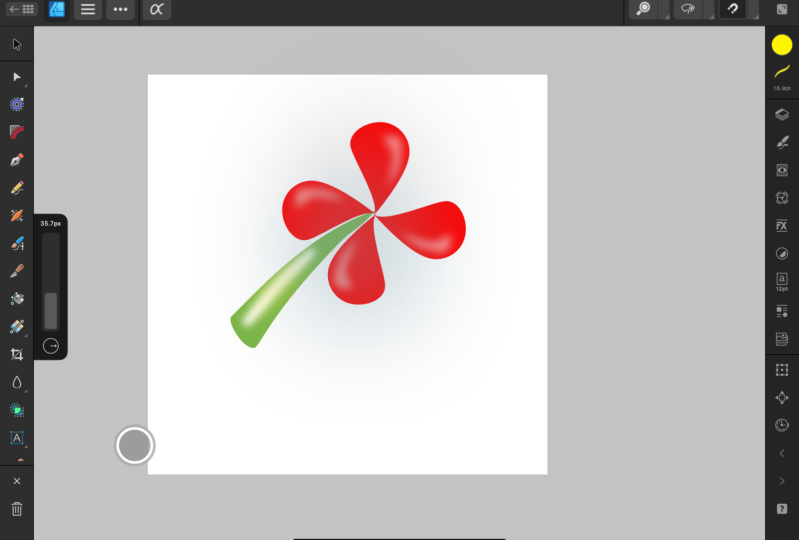
9. Vector flower tool- Introduction : all right, folks, and it's challenge time. We've been talking about the pen tool, the pencil tool on all things vector. So this the chance to practice everything, even doing vector. This image is a very simple, vector based stylized flower, and so it uses a few shapes, and it uses a lot of vector art from the pencil and the pen. So what I'd like you to do use the tools and techniques that you've learned. Try to style eyes. A flower doesn't even have to be a flower. Doesn't even have to be this flower. But if you'd like to give this a shot, give it a try. See what you come up with. Post your results in the assignment section right after this And if get lost or you want to see how it's done, go ahead and skip to the solution. We've got the working file in there for you. And my solution, along with step by step, is included on how to do this. All right, folks, have a good one. Like to see what you come up with in the challenge and will catch everything the solution file. All right,
10. Vector flower challenge solution : All right, folks, welcome back to the challenge. So it's time to go ahead and try to make this shape flower here. So let's go ahead and create a new document. I'm gonna go ahead and I'm gonna work in the web persona, and I'm gonna make this square 1000 by 1000 pixels again for this example. The working sides is not necessarily important, and we're gonna bring it up. All right, So the first thing we're gonna do here, I'm gonna begin by starting with shapes. So I'm gonna come up here to the rectangle tool. I'm gonna find my tear shape, and I'm gonna go ahead and I'm going to drag it out. Now, let's check out our layers panel, notice that it is a shape and shapes have filled. So let's go ahead and adjust the pill to a red. That looks pretty good. And now what I'm going to do is with my shape tools still selected. I'm gonna come in here and I'm gonna just change it up a little bit. I really want to kind of capture the whole swoop of this particular pedal. All right, now we're gonna come into our it's grabbed the pencil tool. And now what I'm going to do, I'm going to come in here and I'm gonna grab And I'm going to drag out a shape similar to that and notice I had my feel on be kind of hard to miss, right? And I'm gonna go ahead and make it just a little bit different than the red. Now I'm coming down here. I'm gonna grab the curve that I just created and I'm going to drag it inside and I'm going to put on some go, Schindler. So I make sure the blue effect Cabazon, I select it and I come over here. Now if I want to change it up a little bit maybe making a little bit more light, I can always come over to this particular layer. Come over here and I can adjust it until I get it kind of the way I want it. I think I'm pretty comfortable with that now. I'm gonna go ahead and I'm gonna use the pen tool. Just kind of show you how guys, how this works. Zoom on up in here, grab the pen tool. And now we're gonna de select and I'm going to start clicking with the pen tool. And so I'm gonna go ahead and close that shape up. All right, Now, I want to make some adjustments to the nodes, some coming over here to the no tool. And I'm going to want to drag this. No doubt. I'm gonna go ahead and take that note out of the mix. And also gonna take this note out of the mix That's going to make it a lot nicer for me to get a nice, smooth gradation here. Okay, You see how we're kind of moving on that side? I don't want that to happen. So I'm gonna come over here. I'm gonna put my finger on it. And this is where it kind of swipe it away. Right? All right. Looks good. Same thing here. Noticed my finger hasn't moved, so I'm adjusting the nodes now. I come over here, fill that with White, take the stroke, take it off. Perfect. And now I'm going to apply another effect over here. Doh Schindler. And I'm going to with the great out swipe. It looks pretty good. All right, let's go ahead and zoom on out here. Let's look at our layer structure, and I want to pull this inside of the shape, so I make sure my blue lines here Perfect. Now I want to go ahead. I want to duplicate this. Let's make sure where tears selected and duplicate. Now, I want to go ahead. I want to transform it some coming over to my transform panel, and I'm gonna rotate this bad boy. So to rotate it, I come over the rotation, make sure were selected. Hey, how about that? That works, All right. Make sure that were selected here, come over the rotation, and we're gonna rotate it 90 degrees. All right? Perfect. Now I'm gonna come over here, and I'm going to join it up with this one here. We're gonna go ahead and share that access point for this one. Close enough roar, shoes in hand, grenades to be pretty close. All right, So now let's go ahead and do the same thing again. Make sure you've got one selected, learn from our mistakes, duplicate and go over to 180 degrees. Perfect. And bring this into center. Good deal. Looks pretty good. Guess what we're gonna do again, folks. We're gonna select this one we're going to duplicate, and we're going to come over to transform, and we're going to go over to and even 270 degrees. All right. Why didn't that take their? See, we got here to 70. Oh, if it doesn't want to do it this way, we'll just do it that way. All right? Problem solved. Problem. Stay in salt. 100 different ways. Home. All right. Perfect. Now, with all four these selected, I'm gonna come on in here. I'm gonna go to my group and I'm in a group home, and I'm gonna call this flower. All right? Perfect. Now, let's go ahead and zoom on out here a little bit. Now, I want to take my let's do the pen tool for this one. I want to get used to the pen tool, and I'm going to de select. And when a pop a line there, papa line here, I'm gonna push down with my finger to move this handle only I'm gonna pop a line here. And then I met a proper line there. All right, good deal. So now what I'm gonna do, coming over to the no tool and I'm going to begin adjusting these a little bit. So I get it to where I kind of want it. I think that it looks pretty good right about here. Kind of like that. All right. And let's go ahead and fill that green swing over to the green. Maybe something a little darker. No, Joe. All right. And if we wanted to make it dinner, we could always come back and readjust this thing. I wanted to give enough room here to where I can make it work. All right? And now notice are layering structure. Let's go back to our layers. I'm gonna do the same thing now with the pencil tool that I did with the other. I'm gonna put a highlight inside. Here, you see the rope stabilizer moving. All right, come over here and we're gonna fill that. Let's make that kind of white kind of like that groups. Let's go a little bit more green. There we go at a little bit of ocean blur, so we'll come over at an effect. Go, Schindler. Swing it. Pretty good shape there. All right, now, let's go ahead and add a little bit to the bottom side here. Come over with the pen selected. We're gonna go ahead and do this bottom base here, and we're coming over now to the dark greens. I think we're pretty good there. Bring it inside. So again, now we're gonna nest, nest inside, nest inside. And when we close the curve were good. And to this curve, I'm gonna go ahead and add egg ocean Blur. All right. Now, the last thing that I'm probably gonna do here because we're running a little bit long on time, I'm gonna go ahead and thin this out just a little bit more. I'm coming up to the curve layer, and I think I want to thin this out, and I want to take this. And collectively. Now I'm going to move this, and that will change the rotation ever so slightly. The last thing I'm going to you here, I think I want to put a little bit of yellow inside of it there. So I'm gonna go for a little bit of a yellowish green. I think there we go. I like that a lot more. Now, let's just go ahead, shift this just a little bit, All right? I like that. All right, so that's a little bit about using the tools that we've been talking about. You now know how to use the pen tool, how to use the pencil tool. You're leaning on skills that you've learned before. We've gotten into the basics of adding effects layers, and so we're ready to take the next step. Let's go ahead and learn about vector brushes. All right, we'll see in the next one.
11. Basics of vector brushes : All right, gang. Welcome back to affinity, designer. So it's that time of the course where we're gonna start talking about the next type of tool . We took a look at the pen tool. We took a look at the pencil tool. It's time for all about vector brushes, so vector brushes are extremely cool, although the way affinity designer deals with them is a little bit different. But it is still a lot easier than Adobe Illustrator, so let's go ahead. Open up the interface now the vector brush tool is over here. You see that? I'm highlighting it. It's in the draw persona, and now you're gonna find the brush is available to you over on the right hand side in the studios area. So let's go ahead and go over to the brushes. Now you can scroll by tapping on the left or the right arrows up here to go through all sorts of different brushes. So we've got pens, we've got shocks and pastels. We've got acrylics. So now if we go ahead and we click on them, let's go to the pens tab and let's go ahead and look at solid pen with pressure. Let's go ahead and tap on it. And now long tap on it and let's go ahead and hit. Edit now, don't edit it. You'll see that all the brushes have similar characteristics you've got with size variants , opacity, variants and then something that's called a controller. This tales affinity designer how to respond. You see how the ends taper down when pressure is selected so you can adjust by velocity the inverse velocity. You can have no controller, and it will be solid all the way through the stroke. I like to keep mine on pressure, and if he had this little graph here, you'll see that you can adjust to the nodes. I don't mess with pressure a lot, but you could theoretically adjust the pressure curve to match your particular style. So now let's go ahead and take a look at these wheels. So now you'll notice this is by default. 16 point. Now, if I swipe over to the right, the stroke, it's bigger. You see what's happening to the preview of above. Let's go ahead and move it down and, as you know, much like all the other wheels, if you tap it, you can set the appropriate size. And now, with size variants what watch what happens? We go up, you see how it gets super duper narrow. And then if you wanted to adjust the opacity, you could move it and you see how the opacity also changes. So there's a lot of flexibility with brushes. There is not as much flexibility with Vector Russia's let's say as there is with the raster brushes, which we'll talk about in the pixel area. And once you got the brush where you like it, you can go ahead and hit. OK, now you'll see right above where I was working right here. You see, the brush has changed. Now let's say you didn't want to do that. My best advice to you folks is to go ahead and create a new category. Now, to do that, we tap on these three lines surrounded by the square here, and we're gonna goto add category. Now you see a new categories of selected and they really creative about this. They called it brushes. Let's go ahead now tap on those three lines again and renamed the category, and we're gonna call this affinity designer practice. So this is where we're gonna put all the brushes that we're gonna use to practice. Affinity designer. So once you got that, you probably need to put some brushes in there. So to do that, let's go to the solid pen with pressure. Long click on it, duplicated Now we duplicated it. Where did it go? You see, it's down here at the bottom of the stack called brush Copy. Long press on it, move to and then put it in the affinity designer category. So let's go and see if it's there. There it is now. Brush Copy isn't exactly an eye catching title, right, so let's go ahead. Don't click on it and let's go ahead and rename it and let's call it Modified Basic brush. All right. Perfect. Now we've renamed a brush. So think about in the last four minutes you've learned that category. Zahra thing. You've learned how to don't duplicate. You've learned how to duplicate a brush. You've learned how to rename a brush your well underway and brush management. So now the last thing that I want to show you is how to create some new brushes because, let's be honest. A graphics program isn't fun unless you create new brushes. So to create a new brush, we're gonna come over here, we're gonna create a basic solid brush. So let's go ahead and click on new solid. Now, this is not extremely sexy, folks. A solid basic brush is simply adjusting the with up to where you want it adjusting the size variants and adjusting the opacity where you want it. And now you can absolutely change the controller. That kind of gives it an interesting appeal. I'm gonna go ahead. I'm gonna modify pressure, and I'm gonna show you guys how to modify the pressure curve. Now we can come up here. We can move this area up. We can move this down a little bit, so you can absolutely just the pressure curve if you so wanted. And if you realize that that is just complete garbage, you can modify. Here, toss it so or you can go back to the standard line. All right, I'm gonna go ahead and keep it in the standard line. I'm gonna hit, okay? And now, in order to work with this, this is how you work with the vector brush. You come over to the vector brush duel. You make sure the brush you want to use this selected, and then let's go ahead and grab a black stroke. Come over here and use it. Now that doesn't exactly look interesting, right? But let's go ahead and up the size of this thing here. Now you see, nothing is happening. Well, why is nothing happening? Let's go ahead. Select and delete, because in the vector brush tool notice you have the same options. You have to turn on the controller in the vector brush tool. Make sure you turn on the controller. So my controller is now going to be brushed. Default. Guess what's going happen with this? Now I get that really nice control that we were talking about. Now the stroke is still ugly because guess why That is an ugly, ugly brush so you can absolutely see impressing very lightly. Now I press hard. Now I press lightly. You can definitely do some really cool stuff with that. I'm like, Consider that kind of like an inky cartoon line type of brush. So let's go ahead in the parting shot and rename it that long. Press rename Inky lining Brush All right, Let's go ahead and do it this way. So let's recap, right? Because you did quite a bit of work here. You learned how to create a category. You learned where the vector brushed awas. You learned how to turn on the controls to the vector brush tool to allow the brush to do its thing. You also learn how to rename a brush once it's in that category. All right, folks, who think that's enough for 78 minutes. Here, Let's go ahead and take the next step. We're gonna show you all about some intensity brushes. All right, see the next one.
12. Introduction to image and intensity brushes : All right, folks, And welcome back to Infinity Designer. So in this lesson, we're gonna show you how a textured image rush and a textured intensity brush. Very So let's go ahead and find out where these are. If you pull up your brush menu and hit on the three little icons here, you'll see you've got new textured intensity brush and new textured image brush Now affinity designer. I consider these to be very convoluted, So I want to show you how these two differ in this lesson because if not, you'll never understand what you're doing in the subsequent ones. When you go to use vector brushes, a textured image brush works on the color value. A textured intensity brush works on gray scale value. You set thes two brushes up differently and what I'd like to do, I've got to files that have included under downloads. I'd like you to download those, and we're gonna make brushes using the exact file, and you'll see exactly how affinity designer treats these different. So let's get started. We're gonna start with a textured image brush. You're gonna grab this orb with no background. Now, an image brush you don't want to use background on it. You want a transparent background. It's got to be a PNG. And now I'm to go ahead and hit. Repeat now you see what that just did in the brush editor. When I go ahead and hit, OK, I come over to my vector brush tool and I draw a line ups. Why did that happen? We didn't select her brush. That looks a lot better. Notice the brush stroke that's created that looks good. And if you could imagine it in between each one of these little dots, there's transparent background. That's what an image brush does. It works off the value that comes from the color. Now, if I use the exact same file when I try to make this an intensity brush now, you don't have to do this right. We grabbed the exact same file notice what happened? The intensity brush doesn't recognize color. All it seizes black and gray, so because it doesn't have a background off from that PNG file, it assumes that it's black. So it goes okay, Sure, and you'll see this weird thing that's created. Watch this. Let me edit it so we can get A We're gonna go ahead and repeat it so that it looks like it should We're gonna select that. And now with my vector brush selected notice what happens here. That's a very different type of stroke than what I had here. That's because an intensity brush works off grayscale values. It didn't have a background to go on, so it did the best it could with the information that you gave it. All right, So when you run an image brush, which we're gonna make it next lesson, you're going toe. Want to make the background transparent, and it will work off the color values. Now, an intensity brush. On the other hand, let's go ahead and make one of those. We're gonna go ahead, delete this whole or brush because I don't quite like it. And now we're gonna come up here and we're gonna create a new textured intensity brush. Now, I've included a download, the spatter vector one file. All right, so we're in intensity brushes Now, I'm gonna make a subtle adjustment here. I'm going to bring the head in a little bit. I'm gonna bring the tail in a little bit of this image just like that. And then I'm gonna hit, Okay? And now you see what's created. Make sure it's selected, and now let's go ahead. Grab our vector brush again, make sure it's selected, and let's drag out a stroke that looks pretty good. Looks like it should. I can change the color here that works out just fine, looking good looking like I expect. But now let's use the exact same image and make it an image brush. What do you think is gonna happen when that image rush looks for a transparent background and sees a black background? Given your brush spatter vector, Let's go ahead and just the head and the tail so it's a fair comparison hit. Okay, now let's select this and let's change the color to make sure that we're good in their comparison. Make sure they're all right. What is this? You'll see that the image brush says I have a black color in the background of that image, so therefore the color is going to be black. Notice how you have to set different brushes up for different activities. So in the next lessons, we're gonna show you how to make an image brush. We're gonna show you how to make a vector intensity brush. And they are very, very different. All right, folks, that's a little bit on internal brushes. I know that this might not make a tremendous amount of sense right now, So join us in the next lessons where we make a image brush and then we'll make a vector intensity brush. All right, we'll see the next one.
13. Making an image brush : All right, folks. Welcome back to affinity Designer. So in this lesson, we're gonna show you how to create these really cool image brushes. So in order to create an image rush, let's go ahead and open new file, go to new document. And now it's very important. I feel to make these things square. So I'm gonna go 1000 by 1000 pixels just like that, and we hit. Okay. All right. Perfect. Now let's go ahead and zoom this down. Now, when you do an image brush, it is essential that you have a blank background. So let's go ahead, go to canvas and just set ourselves up good habits and do a transparent canvas right off the bat. All right. Now, with our shape tool selected, let's go ahead and do a really cool triangle, right? So we're gonna go ahead. Let's make a heart come down, drag out a heart. Let's go ahead and put our finger on it so that we can make it symmetrical. And we're going to go ahead and center this bad boy front and center. Now, in order to make our heart look good, we're gonna go ahead and we're going to make it into a red heart. All right. Looks good. Now let's stylized it a little bit. Come over to the layer, grab the layer, grab a pixel air. We're gonna go ahead and practice pixel persona for a second, and then we're gonna come over to our color wheel. We're gonna grab our color, and we're gonna grab something that's maybe a little bit darker, and we're gonna come over to our sprays and spatters Grab the airbrush four here. Now we're gonna grab our hardness. Let's go and crank the hardness down a little bit. Let's go ahead and crank our size down ever so slightly. And now let's just kind of fade out the heart a little bit. There we go. I think we're pretty good there. All we're doing is just adding a little bit of stylized to it. All right, now let's go ahead and add in a little bit of white to it. Here, Come down here. Because again, in order to make it look good, you gotta put a little bit of highlight in it. And then let's had a little bit more highlight here. Let's make it really white. We're gonna strength this down a little bit. All right. Good deal. I think that we're pretty good for horseshoes and and grenades on this thing. So now let's go ahead. Come up here. Make sure that it's selected. Let's start there. Make sure you got your selection. Come over here and go ahead and hit, Export. Now we can grab the whole document, or you can just go ahead and grab the image. I'm gonna keep the whole document since we have a square document. And let's delete this out and let's call this heart brush. Okay? Now, we're gonna go ahead and keep it as a PNG, cause we got transparent background, right? We're gonna return, and you're going to go to no background and you're gonna hit. Okay, Now, on my iPad, I like to keep my stuff. A designer. Ah. You see what's happening here? You see this little icon here? It's his heart brush. Cancel, cancel. Come over to the layer. We didn't drag our layer down inside. Ah, all right, now we're ready to go. Fact export. Little stuff like that will always hang up. Heart brush return selection without background It. Okay, go. There saving and designer. And he had and away we go. All right. Perfect. Now let's come over here. What's creating you? Document. Just we can practice. This doesn't matter what size the document is. We're just gonna use it, sir. Brush Come over to the work we've been doing here. Affinity. Designer practice were to create a new image brush. Grab the heart brush. Beautiful. I'm gonna go ahead. I'm gonna repeat it, and I'm gonna go ahead and I'm gonna set a little size variance. I'm gonna want this to be safe. 50. We dio all right, and we're gonna make pressure. All right, That looks pretty good. So let's give it a shot. And there we go, folks. That's exactly how it works. All right, that looks pretty good. Now, the last brush thing you can really set, and it doesn't work well for these types of brushes. You come into the brush, we can click on it. And one of the things that it's going to ask you when you go to edit is what he wanted to do. When it corners, you want the pole or fold or overlap itself. This is a tricky one because watch what happens. This brush is really cool to go like this right up until you turn corners with it. Now you see what happens there. You get some weird artifacts that come up when it talks about what you wanted to dio. This is what I was talking about here. You're really gonna want to focus on just using this to do the straight and narrow path. If you decide to go through and do these sorts of curves, you're gonna have problems with this style of brush. All right, so that's a little bit on how to do an image brush. If you like this one, go ahead, play with it. We're gonna have a challenge of the into this. Where you gonna create both an image brush and a texture Brust Infinity designer and create your own category. All right, folks will go ahead and cut it here. We'll see the next one
14. Making an intensity brush : All right, folks. And welcome back to affinity designer. So in this one, we're gonna show you how to make a textured intensity brush. And now this is super cool. This is my favorite type of brush to make. So let's go into started. Now we're gonna create a new file and again when you make brushes, I always stressed the importance of making a square canvas. I don't know why it's just something that I dio. So I'm gonna make a 1000 by 1000 pixel canvas. Now, with this, it's going and shrink this down. It is essential that you take the background for intensity brush and you fill it with black Step one. Fill that canvas with black. All right, now we're gonna use raster brushes in order to make vector brushes. I know it's an abomination, Right? So we're gonna come over here to our Raster persona or are pixel persona. We're gonna grab some brushes and I'm gonna go ahead and I'm gonna play with Oh, I don't know. Let's grab our paint splats and splatters. And let's grab splatter too. Make sure you've got your brush selected here. You see where I'm selecting it. And now let's make it white. Now, I'm gonna go ahead. I'm gonna crank up this size here and now I'm just going to start putting in some randomness. Now, I'm just touching this year right now. Unless your goal is to make a perfectly uniform brush, you're going to want to take the brush size and alternated from time to time. So a block in some of the big sections, Then I'm gonna come in here and I'm gonna grab the ink spatter. I'm gonna kind of texture some of these areas away here. All right? And remember, intensity brushes work on differences between black and white so black it conceals wide, it reveals. So whatever you put in white is what's going to shine through when you apply the color. So the last thing that I might do here is I'm gonna put in some large spray in order to add in just a little bit mawr into some of these bold areas. I'm thinking ahead here, right. I want to head in the tail. I think that looks pretty good. So in order to do this, we select it. We come up over here and now we're gonna go ahead and we're gonna export it. We're going to select the area, but with the background, make sure that is an absolute must. And let's call this. We're gonna go ahead and delete this. We're gonna call this spatter to because that's the second brush I made. Probably be spatter one for you. Return hit, OK, and save it in my iPad under designer and by the way, have included this file in the downloads on this lesson. So now we're gonna come over. Let's grab a new document. Not a new program scrubbing new document. I've got one right here. That's open. All right. And now let's make a new brush. Come over to the affinity designer brush section that we you were working with. Let's go ahead. But now we're gonna add a new intensity brush. And remember, you had to have a black background for this. Recall this spatter too. That looks exactly like what we created. Now I'm gonna go ahead and I'm gonna just what's called the head and the tail on this bad boy. You see how that changed the brush editor Now you could stretch it, you could repeat it I'm gonna go ahead and I'm to stretch it and then you can change how it goes around corners. I'm gonna go ahead and I'm gonna pull it around the corner. I'm also going to allow for size variants. I'm gonna set that to 100% basically, because the way that I draw I really like to be able to control the opacity and the pressure using my apple pencil. Let's go ahead and select black so we can see it really bold, large and in charge. Let's grab our vector brush, make sure the spatter to is selected and let's see what happens Now you see that my capacity variants isn't really happening or my size variants. I have to make sure brush to fall to selected. And I've got to make sure that because it's the line my line is selected. Oh, that's nice. Look at that. I've got just that little bit of holdover on that thing. That thing looks all sexy. Beast. Look at that. I could bring that down to almost nothing. That's a good looking brush. So playing with brushes playing with vector brushes is one of the coolest things to do. So in next lesson. We're gonna give you challenge, and we're gonna ask you to create a couple of your own notice. You used the raster brushes and you're working in intensity in order to tell the vector art exactly what to do. And the reason these air vector brushes. Watch this. I can come up, and with my move tool selected. I can select any one of these strokes and I can modify the stroke profiles. So if I want that to be bigger, bolder batter, I absolutely can, folks. It is a huge new, wide open world with this thing. All right, folks, that's a little bit on vector brush tools. Very cool, very exciting. And I'll tell you what. It's professional artists. The tools and the brushes that you make will define the art that you create. All right, folks will see in the next one. Let's get ready for chow
15. Challenge on vector brushes : Alright, folks, let's go ahead and figure out this challenge here. Now, I'm gonna go pretty quick because a lot of these techniques you've already seen So I'm interested to see what you put in the screenshot area and see what you create with it. So let's go ahead. Now we're gonna go ahead and we're gonna open up a new document. We're to call it 1000 by 1000 pixels. You've seen this show before and we're gonna hit. OK, now, the first thing I'm going to do, we're gonna go ahead and we're gonna work on this image brush. So I'm gonna come down here to the document and I'm going to choose canvas and we're gonna make it transparent. And I think I'm gonna make a really cool type of stylized skull, right? Something basic two D, sort of like a stamp. So let's grab the ellipse and we'll grab out a skull shape just like that. We're now doing this really super simple, because again, if you have shapes, you don't need a whole lot to begin. So we're gonna just do a triangle that kind of is centered in here, and then we're gonna grab one more lips that I want to make into the cheekbone. So we're gonna grab that. And then with that ellipse still selected were coming up to the dots and I'm gonna duplicate it. And with the move to well selected, I'm going to place it. All right, let's go ahead and kind of center those up. All right. Looks good. Now, with all of these selective, we're gonna go ahead and we're gonna grab the three dots and we're gonna add, and now that creates a solid skull. Now we're gonna go ahead and fill it. Read? I'm going to use a black stroke animal to crank up the stroke looking really good there. So now let's go ahead, make nose coming into the nose. We're gonna grab the heart, and we're gonna make a nose just like that, and we're gonna rotate notice. I've got the blue dot for my finger, and then we're gonna fill it black. Perfect. Now, how do we make different eyes? Let's go ahead and just grab some ellipses and I'm gonna go ahead and make them non symmetrical. And with the lips selected, I'm gonna duplicate Come over to my move tool, and I sent her up my eyes. And then I sent her up, my nose look good. And then I come over to my rectangle, and there are a lot of different ways to do this. I realize that I'm probably not being the most precise in this, and I duplicate and I duplicate 1/3 time, and then I come over and I just move my rectangle in order to create teeth. Perfect. Now I select it all. I come over to my document, all right? And I'm gonna export now because it is a transparent background. I start with PNG. I choose selection without background, and I'm going to go ahead and call this Red Skull three. All right, and return. And OK, and we're gonna go ahead and save it on my iPad in the designer file. And away we go. Perfect. So that's the 1st 1 Now, the 2nd 1 Let's come over here. We're just going to duplicate this. All right, so we've got this one now, and I'm going to trash the entire thing. And now we're gonna make an intensity brush, so I'm coming over and fill it with black. Remember intensity you need black on white, and we're gonna make this really simple fog brush. Now, there's a lot of ways to make fog. There's some more advanced ways to make fog. We're gonna show you how to do it to make kind of a foggy stroke. Come over here and we're gonna find the default sprays and spatters, and we're gonna go ahead and choose this airbrush eight. Now, with my brush selected. Remember that White reveals black conceals. I'm going to come over here. I'm gonna start just putting some white down on the page. Now you see where my opacity is? Sometimes I want to crank this thing up, all right? Just like this. Sometimes I want Samora pass ity just like this. What I'm trying to avoid is any hard edges. And once I think that I'm pretty good here, I'm going to go ahead and crank my flow up on a couple of these here there we g Oh, there we go. I'm gonna go ahead and I'm gonna call it a day. So you see, I just kind of used that white, the kind of spattered around, And now with this selection, I'm gonna come up and I'm gonna export. And this time I'm gonna save as a PNG, and I'm going to want to choose the selection with the background. And I'm gonna call this fog stroke one. All right, and return. And let's put that in the designer folder as well. All right, Perfect. Now let's check our work and make a couple brushes. So when we do this first thing out, let's create a new document. Any size doesn't matter. Okay, New document ready to rock. We come over to our brush panel, and we're gonna create a new category someone at a category, and then I renamed category. So once we got this, let's go ahead and create a new image brush. I'm gonna come over here. I'm gonna find Red Skull three, and I'm going to repeat now. Look in the brush editor up top. I don't want any size variants on it, so I'm pretty good here. I'm gonna go ahead, though, when I am in a crank up the pixel size to about 1 60 And now if I've got my vector brush to allowed and I've got the red skull selected and I turned my color over to read. I should get Red Skull's perfect. All right, brush works. Problem solved. Problems stay unsolved. Now let's go ahead here. Select them all. Alina, ma. And now let's make this fog brush. So when we come into here, we're gonna come to our brush menu. I'm now going to create a textured intensity brush, and I'm going to look for fog. Stroke one. All right, Perfect. Now, when I create this brush, notice where it is. Here. I'm gonna go ahead and I'm to crank this bad boy up quite a bit because I want this brush to be pretty large when I use it. I don't want any size variants. I don't want any opacity variants, and I'm gonna go ahead and hit, OK, now, the easiest way to see this. Let's grab a rectangle, paint this bad boy black on the rectangle, right? And then let's grab this vector brush, and we'll bring this in with kind of like an off white ish. That's gonna be really cool. Kind of like a gray. Okay, cool. Now let's see. We got here. I really like that. I think that that is a really cool type fog effect now, if I wanted to do it is a stroke. Let's say you can come in here. We're in a crank down the opacity a little bit, or I should say the size. And now watch what happens when we use this as a stroke. You see the application into this Halloween type stuff that we're doing? You can get some really cool spirit effects using vector art if you set your brushes up correctly. All right, folks, I'd like to see how you made out there. Go ahead. Make sure that screenshot is down in the assignments area for this lesson. Love to see what you got. We're gonna take this seventh season brush set in the next lesson, and I'm gonna show you how to import these so that you can use them at home. All right. Folks will see in the next one good challenge.
16. Importing and exporting vector brushes : all right, gang will come back to affinity in the iPad. So before we get into a real first lessons here, I thought I take just a couple minutes to show you how to work with the file management. If you're working between, say, Dropbox and the iPad and the coursework. So this is not an art lesson. This is a purely functional lesson on how to get your resource is and how to open them in affinity designer going forward for the rest of the course. So what I've got here, I've got my desktop and I'm just gonna go ahead and pull up the course, as you would see it. So this is the course that you guys find yourself currently in. And now the interface along this route left hand side. Let's go ahead and grab the smiley face. All right, so we're in pretty good shape here with a smiley face. Now, this is a lesson that you guys would normally see. You've got all of your learning objectives underneath. And now I use Google drive to go through and link all of our materials and all of the assignments emissions. So this 1st 1 is how to get shore materials. Let's go ahead and pause that. Just go ahead, take your iPad pencil or your finger and click working files available. Now, this will take you to a folder. And you see that this has a dot k f design extension. Let's go ahead. Hit the three dots, and now you're gonna go ahead and you're gonna open this in affinity Designer. So it exports slide over to the left. It copied the designer, and away it goes. Now, you want to make sure that you if you're doing this, that designer is open to this page. If you're in the middle of a working document, it will tell you I can't move it over because you're already using designer. All right, so now let's go ahead and do that again. So I make sure affinity designers on that page come over here. Let's go ahead and grab the part two, right, cause that's got a different link. Come on, down this way. Let's pause that, and then we're gonna go ahead and click it. We'll go yet? Yeah. I don't need to see notifications. And then here, open in now. You could put it in Dropbox or you can go ahead. I just like to go right into designer with mine. And then once you're here, you can go to file and save a copy, and you go ahead and save it, and then it saves just like any other document. So that's how to go through and get all of those working files. Now, let's go ahead. And I'm gonna show you how to submit an image into one of the challenges, because you're gonna need to know to do that. All right, so we're coming back here. Let's go to the course, and we're to come down here where you're gonna go through and let's go ahead and build these cross cannons here. So we go to the cross cannon lesson. Now we come down here and you'll see that I've got the solution file that's linked. Now you're good to go there. But now you see, the assignment could be dropped here. Tap on that with a pencil or your finger, and this will bring you to the homework submission. Now, you see, we've got people that have already submitted homework. All you gotta do now hit the plus sign and then click the upload icon and then you can either browse or you can go to your photos and videos. So let's say there, I want to upload my finish logo. I can upload my affinity designer file if I wanted, or I can come here and I can upload from my photos area. So if I've got some things in Dropbox, I've got some things from Screenshots find wherever you put it And go ahead, hit, upload, All right. And that's really all there is to it. So now you know how to submit an assignment. So if you know how to grab your working files, you know how to submit assignment that's gonna get you started here in Affinity Designer, we're gonna have these kind of going through odds and ends here and there. I'll tell you that working with the iPad is extremely challenging. The easiest way I have found to communicate this with students is to use Google Drive in order to make that interface work. The second most used one is definitely dropbox. All right, so now you know how to take your working files out of the software and then place them into affinity designer from there. Now, let me show you how Dropbox works. We've got another lesson on Dropbox coming up. So if you're in the course and let's say that we want to download this cross cannon file, right, because it's a resource. You come over to the three dots and now we're gonna go ahead and we're gonna open in now. You saw it say, preparing to export. Now, this is tricky. Do not choose Dropbox. Keep swiping over to the left until you see a copy to Dropbox. Then from there you can choose a folder in Dropbox if you want, or you can just hit straight up save. So once you got that done, it done. She was a folder. Put that in affinity designer shoes and save. Replace that with the file. Yes, please. And away it goes. So that's how you do that. To get the resource is off the software and into your dropbox from Dropbox. You're pretty good with the finicky designer. All right, I know that's a little bit complicated. Unfortunately, iPad is anything but intuitive when it comes to working with file management, especially between Google and PC. Alright, folks, let's go and take the next step, get onto some actual art
17. Making a vector brush png from a physical image: All right, folks. And welcome back to affinity designer on the iPad's. We're gonna be talking about vector based brushes in this course, so let's go ahead and take the next step to make a brush. Go ahead and click the plus button here in Affinity Designer and let's open a new document . Now, when you make a brush click on the width and make it 2000 by 2000. Always make your brush Canvases square DP I really doesn't matter. You could set it to 72. Let's say keep the file size down a little bit. All right, so you got a square image now we're gonna go ahead and hit, OK? And what comes up is a square workspace. All right. Now the thing with brushes is you're gonna want to take a rectangle, and you're going to click and drag a rectangle out to your workspace. Notice my snapping is on snapping is that little magnet down in the lower left hand corner and now to change the color of my shape. Hey, look at that. I just showed you where shape to awas. Click on what is my gray circle up here in the studio and bring it to black. All right, now we need to get our image inside off this document. So to do that, we're gonna come up to the piece of paper in the upper left hand corner. You see, I'm tag going on it right now, and we're gonna go in, and we're going to place image now. You go a lot of different places here. We're gonna import from photos. I'm gonna go in from my Dropbox, and I'm going to click on this image. This image, by the way, is in your downloads for this lecture. And this is a collection of all sorts of different watercolors paints in acrylics that I used when I made a certain brush set. Now we have a lesson on how to get things from Dropbox into affinity. Designer, My advice to you. Affinity designer place so well with Dropbox, make yourself a free dropbox account. I personally hate apple products. I use the iPad on Lee for the art side. It's connectivity to everything else I think is garbage. I'm a big fan of the PC. I use the iPad only out of necessity. And so I live or die by Dropbox. Now, with this image, the first thing we're gonna do well and come to the crop tool. You see, I'm tapping on the vector crop tool, and I want to isolate just one pen stroke. So let's grab this pen stroke right here. All right, That isolates the pen stroke. Now click on your move, tool. All right, let's bring this up a little bit. All right? There's my pen stroke. Now what we want to do, we want to make the black stuff white in the white stuff black. Now, how are we going to do that? Let's look at our layers panel. You see, I have this photo as my primary layer. Well, what I want to do, I want to add an adjustment to it. So we're gonna come down to the adjustments panel. You see, I'm clicking on right here. It turned white, and we're gonna add what's called a levels adjustment. All right, now we now come up here and you'll see we've got a levels adjustment on that layer. You see the levels adjustment, click and drag. Make sure the blue line is in the middle. This is how you nest on the iPad. All right, Now, this levels adjustment is tied on Lee to this layer. So any adjustment I make to the level will only apply to that layer. Now, watch this with the levels adjustments elected. Come down to there and I'm a double tap now. How did they do that? Let's do this again. I was on the layer. I came down to the levels adjustment. Now look at the context toolbar. It's not moving. I'm double tapping on the level boom. That's how you bring up the context toolbar. Now I'm gonna crank up the whites crank of the blacks a little bit in this thing. All right, There we go. That looks pretty good. Now you want good contrast. Right. So make sure your white is it 100%. Make sure your black is up around here. That's really nice. Now, why did we do a levels adjustment? Your brush is going toe work on contrast. So if it's a shade of gray, you're gonna get really dull, muted colors when you use it. All right, so now we want to add another adjustment. Gonna come down to my adjustment tab, and I'm going to invert that. Where is my invert? Right there, bone. All right, Now you see what that just did that made the blacks white and the whites black. Now, you see that little holdover white? That's completely OK. I'm gonna show you how to fix that now. All right, So now how do we fix that? Well, what we can do, because it's still vector, right? We could still come over here, and we can corrupt it out. There we go. All right, So make sure now you've got this selected Come over here. And now you're going to export. All right, So this is now the export window. Select PNG. Do the selection with the background, and let's go entitle it. Let's call it delete brush one. Okay. All right. So preset PNG selection with background brush one. Let's go ahead and hit. OK, Now it's gonna ask you where you want to put it on the iPad. I like to put my stuff into the designer folder ad. All right. All right, folks. So that's a little bit about how to prep the image for a brush in Vector. And the next lesson were to show you how to make the vector brush. All right, we'll see the next one
18. Finishing the vector brush using the .png image : All right, folks. Welcome back to affinity designer. So we're now going to show you how to use the brush file that you created to make a vector brush here in affinity Designer, Let's go ahead and get started. We're gonna go ahead and we're gonna hit the plus button. Now, it doesn't matter what the document sizes. You're only going to use this document to test your brush. All right, let's go ahead and zip this thing down here again. Document size doesn't matter. And you're a pro at this by now, it's starting a new document. We're gonna show you how to work with brushes, so we're gonna come down to the brushes. And now let's go ahead and go to these 34 little dots here in the corner. Let's go ahead and add category. Now what Brush categories like collection of brushes. So we're gonna come down here and now click on it again and renamed the category. Let's call it Vector Inc. Because that's kind of what we're making here is Vector Inc style brushes. All right, looks pretty good. Now with the Vector Inc. Let's go ahead and create a new brush. Let's go ahead and create a textured intensity brush. It's going to click here now, what it's going to ask you to do, it's gonna ask you where you put that image file that you use the last time. So I'm gonna go to on my iPad in designer, and I'm gonna go ahead and I'm gonna find brush one. Okay, so now notice what just happened here. We've got that ink stroke that we used before, so that's awesome. And now it's got these little red lines where the red lines. Well, these air called the heads and tail lines. So if you click him into just, um, what happens in a vector, brushstroke is, it stretches the image. So what, it's gonna ask, it's gonna ask, What image part do you want me to stretch now? I like this tail piece here, so I don't want it to stretch the tail. I wanted to stretch in this body area, so you'll see when I use the term stretch and I use the term body. You can ask it to repeat the body section, or you can stretch the body section right now. We always wanted to just stretch it because we want to create kind of a pen. Look to it. You can set the width, so I like to work in a little bit larger stroke. So I'm going to say this thing is going to be 80 and to adjust. This just happened circle. And now I'm going to control via pressure. You can then controlled by velocity in verse velocity. You can set no controller, but because we're working an iPad and pressure is the thing that we can check with pencil, I'm gonna go ahead and I'm gonna controlled by pressure. Now notice you've got the head offset in the tail off set. These were the red lines that I was adjusting here. And when you're good with it, go ahead and hit. OK, All right. Now, let's check this out. Let's go ahead and select the brush. Go and select a color. Any color will do. I'm just gonna use a contrast in color. And now select your vector brush tool. Select the red. And now let's just pull this brush. That's a good look and brush their now let's go ahead and increase the size. All right, now, we could do a little bit more with it here. If you ever want to adjust it, come into the brush, click and hold and let's go ahead and edit. All right, now, we've got a good pressure curve on that. What I would say here, let's go ahead and crank this up. Let's go to a default of 100 and I want to kind of adjust this tip. Let's go ahead and drop the tail. All right? Now let's try it again. Yeah, that's a lot better. What I might do even let's go ahead and make one more adjustment. Click and hold. Go to edit. Let's go ahead and move this tail over here and we're just gonna free form the whole thing . Let's grab all of these. So I grab my move tool, and now you see the delete garbage can delete. All right, let's do it again. Vector brush up the size. Maybe 2 50 And now Oh, that's gonna be nice. That's a good, nice type of ink brush. All right, folks, that's a little bit on how to create a brush in affinity designer using the image that she made on the PNG. Remember, the PNG is key exporting it with the background is key and whatever is white on that P and G is what's going to show up in this brush.
 Jeremy Hazel, Education Through Creation