Transcripts
1. Promo of the course: Hello and welcome. And
it's going to tell me and I'll be your instructor
in this class. I'm 17 year and I am clearance over five years
in the field of 3D. This class targeting
the intermediate users of lender or beginners. So we will start by
making an wooden table in Blender using
some perspective if you image and also
then we will start another chapter how we can
make and used to be charger. And also we will
see how we can make an USB stick or USB flash drive. Also, we will finish this course by making a complete
headphones from scratch. You will need only the
blender storage is free. For free such as
a game or Krita. Or if you have access to job you can use
also for chip for making the 2D sticker or to
delete goes for the 3D model. I hope you enjoy this class and let's dive and talk
about the class project.
2. Modeling Wooden Children Table: Hello everyone, Welcome. So today is the lesson is very interesting and we will see how we can make this
wooden table blender. This is a table. As you
can see this screenshot. We will see how we can design. We will, of course, but we will focus on the wooden. Let's go ahead and start. We'll see that as
the limit inch. Let's get started. All right. I don't think it in a reference. I will save this. Let me
activate the screencast. We have a reference, so I will make a
reference for us. Or Coasean inches,
meters, not meters. So it will be 31.25. And probably rotation direction. In the x is 2121. Of course. You can activate
this neighboring points, a grid like this. This will be our guide. It will be moved to the reference. This one, it wouldn't
be so great. We can also select this one. This visibility or
viewport display layer. Let's go to the mixer. X will make a cube. I want to be around one inch to an inch to this direction. So scale Shift Z to scale shift. Let's go for item
and just scale. It will be 1.25. No fee. Bliss, center to center. And select middle x. And we can add some
beautiful pivoted. It will be on shift C, Blinn, scaled, x-axis. X-axis. Let me exit route. Is it x is going to fall. I'm going to This shift to the
silvered by selection, you will exit
through the x-axis. Let's move on to the x-axis. Exit route. It's similar. I will duplicate this one. Rotate 90 degrees and the middle Zoe and rotate 90 degrees. Transit axis like this opens x axis. Let's see what we have got here. X axis. X is close to the final chip. Cursor will scale down here. Move to be here. Indeed it is not or
exit through the x's. Alright. Let us think it's shifted axes. I will separate
this by selection. Finished modeling materials. There is some scores
we will use for your factory search for Bolt. Activities that we don't
need the reference anymore. Select this one and
do smart UV project. Add here, search for some wooden texture. I have cystic shirts and
deletes test to them. It's so on k. If
it's not enough, we can use to create all
four K. Control Shift. Select the texture.
Texture. For us. Let's see. I would
make something maybe in control. Control. And it's fine under
rotate around at 90 degrees. Shedding. Skin, maybe two. For this one would also smarter to v. It
will rotate 90 degrees. Smart T of V and
rotate 90 degrees. This is smart. Three degrees. Of course, here. Flu. The flu is correct. The Spirit also small. It goes as it is. Often this color ramp. Roughness using the shading will be showing you. This is what we want to undo, can use color saturation. The color, color RGB curve is what we want. Let's render this out. You can search for toys and
the milk we have from it. Something we want. This homework is to add
twist to the wooden table. And this one will be plastic. It will be cutoff 0.22. Let us some ships. I mean, background enough for this lesson in the next
and then next to this one, we will add a background. And during the outer scene.
3. Rendering the table: Alright, so in this video we're going to see
how we can render. This is the assembly procedure, is the same method that we
have used a lot of time. The three-point lighting
or a three-point lighting, we use K light and fill
light and a backlit. So let's start by
adding the floor. We will add Thursday the backdrop and scale
and exit two times Cellectis's birth control B. Let's upload a scale
control B and B like this. And scale. This is our bucket droplets move to the camera collection
connection at our main light. As a camera, the
light control up to 0 because this scene or
is reduct is into macro. So we can use 50
millimeter of course, or certified or angle. I will use 50. Looks fine. It's Troy certainty. If we use wide shot such as 22, It will be like this. So 70 looks fine. Shift on Zoe. All right. As you can see now,
we have having to enlightening only
the main light. I think we can use HDRI, right? So we have a and we must add some fill
light here to the shadow. So I will use Blinn and
the skill two times. For light. Light off to the camera
will be emission. Students to be quadratic. One. Let's terms for you. This will be blue
and this will be C, will be saturated like this. So this one would be ten inches
and it will be 100 light. Okay. I will decrease to three. And the area maybe move on here. And this one would be
your competitive audit. The light will be an HD
or this will be one. And this will be this. For the setting, we will
use denoise optics. And December will be
600 as a test render. And the performance style
size 200. Save underneath. And this is a rendered view. It's now rendering,
it's not completed. As I have seen here. This can be fixed it in the UV. But the overall shape is fine
with the homework for you is to add the toys. And you can go to this table
in a scene and introducing, I hope you like this tutorial. See you in semiconductors.
4. Modeling Usb flash drive: Hello everyone,
Welcome. Today we are going to store the new product and video are good to see
how we can make an UCB. Example is that we
are going to make, and I think it's a
very simple and clean, It's a good example
for us to model. We will start by making
quality one birth when you see B section and after that we
can duplicate it. Render product. So let's get started. In this video are going to model based on the
perspective view. So we will not load any
viewport or industry view. I have, I have hidden this collection
reference because we will design if you
have a front view, but we will be back to Susan
on the perspective view. I will start by Berlin. Berlin will be sizes
of two centimeter. I will go for units here
and it will be meter. Let's zoom me clear to loop cuts. It's already narrowed. Axis. To delete this word. Middle. Exist in the z-axis to five centimeter. Exit route. Selected. This one cos
of selected the scale. And this is going to mine. That's fine. Let us make loop. Will be selected both on the scale axis like this. Let us say I will select
all these faces here and selecting is used to
faces and exit route. Until distance may
be just distance. For now. We must add some
definition here. So let's select this. Three-fifths is scale one to nine. Let me add a
subdivision surface. Fibrous subliming surface
must activate the screencast. We should be like this. Let's do we want some definition exists? Let me go here. And also set flow goes through. If you haven't activities, you can drink Force Adam. Description of this video. But here we have H2B. I think we need
some sickness axis. This is z1 and z2. We have defined the shoot. I haven't told you before. I am vectors. All of this move and let me select and move and be selecting a vertex here
and move in z, the x-axis, scaled on the z-axis. Under assumption we have missed. Clipping will be hidden or disabled and now
it's inadequate. Alright. Let us check the normal orientation
is very clean. And I have noticed is
that It's curving. Top and the bottom.
Select this scale. What we're showing in CC dx, this is going to be fine. Let's discipline
similar to see some phase here. So I will disable. And clean. That's fine. Lets us move to the next part, which is the Chrome
or metal board. We can select edges or faces. Here. Duplicate, duplicate. Again, select all exit
through the x-axis. Around five centimeter. Ddd physis async call so
we can face or move here. It will not be shown before. A subdivision
surface is too much, so it will be one millimeter,
be two millimeter. See, one is enough. Let us check the reference. Then. We have to hold, click and
add a loop cut control, and the control loop to loop. That's fine. Do we have some shape here? Let's select these faces. Shift to dq. Selection of x's. Deselect all of this and select again. The Xs over probably exists. I think it will be higher. Also, this one will be
scaled axis 0 plus, so it's a little edge will be scaled because we don't
need it to be curved. Such as scale, does it do? Let's also shift is closer to elected. I will add an a cubed scale. Scale again. I'm describing. Let us bridge this to look
here and here. This view which is a tuple, will move towards this. Also we need some age shifted several exit route like this. 12 heads subdivision
surface of T2 and T3. Control V will be smooth and you can
hear this one. I'm going to just scale this. We are not enforced modelling. Let's see what is
the difference. After revising, I
think reference isn't. So we will move in x-axis
minus one to six millimeter. And this is also x is
minus 0.60 millimeter. Now, let's add the material. This one will be from here, will be meter Chrome, metallic. One. Base color will be great. As this one will be. Plastic. Elastic or less degree already exists and the roughness will be 1234 meter. We will add some bump. Let's go for sharing tab. And make sure that you have activities general
triangular and after. Normally, sturdiness,
texture, and Control Shift. Scale will be 100. Ccs object. Bump factor too. The normal, normal stress will be one. For roughness. Meter will be around
three. It's too much. Scale 150, but it's a starting point to the
roughness will be three. Also. We have shown
limited here. Also, meter. Meter will be black console. It will be scaled. More. Strings. We'll be going through some shiny element is Zoom. And add some signals here. Another material, which
is called shiny metal. It will be agree as
reference should be lower than 0.07 and assign like this. This is fine. Again, let's add this
metal shiny here. Here, here, here showing limited Control plus C. This also will be plastic block. We want it to be light. This corner. See and test. This is no done. Let's add the materials. Will be moved to the
design collection. Us at the floor. Scale is two centimeter. Let it make it 200. Floor will be moved
towards camera collection. Also in CIT online outliner. And after that we
will add camera. It will be macro shot, so 105 millimeter control 0 and ends of you
not cover to view. Let us make sure. Such as this one. Duplicate collection,
duplicate collection, duplicate collection, object. And move here. Select object, this move here. The select object and move here. And minus 90 increase. It will be like this smoothly to be here and
design on will be moved here. Plus CO2 we have, we can counter to be here and make it square.
For Instagram. We didn't have added it. We can use HDRI, but let's see if we
have added some light. Light. I think it's too big. Ten centimeter or
2020 centimeter. The floor. Let us make it
metallic. Roughness to be 0. Did it at somebody. So here is the field
oid, the film noir. It will be added scale rotation, field emission
streams to quadratic. One. Fellow it is blue. Let us see. Just
turns out to be six. And I will add one
to light here. To see the effect. To be here. This rim light is okay. But I will make it yellow, orange. This is roughness. Random. Sitting or even using circles. And the GPU render will be
500 symbols by architects. And let's render.
5. our results: Alright, so in the
previous lesson, we have seen in around 30 minute how we can
model this USB adapter. You can of course add
your logo or anything. But let's move on. As you can see, there is some
variations here. Very nice.
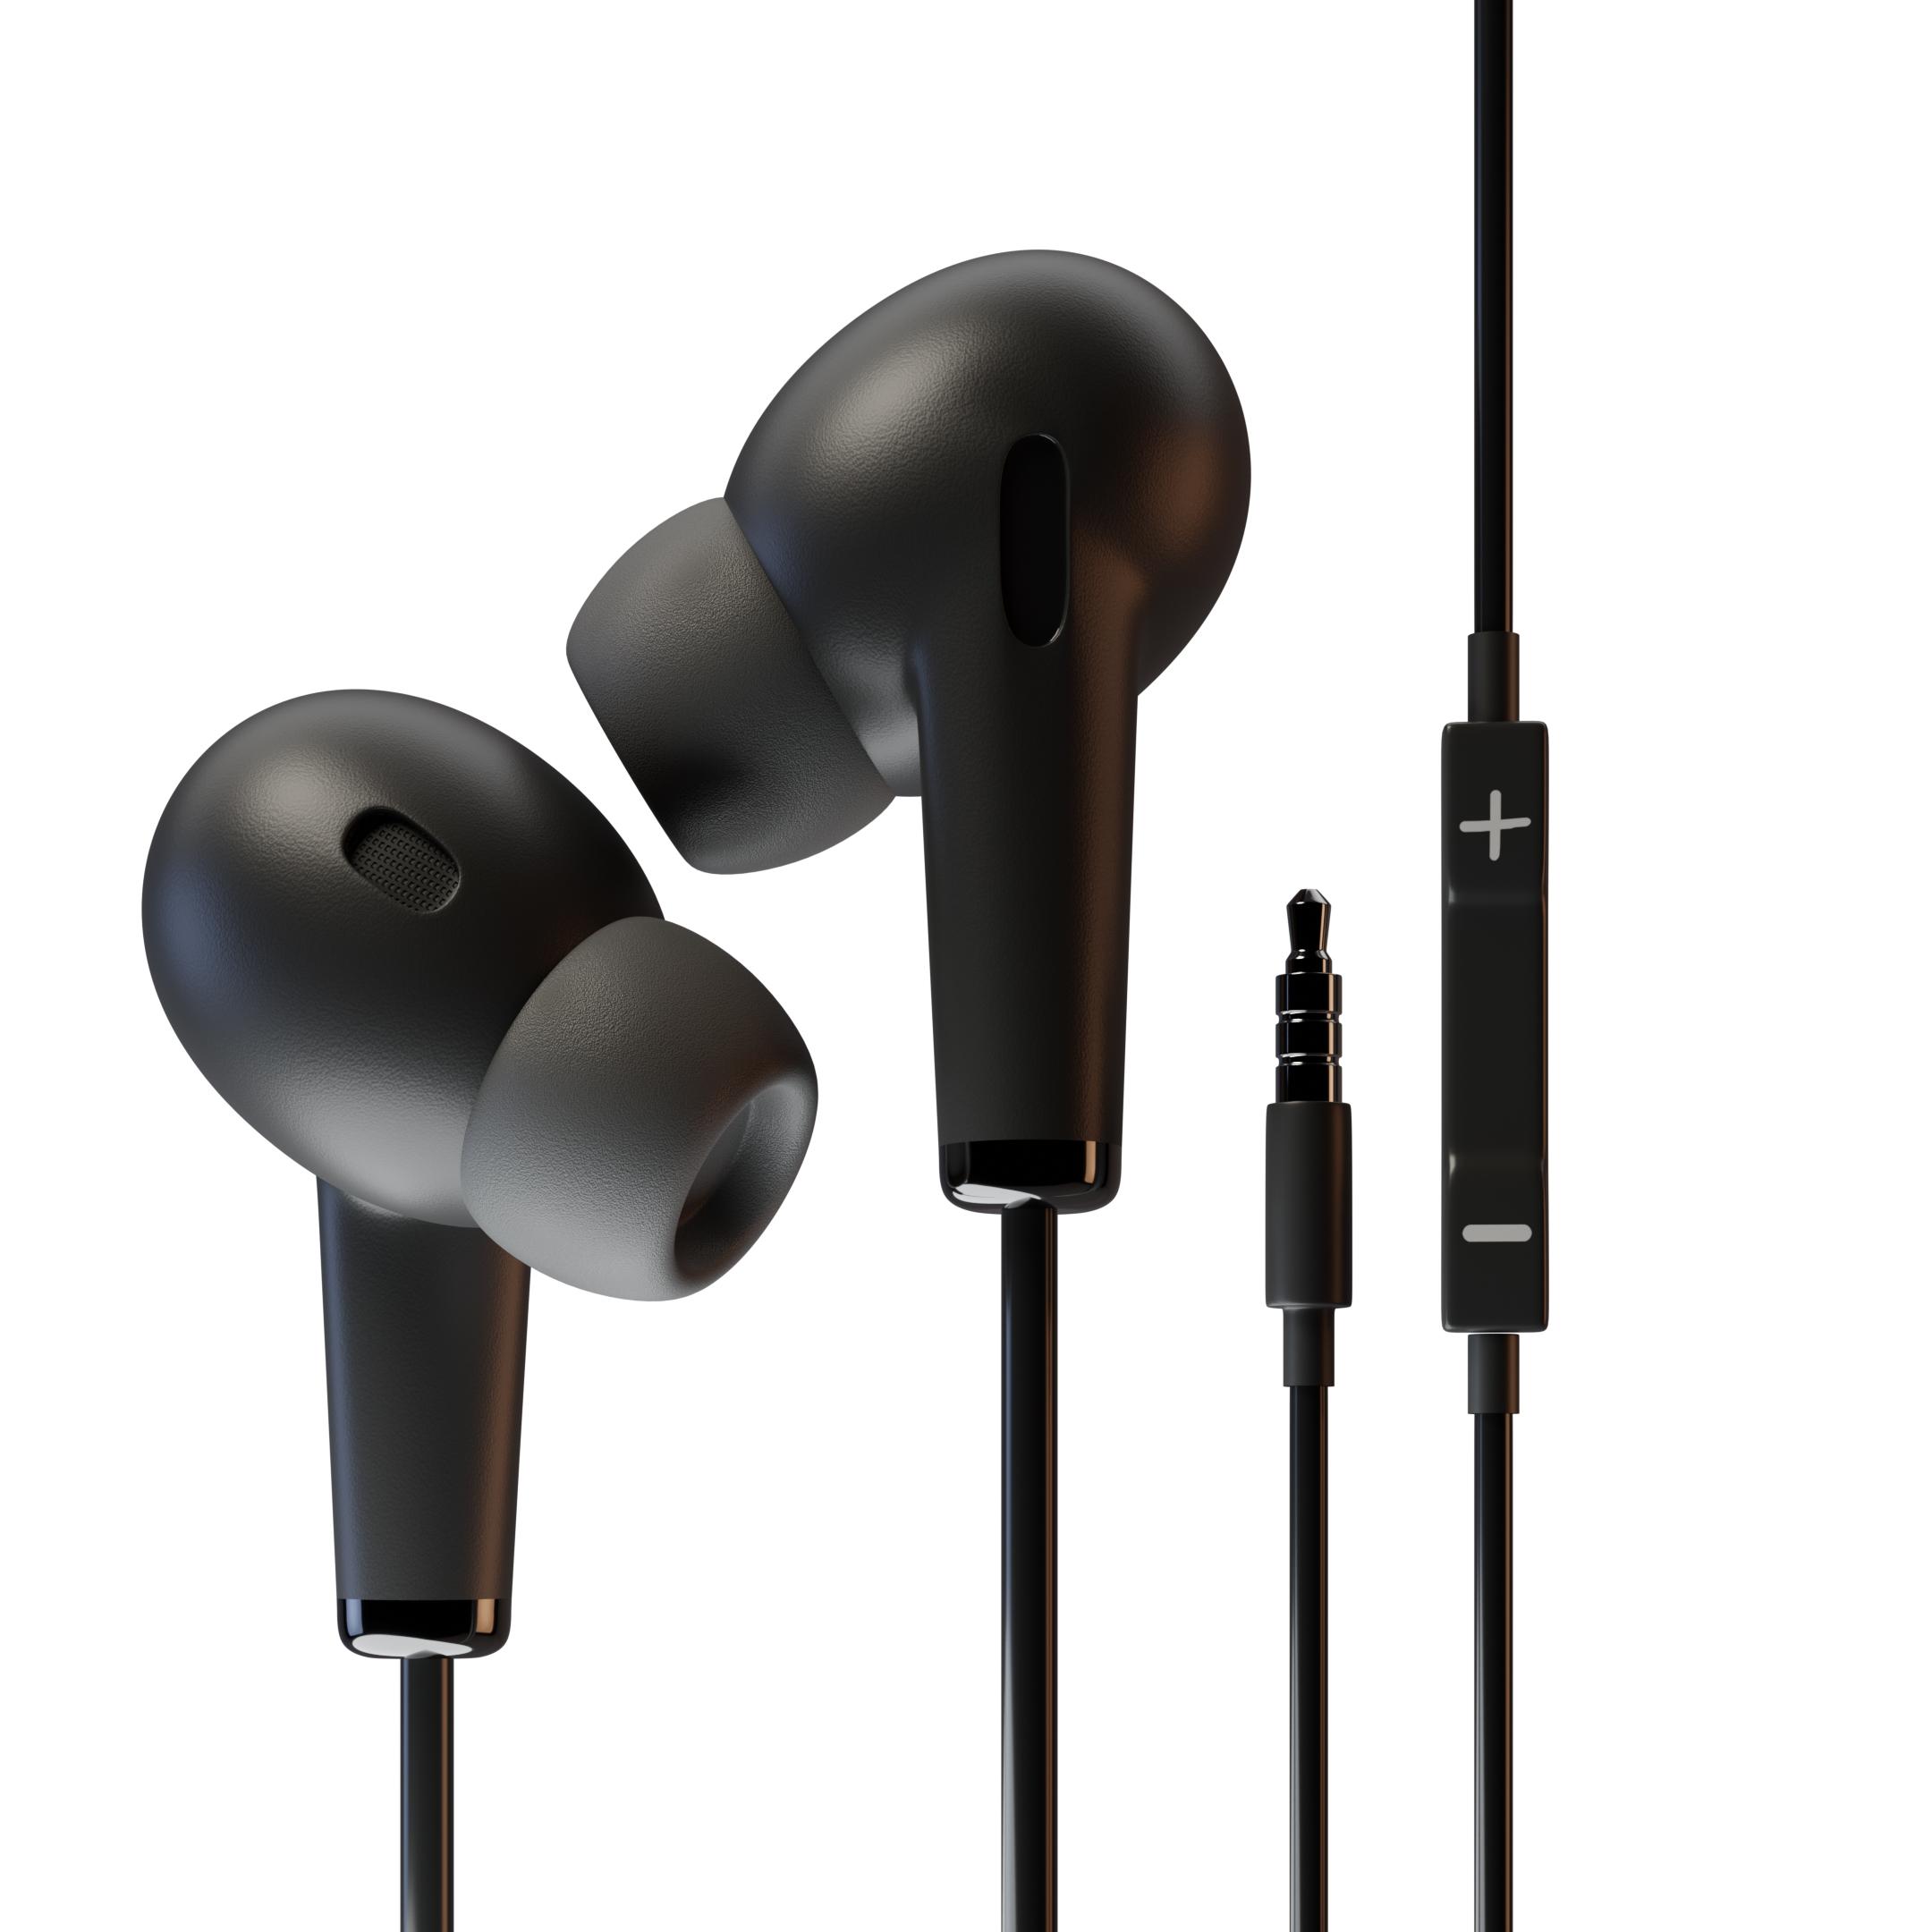
6. Modeling and design headphones from scratch: Alright, so in the previous
board to have seen how we can make an OCB and
do have a challenge. Today, we will go to see how we can make these headphones. We will see how we can make
is the same. We'll start. As you can see, this
is exactly look like then if one is lifted
but it's flipped or mirrored. We'll see how we
can make this grid. We can make this robot, this metal one, this metal part. And of course the cable. We have this view also. And we have this short. So let's get started. I
will open Blender three. You can use also
3.1. It's the same. Selecting this MVT and going to the reference or the image
is unselect our reference. I will select this one
and move into the ROI. We can work also up to scale. Because this is ten centimeter. Make sure that this is a dense. It's all just one. Will be ten centimeter. So electron semester,
much like this. Select All and move into z-axis. We don't need our guide. And let's look at this layer, which is the front. This is fine. We will start from
here by assembly, going into the circulation
and distort from a cylinder. Cylinder will be a
radius of point O 17121201 soul in the unit. So we will make a centimeter. 5.24 will be centimeter going three. But we want it to be shift to see selection to cursor and move. It will be smooth. And
adding subdivision surface. One to zoom in. Insert, insert,
and add some loop. Alright, so I will add an a
sphere here, 2416, let's see. 2014. A radius one
to two to one. And the scale,
scale, scale scale. And using this hybrid version, that version dating,
we can remove this. Shift this course to
lifted and just fear. The shift is selection
tool, cursor. Let's see, ought to
have or you don't move until it reaches this one. Right? Let's see what we have.
We have the grid, we have the ship. So how we can make it. We can select this part
maybe and control loss. This child struggling to make a clean lets us make it
not flatten like this. We, you don't need
it. This area. So let's select this
one and this circle, not flatten best-fit
influence to be here. Let us exit route
and z axes scales at 0 and x and z axes. Like this. Let us add the substance
surface to three levels. We are now. So this one will be
perfect circle flatten. And it's this one also the same. Let's see. Good morning tonight.
And exit through it. Ends is your axis of rotation and move. Alright. So we have made this board we want
to make is a grid. You will move it here
and move it to here. Let us look at another
loop cut to be here. And there's this will let us
scale the x axis to be 0. The scale and access
to scale X is 0. To move it. And the move and Zoe. Then we'll exit route. Right thing because
it's too much. Zhe and this is the front. This is a work will have
again here some grid. So this will be front, but ends up here in the back. We have should be here. So we can also
enables that living. So we can exit route, again, a loop cut here and here. Let's see what we have.
This looks amazing. We want to maintain the
curve to be the same. Solid Troy. So in this view,
select these edges. Move into exits. Hello, set for loop here. And sit here. To make. This also will be smooth
vertex this vertex and sit through this one also
smallest vertex and flu. Alright. For this
sort of our birth, we can start from n
circuit, from encircle. We will end at
cursor to be here. And encircle 24 is enough, or 20 scale down or scale
down until we match this one. Rotation will be here. In the Lockean normal,
maybe exit and exit to scale it. Sub division surface
to be smooth. Or right here. This green sea. Fix it through the scale
and the g and z axes. Alright, this is fine. I have made one. Before
continuing the material. The material is this one
would be a rubber rubber, gray and specular roughness going to S35. Else. Maybe 0.4. For this one it will be
plastic, plastic black. Here. It will be a value of 9.1.11. And the roughness wound 25. This will be assigned as metal. So it's a Chrome and we
will make it Chrome, metallic to B1, roughness
to be pulling to swing. This will be the cable material. Cable already look. But often this boon to one x and it is this. Alright. Let's see you. The material and Shift
shifted E one to nine. Because this is plastic. As usual, it's worth
for the shader editor. Noise, Add Noise, temperature,
control, T. Bombed. Factor to it. Normal to normal. Scale to be 202. Strings, 1215. Let's see, instantiating turbo, we have good looks of
the strands is too much. I'm going to 05. Rubber
also has the same. So it's Control C, Control V. But it
will be one to two, maybe normalised one-on-one. Moving to these faces. A sign. It's already glossy
black plastic, so it's just one
roughness, almost 0. And misconduct to be this color. Since he'll do have, alright, for grid, We will mean something. Let's see, reference. It will be black. So we can use normal
map image. Let's see. Texture will have some
textures already. With Voronoi. Grit Texture. Maybe that will scale to be 25. Or certainty. The screen size. So I have added
the texture here. And we can use the bump map to normal. But it's too much. If we add color to the light, I think it's too much. See here, it's too much. Let's see. We can invert. And so this is a grid. You can increase this slider
to adjust the normal. Does it? No, I'm going to go back to the layout and select all these
three vertices shifted, you duplicate, or 180 and move, rotate around the axis. Maybe minus 15. And it looks like
we have done this, but what we want to
make is a cable here. So I will duplicate. Let me select the top edge, which is here. And
duplicate, separate. Let's exit through it ends
at x is x and through the scale exit route again, and exit through a
scale a few times. For this metal bar, we can select this edge and duplicate, separate
voice selection. And let us continue it
extruding and z axes. Exit route, again,
scale and exit, exit route, scalable
and seven, etc. And exit through the scale, scale one to five. We have a three year or two. So Control B. And excretory scale shift, is it going to seven? Mine? So we have
murdering this board. It will be a chrome. Is this Chrome? So it will be Chrome. Metallic roughness going to 08. Let's add some arms through. And this one will be plastic. The plastic. This is a cable. And this wouldn't be here also. No. Different. As we don't want. This lubricate ends as it exits. And axes. Let me Blinn, scale that down here. Move to this area here. Again to see what to have. When you should move in. On the scale in x
one to nine maybe after sin for now. Alright. What is the warranty or the thickness is too much. So we will select the middle, this one, and move in the world. Maybe adding some sickness here. And select all from, view it and scale it. And let's export out. To be heads. From precinct on k is enough. I will go for a job and edit the headphone. I am
here in the tube. So I have this file, which we have
extroverted. This one. And this one here. Convert to Smart Object. I think it's white. So we will look for it. Control T, and it will be 70. This one also has the
same layer style after converted to a smart object. While you are doing business. Because to maintain the quality, I think it will be
lowered, will be 55. Let's except for this
one as being the GI. As B initially, go
back to a shading. And if we have seen this one is blessed stick or
a group elastic. So roughness will
be bound to three. Color will be such as this one. What alight? We have the image I took
a chore to be here. Next shader. Let's see, it was alpha, was all for sushi. Truly work. If we want
to add the signs, we can roughness, Blinn, specular, roughness blend tool. It can be metallic, but we
don't need it to trick. We can add also the bump
for the same query. So let's go to the sink. We don't meet it in the back.
It's only in the front. So only this one would have labeled would live with labor. This is one deleted. So this one will be
assigned here and the work now doesn't have any sign. Also, you will go for the UVA thing and
scale it down the window. And so here we will go for is the UV and select All and move and
z-axis until we reach. Use this one. For job, you will, can move it. All right. So I will go back to
the job and Control T. Make it 50. And Control T, Make It Stick is t. And support. Alright. Alright. You have a homework to add a bump
for solid cylinder. We are done. Let's render. This is a design. We don't think the reference
anymore or you had a blend with the
floor and camera. Move it to the
camera collection. Also. Select this edge and remove access. We want to square format. So I will go here and do 180. Select the camera and, and select the camera. And 90. Let's go and
you can go to view. What is the problem here. And I'm gonna go here
and shift and soy. See what we have. It's fine. It will
be completely white. Let's see if we have
a chilly or no. So first, this is the key light, the same three-point setup. And here we'll add an oblique
plane which is called the fill light emission quadratic. And for me before. So here an elastic,
it's more roughness. So we will go for the
roughness and to make it 0.4 is enough. This is fine. And this
is fill fill light. And lenses. Soon to be low. We want to, we can add, I'm going to dump this out too. And radius 0.1 minus one corner will be like this. Alright? So we want it to be transparent
so I will make it not visible or you
move it to the camera. And to make it not
visible in the render, The Transparent be energy film. And if we add and assembling
your interim 100s, of course, no problem. Let us save and render. As you can see,
this is our foil. We have is a grid and
it's transparent. This is very fine.
And as you can see, that towards the section
of making headphones, if you have any question,
don't trust it to tell me in the comments
of this course, and this is updated
version of this course. Any tuple t 2022. If you have any
questions, don't hesitate to let me know in the comments. I hope you enjoyed this lesson. See you in the next tutorial.
7. Modeling USB Charger: Alright, soldiers is
the first product and the first section
in this class. And today we have a challenge. We had a change for making an cable or uncharged
or for the iPhone, which is similar to this one, which you may find here. We will try to make this one, but it's still white.
As you can see. This is the charger tablet, but we will make the chariot
falls iPhone of modulus, which is charger, and you will make only a cheerleader
and is a table. So let's dive into the tutorial. I will open the blender. Here. We have the I
will open the file. This is a file
which I will open. And as you can see,
we have the widths. Maybe here is the width will be around eight centimeters
by eight centimeters. So let's give it a try. We will start in the design. This is a start file which
I'll open in every project. I have the reference which have this reference rebellious here. Any image I want to know. And I will stick in the design. So let's start with plane. And this plane will be around the brain because we
are working with small. So we will go to the scene in Zionists and working with
lends to be centimeter, be millimeters or
centimeters works fine. I will hit K, which we must go. And you will see the
screen cast gates. That's fine. You think, or you want to hear an
origin to be here? I think. That's fine. Let's rotate it 90 degrees and
move into four centimeter. And after that, it will
select all angles. Control Shift to be. And make some loops like this. Join all of this vertex. I will join, no, because this vertex
and this vertex, u in two here and two here. And I think after
joining this vertical, we are now done. As you can see this, we can
resist statistics from here. And as you can see,
it's the five soul. We must join this, join. This way. I will join, undo or no Don. I think we must add
some thickness. So exit route ends the
y-axis or Rowan minus two. Because it's, It's
the symmetrical. We can use the mirror modifier. And it should or canal. And exit through the
scale shift toy, p scale shift toy
going to mine, mine. And in the view, in my view, clearly
start here. Control B. Controlling be selected
also, this one, B. And after earning a
subdivision surface, we can have a look on this one. Let's add some details here, which is a USB Type C. Let's try solution here
which maybe work. And I will circle. The circle will be 220 for
x 90 degrees, 90 degrees. And this scale, scale, I will delete this half,
etcetera would end. This shift is set
origin to 3D cursor. And the scale. Move here. Scale. Or you wouldn't move. Look this one and move here. Exit through the x axis. The x axis, such as this. This will be the Boolean. So it's a Troy. A boolean. From this one. The difference under its height. So we have another option. I will move it to the trash. We can look here. And the three cuts in. Boy, enjoy. When did it sticks its hide? This one. I want to select the vertex
here and a vertex here and etc would enable
snapping, snap to vertex. And g x, x. Connect this one to this one, and exit through the x-axis. Fill. And it's here. And fill here. Again, what we have done, that one we must go up is it picks a toad in the x-axis. Again, except through it. X, x is the fill here. And this one we will
throw is a great field. And it's, it's, um, some look Katia. And that's it. I hope you like that have increased our organs. But it's has, has no end. It's perfect for now. Let's see what we have to make. No. So let's see. We can delete these faces and select this one. Exit through it, ends as it 123. Here, 32. We will connect
this one. This one. This is B. We can enable the
Southern surface for now. Shifted. I will add
loop cut here and Shift S cursor selected to
3D cursor, which is here. Let's delete B. We can delete all
of this vertice. And also all of these will be debited the Boolean or the mural, and see what we have here. So Dorian to 3D cursor and uploads the rotation. That's it. For now. We can think about to be here. Too much easier reference. So I will move it to be here. All right, that's fine.
Let's see what we have. Let's make the move. Cursor here, shift is
considered selected. Blame or X9, two
degrees scale exists. And you will exit
route in the x-axis. Because this control or control B, you will make it circle. And the delete. Select all
and exit 2D, like this. After that, surface to three. Here we will add loop
and another loop cut. It will be smooth. We may require it to
be like a carryover, so it will move in the x axis. And the scale down like this. That's it for now. So this one will be mirrored. And how we can render this. Before rendering, we must
add some Chrome here. So let's for now, I will
delete the William. So let's you will duplicate. And let's blow or convert. Could've voted to Mish
and origin to geometry, fix it through the scale and extrude x axes. Let's see what we have. We can delete all
the faces here if we have a subdivision surface. So it's not fit. As we learn, we will delete
the medial border of the clinic. What we have here. It's a no for unfold. It's connected to this one. And the connectivity smooth shift. And that's it. What does this vertex and
this ended access to it, even sickness. So it's deployed. And in the x. So all of these items, this will be the short jar. And this would be maybe seven. This is a Chrome or type C. This one will be
the chrome material. Will be basic color. And of course metallic. Roughness going to four. This will be plastic, quiet, clear white plastic. And y to be white. And the roughness going
to phi of B as this. And let's make it also Chrome or I want this to be the design. So let's select over
than to rotate in the x axis, 90 degrees. And move here. Again. We'll add a camera view. Here, the 90 degrees. And at anytime if you
want to add thickness, you can increase the thickness. You would like movies a camera to its own
collection camera. Right? So what we have now, we must add the ground is this will be black. Roughness will be 0 or one. Speaker will be one. It's immaterial or isolate. We have low tier will be four and this will
be filled with a gradient. Fill light. It will be emission. And the students will
be quadratic on three. And it seemed to have no, it shouldn't be
close, such as this. And because their
affliction, we will move. So here we have the camera, and here we have the tube
that's in the camera Grindr. And move it to be here. We must move it to be here. And shifted D is this one will be five. And as a color, would it be Here? Let's make an render
and threefold the samples is to
denoise optics. That's fine for now. Therefore, once you style to
56, underemployed enough. So in the next video, we'll see how we make the
cable for is its charge.
8. Class project: So as a cluster for this course is to model and
Bluetooth microphone. After watching all this lesson, you will have the ability
to model is a beauty. I will upload an image from the front and
side for the beauty. Then you can make your own, which is, which is very popular. So after making this render, just upload it in the class
bricked of discourse, then I will review and
give you my feedback. Thanks a lot. And let's dive
about and talk about next.
9. Wacom Workshop: modeling the tablet: Hello. Today we're going to start a
new chapter in our course. And today we're going to model a new product basically
based on reference, which we will see now on tablet, tablet maybe just maybe
take 30 minutes or an hour. I don't know, I haven't
modeled it before. So we have our startup scene which I will download
and upload for you. So basically we have designed
which we will model, and we have our reference. So let's see how
we can reference. So let's see how we can drag. So I will move it to make it flat because our
reference is flipped. Open. Our reference. Alright. I will open it to
the location, and that's it. So we can start from here. This will be the back. It may work. But let's see what the
difference here. No problem. We can start from z and
we have the out here. So I will move it here
and this direction and the look is this collection. After that I will start a
blend and make it mirrored. So I will start from
an oblique plane, and this plane will
be here and we have the lens around 30 centimeter. So we will scale it one-to-five, scale it around 123. Go here to our reference and match the reference
again to work with correct dimension
from the beginning. As you can see
here. That's fine. So we can, of course, also we can select I can remove
that excess such as this. And that's fine. Let's go also, don't
forget to make it lower. Or you will mirror. And after that. Or you move in this
axis, this one. And this x is the move
again in this axis. Mirror. I will select
this one and this one. And do Control Shift P and add plus one to three times. And here. So we can using his own life, using the knife and select
which of these anti join. And you will join here also. And we'll join. I think we don't want that. So you would join here. And using his own life, what I am going to mix
it because I went, I want to have clean
geometry from the beginning. I don't want to have
any quads or so. This is similar products
to enhance our skills. Also, I will select
it from here. Here. We can add a loop cut
here, here, here. And it's perfectly fine. It doesn't matter
because we will not have any detail here. But if you want to make it, so you can select
all and make active. And the scale in 00. And here also, you can select here scale and
that's fine for now. Let's go here. Let's
see what we have. We have make the bat, let's make the other,
which is a tube. So I will exit route. That's it. X is around 0.5 millimeter. So it's a rowing nine
millimeter ID number, so we will make it lower, such as this, maybe
seven millimeter. And after that, you can sit two small number. And we don't want that. So we can. Make it go in three. Whereas bone three. Solid problem. We
can know, Select, select this and don't select
this one and delete vertex. Or we can select all of these faces and delete
faces. After that. I will disable the
second delete faces. After that. Skill on x 0 here enable clipping
to move in the x axis. Here we are. So we can
select all of these faces. And you will exit through the z location
around two millimeter. I think let's see the
reference to check with reference to see what
is the dimensions. I think it's small. One millimeter may be. So Zhe Xie going to O1. And I will select this and
move in z, such as here. And and after that, I will add a subdivision surface to the three and
the smooth shading. Let's check. Now, we are done for that. Let's see what we have.
We have n detail here. So we have detail here. From here, I will add look at what we've got here
and the skill in 0. Record here. And I will add a
loop cut here, maybe three. And select any vertex, such as this one. Go ahead, which is
an circle of ten. I mean IT. And the scale, scale. Scale. So let's just scale again and move our items. So soil selected this one on the move here. Because of this. Or
you will move here. And this one will be moved here. Scale envoy an x. So we can now select all of
these faces and exit through it minus two millimeter. So before that, I will
make an incident. And exit route. X
is R1 minus R2. I will move that
such as this one. Or we can exit routes in zone C or reference. So what is the error here? I think we can make a look
up here on the scale 0. So we want to. Maybe to be refectory circle. So I will select K or go ahead. That's fine for now. And we will make the
buttons. It's very simple. We have four buttons, but I think we can
scale that annoy axis, or rover's at first. And the scale of one
to one. Let's see. Maybe moving in the x axis here. Here. And this will
be the button. First of all, shifted
you in the x. And separate by selection. Let's see if there
is any duplicate that or you will activate
the screencast case. And I will exit route
is three millimeter. Here also, I will make duplication and etc, would be 0.03. Let's move on here. And this one will be
defined such as this. And let me add another level
of detail here. Again. You can tell me, and I will select this one
because we have to be careful. So select smooth and connected and they move
in z axis of second, it will be such as this dimension minus 0.0015. That's fine. Again,
do the same here. G is minus one to one for you. That's fine. Fine, fine, fine. This is the welcome. Of course, we should
valuable, which is here. Or you will move the cursor and add a blend scale one
to one, scale again. The scale and the
x-axis, such as this. Disabled. Here is evolution eating and delete some
move to its location. After that. We'll look at
here and select this edge and move shift S-curves selected
set origin to 3D cursor. Let's see if we add a mirror and ends as it will
be such as this. Or you will move. Again. It will be here. It's now time to add sub unit surface to maybe smooth. And after that, it will be two. After that, solidify. Solidified. Maybe four. Let's increase. This is dimension. And I will divide by two. Another subdivision surface. So here are our modern, I think we have done
some modelling. So that's it for now. That's fine. So we have finished the modern ones
selling goods to make. I will make is here. We have here. Let's see. We have an hold
here for charger. So we can select this face and this
scale in the scale in the x's or inset scale in x. Let's continue. I will kill an X
and X intrusion. In this dimension,
maybe four or five, which is five millimeter
in y minus 1205. And that's it. Shift E point it, control plus shift to it. And that's it. Let's check if there
is any duplication. There was four. And that's, it ends up. In the next video.
We'll add material and render our model.
10. Wacom - Modeling the pen: All right, Hello, Welcome. So today we're going to this, which is from welcome. Basically, you can attract
another reference. So I will hide this reference
and use as a reference. Or you will add a reference. So here I will add
an image reference. What about the
background, this bin? And I will scale, scale, scale again, so that
we have this bin. It will be moved in the
reference collection. And after that, I will
start from n cylinder. What may be circled Here? Let's see what numbers we
have here, an orientation. So maybe start from 2020
will define for now. So it's very simple. I will start from 2020 or 24. Maybe 24. And the radius went on
and rotate over here. And move here. Scale that one. Let us exit route. And the white. And extra time. Again. Another term in scale, and exit route and OIE. And the scale. And extra true scale
of one to 97 maybe extrude in y scale
of one to two. And x through the scale when it and exit route in
oil such as this. And shifted you
and extrude envoy. Extrude and ROI. So we have there
been no let us make this detail To continue on the record here.
And let's see. So we have two
here and two here. So, so, so I think we need three or four, okay, we will work from four. But firstly, you select
it just two edges. And the scale and 1.051.04. And select this edge and
the skill and 112107, or eight or seven. And select all of these
faces. And delete us. Let's select these
edges on disk Illinois and extrude minus 0 to c. Okay? Okay, We will, this one shifted the separate by selection and we will exit
route in this direction. And what we have here. So we have an loop cut here. And another loop cut here. This loop cut will be scaled. And y two. We have another loop cut here, Control B, only one segment. So what we have now, so what we have, we should now see seven. Alright? So I will select all the
faces and the two base cases. And which will be here. And the move in the y direction. And select the faces. Are you select box,
select these faces. Let me select these
faces and extrude. And z minus 102 g and z
minus two millimeter. And five, we will, because we are working
with small dimension. So from meters, I will change the insulin
to be millimeter. After that, we select These two items and duplicate
similar to another item. And we will exit
route such as disease and some division surface 34. We need some loop cuts
here to define our ship. Later we will add the logo. We need, of course,
one loop cut here, and another loop cut here. Let's see, after reading
good solar surface 34, we should have this shape. Here. We have this tube detail that I didn't go to cut here and another loop
cut here. Smooth. And we have no will, will be smooth. And this one also will be at 34 E f. So is that we have our mean. Of course, we would
add the details here. So exit route, annoy
and the scale. Scale. So through the scale. And we have an detailed here. So I'll scale and the
exit route to this though you mentioned. That's fine. We have no Orban and skill
Illinois 0 and the slide. That's fine. Well, that's fine. We have no That's cool. Okay. We have no chance
to add detail here. Some detail here. We have no French
modelling section. In the next video, we will
see how we can add materials. It's very simple
just to ballistic. And two material zone, which is glossy and one
which is highly afflicted. And we will see
how we can render that in an awesome team.
11. adding base materials: Alright, so we
will continue with this workshop and today we're
going to add materials. But we have here in
detail which we have added in the previous section. So I will save this file
and another version. After that. I will select this bottom faces. Selected this bottom faces. And after that, I
will answer it. Good to see. So every
select all of the items. I have, select all of that. And after that, I will insert. Let's see, That's fine. And move it. And after that artistic, this cursor or this
point, I mean cylinder. Or maybe the sphere. Let's say it will be 1220. And the scale point to one. The scale tool. And you will delete, use, Select All and
the scale and when T2. And this time, it
will be moved here. Maybe scale and exit route in this case. So what we have here, middle is that based
on this this body, solid CC, it's fine. But just don't. So we can enjoy the move. And Neu, again, such as this one. I will upload the mirror as we can duplicate,
alter the NOI. That's fine. So we have
finished this a modelling. After that, Let's
add some material. Basically you have
an glossy here. So it will be black, glossy. I'll select from here the black and the roughness
will be going to 05. And it will look metallic. That's it. It's a
plastic, of course. Plastic around one wins seven. Let's teach exempt or non-exempt for a fraction
of the plastic 1.46. And do have two materials. So it's another material will be listed in the
reference material will be so other material
will be met. Okay, So let's add
another material. Let's take, of course, it will be black, but you mean it will be
black, of course. Roughness going to two. It will be on all of these areas here. And assign. And I will
go to the shading tab. And we will know some detail. So we will add, of course. And let's add alloys, temperature control T. It will be based on
object and scale. It to 200. Let's see the reference. As you can see
here. It's too low. So let's see if you have
signals are generated. You will choose the object for now and just kill five hundred, six hundred on Susan until it factor. To determine the factor to it, It's too high. The distance will be one to two and students will be 0.05. And the roughness will
be going to four. Okay. Here is the other glossy. It will be To see it will be a great roughness going on. And saying This will be glossy. But was most and color ramp and the bump normal to normal. And factor two. So I have decreased the bump and it hadn't
created a scale here. And this one also will
be a modal async. So we have now the
materials for that one. Let's see what we have nicotine. We have here. We have that velocity except
revise our reference. So we have glossy
except the buttons. This will be met. This one will be glossy. And you select this one. And this is met, and this one will be. So you select all
of these phases. Select all of these pieces. Another layer and glossy. Assign this one on the sign. And let's, this one will be bad. But it's fine. This bird will not have roughness of 0.22, will turn maybe one to two. And it will have a bump, bump. Noise. Control T. And let's see over noise. It will be skilled in one
to two to maybe three. The square root of two hundred four hundred color. Normal to normal city or to have later. Okay. What about the color? The color will be I
think it will be great. Will be gray such as this. So now we have finished, I think that's it. Just decrease the students. Maybe going to two. And if you'd like, you can increase
the scale. Does it? So in the next video, we'll see how we can add
a logo and other things. Maybe a decreasing this
value, such as this. And I hope you like this
video students next tutorial.
12. adding logos and text in photoshop uv unwrap: Alright, so today we're going to continue what we have
left in the previous part. And today we're
going to see how we can add the materials and how we can UV unwrapped and
on other thing is here. So basically, I will
select this part. So let's go again. Let's return back
to UV unwrapped. We must have clean
geometry and let's see. So now it's the time to
apply the mirror modifier. Let's save this in another file and to
continue what we have left. Mirror. Let's test if we have the Smart TV project
to see what we have. So basically, we have this tube and just
work, That's work. So I will select again the smart UV and
demi B is a margin. Maybe buoyant. It went, it, let's
say it will be 0.04. And I will, I will
not use any of these. So I will select all, select or select
all, and select. We will not use any of these. So a scale between
T2 and move here. Let's move here first. And this one will be
rotated 90 degrees, and it will be the back. And this one will be the top. To move NY, control
Ellis, scale. And move like this, is this one. Let's move here. We will need to use this select or select all and to
villi in here u, v. And this one will be u, v. So we may say it will
be 2 thousand Y2. Let's go back 20481235
or UVs and export. After a few seconds
on your machine, it will be, it will be exported. So let's see what we have next. We will again open
Photoshop, right? So I have opened
this in Photoshop and I will say it will be this and
this is the background. So let's add it to be white. And we'll add some
point is here. This is will be mostly be black. Let us it will be great. Maybe agree. And we will add here, we will add warranties. So let us buoyant. I will revise. We
have encircle here. We have around us,
make it small. 70 maybe. So I will duplicate it 14
times 1234567891011121314. And the final one
will be moved here. And select all and make them
distance such as this group. I will duplicate a duplicate
this group on time. Let us move this group. Again. This group will be moved the top. And I will duplicate this group. Duplicate another time. Duplicate another time. And the duplicate, these
layers. We have ten. Let us select the move here, such as this, and select
all the mic distance equal. Maybe higher. Select all distance equal. This is circles. So we will explore this, but we have in the back side, I think we have an
welcome in tears. So lets us make the work. So I will type here
using that gray. It will be, you
may be using fonts or tea. After that. It will be this one. This is fine. And I will use the welcome
logo. The logo here. Then I will move to
UV. And it's large. Let us make it convert
it to smart object and using this to V2. And enter. Let us again scale it
down, maybe it seven. And it will be here. And this one would be large. Maybe selecting booths. It will make a change. So I would make the logo. It will be this one. It will be green or green. Or maybe it will be,
have an agreement. Let's check this color. A lighter green. This one. This one is fine. And after that, I will change
the color for this one, not two, but that's fine for us. And I will move and
exported this as B energy. So as we energy. So let's return to work. For this one. I will choose. Let's see, we have that, but we have the bed
and the black glossy. So firstly, we will
change the shader editor and mix shader. Image. Ticket chores, the logo. We have it in the
temperatures are the same queue of
years. We have local. And that's it. Let's
see what we have now. Let's wait for shading
to be activated. So we have now our
material added, 33. I have to go in the shader
editor and edit mix shader, instable and logo connect
principle with mixed shader. And the logo will be alpha. And this is the one we have. And also this one
will be fabric. And we will add image texture. And afterwards it. Or write for fabric, I will go to the shader editor. Select this one and
control shift T. If make sure that you have
the new triangular enable. You go to Add-ons and search for Node Wrangler and then make sure you have this one is enabled. A check to such as this
control shift T and go to fabric textures and setup. We will make some adjustments. So we will leave it
for now for one. But we will add color management here and
maybe bright contrast, or RGB curve is a statistic. The RGB curve is,
let's go for shading. This one will be local. And let's see. This one will be the other. Sink. So select all
and go for u, v. Here. This one will be uv
and rotate 90 degrees. Maybe. We want to
scale that one. Let's see two. Maybe 11254. No, it will be dark. Dark. It will be dark, such as this. And after that, we will
add, welcome to go. So let's see, C
is overcome logo. So we will add in for trope, will start a new file. New file. Let us make it one
thousand, one thousand. And after that, I will
move it to be here. And after that, you will make
it convert to smart object. It will be covered
overlay, Color, Overlay. Here, it will be white. You can choose any color, but I will choose
white as reference and control T,
rotate 90 degrees. And let us scale 1020, such as this. And it will be here.
And you will please tear and move it to be welcome tickets as being
G. Let's save this one. So after that, after that, or you will go to layout
and choose this fabric. In here in the hybrid
mix shader. Not mix. Mix shader will be here
and duplicate that one. This one will be here. And image connected
this to be here. U, v is this. Welcome, alpha two here. So let's see. So let's see what we have. We should have this on. So let's wait for it to
be finished. We may. So let's see here. So we will go for u, v, and let's go here for material and move it in
x axis, such as this. Welcome. So maybe
control MY control MX. Rotate 9000 degrees again. And that's it. For now. Maybe scale the move in
the x axis such as this. And that's it. So I will leave you for also how you can add bump or normal map for this material. And if you don't have
an answer or find it, you can send me a message or live in the discussion
tab, even commit. So we have now finished
design material. Let's see how we
can render that.
13. Wacom - Render: That's it. So how we can make the render, It's very simply will add here. Let's select all move in
the z axis, such as this. I will add floor plan. As usual scale maybe to time. This one will be due camera. Here, it will be lower. For now. Mic wouldn't. It will be good. Maybe. Let's add our camera
here or you will to Camera Control Alt 0
and you will be macro. So we have at the
camera of course, and I will make the
focal lens maybe 90. And that's it. We
would add light, of course, let's add one light. Here. We'll add an
relate. To be here. This one would be 1 thousand. And move the two we cover. This size. I will leave it to one meter. So let's just, for now. It's too bright. Make it 1200. Let us make it 5480. Pandemic English. And of course, we will add here is filled as Blaine. And this billion will be scaled. And this one will be called affiliate or you will move
to the criminal conviction. Let us make it emission. And students will be
called quadratic. Smooth will be one, and this term will be five. So if we choose such as this one, alright. Let's see. This
one will be okay. So good. So good. No problem. We can make it three and maybe
adding an H either. But first, let's see. If we have the tier and blend. This one will be light
emission five and just color. And I scaled this one, scale of one to one. D here. Doesn't have any effect. It. So let's move here
and see its effect. This one will be, okay. Let's make it white. Of course we have multiple
variations. Are you? Oftentimes will be
white and time will be metallic, such as this. One time. So let's
make it white. And for the render, I will use optics 600. The performance will be on. Alright, so this is our
final image, finer render. As you can see, we have made this from scratch
and it's very fun. I hope you liked this tutorial. So ASU and then it just updates you and then
you can still listen. We will move to another
product and this will, this will increase
your productivity and increase your modelling skills. So thanks for watching
this course. Chapter.
14. Sony Headphone: Modeling Top part: Hello, Welcome. So today you had a chance to make this
Sony headphones. It's NOR lists and
Mike, of course. And we will make it from
scratch based on Blender. As I have mentioned before, is the result of
softwares for today. And we will not be
stuck for this concept. We can change temperature
or material or anything, or position of the buttons. So this is front. This is irrespective,
would make this short. And this is so let's prepare our reference photos
in the future. So I have downloaded this image from the Internet and I would crop image group. And after it, I will
save it as a front. And let's save. Then I will open a blender to reference. You
have to miss it. Firstly, you can drag
and drop the image. You can add an empty image. Surfers that. Firstly, I
will load my screencast. And after that,
Let's load an image. It will be in the front. And this image will be front. We have forget to remove
our white background. I will go back to Adobe job. And after that, Let's
select the Magic Wand Tool. Select the white. You can go for. Select, Modify, Expand the tube. Excel. Let's go for two. We will drift. Let's save again front
VNG as B energy. And that's it. Let's open front. This way. If we increase the
two-week set to two and maybe three or five, it will be removed, but it will not
affect our workflow. This front will be moved here. After hazard lead to go back to the side
there as a reference. Or we can duplicate this one and rotate z 90 degrees is in open. This will be called the right to view and front view.
Front reference. Just for the red, I will replace for our
image which is here. Let's ends x-axis, but
I will add an acute. And this group will
be such as this. And do we need to match? Alright, this is
for, just for us. Let's come back to this view. Okay, it's perfect. I mentioned, let's delete. And of course, in the center is, and I will make it in the
center and also this axis. So it's worked perfectly. We can now add selection
filter and de-select. So you can't select them. And you can start either
viewer in design. So this design, I think it's
symmetrical. On the x axis. Everything is symmetrical
except somebody. So we will make the same design. Exactly. In the right, will be
the same in the left. But we will make
some changes later. For some details. For here we will add, we can start from and circle. This circle will be
around, let's say 24. Rotate around the x
axis, rotate 90 degrees. All right. We need something. We need this to
be in the center. Alright, I will
make Sabbath going to be in the cursor,
such as this. And this is Z. Let's move. Alright, and I will
delete this bottom bar. And here we are. We want to just want
to be the center. So sitter into the 3D cursor. And this one will
be scheduled on x. And let's exit. So that's it. Let's
add another extrusion. I will make the
cursor to be here. Or we can go to bounding
box and select all etc. Scale such as this cursor here. Again, two to be the cursor
and the scale, such as this. And as I mentioned, we will use the mirror to delete this bar and use only one side. So I'm using the right view. Or I will model on your own, but the other will be
reflected by using. So we had a plane and let's move into the forefront. Let us me 0.64, right? I will decrease the opacity. I think we'll be fine for now. Again. Let us select all and in all, such as this. And move in summary. Again. Alright, so I have the video
on YouTube for this joint. And this joint has
some separation. But is this one will be surveyed and this part
will not so well. So let's now select our circle. And the code here. I will select the move here. This one also will be moved. We have some awesome, I don't watch it flow. It can distribute our curve. And here also we can
distribute our curve. This is completely free. Search for it to flow. And you will, after installed,
you'll get to Freud, which is very small and search for flu and you
just activate it. This is edited by being soda. And we can move
some vertex here. And you will select, let me select this one until it fills. All right, no problem. We can fear or a field like who can
dissolve and another H, such as this one. Right? Let me some loops. And I will add a subdivision
surface loop cut and then Control B, the joint. Now, you will select this edge, go Phrygian mode control B. And this is for the slimming. We will click E, right-click and Altis to shrink. This will be, this will be up and this will be
done to this area. And we are done for now. Then we can deselect this above and move this
one to be here. Let's try. So we want
to move in this side. So I will select this local. Let's try it. Normally work for you. And I will define such as this. Let's see. So let's go again for the edit
mode and select the move. Here. Here we are. We are now, but for the spot. So in the next video, we'll make a competitor
handled overhead. And after that we
will make as men. But which is this one, which is lysine, is
a headphone itself, which is over here. So let's continue
in the next video.
15. Sony Headphones : Modeling basic over ear: Alright, so let's continue
our watering apart. And this is second video in
our string close circuit. Let's try making encircle
either choose 50. Let me skip this. Just to mention, it's
not real dimensions. Later, if we want
to make it perfect, we will make some model. And after it we can scale later when we finish all births. Is it can be useful trick. So I will choose the Move
tool and move it like that. And let's scale that one. And exit route and y axis. Let's make another
loop cut here. Alright. We have
some synchronic, so let's redo that. We will exit route this direction to make
another loop cut. Okay? And this is a right view. We can move to here. As you have seen here, is a scale isn't correct, so we will not follow
the scale here. Let's see. I think is
zoomed in and not correct. We will follow the front. Let's continue. I will
exit route again. We can select this edge and move here to add another edge. And after the Extrude, click the Move NOI. Skill level. Scale. Scale is Enfield. So let's see this front view. And that's fine. Let us select or we can
using is a C tool for circle route to
delete these faces and sees front of you. We need to extend. Or you will select. Is that selection. Make geometry until the wound to be here. Just to mention we are using the native tools from blender. Maybe there's some other
ones in the market and said, Can Save sort of time. But we can no longer normal. And let's see. We
can exit through it. And let me select this edge. Enjoy. Let's see if we
have some normal, right? This is where we connect. And I sink. We need to fill this fizz. And also this one. Here we count. We can see that we have
12345678, so we need it. Now. Let me reconnect to this one. To see you have it
another eight here. I'm using a fill. Let's find also here
one. We can feel. That's fine. And to be clear, we must look for with a loop. Here. I will select a face and the scale don't
scale of one to nine. And the move towards
this direction, slightly, not too much. And of course, let's
exit through the scale. Scale and marriage. We can now add a subdivision 24. And don't forget to just moose. And we should, of
course, Chronic. Right? It's time to go into this. We have statistics
14 minus four, so we will need to attend. If we count, I have removed this number and this
number and two from here. So I think we need to, we will see, Let's see exactly when we have often. And I will fail this one. Tin. And it's in this direction. We can use the grid
listed twice a grid. It has done it correctly. Right? What if we
have a look at here? Look Katia, not forget to
add some definition here. So you will know
the bar to here. So we have made this part, and we can now stop here. And let's start in
the next video. I will continue
making, which is here.
16. Sony Headphones : Modeling the over head: Alright, so this
is the third video and discontinuous we have
lived in. The brief is marked. As you can see here,
we have some faces and I will remove
to make it clean. So I will remove this face and after that lists the middle. For now, feel free
to connect it. This part as you'd like. But I will make
some loop cut here. And after that, we can connect the bottom, which we have selected now. Alright. So I sync service is to manually
connect to them. But it will not be connected, but it will be adjusted. So let's move this phase in
its axis, which is normal. So let's move like this. And this edge will be moved him. This is fine for now. Let's select this face and move this one in this direction. Alright. I will select
this edge and duplicate, right-click Separate
by selection. And after that, it just
gives literally Boynton online and exit through
this direction. It looks at root
until I might cheer. Let's add some edge. And at B will be
slightly smaller. And I will delete, select all unsavory
values parties. This one will be our main
exit through the scale. After that exit through the scale. The same thing. It will be on here. Exit
row scale of one to nine, excuse, good wound line. And after that, you can feel it. But for this part, it's first to scale
down and exit through the scale burn it
and exit route area. Right? You have now done the most remote this later
of course we will mirror. Let's see. It must be sculpted, but let's see if we can do
that without sculpting. We can add look quite clear. And it will be scaled Altis. And this one. And this one. Let's see, was smooth vertex. And we want to make some room. Is alright. Photos, but we want to the
center to be in the Swiss. So I will make origin to 3D
cursor and the scale down. Let's see if we can
move into local axes. Right? I will add loop cut here. So what do you think? I think you will have made this? I will save another
version of loi, one subdivision. Let's see. Alright, I will
select these faces. Let's start Select deselect. And we will, we must select edges and select
Checker Deselect. That doesn't work. So if we select, Okay, select this one
and select your code. Does it look? Let's try again. Select, de-select. And I'm probably, I will select shackled silicon. And after that, I will add
just to assign another group. And here also select shocker
D, select and assign. Also here, select, Checker,
Deselect and assign. So if we select it as it just doesn't work, let us select this one. Loop. Yes, this, this
is what we need. I will select here, select and deselect. Again. We need to select one by one. Let's select the minority as the frozen soil, select all ranges and to come back after
watching the video. So after selecting the edges, I have clicked the
Altis. And that's it. We have this effect. If you want to make it perfect, you can go for this card. And it is as old as you'd
like after material, we can do that. So here we will use the bump. And if you want to
add more detail, you can use the same suit here. Just select Chicago, de-select. I have selected the edges. Let's try using glucose. And let's scale shift toy. Or using alt is likely a little rule as
a tale boy called node. And let's, as you
will, an MVT here. This one will be called
to select this one. And again tomorrow for this board object tool. Finally this part. And just
do it for this lesson. I think we are 90% of
the Sony headphones. So in the next video, we'll see how we
can finally tens and I think it's
too sick from here. So we'll fix this part
also and materials. And then a customer.
17. Sony Headphones: Adding details: Alright, so let's continue what we have lived in
the previous month. And today we're
going to continue modeling and add some detail. Before we add in the detail, I will separate
each worth by fire. And after this lift
under control. And then I will
disseminate boy selection. Then we will add the
detail for the right, so we select it. And after that, I will go for
the top view and the Hulu, which we will, we will, we will create an airplane. And let's scale the scale in x. And I will select this board. And after that, E
spin, spin by 180. Let's say the steps
will be seven. I will make it eight. Step is indeed the leftward. And merge. These two. You will merge both at center. We need here to, here to here. We can, we can know
Phil, such as this. Then it's similar
around this axis. And you can scale
down if you like. You will hear this
is our Boolean, is that we will cut, you
will move in this area. Don't let sublist it correctly. I will select. We have one hold here. So I will say look, this
makes election to cursor. Rotate scale. They will move in z and
exit route to this area. Let's see. All
right, that's fine. Or you will add here and
some different surfaces. Let's add some division surface. Another subdivision
surface. That's fine. You can have low is
a mirror. Let's see. If we add the Boolean
and select our cutter. I will name it cutter Qatar. And just the difference. Alright, this is what
we have right? For now. We will go and delete these faces
and applies an error. Let's convert. To see. We can select is a
normal good is Moose. Alright, let's correct. And for this one, Let's move slightly. I will duplicate
this because it will be the bottom of course. And let us disabled women for women and
duplicate and z axes. And the name It button. We have made one sink,
it's large enough. No problem. We can select the gutter and
scale shift to 0.5. And this one also scale shift Z, scale shift to
0.85. That's fine. And I will make the
same area. Let's see. We can, of course, cutter and duplicate in
the x selected this point. But first I will scale, just got her screen for. In this area. We
really see here. Let us make orient to
geometry, selection to cursor. Let's rotate around the x. And I will add another Boolean. This time it will
be the cutoff to Qatar to and it will be exactly, Let's save the case of a crash. And that's it. This
is fine. Same time. I will slightly and call it button to I think it
will be a whole new problem. And all Qatar will be moved
to the cutter collection. And we can hide. For this one. We want this to be moved. So it will be moved and z-axis, right? Select the sphere to see. Alright, I will say it
is a sphere slightly. And then we selected
a smooth move. And selecting this, and
let's scale in x is 0. And the vivid faces. This one will be grid filled. Let's see. It work. No problem. Let's again select bridge. Some loops here. Select for loops.
And the bridge. Boy, selecting
bridge, a do loop. After that. After that. After that we can, and this is fine. Selectors are one selected. And let's average. For the same time. Let's assume we will
add to one loop. Let's fill and fill filtering. What if we add a
subdivision surface? Not forget to look
at here. Loop Katia. Let's see. Now is
the time to select, select, Insert, select all, and move in the z direction. Let's move in z direction. So let's select all
that and z direction. And we can scale and 0.3 or point five squared z. Going to fire. Again. This is what
you can also choose. The z axis. For this product. Let's move. Right. We need I will delete all the
faces and the top. So let's select through
here and delete. Delete. Let's sorted
it for another time. Just lit up larger scale first. And let's see, 3041 millimeter. That's fine. This
is what we want. I will select select all the edges and the
scale on the axis. Let's scale and z axes, right? It will be here.
The UCB charger. Don't forget to refill. So let's subdivide it. I'm going to say
three and z axes. Let's move. Enable this direction. Right? We can add
another detail. See if we can avoid selecting fears and
duplicate ends the oil. And separate. Visual Geometry to Mitch. Select all under scaling x squared and z squared and x, right? Right. Because that's the frame. So we have to have
taken some time. The other thing we
will add when we take a chirp, the headphone. So see you in the next lesson.
18. Sony Headphones : applying materials: So before ordering materials, I will add some details here. I have found is that firstly, I have selected all visits in this direction and
slightly inset, slightly inset, not too
much, such as this. And after that, feel free to exit route around
the normal direction. That's it. You know, not so much also, I will add detail
here or loop cut. Then selecting
this face and then sit or normal also
in this direction. Let's see. All right, this is the
tail that we want. If you find it too much, you can look at here. And it looks fine. So let's admit it as big as
this one will be lizard. Or you will do my best to do at this point. But let's add. So are you select the principal? So you can have many choices. Russia can use the blender, get. Let's see if it can help search in
materials for lizard. And it was 333 here. And this one is Black Sea fleet. All right, This one looks fine. I will choose Android. It's loading. Don't you
think it's six megawatts? Let's see if it's a
procedure or lab. I think it's solid to go for. Share the return. And yes, it's mapped. So we need first to unwrap. If you wanted to
unwrap it correctly. You can. Or you will
select this edge. And democracy just you unwrap uv and save. See. This is not the
result of that we want. It's the forefront for
coach, but no problem. And your skills as K, I will use the skill endemic. It's three. Also.
Let's make it 44. So we have no we didn't we didn't make it smart UV editor
for the plastic. Let's make it two plastic. And we need something. Do we need a separate, as you
can see in the reference? Firstly, I will make it a base
color to be, such as this. Roughness will be
going to one for you. It's easy. Go ahead for shader editor. And after that, it's a
Troy gradient ingredient, temperature based on the object. And let us separate, separate XYZ based on X
and it's through shifted. We need to make,
Let's throw it away. So it's the x. But
we need to rotation 90 degrees, 90 degrees. And it's rooted. Right? I will duplicate this in-between an entity sphere and
based on the VT2. So I haven't tried using
because our gradient, but it's not doing
that you want. So I will remove
and use the image. Let's use the mosque, which I have created
one for job M1. Let's throw the M1. Okay, is this going to do is quadric shapes
that you want? Let's throw the image
tool because this is just all also is correct. So we will use this mask. Firstly, we have
a plastic and you have mix shader to connect this ballistic
with another material. And you will use image
and take pictures. Control shift T, T,
temperature, silicon. Three. No, we don't change that. We have this x. Let's try either scared to be tin foil and mix with this one with the most. Let's see. Okay. Fine. We will increase the scale, maybe 12. And rotate that. 45. And let's throw the scale is good and
I will decrease bump. To be born to five. That's fine. Let's go back to other shapes. This one would be the same. So I have been to this
mosque, which is imagery. And I will go again for shader
editor and using imagery. And just invert. As you can see, it says Enter and I will invert. Of course, it's in
the outer area. I see that the
scale is too much. Let's see, this kid
is too much for us. So I will decrease the
scale to be maybe seven. Let's make it eight. And for the black, Let's make it too. And so division will be three. And this is which
you can see here. This is the same material. So let's see. If we can go to firstly, I would avoid or smart TV. A new image to k. This time, I will make the color white, and then we named it untitled. So I will name it Moscow four. And I will go for
the new material. And then you have
this mask for image and connect image to base
and click on most before. After that can go to UV. And just to be black. So 0.29. And I'm selecting the color
to be luck until it's even. You can use for child abuse, which is your suit with photo. I'm using it just because
we want to get it into as we see in the reference. Okay? So this is heaven because
we didn't add margin. And also let's reduce
that. Let's redo. I will go again for
temperature went and filled with white. Select all. And I have failures white. Then I go to draw. First three. I would
add some margin and go for ticket is black and area shifted to
be on this area. I think I have forgot
to say what is it? Let's go and use the black through. And I see all this area
will be vented. Of course. As I said, you can only
select this outer face, and so that's it here also. Alright, assume this
is a musk claim, is that let's first
save our image to be informed in the
fourth and forth. And after that, I will
go for shader editor. This is plastic. Plastic to the shader editor, I will select the folder. This is what we need
for this material. So I fix this later, but we'll fix it. But as you can see in
this lesson, to recap, we made and muscular
for auto material and for the unknown
material we have made. And you can do it as a mustard, is that we will explain here. So select all that and plastic and you name it version. One. Version will go for the
shader editor. No problem. We can delete that. And to just connect it to another plastic version tool. And just delete that
and to reconnect. But this one will
be version control. This one will be version two. And we need to unwrap. Select the Smart TV. And it's fine. For button. It'd be the same but different. Color, Roughness, I
will make it 123. And this will also
will be metallic. It will be metallic. Roughness going to five. Base color will be Chrome. But this one the same, except its roughness is fine. And we have all materials. In the next video, we will run this. And we look, of course.
19. Sony Headphones: Rendering: All right, Let's continue adding materials. I
will add the logo. So I will go for u, v and u v. This u v logo. Select these three and then just select the
scale, such as this. Then go for shader. I will select a logo, brushes. Here, u, v and logo. No fee. For service. We will use female. And also here we use female and a blockquote, and this will
be our mask for burdening. So let's see. This is a basic and we
need to add the Sony here. So this is image is
that we will add. So you mix shader, connect to that one
here, one here. And the final will be here. Before the Moscow
will use this one. And let's see it to be flipped. Right? So I will go for UV editor and select this one. And the scale up, rotate it to start to redo. So I would go to take a chance. And I have made this one. I prefer the sort of see, we haven't done we haven't done. If you want to change that, so need to go feel
free to change. Is this what I think is
that weight is good. Let's just make it.
For now. Let's render. We don't see any
difference anymore. And I will add an
in-between here. We'll call it select all and
say Look, the empty object. So we can know our
foil as we want. You move in x is and rotate in z, 14. Rotate z minus 40 x certainty. Certainty. After that, it's a blend. Will adhere an area light. So this main light, of course, lighting technique. So you will hear an
area once thousand. Of course we will use cycles, GPU and samples of 500 test performance to 50. And after that, it's a duplicate and rotate. It will be a rectangle. This on camera 100. And it will be squared is too much and it's
neat to be far away from our subject and move it in the oil and exit
route in z is one. Oh, you didn't make it 200. And this one would be let's see, like this immigrant placement for this one, you
will move here. And here, I'm going to lump some real light or back
light. If you want to cool. And I will place here and make
it small radius to be 200. Let's make a trip
to test values. Come here and come
here and here. You will make color to be 100. And if you have, if you
want to do is this style, you can go on for now. Is that rim light is
too much also solid CC because we are
losing a cycle is that we don't think of light is fine. Okay. I will render now. If you want to make the energy foil or we
start to look around, of course you can
Google and visibility, not in renter and
just film sets. It was finance render image from our file without enables
storage system or any. And am very happy with that. Feel free to make
your own borders. And that's it for this class. I hope you enjoyed this class. So see you in the next lesson.
 Kamel Altohamy, Designer & Youtuber , basically Engineer