Transcripts
1. Intro: So let's imagine you've
set up your home studio. You've recorded your
voiceover or your podcast. It's gone really well,
except for the fact that halfway through you're
recording it downstairs, neighbor turns on
their washing machine, creating this annoying
background harm that can be heard intermittently
throughout your recording, making it unusable. Or maybe there's a mike
pop or a plosive sound that ruins and otherwise
perfectly good take. How do you fix those
mistakes without affecting the rest
of your audio? And how do you create clean, professional
post-production sound? Well, but the end of this class. Hi, my name is Josh, and as a voice actor and sound editor with
many years of experience, I frequently use the
tools I'm going to teach in this class
to get myself out of quite time-consuming and maybe even expensive
re-recording sessions. Unintentional sound
issues has the effect of immediately taking your audience out of the story you're telling. Whereas clean professional audio keeps them listening
to what's being said. But also makes it much
more likely that you'll be rehired by happy and
impress clients. This class is to actors
and voice-over artists, potentially with their
own home studios. But it's also for content
creators and producers, maybe even video editors. The most out of this course, you will want to have your own
version of Adobe Audition. And as we're going to
be jumping straight into the noise
removal techniques, some basic knowledge
of how addition works just so you can know
your way around when we start. By the end of this class, you'll know how to remove or reduce background harm,
mouth clicks, pops, siblings, and plosives,
as well as learning some time-saving hacks and export settings to
add to your toolbox. Once you finished,
you'll be able to download the raw audio I've been teaching with and use it to put your new
skills to work. That's enough of me talking. Let's get right into it and I'll see you
in the next class.
2. Class Project: For the class project,
I'd love to hear some of your noise
and reveal work. So what I've done is I've
uploaded some examples of unedited sound with the
noise mistakes left in. And these can be
downloaded and then imported into your
version of auditions, where you can have a go
at fixing them yourself. These examples are great
at getting you started, but I'd really encourage
you to, if possible, work on and perhaps even share your own voice,
your own podcast, mistakes, your own
film dialogue, sound issues if you have that. This is just because
your voice and your recording
environment is gonna be different to the
examples that I upload. And it gives you more of an
opportunity to experiment and learn when working with your
own mistakes, essentially. So if you do want to
share what you've done, just make sure to include a little before and
after comparisons. So before and after
you've removed the noise. And that just gives me
something to compare it to. If you do want me to
give you some feedback. An important thing
to mention as well is when you are ready
to share your work, you will need to convert your audio file from
audition into a video file. That just makes it easier to upload onto Skillshare's
project gallery. Now there are a couple
of ways you can do this. Both of them are really
simple and easy. I can cover these at the
end of the class for anyone who's interested in
sharing their own work. Now the most
important thing about noise removal work is to make it imperceptible
to the listener. So often, when we're
removing a sound, we really go to town
on removing it all. And that can sometimes
affect the rest of the original recorded
audio and make it sound kind of weird. So what I'll be looking for in your projects is this balance of noise removal versus maintaining the integrity of the
original recorded audio. And if you're sitting
there thinking, I've no idea what
he's talking about. Don't worry about it. All become clear as we
work through the class. So let's get into it.
3. Workspace Tour: Hello, Welcome. So here
we are in my computer. I thought a great way to start
would be to just show you an overview of the
workspace in audition. So there were three
main workspaces that will be hopping between. The first is you see
on the screen here is the multi-track workspace. Now, this is mainly
used for editing. You won't be doing a lot of
noise removal in this space. If you're coming to this
from an editing perspective, you'll be very familiar
with this space probably. But even if you're
not, it's good to know how it all
fits together. So space number one, space Number two is
the waveform space, which if we go over here, we can toggle between them. So we've got multi-track
group selected there. And then if we click that
there is the waveform. This is what it looks
like. If you're sent an MP3 file or a web file, you open it up in audition
and this is what you'll see. And so you can see what I'm doing here is I'm zooming out and zooming in. So this is just plus and
minus on your keyboard. Or you can also use this
kind of gray box here. You can zoom out and
zoom in by doing that. The third space is, if you go down to this little tab here,
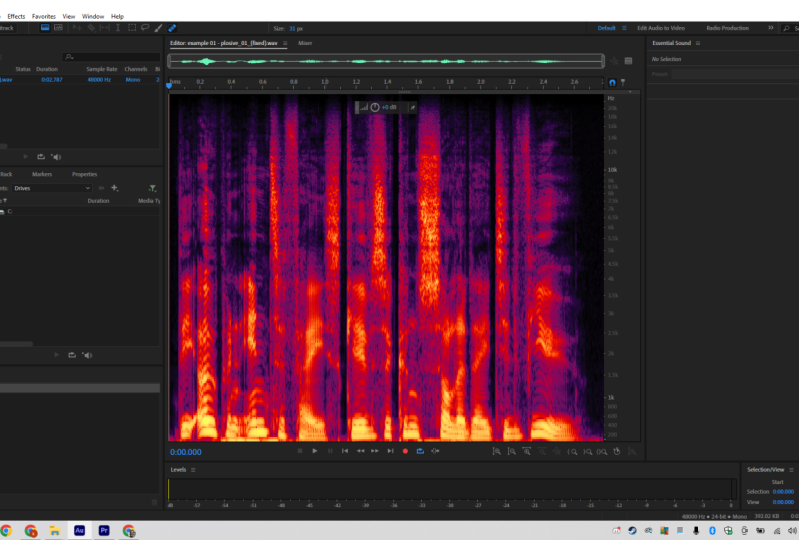
you can pull it up. And there is the, what is called the spectral
frequency display. Now this workspace is
where you will be doing the bulk of your noise removal. You can see every other parts of the voice that
have been recorded. If we go a little
bit closer in here, we can see at the bottom
these kind of very yellowy, solid bits can like flames, I suppose, are the main
bits of the voice. So we don't generally
want to touch them, or at least not much
because then you start actually removing
the voice itself. Just below. The yellow bits, just below here is where your plosives
will usually lie. We'll go obviously more into
that in the plosive class. But, but just to let you know, here is an inhale
and there's also can be inhales and then kind of
puffs of air at the top here, which you can
sometimes get rid of. Now as you get more into this, you will see that
there are when you start to zip and don't
worry about the way. This can be a bit
confusing and overwhelming when you first look at it, but very quickly you'll start to identify what sounds look like and I'll help with
that as we go along. But very briefly
before year end to it. There's little clicks and things here which sometimes
you don't want to remove because they're
part of the voice. But sometimes you do. And we can use different
tools to get rid of those. Another way, you can
kinda toggle between these workspaces in addition to what I mentioned before in terms of these toggles here, is you can press nine on your, on your keyboard to get
to the waveform space. And you can press 0. To get to the
multi-track editor. You can also, if you're in
the multi-track editor, double-click on a file, on a sound clip there
and you'll get straight into the waveform workspace. So, yeah, lots of different ways you can toggle between them. Before we get into the main
section of this class, I just wanted to
introduce to you. One of the main tools
we'll be using in the spectral frequency
display workspace. That is, this spot
healing brush tool, which can be found up here. Along these little
sets of tools. If we click that,
that is what we can use to really kind of start almost like an
eraser tool on Photoshop. If you've used that or
paint paint software, you can literally painting
out sound to remove it. But we'll go much more in, we'll go into much more
detail as we go along. So there we go. Just a little overview of
the three main workspaces. In addition, we've got the
multi-track workspaces here, which is mainly for editing. And this is what, when, if you have been
editing something, a podcast or a voice-over, you will probably start off
with this workspace number two is the 123, I should say, is
the waveform space. And that's what this
looks like here. And then if you pull
this little tab up, you've got the spectral
frequency display. So that's the lay of the land of the three main workspaces. So let's get into
the next class, which is all about how
to remove mouth clicks. So I'll see you there.
4. Mouth clicks (before & after speech): Mouth clicks and mouth
pops before or after. A word is said. That I thought this
is a good one to start with because
it's probably one of the easiest noises
to get rid of. So if I play you this
little blip, the fear. The fear Little, did you hear that there's
this little blip here is very tiny, but you can get some very fancy clients who wanted
to get rid of that. Now there are two ways that
you can get rid of this. In fact, there are
probably three. So as we looked at before, there is the the Spot
Healing Brush Tool, which you can get up here or by pressing B on your keyboard. And literally, all you do is you identify the blip
and paint it out. We go, it might take
a little while. And of course you have to start identifying the blip first. If we play that the fear, the fear is gone. So if I undo that just to
bring it back and you can see it was it was
this blip here. The fear there is painted out with the spot
removal brush, brush tool. The fear is gone. You can increase or
reduce the size. Here. I'm a bit easier to make it a
bit a bit bigger here. You don't have to be
to tidy in this way. As you can see, it
can be quite messy. So that's, that's the first way. The second way is to use
noise removal process. And for this, you're going
to want to go over here and press the time selection
tool or T on your keyboard. So you can, you can
start to highlight on the spectral frequency display the sound that you
want to get rid of. So in this case, it's
this, this one here. What you do is you
go to Effects, go to Noise Reduction
Restoration, and you capture the noise print. So what we've done
by highlighting that little section is we've told her dish and that's
what we want to get rid of. And by pressing, capturing
the lowest print, it captures the sounds that it needs to analyse
and therefore get rid of. So you need to do that first. Okay, after you've done that, we go up to the
same place again, effects Noise
Reduction Restoration and go to noise
reduction process. You can also
shortcut for that is Shift Command P on a
Mac or Shift Control P. If you're on a PC, you
want to click that, then you're on to this box here. So the effect noise reduction. Now, this is going to initially look quite
confusing, but honestly, the two things that I
really use and that you need to be focused on here
is just these two dipoles. So noise reduction
and reduced by. And also down here you've got toggle the effect
on an off and loop. So you can, if you
want to listen to the sound there with a loop that's
a lot easier than having that little began. It will just play through the voice-over so we're
talking about on. And then you can kinda goes
around, around the effect. Then what you need to
do is you just need to use this notice noise
reduction and reduced by everybody starting to remove
it right there. So if you bring it down,
again, starts here. For a sound like
this, I wouldn't be too worried about being too careful here because there's nothing else that
we need to preserve. So you can just go up to a 100%. Really. You can hear it's gone. What we need to do there is you can press the
space bar to stop it. Going round and round. I'm playing on a
loop, press Apply. And then it's got a big hole
there where it's removed it. The fear the fear of lift. As you can hear
it's got rid of it. So that's the second way. Now, some of you might have
been watching this thinking. Okay, but what if there's a sound before she
starts speaking? Why didn't you just highlight it and just cut it out like that? And of course you can do. And if it's far enough away from
the beginning of the word, then absolutely do that. Of course, otherwise,
save you so much time. In fact, if we go into, we just undo that so it's
back and go into the editor. Then you can absolutely do this. The fear, the fear, the fear. The fear a little bigger. Of course you can, if you go too
intense on an edit, start to lose the
beginning of the word and then people will
start to notice, hang on a minute,
that's not right. This is why I want to teach you all the different tools so you can make a decision.
What you can do. In each situation. There we go, there, there are
three ways you can use at the beginning of a word.
5. Mouth clicks (during speech): Welcome back. So now we're looking
at mouse clicks, mid speech or mid-sentence,
if you'd like. Now, at this point, I just want to quickly
say that, of course, there are some sounds that we don't want to get rid of because they sound human. So like inhales, exhales, some, even some math clicks. So it's very easy to get a little bit to trigger
happy if you'd like. With this kind of
sand removal stuff, you can find yourself getting
a little bit obsessed with. There's, there's a
tiny click there, I bet get rid of that bit,
better, get rid of that. But the things that we're
concerned about really is just anything that just takes us out of the story or what
we're listening to, anything that sounds a bit like. That's that's a bit weird. That's oh, that was allowed. Click. It's a bit like, you know,
when someone's eating quite loudly next year and you
can really hear everything. If you're on a train
or something in someone's eating
their lunch or loudly and you can really hear
the mouth clicks there. Then that is something that
obviously we want to avoid. Any one emerging from the waves. Has anyone emerging
from the waves? As you get more
experienced doing this, you start to actually see It's a bit like the
matrix you start to, you start to see the matrix. You start to see the, the bits that are the clicks. If you see what I
mean. So there you go. This is the, these
are the guys that I'm, I'm thinking about here, mid, mid sentence because we've got these ones at the end. We got these beginning. You got this, this, this, this one here. But these are the ones that are the kind of
loudest, I think. So. What are our tools? Well, if we use the noise
removal tool here. And remember we go to effects, noise reduction restoration
and we catch the noise print. And then we go to, again, we go to
production process. You can incidentally go to capture noise print
and do it that way. But if we go to here and we look for because what we start to lose as we start to lose the rest
of the voice too. So if we press apply waves, waves, that's not ideal because we're losing,
losing their voice. And even if we go back here, if we do it just
by a little bit. It's kind of fun. The
waves from the waves. It's just, it can dips
and volume there as well. It's too broad brush stroke for what we need for this
particular example. The only thing we
really want here is the spot removal tool,
which if you remember, we got here, our brush
tool is slightly too big. So if we got to the
size of it here, we just put it
down to around 38. That's just so it's
almost like matching the size of the wave form here of the little
blip waveform. Let me remove that
from the waves. The waves go, That's
a bit better. The waves. So that's it back in. And that's it the way out. So quite, quite simple to do, but you can see that
we need to be a little bit more specific. Otherwise we might start to
lose bits of the other boys.
6. Plosives: So new section, new shirt. Why not? So plosives? Plosives, I kind
of use that word interchangeably to talk about any sort of consonant sound, either a P or a b or a. I'm not going to list all the constants
that would take too long. Just anything that makes a
loud noise against the mic. Where the mic is either
too close or maybe the mic gain volume
is up too high. That sounds noticeable,
if that makes sense. So let me just play this
and it will be clearer. The open interface gives
a consolidated view. That's me doing a auditioned, I think for a voiceover, I was clearly
standing too close. Or maybe my mike gamers
turn up to high, resulting in this plosive. The open interface gives
a consolidated view. This is pretty easy. This kind of sound to
get rid of what I would suggest as being
really the only, or at least the best
tool to use against this is the good old
Spot Healing Brush Tool. Press that, find that
over here again, or press B on your keyboard. We go down to where
the plosive is. Now, plosives are found along the bottom section
here, underneath everything. As we mentioned earlier, the main parts of the
boys are these flames, yellow we bits here. And if you remove these, then you start moving the voice. So if I start doing this, the open interface,
it's going to start to literally the open
interface sound weird. It's going to remove my voice. We've got to be careful here. However, if I remove them, if I've identified which
I have the plosive, which is around here, it shouldn't be too, It
shouldn't be too bad. The open interface gives, the open interface gives. There we go. If we look at another example, the the Hawkeye
amongst you will have noticed that there's example one and example three
tricky plosive here. And we're going to look at
the tricky plosive right now. Just as another example, let's give it a play with clients centricity
at the very far. Yeah, that's not a
nice one, is it? Centricity at the very thing that smile called
it tricky plosive because that really attacks
the mike, doesn't it? That's really an ugly sound that we don't really
want it to have. So again, you'll start to notice by I where
the sounds are. So you'll likely hear
it first wants to going through a voiceover
or whatever it is. You're gone the
spectral display, and you'll start to see things that don't look
right. Here we go. If we look at the whole
rest of this line here, there is nothing else in this part apart from
this kind of vague. Then what else to call
it other than an orb, this flame orb of
a plosive sound. If we just paint over that, paints over a bit more. See how we go on with
clients centricity at the very full and with
clients centricity at the very forefront. Now that's removed the plosive. But if you can hear, that's made a different sound, a little bit more clear. So if we just press T on the keyboard for the
time selection tool, or you can go out
to press it here. And let's just play this. Interests, interests,
interests, interests, interests, interests, interests, interests better than
no sound or something. And I think it's about here. So if we just press B again,
let me get rid of it there. Centricity at the
very forefront. There we go, it's gone. So that's a little example of sometimes when you
get rid of one sound, another will reveal
itself to you. Either because you
haven't got rid of it completely on its own or because getting rid of one has made a different one
more noticeable. That can happen quite a
lot and you'll, you'll, you'll find that once you start doing your own work
on these things. So there we go. To sum up, you will find them at the very bottom
of the wave form underneath the
flames of the voice. Remember to be a little
bit careful to not remove the actual parts of
the voices, voice itself, but to identify what plosive is, it can adjust the size of
the spot healing brush tool. If you really need
to get in there, then you can make it smaller. But generally speaking,
quite quick and easy. That's how you get
rid of plosives.
7. Sibilance: Welcome back and thank you for joining me for this
section of the class, which goes over how to
remove sibilant sounds. Now, siblings is another one of those kind of onomatopoeic
words, right? Where the word sounds like
the sound is describing. So this is like plosives. It sounds like, well,
it sounds like this. So did my mind still
fleeing, still unsure. It's those sounds where they just they just put your ears
a little bit on edge there. Just a little bit to SE
for want of a better, a better term in terms
of identifying them. They look a little
bit like this. So they generally appear at the higher part
of the waveform. In these kind of sort
of hazy sections, they kind of quite yellow
light the flame color. And that means that
there's just a little bit too intense as a sound. So again, we're going
back to our old friend, the spot healing brush tool, which really is for
my tastes anyway, the only tool you can really effectively use to get rid of it if we just highlight
this section here. If we want to lessen that S, we wants to be very specific with the
Spot Healing Brush Tool. It's not just about doing
this and getting rid of it. Because if we do that, well, if we if we just can't try and get rid of it all like that. Still fleeing stiffly. It doesn't sound right. Yeah, we're getting rid
of too much S sound, so it doesn't really
sound like an S anymore. So what you need to do with
the Spot Healing Brush Tool is you need to just it's a bit like
any artists out there. It's a different
style of painting. Not that I know that much about painting and I'm going
to reveal that now. But it's almost a bit
like instead of a long, deep strokes, It's kinda short. Specific strokes where you are very subtly
removing the sounds. So as we do that, you will see that
these bits of yellow are the spirit or at least
kinda lessening and intensity. Still fleet stuff. And there we go. That's that's that's helped a little
bit. I would say. You could, of course, reduce the size of the spot using the spot
healing brush tool. And that will, that will help
you get much more specific. And again, to get
even more specific, you'll want to
zoom in much more. And that again is by pressing the plus key on
your keyboard or by using this box up here. I'm sorry, by the way,
if you're hearing the odd plane flying past, unfortunately, my flat around this time of day is right
under the flight path. So I probably need to do a whole new course
about noise removal. For noise removal courses, which is little bit
too intense right now. Here is another example
which is a little bit more extreme and always takes time to summarize
the key actions. This is one of those
ones that just makes you cringe a little bit. Can you see where it is? An always takes time to
summarize the key Act. So if we, if we zoom in
a little bit more here, here it is, that's like a gash through the waveform
isn't a sibling. Gash when it's quiet
specific like that, it can be easier to be
honest to get rid of. So we've got our trustee
trustee friend that's a little bit too big there. Let's put it down to around 25. Our icon. Again, just about
painting it out. Now sometimes it will shift
around in place, little bit. Waveform just whilst you're
getting rid of things. But don't worry too
much about that doesn't usually make much difference
to what you end up hearing. So it's just just being very specific and try
not to move too much. Let's see how that sounds. And always takes time to
summarize the key action. That's a bit better, right? You could probably do, I mean, I would maybe go in a
little bit more on that. It's almost like blending in Photoshop or
something like that. Let's just give that a listen to summarize the key actions. That's better. Disease. So it just takes the edge
off of that S sound. So to summarize them, removing siblings S sounds, usually you'll find them in the higher parts
of the wave form. They will be quite
bright yellow, like this example here. In amongst a sort of hazy puff
of dark reds and purples. Use the Spot Removal tool, but makes sure that your strokes are much shorter and
lighter and more specific. If you go in there, guns blazing, then you're going to remove
some of the voice. And that is how to
remove siblings.
8. Echo: For this next part of the class, I wanted to talk about
how you can very quickly remove echo and reverb. Now, there are different
degrees of echo, if you like. Usually it's actually quite
difficult to remove echo, but it depends
what the sound is. Ideally, you will have sound, whether that'd be voiceover or sound from a podcast
or film dialogue that is recorded in an environment with good mix with oil
sampled environment. You won't ever have
to get rid of echo. But of course, sometimes it
happens in an interview, for example, is recorded
in an echoey room. Maybe you've got a home studio
as a voice-over artist. And it's not quite
up to scratch. And so here and there, there are little bits of echo where, where your sound waves are bouncing off some hard
services that you haven't properly insulated
or prepared yet. When it happens, there
is a very quick, easy way that you can probably just eliminate the
edge of an echo. It's not perfect, but it might just help you out in those situations when
you really need it. So if I just play
you a little example that I recorded just now, Hello, this is an echoey sound. How do we reduce it? Does what it says. There we go. So just highlight that either on the spectral frequency display or you can also do
it just as well, just as easily on the normal waveform display
highlight that makes sure that the selection
tool is selected. Then go to Effect
Noise Reduction, Restoration and D reverb. Then we come to this little
box where you can actually, there are two defaults
here, heavy reverb, reverb production and white reverb reduction if we just
have it on custom here. So hello, This is
an echoey sound. How do we reduce it? If I just take that, toggle that effect off. Hello, This is an echoey sound. How do we reduce it toggling on? So hello, This is
an echoey sound. How do we reduce it? As you can hear it, it
kinda does the job. It shortens those reverbs. It kind of shrinks it, the waveform down a little bit. I click Undo, you can see
what it was like before. So just as a reminder, effects Noise Reduction,
Restoration, the reverb. And then you can play
around with the amount. So hello, This is
an echoey sound. How do we reduce it? Obviously, the higher you get, the more you will remove
the actual voice itself. So like all the other noise removal
tools, it's about balance. Once you're happy with the
amount you're removing it by, I wouldn't I wouldn't
worry too much about processing focus
and that kind of thing. I would just focus
on the amount. Yeah, So once you're
happy, click Apply. And you're good to go.
9. BONUS: Exporting from Premiere: So I just wanted to do
a little bonus section of this class for all you
video, this is out there, or anyone who uses Premiere
Pro and who might come across a sound that they
want to remove or work on. In addition, what is the
process of getting that from Premiere into audition so you can work on it as
we've been exploring. So here we are. I'm
in Premier right now. And the more observant
amongst you will realize that this is the class
that you're watching now. I'm currently editing it. So we're getting a little
bit inception right now. What I would do is having identified the
sound and here it is. Here, I would make a
cut on the timeline. This is so you don't
pull the whole of the clip you're
editing into addition, and then you have to
go and find it in audition that takes
a little bit longer. Right-click on that
clip that you just cut. Edit, click an
audition. There we go. So there is, we can
see immediately there the sound that was
I wanted to remove. If we pull up the spectrum
frequency display, there's just a lot easier to
see as we've talked about. Removed the sound as you would, as we've been exploring. Once you've done that,
because Adobe Creative Cloud, it syncs the two apps together, audition and Premier, or
you need to do is save. Because it saves it as it doesn't overwrite
your audio file, it saves it as audio extracted. And that will usually be saved wherever you're
saving your files. So clicking Save in there. If we go back to
Premiere, there we are. It's got rid of it. Incidentally, if you do
decide that you want to restore the clip in
Premiere to the way it was. You can right-click and you can go to restore
and rendered. And there it is. Back again. If you've made a
mistake or if you want start from scratch. That is a very quick way
for those of you who do use Premiere Pro and you come across a sound that
you want to remove. How do you export it
to audition and get it back into Premier. And that's just a very
quick little tool there.
10. Background hum (method #1): Okay, so how to remove a
constant background noise? In this case, a background hung using the noise
and move at all. Now, firstly, I just want to say that this kind of noise is one of the main reasons I
wanted to do this class anyway, because it happens
maybe other week. I was recording a voice-over at home and my downstairs neighbor, as I said in the intro, literally put on their
washing machine. And it created this hung
throughout my recording. Now, the issue was
is that I needed to get this voiceover to
decline as soon as possible. And so I didn't
have time to wait until the noise had stopped
or to do it another day. But luckily, I knew
that it was the type of noise that you could
remove relatively easily. There are two ways that you can remove this kind of noise. And the first way is what we're going to talk
about in this video, which is the noise remover. Let me just play you the
voiceover in question. It's important to
remember that if we only ever give
negative feedback, people can feel overwhelmed or discouraged, lose confidence. So this is a little bit
different than noises that we've been
working on so far. Because it happens throughout a recording or at least
for a good chunk of time. It's not just a little
mouth click or a plosive or some siblings or an
echo here and there. So what we need to
do, and this is where it's important that
we capture the noise print, that we capture a
clean noise print. There are some little gaps
when I stopped talking. Where if we highlight
those gaps using the time selection tool
here. And we play that. There's also a
little blip there. So that's probably not the most ideal bit of
silence to highlight. Let's see what this one is. That's got my inhale. So again, that's not the
most ideal on to highlight. We want to find as clean a section with the
HM as possible. And by the looks of it, it's this area here. There we go. So what we do there is Shift P, which captures the noise print. Or to remind you, it's going up to Effect Noise
Reduction, Restoration. Capture Noise Print. Then we go to no instruction restoration
and noise reduction process. Here we are. So if we play that through
now at the moment, because of something
I did earlier, it's already quite
high up there. Now, I would recommend
not if possible, going above ten on
reduced by or above 40 or 50 on the noise
reduction scale here. And that is because if you go too high as we've
talked about before, you start to remove
elements of the voice. Okay, So we've done that. If we toggle it on and off. You can hear that it's
done quite nicely there. What you can then do is you
can select entire file. And that will apply that noise print to that moment
we highlighted throughout the whole of the
voiceover or at least the whole of the clip
that you're working on. Why would then do is
before pressing Apply, I would recommend
listening through and seeing how it sounds. Okay, so let's do that now. The ever give negative feedback, people can feel overwhelmed
or discouraged, lose confidence, will
become defensive. Why we're doing that is to see if it's too much of
a noise reduction. And that actually
sounds quite good. So what we do then
is we click Apply. If we highlight that same
part that I did earlier. You can hear that it's
much more reduced. So I would just I would
just suggest you have a play around and
by trial and error, find the right amount
of noise reduction. That works for you. As I say for me usually it's trying not to go above ten on the reduced by or 40 to 50 on the
noise reduction. And just a little
detail to note, if I just undo
that effect there, you will see that there
was the hum there. And if I redo, the effect is gone. So that is where the harm lies in the lower sections
of the frequency, which is why in the next class, we'll be exploring the
parametric equalizer and high-pass filter because that is exactly how you get rid of different frequencies
in your waveform. One thing to note, if you apply this effect to the whole clip
more than once, each time, it's going to remove
even more and more sound. Then you start to really
sound like a robot, like you're in some kind
of strange airlock. That's an important
thing to remember. But essentially, that is
a quick way that you can reduce some kind of
background harm or background noise throughout
the whole of a voice-over.
11. Background hum (method #2): So next we're going
to talk about how to remove a background sounds such as a harm using
the parametric equalizer, which is just another tool
that is really good at honing in on different frequencies
and reducing them, are increasing them if
that's what you want to do. So what we can do is
highlight the same area. I've got that
annoying home back. And this time, if we
go over to effects, we go to Filter and EQ
parametric equalizer. Now, here we are. So this is actually
if I go back to default because this is
actually what I did earlier. If we play that through. Here is the waveform. Now, because the hum is on, this is in the lowest part or some of the lowest part
of the wave form here. What we want to remove on the parallel
parametric equalizer is everything that is on the
low part of the waveform. And you can do this more automatically by applying something called a
high pass filter, which if you press this here, That's HP means high-pass. But I've found for
sounds like this, it doesn't quite do the job. And that's because as you see, it's only cutting off a
small amount of the sound. So this is what we
start with, right? This is this line. We've got the
low-frequency sounds here, the HMS and the plosives
and whatever else, they're a low
voice, for example. Then as we go along, we've got the high,
the high sounds. As you can see, there's
not that many of them at the moment is it's mainly, we're in the
low-frequency sounds. And you can play with all kinds of things here if you want to increase the sound of something high or if you
want to decrease it, which is what we're
wanting to do now. Because as I said, this is in the low frequency. We want to remove as
much of the low as possible without
disrupting the voice. And as you can hear, that's, that's done quite well in
terms of removing that sound. So if we listen to the rest of the audio right
now, all become defensive. It's important to remember that if we only
ever give negative. Now, what it's done
is it's taken off a little bit too much of the
low-frequency making my, my voice sounds a little
bit kinda tin and thin. So what I'm gonna do
is I'm going to play it through and I'm
gonna just kinda play with this parametric
equalizer as we go. It's important to
remember that if we only ever give
negative feedback, people can feel overwhelmed
or discouraged, lose confidence will
become defensive. It's important to
remember that if we only ever give
negative feedback, people can feel overwhelmed
or discouraged, lose confidence, all
become defensive. It's important to
remember that if we only ever give
negative feedback, so that's maybe a nice little
balance and you can spend a lot longer exploring this
kind of thing and tweaking. As you can hear the tricky thing about about a harm like this is because if you've
got if you've got someone with a lower voice, that's similar to the
frequency of the low hum. And so sometimes if you
want to remove the harm, you need to remove a bit
of the voice as well. That's just part
of what needs to happen and that's what
the balance is all about. When you've got nothing
to compare it to. Sometimes people
aren't going to, aren't gonna notice what that you've just
removed a little bit of the low frequency of the voice in addition
to removing the harm. One thing that's
important to note though, if you remove a little
bit of the voice with the parametric equalizer to allow you to get rid of a hmm. That's great. If you've got
nothing to compare it to. However, if you do it in different sections of the
voice-over, for example, if the harm is intermittent
throughout your recording, then the listener might
start to be like, Oh, his voice is suddenly
got a bit thin there. So this is when it's
very much about balance. And even I would suggest if you don't have a harm throughout
the whole voice-over, it might actually
be better to have this parametric equalizer
effect throughout, because at least then they're not going to really
know the difference. Once you are happy, of course, with the effect, just
remember to click Apply. And then that will be applied to the whole of the section
that you've highlighted. There we go. That is how to remove
background noise, in this case a background hum using the parametric equalizer. Good luck.
12. Summary and export settings: Welcome back. So in this section of the class, I thought it might
be quite helpful to sort of summarize what we've learned through
describing my process of editing a voice-over, in this case, to identifying
a noise to what I do having removed it and
the order in which I then finish and export, I thought that might
be quite helpful. So at the moment, you will
see that we're back onto the multi-track that you'll recognize from the
beginning of the class. I've edited an e-learning
voiceover, I think it is, and I've split it into
four different sections because the client
wanted it and for different so headings
and areas, if you like. So very briefly,
what I tend to do when I'm going through is if I am playing it through and identify a little mouse-click,
I will double-click. As we've talked about before. That's a quick way to open up the the spectral
frequency display. I'll remove whatever
noise I need to remove. And then what I'll
do is if I've got, if I've been editing on
the multi-track editor, say, I want to export a video
for France around here. So I do some in and out
point psi of the tree. Well I do is I press I on the keyboard and then go to
the end and press O there. Then what you can do is you
can go over to File Export, multitrack mixdown,
time selection. So that will export what I've just put the in
and out points into. Just one thing to note here, when you export a
multi-track mix down, if you're in the
multi-track editor, make sure to export it as
a web file or a wave here. And that is because if
you export it as an MP3, which is a lossy format
and is highly compressed. The more you export it, the less good the
quality is going to be. Because we're still gonna
do some work on this mixed down to before we do
the final export file. We want it to be a web file. And that means that it retains the quality
much more because it's just kinda uncompressed as a file if you
see what I mean. So that's just a little
important detail to mention their name, name, your voice-over, choose
where it's going to go. And hit. Okay? Then audition usually
makes it turn up what you've just exported into this section, this window here. I'll double-click on that
As I've already done. And here is what I have. Just export it. So once I've got the mixdown of the whole VoiceOver here
or whatever it might be. There are a couple
of things I would do in my process
of finishing up. What I wanna do first is I want to make sure these
peaks are all more or less a similar level just so they're not kind of
all over the place. The listener listening suddenly
gets a shock when the, when the sound peaks and it's louder than
everything else they're listening to. What you can do. To apply that to the
voice-over is double-click, just making sure that
you have captured everything in this white
highlighted block here. Then if we go over to effects, amplitude and compression
dynamics processing, a good rule of thumb that I'm just going
to let you know here, is if you click on this top node here and pull it down to
around maybe three. And click Apply. That as you see, there has just sort of leveled out the
peaks a little bit more. If I undo that, you
will see what they eat, what they were before
and redo there just a little bit more level. What I would then do is I
will double-click again, make sure it's all highlighted. I would go up to
actually I've got two favorites and I
would go to normalize. And normalizing. In that case, I just want to normalize to minus
three decibels. Just brings the levels up. So you read a bit more of a, a boosted volume for, for people to listen to. Now, this is where I would
remove any background hum, I would leave the
background harm to the very last thing of the
process before you export. And this is because
when you often, when you normalize and
you boost the volume, that's when you will start to hear sounds that
you might not have heard as much before when you were
editing at a lower level. Once I've removed
the background, hum, and i've I've played
it through to make sure that I've got
that good balance, then we're ready to export. So what I would do is
I would go to File, Export, export a file, then call it whatever you like. Usually I will export as a wave. Let's just call it
Josh voiceover. Having browsed and make sure that you're saving in the place that you
want to save it in. Hit. Okay. And that's job done.
13. Sharing your work (method #1): Hi everyone. So
you might remember that at the beginning
of the class, I mentioned that you'd need to convert your audio file
into a video file. And this is just so
you can easily drop a link into the Skillshare
project gallery. So there are two ways
you can do this. Both are very simple and easy. The first method I'm
going to talk you through is using a site called V.io. So if we just go to VDD, now, it's just an
online video editor. It's completely free. Now because I've
already got an account. It's gone straight to
my project window here. But if you just quickly create a free account
for yourself, you will be greeted
with this window here. Now all you need
to do is create, project and upload the file
that you saved earlier. For me, Let's just
use this voice-over. Some templates to
choose from here, I would just go for
the YouTube one. Probably the simplest template. As you can see, it's now got the voice-over sound along
the bottom here. And it's going to
convert it into a video with this picture. If you like. Of course, you can change the artwork. But I would just, once you've given
it a play and made sure that it's the sound that you want to export. And then just go
to export video. And VDD will pretty quickly
do that depending of course, on how long your file. Okay, So here is your audio file converted
as a video file. And I would suggest
the easiest thing to do in order to share it into the Skillshare
project gallery is to just hit Share here
and copy link. Because what vj will have
done is it's hosting it as an unlisted video
on your account. So you don't even have to upload it to YouTube if
you don't want it, you can just copy this link and share it into
the project gallery. So give that a go. And if that doesn't work
for you for some reason, try the second way, which I'm going to explain
in the next video.
14. Sharing your work (method #2): Welcome back. So this is the second
way you can convert your audio file
from audition into a video file in order that
you can easily share it as a link in the Skillshare
project gallery. Now if you have an Adobe
Creative Cloud subscription, which is how you got
access to audition, you usually have Premier Pro and Media Encoder
included within that. An encoder is what we're
going to need to export to. So if you don't
have Media Encoder, I suggest that you do
step one instead of this step because you need to have Media Encoder
as a prerequisite. If you do, however, it's very quick and easy. So we've got our noise
and we'll project here is all completed.
Are happy with it. If you haven't already. Just go to Export File. Not my noise, my noise removal project, that's
absolutely fine. Save it as a wave
is fine or wealth. Or an MP3. Absolutely
up to you. And hit. Okay. So in order to export to Media
Encoder from Audition, we're going to need to export from the multi-track workspace. So you can either click this
up here, toggle this on, or we can go from the wave form workspace to
file new multitrack session. And you can call this my noise removal projects
or whatever you like. So what you can do is if you've already exported your file, it will usually appear
here in audition. And you can then
literally just drag it into the multi-track here. Or you can just import it from where you saved
it, which is there. So we've got it on
the multi-track here. Then what we do is to, in order to export
it to Media Encoder, we go to File. Whoops, exports, export
with Adobe Media Encoder. Click on that. Make sure you're
happy with the filename. And it's just opening
up Media Encoder. Now. You see it jumping up here. So what you can do then
is go back to this screen here and made sure that H.264 is selected as
an encoded format. If you're familiar, by the way, with exporting video is MP4s, then you'll know this already, but just in case you're not. And make sure that this is
selected Match Source Range, entire session is fine. And then just click Okay. And as you can see, it's
actually already exported. If you click on this here. Here it is. There you go. Now you
have a video file. What you'll need to do now is either use step one in order to host a link to a
video file so you can share it in the
Skillshare project gallery. Or of course you can use
that MP4 and you can share it as a private
link on YouTube, for example, and just share that link into
the project gallery. So good luck with that, and I'll look forward
to hearing your work. Thanks very much.
15. Good luck!: So there we have it. Congratulations on
finishing the course. I really hope you enjoyed it, and that has given
you some more tools to add to your sound
editing toolbox. And most importantly, the confidence to use those tools in a variety of different sound
noise removal situations. Just to recap, then, we covered background hum,
mouth clicks, plosives, siblings echo, as well as best-practice for the order in which you might use those tools. We also explored
some time-saving, editing and exporting tips. So thank you so
much for watching. Don't forget to post
your projects in the project gallery if
you'd like some feedback. And if you enjoyed the course, why not follow me on
Skillshare or find me on my website at vital
thread.co.UK. See you in the next class.
 Josh A., Editor & Filmmaker