Transcripts
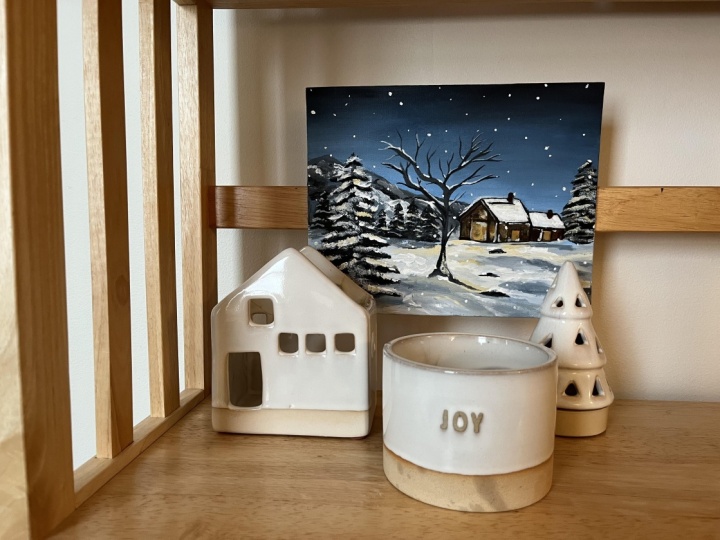
1. Introduction : Hi everyone. My name is Olivia and I'm an artist here in San Jose, California. Welcome to my painting class where I'm going to be teaching you how to paint it cozy of winter landscape in acrylics as Venter and Christmas approaches as a very zone at this project can be perfect for a gifting your loved ones. Or you could even turn this into your very own handmade Christmas card to make it extra special. In this class, I will go through all the materials that you will need, will show you how to prep your canvas. I will walk you through basic techniques on how to make each week simple brushstrokes. We will also be going through the sketch phase, and then we'll begin our painting by blocking in color. And we'll walk you through building up layers and adding details as we move along. This class's grade for a beginner, but all levels are welcome to try this. I've also be adding in a class project at the very end. So I can't wait to see what you guys come up with. So let's dive right into painting.
2. Materials / Prep Canvas : So these are all the materials that he will need. I'm using a five-day seven. Our teeth are canvas panel. Again, I am going to list all of this and description if you want to check them out. I'm also using our teeth are pins and all the names will be also listening description along with a ball, a paper towel. And we'll see you think a palette knife. If you want to use that. And then I'm using a glass palette and a scraper. Okay, And then these are all the brushes that I have used, the army Lee just flat brushes. There's one Philbrick brush and then to kinda point2 brushes. And this is the gesture that I use to prime my canvas. Ok, so to prep our canvas, we are going to adjust all the entire canvas before painting. Think of this as a primer. It's sort of perhaps the canvas beforehand. Now most canvases dual come jostled anyway, but I like to give my cameras allele or an extra layer of g, So regardless. And then once you are finished with this lecture painting completely dry before you can walk to the next step.
3. Sketch : Alright, so let's start off this painting by likely sketching and mapping our landscape. So I'm gonna begin by trying out derives a line which is a little bit lower than halfway. And then we're going to have a house on the right side here. And not to show what I'm going to be adding in to the house yet or how it's gonna turn out. But I do know that I do want a lot of light coming through the windows like in the front of the house. Good. This will be like an evening sky and we'll have like really cozy beaming lights coming through the house. We're going to have some faraway snowy Triers and a mountain behind it. Keep in mind to not stress about adding into many details. And this is just for you to get an understanding of placement. And it will also give you a good direction of what to expect. And also a bunch of this will be covered with paint anyway. So here I'm making a straight line for the branch of the tree and then almost like zigzagging my way upwards for the tree. Again, doesn't have to be very clean. You can just kinda roughly outlined it. To add in some more depth. I added a tree in front of the house and I'm also going to be an adding another tree close up towards the foreground. So this way we now have a foreground, middle ground, and a background. I'm just adding in a few steps leading towards the house. And maybe I'll put in a few people choose to add in some more interest. I think of these as stick figures right now. I'm going to show you how to paint them. Alright, perfect. So now we've got our sketch fears done. Let's move on to the painting.
4. Blocking In: Okay, so we're going to now begin our blogging in stage by adding a base color to our shapes. I'm using ultramarine blue, and white. I'm starting at the base of the sky and will progressively get darker at the top by adding in some black to my blue. And using a filler word, brash father, Skype. And you can use any flat brush to make sure to blend these colors in between by simply merging those two colors together. I'm also adding that same biggest color Debbie added to the sky, to the ground. So again, using ultramarine blue invite to just kinda fill up the entire ground section. We will be building up on the snow and the colors slowly. But for now, this can act as a, as a good base color. And then for the mountains, I am taking the blue and the black. And I will just sort of fill up that shape completely as well. Like I said, majority of your drawing and sketch be covered with paint anyway. But, you know, if you're somebody who really does like to see some sort of reference. As far as a drawing or sketch is concerned. You know, feel free to take a pic of your drawing section, like in the forest, the first phase of the sketch that we did. So before you begin your painting, either click a picture of it or then you can also always do a little sketch on a different piece. Just you have a reference to go back to.
5. Painting Part 1 - Mountains & Sky: Alright, I'm using a palette knife. I'm going to be adding in some texture to the mountains. If you do not have a pallet knife, that is perfectly okay, just use any flat brush or Filburn brush that you have. I'm still using the same ultramarine blue and mixing it with some weight. You should have enough paint on your palette knife. And then using it side and then the belly you can press down to create some fun textures. I am going to be blending all of the sub anyways. So that is why I said that if you don't have a pallet knife, that's perfectly okay. You can just continue using your brush. I'm just using a flat brush to define some of the edges to the mountain. But just keep in mind that all of this, majority of this will be covered with trees anyway. So I was just kind of playing around and having some fun with this section. But just to see, you know, that it will be covered with a bunch of trees. Alright, so now I'm just using is soft round brush to blend this mountain to create a softer look. Since this is further away, it shouldn't really have this many details. So I'm not putting in too much pressure, but just gently, sort of swiftly my way through this and certain areas. So I'm going back in to the sky to adding a second layer and to build up and intensify some of the colors a little bit. So I'm using the same exact colors that will be used for the sky the very first time. And just adding a second layer to just sort of bring out the colors a bit more.
6. Painting Part 2 - House & Trees: All right, so now let's dive right into adding and some color to the house. I'm using Barnes, CNR and brassy Anna to outline the shape that be true. And taking in some dark brown and filling up the sides of the house. I'm also going to be using some deep yellow to add to the front of the house where a majority of the light comes from and mixing in sunlight, but the deep yellow. And then certain sections, I'm also adding in some of the raw Sienna to the yellow. I'm gonna switch it up a little bit. In that section. I will come back to the house and event, but for now this works moving right along the trace. And now this has a lot easier than it looks. It can be done in simple brushstrokes and using olive green and some black, and then using a small flat brush, I'm going to start by making a straight vertical line. And then I'm simply going to tap the tip of my brush, gently moving left and right, back and forth. So you want to hold your breath straight up there where you can access the tip only. So remember, you want the tip of the tree to be narrow and smaller and get wider as you move down. And third, we and yeah, that's it. I'm just going to be repeating the same exact steps for all the trees in this little section. So, yeah, just keep watching closely if you need more demonstration on this.
7. Painting Part 3 - Snow Trees: Using some weight and a tiny smudge of cobalt blue, I'm adding in some snow to the tree is still using the same flat brush and the same method of typing. I am just working my way downwards the tree. You don't wanna cover up all the dark greens that you already have. You're just adding a tiny bit to just maybe the top, top layer of each tree. Little gentle strokes. Don't push in your branch on the cameras to reflect some of that light from the house onto the trees. I am taking the deep yellow with a lot more white and tapping gots to only the right side of the trees which are facing the direction of the house. And also adding that same yellow and white to the ground right in front of the house to build on the reflection of the light. I'm going back in the olive green and some black to add to the trees just in between some of those whites and this noisy bits. Just to bring out some of the dogs a bit more. For a little more control, I'm using a small round brush. I'm also adding that same black just to outline the shape a little bit more of the house and define some of those spots a little bit. And then I'm also taking in some blue. So this is cobalt blue, some white and some black to make this a grayish sort of cholera. And adding that to the shadowy part of, of the trees.
8. Painting Part 4 - Foreground Trees: And back to using my flat brush. And I'm going to be working my way to add in Big Bear tree in front of the house. I've allowed me adding any leaves to this one just to kind of add to the venture, touch a bit more. Adding this tree in front of the house, I think will add more depth and perspective to your painting. Some gonna be starting with adding a thin line for the trunk and then just randomly drawing out the branches in different directions. And be sure to hold your brush straight up to get the NOR lines. I switched library J2, a very skinny, long pointy brush to get those tenor and tiny tweaks to my branches. Be intentional of adding in different variations of sizes. Do your branches tried to do the semiaquatic so that you can get a more natural effect. And this will also prevent your hand from shaking. Feel free to look at a reference. Pick off a bear a tree if you need help with a section on, on the direction of how to draw them out. So yeah, there can always be really helpful too. I made and I'm using that same brush. I am taking white and just a tiny, tiny smudge of funding at all. And just adding it to the sides of the branches to add to give it that snow you effect. I'm going to be adding a big snowy tree right to the foreground. So the same exact steps will be applied to this one as we did to the smaller ones in the back. But this time obviously it'll the the strokes will be much bigger than the ones we did before. He was a slightly bigger flat brush for this tree. If you have one, I'm starting with a thin vertical line and then using the tip of the brush, start at the tip and tap heal via Jayanthi moving left and right. So you're kind of just going in back and forth as you work your way downwards. So just moving left to right. And as he worked your way downwards, Make sure to widen our pure shape. All right, so now I'm adding in some white and a little bit of CVD blue to add in the snow to my trees using the exact same method. To add in some reflection from the house. I'm taking you in a little bit of yellow and a vacuum of eight and just adding and kinda tapping my way through the right side of the tree.
9. Painting Part 5 - Middle Ground: All right, now working my way through the middle ground here, I'm using a mixture of this cobalt blue, white, yellow, and a tiny bit of black to create this light greenish bluish tend to add to certain areas of the ground. So remember why does reflect color around it? So since we've got white snow, it will reflect colors from the tree, the lights, and the skies. So adding tiny tens of green, yellows, blues to the ground will add a nice effect to your, to your middle ground. I'm just taking y directly now and building apps and laugh that snow to the ground. I'm using black and foreign CNR and making little tiny strokes to kinda represents little steps, little bricks leading up to the house. Getting some of that cell to the rooftop of the house. I'm using a lot of whites, just a tiny bit of Coval blow and just laying it on top of DevOps. Alright, here I'm just deepening up some of that reflection of the light to the ground. Sum using the deep yellow intensifying some off that color. Just a tiny bit of few shadows to the snow. So using cobalt blue and some black for that.
10. Final Touches : Let's make this evening a bit more magical than cozy by adding some falling snow. I'm using a tiny round brush and clean, right? To make quantum dots throughout the painting. Alright, and then to finish off this piece, I am going to be adding in a few people. You don't have to do this if you are not comfortable with it. But I just had to add in some more interest and it would build on Bolson counter to the painting as well. So to start off, make a tiny dot, it can be a little irregularity future was still, which can give an impression of a piece of clothing or yhat. Then for the body, you think of the ship as an upside down triangle, but again, not making it perfectly. These people are far away so don't get caught up in too many details for the legs. You just want to add a thin little lines coming down from the body, one shorter than the other to give the person the impression of blocking. I thought of adding a little child on the side. So I give him a little bit hat, which I think is queued. I really hope you all enjoyed today's class and learn some basic techniques in painting. A cozy had been tourist, snowy landscape. These can make Walid great gifts the season. You can also print this on your very own handmade card or painted directly on your DIY card itself and give it to your loved ones. I'm sure they're gonna appreciate it so, so much. Move onto the next section where I will discuss the class project where you can get involved. I can't be to see them and I'm so excited.
11. Class Project : Thank you all so much for watching and I really hope you enjoyed today's cozy winter landscape. So for this last project, I want you to try and paint this winter landscape and acrylics. Just take it step-by-step, layer by layer. And obviously, if you need any help, so make sure to post any questions in the discussion tab below. And once you're done, do not forget to post your projects and the project tab. I would love to see it and also feel free to leave this class review if you enjoy it. Definitely does help me out a lot. Once again, thank you all so much for watching and for completing your class. Well done, and I will catch you very soon.
 Alifya Plumber, Artist | Acrylics, Watercolors | Painter