Transcripts
1. Introduction: Welcome to able to live
QuickStart for beginners. My name is Brian Jackson
and I'm a music producer, audio engineer, composer, sound designer and educator
from Brooklyn, New York. I'm also the author of the
music producer Survival Guide, chaos, creativity and career in independent and
electronic music. I'm one of the first five
Ableton certified trainers on the planet since 2008. And while I do often use Pro Tools when
working on sound to picture projects and logic from time-to-time when
collaborating with other producers and composers. Ableton Live is my primary DAW. The one I've used to
create all of my music since version four
was released in 2004. I've created this course for total beginners
with Ableton Live. The only prerequisites
for this course, or that you will want to have solid skills with
your Mac or PC, such as knowing how to locate
system settings and how to easily find and manage files and folders on your computer. You don't need any music theory or music production experience. Why live? I can sum up why
to use live in five reasons. Creativity, workflow, flexibility, speed,
and live performance. Of course, live is named live
because it was originally designed to allow musicians to perform on stage
with their computer. It's now the industry
standard DAW for live performances of
many genres with some of the largest acts in the world using live to run their entire shows in front of massive
crowds around the world. But even if you don't intend
to perform with live, it's evolved into
one of the most powerful and popular DAWs for music production
used by musicians, producers, beat makers, and composers from almost every
genre of modern music. We'll start with some general discussion of what
you need to get going and then move on to
setting up an account, downloading, installing,
and authorizing live. The first half of this course is about learning your
way around live. In the second half
of the course, we'll make a simple
song together using content from
the core library, which is automatically installed with every version of live 11. Your project for this
course is to complete a simple song that can be
exported as a wave and MP3. You can either remake
the song as I show you, or create something
completely on your own based on
what you learn. I'll mostly be on
MacOS for this course, but live is nearly
identical on Windows. I use Windows for a few
parts of the early lessons, and I will discuss
pertinent differences between live on the
two operating systems. If at anytime things are
moving too fast for you, you can stop and
pause the lessons and try things out for yourself until you're ready to get going. Again. I've included a number
of Live sets that you can download so you
can follow along, check the links below. And I'll mention these
projects multiple times as we move
through the course. If you have any questions
about the course, definitely use the
discussion section below. I check in often and
do my best to reply within 48 h, often much quicker. I'm also available for private
lessons via video chat. Should you get stuck or simply wanting a personalized
learning experience, you can reach me at info
at Formlabs nyc.com. In the next video, which is
the first proper lesson, we'll talk about what
you need to get started. And I'll point you to some of my older courses just in case you only want to use Live nine
or live ten for some reason. Okay, let's go.
2. Getting Started: What do you need to get
started for this course? You don't need too much, really just a fairly up-to-date computer with
minimally 8 gb of RAM. On MacOS, you'll want
to be running at least 10.13 High Sierra or on Windows, you'll want Windows ten
built 1909 or later. And this is if you're
gonna be using live 11, you'll also want to make
sure that you have plenty of free hard-drive space weather on your internal drive or if
you have an external drive. Here's the page on Ableton site and it's
also linked below. You'll ideally want some
decent headphones or speakers, but most earbuds should be
okay just to get you going, as long as you're careful with the volume leaving
your computer. For this course, you won't need a midi controller or
an audio interface, though, having the
latter for controlling your listening levels is ideal. Check out the kit that I've linked to in the discussion for some equipment recommendations
for beginners. Which version of live
is right for you? Well, for this course
you can download the 90 day fully functional
demo of live 11. Sweet. Just note that each
time you launch live, you'll want to make sure you
have an Internet connection so that you can actually
save and export. But you can use any
version of live 11, including intro,
standard, or sweet. If you have live light, which is only
available bundled with third-party products such as many different midi controllers, you should be okay, but it does have more
limitations than even intro. For this course. If you have a license
for an older version, you should take advantage
of the free update to light 11 via Ableton site. I've added the link down below. If you're serious about
working with live, once your demo expires, you will likely want to purchase
at least live standard. Live suite is essentially live standard with a ton
of add-ons included. Since samples and other more
advanced functionality, you can check out
the full list here. On a final note before
moving onto the next lesson. If you are alive
ten or earlier and don't want to install
the live 11 trial. You might want to check
out my four-course series created in Live nine. But if you wanna do this course, you should be just fine. Though Ableton made
a few major changes to one part of the
interface in live 11, which I do address
and a free PDF that's linked in that course. And down below here, though, you can grab the trial of
live 11 for this course and keep your older licensed
version on your computer. Note that to open any projects I have supplied
for you to download, you will need live
11.2 or newer. Okay, so let's move on to
installation and authorization.
3. Installation and Authorization: In this lesson, we're going
to create an account, download the live 11 trial, and authorize it so you
can save your work. If you've already completed
all of these steps you still might want to watch
through in case you missed any finer points. Since I'm already
authorized on my Mac, I'm going to show
this part and Windows ten via Parallels
Desktop for Mac. That also means there's
one final step that I show on Windows that I'm not going to show for
the Mac install, which happens at about
2 min 30 s or so. So let's go to ableton.com and click on login or register. If you already have an account, you can just login. But for now we're going to
register as a new customer. Ableton has a great newsletter, so I do recommend
signing up for it Here. Let's go ahead and login. And then click on your account. And you won't see
any licenses yet. If you purchase live, click here in this pop-up and
choose register a product. And then you'll just type in the serial number that Ableton, since you if using
the free trial, your license will show up
once you finish authorizing. To get the pretrial click
here on try live for free, and then choose the
appropriate version for your operating system and
computer to download. Now, keep in mind that live
11 suite is about 2.6 gb. So depending on your
internet connection, this could take a little while. We're going to do the
Windows install first, and then I'll do
the Mac version. So you're going
to open the file, double-click on the installer, choose, Extract. Extract. It. Just can take a little while, so I'm going to fast forward. And then now we can click
on the actual installer. And you're going to click
through everything and agree. Again, this can take
a little while, I'm going to fast forward. And now you can
actually install it. Agree? And again, this
could take a little while, so I'm going to fast
forward and finish. And now we're going
to open live 11. And because we still
have our browser open in the background
and we're logged in. This is going to go
pretty smoothly. So keep your browser
open and stay logged in. Now, just hit start your free trial and agree. And now you're ready to start
using live 11 on Windows. Let's now get this
installed on a Mac. So we're going to
download the universal binary fast-forwarding here. I'm downloading to the desktop, but you're downloading
might go to your downloads folder
in your home directory. Double-click to open it. Go ahead and agree
with the user license. It's going to open
the disk image and then drag live 11 to
the Applications folder. And then make sure that
you eject the disc image. You don't want to
accidentally open Live from the disk image and then
go ahead and open live. And just like with the Windows, install heavy web browser open in the background
and be logged in. It'll ask you to
authorize and it'll go through the same steps we saw with the Windows installation. Okay, now you're ready to go.
4. Getting Help: In this lesson, you're
going to learn how to get help when
working in live. Let's start with the help
menu in the top view. Notice all the options here. Let's select Help view. On the right of
Live's interface, we can see the health view. To close it, click
on the X here. Use the help menu
to open it again. You can access Ableton is
built-in lesson system, which is actually how I first learned live way back in 2002. You can also access
the manual from down here or from the help menu. Make sure to check out
Ableton is manual. It is really good. Now we'll just click
on a link and then use the buttons at the bottom to
navigate through a lesson. Up here at the top, the back and forward buttons are for
navigating your history. And you can always get back to the start page with
this Home button here. Many of the lessons
have live sets that you can open
to follow along. Like here when we click
what's new and live 11, this is the project that opens the very first time
that you launched live. At the bottom of the
lessons homepage is even a lesson on how to
navigate the lessons. One tip when using live, there is always and only
one set open at a time. So closing the sets window actually quits the application. If you want to start a new set, just go to the File menu
and choose New Live Set. Let's close the help
view and move on. Able to not only gives
us built-in lessons, but also a way to
get information about anything that's
under our pointer. On the bottom left
here is the Info view. Notice how it updates
as I move around the mouse to show and
hide the Info view, you need to type question mark, which is Shift plus backslash. Right under the Info
view is the status bar. This area won't always
have something visible, but it does often give us useful information
about various things that we click on Select
or mouseover, e.g. the volume setting
at this fader. This is easy to miss, so check it out
from time to time until you get used
to live a bit. That's it for this lesson, take some time to make
sure you can open the manual and show hide
the help and info views. In the next lesson, we're gonna look at the
audio preferences to make sure you can hear the
sound coming out of live.
5. Sound Setup: In this lesson, we're going
to look at the Audio tab of the preferences to make sure that you can get sound
coming out of live. So we're going to
open the preface from the live menu and a Mac. Or if you're on Windows, go to the Options menu. Right now, we only care
about the Audio tab. For driver type on a Mac, it's always gonna be core audio. Windows. You'll see a
bunch of other options. Ideally, we want to
use an ICO driver, but the Windows drivers
should work for this course. If you don't have
an audio interface that installed this driver, you can get the free
osteo for all driver. I link to the page about
it unable to incite below. For the audio input, you don't need any device now, for the output, it's
either gonna be your computer's output
or your audio interface. If you have one. For the
sample rate, 44.1 K, also known as 44,100 or
48 K, which is 48,000. Either one of these is fine. They do pretty much
sound the same. But the 44.1 is the old-school standard
for music only projects. While 48 K is standard for
anything broadcasts related. But many people
just use 48 K These days for pretty much
everything including myself. Most people,
especially beginners, really shouldn't bother with
anything higher than 48 K. The buffer setting is to balance
how quickly the computer reacts to sound going in
and out of your computer, and how hard the
computer's CPU has to work to accomplish
its many tasks. 128 or 256 should
be good for now. But if your computer
is sluggish, you might want to try
a larger setting. And if you have one of the
new insanely fast computers, you can try something lower. There is no right setting here, only what works for
you and your setup. The test tone is used
for a number of things. But for now, just think of
it as a useful way to make sure that you are
actually getting sound out of your computer. But it is also good to see what buffer works
for your setup. In the next lesson, we're going to take a
look at the browser and also talk a little
bit about life packs.
6. Packs and The Browser: In this lesson, you're
going to learn about Live's browser and a little
bit about life packs. Remember that this is
a QuickStart course, not a masterclass. So we're only going
to cover what you really need to get going. Okay, so what's a pack? Here on Ableton site, we can see packs across
the top navigation. When you click and
go to that page, you'll see a ton of stuff. E to the Listed products
is known as a pack, which is the format
able to use this to deliver content
for use with live. Packs can include
anything really. Loops, samples, presets
for Simpson effects, and even whole example projects. And they do vary
all quite a bit. If you click into one
of the packs pages, you'll also get a
lot of info about the pack and some
audio demos as well. Live I live in Suite
comes with a lot of packs and you can install
them with your trial. For this course, we're only
going to use the core library so you really don't need to install anything else presently. Once installed, you'll see
them here in the browser. Let's go down here
to places and then click on pacs and you'll see them right next to
the core library that Ableton installs the first
time you launch Live. Let's now dive into
the browser bit, starting at the
bottom with places. Places represents
the actual locations of files and folders
on your hard drives. Pack shows you all of your
currently installed packs, the core libraries installed by live the first time
you launch it. If you scroll down,
you can see the packs that are licensed with
your version alive. You can download and install
them from right here. But I recommend not doing that until you're up and running no earlier than towards
the end of this course. If you did install some
already, No worries. And you don't need to
uninstall them, though. If you do ever want to delete
a pack or uninstall it, you can just right-click on one. And also notice you can show the built-in lesson for each pack if you want
to learn more about it. Categories is where live
sorts all of the content from all the packs
into categories. Here you will also find lives, built-in instruments
and effects, and any third-party
plug-ins you've installed. We'll come back to some of
these later in the course. You do not need any plugins
for this course, by the way. But if you do want
to access any of the plug-ins that
you already own, you're gonna go to Preferences, Plugins tab, and enable V S
T on Windows or on a Mac, you can do VST and
or audio unit. Then they'll show
up in the browser. The first time you enable
these live does have to scan all of them and it can take awhile the first time
you turn them on. So just be patient. Now up here at the top, collections is how you
tag your favorites from anywhere in
categories or places. Let's add an effect
to Favorites. Go to audio effects than
unfold EQ and filters. Single click on Auto Filter and then just press the
number one on your keyboard. And you should now
see a red square. And now if you click
up top and favorites, you'll see it there. You can actually have up to seven collections
if you click on Edit, which shows up to the right
of the word collections, check the box for any
of the ones you want to see and you can rename
them as desired. Oranges, number two,
yellow number three, great number seven, et cetera. If you want to remove
something from a collection, just right-click or press
the associated number again, leave that collection and when you go back to it,
it'll be gone. Let's talk a little bit about
navigating the browser. Here in packs you can
see the core library. If I click on it, I can now use the arrow keys
to move up and down and open and close folders with the right
and left arrow keys. When we get to a file
that makes us sound the browser set up to
Auto preview by default. So if we look down here, we have a waveform in a preview switched the little
blue headphone. If you turn this off, you can always preview
manually with the right arrow. If it's a long file and just press Escape
to make it stop. Or you can jump around
by clicking with the cursor that looks
like a little speaker. To control the volume
of the preview, we do need to jump over
to the master track. We'll look at the mixer in
more detail in later lessons. But for now, know that
this slider controls the level leaving live when the sound is coming
from a track. While this knob is
used to control the browsers output volume. Dad something from the
browser to attract eyeballs you have to do is drag
it or double-click. Depending on what it is, libel either add it to the currently selected track
or make a new track for you. Okay, so let's add a few
samples from the core library. We'll go into a bunch
of these things in more detail as we move
through the lessons. The search feature in the
browser is really useful. All you have to do is type in what you want and search for. Then you can use the categories to narrow down your search. Command F or Control F is the shortcut to jump
up there by the way. So you don't confuse
yourself later by accident, make sure to clear
out your search. Just click on the X up here. Okay, so in the next lesson, we're gonna learn how to use loops here in the session view. And we're gonna make a
little bit of music.
7. The Session View: In this lesson,
we're going to play around with different
loops to get a sense of one of the evil
twins most notable innovations, the session view. In the next video,
we're going to do a thorough tour of
Live's interface. But I want to get to
making some music before continuing with
overview stuff and then moving on to writing our
parts from scratch with Midea on the desktop in
the Finder or Explorer, create a new folder
and name it something useful like Ableton
Quickstart course. Go to the pinned post
their discussions and download the follow along Project Zip ideally to the
folder that we just created. Unzip it with a right-click
or double-click, and you'll see a folder
with some files in it. Open the folder, Double-click
on follow along a dot ALS, or you can open it
from the file menu. I recommend keeping this
zip file around so that you don't have to download
it again if you want to start over from scratch. And we are going to
use the other follow along files in
subsequent lessons. Remember that you
will need live 11.2 or later to be able to
open these live sets. You should see what I see now. I created this set by adding various things to
Tracks via the browser, as seen at the end
of the last lesson, we're going to look
at how I created the various midi clips as
we move through the course. Now, leave live open and continue watching until
it makes sense to pause. And then you can try some
things out for yourself. Unlike most DAWs, live has two different ways of working and two different workspaces. Ableton calls this
the session view. What we're looking at now, Session View is non-linear, meaning that you can
play different parts in any order at anytime. Session view was originally designed for live performance, but it's also an amazing
sketchpad for working on ideas quickly before deciding what you want to arrange
and do a song. And if you hit Tab
on your keyboard, we'll switch to the
Arrangement view. The arrangement view is a traditional timeline
approach and it is needed to arrange a composition
will return to working in this view towards
the end of the course. To go back to Session
View, just hit Tab. Or you can also click on these
selectors to switch views, but tab is much faster. Let's go over some
basic terminology before we dive into
the session view. Clips and track's. Clips are the basic building
block of any project. They contain either
audio or midi. Audio is a recording. The actual sound
that we're hearing. While Midea is just data. And it tells an
instrument such as a synthesizer or sampler how to make a sound returned to midi in a
little more detail, a few lessons down the road. Now, tracts contain clips and the complaint back
only one clip at a time. Though you can have
as many tracks as you want in live standard
or life sweet. Every clip in your
set is on a track. Every track is in both views. And you can put
clips on tracks in either one of them
or both of them. Think of Session
View and Arrangement View as two different
inputs to the tracks. Not unlike a DJ mixer
channel that can be switched between a
turntable or CD player, but not both at the same time. Okay, so I'm going to
launch a drum loop. And now another one. If I hit tab, you can see that the arrangement
view is empty. If I stop this clip and then look at the
arrangement view again, we hear nothing even
though live is playing. We hear nothing
because we've not put any clips on the tracks
in the Arrangement View. Now don't worry, we
will do that soon enough to demo how it's the same track in both views that's launched a clip
again and press Tab. If I turn down this track and go back to the session view, you can see that the volume
is the same in both views. Will cover the mixer
in more detail. A few lessons from now. Okay, So full disclosure. At this point, I was totally
confused the first time I use Live and I think
pretty much everybody is. At this point. It's actually quite
simple once it clicks. And it's one of those things
that once you got it, you got it and you
don't forget it. So just hanging in there. I promise it'll all make sense soon if it doesn't already. Alright, so this spreadsheet looking grid that we're looking at in this session view is
comprised of clips, lots. A slot is like its own mini
sound player with stop, play and record built-in. In the session view, it clip is either launched or it's not launched right now, only one clip is launched, as indicated by
this Launch button. If I stop playback by clicking here or
pressing space bar, you can see that the
clip is still launched. Even though it's not playing. If I hit Spacebar
again, it keeps going. Now to actually stop a clip, just launch another one on
the same track or press any square on the track
square, meaning stop. Or click on the stop all clips button over here on
the master track. Now we don't get
into recording audio or midi in this course. But for now, just notice
that if my arm, this track, the empty slots
changed from stop to record a square
root to a circle. Now, make sure not
to accidentally arm attract so you don't accidentally record
something that will cause confusion later. Let's play around
with these clips. Now you can mix and
match clips from different tracks to find some
combinations that you like. Or you can move
clips around if you want to hear them
at the same time. So let's create a new audio
track so we can hear to drum loops at once
from the Create menu. Insert audio track. You can use the
right-click context menu. From the Edit menu
or the context menu. Choose Rename and give
it a useful name, Command R or Control R.
Click and drag a clip, or you use Cut Copy Paste. What if you want to launch a
whole row of clips at once? Over here on the master track, you can use the scenes. Notice that the
scenes also launched the stop buttons in
the empty slots. What if you don't
want to clip to stop when he launched
a new scene. Easy. Just remove the stop
button from the edit or Context Menu and
repeat to add it back. And if you want more scenes, you can create them from the Create menu or
from the context menu. Now what if you like a
combination of clips that you have going but they're
on different scenes. We're going to use
capture and insert live. We'll add a new scene below the currently selected one and copy all of the
currently playing clips and keep them going. So let's rename our scene with Command R and give it a useful color via
the context menu. And then we can drag
it up here to the top. Okay, So one last thing
before we wrap up and move on to going over the
rest of the user interface. Have you noticed that when
we launched and stop clips, it always happens on the beat. You can control this timing
via the quantization menu. You're able to means quantizing the starting and stopping
of clips and other events. Now, midi quantizing, which
is a different feature. It's a bad idea to
set this to none, but let's hear what happens. Okay, So you can tell
that's a total train wreck. Now what about some
of the other options? Okay, so that seems to
be a little better. Now here's a fun trick. You can use the arrow keys on
your keyboard and then hit Return to launch the play or stop and the
selected clip slot. We'll see how you
can give individual clips their own
settings in lesson 16. So just play around
and have fun, but you'll also
likely want to leave the global
quantization is set to one or 2 bar most of the time. Now just practice
what we've covered here and just have
fun playing around. If you like what
you've done so far, make sure to save your life
set from the file menu and put it in the folder we created at the beginning
of this lesson. You'll soon learn how to
capture your performance into the Arrangement view
so that you can export it out as a song.
8. Interface Tour: In this lesson, we're going to take a tour around the rest of Live's interface and promise we'll return to making
some music really soon. We've already looked at the
health view, the browser, and the session view, and we had a super brief glimpse
at the Arrangement View. Let's start with the menus, live, file, edit, create, view options, and help on MacOS, we have the usual
application named menu. Here we can do the
usual Mac things and most importantly,
access the preferences. On Windows, you'll find the preferences in
the Options menu. And remember, if
you're on Windows, nearly all the key
commands are identical. Except you'd hold down
Control instead of Command. And Alt and Option
mean the same thing, whether you're on
Mac or Windows. And especially in this case
when we're using live. Over here in the File menu, we see the usual
things for opening, saving, and also exporting. Notice that there's
no closed set option since live always has a set
open and you can either open another set or quit live to close a set will go into saving in detail in the next lesson and exporting towards
the end of the course. The Edit menu is full
of useful commands, including the
expected cut, copy, paste, duplicate, delete, and some others we've covered
in the previous lesson. Notice the key commands here. Some of them are single
key, key commands, which is really nice, but also be mindful about
accidentally hitting them. Create is where you tell live to make something new for you, whether a new track or seen
as we did in the last lesson, but also some other
useful functions. The View menu is simply about what you want
to see or not see, and you can show and hide the different elements of the
interface from this menu. Notice how the key commands are really logically laid out. And you can also use these
little triangles and circles in the corners of the interface to show
and hide things. We'll explore some
of the commands and the options menu when we
get to relevant lessons. The help menu we've already
covered in a previous lesson, the context menu is used a
bit in previous lessons, but it is worth taking
a minute to talk about. Since the context menu shows you different
options depending on where you right-click on
a Mac and you're not sure how to right-click
with your trackpad or your fancy Mac mouse. You can always just hold down
control while you click. Are also makes sure to check
out the macOS mouse or a trackpad options in the system preferences
from the Apple menu. When you right-click,
sometimes you'll see a lot of options, sometimes you won't. And sometimes you'll see
commands that are in the menus and
sometimes you won't. For this course, we're not
using any of the commands that are not found in
the primary menus. Across the top we
have the control bar, and this is always visible. We're not going to use
all of the controls found here in this course. We'll cover each
one is we need it. But let's take a quick
orienting to are now. And also makes sure to
use the Info view in the bottom left here when
you mouse over each element. Over here on the
left, we find all of the controls related
to timing and tempo. To change the tempo for
your entire life set, you can click and
drag up and down or click and then type a value. We looked briefly at
the quantization menu in the previous lesson. The middle we have
a few sections. All of them are
related to playback, automation recording, and also for looping when you're
in the arrangement view. Over here on the right, we have controls related
to midi editing, mapping, CPU, and
the audio engine. The bottom pane at the interface is known as the detail view. This view shows you
either the clip view or the device view. Shift plus Tab will toggle
between these views just to tab toggles between the Session View and
Arrangement view. The clip view shows you all the details for
audio or midi clips. And the device view
is where you see any audio or midi effects and any virtual instruments
that generate sounds. We are definitely going to take a deeper look
at the clip view, a few lessons from now, and we'll get you started
with the device v2. The Mixer is for controlling
all of our signals. We can see the mixer
here at the bottom of the session view and over on the right when we're in
the Arrangement View, we do have a full lesson
coming up on the mixer and its related views right
after the following lesson. So let's learn how to properly save our
projects right now.
9. Saving Your Work: This lesson is all
about properly saving your work and developing good file management
habits from the gecko. Let's start with how
able to organize as all your files and let's learn
their proper terminology. Live opens up with an
unsaved Untitled Set. Anything you do now is
going to be stored in a temporary folder that's buried somewhere on
your hard drive. So let's save before
we get too much done. Ideally, you'll have
a dedicated drive for your music projects, but at least make sure
to create a folder in the Finder or Explorer to
store all of your projects, just like we did a
few lessons back, when you save for the
first time liable create a new folder to contain
everything for this project. Thus, the folder creates is
called a project folder. In this project folder, libel create an
assortment of files and folders depending on
what you've been doing. At its most basic, you'll see an Ableton project info
folder and one dot ALS file, which stands for
Ableton Live Set. I do recommend that you leave the project info folder alone and don't accidentally
save anything in there. If we look across the top alive, will see the name of
the currently open set and the name of its
containing project folder. And right now they're
gonna be the same thing, which is totally normal. So let's say that we want to
save a version of our song, which for a lot of reasons is a good idea to do
from time to time. In case you want to easily
backtrack to a point before you've made certain
changes or mistakes. So let's now do a
Save Live set S, and we're going to add V2 for version two at the
end and save it. It's crucial to save this in the same project folder right now since it is the same song. Now look up top at the names. You can see that something has changed and the other has not. If we save a copy, this allows us to make a
backup in the background. Unlike save as live will
not open this one up. As you can see across the
top, it still says V2. Now you won't really need to use save a copy for this course, but it is good to know about. So let's say that we want to
start working on a new song. It's really important
to make sure that we save the new set in
the right location. So let's create a new
live set and save it. Make sure you don't save it in an existing project folder. Now, it's not the end of
the world if you do this, but once you get
going with live, it can cause a lot
of inconveniences, especially if you have
multiple different songs in one project folder. So let's save it
in the folder you created for all of your
music production stuff. The option called collect all
and save is very important. It will copy all
audio files used in your current set to
a samples folder in the project folder. We'll come back to this
one again once you get to creating your own project
folder for your course project. But let's look at a
project folder for one of my completed
compositions. In this folder, we see a
number of files and folders. Two of these folders I created myself for keeping
everything organized. Bounces is where I keep exported versions of the
song as I work on it. And this way I can
listen to them anytime without
needing to open live. And z old ALS is where I keep old Save As versions to
keep things neat and tidy. I added z to the beginning
of the name just so it easily sorts to
the bottom of the list. Live created all of these
other folders as needed. And when I did a
select all and save. So as long as you're mindful of where you save your files live, we'll do a good job keeping
things organized for you. And if you develop
good habits now, you don't have to worry
about where everything is and are much less likely
to lose important files. These other two options are very useful once you start
using live regularly, but we're not going
to cover them now. What do we do if you accidentally save a
set somewhere that you can't locate and you
can't find it in the Finder or you can't
find it in the Explorer. So we can use the browser
to locate it for us. If we go down here under places, we can see current project. Just right-click and choose
Show in Finder or Explorer. If it's a set that's not open, try go into File, Open Recent, and then open it, and then use the current project right-click to locate it. In the recent set
sub-menu, It's grayed out. That means that live
doesn't know where it is and you either moved it, deleted it, or rejected
the drive that it's on. In that case, use the
search feature on your Mac or PC and then
make a note of where it is and then move
the whole folder into your dedicated
projects folder or drive. Okay, that's it for now. In the next lesson
we're going to learn about lives mixer.
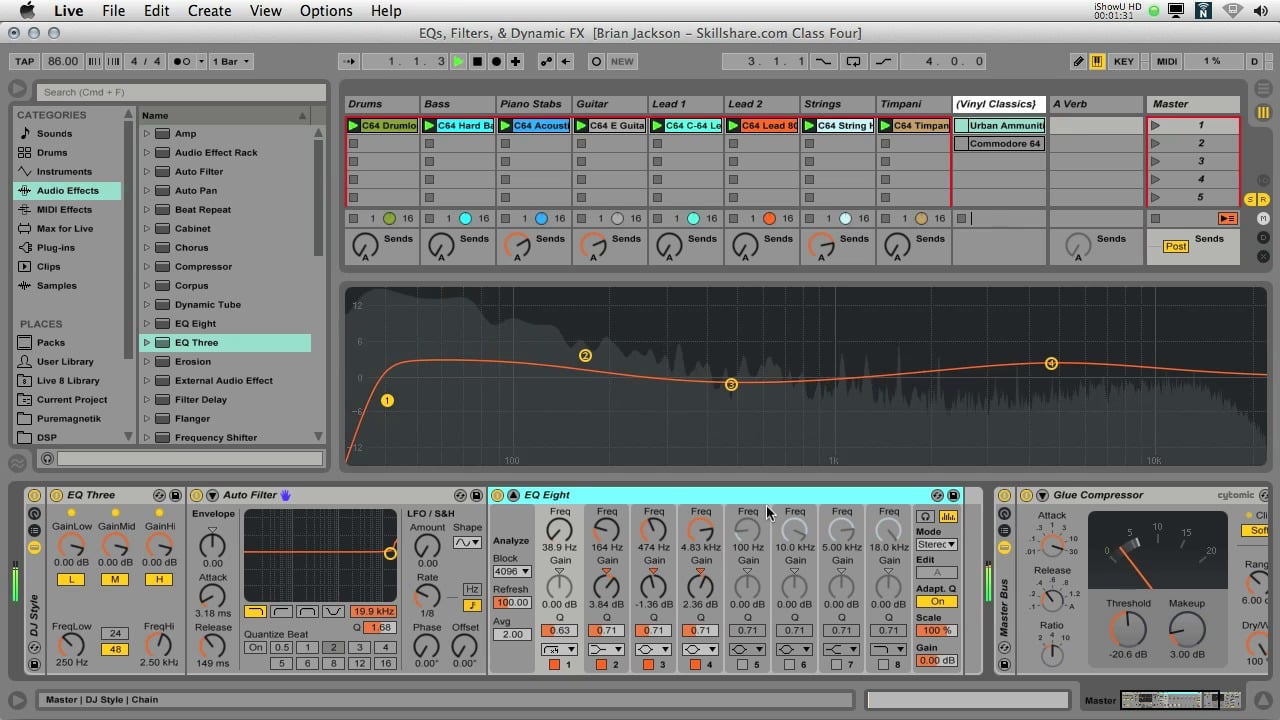
10. The Mixer: In this lesson,
we're gonna go over the fundamentals of lives
mixer at its most basic, a mixer is simply a device
that adds up signals. In a professional audio mixer or DAW like Ableton Live mixtures
do a lot more than that. Let's take a look at
what you need to know right now about lives mixer. Here I'm using the
fall along a set. If you want to follow along. Over here on the right, we can see which aspects of
the mixture are visible. The Show Hide buttons, match opsins found
here in the View menu. Presently, only the controls that Ableton labels as
the mixer are visible. Let's look at these
and then we'll look at the other components. Each of our tracks has the exact same controls,
volume, solo, mute, and pan, with the exception
that midi tracks without an instrument will
not have all of these until an
instrument is added. To make an individual
track louder or quieter. Just moved the volume
slider up or down. If you want to hear
only one track, click on the S to solo this track and this will mute
all of the other tracks. Ableton call it the boxes with the numbers in them,
track activators. But really they're
usually just called mute, or in some cases, cut. Mute means that you won't
hear the track's output, just like when you press
mute on your phone. Or if you want to move a sound left or right in
the stereo field, use the pan knob to
reset a knob or slider, just double-click on it. Now, over here on the right
we have the master track, which was briefly discussed in the lesson about the browser. The master track is
always there and there's always only
one of them in live. This is where all of the sounds from all of your
tracks travel to and mixed together before leaving your computer for your
headphones or speakers. Generally speaking,
you don't want to change the volume on the
master track when mixing. And ideally you'll use the volume control
on your computer, or even better, an
audio interface. But for now, feel free to
use it to turn things down. It's a best practice to
keep all of the levels on all the tracks from hitting red at the
top there meters. But definitely avoid this
clipping on the master. For your convenience, I've
already added a limiter to the master track
to make sure that the levels don't go too high if you're working on headphones. Let's now take a quick
look at the other mics are related features and
live. Starting with I0. This shows our
routing options for the inputs and outputs
of the tracks. We use these choosers when
recording audio and midi, and also for some other
intermediate and advanced uses. You can see how all
of our tracks are routed by default out
to the master track. By the way, you
won't need to use the IO choosers in this course. Now let's jump down
to the bottom. C refers to the
performance impact, and it shows you the CPU
usage on each track. X's for the cross fader feature, which is great when you're
using live to perform on stage and can be
really fun creatively, but we don't need
it for this course. D here means track
Delay and can be ignored most of the time and definitely can be ignored
during this course. And this is for
our mixer proper. S and R work in tandem and
stand for sends and returns. Going into the
sentence and returns isn't necessary for this course, but they can be a
lot of fun and they are very useful and
use all the time. So we are going to mess
with them a little bit. These concepts don't click
right away for many people. So don't worry
here if you feel a little confused,
that's totally normal. These are most commonly used for sharing reverb and
delay effects, which is why Ableton has
already created them for us. And the default set, return tracks are created from the Create menu and
don't contain any clips, since they are only for moving
audio around in the mixer. In live, sends her always
paired with the returns, e.g. send a on every track, copies the signal from the
track and send it to return a, same with B and so on. If you create more returns. Before wrapping up, let's
set up our center and returns from scratch and add some effects
from the browser. So I'm gonna delete
both of these returns. And notice how the
Sends also disappear. Now from the Create menu, I'm going to insert
a return track and then go to the audio
effects in the browser. And find reverb and the
reverb folder and then drag it anywhere on
the return or down here where it says drop audio
effects here in the device VT. Let's repeat this process. But now let's go to delay loop and double-click on delay
to add it to the return. Since return B was still
selected After creating it. We could have done
this shortcut before, but I wanted you to
see it done both ways. Now, make sure that this
dry wet parameter is set to 100% when using
these Anna returned. And this is so you don't
just accidentally make your unprocessed sound
louder for no good reason. Now you can play around by essentially putting
different amounts of reverb or delay
on each track sound. And then you can turn up or down the entire effect before it
goes to the master track. Along with the
unprocessed dry audio from the audio and midi tracks. Spend some time getting
comfortable with the controls we focused
on in this lesson, and then we're moving on next. So looking at the clip
view in more detail.
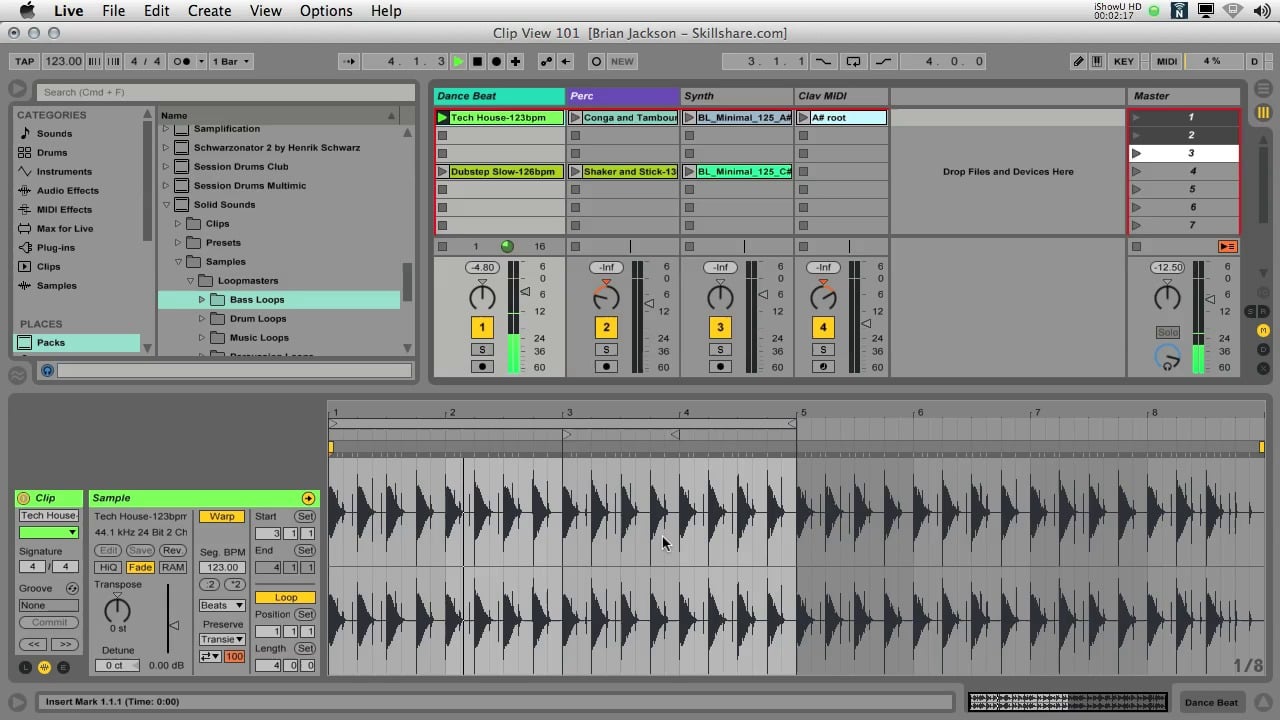
11. Project Setup and MIDI Clips Basics: In this lesson, we're gonna get the sounds ready for the song
that we're going to make. And then we'll get into
some middy basics. All of the sounds that
we're gonna be using are in the core library in all
versions of live 11. So you can see
them in one place. I've added them to
my favorites as briefly discussed in
lesson six on the browser. For this lesson, we're going
to use a blank new set. And you'll see two
empty midi tracks into empty audio tracks. We're going to need for
midi tracks right now. So let's delete the
two audio tracks and create two more midi tracks. Let's set our tempo to one-fifth
here in the upper left. Now use the browser
search feature. Click here and then type
Borussia kit for your drums. Here on the left click on drums. This category shows us
all of the drum kits included with any life packs
that you have installed. So let's drag board jacket
to the first midi track. And now we're going
to repeat this for our next three sounds, Jx, chorus base for our base. But now you'll click on sounds and categories after typing. Sound shows us all
of the presets for each of lives
built-in instruments, but categorized for
your convenience. So you don't have to look
through a bunch of list to find a specific
type of preset. For the chords. We're going to use
E Piano, rusty. And for our melody, we're going to use
little synth piano. So we're ready to go. This project is in the
folder that you already downloaded and is
called follow along b. And then that way
you can follow along with the rest of this
lesson immediately. But when you have time, I do recommend doing these
steps for yourself. Now, let's use
what we set out to learn about the basics
of midi clips and live. But first, what is midi? Midi stands for Musical
Instrument Digital Interface. It's a protocol that
was created by a number of synth makers in
the early '80s. Instruments and computers from different companies
could communicate musically with each other. The most important thing
to know about Midea right now is that
it is just data, it is not audio. Midi itself is simply a
set of instructions on how an instrument should
make a sound and how it should react
to incoming data. It's really powerful
and it's used to control a lot of
different devices in a lot of different ways. But for now, just remember that to hear a sound and
live when using middy, you must have a virtual
instrument loaded onto a midi track that's
going to generate the sound. Fortunately, we've done this on our four tracks and
we're ready to go. Double-click in
the empty space of an empty slot to create
a new midi clip. Then drag the Detail
View up so we can see more of what's
going on down here. Depending on the
size of your screen, you might want to hide the IO, hide the sands, and
hide the returns. We can see here what's
known as a piano roll. And the name is taken from
those old timey player pianos that use rolls of paper to
play songs automatically. Quick to the left of
the keys and drag up, down or left, right
to scroll on Zoom. Notice the numbers next
to the letter names. They represent which
octave we're looking at. And they show us the full
range of a grand piano. And then some s3 is
referred to as middle C, as it is found below
the treble clef and above the bass
clef in sheet music. Here in the upper right, we see a little pencil. This switch toggles
Draw mode on or off. The shortcut is B. Withdraw mode on to single click to create
or delete notes. And then we can go to the
edge of a note to resize it. To select and move notes, press B to turn off Draw mode. So let's click here
and empty space to clear out any notes selections, such as the last one
that we just created. Simply click on a note to
drag it where you want, or Dropbox to select multiple notes and then drag
them wherever you want. Or we could use the
arrow keys to move selected notes up or
down, left or right. And of course,
delete will delete them. Withdrawal mode off. You can create and delete
nodes with a double-click. Notice how all of the nodes
are snapping to a grid. By default, new clips
have a 16th note grid. As we can see here
in the bottom right. If we want to change
the grid setting, you can simply right-click
and select a different value. Or from the options menu, we can use narrow
or widened grid, and you can use Command
E or Command E on a Mac, or of course, control
under control to if you're on Windows. Right now, we have
a one-bar loop. We can easily change
the length over here on the left by
typing in a value. Or we can click
on the loop brace and then use some shortcuts. Command up, down will
double or half the loop, which would be Control
Up or down MPC, which just up or down. We can move the loop left
or right by its length. The left and right arrow keys move it according to
the grid setting, which can result in the
start marker ending up in a weird location
if you're not careful. So make sure to use the
up and down arrow keys. Now the left and
right arrow keys. But you can easily drag the start marker to
where you want it, or just type in a value
here on the left. And all of these controls
related to the loop brace and the playback start are exactly
the same in audio clips. To clear out all
the notes, select all of them and delete them. And then we can start working on our Beat Command a or
Control a on Windows. And then just press Delete to delete the whole clip selected up here, and
then press Delete. Okay, now we're
ready to move on to making a drumbeat
in the next lesson.
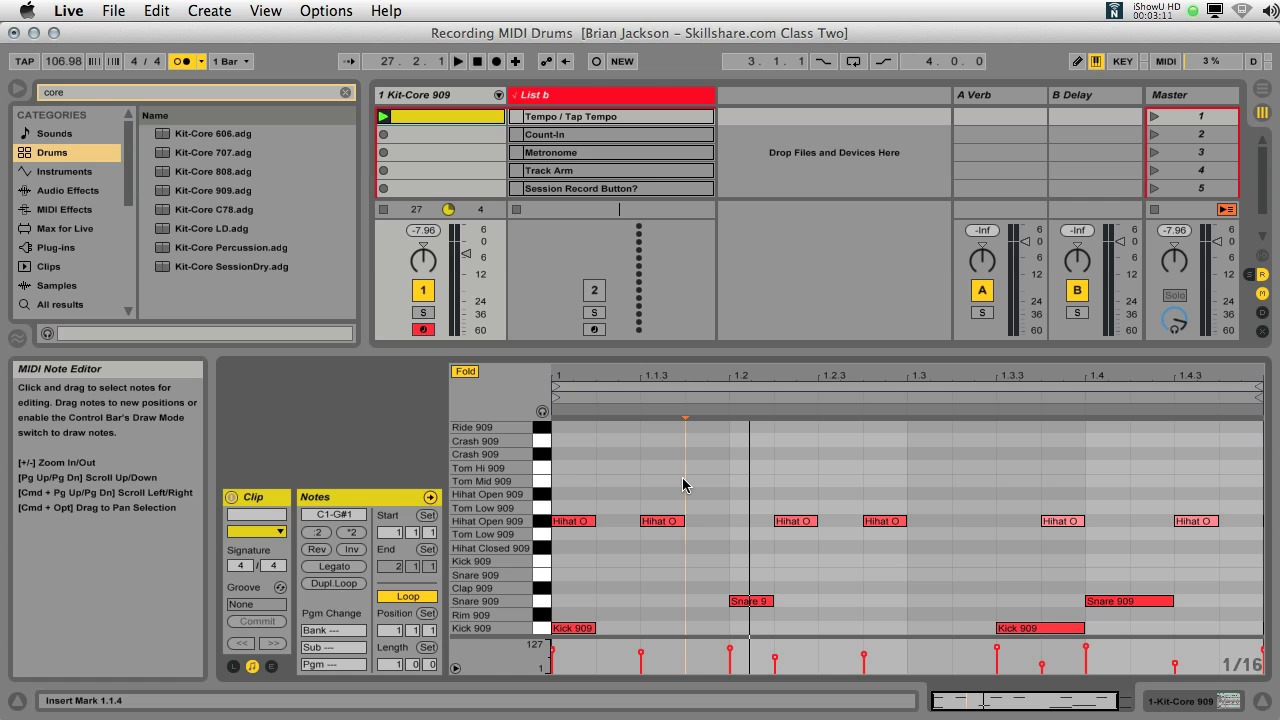
12. Creating MIDI Drum Beats: In this lesson, we're going
to make a midi drumbeat. We added this drum kit
in the previous lesson. So open up that set if
you want to follow along. Let's double-click
here in an empty slot, and this will make a
new empty midi clip. Down here in the clip view. Notice how live
puts the names of the drums next to the
piano notes for us. By default, this clip
is 1 bar in length, as we can see over
here on the left. And if we look in the bottom right or grid
defaults to one 16th. So we see 16th note
divisions in the piano roll. 1 bar divided by 16 is gonna
give us 16th note grid. This little blue
headphone icon allows us to hear a preview of the
sound when we enable it, when we click on a key or
touch any of the notes. Let's launch our clip,
and now let's pencil and some kick drums in what's known as a four on the floor pattern, which is gonna be one kick drum at the beginning of
each quarter note. And of course, if you
don't want to hear the preview, turn
off this button. Now, let's add some snare
drums to the two and the four. And this is going to
create the foundation of what's known as
a backbeat rhythm. And now we're going to add
that disco hi-hat pattern on every third 16th note
of each quarter note. Which would also be the same as saying every other eighth note. If you hit command two
to make the grid wider, you can see now that each of these is on every
other eighth note. Let's delete a few of the kicks and then move a few
of them around. Let's select our hi-hats by clicking on the piano
key to the left, and then use the left
arrow to move them over. Let's add one more hi-hat. Now, let's make a
variation on this beach. Select the clip and then Command D or Control D on Windows
to make a duplicate. And then go ahead and
launch a new clip. Let's find a few more sounds
and add some more notes. Once we've pencil in a note, you can just use the
arrow keys to move it around until we find
something we like. Okay, so now we have a
beat that can work for a lower energy part of our songs and one
that's higher energy. Let's name our new clips. And we can do that by selecting
and then right-clicking or Command on Mac and
Control R on Windows. A few of these drum sound
are a little too loud, so let's lower their velocity. The easiest way to do this is the whole command or Alt on PC. And then just drag up or down. You'll see the
little cursor change when you do this
right above the note. Okay, so it takes some
time to copy these beats and then play around and practice making your
own drum beats. In the next lesson,
we're going to add a baseline to our drums.
13. Creating MIDI Basslines: Okay, so in this lesson we're
going to add a baseline to the drumbeat that we just
made in the previous lesson. We could start on chords
or writing a melody now, which is totally an
okay way to work. And people work in a lot of different ways and start in
a lot of different places. But I want to keep working
on the rhythm section. The rhythm section is not just
the drums and percussion, but also the base. Base essentially
connects the drums to the melodic and harmonic
elements of the song. So our bass instruments play
notes, usually low notes, baselines are also about the groove and the
song's rhythmic feel. The bass track, we're
going to double-click, and this will make
an empty new clip. And we're gonna make
this 2 bar because you might remember that it's
going to default to 1 bar. So we're just going
to type two in the leftmost value right here. And let's also enable scale mode and make sure
that we're in C minor. Now live shows us which notes
are in our selected scale. We're going to
start by penciling in the rhythm all
on the same note. And we're just going
to do C1 right now. And want to make sure that some of them hit with the kick, snare or high hat. Now we'll change the length
of a few of them and see how the cursor changes to
this little bracket thing when you go to the FDA note. And now let's move these middle
three up, two semitones. So I'm going to press B
to turn off Draw mode. And then I'm going to
draw a box around them. And then I'm going to
hit the up arrow twice. Okay, I think that
sounds pretty good. Now we're going to
duplicate our clip command D or Control D, and modify our copy to
add two more energy. Let's see what's happening
in the drumbeat at the same time. Launch B2. So I'm going to click on the base clip and
then hold Shift, and then click on this drumbeat. Now let's select this last C and hold Shift and then
press the up arrow. And you'll notice
this is going to bump it up a full octave, which is 12 semitones. And this particular synth
bass patches program to slide between
overlapping notes. So I'm gonna go ahead and
overlap a few of them. Make sure to name your clips. And then you're ready to add some chords in the next lesson.
14. Creating MIDI Chords: In this lesson, we're going
to look at one way to go about adding
chords to a song. There are a lot of ways to
approach writing chords, and some people actually do this first even before
writing and drumbeat. So there is no right or
wrong way and only what makes the most sense for you and the type of music
that you're creating. I'm gonna make this a
very practical example. So we're not going to
spend too much time on music theory. The goal is for you to
see how quick and easy it actually can be to get a
chord progression going. Now, let's stop all the
clips before we get going on our chord track. Let's double-click to
make a new Miniclip. And let's set it to 2 bar
over here on the left. And let's launch it. And I'm also going
to right-click and set our grid
to quarter note. Since we already set the
scale mode to C minor when doing our base libel
Judas automatically. Now, make sure that we can
see S3 here on the left. And now we're going to pencil in the entire C minor scale, seven notes plus
the active on top. We can refer to
each of these with a number that represents
their position and the scale. The first, which
is also known as the tonic, than the second, the third, the fourth
up to the eighth, which is also known
as the active. For our chord progression, we're going to do 1254. So let's delete out the third
six-sevenths an octave. And then just for fun, That's select 4.5 and use
reverse over here on the left. And now we're going to turn these four notes
into four chords. We're going to do this by stacking 3rds on
top of each other. So each chord is essentially
going to be a third and a fifth stacked on top of
the root note of the chord. And this is going to create
what are known as triads. Triads form the basic chord
structure of each scale. Enter simply comprised
of every other note in the scale added on top
of each scale tone. If you did middle-school band, or maybe more than that. And he learned about
reading sheet music. There's ways to remember the letter names for the
lines and the spaces. So something like every
good Burger Deserves Fries for the lines or face, F-A-C-E. for the spaces, these letter patterns
are every other one. So essentially they're
patterns of thirds. And so you're going to notice
that those patterns show up again and again when
you build your triads. So to build them, Let's click on
scale over here to hide any non scale tones. So we're only going to
see the notes in C minor. And then we're just
going to pencil a new note on every other line. Okay, So let's check what we have against our rhythm section. I'm going to hit B to
turn off Draw mode. And then that space
these out a little bit. For this last chord, I wanna go back to
an eighth note grid and then I'm going to move
them over a little bit. And then maybe let's
select this first chord. And then I'm going to click on legato over
here on the left. And let's do that
again on the last one. And let's make this second
chord a little longer. And now I think we should lower this d in
this third chord. So let's move it down an
octave and I'm going to select it and then
press Shift Down Arrow. Okay, so now let's go ahead
and make a duplicate. And now I'm going to
deactivate the second chord and the last chord in the
first one of these clips. Before wrapping up this lesson, let's do a quick check of what
we have against our base. So I'm going to select the keys hold Shift and then
click on base. And then over here on the left, if we double-click on
the note names live, we'll zoom in so we can see all of our notes on the
screen at the same time. And we're looking just to
make sure that the notes and our baseline aren't
going to cause us an issue with the chords
that we just created. Normally the node D and C at the same time are going
to be very dissonant. But in this case, our chord is fading out
by the time this d hits. And a little dissonance is often a good thing and I
think it sounds fine. What about the busier
scene of these clips? I think this one
sounds okay too. So this type of baseline allows us to get away
with some things that wouldn't work if our
bass notes were more sustained and less staccato. And we're always
hitting notes in the chord while riding
along the route of the scale will make
variations of all these clips. Once we start arranging in
a few lessons from now. And now, let's rename these
clips so they make sense. So I think we're good
to move on to writing a lead in the next lesson.
15. Creating MIDI Leads or Melodies: In this lesson,
we're going to write a higher pitched melodic
part to act as a lead. Now, a lot of times the lead, the melody are not
the same thing. The melody is the
part of the song that you can hum or sing along to, sometimes called the hook. Simply stated, a lead is what's out in front to grab
your attention. And in this case,
we're going to write a melody that acts like a lead, so they can be the same thing. Now, everyone goes about writing these kinds of lines
in different ways. Often they're composed
on a guitar or keys by improvising a bunch of ideas while the rest
of the song plays. And then going with one of those ideas as a starting point, we're going to make one from the cords we made in
the previous lesson. And the lead track, Let's make a new empty clip next
to the busier clips. Let's make our clip 2 bar long and then set our
grid to eighth note. Let's pencil in C, E flat, G, and then E-flat on
every other grid lines. And now let's play around with some of their
lengths and timing. If I Alt, drag this a flower, I can make it into another note. I'll make this a G. And then maybe I'll use the up and down arrow keys to play around
with this for a second. I actually like the tension
created by moving into F. Now let's duplicate
the entire loop using the duplicate button
over here on the left. Now, ineffective melody usually
has a two-part structure, or this is one of the basic
ways to think about it. So the first part
is like a call, and the second is
like a response. Moving the middle three here down an octave
sounds pretty good, but now the f is weird. Let's move it around.
What the down arrow key. Okay, I like it on the B-flat. Let's leave it right there. Now, what does this
sound like if we move this whole
performance up an octave? And a good and easy
way to do this is to try using the
pitch midi effect. Over here on the left in the
browser we see midi effects. And I'm going to click
on the triangle next to pitch and drag plus 12
onto the lead track. Okay, Well, let's turn it off, but let's leave it
there for now in case we think it might be a
good idea to use later. To get back to the clip. You just double-click
on any clip or on the Clip View Selector down here in the bottom right, I prefer Shift Tab. And seems like maybe
we're good to move on. So in the next lesson
we're going to add some audio loops to our sketch.
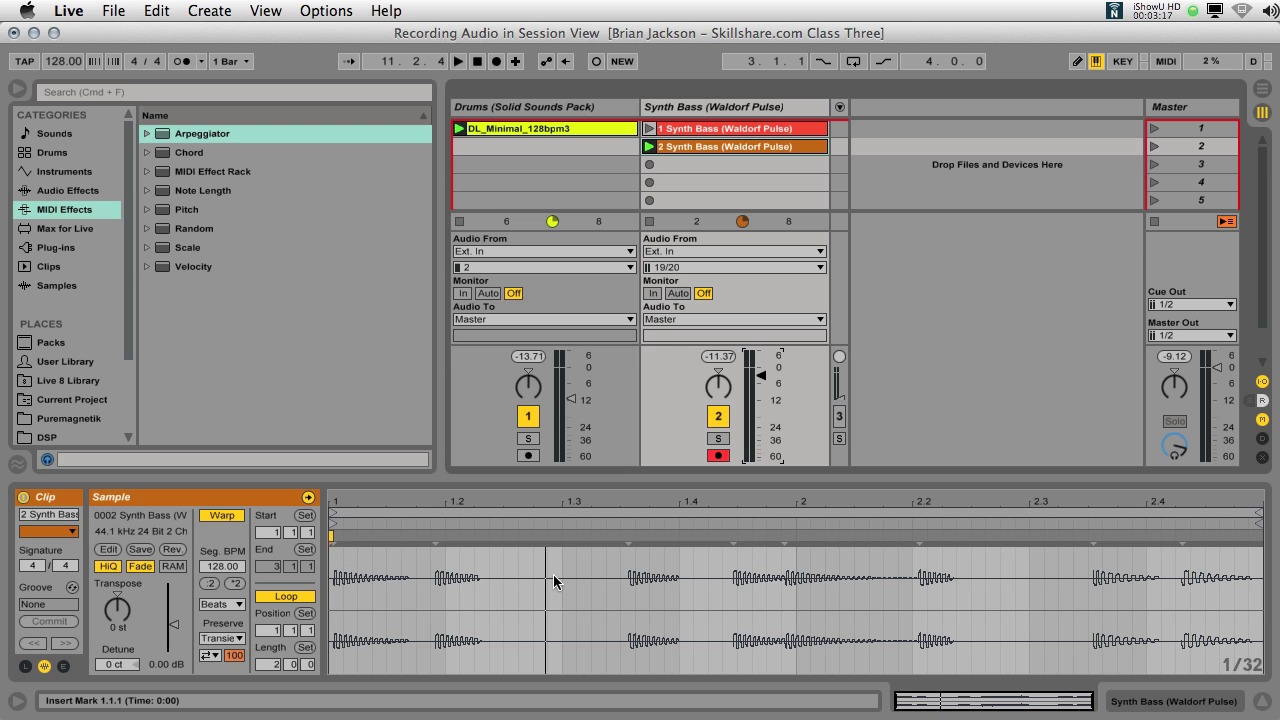
16. Audio Clip Basics: In this lesson,
we're going to take a brief look at audio
clips and also enable tins Warp features from the zip you already downloaded
a few lessons back, open follow along, see if
you want to follow along. I added these audio files
by dropping them onto audio tracks or
into the drop area. And I made sure not to put them on midi
tracks by accident. All of these loops are
from the core library. Down here in the clip view, we have all the controls
for controlling playback and loot
position and loop length. Just like with midi clips. To the right, we have the
Audio tab with the number of parameters for adjusting
how our audio sounds. Gain is really useful. We can adjust the crypts volume independent from
the mixer volume. I use this all the time. Many loops are normalized
to maximum level, so turning them down a bit
is really a good idea. Pitch allows us to
transpose our audio. In this case, I've pitched
this base loop up by seven semitones so that it plays back the note C
instead of the note F, as indicated in the filename. The divide by two and times two buttons do have
practical uses, but are also just great for fun, especially when trying out different warp modes and
messing around with the pitch. Speaking of warp, over here, we can see that warp is enabled and it's usually
enabled by default. Warping audio and
live as a deep topic. And for some users, what got them into live in
the first place when no other DAW could do
it live allowed us to do. Let's check out the basic starting with this
regulatory loop. Notice that if I change
the global tempo, the clip follows along and
the pitch doesn't change. Also notice how many of
these clips were created at different tempos
as found in the name. Yet they all play in
sync and in time. But what if I turn off work? Notice how this clip now ignores any tempo changes and
loop becomes disabled. And it's pretty
easy to end up with a train wreck on our
hands by doing this. So check out what happens
when I mess with the pitch. This is pretty much how audio behave before
warping came along. If you slowed things down,
the pitch went down. If he raised the pitch, it went faster the same way a turntable or cassette
deck would have worked. There are a lot of uses
for unmarked audio, but when working with
loops and wanting to sync together audio that was
created at different tempos. Work really is the
only way to go. When we turn more back on, you'll also need to
re-enable the loop. Now let's use this
basically have to check out the modes to fine tune how the audio sounds when we
change its tempo or pitch. With warping, we have
different modes. These are different
algorithms that are optimized for different
types of sounds. Beats for drums and percussion, tones for notes, and
texture for textures. We pitch acts like a turntable. So when you change the
tempo, the pitch changes. Notice that we can't
transpose our clip in this mode since the pitch
is controlled by the tempo. Complex and complex pro, or in all versions of live 11, but are not available in older versions of
live light or intro. These modes generally
sound best on sounds that have a combination
of beats and tones. Or when transposing tone type sounds such as vocals
or this basically, they are more CPU intensive and don't always sound
better than the other modes. But in this case,
Complex Pro sounds best since I've
transposed this clip up. Note that if the clip is
playing back the audio file at close to its original
tempo and not transposed. You likely won't hear much, if any, difference between
the different modes. Let's talk about warp markers. Okay, So I'm going to duplicate this hi-hat cliff and then
set the loop to 1 bar. We can also change the
timing of parts of a clip by adding and moving
around warp markers. To create or delete a warp
marker, you just double-click. These little lines were alive, has detected a
transient or onset of a sound are good recommendations as places to create new markers, especially with any sound
that's progressive. But they are just
recommendations. Just click and drag the markers until you like what you hear. But makes sure to pin down
the audio if you want to move this section without affecting audio to its left or right, think of this like a rubber
band and thumb tacks. Now, if you're on repeat mode, you'll also notice that
the pitch changes. This lesson was just
a brief introduction to warping and live. You should take some
time to just play around and experiment
with all the clip features we've explored in this lesson and in
the previous one. In the next lesson, we're
going to look at how to move your clips from
the session view into the Arrangement
view so we can start arranging and
finishing our song.
17. Session View to Arrangement View: Okay, So you're getting really close to completing this course. In this lesson, we're going
to record our performance from the session view into
the Arrangement view. But first let's
walk through how I have this setup and you can use the follow along d live set if you want
to follow along. I deleted one of the tracks with a synth loop that just
didn't fit with this song. And then notice how I have
everything well organized, color-coded and
named the tracks, the clips, and the scenes. I changed the colors
with a right-click. And then I use Command R
to add or change names. I played around with
the clips in this set, and then you use capture and
insert from the Create menu. As discussed in lesson seven
about the session view. For this kind of song, I want to make sure
that it's easily arranged in four-bar increments. So I'm going to change the
quantisation to 4 bar. And sometimes it even make
sense to use 8 bar for this, but 4s is a good
one to start with. This way, I don't have to
do a lot of counting when I performing to the
Arrangement View. Now if you're doing
something more chopped up sounding or experimental, you should use whatever makes the most sense for the type of music that you're working on. First, I want to change your preference
before we perform. Now, we don't actually have to open the preferences
for this one. We just wanted to right-click on the arrangement record and make sure that there is no checkmark next to start
playback with record. Now stop all clips. Double-click on the stop
to make sure we're at bar one and then turn on
arrangement record. If we had not turned off that preference live would've just started playing right away. Okay, So now I'm going
to launch each scene right after the
previous one starts. And then notice how I
can just switch back and forth by hitting tab
while this is happening. So what you're looking at
and what you're hearing, don't have to be the same thing. I hit Spacebar to stop Playback, tab to switch views, and then spacebar to play. Okay, so why am I not
hearing anything? Well, you can see how everything's kind
of grayed out here. And that's because lives still things were working
in session view. But this isn't easy
thing to deal with. So I'll just click on
this orange button, which is known as the Back
to Arrangement button. And this tells live to play whatever is in the arrangement, whether I put something
in there or not. So it might be silent or
it might have your song. And this will also stop all clips in the session
to you immediately. If I switch back to
the session view, notice that none of
the clips are launched and basically lived at a
musical copy and paste for us. So at this point, think of Session view as continuing backups
of your clips. The ones in the two views are not connected, they're copies. And also session
when you becomes useful as our mixer view. Okay, so now is a good
time to save or save as. And then we'll pick
up right where we left off here in
the next lesson.
18. Editing in the Arrangement View: In part one of this
two-part lesson, we're going to make
sure that you can navigate the
arrangement view and then look at some basic
editing techniques for finishing up a song. So let's start where we left
off in the last lesson. But before we dive
into making changes, let's first make
sure that you can navigate playback and also make sure you can
always see what you want to see at any given time, anywhere in live, that you see the pointer change into a magnifying glass
is where you can click and drag to
zoom in and out and also scroll left and
right or up and down. This includes the overview which you can show and hide from the view menu and the
area directly below it, the beat time ruler. To zoom out all the way. Click on the W button
over here on the right. Or if you turn off your
computer midi keyboard, just press W. And H will optimize the
height of all the tracks. When working in the
arrangement view, you really probably don't need the computer midi keyboard on and it does block a lot
of the key commands, so I recommend just
turning it off right now. If you are zoomed in and
want live to follow along, you can enable follow. Though, I rarely if
ever use this feature. To start playback
from any location. You can use the scrub area below the beat ruler when you
see the little speaker. This will occur according to
our quantization setting. So I usually set
it back to 1 bar after recording from
session into arrangement. And sometimes they
even set it to none, depending on what I'm doing. Notice that when we hit
the Spacebar to stop. And then again to start, it goes back to the beginning. This little blue triangle and this vertical line tell us where the arrangement
insert marker is, which is where playback
will start from to move it all is we have to do
is click somewhere on the grid or select a clip. Now I can check out another
part of the song with the scrub area and then start back where I
selected the clip. Now let's look at
the loop brace. It behaves much like the
one in the clip view, but this is for the whole song. Appear you can see
there's number fields and they work the same
way as in the clip view. We have one for the loop start. And then here these are for the loop length to lupus
section of the song. You can just drag
around the loop race. You can also make a
selection and then Command L or Control L on a PC. Just like in the QlikView. And one selected, we can use
the exact same shortcuts. You can use the
up-down arrow keys to move it left or
right by its length. And command up or Command
down to double or half it. And of course that would be
Control up, down on Windows. The loop race is an easy way
to make timeline selections. Just stop and then start
playback as needed. Okay, so you can follow their unfold tracks
with these buttons. Hold Alt to do them all at once. Can also drag up and down to
change the track heights. When you see the pointer here. If you want to move a clip, you put the cursor here towards the top of it where the name is, and then you'll see a hand. Now towards the end of the clip, you'll see that the cursor
changes into a bracket and you can drag left or right to
change the length of the clip. And if we want to split a clip, we're gonna put the cursor on the grid below the
clips name area. So you don't want
to see the hand, do you want to see
the normal cursor? And then you just choose
split from the Edit menu, which is Command E or
Control E on Windows. Or select a range. Then move the cursor
up until you see your hand and just drag
it where you want. We can also do this to make
a copy instead of moving it, hold down Option or
Alt to make the copy. So I recommend going back
over this section a few times and practice
these techniques until they make sense. Okay, let's look at how to make some variations of the clips that we recorded in
from Session View. So I have beat one
selected and I'm going to press Z to zoom the width, and then z again to
zoom the height. Then if I look down here, of course we started out
with a one-bar loop. And if you look, we have these little
hash marks here and this is showing me where the
loop is actually happening. So notice if I change this, it deletes it on all of them. So I just want to change it, maybe in the first 2 bar. So I'm going to click
here Command E to split. And now whatever I
do is only going to affect the first 2 bar there. So I'm going to deactivate all of the high hats
in the first 2 bar. And then maybe I
really only want this shaker sound here on
the second time it happens. So I'm going to
consolidate these. Command J or Control
J on Windows. And now I'll just press zero to deactivate the first one here. And I'm going to press X to
zoom all the way out again. So let's say I want
the last notes of the song to be this chord. And again, I can see that
this is looping after 2 bar. I'm gonna go to the edge
here and just drag this out. So I get that first
chord from here. Then W to zoom all the way out. So you can go into any clip that you brought
over from session view and separate the loop or use some of the techniques
we just talked about, where I could make a
selection like this command E. And now if I change
this one part here, it's not going to
change everything else. So there you go. Some ways to make some variations
of your existing clips. Now, what if we want to make
big changes to our song? Because of course we just used 4 bar when we record
it in over here. So our songs pretty
short right now. And so the easiest way
to make big changes to the whole song is with what
are known as time edits, which are found in the Edit menu or via the context
menu on the loop race. So let's go ahead and use duplicate time to
extend our song. And notice that as
I'm doing this, it doesn't only duplicate
the clips that I selected, but it also pushes everything
over to the right for us. These time edits
are not just for the selected clip there for
the whole range of time. Now what if I want
to delete some time? Select a range,
click on the clip, and then I can
choose Delete time, and it collapses everything
back to the left for us. Now, what if we want
some empty time? To do this? We're gonna go to the Create menu and
choose Insert silence. Now this is a lot
like a time at it, but technically it's not because it's found
in the Create menu, but it seems to
work the same way. Just remember you have to go to the Create menu
and this is gonna be Command I or Control I. And now you just
make a selection and hit that and you'll
see what it does. And what if I want to type
in a certain length of time? I can just make sure I
don't have a selection. And then I can hit Command
I and type in what I want. Now, once we have a
basic arrangement going, it's really useful to have some labels for the
different parts. For this, we can use what
are known as locators. And this is a pretty
simple process. All you have to do is
hit the set button. And the insert marker tells live where to put the locator. So I'm gonna put a
few of these in. And then we're going
to rename them. You can right-click on them. And also you can use Command
or Control R to rename them. In the next lesson, we're going to look at how
to create some transitions. And then we're going to
have a look at automation. And then after that,
we're going to start talking about
creating a rough mix.
19. Intro to Transitions and Automation: In this lesson, we're gonna
look at transitions and automation to add more
interest to your composition. So let's start
where we left off. Let's make a transition sound with a reverse
crash cymbal, which we can find in the
core library, samples. One shots symbol. Or you can just
use the search and search for crash or for symbol. We want to put our
transitions on their own tracks so we can just drop it here or we can create
a new audio track first. And we can use plus or
minus to zoom in or out. Let's reverse our sound so it builds up into the next part. You can simply press R as long as the computer
midi keyboard is off. Or down here in the clip view, you can click on reverse under the clip gain
and pitch settings. And now we're going
to drag it so it ends right before our
next section comes in. You might want to turn off the grid to get it
right where you want. Okay, So let's make
another transition sound using this base loop
that we have in the intro. Now, option drag to
bring it over here, zoom in with the plus key, reverse it with R. And then I'm going to
change its length. And I'm going to line it up. Again. You can use plus or
minus to zoom in or out. And then let's make a copy of our reverse cymbal
holding option. And then let's drag it
over later in the song. This is a situation
where a copy and paste would probably be easier. Let's now automate something. Automation is kinda like a little robot in
the background that changes perimeters for you when you want
something to change. So let's start by
painting something around in the stereo
field from left to right. We want to enter
automation mode with this button or you
can just press a. We also want to make sure that automation arm is enabled
up here in the control bar. Then I'm just going to hit
Record and move pan around. Notice the red dot here on
the tracks pan control. And notice how it's also moving around if we switch over
to the session view. Now if we move this parameter, it's going to gray out. And that's because it's
just temporarily been disabled to re-enable
overwritten automation. Right-click and choose here. Or for the whole project, use the global re-enable
Automation button up top in the control bar. So let's grab the
Auto Filter from audio effects and
automated filter sweep. And now let's automate the
send to the delay return is this part ends to help
smooth this transition. If you're not happy
with your automation, you can just record it again. Or sometimes it's easier just
to edit these breakpoints. So you want to size
the track to taste. And then we can single click to create or delete
the breakpoints, or just select a
range and delete a whole bunch of them
at the same time. Or withdraw mode on, you can draw in based
on your grid settings. And if you want
to draw freehand, disable Snap to Grid from
the options menu or from the right-click to see
automation for any parameter, just single click
on that parameter. Delete all of the
automation on a track. Right-click in the area
below the choosers, this empty little
area right here, and then you can choose one of the clear Envelope options. Okay, so let's exit
automation mode. Now there is a lot
more to automation, but this should be enough
just to get you going. In the next lesson, we're going to have
a look at what's known as a rough mix, which means that
you're getting really close to finishing
your composition.
20. Creating A Rough Mix: Let's do a quick rough mix. Now, a proper full mixdown
would include using EQ compression and usually a
bunch of other processing. But for now we're just
gonna do a basic rough mix so nothing is way too
loud or way too quiet. And we can do everything from right here in the
arrangement view. But sometimes it's nice to
see the mixer in full detail. So I often use Session
View as my mixer view. Let's make sure the
overview is visible. And then you can drag it
down to make it bigger. And we can do some
basic navigation of our song from here. And then I like to drag
the mixer up so we have more resolution on
the feeders and meters. The first step is
gonna be to balance the volumes and make sure
that nothing is clipping, especially the master track. Adjust your sense to taste. And then makes sure
to listen through a few times and don't
look at the screen. I always have a notebook out and make notes as I listened. And then I'll dive back
in and make the changes. And finally, we're going to add a limiter on the master track. This step is just so your
song doesn't sound too quiet or isn't clipping
your main output. We do this step a
lot while wanting to listen to works in progress. But it is not generally a good practice
once you know how to properly mix that song. And to adjust the limiter, we're going to find the loudest or densest part of the song. And then I'm going to slowly
turn the gain up until I start to see something happening on the meter here on the right. If for some reason you
need to trim this down, it means you need to go
back up to the mixer and pull back the volume faders
on the individual tracks. You don't want to have to be turning this down
because that would mean you're probably clipping somewhere on the master track, even if you don't see
red on the meter. Now what we're gonna do
is collect all and save. The CBG option is like normal
Save, but additionally, it allows us to make
sure that all of the audio file is
used in the set, are copied into
our project folder so we don't accidentally
lose any files. And for right now, I recommend using the
default settings, which has the top three
options set to yes. This will copy files from any
location on any hard drive, except for the files
from the factory packs. In this case, I'm only using
files from the core library, so I'm not worried about
losing any of them. That being said,
when I'm done with the project and I
want to archive it, I also set this option to, yes. Okay, so in the next lesson we're going to look at
how to properly export your arrangement so
that you have a wave and an mp3 of your
finished composition.
21. Exporting Your Song: In this lesson, we're
gonna make sure you export your song properly. If you open up, follow along e from the zip you
downloaded previously. You can see in here a
version of our song with some additional arranging
and mixing completed. The bonus lesson shows me
working on our session after the rough mix lesson to turn it into follow along ie. In the File menu, you'll
see export audio, video. Now, different DAWs use the same terms to mean
different things and some use different terms for the
same process when referring to generating a file from
the output of their mixer. Pro Tools and logic
call it bounce. Some call render as ableton
did some versions ago. Thus YR is in the
key command and some call this process Export As
able to int currently does. The most important
first step is to make sure you have the correct
start, position, and length. We can see that it's
going to start at birth 31 and only going to
render for 4 bar. If the renderer doesn't start at the beginning for some
reason, hit Cancel. Then just double-click
on the Stop button in the Control bar to make
sure it goes to 111. The correct length can sometimes be a little tricky
for life to get right if you have any sound that continues beyond the
end of the last clip, often this will be reverb delays or release of different scents. Sounds. Accidentally chopping
off the tail of our song isn't easy
mistake to make. The best solution is to use the loop brace to input
the render link for us. Though, you can
just drag the loop around until you
think it's correct. I'm going to show you
a foolproof method that'll help if you're
struggling with this part. These steps can be accomplished
in a different order. But I'm going to show
you what I think is the most straightforward
for beginners. Click anywhere and then select all from the Edit menu
or just hit Command a. Then loop selection from the
Edit menu or context menu, which is Command L.
Now make sure loop is off and zoom in a little
near the end of the song. We're going to listen
to the last few bars and keep an eye on the
master track's volume meter. And then we're going to hit stop when the sound is all gone. Now just drag the
end of the loop to the time you see
no more level on the meters zoom out so you can see your
whole arrangement. I'm going to use w. If you have an empty bar
to at the beginning, adjust the loop is needed. Click on the loop race
to select everything. Now we can export our
song Shift Command R. Notice that the numbers here match the loop start and length numbers in
the control bar. There are a lot of options here. We only need a few of them. For rendered track,
we just want to pick the default which is
the master track. And that's gonna
be the output of our full mix into one file. Make sure all of these
other options are off. If you didn't use a
limiter as we discussed, you can enable Normalize, but either way, that's
really not a big deal. I personally never use normalized when I'm
exporting a song. For the sample rate, generally you want to leave
it where it is, but if in doubt, 4041 or
48 are gonna be fine. I usually have to
deliver files at 48 K, So I leave it here
and change it to 4041 later if I need it. And that would be during
the mastering process. Pcm stands for pulse
code modulation, and really just means it's the full quality
uncompressed file. To keep it simple, just use
these settings and you can learn all the technical stuff
later if you're interested. So you can see here
I've picked wave 24-bit and rectangular or no dither is pretty standard
at this point. I always like to have
an MP3 around to you, but this is optional. Now click Export
and make sure to save it into the project folder. I often like to listen
to my export and mixes and then go back in
and make revisions later. Alright, congratulations, you've made it through
the whole course. And now you can either recreate what I've
shown you how to make, or you can start working
on your own project, making your own song using the skills
that you've learned.
22. (Bonus Lesson) Watch Me Work: Alright, so this is a bonus lesson that's just
going to show me working on follow along d After the rough mix lesson to turn
it into follow along E, I'm not going to be talking
through most of this though. I will jump in and a few spots
to explain what I'm doing. And I do use a few features
that we didn't cover. So you might be able to pick up a few things if you're
ready to move on tasks, the skills you learned
through the first 21 lessons. I just recorded myself working
for about an hour and then added in this commentary
as I watched back through. Right now I'm just cleaning up the drum rack so it's
easier for me to do some additional mixing on
the individual drum sounds instead of just
on the whole drum kit. And here I'm going to do what's known commonly as side chaining, which is going to be ducking
the base when the tickets. And now I'm going
to work on making some variations of the clips
that we started with in session view by
deactivating some notes and messing around with some of the performances to
add more variation. And we need some crafts symbols
on some of the downbeats. So I'm going to find one and
put it on its own track. So it's easier to move
around instead of trying to add it into
the existing drum rack. Now I'm going to work on
the intro a little bit. Here I'm actually about
to make a little bit of a mess for myself that I
will have to clean up later. So just be careful
when you option drag things that they go
where you want them to go. Not every idea that you
try actually works out. And sometimes you just
have to undo it and then see what mess you may
have made for yourself. Now I'm just gonna kinda
be checking to see what I did and making sure that all the start markers
are in the right place. Sometimes you can bump into happy accidents when you make
these kinds of mistakes and you'll find a cool
rhythm or grew that you wouldn't have
planned on otherwise. And now I realized
that I need to make some more variations
of some of the parts. And here's where
I'm actually about to make a workflow mistake. I shouldn't have turned full on here even though it's
Vida would help. And I'm actually going to fumble around here for a
little bit before I realize that I'm not really getting the
results that I want. After a frustrated
myself a little bit, I'm going to turn
fold off and figure out what I'm actually
trying to accomplish here. Probably should have just
drag the whole clip view up. So I had a bigger view
of all the midi notes and could see the note names. Instead of trying to work in the little small
section down below. And here I'm spending
a little bit of time on the very
end of the song. So it feels wrapped up in
that the song is over. And now I'm just going to rebalance delimiter
at the end since I did a bunch of mixing and
changed some of the parts. Now there's a lot more that
can be done to this song, but in pretty decent shape now. And while this isn't a full
final mixdown by any means, and it would still
need to be mastered. The arrangements
in decent shape. And it gives you a good idea on the types of
things you can do to make a song feel more finished
and not just a sketch.
 Brian Jackson, Ableton Certified Trainer