Transcripts
1. Intro: Hey, this is Hongshu
from Moti Circles. In this class, I'm going to
show you how to get started with three D in After
Effects from the ground app. This is a practical
project based class designed to take
you from zero to constantly working in
three D inside After Effects even if you never
touched three D before. This is a project that
we'll be working on step by step so you understand how
it works and why it works. We'll start with
the fundamentals. We'll start with how to navigate three D space
in After Effects, how to set up
lights and cameras, how to operate cameras
and add animation, how to create depth
in the scene, how to work with
materials and colors, how to polish everything to
give it a creative look. Every lesson is taught through real examples and each one builds naturally
on the last one. As the class progresses, you will move beyond just setting things up and
start thinking more intentionally in three
D. You will learn how to build simple environments that
feel deep and dimensional, how to use lights and
camera to guide attention, and how to control
color, contrast, and materials to create
mood and atmosphere. Instead of scenes
feeling flat or random, your work will start to
feel focused, cinematic, and more complete because every choice supports
the final result. By the end of this
class, you will create a cinematic 15 second
three D animation, something you can use
as a demo reel ending your personal logo review animation or a customizable
portfolio piece. More importantly, you
will walk away with a repeatable workflow and a clear three D mindset you can apply to
your own projects, not just one simple animation. A lot of people think
three D and After Effects is hard or overwhelming, and that's usually because it's not taught in a practical way. This class, everything
is explained inside a real project so you
understand how each element, camera, light, material,
and color works together. Instead of copy presets, you will learn how to think
and make decisions in three D so you can solve problems and build your own scenes
with confidence. A basic knowledge
of After Effects is recommended before
taking this class. We will not be covering
After Effects fundamentals. Instead, we'll jump into the three D aspect
of the program right away from the start. If you're a motion
designer, graphic designer, or hobbyist who wants
to feel comfortable creating cinematic three
D work in After Effects, this class is built for you. Simple, intuitive, practical. I can't wait to
see you in class.
2. Assignments: Welcome to the class. Let's talk about the
class assignment. In this class, your assignment
is simple but powerful. You're going to create your own short three D animation in After Effects using
the techniques we built throughout the classes. This class is designed to
be followed step by step, so I recommend watching
the lessons in order. Each lesson introduces
one core idea like three D space, cameras, lights, materials,
colors, and animation, and every concept
builds on the last one. As you go through the class, I encourage you to pause, try things, and experiment. You don't need to copy
my scene exactly. Think of my project as a
framework, not a template. You can customize your text, your logos, your
extrusion depth, your shapes, camera movement, lighting styles, and especially
your colors and mood. If you want something bold
and graphic, go for it. If you prefer something soft, minimal or cinematic,
that works too. The goal isn't to
recreate my animation. It is to use the same
thinking process to build something
that feels like yours. By the end of the
class, you should have a 15 second three D animation that shows clear
depths and space, intentional lighting,
controlled camera movement, and thoughtful color choices. When you're done, upload
your final animation or a preview frame to the
class project section. You can also share screenshots
or working progress. Those are always welcome. Remember, this is about learning how to work confidently in
three D, not about perfection. Follow the process,
make it your own, and most importantly,
enjoy the learning. I can't wait to
see you in class.
3. Navigate in 3D Space: Welcome to this
lesson. In this one, we're going to show
you how to navigate in three D space
inside After Effects. First of all, let's
open After Effects. And in order for us to
have the same layouts, we can go to Windows and
then go to workspace, and then we can choose
the standard layouts, which is going to be
the default layout when you are first
opening After Effects. And once I choose standard,
this is what it looks like. But another thing I need
to do is I need to also reset standard to
save layout so that I can push it back to
the default layout. And this is the
layout that we have. Just so we have the same
panels on this program. Now, what we need to do
is create a composition, hit on new composition, and then we can just
call this one main cup. Is 1920 by 108025
frames per second. And let's do around ten second. I just want to show
you how we navigate inside the three D
space in After Effects. And first, let's create
a text, in this case, we can create just call this
13d and then make it bigger. Can center it like so, and then we can go to
character, change the font, we can change it to pop ins, maybe make it bold so that we have a bolder font
in three D space. And then we can center
the anchor points, hold down command and
then triple click on the Pen hint to center
the anchor point. And now we can also center
this text in the composition. So we go to line and then
we go to center this. Now, let me just make
this even bigger. This is going to
be my two D view here. Everything is two D. So in order to turn on three D, we need to turn on the three D feature of this composition. When we are making
the composition, when we're making the new comp, if we go to Command K, this
is our composition setting. We need to go to three D render and then make sure
it's set to Cinema 40. There's also classic three and advanced three D
inside this render. But in this lesson, in this whole class, we're going to
focus on Cinema 40, which is the most advanced three D setting inside After Effects. So we need to
choose Cinema 41st, click on K, and then this layer, we need to turn on this
three D icon here to make sure this layer
is turned into three D. So we're going
to click on this icon. If you don't have the icon, make sure you click
on this button, the left corner
button here to show all these different
features on this layer so that you can access
the three D button here. Click on three D, and
now we have an axis, and we can see over here, it says the render is
set to Cinema four D and then we're in the
active camera view, and then we have one view here. Everything we need
to do to get started in order to turn one
layer into three D. And now since we are turning
this layer into three D, we can actually let's go to the drop down menu
here on this layer. Since we turn it into three D, we have geometry options here, and then we have a
material option. So in this case, we can actually extrude this layer
to make it thicker. And in order to see that, we need another view over here. So over here on the corner
of this preview panel, we can click on this one view and then change it
to two view here. Once we change it to two view, and you can see we are adding one top view on this side
of the preview panel. And then over here you can see
this top view is selected. Once I click it,
it's going to be highlighted in blue
on the corners. It means that this
view is selected. And I can also change this top view to
another view over here by selecting either front view or the left view
or the top view. So I'm selecting and changing
this right panel preview, and I can also change and selecting and change this
left panel view here. Now it's set to
active camera view. So that's a default. I can
also change this left view to either a left view or top
view, any other view I want. But normally, I will just make sure it's going to be
inside the active camera view. And this is a two view setup. We're going to be using
the two view setup in the class throughout
the classes. And just want to show you
there's also a four view setup. So if you're working on
more a densed three D, you can actually have four
different views here, and then each one is going to be represented by a
different angle, like this one is going to be the back and then this one front, this one is the right
so that you can see all sides of your
object. In one go. However, we're not making
it too complicated. We're sticking with
two view for now. And then we're sticking with top view on this right panel, active camera view on this
left panel, that's good. And then what we
can do is we can extrude the depth
of this text here. If I change this number to be a bigger number
here, you can see, I'm actually making
this text thicker from the top view so that we have
some thickness to the text. So that's how we navigate the
views of the three D space. And another thing I want to show you before we get
into the next class, which we're going to get started with the project right away is that we want to show
you the navigation, which is the three different
navigation orbits, N, and then dolly. So in order to orbit
around our object, we need to hit C
on the keyboard. It's actually this here. So the shortcut is C. If we hit C on the keyboard, we're going to have this
icon that's on our cursor. And then if we click
the left mouse button and then drag it so that we can actually just orbit around
this text that we have, we can see the different
sides of our objects. So right now, let me
just go change the color to maybe a red color here. And then we're going
to click on the path in the drop down, go to animate, choose
a side, color RGB, and then we're going to change
the color of the side to maybe a lighter red so that we have some separation between the front color and
the side color. Right now, I'm still
in the orbit tool, so I can just drag this one and orbit around this hero object. So that's how I
orbit the object. However, this is only orbiting. We're not actually
turning this object. We're actually just changing the camera view
or the preview of this scene here instead of changing the object so that the object it's
still staying still, but we are actually just moving around to see the
different sides, right? You can see on the top of
you my object is not moving. It's still staying still.
So that's how we do it. And once we get to a
weird camera angle here, we can actually go
back to our view. So we just go to
active camera and then reset default camera. So once we reset, it's
going to go back to a front view active camera view. So that's how we
reset after we orbit. And this is orbit.
Once we hit C again, we can actually go to
this pen view here. So pen is basically
just moving left and right and up and down in
the three D scene here. So we're actually just seeing the things move up and
down and left and right. Very simple, straightforward to understand and same thing, we're not moving the object. The object is staying still. We're only moving the view here. And once we do that, the
camera is going to be moved, so we need to reset the
default camera to go back to the original view point here. And then the last
one is going to be the dolly forward
zooming in and out. So this is a dolly if we hit C, we're going to toggle
between the three here. I'm just hitting a C here. Once I have the Dow tool here, I'm going to just
click the cursor, mouse button to go in and out zooming in and
zooming out of my object. So that's how we navigate
inside the three D space. And once we are
actually navigating inside this three D
space with orbiting, so you can see this axis
is changing, right? That means we are actually
just changing the camera view of the object instead of
changing the object itself. So that's the three
tools that we can use to navigate within
the three D space. That's about everything
to get started. In the next lesson,
we're going to start on the project right away to
start building the scenes. I'll see you in the next lesson.
4. Create Depth with Extrusion: Let's just create a new
composition, 1920 by 1080. We'll do 30 frames per second. Over here, in the
three D render. We're going to use
Cinema 40 today. Cinema 40 is a robust software. It's kind of, like, as big as
there'll be After Effects, but it's from a
different company. And they integrate
this three D software so that you're able to get
true three D in After Effects. And I'll show you what
I mean what I mean by true three D. So we're
going to do okay, choose Cinema 40,
all these options. You don't need to
worry about it. We have Cinema 40 turned on, and then let's go
draw a circle here. I can just go onto the Elliptol and then let me
double click on this. I don't need this full color, so I'll just delete
the full color. I'll change the stroke
to a red stroke. And you can see for what
I'm changing to red, I'm changing to completely
red 255 RGB color. So the green and
blue are all zero. So I'm changing it to a
completely red channel 255. And then I'm going to go inside here, go to
Ellipse School. I'll change the size over
here to maybe 600 by 600. So I'll just get a
perfect circle here. I'll lock the size here. And now we can go to add
a three D layer here, just turn on the three D layer, new Sema 40 control skip tours. So now we have I think
this is too thin. I want to change it to maybe
20. I think that works. So I'll change it
to, let's do 15 pixels for the scroke size. And then once I turn
on Sem 40 render, we actually have the
other options here. We have geometric options,
which is extrusion. Normally, within the
classic three D, we actually don't have depths. So when you're thinking
about three D, it's going to be X,
Y, and Z, right? So X is horizontal axis, and then Y is vertical axis. And then Z is going to be
the depth. You go inward. That's going to be the
three D dimension, right? So that axis. But within
the classic three D, we actually don't
have real depth. It's a fake depth. So meaning if you want to, let's say, 1 second, let
me change it to two views. And then for this one, I'm
going to go to top view. So this is the top
view of my circle. Right now, I don't
have any depth. Everything is just
one thin layer. So for Cinema four D, I want to add depth
to this ring here, I can go inside here
geometry options, and then I can go at extrusion. So extrusion meaning I can
make it thicker like this. So in this case, if I make it, let's say, um 25. That's too thin. Maybe
like this. I like it 75. I'm adding real depth
to this ring so that if I go in here
and then turn it, you can see I'm adding a
thickness to this ring. However, within classic three D, we actually don't have all
these real three D options. What we can do if we are
in the classic three D, before we add Cinema 40 render, people used to just
duplicate these layers. If you want to create something like this in classic three D, you would have to
duplicate this layer, maybe, let's say, 75 times. Then each layer is going to
be overlay on top of it. So you're going to
use some kind of script to maybe push each layer, a couple of pixels
backward in that axis. And then you need to
have like 75 layers in order to form
this fake depth, which is just formed by individual layers and multiple
layers within that space. When you turn it, it almost feels like you have a thickness, but it's a fake thickness. So that's kind of the issue with the classic three D. They
don't have real depth. Only Senna 40 has real depth, and this is all
controlled by a setting. Whenever you want
to make something thicker or you want real depths, let's say, not only can
you do like a circle, you can also do like a
triangle or square, whatever, you need to come to the SO 40 render and then go
into this extrusion. We're using extrusion depth 75, and then we're seeing
the top view here. So that's kind of
what I have now. And then what I also want to add is I want to add a bevel. So if I'm zooming close, so right now, so I
want to add a bevel, but then, first of all, I
need to turn on the bevel. Bevel, it just
basically the edge. So right now, it's
a 90 degree edge. So basically, this thing, it's hard to see right
now, but, like, I need to add some
roundings my object. So if I go to this convex, and then I can add
a bit of rounding, let's see if I make it big, like ten it's hard to see now, so I need to change the color. To change the color, I'll go to click on the Ellipse tool. You need to click
on this ellipse here in order to add a color. And over here on the ad, I'll just add a side color. So over here, I can choose
side and then go to color. So the side color,
let's do a blue color. So right now I have red in 255. I'll change it to
zero. I'll do blue, so I'll do 255 on the blue. And you can see, we
have a side color. It's on the outer
side of the ring, and we've added a blue color. Now, I also keep clicking
on this lip stool, and then I'm going
to click on here, go to Bevel, and then I'm going to add color on the bevel. For the color bevel, I'm going to change it to green, so I'll do 2550. So it's zero, 255, zero, so I will click okay. And you can see now,
we actually have some green edges that's
blending this blue and red, and that's our bevel. So if I turn it, you can see my edge is kind of rounded now. If I turn it over here on the side and then just
turn it like this, you can see my edge
is not sharp anymore. So if I turn it off, if
I turn off the bevel, I wouldn't have any bevel. And then if I zoom
in, this case, we have a 90 degree angle, sharp turn from this red
surface to this blue surface. And now, since I
just want to add some bevel to make
it more smoother, so in this case, I'll
add a convex bevel. You can also test all these. So if I add this one here, it's probably just like
pushing outward a bit more. Let me change the depths to
smaller numbers, maybe three. So I think this is angular bevel and then concave bevel and
then convex bevel. Normally, we just use convex, just like choose convex.
This is the most common. I never use these two, but
sometimes maybe you need it. So until you do, I don't want to, you
know, overwhelm you. So now let's use convex, and then let's use
bevel depth here, three pixels. I
think this is good. I just want to have
a kind of like a rounded corner turn for
these little things here. This is the setup, basic setup for my ring here.
5. Camera Simplified: And now, I just want to
call this one circle one. Let's duplicate this one here. Let me go to the front view.
This is the front view. And then I want to
duplicate two times. I want to make this one smaller. Let's say, go to scale property, change this one to maybe 65, and then this one to maybe
even smaller number, I'll go to scale to 35. So now I can also add a null object to control
the overall size. So I'll just add a null control. And then I'll pair
the three rings. Another thing is over here,
and you can see over here, my null is not right
in the center of the three rings horizontally
in the top view. So it's right now in the
front view in the center, but then in the top you
it's not in the center. So I either need to
push this null back. Let's turn this
null into three D, and then so the thickness
is going to be 75. What is 75 value two, 37.5. Okay. So our thickness is 75. So I just divide it by two, and then 37.5 should
be in the center. It seems like in the
sample, that's good. So I'm just putting this
null in the center, and then I'm going to paren
this one to the null. So now I can use a null to control the size of these rings. And next thing, what I want to do is I want to add a camera. So we have the three rings here. I don't like this
view that much, so I wanted to add a camera. So let's see, go to
Layer New camera. And in terms of camera,
there's a couple of things that we need
to understand. It looks pretty complex. If you do photography, it
will be easier for you. But if you don't do photography, I'll just quickly explain
this thing to you. So you don't need to
understand all these. All you need to understand
is a focal length. So the focal lens, meaning 50 millimeter focal lens is
basically similar to our eye. So right now, if I do a 50%
50 millimeter focal lens, this view should be similar to what I'm looking at right now because this is like
an eyeball view. If I do a 50 millimeter
camera, let's see. Okay. So now, if I go to
the side view, left view, so if I zoom out this left side, you can see this
camera right now, the focal range
is 50 millimeter, and then we have a
camera over here. And then the camera
is in the front of this object and then it's
basically shooting this object. And I can also move
this camera in using the z axis and then change This is called
point of interest. So everything that's in focus, you need a point of interest. So let's say I move this
point of measures over here. So this is a 50
millimeter camera. So I want to show you what
50 50 millimeter looks like. It should look like,
exactly the same as if we don't have a
camera because this is like the most
similar to a human eye, 50 millimeter human eye view. So if you don't have a camera, this is exactly
what it looks like. But then, at the same
time, in this case, I kind of want
some exaggeration, a wide angle lens. So in that case, I need
a smaller focal range. I want to change it to like
this extreme 50 millimeter. So this is going to
be a wide angle. Wide angle, meaning almost
like if you do photography, if you shoot wide angle, you're going to get more
things inside your view, but then it's going to be
distortion. On the edges. So it's going to be
stretching things outward to the four
corner of the view. That's a wide angle.
Mostly for wide angle, you shoot like landscape. You can get more
landscape in your view, but you don't use wide angle
to shoot people, right? It's going to
distort the body or, like, the figure so that it
doesn't look really well. So normally, when
you're shooting people, it's probably within
the 50 millimeter, 80 millimeter thing. And then the 200
millimeter is what you see those really long camera lens where you see sports stadium. Where they basically
shoot all these athletes, like when someone's playing
soccer or basketball, they want to take a picture
of these people moving really fast and then really further
away from the camera. So they need to use
like a 200 millimeter. So this thing is going
to be really far away. The camera is going to be really far away from the object. So in this case, I want
to use a 15 millimeter. And then, in this
case, 15 millimeter, I need to push this thing in, and then I just want to
diret this point of view on this object so that we
always have it in focus. I need to change this one
to active camera view. So in this case, we
have a 15 millimeter, and you can see we are
actually distorting this view. We are using a white angle lens. And then if I just push it really far, this is
what it looks like. But if I zoom in closer, you can see I'm able to see the inside of the ring
because right now, I'm using a white angle lens, and it's kind of
distorting everything, stretching everything
out to the corner. And that's why I'm getting
this distortion over here, whereas if you know what, I think I forgot to turn on the active camera view before when I was using
the 50 millimeter. So let's go to 50
millimeter again. So you can see over here,
if I use a 50 millimeter, if I just zoom in, I
don't see much inside. This is kind of
the eyeball view, exactly like how it should be. There's no exaggeration,
no distortion. If I move the camera
inward or outward, basically, we're just zooming
out of these rings here. You see that? There's
no distortion. That's not fine. I
want some distortion, so I need to choose
15 millimeter. And then, in this case,
if it's zooming closer, I'm actually getting
more of a almost like a very suffocated, kind of, like, something is falling on my head
kind of thing. So we're getting
this distortion, getting this artistic treatment. So that's kind of the difference between these two camera. So I can also show
you what happens if we add a 200
millimeter lens here. So if I turn off this
one, turn on this one, and you can see this camera how far the camera is
from our object. It's actually from here,
all the way from here. And if I push this camera in
you can actually see this, like, whole object
becomes thinner. You're not able to
see the inside, and also it becomes thinner. It's not even just, like, looking the same as the
previous active camera view. So that's kind of the difference
you need to remember. If you want to use a wide
angle, it'll be exaggerating. It will be just distorting the image to make
it more artistic. Depends on how you
like it. And then if you want to use
a 50 millimeter, it's going to be more resemble
to what human eye sees. And then this one
is just going to be so far away and then kind of
like shrink everything down. Depends on the use case. Most of the time
we're just using, 15, 35 or 50. So in this case, we're
using 50 millimeter here. We have the left view here. I need to go fit the
object here, so fit it. So if I miss the object
in the view here, I drag it somewhere else, and then maybe it's too
small, like I can see it. I'll just go here and then
just fit it to view, right? So click on this one. It's going to go back to
the default view here.
6. Lighting Setup: After I have this camera, I want to add some light. Right now, there's no
light in the scene here. So let's go to Layers New light. For the lights, we have
four different lights. We have the ambient light. If we add ambient light, let's go see at
an ambient light. Let me make this ambient. Right now, the intensity is what 100%, and the color is white. We can actually make
this one really big, like 2000. Let's see. If you see the difference,
if I turn it off. See this difference here on this view here, the
active camera view. So if I turn on this light here, Everything is kind of, like,
become white and blown out a little bit,
almost overexposed. So ambient light is very
simple to understand. You just add a light, and
then there's no light source. It's just ambient.
Like it's everywhere. If you have a white
ambient light, it's basically make the
scene overall brighter. We can also change the color. Let see if I change it to a
red ambient, it's too much. It's like 2000,
so we're actually overblown the whole scene to a red color. That's
not what I want. So if I change it to zero, it's gonna be completely
dark because there's gonna be no light in the scene.
Let me change to 20. So if I change it
to 20, you can see here you can see a little
bit light, but it's red. So that's actually
not what I want. I want to use still see the original color
of my composition, and then this is how
it looks if I have, 20% light and then 30%. You can explore
more on your own, but that's just the embolt. Basically, there's no direction. It's going to be light in
the entire scene everywhere. So we're not using
this actually. We're using parallel light. So I'm going to show you
the parallel light here. So parallel light here is basically like you
said, it's parallel. Basically, it's shooting
in one direction. The light is going
to one direction, and it's only going
in that direction. So over here, I want to change my parallel light
to 2000 intensity, and this is going to
be my parallel light. Click Okay. And for this one, I want this light to
shoot from top to bottom. So you can see right
now my light is over here on the left
hand side over here. It's over here.
This is my light. Before we were using
the ambient light. Ambient doesn't have
a light source. So you're not able to get or
change the ambient light. It's going to be just
almost like giving your entire scene rider
like a brighter color. And now we have a
parallel light. Parallel light is
basically we can change this light and we can move
this light to the top. I want this light to
shoot from the top. So I'm going to drag
this light here. Put it here on the top here. And then this is the direction. So I want the direction
to shoot down here. So I want it to go
down like this. And then I'm going to move
it over a little bit. So I still want to see a little
bit of color over there. So I don't want it to go
completely, like, straight down, almost like because if I
let it go straight down, the top ring here is going
to cover a lot of my lights. So I kind of want to get
this shadow and light feel. Like, the top portion is shadow, and then the bottom
portion is light. So I want to maybe just slightly change the angle a
little bit, you see that. I'm taking this angle, so this light is coming from
the top forward position to, like, almost trim down, and then a little bit,
like, going to the back. So that's what I have
one parallel light. And this is, like,
really bright. It's 2000 intensity parallel. And now I want to
add another light. I also want to add
another parallel light. In this case, we're only
using parallel light, so we can choose the
direction of the light, and we're using three lights
to light up the scene here. So, in this case, I'm using
another parallel light. I'll change it down
to 1,000% intensity, make it a bit less
intense. Click Okay. And this one, I wanted to shoot from forward
front to the back. So over here, I wanted to
shoot from here to here. So adding a little
bit of details here, I'm shooting from front to back. And on the left
view, you can see, it's actually just shooting from here to the back and
my lights over here. Let me see the top view here. And you can also
see the top view. My light is just beside
my camera and it's shooting to the back
side of the ring. So we have a little bit
of different colors showing up on the
top here because before we had this
all in shadow, right? Because the previous
light is all coming down and then the top portion
is completely in shadow. So we want to bring back
some of the color over here. So we want to add one more
light over here in the front. And let me go back to
the left view here. So I have one light going
from the top to down, one light going
from right to left. And then let me
see I want to add one more light to go from
the back to the front. So I'm going to move this
like here to the back and then dig this point this is where the light
is going here. So I want to add it
maybe a different angle. Like, this is not set. This is just, like, however
you want to shoot it. It's going to give you a
completely different results, however you want to
angle those lights here. So, you can explore this
yourself however you want. But this is kind of the way
we want to set this up. We have, like three lights shooting from three
different places. And then, um reason I want to put it in
the front and back is, I want to see the
color that's going inside the ring because
we're using wide angle lens, and then we want to be
able to see the inside of the ring so that we can get
some light interaction. Mostly, parallel light
is pretty useful. It can just give
you a light source going in one direction,
so it's pretty good. And you can also change
the color if you want, but in this case, we're
not changing the color
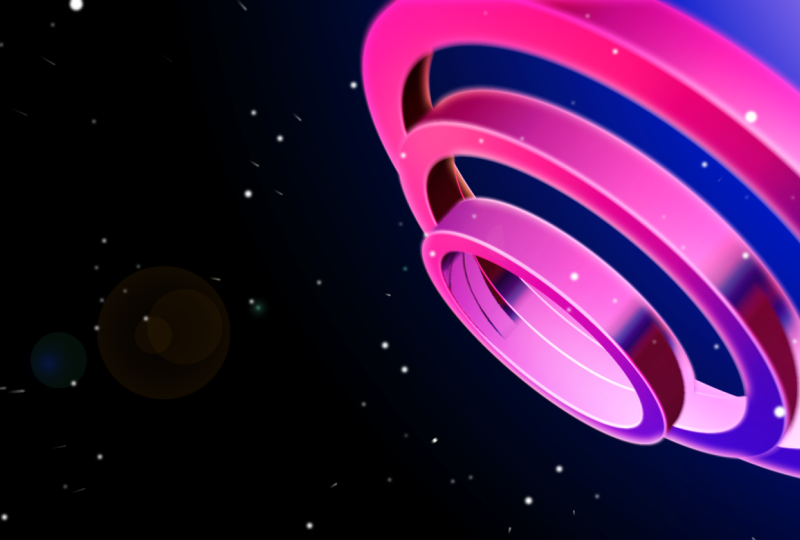
7. Make Your Object the Hero: And now, another thing I want to do is because we
have the light now, and I want some interaction
between these three rings. So first of all, I want to add a little bit of animation
on these three rings. Let's go to rotation.
R on rotation. I only want to animate
the Y rotation, so I'll go to add a
keyframe on the Y rotation. So Y rotation would
be just going like this. This is a Y rotation. So I'm only animating
the Y rotation. And I just realized the
anchor point right now is not in the center of my
ring here because right now, I see if I rotate this here. We are actually having
this anchor point in the front surface of this ring. I kind of want to rotate it
from the center of the ring. So I need to go to
my anchor point. This is kind of the only time I need to change
my anchor point. So 37.5 our thickness is 75, so we need to divide 75 by two. So we're going to move this
ring forward a little bit, so we have the anchor
point in the front, and I need to duplicate this
number in the Z axis so that all my rings are in
the center and then my anchor point are
in the center of the ring so that
when I'm rotating, I'm going to go to
R for rotation. Everything is rotating based
on the center anchor point, so I'm not moving this one to a weird tion. So that's good. I just don't want to do,
like, a very simple rotation. So for this one,
I'll just rotate it a positive one round, and then this middle one,
I'll do a negative one round. First one, I want to do
a positive one round. A second one, I'll do
a negative one round, and then the last one, I'll do another negative. So I'll do so they're rotating
in different directions. Let's see how the
animation looks. And then they're
going to go back to a full rotation, right? So this is what it looks like
here. So they're rotating. I think the outside
ring might be too big. Let me see if I can make
it a little bit smaller. Like, 85 maybe? Yeah, I think that
might look better. So this is just random, right? So now I see it looks
a little bit too big, so I just want to
change the scale. And after we have a
rotation going on, we also want to not
have these rings rotate all in the
same orientation because right now they're
rotating based on the Y axis, right, because we're
rotating on the Y rotation. So they're rotating
based on the Y axis, and then they're
rotating horizontally, left or right, but they're
rotating based on the y axis. And now I want to change the rotation so that they're not rotating based
on the Y axis, rotating a bit more differently. So over here, in terms of orientation for the first
ring, which is the outside, I want to just change this
orientation a little bit. You can see on the
side view here, like how when I'm changing the Z axis orientation is
moving my ring like this. I just want to get
something like looks cool. So let's say if I
change this to 65 and then if I modify this to
basically, when they rotate, I want them to form, like, a ring shape, almost like three rings, almost like they're going through each other,
something like that. So I need to tweak my
animation over here. So this is the first ring. I like the rotation it has. So the second ring, I'll just do like, something like this. This might be a good rotation. So I mean, good orientation so that when they are rotating, they're kind of using
a different axis, and then it's looking
a bit different. So this one, I'll just
do maybe like this. So I'm just trying to change the orientation randomly
on the axis over here. Let's see how that works. So this is the orientation
that I changed. So at the beginning,
it would be, okay, I need to set zero. So this is the beginning. Everything is straight,
facing camera, and then if I go
forward in time, they start to rotate, and then this thing is
going to rotate like this, and then um crossing each other, do some random
rotation like that. I think that's okay.
Looking pretty cool. So if I play it, this
is how it looks. Crossing basically, we're only animating in the white rotation, and then we're changing
the orientation of each ring so that they kind
of rotate differently. Now, I have the ring rotation. I can also add a
camera movement, so I'll go to P for position, and then I want the camera
to be inside the ring. First, I'll just pull the camera out like this while
it's rotating. So at the beginning,
I want it to be just completely
inside over here, and then at the end, I want the camera to come
out like this. So this is my camera,
just moving, zooming out. And let's see the
animation here. Okay, that's how I like it.
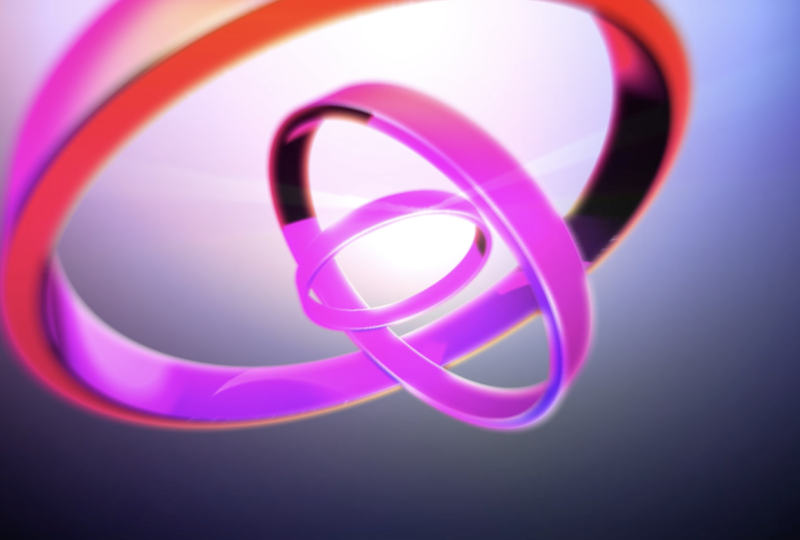
8. Reflective Material: Since we have the
light and the camera. What I want to do is I want to add some interaction
between these materials. So I want some
light interaction. So I'll go to this camera one. I mean, circle one, go down. There's a material option. So there's a geometry
option which we use to extrude the shape
to make it thicker. And then there's a
material option. So I'll go down to
material option, and I'll turn on cast shadow. So basically, it's
going to be able to based on where the light is, it will cast shadow onto another object
within the same setting. So I'll turn on
that cast shadow. And then over here, the most
important thing over here, there's some specular intensity, specular shyness, and then there's a reflection intensity. So basically, I need to
add some reflection. I want to add some reflection. I want to make it
more of a smooth, shiny surface so that when
my light is coming through, there's going to be
light interaction between these shaped shadow
and light and, like, forms. So let me turn this
reflection intensity to 50%. I'm going to change the
specular shyness to 85%. So you can see, if
I change it to 85%, there's a slight change
in the material. Not much going on. I might need to exaggerate
this a bit more. So you can see there's
like a shadow over here that's casting on
this ring here. You see this ring is
blocking the light, and then that's why we have this shadow area and then
the light area. So I might need to exaggerate. Let me change this to 100%. So I'm changing specular shyness to 100%, making it more shiny. And then I'm changing so
metal is already set to 100%. Specular intensity, I'm
going to change it to five. And then the diffuse
I'll change it to a 15, trying to change these
settings so that we can get some interaction between these
shapes while it's moving. You see that? Like one
is moving this way here. So diffuse, if we change it up, Like, you can see, if
we change it to 15, we have more concentrated
shadow and highlights, but then if we move, bigger, it just blow out everything. So in this case, we need to make it around like, let's say, 10%. My way of doing this
is basically kind of, like, thinking about, Okay,
if I want to make it shiny, more like a glass
mirror texture, I can tone this really up or if I don't want it
to be like a mirror, more like a metal thing, I
can tone it down maybe 50%. And then reflection, how
much reflection I wanted. I don't know. Maybe let's say, if I
want 100% reflection. It's just making everything
too dark. I can keep it 50. So keep the shadow and the
highlight area still there, but then have some
degree of shadow, or these, like,
reflections going on. So I'm keeping a 50% and then keeping this
diffuse to 10%. Specular intensity
change to 100% for now. Shyness maybe changes 75. So that's kind of what I like. If I play this, you
can see there's a lot more details
to these rings. And once we add the color, it's going to show up
on the color side. It's going to make
it more interesting because we have
interaction between these rings based on the light that's coming through
in different directions. So that's kind of the
material option that we need to do before
we color this. So right now you see over here, we have some shadow highlights and then one is going away. You can see all these details. So that's the material
option that I want to show you before
we do the color. And in that case, after we add the material, we finish everything inside
this composition. So this is exactly what I
need for this composition.
9. Background with Life: Okay, so this is what we
have here and it's rotating. And then we need to
create a pre composition. So now we have the setup, and remember we did the
material setup as well. So underneath over here, inside the material option, we play around with the diffuse, so change it down to 10%. Once we add the color,
it's going to show better because it's going
to have a mirror effect. So essentially, for
Cinema 40 render, we get these two
different options, geometry option and
material option. So these are the two
options we have. And like we already
covered previous lesson, we have the camera pulling out. We have the parallel light coming from three
different direction. This control now, right now, I'm not using it, so I
can just delete this one. Yeah, we're not using
this now. That's okay. And now I want to
precompose this. Let's go to select everything, and then Command Shift C, precompose this, one, two, we can call this one ring
animation, and then click on. Now, we have this
ring animation. So if I play this, you can
see, this is what we have. So now we can just think
of it as a two D layer, and then we can just color
this based on the two D layer. And first of all, I want
to add a background. So let's add a background. I'll just do a
gradient background. So let's go composition,
go add a solid layer. I'm creating a background, so I want to stick with
my solid layer. I'll call this one
background one. Click Okay. It's going to create
a solid layer, same size as my composition. So I'll drag it down over here. So I'll go to my
Effects and Presets, search for gradient RAM. And for this one, swapped color, we can do like a radio RAM, drag this bottom black color to the left so that we get,
like, lesser black. So we just get almost like a glow light that's
going from the top. Remember, we had this top light as our main light
in the composition. So I kind of want to
create similar lighting. Based on the ring
animation that we had. So we had, like,
one parallel light just coming from the top. So I kind of want
to resemble that. So we have the radio
gradient ramp, which means the white
is coming from here, and then the black
is coming from here. So it's got like a
radio gradients. I'll just strike this
one so that we get more gray area instead
of the black area. And then I'm going
to duplicate this. So, same thing. But now I want to create a lighter blue to a
darker blue color. So I'm going to click
on this white color, change it to a lighter
blue, maybe like this, and then change the black to
a darker blue. That's good. Just some random blue color. And now I kind of want to change this one to a linear gradient. Let's try linear gradient.
Let me solo this. For this one, I want
to come from top to bottom. Like this. So my blue color is a linear gradient coming
from top to bottom. And my black and white color is a radio gradient
coming from the top, almost like a sun glowing on the middle over
here on the top, and then it's
glowing some lights. And then the whole area
is kind of bright. The further it goes,
the darker it gets. So I'm going to use background one to do an
overlay on the background two. So I'll change it to overlay. Background one, overlay,
blending moti overlay. We're gonna use a
lot of overlay. Effects. Basically, make
the darker color darker. And then if you see
here for the overlay, working the same as the
overlay blending mode in Photoshop as well, right? So if we turn off the ring here, so we have white
color all the way to different shades of gray
and then to the black. And now, if I add in the
blue color from the top, blending that with
the gradients, we're going to get much
smoother gradients. And then the white is still
white, black is still black. But then in between, we get more separation. There's like different shades
of blue color in between. So just kind of create this blending gradient
color as a background. That's looking pretty
subtle, pretty nice. And almost like we have a sun
that's glowing on the top, and then the area is over here,
the end is kind of black. This is a very, I would say, common way of doing background. If you don't know how to
do a background, like, you can just always go to
this way to do a background. So this is not just like some kind of random
way to create. This is almost like whenever you need a background, you
can create it this way. So it's kind of like
a common practice. Basically, you can change
color to anything, but then we always want to overlay a black and
white underneath. They also change up, like how this light source is
coming in this background. Like, right now, the light
source is coming from here. So if I on a drag here, it means that my light source
is coming from the right. And then if I just change it to overlay the
first layer on top, it means that I have a light
sources coming this way. I can create a pretty good
looking gradient as well. And now I feel like
the white color over here is too much. So now I can go inside this layer here and
then maybe drag the starting lights area up so that I get more
of the gray color instead of the white color. And now if I just overlay
this blue on top, it's going to create this
diagonal grading color. It's looking pretty nice. I can also drag this black here. So it's going to kind of give
you more subtle gradient instead of just having
one layer of gradient, which is pretty flat. If you just create a gradient like this with the blue, like, one color blue and one
color darker blue, like too dark, that's
just, like, really flat. There's no light schwartz.
There's no environment. I feel like it's just basically a plain background
that's kind of, like, doesn't have any
life to it, right? So once we overlay on top of
a black and white gradients, it's going to give
you some light. It's going to give you
some light source. So that's why we're using two layers to create background. And now I just want the white
to be over here on the top, and then the black I'll
just do over here so that we have almost like a light
coming down over here.
10. RGB to Greyscale Colouring: Okay, cool. Let me just
put in my ring animation. Now, here's a heavy lift part. We need to color this ring here. So we want to color this. Right now, it's in RGB. This is called RGB
coloring, RGB coloring. So meaning your object should
only have three colors. Your object should
only have RGB. In this case, the way
we want to color this based on the RGB color is because we can actually separate each color by using
the set mat effect. So set MD effect is
the same as track mat. So basically, if I go at
some let me see here. Let me add a solid layer, and then we're going to choose
this one to call it side, and then we're going to
add in so basically, we're going to use three layers, color this into greyscale. First, we need to
color into greyscale, and then we're going to do a color overlay on
top of greyscale. First, the first logic is
we need to use black and white to switch the RGB
into black and white. And then after we
have the greyscale, we'll use color overlay to
color the black and white. And that's how the logic works. So, just remember,
from RGB to greyscale, from greyscale to color. So we're going to create
three different solid layer to represent three
area, the RGB area. So we have the side, which is
going to be the red color, and I think the
side is red, right? Yeah, the side is red, and then the outside is
going to be the blue. So we're going to have side. We're gonna have one side one
outside and then one beble. So let's do the side first. We just create a solid layer, and then we add in a
gradient, gradient rem. Let me turn it on. So
I'm thinking in terms of greyscale, in
terms of greyscale, we want to also separate the three different area
more so that for this one, there's two a gradient. Let me swap it. So
from white to black, and then for the black,
I'm going to use, like, a gray here
instead of black. So basically, over here, I'm going to use
a mid tone color. So, let's say, for this one, I'm going to rename
this one to side maton. Mi tone just means that we're not having any
highlight or shadow. Basically, everything goes from, like, a lighter gray
to a darker gray. So this is kind of the
mid tone that I'm having. And in this case, after I
have this gradient ramp, I'm going to use the set mates. So only two effects,
nothing complicated, only two effects, the
gradient ram and semat. So now I'm using
set mat effects, and then over here, we can actually take
a mat from a channel. So we have the RGB channel, which is a red, green,
and blue channel. So remember the ring is red. So we're taking the mat
from the red channel, and then we're going to use
effects and masks over here, and then we're taking
the red channel from the ring animation. So what happens is
that we're coloring this red ring here to a
gradient color over here. See that? It's covering. It's taking that mats. It's using this almost
like a track mat where you can use one layer as a track
mat for another layer, and then it's going
to basically fill in the color for the mat layer,
wherever it's visible. In this case, wherever
it is visible in red, if I turn it off, sorry.
Turn this one off. Wherever is visible in red
in the animation over here, you see over here,
it's basically going to fill it with
this gradient color. Now, let me create another one. I'll just go new solid. So this one, I'm going
to name it outside. And then this one I want
to do like a full range. So highlight to shadow because this is the
most prominent area. Outside is the blue color. We have the most blue color. So I want the blue color to go full range from
highlight to shadow. It's going to cover
all the colors from the pure white
to pure black, so that later on when we
do the color overlay, we're going to get more range. But for the side,
we're doing mid tone, so we're not going to
have as much of a range. So just want to have
some separation between these three different layers so that we have more contrast. So basically, this one, I'm going to go from
highlight to shadow, so I'll go to
gradient ram again. And then for this one, I'll swap it, go from
pure white over here. I'll just do like
almost like a diagonal. I think it doesn't
matter that much, but I want to do like this so that we have
pure white here, pure black here, everything
in between is gray. So we have full range
here for the outside, and then we're going to
use a set mat effect. Call this one. So we need to choose a layer that we
are taking the mat from. So the layer is called
the ring animation. We're taking this layer, and we're using the
effects and mask. And right now you can see
it's set to Alpha channel. Alpha channel just means
that everything that's visible is going to take
that shape from that layer, which is a ring layer, but
we're not using Alpha channel. We're using the blue channel. So let's go here, change
the blue channel. So now you can see, I have a
greyscale blue channel here. And remember, we
added some material. So since we have the material, you can see some
of these blue see throughs from the greyscale, which is totally fine because
we want those see throughs. When we add color,
there's going to be color interacting
with the material. So this is kind of like
what we have here. So we have the outside
highlight shadow side meton and then we're missing
just the bevel, right? So we're doing the
same thing. Go to solid and call this one bevel. It doesn't matter what
the color is for this solid because we're adding
a gradient greyscale. So we're doing a
greyscale over here. Call this one. This one is
gonna be the highlight only. Let's just do a gradient. RAM. And then in this case, I'm just using I'm
going to swap color. I always want the
white to be on top. And then this is a highlight, I just want to change this
darker black to, like, a lighter gray so that
we only have white to lighter gray like
this. Pretty subtle. Like this. So we have this, and then we'll go to
add a set Mad effect. Book. And then I'm going to change it to
the ring animation, change it to Effects and mask, and then change Alpha
channel to green channel. So now I have this edge
that's highlighted. Think about it as
almost like an edge. You always want the
edge to be highlighted, and then the edge is going to
be the highlight all white. So this is kind of
what I have here. It's in greyscale now. And
that's exactly what I.
11. Apply High Density Colours: No, we need to add some color. So the way we add color is, first of all, we need to
duplicate this ring animation. We need to use color overlay to add color on the gradient. So in terms of color overlay, we need actually still
this ring animation shape. We need this layer because
we need to take the shape to apply overlay on
top of this itself. So we need to
duplicate this one and then move it all the way up
and call this one overlay. So now I have this overlay. And for the overlay, I
want to add some color. So I don't need this
original RGB color anymore. So I need to actually
based on highlight and shadow and me tone, I
need to color this. So let me go to my
Effects and precess. I need to search for effect
called CC toner. Add it on. So by default, it's
going to be a tritone. So it's going to have a
highlight me tone and shadow. And then right now, it's
coloring my highlight to white. It's coloring my
me tone to this, like, brown, and then it's
coloring my shadow to black. So this is what I
get. It doesn't look well because I don't like these colors. It's too dark. So I need to use Penton. So Penton is going to
give me five colors. Instead of three, Triton
is going to be three. I need Penton. Penton
is five colors. So I want to modify these colors so that they look better. I just want to keep it, more
like a blue and pink color. So I actually put together this color composition
here. We have this. You can actually
randomly pick color, but this is the one that I choose and it's working
pretty well right now. So I'm using the highlights
as it pink color, and then the brights I want
it to be the bright blue. Lighter blue, and then
midtone uses midtone blue. And then dark tone
uses dark tone blue. And then shadow uses,
almost like a beige. I can turn off this
color for now, but I have this
CC toner already. Everything is set
to its own color. I'm going to change
it to overlay mode. So I'm going to overlay, so
it's going to see through. But then this is the
first overlay I have. So I'm using this shape, adding a CC toner, because if I don't
add the CC toner, it's going to still
show the RGB color. So that's not what I want.
I want to use a CC toner, see through some of these
very washed out color, and then I'm using overlay. And then we're going to add
some layer styles over here. We can add a grading overlay. So we're going to use another overlay on
top of this overlay. We're going to use
grading overlay, and then click on the overlay. We're adding the
layer styles, right? So let me turn on the color
for the gradient overlay, I'm going to just add gradients. I'm going to use this gradient
over here from maybe just like orange color to
this dark blue color, so we have some pink
color in between. So this is going
to be my overlay. I'm covering the whole
thing, so I need to change the blending
mode to overlay. And now I have some
color seen through now. You can see after I
add in the overlay, if I turn off the
color over here, it's already showing me
pretty good looking color right now. So let's play this. Yeah, I think it's okay. After the overlay, I also
want to add some shadows, inner shadows and
some inner glows. For this case, I
don't need able inbox because it's already
in three D. So now, let me just use an inner shadow. So you can see there's a
black shadow over there. Go inside over here. I want to change the
shadow color to this, like, more of a pink color. I want the color to
be more of a pink, so overall style is
more exaggerated. So it's more stylized. And then I want to
make the size bigger. So you see if I make it bigger. And then I change
the distance here. So you can see these purple
pink color peeking out as, like, a shadow over there. So I can probably turn
up the opacity to 100% and it's adding like
a pink shadow covering. Like if I tone the size down,
this is what it looks like. If I change the
distance, this is the shadow that's
coming from the top. You see that? I can also
change the angle if I want. But for now, I think this
is okay, maybe like this. So this is my shadow. Distance is okay. Just change the
size so that it's blending into the ring, right? So we have this shadow going on. See if I make it
like a bit darker. Yeah, darker is too dark. Maybe I like somewhere
around here better. You can also use other
colors like a yellow or it's just going to be
more colors in the scene. I think it might not look good. I think the pink
is looking better. Just keep it the pink color
like this. That's good. So over here, let me see if
I change the blending mode. Either like overlay,
I think overlay, make it more like a
glow instead of shadow. So I'll just stick to multiply. Then once I have
the inner shadow, I'll just add one more thing, which is the inner glow. I'll just go inner glow
and then go inside here. So for the glow, if I
turn off the eye icon, very small glow that's on the edge right now, so
I can make it bigger. So let's go to the size
and make the glow bigger. That's too big. So maybe just change it to what
I don't like is I don't like the glow on
these edges over here. So depends on your preference. Let me just add a small number, like 25 or something and
then keep it like that. So that's kind of how I
set up the ring here. And now I need to add one more overlay to add
more color to this ring. So one more overlay. Over
here, I need rectangle tool. So this is going to
be the final overlay. And the color I want to use is this blue to yellow to pink. It's kind of my theme here. So I got the color from
my color composition. So this is the color
of the final overlay, from pink to yellow
to dark blue. So I have this, and then
I just stated to overlay. So now, if I turn it off,
this is what it looks like. Still doesn't have much details. And, it's got all
these reflections, which is looking pretty cool, but it's pretty
still pretty flat. It doesn't have too
much life to it. So once I add the final overlay, this is what it looks like. It's got a lot more
life to it, just, like, kind of coloring
the overall scene and it's interacting
with the background, interacting with the foreground, interacting with the rings here. Might be too saturated. I can tone it down if I want. Maybe like 65% or something. Or just keep going to
add to final adjustment. So this is the color I like. I can depends on the preference. I can tune it up to, like, 100%. It's looking pretty well,
or I can tone it down. And then one more
thing I want to add is I want to add an
adjustment layer here. So I can delete the
color composition for the adjustment layer. I call this one light rays. So we're going to go to Effects and precess
and search for CCl ray, add it on. So what happens is
for this light ray is if I drag this light
ray here. So right here. Whenever it covers by the ring, you can see there's a
light rays shooting out. Almost like a back
lit light source where it's being
covered by the ring, there's some kind
of light source coming in like the shooting out. So I want to put it
in the center so that when my ring
interact the center, it's going to shoot
out some rays here. So I'm going to maybe
change some of the setting, keep modifying and
see what I like. So I think that's okay. So when the ring is interacting
the center over there, you see that we're having some light rays shooting
from the center. See that? It's giving some
more life to it. So that's looking pretty cool. That's one thing I want to add. So it's light rays,
giving you like a back light effects and
giving you a light rays. So that's a CC light ray effect. And then I'm going to do,
like, the CC light burst. So it's another one. So I'm going to add the
CC light burst effect. And small almost
like a motion blur, where right now, the
intensity is 100%. So if I play the animation,
everything is blurred out. It's pretty intense. I want to tone it
down maybe to 20. No. And the ray
lens is too much. So it's a 50. Change
it to ten or 20. Just give it like a
small number here. So we have some kind of
motion blur going on. So that's a City light burst. If you do, turn it
all the way up, it's almost like a motion
blur that's kind of blurring out from the center and it's bursting out lights. And I just keep a
small percentage. I can see the light
rays going on. Whenever this light
rays is going to help with converting the
light rays to, like, burst and giving you some, like, motion blur, more action
in the scene here. We got a bunch of
overlay, right? We have this ring
animation overlay using the CC toner Penton, and then inside, we added a layer style grading overlay
using this grading color. You can actually
modify if you want. It's going to give you,
like, different results. The screen looks pretty nice. So I don't want it to be
in the same color tone, so I need to make sure the two color wet are in
two different colors. So if you modify it
to green and yellow, I think this looks
pretty cool as well. So it depends on
the color you want. And then we're
having these lights and shadows and just, like, reflections going on based on the material option
from inside the ring.
12. Scene 2 Setup Workflow: This is the composition
we'll be working on today. So we have a similar setup, but there are three ring on one corner of the composition. And then we have some other
special effects that's added. In terms of the setup, this
one is a bit different. Change the camera angle
for this shot and then kind of work
with the camera more than the previous
shot to get kind of, like, similar composition
like this one. But the shading
techniques are the same. So we use the same workflow
to work on this one. You can see there's
a camera kind of like panning in the space. So this is the animation
that we're trying to get. So let's go ahead and create the composition from scratch. Let's go create a composition, and then the call
this one main com. And this one we 1920 by 1080, and then frame rate, let's
still stick it to 32nd. Duration can be ten. We need
to go to three D render. Make sure it's set to
send a four render. Click Okay. And now we need
to create three rings. And in this case, since
we want to create these rings facing on the side, if we look at the example, the rings are actually
just facing on the side. So this is kind of
the final look. This is the look that
I'm trying to get. So I need to think
about the logic of how we can get it faster
to this ring here. And you can see it's
actually facing on the side. So I think in this case, the best way for me is
to create the rings in the side view so that in the front view
is actually the side. In the active camera view
is actually the side view. So, I'll demonstrate so that
you understand it better. First, let's create a ring here. Let's just draw a perfect circle holding down option and shift. So we have the circle here.
Let's delete the fill. I'm going to click on the fill, click on this none, and then go, Okay, I need to put the anchor point in the
center of the ring. So I'll go to my position,
anchor point tool, click the center, click reposition. Now
it's in the center. I also need to make this ring in the center of
the composition. So I need to go to
the align tool. And then make sure it's
aligning to composition, hit the align vertically,
horizontally and vertically. Now, I have this
ring just completely aligning in the center with the anchor point in the
center. That's great. And then I'll go to
my selection tool. Now, I need to
turn this one into three D. Let's call this
one maybe ring one. I'll turn this one
to three D. And then I need to go direct
my panel over here. I need to go to myTview. It's all the way
to the side here, so I need to direct this
one really to the right to access this two view
here. I have two view. And now you can see in
my active camera view, I have this ring actually
facing front, right? So that's the active
camera view right now. And then on the left view, the ring is actually
facing on the side. So first of all, let me
just add in some extrusion. I'll add in the
beble here, convex, 0.3 here, and then extrusion, I'll just do 50, so we have
some depth to this ring here. And in this case, I actually
want these rings be a side view in this active camera view
because at the end, I want the rings kind
of like facing on the side on this right
corner, top corner. So it's really simple. All I need to do is just
rotate this, right? And before we do that,
I also want to change the anchor point to the
center of the extrusion here. So you can see the
anchor point right now is on the side
of this extrusion. I need to go to my
anchor point setting, hit A on the keyboard. And then over here,
in this setting, I need to change it to
25. My extrusion is 50. So once I change it to 25, I should have, did I
put 50, 50 extrusion? So once I put 25 on the
position of the anchor point, I should have the anchor
point in the center. And now, all I need
to do is to rotate this 190 degrees so that the
side view is facing front. So let me go to
the rotation here. And then so I'll just change the orientation of
the Y orientation to make sure my ring is
orientating towards us, right? So I'll give it a
90 degree angle. That's good. So this is
exactly what I want. I want this ring to face on the side in the
active camera view, so that when I
duplicate more rings, all the other two rings, I mean, altogether three rings
are facing on the side. I just want them to face
on the side because the final composition that I want have the rings
facing on the side, so that we're building it on the left view kind of like
a different logic than the last example
we're building in the front view and then using
the left view to kind of, like, assist us, right? To position some of the lighting and some of the
camera positions. Now, we're building it inside the left view because
the left view, we can see almost like
a front view right now. So that's kind of the
logic change over there. Now, I'm just adding RGB
color to this ring here. So let's go into content. Make sure we're clicking
on this ellipse here. If you don't click
on the ellipse, it's going to give
you an error and you cannot add the color. So I'll go to the ad
here and then I'll add a side color here.
Let's go to color. So for the side color, I'll just go to add a green. So 255 or using RGB to color it. So everything should
be just pure green, pure blue, and pure red, right? So 255 pure green, click on. You can see the side is
changed to green. That's good. And then keep clicking
on this ellipse one add a bevel color. For the bevel, I'm going
to change it to blue. So 255 on blue, and then change red to zero. Now we have a pure
blue here. Click on. Now you can see there's
a bevel around in blue, and then the outside is the green color and the front side is actually the red color. So
that's all we need. Now, I just need to
duplicate this ring here. Command D, Command D, duplicate. I'll go to this front
view, active camera view. I just need to drag this one out slightly, maybe over here. Or if you want to
do more exactly, so let me pull out the
position property. Remember the extrusion is 50, so I just need to pull
this position out. Let me just drag this one
to align it. Eyeball it. I'm just going to eyeball this. Doesn't have to be exact, right? Roughly like that, right? So I have three rings
on top of each other. You can calculate if you
want to make it more exact, but now I think this is okay. So let me just do
it this way here. Three rings on top
of each other. And now, I want to
change the size of it. So all I need to do is to
change this one smaller. I can actually just go a link in the scale property and then
maybe change this one to 65 and change X and Y to
65 without touching the z so that my thickness
extrusion is still the same. So now we can get it by
using the scale property and then change it to 45% here, and then 45% here, so that we still keep
that thickness going on, the thickness of the extrusion. And we change it to 65. I didn't like this gap here, so I might want to change
the second ring bigger. So you see this gap here is
bigger than this gap here. So let's change it to 70 instead of 65.
Okay, that's better. So we have more of an
equally spaced gap here. That's how we create the
three rings very easy, same as what we did last time.
13. Perfect Camera Control: Now, we just need
to add some light. So same thing, go to new light. We're going to just
go faster this time, since we already showed
you how to do everything. We'll do Paralyt one. This one we could say maybe top to down. And then with intensity,
we made it really big, so it's going to be 2000. You can see, once I add
in this left panel here, it just everything is blown out and not blown out.
It's really dark. So I need to change it to make sure we have
it on the top here, and then I can direct this point to point down all the way down. So I only show half of
the ring that's in light. And the other half,
it's kind of in dark. So I also don't want it
pointed, like, straight down. I want to give you
some angle here. So let's try to keep it like
this, something like that. If it doesn't work,
we can change later. So now, number two lights, one could be the front to back, and then intensity we
change it to 1,000. So this one is front to back. However, we're in the side view. So in this case, I need to go back
to my front view, active camera view to make sure it's kind of going
through the rings. So I need this one to
go from front to back. So front is over here, this is front, and then
back is over here. So we're going
through this ring. And I also want to make sure this side view here is probably
I need to have this one, the ring in the center so that it can go from front to back, going through the rings
because this is a side view, or you can change this
one to a top view. And this is the top view. You can see it's actually
not going through it. So I need to make sure we're
going through like this. This is the way it will
go through, right? I don't want this side
to be completely dark, so I want to modify the
angle so that we have somewhat of a lighter
shadow gradient feel to it. So this is, like,
looking better. And now I'm using the top
view and the front view to see it clearly
that this light is going through the rings
here in the center. So that's good. And now let
me add the third light here. This one is going to be
called back to front, and then 1,000
intensity over here. This one is going to
be the back to fronts. And then even if I drag the back to front light in the
active camera view from, you can still see on the top, it's not actually in the center. So I still need to
make sure in the top, it's in the center as well, right? So something like this. Okay, and then I'm going to
go back to my left view here. The lights, parallel lights. One is top to down, and then top to bottom. The other is front to back, and then the other
one is back to front. So that's the three
lights we added, same as last example we had. Next thing, I can either add a camera or I can
add a material. So let's add a camera
first. Cameras a little bit tricky this time.
So let me show you here. This is the number one
common way to do camera. A lot of people actually
don't know this method, which makes the camera
so hard to work with. So first of all, we add a camera. Same thing. We talked about camera, and then we talked about
the focal length. For this case, I'm going
to use a semi white angle, which is 35 millimeter. I don't want to have
like 50 millimeter, which is kind of the
same thing as human eye. So that's boring. I don't want the
huge white angle. It's gonna give me too much extortion at the end of the day, so that's kind of,
like, too much. I'll just keep it 35 millimeter. Still a wide angle, but
not too much distortion. Click Okay. Now
we have a camera. What I need to do
is we need to use the camera without changing
the position of the ring. I need to use a camera to
push the ring to the corner. We normally just keep the hero object in the
center of the frame. Thinking about when you're
shooting a model, right? Thinking about when you're shooting like a famous
model or someone, and then you have a
studio setting, right? You don't ask the
model to go like, you know, can you go
over there on the right? It's just basically a setting, almost like a composition. And then in the center,
there's good lighting. All the lightings are set, and then you have a model maybe trying different
clothing in the center. And then the camera man is
going to change his position everywhere in front of the model to get a
good composition. So that's how we do camera. We're not asking
the model to move. Model can give you different
poses that move slightly, but it's we're not asking this ring to
move to the corner. So no, the ring is going
to stay in the center. We're going to change
the camera to move the camera according to the
composition that we want. But the problem is, when
we're adjusting the camera, let's say if I want change
the ring to the corner. I can make it closer. That's good. I can
make it over here. And then let's say if
we do change over here, and then rotation
over here, like this. And then okay, we're just changing the camera
on the flat angle here. So we also need to pull the position of the camera
to show more of the front. So it's actually
really hard to control the camera this way
with the camera handle. Meaning, right now, if we really want to get a good picture
of this model here, we actually need to
move this camera so randomly in the space
because the space is so wide, and then we need to make sure our point of
interest is also always on this model on this hero object inside
the three D space. So it's actually really hard to do it this way because
at the end of the day, you're going to mess up with the camera because you are changing so many
settings over here, and then you actually
don't have an anchor. There is no anchor
to the camera. Like, everything is random. So the rotation is random. The position is random. You're just kind of a
remember in three D space, it's not like in one
side of the view, it's not like what you
see is what it is. Sometimes you change
the left view, and then you see it might be
facing the object correctly. But then when you're
going to the top view, it's actually all messed up. So we're not able to work this way efficiently
if you are only using this camera setting and then
keep pointing the camera to the object this way by dragging the rotation and
position randomly, it's not going to
get what we want. So instead, what we do is, let me go reset here. So this is reset.
I have the camera. Everything is zero, and then
I can drag this one closer. Keep the point of view on the ring here. This
is a point of view. We need the point of view
because sometimes if we do the camera
blur or something, if we don't have the point
of view on the object, the object is going
to be blurry. So it's almost like the depth of field that we have on camera. So the way we do this
is we actually add a null object so let's
go at a null object, and this is going to be
called camera control. And then the null object, I need to make sure the
null object is three D, and I need to make sure
the null object is also in the center
of my three rings. So I might want
to push this null here to this middle ring here. So if I go to position property, I'll just push to the left
to this middle ring here, roughly in this position here
so that on the front view, this active camera view, I have this null object in
the center of three rings. That's good. And then
in the left view, I have the null object in the center of the
ring. That's good. Now this is my camera control. So now all I need to do is to pair my camera to
the camera control. I'm paring this camera
to the camera control. And now I'm gonna be changing the setting on the camera
control instead of the camera. So I'm pulling out the position property and orientation
rotation here. So if I change the
camera control, what's happening is I'm
actually parting the point of interest of the camera to the
center of the hero object. Meaning, wherever
I move this null, the camera is always pointing
towards my hero object. So before, if we change the camera setting here,
position, rotation, whatever, position,
rotation, orientation, whatever, we're
actually changing from the camera handle side. So once we change
the camera handle, randomly, sometimes we're
going to lose the object. We're going to lose the focus. We're going to lose
hero products because we're changing based on
the handle of the camera. However, this case,
because the null is inside the hero object, and then we're pairing
the camera to the null. So in this case, we're
actually changing the camera based on the null
inside this hero, meaning we're actually
wherever we go, we always have the camera
facing the object. So if I change the rotation, you see the camera is always facing the object
wherever we change. Whatever we do with rotation, position, orientation,
wherever we go, are actually using
this null object to control the point of interest
of this camera so that the camera is always
facing the object instead of losing the object if we are changing the
camera from the handle.
14. Camera Animation: So once we get that,
it's really easy now. We just need to move this null. So I just need to turn this. I now don't even need this
two view here, I think. I'll just turn this one to
one view, zoom in here, and then I just move
the rotation here. Once I have the camera control, I can freely drag
these rotations. I'm confident that my camera is always be facing
my object, right? So I don't need to worry
about losing my camera. So I need to drag this
one here like this. I just need to get it to a
good looking composition. In this case, I
was actually using the camera control position to reposition this camera here. Even if you drag the
camera control position to kind of, like, reposition the composition, the layout, I think that's okay. The only thing you need
to understand is that once you start to
drag this position, you are actually
moving the null object away from the center of this
ring here. You see that? So that might not
be what you want. So the only difference
is that if you dig this, the null is actually not
within the center anymore. So if you want to modify it that way, you
need to understand that. But as long as you understand
that and keep it in mind, if it doesn't affect anything later on, I think
it should be okay. So in this case, the
only thing I want is to push this thing,
the null over here. So now, if I track the
position, it's not even moving, so I actually need to use that null because I'm moving
the position of the camera, it's not pushing this
object to the corner. It's only moving the camera
angle here. See that? And then only the z axis, I can push it in closer
here to get it closer. So I can push it in closer, but I still need this to drag
it to the corner over here. Something like that.
Okay, I just need to have a good looking
composition like this. And then I can animate this white rotation to have this thing come
in like this, maybe. Once they come in like
this, add a rotation, and then let's go
maybe 4 seconds. Keep rotating like
this. So we have a rotation in three
D space like this. Right? So when they come
in, it's on the side, and you don't even need to
worry about this camera where it is because it's
always facing our object. All we are working is
on this object, right? So we have the
same go like this. I'm going to add some
animation on the ring here. So now I have a camera animation that's turning the Y
rotation like this. It's pretty cool.
And now I'm going to go at scale property. I'm going to do position first. Let's go peeper position. This is the final position, so I needed to maybe come
up after 20 frames. And then at the beginning, I wanted to go
outside of the frame, which is X over here. So I'm going to push it
all the way out like this. So I'm going to push all the
way outside of the frame, and then I'm going
to go easy ease it, do the same thing
as we did before. We're going to go at
easing in curve here. And then I'm going
to cut maybe one, two, three, four, five frames, cut it there so that we are
coming in in action, right? So I also want to
do some rotation, I mean, scale animation. So I'll go to S for scale, and then I'm going
to add a scale. I'm going to link this. So this is going to
be the final scale, so I'll go forward maybe eight frames to be
the final scale. And then at the beginning, let's try to make
it change to zero, and then we're going to
do an overshoot here. So this is going
to be the final, and then I'll go
and overshoot here. So the final is 45 70. I'll add an overshoot.
This could be 50. This I'll go to 75, and this one is 100, so I'll go to 110. So we're adding an
overshoot here, zero to overshoot to
this position here. I'll go easy es, and then let's go dig
the graph editor. Like this, add some
EzA. That's good. And no, so I need
to stagger these. I need this big one
to come in first, and then after maybe one, two, three, four, five,
one, two, three, four, five, After five frames, I'm going to have the
other ring come up. Should I have the
small ring to come up first? I don't
know. Let's see. Okay. Okay, this
might look better, but I don't like it to come from 100 I mean, zero to 100%. So I'm going to move
these rings here, the scale property
backward a little bit so that I only want
that overshoot part. So I don't want it to scale from zero because I feel like
the bounce is too much. So I'm moving this keyframe
backwards so that I'm cutting the scale to come up
from this size already. So once they come up,
they're already big. They're not coming from zero. I just need small overshoot. Maybe it's not that
visible anymore, so I might need to make the
overshoot more visible, but I'll just push it
back one more frames. Yeah, that looks better. That's okay. I'll just
keep it like that. So we have the ring come up
and then Rotate like that. Ooh. CompoRotate. Maybe it's too fast. I feel like the camera rotation is too fast. So I'm going to drag it to
six second to make it slower. So we have this thing
comes up and then rotate. And that completes the
setup that we have.
15. Create Sense of Space: Next thing, I want to
show you another effect that's really important
whenever we use camera. So let's go at a solid layer. I need some effects
called CC ball action. So we call this one
CC ball action. Change it to baby gray color, and then I'm going to go to
Effects and Presets search for CC ball action. So if I put it on, you see here, it basically generate
a pattern here, almost like a wallpaper pattern. We can actually spread
these balls out. They're actually just balls
or circles in the space. If I drag the great setting, I'm going to make
the balls bigger. I'm going to change to 20. And then change
this one ball size to 20, make it smaller. And you see that, we
have these balls here. And then I'm going to change
the scatter to 1,000. To have a scatter
around in space. I want some stars in the space. And now all of a sudden, you can see who has some stars going on. And I want to color this
one to a white color. So I'm going to do a
fill color effect. I'm going to change
to white. So that's my CC ball action. So what I did is I need to turn it down three D as
well. On three D? This effect, the best feature of this effect is that
it's a three D effect. Meaning, if you have a
camera moving in your scene, this effect is going to
move with your camera. So if I turn this one on
without showing anything, if I play this, Okay, we don't need to
turn on the three D because once I turn
on the three D, it's got an error here. We don't need to
turn on three D, but it's got a three D feature. What it means is that if we have a camera movement
in the scene here, the whole effect is
going to move with the camera to create
the three D space. And since we don't
have any point of reference or reference
points in the space, we actually don't know
how big these rings are, and then when they
come on, we actually don't know they are
actually moving the space. It doesn't have a
visual reference. So we are using
the CC ball action to add some background as, like, stars in the back or, like, really far away so that we can create a space,
a sense of space. It's moving with the camera. You see that slight
movement with the camera, it's taking that movement from the camera without any keyframes on the CC ball action because
it's three D effects. So once we have the CC
ball action active, it's going to inherit the
movement of camera and then adding a sense of space
for our composition. And essentially,
this is what we get. If you feel like it's too much, what we do is create a
composition, combine everything. This one we call this
one ring animation. And then I'm going to
take this ball action, command X, cut it, and then I'm going to drop it in here and I'm going
to precompose this one, call this one CC Ball
action composition. I'm going to also
copy the camera and the null object into
the CC ball action. I need to copy these effects, make sure it's inside
the CC ball action here. Okay, and then over here inside, I just need to make the
camera move a little slowly. Like right now, the movement
is taking up 6 seconds. I'm going to change it
to 10 seconds so that my CC ball action is moving
slower than the camera, so it gives you, like,
a background feel. I'm going to put it underneath the ring animation
here, and you can see, let's play the animation.
We have two layers. One is ring animation, and the other one is
a CC ball action, and we have two different
sets of camera movement. The CC ball action
inside the composition, the camera is moving
a little bit slower, but it's the same
exact moving path. So it's got the same
rotation in the space, so it gives you the
same parallax effect, and the ring is
coming up over here, but the ring is having like
a faster camera movement. It gives you this sense
of space over here. And you can also add
a fastboxblur effx. To blur out maybe so give you like two point
blurs that I'm blurring out some of the stars further
away from us, like that. And then once we add
in some background, I can look pretty nice.
16. Apply Creative Looks: So let's keep going on this one. We have the stars in the back, and then we have the ring here. Now, we just need to create
a background, right? So go to create a solid.
Let's create a background. So this one could
be background one, and then let's go
at gradients RAM. This one, I'll put in the back. I want the light source
come in from this corner here so that we have
dark area on the left. So do still use radio
gradients swap the color. So this could be the black. This is a black. So we have
a fan shape over here, and then the light is
coming from this side here. So that looks pretty cool. And now I'll just
duplicate this one, change the first one
to a lighter blue, and then change the second
color to a darker blue and maybe slightly adjust
the points here, and then I'll just do a overlay of the
first background on top of the second one. So I think the colors
still a bit washed out, so I'm going to change the blue, lighter blue to a more
saturated light blue. And then drag this white point out more so that the
white points to, you see, like if I put it
here, it's be blown out. So I want to drag this
white point out a bit more so that we have
more color over here. And you can just tweak
this one however you like, once we have the overlay set up. So I can dig this
one out a bit more. I think that looks pretty good. I like that. And now we
have the background. We have these. Now I need to
set up my greyscale, right? So I need to go to another
solid called this one. So the right is front. Front, I'll do I'll just
do highlights then. I'm choosing highlights
and shadows, I'm just thinking the area
that shows up the most, I'll use full range,
which is the green here. The green is showing
up the most. So I want the green
to be the most range, which is going to
be from white to black with both high mid
tone and shadow, full range. And then the red, I can probably do midtone, but I think the trick
here is the angles. So you want to angle them
differently so that they have some separation on
each panel, each surface. So what I'm saying the angle, let's say if we want to do
this red front highlight, I'll just go gradient
ram and then I'll just do this is going to be from
white to a lighter gray, and then I'll just go
from here to here, right? And then I'll use set mat. Choose the ring animation, defects and masks,
and then red channel. So this is the highlight
that I'm talking about, mostly just like
brighter, right? So this surface is brighter. And let's say if I
duplicate this one, this one we call this
one green could be side, and then I want to use
full range for the green. So this could be the fo range, which means going to be
from white to black. And then we're going to set
it to the green channel here. So in this case, another thing I can
do I swap the colors so that we have the black
on the top and the white on the bottom so that we have
a different angle than the previous y channel
so that we have more contrast between
these surfaces. You can see which
one you like better, but for me, I can test it
out with this one for now. So we have the darkness on the top and the
lightness on the bottom. And then there's a lot of contrast between this red layer, red channel here and the green
channel because this is, like, dark and this is pure
white. A lot of contrast. For the bevel, I always
want to do, like, a highlight because I want the edge to be
highlighted sometimes. So for the blue, which is a
bevel, I'll do highlights. So we have two highlights
and one full range. It doesn't matter if
you want to change this one to mid tone,
you can do as well. It's probably going to give
you different results. You can do some testing, but
it's not really important. You can kind of, like,
play around with it. For the bevel, I'll just do swap the color white to white. This one change to
the blue channel. Yeah, I just want here
to be more highlights. So I'll just do this one here. Now we have the greyscale, and they're going to
duplicate the ring animation, move it on top over here, and then let's do a
CC toner effects, and then we're going to change
it to pentoF the color, I'll grab my color composition. Change the color hers. Even the toner color, you can
change whatever you want. And now I just need
to add a layer cele, which is the grading overlay. For the grading overlay, I'll
change the color to sears. Same way as we added
color last time. So we need to make sure we change the blending
mode as well to overlay. We also need to
make sure we change the blending mode of
this layer to overlay. And then turn off this.
That's right here. Now, I just want to add
another inner shadow here. So I go to layer
cell, inner shadow. For the inner shadow, I can choose like a
pink color maybe. And then I can make the size
bigger, distance bigger. Like that. Size
bigger like that? Okay. That's good. And then if you want, let's
see how the inner glow works. I'm not sure if it's
going to work well. Okay, add a little bit.
I think it's okay. Maybe 25%. Inner glow,
some glow over there. So we have this one come out. And now we need another overlay on top of
this with nothing selected. You just want to add
a rectangle tool. And then this is going
to be my color overlay. So I got this color. This is a new color.
It's also from my color composition
here, this one. So it's kind of a new
color that I pick it out. This is a new color, and then I'm going to set it to overlay. Maybe too much. So I'm going to change the
opacity down back to 75%. You can also double click
on this gradient color to change the gradients
to however you like. So if you feel like whoops. I feel like the pink
might be too much. I'm going to move
the pink back and then give you more orange. Blue is too much. Maybe add
one more orange over here. Like if I add some orange, there's some orange toe over
here looking pretty nice. This is white, orange, blue. What if I add more orange here? Yeah, you can, kind of choose those colors
however you want. It's gonna give you
some more variations. So this is after we have that, and it's gonna turn like that. I feel like the bevel
might be too much. I mean, the bevel is too white. If I go to the layer
style and the gradients, what if I change the
gradient color over here? So this is the color
that's most important. It's going to set the tone
of your color overlay. So if I change it to this green, it's going to show
some green over here. I can also add another
color in between here. Maybe, that looks better. So that's a lot better. And
that looks pretty cool. You see, three colors, there's a lot more
color going on, a lot more reflection. So if you like the green tone,
you can choose the green. Or if you like contrast
the feel, we have, like, the purple to yellow to green. So that looks pretty
cool as well. I think I like that better. So I'll keep it
like that, giving me a lot of color over there, looking pretty nice.
You know what? I forgot? I actually
forgot to add material. This is even without
the material. So by default, it's
got a bit of material. So we can tone it down to 30, change the sinus to 50, reflection to maybe 50 to add a bit of reflection
or the three rings. I'll duplicate the
material option and paste it onto
these two things. Let's see what happens outside. It just basically makes
the rings more reflective. I think it's looking
pretty nice now.
17. Final Touch Up with Effects: We can just add a
couple more effects. Let's say, we add in
the adjustment layer, and this one we can
do the CC light rays. So this is going to be
my light race here. It's going to kind of if I have the animation,
like the center, add a keyframe at the beginning, and then once I come up, I'm going to have the
center drop here. So have some kind of light
shooting in like that. Maybe that's too slow. I'll have it complete
for 1 second. And still some easing, so it goes well with the overall easing
of that animation. It's too bright. I can
change it down to 50. Yeah, something
like that. So I'm also going to add
the CC light burst. And then for this
one, lens change it to four or five and keep the intensity to
100. That's pretty good. So this is before
after maybe to ten, ten too much to eight. After have some
motion blur going on. And now you see the problem. My stars in the back are
taking the overlay color. So I don't want those
stars to be colored. So I need to move my CC
ball action to the top, so they're not underneath
my adjustment layer or the color layer,
overlay layer. So they're still in white color. So I want it to
be white colored. Change it back to six, a
little bit too blurry. And the center, I
want it to be here. Move the center to here. So
this point is the most crisp. It's the highest resolution
everywhere else, there's gonna be light burst. I also don't like
this line over here. So what I can do
is I can actually animate this fil color effects. So if I go down, to the content to the rectangle, to the gradient fo, to
the started endpoint. So I want it to come in the
same time as this ring here. So at the beginning, I want
this point to be over here. So I'm animating the started
endpoint of this gradient. It's almost like it's going
to come in the same time as this ring so that it's going to fill the
ring with color. So I'll do some adjustment
for the curves, give it an extreme easing
curve coming in like this. It's going to be like
this so that we don't have that line over there. So this is the full setup the
ring and the camera move. And we have the overlay, everything we talked
about last time, right? CC Library, CC labers. We add it in the ball action. Make sure it's on the
top, so it's not colored. Finally, we can do lens flare, and then we can finish it up. So let's go to add
adjustment layer, call this one lens layer. So we go to pull
up the lens flare from Effects here. And
this is a lens layer. It's got three different types. This is a default type. It looks like this. So I
think we can use this one. It looks pretty cool. Another one is 35 millimeter
prime less layer. It looks like this. Too big. Don't like it. 105.
This is really subtle. It's got big and
small, really long. So I like the first one
better, the shape, better. And then I can blend
with the original. Let's do a 50% blend,
so it's more subtle. And we can animate the
lens flare center. So let's go from the
center over here so that my lens layers overs
and then add a keyframe, hit you on the keyboard and
everything comes down here. I'll have the lenslare
drop down over here. So my lnslaer just got
lifted to move over here. It's going to be from outside. Then coming in and then
go up, almost, like, similar to this camera motion, come up and then it's
going to stop over here. So we're going to cut
to the next scene. And in this case, this
is my lens flare. I like how it looks. You can
also change the brightness. You can make it really bright.
It's going to be blown out or just keep it like 100%. And another thing
is, I don't like this lens flare to come
in from this side. The source is over here. It's going to have a soft dot that's coming into
my scene here. So all I need to
do is to a mask. I'll just go to ellipse tool, and then I only want this
side of the lens flare. So I'm cutting out
the other side. I'm only showing this side here. So we don't see that
source lens flare center that's coming in from the side. Right. And we have this lens flare that's coming
home from here to here. Okay, that's looking
pretty cool. And the original example, I also have a just a ball
animation like these two balls. So I have these two layers
coming in on this side here, I'm just going to copy this
because this is just like a very simple path animation. So I have this circle coming in. I'm going to use this now to
move the circle around here. And then once it goes here, it's going to shoot
inside this ring here. So if I play the animation, this is what it looks
like. Need to cut it here. So as if it's entering the I don't want it to
overlay on top of that ring, so I want this ball
to enter the ring. So the next frame is going
to be cut like this. So we have this ball coming in. And then got sucked in.
It's like a jump point. You have this spaceship
coming in and then see this jumpoint
and then go away. I don't like these two
bigger dots in the front, kind of, like, distracting me
from seeing this ball here. So that's all my ball action. I can probably make
the size bigger. Just to cut out two
balls over there, make the sides a bit
bigger, like that. I think that's okay.
So we only have one. Or another way, you can
probably just adjust some of the settings in here,
grid spacing, 21. Yeah. Maybe 21 grid spacing is going to get rid of
that bigger circle. So we have this thing comes in, give it a rotation. So it's coming in this way here. And then it's gonna turn. It's gonna see if it's gonna get sucked in and then all
of a sudden get sucked into the jump point
of the universe. So this is the final
animation we have.
18. 2D Scene 1 Overview: In this lesson, let's
take a look at how we animated the first
two D scene here. So let's first take
a look at that and then we can put the
three scenes together. Let me go to my scene one here, and this is the setup
of my scene one. Basically, I have
this animation here. I'm not going to go through the exact step by
step in this case, because this is mostly two D.
So we're transitioning from a two D environment
in the scene one to a three D environment in
scene two and scene three. So that's how the
animation was set up. If I play this, you can see, this is a very simple and
straightforward scene here. We only have a bunch of circles, a bunch of lines here. We're using trim paths
to animate everything. So let me go through
how I set this up. First, if I turn off all these
layers here at the bottom, we just have a black background.
Nothing is happening. And then we're going to turn
on this animation here. Those are the two
circles with patterns. So if I play this animation
here, you can see, we basically have a bunch of patterns inside this
composition, that's changing. Keep changing. Like that. And then if we go outside, we use a shape layer
as a track mat so that my pattern is going
inside this shape layer. And there's a little
animation on that shape so that we have a bigger circle and a smaller circle like that. So that's my circle animation. And then if we go outside
in the scene one here, I got these two circles with
the pattern keep switching, floating up like that. Okay, so that's
the circle setup, and then we have
some lines here. So we have these lines
going down like that. And then the way we
animate the lines is we have this composition here
with a bunch of lines, and then if we go inside
the lines animation, so we animated the trim pass
effect from start to finish. So this is trim path, and then we have this line animation with
the trim pass effect. We have this start and end
keyframe setup like this so that each composition has this line just going
shooting like that. And then in the
previous composition, we duplicate a bunch
of these lines here, and there's some
dots also animating, and this is how we set up the speed lines in the background. And then if we go back
to the scene one, so we put everything together, we have a null object
controlling the entire scene, so everything is going up first, and then the null object is
rotating the whole scene to 90 degree angle on
the side so that the circle is going to
shoot to the right. And then at the same time, while the circle is shooting
to the right, we have the glowing
background that's happening. So from this here, we have
this radiant ramp that's going from this blue color showing
on the right hand side, and then almost like a
light is peaking out so that the circle is traveling
closer to the light. So the entire animation
is going to be like this. No, move if you want
to look closer, you can take this
project file and take a closer look at the keyframes
and how we set it up. I'm not going to go over the details because this
is a three D class. This is entirely in two D. Also, if you don't like the setup, you can also create your
own first scene as well. You can do anything. You
can do anything to D, and then the circle is going
to shoot to one direction, and then we're
going to do a match cut to cut it to
the second scene. So this is how we set up
the first scene here.
19. Star Burst Transition: In this lesson, let's put
the three scenes together. Let's go create a
new composition. Call this one the final render. 1920 by 1080, we have
maybe around 15 seconds. Click on. And now let's
go into my asset folder. I'm going to drag my first
scene into the composition. So this is my first scene here. It's starting from
zero second right now, and this is going to
go down like that. And then as a shoot
to the right, when the speed is the fastest, I'm going to cut it to the second scene,
maybe around here. So I'll drag in my
second scene animation, which is second
scene option one. For option two is basically another color variation that you can take a look and explore. But we're going to
use Option one, which is the one that we
did in the previous lesson. I'm going to just put
it at this point here and then let's see if the speed and the transition match up. Up. I think it's a bit too late. Maybe it's gonna
cut it around here. So I'll just cut it here. One. And then I'll change the resolution to third
so we can render faster. Yeah, I think that match
up pretty well in terms of speed and also the momentum. Done. So that's my second scene. And then as the circle goes into the jump point over here, I'll cut it to the third scene. At this point here,
I'm going to go to scene three, option one here, and cut it here so that as soon as the circle
goes into the jumpoint, we're going to cut
to the third scene. But then I will probably
cut maybe first two frames. So we're going to
start at this frame. I'll option left square
bracket, cut it here, and then move this back
to this point here so that we can tie the two
scenes closer together. Yeah, I think that
looks pretty well. As soon as the dot is
coming into the jumpoint, we're going to go to
this scene here where the camera is pulling out from
this rotating rings here. Let's play the
animation. No, no. And then at the end,
I actually want the whole thing resolved
to either a logo or a line so that you can
customize it yourself, right? So what we're gonna do
is we're going to add a transition after
the third thing here, and then we're going to
resolve to a logo review. Let's do that. And then for the third scene,
as you can see, what we're actually
missing is we're missing a little bit
of sense of space. We talk about sense of space in the previous lesson where
we use CCD ball action. And I'm going to
show you another way to add sense of space, and then we're
going to introduce some speed tunnel to transition
to the last logo review. So in order to do
that, I need to first, create a new composition. Let me just create
a new composition, call this one star transition, and then we're going to
use around 10 seconds. Click Okay, and go back
to the final render. What we actually need to do
is we need to have the stars appearing in the third
scene so that it can create a sense of space and also transition to
the next scene. So we're going to use the same camera movement
from the third scene. We're going to go
inside the third scene, go inside the ring animation
and copy this camera. If you see here, this is a
camera movement that we have. The camera basically just
pulls out so that we have this ring zooming
out from the camera. So let's copy this
camera movements. Command C and then go to start transition,
pasted in the camera. If I go to the two of you, you can see we actually
have this camera. I'm going to cut the
first two frames because the camera is
on the wrong side. But we have this camera pulling out like this
in the top view here. So now we just go to
Layers new solid. Let's create a star burst layer. Doesn't matter what color it is. We're going to use Effex
called CC star burst. Add it on the solid layer, and then you can see we
have a bunch of stars. But first, let's change it to white color, so
it's easier to see. We're going to use the folk
effect, change it to white. That's good. And then
the stars are too much. So you need to make the grid
spacing bigger, like this. Let's change it to 20. And then the sides of the
star are too big. So we need to shrink it down. We can change it to 20 again. And then for the scatter, let's make the scatter bigger so that the stars are
further apart. I'm using a setting around 300. And then if I play
the animation, you can see we have the
star coming into the scene. However, in this case, we actually want the star to go backward because our
camera is pulling out. So in order to do that, I need to give a negative
value to the speed. If I do negative one, you can see the star actually going away from us,
from the camera. So that kind of match
with the camera setting. So at the beginning, I want it to be really slow,
really subtle. I'll create a negative 0.1
speed for the first part, make it really slow,
really subtle. To match with the
camera movement here. And then around maybe 2 seconds, I'll start to make it faster. So I'll add a keyframe
on the stopwatch, hit you on the keyboard
to show the keyframes, go forward to three frames, and then change it
to negative five, not 0.5, negative five, so that we have a much
bigger speed like this. The stars are going
away like crazy, so this is where we're
going to do the transition. And then in order to do
the transition better, we also need some
speed lines, right? So in that case,
I'm going to add another effects on this
layer, which is called echo. For the echo effects,
if you take a look, if I change the echo
number to maybe ten, we can actually create some
speed lights like that. But this is not working because ten is not a
good enough number. If we increase, we can actually
connecting those dots so that all the lines are visible and we
don't have any dots. So we're going to change
the number of echos to 60, and then we're going to decrease the echo time to a
much smaller number. That's two -0.01. And I think this is not even
still not small enough. So I'm going to change it
to really small number, 0.001 so that we
can actually make the lines really connected
without any circles. So at this setting, 0.001, and with 16
numbers of echos, we can see the lines
are connected. Let me hit the stopwatch to add a keyframe on both properties. And at the beginning, I
still want to keep it to one echo so that there's
no echo at the beginning. And then after 2 seconds, there's some echoes
and then all the stars are going away from
us really fast. So this is going to be where the transitions get happening. So that's kind of my
transition frame. I like that. I like the speed. We have this composition setup. Let's go back to
my final render. Let's drop in my star
transition here. So from 5 seconds, I'm gonna drop in the star. So we have the stars going away. And maybe because right
now the stars are overlaying on top of the rings, which is something
we don't want. So I'll copy this composition, actually cut it, command X, and then I'll drop it
inside the scene three so that we can have the stars
actually behind the ring. So I'm going to move
the stars behind the ring so that we can
still see the stars, but then the ring is
covering on top of it. And in that case, in this case, I think two second transition is way too fast
or way too early. So we need to actually
transition maybe around here, four second where the
rings are lending. So let me just go inside and
then move the keyframes to around four second. That's good. I don't need this
keyframe because we're not changing the
value of the echo time. So let me go back here. So this is where the
ring is lending, and then we're going to
transition like that. It. And I also don't want it to transition
after the ring lens, so I want to transition
right before, so I might need to move
this one a bit early here, right before four second here. That's where we're
going to transition. And as we transition, I also want to modify the
color of the background. There. So if I
solo the last one, the last background,
which is black and white, this is what it looks like. And then this is the overlaid
blue color on top of it. So let me just go change the gradient ramp in
this last background. I'm going to add a start of keyframe and then end ramp
keyframe at this point here. As we transition, go forward. We're going to go drag this one out and then drag this one
down so that everything is becoming a bit more
white blown out like that. Let's see if that works better. Well, as if there's a
light in the center that's glowing and then
covering everything like that. So let me add the same keyframe onto my blue overlay layer here. So I'm gonna copy
the key frame of the start and end ramp and
then paste it in here. Let's see what it
looks like now. What yeah, everything
is blown out, and then we're going to also
fade out the rings here. So let's go to this
ring composition. Let's add some keyframes
on the opacity. As the background
is blowing out, we're going to change
the opacity to zero so that we're actually fading
out the rings here. Let me also copy the keyframe to these three coloring
layers here. So almost as if there's a light that's coming into
the scene that's blowing out everything and
then making everything so bright like that. So that's gonna be
arch transition. Yeah, I think that
looks pretty cool. Let me go back to
my final render and take a look at this
part of the animation. As the speed line comes in, I think I want to have that light glowing animation to start early as soon as
the speed line comes in. So around here,
so I need to drag all these keyframes to here. And then the ones also
in these three layers, I need to hit you
on the keyboard, align them together so
that they can start the transition a bit early. Yeah, I think I like that.
It looks pretty cool.
20. Logo Reveal: Now, what we need
to do is we can add some logos or text in
the final scene here. So we can actually
do two versions. One is a white version, and then we can do
a black version. But before we do anything, let's try to do the black
version first, right? So for the black version, I have let me go back to the
scene that I already set up. I can copy these layers here. I have a sound track
that I can copy. So I'm going to go
paste in my soundtrack. I can show you what
it sound later, but it's good to
have some sound. You can also do your own sound. And then for the logo, I can just grab the
logo, grab the text. I have a black solid color. So let me copy this black solid. Essentially, what we do is as we transition to
this bright color, we actually use this black
color to overlay on top of it so that everything is
resolving to a black. I did. Scene over here after the transition
of the speed light. So I'm going to copy this one. This is my end scene here. So this is same as
the third scene. However, I just made it
a black and white with the black and white effects
and then change the contrast. So if I solo this scene here,
this is what it looks like. Basically, it's the scene here. If I kill the effects, I'm using this inside
ring composition as a starting point. But like this, the same way
we animated scene three. And then I'm adding the
black and white color. Black and white effects changed a little bit of setting
to make it look better, and then I use brightness and contrast to change the contrast. And now we have this scene
here, and then on top of it, we're adding a black solid
just overlay on top of that so that we can transition
if I just unsolo these two. As we transition, we're
going to just fade on the last scene which is going
to be black, like that. And then as we're fading
on the black scene, I can also go back to my
composion get my logo and the text over here so that I don't need to do
the logo and text again. And then as the ring
opens over here, we're going to show
the text animation just fading on, nothing special. So maybe around here, I'll cut it to 13 seconds. We're going to resolve
to this scene over here. Let me change the resolution to a quarter because
it's rendering really slow right now because we have all these three things going on. But I want to show
you what it looks like now after the transition. So this could be the
end of your demo reel or you can use it
to introduce your logo. You can change the
text over here. Right now, I put thanks for
watching demo reel 2026, and then the motion
Circles logo. You can customize
this scene however you want to fit your need. But right now, I'm just
assuming we can use this as the end of the
demo reel and just say, thanks for watching
something like that. So another way we can do this is we can make a white
color option, and then we can go to
add a adjustment layer, and then just call
this one invert color. So we can add a invert
channel effects onto this adjustment
layer over here. And then I'm just drag it
all the way to the back. So right now, I think the end is going to work out okay
because you can see the black end frame is becoming
a pure white end frame. So this is how we also made the section cover,
as you already know. So this is how it looks after we invert
the color of the rings. We got a little bit of hint of the three D ring animation
in the background in this, like, white and
brighter gray color. And then we have the logo
and the text in black. So that works out
okay. The only thing is this transition right
now is not working out. Let me go add a solid layer, change it to black here, and then I need to
drop it underneath my sin thin composition, and then push it
all the way here. So I need this scene to
actually be dark when we are introducing
the invert color because we're
inverting it to white, and it needs to be completely
dark at the beginning. So in that case, I need
to actually do a fade in. From white to completely black. And while we are
fading the color, I'm going to align
this one better here, and then I'm going to change the opacity of the invert
color 0-100% as well. So zero at the beginning,
and then 100%, so that we're fading to
a white color car here. And I think right now
they're not tied very well, so I need to reposition these
layers a bit more better. Actually just cut all these
layers from this point on. So I'm going to cut
the three layers, cut it, cut it, and cut it here, and then I can group
everything over here. I'll just group the ends, call this one Command Shift C, call this one white and frames. And then from this point, I'll just fade in everything, go at a opacity over here, change it to zero
to 100% so that we can fade in the end car
like that, keep it white. So that's how we transition. Let's see if that works better. Yeah, I think that works okay. So we have this transition and
then goes to the end card. So that's a white version. I'm going to show you what it looks like after
I render it out. Let's go ahead and render it. Go to composition, add to
Adobe Media Encoder Q, and it's going to open
your media encoder. So over here, we
can choose H 264, which is the MP four format. And there's also other
format that you can choose. For now, we're going to
stick with the issue 64. There's also a quick time
version that you can do. So we'll stick to issue 64. And over here, we don't
need to change anything. We just keep the same as is, high bitrate, match source, and then we can choose a folder
where we want to export, save it, and then we can
hit this play button. It's going to start render.
And there you have it. That's how we render. Let's
take a look at the final.
21. Congrats!: With that, you finish the
class, so congratulations. If you follow along, you should now feel more
confident working in three D inside After Effects and comfortable making creative
decisions with cameras, lights, materials, and color. I hope this class
showed you that three D doesn't have
to be complicated. It just needs the right process
and the way of thinking. If you enjoy the class, I'll be really appreciated if you could leave
a short review. It will help this class to reach more students and let me know
what worked well for you. I share more motion design
tutorials, workflows, and creative breakdowns on my YouTube channel
Motion Circles. You can also find more
resources at motioncircles.com. Thanks again for taking the
class and learning with me. Keep creating and I'll
see you next time.