Transcripts
1. Introduction: Hello everyone. This is machine what Amy, if you are a beginner looking to land and expand your knowledge on the software application or Adobe I arrow beta, then I guarantee you that you are in the right place. In this tutorial, we shall go through the step-by-step procedure you can use to build and create an augmented reality experience, basically an AR experience, exploring how to navigate the software application, the capabilities and limitations of the software application. And most importantly, the tools are available to you for use. First and foremost, it is important that you have Adobe Aero beta installed and running on your device ready for action. But if this is not the case and you don't have the software application installed, then it's totally fine. I suggest you head over to the Adobe website where the application is free to install and install it right now to get started. So let's get right into it.
2. Understanding AR and what Adobe Aero (Beta) is: I genuinely believe that it is important that before we go straight into the video, we fully break down, analyze and understand what Adobe I wrote beta is, what it is used for an its purposes. I find this very important because I do beta 0. Beta is a software application that is often misunderstood and confused in terms of its uses and purposes. Therefore, I think it is important to clarify this and say that you pause this video right now and try HAVA go of what you define it as. So what is Adobe IRA better? Adobe I error of Beta is a software application designed and built specifically for publishing and creating augmented reality, which is also referred to as AR experiences. But what really is augmented reality? This is simply building an enhanced version of the real physical world through the use of technology, we use different technological features such as digital visual elements or other sensory stimuli such as sound. To build these enhanced version of the real physical world, we use a software application, Adobe Aero, better to build, design, view and share a massive augmented reality by using the Tammy massive women, the users are presented the answer surrounded by a three dimensional image. Three-dimensional images. Basically, if the 3D images help create a virtual reality experience, they create the illusion of depth in an e-mail, which makes the image seem more realistic. Let's now discuss some of the advantages and the disadvantages of the software application. Adobe I arrow better. Some of the pros include adobe i o beta is a good tool for developing prototypes. One of the most common uses of Adobe Aero beta is for creating prototypes. In that case, what is a prototype? Prototype is a sample or a model of a product designed for testing its usability before the final product is produced in simple terms, usually before producing the final product of a project being developed, numerous samples are created on these samples help determine how the final product is to look like. These samples are what are referred to as prototypes. Fortunately, Adobe II error or Beta, enables users to develop multiple prototypes that helped create the perfect product they desire. On the second row, we have no coding or 3D design experience is required to use Adobe Aero better. It actually doesn't matter whether you have any experience in both coding on 3D design or not, adobe Aero beta has tools that perform specific functions relative to what you're trying to execute. So there is no limit to the quality of product you can build using the software application, you regardless of your level of ability. And on the final probe we have Adobe IRA beta has the perfect tools for authoring a IR. There are numerous tools are available to you on your workspace that you can use for authoring augmented reality. The fog that there are numerous tools on Adobe Aero beta's simply shows how resourceful the software application is. And the availability of these tools helps creates the best possible experience for you as a user. Now, onto the cons, the first disadvantage of Adobe II error or Beta is it can take a long time to create a decent performing prototype. Creating a prototype using Adobe iRobot may not necessarily be difficult, but I must admit that it can be quite time-consuming. Usually this depends on the quality of product you're trained to create. The greater the quality of product you're trying to create, the more likely it is that you are going to spend more time creating it. But from a general perspective, it takes quite some time to create a decent performing or functioning prototype. And this is because of the number of processes involved in developing it. On the second coin, we have this software application can be slow at times. Adobe Aero beta is a software application, but usually uses a lot of computer resources such as RAM, memory to run. Therefore, the application being slow is not something out of the ordinary, and it is something that you as a beginner shouldn't be aware of. And on the last and final con, we have Adobe I wrote beta has regular, frequent updates. Understandably like any other software application, there must be updates that help improve the quality of the software application and most importantly, better our experience as users. However, with Adobe Aero beta, these updates tend to be frequent and these can be a bit irritating because it is time-consuming as well. So here is the main question. Do I personally recommend Adobe IRA better for beginners as the perfect software application for publishing and creating augmented reality experiences. My answer is yes. I do think that it is perfect for beginners and these are my reasons why. My first reason is Adobe io beta is accessible across numerous devices. This is actually one of the best things I love about the software application. And Adobe Aero Beta can function on different operating systems such as iOS and Windows. However, you can not only access it on your computer or laptop, but you can also access it on other devices as well, such as phones and tablets. The second reason why I recommend Adobe Aero Beta is that it is user friendly. It is actually quite easy to get a hang of using the software application. And why is this? You may ask, this is because it has an easy to use user interface which allows you to navigate your way through the application at ease you, regardless of your experience using a software application similar or not. Among the last and final reason why I recommend Adobe Aero Beta is the software application allows users to create a new learning opportunity. This is the case because users are able to create projects to tell their story or sort of share their experience, whether past or present. And all these can be done in a real-world setting, which creates more reality and visual in the story they're trying to turn.
3. Creating a new project: So now let's go straight into the action. When you open Adobe Aero Beta, this is exactly what you are expected to see. First thing I would like you to notice is that we are currently on the home screen, whereby days the edit on the previous screen as well. And on the home screen there is this section here on the left-hand side, whereby we have a number of options. As you can see, we are currently on the home option. And over here it says, let's create mind-bending AR experiences. So we can begin our journey of creating, designing, and publishing AR experiences using this option here that says create new. But before we do this, let's explore some of the other options available here on the left. So under the yoke section, we have the option Cloud documents. First and foremost, what our cloud documents, cloud documents are documents that are created using Creative Cloud applications like Adobe Photoshop, adobe Illustrator, and Adobe iro beta itself. Cloud documents can be used online or offline and across different devices. So if you are trained to use a Cloud document that you created and the iso neo Cloud Storage, then this is the option for you. There is also the deleted option here, which simply displays any deleted document. We can create a new project to launch our journey towards building and publishing AR experiences by clicking on this option here, Create New. And finally, there is the open option which we can use to open an existing document that is compatible with the software application. So let's go ahead and create a new project. And we can do this by either clicking on Create new here or heading over to the home option and clicking on Create new. So this should pop up asking us to name our project. I'm gonna go ahead and name it Project 1. Perfect. We can now create the project by clicking on, Okay. As you can see, a new project has been created, and this is exactly what you expected to see. First thing I would like you to notice is that we have now moved to the edit view. Now, this is the workspace we use to create a AR experiences.
4. Exploring workspace: The space you're currently viewing is referred to as 3D space, basically three-dimensional space. As you can see, this space comes in the form of agreed. The importance of this layout is to help you align the items or objects you please on your workspace. On our 3D space, we will be dealing with three axis. They are displayed on the corner down here. We have the x-axis, which represents horizontal or with the y axis, which represents vertical or height. And lastly, the zed axis, which represents depth. We also have a number of tools available on our workspace. On the left side of our screen, we have this panel here. We use this tool here to import our file that we want from our PC. As you can see, after it is clicked, it asks us to select our file we are trying to import. There are these four tools here that we can use to perform specific functions to the items we put on our workspace. This tool here is actually the tune we are currently using, and we use it to select an item on our workspace, which then makes it to the main focus point. This is the move tool here, which we can use to move any item we have on our workspace. This right here is the rotate tool, which we can use to rotate our item. And finally, we have the scale tool that we can use to adjust the size of our item. The three tools that follow a rate below here I used to navigate our screening. This is the orbit tool that we can use to rotate around our screen. So you simply click and drag. There is the pen tool as well, which we can use to move around our screen. Again, just click and drag. And finally, the daily tool that we can use to zoom in and out of our workspace by once again clicking and dragging. At the very bottom of this panel we have the content panel and the behavior build our panel. Now, these two panels have very important tools that we can use to manipulate the items or objects we have on our workspace. The content panel is represented by this section here, whereby the behavior buildup on an issue presented by this section here. On our right-hand side, we have this panel here that consists of three sections. So at the moment, you can see that there isn't really much that we can do with these sections. And this is because we don't have any items or objects on our workspace. But otherwise, if we did, we would be able to see the names of our items we have on our workspace displayed here. We would be able to perform specific actions on our items using this section, such as deleting. And finally, we would use this section to manipulate the properties of our items, such as their positions and sizes.
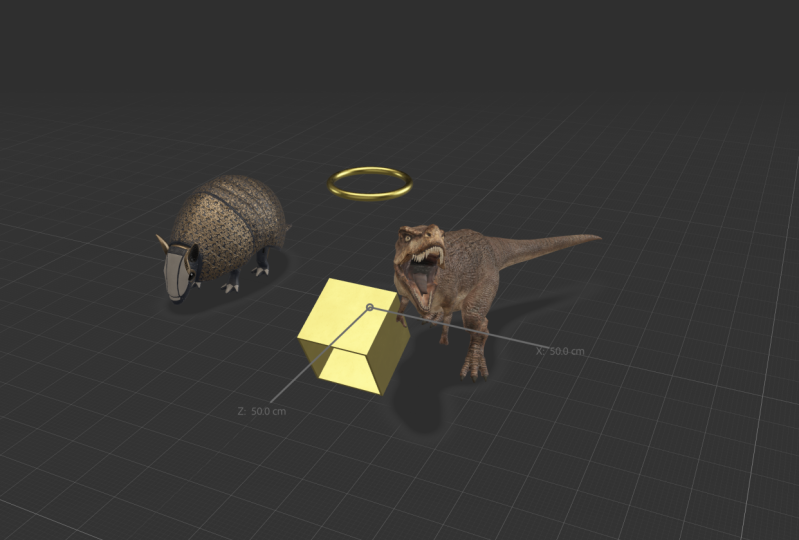
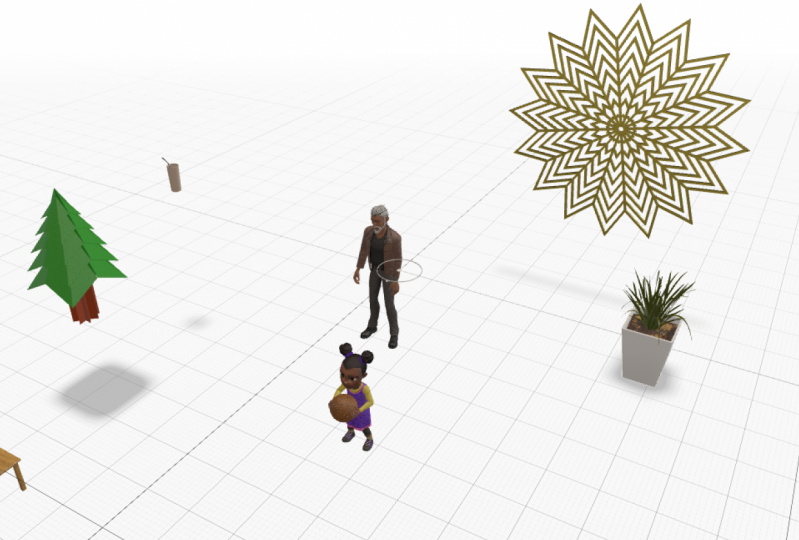
5. Adding starter assets and previewing changes: So how do we add an object to order an item to our workspace? We do this through our content panel. So I'll go ahead and ensure that it is open. And as we know, this is our content panel. We can open it and close it by simply clicking on it. Perfect. So these are our stata assets and we are going to go ahead and click on abstract shapes. As you can see, there are many different objects that we can use. So I'll go ahead and click on this one. Here. Perfect. As you can see, it has appeared on our workspace. The object is shown here as well. And now we are able to perform any actions or need. And we can edit its properties directly here as well. The XYZ axis are then showed on our object and we can move our object in these directions respectively by clicking and dragging. Perfect. So I'll go ahead and add another object. I'll add a ring. Perfect. And finally, I'll add one last object. And this time I will add an animation. So I'll scroll down and click on animation. And I'm gonna go ahead and add the dinosaur by clicking on it. Perfect. The dinosaurs seems small for my liking, so I'll increase the size using the scale tool. I will also reduce the size of the solid cube and adjust the height of the ring. Putting it right above the cube. Perfect. We can presume the changes we have made by simply heading of on top here and clicking on preview. Any changes we make on our workspace can be validated here, including an emissions. We add.
6. Adding triggers and actions: Now let's go ahead and add some triggers to our objects to make them more lively. We do this by clicking on the object we want. So I'll go ahead and click on the cube. Then head over to the behavior buildup panel. There's this option here that says Trigger. So I'll click on it. And as you can see, there are three options that pop up. There is the start, the top of the inter proximity option. This option will trigger an action on the object from the moment it is previewed from the get-go. The top option will require you to click on the object to trigger an action. And finally they enter proximity option will trigger an action on an object when you reach a particular distance from this object. I'll go ahead and click on this third option because I want make you to perform an action from the get-go. Perfect. Now we can select the action we want for our cube by clicking on action. As you can see, the actions have appeared. We can play animation, we can play audio, move skin, and much more. In my case, I won my QC to spin. So I'll click on it. First thing I would like you to notice on the options that appear here, we use this section to edit our action. I'll go ahead and click on the small Play icon here to see if our action has been successfully added to our object. The cube is indeed spinning. Our action has been rightfully added. We can increase the duration of which our cube spins by clicking on this. And we can put in a value. So I'll type in three and press Enter. Now the duration of the spin should be longer. Let's confirm this by once again clicking on the play button. Perfect. We can also change the axis. We want our QM to rotate. It is currently rotating in the y-axis. We can make it rotate in the x axis instead by clicking here and clicking on x. As you can see, the cube is not rotating horizontally now, but instead vertically because the x-axis is the pivot, I prefer it to rotate horizontally, so I will change it to x. Perfect. And finally I want my cubed rotate non-stop. So I'll do this by scrolling down and checking this box here that says infinite. This should ensure that our object to remain constantly spinning. I want the cube to spin constantly and at a constant speed. So our change, this option here that says ease in and out to linear. Perfect. We can now preview our changes by once again heading of on top here and clicking on preview, what changes are successful. And now head back to the Edit menu and add a trigger to the ring. I'll click on the ring and head over to the behavior buildup panel. I would then use this option again. And this time the action I'm going to use is bounds. So I'll click on it. We can confirm with our action has been successfully added by once again, clicking on this button. Perfect. And like my Ring, mountain and stroke. So I'll scroll down and check the box infinite. I would like you to notice that we can add more than one action to our object. And we can do this by clicking here. And I'll add the Rotate action. Now let's see how all this plays out. Perfect. The order which your actions are triggered depends on which action you put fast. Because these actions are triggered in order, basically from left to right. It is important that you are aware of the order of your actions. You can also add another giga by clicking here. And finally, let's add a trigger to our dinosaur animation, following the same process. So I'll click on the dinosaur and head over to the behavior build out where I'll click on trigger. This time, instead of using the structure, I will use the top, which will require me to click on the dinosaur in order to trigger the assigned action. So I'll click on it and on the options, I'm gonna go ahead and click on Play Animation. So let's see the animation that comes with the dinosaur. Amazing. Unfortunately these only one animation that comes with these characters. And we can see this hill. However, if you have any animations, download it for these specific character that you can import them by clicking here. And as you can see, you can select and import the animation. We can also change the clip length here, as well as the speed. So I'll change this to two. Perfect. Let's now preview our final product. As you can see, the animation of the dinosaur is not triggered upon and preview. However, the animation is triggered when it is clicked. And that's it for this tutorial, I really hope that you enjoyed it and most importantly, learned a lot from it. But before I go out, I like to leave you with an assignment to create a new project. And on this project and at least two strata assets, with one being an abstract shape and the other being an animation. And finally, unto God has to own your objects. I would now like to take this opportunity to thank you for watching. Thank you very much.
 Mutebi Mosheen