Transcripts
1. Introduction: Hi, I'm Frank Min Geer, and here at the
perfect Photocopany, I have taught thousands of
people how to use the camera. Now in this class,
you'll quickly learn how to master your
camera's many setons. So consider this your fast
track to great photography, and you'll quickly
learn how to select the best settings to capture great
photographs every time. Now, I make learn how to get
the best M camera really simple with easy to follow explanations and
fabulous examples. And you can watch me capture
photographs in real time, where I'll explain all about each setting used
in each photograph. Once you know how to
control exposure, you really will be flying. And a quick heads up exposure is controlled by
just three elements, aperture size, shutter
speed, and ISO. So just three things to adjust. And, of course, our cameras have semiautomatic modes which
allow us to be super creative by adjusting just one
of those elements while the camera adjusts the other
two. How cool is that? So join me as I
help you to release your inner creativity and become a confident photographer. And I look forward to you joining me in module number one.
2. Module 1 The 3 Exposure Elements: Photography is all
about exposure, but what is exposure? Well, a camera is basically
a black box that has a sensor inside that we expose to light when we
take a photograph. Now, before digital, of course, this would have been a light
sensitive roll of film. Now, to capture the
perfect photograph, we simply need to control the
light entering the camera. So in this module,
we'll take a look at the three elements that we use
to determine the exposure, and they would be aperture size, shutter speed, and ISO. Understand these
three elements and you're on your way to
mastering photography. So essentially,
you are just three steps away from
perfect photographs. Now, is it that simple?
Well, I think it is. So let's take a look at where those three elements
are inside your camera. So I'm going to use
this animation of a typical mirrorless camera to show you whereabouts the
three exposure elements are inside the camera. First of all, then the
light will pass into the camera through the
lens on the front. Now, essentially, a lens
is just a hollow tube, but we have the ability to
make the internal diameter of this lens or this hollow
tube bigger or smaller. And of course, that is going
to affect the exposure. It's going to affect
the amount of light that enters
into the camera. So let's have a look at
how that works, then. As you can see, we can affect
the internal diameter by closing down the
aperture blades clearly, if you make the aperture size
inside this lens smaller, less light will
enter the camera, and the bigger that size, more light will
enter the camera. Now, aperture is just
a fancy word for hole. So you can make the hole inside this lens bigger or smaller. Now, of course, that affects
the exposure, like you say. But also, its creative use is to determine how much of your
photograph is in focus. And this is really great when we start to get creative
with the camera, but more on aperture size later. All you need to know
at the moment is that aperture size is one of the elements that we use
to determine exposure. Let's take a look then
at the other two. So the light continues through the aperture and it
reaches the sensor. And we can make the sensor more or less sensitive to light. So how that works is if
we're in a dark environment, we can make that sensor more sensitive to light because
there's less light around, or if we're in a
bright environment, we don't need the sensor to be so sensitive because there's
a lot of light around. Now, it's not very creative ISO, but it is one of
the three elements that we use to
determine exposure. We tend to think of ISO as
the method of last resort. But more on that later, but
just a little heads up, we try and keep the ISO
number as low as possible. Now, it is there to be used, and if we have to lift
the number up higher, then that's what we have to do. Why do we try and
keep the number low? Well, as that number increases and the sensor
becomes more sensitive, there is a chance that we'll
introduce digital noise, and it's just what
happens, basically. Now, cameras have got
better over the years, and that digital noise, you know, is not as bad
as what it used to be. So don't be frightened of it. If we do need to lift that number higher,
then that's okay. So let's take a look then
at the third element inside the camera that helps
us determine exposure. And that would be
the shutter speed. So we have a set of shutters
that live over the sensor, and when we take a photograph, they open and close. So we can set the shutter speed to stay open for a long time, or it can be incredibly quick, and it just depends what
we're trying to achieve. Now, clearly, if the shutter
stays open for a long time, then more light is
reaching the sensor. And obviously, the
other way around, if it's really quick, then less light will
reach the sensor. But it's a lot more
clever than that because shutter speed allows
us to control time. We can freeze motion
or we capture motion. We can freeze time.
It's really clever, depending on what
shutter speed we use. But essentially, what you need
to know at the moment is, it helps us to
determine exposure. It's one of those
three elements. Now in the future module, we'll look at shutter speed and all the amazing things
we can do with it. So they are the three elements inside your camera
and where they live. Let's just take a look
though at a DSLR camera. Just in case you haven't got a mirrors and you've got DSR, it's pretty much exactly the
same. Let's take a look. So a typical DSLR camera is exactly the same with
the same three elements. The only difference is, it has a mirror which flips
out the way when you take a photograph and a
modern mirrorless camera, of course, doesn't
have a mirror. Now, other than that, they
are exactly the same. Now let's take a look at
the relationship then between the three elements
and how they work together. And to do that, we'll take a look at the exposure triangle. So let's pop on the three
elements onto the triangle. We have aperture size, ISO and shutter speed. And all the triangle
proves is that if we make a change to
any of those elements, then one or the other, or both of the other two
elements need to change. So if I was to change the
size of the aperture, then the shutter
speed would need to change or the ISO or both. And the same thing with
the shutter speed, if I change the shutter speed, then the aperture
size or the ISO or both would need to change just
to maintain that balance. So it's a little balancing game that you play, and you'll see, as we go through all
the various modules, you'll see how I balance those three elements to
get the perfect exposure. Now let's take a look
at this animation then. So I'm going to pop
on the aperture size and then the shutter
speed, and then the Io. And then down the bottom, I'll pop on an exposure meter. Now, your camera has
an exposure meter, but more on that later. Now, the exposure meter
will show us if you are underexposed or overexposed, too dark or too light. And as I say, your camera has an exposure meter
in the manual mode, and we're going to take a look at that a
little bit later. Let's choose a nice,
low ISO value of 100. I now know that that exposure is perfect. How do I know that? Because I will look at
the exposure meter, and the little
pointer is on zero. And that's what you're
kind of aiming for. When you're shooting manual, you're looking at
that exposure meter, and you want to see
the little pointer, however it's indicated on your camera because they
are a bit different. But basically, you're
looking for a zero, which will sort of confirm that you've got the
perfect exposure. Let's make some changes
then to the aperture size, and let's make the
aperture size smaller. Now, if I do that and then
look at the exposure meter, it will indicate that I am now underexposed, and
that makes sense, doesn't it, because I am letting less light in through
the aperture size. I've selected a
really small hole, if you like, in the lens, so less light is now
entering the camera. So I'd need to
make some changes. So if I slowed the
shutter speed down, it would actually
balance the exposure because I'm now
letting more light in by keeping the
shutter open longer. Now, looking at the shutter
speed that has been selected, I might decide that that's
a little bit too slow. I haven't got a
tripod, for instance, and the shutter is telling me it will be open
for a full second, which is too long really
without a tripod. So, let's make some
adjustments, then. Let's put it
somewhere reasonable, 125th of a second. And of course, I will be underexposed again because
I've made that change. So all I would need
to do is lift up the ISO and it would return
that balance to zero. So you can see, it's a
little balancing game of the three elements
when you're in manual. Let's make a change then to the aperture size and just watch that little
animation again. So let's make the
aperture size bigger. Now, clearly now I'm
letting more light in, and if I didn't change
the other two settings, then obviously I'm now
going to be overexposed. So the first thing I
could do then to get the exposure back to zero
is drop the eyes out. And let's see where
that takes me. It's still a little
bit overexposed, so I'd simply increase
the shutter speed. And lo and behold, we would get the perfect
exposure again. So as you can see,
in the manual mode, it is a little dance that we do with balancing
those three elements, and we use the exposure meter to ensure that we've got
the perfect exposure. Now, let me show you on
some typical cameras, a little selection
of cameras what an exposure meter looks like when you are in the manual mode. So in this particular
Fuji camera, it's on the left hand side. This is a typical cannon camera, and it's along the bottom, and this is a umax camera, and it's along the
bottom, as well. It might look slightly
different this one, because it isn't a gauge. It's just a set of numbers, but trust me, it's
exactly the same. So let me show you how
the exposure meter works then on three
different cameras, just so you get an
idea of how it works. And you'll see how simple it is. In this first one, then we
have got a Fuji camera, and the exposure meter is
on the left hand side, and you can see
that I'm adjusting the shutter speed and the
aperture size and the eo. All I'm watching all the
time is to ensure that the exposure meter
finishes on zero. And the same thing on
this cannon camera, simply adjusting
the shutter speed and the aperture
size and the ISO and jumping between those three until I've got the
exposure meter on zero. And as importantly, I've got the settings that
I want dialed in. Then lastly, on this Lumax
camera and the same thing. In this case, we
don't have a gauge, but we have the numbers,
so it's exactly the same. It just looks a
little bit different. So that is how we balance
the three elements in manual mode using
the exposure meter. Now, when you are not in manual and you're in the
semi automatic modes, you will not have access to an exposure meter
because you don't need one because the camera is
going to be helping you out, which brings me to the end of this module, and
in the next one, we're going to look at those various camera modes
that we can select. I'll see you in the next module.
3. Module 2 Camera Mode Choice: In this module,
we'll take a look at the mode wheel which sit on
top of your camera just here. Now, of course, we use the
mode wheel to jump between different modes and hopefully
out of the automatic mode. Although the automatic
mode is very clever, but in the automde, it's simply the
camera that's doing all the work and making
all those decisions. And that isn't very
exciting, is it. So it's so much more fun when we have an input into
making those decisions. So let's take a look at those
import and camera modes, the modes where we can adjust the three
exposure elements. Let's take a look at some
typical mode wheels. So here we have a Sony wheel, a cannon wheel,
and a Nikon wheel. The mode where you can
make a creative input are the PAS and M modes, and that's what we're
going to take a look at. So they are the modes where
you can jump in and make changes to any of those
three exposure elements. So what do those
acronyms stand for? Well, obviously, the letter
M stands for manual. Now, in the manual mode, you control all three elements, but you will have the option on some cameras or most cameras to switch the ICE out to automatic if you feel
you need the need to. But I think if you're
in full manual, it's nice to be in total
control of all three elements, but it's entirely up to you. The next mode then is A or AV, which is aperture priority. Now, in aperture priority, you only control the
size of the aperture. So you just simply control the size of the
hole in the lens, and the camera will
read the light coming in, use a light meter, and it will select
the shutter speed and the eo to give you
the perfect exposure. And it's fantastic, isn't it, because that will release
your creativity because all you have to
really think about is what aperture size to use. Now, the acronyms are slightly different if you have
a cannon camera. In that, instead of
the letter A for aperture, cannon has AV. Now, it's exactly the same.
AV stands for aperture value, so don't worry if you've got a cannon camera like this one, and it actually says
AV instead of A. It's exactly the
same. The next mode we're going to look at then is S for shutter priority or
TV if you have a cannon. Now in shutter priority, you have full control
of the shutter speed, and the camera will adjust
the aperture size and the IO to south to make sure you get
the perfect exposure. Now, remember if you've
got a cannon camera, the acronym is TV
for time value, but it's exactly the same
as S for shutter speed. So they are the three modes
that we're going to look at. Now, in an earlier module, we looked at the
exposure triangle for manual photography, and I showed you that when
you are in manual mode, you are in control of
those three elements. It's a lot of fun
manual photography, but it does take
slightly longer to sort of get your camera set
to capture photograph. So let's take a look at an exposure triangle
for aperture priority. So in aperture priority, you would simply select the acronym for
aperture priority, that would be A or A V, depending if you've
got a cannon camera, and you will be in full
control of the aperture size. Now, the camera will read how
much light is coming into the camera and it will adjust the shutter speed and
the eyes out for you. So essentially you just have a creative decision on
what size aperture to use. Now, we're going to do a whole
section on aperture sizes. So by the end of that module, you will know what
size aperture to use. But all you need to
know at the moment, that is in aperture priority, you are in control of
the aperture size, and the camera will select the other two exposure
elements for you. So let's take a look at the exposure triangle
for shutter priority. Simply select S for shutter
or TV if you have a cannon, and you will be in full
control of the shutter speed. And the camera will read how much lights coming
into the camera and adjust the aperture size and ISO to give you the
perfect exposure. And again, what this does
is releases you to be super creative with your
shutter speed and sort of confident that the
camera will select the correct aperture size and ISO to give you the
perfect exposure. So they are the three modes
that we're going to look at. So you can see how easy it is when you are in
the priority modes, aperture priority
or shutter priority in that you only have to
make one creative decision. And I think this is fantastic. For instance, you may decide
to isolate a subject. Now, we would use aperture size to create that
blurry background, and this would separate our
subject from the background. It's a lovely effect, and you will see me take
photographs by using aperture size later on in this course. But it's
a great thing to do. Now, very quickly, you
can switch the camera to shut up priority perhaps
you've seen some movement. It could be someone
on a skateboard, somebody jumping
on a trampoline, for instance, anywhere you
want to freeze the action. And in both cases, you know that the
camera is going to help you get the
perfect exposure. All you are going to do is select the correct
aperture if you're in aperture priority to
achieve that sort of shallow depth of field where the background is blurred. Or shut a priority where you're going to
freeze the action, somebody on a trampoline, for instance, and you'll
freeze them in the air. And it's simply just a matter of jumping between those two modes, knowing that the camera
is going to help you out. It's really, really clever. But don't knock, and I'm not knocking Manual manual's
fantastic, as well. But I think with
manual photography, you need a little bit longer
to set your camera up. Either way you do it
is really fantastic. Don't worry about it. Anyway, I see you in the next module.
4. Module 3 Camera Setup: All cameras typically have the
same options and settings, though they may look
a little different. Now, before I teach a class, I usually adjust the settings on each student's camera ready
for them to take photographs. Now, I generally make
these changes in the main camera menu or in
the camera's quick menu. So let me show you the changes that I make in the main menu, and then I'll show
you how most of those important settings can be changed using the
camera's quick menu. The first thing I would set is the image quality and the file format for
the photographs. You can see that we
have two options. We have JPEG and Raw. Now, raw is the format that most professionals
will shoot in JPEG, I guess we're all familiar
with the JPEG format. Now, if you have absolutely
no interest in editing a photograph and
you just want it straight from the camera
and to be able to use it, then don't choose the raw option because raw photographs
need to be edited. They are much bigger
file size as well, which we'll see shortly, but they need to be edited. We're a JPEG. We can use it straightaway for social media
or whatever we want to do. But as I say, the raw
file needs to be edited, and of course, you need the
software to edit it, as well. We can see that if we select
that large JPEG option, we can take 9,000 or
over 9,999 photographs. Now, to me, it makes
the most sense to pick the largest JPEG. I can't really see much point in choosing the smaller JPEG sizes. So the JPEG option, it's a compressed photograph. Now, if we look at
the raw option, a raw photograph
is uncompressed, and it's a much
larger file size. So now with the raw
option selected, you can see that it
has dropped to 3,479. Now the raw files
are so much bigger, but that gives you the
scope to edit them. They have more dynamic range and more latitude to be pushed and pulled in the
editing process. But as I say, if editing
isn't your thing, then stay in the JPEG format. And as I say, you can those photographs
are usable straightaway. And the other option
you have is to shoot in JPEG and raw
at the same time. Now, what this does is creates one photograph but two files, so you'll have a JPEG and a raw file. So why
would you do that? Well, imagine you went
on an exotic holiday and you managed to capture the best photograph you've
ever captured in your life, but you only had it as a JPEG. Well, that might be okay
because you may never, ever want to edit
photographs, like I said. But imagine if you got
the editing bug and you want to edit that fantastic
photograph that you captured, but you only had it
in the JPEG format. So I often say to people, if you're going anywhere exotic, then just switch your
sentence to JPEG and raw. You may never, ever, ever venture anywhere
near the raw file. But who knows six months, 12 months down the line, you
might want to edit the shot. And the thing is a
raw file has got so much more latitude
and scope to be edited. It's a much bigger file size. Just a little idea for
you. You don't have to. I know many, many
photographers that just stay in the JPEG format. But raw, honestly, it gives you all that opportunity and scope and fun to
edit a photograph. The next option,
then I would set is the aspect ratio
of the photograph. And you can see that
we have a number of different options, three by two, four by three, 16 by nine, and one by one, which is square. Now, I would suggest you leave the aspect ratio
is three by two, but by all means, play around with different aspect ratios. You might fancy shooting in
square format, for instance, it's entirely up to you,
but three by two is the most popular format
for photographs. The next option to look at then is how the camera
reads the light, and this is the metering mode, and we have a number of different options,
valuative partial, spot, center weighted, and all cameras have
something pretty similar. The option I would suggest is a valuative and that's
what I set my camera to. So my camera will read the
light from everywhere. Now, obviously, the
other ones are more specific, centuated or spot. So you can read the light from a specific area of the image
that you're photographing. But for me, a valuative works. And especially when you're
learning photography and you're a
beginner, it's ideal. The next option to set then
would be the white balance. And as you can see, we've got a number of little icons that indicate different
situations that you might find yourself in. And the first one
or a white balance. And then you can
see sunny, shaded, cloudy, incandescent
fluorescent flash. You can set your own or you can dial in your own temperature. Now, I would say, straightaway, the one to choose
without a doubt, is As or white balance. Believe it or not, just put
it into Auto white balance, and the camera will
do a fantastic job. Would I use any of the others, I often set my own
custom white balance, but that is when you get to sort of like a
professional level, where the colors have to
be absolutely perfect. And generally auto white
balance gets very close. So auto white balance
is the way to go. Now, oddly enough, when you
shoot using the raw format, it doesn't actually write or bake in that white balance
setting into the photograph. So you can
retrospectively change the white balance of a raw
photograph when you edit it. The next option then
would be picture style. And you can choose from many
different options landscape, fine detail, neutral, faithful. Cameras will have their own sort of names for different
picture styles. And these picture
styles relate to the JPEG format because when you shoot and raw, it
doesn't really matter. It doesn't record what
picture style you've shot in because it just
assumes that you are going to edit that
photograph later. So it only relates
to JPEG photographs. Generally, I would put
it into standard or automatic or neutral or
natural or faithful. As I say, all cameras have
different names for them. But you can't just stick in the auto setting for
the picture style. You can actually go in, as well and edit those picture profiles
and change the sharpness, the saturation, the contrast. Sort of if you like, make your
own sort of picture style. Would I suggest you
do that? Not really. But then again, if you don't want to edit your photographs, maybe it's a good idea
to set a picture style that you prefer. It's
entirely up to you. So the next option to set
then would be the drive mode, and I pop it into single shooting so that just means you're going
to take one shot. So set it to single shooting, you're going to point the
camera at an object, a person, a landscape, wherever
it's going to be, and you're just going
to take one shot. That's what single
shooting means. Different cameras would probably
call a different thing, but that's generally
where it is. So I would set that first, but let's just take a look at the other options
in the drive mode. So in this particular, we have a high speed, continuous mode, low speed, continuous mode, and then we have our
self timers, as well. So the drive mode stays
in single shooting unless you want to
photograph a moving subject. So any sport and event, anything where there's
a lot of fast movement, and you would use
continuous burst mode where it takes multiple,
multiple shots. The next thing then to look
at would be the auto focus. Generally, what you
have is the option to continually focus
or focus just once. So if you look at
this cannon camera, we can see that we have
something called one shot. In most cameras, it will just
say AFS, auto focus single. For some reason, can
and call it one shot. It doesn't mean that you're
just taking one shot. It just means that you're
going to focus once. The other options then for
this cannon camera are Servo. As I say, can and call it Servo. Most other manufacturers
will call it continuous focus or AFC. And then this cannon camera has AI focus where
the camera will decide between either
just that single focus or continuous focus. But if we look at the focus
modes in this umax camera, we have auto focus single and auto focus continuous
and manual focus. And generally, that's what
you would get in a camera. So AFS will just focus
once on the subject, or to focus C or auto focus continuous will
continually focus, and you will never use manual
focus because you will never focus as good or
as well as autofocus. Now, as well as
selecting autofocus, single or autofocus continuous, we need to tell the
camera whereabouts we want the focus point to be so we can move the
autofocus area point around. Now, this is really important
because you need to put the focus point on the subject that you're
about to photograph, and you've got several options. So let's take a look on this
particular cannon camera. What options. Now, the typical options because most cameras or all cameras have the option to change the shape of the focus
point and more importantly, where it's going to be in your frame that
you're photographing. This can and you
can see, we've got a spot autofocus, and
then moving along, we'll have different options,
one point autofocus, which is the one I
generally tend to use, and then you can expand that. So it's that one spot, but just several, little bit of an area
around that one spot. And then then you
can have zones, flexible zones in this
particular case, or indeed, the whole of the screen
can be in focus, which is pretty cool
for a landscape. As I say, all cameras
have this option to be able to move the focus
point around the screen, and we can pop the focus
point on our subject. And we can have a single point. We can have a zone. We
can have a flexi zone. We can have the whole of the screen as the
focus for a landscape, for instance, and all cameras
are going to have this. And it's important because it's part of the fun, isn't it? Because you tell them the camera exactly where you
want the focus to be, and you can direct the
viewer when they look at your photograph to exactly
what you want them to look at. So it's really cool, isn't it? Let's take a look at a
few other options then. Another option that your
camera might have is the ability to detect a subject. Now, as I say, all
cameras are different. But in this particular camera, you can see that we
can select people, animals, vehicles, and it
comes in really handy. Now, indeed, I am filming myself using my Lumix camera and I have face
detection switched on, and I ought to focus, and that is going to lock onto my face no matter where I move. So I think the detect
focus is fantastic. If you are shooting nature
and your camera may have animal or bid
detection, that's great. It's going to lock onto a bed. If automotive stuff
is your thing, then you can switch
on, you know, the automotive or car detection. It's really cool, and it
works really well, as well. So that's going to help
you with the autofocus. So one of the other
options that I like to set is the minimum
shutter speed. So what do I mean by the
minimum shutter speed? Well, when you select
aperture priority, now remember you're
choosing the aperture size and the camera will
choose the shutter speed. Now, I can set the camera
to a minimum shutter speed. In other words, when the camera selects the shutter
speed for me, it doesn't drop below a
certain shutter speed, and I like to choose about 1/1, two, five of a second. If you have that on your camera
a minimum shutter speed, then my advice would
be to set it to 1/125. Now the quick menu
gives you access to the settings that you
use more than others. So instead of jumping into the main menu and scrolling through pages of
different options, they're right under your
finger in the quick menu. Now, all cameras
have a quick menu. So let me just show you on
this camera where it is. And it's just here
in the center. Now, if you take a look
at another camera, then, so I have a Fuji
camera over here, and I'll show you on the
back of this camera where the quick menu is,
and it's just here. Like I said, all cameras
have a quick menu, and in a lot of cases, you can sort of put
into that quick menu the settings that you use most so you can
actually customize. So let's just take a little look around a couple of screens, and you can see
where the sort of settings live and just get
a feel for how it looks. So as you can see,
we have access to a lot of things we
found in the main menu. So we can change
our focus points. We can change our
single point focus or continuous focus or AI focus. We have our file format. So as you can see,
in the quick menu, we have access to most of those important changes
we made in the main menu. And this is great because
you don't have to go into the main menu and scroll through loads
of different pages to make all those changes. They're right under your
finger in the quick menu. And of course, you can customize the quick menu in most
cases and just have on exactly what you want to be on there so you can kind of
customize it to your liking. It's really good. Now let's take a look at a different camera, and I'll just show
you the quick menu. This is the Lumix camera, and I'll show you
how that looks. So by pressing the quick
menu on the Lumix camera, it will pop up at the side. And you can see the same things. We've got the ability to change the focus mode between single
and continuous and manual. I can switch on and off
the image stabilization. I can select the
picture profile. I can select face detection
or subject detection. I can see the metering mode. There's so much you can
put into the quick menu, and these are
specifically ones I've decided to put in
there including Wi Fi. So I highly suggest
that you jump into your main menu or the
quick menu and make some, if not all of the changes that I've shown you
in this module. Now, we're getting very close to the point where we'll be
starting to take photographs, and it'd be great if you were on the same page and getting
the same results, obviously. Okay, I look forward to seeing
you in the next module.
5. Module 4 Focusing: Now, nobody wants an out of focus photograph or the point of focus perhaps in
the wrong place. Now, being able to
tell the camera where we'd like the focus point to be is really important
and very easy to do. Now, there are plenty
of options to do this. And in this module, we'll have a look at the
choices you have, as well as looking at
subject detection autofocus, including animals and cars, plus human eye autofocus. So let's take a look.
And in this module, I have my friends
to help me out. One area focus mode is
my default setting, and it is the autofocus
mode I use most, and I highly recommend
now remember you can easily change the autofocus
mode in the quick menu, and most cameras have a
dedicated button giving you direct access to all the
autofocus mode options. Now, using the touchscreen, I can simply drag
the focus point exactly to where I needed to be. If you have a camera
without a touchscreen, or you would prefer
not to use it, or perhaps you're
using the viewfinder instead of the touchscreen, you can always use the
keypad on the rear of your camera or the joystick
if your camera has one. To capture a photograph of the mannequin or indeed
a real human being, I could switch on
the eye autofocus. So let's take a little
look how that works. So if I was capturing
a portrait, I would keep the same
one area asofocus mode and simply switch on the
human eye face detection. Then I would place
the focus point on or near the subject, and the face eye
detection would kick in and lock onto
the subject's eye. It sticks really well even
when the subject moves. So let's take a look at subject ausofocus and it will detect this
car and this bed. So let's take a look
at how that works. Now, of course, I
could simply use the one area ausofocus point again to shift focus between
the car and the bed. That's fine. But
what about using that automobile and
animal detection? Let's take a little
look how that works. Still using one point autofocus, I can switch on
detect subject and select animal and choose
body rather than head. On some cameras, you
can actually switch on animal eye autofocus, too. Then I would simply place the focus point on
or near the bid, and the animal detection would kick in and lock
onto the subject. It sticks really well even
when the subject moves. So that works great, doesn't it? Let's try the subject
detection on this car. I'll just simply change
the subject detection to car and then place the focus
point on or near the car. And just like with
the animal detection, the focus locks onto
the subject and sticks really well even
when the car rolls forward. So let's try a bit of zone focusing with
Asofocus continuous. So here, I'll choose
zone focusing and put the focus mode into AFC
or ausofocus continuous. Now when I half press the
shutter release button, I move the car forward, the focus will stick to the
car, maintain and focus. And here, I'll do the
same on a cannon camera. In this case, selecting Servo, which as you know, is the
same as autofocus continuous. And as you can see,
it tracks the car and continually
focuses really well. So let's have a look
at focus tracking, and focus tracking is
great because we can put the focus point on
a subject matter, and it can be anything,
it could be a car, it could be a sports person, it could be an
animal, and the focus will actually track the
subject as it moves. So let's take a little
look how that works, then. So first, I need to
switch it on and make sure I also have continuous
autofocus selected. Then gently pressing and holding down the
shutter release button, the focus point will track
and focus on the subject. So my default focus is generally set to the one area auto focus. And I would suggest
that you do the same, and then you can just
simply jump between the other options as and
when you feel the need to. But generally, that one area auto focus works really well. And you can see how quickly I can move the
focus point around the scene to focus on the
various items on the tabletop. And as I say, most
cameras will have a dedicated button that you can press that will
take you directly to your various options
for Auto focus, or indeed, you can
use the quick menu. Either way, it's very simple
to change your focus point. Okay, I'll catch up you
in the next module.
6. Module 5 Aperture Size: Now, as you now know,
aperture size is one of the three elements we
use to determine exposure. But as I mentioned in
a previous module, we also use the size
of the aperture to control how much of our
photograph is actually in focus, and we call this
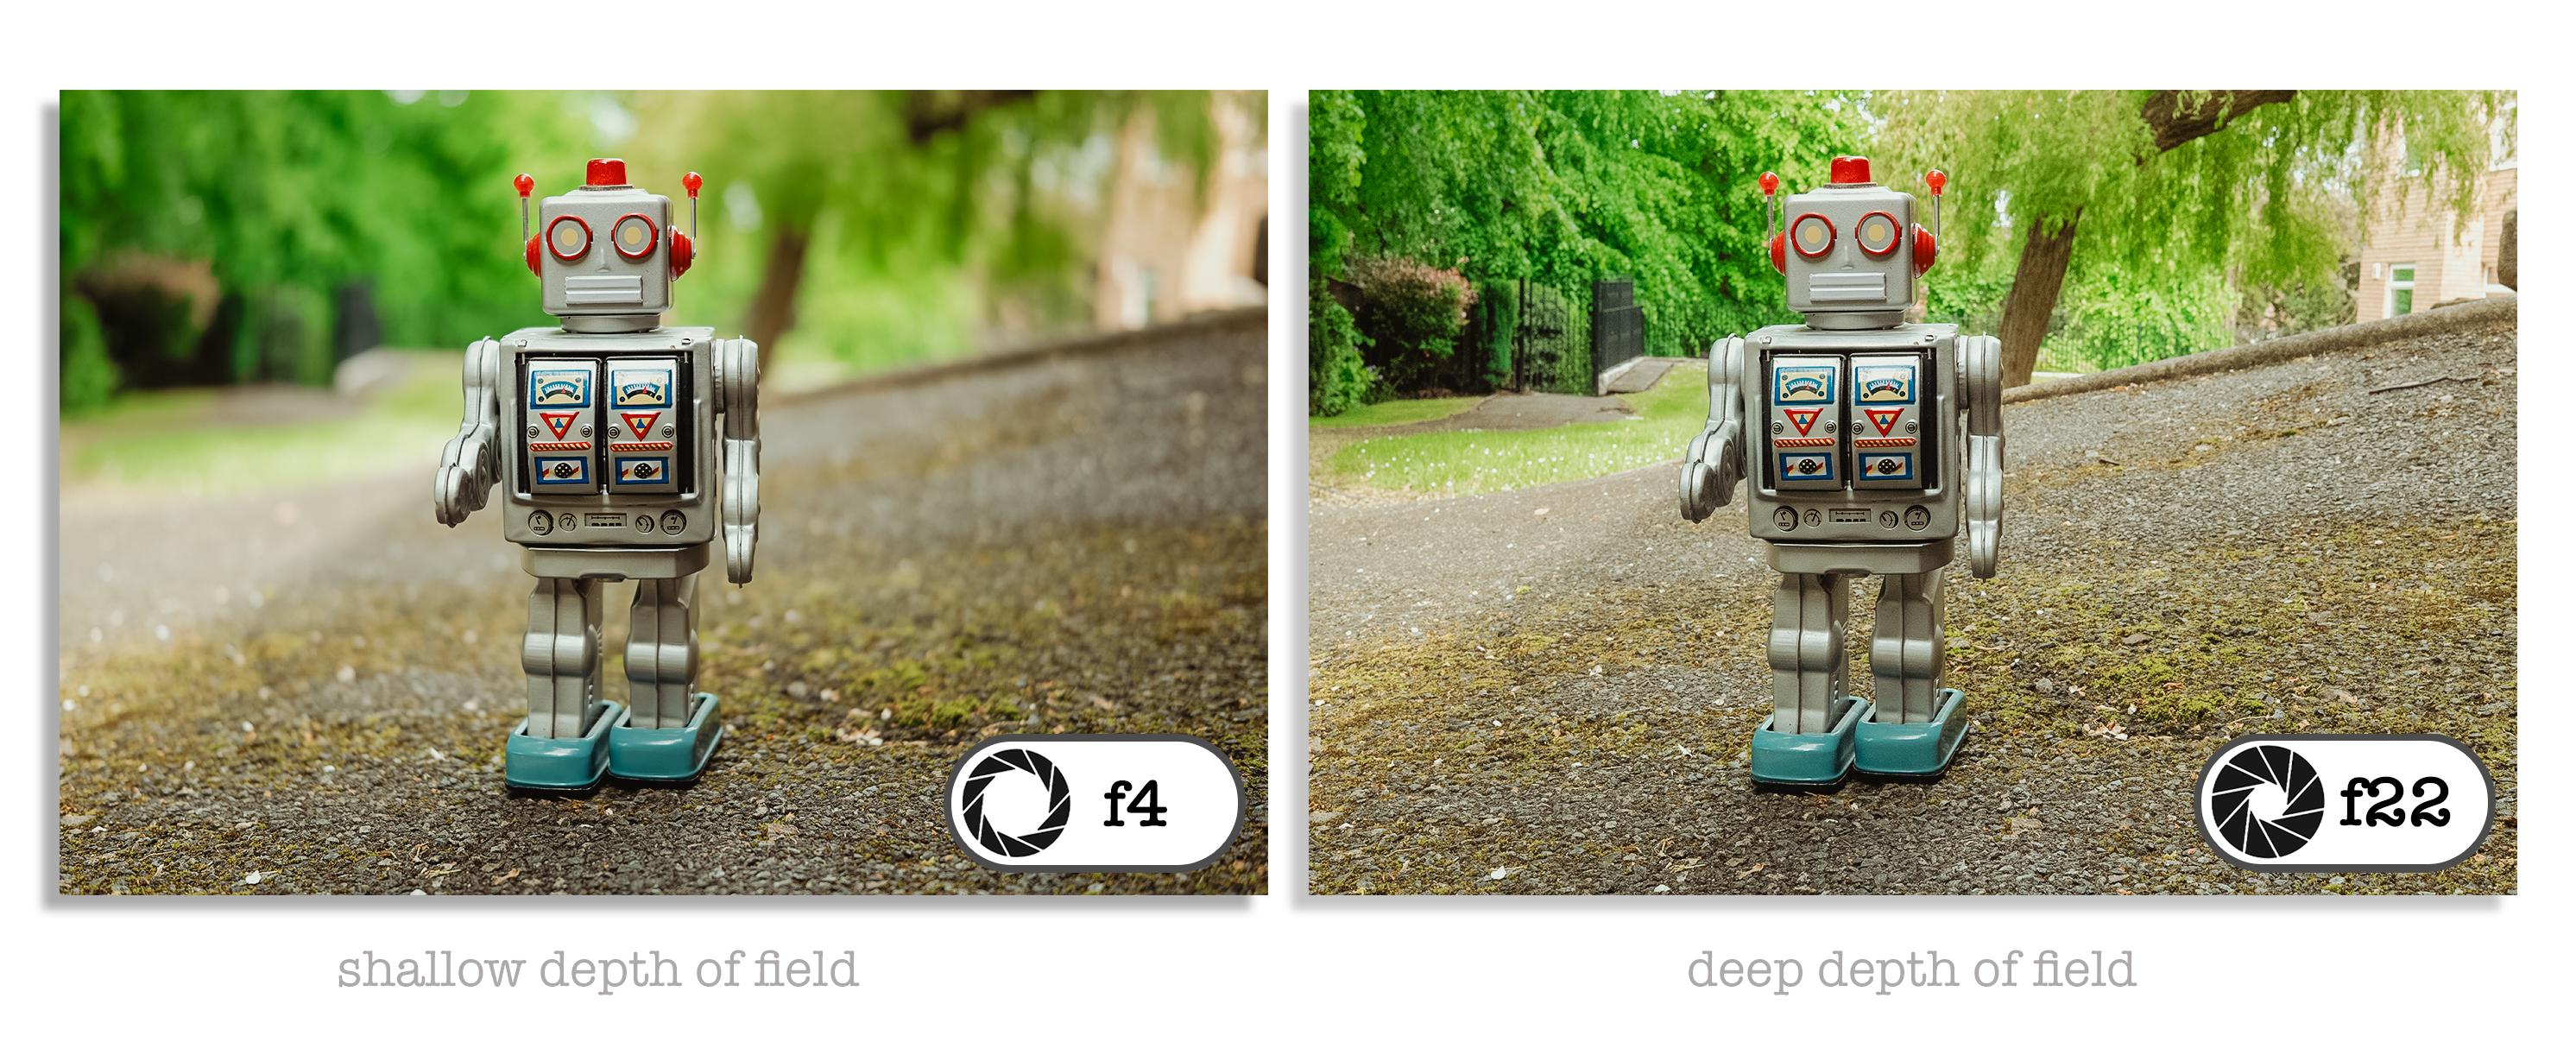
ratio depth of field. Now, as humans, we see
the world in three D, and when we focus on something
relatively close to us, the background becomes house of focus or slightly blurred. Now, we call this a
shallow depth of field. This isolates the subject and makes it the
point of interest. Now we can achieve the same
effect with our camera by opening up the size of the
aperture to make it bigger. Of course, we also like the images where
everything is in focus. Is to achieve this,
we would close the aperture down
to a smaller size. So in this module, we'll take a look
at aperture sizes and a guide to how to
select the right size. I'm also going to
capture some photographs and then vary the aperture size. Then we'll take a
look at the results. Then at the very end, we'll take a look at selection
of photographs I have captured out and about with my camera by varying
the aperture size. So let's jump in
and take a look. So here is a selection of
aperture sizes ranging from fully open to closed
down really small. Each size is given a corresponding F number
with the largest aperture having the smallest number and the smallest aperture
having the biggest number. Here we can see the
largest aperture has an aperture size of F 1.4 and the smallest
aperture size has an F number of F 32. Now, it is really important to remember this that big hole, a big aperture, has
a small number, and a small hole
has a big number. It's counterintuitive for now, but once you get
your head round, it's quite easy to remember. Now it is the larger
aperture sizes that give us the
shallow depth of field, the amount of blurry
background, if you like. Now used creatively, we can isolate a subject
from the background, and this is ideal for portraits, product shots, et cetera. Now, middle aperture sizes are considered to be ideal
for general photography. They have the least amount
of lens distortion. Lastly, the small apertures give us the greatest
depth of field. This means that more of the
image will be in focus, and they are ideal
for landscape, cityscapes, group
shots and interiors. So on this Lumix camera, we can see we've got an
aperture range from F 2.8 down to F 22. And on this cannon camera
from 1.8 down to F 22 again. Now before I capture any photographs using
this Lumix camera, here is a quick guide to what
you should be looking at. You can see the current settings along the bottom of the frame. We have, starting from
the left, the mode, which is shown at
the camera is in manual mode,
highlighted in pink. Next, we have the shutter
speed highlighted in red. Then the aperture size
highlighted in blue. Then the exposure meats
are highlighted in yellow, and lastly, the IO
highlighted in green. So in this first example, I'm going to use a large
aperture to blur the background, and I'm going to focus
on this red car. So let's take a look
at how I do that. So we can see I have a
shutter speed of 250, an aperture size of F 11. IOs a 5,000, and we can see in the exposure meter that we are underexposed by one and
two thirds of a stop. So first of all, let
me change the size of the aperture to F 2.8. So I've opened the
aperture up nice and big, and we can now see we're overexposed by plus
two and a third. So the first thing I'd
do then is drop the ISO. And we can drop it
all the way down to, in this case, down to 1,000. Looking in the exposure meter, we have now got the perfect exposure because we can see it is now reached zero. However, the IO could be
dropped a little bit more, and to do that, I'm
going to slow down the shutter speed
to 120 50/second. Again, it was slightly
over exposed, but that's exactly what
I wanted because now I can drop the IO down to 640. I've now got the
perfect exposure. I can see it's on zero
in the exposure meter, and I can capture
that photograph. And of course, I can
move the focus point around, focus on the skull. And then focus on the camera at the back of the
brownie camera, knowing that my exposure is going to be perfect in
all of those three shots. So let's close the
aperture size down smaller to Fight and see what results
that we get this time. So first of all, I would close the aperture size down to Fight. And as you can see, looking
at the exposure meter, I'm minus two and two
thirds underexposed. So the first thing I
would do then is drop the shutter speed downs
for 60th of a second. Now, we're still underexposed. And so I would lift the IO up. All the time watching
the exposure meter, looking for that magic zero. So at those settings,
60/second F eight, and with the ISO on ISO 2000, we get the perfect exposure. So let's carry on our journey then of closing
the aperture size down and take a
look what happens when we close it down to F 16. So the first thing
to do then is close the aperture size down to F 16. And when we do
this, we can see in the exposure meter that we're
now two stops underexposed. Now I want to leave the
shutter speed on 60th of a second and lift
the IO up to 8,000. And when I do that,
I can see, again, our exposure meter
is indicating zero, and I can indeed take that shot, and I've got the
perfect exposure. So lastly, let's close
the aperture size down to F 22 and see what
results we get. So closing the aperture
size down to F 22, we can see we've got an
exposure meter reading of minus one. So the first thing I
would do then is to lift the IO higher and indeed, we get the perfect exposure. So now, if we overlay the four photographs that I have captured at the different
aperture sizes, we overlay them on top of
each other and we can see the difference as we close
the aperture size down, and we'll see more
things become in focus. Let's take a look.
First, at F 2.8, where the background
is a complete blur, then closing down to F eight, where the skull is
beginning to be revealed. At F 16, we get more detail in the skull and the camera is now beginning to be
revealed in the background. Then F 22, all the items
are more or less in focus, and then back to F 2.8. And you can see the
difference between F 22 and F 2.8 is
amazing, isn't it? So as you can see, you can be super creative with
aperture size, and you really can determine where the viewer is going
to look just by putting the point of focus on
the item or the person or the subject and selecting
a bigger aperture size, then the person looking at your photograph is going to
look at what is in focus. It's a great way of sort of if you like telling a
story with a photograph. Now, obviously, I took those photographs using
the manual setting, but let's take a look at
how easy and how quick it is when you jump into the
aperture priority mode, because, as you know, in
the aperture priority mode, the only thing you have to worry about is the aperture size. So let's take a look then at
how quick and simple it is. As you can see, we are
currently underexposed. Now, in the manual mode, I would need to adjust
all three elements to achieve the correct exposure. Now, remember, in
aperture priority, you only have to choose
the aperture size. So to show you the magic
of aperture priority and how the camera helps you achieve the
perfect exposure, I will need to pop the lens cap on so you can see how quickly we can move from an
underexposed photograph to a perfectly
exposed photograph. So the first thing
I'm going to do is change the ISO to automatic. Then I'll change the camera mode from manual to
aperture priority. So A or A V on the mode wheel. Then I'm going to take off the lens cap and let's
see what happens. Perfect exposure. Now, ignore the
plus or minus zero. That is not the exposure meter. That is the exposure
compensation, but more on that later. We now have the
perfect exposure. Let's take a look at
the shutter speed, and if a hard press to
shutter release button, it's indicating that it's 1/125. Now, I have actually set
my camera in the menu to ensure it doesn't drop below
1/125 because of course, obviously, the camera is now selecting the shutter
speed for me, and I don't want the
camera to select a shutter speed that
is much too slow. So in the menu, I have set it. So when it does select
the shutter speed for me, it doesn't drop below 1/125. Now, if you can do that in
your camera, then please do. Just look for minimum
shuttle speed in your camera's menu. So if I half press the
shutter release button, I can see the IO that
the camera has selected. And in this case,
it's ISO 2,500. Now, I would like to make the aperture size bigger to give me a nice
blurry background, and I'm going to select F 2.8. I when I half press the
shutter release button, you can see because
I'm more light in through the aperture size, the ISO has dropped now to 640, so the camera has
selected 640 for me, and I've got the
perfect exposure and the exact photograph
that I wanted. Now I can go on to make
further changes. F eight. The IO has now gone up to 5,000, and I can capture that shot. And then I can simply, again, adjust the aperture
size and make it smaller all the way to F 16. ISO has now gone up to 12,800, but we can see the shutter speed has now dropped to a 60th. So as I said earlier, I've set a minimum shutter
speed of 1/125. But I also set a
maximum ISO of 12,800. So when the camera is working
out what setons to use, it's made a note of
the aperture size that I've selected,
which is quite small. It is made a note also
that it could not go above 12,800 because I
set that as a maximum. So the only option left
for the camera was to make the shutter speed
drop below that 1/125. So you do have to keep an eye on the sentence that the
camera is selecting, and in most cases,
it gets it perfect. And dropping to a
60th a second or below that in this case is fine. So, finally, let's close the
aperture size down to F 22. Now, remember I have the IO capped at a maximum of 12,800. So the camera has selected a shutter speed of
a 30th of a second. Now, remember my minimum
shutter speed was 1/1, two 525th of a second. But to achieve the
perfect exposure, the camera has had to override my setting and select a shutter speed of
a 30th of a second. So let's take a look at
those four images together, then all shot with
aperture priority. The first one F 2.8, and we can see that lovely
shallow depth of field. Then the second one at F eight, and we can see the skull is
starting to become in focus. By the time we open up to F 16, we can see a lot more detail in the skull and the camera
is coming into focus. And then at F 22, pretty much everything
is in focus. So Aperture priority is
fantastic, isn't it? And it's so easy, and all you have to think about
is creatively, what do you want to achieve? So now let's take a look at
some photographs that I've taken over the years
using Aperture priority. So this first one, F 5.6 and the focus is on the
rope, it's great, isn't it? It just separates the
subject from the background. Now, this next one,
I've used F 3.5, and I've focused on
the gentleman doing a limbo dance
underneath the flame. Now, I've used F 3.5 to make
the background blurred. But creatively, was that
the right thing to do? Because we look
in the next shot, taking at roughly the same
time using a smaller aperture, we can see the people
in the background are more in focus, and I think that looks
more interesting. We can look at the
people's reactions. Now, there's no right or wrong. Both photographs are fine. It's just a creative decision, and that's what we can
do with aperture size. So this one, a street
photograph I captured at F 11, and as you can see, most
things are in focus, which is exactly what you
want for a street photograph. Now, this shot was
shot really close with a very large 1.8 aperture, and you can see
that there's very little of that photograph
that is in focus, but it's a really nice effect. This one at 2.8 kind of transport you
into the photograph. And that's what I love
about a shallow depa field. F 3.5, and this is a
great character study. Another street photograph
shot at F eight, and the same again at F eight. This one taken in Madrid at F 11 to get most
things in focus. And this one at F 16 in
Liverpool of the Palm house. And again, everything can focus
1.8 and getting close in. It's a really nice
effect, isn't it? F 3.5 in the Mersey Tunnel. And this one F 16
on Crosby Beach. So as you can see, you can
be super creative just by adjusting the size of your
aperture. So give it a go. Jump into aperture priority, or if you're feeling
super adventurous, jump into fully manual, and I'll catch up with
you in the next module.
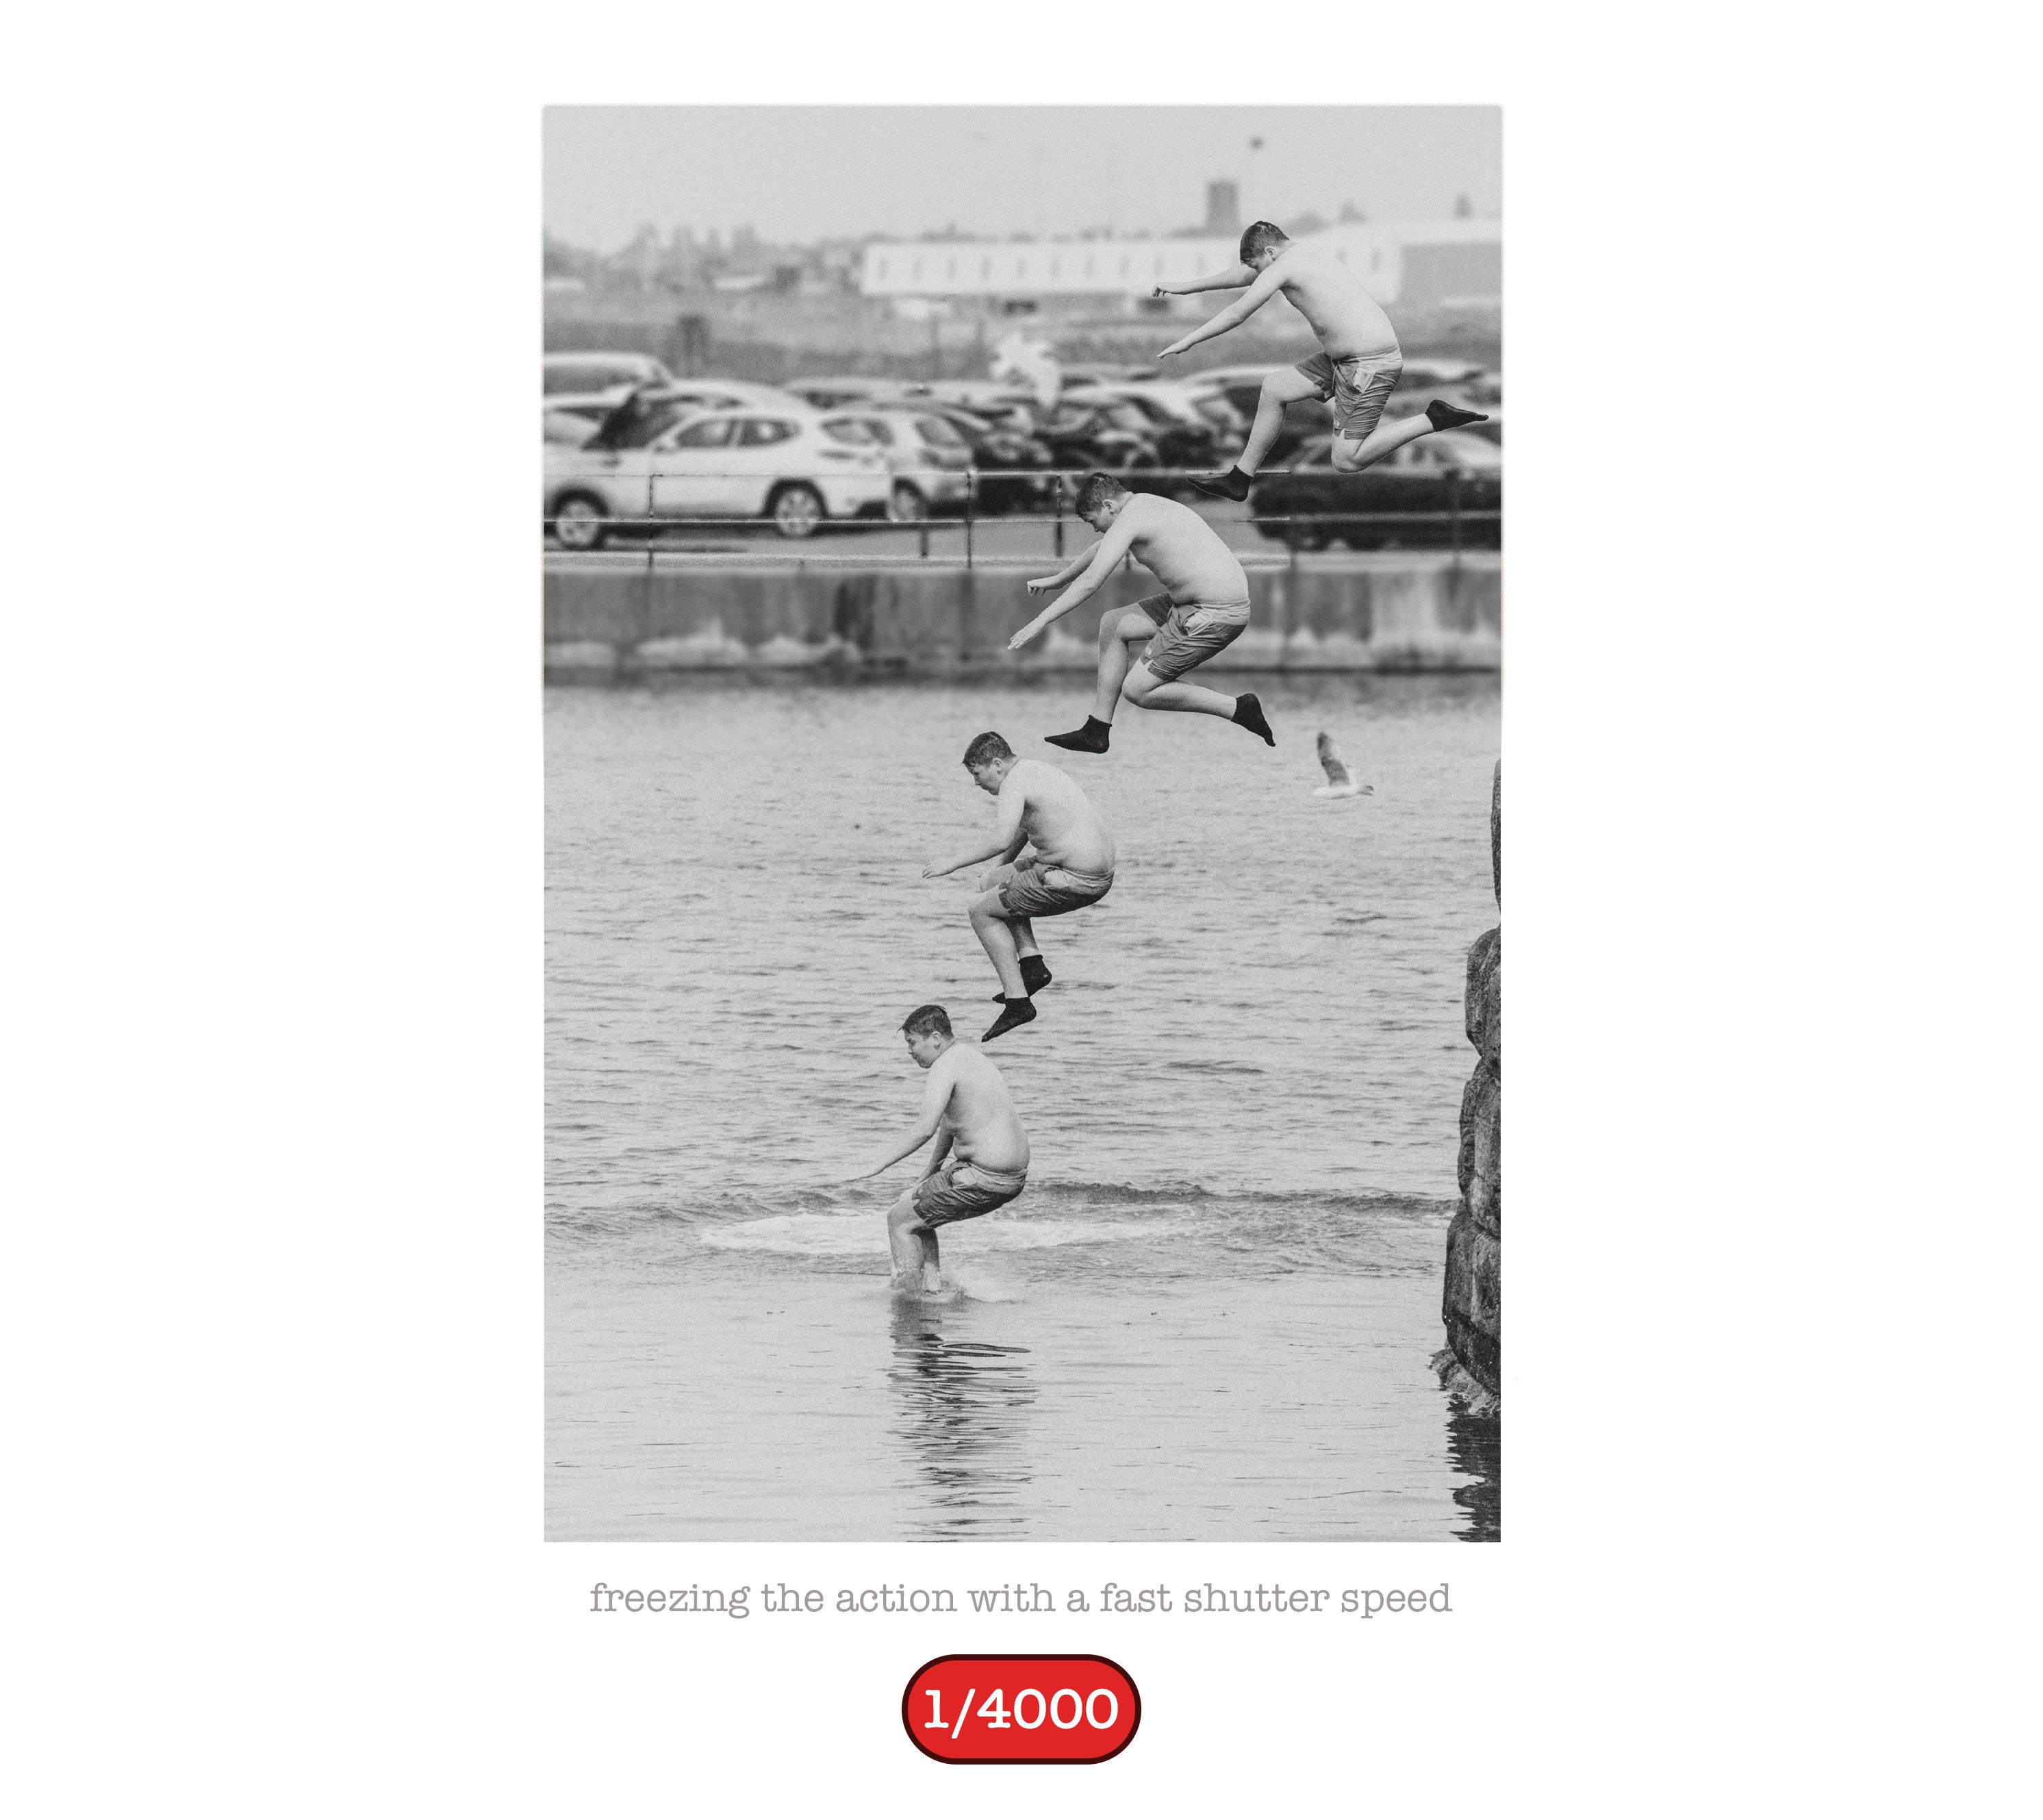
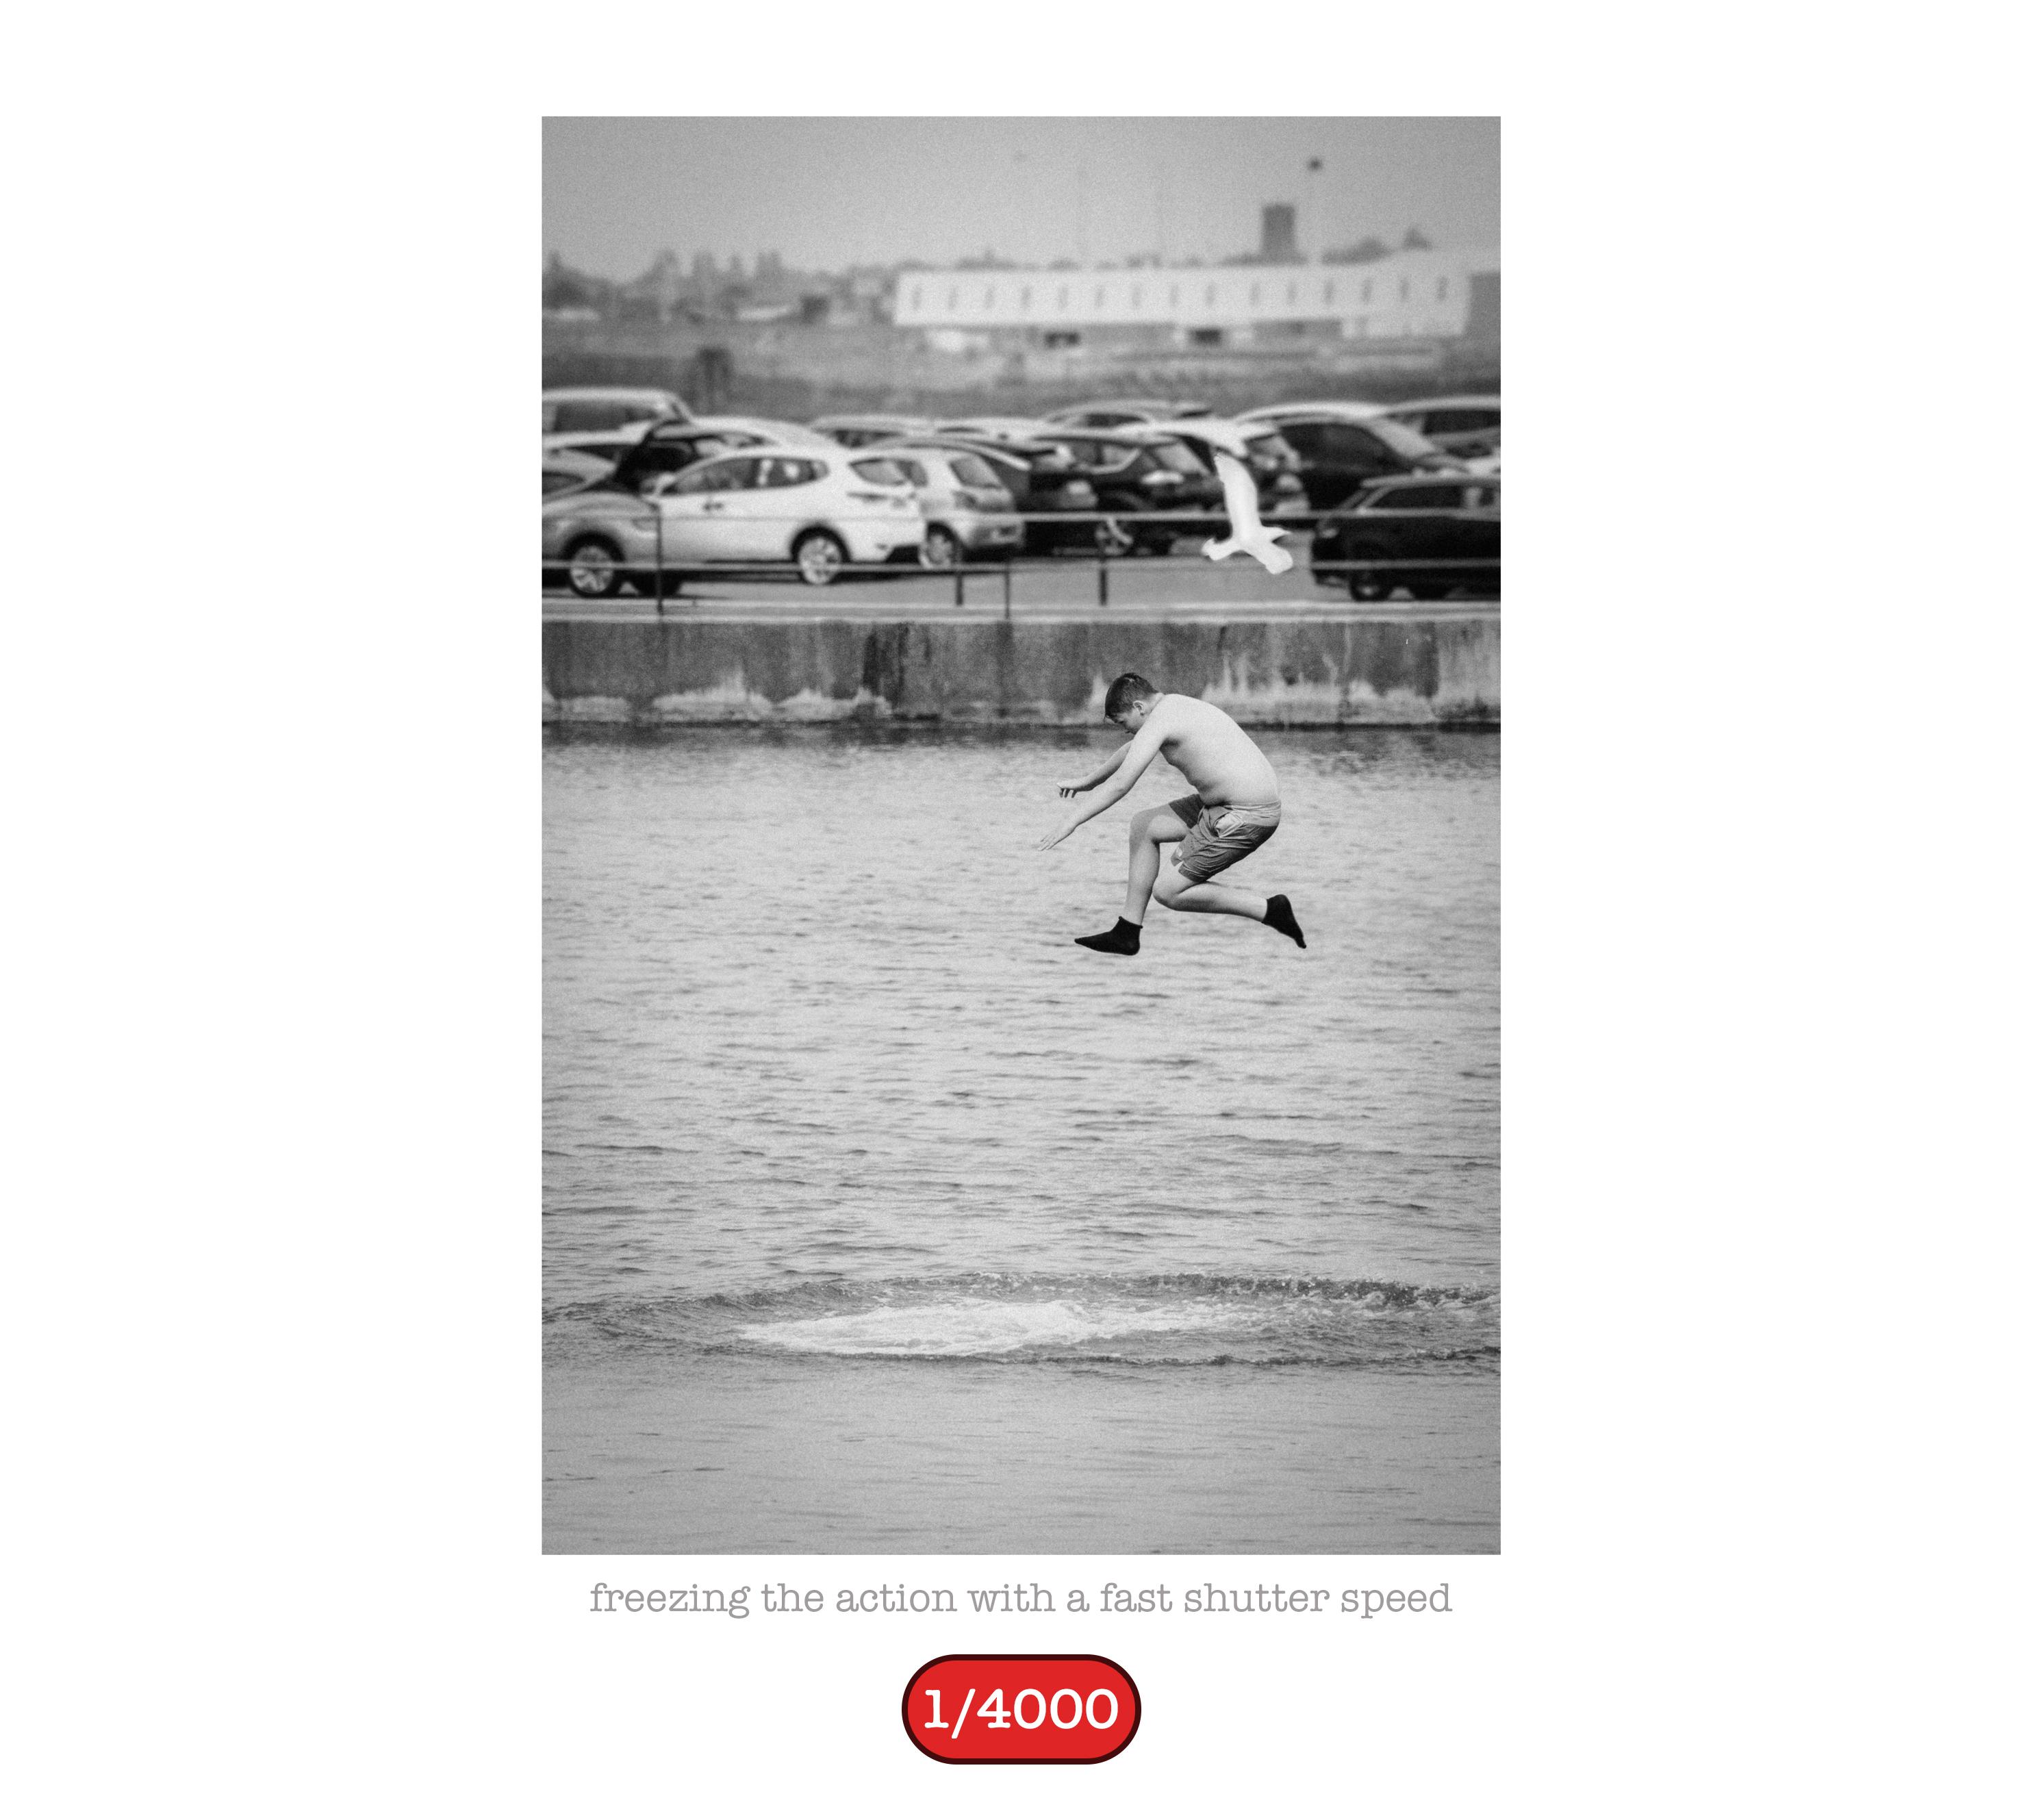
7. Module 6 Shutter Speed: Of course, shutter
speed is one of the three elements we use
to determine exposure. But used creatively, we
can freeze action with a fast shutter or capture
motion with a slow speed. Now, it's measured in seconds
or fractions of a second, and Shuster speed really does help to create some
amazing effects. So in this module, we'll look at shutter speed and a guide to how to select
the right speed. I'm also going to
capture some shots and vary the shutter speed, and we can take a
look at the results. Then we're going
to take a look at some photographs that I
have captured out and about with my camera using
various shu of speeds. So let's jump in
and take a look. Shutter speed is measured in seconds or fractions
of a second. We could actually
keep the shutter open for minutes in the bold mode or set it to open and
close as fast as 8,000 of a second
on some cameras. Here we can see a selection of shutter speeds from 2
seconds to 2000th of a second with the
slower speeds capturing motion and the faster
speeds freezing the action. So let's take a look at a simple guide to shutter
speeds and when to use them. Now, you're going to need
a tripod to shoot at slower speeds plus
a remote control to avoid camera shake. Now, if you don't have
a remote control, you can use the self timer on your camera or you
can use Bluetooth if you have the app installed on your phone. So
let's take a look. The faster the shutter speed, the more we can
freeze the action. We also change the drive mode to continuous burst
mode to make sure we capture the perfect
moment frozen in time. We can use slower
shuster speeds to capture motion and
record movement. With slow shuster speeds, we ideally need to have
the camera mounted on a tripod and perhaps using a remote control to
fire the shutter. Longer shussle speeds are
ideal when shooting at night. Also in the daytime with a suitable neutral density
filter attached to the lens, you can capture
movement, a waterfall, for instance, a tripod and a remote control
are essential. Scrolling through the shutter speeds on this cannon camera, we can see there is a large
range of shuser speeds from 4000th of a second
down to parts and full seconds indicated with speech marks right
through to the bulb mode setting where we can keep the shutter open
for minutes and longer. So time to take
some photographs, and I'm going to use various
shutter speeds to freeze the action and to capture motion using this
Newton's cradle. Firstly, let's
freeze the action. So I have the camera
in the manual mode and looking at the
exposure meter, I can see we are
underexposed by three stops, and the shutter speed is
set to 1600th of a second, which I'm going to change
to 500th of a second. So now the exposure meter is indicating we are now
two stops underexposed. So I'm going to open the
aperture size to 5.6, and I can see the
exposure meter is now indicating that we are
one stop underexposed. So to balance the exposure, I'm going to simply lift the ISO value all
the way up to 6,400. And now I have the exposure set. I have the focus point
set at one area mode, and I've positioned it
on the middle ball, and I'm going to switch the
drive mode to burst mode. Then I will release
the balls and hold down the shutter
release button to capture a selection of
shots and hopefully manage to freeze one of
the balls in mid flight. I chose the best shot from the image is captured,
and as you can see, the ball is perfectly frozen in time. So that worked a treat. Now, I would have liked to
use the faster shutter speed, but as I'm indoors,
I had to make do with 500 of a second. So let's switch to capture and motion with a slower
shutter speed. To capture the
motion of the balls, I'm going to drop the shutter
speed to half a second. On this particular camera, half a second is indicated
by the number two. You may have it shown
as a fraction on your camera 1/2 or perhaps 0.5. Now, obviously, we
are now overexposed, and the exposure meter is
showing plus three stops. So I need to make some changes. And first, I'll drop the ice out all the way down to
the lowest it can go. But we're still two
stops overexposed, so I'll need to make a
change to the aperture size, and I'm going to close it
down all the way to F 11. Then I'll release the balls and hold down the shut
release button to capture a selection of shots
and hopefully manage to capture the motion of
the balls in midflight. And that looks
fabulous, doesn't it? And you can see the travel from one side to the other as the
balls are being swinging. So I've now frozen time
and also captured motion. So let's take a look at the
best two photographs side by side and compare them. Okay. So, such a dramatic difference just by
adjusting the shutter speed. I think they both look
striking in their own way. So can we achieve
the same results using shutter priority? Well, of course, we
can. And as you know, we only need to consider the shutter speed when
using the S or TV mode, as the camera will select the aperture size
and the ISO for us. So let's see how
that works, then. I'm going to freeze the
action, and like before, I will use a shutter
speed of 500/second. Now, as you can see, the shutter speed
is currently set to half a second with
the aperture size at F 11 and the IO at 100. So I'll pop the lens cap on so I can show you how
quickly the camera reads the light and adjust the
aperture size and the ISO. With the lens cap on,
you can see we have an exposure meter reading
of less than minus three. So first, I'll put
the camera into shutter priority mode
and also automatic ISO. And then change the shutter
speed to 500th of a second. When I remove the lens cap, the camera will adjust
the aperture size and eo to give me the
perfect exposure. And when I half press the
shutter release button, the camera will reveal what aperture size
and eo it has chosen. Then like earlier with the
camera set to burst mode, I will release the balls and
capture the perfect photo. So as you can see, I only need
to choose a shutter speed, and the camera will do the rest. So let's take another
set of photographs using as slow as speed
to capture the motion. Let's make a note of
the current settings we used to freeze the action. The aperture size is at F 2.8, and the IO is at 1,600. As I adjust the shutter
speed to half a second, the camera will adjust
both the aperture size and ISO to give me
the perfect exposure. Now, when I half press the
shutter release button, I can see the camera has chosen an aperture size of F
11 and an IO of 100. Previously, we had an
aperture size of F 2.8 and an ISO of 1,600. Then I will release the
balls and hold down the shutter release button to capture a selection of shots, and the camera has done a
fabulous job with the settings. So as you can see,
shutter priority really does help to
release your creativity as you can focus
on composition and let the camera help you
with the exposure settings. Let's take a look at a selection of photographs I have captured out and about with my camera
using shutter priority. I love the shot of some
of my students practicing shutter priority
with a shutter speed of 4000th of a second. I captured the shot at half a second using a variable density
filter on the lens. Runners in the park captured
at 2000th of a second. A lovely evening shot with
an exposure of 1.5 seconds. And then a fabulous
long exposure of 1 minute 30 capturing the movement of the
clouds in the sky. Freezing the water in
this warsaw feature with a shutter speed of
4000th of a second. A 30th of a second
perfectly captures the movement and creates
a striking image. 10 seconds with a
neutral density filter again to capture the
flow of the water. 2000th of a second to freeze
the wave in the River Mercy. 60th of a second with a panning technique to
capture this moving car. A nice street photograph
at 500th of a second. And finally, an evening
shot at 8 seconds. So have some fun with
varying the shutter speed in shutter priority mode or in the manual mode if
you feel adventurous, and I'll see you in
the next module.
8. Module 7 ISO: In this module, we'll
take a look at ISO. It's one of the three elements we use to determine exposure, but unlike aperture
size and shutter speed, it doesn't have a creative
trick up its sleeve. That says it does help
us to be creative. In that, we can adjust
the eo to balance the exposure when
we've dialed in our chosen aperture
and shutter choice. So let's take a
look. Every camera has a light sensitive
sensor that we expose to light when we
capture a photograph. There are generally
three sizes of sensor, full frame, APSC and
micro four thirds. The most common size is APSC. We can vary the sensitivity of the sensor and make it more
or less sensitive to light. We do this by changing
the IO value. IO values generally begin
at 100 where the sense is less sensitive to light and the number increases to
increase the sensitivity. So low numbers are less
sensitive to light and will also introduce less or
no digital image noise. Higher numbers are more
sensitive to light, but can introduce
digital image noise. Here on this cannon camera, we can see the ISO
values beginning at 100 and increasing all
the way up to 25,600. In an ideal world, we would
aim to keep the EO value really low to keep our photographs clear
of digital noise. However, we often
have to increase the ISO value to achieve
that correct exposure. But that's what it's there for. It really does
help us to balance the exposure settings for a particular scene
or creative effect. It may be our method
of last resort, but it's super helpful. So let's take a look
at some photographs that have digital noise. I shot this photograph in
Madrid as the light was fading. I used a high ISO value, which introduced a fair
amount of noise in the image. Noise loves an area
of one flat color, and the noise in this photograph is clearly visible
in the blue sky. Now, if you watch closely, you will see the
noise disappear as I later removed it with
noise reduction software. Zooming into the sky
for a closer look, you can see the noise in greater detail and how the
software cleverly removes it. Now, noise was more of a
problem in the early days of digital photography when the sensors were
not so advanced. My first DSLR camera had a maximum ISO value
of just 1,600. Now, my current camera
maxes out at 51,200, and that's quite an upgrade, and some cameras go much higher. Now, with modern sensors and
clever AI noise reduction, I worry less about IO values. But let's take a look at
one more noisy photograph. Again, this photograph
was captured in Madrid in the early evening. The y is at 12,800 and noise can clearly be seen in the gentleman's face and
in his clothing. Now, using noise reduction
in adobe light room, the noise simply disappears. And zooming in, we can see
that happen more clearly. So don't be afraid to
lift the ISO value. That said, keep an
eye on the values, especially if you
use nose or ISO, as it would be the camera
that is choosing the value. And remember, editing software can help to remove the noise. Okay, only a short
module this time, but full of useful information. I will see you again
in the next module.
9. Module 8 RAW v JPG and White Balance: In this module, we'll
take a look at raw versus Jeg and also
white balance. Now, I have mentioned both of these settings in
an earlier module, but I thought I should expand a little as both are
quite important. So let's begin with
file format and which is best for you raw or JPEG. And a quick spoiler layer, if you don't fancy laying on
how to edit a photograph, then stick with JPEgs. But there's a lot
of benefits though to shooting in the raw format. And think of it this way. A raw file has all
the ingredients ready to cook a delicious meal, and a Jeg is simply a
microwave meal ready to eat. So let's take a look
at Quick Guide. A raw file is like
a digital negative waiting for you to take it
into the virtual dark room. It's unprocessed by the camera, and because the
data is preserved, you can recover information
during the editing process, such as blown highlights, shadow detail, color balance,
and exposure mistakes. So a raw file gives you
more room to fix exposure and colors later when
using editing software. Was a JPEG is a file that gets instantly processed by the
camera for you to use. The camera will sharpen
the image adjust colors, apply contrast,
compress the file, and tragically permanently
discards a lot of data, but it is instantly usable
and a much smaller file size. JPEG files may be the
way to go for you, or maybe you enjoy
using the raw files. Either way, here
is a quick table highlighting the differences. Raw files are much
bigger than JPEG files, but as SD cards hold thousands of photographs, this
shouldn't be a problem. With the greater size comes
better image quality as JPEGs are compressed by
discarding useful information. Raw files are meant
to be edited, whereas although
JPEGs can be edited, they are limited in how
far they can be pushed. Raw files have a much larger dynamic range which
allows you to push them a lot further during editing without
degrading the image. The white balance of
a raw file can be retrospectively
adjusted during ding, not so with the JPEG, and only minor adjustments
can be made. Here is a win for JPEgs as they are ready to share
immediately after shooting, not so with a raw
file, of course. Yes, processing or
editing is needed before converting a raw
file ready for use, whereas the JPEg is born ready. So raw files are waiting to
be processed and edited, but offer superior scope to be corrected and are
much better quality. Their dynamic range really does help to reclaim
highlights and shadows in overexposed or
underexposed photographs. For me, JPEgs have the place when in a hurry to quickly
share a photograph. Please don't let me put
you off shooting JPEGs. If editing isn't your thing, don't worry, as JPEgs
are fine, honestly. It's just that the joy of
editing a raw file and bringing your photograph to life is a wonderful experience, but enough for
everyone, I suppose. White Balance controls how
your camera interprets color temperature
so that whites look neutral instead of too
blue or too orange. Now, color temperature is
measured in degrees Kelvin, with daylight being anywhere
5500-6500 degrees Kelvin, depending on the time of day. Now every location indoors or outdoors will have a
specific color temperature, and our eyes automatically adapt to changes in
this color temperature, but cameras need instructions. This is where we can
go in and change the white balance setting
to suit our environment. So let's take a look at those
white balance settings. So we have auto white
balance, daylight, cloudy, shaded, tungsten, fluorescent,
a custom setting, and a degrees Kelvin option. You can access the white
balance settings in your quick menu or even better if you have a dedicated
white balance button. You can indeed change
the white balance setting to suit
your environment, but you must be mindful to
check each time you take your camera out as you may have left it set to an
incorrect option, giving you a photograph with an unpleasant blue
or orange cast. For reliable results, I would suggest using auto
white balance. And remember, if you
shoot in the raw format, you can retrospectively
change the white balance, not so with a JPEG, but
more on that later. The other option would be to set a custom white
balance setting using a gray card if the rendition of the
colors is critical. For example, you are
photographing a products for retail that has
a definite color. Or you can dial in
the color temperature in degrees Kelvin
if you know it. As I change the white balance, you can see the effect it has on how the camera reads colors. As I scroll through the options, the color cast jumps from
an overly warm color to a cold blue color
when incorrectly set. Popping back to
auto white balance, I get the perfect colors. Let me show you how easy it
is to correct a raw file with an incorrect white
balance and how pretty impossible it is
to do with the JPEG. So just for color reference, this is how the corrected
photograph should look. Let's take a look at
a similar photograph with an incorrect white balance. This is a raw file,
and you can see it has a terrible blue cast due to the incorrect
white balance setting. In the basic panel in the
light room developed module, we have a white balance
panel with a drop down menu where you'll find
all the same white balance settings
found on your camera. I remember shooting this
photograph in natural daylight, purposely choosing
the tungsten setting. Now, as this is a
raw photograph, I can simply click
on the auto white balance setting to
fix the colors. As it did shooting daylight, I'll change the white balance to daylight just to compare. Then back to auto, and you can see the results
are very similar, with perhaps just the auto
option being a little cooler. But a dramatic difference from the original incorrect
white balance. Another option is
to use a gray card. I have one placed
in this photograph, and I can use the eyedropper
to sample the gray strip, which is at 50% gray. The values of RGB, red, green, and blue should
be reading 50%. But as you can see,
the blue is over 77%, which makes sense as the
image has a blue cast. Using the eyedropper, all
I need to do is click onto the gray strip to
let Light room know that this area
should be 50% gray. Light room will then adjust
the other colors to suit. If I put the eyedropper over the gray area now that the
colors are being corrected, I can see that all
three RGB colors are very close to 50% on
almost the same readings. Now, let's take a look at a JPEG image that was taken under the same natural daylight and again with a tungsten
white balance setting. In the white balance panel, we have the same drop down menu, but this time we don't
have the option to choose another white
balance setting. I can select auto as I did with the raw photo, but
unfortunately, this time it won't correct
the white balance as the incorrect white balance has been baked into
the photograph. Even using the
eyedropper to sample the gray card will not adjust the colors to where
they should be. So the raw option easily
wins this battle. But remember, if I had selected auto white balance when
capturing the image, it would have pretty much
given me the perfect colors. My recommendation is to use auto white balance,
as in most cases, it does a pretty good job, and as you've just
seen, raw files can easily be corrected. Okay. I'll see you again
in the next module.
 Frank Minghella, Perfect Photo Company