Transcripts
1. Introduction and Course Overview: Hi and welcome to this course Night sky photography, a hands on tutorial for shooting the Milky Way star trails and time lapse. I'm gonna take you through the steps to creating stunning images of the stars and later Sandy will cover all the editing Optimization is to bring out the best in your photos. So first, what is the Milky Way? As explained by a fidget spinner, it's I galaxy in the spiral billions of stars, planets and nebulae that is our home in space. And Earth is just a little dot on the outer spiral. Well, we view the Milky Way from the site so long, bright strip that you see in the famous images is the core of the galaxy is viewed from the edge. The galaxy is so huge that the light we see is it hits our ice has traveled for millions of miles at speed of light, meaning what you see is actually looking back into time. Hundreds, thousands, millions of years on this galaxy is just one of billions in the known universe feel insignificant yet anyway, back to practicalities. The core of the Milky Way is visible in the Northern Hemisphere between late spring and late summer. It hovers along the horizon earlier in the year. May in June. Early mornings 3 to 4 a.m. You got to be pretty motivated together shots. At that time of year, it's possible to get a panorama, which will show the entire length in an amazing curb along the horizon. If you choose your location correctly, you can include four grounds that really enhance the image, such as a road or sculptures, and we're gonna cover all of that. Then, as the summer progresses, the core is more visible earlier in the evening, and you can get the course slanted or vertical as it results revolves, which again provides great possibilities of combining with foreground elements. Now for the rest of the year, the core is actually below the horizon. But don't let that stop you from taking night sky pictures. Even the remaining field, the stars will look amazing with a great foreground. Star trails could be captured at any time of year, and meteor showers turned up regularly. All the techniques that I'll show you in this course will work for any time of year, so to help you get outstanding image is one thing I want you to remember is to always be thinking off foreground elements. Going to repeat is a lot. This guy alone is a fantastic thing, but in a photograph that I needs a reference at an object in the foreground that can help bring emotion of wonder to the photograph. It could be a street sign, a car, a road, a rock formation. You get the idea. So when you start to scout areas for your shoots, always keep that in the back of your mind. Now, with advanced equipment, motorized tripods, telescopes and adapters, you can shoot deep sky objects and planets. But it's beyond the scope of this cost. Apologies advanced to my Southern Hemisphere friends. I'll be talking from a Northern Hemisphere perspective, but the general concepts will still be useful to you. So a final note before we get cracking the theory of Astro photography can get very in depth on. We'll touch on a few points, but the focus on this course is the practical aspect of getting results. So when you want to dive deeper and learn more, there are a few books that I can recommend later, So let's get started
2. Preparation is Everything! Location, Direction, Light Pollution: so a little bit about preparation. Always remember the six piece when it comes to activities like this. Prior planning and preparation prevents poor performance. It's so true here because you don't want to have forgotten something small but important once you've driven height camped out in your location in the middle of nowhere. So before we talk about what gear you'll need or any camera settings, let's get the basics covered. This means you need to be thinking about location, location, location. So what makes a good location? Well, let's talk about direction and light pollution. So as a general rule of thumb when you're in the Northern Hemisphere, the Milky Way is viewed to the south or to the Southwest, on for the circular star trails you'll need to be facing north in the Southern Hemisphere. The opposite is true, so depending on what type of room is, you want to shoot from those This is gonna have an impact on choosing a location. Why? Well, back when our ancestors were running around hunting mammoths, they would have seen a full field of stars any night, any direction they choose. Just by shuffling away from the camp fire club in hand. Nowadays we have to deal with light pollution, which severely impacts our view of the night sky. Take a look outside on any night, and if you're close to a town or a city, the sky will have an orange fuzzy Hugh. That's no good for sky photography. They say that 80% of Americans can't see the Milky away from home because of light pollution, which is a shame, but it just means we need to travel a bit further to see it. So, in theory, the best environment for this is at least 100 miles away from the nearest big town. Ah, high elevation, where the air is clear, say, Bryce Canyon, or somewhere deep in the Sierra Nevada. Of course, this isn't possible for most of us, but you can still get great results closer to home. And I guarantee that once you've done this once, those dark sky locations will be on your travel bucket list. You confined Dark Sky locations by going online to doc, site finder dot com or just Google around this planet. Insights that explain that. So I like to break it down into two types of location the ideal place. We'll need a few days to travel to in stain on the close to home place, where you'll be able to head to for one night or even go out and head back home again on the same length. For example, we live in the South Bay area in California. North of us is a good 70 mile stretch of highway city lights and not to mention fog. This all combines to create huge orange glow to the north. So to drive beyond all of that in one night to get a clear north facing view for star trails will be tough. But if we look south on the map, we can see that beyond Gilroy or Hollister, things get a little bit sparse. So some south facing dark skies and more likely it's another 300 miles to Los Angeles. So a bit of Googling around will give you some tips in your area. But a good starting point is usually a camping ground, as there generally further away from the cities, failing that look for roads that are perhaps in the mountains or interesting features such a rock formations, national parks, empty buildings or anything notable look at it is a foreground for sky shots. I'm listed a few of my favorite places in the course materials and also sings You'll be driving. You'll want to avoid going off road in the dark if you don't have much experience in the area. This is an important point because at night everything feels further away than in the daytime, when you can barely see six feet in front of you. That lamppost or bench that was a quick stroll at midday will feel miles away, so it pays to do a daytime trip to do some scouting. This will be a fun road trip that can cover a wide area. Of course, if you're adventurous, you can leave some of this to the night itself, but find at least one spot so you can get one shot in the bag. Get down to the area, find some parking spots, orientation points like buildings and turnouts that's going to help you find your way at night really important. Once you've done your scouting trip, you will feel much more confident about going back at night so you can just concentrate on taking great pictures. I'm not getting lost. If a site close to home is not available near you, don't worry. You can combine a longer trip with a photography extradition and have the holiday of a lifetime. Just check out the dark sky websites and put a pin in the map. But the same principle applies is before I get there early deuce and daytime scouting and get yourself prepared. Especially in desert or elevated environment. It's crucial not to get lost and take lots of water and provisions. One more thing to keep in mind once you have your location secured is the moon. The moon is so bright and it can really get in the way of a good shots. And conventional wisdom tells you to wait for the new moon, which happens on some up. It seems pretty limiting. But of course it's the moon set time that counts. Check on Google for moon set times in your area, and as long as it is set in the early evening, your sky will be dark. This weekend we're fortunate enough to have a new moon, and it will set at 6:30 p.m. So it's gonna be out of our way
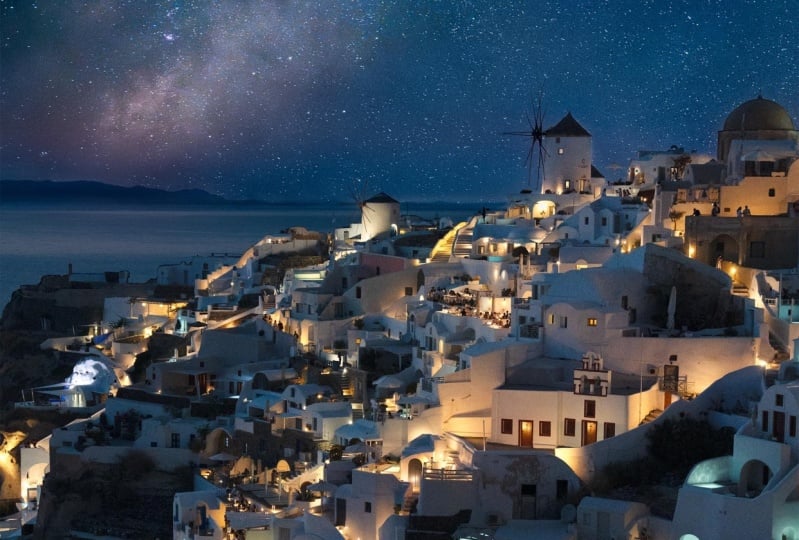
3. Night Sky Compositions: Milky Way: all right. So I'm just gonna talk a little bit about different types of compositions for Milky Way star trails and when there is a full moon. So we're just quickly cover the Milky Way in in this video. So what I love about the Milky Way is it's really down to your imagination and, of course, the time of year being a factor as well. So my favorite, I would say, is this kind of late August early September type of image where you can get the core of the Milky Way going pretty much vertical into the sky, not too late. So anywhere from about sort of 10 p.m. To midnight or one AM so you don't have to be about three AM or four AM to get this type of you mean so that's that's pretty handy as well. What makes a good Milky Way image for me is always the combination of the sky itself in a foreground. So although he took the four great, you could take the sky just on its own. The foreground kind of makes all the difference on again. This comes down to where you visit the location in this picture. We got the Austrian caravan Onda car. I think there's another RV or trailer over there on the right hand side as well On the hill , the light coming from inside that the extreme actually lights up the surrounding area quite nicely. So gives a nice contrast between this with warm glow on the floor on, of course, the immense universe rising up behind it. So when you're planning your Milky Way photography trips, this is a good type of composition. Teoh, go for where you can get a pretty good shot in the bag by just looking for some kind of a foreground like this that will sit right underneath that vertical milky way. This is actually overlooking the ocean. So one of the things if you're taking a picture over the the sea is of course, there's nothing really there. So you gotta be careful not to get a huge blank expanse of nothingness underneath the sky, because that could also look a little bit boring here. We've managed to get quite a decent shot with the bank of fog in the background, which looks pretty nice. Some rocks that are out there in the bay and using a torch or the light off the iPhone to actually light up those flowers and a bit of the send in the foreground as well. So that gives you another nice contrast between what's right in front of you and the Milky Way At the back is out for a nice bit of contrast. Lighting up the foreground, it takes a little bit of practice, takes a little bit of experimentation. I like an orange glow on the torch. The first images that I took, including this one, were just with the iPhone. Andi, if you have a 32nd exposure, which is which is this one, then it only takes a couple of seconds of just waving the torchlight over your foreground and then turn it off again. So you have about 25 28 seconds of exposure and then the last kind of couple seconds by shining a light over the foreground to give you that, that that good clarity, it takes a bit of practice. You will probably find that you'll either under exposed that foreground or over expose. It is not really an exact science. Just go for it. Give it a try and you'll eventually come up with with a sort of feel for how how you can do that. This type of image is the early spring or late spring, I should say, Takes it a little bit more technique to put together with post processing. It's that classic arch now, earlier on in the year. If you look up a look up in the sky, the Milky Way is kind of close to the horizon. But you can really see how it goes from one side of this guy to the other without going directly above you on. This means that with they're white under lens on all the things that will cover later on in the course, you can take a Siri's off port trait images that is to say, kind of upright images where the long side of the picture is a decide. On the short side is the top and bottom, and in this case I think it was about six or seven images taken one after the other. So starting on the right hand side, take the image, switch the camera around a little bit, take another image all the way until you've kind of covered that almost 180 degree view. And if they overlap well enough, then afterwards in adobe camera raw, it's possible to the stitching together in a panorama, and we're not gonna be taken this particular picture in this course. But we will be taking a panoramic of of something else on. Sandy is gonna show you how to stitch that together to actually get that panoramic result, and you can use the same technique everywhere. And it results. I think, in a really amazing picture as well. And then another type of of again experimentation. When you get a little bit more familiar, a bit more advanced with a bit more practice. Using the same techniques is we're going to show you to create the image of the Milky Way itself. Then you can play a little bit. Maura around with four grounds, and what I really like doing is having a subject in their person That's just happens to be . Sandy sat down with some lights surrounding her holding a light, and in this case the lights provide enough of a glow for that foreground as well. What you can also do in this situation is take again, maybe an iPhone light or camera flesh and towards the end of the exposure, just shine the light very briefly on the subject. So she's not blurred on bond. That results in in a very cool effect, like this fair warning. This one takes a lot of practice, a lot of trial and error, so I would attempt this once you've got the basic Milky Way pictures in the bag.
4. Night Sky Compositions: Star Trails: All right, So let's talk about Star Trail star trails or another popular type of night sky photography style of image. We're gonna be doing one as part of this tutorial. In fact, this is the one that that we created on will describe exactly how he did that throughout this course. Now, just to give a little bit of an overview about how the image gets put together or why even the stars trail in this in this way is you just imagine that when you're facing due north on the Earth, it's kind of like a spinning top where if you look at North right in the middle here where my mouth is, the stars, as the earth revolves around, create a very, very small circle on the wider, the further away from that central point the stars are, the further they travel to create this kind of circle as the spinning top revolves and course, the spinning top being our planets and the direction of which we looked being Ju north So and I'll explain a little bit more about this in the next couple of pictures. But the other thing I want to point out years well is again the foreground. So foreground, really making up a lot of thes image in terms of importance. Or here again, we got the Astra in Caravan and the trees that kind of framed that circle in a way. So it kind of really makes a nice harmonized image of foreground and the stars. So just always think about that when you're scouting your locations to create star trail photographs, that the foreground is Justus important as the star trail themselves. Now, how did these get put together? Just a little bit on that, of course, will grow in more detail later on. But if we just skip to a single image of the stars that we have here the constellation, the Big Dipper that we outline here with these lines this is always a good way of finding the North Star. That is the the central piece of that spinning top. You just take that constellation and from the final edge here, the side you just keep going until you find the next brightest star, which is up here. Okay, on that is the North Star. So you point the camera roughly in that direction to get the effects, and by taking there's a couple ways of doing it. One is to create a super long exposure in the camera. I'm just letting it run for an hour or something like this. Alternatively, you can take many, many, many smaller images, shorter exposure images and stack them together later. And that's what we do and how we explain in this course. And just as an example, I've got three images here that I'm just going to scroll through. So this is the 1st 1 That was about 30 minutes later, and that was about another hour later so you can see how the Big Dipper they're just revolves around on the North Star pretty much stays in space. And between these three images, there were about 100 images overall. And then when they're stuck together in a piece of software called star Stacks, they're actually quite a few different pieces of software. That's my favorite, is free. Download off the Internet. I'll show you where later on you can stack those images together to create the Star Trail effect. You can see here a few gaps where we've just kind of thrown that together those gaps or where we decided that we did not want one of the 100 images to be in the picture. So it is possible to fill those gaps in. Or if you don't throw away any images, then you won't see any gaps. Of course, Um, on the other cool thing that you can do with stars taxes kind of create this comet comment effect where the later images a brighter and the earlier images are a little bit dimmer, so it can creates a nice dynamic within the images. Well, so we're gonna show all of that and how we do it. Ah, little bit later on. But just to kind of give you the idea there where you got those many, many images or just one long exposure images of all the stars as they revolve around that central point. Now, having that in mind, you don't just have to point your camera north to get star trails. Of course, you get the circular effect when you point the camera north, But if you point it south in the opposite direction, you can imagine what type of event you're going to get right. It's gonna be completely the opposite So let's take a look at an example of that. All right, so it's a little bit messier. Ah, lot busier because that whole bright kind of area in the middle is actually the core of the Milky Way. There were also taking pictures off. Um, but of course, when you take lots of Milky Way images and statment together later on as a star trail, then that core kind of gets a little bit muddied up in the middle. But the point being is that you can kind of see how we're a little bit opposite. And on the left, on the right side, you've got the beginnings of what would be the actual circle if we were to turn around back north again to do to do the circular star trail. So my favorite type of star trail image is the circular type way you point north or again if you're in the Southern Hemisphere, your reporting yourself, Um, but again, four grounds, always a big part of that. So just keep that in mind when you're thinking about star trail images again pointing at that, simply pointing at the sky and taking a photograph all well and good, and it will still look great. But four grounds really, really make the image stand out
5. Night Sky Compositions: Full Moon: So the third type of dementia I want to talk about for night sky images. Aside from the Milky Way, Andi the star trails is shooting during the light of the full moon. So although we're not gonna cover this in much more detail through the rest of the cost, this is something that I encourage you to come back and visit once you've gone through all the other topics within this course, because this is a great way of experimenting and creating some different types of images. So I'm going to risk a little bit of controversy here by talking about Yosemite National Park in California, which is a wonderful place. However, during the daytime bright sun blue sky photographically speaking, it's a little boring. Now, despite the impressive nous of Half Dome and El Capitan, you still need to get a great photograph. You still need some kind of interesting elements. That's why a lot of the great photographs of Yosemite tend to be at sunset or in the winter with the fog and clouds. If you just go up there midday and take a photograph, you're gonna see a lot of grey rock you're going to see some deep, deep shadows, and you're gonna see a boring blue sky. So no matter how amazing those mountain ranges look as a photograph, it's not gonna have the dynamic you need. But what I do love about Yosemite much better than during the daytime is going there at nighttime under a full moon and taking photographs. Then, because the full moon that night is so bright for a longer exposure, it's going to appear like it's actually during the daytime. But with the difference being that you can see stars in the sky and the color of the granite rock Faces attains this kind of silver sheen that just appears to shine and be a lot more ethereal than how they appear in the daytime. So I love going down there when everyone's already gone home or going to bed Onda hanging around in the middle of the night when the full moon is there, you can really see so much detail, and it just gives it a lot extra. So we're thinking about if, let's say you've got some travel plan and the moon is just gonna get in the way of your star photography because it will blow everything out in terms of Milky Way and star trails . Then you can still get some great shots by going out there. And we had to create something like this. So we just go through a couple options you can see so that in the sky is the full moon. It's incredibly bright. The settings are gonna be different to what you might use to take a photograph of the Milky Way, so we're gonna cover that in a lot more detail. But let's say, for example, to get the Milky Way you've set your isil to 3200 your shutter speed to 30 seconds. Um, for a shot like this in the full moon, you actually very likely going to need to set your ice so a lot lower, so the sensitivity is much lower. So I think this one was probably I so 500 on the shutter speed with something like 10 seconds or maybe 20 seconds at the most, because there is just so much light available coming in. So in that respect, you're getting in a image that looks like it could have been taken in the middle of the day , But you can still get things like the rushing water for the headlights as they drive by, becoming a trail because of that as well. So this could still be of great effect when you figure out that this guy's maybe not gonna be Doc enough to take star trails or Milky Way on. This one in particular is is very cool. So Yosemite The Falls are one of a handful of waterfalls in the world that face the right direction towards the full moon, so that whenever there is a full moon on the waterfalls at its highest strength, you can actually see this moon both. There's a rainbow, but it's actually the light of the moon that is causing that across the mist as the water thunders to the rocks of the bottom. So with the naked eye, it looks kind of like a white strip. But if you go down there at the right time of year, which is gonna be sort of fairly spraying Teoh early summer when the water falls where they're strongest whenever there is a full moon, then you might just be a cat. Catch that it's relatively straightforward to find. Just follow all the other photographers that are going there to visit. I'll skip through a couple of this year's so you just get the idea. So again, former and especially in a place like this, where these big granite walls in the daytime it's kind of boring gray at the night time. They get this really lovely sheen on them, and especially if there's some snow as well. It's going to make everything really, really bright, so just keep that in mind when you get out there for some experimentation. I really encourage you to check out the full moon and go and have some fun.
6. The Big 3 - Aperture, Shutter Speed, ISO: All right. So let's talk about what I call in the big three. That is aperture, shutter speed and ice. So So, if you guys already familiar with these things, then feel free to skip the video into the next section. Um, if not, then let's take a look in to the So these are the things, the main things, that kind of starting points in terms of getting ready to take your picture. Um, and we're gonna discuss, um, a little bit in the context of the night sky photography as well. So I started for the aperture. So what is it? It is the opening in the lens that lets light through. So basically, each lens has the mechanism that is effectively a whole that could be resized from very small to very big letting in the respective amount of light, so is measured in F stops. Andi, each f stop is the number as it goes up or down in doubles or Hafs the size of that whole, so you can plan and prepare for the type of shoot type of shot that you need to do. Uh, slightly confusing thing is that the smaller the number the bigger the whole on the bigger the number, the smaller the whole. So it takes a little while to get your head around. But don't worry about it too much. I tend to think of it. Is Thebe bigger than number? Patiently means a lot more light is going to be shining on the camera. Therefore, you need a small hole. Two is kind of like squinting to not let quite as much light onto the sensor. So let's take a look. A couple examples of that. So on the left side here, just taking a couple of pictures off the lens on my camera at F 2.8 and F 16. So if you look at the top on the F 2.8, you can see that the mechanism has made quite a large hole. That means it's gonna let a lot of lighten and the picture there on the right side of his stars. Okay, so they're very faint. If you look over the night sky, they're not gonna be causing any shadows on the ground like the sun or the moon does. So we need to open up that whole toe, let as much light as possible in to the sensor to be out of actually get that photograph. If we look at the bottom net F 16 you can see the mechanism is closed a lot so that the whole is more like a pinhole. Andi. That means Converse. Leave that. Oh, it could be very bright outside, like in a full, sunny day. And that means less light is gonna hit the center because the hole is very small. But it means that it doesn't overblow the sensor and end up with a with a big white image with no color in it. So on the picture on the bottom, right there of the huts outside at the campground that will be going to actually is an example. Off picture taken, it's something like F 16. It might not be next F 16. It could have enough 11 or F eight. But a point is, it was clearly a very bright day. Lots of sunshine, so you have a higher F stop to account for that. So here's just a couple of examples off the difference. F stops as they go through the rain, so this lens, actually in particular is the cannon. 50 millimeter, um, F 1.4. That means they have 1.4 is the widest it can go, so you can see there at the top left that you can't really see the mechanism that opens and closes that hole. But if we go rights across the tops that have 2.8 at 4.5 and then at the bottom F 5.6 and F eight, Um, and 5.6 and eight a very common in portrait photography, which Sandy does a lot of in their studio on F 16 been pretty small, and I think most lenses will go all the way up to F 22 of F 16 is very common for a very sunny day. 2.8 is typically my go to for night sky photography and F 1.4, also used for night sky photography. O. R. Anything that needs a really shallow depth of field, so it's not right depth of field next, So the temperature that is the size of the hole does have an effect on what's called the depth of field. So that's basically the amount of the image that is in focus when you take it, so the bigger the whole certainly F one word for F 2.8. That means that there is a really shallow depth of field, which means there is a small portion of the image that will be in focus. So if you look at the hummingbirds there, the hummingbird drone focus. Some of the leaves to the right of the humming raises we look at them are also in focus. But just in front of them there's a twig, and just behind them there's more leaves and other branches that is completely out of focus , so they're very or blood, but that actually gives very nice effect. Actually, that is very desirable for this type of photograph. Now, conversely, F 16 or the smaller the hole that we get, the larger the depth of field. So that means between your subjects on all the way at the background, everything will be in focus on. That's what we call a large depth of field. So that's better for things like perhaps the landscape photography, where you've got a big scene and you want everything as far as possible to be in focus, and you don't want anything to be blood or out of focus. The depth of field closely related to aperture will be looking at for the rest of this course. Mostly F 2.8 toe let in as much light as possible from the stars. So just keep that in mind. That's going to the shutter speed now to give some context. This is the camera here with the lens taken off, which I don't recommend you do when the camera is turned on, and certainly not for a longer period of time, because just can get onto the sense and get into the mirror, and you really don't want that. So I did this just for the sake of demonstration. When the when you want to take a picture, there is a sense in the sense of that is on the camera that lets in the light and records it. Teoh actually create the image that is covered with a curtain. It's, ah, mechanism that comes up and down in front to let light onto the sensor. And in front of all that is the mirror in the DSLR, at least a mirror which, as the light goes through the lens hits, American goes up into the viewfinder so you can see in the middle there when my mouse is This is this is the mirror on one of religious show. Here is a little video taken with the iPhone Slow motion, 240 frames per second option. And that is just going to show us how the mirror jumps up. When you fresh press the shutter button, you will see the curtain exposed the sensor for the period of time at which you've set the shutter speed to close again, and then the mirror is going to come down. So let's just take a quick look at that and then talk about it a bit more. So I'm gonna skip forward to about 10 seconds in. Let's take a look. Okay, so that was the shot speed. So let's just go back again. Take a look at that in a bit more detail, hunker that even slow us so we can see press the shop on the mirror goes up, and then you can see that these are the gray curtain that's covering the sensor. So when we should, this set the shutter speed to a fraction of a second or many seconds, then that curtain is gonna expose the sense of for that period of time. So during the day, you might set it to 125th of a second or 1 2/100 of a second night. We might be saying it to 30 seconds or 10 or 20 seconds. So when the shutter, But in his press, then we can see that that curtain flips up. Okay, now we can see the sensor. So the center is now exposed is letting in light. Okay, continuing to let in light for the amount of time that we've set for the shutter speed. Let's just scroll forward a bit more on. Then we should see the kit and come back down again. There we go. We can see the mechanism, their little latches all right. As soon as that happens, then the Americans down again as well. And then it's done, and then your pictures taken. So that's really the mechanism of what's happening behind the scenes when you actually take the image. Andi again, along with the aperture shutter speed, plays a role in terms of how much light gets let in. So if We've got a really wide open Apertura 2.8, and we're saying I shot the speed to 30 seconds in the middle of the night, then that stars very faint, but it's going to really let in is just a ton of light to be out of enable us to create that image. It's not the kind of thing you want to do in the middle of a bright, sunny day, because it will just blow everything out and your image will just be white. Andi on there be nothing there. It's on a bright, sunny day when your comment combining these two you would start with something like in F 16 and maybe a shutter speed of 1 2/100 of a second. So a very small hole to let the light in on a very fash at the speed. So the sense it doesn't get exposed for quite as long, and that will give you then the desired results of the image. And in a place like a studio, when you're using flash and strobes, you can use a tool called a light meter that will actually help you clarify exactly what shutter speed you need and what aperture You need two together, right to get the right exposure for your image in night sky photography. Some of it depends on just the experimentation on what works with your camera, because some cameras work better with noise or low noise based on the sensitivity. So that's the third thing off the Big Three on. That's what I'm going to talk about next. So we got aperture covered when we got shelter speed covered. The third thing is, is the icer so the ice? Or is the sensitivity of the sensor? In the olden days, the sensitivity of the film and it's also measured in numbers from was lowers 50 or 100 depending on the camera away, up to thousands and tens of thousands, even hundreds of thousands. The lower the number, the lower the center city of tea, looking at the picture on the bottom left there, that's again. Bright, sunny day would have used a nicer of 100 or maybe 200 combined with an aperture off something like F 16 and a shutter speed of 1 2/100 of a second, which would have given us that kind of nice, clear image of the bench there, on the hills, in the background, everything is in focus because we've got a large depth of field. Everything is sharp. So we got a nice slow shut. This nice, fast shutter speed on the sensitivity doesn't need to be very high because it's already a lot of light anyway from the sun. Now, if we compare that to the image on the right hand side, which is is one of the images we took at the night time for the shoot. It shows a lot more digital noise on the photograph. So what that basically means is if you're taking a nicer of 6400 or feet 3200 depending on how your camera and I so sensitivity quality is, you may take a picture in the middle of the night and it will be really grainy with lots of red orange dots, which might not be apparent when you're looking at the picture from a distance. But when you really zoom in, it might not look very pleasing. And on DATs, all the digital noise that's being introduced with with a really high icer, high sensitivity. So there's just the third thing really that has to be taken into account along with the aperture on the shutter speed. When planning a photograph, you basically want the shop is possible image. You want everything you need in focus, and you definitely don't want to be generating a lot of digital noise. So some of this will be experimentation when you're actually out there taking taking the pictures. So it was a bit of a summary in the context of Night Sky photography in the Milky Way, which is what we'll be doing in this course my sort of go to settings with the equipment that I have, um, again, this will vary depending on your camera, depending on your lens, but I'll shoot for a 32nd exposure with a nicer of 3200 and aperture of F 2.8 on my 14 millimeter lens. Now that exposure time on, we'll talk about this a little bit later on that you may need to change that, depending on whether you go 14 millimeter lands or 21 millimeter lens. How much you're zoomed in if you want to keep your stars pin sharp and not have them blood with the rotation of the Earth, which happens overnight, so but we'll talk about that later. But the main point here is also to experiment. So when you get out there taking our images, try different combinations of thesis things to see what creates the best. Most clear with the least amount of noise image for your camera and for your lens, and also for your own personal preference. So some people like a really blown out Milky Way, for example, that they can take a picture of another. People like it a little bit more subtle that they can edit a little bit more afterwards in photo shop for adobe camera raw. So with that in mind, that's just really brief overview of the Big Three. This slide will be available to you is, of course, material afterwards. Andi, let's head on to the next video
7. How To Plan a Timelapse Movie: Okay, let's talk about time lapse and how to prepare for one. So, first of all, what is a time lapse movie? Let me play one for you and will continue talking afterwards. Okay, that was pretty cool, right? So basically, it's a ton of images taken one after the other to create that kind of movie effect based off things that are moving very slowly over time, like the stars or the clouds. When it comes to the planning, it's all about how maney images you're gonna take. Two. Be able to create a smooth kind of video like playback for a certain amount of seconds. So we're looking at bridge here, and these were all the images that we will be taking for this course and just to kind of show you what it will turn out like So here's one. Okay, it's we're facing North North star. Over there in the middle is the Big Dipper. We got a Rashed Airstream in the foreground. So as we've been taken 32nd exposures, one after the other. What happens when we go from one image to the next image? We can see that it moves a little bit a little bit more on a little bit more. So when we scroll through them at speed, then you can see that we create that kind of time lapse effect. But of course I'm just scrolling through the images here in bridge. But what will be doing is creating an actual movie and before file from that, that will be an actual video. So first of all, how Maney images are like, um, I gonna take now a lot of cameras today, I've actually got this function built in so well, you really need to do is say, I want to create a five or a 12th video. Maybe the interval between the pictures and it will do all the things for you, and you can just set it up on debt. It go. So that's perfect. But if you don't or you just want to know about the theory behind it, then let's talk about that now. So basically, if you think of video a za playback mechanism, all it really is is Lawson still images playing back one after the other. Most cinema movies have shot at 24 of these pictures per second, or frames per second been like that for decades. TV is shot anywhere from 25 frames per second. If you're ever in Europe, 30 frames per second in the U. S. 60 frames per second, 240 frames per second. High speed video lots of sports is shot at very high friends per second. Something slow it down to get slow motion playback, also looking very smooth and very detailed. And even some movies like I think, The Hobbit, which shot was shot at 48 frames per second. And there's a lot of discussion about whether that's a good thing on us. But in the case of just to get yourself a smooth playback with a bunch of images, you're looking at least 24 frames per second. You can go a little bit less. 24 is a good start now. That means, of course, 24 images to just get one second video. So if you multiply that up, you can tell how many seconds of video you're going to get by multiplying 24 by the number of images. So what I like to do is aim for about 5 to 10 seconds off video per kind of setting or direction that so that's clearly quite a lot of images. But 5 to 10 seconds is a good amount of time because to create a full time lapse movie, what you do is do a lot of these different settings, directions, maybe even locations. Some of the Milky Way, some of star trails, some with different four grounds. And then you can cut them all together later in a video instinct program so you can create overall video that might be a couple minutes long or even longer, like I did for the one that I just showed you earlier on. Okay, so that obviously requires a bit of attention and staying up all night. You won't be getting any rest. That's a guarantee. But that's OK, because that's what makes it a lot of fun. Um, but just as a ballpark figure, going for sort of 100 to 200 or 300 images at a time is a good starting point for, at least for a nice guy, Ah, photography. When you can just leave it going now, few other considerations interval omitted services, high speed, continuous setting. So this is really spending Maybe on kind of how cheap you are, how much you want to get into time lapse as a hobby. So what I do for the for the night sky shots is used the high speed, continuous setting with one of the cheap, remote released triggers and just leave it open. So that means it will take 1 32nd exposures after the other, and it will just keep going. I don't need to touch it on them. When I've left it going for an hour or so, then I'll stop it myself. So because that's another thing to keep in mind is, let's say you're planning on doing 240 images to get yourself a nice 12th video. How long you gonna let the camera out there to take those images is going to be 240 images times about 30 seconds. So that is what 240 divided by two, which is 100 and 20 minutes, and that's a couple hours off constant photography. Now you just gotta check, and it's a bit of trial and error, really, of how long your battery will last. I find that with my camera, I can get sort of 1 to 2 hours of battery life just by by doing that. So that's typically just my max. And then I go in, replace the battery eso. That's one thing to keep in mind. That's have you doing the longer exposures, which is the most battery sucking out of all of them. If you do daytime time lapse, then you're not doing long exposure. You're just doing a regular shot. And, um, you might be doing, you know, one shot every 10 seconds or one shot every 10 20 seconds rather than immediately one after the other to get the movement of clouds or far gore traffic stuff like that. Now for this, you really do need the interval ometer because you can't just let it open and just do you know one shot after the other 1 200 of a second cause you'll you'll end up with millions of images, which is not very useful to create a movie from, So what you need in that case is a mechanism to be annotate the image, wait for 10 seconds or 20 seconds or even longer, take the next image and then so on and so on. And that's what I'm into a limited will do for you so you can buy them on Amazon or in a camera shop. Gonna be a little bit more expensive, but there you consent it all of the different options in terms of how long you want to wait between images and how many images you want. Take interval as well. So that's it's really helpful for find more fear for daytime photography for daytime time lapse for the night sky. It is relatively straightforward. Just use the high speed continuous mode, especially if you're just getting started. You can always go deeper and experiment with different exposure times and different intervals as you get more practiced on more advanced. So another thing to keep your mind image resolution versus video resolution. So video HD is only 1920 pixels wide and 1080 pixels tall. So in image terms, that's really, really small. But as HD video for you on four K is compared to the difficult images that you'll take with your DSLR that might be 10 2050 megapixels. In comparison, the video resolution is really, really small, so you'll always end up reducing the size of the images that you've taken to a video resolution in the first place. So what you can do is, of course, shoot all those images is raw. If your flash card is fast enough to be at a right with those huge files to disk one after the other really, really quickly. In my experience, I've run into issues with that. So there's no harm in just setting the camera to J. Peg and saying the size of the J Pixar Many cameras. You can set large, medium, small and different resolutions. Just set it to something that's close to fall K or, if you want to be really future proof 8k resolution, and that will. Still, it'll give you an image size that's still really big, and you won't have to compress it too much to get it to the actual final video resolution of HD or four K. Teoh. Turn it into the movie itself. So that's just a bit of optimization on on your image settings. And I think one of the final things is the camera setting of manual. Just so you know that you've always got full control over the shutter speed on the ice. Oh, on, of course, the aperture as well. If you're using any of the different modes where you let the camera automatically decide which aperture to use or which I so to use or which shut the speed to use, you may end up with this kind of flickering effects, which is not that desirable when, as the overall ambient light changes, the camera might decide to do a longer exposure of short or expose or change some other settings. And it doesn't result in a uniform style of image for the playback. So that's kind of what you want to avoid. So always use manual mode, if possible. And after that, it's really just a case of getting out there, setting the camera up, pointing it in the in the right direction, getting your framing right. Any composition, right? Andi setting off to go and then you'll end up like we did with 100 or 200 images that you can then combine into either a Star Trail image or into a time lapse movie itself, using the right software
8. Equipment - Your Camera, Lens, Tripod and Accessories: All right, So let's talk about the equipment that we're going to use to get these shots. I'm just gonna go through the things that I got laid out on the table here. So first and foremost, clearly camera I'm using a DSLR principle should still apply to mirror lists as well, although not used one for this. Now, the main thing here is that it's got manual operation because we need to set the shutter speed the I so in the Apertura, all individually. So as long as you got manual mode on the camera, you should be good to go. I'm using a Canon five DS ours full frame, which gives me a really wide field of view, actually on dumb. That actually brings us on, then to the lens itself. So the white of the lens, the better for full field of view, full sky as much as possible. You get fisheye lenses that cover literally everything in 100 and 80 degree view, but it's a real specific type of look. This one that is my favorite lines is rocking on 14 millimeters. It's kind of a budget lens, but it is really sturdy really well built on and just works really, really good for for night sky photography. So the main thing here is it is completely manual. So that means you can adjust the aperture manually and even just the focus manually. Um, the important thing about this is because it's very difficult to for a lens to automatically focus on something as faint as a star weaken set this to infinity, and then we'll know the all the stars in this guy gonna be pin shop for our photographs. Now, if you do have a zoom lens or, ah, more advanced lens with a stabilizer on, it is really important to turn that stabilizer off because what will happen over a long exposure is the stabilizer will try to stabilize the image effectively whilst the exposure is going on on that, I'll actually result in a bit of movement and a bit of blurred image. So you don't want that, um, to actually take the pictures will be using a remote release. I got a couple options here. His pocket was it. So you might have seen these in studio photography, where you got one trigger in a flash. But what we can also use with the right cable is just plucked out in to the remote, really suck it on the camera and just hit the button to trigger the shutter. And taking a picture like that if you want to go really cheap, misses a model by handle, which is nothing more than just a little switch that goes up like that again, plugs into the camera and you can trigger it just like so Now if I've been doing things like time lapse photography, then the handle is really good, because I can just leave it open all the time. And it will just continuously take long exposures for Well, for as long as you let it. Which brings me to the next point spare batteries. So if you're doing long exposures constantly without any break in the middle, then you're gonna get about an hour and 1/2 battery life out of the factory that comes with the camera here. So always take a whole bunch of spares review with charges. If you're not in an extreme like where we got electricity, you can get adapters for these types of charges that will plug into the castle when you're driving around getting to location. You can charge your batteries there as well in terms of some of the accessories. If you're old school like me, you can use a compass. Figure out when north and South east to see where you want to shoot for. You can use the iPhone app. Photo pills. It's about $10 but it's really good helps you planning figuring out where the different constellations are in the sky. Um on. And that will make your life pretty easy when you're in the middle of nowhere and you just want a real quick reference of where to shoot moving around the table here. Tripod. So probably the next most important thing, or, if not the most important thing, sturdy Tripod is really important. Carbon fiber is the best lightest but also most expensive option for tripods. But you still want something study, so if you can't afford that, we don't want to afford that. Go for an aluminium or aluminum tripod that will do the job just as well. Just be a little bit heavier now for actually mounted the camera. It's worth spending the money on something like this. It's a ball head with, like, a little joystick attached to it. So you can actually move the camera around really, really easily on that ball head, which just is gonna make things quick in terms of spinning the camera around for portrait mode for landscape mode, putting it north, south, east, west wherever you want to give. So I can really recommend this. This is from man Fratto eso. You'll find them. I think they're about $100.150 dollars maybe, but it Zraly with money. Other accessories that are super important watch not only to find your way around in the middle of the night in the middle of nowhere, but also you can get filters for these. Or the torture might just come with an in built filter with red light, because if you're using a white light in the middle of the darkness, it's going to really screw up your night vision. It takes quite a while for that to recover. If the light is red, then your eye is not going to be impacted as much so you can switch between, you know, looking at the camera, looking at the maybe some notes or something that you have with you. And of course, your surroundings without your your night vision getting screwed up too much in terms of such filters. Actually, one thing I really like to do we'll do this a little bit more as well. Later stuff are four grounds. So if you're in a place where your foreground in something like a rock formation or a natural thing that doesn't have any kind of artificial light pointing to it because it's gonna be very dark anyway, then you're gonna want to light it with a torch or maybe with your iPhone light. But a white light isn't very nice. In my opinion, I like different kind of shades, so it's worth looking at things like some of these filters here from Roscoe we actually use is in the studio to put across the main studio strobes. But there's different colors in here, so you can actually put these. You can see the colors there. Put these in front of your torch on when you shine the torch over your foreground object. Then it's gonna take on that Hugh on make for a really interesting foreground for the footie image. Let me see a couple things so duct tape. Duct tape is always important. I wouldn't survive without the tape. Depends, you know, whatever I'm doing in my life. Andi finally, books free. So even in a place like California where we are, there's not too many bugs. If you're around in more humid areas, then they're going to be jumping on you all night long. Andi, I attract bugs like nobody's business, so make sure you take bug spray as well. Um, when we see, I think that's about it. If I think of anything more, I'll tell you in the next videos.
9. Camera Settings 1: All right, so let's talk about the settings that we're going to use now. There's a lot of variables here. I'm gonna give you some quick start pointers so you can get going pretty quickly. But the key is here to do a lot of experimentation so you can get great results for your particular equipment. So first thing, I so so the sensitivity now, in this case, Canon five DS are not particularly well known for its great low light handling. So it's used mostly in the studio. Um, that means I gotta push the ice so pretty high to get a decent results. So I usually go with about 3200 you might find, depending on your camera model, that you can go a lot lower and still get a lot of light in and enough to actually work with the image. But 3200 is a good starting point. Some people use 6400. I find that that tends to wash out the image quite a lot. So, um, the Milky Way, for example, has got this kind of the bright core in the middle. You want to keep the definition in there so you can bring it out in photo shop later on. If you wash it out too much, then it might get a little bit difficult for anything purposes, Uh, the aperture. So of course it's gonna be really dark outside. Starlight is very faint, so you want to get the Apertura as wide open as you possibly can. So with rocket on lens, I can go to 2.8. What's really well, evening at one point for even better, any less or any smaller aperture than that, then you'll probably find that you don't get enough light to make a decent image. So I've tried with the 24 to 1 of five from Canon at a picture of four or 4.5, Um, and it's really just doesn't let in enough light to make a really great image. So if you do have ah, lens that's around the 2124 millimeter range, then, um, make sure that it could go down to 2.8 is gonna be an expensive one, but you'll get the best results guaranteed there. So after the I, so in a picture, the third thing is the shutter speed. So again, a lot of variables here. There's something called the 500 rule, which is a way to work out the optimum shutter speed for your lens. Without that, stars begin to trail. So you're gonna be standing and the is moving right. So the stars overnight, they're gonna be revolving around you. And if you let your shutter open for too long, then they're going to result in trails, which may be in effect you want. But if we're going to do something like the Milky Way or you want your stars pin shop, then you need to know what's the maximum shutter speed you can get before they start the trail. So the 500 role is basically divide 500 by the focal length of your lens again by the crop factor. Serve you using a full frame. I don't need to do anything more. So 500 divided by 14 gives me a maximum of a 36 2nd exposure that I could do with this lands on this camera before stars begin to blue or trail the maximum before going to the bold Blowed on this camera is 30 seconds anyway, so I just usually said it to 30 seconds, and you're good to go on. And of course, you can experiment with 2015. Depends on your ice. 00 and the noise that that might be affected by that. So just remember that calculation depending on the lens you have, Andi, if you've got a crop sensor or a full frame Onda with that, you should be pretty much good to go. So if we think about some of the other things that it gonna be involved here. So alongside the shutter, speed the Apertura in the eye. So things like the focus. So this rockin on is a manual focus, which is great. I can set it to infinity. And infinity is basically the little loop the little Mobius strip at the end of the focus ring here. So I tend to put it right to the back and then sort of turn it back about of an eighth of an inch on dat gives me with this land's pin sharp stars. If you've got a automatic focus lens, then obviously tenet to manual or focus on something bright in the distance. Maybe a really bright star that you can focus on first and then turn it to manual on. Definitely turn off the image stabilizer so you don't get any artifacts with the stabilisation mechanism trying. Teoh do anything during your exposure? Um, on did that. You should be pretty much good to G O. The only other thing I would say is, if you have a bulb function on the camera, the bulb just basically means either using a remote release. You can open the shutter on, leave it open as long as you want. Um, now, if you want the star Trail movement on a single exposure, then that's what you want to use that for. For the star trails that I'll be doing later on tonight, I'm going to just be doing lots and lots of 32nd exposures for an hour, hour and 1/2 and then we staffing together later, using software, let me see another saying that you could do on the on some cameras. On most cameras these days is noise reduction. The problem with noise reduction is it takes another image with exactly the same shutter speed right after you've taken your main image of basically pure black on it makes a comparison to remove the noise in camera from the previous image, which is fine, but they cost the issue with that is, if you doing lots of 32nd exposures, is it going to be spending a lot of time waiting for that noise reduction mechanism to actually complete? So I tend to leave that until afterwards, you'll be shooting everything in raw, which means you've got all the options available to you to adjust the white violence to do the noise reduction to duel the rest of the imaging image post processing once you get it back home on on the computer.
10. Camera Settings 2: okay, there's a couple of extra camera settings, and I want to cover just to clarify a few extra things that we're gonna set during these shoots. So that is the white balance and the mode of shooting, single shooting or high speed continuous. So let's talk a little bit about white bonds first. So why Balance is really just about setting the color temperature of the image as it's taken? The camera will reference the color of the image based on what the truest white would be under daylight conditions when an image is shot in artificial light conditions than that white reference ca NBI a little bit off. So in the camera we can actually change the color temperature off the imaged how we want it to be. So, for most of the time, you might choose automatic or, if you're shooting in daytime Jews, daylight. If you're shooting and cloudy conditions, choose the cloudy setting. When we're shooting the stars. It's kind of a matter of preference, but I like to choose tungsten because it see what about a temperature of 2800 to 3200 kelvin that's measured in the Kelvin Range? Andi, It will make the image appear a little bluer, a little colder. And for me, that's kind of what I like about a star image in this type of tone. So this image is set tungsten. Now, if you wanted a warm and image, you might set it. Teoh Daylight. It's really just a case of doing some experimentation with your camera, looking at the pictures and see what what you like best. Now, White Balance is a pretty in depth subject not gonna cover it here, but you can certainly check out Wikipedia. Check out a few photography websites and they'll explain white balance in a lot of detail for this type of image that we're shooting in this course, I'll be setting the white balance to tungsten to give us this kind of cold blue light. Now another type of saying in reference to the remote trigger release. So remember, we don't want to shake the camera by pressing the shutter button manually with a finger to take the image. What we can uses a remote release like I showed in the previous video, so that plugs into and this is the cannon, so the Nikon suck it. It looks a little bit different, but we got this little three pin connected here on the cannon where the remote trigger plugs into and when you have this simplest of triggers or not, Intervale Ometer, where you can actually set the time and everything just a real simple trigger like I'm using here. Then you manually flipped the switch and flip it back off again to take the image. So, in the case, off a single Milky Way image or a single field of stars image than that's perfectly fine. And there's a setting on the back of the camera for the type of shootings of single shooting basically means that whenever you release the trigger, it will take a single shot when we want to do a time lapse or star trail. Then, in the case where I'm taking multiple 32nd exposures, one after the other for an hour or for two hours, then what I find easier than setting in development is just to set the camera to your high speed continues on and leave the remote trigger switch completely open all the time, so I can basically flip it over once at the very beginning, leave it like that on the camera is then gonna automatically just take one picture after the other without any break in between him. Okay? And then you just leave that open, let it take many pictures you want to take, um and then turn it off again when you're ready. And that's just a very quick and easy way of getting their start trail images using this setting, the other setting that I referred to earlier in terms of the white balance set over here. So that little kind of incandescent bulb is the symbol for tungsten. And that's the same we're gonna use for that for the time lapse again on this side of just set that did J. Peg medium the reason being that it makes it quicker to write to the flash card because it's a smaller image than a full on raw image. But also, eventually I'm gonna be converting this to a little movie and even a four K resolution. Most cameras thes days could do a lot more a depth and that so a medium to image on this cannon is still about five or 6000 pixels wide, so it's bigger than four K resolution video. Which means that's fine for me for taking this time. Not because I'm gonna compress it and make those images smaller. Anyway, if we just flick back to the single shooting using raw, mainly because Sandy is gonna be doing ah, bit more post production on those Milky Way shots. And the raw data basically gives her all of the options to be out of do all of the adjustments she needs to do without compressing it. T o j Pick first.
11. How to Change Settings on your DSLR (Based on Canon): All right. So let's just take a quick look at how to change some of the seconds on the camera with things that we've bean referring to in the last couple of video. So first of all, which state this and this is, of course, a cannon. So if you have a Nikon and it's going to slightly different, but the first thing that we're gonna be doing, of course saying it to manual mode so we can change all of the Apertura. The shutter speed on the ice, on everything individually. Now, when we come on the back here, we have a little. But over here, we compress to get our settings up. So we do that, then you can see here the shutter speed, the aperture, which is zero, except with the manual rockin on lens on there on the isil, which is set to 200 at the moment. Now, to set any of these, just spin the wheel. So, of course, if I'm going to send it to 3200 then I just throw it up like that. The shutter speed. You can put it away up to 15 2025 30 depending on what the longest measurement is for your particular lens. So I know that with my 14 millimeter rocking on, I can do a 32nd exposure without the stars begin to trail on their own. All right, so if we just go down, look a couple of the other settings here. That a particular to what we want to do. The white balance so you can flip through a bunch of settings here or just leave it on automatic. Now, what I like in star and Milky Way photography is the tungsten lights of That's a Kelvin temperature off around 3000 on that gives the whole image cannot cold blue look rather than an orange warm look that you might get if you said it to daylight. Um, so that's just something that you can play with If you're taking a raw image, you can always change it later on. Impose processing very, very easily. Um, speaking of which, the raw settings are over here so I can just leave it like that or I'm gonna do this Stock trail for a time lapse movie than when I typically do is just There's a scroll wheel on the top of the camera here, Um, where I can turn the raw off on them with bottom. Well, I can just change my J pick size setting. So if we're looking at the m two, which is just what I've used for the time lapse, then you can see already that it's it's almost 6000 pixels wide, which is still a lot wider than four K resolution on a movie. So I will just set it to that to keep it ready for that, because we'll make the image smaller anyway. But if you want to go back to your single shots for the Milky Way off the stars, then you can just turn it back to raw at the top and turn the Jay Peak setting off. And there you are again. And then the last setting, at least on the back here is the high speed, continuous, all single shooting serve. I'm gonna leave the remote trigger fully open. That'll take consecutive 32nd exposures for a couple hours without stopping. Then I want to sit on the high speed continuous because then I don't need to either. Set in interval limiter on. I don't need to worry about stopping and starting the taking images myself. I just leave the trigger fully open. Andi. It will take one image after the other without stopping for a long was I wanted to. If we just want to do single shooting for the for the Milky Way, then we can set it to that as well. Um, you got a couple other options? If you don't have a remote trigger, you could get away with doing the self timer with a two second in 10 seconds. But you still run the risk off when you hit the shutter button the front here that that you create a little bit of shaking the camera. And, of course you want to just avoid that as much as possible because you don't want an image that will get blurred. Now. The final thing if we just turned the camera over here at the top, is, of course, we've got a manual lens, which is the rocking on over here. So that's why we don't see the F number. The temperature number on the screen in the back is because it's not automatic, so basically we've got a spin wheel here. You can just see that, um, where we can change the aperture from 22 all the way down to 2.8 and 2.8 is what will be using for the for the star photography and this course. And, um, the cool thing about this is when you're actually looking for the viewfinder, which is more apparent during the daytime, where it's easy to see stuff, you can immediately see the results of changing the opportunities and when he said it 22 through the View finder, or everything will go a bit dim. And if he said it was 2.8, then everything will become a lot brighter. So this is very cool lens for learning as well, because you immediately see the effect of changing the setting here manually, rather than relying on the automatic sitting at the back. So the other thing that's manual on the lens. Here is the eyes, the focus circles away for very close up image. Andi, if you want to photograph the stars, then you're gonna wanna focus to infinity, which is Thekla Mobius ring of the but the fire end here. What I find with this lens is, if I just pull it back until those two lines meet up. That results in the sharpest, pinpoint images where the stars appear to be most in focus. So I said it to their onset, my aperture to 2.8. The other things we do on the back of the camera and then we should be good to go.
12. A Star Trail Primer: for the times of year, when the Milky Way is not visible, star trails are always your option as well. They could be shot in any direction, but for the classic secular effect, you just need to point your camera. There was the North Star Polaris because as the earth revolves, stars rotate around the North Star. So to find the North Star, you can cheat and use the night sky app where you can do it manually and draw an imaginary line from the cup of the Big Dipper upwards until the next bright star. It's a bit faint circum a bit hard to spot, but it gets easier with practice. To get the trail effect, you can either do one very long exposure or take many shorter exposures and stack them later. And software. I prefer this method because it gives you the chance to check and fix any issues rather than waiting for an hour long exposure to finish. So, incidentally, this technique can also be used to create a time locks movie by using a software program to join the images together. So we'll do that, too.
13. The Shoot Itself: Thanks. So this is the extreme, and that's gonna be a full ground. We're gonna turn around and check out the camera settings. So camera set up here with the 14 millimeter lens 2.8. So 3200 with a 32nd exposure. Andi here, the animal screeching in the background. It was got the remote shut the release. So for the star trail, whose were pointing north, I'm just gonna let this go from an hour. Should give us enough pictures for a nice trail as well as a bit of time lapse because we're gonna do a time. That's I'm just gonna shoot in J peg. When we turn it around to look south for the Milky Way, I'll shoot in raw So we get all the detail and image optimization are possibilities there as well. All right, here we go. - So we just don't need Star trail. Took about 110 images, 32nd next, 32nd each exposure. So stuck them together later. Um, now we've turned around facing southwest s so I can see the Milky Way behind the Airstream . Here it is about 11:30 p.m. It is August writing. So by this point, the Milky Way is pretty much vertical on. It's gonna look like it's coming out in the back of the extreme. Um, this one, we're gonna shoot in raw on after we've done this will go up to the Mexican looking, building the huts on up on top of the ill, take a few shots up there, and then we're gonna come back down here and do another time lapse of the Milky Way on and probably just leave those going until early morning. All right, Let's go. I didn't.
14. Intro To Using Adobe Bridge CC: hi, guys. And welcome to my tutorial on how you can process your night sky photography because you want to get a little bit more detail in your images and probably also want to reduce noise because it's just a little bit tricky with a lot off night photography because you have to raise your eyes or which will introduce a lot off noise and therefore we have to take care off so it's a little bit in either adobe camera or photo shop or, if you prefer, you can also work in light room. If you see I'm here actually in the Adobe Breach CC 2000 and 17 and a lot of photographers they don't know that Adobe Photo Shop issue subscribe it or if you're still using an old version where you actually bought it. That comes with its own catalogue and organized system and also with its own developing program. A lot of photographers things they need toe use light room. To get this first development started, however, you can use ease off them. So the workflow that we would do today it's fairly similar and balls and I will show you also in the in the little bit how you can use light room if you prefer to use that. However, if you're interested in how you can open up your adobe bridge, I just go under my applications. And if your PC users and the equivalent off that and if you downloaded Adobe Photo Shop like I've got here Toby Photo Shop CC 2017 then that also came to see Adobe Bridge Si Si 2017. And that's a program that I'm using to catalog and to store all my images. And from here, you can just drag this Adobe Bridge logo into your talk if you also working with the Mac because and from here it's really easy toe accesses every single time. Then you don't have to go into application. So that's kind of how I excess butcher. Just open up my dog and I click on it. And the next step is obviously how you get your images from your card or your card reader into the bridge program. And that's super easy as well. You have two options. He really You can set your bridge immediately by using the preferences. If you go under Adobe Bridge D c. 2017 and into preferences. And then this first item here, where it says General, you would see Otto's behaviors, and if you take this boxier, it will immediately open up your images because it says When the camera is connected, lounge adobe. Photo down Laura So that super easy is and you get those pictures automatically, or if you don't want that it opens up, then you can also do this manually. You just have to click onto this little camera logo, Byrd says. Get photos from camera and then you have this window open. And now obviously it didn't detect anything because I have. So it's images already, but it's really easy to set up, so it would detect now your cats or you could also, if you have more things available that it could connect to, then you just have to say to which one should connect. Oh, what should get its photos from, And from there you just have to give it a location. So I just clicked on to choose, which brought me then in this dialog window, and from here I can say no. Where do I want those images stored? So I have here my favorite folders, and I have a picture for that. So I just click onto that. Then I could create a new folder, for example, New Nights guy images or anything that makes sense to you. And then I just click on to create. And then I can open this Florida, and that would be now the defined location on to where I can store and organize my emergency and bridge, and you have more things that you could take here on. You could already converted to CNG, if that makes sense. But I don't really touch any off so things, but certainly play with them. If that makes sense to you to create maybe sub folder and so on, that's all. It's on Advanced Dialog window where you would now see all of those images. And as you can see, you could also check oil or uncheck oil. And that kind of depends if you want to download all off those images or, if you want to say to some, yeah, they were not that good. I don't have to down Botham, then you can also untech them, however, as I don't have any of those images right now, I just go on to cancer, and that's how I uploaded my images right here
15. Organizing Your Folders in Bridge: So the first thing that I do when I have no my folders, it's that I separate my images because I want to have a really easy overview in my workflow . And most likely you will have now to fold us, depending on how long you shoot at night. So you probably have 14 There was the date or the times them before 12 o'clock and then after midnight, you probably have a new folder with the kind of years next day, So I want to name those folders so that I don't really have to sing. Oh, what's this for a date? I want to actually know what's inside So folder. And that's really easy because I already Yeah, I kind off separated those images. Yes, I have one that is my stack for my Milky Way. So when I opens us, you will only see those images now that look now fairly similar because that's just moving Milky Way, kind of like a time lapse or if you wanted to have a stack. So that's my stack off Milky Way. That's no my start trailer that I could either do. I could also have a time lapse out officers. So I separated those already. And I also have one folder that's only for my white life. And then I also have sincere with the landscapes that we took during the daytime and also some NYTPhotos. And I want to use this for it an hour to show you how you can separate those images. So first off, I'll with the right mouse click by Click into the sphere, and I just say New Florida and I want to cause us now only landscape. So that's my landscape for their now and then. I go into my father right here and then I just say, OK, I have to look now at all those images that are obviously not nights guy related, so they're quite if you'll let me start. Your first was a camera raw images, and I just want to separate them, so I just collect them with command or control. Then I just collect the walls, and then I just pressed onto command or control, and you can copy them now across, or you can cut them out and then they're not in this for the anymore, but in your new Florida, and that's what I do here because I don't necessarily want to duplicate on my images because and I have so much storage where I have to put them into so I don't Yeah, I don't duplicate, but just kept them out from here. And then it's just less storage later. And then I go into my landscape Florida and was control or command and v I paste them now into this new Florida and then I go back and see Okay, what else is in here? So then I see your keys for my camera Raw images to have some more down here because obviously have worked on them already. So have camera raw images and J pic images. But he's our nights related now and then I just go into my J picks in Sochi. I can also copy across ALS that I worked worked on already. So it was command or control. I collect those as well. So is this one this one and this one and once more was commend or control and x I just cut them out and I go back into my landscape for there was a double click and then I paste them in here commend or control and V Okay, so now I have all my landscape images in my four, the landscape. And that's pretty organized now because now I don't have to guess what inside of souls forward us. And if I go back, I can also now renames this for the right here, but says landscape and night if I just click onto the name and now I can delete the landscape what it says here, and I can just cause us maybe night images. So I think that's pretty easy. And bridge. You can organize your folders in a couple of seconds, and that's the first step off this workflow.
16. Rating and Labeling in Bridge: so if you only took images off the Milky Ways and obviously you don't have to separate your images with what I have, you know was white life off the stack. Milky Way also start trail forever. If you do have a similar process that you go out at night and you should several different things like If you also want to shoot a star trail or if you want to have a time lapse off the Milky Way and maybe a singular make you a image, then I think it's a really good idea to organize those for it us because later we will do a batch process, and it's just easier if you have already is the same images and 14 order, because from there on your babies and not very confused was like images in between. So therefore, I really recommend that you sort your images first, and once you're happy and kind of organized results, forward us, then you can go into your images where you want to edit singler images, so I will go now into my night images with the public liquor. Just go onto the Florida and from here I go now into camera raw because obviously, I just want to show you all those Ross that we took and from here, it depends now on you, so you can go on to your image. And if you just press the space bar Enbridge, then you will see the whole image. And from here you can raid this. Now, if that's an image where you would like to work on, then you can either press like if you press for examples real, you will see now that the US three stars or you can also press forth and they're forced us off five stars and that indicates if you think this is a good enough image to work on. So for me personally, a normally goes through images a few times because, yeah, when you come back, you're normally so excited that you want to go on all the images that you took forever, as you can imagine, that can be very time consuming and normally only want to back on the best images. So normally I go in and say, Okay, I go through them all the images that are like that we get a three star or images where I'm like, Oh, this is actually not quite sharp or maybe a little bit underdeveloped. Then you can also label your images, So if you press on to six, then you will see the estan red labour, and that would indicate for me personally, I use red for images that I don't like and that I want to just yeah, put into the trash later. So that's kind off the indication for that all you can also press on to seven. Then you will see a yellow labor. Or for me, if I really likes and an image, you can also press aides, and then you have a green labor. So if you open the image with space bar, you can press on 212345 and that will indicate the stars. Or if you press on 678 then you will have red, yellow and green, and that's all you can raise your images. You can either do it with the space bar, or if you think now that's maybe not the best way how I want to review my images. You could also press on to command or control, and a so that all images are selected, and then you can go over your review moat, and you can do this on two different ways. You can easily just go into our menu bar, appear with view and into review, or you can also press, command or control and be, and then you also in the review mode.
17. Rating and Labeling in View Mode: so in your review mode, you can do the similar sing. You can also read your images year, and some people just find this easier toe kind off to compare images because you can see already a little bit the next one up here and the next one on the other side, right and left, and then you kind off kind of like a carousel. You can just flip through those images with your error button, so if you press onto your right arrow button or you can also use those arrows down here, then you just flip onto the right side. Or, if you want to go to the end off your images with the left Aero, you can also just excess all those images that you took at the end. So that kind of depends a little bit, what workflow you prefer. And in the review review mode, it's just the same procedure like before. If you oppress onto 1234 or five, then you just raid your images, ones more, just with stars. And if you press on to six or seven or eight, then you get the labor system and personally, like I said, I just go through them to get an overview first and my rates number three. And that's kind of how I proceed through years. So here I have two images that as the same. So here we're just president onto six and say, I don't really needs to placate and I would just trash those later. Yeah, I think Ochiai that video good in Metro's and you foreground, I would present six. It's probably not that good. Here's the same. I would go into six and just what? Yeah, just throw this away and then any images that I like. You, for example, a press. Three year again. I have my torch. How I walked through the image. It's probably not the best shot, so press on to six and then that has this red label, so I can throw it away later once more. Yet also, this is torture. Walk through the image, so that's not that good. This image, for example, I think although it looks a little bit attack, I think we could work out this foreground a bit in adobe camera raw. Also, I give it a three year. It's obviously even better because we already used to torch to light up our foreground. So once my gifts is of three Yes, we Ah, yes, three. I think this is also good. It depends. Obviously, if you want to keep too many duplicates or if you want to be a bit more rigorous right from the start, that's obviously up to you. And normally I always tell my students to not keep too many images because sometimes, yeah, you have to be a little bit strict and say some probably won't work on them, so you can already just ditch them. But again, that kind off depends. Sometimes I also just flips ruin. Don't give them any rating because they might be my backup plan. So they're not bad enough to throw them away and also not good enough to labour them. But I just keep them just in case for later. And that's how I would make my way through all off those images. And once you're finished, if I just close this down for now, then I go in once more and say, Okey, I have no Elmasry star rating CIA, And if I click on them, that's no my filter. I see no everything with three stars and all of my camera raw images. And then I would go into the review mode once more. If you want to go over your menu about or command or control and Beaver opens the review review mode, why is it so difficult review mode? And then I could say, How about this one? I really likes an hour gives us a four, and that's how I kind of go through and filters. I'm even first once more. It's up to you if you are already like, yeah, I want to work on this one. You can obviously do this, but definitely just sought out all the images that you don't like, or that maybe not 100% shop so that you don't have to waste any storage space, But yeah, that's just what I would do. So I give souls that I really, really like no forced us, and then this indicates me. Okay, I want to bug on those images
18. Edit Your Milky Way Images with ACR - White Balance, Clipping & Contrast: So now that I found my best off images, I'm act them now with my final star rating off five styles, and that indicates me now that I want to work on to those images. However, if I am thinking I want to work on even more, I also have no my four star rating must restyle rating and the no rating as a backup plan just in case. And I see here my five images that have since read Labour that every put into the trash cans or let me just do this first. So for that, ever just click onto one image and then I go on to command or control and a and I never just drags them into mandated trash bin. And now they're gone and I don't have to worry about started to space for images that I don't really need. So let me go back to my five image rating, and from here I want to work no on this first image to show you how you can enhance your making ways. And if you shoot and raw, then the only thing you have to do toe Xs now adobe camera raw is that you double click onto the image. If that doesn't work or if you have a J pic, don't panic. You can still access. It will become a rod Super easy. You just have to go onto this weird and then it also says open and camera wrong. So that's no problem. If you have a J peg or a raw, that doesn't matter. Just go onto this wheel and it will open your image. Or, in my case, I just Abit click onto the image. So now that I'm here in adobe camera raw, I want toe. Yeah, change a few things about this much. I think the Milky Way is already pretty nice and you can see it. It's good visibility in this guy. However, I think it could be a little bit more dramatic because I really want to work out those details and that works Super super good and adobe camera. I promise. It's really easy and I also want to have a little bit more light on this Airstreams because I think also that is already is a watch a little bit on it, and we also have, obviously, is a light from the inside to illuminate the whole ass stream. I think it could be a little bit more extreme. So first off, all I'm here In my basic development, Mort and I also think it probably could be a little bit cooler so that we get more blue in the sky. So what obviously helps if you have already is a right white balance when you shoot so much . And I think we shot this in tanks. However, it doesn't show up here, So I think that cannon white balance and the adobe camera white balance that working a little bit different to what you see here. So for me as shot, if that's just actually how I shot it, it's at 3200. And if I go on to chanson and actually indicate that it could be even cooler, I think that's just a little bit off a difference between adobe camera raw and the canon cameras. A. I think that this is tanks in, but they have a different understanding off the number that's actually in the cave in temperature here. So once more that depends a bit up on you If you want us. Yeah, this is true chanson or is shot. When I look at this guy, to be honest, I think it should be blue. And sometimes also we should with the right white balance, it still has a slight grayish stand on the top. And I think overall, it could be probably a little bit cooler. So I will just change this down. Maybe not ours away, But maybe, like 2950 year Yeah, more 3000 something like that. Just to get this overall blew us guy already in my basic development from here, Yeah, it depends. If you want to press on auto, I never get a good function. Here was auto. If I click on it, then yeah, that's what adobe camera Raw sings, How everything should look look like, Like completely Let's and I don't think it's the best result, but I want to have my own development here so you could potentially click on auto and then just reduce some also sliders. Or you could just go back onto default and then you could regulate everything yourself. First off, what I always do is that I check my whites and I do this with all the option and the sea. There's already some white point in here, so the contrast in the image is already pretty good because I always check if there's one white point once more was old or Ahad or option address. Press on to this and that indicates me. If there's one wife point, that's good. I don't want to see the image Lexus, because that would indicate now that all those areas that have blue tint on them or white that they would be completely bleached out. As you can see that kind off what the out of function did before. That's not what I want and it's definitely now reached out. And therefore I would dial this back and I see already that here is a little bit off the speech out area wherever if it's just on one part, I don't really mind. I think this is OK. The next thing I said, I look into my blacks and the do the same thing once more was all option. I just go a little bit left and hear all the areas that have no the stint on them. That also indicates that this is my black point and I don't want to have no even more black because then the areas, even DACA and I would rather lighten this up a little bit later. So for now, I think the Contras is really good. Everything looks okay here from a black point in my white point and in the next tutorial, I just want to gives the whole image more defined areas where I want to have more definition.
19. Changing Exposure, Highlights and Clarity: now from here, you can obviously always also change the exposure a little bit if you want us just a little bit brighter over oil and you can just raise a C a little bit. I mean, auto said it wants to give me more contrast. I'm not sure I don't sing. It works here because and just once more the actions this area here to extreme. But we could just maybe adds a tiny bit off. More contrast. Let me just check of that change. No, my white point. That's the okay, I think so. We good was black. It's also still okay, and once more just press service or the option and just moved to slide a little bit. And then I just see the area where I have a little bit off this clipping here, but that's their looks. Good. If you have now an area like we said before, where your whole image would be more like this. So if you had some areas that was really lit up, like attend or something, where there was a lot of light and you didn't take maybe two images one for the foreground and one father nights guy then you could always go into your highlights and see if that would maybe fix any overexposure in your image. So then you could also just track them down. And if you go into your rights again now, that's actually really good jobs that highlights that there, because now it just changed the soul over exposure that you had in this area. But I think for me, that's not really big deal here because those lights in the Airstream, they're not that bright. So I was angry, okay? He had let me just reduce us down again, and I just lift this, but yeah, you could darkens this if you saw this was too extreme. But I sing in our image. Maybe just a little bit Something exist, and then you can decide Now if you want to open those shadows over all in your basic development tool here or if you want to do this later on, just parts off the images. So maybe in the basic developments, I just opened the shadows up a little bit. Let me see how it would be at one hundreds, actually, not changing two months. So maybe I just changed this year to like 45 and then that can still open up source shadows later when I go in here with my adjustment brush. So I think for now this looks pretty good from here. I go on to my clarity's light and see how much clarity I can already change. Here was out that it looks too tacky because if I go 200 yeah, I think the sky would be kinda cool. Whoever the ask dream and all that, that doesn't look really good. So I'm normally quiet. Yeah, moderate in my clarity usage because I think it's often the most abused tour in light room or adobe camera raw because a lot of people that also uses first kitten softening and then they just single cases looks awesome for me. This can be a little bit tricky because the clarity's lighter just means that it increases or decreases your mid tones, and you don't really want to overdo it. So maybe yeah, I think normally anything up to 25. OK, so maybe 23. Let me just see the before and after how much we changed. I think that's OK. So for now we good you can also change. No, you're vibrance. If you just wanted this guy and all those tunes overall, a little bit more vibrant. I normally like the vibrance better than the saturation, because the saturation can often especially look on skin tones like really yellow and horrible. And you see how fake that looks at 100. So I think it's normally better to use a vibrant slider. Then it's just not so extreme. So maybe I bring the clarity a saturation down to maybe a five and then the vibrance to like, maybe 27 now is the before and after. Yeah, things this looks pretty good.
20. Sharpening: Okay, so in the next step, I want to sharpen the image. And now my fan is also a little bit quieter. I hope it stays this way because whenever I do any changes here in this basic panel, it looks innocent. But it actually is really demanding on the process. Also, I'm sorry if you hear my fan a lot because it just takes so much. Yeah, processing power. But let us go now into the sharpening tool and that this one here, where it says detail And here I really want to sharpen the image while at the same time also reduce any noise and especially if you have a camera that's not really that made four nights guy photography. Like we said the five years as an amazing camera. However, it's not really meant for night photography because it doesn't handle noise too much. So I definitely want to reduce my noisy, and I would normally go anywhere between 40 or 50 when a do night skate photography. You can also changes the detail if I also brings us a little bit down, maybe also to 40 that gives me a really good reside. Nothing because in this area is better. Now if I just zoom in here to see the before and the after. Yeah, I think this looks a little bit smoother. Things that before this Yeah, I think this is better. No, the noise doesn't seem to be too crazy. Wherever the problem is when you introduce any noise reduction, the noise just also things that the stars are noise because it sees just these little particulate and things that's also good to reduce. And that's obviously not what I want. So for the stars, I want to increase my shopping in quite a lot. And that depends a little bit. Andrea. Yeah, idea. If you want to shop already in adobe camera raw, a lot off people are like, No, you have to do this happening last. And for me, I think why it? Because he is awesome. Because I cannot only shop in these areas. I can also mask them and I can't do this in photo shop. Therefore, I do some basic sharpening right in the beginning to get my detail back here especially. And then I can just also mask this out. And this masking is awesome because let me come out here because I don't want to shop now. Once more, this area here, where have this noise? Because it would mean I would also shop may any noise in the image. So when a press onto this masking slider was all the option, I can tell Adobe camera raw. Okay, please only show happens all stars so that I get this detail back. But don't shop anything in the foreground because I don't want to shop in those areas in the blacks because that's where you have all your noise. So I think now we're looking pretty good. Yeah, that we got the detail back and stars and you're rising from 80 and 40 things. That's okay. I hear some photographers like search family. He's also really good. Lens gave a night photographer and he has this rule that he wanted this amount That's up to 100. So here he would have no 60 if the noise reduction is at 40. But because we must out this area quite a lot. I think if we just sharpens its overall a little bit more just to get so stars back, I think we're looking pretty good here.
21. Color Adjustments on the Airstream: in the next step. I want to work out the color a little bit more because I think it's nice when you can work any time where you have different colors and your images that they're more complimentary. And if you ever looked at the color beers and you would know that if you have the complementary color from blue, that would be more often orangey color. And here's inside off the Airstream that looks actually more green, and I'm not really too keen on this. I think overall I like that image is blue because I think this guy should be more blue. But I don't like the cool image in the Airstream. I would like to warm this up, and the best tour for that is your age as Ellen Grayscale, because here you can change the U. And if I single keys, this is more like a greenish you. Also, I could probably change visas. Agreeing yen just brings us more into the yellow. Or I could also see if I can maybe change even the yellow slider already also because that goes from the green into the yellows as well, and I actually want to brings us more into this orangey color so that we see if that worked . So that's before. And that's the after. Yeah, and I think that looks already a little bit better now or cannot change this even more odd . Assist to anything? Yeah, that has not so much green over oil, so I think that's probably as good as it gets for here. But I think the overall tone that looks a little bit yeah, even a bit more nutrients and this really strange horror green that's going on inside the Airstream, I think that's not very flattering for the image at all. So I think that looks pretty good. And then that See if we can saturate the orange, maybe just a little bit, so that this is more extreme had only a little bit. Maybe the yellows, maybe yeah, or just a tiny little bit. But I think the saturation he has nicer because rather than doing the over oil saturation in your basic development tour that can look a little bit off with than in the age as l, you can go in and say OK, just specific tones should be more extreme. Maybe just oranges or just the yellows in this case here. And then you could also say Maybe, how about that? We just decide trades, agreeing overall. Maybe that could also work. And then you see that now we can actually neutralizes area over oil, and at least it's not so green. So I think this is probably a good idea. Overall, I think it looks nice as this way rather than having this strange green color cast. And then you could also have a look into the ruminants if you shoot like a blue sky. Normally that ruminants is really Quito toe. Yeah, you don't change the color per se, but you change the light information off the color so you could brighten or darken a specific color. And it often looks nice and landscape photography when you can just bring the blues down to bring out the sky, even for us, are, however, here. I think we can only do this maybe a little bit so that this guy gets a little bit darker. But I don't want to go to extreme because I never lose Milky Way detail, but maybe just a little bit. And then we could also see if we can bring out your any more color and just lighten certain areas. Maybe just something like this. It doesn't do a lot, but you are maybe something like this. So let us look at the before and after. Yeah, since this is nice. But before we had this greenish color and now we have a bit more DACA sky color and the more neutralized and more warmish air stream. So this is pretty cool.
22. Toning the Image and Finding the Ideal Crop: okay, and the next step, we can change the toning even more. And that's our split toning. So if we go onto our shadow area, if you want to toe warm this area even further, we can press on to you was old or option and then you see the effect of 100% and obviously that's too extreme. I wouldn't want us at 100% and just looks at very surreal. But if we just change this to the slightly more warmish tint and now go into saturation here, we can define now how much we want us affect actually on our image, because before we saw that the 100%. But that's obviously too extreme, so I would just have sincere, maybe a 20 and the same. We could also dough for the highlight. So if you press on through the you was all toe option once more, we would see what it does it 100% saturation and I just wants us also a little bit. Woman's those highlights. But as I said, not overall too much because I don't want to change the color off the sky. So if you look onto the before and after. Yeah, I think this guy changed a tiny bit, but we can fix us again later. So I think for now this platooning that works pretty well. And in the next step, I want to change my correction because I think the Airstream over I could be a little bit straighter. And I could also remove now some chromatic aberration, because it always happens if you shoot against light. And if I zoom in here, let me see if if there is a lot off chromatic aberration and that if you don't know what that means, that's basically when you shoot against light that you have souls fine lines around your subject, like purplish or reddish your greenish lines. And that means that you have some kind off chromatic aberration. And the thing It's not too bad in here. However, I just clicks is always on because it can really harm. Because if you have some off those chromatic aberrations in your image, then this would just remove it so also, so that's always something that I take. Then I can really enable my pro for correcting me. Unfortunately, because this is, um, manual lens that we were shooting Bus Texas rocking on Lens. So unfortunately, any manual lenses cannot be detected. That's why it says Daniel, unable to locate a matching lens profile. So therefore, that sadly doesn't help me here. I could go on to manual. I could say No, I want you to have less distortion here or more distortion. Maybe I could already changed the tiny but likes us just to get this distortion out of it in the front, where it looks a bit more biology. And you could also different your image now even further. If you would have some chromatic aberration and think for now, that's all I can do here and therefore I will go into the stool appears that's kind off quite transformed to it and the nice thing that I could do. Here's that I have thes automatic functions how I can also change my image a little bit that its overall straighter. So even easier on this. A button here where I have the apply balanced perspective correction, or you can click through here what works on your image yet says level apply only level correction. I could change its this way. I think that might kill too much off my foreground. This is the vertical apply level and vertical perspective Correction on this one would also change the not only the level but also the horizontal and vertical perspective Correction. I think those are probably too much. Let me just get rid off all off them and let me see what this one did. I think this is probably the best. It just rotated the image that it's not quite so. Yeah, titted Because I think this kind off tickets this way. So let me see. What? That us again. Okay. And now we're just going to Is this one the I think this is probably the best It doesn't. Yeah, it's too much off my foreground and it just correct this year, but more if you're not happy with any off those changes, if you want to change or yeah, change the over or vertical perspective even more than you can also just change those buttons here a little bit. If you're not quite happy, will see overall horizontal layout. You could also tell this may be a little bit, and then you can even rotate this further. If you're not happy with any automatic transformation that will be Kamerad it. But I think from now this looks pretty good. Now you can ease a crop, your image or you can also scares this. And what lose all those transparent pattern that you see there are those picks. It's, But I think that's probably yeah. I might keep it like this for now and then A rather just crops the rest because and I can also see if overall likes the layout off the image. And therefore, I will just see on what ratio I've got this year. So it's it's a 2 to 3 ratio. That's also how shouted. So I keep it like this and then addressed Wreck. My cropped will down. Yeah, and now is a quick thing is that I see that they are going Rule is a rule of sorts where can then also just create a little bit more often interesting composition. So things this looks probably quite nice. This is a little bagging me, but yeah, that's just how nature is. Sometimes you can't takes a tree out where you want to shoot, so I could probably crop in, but I don't want to crop too much into the Airstream Easa. So I think maybe that's for now. Okay, so just press on enter. And now I have this new crop.
23. Enhancing the Overall Image & the Milky Way Even Further: Okay, so I think this looks know a little bit better because it's less distorted and less crooked as it was before. So I think we're pretty good year. If you don't like any off those things that we just did. If you still think it's not exactly straight or how can I straighten it even further, then you can also use this tool here. If you just click on this, it is automatic straightened tour. But the problem ms Year that I don't know exactly what line should be straight. It's easier if you have some kind of subject and your image like a pole or house where you have one lion where you can orientate yourself on. I don't really have to see it was the Airstream because I could say this. This may be straight and then till it's this way and I'm like McKee, I'm not so sure if that's not straight and never just go backwards was command or control and that a few times okay, that obviously didn't do such a good job. So I would say maybe I just go back into my crop toe, and then I just changed this against how icing would be a little bit better. But if you have some straight lines running through, imagine, that's definitely a good way. Was a straightening tour because and you can just drag line down. And then this is how you can straighten your image. But for now, yeah, let's just keep it like this because singles Moses is us. Yeah, the less distorted version off this image and the less crooked image off the Airstream. So I think we're good and I want to change now. The over oil details and the images promised. So I want to start out here with my Milky Way because I said that I want us more defined and also wants the sky over all a little bit blew up and forces ever go into my grade in first, and he had just click onto the minus temperature sign because that we reset all of those as a sliders, and we're just give me a temperature of minus 25. And with shift, I just go on to the top. Image. Yeah, never just Drexel's Grady in town. And that will just give me this overall blue tin does this blue color temperature and the first thing minus 25 isn't enough. Then I can always go in and just change this even further because before it was a little bit more reddish and I think it should be a little bit more blue over oil, I could also change the Tinti if I think it's now a little bit too magenta and that wants us maybe a tiny bit more into this greenish tint. And I could also change the CFS maybe minus eight or something like that Let me see the before and after. Yeah, I think this is better. Before it was just a little bit too magenta. So things that's over oil not bad. And there was Yeah, I would keep it like that. Now I want to go into my adjustment brush and just bring out this Milky way even more. And for that I would go on to my plus sign here, so I reset. Now my temperature. So that was before, as it was on the Grady in Fitter, and now I changed it for my adjustment brush by just clicking onto the plus. No, I have a 50 per year plus 50 more exposure. Whatever I will die a suspect just a little bit, maybe 25. And I want to also have more clarity. And that's not only for the Milky Way. And if I see yeah, I think the brush is probably OK. If you want to change your brush, you just have to slide all the way to the bottom. And so you can just change the size. Or maybe I go for a size 10. You definitely want a feather off 100 because you don't want to see no any edges on where you're painting because it wouldn't be really for giving him this guy. And yeah, you want us really, really soft brush so that you can really just change this. Without that, anybody would notice any edges and then I just go slightly down this area so kind of where Caesar was detailed in the Milky Way. And then I just lightens us ever so slightly and now want to dial all off the back even less. And then there's also this. But next to the Milky Way was I see some definition and are pained over this a swell and once more if you want us more extreme you can just click on this and then it says at and then you kept could increases once more so you could go crazy. Legs is if you want a little bit more for surreal image or yeah, very dramatic sky. But a sig, normally once more of a circularity, always keep it about 25 or maybe 30. And then I just get really good results. And if I look now, it's before and after. I have already really nice definition now in my Milky Way here, so this is pretty nice, The same thing. I also want to do no with my Airstream. Like I said, I would like to have a little bit more light in here, and I have two ways our producers I could ease. I have a new brush here, and then I just want the biggest sized Russia's Well, maybe something like this, and once more, just click onto the exposures that everything else is reset. Now I have a 50% exposure, and as I said, I wanted this area's fairly warm so that I have complementary color to the sky, that it's a bit more orangey over. And then let me see what that looks like. Actually, I think the exposure could be even more because I think it's not too bad here with a noise . Or let me just paint you even further. Let me see if I can also just painted over the floor. Maybe even a bit was a spin jizz and then a little bit in the tree. And I think this looks pretty cool at the same time, I can also go in here and reduce most noise because I say now, part initially or like this partial area where say I want more color information but I don't want that you increase the noise. Rather would have less noise in this area. And so I think now this looks pretty good. As I said, I could also do now the whole sky over I was more blue. I can brush any areas that I want, but for now, this is probably all I want to do here in my adjustment brush. And if you want to change area over all in more color, you can also go on to your radio filter and just do the same thing once more so we can go on to the exposure, and then we just drags this area and then we get even more information and probably once more. We would also increase the noise, or what, at the same time reducing the noise even more because I'm not too worried he was any sharpness. I mean, it's nighttime. We all know that it wouldn't be this 100% crisp and clear image, but we also don't want that. It's so noisy that it's a distraction. So probably just grits this a little bit in nexus so that I have some kind of noise reduction and also a little bit more exposure. And then maybe even more warms because And I have this really nice orange tone, something like this, Yeah, I think this is nice. And, yeah, you can change your oil sorts of things you could also change, knows a contrast. Or you could also bring your shadows even further out. And you could also have more light in this area or if you're now worried that if you have more overall exposure in this area, you could also bring your highlights down
24. Vignette with the Radial Filter: the nice thing about the Radial theatre. It's not only that you can place light and three image, you can also place shadows in your image, for example, like even yet. So I want that my viewer looks more onto this murky way and onto the Airstream, and therefore I think maybe I could just darkness was calling us a little bit down, so I just do this the same way. I would just drag my area into the image. However, I have to turn the effect around. If you never used this, I think by default it will be on the outside and then you might have to change it to the inside if you want to have, like, a light effect inside the circle. However, now I just click onto the outside and when I direct on my circle in, then everything will be affected on the outsides and moles. But because we have a feather, it will also slightly go inside the circle. So then you just have to see maybe the 100% feathers too extreme, so I could just lowers this down so that the circle that ever place now it's a little bit more defined and doesn't go on to the Airstream. And obviously now I also have to check on my as I sing C s. I want to have obviously the shadow area. So every good was my exposure onto the minus areas who may be minus 50 should be okay And then I click on your ones more. Or it can also just say new radio filter and now just rexes in. And you see already that attacking everything down and they're not just places. Maybe not that it's all in the middle. But more than attacking those corn us maybe also this tiny bitty and foreground and then I just clicks it off and then we just have a look into the before and this is he after. Yeah, and the things This is nice, because now the viewer's eye egos, like immediately to the Airstream and the Milky Way, and I think this is pretty cool. You could also drag now another radio here onto the Milky Way. If you want to define this even further, was clarity and so on. But for now, our basic development of finished year and we will open our photo shop and you can either open your image as a smart object if you want to go back into this modular than that would be a possibility. But in my case, I just want to open the image as it is, and now I just click on open image.
25. Cloning out Distracting Elements with Content Aware Fill and the Clone Stamp Tool: So now the images opened up in photo shop. And because we did already like, I would say, 80 or even 90% off our workflow in adobe camera raw, we don't really have to do here too many things. So I just go into Photoshopped to change the color off my Milky way a little bit further so I can bring out even more detail with levels. And that can also change the overall look off this guy a little bit. However, I want to start here with this leaf here on the right side, and that's completely up to you. If you don't want to change it because it's nature and because you will also change now a little bit constellation off the stars, then you don't have to. But it's just bagging me a little bit because it's catching this light and I just think it's a bit annoying. So I want to get rid of it and for that I will first duplicate my background layer was command or control and J. And then I would go on to my last. What will I can also press any for less? Oh, and they were just circle around something like this and then was my right mouse click. I go inside this area and never click on to fill, and here you have all sorts off options. I'm going here for the content away off it, and then it just press OK and that see if it does a good job. Oh, actually, that did a really good job. So that's good. And sometimes you what things the nice guys really forgiving because it's just blue and dark area and with a few dots as the style, so that you could copy over this fairly easy. However, it can be tricky at times because there is still a lot off variation and light and dark information. And if you just go over this area here was clones them. Sometimes it just doesn't do a really good job because you can slightly see how the stars. Then, yeah, just look loaned and leaving some kind off a strike, especially if you have like an airplane going through the image. You have to zoom and, like, really, really close that you can do then a very fine job off cloning. As a wise, Somehow you just see it. It's weird because he would things the night sky. It's just dark information with some dots, but sometimes it can be just very tricky. However, here did a good job. So I just swim in so I can see what I'm doing here. So then I just go on to us for my clones them to, or you can find this crown stemcell here. And I have a really soft brush here with 0% hardness. And you can change this appear if you want to. I just use my control. And although option and then I can just change the size off my brush sourcing something that's in the similar size should be okay. And then a December, this area appears so just press on my oil to opt in to sample this area and then address can still clones out years. This last bits where the content field couldn't quite understands or speaks is, But I think this is still a faster results. And if I would have tried to close this out beforehand, I think did a really good job overall. And that would also see if there are any edges left because sometimes it can also happen with the content aware. So just amount. And I think this looks pretty good. So that c before, let's see after. Yeah, If you would say no. This sky should look like this. And maybe you are, I don't know, into astronomy and so on. Then you might notice. But for somebody, I think if they would just look onto this image and if they're not specialized in the night sky, then that should be okay and nothing. It's now just a little bit less distracting.
26. Changing the Color of the Night Sky with Color Lookup: in the next step, I want to change the color a little bit further and for that I uses color. Look up in my adjustments and the color look up passing was introduced when photo shop also made it possible that you can add it video of material so you can edit now your videos and photo shop and give a different color looks. But I quite like it also sometimes just to use it on a single image. And for that every go into this first drop down menu and I want to go on to crisp and winter. And that gives my image once more this really blue color. But you could say, Yeah, why didn't you change it already like this in a CR? But I just think it it gives me not only Kala, but it also gives me a little bit more contrast. So I think overall, this looks pretty cool year and obviously it's too extreme because that looks a little bit now on the tacky and fake side, but ever just reduced capacity to maybe 60. Let me see your 59 before and after a I think this is pretty nice if you only want to have those on the night skies, and you would have to just go onto the mask here and was be for brush and was a black background foreground color. So here said toe black. And if it's not at black at the moment, you can just press on to D. Then you will have black and white, and now it's obviously wide as your foreground color. And if you want black, you just switch it with X. Or you could also just press on you. Or you can also go in yet and then just select black. So you need a black foreground color, and then you can work on this mask. And then we could say, If you don't want that, the blue is on the Airstream because we went through all the trouble to make it orange. Then we maybe don't want that. It has the school Cullerton's. Then we can also mask this out. So I think that's the before and the sissy after I think it might be also be too extreme ons. ALS. Bush is. Yeah, I don't know why that came out to Blue anyway. I guess there was some kind of as, Ah, jail or something, I'm not sure, but I just masters hours because I don't want that. It gets to blue eyes. I like it for him from how they say that it's a bit blue, but I don't want that. It's two extremes or something like this that miss easy before and after your I think that's OK. So if as room out before and after you, I think that this guy is over or just a little bit more interesting and once more I like when an imagesas complementary color in it so that you have no this blue sky and the warm orange airstream.
27. Changing the Milkyway with Curves: In the next step, I can see how my levels are doing. If I now burned any single, clipped any area out. So I can also check your once more if I have the right contrast and that just go on to my left side was also option. And then I see that this area now lost a bit off contrast so that I just introduced my blacks ones more. So I think that's a key, maybe it for so it's not all streets that it's not too extreme, but that I have a little bit more black and the image and when I go with also option onto the right side. Then I see again that I have here a little bit off a clipping. But it's just a little yeah, so little. I think that's OK. So my levels are still looking good here. Nothing has clipped too much and in the next step I just want to go into curves and I want to bring out the detail in the Milky Way, even for other. So you can also bring in more contrast if you have your curves and you do this s layer, which means that you're on this general area here, where you now you're working in all the colors and you just bring in this detail. So for him, for me, maybe, Yeah, not too extreme, because And it looks a bit too unrealistic. But maybe something like this, that would be my first change. That may just drags us up here and then that. See, before that after and then I would mask everything out. So for this, I would not turn this mask around and the press on to command and control, and I And now I have so splenic mask. And then I can just paint this back in so it would be for brush. I go onto therapists and hardness and maybe also not at 100% but maybe, like, 20%. And if I want us more, this effect and I can just pained over this a few times, and then the effect is duplicated. So I just bring this out a bit. Lexus. But I need wide as my former on color, so paint overs is ever so slightly and the single could be but more extreme. Something like this. Maybe I go over this like three times. Okay, And now the before and after. OK, so it's a little bit more defined. They never go into curves once more. And now I can go into the single color. So before I still say that wasn't all the colors as at RGB, and I only changed really the contrast. But in here I can change now the callus well, and I just have to drag this out on actually seeing what I'm doing. So if I go up here, for example, you would see that I have even more red now in my ass stream because in this area up here, I'm changing most Lisi highlights. That's pretty nice. However, I can also change more Redd's If I wanted to have it in my in my Milky Way way. I've got more off those shadow area, so I could maybe maybe something like this and then, Obviously I don't want to keep it this way because it's too extreme. So was commander control, and I just inverters and then I just paint it in one small. So maybe just ever so slightly to get some kind off color information back in here, okay? And if you wanted There's no even more extreme on the Airstream than you could also paint this in. Yeah, I just wanted just this little bit off a finished block so that before that's the after. Okay, now I go into curves once more. Change. No, I can have. Look. No, what's the next one appears doing. So that screen. So if a go up here can change this if I thought this is now to blue than I could just gives a stint off green inside. I can also change my shadows down here. But I think if I go into the opposite direction, then I changes into Mogens A. But I don't think I want any magenta and my image. So I would stay here, probably in the green. That me see what I want to lift here a little bit? Something maybe like this. Okay. And again, I don't want us over the whole image because I changed all my lights yet because I didn't want some greens. I definitely don't want them back in green, and then I just pains us in here as well. The nice thing is, if you just that slow was a small a pass ity. You can just go over those areas and if it doesn't look like you're doing much, you do actually a lot. It's just better of icing if you start a bit more careful and then you can just work your way up. So something like this, maybe, Yes, he you sing. I don't do a lot, but it's already quite a drastic change. So even though the capacity here So I think this is probably quite nice. Okay? And then we have one more craft where we can have a look at if we like it. And that blue are the other side is yellow. And then we can also see if you want this more blue or you could also then do the blue in a year. If you didn't want to go over the color, look up. But then you would also have to change is a contrast to get a similar result. But I think we are Ah, it's up to you if you want it Even blue. I think if we go to blues and it can just look a little bit too tacky, if you would go now into the opposite direction, I think that might be actually more interesting. If you want to bring out some yellow tones in the Milky Way, I think this would be actually quite cool so we could change something. Maybe in the opposite direction just brings us down something like this. And then I just go on to command or control and I to invert this one's more. And then I just pains us in again was 30% and that sort down here. This might be kind of queer with more yellow, like yellow and magenta, maybe down here and then we really have a bit off your kind off a definition down here. I think that here I didn't do a good job with my sky. When I masters out because of still thing, it looks to magenta. And I could also fix us now was my cough layer So he had just a little bit maybe ago higher . Now inside this milk, you later of more yellow And that can always just go back Indian and also change it if it any time, I think I could use a little bit more or less color. Hmm. Okay, maybe just bringing this even lower. So it's more yellow. Something Lexus before and after I asked just ever so slightly this change and then once more, just go into my blue. And now I just want to fix this area here so I can just lift this little bit up. Maybe something next. This okay, and what's more, just mask this out, and then I just paint this blue back in here so that it's not such a um yeah, The transition was just a little bit harsh before I saw between Blue and then he had orange and you, Somehow I can see that some kind off magenta cast. I think it's realistic enough because if you have some kind off orange light down here, you would have kind off like a light pollution. That's kind of appears. And then this guy, it wouldn't be then completely blue. And then you have a completely different light on Yeah, so I think it just has to be somehow transition in the way that it's not completely red appear. And then it's blue because you want to change it in a way that you make it more interesting for your viewer, but that your viewer obviously doesn't sing. Okay, this is not completely fake.
28. Final Adjustments : if you want to keep your file as the PSD Fire, so that means that you keep all your photo shop players. Then I would bring them now together into a group so that it's not too confusing. So I would just go down all the way and say, Until here, that's just going to be in a group now. And I recall this sky because and it's our group together and a bit easier so that see before and that's the after. If you sing it too extreme, then you can also change this now as a group, then you can just reduce us down. And then the one under knees that was our Lavery clones this leave out. So I just say, um, moving, believe and then if you open this up later again, so at least then you know what you did here. If you think overall we changed too much, I quite like to go back into Adobe camera from here. And for that I just need another layer on top off this layer so I can do this with the longest shock at ever, which is shift oiled or option command or control and e So once more shift or the option command or control and e depending if you're using a PC or Mac, and now you've got a new layer on top of everything, and I can go back now into adobe camera Raw, which is pretty cool is and see a six, and I go into fitter and from here and go into camera raw filter. And if I sing no, anything like over over oil, it's too extreme or you still not happy that this is Mogens a year. Or if you think this is not toe orange, if you want to lower the saturation, then you can still do this so I could lower my saturation down now a little bit. So it's not so extreme. Overall, I can go back into my adjustment brush up here. And so he maybe still that I want us a little bit more in this bluish tin that maybe a tiny bit more magenta I can bring in even more clarity and anything you want. So this is a pretty nice option that you can still go in here once more after you've bean in photo shopping, that there some changes, so I can still just bring in a little bit off this blue color appear. And maybe if I wanted to go crazy and bring out this Milky Way, so it's really extreme and everybody's like Well, with that such a quick, milky ways and I could do this year also once more if I just bring in a bit more contrast, maybe, and more clarity. That's a regardless, clarity this time a bit more extreme with 35 then I could just pains us in here after I did . All those adjustments appear, for example, and then I'm still very flexible. If you're not quite happy with the adjustment that you did appear, if you sing us might be detectable that we clone something. We could also just stacking this down, and then I just reduced my exposure, and then I just go a little bit down here and then I don't think anybody would notice is ever that there Waas once a leaf once upon the time, so I think something like this, and then we can just go okay. And the cool thing is, because now all those adjustments are on its own layer and once more if you would sings. This is too extreme. You can still was your pass ity. So that's pretty cool as well. And your let's bring this know all together in one group so that we can see the overall adjustment that we did. Yes, A. Before and after. So we just causes adjustment. Something exists. Anything that makes sense, obviously, for you, I don't know. I always have this error message Don't bury. It's, I don't know, a glitch in photo shop. So just say okay, and then I go onto the before and that's the after. So that's kind of what we changed now and photo shop in Adobe Camera, and I think that looks pretty cool.
29. Speed Up Your Workflow With Presets: So this was our original image, and that was the image we changed sourcing. That's pretty nice. We have knows this more orangey airstream and redefined Milky Way. If you want to bring noses color, look and all those changes that you didn't a c on to all your other images, then you have two choices. You could go into your original image that you just changed. And from here you could create a preset so you could go into your presets year. That's this kind off you have so sarees light us and that your preset And from here you go onto these has this button that also has so three slide us and you can just save now all of the settings you did in here where you changed all those areas for your Airstream, for example, and then you can go into safe. And from here you can just cause us, um, I don't know, night sky photography. And then if you go down here now, you have a new preset called night sky photography. And the nice thing is, now that this saved all off those adjustments that you did here, so everything that you changed here in your white parents, for example, or your exposure and so on. So I can just press on to cancel now. And we could open this image now, for example. And you see, it did already some changes year. So if I just go onto my leverage back here and I can just say OK brings us back to camera raw setting so that you see how it looked in the beginning. And then I can go into this preset mode and then I go onto our nights guy photography. Where did that go? There it is. And then I just click on it and then you have the same changes as we did before on the image. So I have my exposure here. My highlights and so on. Even my shop Ning, my masking malu eminence seizing that used Teoh want to do is that you work here on the fine tuning so you can still say no where you want the radio fitter and these kind off adjustments. And also, if you wanted to change now if maybe your image wasn't notated in the same way how it was tilted before then you still want to find you some things. But overall, I think it's really quick fix if you can work with the preset
30. Sync Settings to Speed Up Your ACR Workflow: if you don't want to work with presets or if you have fairly similar images where you would also like to sing up all those adjustments that you did with the radio or the Grady in filter or the adjustment brush, then you can also do this in adobe camera raw and you can just sing up all off, so settings. So for that, we just have to use the image that we worked on before because it's our reference and much . And now I just want to change all off those who are just take on to command or control and a and then address tab click onto the image So our reference image has to be ticked on. And then I go into our filmstrip into these three or four lines here, and then I just go on to select. And from here I go and once more And then I just go on to sing setting. And he has a nice ing. Is it? Yeah, I think it's kind of clever. How do became a rose s Okay, Most likely you want to change all off those things, So if you don't want to change the shadows or highlights and so on. Then you can also just takes us off. But I want to sing up all of those items. They could also say now, yeah, I think by D for that makes sense that you don't have to spot removal and the local adjustment on everything. Because for me now, it's probably a little bit tricky because I have my milky way up here. We're changed the clarity and Sinkala and all of those things. And now this image, she looks completely different. I don't really even have to make you a here, so I don't think it would make sense that Adobe Camera says, okay, that sing up all these local adjustments as well. However, you can do this. So if you are images air fairly similares and definitely make sense But they're also not written in stone, so I can still move them around. So let me click onto local adjustments and then I just go onto okay, and now all of those areas that changed and now I just have to find you in this a little bit because, of course, this image was also in a different it. So I have to see if that makes even sense. Now, in my free transform tours for Cochise resets us, for example. Because I don't think and needs is extreme toot. And then I could also see if the script makes sense, But things the crop is probably OK. Let me just fix this first because of free transformers. Probably too extreme for some off those images. No. Okay. And then I go on here as well and just clicks is off. Okay. Actually, that probably could be a little bit more rotated. It's the other way around. Okay, maybe something like this. And then this image is probably not too bad. Actually, I think years this looks quite nice. So here, ever just keep this. But then ever probably have to f if this is a good crop, Probably not so much off a good crop. That, missy, is This is a good crop. Yeah, since it's probably okay. Okay. So now all those areas are crop properly in straitened, so it's still a little bit of find union. You have to do if you want to take over the crop. But it's possible. I mean, like I said, if you just click on here. Nothing is written in stone. You can always just just change it. And the same is also if you just go on to your adjustment brush, for example, you see here the adjustments that we did for the Milky Way so you can adjust if you just go on here than you see all these different areas that we can let in. And that's also no problem. So if that doesn't make any sense for your imagery, can also just go down here and then we can delete all off them. We can just go on to clear oil and then we can just paint is in our self So, for example, for just want to bring in some exposure down here, then I can just paint over those areas maybe a little bit more extreme, something nexus I can do the same also were replaced. Our radio filter maybe even like it in the way. But maybe just not at the area where this then I can also just drags us down. So that's up to your images. What's faster so sometimes it's faster, too. Don't take it over or two deleted, and two can just start from scratch. But on the other side. If it's fairly a similar image, then you can also just move those areas around, yet definitely doesn't work, for example. So which is kids them all? And you're like I said, that kind of just depends on either to just move them around or to just paint some on but a sensing overall that you can sync up our those images. It's amazing because it just say, if you so much time.
31. Workflow For Star Trails: In the beginning, I said, It makes sense that you separate your images into different folders. If you wanted to produce the time lapse, for example, for the Milky Way or if you wanted to produce a star trail and you also recommend that you go through a post processing because and your star Trevor just look so much clearer and more defined and we reduce us in the same way. How we worked was a singular image, so I would just double click onto my Florida. And now I've got all those images in here for my star trail. And first off all, I have to see if there any pictures and year that could cause me a problem. Because I walked maybe through here was a torch this year, for example, and if I just text them into my start trade, and I think this would disrupt the flow off the start trade, so I would just eliminate all those images that I think that could be potentially a problem . So was command and a or control and day. I will select them all and never just go into my review mode just so that I can flip through them a little bit faster and anywhere where I see this could be potentially a problem. This one, for example, because the car drove by. I just go on to six and just label them read. This might be also a little bit too extreme with the flesh or the torch. This will also get a red one. I think when there's just a little bit light on the Airstream, that's probably OK. But anywhere where I have says here, for example, walked through here with my torch. So that's obviously a little bit off a problem. And then I just go quickly through them just to see if there any other errors here for examples are just press onto six once more. But other than that, we're looking OK. This might also be a problem. This, I think, is kind of good to keep because he has an ass stream. Has this really nice lit up? Um, run. So that might be also a good image if you want to, to create the star tria. But then also might want to overlay the Airstream so that you have one image for your star trail and then an over late emerge where you just have the illumination on the Airstreams. I will keep them in. I just don't want to have any images that have some kind off streaks or any kind off disruption. But I think so far we're looking quite good year where there was one more. I think that's too extreme. This one also kicks it out. This one I would kick out this definitely where walks through with my torch. That's just happening at night because you're moving around and then sometimes you're in your own image, so OK, but I sing. Other than that, we're okay. Yes, just one's in between. All off them, Okay. And I think we're done. We're back to the beginning because he had read. But I think this should also be read. Yeah, so we're back to the beginning. So we just labored all those images that have some kind off disruptive behaviour in them. Some kind off light street goes something like that. So we just kick them out and then we just go on to the select and was commander control and a I just drags him now into the rubbish bin just like that. And now We just have so screwed images, so that's a lot easier already. And as I said, if you want to open images as a raw than that's no problem any longer, we can just collect them all command or control and a and then we just press onto this well . And then we opened these images up in adobe camera raw.
32. Preset and Sync up for Star Trail: and the really quitting and adobe camera raw is now that become buying our to work flows together. So first off are we can go into our presets into our night sky priests at Let me just see where I've got this Because I have so many I just have to scroll through them a little bit . Where are you? Ah, yeah, Night sky photography. And now we can first of all, implies this onto all off those images and then we can also sync them up. So now I just had some already are collected So now all off those images have the nights guy preset on them that we did before. However, we can find June's us Now and then we can sing upsy as a images as well. So if I just go back into my first basic development with and I can say OK, first off, all I sing our preset work better with this blues guy on the other image. So I don't want the blue quiet too extreme. I want more simple, um, post process for this one. I mean, it's always nice to see one more extreme processing, but now I want to also do one that little bit more subtle. And then I also want to see if these white points that were correct for the other image if they are good for this image here as well. So it's auto option. I just go onto my why it's not see that's cool. It's only a tiny, bit off, beached out area and the same also do for my blacks. So I also have got two black points years. That's good. And from here on, I can also see, I think are the as adjustments. I good. I mean, the happening should be also good for this image. It could probably just a little bit more for the staff's overall here as well, so we can check this and we can also check if you like your reds or you use here. I think in our case, probably doesn't do too much here because we don't have horror Green that we had in the other and much he its mother's blue. But I think we don't have to go here with the complementary color that's up, obviously always up to you, you can play here was different color, but for me addressing Why not? We can also have one wears a You have the Airstream color off the windows and similar colleges, this guys and you know, it's just a little bit different than so. I just I think he is, OK, We could also just ties us down if you don't want to go into this orange side. But I think for now that should be okay. Doesn't do too much here because we don't have too much green that we changed. So I think overall, that's good. Then you can also changes a split tone if you want to to or you can also go in and see if you wanted to change you even more if you had no something where you could enable your profile corrections. But for measles, all looks good now, so I think that's fine. But I want to do something here in my radio filter once more, so I just go in and say, Okay, I want a little bit more light information here on my Airstream. So I just opened this up a little bit and also in the shadows, and then I just track over here and nothing. Ones that are opens us up. I also have to bring my noise a little bit down. So I just go here, maybe 2 40 or something, and then I don't want to so high. And this guy I don't wanted the noise goes onto the stars Or that I opened up certain areas that it gets too bright. Something like this. Let us have a look at sea before and the after. Yeah, I think that's okay. And because we had this image here on a tripod, we could even go in and think up some kind of feeling because this might be a little bit annoying. So I just want to go into my healing brush, and then I just bring the size and a little bit that just fits around this area and then ever just clones us out And you think this looks pretty nice? Maybe overall, I could bring in my adjustment brush lips even more. Just a little bit more color. Maybe in this area down here so we can see a little bit off this floor. Maybe not too much on this poor, because that's not very interesting, but maybe just a bit on the foreground and then I just want to erase us whatever ditty on the pole, because that doesn't need more light. I think that could rather be a little darker, just a bit down and then just a smaller brush. And then I think this doesn't need so much attention, whatever that is. And maybe this year can also be a bit dark and you can just play around wherever you think there should be more light or there should be less light. I think this backs me now. That just brings us down. Even for us, it was a new brush and then less exposure, whatever that is. And then I just pains us away just so that it doesn't attract too much attention because whenever there's light on something, then obviously the viewer looks onto it. But I think now it's a bit neutralized and Alexis a lot better. So I think this is pretty cool and from here we cannot sing all those other images or one more thing I want to see, appear, just want to see if I likes us transform overall, let me see what it was before. I don't think it changed anything, and then the rotation. No good. Probably a little bit more. Yeah, I think so. That's good now. So we go on to our Baron Sea once more, select oil. And from here, I can think No. All those other images and I also want to sink the spot removal and the local adjustment. And then I just go, Okay? And now all those other images are getting things up. And when I click on them, then I see that this area's that backed me before whatever this little light was has gone because that's a cool thing that when you work on a tripod and then you have some areas that you don't like and you want to clone it out, Then when you think of all your images, then the single will also be on the other images. That only works if you work on a tripod. Because otherwise, if you change something here and then you would sing up image that slightly moved in this area would obviously be not fixed, and you have to go in manually. But if you're on a dry pot and that works really well
33. Manual Adjustments for Star Trails: from here, you can just go through in case there are no some areas where you still have some light and you want to change this now manually. Then you can also go in here. One small issue addressed men brush, and then you can go on to minus. And then you can also just back in those areas down. I think if there some light streaks and it's probably okay, I deleted already are the ones were too extreme and then you can still can't off lowers us down on some images. So I think that's okay. Here, for example, we have a little bit off the red flesh going on what's probably a cow or something that drove by. And then we could also reduces for us are. So if I just say Okay, let's say we don't want any saturation He had all because the reddest backing us, Then we can just bring the saturation down, and then the exposure and maybe like ours, it's light, and then we can also just paint over here, and then it's not too visible now. It's obviously too extreme, so we can just change this once more. Just bring the exposure up a little bit, just so that it doesn't catch our eye too much. And then maybe even with the saturation lower, and then it's a little bit neutralize. And then a Children really disrupt our find image too much. Maybe add on one that it gets too dark and then noticeable. But I think now this looks probably but better than before. Let us easy before Yeah, it was this red and shiny, and now it's just a little bit more neutralize. So I think that's much better. And because we have the same issue on the next much we can sings those up once more just on this, too. So just this one that I just changed, and then I just going to command or control just to select it. And then I just sink. This image is well, so I just go onto my local adjustments and then I just say, OK, and then this image is also neutralized. So the one that you click on first it's all always your reference in much. Then you just click onto the other ones that you want to change, and then you just go on to sing and then the other ones. They look the same as your reference and much. And if it goes through humans, more icing, all the other, they're looking OK. There's a little bit more light on near because we said we wanted to keep this because he I really, really like how the Airstream was lit up naturally. So that might be one image that you want to keep separate. Because if you like later, you're your star trail and you want to blend this image in just because it looks so much nicer than those other images. Then you could do this a swell. But now it might be too bright because obviously there waas already light. And then we did further adjustments. So let's go on to our radio and let's see if we just want to brings us a little bit down so it doesn't catch up. Doesn't catch too much light something, maybe Lexus and then this one probably the same. So let us sink them again because I think thes three A probably, said Mila. And then we just things that setting once more was our local adjustment. And then we just say OK, and then the those were also now just a little bit darker. So I think this looks no pretty cool. And yeah, easy, right, Because you just use your preset and then you just sink them. And that's how you work through 90 images all at once. It can get easier than that. And now we just collect them all once more with command or control and a Or you can also go in here and select all. And now we just want to save them. So I go on to safe images, and then you can just decide how big you want them. So I have here quality off 12 and like this maximum quality because I'm not sure how much quality met needs if he wants toe place him now together as a star trail, so arouse. I give him 12 year just to give the best quality, and then we just saves us in the same location. And then I just go down here and say, OK, you can Chapman's the CFO screen. Nothing. That's okay. You could also go in here and change a radio meta data. Or you can also change your document document name here. But I think this looks are good for me now, so just press onto safe, and then all those images are saved as your new J pic.
34. Timelapse preparation: the exact same thing You can also do if you want to produce a time lapse, and you also want to prepare your images for that a little bit. So once more, just quickly. Look through here. If I see anything that might be too extreme on my Airstream if I walked through there once when my torch was on, if a car drove by, that might disrupt my image. But I sing. So far, so good. It looks all OK again. You can do this in bridge by just scrolling through, or you can bring it back into your review mode. Whatever you think works best. But I sing. I don't see here anything that's bothering me too much. I mean, of course, Sometimes the light goes on and off, so I'm obviously sometimes inside, and then I'm outside again. However, that's probably interesting in the time lapse photos, and you not only see that your Milky Way it's moving, but you also see there is some action and the Airstreams or that doesn't bother me. Too much sizing. We're good. So once more was command or control and a I go onto my well toe open them all up together in Adobe Camera. I go into my presets and you can obviously also develop different presets because before we said that the Nights guy was a little bit too extreme in this one image. So we can obviously change the see n say Let's develop another preset so we can just brings us a bit down. And that's and more the natural development off our night sky. So they say, Maybe this. Then we can checks us and can even open the whites a bit more, bringing the blacks of but down, maybe lowering the contrast also a little bit, maybe a little less vibrance, just so that we have one extreme preset and maybe one more subtle, preset and nothing that's OK. And then we can just go into our presets and just your safe. Soc! As maybe the natural, Let's say natural nights guy. So we have two different ones, and then we can just say safe. And then we could also sing up all those other ones easa through this one, or we can also just click onto all off them and just apply the preset and let me just see where friends this now natural. I have too many off them natural nights. Guy, There you go. And then this will be also applied now onto all of those other images. And that's obviously really cool way. How you can play around. You can have presets a little bit more extreme and then some that are more natural from here. We can also decide if we want to. Maybe crops is image tiny bit. So it's a bit more interesting from the way how it's laid out so I can just maybe go in a tiny bit. And then it just brings us in. Not too much, because a story one that the time lapse has enough space appear. So that's make you a can move. So not too extreme. But maybe something nexus, maybe just nexus. Yeah, okay, I just press enter, and now that's cropped up things at school and I once more I want to change your little bit of light on the Airstream to have some more extreme. So I go into my radio. Just make sure again that you hear in the inside that you are defectors in the inside and not outside, and so you just brighten the inside Officer Circle Justus much as you want. And they just opened those shadows. No, too much in this guy. I don't want that. This is breached our something Lexus. And the moment you open up in areas and you will also introduce noise, so I just don't want that it gets too noisy. Maybe something exists. And you could also do now the same on the Milky Way to bring that a little bit more hour. So let's say you want now. Just secure charity something nexus. The cruising was a radio. You can always just change this from the direction. And then we're just placing this on that something nexus. Okay, I think probably even a bit more extreme would be cool, so that we really see the details here. Okay, I think that it's nice, and that is just have a look. Maybe on the before and after, But somehow it's their working. Yeah. Okay. Now I can go onto the before, and that's the after. Yeah, Okay. That looks pretty cool. And if you wanted to change more, you know, now you can also use obviously you adjustment brush here. If you just want to bring out some more off the exposure. Maybe just very little bits, a smaller brush just for bring in some interest year on this bits off brighter area and the Milky Way think that's there to extreme ever just brings us down. Also, the clarity, because we don't have to do this was the radial and the adjustment brush than it's getting too extreme. Not just from that. It's a little bit more visible, and then you can also do. If you wanted to bring out this kind of reddish color even more, you can also bring in a little bit more magenta or maybe a little bit more yellow. Just so that's a make you wait stands out with all those colors and all those details that it's having here inside Sal's areas yet and then maybe even a bit more sharpness. Something like this. Yeah, I think this looks pretty cool, and from here we cannot sing. See, Adjustments was always does as the images command or control, and a to select them all. I just have to wait not because, as you can hear my process that goes crazy and the Faneuil's on so sometimes, and it just takes a bit. Raza, go over here to select them all. Now I think them all See local adjustments. And if you have any spot remover, you could click onto this a swell. And then I just say, OK, all right. And now they're all singing up. It takes a little bit because I'm recording at the same time. And then just my laptop goes a bit slow, but probably doesn't happen to you, depending on the power off your computer. But as you can see, that all looks no fairly similar. So that should be a really good preparation for you, our time lapse.
35. Panorama Introduction: in this tutorial. I want to show you how you can stitch a panel Amma together, And that's especially important if you're planning on shootings and murky way with this nice bore. And that's possible. And yeah, somewhere between March and early May. And for that you will have to stitch images together because even if you should was wide anger, you will not be able to capture this. Who abo at once you will have toe Yeah, kind of stitch images together so you will have one image here. Then you remove the camera a little bit more than you have some kind of overlapping in between. Then you have the next image again. Make sure that there's some overlapping, the next image and so on. And I think this image was actually taken from six different images, and it's even better if you can do more. Because although I try to clone those dark lines out, that's just the problem. When you don't have enough overall overlapping in between, you can end up with this kind of darkish area, so the more images the better. But I would say at least six to achieve this look. And if you're interested annoying how to create such a panorama, then a visual uses now
36. Why to Blend Multiple Exposures to Get the Best Panorama: before we start stitching our panorama, I want to show you how you can blend images in photo shop. And it's kind of up to you because as you've seen the power in adobe camera raw, also in light room is these days so good that you would even get away, probably with a little but often over exposed foreground. As you can see you and Dawkins us down. However, here in this case, it's going to be already be tricky because some area look really white and bleached out to me. So it's always better if you edit location and on the tripod anyway, that you kind of have one exposure for the sky. So here's the exposure is really nice for the sky. You see all the stars, but that you have seen one as I exposure and thats no for your foreground only because if you docking everything, then also the skies will be less visible and I want to go into Photoshopped. Toe blends those images and, as you can see, 1/2 year, six images. But we will be really stitching on the three because I will blend those images together So once more this is here just for my stars. This is for my far ground. That's also just for the staff's this images for the foreground once more. That's just for the staffs. And this is for the foreground. And they were just open them up now all together with Commander control and a and then I just go onto my wheel and this will be open now are together in that will be camera And you can do already some changes in here if you like. Wherever I readjust to the blending first in photo shop in the later when have my stitched image. Then I will come back to Adobe camera raw to do further adjustments. So from here I will just go into this bar up here. I will just say select oil and without any further adjustments just that the oil selected Now I will just go into my open images and the novels you again in photo shop
37. Blending Images In Photoshop: So now we opened absolute images into photo shop, and I want to select this area and paste this on through this area. So the easiest way for me to do so, its command or control and a too selective area. And then I go on to command or control and see two copies is and then I go onto this image and was command or control. And v I put this in much on top. So the idea is now that I want to keep the sky in my image appear so that's the area that I want to have revered wherever. This area down here I want from the image on the knees, words DACA. And the easiest way to do so is if I just go onto my mask and I have a black foreground color and I'm on my Grady into it. And then I can just place my my shift here somewhere in this area where want to have this transition. So I just want that this area was the trees might just transition into this brighter area. So I will show you know what I mean. Was that so? The shift A click? No, onto this area kind off these trees are. And then I just drag a line up top something like this. And now if we look into our Grady in members auto option. So you see, this year on this mask is now this radiant that we direct. So we have sex Bleck, foreground color down here it's 100%. And then we started here kind off at thestreet lines, and that's where we place this transition. And then up here we have no the whole area revered. So if you look into the emergency Z before and after you see that we have now the sky revered and a little bit off the trees if you don't want to use the Grady in than if you just throw this away for now, so I just go in and adjust It leads us. Yep, Deletes. And if you don't want to use that, if you think that too complicated, then you can obviously also use your brush. So I just go No beautiful brush. But you still want to transition that somehow because it would look a little bit weird if you're now painting this completely dark and then all of a sudden it sends us brightest areas, did it in the tree because if you don't do it transition and you really would have to zoom and very close to the tree to completely paint them out and adjusting. That's not really necessary. And it's faster if you just transition into the brighter area. So there's 100% over just pains of area outward thing. It's too bright, like hundreds and now just painted out. And now I just have to say, OK, maybe was now a 50. I go a little bit up and paint out these trees and then maybe was 20. Just paint a little bit over the sky, and then I can just see my before and after and I was still have source trees revealed and the sky revealed and every look. It was all too option onto the mast. And you see, there's also some kind of transition, so he had completely masked out, and there's a slight a gray area. That's the transition into this guy, and I think that's just a little bit more natural. If you want that, we bring out this area's well, we just have to switch our color was X, so we have no white foreground color. And then we could also masters tree out a few things that should have maybe a little bit more light on it. And then we can do this as well. Or we could also just say, if you want to masters maybe 40 or something and then you just get some detail. Beck. So that's one or the other way. If you want toe mask it out with the Grady and or with the brush that's up to you. But I think for now we're looking good here. That's kind of what I wanted to achieve. So I just brings those layers no together. If you want to keep those layers or as a Photoshopped fire, that's up to you. That's no problem for me. I just don't really have a need for that. I just want toe bring them into a J pic. So I just go under shift command and E to reduce them down to the background player. And then I go under shift command or control and s to save this and then I'll just save first in much four panel. Something like that. Anything that makes sense to you. And then I just go onto safe. And yet it's up to you if you want to have so full on maximum was 12 to save the image. But because I want to bring those fired into a panel AM I don't want to have the single image is too big. Otherwise the panorama just gets massive. So this thing was 10. We okay? And then I just press OK, All right? And then I can go into this image and I can just close us down. And I don't have to say if you anything, because I already saved us. And now we can work on to the next image. So he I do the same thing once more, command or control and a to select command or control and see to copy. And then I'm going to this one and was Commander Control and V. I just places on top and just so that it's a little faster, I would just use another Grady in tow, maybe a transition somewhere about you. The shift is just so if I would just drags this and this wouldn't stay in place. And if you just press shift at the same time. Let me just go back here, then it's just a straight line. So that's why I press shift at the same time. And then this is stocked. And obviously now that he wrong way around because I have white notice, my foreground color. And if it's white as your foreground color, you just have to go the opposite way. And now you have also this transition. If you can narrow this for the first ham, it doesn't really matter. It's kind off. It's not really difficult because the moment when you see that it's the wrong way around, you can also just press on to command or control. And I to invert this master, If we do this now, now it would be this way around, and we're like, Oh, no, that's wrong. And if you just go on to command or control and I again, then that's the right way around. So I think that's pretty cool. And then it just reduces down again and going and going to commend and control and shift. And then I just say, um, second and much for Mama, all right, and then I just going to safe and 10. That's fine. And then I can also close those two down. So just go, don't save and then also just kills this one, all right. And this is already the last one year. So once more, commander control and a to select command or control and see to copy and then command or control and V two places. And we can also use no the brush and just there keeping pronto masks this down here at 100% . So I just pressed on to zero, and then the opacity changed 100%. And I need a black foreground color. So I just switched. This was X, or you can also just go on here and such those callous and then I just masters our That's 100%. Definitely the house here where it's just too much light, something like this. And then I just press on five for 50 and that's you have my transition now. So it's just a little attack in the trees. And then maybe a just zoom in a little bit to get us out of swell like a 50 because it just sings. This looks a little bit reached out and then never just brushed with the twenties were pressed to for 20. They never just brush over this area in general. And then if I look into my mask, I also have some kind off a transition here where you see this light? Great. So I think that's okay, Andy, before that's the after. Yeah, I think that looks pretty good here. We can even see now the end off the Milky Way, which is pretty nice. All right. And now we just have a nice foreground. Tears. Well, so with shift commend and ear just reduces down and we'll shift command or control and s I would safe those. And I will say that's my search in much for Panorama. Obviously, the more images you have here is a better. But I think for now, with the three images that should work all right to stitch them Now back in adobe camera, raw together. So now I just go onto safe and say OK, and then I can close those down as well. So just don't say for safety's already and then we're back on here. So if I go into my bridge, you see now my first J Pig, second Jay Pig and search APEC for my panorama and I will just collect them now. Once more was command or control. And then I opened them up in my adobe camera raw once more on that, just collect them all together. And then, instead of saying something like what we did before, now we click on to merge to Panorama and, as you can see the adobe camera raw function here when you want to merge a panorama did really cool job. You can play here with different projections. It doesn't work in perspective because I don't have enough images for that. But you could play here with the's cylindrical a. If you things that would look better, and then you can also dry. Here's a different boundary rep. However, I think this Vereker, but it was by default is probably the best option, and once more if you want a little bit more information than you can also use years this war. But I think how it came out, it's already pretty neat. I think you're just leaves us here at zero because I think it did a really good job. So now I just click on too much, and then from there on we can do our fine tuning in adobe camera, raw
38. Panorama Edit in ACR: all right. And now we have our image year made from those three pictures and that our panorama. So if you're not quite happy yet was any layouts, you can do the free transform immediately. You could try. If anything works year, what's just a little bit more straight or one off those other functions? He It's just a little bit motivated. I don't think here, that does a lot, So I can probably stay here with a and then if you wanted to rotate us a little bit because I kind I mean, this is kind of for here, So I can't really orientate myself, but said, But I think this should be straighter So I just want to rotate us a little bit because it looks a bit t to me and then this is kind of my horizon. So I think that's probably okay, and then I could also maybe crops is in a way that it looks a bit more interesting. But let me see first if our continued sits vertically because the thing that bothers me, yes, obviously this house, so maybe it just go here. Bits of it looks a bit straighter. And then I can receive up my scaled us here on my aspect. I could also just maybe just pushed us a little bit like this. So I think that looks no, fairly good. It's a little bit irritating, but yes, this is ah, like a little here that goes up here. So don't think that this is audited. That's literally how it is in this location, because it goes a little bit up like that. So I think this looks straight and this looks fairly straight. So I think we go cheer so we can also crop just now. A few things that might be Yeah. Just a little bit on the boring side. And we can bring this may be a bit in. Maybe something next. This maybe we can catch here through this first, owners. Well, just toe have a little bit more off. Interesting composition. Yeah, once more. This tree is bagging me a wish it wasn't there, but that's nature. So maybe something like this I'm not sure it's up to you. You can just play versus in general. But I think for now that looks pretty good. Surgeons press on to return, so I think our layout looks fairly good. Our house doesn't look too crooked. So over oil looks fairly straight to me. So now we can just change your our panel. But because once more I think overall, this could be a little bit blue in the sky and then we can just play here, which was certain areas. We can also just use the preset if you want to do that. But for now, I think I just do this manually because I'm not quite sure how my highlights are doing here . Let me check those white points once more. Although we reduced this town already was hour blending and photo shop. Let me just check if you can just opens us a little bit because I don't want to have a tooth fled. Overall, I won some kind off white and black for my contrast. So I think this looks good and I also will just introduce a bit more clarity. Not too much here because I think that those trees look tacky. A raza brings a clarity into the sky later and maybe just a bit more vibrance. Something like that and I think he had would be nice once more if we just play here with those complementary colors, that's the trees are not quite so blue, greenish and cool looking. So I think I want to warm them also a bit in this area. But first of oil just bring in much happening, maybe something like 80 but every master off up to a point. This area front, this black. So everything that's black, that's mast out and everything where you see what? Why it you will have so sharp ning sc effect for things this is cool. Then we could also bring in a little bit off the ruminants because off course, when you shoot at 3200 you will have some noise. So let's say something like that. We have been over this 100 rule now if we wanted to be correct and this should be 70 year, but again, we must this guy out. So I think it's not so bad if you just go here a little bit more crazy because I don't want to lose those details here in just in the sky. So I think that looks cool Now. We can take care if we want to have souls trees, a little bit warmer. Let receiver can just brings us green into a more yellow Ashton's asking that school that received that dusty anything. Yeah, it's just maybe, but more yellowish rather than so green. And then we can see if we can gets a bit more orange. Yeah, I think this is pretty nice. If any off those colors are bagging you. You can also just reduce the saturation here little bit. So, for example, can just Drexel screens out just so it's not so overpowering. So I think that looks nice. We can also do here some split toning if it just go on to the U Maybe we find some nice orange something nexus, maybe the same miss a shadow. I just press also option down to see the effect. And then maybe in the shadows, we can just bring in some flutes and swallow something like this. Maybe normally, when you have a new orange tone in your highlights and the blue tone in your shadows and it gets this kind of movie looks that I really like, So I think this looks pretty cool. Then I go into my chromatic aberrations. We can also egg again you can't enable your profile corrections here because it was also shot with the manual lens, so that doesn't work. Unfortunately, however, we could reduce some off this distortion if you think it's maybe still a little bit crooked . Maybe something like that. Yeah, I think this is nice. And from here, you can also decide if you want some slight, then yet maybe just to darkness is era even more. As you know, you can also just do this manually. But maybe a little vignette ing would be quite nice. So that's all what I want to do here in those basic adjustments. And then I just want to go back into my radio filter. And I want to warm this house here even more. Also, let's go in here. Maybe a small exposure, but a pretty warmish tint. Something nexus because I don't like when the lights look kindof greenish or bluish, using it to people orangey. So let's see. Yes thing that's nice. And then I will just bring in the new reagent and then ness exposure, maybe a little less office, and then I just Drax is over here as well. So then I get this orangey color once more also have this complimentary color. I think this was nice. Just be careful that you don't bring it to a high interest, this guy something maybe like this. And then I just do another one, and not just to maybe tens of tree. And I think, yeah, you could probably do this, but maybe it's easy. And now to work here just with your adjustment brush, and then we can also take it tends ALS trees down here just ever so slightly just so that they look like they also gets this color from those lambs as a vice. It's a bit unnatural of those lambs and, like Super Orange. And then those trees have slight how it hurts before, so obviously always make sure that it looks as realistic as possible. But sometimes it works best if you work on all off those three different ones. Sometimes it's a really good combination to work with the radio. The adjustment ends a Grady in Filter to get the best results, and I just want to go in. He was a smallish brush because I think just in the top here, just so that also gets a little bit off color. So I think this is pretty nice. And you let me just go back onto this first adjustment just to see if I didn't bleach know anything out too much? Nothing. Because I put the exposure and here I have to reduce those highlights down now. So let me see. Yeah, I think that's OK. That's not too much off a bleach area. Things that's okay. However, I think a gill, I go now back into my adjustment brush and then I just paint the rest off the house. You just a little bit just to give it a bit more color just to make it a bit more interesting for the viewer. Something like this. And then a bigger brush down here. And I'm just a little bit appear. So I think this looks pretty cool. So let us easy before and after. Let's see, before that after was more like, Yeah, I really likes it. So from here I will brings us in tow Photoshopped to just do some really minimalistic find changes. But as you can see, you can do already 90% off your workflow, and that will be camera
39. Panorama Edit in Photoshop: now our images back in 14 shop and yeah, I just do the same thing as we did before. I just go into my color Look up and I want this Ah, sky area just a little bit business crisp and winter Just I think it looks kind of nice and obviously not over the whole image to adjust inverts this mask with Commander control and I and then maybe not was 100% maybe more like a 30% and x was X. I just changing my foreground color toe white And then I just pain ever so slightly over this guy area just a little bit. Maybe just sorts a little bit more interesting, because it's did it. Although we changed the temperature already. It's the kind of has his grayish look. And now I think it's just a little bit more blue and nothing's This is pretty nice. Then I will do the opposite effect down year. And for that I go once more into my color Look up and instead, off the crisp and winter, I will now go into crisp and warm. And then this warms absence area even for us and also gives me more contrast. Obviously, that's there To extremes was command or control and I inverts the mask and then was be as my for one color and white B as my brush and white as my father on Kala. I just go onto my 30% year, and then I just brush in this warm contrast and obviously the closest used room in the better reside you will have. So I think something like this a little bit up into this guy as well, so that this tree once more looks a bit more realistic. You could also work here with the Grady in, but I was just, you know, on my brush, maybe something like this before and after he had just to give me a little bit more contrast. And I think I went a bit overboard. Just switch two X ones more. No, I have black as my for one color. And then I can also masters out when I went a bit too overbought so that he before that after And if you're not happy, you can always just reduce your a pass ity down. So that's no problem at all. Okay. I think this is pretty cool. Then we can also work here maybe a little bit more on the contrast in the sky once more with your curves So you could brings us a little bit more out and then was an s curve. You can also get a bit more contrast. So I think this would be pretty nice in this guy something next this year. I think that's cool. Would be maybe even good for this area down here, but just not so extreme. So first of all, I just inverters again, Commander Control and I and was 100%. And we just brush into my sky. So I just pressed or 400. You can also change your A pass ity obviously up here and the ones of wrong for Ron Callus was X. I switch back to buy it and then I just pains us in something like this. And then I go onto my mail. Let's say maybe 20% off on a pass iti. And then I would also bring in some contrast up here that thinks this might be too extreme . Overall, No, actually, in this guy, it's quite nice. In the three years a bit crazy. So I just reduces down maybe 60%. And you could also go in here now if you would see more off the Milky Way, as he read it before, where you can just play year with those different colors. And you really can callus the work off the Milky Way, even for us, where you already have so spreaders and yellow tones. But I think the Milky Way, the anti years not really clear enough for really painting anything else out off here. So things this contrast overall, it's already pretty nice. The only thing I thought we could do if we go back into camera raw as a filter, maybe some more clarity in this guy. I think that would be pretty nice as well. But for that we need a new image layer on top. And, yeah, that's the longest shortcut on us shift old or option, command or control. And you, we'll bring us this image layer and was shift command or control, and a We will be back in camera raw as the filter. So, yeah, I just want to bring in a little bit more clarity. Let's use the adjustment brush for that so I just go onto. My clarity was maybe 25 a smaller brush. Maybe you like 15 and then I just brush a little bit over this area. Just who brings this end off the milky Way out? Just a tiny bit. And then I can receive her once. It's more or less if ago, 100% and it's even more extreme was a sigh. It's here where heads us fester in my brush, but you are maybe even, you know, maybe a 50 or something like that. I think this looks really nice and then I just press OK. And if you don't, if you don't like to work with shortcuts, then you could also go into your camera feta over fitter and camera raw filter. Or, as I said, you can also press shift command or control and a and then you can also work more with the camera advertising Zissis since six, and that's pretty cool. But I think for now I really like this so much. I don't think we have to go here too crazy. As I said, we did already a lot off stuff in Adobe camera raw anyway, as you can see you. Like I said, it's better if you have more emerges because you can see a little bit off this darkish area . And that's where adobe camera raw stitch those images together. So if you don't really like this and you could try to copy now a little bit over this or we can also just slightly calluses in with blue just so it's not so black. So that's probably the last thing I would do here. So I go on to I to pick up a Kulla. Maybe something from this area appear, and then I just go on one for 10% capacity is really just ever so slightly. Just because I see here with the stitch was from one image to the AZA. So the more you can chewed in the way that you have those overlapping area. So instead of just taking those three images, if you would take maybe five or six images, then you just give photo shop or do became a raw, just more area, as I can do. He has this this heading off those pixels and then you will end up with less stitched areas that are visible so I'm just painting over here just a little bit. Let's just make anything now, maybe a bit brighter area. Let's go into this area. Yeah, or maybe even a bit brighter. If you just want this brighter, you can just move. Those appears well, and then maybe just was now 10 or 20 maybe. And then we can just paint us a little bit. Just was, it's This stitch area where it's dark in the middle is not quite so visible, and then I think it's too extreme now. But that's no problem. I can just lowers the capacity down, maybe 50 or something before and after. Yeah, I think that's nice. It went a bit overboard here, so let me just mask my medic. EBay Milky Way back out was X. I just have my black father on color and then obviously 100% just to get my milky way back and then the before and after. Yeah, it's just this area here that just faxed me a little bit that it's too dark. But if there's room out now, I don't think it's too noticeable. So I think this looks pretty cool. So once more you can keeps us Now it's Photoshopped layers or you can just also save it as a J. Peck. That's up to you And yeah, let's have a look now at sea before and after. So let me just break this down and that just saves us s a J pic, okay? And then I just go back into my bridge and let me see. So that will see before that we kind off made from those images that we already blended with the Dhaka and the more exposed area. So that's a stitch from that. And this is now our adobe camera raw file. And I think this looks pretty good. I mean, okay, we can always change more things. And Photoshopped, there's still a little bit off docker area up here. You can also clones us out or just paint ever so slightly over this. However, I don't think it's too extreme. So I think the colors and the world's ditching that worked really well. And you also that see, reside off our panorama
40. Developing the Image in Lightroom: now you saw all those different work flows how I work in adobe camera. But I promised you that if you prefer light room that you can do the exact same things. So let me show you now what I mean was that so for this average us track in image out off my bridge into light rooms were just brings us down into my dark and then this will be opened up in light room. So light room immediately detected. There's actually who were fooled other directors and much from so I could potentially import all off those images. However, I just wanted to have this one in Murcia and light room, therefore that a sticked and then I just go on to import. And now light room they're just opens this one image. The whole thing was light rumors that it works really similar to adobe camera raw. It just has a completely different layout. So instead of having bridge and then you have these folders and double click in tow Adobe camera raw. Here you have the scanned off library and develop toe side by side. So that's just up to you. What you think is easier I kind of grew up with bridge. Therefore, I just think that's easier. But if you're used to light room than you can obviously do all those changes that we just did in light room as well, that's no problem. So here you can see this is the library here. All those forward us just as they are in bridge. You also have, like, different versions. Are you can tacky what? And so on. But now we want to do our development, and fathers are just click into develop. And if this has no data selected or something, then that just because you didn't actually click on this image So you have to have this image, she and gray. And then this is visible in this big area. Appear and then on the left side are here of thes presets like what we did before. So you can also just generate presets and save them. And then you would not find them in this Panama we clicked through. But you would find your presets here on the left side, the same the snapshots and history and collections. And on the right side you can do your basic development appear. You have the same functions as we had in a little bit. Camera raw up here. You can do your cropping up there. You can do any feelings or you can clone things. You have a red eye correction appear. This is your radiant and this is your radio and this is your adjustment brush. So it's fairly similar. Also appear just as you saw in adobe camera raw so fast off our why don't be just crops is in much. Maybe so we could just say maybe a bit more interesting off a crop. You can also change your anger or the aspect. And you could also keep now constrain and much. So for me, that makes sense because I want the same image layout year, the students re racial and then I can just Rex is a bit sort, maybe a bit more interesting. Now. I just think I lost too much off the Milky Way, and that's probably more interesting than this bench. So maybe something like this, and then I just press on, enter or return, and then this is my new crop. From here, I can decide to elect my temperature to a once a sua Mukula the tin, just as we did before. Then we can just go down here rather than going through those panels we can just thrown out down. It's a little bit treasury, but just very slowly to see the next thing up here. Here we can change the exposure. If you just wanted the whole image, maybe a little bit more exposed. And then also maybe the contrast. I think it actually talks all things over already from Adobe Camera Raw. Also, it's quite nice. All these bows. Yeah, these two programs, that's a can off black hands and hands. So any changes that I did already in bridge are visible here in my basic developments as well. So that's pretty cool. But I can still play he around with my shadows, my whites, same thing. If a press onto, although option, I can see here my white points and my black point. So that works all the same. No problem at all. Maybe something Lexus. And then I think the overall exposure and the tone that's okay. Then you can also go here into clarity and vibrance. Maybe we just wants us image a little bit more vibrant. You can go into your tone cough, which I normally don't use a lot, because I do already there kind of touch up in the contrast with my wife and my black points from here. You can also change nosy you so we can change this yellow is you into something that's not quite so greenish looking. But maybe Moses brownish toned something like this. I think that's pretty nice. And then from here we can go into this split toning, I think maybe in the shadow area we can use a bit more blue. Let's see, maybe something nexus, and then we can just cool this area a little bit down. So it's their kind of a brownstone, but maybe not quite so color for so I think this looks pretty nice was split toning from here. You can do no, you're sharpening your noise reduction. You can also see if you are lens would work here in the lens correction once more. For me, it doesn't work because it's a manual ends, but I can also remove your chromatic aberration. I can also go here into manual. If I wanted to have some kind off, less distorted image. Maybe something like this. And if you have any chromatic aberration, you could change the CIA's well and then you can go down. And then you could also change here. Now the over oil, Yeah, crookedness off the image of its stated. Or if you just wonder, to transform your image even further. If you wanted to rotate it and so on, then we could change this. Yes, well, maybe something nexus. So that's us. Benj looks a bit straighter. It's always a little bit off a see saw effect because now the bench look straight, but the mountains they go down. But I think they that's just how they are in real life, and I believe they do go down. So that's obviously when you just orientate yourself on this horizon line, that might not actually be the truest off the image. So now I think this also doesn't look straight now. It's always a see saw effect, so you have to play. This is rotation a little bit, so maybe that binge ends us. Um, I think it's a solar panel that that kind of matches upsizing. Now this looks pretty good, and then we just go down so you could also place your some effects. If you wanted some kind off post crop vignette, then you could change this year's. We could brings us in the tiny bit. Maybe just a little bit. You can also bring in grain and so on. So all those basic adjustments are just like what we did in Adobe Camera. Then from here, we can also say No. Maybe this looks a little bit too over lit, and I would use my adjustment brush with us now and then. I just bring my exposure but down and then all the colors will warm. I think that's OK and probably the size off. The adjustment is also okay, and then I could just brings us maybe a little bit down because I think it's nice that this bench has a little bit off a flesh on it, so it's a bit more noticeable, but I don't think it has to be all the way appear. So it would just turn this down. Not so much, just a little bit, and you can also play here. Off course was a different feather, and on the size and the floors we could awesome just reduce the floor here says that the phasers okay at 100 but probably the floor. It's better if it's a bit lower, and then we can just pains us and maybe also around the bench sorts of Ataka. So that's the I goes to the bench and from the bench into the Milky Way, its existence. This looks pretty nice. Let's just create a new brush and then we can do is the same for the Milky Way. I just want to have. This was clarity. Now let me just say the clarity, maybe Sirti. You can also just click in it and change. That's fairly easy here. Just say zero and then I just pains and maybe a smaller brush. Maybe something exists. And then I just paint a little bit over the murky ways that I get more detail and year. If you would brings us now into photo shop, you really see how the Milky Way is made up from all those color. So this was red or magenta and green and yellow. So if you want to play with this image in curves, I think you could really find you in here, this detail, so that's pretty cool because you can see all off those yeah, defined areas in the Milky Way. So that's obviously really nice. If you have images like this, however, as a basic development light room or adobe camera raw, they do really good shop as well. So we're I think this looks all and are really nice. If you wanted to bring and maybe some more bluish stand up here. We can also Drexel's Grady and down a bit more when we just bring this and maybe you, maybe something like 20. And then we can just press shift once more and just rexes Grady and down. And then it's It's the same thing. How it's and it'll become raw just looks a little bit different. So the center is where it will be placed the most, and then it has this Faiza to those sites. So that's kind off. Now you're Grady in, so let me just see assing. This is pretty nice and there's anything out we want to change. No, I think this looks really good overall, so yeah, it's promise. That's the exact same development that you can do here in light room. As you learned in Adobe Camera. So have fun thing was that
41. Opening Image from Lightroom into Photoshop: And if you want to open your image now in photo shop, then you just go under your area here with your right mouse click. And from here you just go in tow, add it in and from here you collect added in adobe photo shop. And then it just takes a few seconds and then that will be opened up in photo shop. And from there you can do then all the other find joining as we did before, so have fun.
42. Creating A Star Trail Image: All right, so now we are ready to make beast Artrell images. Sandy's done some of the pre editing forced, so we should be good to go. Festival. Let's check the program to use their few out there. You can google around. Feel free to experiment and see what's available. I e views Stass tax for a while. It's free. It's great. Does the job Pretty simple. You can find it on this website here, so just head over there, download it, install it. There's Mac and Windows version, and when you open it, then the interface looks a little bit or exactly like this. So super simple. You can drop the images over here to get them processed, so let's just go ahead and do that Now. I've got the images over here, so let's just go and select A mall. Boom means that the Star Trail one. So there's about, I think, 96 after Sandy removed a few that had some undesirable little light trails on them. So they get loaded up here into the ah into the main view, and you can see some of the details around the particular images, and they're not a lot of options, But I kind of like that because I just want to go ahead and create my final images as quickly as possible without too much messing around. So things like the blending mode you can feel free to experiment a little bit here. I intend to just use leave it at the default, which is lighten now when I do like a couple sayings in particular. So one is thes comet mode. So if we were to just create the star Trail effect as is, then the stars would begin to create this circle, with each image having an equal amount off exposure. And that results in a relatively boring version, which where each line each star makes, is equal size equal with all the way around. I like becoming mode because it sort of tails off the earlier images to be less exposed. So each star, as it goes around, looks brighter by the end of the trail than it did at the beginning, which will see on it really just gives it a very cool, dynamic effects, so you can play around with that now. What we can do at the same time is saved the image after each step. So this will help us make our time lapse video a little bit later on. Because if we do a time lapse off the stars, Justus they are is like pinpoints. We saw it on the on the time lapse video that I made from last time, and it's maybe a little bit difficult to see them revolve very easily because they're very small pins a lot. So what's, Ah nicer way to do it, in my opinion, is to save the image after each step, so each image as it gets saved is a longer and longer and longer trail. And then we can add them all up together later to create the time lapse moving. And we'll see it actually here as we do that. So we'll save after each step. We can just choose, are naming there, and I will just put it may be in a different fold it. So the doom let's go over here, create that and cumulative All right, then we'll save it that there is a few options again for the background and interpolation. I tend to just leave that as default and cost the general settings of English works for me . You got a few language options there as well. So right, we're ready to go and create asked natural image. Save him after each step. All you do is hit this little button over here to go processing, and you just let it do its job and it is doing it. You can see how the trails get created and how the final image gets created as well. And this is always a good one to check. If you were really pointing exactly north or not, because you really see how the North Star in the middle over there is either exactly in the center or maybe just a little bit officer, in my case, a little bit off on. Of course, that's fine, because it's a cool effect. How the Airstream and the trees can a frame. The circle is it goes around. But you got many different options here to play around. You might not get it right your first night out, but don't worry about it because just always make it a lot of fun. Whenever you do, do it now, as you can see and we'll see the final image when it's created. But see other later images. Ah, a little bit brighter and they're sort of trailing off. So the earlier images and not is exposed, if you will, on that creates that comment effect. When you took the the button, we can do it again without the common effect, just so you can see that comparison. All right, so that's done. Now, with the 96 images, I actually took about 100 or just over 100 sandy through a few out because there was some unwanted like trails going here, a bit back and forth. That has resulted in a little bit of Gap I don't mind in particular. But there are ways to fill that in. If you wanted to do that in front of shoppers, well or if you just wanted to take the images with those extra with no gaps. So let's look at the output image. We can just go save as, and it would be a default name here, so that's fine. So I'll just save it. Boom with a picture. Okay, so let's go ahead and take a look at that. All right, so that's pretty cool. That is the comment effects. So again, with some of the images taken out to cause those gaps, I don't think it's a really big deal. If it disturbs you, then there are ways to fill those in. But I think it was a little bit better than having ALS these streaks of light back and forth for about five or 10 pictures, where we've done that by when we were walking back and forth in front off the lens. Because the easiest way to avoid that is to not walk in front of the camera while you're taking the pictures. Okay, so here I'm gonna do the same again, but without the comic modem, without saving after each step. So just to give you guys the comparison off, what it looks like without the comment motor. So let's just let that go through. All right, so that's done. Now you can see a little bit of difference that already, so let's just save that again over here. All right, so it's going. Take a look at that as well. So this is our image. With the comment effect on this is the image without the comet effect now, it's really a matter of personal preference. I kind of prefer this one is a little bit more subtle. It looks like a little bit more dynamic, but that's also cool as well. Now we can also do is go and take a look at our cume. It'll live cumulative images that were saved after each step on this picture. All right, so here are Q look, human lip tive images so we can see the 1st 1 And if we just scroll through these, okay, we can see how each image is basically the length off. All those star trails added up as time goes on. So by the time we get to the end, the last one is basically the full star trail on get reduces. We go further back now. Why that's important is because when we add them all together into the time lapse movie will see the Star trail get built up from scratch, which is a very cool effect. So let's go and take a look at that
43. Creating The Timelapse Movie: all right now to the fun bit where we can actually create the time lapse video itself. This is the final part off all that hard work that you've done. Creating the image is getting out there into the middle of nowhere or hopefully not too far away. And you should have hopefully got a few folders off tons and tons of images. Maybe over many nights that you can all stitched together. Now remember each kind of time. Much clip that you can make tends to only be sort of 5 to 10 seconds long because it requires a lot of images. So to get a full video of a couple minutes long or or even more than you'll most likely need to be out on quite a few nights. So we're gonna make quite a short video here. We're in light room. I've got a combination off the Milky Way images on the Star Trail images, actually, the cumulative images that we created in star stacks so we can watch the star trail grow Aziz, part of the time lapse video. So until we got 291 images and but before we can create the time lapse from this, we need a preset. Luckily, the clever folks over at light room blood dot com have created a time lapse preset for us to use. It's free. You download the zip file and unzip it. And in the slights show section of light room over here, we import it. So you got your user templates. You just do right click and import and in your downloads wherever you download it from, check out the slideshow templates and just select a mall and import them. Unease A basically just frames per second presets for that eventual video that won't get exported. All right, so in this case, I'm just gonna do 24 frames per second. You can experiment with the other ones as well. Andi, if we look over on the right hand side, there were quite a few settings that we can apply here, so I'm not going to go through all of these. I just encourage you to experiment them with them yourself. Like you can add music, for example. Um, you could choose random order, but that's not gonna really work in this case. Um, and again, this is mainly aimed at slide shows But of course, here we're actually making a video from it in terms of basically speeding up how often each of those slides plays. Whereas a regular slight slope show it would play back pretty slowly here, we're obviously gonna play it back much, much faster. You can choose the quality down here is high and simply select your frames per second setting and go export video and shoes. Our folder. So I'm just gonna call this one night Skype, your video presets. So just go for the 10. 80 p. Now, this doesn't have a four k preset yet. Maybe it will in the future. And in that case, obviously you want to just make sure your images or at least that resolution But as we discussed earlier on most or even all DSLR cameras will create images that ah, larger than four k resolution because about eight megapixels. So we just had exports. Boom. And you can just see the progress on the top left on side over here, and that will take a few minutes to complete. All right, so that exported. So let's go and take a look at it. This will have most likely created us about 12 12 to 15 seconds. Video. So, as you can see, is a lot of work that goes in in terms of time spent out in the night to create all these images. And the final result is generally pretty short. But when you get a lot of these over a lot of nights all put together, then you can really create a great video. So let's just take a look at this, all right? So pretty short. But I think you'll agree. That is pretty cool. And I hope that will inspire you to G. O and do your own, because when I started, I didn't want to stop. So every time I go out and do night photography nowadays, then I'm always including a time lapse portion off it as well, because it's just awesome. So have fun. Good luck.
44. Thank You And More Example Images: thank you for joining us on our journey to photograph the night sky. As a summary, we covered how to find your location, camera equipment in settings, Milky Way photography, stock trail photography. Ah, quick time lapse Prime AP on a night sky image editing workflow. We always have a lot of fun getting out there and shoot in the stars, and I hope you are now inspired to head out there and do the same. I really want you think amazing images of the sky and experiment with different ideas, equipment and invent your own setups. As always. If you have any questions, we're here to help. You can contact us at Sandy at Sandy's eye catcher dot com, or follow us on Facebook and Instagram at Sandy's Eye Catcher or eye catching world. So thank you until the next time.
 Sandy Dee, Sandyseyecatcher