Transcripts
1. Promo: Hi, My name is Sonya. I am a senior motion graphics designer at Could ska Zach Internet Shell. We are a science channel on YouTube and create two D vector animations for the channel on various clients. For our skill share calls, I'm going to show you how to animate typical scenes from a codes Kazakh video. We will cover animating a multi stat screen, a split screen with simple characters on also a more complex character animation. By the end of this course, you will have several Philly animated scenes in the characteristic cuts Kazakh style.
2. Intro and Overview: in this class, we're going to focus on animation within after effects in 60 frames per second. Throughout the class, we will learn how to do rigging, using doing simple character animation and how to use the wiggle expression. You will need the free Do it plug in for this class you can download doing at Rain Box brought dot coop. This class is perfect for animators who want to get a grasp of complex scenes with a lot of detail. To benefit most from this class, you should know how to set up an illustrator file for animation. We covered some of that in part one of this cause. How does that key frames and generally have a basic understanding of after effects? Some knowledge of rigging and, like a handles, may come in handy. This material is specifically meant for animators who want to learn the courts Kazakh style of animation. Go ahead and download the illustrator assets for your animation from skill share. Okay, let's get started
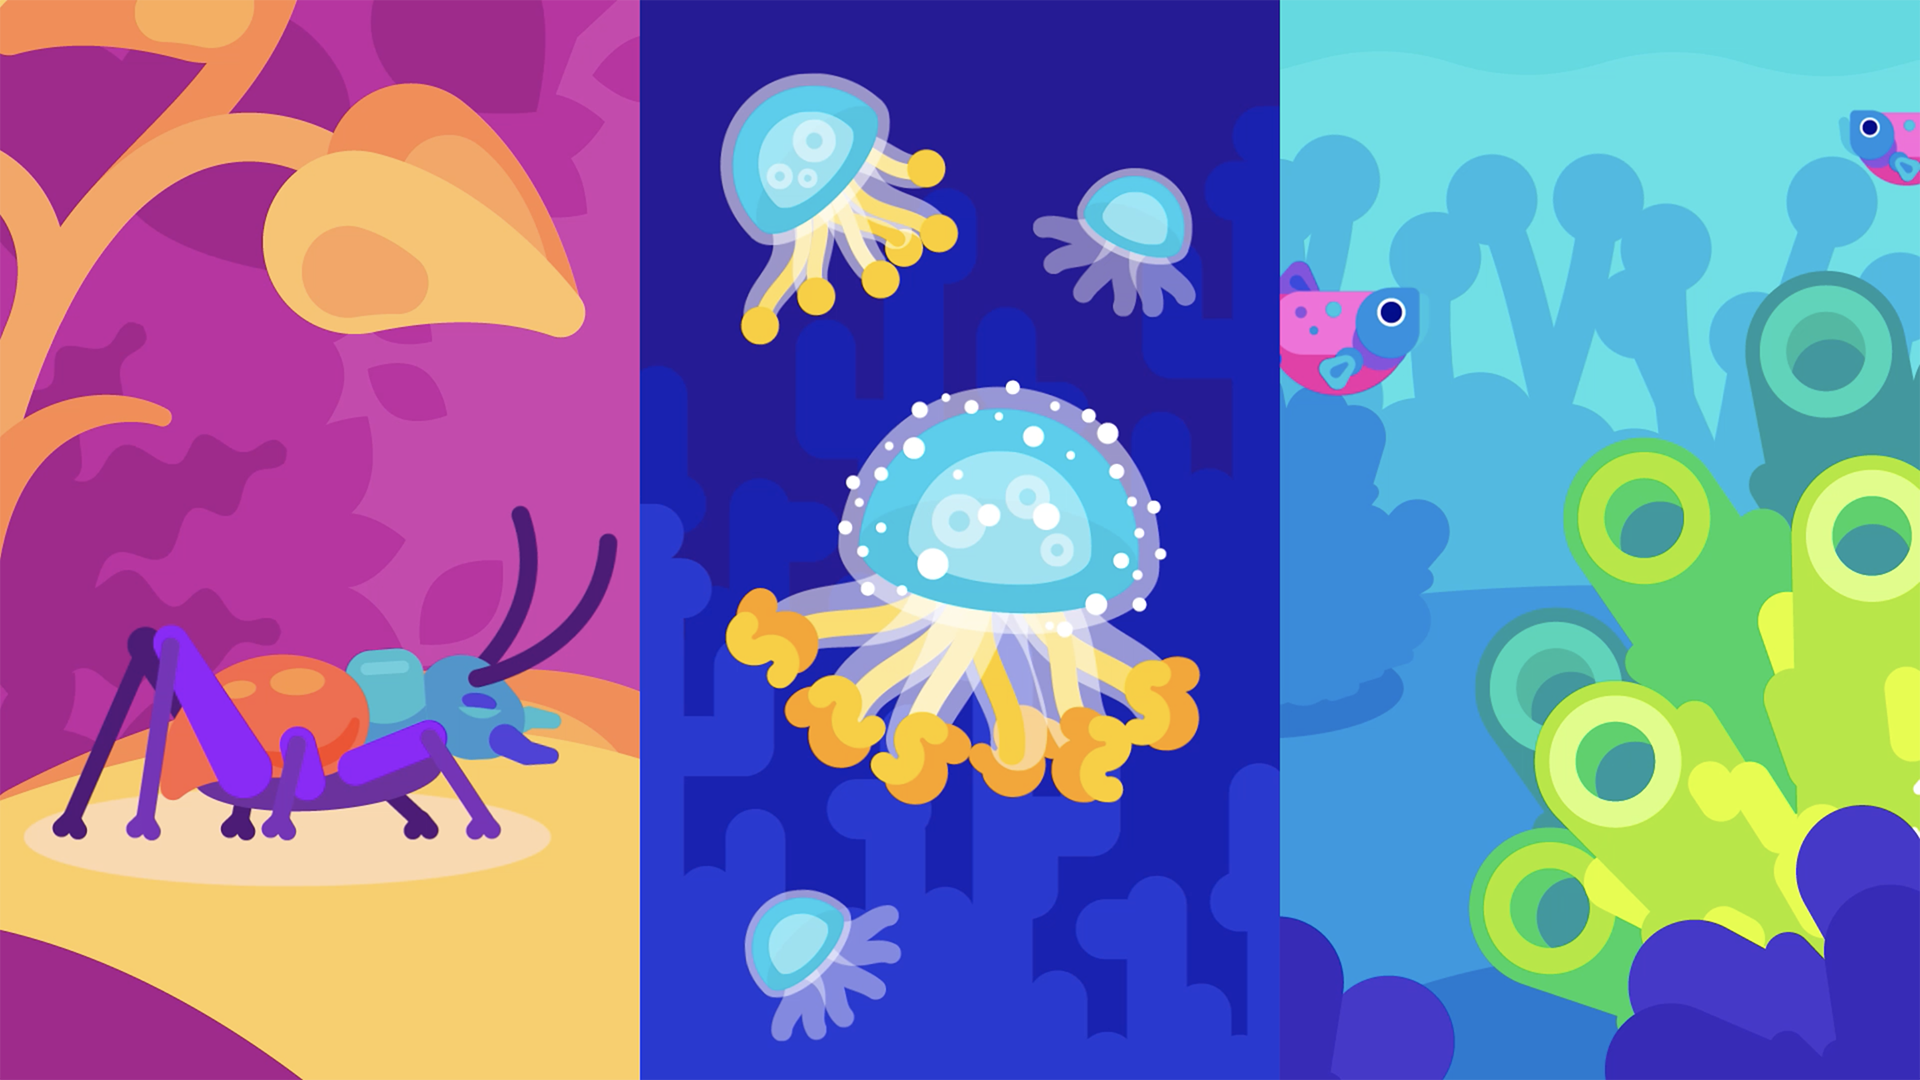
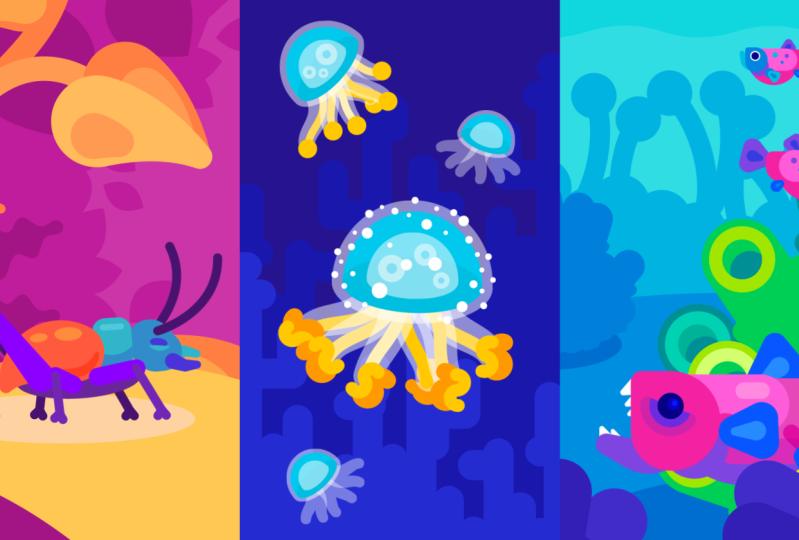
3. Setting up your Project: just as a note. This course is not for complete beginners. We will build on the knowledge from part one off this course, we will focus on animation within after effects. Please don't Luthi acids from skill share. The illustrator file is included in those assets, and you can use that for the animation as mentioned before. Naming is crucial for animation, especially when you have a lot of layers. Like in this case, we have a character that has legs and feet, Andi ahead on a body and so on. You want to start your group of layers with one words like in this case, and and then you want to add what part of the and it is like the body, the leg, the foot, etcetera. We're going to be animating a triple split screen. Andi. I like exact comp sizes for a triple split screen. One scene is half off the full width off our seen off our composition, which would be 960 pixels. Even though each scene is only 1/3 off the size off a screen, we're going to have the Illustrator Art board. Andi Aftereffects comp set to a slightly wider size, which is why we're going with the 960 pixels. This way we have a little bit of a buffer zone. If you want to animate something in from off screen, we don't have to work blindly on weaken slide panels to the side. If we want to create a transition and it doesn't feed gaps between the scenes, we don't have to worry about those. Right now we're going to jump into after effects on this is the scene that we will be animating today. You can download all of the files from skill share, and this will also include the final animation file. If you want to check back, see what I did, what you did differently and companion, it's We have already discussed importing assets into Illustrator and part one of the course , so I'll skip this part will start immediately with setting up our comp. So I've already prepared all of the sub calms. All of the pre comes over here and there, sitting within my main comp over here, it's quite important to have a clean folder structure as mentioned before we have three scenes over here. Andi, I've numbered them in the VFX naming standards. So 010020030 I've given them three different colors, so they stand out within our main comb, dragged them into our main comp. I'll just demonstrate here we want to have one main comp. With all of our scenes inside, we're going to set the start time code to 59 minutes on the duration of the animation will be 11 minutes. I'll remind you later off why we are doing it this way. Then we would have this camp. We want to drag our three camps in here. I've already said a start in an end marker. We have them over here, will set the beginning off our animation, said a start marker Onda set on end market at one minute off the animation. So this is what it would look like. We would then also want to cut the beginning of our comp instead of start marker at the beginning off each comp. The reason why we're doing this is in case we had cut all of these cops over here on. We were moving around very quickly and didn't notice that we moved our animation over here . We now have a visual aid that this animation has moved this compass no longer in the correct place so we can move this back on. Do we know that is all correct? You would now move all three calms to their correct positions to create the triple screen look for its Let's jump into our prepared me income. Like mentioned, we will be setting the end of the animation at one minutes just to remind you we have the start time code off. All comes set to 59 minutes, with the duration off 11 minutes. That means we have one minute of leeway in case we want to add some animation or a pause before the point we have set as our starting point for our animation. It's kind of like a fail safe. Our 0.0 will show as one hour in the timeline. Ideally, you want to start all of your animations at a 10.0 or, in our case, a theoretical 0.0. In case you are, someone else watches your animation back. They can then tell you that, for example, at one minute 11 seconds, there was a mistake you can jump into your aftereffects file and skip exactly to that time without having to scrub through your animation. So it's kind of like helping you with feedback. We have markets at the start and at the end of our scenes, so we know where to set our workspace for rendering. Inside our comp, we have all of our layers trimmed to the beginning off the scene and set, start and end Marcus, just like in the main camp, I have already done the color coding off all of the layers on. Since we've covered this in part, one of this course will be skipping it. For this part, you want to make sure that the background is in the correct position. If you have some pixels that are off, you can right click and you can hit Reset. Then you want to flick this little button to continuously restaurants your layer to avoid a transparent pixel frame around the edge of your layer. This can sometimes happen, and if you have overlapping scenes they could shine through. You want to avoid that now for character. It's quite important to have a very distinct parenting dependency. So, for instance, we have feelers over here, front and back on. We want them to be parented to the head. Same with the jaw. We want that one parent it to the head. The head needs to be parented to the body so that if we move the body, the head comes along. If we move the head in some way, the feelers and everything that belongs to the head will come along. Now we've got size over here. These thighs need to be parented to the body. And then the second part of the leg is the leg that used to be parented to each corresponding thigh. You see have named all of the legs leg frond, a 12 or three. So we've got back legs on, we've got front legs and there's quite a lot of parts. So it can I'd like to point out that naming is crucial. Otherwise, you're just gonna lose your mind rights now that we've parented all of our legs to the thighs were going to go to the foot's and we want the foot to be parented to the leg. And now we want to give the body a controller will hit control or command Ault, shift Why? Well, position the controller where our body is on well, parent, the body to the controller. We always want to have one main controller for characters. This acts as just a controller for the body so that everything comes along. We must have missed one of the legs. Additionally, to controlling the character. It also acts as a visual aid on a divider between all of your layers because you have so many layers here. If you had multiple characters, you have a controller for each character and then you can see where all of the layers for one character and the crop this layer and will give it a name. We'll call it controlled. And Andi, let's check the leg, which wasn't parents into the thigh on the food, which we had parented. Let's check if everything is parented correctly. Yes, on. We also want the shadow to come along. The shadow cannot be parented to the body. If you want to move the body, the shadow would move. So we want to parent the shadow to the controller as well. Now everything else can stay the way it is. If you like. You can also parent the leaves to the corresponding plants now will jump into the next scene. We have some jellyfish over here, so we want all of the jellyfish legs to be parented to the corresponding jellyfish on. We want each jellyfish to have a controller, so we'll hit. Command control Ault shift. Why? For crop that layer. Move it to the position of the jellyfish on renamed that controller on. We'll do the same for all of the other jellyfish. We will then parent all over main bodies off the jellyfish to our controllers. Also, check out background and make sure this little star is ticked right. Let's jump into our last seen on. We want to do exactly the same thing. We want the fins on the jaw off each fish to be parented to the corresponding body off the fish. You can also click on the little colored box over here and select label group. This is another reason why we're coloring all of our layers and after effects, because everything that belongs together can let me selected by clicking select label group . It will then select all of layers that are colored with this color, and then we can drag all of this to the fish body on all of them are parented at the same time. It's a great trick now. We'll also add some controllers to all of these fish. I parented my fish to the controller immediately on. That was a mistake, because if I was to move this now, the fish would come with, obviously. So you want to move your controller before you parent your fish to the controller. So let's undo that. Move our controller to the body position. Then we'll parent the controller, crop it on. Give it a name. We'll do the same for all of the other fish. I use Capital B and Capital F to distinguish between foreground and background objects. That way the names are shorter and you don't have background. Something written out because the longer your names are, the more space you need over here to display them. So you want to keep your naming very, very short. Now that we've done that, we want to position the anchors in the correct position for all of our characters. Let's begin with our first seen on the ant. We want the feelers to rotate from the base off the feeler over here, So you want to hit why and reposition the anchor point off all of these objects. We also want to do that for the jaw from the gradual Andi for the feeds, thighs and legs as well. It helps if you solo your layers and then you can see just that one layer without having to turn everything on and off all the time. You can also do that for multiple layers at the same time, if you just wanna look at one entire leg with all of its parts. That way you can see where the rotation needs to sit. In correlation to the next part, you want to be moving, the anchor points to where the foot or where the part of the body is going to be rotating. Now we've set all of that up. We want to move over to the jellyfish, and we want to position the anchor points off these legs where they will be rotating from so at the top over here. - Now that we've done that will skip to the last scene and again do the same. You can zoom into your seen by using the scroll wheel on your mouse. You can also use shift to move your anchor point horizontally or vertically in a linear fashion. If you hold command or control, it can also snapped to a point. So I've missed that. We have ahead separated from the body for this fish. We want to parent the jaw to the head and the head to the fish body. So since we can't see the Finns over here, we can move the fish into the scene for now. Well, just the anchor points like this, and then we'll just move the fish back. Now that was done, that we can start animating.
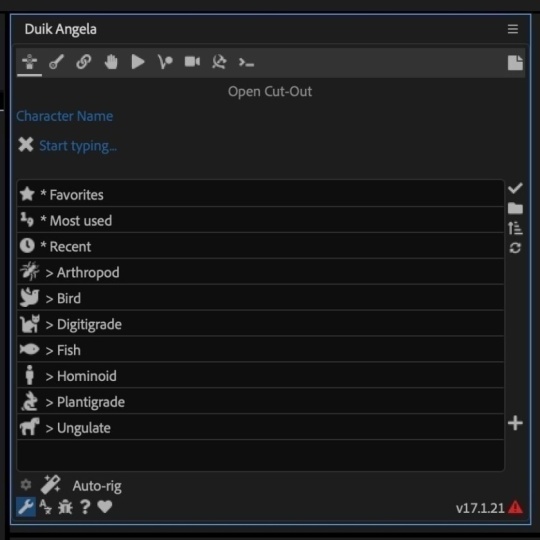
4. Setting up an IK Chain with Duik: Now we're going to set up the doing I keychain for the ants legs I. K. Stands for inverse Kinnah Matics and has used in animation to link multiple parts of a limb like the thigh shin and foot of a leg. So the react to the movement and rotation of their parent intuitively, without having to animate each individual part, you will see what this means exactly once were set up our I keychain. The important part at this point, is that your parenting is done. First thing we want to do is create controllers for each of the feet, will be using the Do it plug in for this, so make sure it's open. Highlight. You fit on, go to controller on create. We'll move the controller just above all of the parts of one limb, and then we'll continue doing the same for all of the other feet. If you wanted to make a walk cycle with this and you would be using these controllers to animate the legs, you would no longer use the foot leg and sigh layers off the limb. Now we want to link the controllers into an eye keychain. For this, we want to highlight all of the parts of the limb from the outside to the inside of the body. So we'll start with the foot than the leg thigh and then the controller Then we want to click on I k. And we want to make sure that we have to layer i k and gold selects it. Onda lock and shy layers after creation Toggled This means that the original layers will be locked and they will be shied. So just like we have shied all of the other layers that were no using at the moment they're still there. They just kind of hidden from view from the animation standpoint is that you don't want to use the original layers anymore. Once you set up your eye keychain, you will be using the do it controller. So let's do that will create the first I keychain. You've seen that the layers disappeared. They're not gone there right here. They're just shy at the moment. Now that we've done this, we want to make sure that the control of works and the I keychain is set up correctly. So we'll move this leg and as you can see, everything is following this controller. Everything is rotating and bending, just like a real leg would. That's exactly what we want. Well, now do that for all of the rest of the legs. Each time we create an eye keychain, we want to make sure that it's working in case we've set up something wrong or we've parented something wrong. It's much easier to undo immediately, once you've done something wrong than having to repair it later. So as you can see, something went wrong here. So we'll undo this, and we'll just check what were wrong. The might have beens a parenting issue. So just re parent all of our layers on. We'll redo our I keychain on DNA. Now everything's moving correctly. That's what we want. It can also sometimes happen that you've moved your anchor point of the wrong position on that could be breaking the I keychain, so we just want to make sure that everything is where it should be. If you have a lot of limbs, it can happen that sometimes you parent something wrong or the anchor point is not in the correct position, So you always want to check your I keychain. If something went wrong. You can fix it there and then and otherwise you've got perfectly moving legs. Now what we want to do. Let's trim these controllers and will make the body move. So let's solo the rest of the end body so we can see what we're animating, and we'll add a key frame to the body. One position key frame will move 50 friends forward on. Move the and body up a little bit. You can already see how the legs are moving intuitively with the body position. You don't have to add any rotation. You don't have to add any key friends to the controllers. Are any off the leg layers? It's just moving along, and that's what a Nike a chain does Now we'll add an easy is on a ping pong loop expression . Now we're also rotate the jaw. We'll add a rotation key frame here and will start at 50 frames just to add a little bit more diversity to the motion. So not all of the key frames start exactly at the same time. We'll move 20 friends forward. Andi will have the first key frame at plus five degrees for the front door and minus five degrees at the back door on will just reverse these two minus five degrees on plus five degrees. We'll add Easy's. We'll move 20 friends forward and will copy face by marking these key frames, copying and pasting them here. Now we'll move forward. 130 friends. We'll copy, pays the whole lot front and back, then move forward. 90 frames on will change this to plus five degrees from the front jaw and minus five degrees for the back door. The reason we're doing this is just to add a little bit off irregularity to the jaws so the animation isn't so predictable. If we could have just done the first set of key frames and added a loop expression on, that would have been fine. But that would have been a very regular kind of clamping off the jaw continuously throughout the entire animation. Now we have a bit of clamping, a pause, some more clamping and then a different length of a pause. So it's a little bit more interesting to watch. No, we want to add a lift expression hold old as you clicking on the stopwatch on. We can just leave the expression as it is, as it's a cycle expression. As a standard on now we have a breathing clamping ent.
5. Wiggle Expression and Slider Controls: Now we're going to add a wiggle expression to the head on the fearless off the ant. For that, we're going to create a wiggle controller if you want to wiggle. Ah, lot of objects in your scene is greater. Have a controller because if you want to make changes later, you want the wiggle to be a bit stronger or more frequent. It's easier to make those changes to one controller rather than having to go into each expression off each layer that has the controller added to it. So for this I have sold everything that we need on. I have shied everything that we don't need to see. Right now we're going to create a null object with command control. Old shift. Why trim it on? Give it a name will name it. Wiggle Underscore feelers. Andi head will now add a slider. Control to this. You can search in the effects and presets window. And if you don't have that, you can open it by going to window effects and presets and open this window right here. I will take the slider control and we can double click or we can drag it onto here. So since I've done that twice and now have two controllers, which is great cause I need to anyway, we'll rename the 1st 1 frequency on the 2nd 1 Amplitude frequency determines how often per second the wiggle expression will be applied on the amplitude specifies how strongly it will wiggle. So since we'll be adding this to the rotation, it's the amount of degrees it will wiggle. If it waas for position, it would be the amount of pixel it would wiggle. Slider controls are great if you want to control layer properties or key friends off one or more layers. They can also be used to key frame expression values that would otherwise be hard to control. We are going to parents the frequency Andi amplitude values of our legal expression to these sliders on control them through the wiggle controller. Now we're going to add a wiggle expression to the rotation off the front feeler. We want to alter click the stopwatch and will type wiggled on one comma to the numbers are not important at the moment because will be changing these anyway on. We want to close the bracket now. What we want to do is highlight the first number. The first number is the frequency and want to pick witness to the frequency slider. Make sure these sliders are open, otherwise you won't be able to pick whip. Now we're going to highlight the second number and pick Whippet to the amplitude slider. Now we can copy paste this expression to the other layers. We'll add a number here. Let's do 0.5 on 20. Now you can see that this is willing quite a lot. It's a little bit too strong, Andi, Since we've created its controller, we just need to go in here at just these numbers. Let's take this down to 10 and we don't need to touch these expressions at all. Will hide that again? All we need to do is change our numbers in the controller. Now with was a great expression for adding simple movements when you have a lot of objects in the scene, the downside is that you cannot create a loop with wiggle because it calculates the position often object for every frame randomly. If you prefer to have a lift animation, you will have to key frame your objects and then add a loop expression to them. This is why we said our animation at one minute. So you have a good chunk of time where you can see you animation. But unfortunately, you can't loop it at the end of that time. Now, let's have a look at our whole aunt, and this is what it looks like.
6. Rotation and Position Wiggle: What we want to do now is take this regal Controller Andi copy pasted to this jellyfish seen. So I've copied that layer on. We're pasting it in here now will now also go to one of the layers where you've added the legal expression on copy expression only, and we'll add that to one of the jellyfish controllers. What we want to do now is rename this controller on change it to rotation. We'll copy paste this expression to all of the other jellyfish controllers on will also add this to all of the legs. Now I want to adjust the controller. Let's take this down a little bit. Seems like the wiggling quite a lot. That's great. Now we want to duplicate this controller on Rename it position. Now we want to copy expression only from the rotation and paste this on to the position will open that expression. You can also hit e e, and it will show you all of the expressions off that layer on. We want to change the name off the controller in this expression. So you want to remove rotation, change it to position and now the position will react to this controller rather than to the rotation controller. And then we can up this a little bit because five pixels is not very much movement for position will now take this expression from the position and added to all of the other Jedi controllers. Now, as you can see, the legs are rotating on. The jellyfish are wobbling in the ocean. So if we worked justice controller, we can make this a little bit extreme. Now they're wobbling around, but as you can see, the legs are still rotating at a very small pace. Let's put this back to 20. We can maybe up the rotation, and now they're going crazy so you can see it helps quite a bit, having the dimension separated onto two controllers. Of course, you could also have these sliders on one controller, but I prefer having them on two separate controllers. That way I can just toggle this open and close, and I know exactly what I'm working with rights. Now the jellyfish done on will move on to the fish scene
7. Wiggle Separate Dimensions: What we want to do now is do the same thing as we did before. We want to copy the wiggle controller from the and composition jump into our fish scene on Pace. The controller in here. We then want to copy the expression from one of the rotations that are linked to that controller on. We want to paste it onto the position off one of the fish bodies. We'll show the expression by pressing E twice. Now What we want to do is the fish needs to look a little bit more like it's swimming. We'll add some key frames, so it's swimming from left to right and from right to left, depending on which direction they're facing. But we want to add a little bit of a why wiggle in this, a wilder swing from left to right, and vice versa, the wheedling up and down a little bit. Andi, you can do this by amending the wiggle expression. You can wiggle X and Y positions independently. Now we want to rename this wiggle controller from feelers and head to fish. Well, just the values a little bit. Let's bring this up to 20. We can adjust that later. If we feel like that's not enough for, it's too much on. What we want to do now is add Ah, heart bracket onto here, then value heart bracket zero on close hard bracket than a comma. Then our Wiegel expression follows. At the end of our legal expression, we want to add hard brackets, one close heart bracket and then another closing off the heart bracket, which correlates with this beginning one. No, this fish over here should be wiggling up and down on. He's doing just that. Now we want to coffee this expression and pace it onto the other fish. Now, this expression says, don't do anything for the exposition and only wiggle the Y position. If you want to switch the wiggle from why to your exposition, you need to swap your wiggle expression with the value within those hard brackets. We will do that now to wiggle the water in the exposition. Now we're going to duplicate this controller on rename it water will grab this expression and well paced it onto the water. Now we need to change the name of the controller in here and rename it from fish to water on then, as mentioned before, value needs to be replaced by our expression on where it used to, say, Wiggle it now needs to save value on Let's see what that looks like. The waters wiggling up here. It's not very strong. Let's adjust this a little bit. Let's put this frequency to one. Andi, let's move the amplitude up as well on That's what that looks like. Now our fish are bobbing and our water is flowing.
8. Dynamic Displacement: What we're going to do now is make those fish swim. So you want to add some key frames to the position off the fish controller, and then we'll add another key frame all the way at the end of ours, seen, which is at one minute, and we'll just drag this control across the screen and we'll do the same thing for the other fish. So you want this one to begin here and end somewhere around here? We'll do the same with the front fish on. Move it somewhere around here. Now what we're trying to achieve is that the front fish is swimming Ah, lot faster than the back fish. A little bit like a perspective shift. The front is always moving faster than the back. So I think that we can have the middle fish move past a little bit on the very back fish a little bit less far. So maybe something like this, right? That looks good. Now we want to animate. The Finns will start with the front fish on with Finn. 04 will add a rotation key frame and will move 30 friends forward zoom in a little and will wrote it this by 15 degrees, we'll add on Easy's on a Ping Pong group. Now we'll copy the frames, including the expression just by clicking on rotation and adding it to the beginning off in 05 and 06 Now will shift these back 10 friends and 10 friends again for Finn. Six were doing that to add a little bit of dynamic to when the Finns are moving, so they're not moving all at the same time. This will add a lot more life to the fish and realism to the swimming. Now we're going to do the same for Finn. Number two 30 flips forward on will rotate this one minus 15 degrees. We'll add Easy's on steel, the expression from the back fins pasted onto this one. Copy the entire rotation, including expression, and added to Finn one and three. Now we'll shift these Bactine frames on Will shift number three back 10 friends again now will mark all three of them and shift them back a further five frames Now repeat all of this for the other fish, plus 15 degrees. He's He's steal the expression pasted on copy and add to fin four shift Bactine frames Andi now number one rotation plus 15 degrees and will shift the two of them back five frames. Remember to save your animation frequently by hitting Commander Control S If you're after effects crashes or your computer freezes, it's always good to have a frequent save, even if you have auto saved in after effects turned on. It's always a good idea, plus 15 degrees Eazy E's still expression Copy keys on expression, hazed onto layer. Now we want to do the same thing for the jaw. Let's start with the front fish and let's rotate the jaw. We'll move forward 50 friends and rotate this five degrees Eazy E's loop expression, and we'll do the same thing for all the other jaws. Well wrote it. This minus 15 degrees on will rotate this plus 15 degrees. Also shift the jaw off the back Fishback, 25 friends again just to add a little bit of dynamics, so they're not all moving at the same time. Now let's have a look at the entire animation
9. Path Animation: So what we want to do now is animates the background water plants in the fish scene. At the moment we have a guide layer showing us what the plants should look like. However, this is a static layer, and we want to bring these plants a little bit to life. We will create a pre comp off this layer that we will duplicate and spread across the background. First, we'll creates the comp out off plants. 01 top. Which is this one? Representation off. All of these plants in the background will hit command control shift See on gwil. Name this layer 030 A. Because it's part of the scene. 030 right call it writes plants top. We want to leave all attributes in this comp. By taking this, our compass automatically cropped to the size of our layer. On the start off. The camp is also trimmed within the parent comp. This feature is very restricted and doesn't work in all cases. But in our case, it's great. For example, you can only use it for free comping one layer or layers that don't have the continues restaurant ization ticked on. You can also not use it for layers that have bean converted to shapes. But like I said, in our case, it's perfect so we'll do that now. As you can see, this is our company now well out of start Marker immediately will move in will crop The layer will add a start marker again Here, Aziz. Well, we'll change the layer color before and also the complex color. And we can also do that in the project window. So now all of them look the same, which is great. Now we want to create shapes from this vector layer. We can remove the original layer. We don't need that one anymore. Will toggle open the contents on also the group's on ruled leet. This merch path will set key frames to of a path Move forward 100 friends We'll set an end Marca Onda will animate this down a little bit so we kind of want this plan to sway from left to right so kind of from here a little bit too from left to rice. We don't want this animation to be too extreme, right, So we'll move to our end. Marker will go back to our parent comp and will add an end market to this compass. Well, the reason for that is because we want to add a time re math, and we want to add key frames to both of the markers that we have set here will remove the beginning key frame at the end key frame. We will add a ping from expression on, see how this animates. So you definitely want to add some ease to these key friends on DNA. Now we want to duplicate this comp and position it approximately in the same positions as our reference layer over here. So, as you can see, I've set this layer to be a guide layer because we don't actually want this layer to render its just for us so we can position this planned composition. I've done this beforehand before we started animating. So you probably want to do the same in case you have not done this yet. Now we'll turn off our ground layer for now so we can see a little bit more and we'll start duplicating this comp. We can also right click, transform and flip horizontally on. Then we can rotate this by hitting W on the keyboard and just repositioning this layer doesn't have to be 100% accurate. We just want it to be just approximately in the same position. Now what we want to do is shift all of these comp so back five frames eat, so we have a little bit of dynamic displacement. Of course, if you already have a plug in or a script to do that, please go ahead and use that. It's very handy, but for those of you who don't have that, you can just do this manually. So you want all of your comes to move back rather than forward. Otherwise you'd have a very unpleasant popping off the cops. Now, the reason why we have pre comes this plan is that we only need to animate it once. And if we decide the movement is not quite right, we wouldn't have to adjust the animation off 10 plus plans. We could just adjust one animation in one comp, and then it would reflect this change for all of the other plants in this scene. Now we can hide the guide layer because we don't need that one anymore. On may be want to adjust this plant automation just a little bit more. It's a little bit stiff. So what we can do? We can adjust the busier handles a little bit, Not too much. We don't want the background to be animated too crazy. The reason for that is we want the focus of the animation to be in the foreground. We don't want the background to be too crazy and distracting, so for this reason will bring back all of the other layers. I won't just see what it looks like if it's too much. If we need to tone it back a little bit, we'll just adjust. So I still feel like the background is a lie a little bit too much. So let's just bring that down a little bit. Let's bring this back. You can skip between the beginning on the end of your work area by hitting shift on home and end on your extended keyboard. Let's have a look at that that looks appropriate Now. If you feel that the motion is also too fast on, do you want to stretch it across More key friends you can adjust adjust time, remapping key frames. So at the moment we have them said across Ah, 100 frames. If you want to do, you could stretch this key frame on. The animation would play slower, as you can see on this little guy over here, But for me, this animation looks great, so let's leave it the way it is.
10. Finalisation: on this is your completed animation well done. The reason why we have set our animation at one minute, as I've mentioned before is because we're using a riddle expression. As you can see here, the wiggle expression, or rather, the animation looks different at the beginning of our animation. Compared to the end of our animation, wiggle is random. Andi, you cannot make a loop out of it. If you wanted a perfect loop, you would have had to use key frames Andi the Ping Pong or a cycle move to make that happen . But I wanted you to try something new. Use the wiggle expression, and that's why we set up our animation quite long. Of course, you can make this animation longer or shorter. Whatever you prefer. The wiggle and all the loops that we've created today well animates until the end of time so you can make your animation as long as you prefer. Now, if you want to render your animation, you want to make sure that you have your workspace set at the start of your animation by hitting be Andi at your end marker. By hitting n now you can hit commander control old m to send it to the media encoder for rendering. If you don't remember how to render your seen or what the most suitable render settings are , please check part one off this course, which is all about rendering your scene. Now have fun with your ocean themed animation. Thanks. Bye.
11. Outro: this concludes our class. Today we learned how to rig on de animate a simple character using do it, how to set up a wiggle controller and wiggle various layer properties. I hope this was useful to you and the scene had a calming effect on you. If you have any questions or feedback, please leave a comment. Really appreciate your input. Thank you for taking this class.
 Kurzgesagt - In a Nutshell, Motion Graphics Videos