Transcripts
1. Introduction: Have you ever wanted to create 3D characters but didn't
know where to start? If so, you are in
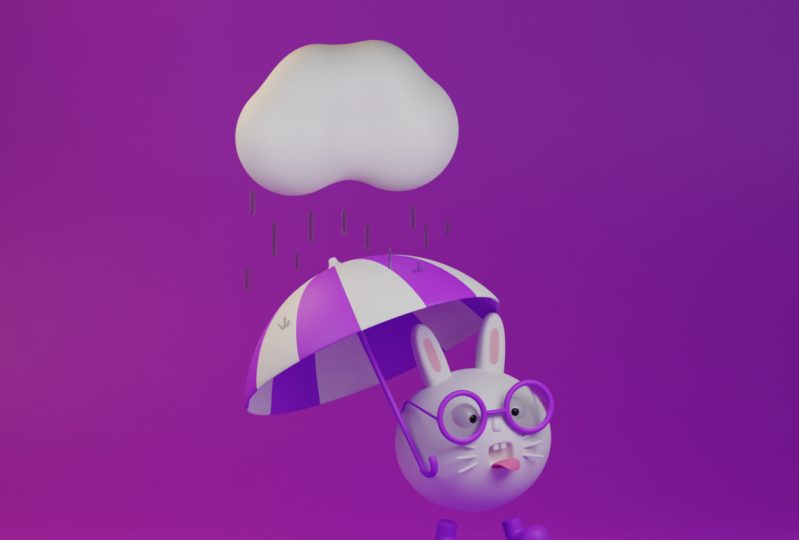
the right place. Hi, I'm and I'm a designer. And in this course, you
and I are going to create this little bunny from
scratch using Blender. We will start by preparing a mood board, this
simple sketch, and then we will move
on to modelling, composition, texturing,
lighting, and so much more. By the end of this class, you'll be able to
design and render your own 3D character. So if you're ready to create
stunning 3D characters, I'll see you in class.
2. Requirements: Hey, welcome to the first
lesson of this course. In order to complete the
course successfully, a basic understanding
of Blender is required. If you have never worked
with blender before, makes sure to check out
my other blender course, spheres in which there is a dedicated section
called Blender Academy. On the other hand, if you
know the basics of blender, you can continue
discourse with ease.
3. Introduction to the Project: In this section,
we're going to work on a 3D character from scratch, you will learn about
modeling, texturing, lighting, composition,
rendering, and so much more. So see you in the
following video.
4. What's a Moodboard?: Hey, welcome back. In this video we're going
to create a mood board. But what's a mood board? Well, a moodboard is a collection of your
visual ideas that works as a reference and a source of inspiration
for your project. No matter how creative
and experienced you are. Whenever you start
working on a new project, it's always great to start by creating a mood
board so that you can organize all your ideas
and references in one place. Believe me, it will save you
so much time down the road. But you may ask, why
do I need a reference? If I modelling something
I'm familiar with? Let me give you an example. Let's suppose you want
to model a watch. You know, it's overlook, but you may forget to
include its details. That's when the reference
comes into play. Alright, now that you
know the importance of having a mood board,
Let's create one. There are many ways to
create a mood board. You can use different
software for it, but I always tend to keep things simple and I prefer to use
Pinterest for this purpose. For this project, I'd like to create a funny and
stylish bunny. Therefore, I'm going
to type binding here. As you can see, there are many images you can
get inspired by. I really liked this cute bunny with its pair of sunglasses. I'm going to save it. What else do we need? I want to make the scene rainy. So let's find an
umbrella for our bunny. Here it is. I think this one looks good. Let me save it. And that's all. Of course, you can add more
images to your mood board. But I think for this
project, that's enough. Next, we're going to
create a simple sketch. So see you in the next video.
5. Create a Sketch: In this video, we're
going to create a sketch in case you don't know. A sketch is a rough drawing
without details that will assist you in making
the final model or seen. If you're not a good drawer, don't freak out because
I'm a terrible drawer to. But here's the good news. As long as you can bring your ideas on paper,
you are good to go. We just need to understand
what we are trying to achieve. So if your sketch
is not very clean and polished, It's totally fine. We want to use it as a guide
in the modelling process. So please grab a piece
of paper and a pencil. I use an iPad instead to create
a more polished version. Keep in mind that sketching
can take so much time. So take as much time as
you need to prepare one. It usually takes me around an hour to get
my desired result. But for this class, I'm
going to fast forward this process to not bore you
with reiterating our right. Let's get started. First. I'm going to start
with the bunny's head. Let's draw an ellipse and
then move on to the ears. For the ears, we need to have the inner part according
to our reference. Now let's draw a tiny mouth
with teeth and the tongue. I actually want the tongue
to come out of its mouth. Something like this. Looks very good. It's cute, isn't it? Now let's draw its eyes and also whiskers around its mouth. Next, we can dry pair of shoes to indicate
that it's working. But I am going to make
them detached from its body to make
it a bit stylized. But what about its sunglasses? Let's write them. Obviously it needs
a nose as well. Next we can draw a simple
umbrella right here. I think it would be nice to add a cloud right on top
of this umbrella. And finally, the rain. There's one more
thing I should do, and that's to eliminate
this line from its tongue. Our right, our sketch is ready. Now, you can take a
picture of your sketch and have it on your computer
as your reference. You can also download
my sketch from the resources section
if you want to get it done the way I do
in the next video, we will start modelling the
character we just drew. See you in the following video.
6. Modeling - Bunny: Hey, welcome back. In this video we're
going to start modelling our little bunny
together. Are you ready? Let's begin First things first, I'd like to mention something whenever I use a
hotkey in blender. You can see it appears here on the bottom left
corner of my screen. Let me show you how it works. Let's suppose I hold down the
Shift key on my keyboard. As you can see, the
piers right here. Most of the time I mentioned them myself when I'm using it. However, in case I forget, you can always take a look
at this part of my screen. Just keep that in mind.
It's going to be handy. The other thing we
need to do is this. You need to save your
project now and try to save your project
frequently as you go along. This case, if
something goes wrong, you won't lose your project. Before we start, we are going to change something in
the Preferences. I'm going to go
to the Edit menu. And from here I'm going
to go to Preferences. And then I'm gonna go to input. Here under the keyboard section, we have this option
emulate non pad in case you don't have a
keyboard with a numpad, make sure to check
this checkbox. Emulate numpad because this way you can use the numbers of your keyboard to change the views in Blender are
right, We're good to go. First of all, we're going to
remove all these objects. We don't need them right now. We have a camera or
a cube and a light. I'm going to select them all. And I'm going to hit Delete on my keyboard to remove them all. Now we need a reference image, which is the sketch we prepared. But before we add it, I'm gonna go to the
front orthographic view. To do that, you can
use this symbol here. Alternatively, you
can hit number one to go to the front
orthographic view. Now I'm going to hit
Shift a and from image I'm going to
choose reference. You might not have this
Images as Planes option. That's totally fine. That's because I'm using an additional add-on
for this option, but we're not going
to use it here. Just click on Reference and just look for your sketch file. Select it, double-click
and it's there. Okay, Now I'm going to
scale it up a little bit. I'm going to hit S and
try to scale it up. Something like this should work. Then I'm going to move it up. I'm going to hit G to
move it along the z-axis. And let's move it
up just like that. Alright, our reference
image is ready. There are two ways we can use a reference image
in our project. The first way is to just
place it here and try to model everything according
to this reference image. And try to, for example, modifying the location
of each object, rotate our object, etc. That's one approach. The other approach is to just
try to use it as a guide. And later when we want to
create our composition, we can try to locate everything precisely according
to our sketch. I'm going to use
the first approach. I'm going to use it
as a guide for now. And later, we will position everything precisely
according to this sketch. Alright, now I'm gonna go to the reference image option here. And I'm going to check this
opacity checkbox, okay? By default it's set
to one or 100%. I'm going to make
it transparent. Therefore, I'm going to decrease this amount to
something like 0.4. Okay, now we can start
working on the bunny's head. So what do we need here? Well, for the bunny's head, we can use a UV sphere, okay? If you just hit Shift
a and you go to Mesh, you can see that we have
many different primitives. I'm going to use UV sphere. So let me hit shift and a mesh. Click on UV sphere. It's right there. I'm going to open up this menu
right here at the bottom. Makes sure that you have a
32 segments and 16 rings. That's enough for our head. I'm going to close this menu and then we need to scale it down. I'm going to hit S
to scale it along the z-axis and tried to
scale it down like this. Something like this. Looks very good. Are right, we need to scale
it along the y-axis as well. I'm going to hit number three
on my numpad and then hit S Y and try to scale
it down like that. Okay, it looks very
good in my opinion. Let's go back to the
front orthographic view. I can now hide my
reference image. I'm not going to
need that right now. Okay, here is our head. Let's hit G, Z and bring it up. What else do we need here? Well, let's first
create its mouth. To do that first you need
to go to the Edit mode. I'm going to hit Tab on my keyboard to enter
the edit mode. And now what we can do is this. We can select a few
of these phases and try to extrude it
in instead of out. Okay, so for the mouth, I think these four faces
would work very well. Let me take a look. These four should work fine. So please select the Face, Select tool and select
these four faces. You can select them like
this, left-click and drag. Or you can select
them one by one, but you need to hold
down the Shift key on your keyboard just like this. Now what we're gonna do is this. Before we extrude
these phases in, I'm going to insert
them a little bit. The reason is later, we're going to add a modifier to this sphere in order
to make it smoother. If I extrude these phases
in without having an inset, the edges around its mouth
are going to be very sharp. That's not what I want. I want them to be smooth. That's why I'm going
to insert them first. I'm going to hit
I on my keyboard and try to insert them
just a little bit. Not too much,
something like this. Now we can extrude
them inside a line, the y-axis, I'm going to hit E, y to like them, allowing the y-axis and
try to extrude them in. Just like that. Alright, looks good. But as you can see, it's not smooth, right? So what we can do is this. You can go to the object mode. You need to hit Tab again and right-click on this UV sphere, click on Shade, Smooth. Our UV sphere is
much smoother now, but as you can see, our mouth doesn't
look very good. Alright? That's because
right now we don't have many vertices
around these corners. Therefore, blender cannot
create a smooth mouth. So how can we add more
vertices to our geometry? We can use a modifier, the subdivision
surface modifier. Let me go to the object mode. And I'm going to go to
the modifier panel. And from here I'm going to add the subdivision
surface modifier. As soon as I add that, you can see that these corners are starting to smooth out. However, it's not enough because we can still
see these edges. Therefore, I'm going to
increase the levels here, both for viewport and render. I'm going to set the
levels of view port 23 and render to four. So it means that in
our final render, it will be even smoother. But if I increase it to four
or five in the viewport, it would be hard
for my computer to just render everything
in real time. That's why I chose a 34 here. But now as you can see, our mouth looks very good. Everything is smooth and we
can move on to the next part. And the good thing about using a modifier is that
it's non-destructive. It means that I
can always remove the subdivision surface
or even disable it temporarily to
adjust my geometry. Even if I go to the Edit mode, I can still modify my model. Right now, these
faces are selected. I can hit G, Y to
live them allowing the y-axis and try to move
them even further inside. Just like this. Alright, The first step is done. Now let's move on to its teeth. Alright, for its teeth, we can use a cube, make sure that you are in the
object mode, not edit mode. Because if you add an
object in the edit mode, those objects will be
considered as one whole object. It would be very hard
later to adjust them. But if you are in the
object mode and you hit Shift a and add a
cube for instance, you can see in the outliner that now we have a separate object. That's exactly what we need. I'm going to scale it down, hit S to scale it down, then hit G, Z and bring
it up right here. I'm going to go to the
right orthographic view and I'm going to hit G, Y and bring it here. Perfect. Now we can see it. I'm going to scale this
cube, allowing the y-axis, it's s, Y, and scale it
down, something like that. Then I'm going to scale it along the z-axis to make it taller. It s, z and scale it up. I think it looks very good. Maybe we can scale
it up little bit, hit S and scale it. Now, we're going to
make it smoother. So what can we do? Yes, you're right. We can use the subdivision
surface modifier. I'm going to add
this modifier to it. And as you can see, it
doesn't look very good. That's fine. We're going to fix it. First. I'm going to increase
the levels viewport to three and render
to four like that. Then I'm going to
right-click on it and click on Shade Smooth to
make it smoother. Now, what we can do is this. We can go to the Edit mode, hit Tab on your keyboard. And here we are going
to need more edges and vertices to modify this object. To do that, we can
add loop cuts. Alright? To add loop cuts, we can use the shortcut Control R or Command R
if you're using a Mac. So let me show you how it works. I'm going to hit
Control R. And if I hover over this object, you can see this yellow
lookout appears. Okay. It's not there, It's just showing me It's
possible location. Now I'm going to increase
the number of luke cuts to, to using my mouse wheel. I can increase it. Now. We have to look cuts. That's exactly what we need. And I'm going to left-click
to create those loop cuts. Now I can move them around, but I don't want to change
their location at the moment. I'm going to hit Escape to
place them where they are. Well, I think we need to make this bottom part and also this top part a
little bit sharper. So what we can do is this, while loop cards are selected, I'm going to hit S, then z to scale them
along the z-axis. Just like this, okay? Of course you can
do it one by one. To do that, you just need
to select one loop card. Just make sure to
select the edge, select to hold down the Alt key and click
on one of these edges. And this way you can
select this edge loop. Alright, now I'm going to hit G, Z and bring it up to create
something like this. And I think it
looks very good as our tooth are right now. Let's move it up, hit G, Z, and bring it up. Let me check its position. I think it looks
very, very good. We need one more. And to create one more, we can have linked duplication
or a normal duplication. The difference is when you
have a link duplication, when we later on add
materials to one of them, the materials will be applied automatically to the
other one as well. That's not the case with
a normal duplication. Alright, to create
a link duplication, you can use the hot key Alton D, or you can just
right-click on it and click on duplicate linked. Okay, I'm going to use the
shortcut Alt D and then hit X to Luckett along the x-axis and just place it right
next to the previous one. Maybe I can scale
them up a little bit. I'm going to select them both. Hold down the Shift
key to select them, hit S, Z and just scale them up. Then let's move them down, hit G, Z and bring them down. Okay, It looks nice. Now we can move on
to the tongue, okay? For the tongue, we are going
to use the same technique. We are going to start with
a cube and then we're going to adjust it to get
our desired result. So let's start. First of all, as I said, we're going to need a cubed. So I'm going to hit Shift a and I'm going to
add a cube here. Let's hit S to scale it down. Then I'm going to scale
it along the x-axis, hit S, x, and scale
it like this. Now I'm going to hit S and scale it down because it's too big. Then hit G, Z and bring it up. It's right here in the middle. I'm going to go to the right
orthographic view, hit G, Y. Just like this. To easily model this tongue, I'm going to hide
the other objects and later on high them. To do that, I'm going to
hit the forward slash. And as you can see now we
are in the local view. Okay, that's why we can
only see this object. Alright, so how should we start? I'm going to go to the
right orthographic view. Then I'm going to hit tab
to enter the Edit mode, Let's select this
face in the front. Okay, we need to extrude it out. I'm going to hit E,
just extruded this way. Left-click to confirm. Then I'm going to
rotate it a little bit, hit R and rotated this way. And finally I'm going
to move it down, hit G, Z and bring it down. We're going to repeat
this process again and again and again to get
our desired result. Once again, E, just
extrude it out, R to rotate it, left-click to confirm g
and bring it down again. E, excreted out, are rotated. G, bring it down. Once again, E extruded out are rotated and G bring it down. Something like this should
work as our tongue. However, we need to scale these edge loops
down a little bit. Let's start with
this front face. While it's selected,
I'm gonna hit S and scale it down like this. Then I'm going to
select this edge loop. Let me select the
Edge, Select Tool, hold down the Alt key, and select this edge
loop like that. I'm going to hit S
X to lock it along the x-axis and scale
it just like this. I'm going to hold down the Alt key and select
this edge loop, hit S and scale it. Then I'm going to
select this face right here and scale it down, hit S and scale it down. You see we're getting there. I think it looks good. Maybe we need one
more extrusion here. Let me go to the right
or too graphic view. We can select this face
and try to extrude it out. E, extrude it out like this. R to rotate in g
to bring it down. And then you can
easily scale it down. Something like this. Alright, it looks very good. And here as well, we can have an extrusion. I'm going to select this face and hit E to extrude it out, R to rotate it this way, and g to bring it down, let me go to the top
orthographic view. I need to scale it down as
well, something like this. Now I can select this edge loop and scale
it up a little bit. Okay, I think it looks good. Now I'm going to add a subdivision surface modifier
to it to make it smoother. I'm going to increase
the level to three and here the
render to four, okay, looks much better. And right-click, Shade Smooth. There it is. Our tongue is almost ready. Maybe we can adjust it a little bit to make it look even better. I think the thickness
here is too much and I am going to select this edge
loop and also this age group. Hold down the Shift key
Alt and click on it. Let me go to the right
orthographic view. I'm going to hit G and try to make it thinner,
something like this. Make sure that you are on
the right orthographic view. Okay? Yeah, it looks much better now. Our right, our tongue is ready. I'm gonna hit forward
slash to exit the local view and we
just need to scale it up, hit S, scale it up like this. Hit G, bring it down. And since the origin point of
this object is placed here, it scales down or up in
relation to its origin point. So while it's selected, I'm gonna go to Object, Set Origin, origin
to center of mass. I'm going to scale it
down or up here easily. Great. Let's go to the
right orthographic view. Hit G, bring it here. I can scale it up, okay? I'm going to place it here
and we can rotate it as well because this part should touch the
floor of its mouth. So I'm gonna go to the right
orthographic view heats are, and try to rotate it like this. Nice. And also we can rotate it here, hit G, bring it right here. And then I'm going to
rotate it this way. Hit G, bring it down. Yeah, it looks very good. Of course, we can adjust
it whenever we want. I'm going to bring
it out a little bit. Alright, it looks good for now. Now we can move on
to the next object, which is its eyes. For its eyes, we can
simply use a UV sphere. I'm going to hit shift
and add a UV sphere. Scale it down, S, scale it down, hit G, bring it up like that. Let me go to the top
orthographic view, hit G, bring it here. I'm going to scale
it up a little bit. Right-click Shade Smooth
to make it smoother. Okay, It looks very good. Now. Hit G and bring it
inside are right. Now we need to create
the pupil as well. So for that, we just
need to duplicate this hit shift a to create
normal duplication. We don't need them to be linked. I'm going to scale it down, hit G and bring it right here. It's S to scale it down and I'm going to
place it right there. Okay, it looks very nice. Now I'm going to
select them both. Hit shift and a move
them to the right side. Let me go to the top
orthographic view. Okay. I just need to change the pupils position
to hear our right. Good. Now let's create
it snows for its nose. We are going to use a cube, hit Shift and add a
cube, scale it down. Just like this. It's s, z, scale it
along the z-axis. Just like that. Hit G Z and bring it up. There it is. And I'm going to
make it smoother. So I'm going to add a subdivision
surface modifier to it, increase the levels
and also the render, and then right-click
on it, Shade Smooth. However, I'm going
to adjust its shape. I'm going to go
to the Edit mode. Let's add to cuts here, just like this, left-click
to confirm Enscape. Let me go to the right
orthographic view. Scale it down, hit R
to rotate like this. Hit G and put it right here. Very nice. But what
about its whiskers? They're gonna be simple as well. We just need a cube, obviously. Hit shift and a mesh, add a cube, hit S
to scale it down. Just like that. Then hit S, x, scale it along the
x-axis, hit G, bring it up, go to the
top orthographic view, hit G, bring it here. And we just need to add the subdivision surface
modifier to it. Just like this. Right-click and
hit Shade Smooth. Alright, it looks good, but I'm going to
make it thinner. Hit S Z and make it a
little bit thinner. Go to the top orthographic view, hit S Y and make it
thinner like that. Perfect. As you can see,
it's very straight. That's not what I want to
make it a little bit curved. I'm going to enter
the edit mode, and then I'm going to add
a few loop cuts here. I'm going to hit
Control R or Command R and just create three
loop cuts like this. Left-click to confirm
and hit Escape. First, select this
edge, select tool, hold down the Alt key, and click on this edge
to select the edge loop. Now I'm going to use this
proportional editing tool. I'm going to enable it. Go to the top
orthographic view, hit S, adjusts the fall of
using your mouse swill to something like this, hit G, Y and just bring
it down like that. And as you can see, we
can make it curved. Okay, looks much
better now I'm going to hit G, move it inside. Let me go to the top
orthographic view. Rotate it. It's R to rotate and
g to bring it down. I'm going to place
it right here. Then I'm going to duplicate it. Hit Alt D to create
a link duplication, bring it up, hit R to rotate. This way, I'm going
to select this one, hit Alt D, Bring it
down R to rotate. Let me check them out. Okay. I think we need to move
them inside, hit G, Y and move them in like this. Alright, they look nice. Probably we can rotate
them like that. Perfect. Now we need
to duplicate them. Alt D, move them here, hit R, rotate them like this, hit G and bring them right here. But they are too big. I think. Let's select them all. Hit S and scale them
down a little bit. Now we can adjust their
position. Once again. Are right. Now. Let's move on to its shoes. I'm going to create a
pair of shoes for it. So to do that, we just need to use a cube. Again. I'm going to hit shift
and a and add a cube here, scale it down, hit S, to scale it down, hit G, and bring it here. I'm gonna go to the local view so that I could
focus on this shoe. Hit the forward slash on your keyboard to go
to the local view. Alright, let's get it down. It S, So what are
we going to do? Just like our tongue? We're going to
extrude this face out again and again and
again so that we could get the overall
look of our shoe. And then we will add a
subdivision surface modifier to it and adjust its details
to make it look good. I'm going to enter the edit mode and I'm going to go to the
right orthographic view. But first, let me
select this face. I'm going to go to the right
orthographic view now, hit E, extrude it
out just like that. Let's go to the top
orthographic view. I'm going to scale it, hit S, but make sure that your
proportional editing tool is turned off. Okay? So I'm going to turn it
off first, then hit S, x and scale it along
the x-axis like that. Once again, go to the
right orthographic view, hit E, extrude it out like this. Go to the top
orthographic view, hit S. X and scale it down this time, something like this should work. Now let me select this top face, go to the right
orthographic view, hit E and extruded
out like that. Okay, I think it
looks good for now. Now we can add the subdivision
surface modifier to it, increase the levels of viewport to three and
rendered to four. And now right-click on it, Shade Smooth to
make it smoother. Well, it doesn't look very good. We are going to adjust many things to get
our desired result. First things first, let me
select this edge loop here. Scale it more. I'm going to select
the Edge Select Tool, hold down the Alt key and
select this edge loop, hits S x and scale it up. Just like that. It looks much, much better than I'm going to
make this top part sharper. So I'm going to add a
loop cut right here. Let's hit Control
R or Command R. Left-click here and
just move it up. And also, I want this
part to be sharper. So I'm going to
add another loop, cut Control R or Command R and just bring
it down like this. The other thing we
need to do is this. We need to make this bottom
part sharper as well. So let's add another
loop cut right here and bring it all
the way down here. Alright, it looks
much, much better now, however, this part is too tall. So what I'm gonna do is this. I'm gonna go to the
wireframe mode, hold the Z on your keyboard
and click on Wireframe. And I'm going to select
the Face Select tool and try to select these faces. But first, I'm going to
change my selection tool to select box like this. When you're in the
wireframe mode, you can select all faces around your object,
just like this. Okay? And then I'm
going to hit S, Z and just scale it down, hit G, Z and bring
them down as well. Now I can go back to the
solid mode much better. The last thing I'm
gonna do is this. I'm going to select
this edge right here and try to
move it up, hit G, Z, and try to move
it up or write, our stylized shoe is ready now. Now let's exit the local view, it forward slash
on your keyboard. I'm going to scale it up. It s, just scale it up. Hit G here. Let me see. All right, it's
positioned. Looks good. I'm going to create
a link duplication Alton D x and bring
it right here. Later, we will try to
adjust its position. We will rotate them to
indicate that it's walking, but for now, we're good to go. Alright guys, are bunnies ready? I hope you enjoyed this video. In the next video, we will create its
eyeglasses. So see you then.
7. Modeling - Eyeglasses: Hey, in this video, we're going to model a pair of eyeglasses for our little bunny. Are you ready? Let's begin. For the eyeglasses. What we need is a torus. We're going to make it circular
according to our sketch. So I'm going to hit Shift a and I'm going to click on torus. Before I click somewhere here, I'm gonna go to the Add
tourists panel here. And I'm going to adjust
the major radius from one meter to something
like two meters. If I go to the top
orthographic view, you can see the effect
just like this. Alright, it looks good. Let's go back to the
front orthographic view. And then I'm gonna go to the local view by hitting the forward slash key
on my keyboard. And then I'm going to rotate this tourists along the x-axis. So I'm going to hit our
x two lucky to align the x-axis and then type 90 hits Enter to confirm,
and there it is. Okay, now I'm going to
scale it down, IT S, and just scale it down
to something like this. Now I'm going to
make it smoother. So I'm going to
right-click on it and click on Shade Smooth. Alright, perfect. So now we need another tourists. Okay? So what we can do is this. We can hit G x, move it to the
right side and try to duplicate it on
the other side. Or we can use the mirror
modifier. To do that. We need to place the mirror
right in the middle. Okay? So basically when you want
to use the mirror modifier, it will mirror your object in relation to its origin point, which is here right
in the center. So what we need to do is this. We need to move our object without moving its origin point. And to do that, we need
to enter the edit mode, hits a to select
all these faces. Vertices, then hit G, x, and now we can move it to the right side without
moving its origin point. That's very, very important when you want to use
the mirror modifier. Keep that in mind. I'm going to place it
somewhere around here. Cool. Now I am going to add
the modifier to it, the mirror modifier,
and there it is, we have our duplicated object
here on the left side. If you're not happy
with their distance, you can simply hit G X
and try to adjust it. I'm going to increase
it to something like this are right, it looks very, very good. Probably to make them smoother. We can add the subdivision
surface modifier as well. I let set the levels to 23. However, I'm going
to put it behind this mirror modifier because the order of modifiers matters. Alright, what else do we need? We need the handle, right? There are many ways
to create a handle. We can use a cube
and extruded out, then try to add a subdivision
surface modifier to it. But I'm going to show you a very cool technique to do that. Because I believe it's gonna be so helpful when it
comes to modeling. I'm going to go to the
right orthographic view, entered the edit mode, and I am going to select
the vertex select tool. Okay? If I move around, I can simply select this vertex here and then I
can duplicate it. Alright? If I hit Shift and
D, As you can see, I just duplicated this vertex and I can place it
wherever I want. I don't want its location
to be changed, okay. Because I want to
place it right here. Therefore, I'm going
to hit Escape on my keyboard so that
it stays where it is. However, I want to separate
this duplicated vertex from this object because later we're going to add
different modifiers to it. So to separate it
while it's selected, we just need to hit
P. As you can see, this separate window pops up
and just click on selection. That's all. Now I'm going to enter
the object mode. And if you take a
look at the outliner, you can see that I can simply select this tourists dot 001, which is our duplicated vertex. Very good. Now while this duplicated
vertex is selected, I'm going to enter
the edit mode, hit a to select this vertex. Make sure that you're using
the vertex select tool, not the edge or phase. Otherwise it won't work. It's very important
because right now we don't have an edge, we have only a single vertex. That's why we need
to make sure to use the vertex select tool. Now that it's selected, I'm going to extrude it out. Okay, I'm going to hit
E and just extrude it to somewhere around
here, like this. Nice. And then I am going
to again extruded out. But before I do that, I would like to remove this subdivision surface
modifier from it for now and then hit E and extruded
out just like this. Perfect. But here, this
point is too sharp. The way they are connected, I'm going to make it smoother. So just select
this single vertex and I'm going to bevel it. Bevel, you can just hit
Control V or Command B. But as you can see,
nothing happens because we need to select
the vertex tool as well. Then I'm gonna hit V to
select the vertex tool. And now we can try to bevel it. However, we need to
increase the number of segments here using
our mouse wheel. So just like this, I can increase the number of segments and try to
make it smoother. Something like that should work. I'm going to
left-click to confirm. And we are done just like this. We created the handle, but right now it doesn't
have any thickness. And that's a problem
that we are going to fix very quickly. We can use another
modifier called skin. I'm going to add the
skin modifier to it. And as you can see now, it has some thickness, but it doesn't look good
because we need to add the subdivision surface
modifier to it as well. I'm going to do that. Let's increase the
levels viewport to three and the render to four. Let me zoom in. If I just right-click on it and
click on Shade Smooth, you can see that
nothing happens. That's because when you use the skin modifier and when
you want to make it smoother, you need to enable this
smooth shading option right here in the
modifier panel, I'm going to click
on it and now it's much smoother, are right, good. But I'm not happy
with its thickness. How can I make it thinner? Well, first we need to
go to the Edit Mode. Then we need to select
these vertices. So make sure that the vertex
select tool is selected. Hit a to select them all. And then if you just hit
Control a or Command a, you can use your mouse
to adjust its thickness. I'm going to make it
a little bit thinner, something like this
looks very good. And last but not least, we need to attach it
to the main part. Okay? So what I can do is this, I can select this
single vertex, hit G. Try to attach it this way. We don't need to have
so many details here. It looks just fine
for our purpose. We just need to have
one more thing to attach these two main parts, we can simply use a cylinder. Let's go to the object mode. Hit shift and a, add a cylinder, it s z, scale it up, then hit S to scale it down. Heats are why 90 to rotate
it along the y-axis. Then hit S, x and scale
it up just like that. And finally, right-click,
Shade Smooth. Okay, The last thing we need
to create is the lens, okay? And it's gonna be so simple. Well, there are many
ways to do that. We can use a circle
and try to fill it and extrude it out and
put it right in the middle. Or we can just select these
tourists into the edit mode. Select this edge loop
here in the middle, duplicate it, then separate
it and extrude it out. If you want to precisely puts the lens right in the middle, I prefer this way, because this way you can
do it with precision, but the first way works as well. Alright, let me show
you the first way. I'm going to hit Shift a
and add a circle here. I need to rotate it
along the x-axis, hits our X 90. There it is. It's s, scale it down. Bring it here like this. I'm going to go to the
top orthographic view and a wireframe mode. It's right in the middle. Looks nice. Now we need to fill this circle. We just need to
enter the edit mode, hit a to select all
these vertices, and then F to fill it. If I go back to the solid mode, you can see that
it's filled now, but we're not done yet. We need to add a little bit
of thickness to our lens, because obviously lenses
have some thickness, right? So I'm gonna go to the
right orthographic view, entered the edit mode, hit a to select all vertices, and then I can go to the
wireframe mode to see what I'm doing then E and just
extruded out like this. I can select all
vertices, hit G, Y, and bring it back
to its original place. Our first lens is ready. Now what we can do is this. We can add the
mirror modifier to this object like that,
but nothing happens. That's because its
origin point is here. Now we can change the mirror
object using this option. If you just click on
this eyedropper icon, you can select another
object as the mirror. For this operation, I'm going to choose this
cylinder in the middle. Still nothing
happens, but that's because the axis is set to x. Now we are going to mirror
it along the z-axis. So I'm going to click on X, then I'm going to
enable z instead. And there it is. Okay, nice
or eyeglasses, I'm ready. Now what I suggest
is to parent them. So I'm going to select all
of these objects, right? However, I need to
decide which object is going to be the parent
of the other objects. Probably the tourists would
work or this cylinder. Let me just select
this cylinder. If I just hold down the
Shift key and click on it, you can see that it will
be highlighted with this yellow border
instead of orange. It means that this is
the active element. And if I hit Command P and click on Object
keep transform, I can parent them. Now, all the other objects are
children of this cylinder. And here in the outliner
we have one single object. If I just select it, hit G and move it around, you can see that the other
objects move around as well. And that's exactly what we need. Let me rename it by glasses. Of course, we are going to
rename the other objects as well once our models are ready. Alright guys, that's
all for this video. I hope you enjoyed it and
I'll see you in the next one.
8. Modeling - Umbrella: Hey, welcome back. In this video we're going
to model an umbrella. It's gonna be so fun. So let's begin. First of all, I'm
going to go ahead and hide my eyeglasses here. And to do that, if I just select the parent element and I
just click on this icon, Let's see what happens. You see I can only hide
this connecting part, but that's not what I want. I want to hide all
of these elements. To do that, I need to select
the children as well. So if I just right-click on the parent and I click
on Select Hierarchy. As you can see,
all the children, including the parent,
are selected. Now. Now I can simply hit H on
my keyboard to hide them. Alright, great. So how can we model an umbrella? As usual, there are
many ways to do that, but I'm going to show you the simplest one to
model an umbrella. We're going to need a UV sphere. I'm going to hit Shift a, and I am going to add
a UV sphere here. There it is. Before you click somewhere, make sure to open up this
bottom-left panel and make sure that the number
of segments is set to 12. You don't need to
change the Rings, but segments should
be 12. Alright, good. Now I'm going to go to
their local view to just focus on modelling our umbrella. I'm going to hit the forward
slash key on my keyboard, and then I'm going to enter the edit mode for our umbrella. We're going to remove
many of these phases, the phases that we don't need. First I'm going to select
this face select tool, and then I'm gonna go
to the wireframe mode. If you remember, when
we want to select the faces in front
and behind our model, we need to go to the
wireframe mode, okay? And now I'm going to
select these bottom faces, hit Delete, and click on faces. This is the first step. As you can see, inside is
empty and that's exactly what we need for our umbrellas
panel or umbrellas fabric. Alright, let me go back
to the solid mode. Now we need to add
thickness to it, right? There are two ways to do that. We can extrude these phases
along their normals, which is a destructive way of adding thickness
to this umbrella. Or we could use a
modifier called solidify. I prefer the second way, I'm going to add the
solidify modifier here. As you can see, now we
have some thickness. I'm not sure about the
thickness value right now because It's not smooth. First, we need to add
another modifier, the subdivision surface modifier to it to make it smoother. Let me increase the
levels of view port 23 and render to four. And then just right-click on it and click on Shade smooth. Just like this. As you can see, the
overall shape is ready. But what about thickness? I think we need to increase
this thickness value. Let me see. Probably 0.03
would be a good value. You can also check this
even thickness option. Okay, So far so good. What's the next step? Now that's our panel or
our fabric is ready, we need to create the top tip. So I'm going to
enter the edit mode. And then I'm gonna go to
the top orthographic view. And I'm going to select these
top faces, just like this. Now that these
faces are selected, I'm going to insert them. I'm going to hit I and
just move my mouse around to insert them inside,
just like this. Okay, now let me go
back to the front view. And I'm going to extrude
these faces out. So heat ie and just extrude them out,
something like this. And since we have the
subdivision surface modifier, you can see that these
edges are smooth now and that's exactly what
we need, are right, great. But what about the shaft? Well, we can just extrude
these faces here as well. But I really want the shaft
to be a separate object. Therefore, I prefer to
add a cylinder here. I'm going to scale it
down just like this. Then let me zoom in. I'm going to enter
the edit mode. And probably I can
select the top face. Let me just select
the top face here. Great. And now I can move it up. I can hit G, z and move it up. But as you can see, we've selected both the
top and bottom faces. That's not what we want. So let me select it once again, since we were in
the wireframe mode, That's why it happened. So I'm going to click somewhere
else to deselect them and just click on this top face. Great. Once again, hit G, z and move it up just like that and connect
it to the top tip. Okay, Perfect. Let me select it. Bring it down a little bit along the z-axis because I'm
going to make it taller. Something like this should work. And I'm going to move this top
face up a little bit more. Let me go to the Edit mode. It's selected. I'm going to hit G, Z
and just move it up. Okay, great. Our shaft is ready as well. Now the only thing
left is a handle. For the handle, I can use
a tourists just like this. I'm going to add a torus here. Let me scale it down. It's s, scale it down. Then I'm going to rotate
it along the x-axis. So our X 90, perfect. Then let me bring
it down, hit G, and just bring it
somewhere around here. What do we need to
do now is remove some of these phases to
get our desired result. So I'm going to
put it right here. I'm going to enter
the edit mode. While I'm in the wireframe mode, I'm going to select these
faces just like this. Probably it's better
not to remove these faces, these bottom faces. So I can deselect them. To deselect them, you can hold down the Command
or Control key on your keyboard and
just drag and drop, make sure that you pass
these circles in the middle, otherwise you can
not deselect them. Okay? That's so important,
just like this. Now, we can simply
remove these faces. Okay, nice. Let me get back to
the object mode and also to the solid mode,
something like this. But as you can see, we don't have any face here. So we can go to the Edit mode. Once again, we can
select this edge loop. If you just hold down the
Alt key or Option key on your keyboard and just
select the H Select tool, Left-click and hit F to feel this area and do the same thing for the
other side to fit it. Okay, So far, so good. What else do we need to do? Well, we need to make
it smoother, right? So I'm going to add the subdivision surface
modifier to it. Let's increase the
levels viewport to three and render to four. Then I'm going to just
right-click Shade Smooth. I'm going to make it smaller. Something like this should work. And also the other thing
I'm gonna do is this, I'm going to bevel
this top face here. So while this top
face is selected, I'm going to hit Control
B and try to bevel it to make it a little bit
smoother, just like this. And let's do the same thing
for the other face here. I'm going to select it first
using the Face Select Tool, hit Control B and bevel it. Alright, it looks very nice, but before gut to make
this shaft smoother. So if I just select
this cylinder and I just add the subdivision
surface modifier to it. You will see something
like this happens. That's totally fine. I'm going to increase
the levels viewport to three, render to four. And then just right-click
on it, Shade Smooth. And now I'm going to
enter the edit mode and we just need
to add a loop cut. So hit Control R or Command R, left-click and bring it
all the way down to here. Now we have a smooth
shaft as well. We can also increase the levels viewport to four
to make it even smoother. Let me check inside. Alright, we need
another loop cut here. So let me add another
one and move it all the way to the top tip to make
that H sharper as well. Alright, I think we are done. Now what we can do is this. We can select all these
objects to parent them. But first, we need to decide which element is going
to be the parent. I think if we just select
the shaft as the parent or this fabric part as
well, that doesn't matter. I prefer the shaft here. So I'm going to make sure that the shaft is highlighted
by the yellow color. So I'm good to go. If
it's not in your case, just hold down the
Control or Command key and just
left-click on it once. Then I'm going to
hit Control P or Command P, object
keep transform. And let's rename it to Umbrella. We can exit the local view. And here is our umbrella. Nice. Alright guys, that's
all for this video. I hope you enjoyed it and
I'll see you in the next one.
9. Modeling - Cloud: Hey, in this video we're going
to model a Cloud together. It's gonna be so interesting. First of all, let me just unhide my reference image to see what kind of cloud
we're going to need. So we can achieve this kind of Cloud by using
different methods. For example, we can start with a cube and just try to
extrude different phases out, then tried to make
it smoother at the subdivision
surface modifier to it and try to adjust
it in the edit mode. However, I'm going
to show you a much, much better way for
this kind of cloud. What you can do is this. You can simply add a metal ball. What's a metal ball? Let me show it to you.
I'm going to hit Shift a and I'm going to go to
metabolic instead of mesh. And from here you can see
we have different options. We have ball, capsule
plane, etcetera. I'm going to use ball. Let me bring it up, hit G, z and move it up. Okay, So this metabolic has its dedicated menu panel here, right here, as you can see. And this panel has different
settings that you can tweak. For example, we have
resolution, viewport, render, influenced,
threshold, etc. But how does it work? Let's see what happens. If I duplicate this metal ball. I'm going to hit shift and D and move it to the right
side. There it is. It's magical, isn't it? So that's basically
how a metabolic works. And for our Cloud, That's a perfect example
because we can simply connect them somehow and
I can just duplicate it. Once again, let me
just put it here. I can duplicate it once again, hit Shift and D and bring it up, place it somewhere around here. And maybe I can just scale it, it s, scale it down. I'm going to bring it here. And from the top view
I'm going to adjust it to make it
something like that. I'm going to select
this metal ball. Let's bring it up,
something like this. Looks very good.
However, I'm not satisfied with its resolution, but we can simply fix it. We can easily adjust the
resolution view port here. If I decrease this amount
from 0.42, probably 0.1. Let's see what happens. 0.1, as you can see, it's much smaller now, and that's exactly what we need. I really liked
this cloud so far. I just want to select
this top metabolic and adjust its position
and also this one. Let me adjust its
position as well. Yeah, something like this
looks very, very good. What do you think? Makes sure that you change
the render to 0.21 as well? And here I'm going to show
you the influence threshold. We don't need to change it, but I just want you
to know how it works. If I just adjust it, you can see how our metal
balls are changing. You see, I'm just going to
set it back to what it was. Alright. I think our cloud
looks very good. I just need to link them,
parent them basically. I'm going to select them all. Hit Control P and click on
Object, keep transform. And now I can
select one of them, the parent, and easily
move them around. I can scale them
whatever I want, just like a normal object. But what if you want
to edit the mesh? If you enter the edit mode, you can see that you won't get all the other objects because
it's not a simple mesh. To do that first, you need to convert
it to a mesh. To convert it to a mesh, you can just right-click on it. Go to Convert and convert
to mesh, just like that. Now, if you enter the edit mode, you will see all these
faces and you can simply modify them just
like a normal object. However, for this project, we don't need a mesh because we're not going to
edit our geometry. So I'm going to leave
it as is our right. Let me just scale it down and put it
somewhere around here. And we're done. All right guys, that's
all for this video. In the next video, I'll show
you how to model the rain. So see you in the next one.
10. Modeling - Rain: Welcome back. In this video, we're
going to model our rain. Well, tomato allow rain. We can just simply use
a cube or a cylinder. Okay, that's all. So let's get started.
For our rain. I'm going to first check out my reference image to see
what kind of rain we need. Let me just select this
cloud, move it around. As you can see, we just need simple cylinders or maybe
cubes for our rain. However, here we have the
splash of water. Okay? So to create this effect, we can use the proportional
editing tool as well. Obviously, we will create the composition in
the following videos, but for now, I'm just going
to model the rain later. We can just adjust their position and try to
locate them correctly. I'm going to hide
the reference image. And I'm going to
put the rain right here so that they could
see what's going on. I'm going to bring
the 3D cursor here. So if I just hold down the
Shift key and right-click, you can see that our 3D
cursor is placed properly. And then I'm going to
add probably a cylinder. I'm gonna go to Mesh,
add a cylinder. Let's scale it down, hit S to scale it down, make it so tiny. I'm going to bring it up. It s z and just scale it
up, something like that. Now I'm going to
apply the scale to it because I'm going to bevel
this top and bottom faces. And if I don't apply all the transformations
to this object fares, my bevel wouldn't work properly. So while it's selected, I'm going to go to Object, apply, apply all transforms. Then I am going to
enter the edit mode, select this top
and bottom faces. Then hit control V or command V, and try to bevel them. In case you don't have
this many segments, make sure to increase
the number of segments by your mouse wheel. Okay? Just like that, Let's
make it smooth. Now I can just right-click on it and click on Shade Smooth. It looks very good. Alright, this is gonna
be our first drop. We can just create
a link duplication. But before I duplicate it, I'm going to make sure that its origin point is placed
right at the center. Because right now, if
I try to scale it, you can see that it
scales in relation to its origin point which
is placed right here. That's not what I want. I'm gonna go to object, go to set origin, and click on origin
to center of mass. Okay, now it's placed properly. Let me create a
link duplication. It's Alton D and bring it here. Now, we can scale it up, it s z and just scale
it up like this. Another link duplication, Alton
D hit S to scale it down. You can bring it
somewhere around here. And I'm going to repeat
this process again and again to get many
drops just like that. Again, Alton D, it's s, z, scale it. Alton D. Put one here. Alton D here. I can scale it down. Again. Alton D, one here. Alton D here. Scale it up probably. Alton D, bring it here. And I think it's enough for now. Later when we create
our composition, we can duplicate it more, but for now it's enough. Let's create that
splash of water, okay, to do that, I'm going to create a
normal duplication. Hit Shift and D, duplicate it, scale it down, hit S, Z, scale it down. And then since we are going to use the proportional
editing tool, I'm going to enter the edit mode and I'm going to add
a few loop cuts here. So I'm going to hit
Control R or Command R. And let's add a
three loop cuts. Left-click to confirm
and escape. Okay? Now I'm going to hold down the Alt key and select
this middle loop cut. That's all we need to enable the proportional
editing tool, hit G, adjust the fall of amount by
your mouse wheel and try to create a curved version of
this water drop like that. Alright, it looks very good. Probably we can add the subdivision surface
modifier to it as well. Maybe 23 or 34. And now I'm gonna go to
the top orthographic view. It's s, scale it down. Now. Okay, Bring it here again. Go to the top orthographic view, heats our rotate it. Let's go to the front
orthographic view. Hits are rotated here. I can scale it down. Let's put it somewhere
around here. Rotate it. Nice, and Alton D, duplicate it. Go to the top orthographic view. Hits are rotated this way. Let's bring it here. Hits are rotated. G, bring it up. You get the idea, right. You just need to
reposition it until you get to your desired
result, okay? And finally, we need a drop
of water right here as well. So I can just select this one. Alton D, Bring it down, hit S, Z and just scale it down, hit S and just scale
the water drop down. Put it here,
something like this. Obviously these drops should
be placed right here, okay? They should be placed
above our umbrella. But for the modelling part, I placed them there later. When we put all our
models together. I will reposition them. For now. I think we're good to go. I hope you enjoyed this video and I'll see you
in the next one.
11. Scene Composition: Hey, welcome back. In this video, we're going
to compose our 3D scene. But before we do that, we need to model
our bunnies ears as well because we forgot
to do that before. So I'm just going
to quickly go ahead and model the ears for it. But let me take a look at
the reference image first. Alright, we can model these
ears using the cube simply. So first I'm going to bring
the 3D cursor right here. Do that. I can just hit shift
and C on my keyboard. And as you can see, it
has been repositioned. Let me add a cube, Shift a go to Mesh and
add a cube here. I'm going to scale it
down just like this. G, Z. Bring it up. Let me go to the top
orthographic view. Alright, it looks fine. Probably I can scale
it along the x-axis. So hit S, x and scale
it just like this. Now I'm going to scale it, aligns the z-axis as well, s, z and scale it up. Something like this should work. I'm going to scale it
along the x-axis a little bit more
to make it wider. And also I'm gonna
make it taller. Nice. Let me scale it, allowing the y-axis as well. I'm going to hit S, Y and
just scale it like this. Alright, good. Now I'm going to add the subdivision surface
modifier to it. Let's set the levels that
you pour 234 as always, and then I'm going to
right-click on it, Shade Smooth. And finally, let's enter the
edit mode to modify that. So what should we do? Well, first of all, I'm going to make this
bottom surface sharper. Therefore, we need a loop cut. I'm going to hit
Control R or Command R. Left-click to confirm and
bring it down just like this. And then I'm going to select
this face. Just like that. I'm going to insert it, it's I and inserted
inside like this. And finally, let's
extrude it in, hit E and just extrude it in. Something like this should work. Not too much, by the way, nice. And then I'm going to select
this bottom edge right here. And I'm going to
bring it down, hit G, Z and bring it all the way
down to here, like that. I can select this top edge as
well and bring it up here, g, z, and just bring it up. Something like this
should work very well. Alright, so far, so good. Now we need to duplicate it. So I'm going to hit Alt and D
to have a link duplication. Then x two, lucky it along
the x-axis and put it here. And I can add a little bit, rotate it like this and
this one like that. Let me move it to
the right side and something like this
looks very good. If you need to modify it later, we can always do that. But for now, I think our bunny is ready and let's
jump into composition. Before we compose our scene. I'm gonna go ahead and
parents all these objects. I'm going to select them all. And then I'm going
to make sure that the active element
is the bunny's head. Therefore, I'm
going to hold down the Command key or Control key. And in the outliner, I'm going to choose this
sphere, this main sphere. Just left-click on it. And as you can see now it's highlighted by
this yellow color. Now you can hit Control
P or Command P, object, keep transform. Perfect. Let me rename it to Bonnie. Nice. And we are done. In order to compose our scene. We need to use our
reference image because we are going to
reposition our objects. So I'm going to unhide it
in case you didn't do it, make sure to select
your reference image. Go to the reference
property panel. And from here,
check this opacity, check bikes and turn down
the opacity to something like 0.4 to make it a
little bit transparent. Now I'm going to
select my bunny. The parents object, and I'm
going to reposition it. So I'm going to hit G and move it to somewhere around here. And I can also scale
it down a little bit. And then I can go to the
top orthographic view and rotate it like that
just a little bit. Okay, yeah, it looks nice. I'm going to move the bunny to the right side a little bit, and then I am going to just
rotate it here a little bit. Alright, we can
reposition these years. We can make them bigger. Let me just select
these two ears, scale them up like this. And then if I just
move it around, I can just rotate this one
towards the left like that, and this one towards
the right like this. But make sure that
they are placed right above eyes, okay. Not something like this. That's gonna be problematic
if you cannot place them perfectly based on your
sketch, that's totally fine. Okay, Now I'm going to
bring the eyeglasses here. So I'm going to go
to the outliner and let's unhide
all these objects. Then I'm going to
select the parent. Scale it down because it's
too big for our little bunny. I'm gonna go to the
top orthographic view. Let's bring it here. I'm going to rotate it. And then I'm going to
bring it up, it G, Z and bring it up again. Top orthographic view, hit
G and put it right here. I can move them from this view, G, Z and bring it down. But check that
everything is in place. Probably I can move it
towards the front. Okay. Alright. Think it looks nice. I'm going to move
it to the left side a little bit so that the lenses are placed
right in front of eyes. Maybe I can just scale it down, hit G and move it
to the left side. Alright, for now, it's fine. I'm going to leave
it as is later. I can always adjust it. But what about these shoes? Well, I'm going to select
them both and I'm going to scale them up because
they are too tiny. Hit S scale him up, He Ji, bring them down. I'm going to select this one. Go to the top orthographic view, hit R and rotate it like this, maybe a little bit more. And then I'm going to
move around like that. It's R and just
rotate it this way. G, bring it up. Nice. Go to the top orthographic view and just rotate it
a little bit more. Now let's select this shoe. Go to the top orthographic view, hit R, rotate it like this. He Ji, bring it here. And then I'm going to move
around a little bit and I can rotate it like that so that we could indicate it's
working somehow. Let me go to the top
orthographic view. Hips are rotated, it are here, G, and put it right there. I think it looks very good now. Okay, What else? Let me just select this bunny's head and
hide it so I could see the position of the tongue and also the position of its teeth. As you can see in our sketch, our bunny's head is rotated
a little bit, it's tilted. So I'm going to do that here. I'm going to select
bunny and also this eyeglasses object hits are just rotate them like that. He Ji, bring it here. And let's take a look. Okay, it looks much better now. Now I'm going to
select its tongue and let me reposition
it a little bit. I'm going to go to the
top orthographic view. Hips are rotated
this way, great. And from the front
orthographic view, hips are rotated this way. He Ji and bring it down, make sure that it's attached
to the floor of its mouth. It's very important and
I think now we can leave it as is probably I
can select this shoe, hit R and just rotate it, hit G and put it here. Okay, so far so good. Now let's select our umbrella. Okay, here is our parent
element g. Bring it right here. I'm going to hit S to
scale it up like that. Let me just select
my bunny's head. I'm going to hide it. So the Handle should
be placed this way. Therefore, I'm going to select this umbrella and I'm
going to rotate it. It's our Z and try to rotate
it, something like this. And then I can move around
and rotate it as well. It's our rotated this way, okay. Again, in the front
orthographic view, hips are rotated this way so that we could see the inner part of this
umbrella as well. He Ji, bring it down, IT S scale it are rotated a little bit more G. And then I'm gonna go to the
top orthographic view, hit G, bring it down. Now I can just unhide my bunny's head to position
this umbrella properly. Let me go to the wireframe mode, hit G and bring it
somewhere around here. I can just scale it
up a little bit, hit G and bring it down. Obviously in our sketch, the handle is a
little bit bigger, so we can select the shaft, hold down the Shift key, and the handle entered
the edit mode, hit a to select all these
faces and vertices. Hit S to scale them
up. Like this. He G and move it down,
something like that. Alright, nice. Now it's time to
position our cloud here. So I'm going to select
the parent which is here. Hit G, bring it right here. Maybe I can scale it
down a little bit. Hit S, G, bring it down. Something like that. Should work. I can move it up a little bit because right now my umbrella is a little bit bigger than
what it was in my sketch. So I can bring it up, hit G, z and move it up so that we could have enough
space for our rain. Let me go to the top
orthographic view. I'm going to rotate it here to R and just rotate it this way, okay, then hit G and
bring it right there. I think it looks very good now, the last thing is to
locate our water drops. So I'm going to select them
all here in the outliner. Like this. Go to the top
orthographic view, hit G, bring them all here, rotate them are like this. Go to the front
orthographic view. He Ji, bring them down,
something like this. However, we need to
reposition a few of them. Let me move around. So I'm going to
start with this one. I can just hit G and
move it to the back. And maybe this one hit G, move it to the front. Let me move around. Maybe this one hit
G, bring it here. This one He Ji Hu
width to the back, something like this to
make it look natural. And here we have one water
drop, bring it down. Probably we need one here. So I'm going to select this one. It's Alton D. Duplicate it. Bring it right there. Okay. Let me check its position. It's not placed properly. So I'm going to bring it there. He Zhe Xie, move it down. And I'm going to make sure
that this one touches this umbrella
surface because I'm going to place this
water splash right here. So let's move it down. He Zhe, Xie, bring it down. And as you can see, it goes through my
umbrellas panel. It means that it definitely
touched the surface. That's exactly what I wanted. Now I'm going to select
these water splashed drops. Go to the top orthographic view. He Ji, bring them here. Let me see. It should be placed right here. Let me bring them down here. G, bring them right here, scale them up, It
s, scale them up. And then from the top
orthographic view, I'm going to just rotate them. It's our, rotate them this way. And I'm going to rotate every
single one of them now, according to the position
of this water drop, I'm going to select
this one and remove it. Let's select this one. Scale it down a little bit. Okay? And now I can reposition these drops,
something like this. Let me zoom in and
here it looks fine. Let me check it out. Probably I can rotate it
from this angle as well. Alright. I'm gonna bring it
up a little bit. Hit G Z, bring it up. And this one as well
hit G Z, bring it up. I can just scale it down. We can have another water
splash somewhere around here. So I'm going to select
these water drops. I'm going to duplicate them. Alton D, move them
somewhere around here. He GZ, bring them up. Maybe let's place them here. Okay. He, Zhe, Xie, bring them up
and then I can rotate them, hit R and just rotate
them this way. And also I can rotate
them this way. I think we can select these water drops and
rotate them as well. Okay, like this. Now they look much
better and is as well. You can just modify
these water drops as long as it takes to get
your desired result. That's totally right. I'm going to select
this one here, G, and move it here, and I need one here. So let me just
duplicate this one, Alton D and put it right. There are right. I think our scene
looks pretty good. Now. It's time to apply
materials to our objects. So see you in the next video.
12. Adding Materials to Your Objects: Alright, now that
our scene is ready, it's time to apply. Materials are objects. First of all, I'm
going to select my reference image
and I'm going to hide it because for now
I don't need it. And then I'm going
to start applying materials to my bunny. So first, in order to be able
to preview your materials, you need to head over to
the material preview mode. Right here. As you can see, everything is white for now. That's totally fine. I'm going to start
with the bunny's head. I'm going to select
this head and I'm going to head over to the
material property panel. From here. I'm going to click on New. And let's call it white, because I'm going to
use the same material for many other objects. And I don't need to
change anything. I'm going to set
the base color to white and we don't need to adjust any other
properties here. That's the first step. Then let's do the same
thing for the ears. I'm going to select this year, but this time I'm going to
reuse the material that I previously created
from this drop menu. I'm going to choose
white for this one. We don't need any
other material because we created a link
duplication, if you remember, therefore, if I add a material
to one of these years, it will be automatically applied to the
other one as well. For the nose, I'm gonna
do the same thing, white. And for the whiskers, I'm going to apply the
same material to them. I'm going to select one of them. Let's add the white
material to it. Again. Since we had a link duplication, we don't need to apply the same material
one-by-one to all of them. Just like this, as you can see, it has been automatically applied to these
whiskers as well. For the teeth, I'm
going to create a new material
because I'm going to make the teeth reflective. Okay, so I'm going to
select one of them. Then I'm going to click a new, Okay, Let's call it teeth. And base color is going
to be white. That's fine. The only thing I'm
going to adjust here is the roughness property. It determines how
reflective your object is. If I decrease this value, I can make it more reflective. I'm going to set it to 0. If I zoom in, I'm not
sure if you can see it. You will be able to
see the reflections. Right now. We don't have any light, but since we are in
the preview mode, you can simply see
these reflections. If I increase that,
look what happens. You see it's not
reflective at all. So I'm gonna decrease it to 0. And for the tongue, I'm going to create
a new material. Let's call it tongue,
just like that. And then I'm going to
change its base color to something like pink. Pinkish color. Yeah, I like this one. It looks good. Later we can adjust
it if we need to. For our cloud, I'm going to use white as well for our shoes. I'm going to use purple, okay? So I'm going to select one, hit the New button. And here I'm going
to write primary. It's going to be the
primary color I'm going to use for this whole scene. Alright, let's change
the base color to something like this. Something a little bit dark. The two vibrant. Okay, nice. If you want to get the
exact same color code, you can head over to the
hex mode and just copy this hex color code from the project that
you have access to. Keep in mind that you can always download the final project and just check all the
properties that I said already. And now I'm going to
move on to the umbrella. I'm going to select
this fabric part. I'm going to enter
the local view, hit forward slash, enter
the top orthographic view. First, I'm going to give
it the white material. So from this drop menu, I'm going to add white to it. However, I'm going to use my
primary color here as well. I'm going to enter
the edit mode and I'm going to select these faces. Alright, just like an umbrella. So what I'm gonna do is this, I'm going to choose the
Select circle selection tool. It's going to make my life much easier when I'm
selecting these faces. And I can decrease this radius
to something like eight. I'm gonna go to the
wireframe mode. Let me zoom in. I'm going to select
these faces like this, hold down the Shift key and
select them this one as well. Just like this, these phases. These phases. Okay, nice. One more, hold down the Shift key and
select these faces as well. Alright, nice. Then I'm going to add
a new material here. Click on this plus button, click on New and make sure to click on this Assign button, to assign this new material slot to the faces that
we just selected. I'm gonna hit Assign. And then if I get back
to the solid mode. I can simply use this primary color and
just click on Assign. And I can just go to
the material preview. And there we go. Our umbrella is ready
to as easy, wasn't it? Let me exit the local view. The other thing I'm
gonna do is this. I'm going to select the
shaft and also the handle. I am going to use this
primary material for it, for this one as well. And now I'm going to apply the primary material to
my eyeglasses, okay. For the handle, I'm
going to select it primary for these circles, primary for disconnecting
part, primary. But what about the eyes
behind and also these lenses? Well, right-click on it, select hierarchy and hit H
to hide all those objects. And then I'm going
to select this. I, the eyes are going
to be reflected fright. So I can simply use the teeth material or you can just create a new
material for it. In this case, the
teeth material looks good as you can see
now it's reflective. Let's do the same thing for the other eye teeth
and for the pupil. I'm going to select one, hit New and let's
write pupil. Okay. I'm going to make it dark,
something like black, just like this, and make sure that it's
reflective as well. So just decrease
the roughness to 0. And for this one, I'm going to use pupil as well. And now we can unhide
our eyeglasses. So I'm going to unhide them. What about these lenses? Well, our lenses should
be transparent, right? Because these are not sunglasses,
these are eyeglasses. So I'm going to
select this circle. As you can see,
these are connected and I'm going to add
a new material to it. Let's call it eyeglasses. Right now we are using this
principle, the PSVF shader, and we can make it
transparent by just increasing this transmission
property here, like this. Or we can just change
this principle, BSD of Shader with Glass, be SDF, just like this. I think everything looks fine. We don't need to
adjust anything. We can just modify
the roughness. If we want to make
it more reflective, we can decrease the roughness. I think maybe 0.2 is fine. Right now, we cannot
see through it, but later when we prepare our
scene for the final render, you can definitely see the
eyes through these lenses. I'm not going to
change the color as well because white is
fine in this case. Alright, but what about
the ears, the inner part? Well, I'm going to select
one entered the edit mode, and I'm going to make sure that the Face Select tool is selected and just select
the face in the middle. Right now since we
moved that phase in, we can't see it. So if you just go to
the wireframe mode, you can see that I
just selected it, right, it's right there. So I'm going to get back to
the material preview mode. And I'm going to add a
new material slot here, it new, and let's call it here. And then I'm going to assign
it to that particular phase. Now let me adjust this
base color to pink. Something like this would work. But I really don't
like this shape. We need to adjust it since
we are in the edit mode, I'm going to go to
the wireframe mode. Okay? I'm going to select
the Edge Select tool and just select this edge, hit G twice to enable the edges slide tool
and just move it up. And I'm gonna do the same
thing for this bottom edge, G, G, move it down. Let's see what we've got so far. It looks much much better. Let me see if we can make
it taller a little bit. I'm gonna go to the
wireframe mode. And I'm going to select
this face, hit S, Z, Z twice because
I'm going to scale it allowing its local z-axis, okay, if I just hit S and
Z, look what happens. It doesn't make sense
because it's scaling, align the global z-axis. But if I want to enter
the local z-axis, I can hit Z twice. First S to enable
the scale tool, then z and z. And if you take a look at the top-left corner
of my screen, you can see it says scale one allowing local z
instead of global, and that's what we want. I'm going to scale it up a
little bit, not too much. Then I'm going to select
the Edge Select tool. Let's select this top edge here, G, G, and just slide it up. I think we are good to go. Yeah, it looks very good. But what about
these water drops? Well, for them? I'm going to select one of them. Okay. I'm going to add
a material to it. Hit New, let's call it water. The water. I'm going to
make it transparent. So if I just scroll down, I can increase this
transmission value to one. Now they are transparent. A few of them are not linked. So make sure to add the water material to
them just like that. And also we need to
adjust this IRR. Irr stands for index
of refraction. It comes from physics. I'm not going to get into the details because it's
going to be too complicated. But for water, the IOR is 1.33. You won't see any
difference here. But later when we add light to our scene and
we tried to render it, it would make it a little
bit more realistic. Alright, we're almost done. The other thing I'm
gonna do here is adjust the size of this tongue. I think it's too little. Then we're going to select it, hit S to scale it up, hit G, Z and bring
it up as well. And also these teeth could
be a little bit wider. So I'm going to
select them both. Hit S XX and just
make them wider. Alright guys, that's
all for this video. I hope you enjoyed it. And I'll see you
in the next one.
13. Add Realistic Lighting to Your Scene: Hey, welcome back. In this video,
we're going to add realistic lighting to our scene. Lighting is so
important no matter how great your models are, if you can't get the
lighting done properly, your final render wouldn't look very good for this project. I'm going to use
a popular method called three-point lighting. It's a well-known method
in the film industry, in the photography
industry, etc. It has three main components. It has a key light which acts
as the main light source. It has a fill light
which will be placed on the opposite
side of the key light. And also it has a rim light or a hair light that illuminates
the back of our object. I'm going to start by adding a backdrop as our
background here. So make sure that the 3D cursor is placed
right at the center. If it's not, just hit Shift and see to make sure that
it's placed correctly. Okay. And then I'm gonna hit
Shift and add a plane. It's placed right here. Go to the top orthographic
view and just scale it up dramatically,
something like this. Okay, now I'm going to
enter the edit mode, make sure that the H
Select tool is selected. And just select this edge. I'm going to go to the right
orthographic view now, and I'm going to
extrude this edge out, hit E, Z and just
extrude it out. Something like that. However, is still your backdrop has a smooth
curvature right here. And we're going to
make it easily. So we just need to select this edge and we
need to bevel it, hit Control V or Command V. Then try to bevel
it and just add more segments by scrolling
your mouse wheel. Just like this. Now it looks very good and
our backdrop is ready. Let me call it BG
for background. And for the background,
I'm going to use the primary material. Make sure to right-click
on it and click on Shade Smooth to
make this part smooth. Okay, the first step is done. Now to see all the lights, I'm going to go to
the render view. If I just click on
this little icon, you see that now we are in the
render view and everything is dark because we don't have any light source.
So let's add 1. First, I'm going to
hit shift and a, and I am going to go to light. And from these light sources, I'm going to choose
the area light hit G, Z, bring it up. As you can see, our light
source is placed right here. I'm going to move it up here, g, z, and it's too small. If I just go to the
top orthographic view, you can see that it's too small. So I'm going to scale it up, hit S to scale it up,
something like this. You can also adjust its properties in the
light property panel here. You can modify its
size if you want. Right there, its shape. We have square,
rectangle, disk, ellipse, and also power and color
for the main color, for the key color. I'm not going to
change the color here. However, later, I'm
going to change the power because ten watts
is nothing basically. But first, let's
adjust its position. I'm going to hit R, then y two, lucky it along the y-axis. Then I'm going to rotate it by 45 degrees, 45, it's Enter. And then if I go to the
top orthographic view, I can hit R, z, and this time Luckett
along the z-axis 45 and then minus to
place it right here. And finally, I'm going
to move it this way. Hit G x, x, and just move it here, hit G, Z and bring it up. But as I said, the power is too low, so I'm going to increase
it to maybe 1 thousand. Now it looks much better than we need a field
light as well. But first, let me
bring it down here. I'm going to
duplicate this light, hit Shift and D Escape, then hit our z 90
minus its Enter, hit G, x, and bring
it to this side. Okay? It looks much better now, you can adjust the
power as well. And for the rim light, I'm gonna go to the
top orthographic view. I'm going to duplicate it, hit Shift and D Escape r, z 90 minus, and then g, y and bring it up to
place it right there. Okay. Let me take a look. It looks good for the rim light. I'm going to adjust the
color to something like purple or blue or something
like this. Looks good. I can increase the
power to 2000s. I can bring it near my objects. So hit G ZZ and bring it near. Okay, So far, so good. Now I'm going to select my backdrop and I'm going
to move it up a little bit because this money is
walking on the ground, right? So he G, Z and bring it
up somewhere around here. We've added our
lights to our scene, and now it's time to prepare our scene for the final render. So see you in the next video.
14. Prepare Your Scene for Rendering: Hey there, welcome back. In this video, we're
going to prepare our scene for the final render. So let's get started. First of all, when you
want to render your scene, you need a camera. Although we are in the
render mode right now, we cannot render our scene and save this image if we
don't have a camera, because we can
render whatever we can see through our camera lens. Alright, so let's add
a camera to our scene. Hit Shift a and click on camera, or a camera is
placed right here. And now I'm going
to make sure that my camera lens is directed to whatever I can
see right here. So while my camera is selected, I'm gonna go to view a line view alone
active camera to view. Just like that. Then
I'm going to hit N on my keyboard to open up this
menu on the right side. And I'm gonna go to View here. And here we have an option
called camera to view. If I just enable it, I can just navigate my camera based on what I see
here in the viewport. I'm going to enable it
and look what happens. There we go. It's
very easy, isn't it? I can simply adjust
my camera view. Here, the type that lens type is set to perspective,
it's fine, but I personally prefer the orthographic lens
type just like this. Let me increase the scale
here and then I can go to the output properties and
change the resolution here, the dimensions of
my final render. Right now, the resolution
is set to 1920 by 1080. I'm going to set this one to
1200 and this one to 1600. Then let's move my camera up. Once you're satisfied with
the position of your camera, makes sure to uncheck this
camera to view checkbox. Otherwise, you may
accidentally move your camera around and it's very hard to
get it back to where it was. So don't forget this step. I'm going to hit Enter to close this menu on the right side, and now we are ready
to render our scene. So see you in the next video.
15. Render Your Scene: Hey, in this video, we're going to finally
render our scene together. But before we do that, I'm going to mention
something in case you move around like this, you will see that you are not seeing your scene through
your camera lens. To get back to your camera lens, you can always hit number 0 on your numpad,
just like this. Okay, so keep that in mind. Now I'm going to go to the
render panel right here. And as you can see here, we have the render
engine option, EV. As you know, we have
different rendering engines. Ev work mentioned cycles. Most of the time we
use EV and cycles. Well, EV is a great real
time render engine and it basically allows us to preview our scene in real
time in the viewport, like what we can see here. But it's not that precise
and realistic when it comes to shadows,
lighting, etc. So instead, for
our final render, we are going to use cycles, which is more realistic
as you can see. As soon as I changed
it to cycles, the lights have been changed and everything became
more realistic. However, my maximum samples here in the Viewport
panel is set to 1024, which is way too much
for the viewport. I'm going to set it to 32
to accelerate this process. And for the render,
it's set to 49 to six. It's way too much. You can set it to
128 or even 256. Most of the time I use 512 because the more
samples you have, the less noise you will
get in your final render. But obviously it's gonna be more time-consuming for Blender to render your scene if you
use a great number here, for now, I'm going
to set it to 128. Let me zoom in a little bit. As you can see, as soon as I change the render
engine two cycles, my lenses became transparent and we can see how many's eyes through these eyeglasses and our water drops are transparent
as well as you can see. And I think we're good to go. But before we render our scene, I'm going to adjust
something here while we are in
the render panel. I'm going to scroll down. And from the color
management here, I'm going to change the Luke
from none to high contrast. Look what happens. You see it increases the
contrast between our colors. And I really liked this. You can also increase
the exposure if you think you are seeing
is a little bit dark. But for now, I think
we are good to go. Probably I can adjust the
power of my area lights. I'm going to select
my fill light and let me just decrease this
power to 500 maybe. Now it looks much better. And in the background we can see the shadow of our rim
light light source. Let's fix that. I'm just going to go
to the solid mode. Let me go to the top
orthographic view. I'm going to make it larger it, and make it much larger. Let me go to this view and just rotate it a
little bit like this. Hit G, bring it here, let me see if it fix the issue. Yeah, it's much better now. We can still see the shadow
right there at the bottom. So let's move it a
little bit more, maybe towards here,
a little bit up. Rotate it. Now the shadow is
outside our scene. I can just increase
the power 2500. So here is another tip. Now, blender is rendering
the whole scene here, even the areas that are
outside my camera view. In order to make our
viewport render faster, we can just crop this area. I'm just going to
hit Control V or Command V and just try
to select this area. You see now your viewport
render is going to be done much faster and you won't see the areas that
you don't need. Alright, great. Now let me just go to Render and from here, click on Render Image. It's going to take
a few minutes, but I'm going to fast
forward this process for you are right there it is. This is our final render. As you can see, all shadows
and lighting look realistic. You can also go ahead
and adjust the colors, the lighting, whatever you want. For example, you can
change your camera view and see how the changes
look in your final render. But before you do that, make sure to save your render. Just click on Image, Save, and just save it
somewhere on your computer. I'm going to call it
final render one. Okay? Then you can just
adjust the camera view, adjust the colors and
whatever you want. In fact, let's go
ahead and do that. I'm going to hit N on my keyboard to open
up this view panel. And I'm going to
check this camera to view option once again, in order to see the
shadows on the ground, I'm going to just use
my mouse wheel to move my camera a little
bit like this. Hold down the Shift
key and move it down. Now, from this angle, I will be able to
see the shadows. And I really like this version. I can now simply render it. Let's see what happens. As you can see, it
looks much better now. You can also go ahead and change the primary color to
something very warm. Let's give it a try. In fact, I'm going to select
the background because for the background object, we use the primary
color as well. And if I change the
base color here, the change will be applied
to all the objects and all the faces that are
using the same material. So let me change the base color to maybe yellow or orange
and look what happens. There it is. Since we used one new material slot
for all these objects, you don't need to go ahead
and modify them one by one. You just adjust one
of them and you will get this beautiful result. And also, I'm going
to select its tongue and make it a little bit darker, just like this, and add
a little bit red to it. Now we should select
our rim light and adjusts its color because
we set it to purple. But in this case, I can set it to
yellow or orange. It looks much better now. Then I'm going to render it. Let's see the result
are right, fantastic. So as you can see, it's very
easy to adjust the color. Make sure to modify these
settings by yourself. If you want to become
a good 3D designer, I'm gonna go ahead and save
it now, final render too. And that's all right guys, that's all for this video. I hope you enjoyed it and
I'll see you in the next one.
16. What's the next step?: Hey everyone, welcome to the
last video of this course. Congratulations on finishing
the course successfully. It was a long journey for both of us and I'd
like you to know that I am so proud of you that
you've come this far. Now. You are officially
a 3D illustrator and you're going to
build amazing projects. I hope you enjoyed
this course and I would appreciate
it if you could live an honest review of the course so that they could make
it better and better for you if you'd
like to get notified of course updates
and my new courses, you can follow me on Skillshare. If you want to learn
more about UI, UX design and web development, make sure to check out my
other courses on Skillshare. It was an honor to be your instructor and I
wish you all the best. See you and bye-bye.
 Arash Ahadzadeh, UI/UX Designer | University Lecturer