Transcripts
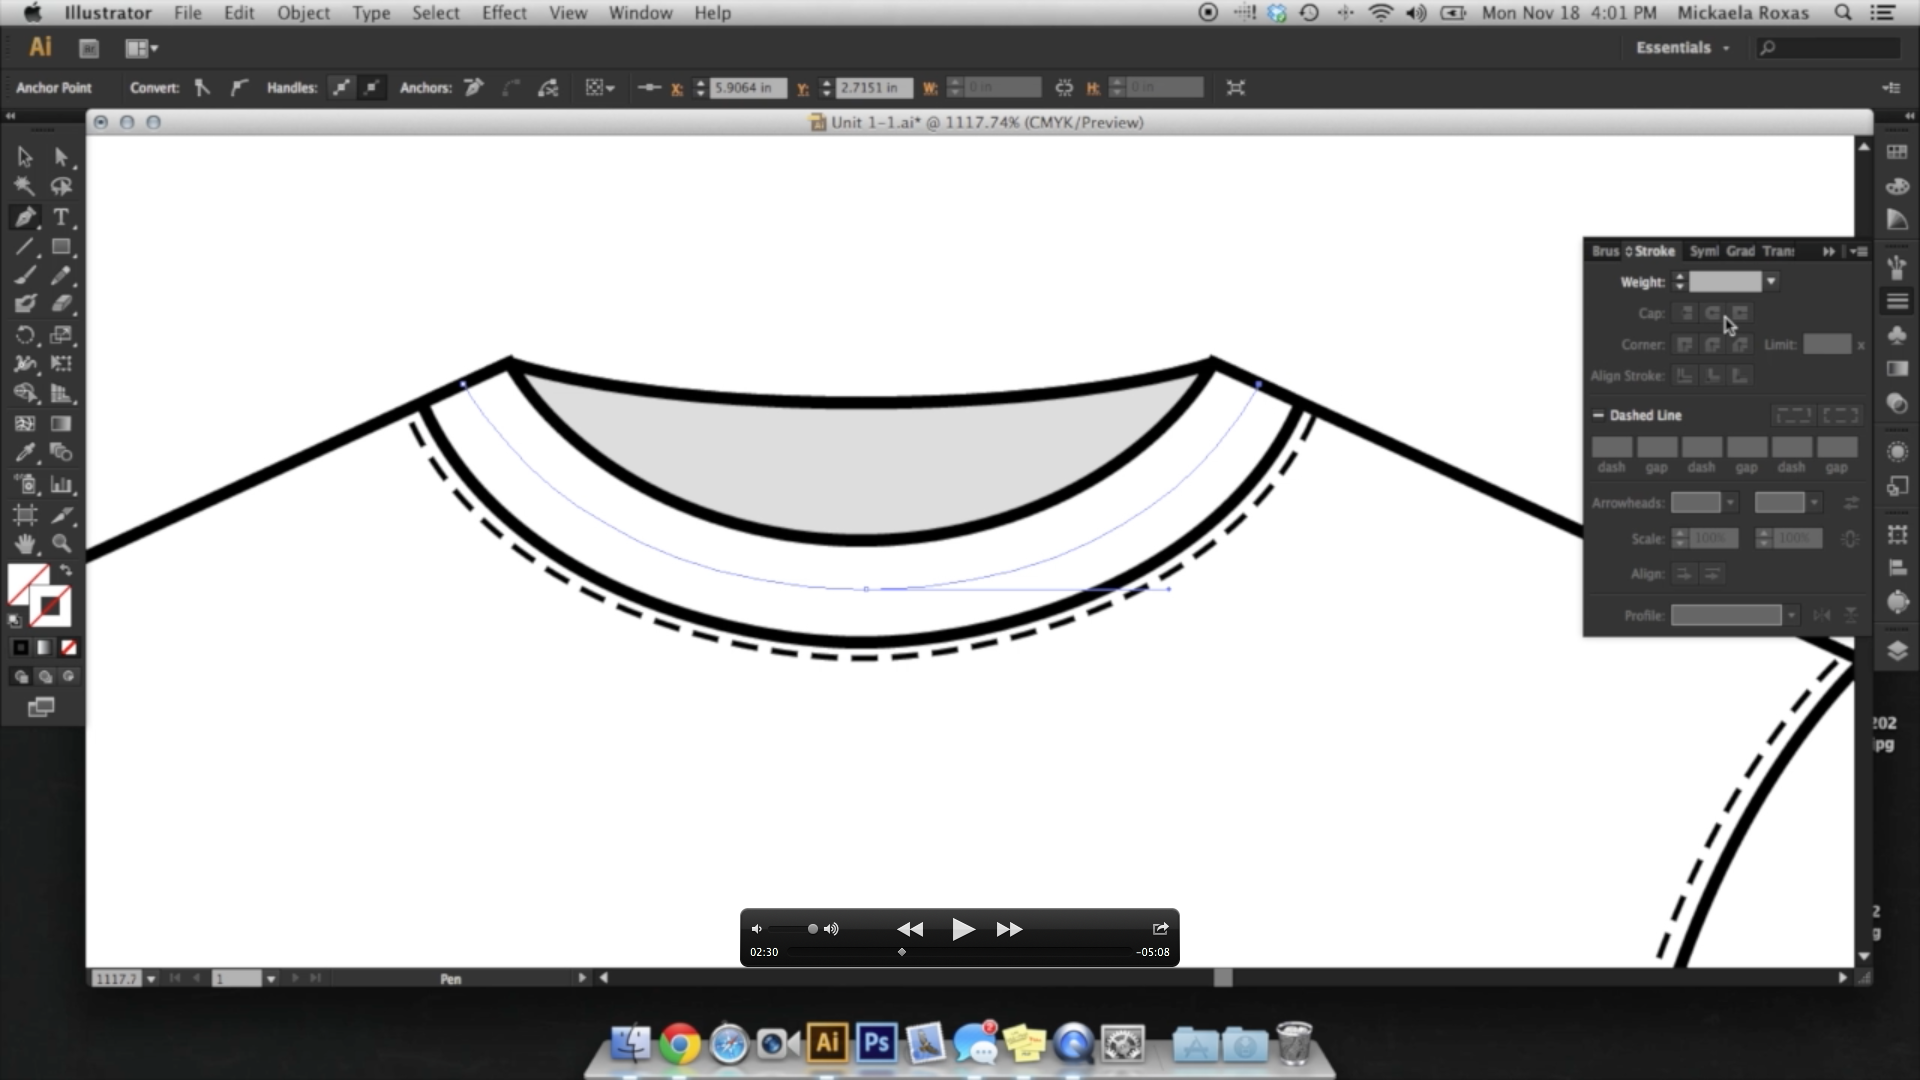
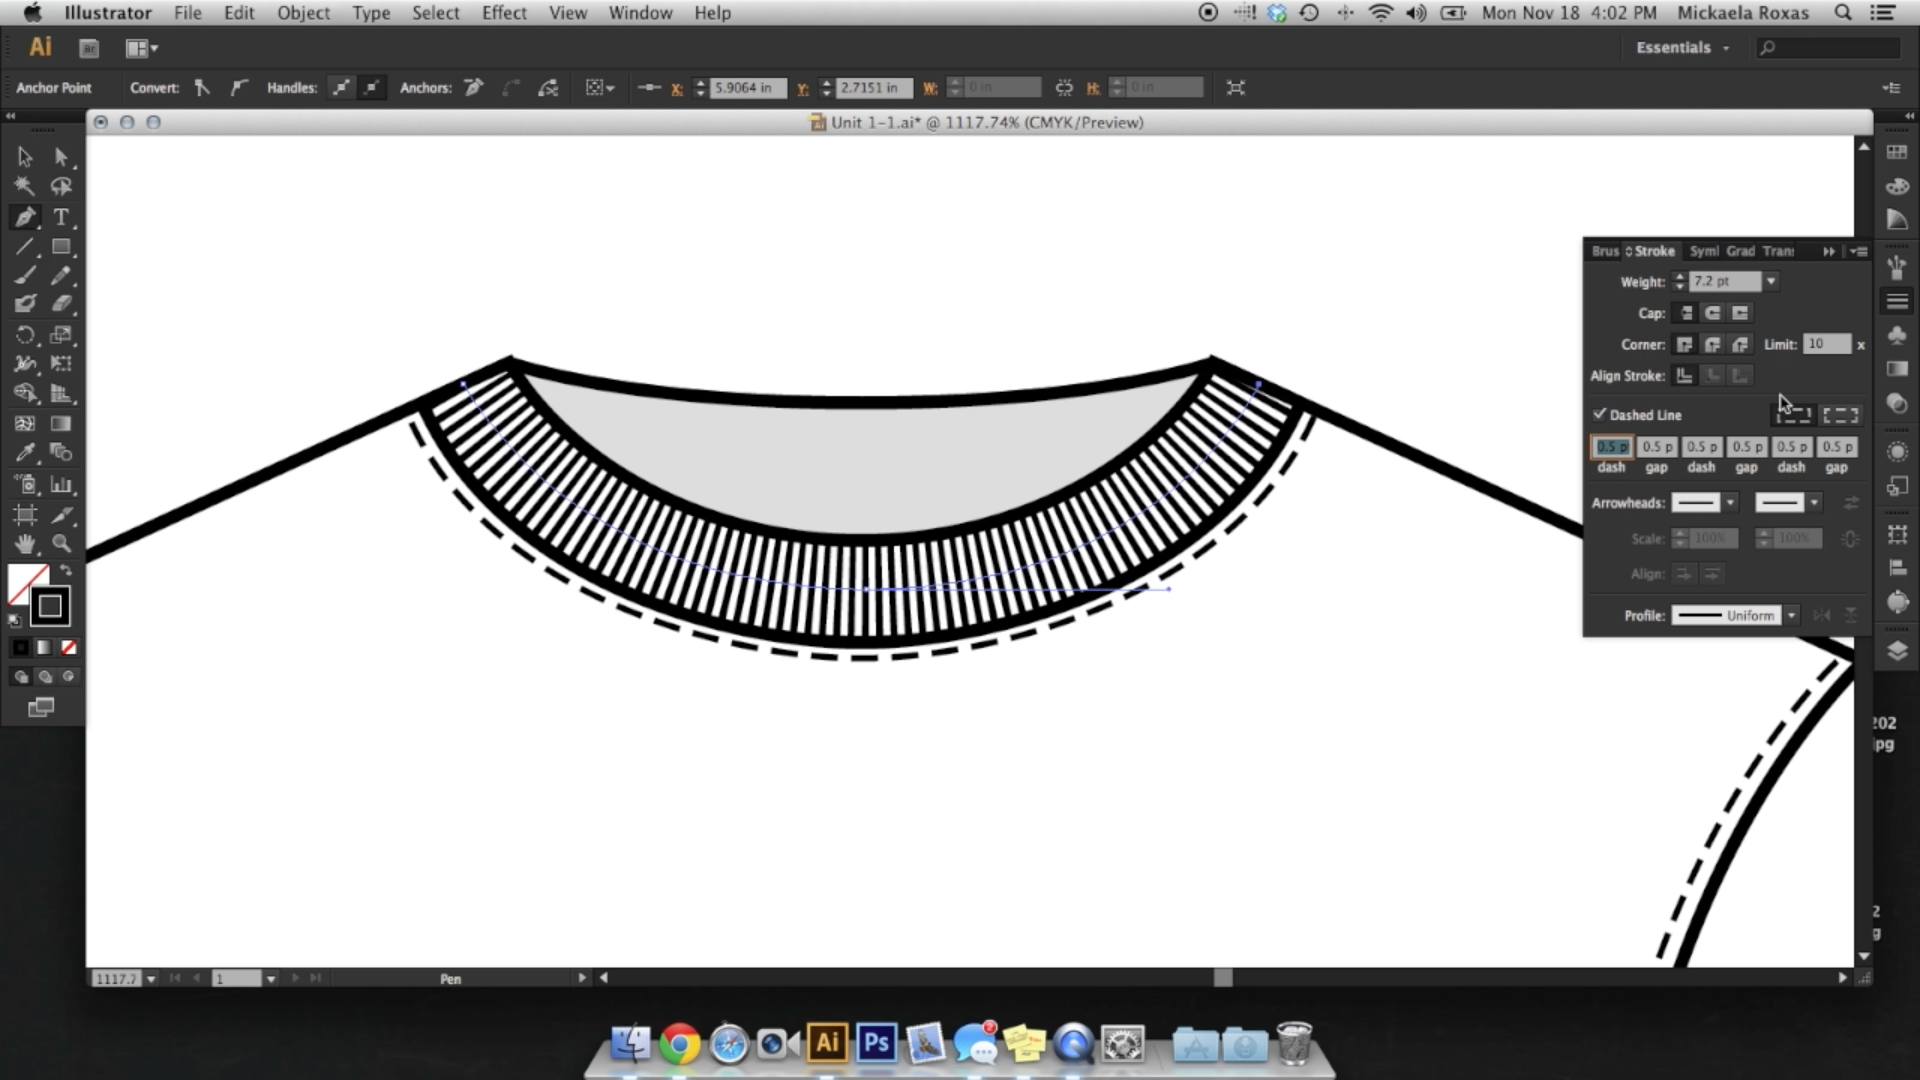
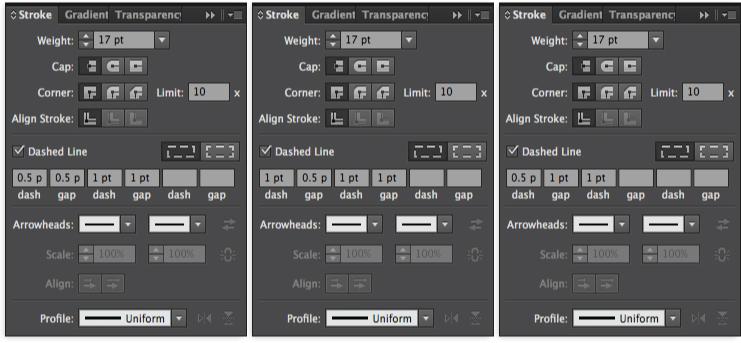
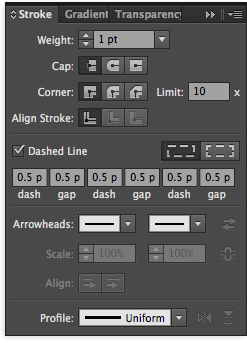
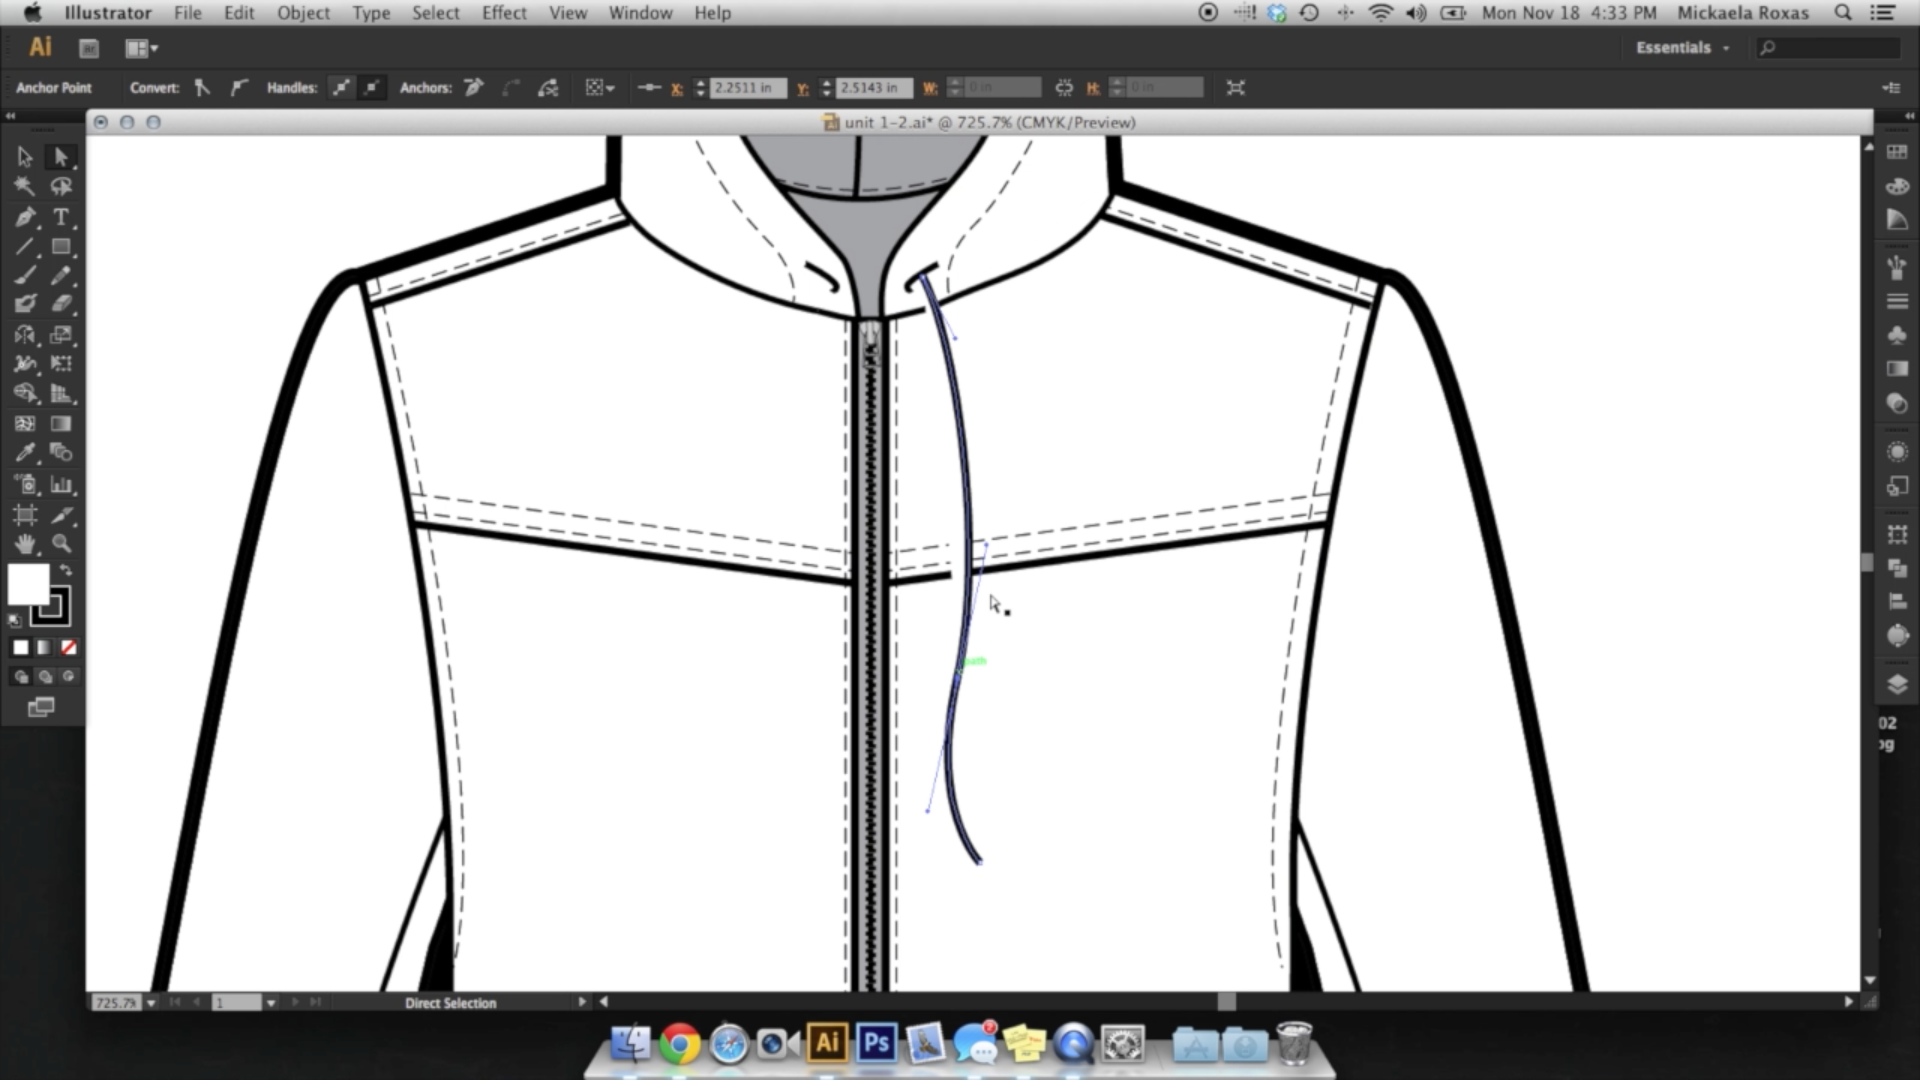
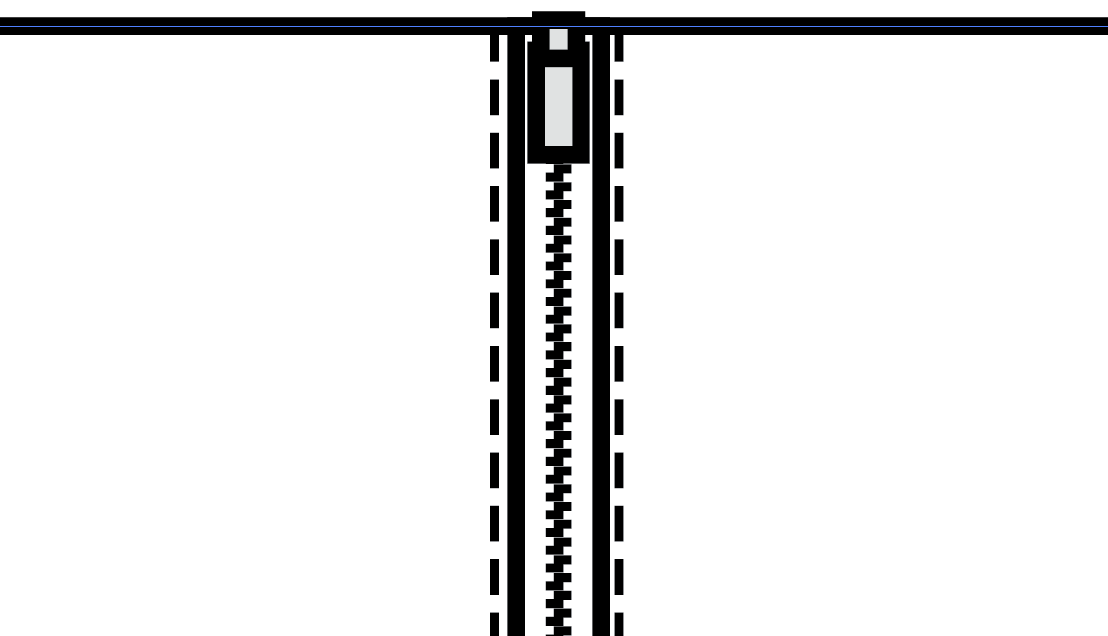
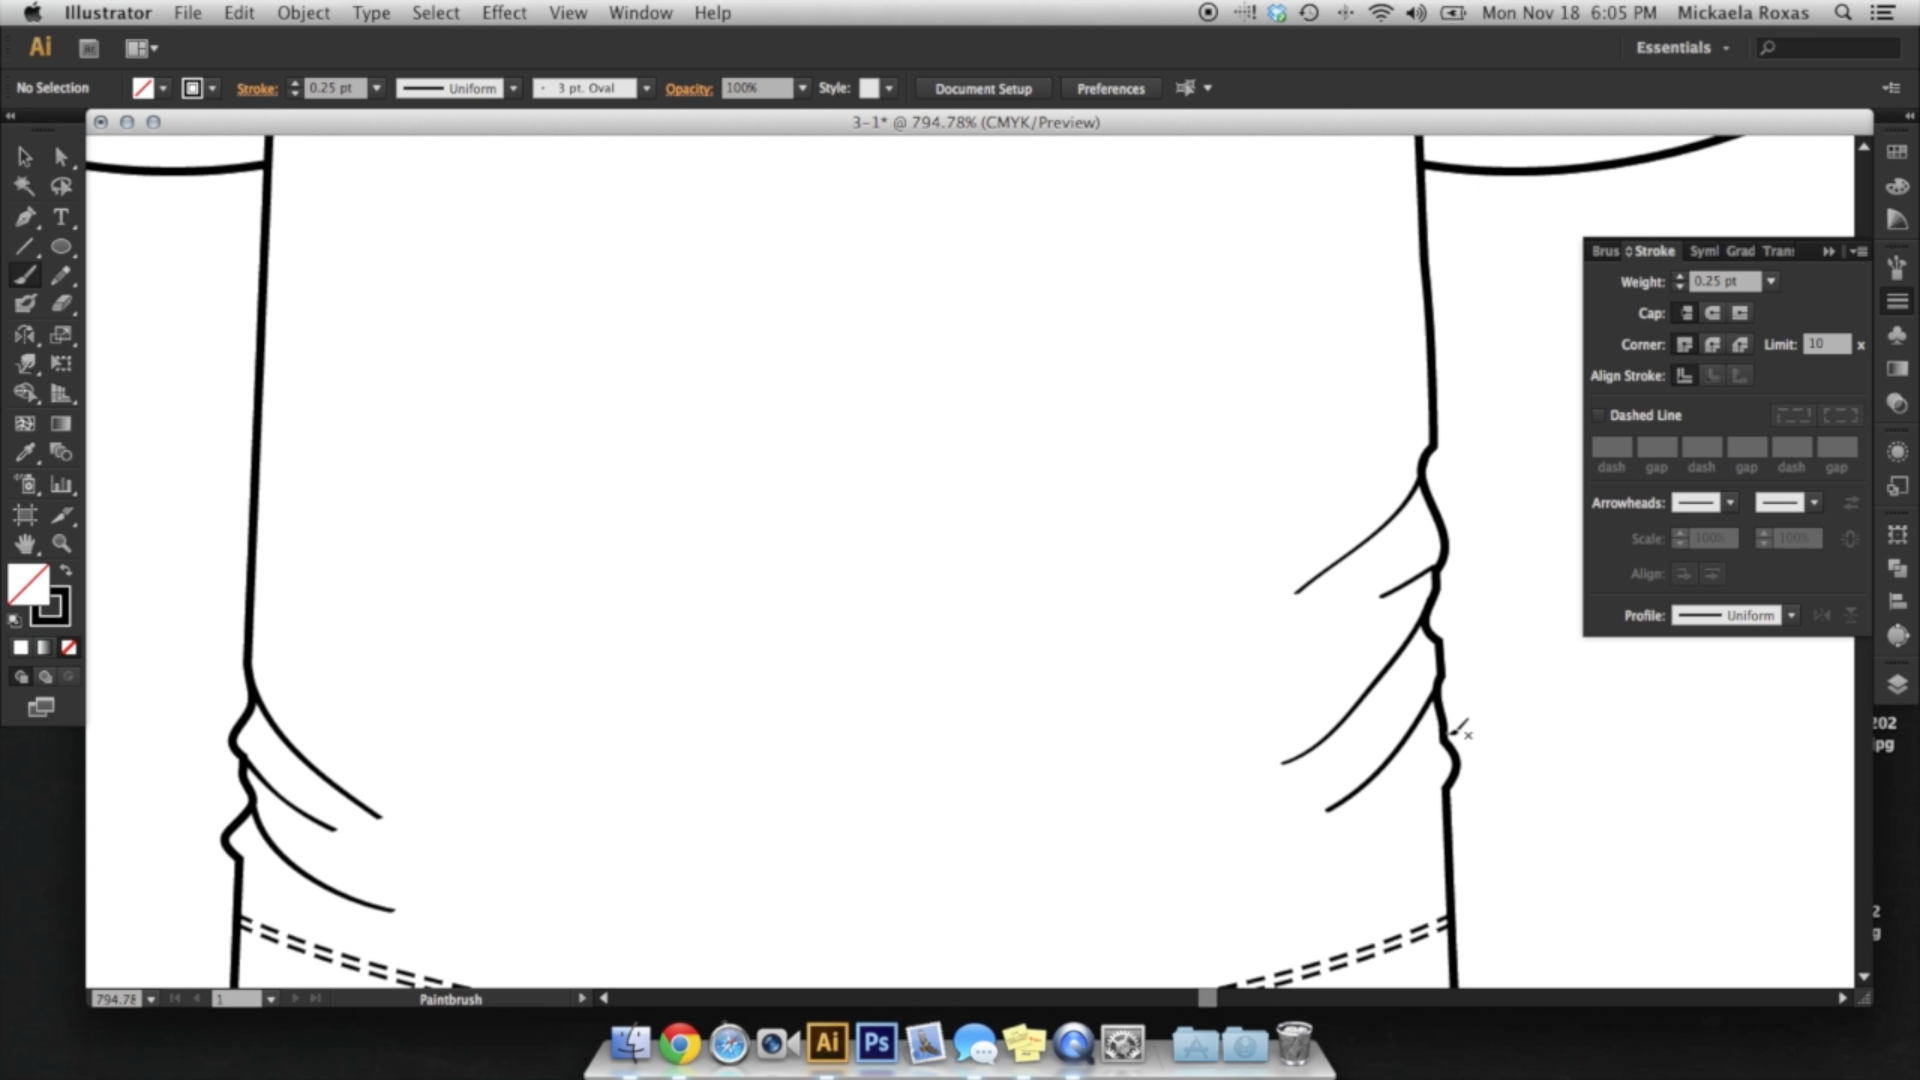
2. Unit 1.1: The Stroke Panel: - Hey, - guys, - it's Mickey here with a follow class to Adobe Illustrator for fashion with intermediate - technical design In this first unit, - I'm gonna be teaching you some more construction details. - We're going to learn how to use the stroke panel to create, - um, - zipper teeth and ribbing. - We're also gonna learn how to use something called the offset path and also how to use - certain effects like the story and transform when you're creating your flats. - So in this first part of Unit One, - we're gonna be exploring the strokes panel to create zipper teeth and also do create - ribbing. - Now, - if you remember from the first class of learning adobe all shared for fashion, - you could find the strokes panel here on the right side. - If you hover over, - it's a stroke. - It's just three lines of from a thin line or thick line. - And if you press on it once, - then you get this lovely little menu here. - You could also go to window and then go down a stroke and it will pop up for you. - So in the first class of learning Adobe illustrator her fashion, - we made this simple T shirt where it was optional for you to create a ribbing here at the - top for your collar. - And some people before they learned this process are what I'm going to teach you. - They literally just make line after line. - Like what I'm doing right now. - And you can imagine how tedious that is. - First of all, - it's not going to be evenly spaced. - And what if you wanted to change the collar afterwards, - then you're all your work is going to go with. - Well, - using the stroke panel is one of the best tips that I could ever give you for her making - your life easier here on Illustrator. - So I'm gonna show you how to do that. - Now I'm gonna take out any stroke in any fill on my pen tool. - And I'm just going to go into the mid point of this collar shape right here. - I'm going to create a line that lies in the middle. - So here, - between these two points, - that looks like the middle, - I'm going to go to my center front and you can just wait till the guides automatically. - Snappy. - They're gonna click and then drag also holding shift at the same time. - So I get the same curve, - and I'm gonna match this new curve with the shape of the collar there. - And then I'm just going to click back to where this midpoint is on the other side. - Quick ones. - There you go. - Very simple. - Next thing I'm gonna do is I'm gonna go to my stroke panel with the line you created still - selected. - I'm gonna I change my weight value until it reaches the entire collar shape. - And once I've done that, - I'm gonna maybe make it like a 7.2. - Once I've done that, - I'm going to select dash line and instantly, - even without me changing any of the settings, - you can already see that it has the appearance of ribbing, - which is fantastic. - So this looks pretty good. - I might keep it like this. - I'm gonna delete all these other ones. - So I have a 0.5 dash. - I could even make it at one point if I wanted Teoh. - Creating ribbing is as simple as that. - And if you want to see elsewhere what you've created, - you just draw a line and you just it shows you that it's creating that stroke, - that dash line just using the pencil, - so it's gonna look kind of funky if you add curves, - but like like a curve like that. - But that's basically what the stroke panel can do, - which is great. - You can also use a stroke panel to create different kinds of ribbing. - So say this was the sleeve to a hoody that I just designed. - I'm going to again go to the mid point of this rectangle, - which is right about there, - and you can see that this is a little too short. - It doesn't reach my, - uh, - the two ends of my cuff. - So again, - I'm gonna change the wait until it reaches both sides. - Think 17 is pretty good. - And then you can again just just the dash in the gap according to what you want to see. - So say I add a one, - another one here, - it creates all kind of different rooting patterns, - and you can switch up the ribbing depending on what you anticipate you will be using for - your design, - which is super hand, - because, - you know, - there are different kinds of ribbing, - uh, - with thickness and things like that. - And using the stroke panel is just a really easy way of translating that idea without - causing so much pain for you, - like toe create every single line. - And the great thing about this is say, - I wanted to adjust my caller. - Now I can just select all of my points here and say I just wanted to make it a little more - of Ah, - curve. - See, - it all moves. - Immunise isn't perfect, - but it'll moves down with me, - which is fantastic. - And you after that, - all you have to do is just edit it to fit inside again, - and there it is. - A symbol is gonna put it back to the original. - So that's how you use stroke panel to create ripping super easy. - The next thing I'm gonna show you with a stroke panel is how to create zipper teeth over - the appearance of zipper teeth. - So again, - I'm going to take my pen tool. - I'm going to remove any Phil or any stroke value that it has. - I have this mock, - um zipper right here. - Just imagine that this is to a hoodie or jacket. - But in this blank rectangle long rectangle, - here is where the zipper teeth would go. - And this is my little zipper pull right here. - So I'm going to create a straight line. - I'm gonna hold down shift, - pressing to the top to the bottom, - and I have a line perfect right here. - Next thing I'm gonna do is I'm gonna create my weight, - which is gonna be just one point. - And then I'm gonna select Dash, - and I'm gonna put every dashed and gap value 2.5 all the way down. - And what you can see that does creates a small Siris of rectangles. - And once I have the small Siris of rectangles, - I'm going to select it with my selection tool. - I'm going to copy it, - and then I'm gonna pace in place another one right on top of it. - And then I'm gonna click and drag that 2nd 1 slightly to one side of it. - I'm going to the right and slightly upwards so that you can stagger the teeth a little bit - . - They could see and I've got this J. - Jaggi a little thing going on. - And once I am satisfied with a place in it, - I'm going to select both and I'm gonna group them together and using my alignment, - I'm gonna also select my zipper pull and I'm gonna without pressing shift, - I'm going to select the zipper pull again. - Which, - as we learned in the first part of this class, - it aligns to key object. - And I'm gonna press horizontal line center, - and it's gonna center in the middle, - which is great. - So when I zoom out too far, - nice amount. - You can already see. - It looks exactly like super teeth. - And that is how you create very simple zipper Keith metals expertise, - which is great. - So that's the stroke panel. - I'll see you in unit one point.
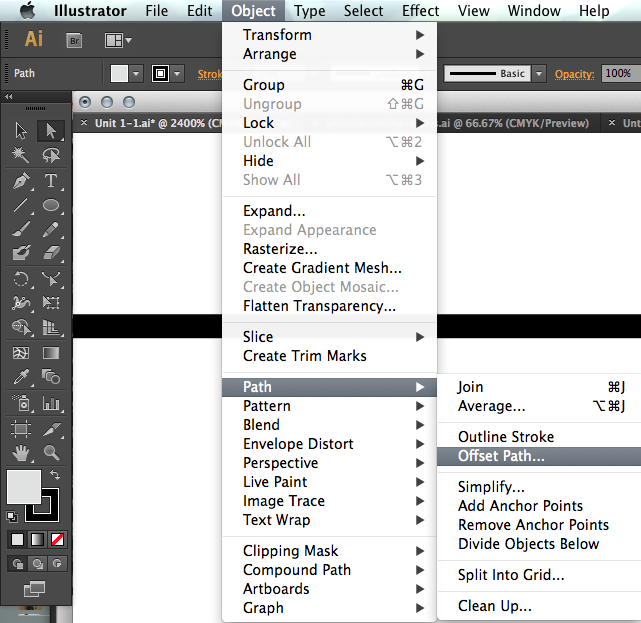
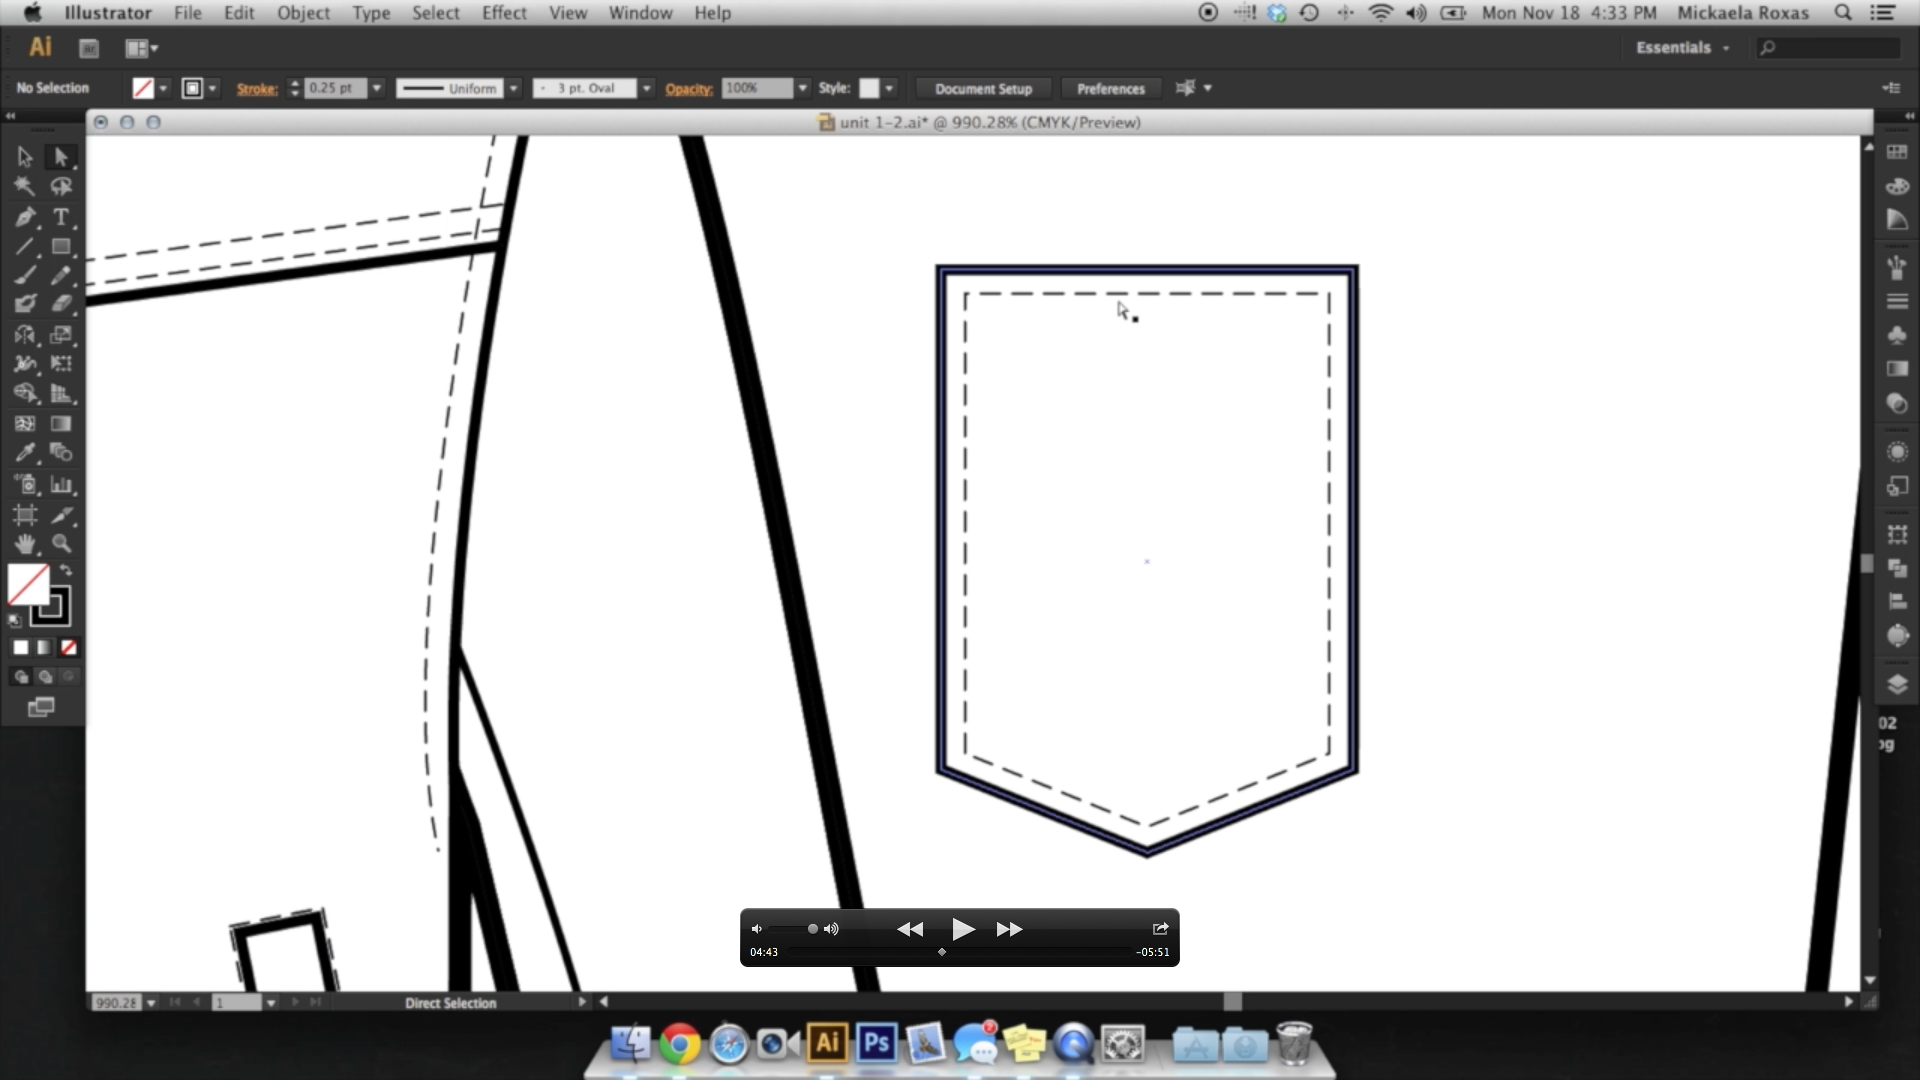
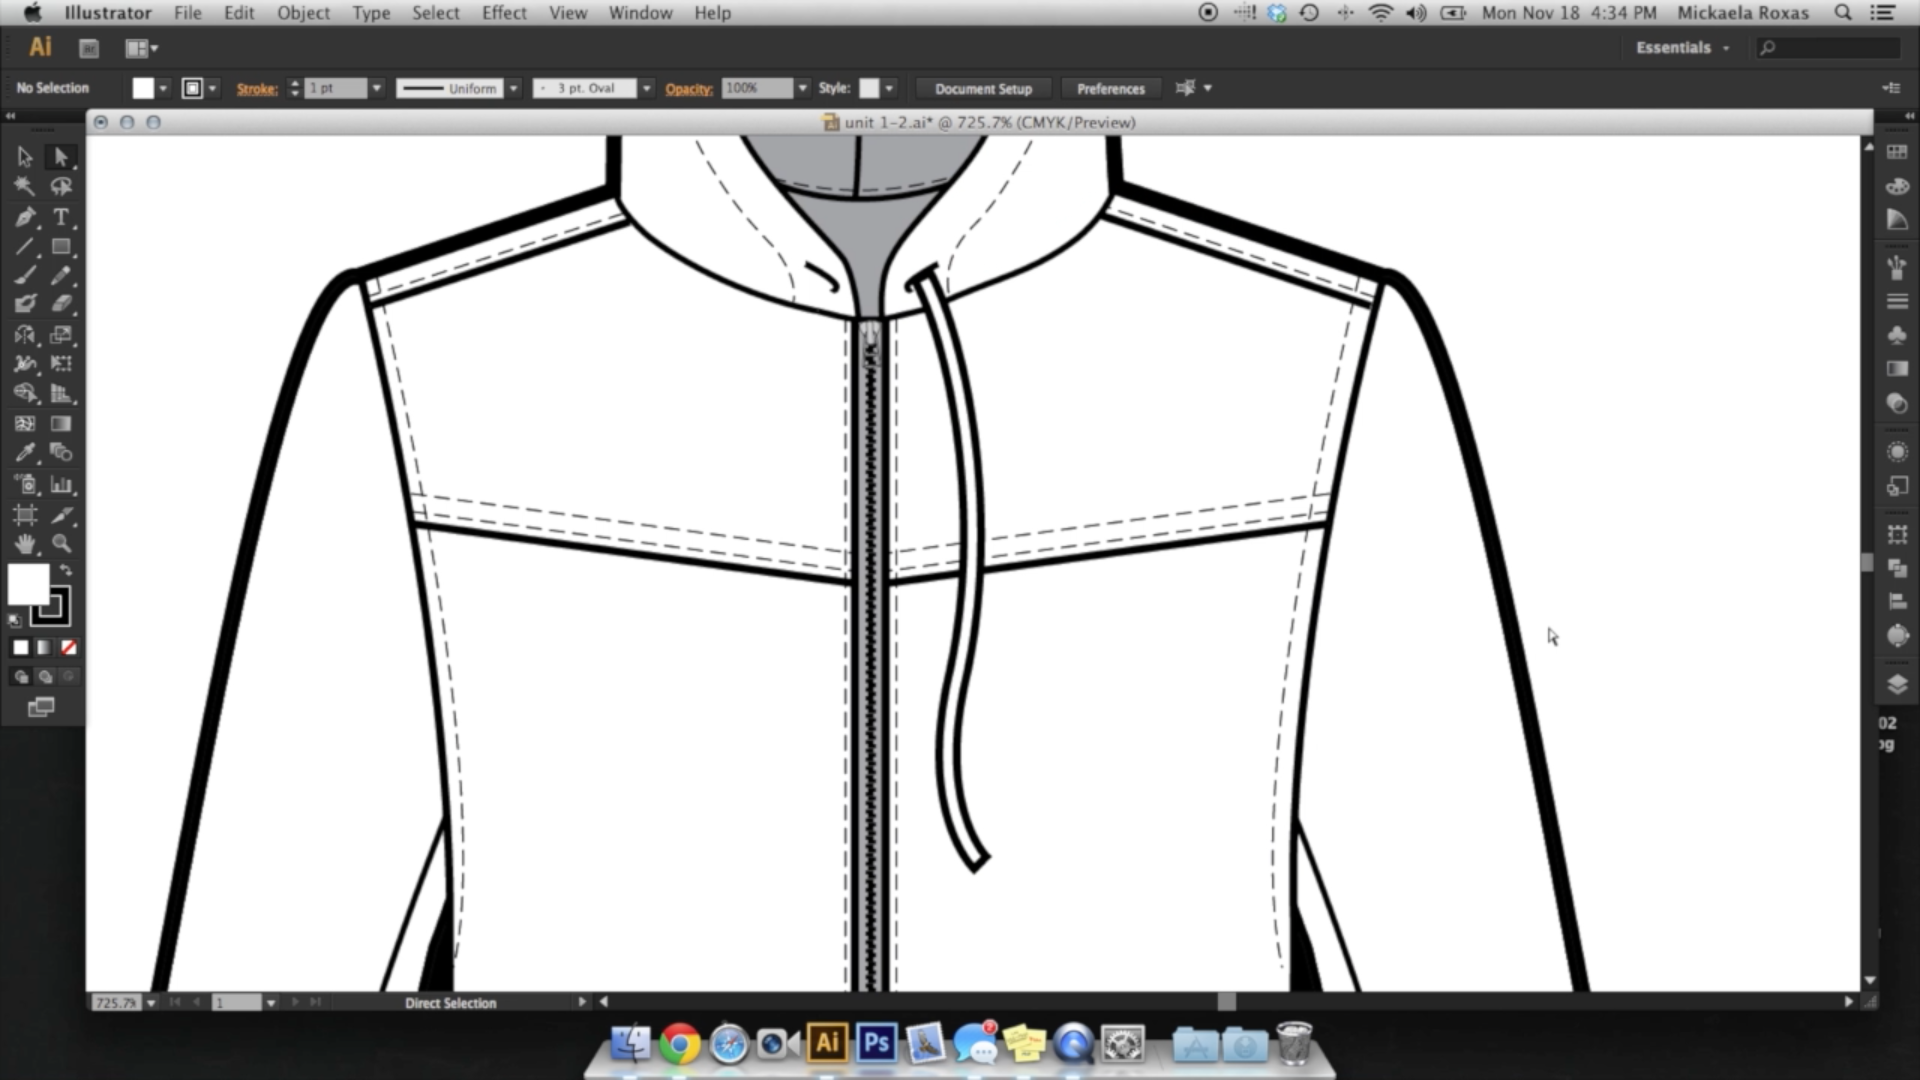
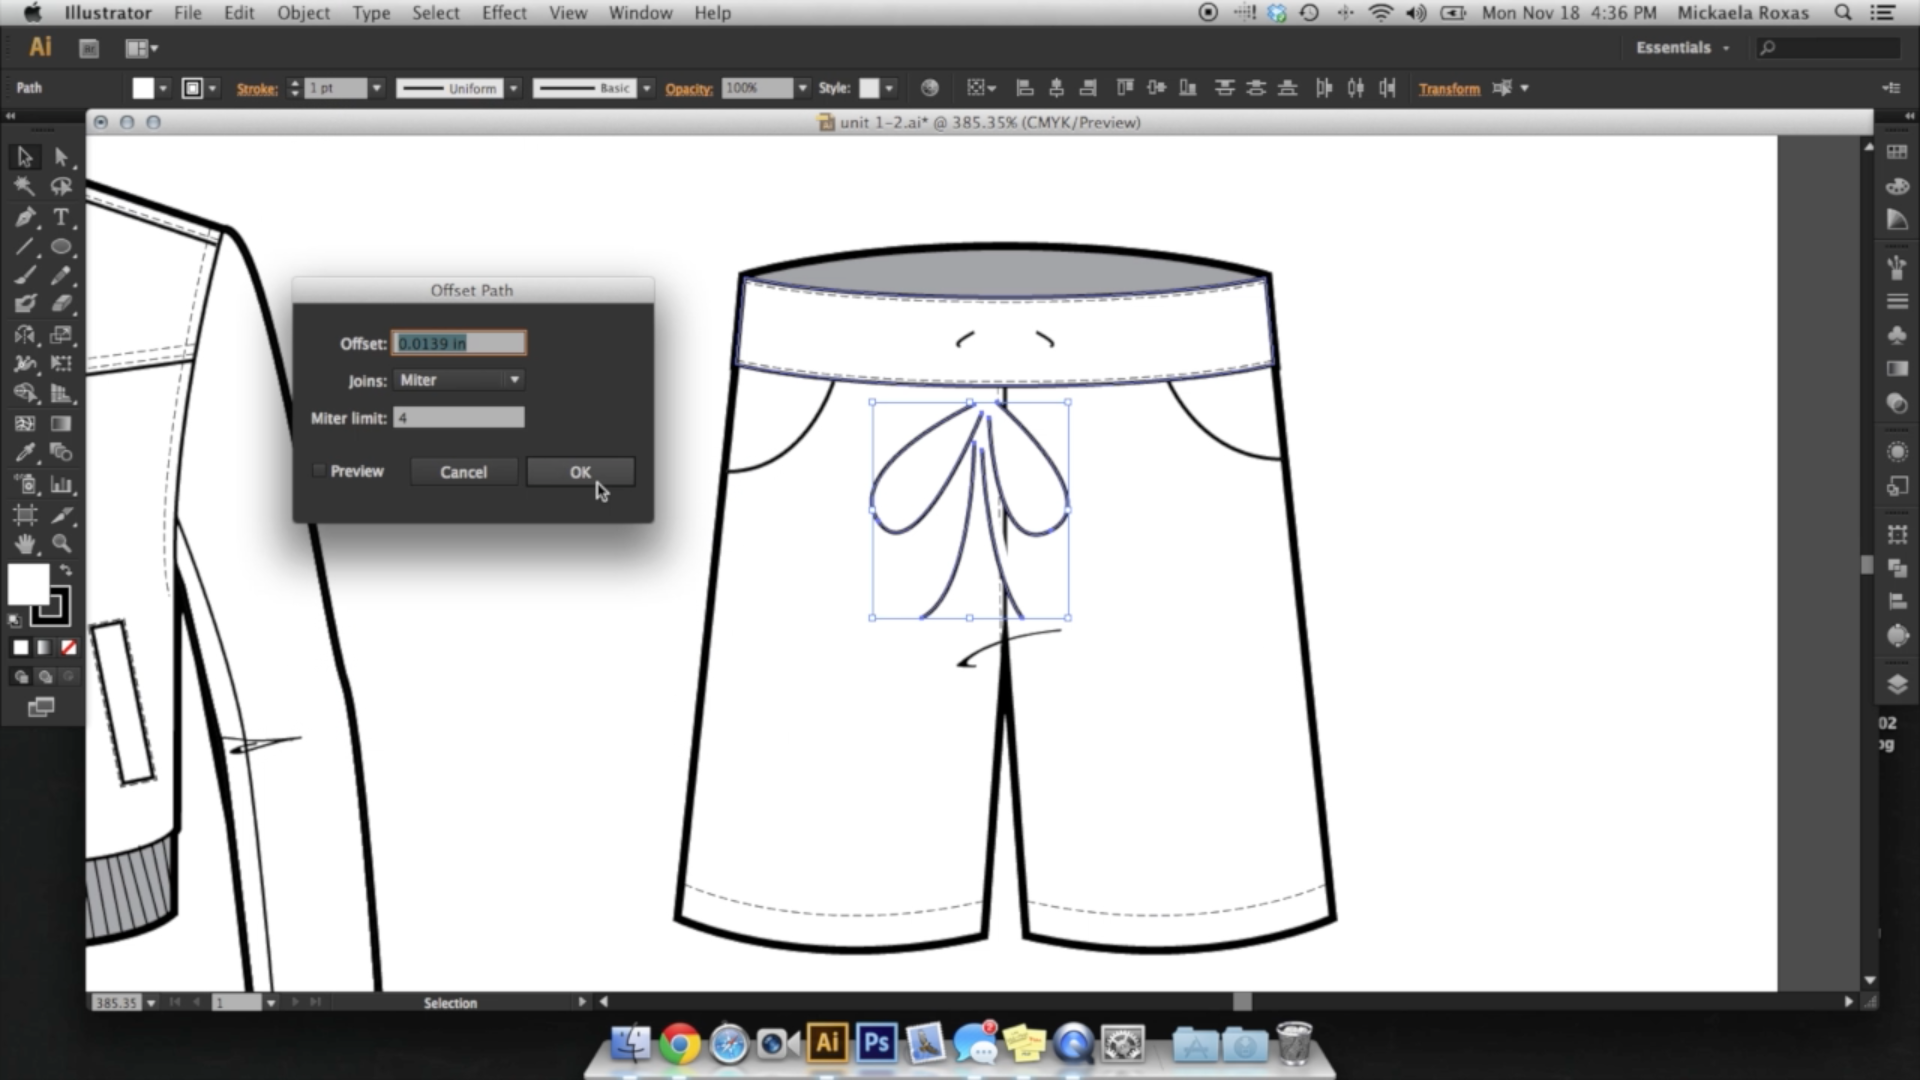
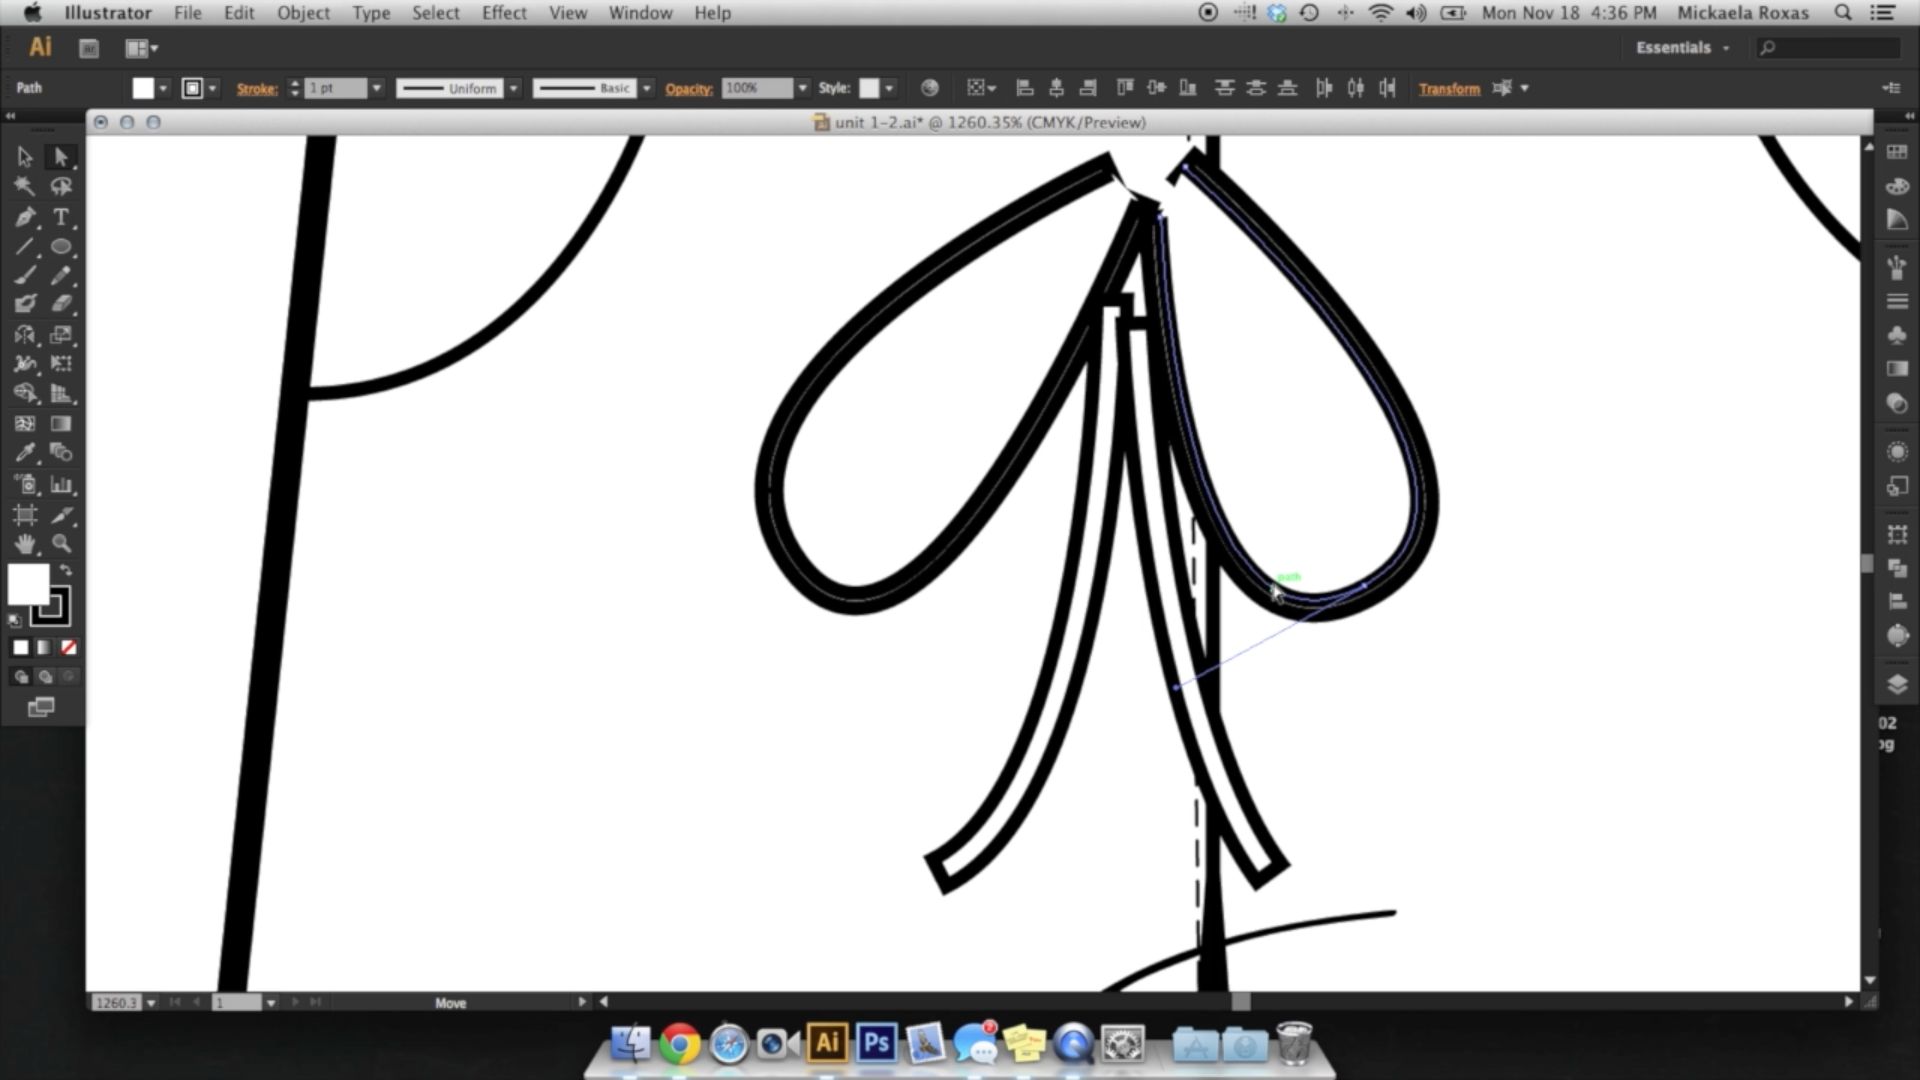
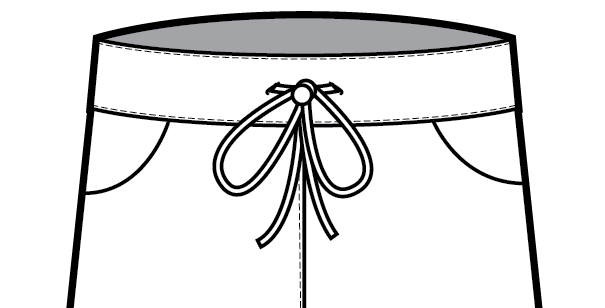
3. Unit 1.2: Offset Path: Hey, guys, this is unit 1.2, or I'm gonna be teaching you about another feature that you confined here on Adobe Illustrator called Offset Pass and to demonstrate offset path. I'm just going to start with a simple rectangle. Zoom into this rectangle, gonna select it with my selection tool, going to go up to the menu bar, to object and to path and then to offset pack. Press it once, and a little box pops up where you can input value. I'm just to demonstrate, I'm gonna put 15 pixels and depending on whether or not your settings or set two inches or pixels for your our board, just just be wary of that. If you want pixels, put P X if you want inches put i n Otherwise, uh, this might put it 15 inches, which would be too much. So once I have that ready, I'm gonna hit preview and you can see by offset path creates on even proportionate offset path. According Teoh, What I dictate the offset to be so this is an even 15 padding 15 pixel padding around my original shape. It also does the same If I were to give a negative value. So we went inside proportionately negative 15 pixels, which is great. This future also works four straight lines. So if I have my straight line selected go to object path and offset path and this time I'm gonna do 10 pixels and hit preview, you can see it created and even 10 pixel patting. Now it's a rectangle, um, around my original line along with straight lines. It also works with curved lines. So I'm gonna make a simple curve shape here. Gonna select it. Turned off, um, the Phil where I removed the Phil gonna go back to object path and offset path and do same 10 pixels. And when I hit preview, you can see that it also took the shape of my curve. So using this tool, we are going to learn how to create drawstrings and also a different way to apply stitching . So let's begin with the stitching. So here is a woman study that I designed. It's based off of one of my favorite hoodies. Um, and as you can see, it's missing pockets. So I had originally designed well, pockets here, so well, pockets would just I need a simple rectangle on Turn it slightly. I'm gonna make a little longer and turn it a little bit And there you go and say like I totally forgot Toe adds dishing, and I moved on. There is no way for me to press undo in which I can just bring it back to this point, which would make it very easy for me to add stitching. Say it was already tilted and I was interested in adding some perfect stitching around it. It would be more difficult to do it now because, as you can see, it's already out of line here. It's not evenly spaced out, and it's not gonna look as clean. You can use offset path for this. So I'm gonna select my well pocket Goto object path and offset path. And this doesn't need to be like sees me 10 or 15 pickles. This can be simply like two pixels. And again you could hit preview. See, that's even a little too much. Maybe just one pixel. Yeah, I think that you might be good. I could even go for maybe like a 0.7. Yeah, perfect. And was I hit? OK, I have it still selected I can press I for my eyedropper tool, and I can select one my situ lines. There you go. You can see it instantly becomes a nice line of stitching around my well pocket. And once that's done, I'm going to select both of them and I'm the group together. And after I back out, I can just right click, transform and reflect it. Press copy and drag it over to the other side, which is great. So there. Now I have my wallet pockets. So this is just, um, a really easy way to add stitching. It's another like thing that you can use for your productivity. It can also be used for well, pockets, which is what I probably or patch pockets, which is what I use it the most for. So you have a patch pocket here instead of, like outline Lee inside. You could just select it object path, offset path and then said it toe negative pixels, and you can see when I press OK and add the dash line. It instantly already added your stitch lines for you, and all you have to do is remove the top movies up and you have some perfect stitching. So this is the beauty of offset path. But, um, what makes offset path even more useful is that it makes creating drawstrings just so easy . So with my pencil and no, Phil, I'm going to create a line. This is where my drawstring meets the hood. So I'm just gonna great a simple wiggly line. And right now it looks like stitching. So I'm gonna just remove that and just gonna edit this little more so it matches that curve that I desire, and that's good enough for me. So with its selected, I'm gonna go to object path and object path and offset path, and I'm really going to do one pixel. And when I hit preview, you can see that it created already a drawstring for me when I hit. OK, I just need to go in and select my original line and erase it. You could see that there's already a drawstring shape available, and I didn't have to do some crazy like if I were to make this on my own, okay? I got the original shape, and then I'm gonna go back entree say, like it just takes so long, and you're not guaranteed, like perfect outline. And plus, if you wanted Teoh change the shape, then you'd have to do this all over again, which can be a pain. But you're using offset path. It's just so easy. And after that you could just create like the not at the end, to say this was like had the plastic little nub at the end on and that could be made by just making a simple rectangle. And then you could just make a simple circle on top of it, and now it looks like it's been tied. I'm gonna show you one more time on this side. Just create a simple curve little different than the 1st 1 and and at the point. So it's more smooth, very nice when it's still selected, go to object path and offset path, and it keeps the same settings from the last one. So I'm just gonna press OK and go in and select my line in the middle of the original line , and there you have it. You have another drawstring, and from that point I can add the little nub like I did before and throw a circle on, and that is just a super simple way That's big as a super simple way to create, um, pull strings or drawstrings to make a more complicated one to show you I have this pair of drawstring pants here, I'm gonna create a bow. So I'm gonna start with my circular tie shape. I'm gonna create the outline just using the pen tool. So hopefully you could see where I'm going with this. There's the bunny ears. No, that's kind of and the ends of the ties for my drawstrings. And I'm going to select all four of these shapes. Gonna go upto object path, offset path it Okay. And this is silly, little difficult part. You have to go in and delete the original lines. And there you have. You see, you already have toe. You already have a drawstring shape. All you have to do is just adjust the positioning and also change the ordering. Ximena, select the two bunny ears and I'm gonna range and bring them in front. So that my drawstrings hiding in the back. But yeah, here you go. And then after that, it just add your little not on the top. And for this once, it's a little bigger I'm gonna add to. It's to give that appearance of it being tied. And after that, just select every piece of the ty A circle here, group them together, and you can easily just move it up to where it needs to be appear. And you could see that there's one more part missing as the part of the drawstring that connects the whole, like, right now, it looks like floating in space. So I'm just gonna create a simple line connecting these two points, which is where the drawstring would emerge from object offset path. Okay, go in and delete my center one. And then from this point, since it is an edit herbal shape, I can just use my direct selection tool to make it match the shape of my little my little part here where the drawstring sticks out. And then I could just move my entire tie up to the front above the line I just created. And when I back out, you can see I created a drawstring. And that's the beauty of offset path. Um, just have fun with it. Just again, like everything else that I've been teaching you here and the trick is just to practice and see how the tools and how the future reacts toe what you're trying to design or how you can use it to solve a lot of problems that you come up with during the design process. So I'll see you guys in unit 1.3.
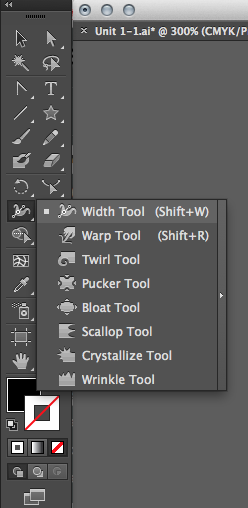
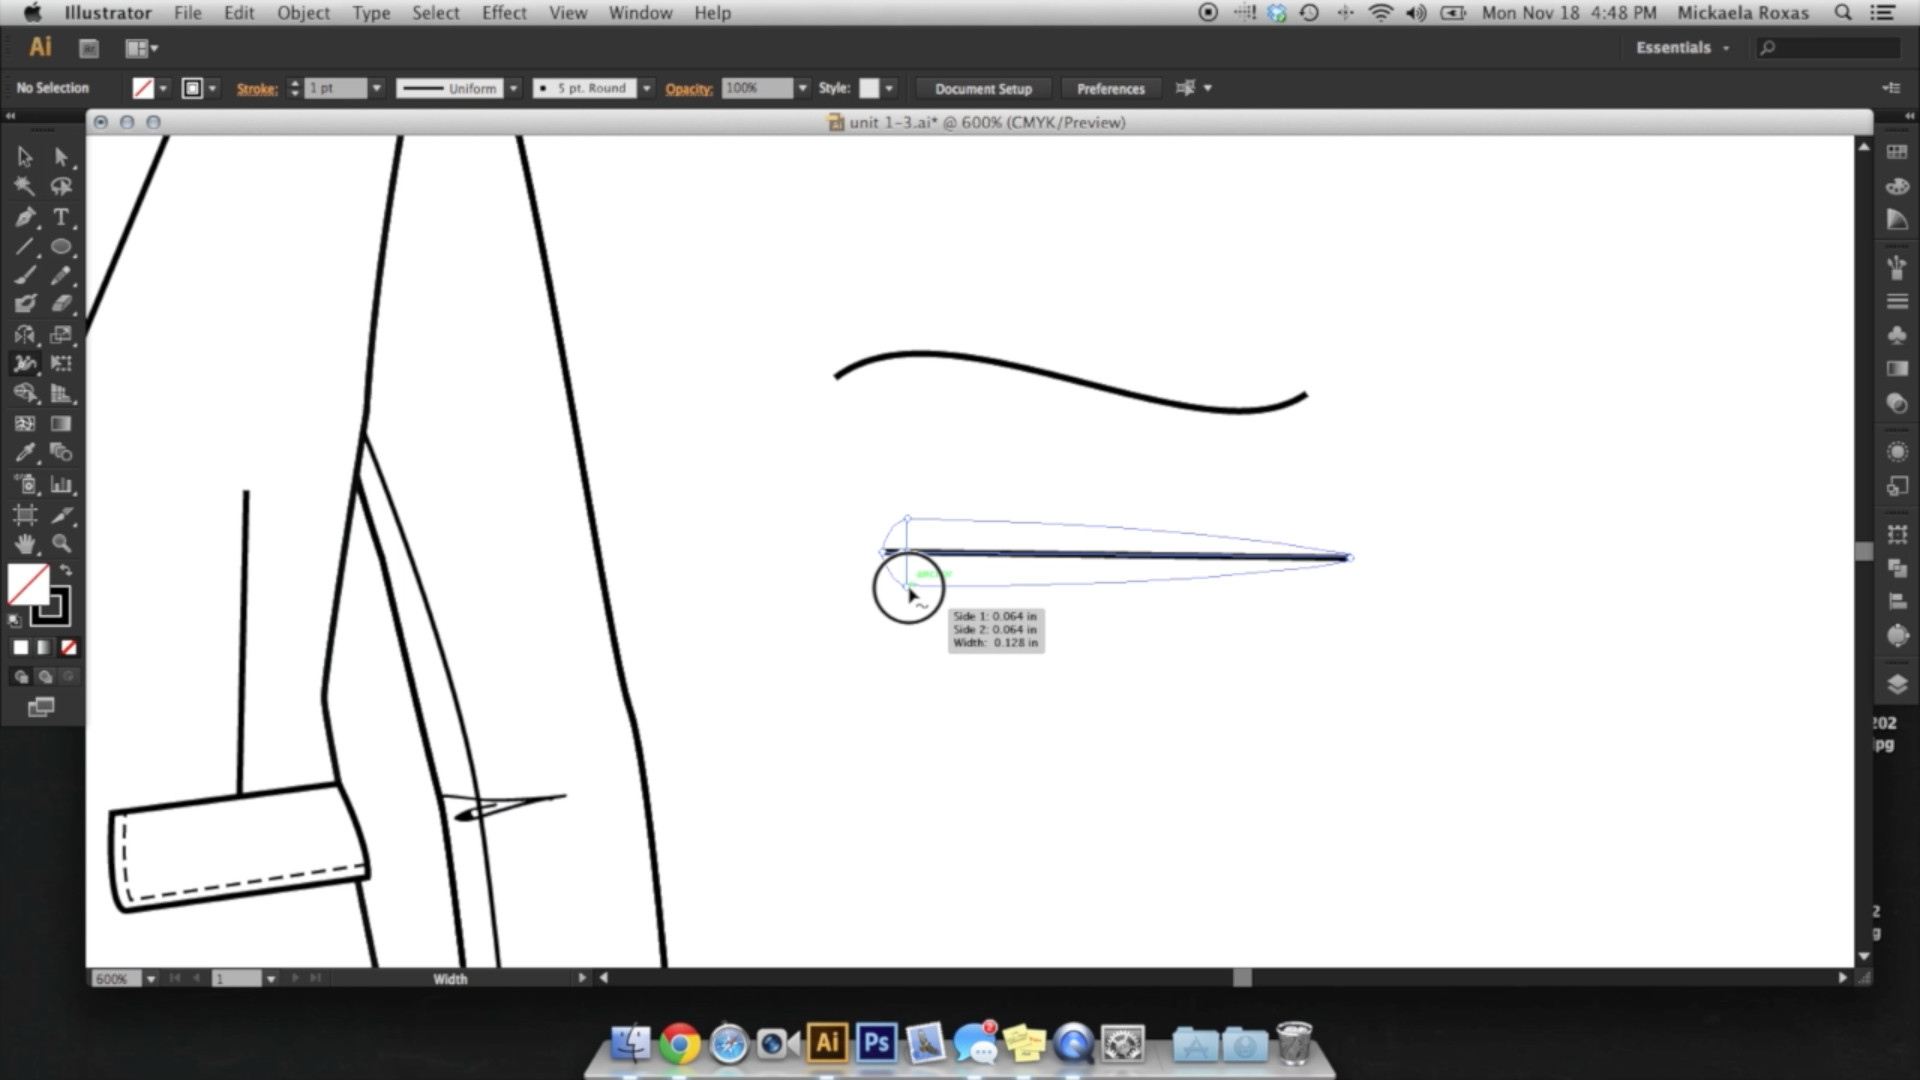
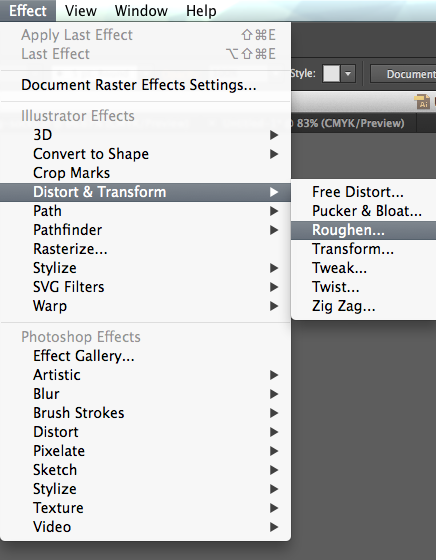
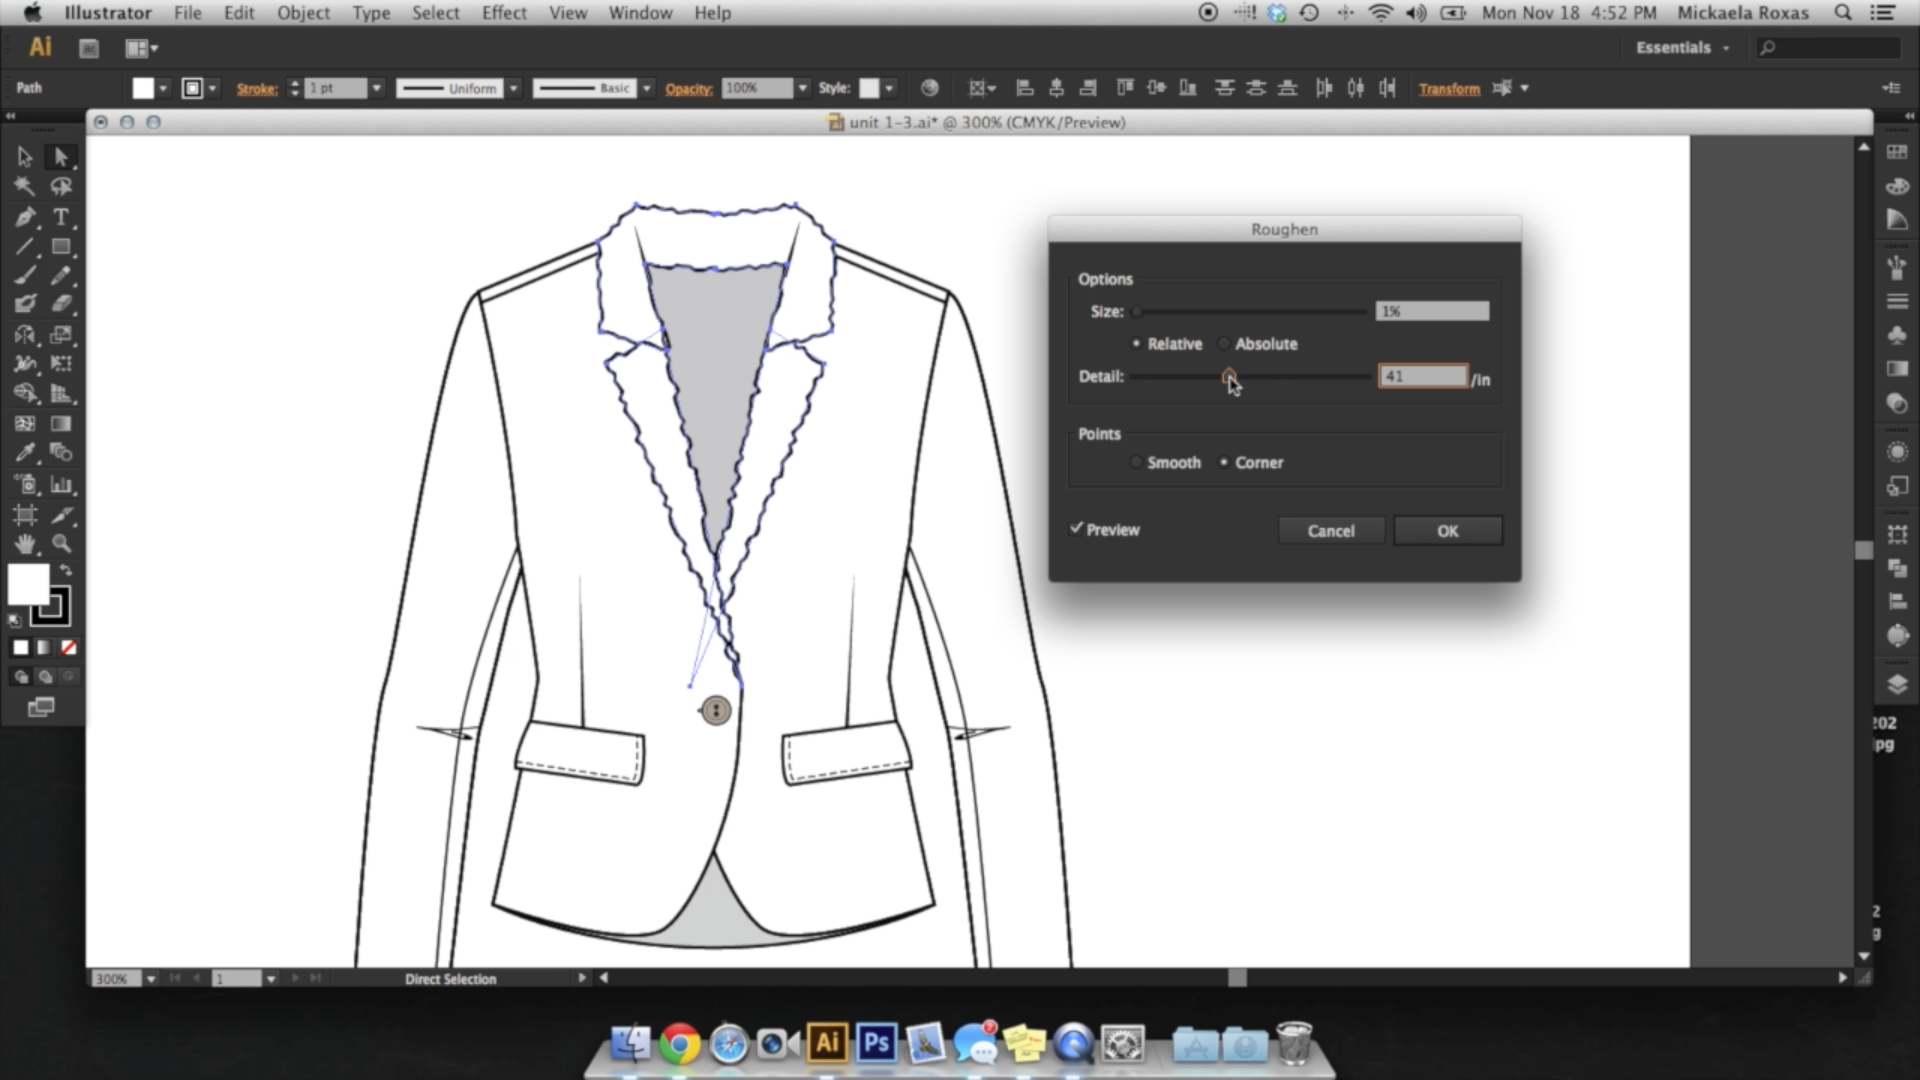
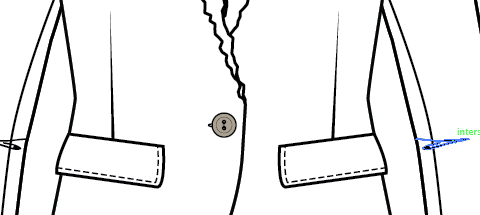
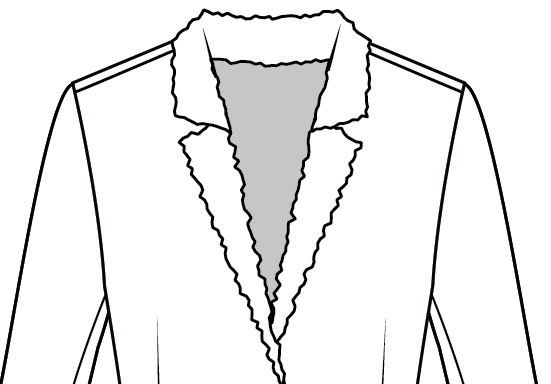
4. Unit 1.3: The Width Tool, Adding Effects, & Unit 1 Deliverable Assignment: - Hey, - guys, - this is Unit 1.3 where I'm gonna be teaching you how to use a certain effect, - uh, - using, - distort and transform called Ruffin. - And also how did create darts with the width tool? - So let's begin with the width tool. - You see, - I have a women's blazer here, - and it is obviously tailored, - but it doesn't look correct. - Um, - construction wise because it looks like this is just the shape of the pattern. - But if you know anything about construction or pattern making you, - you could expect that there would be a dark here somewhere. - So let's say I just wanted to add a dart from the A packs of my bus to the pocket just like - that, - and that's great. - You know, - it's simple. - It's good, - but a way to make it even more professional looking and even more obviously a dart. - You can use the with tool, - and this I can demonstrate the with tool over here, - so I'm gonna create ah, - straight line and also a curved line. - I'm going to go to my tools panel over here, - toe left and underneath the reflect tool there is the Witzel. - If it doesn't show up. - Just hold it down and you can choose from any of these. - And the one that I'm gonna be teaching you today is called width. - So with my wit tool selected, - I'm gonna hover over one of my my straight segment here. - And at any point, - I'm just gonna click and I'm gonna drag up or down. - And what you can see is happening here with the blue outline is that it's widening my shape - . - If I let go, - you can see it widened by segment just at this point. - And it created an even curve downwards the bottom by press and do, - and I move it up. - You can see that it pinched it tight. - This also works if you use with two at an end point. - So I'm just going to use the endpoint and white in it, - and you can see it's just created a very wide And in this second half for this, - the very first point became small and also the same. - If you slept endpoint and drag upwards, - the point became very tiny at this end and remain the same on the other side. - Use it for wits or for, - um, - curved lines I mean, - So I have my with tool and I'm hovering over where the curve is. - You can see that it widens the curve, - and then it creates a nice slope downward to the original wit of the line. - And if you just this is one of my favorite tools to play around with, - Um, - even outside of technical designing, - if you were creating, - like some nice typography or any kind of illustration, - it's just a nice tool. - Tohave So, - like what I showed you using the whip tool at the point, - I'm going to select my with tool. - I'm gonna go to the very top anchor point right here, - and I'm going to drag inwards so that it becomes just a single point at the end. - What you can see that does is that it created the obvious appearance of a dark from - thickness to stiffness or the vanishing point, - if you know, - pattern making. - So once that's done, - I'm just gonna transform it, - reflect and copy that, - and then just move out to my other pocket. - And there you go, - you got darts, - and after that you could still edit the point. - So if I wanted to move it in and move it out. - You can still be able to do that. - Great. - Ah, - the last thing I'm gonna show you for construction details is how to use something called - Ruffin, - which can be found in effect, - distort and transform. - 3rd 1 down is called roughened, - uh, - to demonstrate. - I'm just going to create a simple rectangle with its elected. - I'm going to go to affect, - distort and transform and hit Ruffin. - And again another box pops up. - And instead of in putting anything, - I'm gonna hit preview first so you could see what happens when it's being roughened. - So this incest a corner, - it can also be such a smooth. - So you have more curvy, - but I'm gonna be using corner this time and size creates determines the size of the Ruffin - and detail determines how many, - um, - roughness how much roughness there will be. - So I like to always do preview first so I can see what I'm doing. - So whenever I use Ruffin or even zigzag, - which I can show you two, - I always put the size relatively small, - maybe like two or three. - And I make the detail, - I increase the detail. - Um, - I use Ruffin, - and what I'm teaching you roughened for is how to create the appearance of for very easy. - So say I want my my collar here to be for you know, - it's like one of those designs where it's cold and I want a nice blazer, - but with a nice faux fur collar, - I can just select all of the parts of my collar here. - I'm gonna go to effect, - distort and transform, - and I'm gonna hit Ruffin moved to the side so I can see what I'm working with A preview and - this is madness. - So I'm going to change the size of something smaller, - and then I'm gonna increase the detail and what you can see that does. - It's not. - It's not perfect, - but it does give the appearance of having some kind of texture, - which you can mention afterwards that that is for and it does does look like for which is - great. - So that's the ref in tool. - I'm gonna show you really quick zigzag, - which you can use for stitching if you wanted to. - So surgery stitch lines. - I just made a simple line here, - and with its elected, - I'm going to distort and transform again, - and I'm gonna go to zigzag another dialogue bog box pops up, - can hit preview. - And what you can see instantly is that it creates a zigzag from your original line. - And from that, - you can edit it again. - I always do smaller size, - more ridges per segment to get, - um, - more of a stitch line. - But, - you know, - if you're using this for other reasons, - I just play around the size, - uh, - toggle here and also the ridges. - And there you go. - You have That's exactly for your deliverable for unit one. - I would please. - I would gladly like to see you apply every single technique that I taught you in this unit - , - Um, - in one deliverable. - So it could be one garment per component. - Or, - you know, - some things like this ribbing here you can use for several things and also the zigzagging. - So I'm going to mention them. - I want you to use stroke a stroke panel to create ribbing and also the stroke panel to - create zipper teeth. - Like so from unit 1.2, - I would like you to use offset path to create either pull strings or drawstrings, - and for me and at 1.3, - I would like you to use either the exact tool or the Ruffin tool to create for something - for Lined or some surgery stitching and also used the with tool to create darts. - So that's it for Unit One. - I'll see you guys in Unit two.
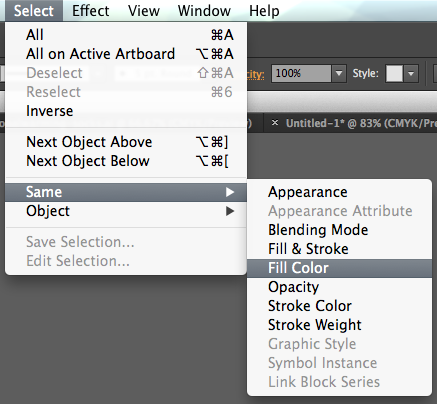
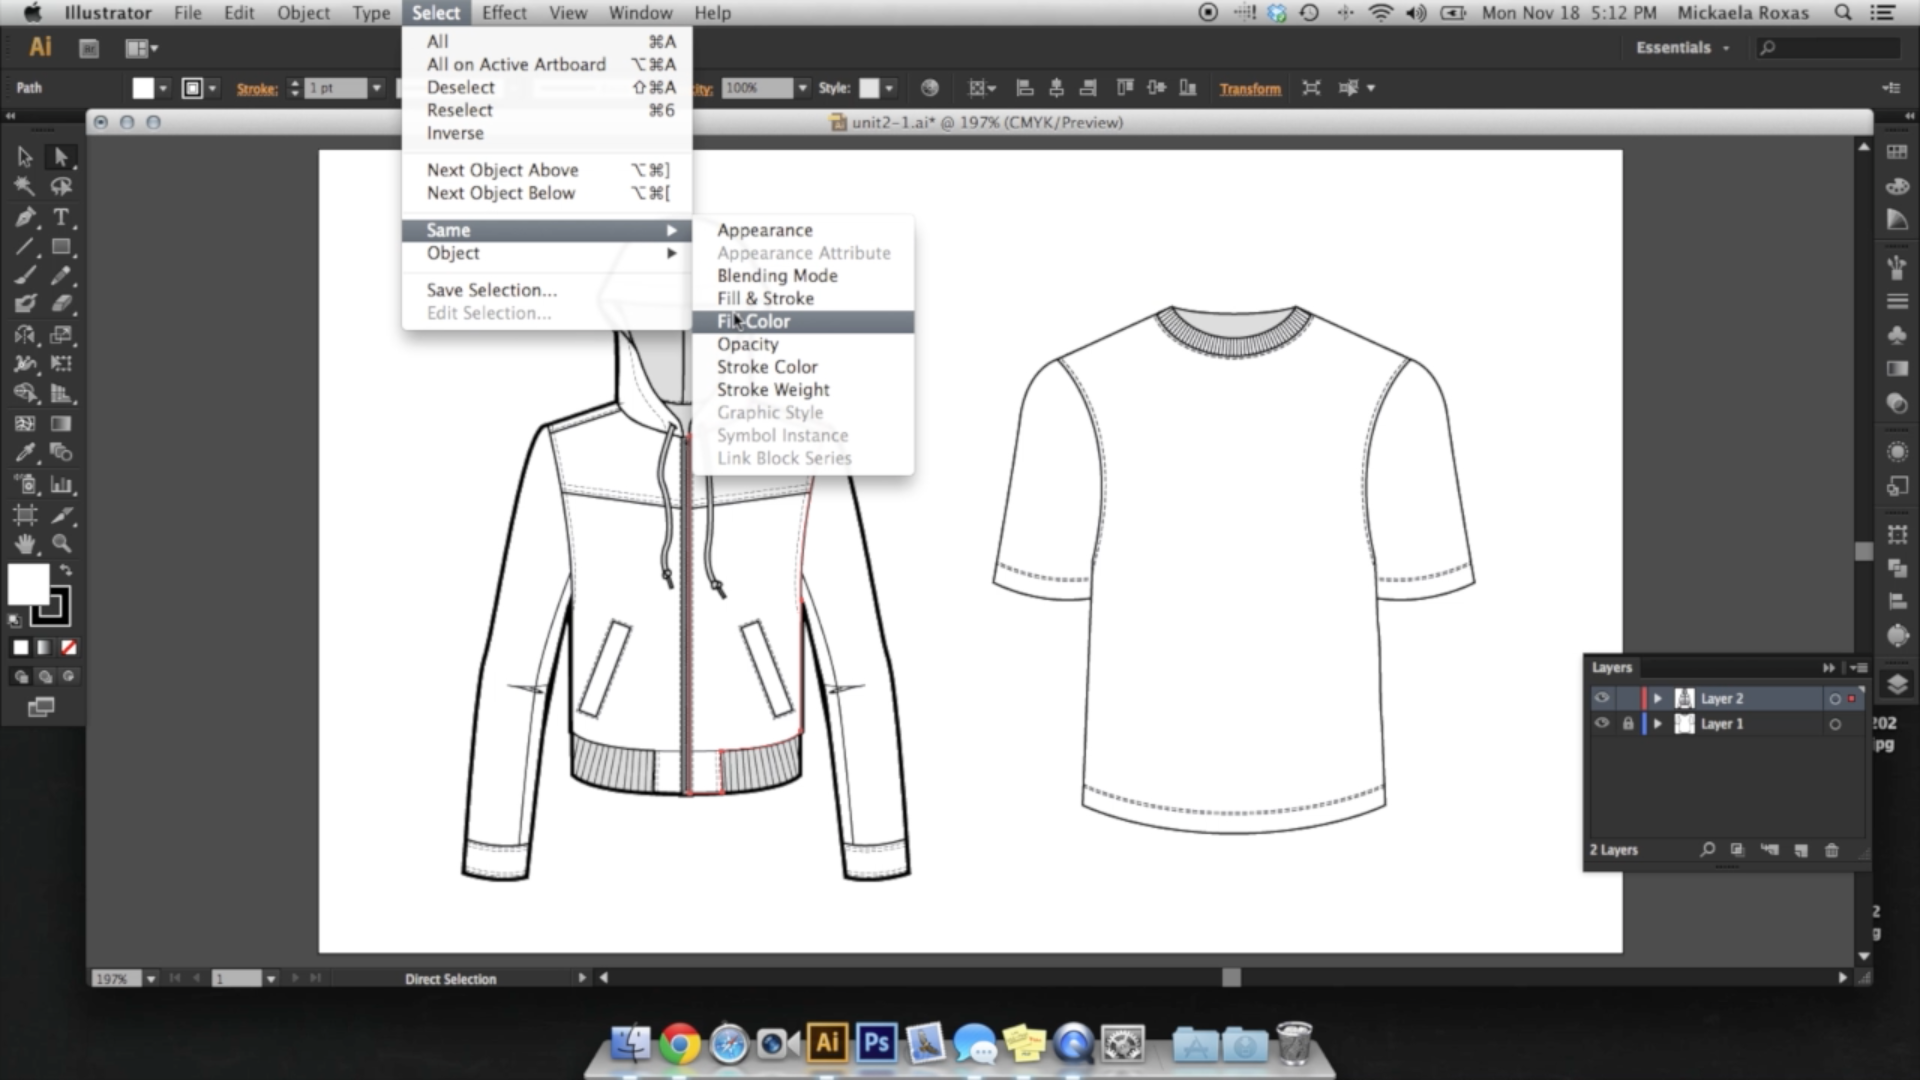
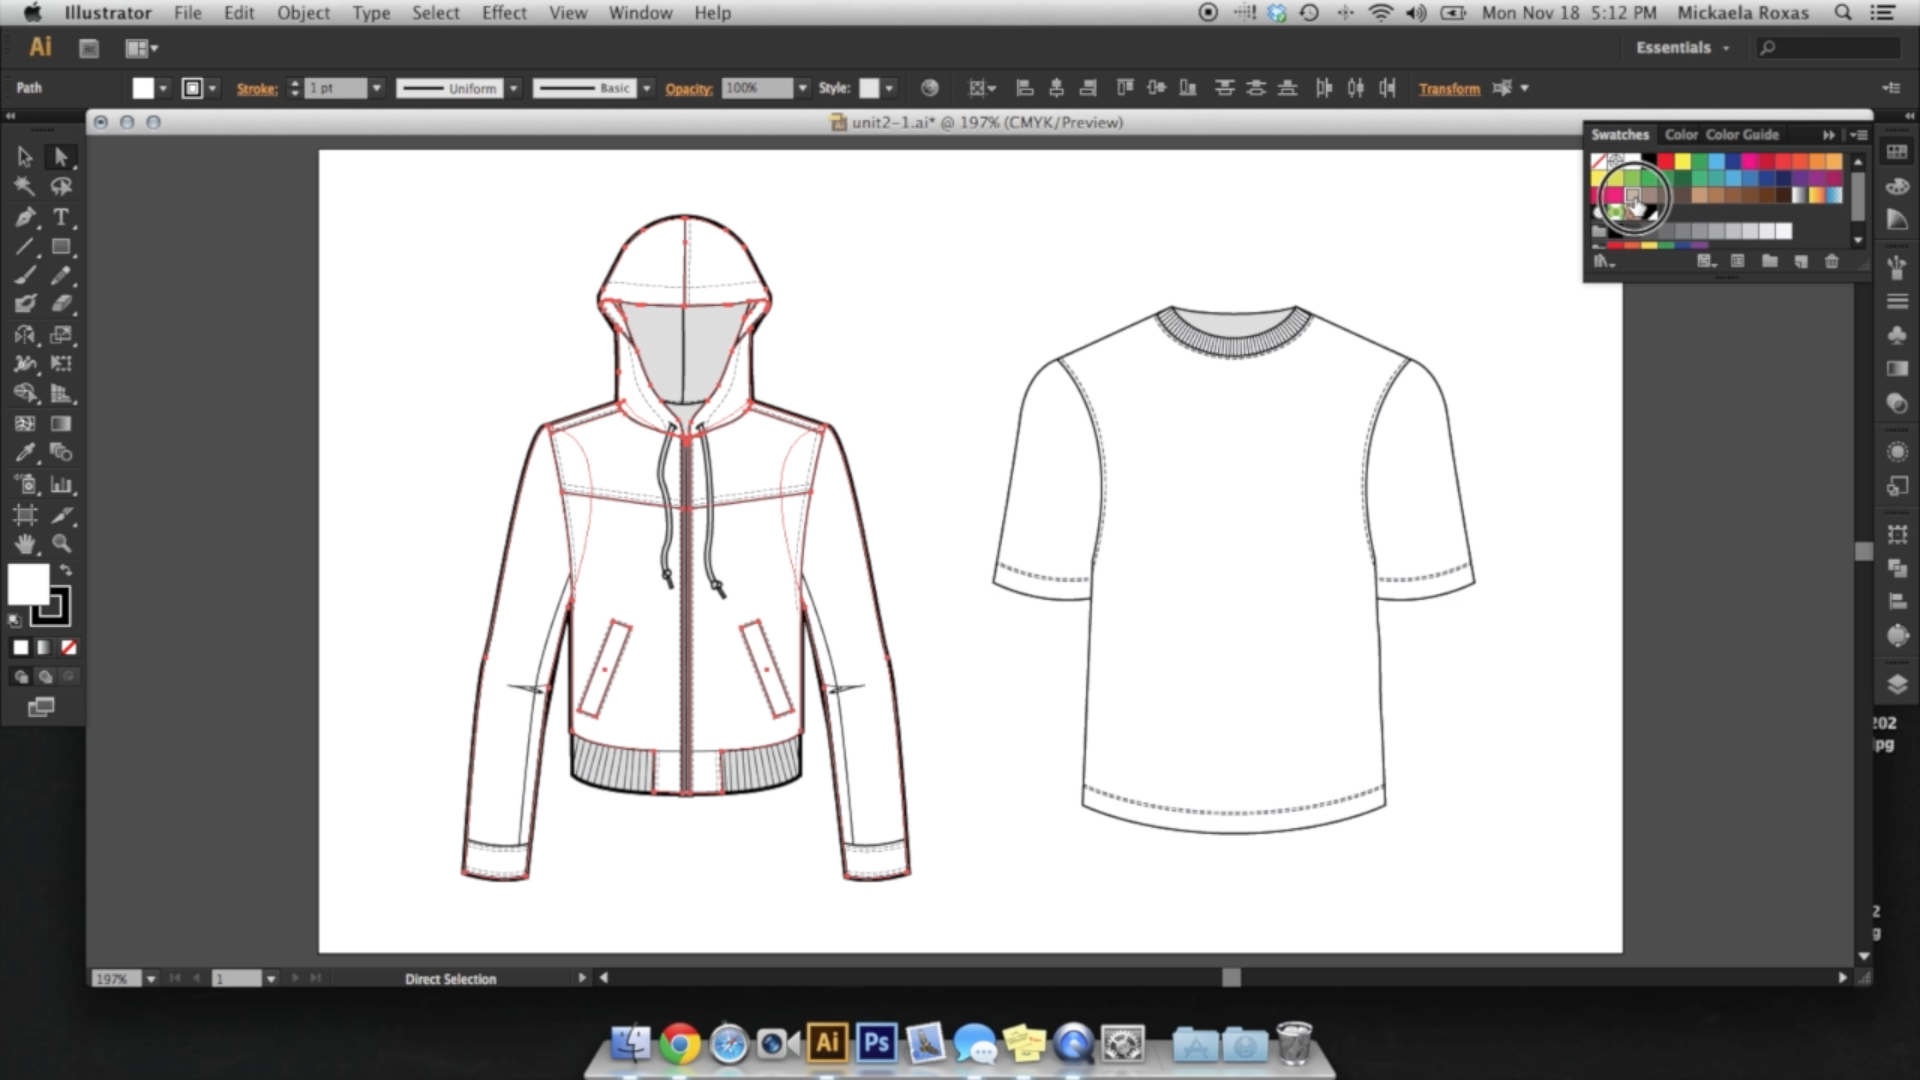
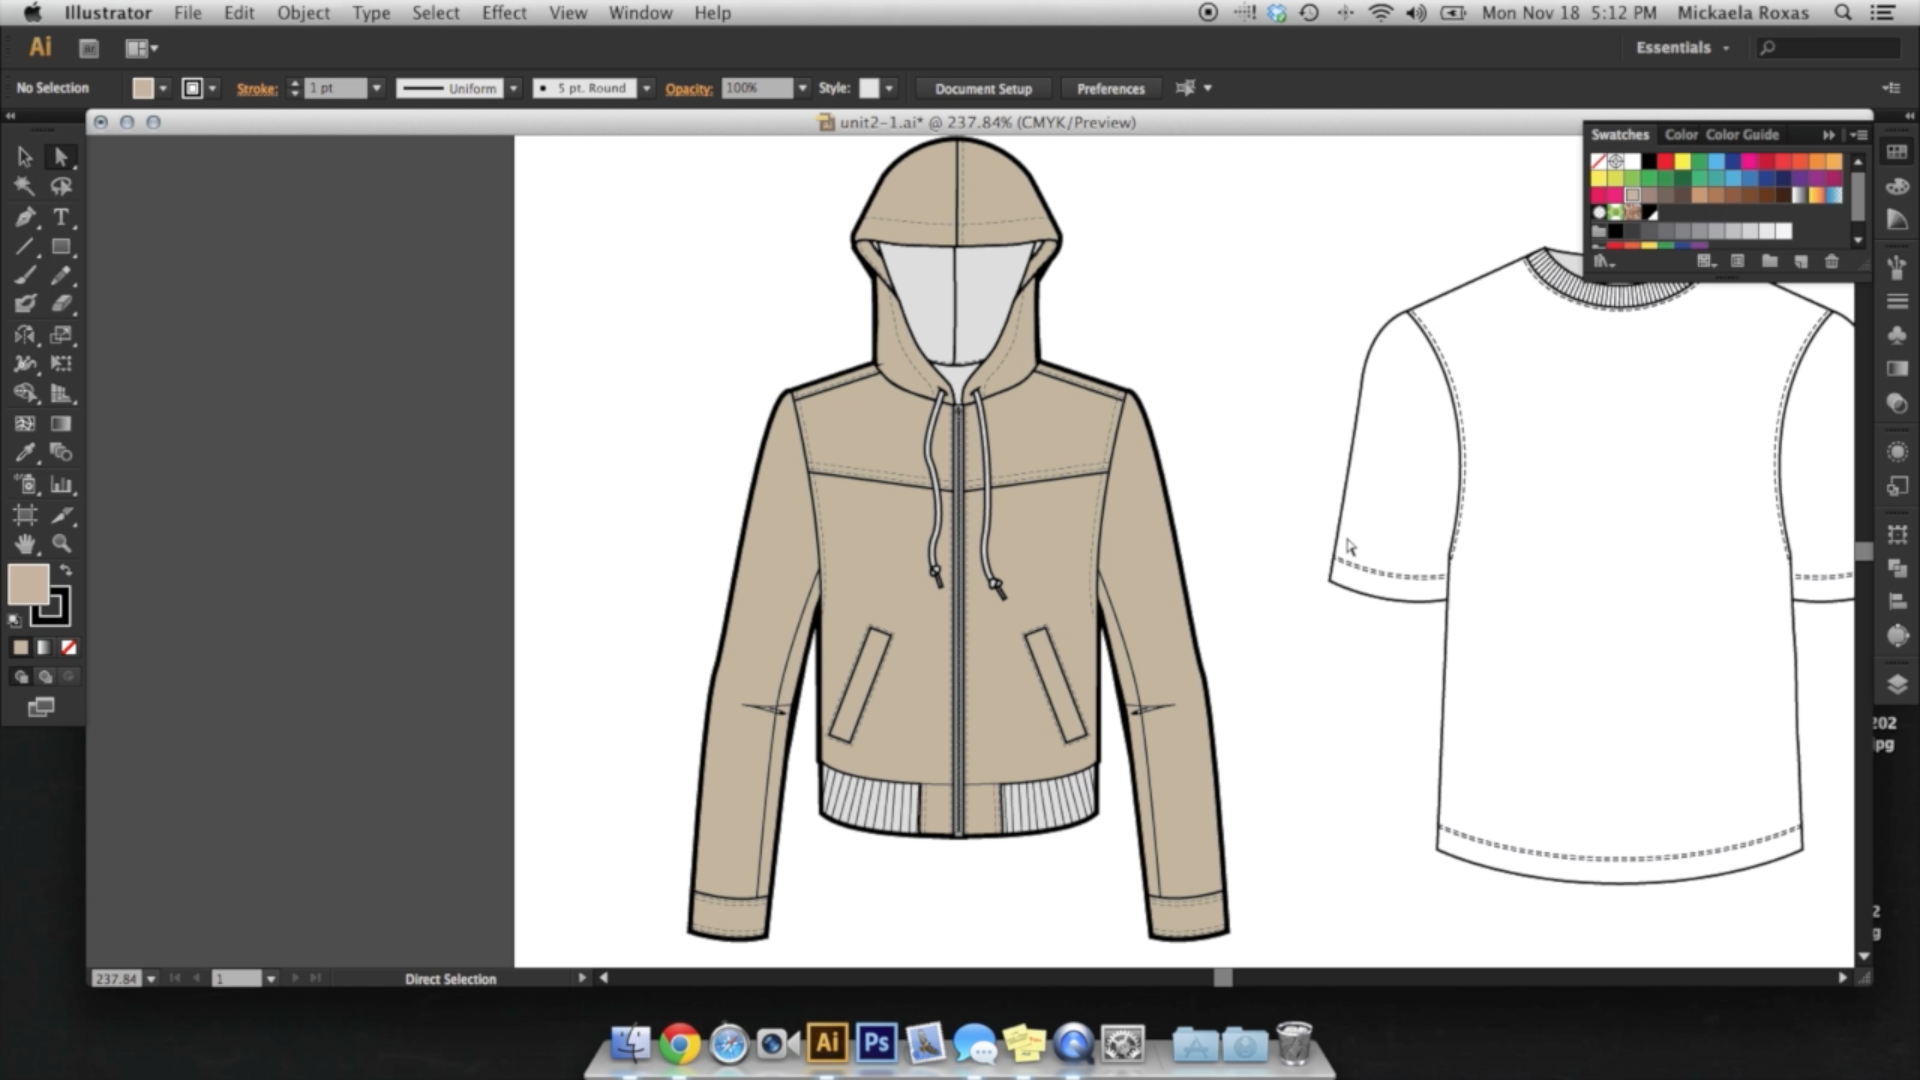
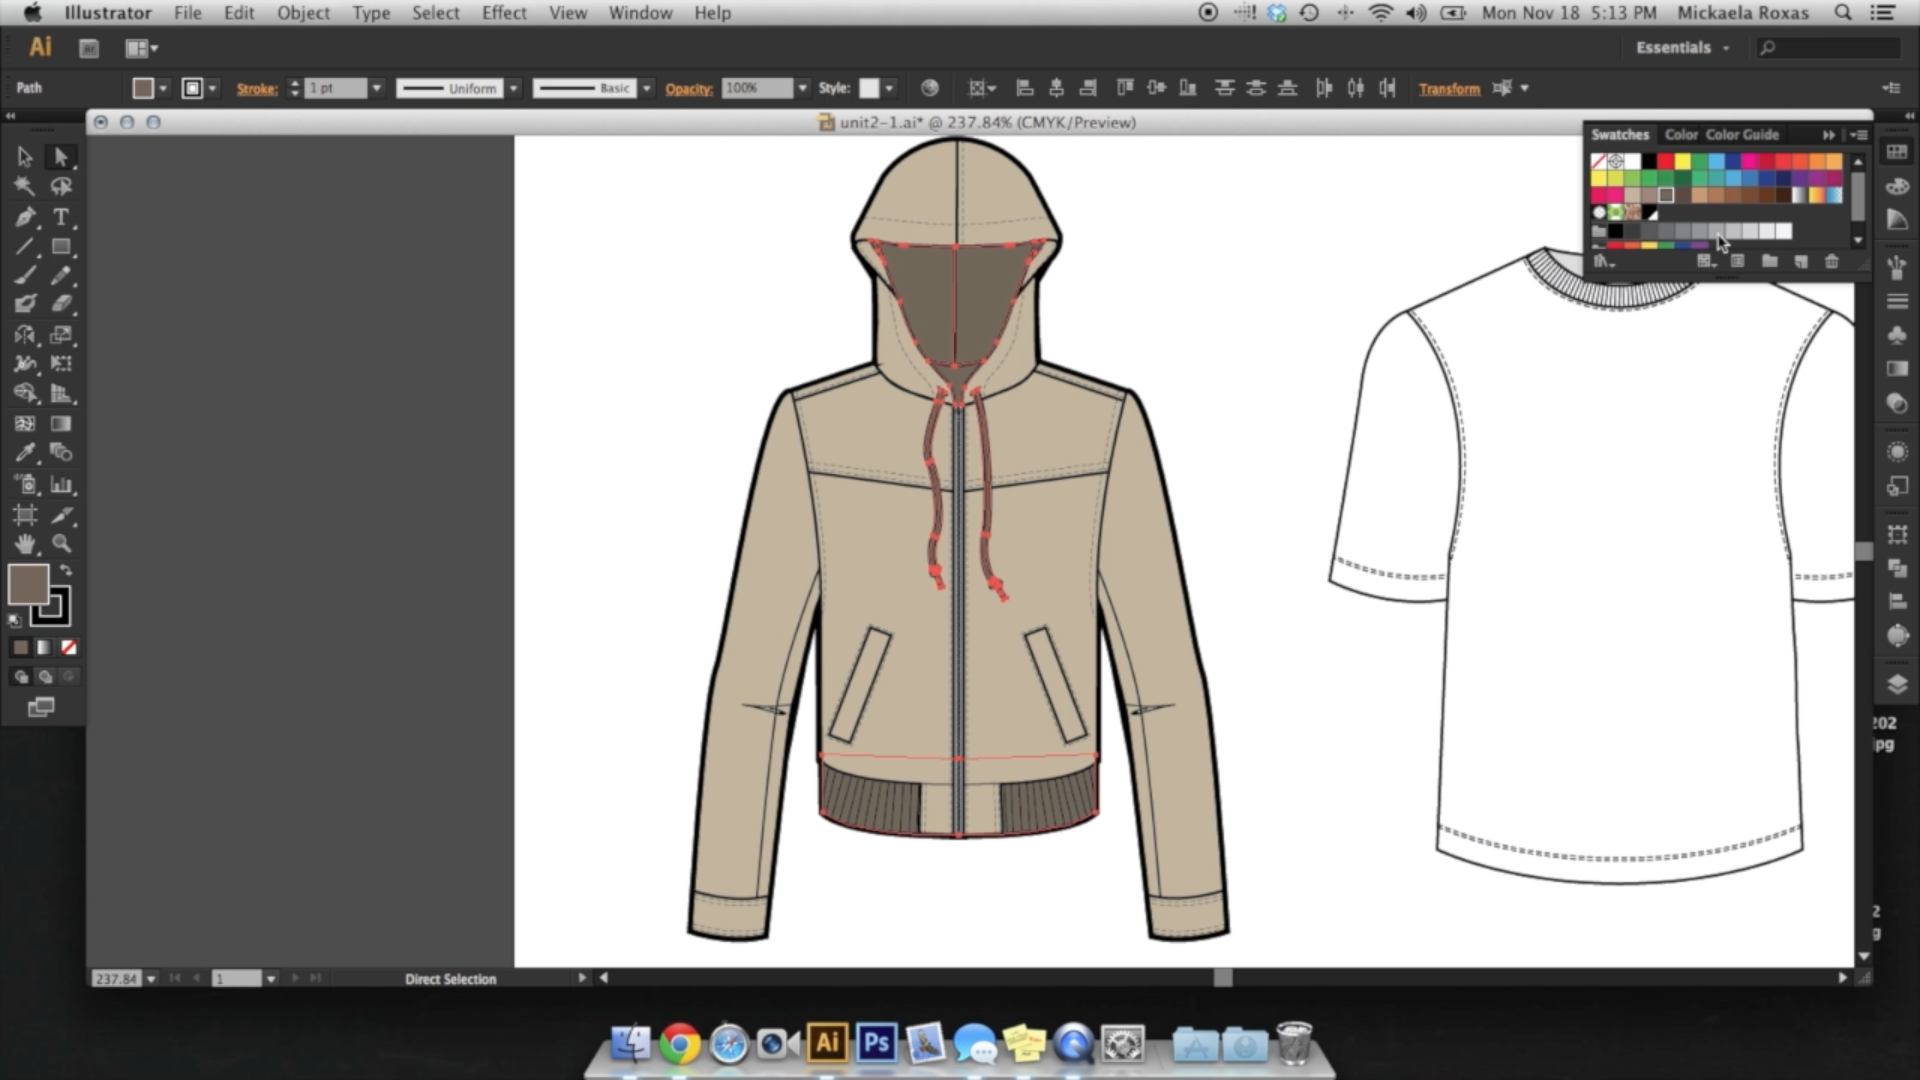
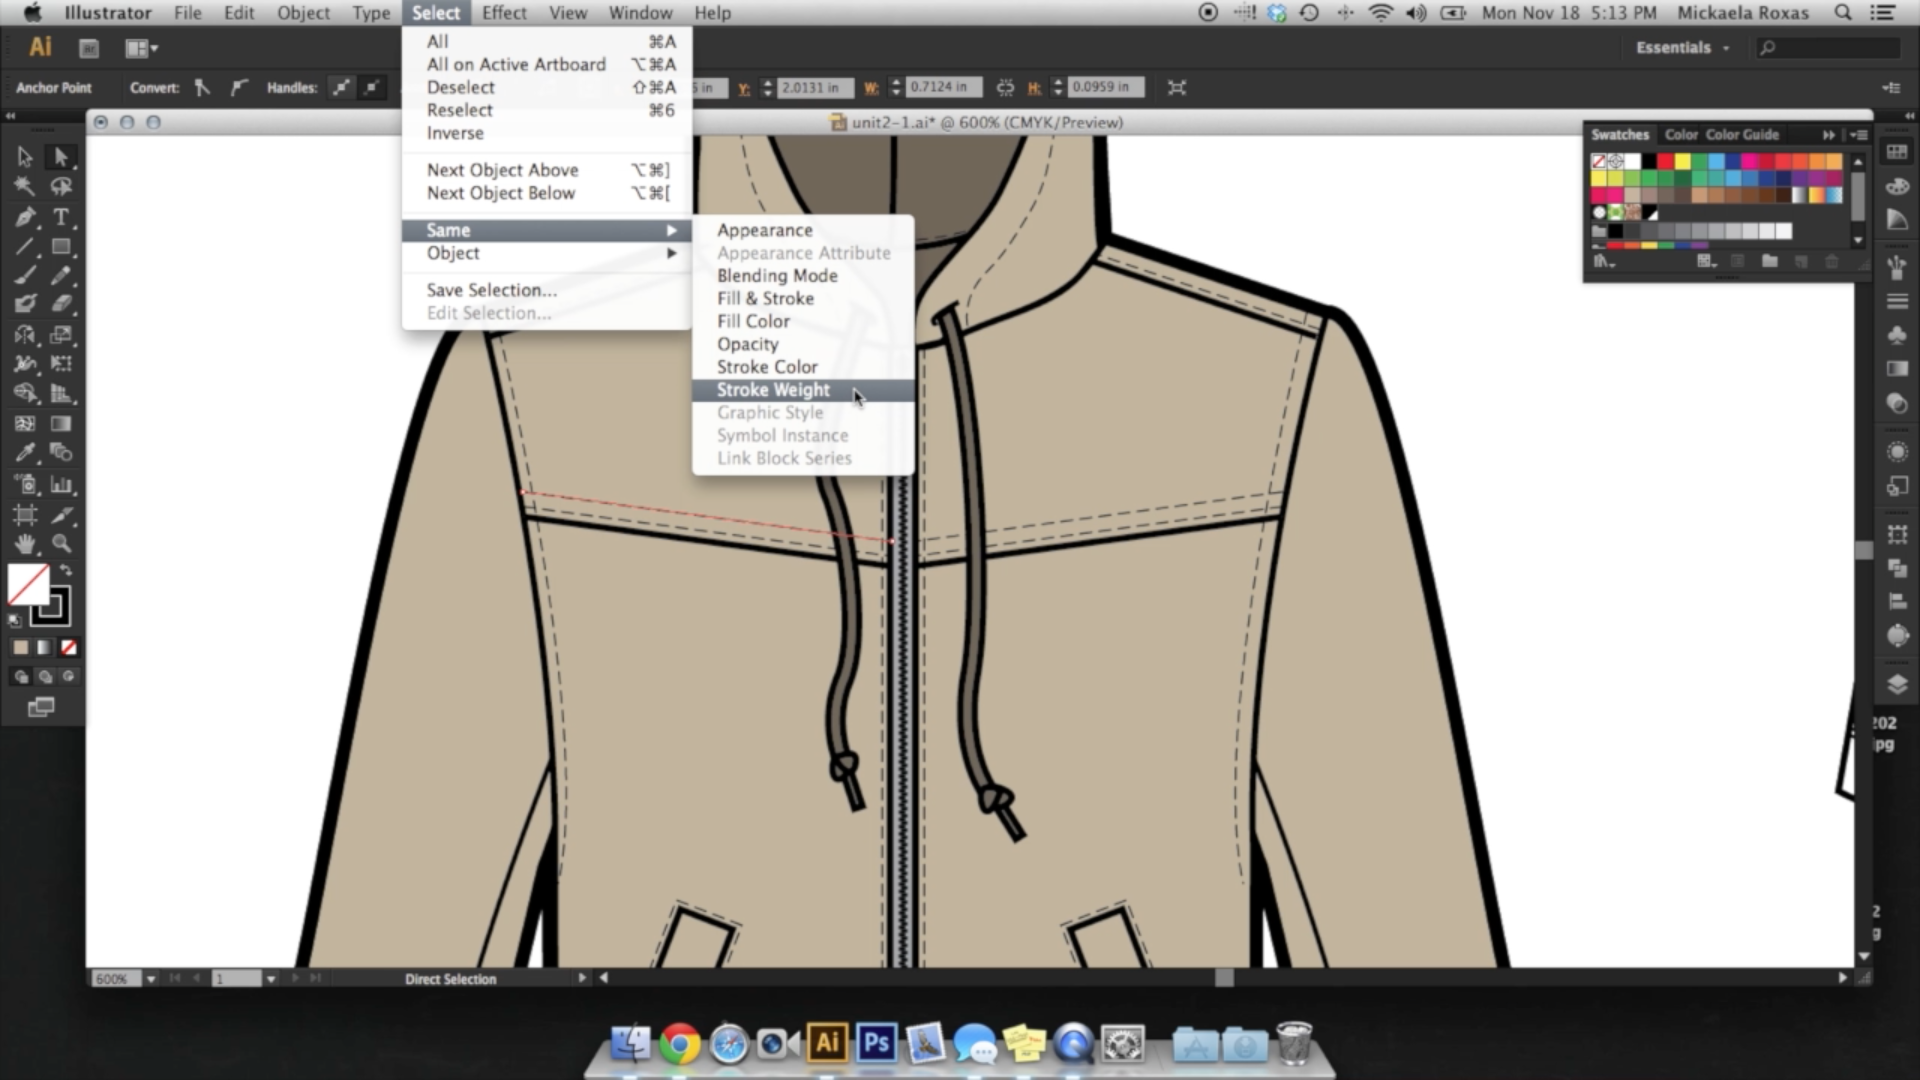
5. Unit 2.1: Adding Color To Your Garment Flat: - Hey, - guys, - this is unit Two. - And in this unit, - I'm gonna be teaching you all about coloring your flats on, - creating patterns and things like that, - Um, - in this first unit or in this first part of unit to unit to unit 2.1, - we're gonna show you how to color your flat the simple way. - Now, - if you remember, - if you took my first class, - Um, - when I told you how to build your flat, - I always recommended that you close your shapes as much as possible, - depending on how many parts it had and things like that. - So you could see my sleeve is a close shave. - My body is a close shape. - Um, - my hood is a close shape and things like that. - The reason why I told you to do that is because when it comes to the coloring process that - comes, - that becomes, - like the biggest favor you could possibly do yourself because, - um, - do four years health because it makes your life easy. - So one way to go about coloring is if you have your your garment grouped, - then just used the direct section tool. - One way to go about coloring your flat is toe literally. - Hold down, - shift on. - Select all the different parts of your flats that you want a color, - a certain color. - And you could just go up here to swatches, - which is this little icon right here. - And you could just select any color I'm going to select. - You know, - clips. - Make sure you're editing your fill, - not your stroke color. - And they're easy enough. - It edited all of the shapes that I have selected. - Let's put that back to wait. - Um, - by as you can see, - for a more complex, - um, - designed like this honey here, - it would be a lot more time consuming to go in and select every single part that's white - and then change the color, - which is the second method I'm going to show you helps you avoid all of that. - So I'm gonna lock my hoody layer and just work on my T shirt layer to show you a simple, - um, - demonstration of what I'm talking about. - We're gonna use the select tool, - so I'm going to select everything with a white Phil just by selecting this body piece, - which has a white fill in a black outline. - I'm gonna go up to the menu bar and might have hit select same, - and I'm going to select fill color. - What this does once I select fill color is that it selected every single part of this - garment flat. - Um, - since this other layers locked didn't select any of this. - But everything that's available that has a white Phil, - and once that happens, - you can easily just click another color, - and the T shirt will become that color. - And as you can see, - it did not select the grey filled piece in the back. - So it seems pretty simple with a T shirt, - but I can show you with the hoody. - So now I'm unlocking the hoody layer going over the hoody, - and I'm just going to select one piece that has, - Ah, - White Phil and a black stroke couldn't go up to select same fill color and go to my - swatches. - And I'm going to select a tan. - And what you can see again is that everything that was originally filled in white. - It is now filled with tan, - and these other parts remain gray, - which is great because what I usually do before I start coloring is everything that I know - will be the same color. - I changed to a different shade of gray so that this process comes easier. - So I'm going to select one part that has that shade of gray. - It's like same and same Philip color. - And now, - as you can see, - it's elected everything that has the grey filling it. - And now I can just select a darker color. - And there's my contrast color easy enough. - So this technique works for very detailed flats and also very simple flats if you don't - feel like going in and clicking every single, - um, - component of the garment, - which is great. - Another thing that it does is that if you wanted to add contrast stitching, - you can just select this one stitch line, - go to select same and then stroke wait, - and it selects the same stroke weight, - which is all of my stitching, - which is why it's also important toe change, - the width of your stitching, - or how it's also useful. - And I'm gonna change it to that same dark brown color. - And this time I'm on stroke over here and you can see that it added a contrast, - Um, - stitching, - which is different from I still have black lines here to show for construction. - But now my stitching is dark brown. - That's basic coloring again. - Super easy. - Um, - just you just have toe, - you know, - practice, - practice, - practice and have fun, - Like with some of the flats that you've already made. - Um, - try I applying this two year flats, - and I I would like to see a deliverable on this, - just along with the entire unit to deliverable to just show me a few of your colored flats - using this process.
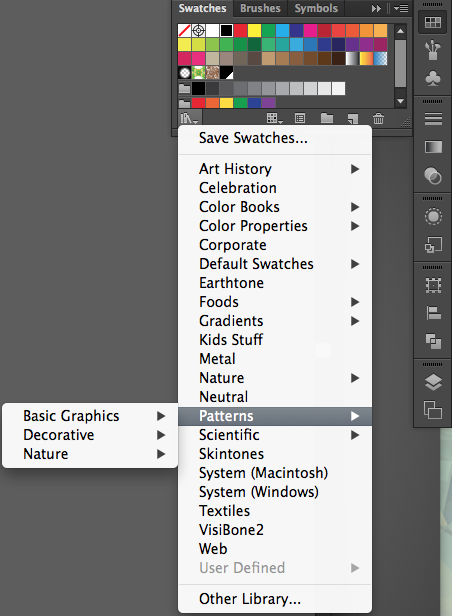
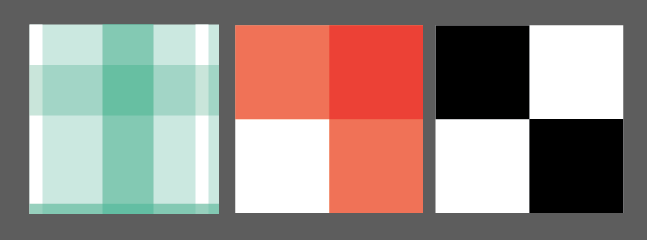
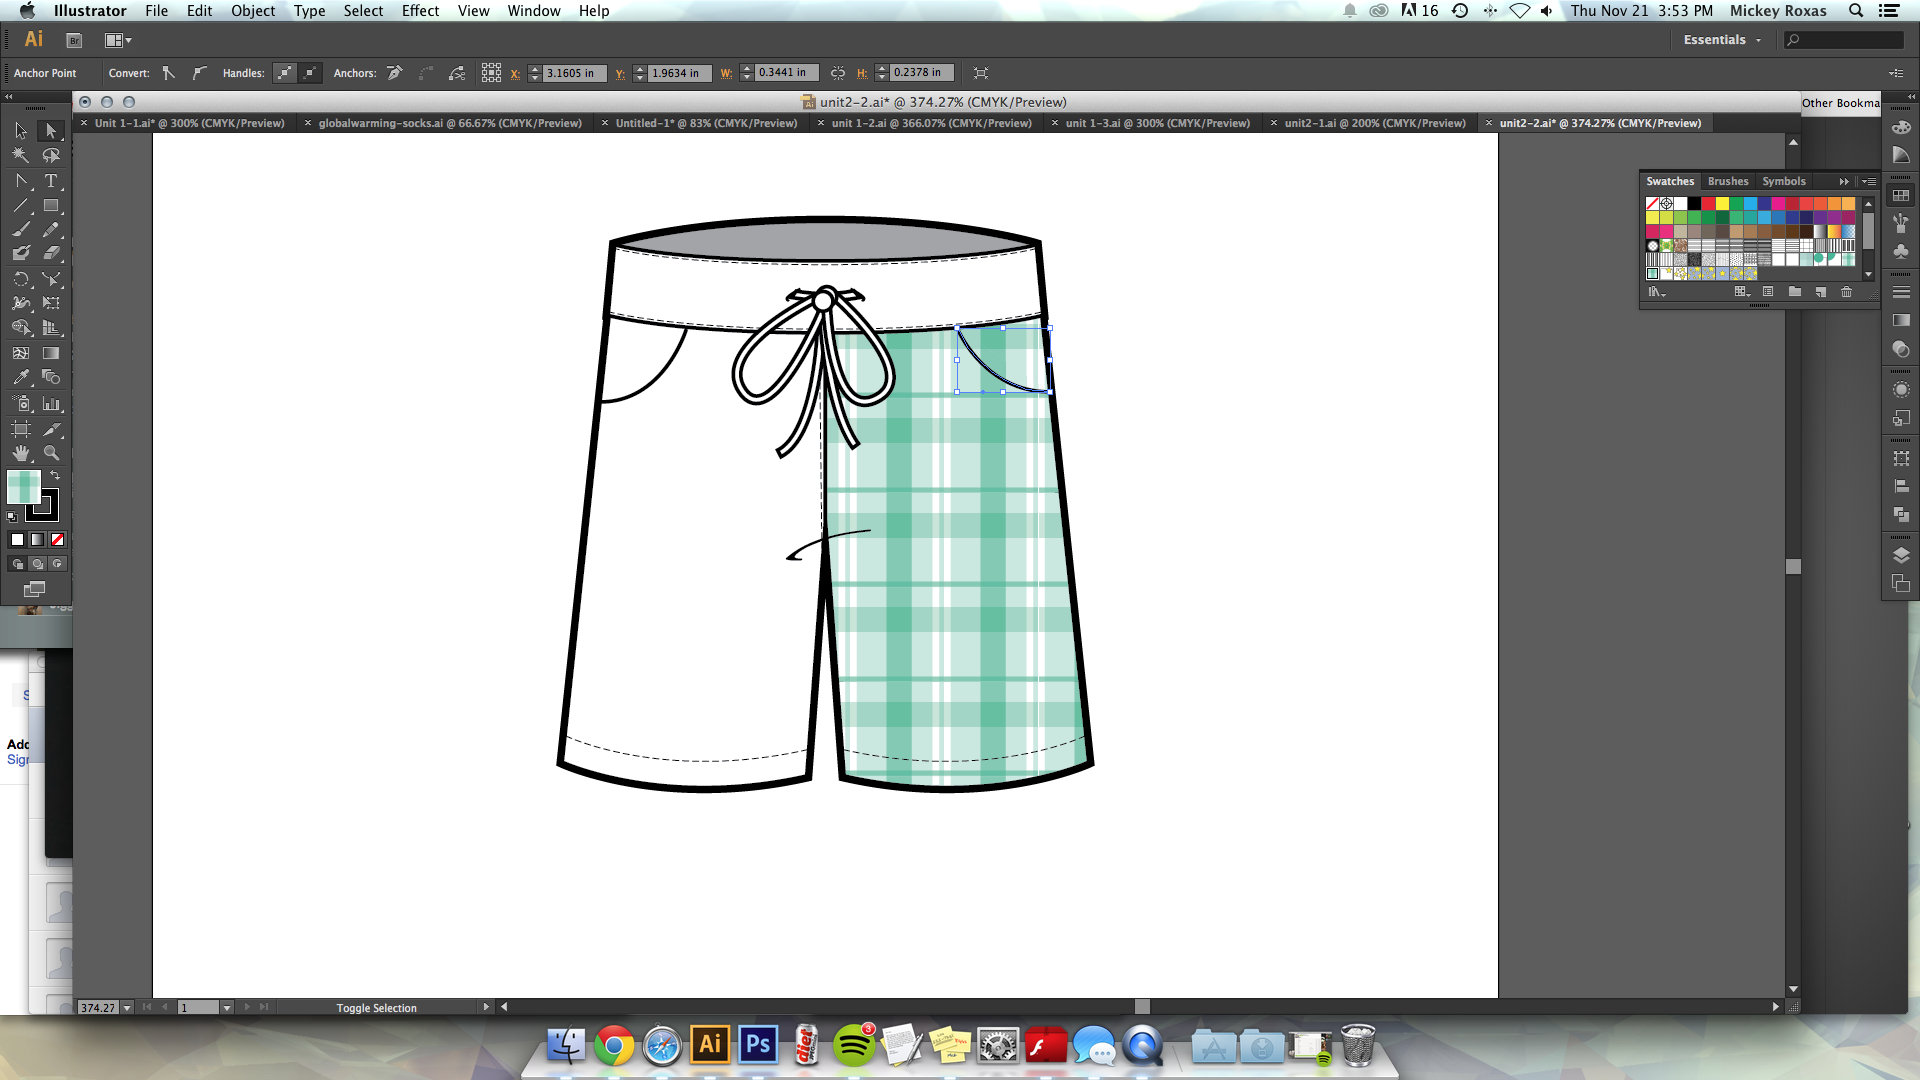
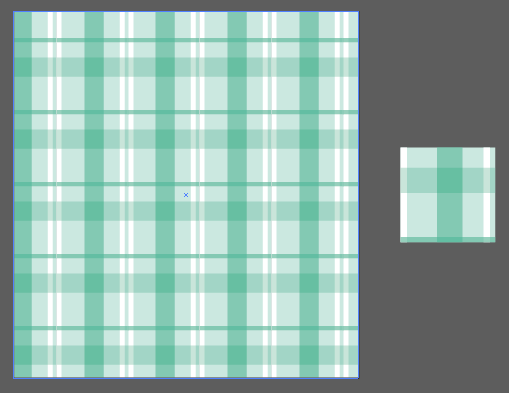
6. Unit 2.2: Designing Block Based Patterns: - Hey, - guys. - So when you that 2.2, - I'm going to be teaching you how to create your own patterns before we get started, - though I want to show you that illustrator already has a nim presage library of patterns - that you can use. - You just go to your swatches, - which is right here. - You go to this little left hand corner called the Swatch Libraries menu. - UAL These selections to choose from a lot of these first ones are actually just color - palettes, - um, - kids stuff, - you know, - just go around these, - like, - just click on all of them, - see what I'm illustrator has to offer, - but I'm gonna be showing you here patterns. - So they have basic graphics, - which also expands two dots, - lines and textures. - They have decorative, - um, - which has two categories and also nature. - And if you click into them deeper so let me do lines, - another little box pops up, - get all of these selections for swatches, - and I'm gonna show you what these look like using my little drawstring shorts. - Here. - It's, - uh, - on Phil right now, - and I'm going to select some lines. - Oh, - there you go. - So what, - you can see is that they've created different Siris of wits of stripes for you. - Also, - they have grids, - have vertical lines that are different weights. - That kind of like greedy INTs, - things like that. - Eso these, - they're super helpful. - If you just want some quick stripes on the go, - they also have dots, - and they also have textures. - So let's go to textures. - Yep. - So once I'm at textures, - I can just click around to see what they have here. - And they all have little name. - So that is called bird feet. - You got burlap and capsules things like that. - And just so you can see what you already have, - it's super helpful. - So if you want, - like, - a little puppet out pattern, - this is already a fail before you. - But I'll show you, - Alex kinda cool. - Um, - I'll show you how to make your own patterns. - So for unit 2.2, - I'm gonna be showing you how to make block patterns, - which is applicable for things like checkers, - um, - orp lads, - which I'm gonna be teaching how to make a plaid or like a gingham. - I'll teach you how to make your own seamless pattern in the next section. - of this unit. - So I grabbed this plaid off of the Internet, - actually, - one of the most simple plans I could find. - Um, - and I'm gonna teach you how to make this plaid now making a pattern. - Uh, - you have to follow a very specific set of guidelines. - So before even create a pattern of this plaid pattern, - I'm gonna show you how to create a pattern in general. - So if I have this square here and I drag it up to my swatches, - that creates a pattern. - And what you can see is what that does is if I apply that pattern into my little shorts - here, - Well, - it's a little too small, - but then it patterns what I've created some to make a smaller square and drag us up there, - select my shorts and show you it created a grid pattern. - Um, - if I threw a circle on here, - all right, - that's not a circle, - right? - There was circle on here and say, - Make it steal color. - And I want this to be the pattern if I drag it in, - creates this weird looking pattern here. - So it's pretty tricky, - like you have to figure out, - um or you have to get usedto making your patterns a specific way, - which is what I'm gonna be showing you here. - So what if I just wanted the section that's inside the square like the part of the circle - that's inside of the square? - To be the only pattern I would need to select this square, - paste it on top, - remove both the Phil and the stroke and then right click it, - arrange and send it to back. - Now, - this is a pretty, - um, - old school method of creating patterns cause there is, - um if you have the latest illustrated, - there is a way to create patterns, - um, - in the tools bar. - But I kind of like teaching the old fashioned way because it's good to know, - like the skeleton of a pattern. - So once I click this new patterns watch, - you could see that it is an even greater of just the top left hand corner of the circle - that I created instead of this 1st 1 where it was showing the whole circle and the square. - So I'll demonstrate that more later. - I'm sure that was pretty confusing, - but for now we're gonna begin creating our little plaid here No, - I'm just gonna start out with a square s so like that square and select the background most - color, - which is this light Mintier. - And then looking at my pattern here, - I'm just going to determine where I'm going to start working. - So how about we start working at this very edge here at the very edge? - I just have a white rectangle, - and I'm gonna make sure that I connect from top to bottom and the next I have a teal - rectangle. - So I'm just gonna grab that color right here. - He screwed over. - And then there's also another teal horizontal one right around here, - and you could see that this one is transparent. - So I'm gonna add some transparency to this by going up here to opacity and making it nearly - 50%. - Maybe in deal more than that, - let's make it 30%. - And I guess this is also slightly transparent. - So let's make that like an 80. - And right now, - like when you're when you're making Platt's, - it helps just move stuff around just like you're ordering. - Yes. - So you can get the results that you desire Gonna tinker with views, - opacity, - values a little more. - But now I see that there's a thinner teal rectangle here at the bottom. - So I'm gonna take my rectangle tool and just said it at the bottom, - like so change the opacity again. - It's a little oh, - stronger looking. - But I'm not not too picky right now, - and it repeats over here. - But I kind of like the way that this is looking. - Now I'm gonna add copy over this white stripe to be we're So now if I select it all, - I have a pattern and what I'm gonna dio and I'm going to select all of this, - I'm gonna click, - and I'm gonna drag all of it into my swatches panel. - And then I'm going to create a huge rectangle for you to see right now how the white Phil - And with the Phil being the one that's gonna be edited, - I'm going to select my news watch. - And you could see that we created a plaid sexually Very lovely Platt. - I like it a lot. - So once I have created my plaid, - Um, - this this pattern is too big for my pants in my shorts here. - So if you can see if I were to put it and you could barely see any of the plaid pattern. - So what, - I'm gonna dio I'm just gonna grab this whole plaid and make it smaller. - You could even group it altogether if you want for ease. - Then again, - I'm gonna slept all of it and drag it to my swatches panel. - Gonna select um, - my white Phil here, - select everything that has a white Phil and be careful. - It might select your pattern as well. - Yeah, - but did so I'm just gonna do it. - D select those two things and I'm getting us likely. - Patty, - there you go. - You have a nice little clad drawstring shorts. - So, - again, - this, - um, - this technique can be used for, - like, - gingham plaid, - which would be and more easy to make If I demonstrate here like, - just use, - um, - say I'm gonna make another light blue gingham plaid. - I'm gonna create square, - It goes inside. - That's where he's gonna be darker, - okay? - And make sure that it's even, - and then I'm gonna expand it to this other side here, - change the opacity to maybe like, - 30 coffee, - paste it, - rotate it and put it to the left or the right side of it matter, - as long as it's not both. - And there you have a very subtle gingham pattern, - which I'm gonna make slightly smaller can drag it into swatches. - Hey there. - And then I'm going to create a rectangle so you could see this final swatch you got. - You got a very simple gingham pattern. - Just great. - So, - again, - I just want you to play around with your patterns. - I will expect, - um, - one of your either plaid checkered gingham or block pattern in general for one of your - deliverables. - So go ahead, - have at it and start creating a plaid.
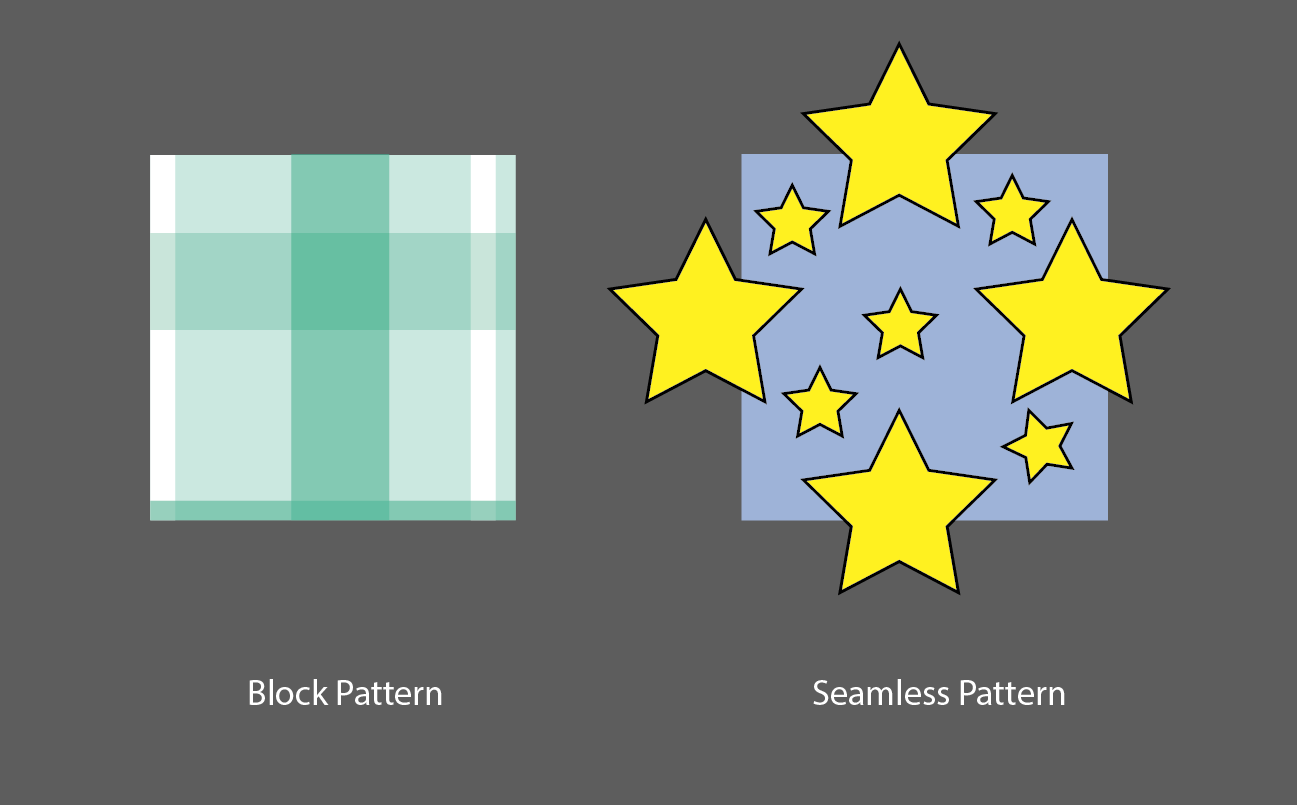
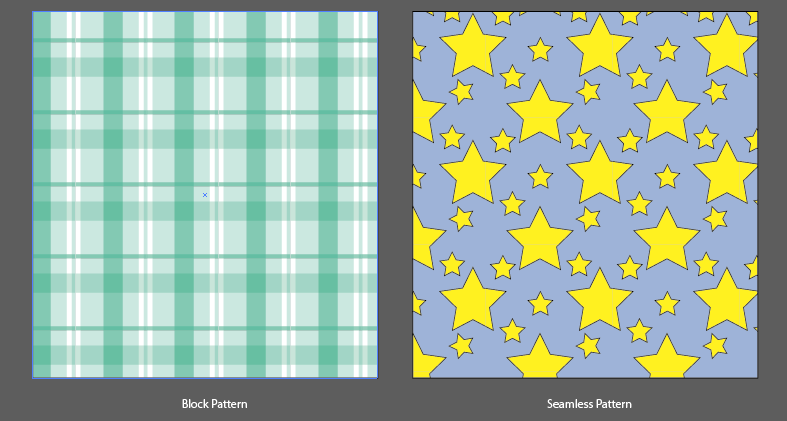
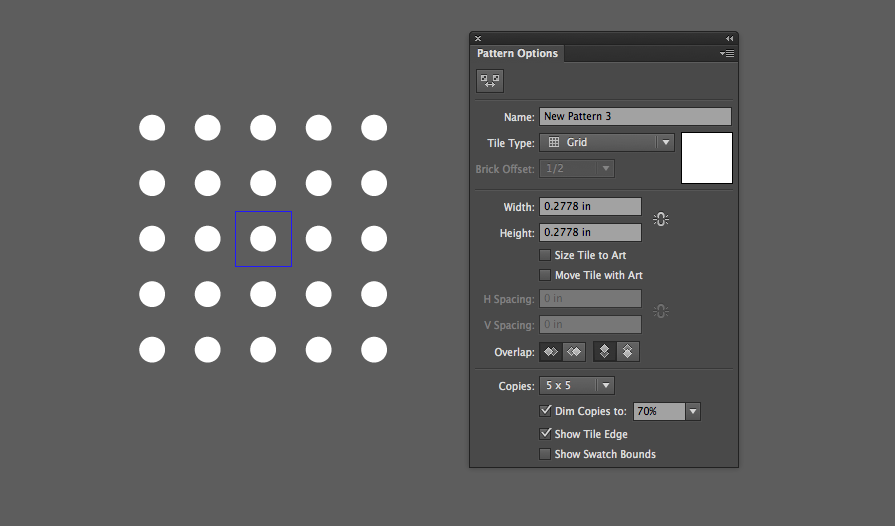
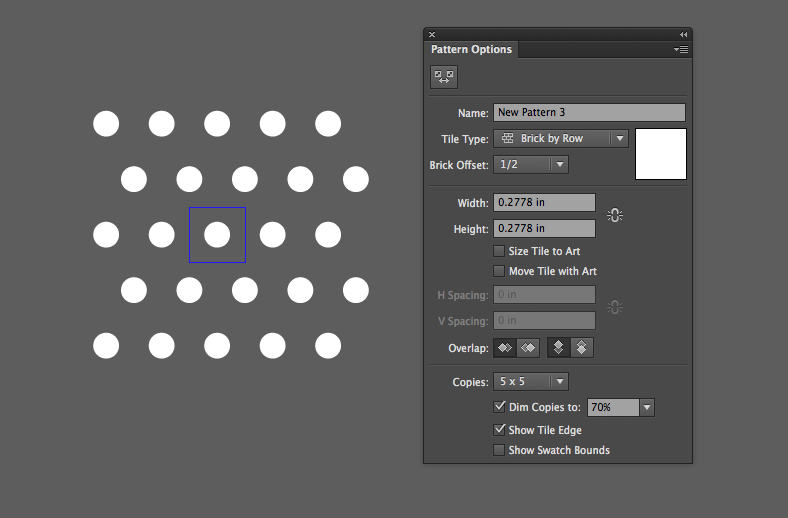
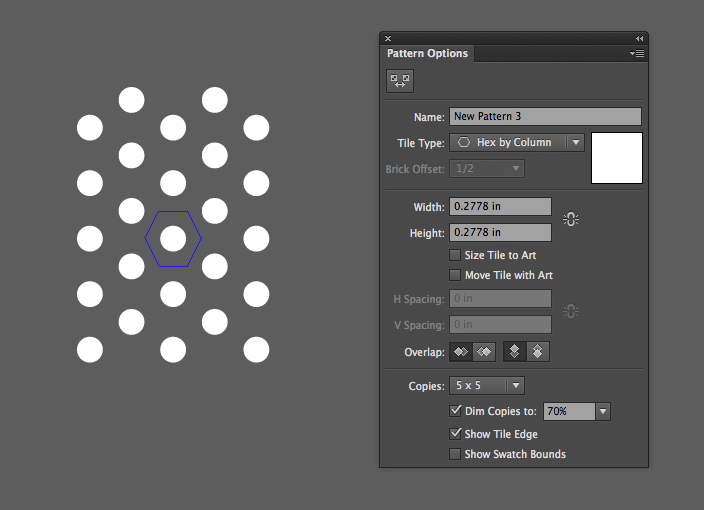
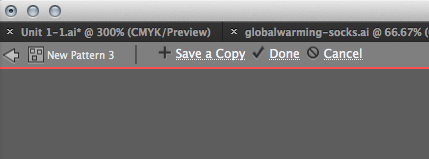
7. Unit 2.3: Designing Seamless Patterns: - Hey, - guys. - So for unit 2.3, - I'm gonna be teaching you how to make your own seamless pattern. - Now, - a seamless pattern is different than block patterns of its the block padding here plaid - that we created. - If we drag out the plaid pattern, - you could see that it fits perfectly into a square. - But a seamless pattern is one that has the appearance. - It's like a repeating pattern. - But there you can't tell two, - obviously where it repeats, - which is called seamless pattern. - So I'm gonna select ah foliage pattern from that one. - The illustrate already had. - And when I expand it, - you could see that illustrator created this really ornate foliage pattern. - And it's not, - um, - a block pattern. - If I were to drag this out, - it is crazy shapes. - It's the whole engine shapes, - not just something that fits inside a square. - And I'm gonna teach you how to make that now. - So we're going to start with something easy. - Um, - let's say stars. - Let's grab our star and we're gonna make it a yellow star because that's appropriate. - And this is gonna be an awesome pattern. - I'm going to start with my square, - which should, - Which is my our board Basically an art board within a dartboard. - I'm going to remove the fell just so I can work with it here and move this or the star on - top. - So now I'm gonna range star in a particular way where I can create a seamless pattern. - And the key to creating a seamless pattern is to match up your edges perfectly. - So here I have my star and it's overlapping a pattern. - Well, - if I were to drag this in and demonstrate what it looks like, - you can see that it's not seamless. - It has all these breaks. - And I'm going to keep the background square in there for now, - just so you can see when it becomes a perfect grid. - But ideally, - we don't want that great in the back. - Does this keep that there as a reminder? - So there have my star, - And once I overlap any of my borders, - I'm gonna copy the entire thing. - Copy and paste in place. - And while holding shift, - I'm going to drag down and match like let illustrator naturally click you to the bottom. - So you're gonna match the bottom line with the top line of the square. - So just get in there and align it right there, - okay? - And keep that star there, - and I'm just gonna remove that bottom one. - So you have a repeating shape right here. - Someone was gonna fill up the rest of the pattern, - making you starts here derogative start there. - And how about we also put another big star over here? - Well, - then, - now we have to move the star. - Oops! - Over to the right side. - So now I'm going to select the border again With square in the back and also the star copy - paste in place. - We'll downshift and drag to the right, - and I'm going again match the two ends of my square so that they overlap evenly. - So right now they're a little bit off gonna drag out, - and I'm going to drag back in again. - This process is like the way that they taught me back in the day. - Um, - there is a way to make seamless patterns on illustrator. - Now that, - uh are is, - like, - way faster. - But I kind of like showing this way because it's just good to know, - um, - like, - I think it will improve your pattern making so Now we've got this set up and I've got all - these stars ready, - and now you're ready to create a seamless pattern. - But if we were to drag all of this into this watch panel, - you can see that it is not a seamless pattern. - It's a crazy pattern you got. - You got all this craziness going on. - So what we're gonna do is we're going to change the background of this color. - Let's make it a black eye. - Looks nice. - Make it blue sky. - Oh, - well, - that's lovely. - I'm going to select the square in the back. - I'm gonna pace it on top. - I'm going to remove any Phil than any strokes and I'm going to right click, - arrange it and send it to the very back. - Once I've done that, - I know it doesn't look like much right now. - I'm going to select all of it and your target and see must watch his panel. - Now I have my test square here, - and I'm going to select the feel that I just made and oh, - how lovely. - It's seamless. - So again, - what I mean by seamless here is that there is no obvious breakage of where the pattern ends - and where it begins, - just like the plaid. - And if I were to drag this watch out, - you can see that it overlaps the square. - So again, - no matter what kind of pattern you make, - always copy the background color, - paste it, - remove any fill or stroke and arrange it and send it all the way to the back, - no matter what kind of repeating pattern you make. - If you put a blank square at the very back of this watch, - it will create a seamless pattern. - Um, - doesn't also don't also doesn't have to be a square. - It can also be rectangle. - But I just like using squares because it makes him or even, - and that's the old fashioned way to create a pattern. - And just justo for fun. - I could show you how to create um patterns, - using the way that Adobe offers now. - So here's the way. - How do you make a pattern using the method or using what illustrator has to offer? - So if you go to window and go to lips pattern options and you go to this little upper hand - corner and select make pattern press OK, - you can see that it gives you a preview of what you're making. - So it tiled already the blue background. - Can you expand that more so we haven't even blue background. - Very nice. - And then I'm gonna paste my star and you can see already like it's overlapping the Blue - Square, - which is our tiling board here. - And no matter where I move the star, - it moves the battery. - He's great. - Um, - so if you play around with this, - this is how you can get a nice repeating pattern going. - No, - I it is. - But you know, - see, - it's like a whole new thing toe learn for me. - At least you knew Illustrator users can feel free to use this to your advantage, - but see how easy it is to see, - like where things are overlapping and stuff. - And I always use seamless pattern making for things like creating scallops or creating hair - and gold patterns. - Um are creating chevron patterns even. - But also, - look, - this is a nice well pattern we got going on here anyway, - when you're done creating your pattern and you're you're fine with, - it is also different ways. - Tile it, - you can do it brick by row and stuff, - but that kind of stuff only applies to things like polka dots. - You can name it. - So I'm gonna call Starry Night and I'm gonna go to the drop down box again and I'm gonna - put save a copy, - which you can also press, - save a copy, - appear to have a copy. - Starry night. - It's gonna be the exact same thing. - Well, - I guess I can't. - And when you're done, - you could express done and it brings you back to the real world. - And when I select my test square here and apply the new pattern you could see created a - nice seem with star pattern. - So that's the easy way of doing it. - If you don't want to do it my complicated way, - I just I would like to show that to you Just so you know, - um, - like, - if you ever don't want to use the pattern uhm, - pattern making tool, - there is a manual way to do it, - which is great. - So yeah, - so that's it for Unit two. - For my deliverable, - I would like for you guys to please make one block pattern which could be like a checker or - plaid or things like that. - And also one seamless pattern which can be stars again. - Or, - you know, - you can use circles. - You Congar ahead and make like, - a scalloped pattern or chevron pattern or herringbone anything like that. - And you don't necessarily have to apply it to a flat yet. - Just give me swatches of your pattern. - Like so in two different applications of just two giant squares. - When with your seamless pattern and one with your block pattern. - Okay, - I'll see you guys in unit three.
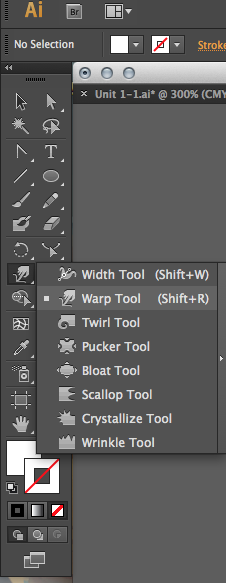
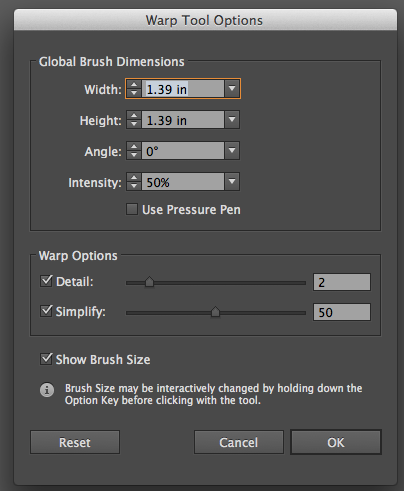
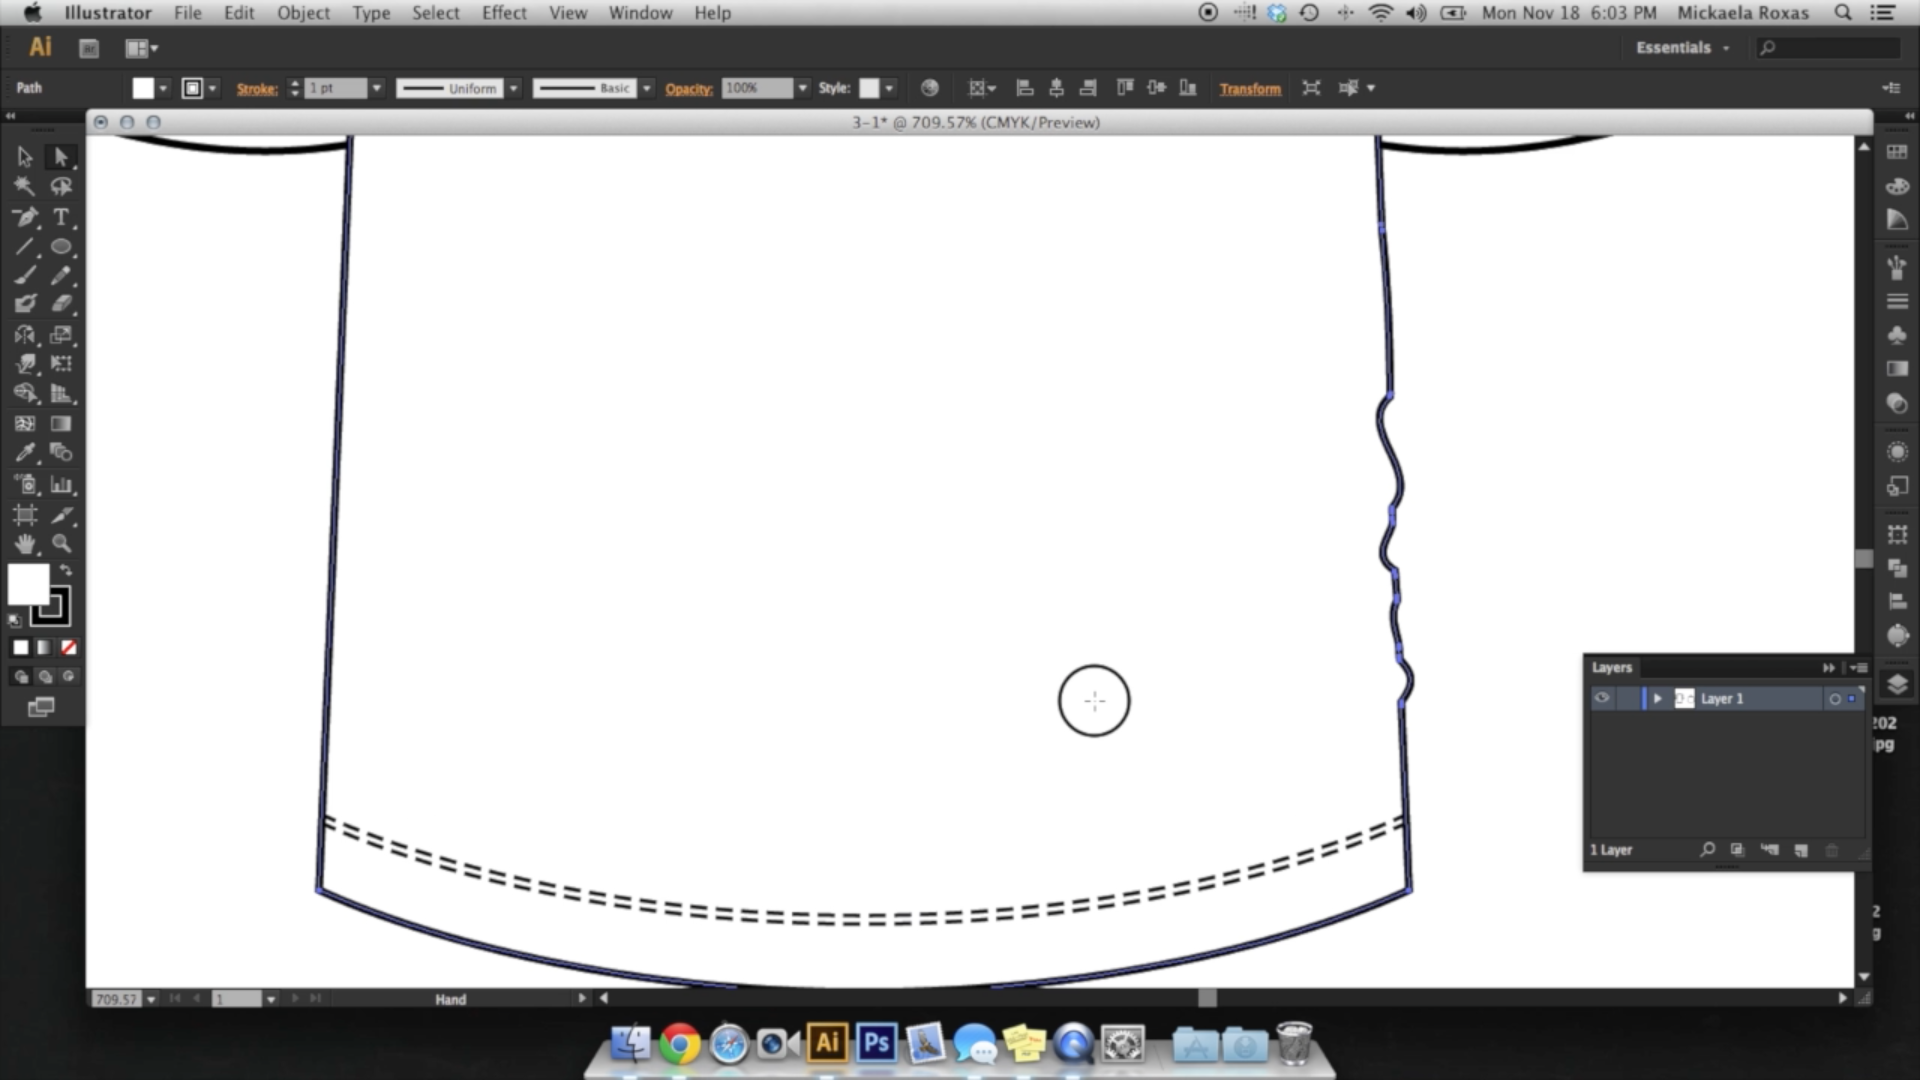
8. Unit 3.1: Stylizing Your Garment Flat: - Hey, - guys, - I'm going to finish up this class by teaching you some more tricks on how to add fit and - drape to your garments. - And also, - um, - some more futures of illustrator that will help you create things like trims like like - zipper pulls and things like that. - So in unit 3.1, - I'll be teaching you a tool called Warp. - I'll be teaching how to make pleats, - and I will be teaching you how to use the brush tool. - So I'm gonna start with warp. - You can find warp the same place you could find where width is if you hold down warp or - with you confined. - Um, - it's underneath the rotate till he confined warp right here. - And what work does is it warps an object to say I have this circle here and then I select - my warp tool. - You'll see a little circle option that pops up, - And if I go to my edge of the circle and make this little zigzag emotion, - I go. - You can see that eight worked my circle and you can adjust the settings of war by double - clicking the warp tool options and you can set it Teoh like something drastic. - Let me show you. - Like what? - 20 point is? - It doesn't have to be a circle. - You can change the width and the height. - You could change the detail and how much you simplify. - Now I have the shape, - and I'm going to work my circle even more. - And that kind of looks like rough in. - But if you don't use it as intricately as I am, - you can really make some cool adjustments. - So I'm gonna go back and put my warp back to five points and leave. - Everything is is your angle 50% of intensity. - If you have a pressure pen, - like a stylist, - then go ahead and do that if you want to. - I keep my detail at two. - And my simplify 50 press. - Okay. - And what I like to use warp for is to add, - um, - kind of like a slouchy, - drapey feel to clothes. - So So you've got this T shirt here, - And if a man were to actually wear this t shirt, - it wouldn't lie perfectly on his side. - Know you'd actually see some rough inning around the bottom ends or even around the waist, - too. - So I'm just gonna show you how to do that. - So I'm just moving in and out of my lines again. - The warp tool is something that you might have toe Um, - undo quite a few times until you get the kind of curve that you want and adjust your - settings based on, - like the size of your garment. - That's pretty good and like, - how much detail you want and I'm gonna settle with that. - For now. - That's actually even a lot. - But for this I'll demonstrate and maybe just make it a little less on this side, - less dramatic. - So I'm letting go now. - I'm not just holding down the warp tool I'm releasing, - so I kind of like this side better. - That's more realistic rather than this side. - And a lot of people use this for sleeves to, - um, - this is just a T shirt, - so there's not that many places to do it by. - Just go ahead and play around with adding draping to that. - So to accompany this, - I would also use the brush tool so you can hit B, - which is brush, - or you could just go down here. - It's underneath the segment tool, - and it's the paint brush tool go up to your Manu bar here and I'm going to select a three - point oval. - And then I changed my stroke. - Wait, - uh, - 3.0.54 point 25 I'll do 250.25 And what a brush does in which is different than a pen tool - , - is that you can drag and draw anything any shape. - And it already converts into vectors so you can see like you can edit your points - afterwards, - which is the beauty of the vestal. - It's not as accurate as like getting curves as a pencil is. - But if you want more of that freehand look, - that's where I recommend the brush tool. - So again, - it was going to take my brush tool, - and I'm just gonna look, - that's not right. - I could change the settings later, - but I'm gonna add some lines to show. - So draping here and the beautiful thing about illustrator is that I can edit my points - afterwards. - And as you can see, - this looks really thick. - So I'm gonna select all three lines, - you know, - in my stroke panel, - and see the weight did not change. - I'm going to make it 0.5 or 0.25 wait crop in closer and then just lined up the edges of my - points to where I want them toe lie on the ridges here, - make one longer shorter just to give the appearance of more of a lively garment something a - little less blocky, - just great to see. - So now you've got some draping going on, - like now instead of it just being a very rigid flat. - Now it's got some movement to it and do it again to the other side, - adding, - So, - lines here, - there different lengths going in and making sure they still a line inside of the garment - playing around with that. - Yeah, - Now you can use this for wastes. - Um, - I like if you have a women's dress and you want to be a little bit more, - it's like, - lively the way it drapes on a woman. - You can play around with the warp tool that next I'm gonna show you how to make some simple - pleats, - and this is just using the pen tool. - It's just a trick of the eye that I like to use. - So I have a simple miniskirt here, - and I'm going to create pleats for it. - I'm gonna set my settings to White Phil. - Black stroke, - which is the standard and I'm gonna do is simply create a pleat looking shape above my - skirt. - And this is one of them many ways you can cheat to make the appearance of something. - So I'm just gonna do this several more times. - And you can vary the heights of these endpoints. - As you wish. - Change the curves at the bottom. - Whatever you see fit. - Do that later and you can, - even if you just get tired of creating them. - You can transform and reflect and copy 1/2 of it and move it over to make things easy for - you. - There you go. - You already have the appearance of pleats. - At this point, - you could just add it, - points a little more, - make them a little more different. - That's very nice. - And then, - just like I showed you the last unit, - you can use your with tool and make the ends of these what? - They're not darts. - But now it gives the appearance of it vanishing into the whole fabric as if the pleats were - meant to be a construction detail instead of just like and strange at on to your flat, - simple, - simple tricks that make your flat look even more professional, - Which is great when you back out. - Looks like you have a mini skirt that's been pleaded, - which is great. - It's also works if you were gonna add the pleats from up top if they were Sony in pleats, - not just iron on pleats. - And yes, - so that's how you use the brush tool, - the warp tool, - and that's how you make pleats and I'll see you in 3.2.
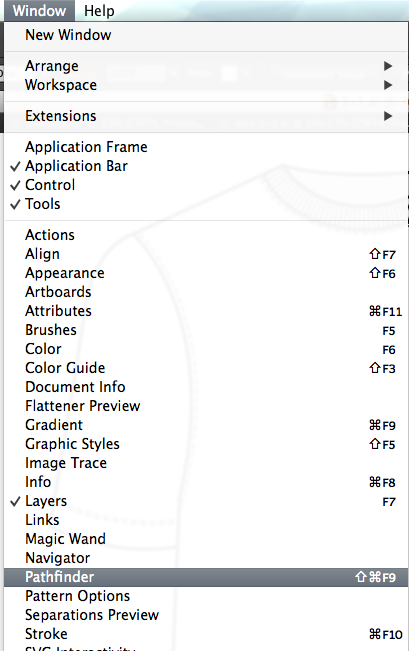
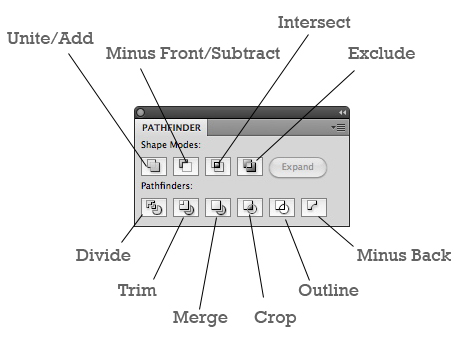
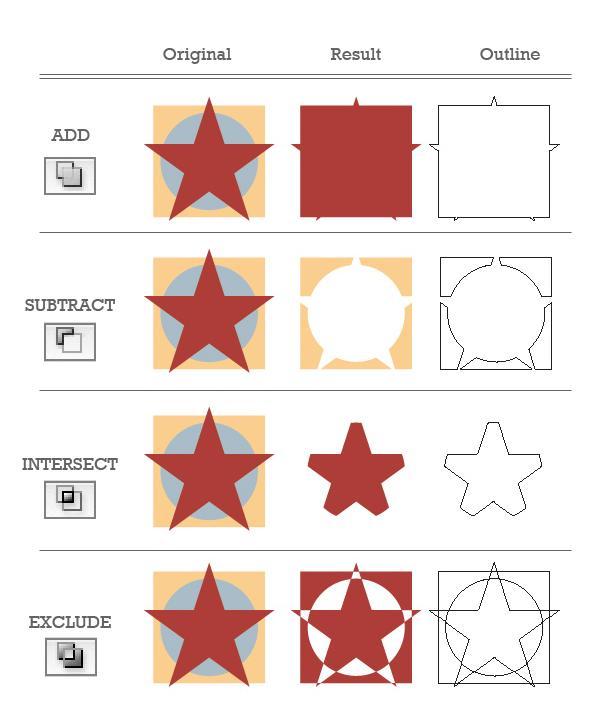
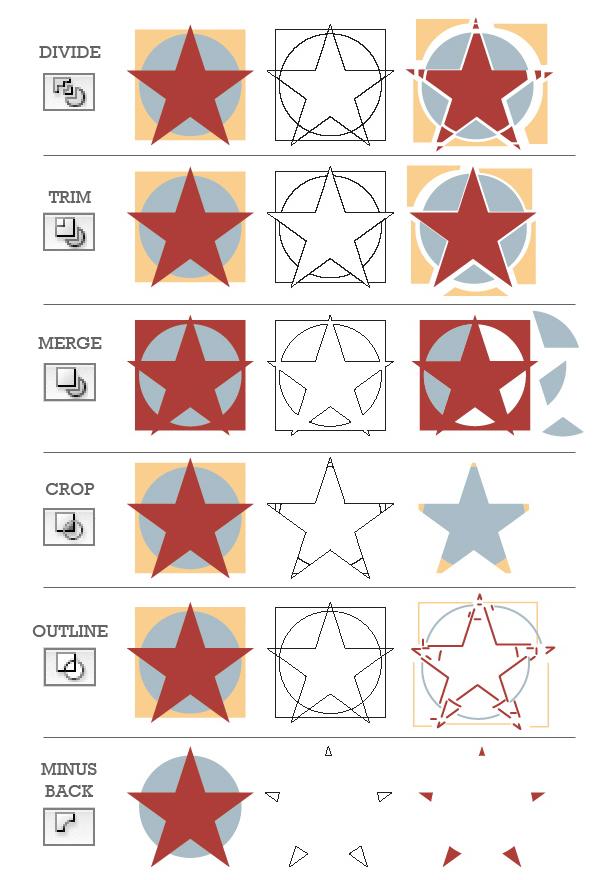
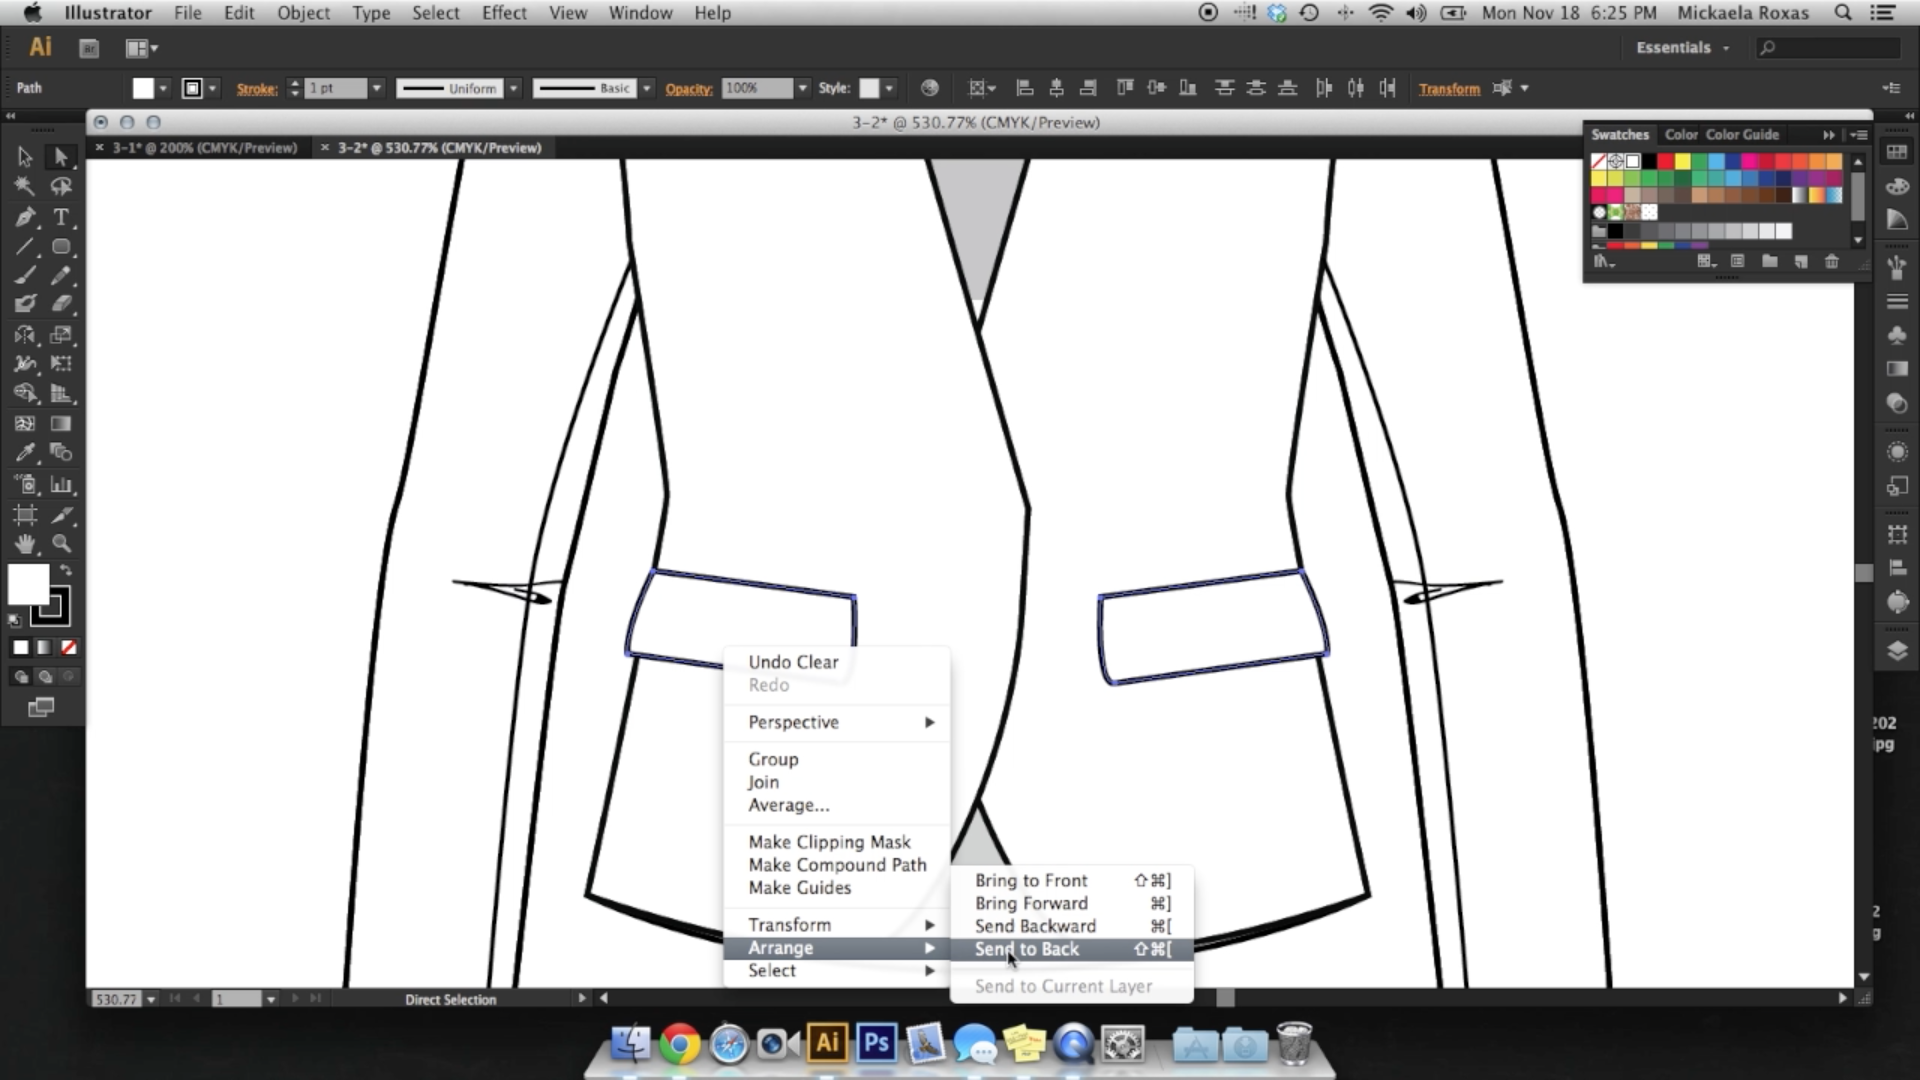
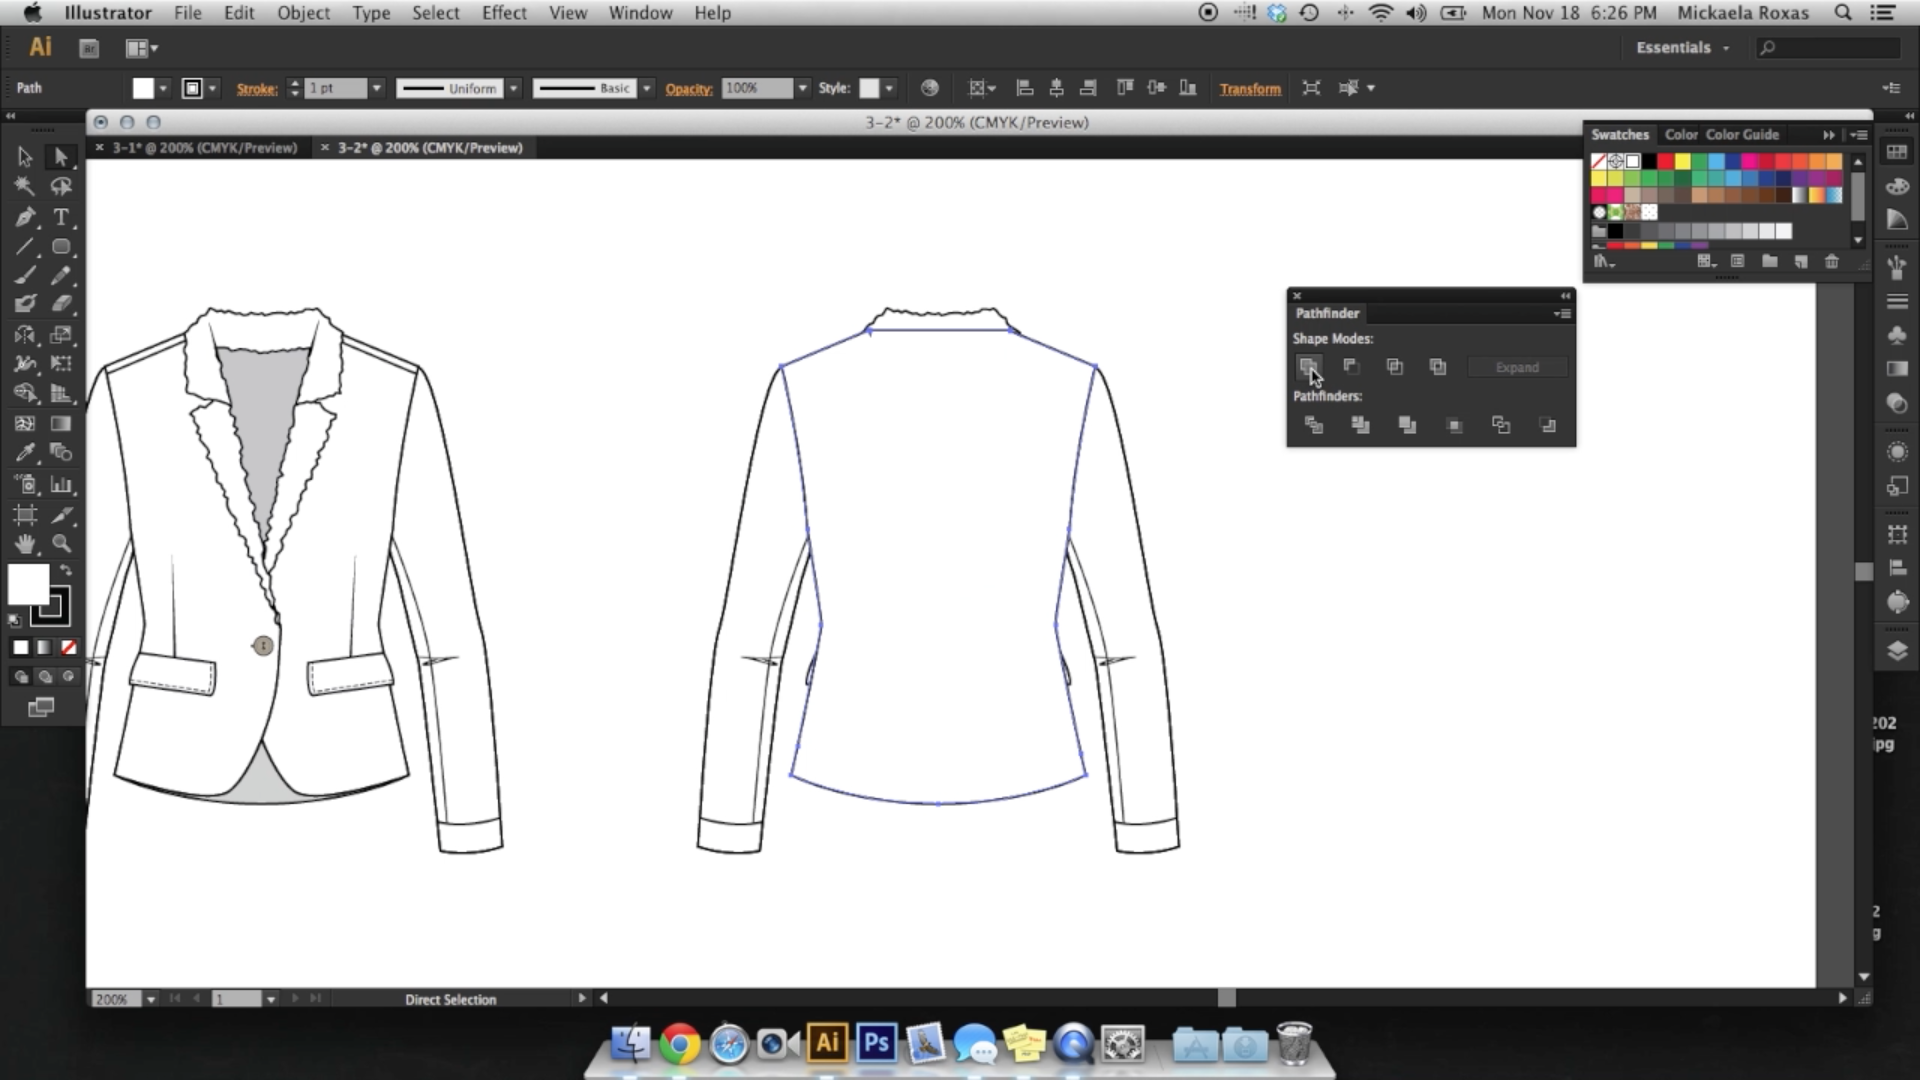
9. Unit 3.2: The Pathfinder Tools: - Hey, - guys, - this is Unit three point to where I'm gonna be showing you how to use Pathfinder, - how to use it to make your life easier while you're designing your flats and to change your - workflow a little bit more and to make trims and stuff like this. - So first, - I'm going to introduce you to Pathfinder. - If you don't already have it in your tabs bar over here, - you can go to window. - Good. - Pathfinder. - Look, - you don't worry. - Open it will stay hoping to go to Pathfinder and it will pop up. - He's gonna make this pop out just so you could see it. - For now. - I'm going to demonstrate what Pathfinder does in a different Siris of ways. - So I'm gonna have a yellow circle, - and I'm also gonna have a red square, - and I'm going to put this yellow circle this red square through every single mode that - Pathfinder has to offer here to show you, - um what it does make a circle a little smaller. - You bring it to the top, - I'm gonna overlap the circle over the square, - and I'm gonna select both of it. - And I'm gonna hit this very first. - Wait sorry. - That was with me with being nit picky. - I'm gonna select growth a little. - I'm gonna select this very for a shape mode which is called Unite. - And if you hover over each option and gives you a brief, - um, - we'll run down and went what it does, - So I'm gonna click it. - And oh, - it joined the two shapes together. - You could see that I no longer have a individual circle and individual square, - and it took the fill color of the shape that's on top. - So if I were to put the square on top, - select both and then hit unite, - you could see it fills with red. - So whatever shape is on top, - Unite will fill and join the two shapes. - Together they will fill with the top color. - So now I'm going to do minus front. - So I'm gonna select both Mom, - I'm gonna hit minus front. - Oh, - we could see that happened is my circle went completely away. - And all I have left is this rest of the square not my entire square, - but what was not overlapped by the circle. - So I'm gonna demonstrate that again with a square on top. - Select both minus friend, - and you could see Now I've got this downward tilting Pacman, - where the corner where the square was was taken out and you just that part of the circle - remains. - Next. - I'm going to do the 3rd 1 which is intersect, - and what you can see that does is that instead of keeping either the top or either the - bottom, - he removed both and just kept what's in the middle. - And it was yellow because yellow, - the yellow circle was on top. - So if I put the square on top and I did it again, - we get the same shape. - But then our red is on top, - all right. - Next I'm going to do exclude, - which is 4th 1 Select both yellow circle on top. - It excluded, - and you could see that will be a square turn yellow because yellow was on top. - But now what's in the middle is gone, - so I'm quitting in it, - and it's not selecting anything. - But if I select a square and the circle, - then they select both same thing. - If the square is on top, - the only thing that will change the color but you still get the same shape so Now we're - gonna go to Pathfinders, - which is essentially the same thing. - But you can use it for different ways. - Gonna select both shapes. - And I'm gonna hit this 1st 1 which is divide, - and you get this line in here now you're like, - OK, - what did this do? - Well, - if I take my direct selection tool and select Pac Man over here and drag out, - you can see he's now been separated. - His little mouth piece has been separated and the square has also been separated. - And that's what divide does, - you know, - undo and all this is the same. - If you were to put square on top, - it's silly differences that this middle portion will now be read. - Now, - with them all selected, - we're going to do the second Pathfinder, - which is trim. - So I'm gonna click it trip. - Um, - the difference between this and the shape mode that we had is that it keeps both shapes. - But you could see what happened is that it removed the strokes on both of them. - And now I can still have a circle available, - and I still have my my bottom square available. - It just got a big chunk cut out of it and my stroke was removed. - We'll bring you back, - selecting both. - And now we're going to do merch Hit, - merge! - And what this does is basically it's essentially the same thing. - Um, - let me show you again with 1/3 piece. - That is gonna be great. - I'm going to demonstrate true again. - So you have all three shapes, - and now I'm going to do merge in all three shapes. - But now I'm going to make all of these the same color which are all going to be read, - gonna select all of it, - and I'm gonna hit merge and now it merge into one color. - So what merge does is it merges the same color of things. - But if it's not in the same color, - then it's gonna be separated out. - So, - for the section, - I would really just like for you guys to play around with Pathfinder. - The positively is a pathfinder endless. - I made this zipper pull, - for example, - using pathfinder simply by getting around it rectangle, - like so, - creating smaller grounded squares inside two of them. - And then, - you know, - he could play with the alignment, - grouping these together and then selected, - aligning it to my main rectangle, - selecting all of it and then hitting this first Pathfinder, - which is divide using your direct selection tool to select one square o seconds clear like - that. - So I quick inside, - nothing's there. - But if I click out here is my piece. - That's a great way to make, - Like a doughnut. - Um, - if you ever wondered about how you can get a shape out cut out of a shape, - this is what you use this pathfinder. - And then you could just make several more or a couple more rounded rectangles to complete - your zipper pull. - Just like what I had already. - And then just adjust the ordering. - Gonna send this one back, - Make this a little taller. - There you go. - You gotta zip, - people. - I also use it for my buttons if I'm doing a close up on buttons. - Sorry, - Pathfinder. - I removed the buttonholes out from the main button so that I can reveal the pattern - underneath, - so I'm gonna change this color. - You could see that instead of me having to click every single button hole in order to match - the color beneath, - um, - I just removed it completely. - And by using Pathfinder so that it can just automatically show what's underneath. - That's the beauty. - Hope any, - um, - have Pathfinder. - Another use of Pathfinder, - which is the main use of Pathein and I used is creating the back of a garment. - Now, - I haven't showed you how to make the back of a garment this entire time because it's good - practice for you first to make the back of the back of the garment completely from scratch - , - since all of you guys are new at this. - But there is an easy way to go about making the back of the garment that I'm pretty sure. - And now you're like, - Why? - Why do you tell me earlier? - All you have to do is take the friend of garment. - Copy it, - based it. - Drag it out, - and I know, - see, - resemble. - Um, - I'm gonna un group this so I can just work with us differently. - You can group it again, - make sure everything is on grouped. - Okay, - Now you start removing things that you know won't show up in the back, - so I don't need this. - I don't need my button anymore. - And I also don't need my darts. - And I don't need this lineup here cool. - Great. - Well, - then I start moving things that I know I will need to keep, - but that they will just be viewed still from the back, - which is for my pockets so you can see the pockets overlap the edge. - So if I were to be looking at the back of you, - I would still see the end of the pocket. - But just this very end part. - So I'm going to select both pockets, - going to right click, - arrange and send them to the back so you can see you just get that flap right there. - Oh, - isn't this just lovely, - lovely, - lovely little pattern we got going? - Lastly, - But I know I'm gonna be using this caller, - so I'm going to send this collar to the back. - Now, - you've got this great of shape. - Um, - if you created a background color, - this is when you'd like. - This is when you should connect the two pieces together like so. - And also, - if he created a back like this, - this is all you need to create the back piece. - So I'm gonna really anything else I don't need. - Now I'm going to use my direct selection tool to select this grave panel, - my two left and right sides and also the bottom part of the jacket Gonna go to my - Pathfinder, - which has mysteriously disappeared. - Oh, - yeah, - I closed it in a fit of rage earlier so that I'm gonna hit you night, - huh? - We see. - Is that it united everything. - So now I already have the appearance of a back without me having to build all over again. - And the great thing is is that it is in the shape still of the exact shape of what I had - originally. - Now, - I just gotta deal with this collar here, - and there's extras. - But what you could do with it selected is to just use the subtract tool, - subtract the points that you don't want and adjust the shape, - become a color. - The last thing I'm gonna do is remove. - He's design marks on my sleeves because you won't see that from the back. - And now you can even add details like back darts so and going in with your with tool and - pinching it at the very end so that it looks like a dart and okay, - disappeared. - Should have told you when you're making double pointed darts like this, - I recommend widening the width of it at the metal so that it just doesn't completely - disappear on you. - And at that point, - I can reflect a copy, - dragging over group them both together with them both selected against, - like, - my body selected again. - So I can select I can align to a selection and then horizontal line center. - There you go. - There's your back. - And let's how you make a back using Pathfinder, - you basically remove all of the, - um, - components that you know that you won't need for the back from the front. - So, - like the button I didn't need these darts I didn't need. - And then you just merged the outermost shape together, - and sometimes you will need toe to cheat it a little bit by creating the shape that you - know, - you anticipate that you know you will have. - But then that just takes practice. - And I encourage you guys to practice. - So for this delivery ble, - please, - um again, - like the first unit, - please give me examples of everything that I've taught you First make one back or two. - If you're feeling if you're feeling up to it for practice, - but make one back version of any garment that you've always already created using past - finder and then it getting Unit one use, - um, - the warp tool to create more of a draping, - um, - dripping appearance and also used brush Fresh tool. - I used this three point oval and then I changed the stroke weight 2.25 to create these - lines here and also create cleats or use the with tool to create things like, - um, - flouncing like a flowered skirt and things like that. - All right, - so thank you guys so much for taking this class again. - I know it was super fast, - but by now I'm sure you guys know me and know my fast teaching style. - So again, - if you have any questions whatsoever, - feel free to contact me at Mickey at beta burn dot com or hit me up in a comment here on - skill share. - And I look forward to seeing what all of you guys make. - And I'm here to help. - Don't forget. - And thanks for thanks for watching my sculpture videos. - Head over to beta brand dot com and go to our think tank once you guys are all set with one - of your original designs, - and you are interested in getting one of your designs made. - Like. - For example, - I want this cute little blazer with a faux fur collar and lapel made just category debate a - brand dot com. - Um, - surf around a little bit, - enjoy some of our website and some of the funny things that we have to offer. - But go to our think tank and you can click some design. - And I love a little pop up window Will pop of we for you to sign it and making account. - But then furthermore, - um, - you can submit design, - and if you have any other questions, - you can refer to my other class that I taught. - If you go to the classes that I teach, - I also teach another very fast paced, - flat making class that also demonstrates how you can make, - um, - a submission to the think tank through there. - Or go ahead and shoot me an email and we can discuss getting one of your designs on to the - website. - So thanks again, - guys. - Good luck. - And I can't wait to see what everyone makes a A. - Okay, - Bye.
 Mickaela Roxas, Graphic Design, Calligraphy