Transcripts
1. Introduction: [MUSIC] As students were
tasked with getting all of this into here and when we don't get the
results that we want, we think maybe I just
need to spend more time, or read it slower, or read it again. No one really tells us how, so we just do
whatever feels right. You take notes, you highlight a few phrases here and there, and then you
read them over. But what most students
don't realize is that our brains are wired to
learn in a particular way. Sadly, many of us go through grade school and even university using study methods that work against the brain's
natural strengths. But with a deeper
understanding of neuroscience, we can learn to stop fighting
our brain instead start using it to study
smarter [NOISE]. Hi we're Mike and Maddie and we're brothers who
love learning. Yeah, we run a YouTube
channel about study tips. We built a note-taking app
for students and we're full-time doctors dedicated to lifelong learning in medicine. Three years of study and
dedication to academic success. Learning how to learn has become a life-changing skill for us. The problem is we were never taught how to learn growing up. It can feel overwhelming to
make time to learn how to learn when you're already drowning under loads
of schoolwork. We made it simple by repackaging everything
we know about studying into a guided
seven-day course with the class project
to help you apply individual techniques
as you learn them. How does this all
work? Process of learning involves two steps, [NOISE] understanding
and remembering. First, you have to get the
information into your brain, and seconds you have to retrieve that information
when you need it. On Day 1, we'll [NOISE]
start with structuring to help us understand
new topics. Then on subsequent [NOISE] days we'll combine
teaching and mixing to help deepen our comprehension of even the most complex topics. After we understand
the information, it's time to remember. We'll mimic how the brain
actually works [NOISE] using spacing and testing to
form long-term memory. For your class
projects we'll build a calendar together
to keep ourselves accountable and overcome roadblocks such as
procrastination, distractions, and
lack of motivation. We've also prepared a
downloadable guidebook with practice exercises
that you can always rely on for direction
when you feel lost. By the end of the study week, you'll have acquired
practical strategies rooted in science to study smarter along with a system that encourages learning
beyond the classroom. We can't wait to study together. Let's get started. No matter where you
are in your education, this class is designed to
re-frame how you approach studying to build lifelong
learning systems. This class is for you if you're an overwhelmed
high-schooler who spends countless hours rereading
the same material without improving your grades, if you're applying to professional school
and want to build those sustainable study habits for your rigorous
training ahead, or if you're just
nervous about studying again because you've been out of school and you feeling rusty, our framework will equip you
with strategies, techniques, and methods to
streamline this process. [MUSIC]
2. Week Overview: Your Calendar: One thing we always
like to say is that if you don't approach
your work with a plan, then you're planning
to procrastinate. In this lesson, we'll plan out a calendar to stay organized. I'll also introduce
the class project, which is a workbook you'll
find in the resources below. Throughout this course, we'll be using the
workbook to apply the strategies ourselves to prepare for medical board exams. You can watch just to see
our thought processes, but I highly encourage you to download the workbook and follow along by applying the skills for upcoming exam of your own. This class is designed to
empower you in seven days, but you can go at your own pace. Now, the first thing
I schedule into my calendar are non-negotiable
things in my life. These include things I
enjoy doing or known obligations I cannot miss despite all the
work I need to do. For example, I'm watching Shang-Chi with
friends on Thursday, I have a hot date this evening, and a haircut
appointment on this day. I got to look fresh.
Then I'm helping dad with some housework
over the weekend. School should not
take over your life, but you also need to carve
out ample time to study. We want our time to be balanced, and this is why the schedule
also needs to be fluid. If an entire day is blocked
off for an obligation, say attending your
sister's wedding, then make sure you free up time later in your
schedule for work. If you consistently realize that the understanding
phase of learning takes longer than expected, adapt your schedule
moving forward. Be flexible and stay balanced. Now I'm going to
schedule school, work, and lectures and then give
myself some time to study. Also give yourself
10-15 minutes in the morning to watch
one of these chapters, maybe while you're
drinking your coffee. Lastly, make sure to
schedule in meals, exercise, and most importantly, sleep. More on that later. Keep in mind that a
top-performing student isn't the one that
studies 10 hours a day, rather it's the student that
has a balanced schedule. This includes time to study, time to recover, and
time to enjoy life. Planning helps prevent
procrastination. It removes any doubt
about what you need to be doing so you can stay
focused while you work. It also motivates you by providing a reason to
wake up in the morning. But most importantly,
it keeps you on track to becoming a
lifelong learner. Now it's your turn.
Flip the calendar in your workbook and let's plan out the seven days you'll
spend with us. You can go at your own pace. Things get busy and life
happens, we get it, but I'd recommend not
taking too much time off in-between lessons because
they do build on each other. Here we've outlined seven days
for you and it's up to you to fill in the
actual date to which you plan to complete
it at the top, then you can begin
to schedule in your individual tasks
and activities. I'm going to start off
by using today as day 1, which is December 27th, 2021. Start by scheduling in your non-academic
responsibilities first. Get in the habit of
scheduling in fitness, self-care, and hobbies, and making it a part of
a balanced lifestyle. I prefer exercising
in the morning and winding down in the evening
with some leisure hobbies. After that, scheduling
a morning routine and a night routine. Give yourself at least
half an hour to an hour in the morning and night to either wind up or wind down for bed. Then schedule in about 15
minutes of Mike and Maty time, so you can go through the designated lesson
for this course. Finally, schedule
in the studying or productive work that you
plan to do for these days. You can be as detailed as you
want for this by the hour, by the time of day, however you want to do this. We encourage you to plan out your seven days before
starting the course. Proper planning is
crucial for success. Definitely post it on the
project page and share it with us and the rest of
your classmates to keep yourself accountable. In the next lesson, we'll
start discussing how the brain works and the
science behind learning.
3. How the Brain Learns: In school we're often
told what to learn, but ironically we're rarely
taught how to learn. I was always able to
get by with a hard work ethic up until
medical school. The information just
came so quickly and I was struggling to keep
up so I had to adjust. There was during this
time that I realized how important it
is to study smart. Learning how to learn
changed everything. Let's use sports as an example. I was a swimmer in high school. I wasn't exceptionally
good at the sport, but I was able to compete
because we had dedicated coaches who taught us
how to train properly, how to warm up, how
to avoid injuries, how to improve my form, even what I should
eat before and after practice to ensure
that my muscles would benefit from the workout. We learned strategy, techniques and
methods for success, but my school teachers
never did that for me. Focus was always on what I
should study for the test, but not exactly how I
should study for it. Reflecting back on that now, it would be like my swim coach saying we have a race next week, so make sure you're fast
and strong enough to win, and the rest is just up to you. I think a lot of students
don't understand that academics work in the same way. But rather than
training our body for agility and endurance, we're training our brains for retention and concentration, so that's the first
important idea to understand as you continue
through this class. Being an academic student is like being a knowledge athlete. Let's use another
sports example again. Basketball. There are two
steps to scoring points. First, you receive the ball
and then you shoot the ball. Obviously, a bunch of
things can happen in between like dribbling
and stealing and passing. But in the simplest terms, you receive the
ball and then you deliver that ball
into the basket. Learning works the
exact same way. There are two steps to
scoring points on an exam, two steps to solving a problem. First, you have to get that
information into your brain, and then you have to retrieve that information from your
brain to solve problems. A bunch of things
happen in between like forgetting and memory
consolidation, but at the end of the day, learning involves
information going in and information
coming back out. We call the first step, that is, information going
in, understanding. [NOISE] This step
involves making sense of the information
we absorbed. How do things work? How are they related to
one another and how are they organized?The second step, information going out,
we call remembering. Can you recall what
you've stored in your memory to solve
problems? That's it. The simple two-step process of how our brains are
wired to learn. We can't skip one or the other. A balance of both steps are equally important for
effective learning. Knowing this, there are two big mistakes that
students often make. First mistake is spending too much time with the
understanding phase. These students will watch a
lecture multiple times or reread their notes 3,4 or
five times over again, praying that the
information finds its way into their
brain and stays there. But they don't spend enough time remembering or retrieving
the information. They don't practice applying
what they've learned, and so that information doesn't
stick and it's forgotten. If you think about
how you're actually going to be tested, you weren't given
notes to reread on the test yet for some reason, that's how most students study. Instead, you're given
questions that can only be answered if you remember
what you've learned, so it's extremely important
that you find a balance in both steps and spend enough time on the remembering
phase of learning as well. The second mistake is
trying to remember information before
understanding it. These students go straight
to making flashcards, just try and memorize as
much as they possibly can, and they do so without
really understanding what the information means or
how it all fits together. Just because you can recite every mathematical theorem in your textbook word for word, it doesn't mean you
know how to apply them, but if you invest the time to deeply understand the concepts, you'll have an easier
time remembering the details because you can often reduce the answers by thinking logically
about the concepts, so be sure to balance
your efforts between both stages of learning,
understanding, and remembering.
4. Day One: Structuring Connections: Welcome back. It's Day 1
in our seven-day journey. Today we'll begin covering the first portion of the
understanding phase. This lesson we'll focus
on using structure to organize your studies for
better comprehension. With this knowledge, you'll
be able to learn new ideas quickly and complex
topics thoroughly. The most important factor in understanding
information is making connections or associations and relating that information to
something you already know. A lot of people
think that [NOISE] when you learn something, the brain files it away on a bookshelf or a filing cabinet, but this is not
the full picture. It's actually less like
a filing cabinet and more like a web or even
branches on a tree. A filing cabinet implies
that all of our knowledge is divided and separated
into individual silos. But if you think about how
the brain is actually wired, it's a vast network of
interconnected neurons. Knowledge is stored in
webs of associations. Every time you
learn something new about, let's say Japan, you take that piece
of information and attach it to the web so that it's connected to all the relevant
knowledge surrounding it. This is all the knowledge you
already knew about Japan. When I think about Japan, I'm not just thinking
about the country. My brain automatically pulls
up associations about sushi, Robin anime, Mount Fuji, samurai and so on. If we retrieve information from our brains in these
clusters of ideas, the best way to understand is also by learning
through association. This is why we want to avoid memorizing standalone
details early on and instead focus on making connections
between concepts. So how exactly do we make
connections within our studies? Well, there are many ways. I'll define a few that I use with examples from
my medical lectures. We have compare and contrast. Compare the similarities and differences between
different concepts. For example, Crohn's disease and ulcerative colitis
are both diseases that affect our intestines. On the outside,
they look the same. But knowing the differences
between their pathology and their histology will help me decide between the different
treatment options. We can use part and whole. Here you try and break
down big ideas into their most basic components
to see relationships. For example, our shoulder has many different
muscles and tendons. By understanding the
range of motion of all the individual flexors
and extensors movements, we can deduce which of the many shoulder muscles and tendons are actually injured. These are all ways you can use structuring in your studies. Structuring allows us to categorize information
within a framework, giving our information,
well, structure. For example, when you're
reading a textbook, the table of contents
is the author's way of organizing all of
that information with structure using part
and whole to describe how all the chapters fall
under the umbrella textbook. In this case you are
borrowing structure from another person who is an expert, but learning how to do this for yourself can also be
extremely helpful. Our method for doing this is called the T-tree framework, and it's something
that we've also talked about on our YouTube channel. It's called a T-tree because all its parts start with a t, topic, titles,
terms, and tables. To build your tree, you
start with a topic, which becomes the
trunk of the tree. When you're taking a class, usually each lecture is
on a separate topic. When you're reading a textbook, usually each individual chapter
covers a different topic. When I'm learning new content, my goal is to make a separate
tree for every topic. For example, in medical school, there's the topic of cardiology, there's gastroenterology,
and there's microbiology. If I just look at the
table of contents, each of these have
their own chapters and each have their
own lectures. I encourage you that when you're building your tree to
study for an exam, you can borrow the outline
of the topics from your professor's syllabus or
straight from the textbook. You can copy the exact
structure they use. You don't have to reinvent
things from scratch. That was the topic, making
the trunk of the tree. Next you add the titles, which will be the
branches of the tree. The titles are referring to the different sections
within the topic. If you look in your textbook
or your lecture slides, you'll see that titles
are what divide the sections of each
individual chapter. If I'm making a tree on the
topic of gastroenterology, my branches of gastro
will be all of the individual organs of
the digestive system, the esophagus, the
stomach, the pancreas, gallbladder, liver,
intestines and so on. Moving right along,
the next part is the terms which will be
the twigs of the branches. If you look again at your
chapters and lectures, the terms are the bolded words, the key terms that you have
to know from each section. If I were to look at
the liver branch, the twigs would be the individual
diseases of the liver, like hepatitis, cirrhosis, hepatocellular carcinoma
and that sort of stuff. Finally, the last part of
the T-tree is the tables, which will make up the
leaves of the tree. These are all the
nitty-gritty details that you have to memorize. Going again off of our example, if I'm using the
twigs cirrhosis, as an example, tables are the details about cirrhosis
that I need to memorize. Some examples, tables
can be a list, like a list of
causes of cirrhosis, alcoholic cirrhosis,
NASH cirrhosis, viral hepatitis, or
Wilson's disease. Tables can be a process, like what are the steps
to treating cirrhosis? That's something I
just need to memorize. Tables can be a
comparison chart. How is one type of cirrhosis similar or different
from another? Keep in mind that while
you're building your tree, the leaves aren't the focus. What's important
are the branches. How the concepts relate
to each other is more important than
the ideas themselves. You can always come
back later and memorize the details
of the leaves. Another strategy similar
to T-tree is mind-mapping. With T-trees, you're borrowing the organization
from the textbook or your lecture slides, but with mind-maps, you're now trying to understand the relationships more deeply. You start with a
topic in the center, and from there you can draw relationships between
different topics. Mind-maps work well even without much texts, use sketches, different colors, and
arrows to help you understand the relationship
between concepts. The goal is to make connections. You might think that
these techniques, T-tree and mind-mapping, or making connections in general don't work well for
subjects like math, but on the contrary, they are quite powerful. The way math, physics, or chemistry works is that the topics build
upon one another. The more math you know, the easier it is to learn more math. A lot of students spend
time trying to memorize the steps it takes to
solve a math problem, but they don't take
time to understand how different math concepts and theorems relate to one another. What is calculus? Why do we learn calculus? What are derivatives? How are integrals
different from them? How does Ohm's law
compare to Watts law? Working through these logical relationships instead
of using them for plug and chug makes
understanding much easier. We've just talked about many different
structuring strategies to help you understand
information. The stronger your associations are when you first
learn the information, the less time you'll
need to spend reviewing them later on. Getting better at structuring
your knowledge is a skill that takes
time and practice. One of the best
ways to do that is to make meaningful notes. You can see on the
left what my notes used to look like compared to what they've evolved into
over time, on the right. Although I used to
have some kind of organization topics and
subheadings and so on, it doesn't actually reflect my thoughts or the way that
my brain relates information. Our brains tend to store info
and webs of associations more like a mind-map rather
than this wall of text. The other improvement
here is that my notes have
become more visual. Pictures are worth 1,000 words. Instead of literally
writing 1,000 words, I've moved towards structuring my thoughts with
arrows and diagrams. Notes are meant to be
quick and easy to review. These old notes on the left
would take a lot longer to read through word for word
compared to this mind-map, where I can just quickly
see how concepts relate to each other by briefly glancing for a few seconds. Next time you make notes, try this more
minimalistic approach. You're not trying to rewrite the entire lecture,
that's really passive. Try to actively structure the information in a way
that makes sense to you. Reduce the number
of words you write, group ideas together, use more pictures and
visuals in practice. In the next chapter, we'll
talk about techniques to help you understand even deeper. [MUSIC]
5. Day Two: Deepen Comprehension: Yesterday we talked about using structuring
for understanding. Now let's talk about one
of the best techniques for understanding,
which is teaching. Teaching is an active way of learning because when
teaching someone, we help them learn
the material by portraying our own
understanding of it. Teaching also forces
us to repackage the messy association webs in our minds into something
more comprehensible. If you can't teach a
concept to someone else, then do you really
understand it? Teaching requires you to put
ideas in your own words. Our brains must process the
concepts well enough to be able to both explain it and
to answer questions about it. When teaching without
notes to rely on, a good approach is to
visualize your T trees and branches and teach according to that mental structure that
you've built for yourself. Here are some tips to
strengthen the teaching effect. Teach to someone
outside of your class. This prohibits you
from using jargon or specialized
terminology and forces you to use simpler language. Teach a child. A child is very curious and
will constantly ask you why. The more you ask yourself why, the further you break
down ideas into their most fundamental
parts and the more you understand the
concepts at a basic level. You can even teach your
friends and family at the dinner table if
they're willing to listen, but you don't even have
to teach actual people. You could also teach
yourself in the mirror or your dog or a stuffed animal. You also don't only have
to teach by speaking, you can also write
or type it out. Take out a piece of
paper and see if you can draw out the T tree from the previous lesson for your
topics straight from memory. That's how you should
think about teaching. Now let's dive into the
actual teaching techniques to improve our understanding. First is the
whole-part-whole method. When teaching, sometimes your students will
not understand what you taught because you
get too lost in the weeds. For example, the Krebs cycle is extremely tedious to
look at, where to begin. Using this method,
we would first anchor our students
to the whole, the big picture idea. Follow it up with
a part or detail, and then relate that
part back to the whole. For this example, I would identify the whole
of the Krebs cycle. It's important for
energy and survival. Then I would follow
it up with a part covering several key
reactions of the cycle. Then I would tie it back to the whole showing why the details matter to
the big picture. This provides your pupil with a well-rounded perspective
of this complicated topic. Having a crystal clear
T tree or mind map of your topics makes teaching
in this way incredibly easy. Next is the Feynman technique. To use this method start by explaining a concept to yourself by writing it out in a mental
model or structured tree. Once you're finished,
take a moment to reflect on your
explanation for clarity. Then repeat the explanation
but simplify it, and then repeat this
approach until you have a well-refined and
succinct version. This is not an easy task and often requires many iterations. The most important goal using the Feynman technique is to identify gaps in your knowledge. If there were struggles with explanation
or simplification, then we can go back into
our studies and address these shortcomings in
a more focused way. Now we've covered two
very effective ways to use teaching in the
initial phase of learning. In the next chapter,
we'll discuss how mixing can be a powerful
method for understanding.
6. Day Three: Mix It Up to Get Unstuck: This is Day 3 of our
journey, and in this video, we'll be talking
about how to use mixing [NOISE] in the
understanding phase of learning. The idea of mixing involves
a two-step approach; learning from multiple
different angles and learning multiple
topics at once. Let's first talk about
learning from multiple angles. To explain the
benefits of mixing, let's once again use a sports analogy,
this time, baseball. Let's say that you want
to improve your swing. You bring up the pitching
machine and practice hitting ball over
and over again. The best way to actually
improve your game is to hit all different
types of pitches. If you only practice
hitting fast balls, then you only get better
at hitting fast balls. But there are other types
of pitches as well; slow, curve, granny toss. In order to improve
your overall batting, you have to practice all
the different types. This idea also
applies to studying. In order to improve
our understanding and problem-solving skills, we need to approach the material from multiple different angles. What are some other ways that we can diversify our studies? We can consume multiple
resources on the same topic, attending lecture
and listening to your professor is just one way. Read about it in a
textbook, Wikipedia. [NOISE] watch YouTube
videos about it, form study groups and
teach one another, work with a tutor, take
a test prep course. Next, let's talk about mixing to learn multiple topics at once. I'll return to the
baseball analogy to explain this as well. To be a well-rounded player, you have to practice
catching and throwing and running in addition
to just batting. The best way to train all of these skills is to
practice each of them every day as opposed to practicing only one
of them each day. For example, if you
practice batting today but you don't hit a ball again
until four days from now, any progress you
made will be lost. Instead, you should
bat for an hour, then catch and
throw for an hour, and then go for a run. Mixing your studies
works in the same way. Instead of studying
Chapter 1 today, two tomorrow and so on, study multiple topics a day. Better yet, breakup study
blocks even further. If you study in
three-hour blocks, don't study Chapter
1 for three hours, then Chapter 2 for three hours, and then Chapter 3
for three hours. Mix them all together. Study all three chapters
in each three-hour block at the same time to stay
sharp on all of the content. How would this look like on a
day when you attend school? Well, first preview the lecture the night
before going to class. Then go to class to get
exposure to it again. Then immediately after class, quickly skim over
everything once again. This can help solidify
everything you covered. We've now covered the
three important pillars of the understanding phase. Starting tomorrow, we'll start diving into the
remembering phase.
7. Day Four: Spacing & Timing Revisions: Yesterday we finished off all the chapters about
understanding information. Today, we're going to begin with the remembering phase and start with a strategy called spacing, also known to many students
as spaced repetition. How does this work? It's extremely
difficult to remember every detail about something
after only seeing it once. But after the second or third
time it becomes easier. The question becomes,
how many times should we review
it, and how often? This all depends on
the science of memory, which can get very complicated. To make it simpler, I'm
going to use an analogy. I like to think of remembering different types of topics, as different types of plants. Some plants need more
water than others, some plants need less, but just because one plant
needs more than another, doesn't mean that
we should give it all the water at once. Because over watering our plans doesn't help them
grow any faster. Some plants need to be
watered several times a week, and some need to be
watered only once a week. The key is to find the optimal watering schedule in which our plans can thrive. Memories work in the same way. New memories fade
a little faster, compared to older memories
that we've already recalled and applied
multiple times. The reason why spacing
works so well, is because it mimics the
signs of memory decay. The more times you
review something, the longer you can space
out the next review. This means that for
something you just learned, you may have to review
it again the same day, to make sure it sticks. Then you can gradually
space out the next time you review it
until tomorrow, and then maybe three
days later and so on. Something that you've known for a long time can be spaced out even further to several
weeks or even months. Now to give this more contexts, the opposite of
spacing is cramming. You've probably heard
of how some people pull all-nighters, and cram right before the test. You may have even
done it yourself. While you can squeeze a lot of review in a
short amount of time, you aren't allowing adequate
time between reviews, for your memories to mature. Because remember, over watering your plants don't make
them grow any faster. This is why cramming
for a test is a terrible idea for retaining information
for the long term. That was spacing in a nutshell. Now let's discuss some ways to implement spacing
into our studies. First, you'll need to break
down your curriculum into digestible pieces that
are easy to review. If you use the T-tree from
our previous lectures, then these would be the
leaves of the tree. As an example, in medicine, we make flashcards and
put individual details on each card so it's easy
to quantify our reviews. You could also consider breaking down your
curriculum into individual topics or
problem sets for review. Once you've broken
down your curriculum and identify the leaves, you'll need to create
a spacing schedule. The most basic way would be
to use a shoe box method. If you're studying
a schedule that has many leaves, like medicine, for example, then
keeping track of the spacing schedule
can get very tedious. To solve this issue, I recommend using a
computerized algorithm to manage the schedule for you. Maddie and I quickly
realized that, letting software handled
the spacing schedule allowed us to focus on our work, without the hassle of keeping
a track of when to review. This inspired us to build
our own App called RemNote. It's basically a
note-taking App that automatically turns your
notes into flashcards, and then schedule your
review sessions for you based on how well do
you know each topic. If you're interested,
it's free to use. You just go to RemNote.com
and make an account. There are other options out there that you can
explore as well, but the bottom line
here is that you want to outsource all the
hassle of spacing, to a programmed algorithm. All you need to do, is plug in your info and you
can just start studying. For subjects with fewer
but more complex concepts like math or computer science, flashcards can still be
very helpful for you to remember how the ideas
relate to one another. You'll also need to find time
to do practice problems. Spacing can be helpful
here if you use a retrospective revision
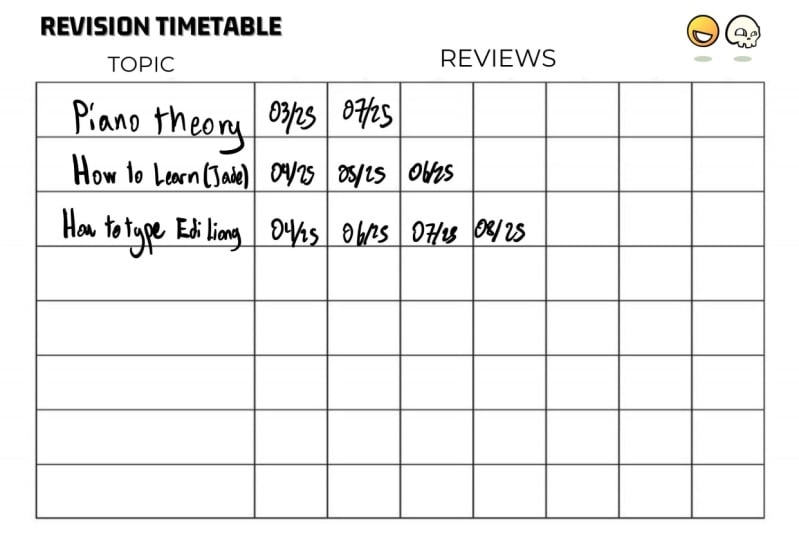
timetable. This is how it works. Now let's go over the class project portion of this lesson. In your workbook, flip to the
revision timetable sheet. Here we'll use this
template to identify our strong and weak
points for our studies. Using this knowledge,
we can then guide our studies more effectively, and dedicate more time to
areas that need review. Our retrospective revision
timetable is unique, and divideed into two columns. In the left column, fill in all the topics you need
to review for your exams. You can organize
this as Lecture 1, Lecture 2, Lecture 3, by chapters or topics,
like cardiology, gastroenterology, etc, however you want to organize
your studies is up to you. In this example, I'm
just going to use lectures 1 through 5. Now that you have the
left column filled out, pick some topics
to study that day. Today, which is December 27th, 2021, I'm going to review
lectures 1, 2, and 3. In the right column
where it says Review, I'm just going to
put today's date, next to lectures 1, 2, and 3, at the end of the day, since this is a retrospective
revision timetable. I'll go back to my
worksheet and color-code, how well I feel I've
mastered that information. For example, maybe
lecture 1 was easy. I highlight all of my
easy lectures in green. Two was difficult. I'll highlight it in red. Three was also easy, so it gets green. Now tomorrow, I'll
have lectures 4 and 5,and since 2 was
highlighted in red, I'll also review 2 again. At the end of tomorrow, let's say that 4 or 5, we're sort of challenging, but not super difficult. I'm going to highlight
them in yellow. Lecture 2 is getting better, but I'm not fully confident yet. I'll also give it yellow. I'll continue this
revision method every day until all of my lectures
become green for easy. I love this method of revision, because it categorizes
our studies by strengths and weaknesses. I can also visually see the
last time I reviewed a topic. Say for example, that lecture 1, I initially labeled green. Five or six days go by
without retouching it. The benefit is that
I can visually see how long it's been since
I've studied lecture 1. Maybe I'll throw it back in the queue for my
next study session. Not only does a revision
timetable help you organize what you
need to be studying, It also lets you see how many times you've
reviewed each topic. In today's chapter,
we've covered many different ways
to use spacing, to remember information, using technology to help you keep track of your
spacing schedule, is a great way to
save time studying. Tomorrow we will
explore techniques, to help us better remember
what we've learned.
8. Day Five: Active Learning & Testing: Welcome back. Yesterday, we started talking about the remembering
phase of learning. We talked about using spacing. Today, we'll talk about testing known by many students
as active recall. Testing is exactly
what it sounds like. You're testing yourself to
see how well you can remember the information without the
help of any hints or notes. You can do this with flashcards, practice problems, past
papers, practice tests. It's incredibly
powerful to combine testing with spacing
using flashcards. This is the preferred method
for many medical students, but you can also space
out doing problems for specific chapters or by practicing essays
on certain topics. You could also form study groups where you quiz each other. As long as you don't rely on notes and come up with
the answers on your own, you're getting the
benefits of testing. We already have a video
on YouTube that will give you 12 ways to test yourself. I can link it down below
if you want more ideas. The most important aspect of testing is to evaluate
your performance. If you forget something
or you fail to recall some thing or you
get a question wrong, you have to figure out why. Otherwise, you'll keep
making the same mistakes. We've had students who
just go all out and do three practice tests all in a row and then check
their answers at the end, and then quickly
realized that they got the exact same questions
wrong on every test. How they actually
stopped between each test to check their
answers and figured out why the wrong
answers are wrong and why the right
answers are right, then they would've
seen some improvement. Now, let's get
specific about how we can approach
practice problems. The reason why testing is so
important is because we're studying exactly as
we are going to be tested on the day of the exam. We don't learn by watching. We learn by going
through the motions. I can't learn to
shoot free throws by watching Kobe
Bryant at the line. I need to physically
go to the court with basketball and practice. The same goes for learning. I can't learn something
by re-reading my book over and over and over. My exams are all closed book, so I have to test myself
without peeking at my notes because that's how I will be assessed
in the real-world. Now, let's get
specific about how we approach multiple-choice
practice problems. Many of your future
exams will be multiple choice and as such, it's best to prepare for them by also doing practice problems. We want to prepare the exact
same way will be tested. We'll be using our
systematic approach to multiple choice questions, which is as easy as ABCDE. We've also included
the framework in your workbook so you can
refer back to it at anytime. For this example, I've
pulled up a question from the USMLE Step 1 Exam. It's straight from their
free practice tests. So I'm not breaking
any rules here. Let's go ahead and use the ABCDE method to answer this question. Starting with A, here's the question and A
stands for Align. Align yourself to what the question is
actually asking for. This step is crucial, so you don't waste
your time reading or re-reading a question without knowing what it's
actually asking. Our approach here
is to first read the last sentence of
the vignette first, then quickly skim
the answer choices to orient yourself to what type of question it is and what type of answer
choices are available. Going back to our example here, let's go ahead and read and highlight the last
sentence of the vignette. Which of the following nerves
is most likely injured? Then I'll skim the
answer choices. As I expected, they're all different nerves,
common fibular, femoral, obturator,
surreal, and tibial nerves. Already just by
reading the vignettes and skimming the answer choices, I know this vignette is going
to give me some clues about sensory or motor loss or something that points
towards a particular nerve. The next step is B,
which stands for bold. Now, it's time to go back and read the vignette
start to finish. Now that we're aligned
to the question, we'll bold or highlight
any important numbers, buzzwords, or clues that might point to a particular
answer choice. Starting from the top,
a 14 year old boy is brought to the emergency
department after being hit with a baseball bat
on the lateral side of his leg immediately
below the knee. I think that might be important. So I'm going to highlight
lateral side of his leg immediately
below the knee. He is unable to
dorsiflex his foot. That's probably going to be the most important piece
of evidence right there. Then we have the last
sentence of the vignette. Now that we've read the
question, we move on to C, which means cross out or
process of elimination. To do this, we're going to treat each answer choice as a
true, false question. Remember that an answer choice
that is 99 percent right, but one percent wrong
is still wrong. If it's incorrect
for any reason, it's wrong so cross it off. Physically, remove it
from the blank field. Even if you identify
a true answer, make sure to go through all of the other answer
choices because some of these exams are
tricky and they asked for the single best answer, which also means that multiple
answers might be true. Super annoying, I know. Let's go back to our
example here and treat all of these
answer choices as true or false questions based on the symptoms
described in the vignette. Starting with A, the common
fibula peroneal nerve. I'm pretty sure this is the right answer because
I know that an injury to this nerve causes
an inability to dorsiflex the foot
or causes foot drop. But I'm just going
to continue on looking through all the other
answer choices as well. The femoral nerve is
incorrect because I know the femoral nerve doesn't cause any foot drop or issues
with dorsal flexion. It really just causes
some numbness in your medial thigh or
your lateral thigh. I'm going to go ahead
and cross that one off. Obturator nerve, I'm
also pretty sure it is false because this one doesn't have anything
to do with the foot's. I'm pretty sure just innervates your hip muscles and some
of your thigh muscles. I'm also going to
cross that one off. I'm honestly not completely sure what the sural
nerve is or even does. I tried to rack my brain has been a few years since
I studied Step 1 stuff, but this one, I'm not sure. I'm just
going to leave it there. The tibial nerve is probably also going to
be incorrect because I remember there's a
mnemonic and first aid about the tibial nerve or you can't tip toe or
plantar flexor foot. I know that one is the opposite
of the peritoneal nerve. Also, can't be right I'm
going to cross it off. That just leaves me
with choices A or D. Next is D, or decide. After, you've gone
through and crossed out all of the incorrect
answers that you can, hopefully, there's only
going to be one remaining. But if you're caught
in a pickle like I am here, you have to decide. Our recommendation here is
to just go with your gut. You've prepared well for
this exam and odds are, your inkling about
the right answer is going to be your best bet. Even if you don't feel
100 percent confident, don't second guess yourself
or overthink question unless you've proven to yourself that you are successful
second guesser. In this example here, my intuition is telling me that a common fibular
nerve is correct. I'm just going to go
ahead and decide. Press "Show Answer". Good. That would've been really embarrassing if I
got that wrong. Which brings us to
the last step E, which is evaluate
your performance. Obviously, this only applies to test prep since you won't be able to review your actual
tests for standardized exams. But as we mentioned
earlier in this video, this step is the most
important part of answering questions
because we want to improve on our mistakes. This is also why it's
super important for your practice problems
to have explanations, to know why the right answer is right and the wrong
answer is wrong. Which is unfortunate in this
example because the NBME doesn't post explanations
for these questions, but certain key banks
that I use like Your World or Ambas, they do provide explanations for questions and those
are very helpful. But in this case, since I
don't have explanations, I'm just going to
have to do a little detective work on my own. I'm just going to go ahead
and google sural nerve. Let's see. The sural nerve is a sensory nerve and the
calf region of the leg. Let's see what else.
What happens if the sural nerve is damaged?
That looks useful. Damage or compression
can result in burning pain and diminished sensation
or loss of sensation. This nerve passes
down the back of the knee along the
outside of the lower leg. If I go back to the question, when it says that
this boy was hit on the lateral side of his leg
immediately below the knee, not the back of the knee. That would have
distinguished the two, had I known that, but now I do. Thanks you evaluating
my performance. The last thing I want
to talk about in this video is how to figure out if you're a
good second guesser. Every time that you need
to guess on a question, and this only applies when you're practicing for an exam, I want you to make a
little note next to that question if you change your answer from what
you initially put. Then when you're evaluating
your performance in Step E, tally up all the times you
changed an incorrect answer to a correct answer or
an incorrect answer to another incorrect answer, or a correct answer to
an incorrect answer. You'll be able to visually
see how many times you change from right
or wrong or wrong to right and if the net sum of all of your guessing
favors more points, that means incorrect
to correct more. Well, good for
you. You're a good second guesser.In this chapter, we recover the importance of testing for
remembering knowledge. Tomorrow, we'll cover memory techniques to
improve retention.
9. Day Six: Long Term Memorization: Welcome back. Yesterday we talked
about testing. Today, let's wrap up the
remembering phase with a few of our favorite
memorization techniques. Keep in mind that memorizing helps us remember information, but it doesn't help us
with understanding. I only begin memorizing details after I have a firm
grasp of the concepts. But more importantly,
and I really want to stress this is that if you've invested the
effort to understand the information
using our framework, making those associations, then the information will stick
much better upfront. In most cases, you won't even need to rely on
memorization at all, but sometimes it's unavoidable. For example, in medicine, we get lists of amino acids or lists of drugs to memorize. This type of information
is difficult to firmly associate with
prior knowledge. For those cases we supplement
with memory techniques. The first technique
is called chunking, where we group similar
concepts together to memorize large quantities
of information. A simple example is how we
remember phone numbers. We don't try to remember
the entire thing in one long string of numbers. Instead we break it down into
chunks of three or four. A more specific example
from a medical studies is trying to remember all
20 of the amino acids. Trying to remember all
20 at once is difficult, but by chunking them into categories like essential versus non-essential amino acids or polar versus non-polar
amino acids, memorizing becomes a lot easier. I want to mention
that this method works well with a T-tree because we've already
structured concepts together by their associations. Next, let's talk
about mnemonics. Mnemonics make use
of acronyms or phrases associated with bits of information to
help us memorize. They are really helpful for
remembering concepts with seemingly no connection or concepts that require
a specific sequence. Let's continue using
the amino acid example, but let's also combine
it with chunking, since we've already grouped them together into categories. To remember aromatic
amino acids, I use the mnemonic PFTT because aromatic
makes me think of smell and [NOISE] might be a sound you make
when you rip bad one. PFTT would be the
mnemonic to remember phenylalanine, tyrosine,
and tryptophan. Here are a few other mnemonics from medical school as examples. You can search the internet for commonly used mnemonics in whatever subject
you're studying for, but you can also come
up with your own. The more vivid or the more
dirty you're mnemonics are, the easier they are to remember. Finally, we have
the mind palace, which is the most
advanced technique. The mind palace
involves crafting an elaborate story and using the details of the
story at associations. It's helpful to
base the setting of the story in a place
that is familiar to you, such as your bedroom
or your living room. A mind palace doesn't
necessarily have to occur in a real-life
setting like your room. You can use imaginary
settings as well, as long as you tell yourself
a compelling story. Are there a list of ideas or concepts that you
need to memorize? Is it a specific sequence? You can try to place
each item of what you're learning in specific
spots on the page. The more vivid and detailed
the imagery the better. Then later on when it comes time to remember
all these items, it should be as easy
as a walk in the park. In this chapter, we covered three different
memorization methods and once again, just to reiterate, because
it's so important. Memorization helps you with
remembering information, but it doesn't help you
with understanding. Now that we've covered all
the strategies, techniques, and methods for the entire
process of learning, tomorrow we can talk
about some skills that will help you stay
consistent with your studies. These are the ability to concentrate and to
avoid distractions.
10. Day Seven: Boost Concentration: By this point, we've
covered both phases of learning from understanding
to remembering. Now it's all a matter of
putting your tools to use. But how do you ensure that you'll actually get
your work done? How do you know that when
you sit down at your desk, you'll actually study and not watch anime or go on TikTok. Well, in this lesson we're
going to discuss how to train our concentration to stay
focused and avoid distractions. Just like how athletes train their endurance for
peak performance, we can train our concentration. But before we start
our focus training, let's make sure that
our environment is set up to be distraction free. This means picking
a study spot with no loud noises or sirens nearby, no people distracting you. You want a comfortable
seat with good posture, so not your bed. Instead, grab your
comfy study sweatshirt. Easy access to water
and a bathroom, and difficult access to your
phone and social media. Music also matters, and we have many videos on YouTube
diving into this topic. But in general, you want
to avoid distracting music such as those with
lyrics or melodies, or just study in silence. Now that you're settled
in, let's start training. Let me ask you, how long can you work before you
start to lose focus? The average student
can focus for around 25 minutes before their attention
starts to waiver. For you, it might be a
little more or less, but the goal is to increase that number as much as possible. The only thing we'll need for this exercise is a stopwatch, not a timer, but a stopwatch which most of us already
have on our smartphones. If you don't have one, then
flip through your workbook to the concentration chapter
where you will find a place to record your times. When you want to start studying, start your timer and go. When you notice that your concentration is
starting to break, you're reading the same
sentence over and over, or your mind is just wandering and you can't remember
what you've just read, then now's the time to
stop and take a break. Now stop your timer and check how long you were able
to stay focused for. Take that number and
divide it by four, and that will be how
long your break can be. If you feel your
focus return sooner, then go ahead and hop back into concentration and you can
start your timer again. Remember start your timer from zero each time you're trying
to increase that number. Over the next days and weeks, you should notice
that the amount of time that you
can stay focused for will get longer and longer before you
need to take a break. Now one very important
note with focused training is that you don't want to push through when you've
lost your focus. The best time to take a break is when you start to waiver, not when you're
full-blown tired. There are two big
reasons for this. The first reason is
that it's better to work at 100 percent
intensity for even just one hour
than it is to work for three hours but only at
50 percent intensity. This is highly inefficient
and you can easily burn out. The second reason
is that pushing yourself to the limits
of being completely tired requires much
more time to recover compared to taking smaller
intentional breaks. It's very similar to
lifting weights at the gym. If you push yourself to
the limit and tear muscle, you won't be able to lift
again for days or even weeks. You've done. But if you take
small breaks at the end of every set and never allow yourself to get completely
tired or worn-out, then you can get more
reps and each of those breaks will only
last a few minutes. Now you're studying and you've
decided to take a break. It's important to
keep yourself in flow even during your break. When you're studying
and you find your groove and you
get in the zone, so to speak, your brain
actually releases chemicals to allow you to
engage in this deep work. When you're taking a break, the goal is to maintain
this chemistry, oftentimes with continued
movement from your body. It's okay to allow your mind to relax, clear your thoughts, and relieve mental tension, but try to keep the
body in motion. Go for a short walk, or do some easy chores
around the house, or even just sit there and move your body through
deep breathing. It's like your mind and
body are a tag team. When you're sitting
down to study, you're using your mind
more than your body. But when you're taking breaks, your mind tags out to
rest and your body takes over to help
you stay focused. Now that you have a
training routine, it's all a matter of getting
your reps in every day. You want to make
sure that the time you've blocked off
on your calendar to study is actually used to
study and not be distracted. This all depends on your
environment as well as how well your concentration
muscles have been trained. Now let's discuss the class project portion of this lesson. In your workbook, there's a
page called Focus Training. I want to go over how to
use this sheet to record your sessions and track the
progress of your training. The page is simple and divided
up into three sections. On the left, fill in the date. Today is December 27th, 2021. Over time, you'll be
able to visually see your focus improve and how quickly it took
you to get there. Likewise, if you
notice a decrease in focus or stagnant growth, this is an opportunity to step
back and re-evaluate why. It's totally fine to have multiple studies sessions
in the same day. Actually it's encouraged. The middle column
is where you'll record the length of
your focus sessions. Remember, we're using a
stopwatch here and not a timer. This is the number that we
hope will improve over time. Finally, on the right
is the break column. This column requires
a little bit of math. Use the equation session
time divided by 4 to calculate how long
you should take a break for before
returning to focus. We've also included
this equation at the bottom of the sheet, just in case you forget, along with a legend about
what the columns mean. For example, let's say that on my first study session of today, the 27th, I was able to
study for 30 minutes. So I'll enter in 30 minutes in the middle column and then calculate how long I'm
going to take a break for. I'll divide 30 by 4 and calculate my break to
be 7 and 1/2 minutes, which I can fill in right here. Since I plan to continue
focused training today, I'll just enter in the same
date in the next line, and I'll repeat this process until I finish
studying for today. That's how you use the
focus training table. Feel free to share your progress with the class
where everyone can see the laser focus that
you've been training. With that, I want to
congratulate you on completing your seven-day
journey with us, keeping in mind that this
is only the beginning of your adventure towards
life-long learning. Join us in the next
chapter where we'll wrap up final thoughts and
send you on your way.
11. Bonus: Motivation & Procrastination: By now you should have all the
strategies and methods for a more effective and
scientific learning routine. You should also have
started training your concentration to ensure
that you get your work done. As you move forward
beyond our course, there are many roadblocks you might encounter along the way. I want to take this
time to address two of the most common ones. Those are procrastination
and motivation. Both of these mental roadblocks work in a very similar way. They both make it
very difficult to get started or to finish a task. Most people think that
in order to take action, we need motivation to do it. That we needed a
strong reason or some emotional inspiration
to make us take action. But in reality it's
not a linear process. I like to think
of it as a wheel. Yes, motivation leads to action, but action also
leads to motivation. It's a positive feedback loop. Instead of waiting
around for motivation, you can take action, and from that, get the
motivation for more action. The same with procrastination. Sometimes you don't feel like jumping back on the
wheel of action. You might be emotionally
distracted and thus procrastinate from
getting started or even finishing your studies. The answer here, again, is to take action
to ease you into it so that it helps you overcome
that activation energy. Taking action might sound
easier said than done. But if you think about it, we take action on things
everyday without thinking. These habits that
we've built over time have become effortless. Like brushing your teeth
or making your bed or going out of your way to the coffee shop to wait
in line to buy coffee. All of these things we can
do without even thinking, without any emotional
roadblocks. As you can see,
both motivation and procrastination are
highly emotional states. To overcome them, I've relied on highly unemotional practices
to help me take action, things like habits
and discipline. Here are a few more tips
to help you take action. First is to use friction
to your advantage. Make it easy to start
things you want to do. Keep your study materials
organized, have a dedicated, convenience study spot, figure out efficient ways to
acquire your caffeine. On the flip side, make it difficult to start things that you
don't want to do. Remove or lock while
your video games, put a really long password on
your TV streaming accounts, make that barrier to
entry really high. Second is to turn one big
goal into smaller tasks. The thought of having to read three chapters today
can be daunting. But don't think about
it in that way. Instead, break it down into
something more manageable. Instead of reading
three chapters, focus on just
reading three pages or even three paragraphs. More often than not, I find that after doing the smaller chunks, I've achieved enough
motivation to keep going. With that, I
encourage you to post your calendar in the
class projects section. Post it where we can
all see it and where all your other classmates
can see it too. Put yourself out there, take accountability and responsibility for
your own learning. If you catch yourself
slipping up some days, that's okay. Just keep going. You're not finished
when you stop. You're only finished
when you don't start again. Happy
studies, guys.
 Mike And Matty, Doctors, YouTubers, Music Producers