Transcripts
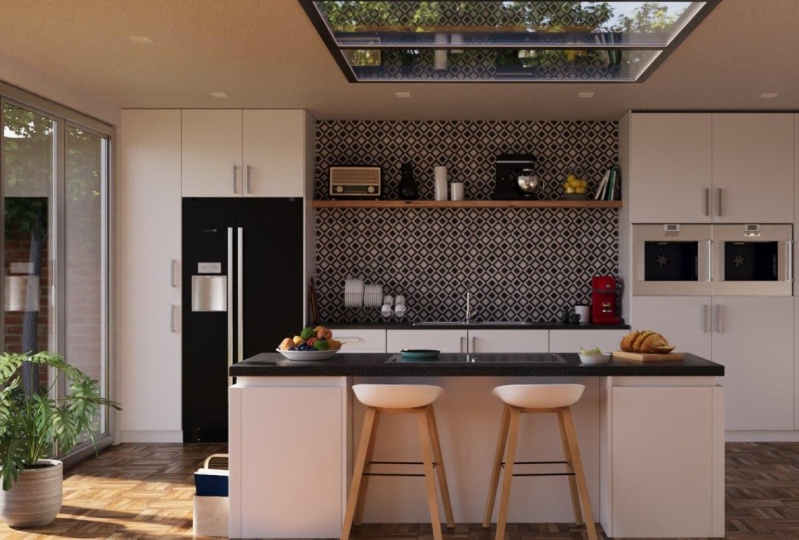
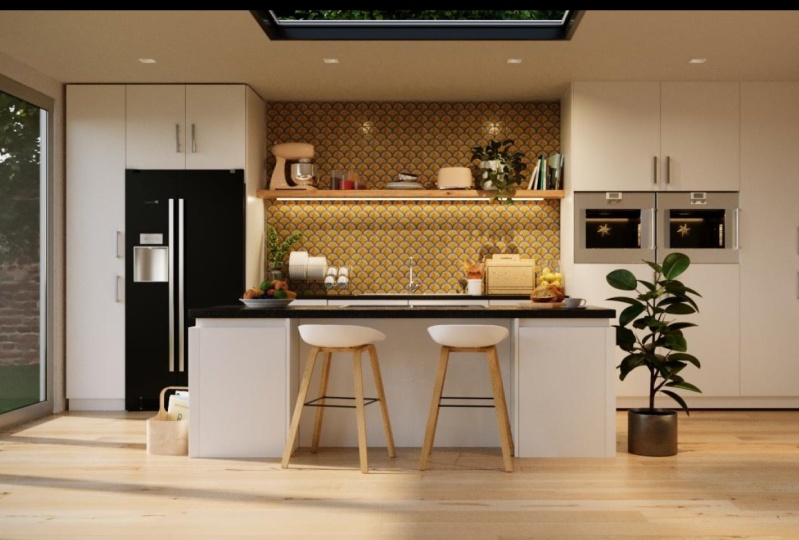
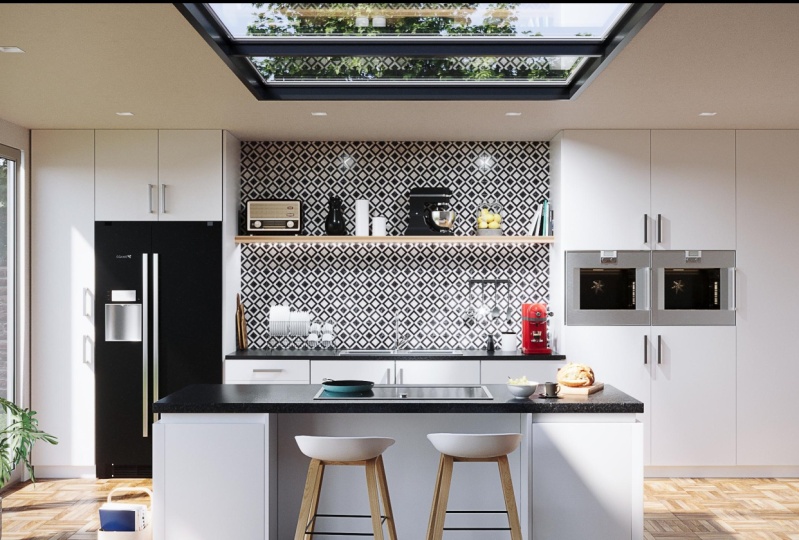
1. 3D Rendering for Interior Designers: Chaos Corona & 3ds Max for Captivating Visualizations: We're ready to create
your own photorealistic images just like this from scratch with the
industry standard tools for the S max and chaos corona, you can do it yourself. You'll learn all the
skills you need to render your own photorealistic images
from beginning to the end. This course is perfect for architects,
interior designers, freely IS or anyone passionate about freely design
and visualization. Whoever you are, a beginner
who wants a job in the architecture
or CGI industry, or an experienced professional looking to hone your skills, or you just want to create
your own images and portfolio. This class will teach you
everything you need to do it. You'll be joining
over 25,000 students. They have already
benefited from my courses, The skills you're
going to learn, and not just for interiors
and architecture, but the same skills I use
to create ads for press, furniture manufacturers, websites, and
illustrations for print. You don't need any experience. The basics of freely
estimates are covered. We'll start by creating
your own studio render for your portfolio in the first section will cover modelling and adding furniture. You'll be able to
light it seems like a professional and
create beautiful renders and detailed shots. And by the end of this course, you'll learn how to put this
entire scene together and be able to do the same for
all your future projects. So why take this course
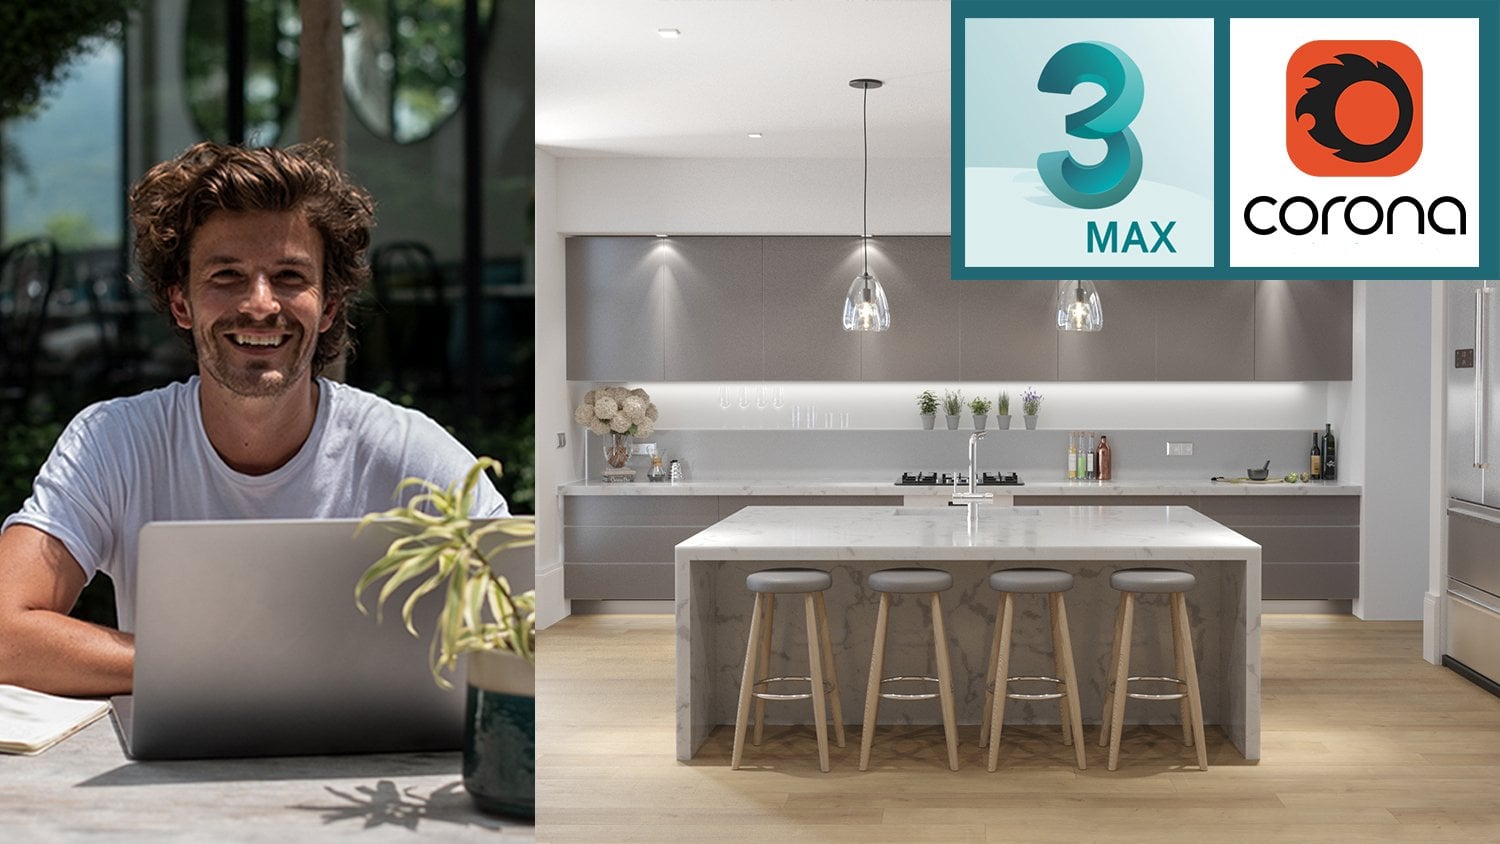
for me as a CGIAR is for over 15 years and
working with some of the world's most exciting
designers and brands on yachts, jets, architecture and adverts. Now at chaos, the
greatest of Corona, what this course is not
affiliated with chaos. I'm excited to share what
I know to help you master freely architectural
visualization and jumpstart your 3D artist career. I'm here to help if you
ever have any questions. You also get access to
the community group for ongoing group support and the newsletter to keep you
up-to-date with the industry. Every few years I create a course with everything
I've learned. And this is the next
installment, is a full workflow, making it the only
corona rendering course you need
to enroll now and take the first steps
towards transforming your passion into a
successful career. So click the enroll button
and I'll see you inside.
2. Discover Chaos Corona: Corona is a photorealistic
render engine used by top studios
around the world. And it's compatible
with the popular 3D modelling software for 3ds Max. And this powerful combination allows artists and designers to create stunning visuals
for a variety of projects. And whilst it can be
used for many things, it really excels in producing architectural
visualization with ease. It's developed by Chaos Group, the same company behind VRA. And the main difference
between the two of them is the ease of use that
corona provides. It was designed with simplicity
and flexibility in mind, making it an ideal
choice for artists who value a
user-friendly interface, a more streamlined
workflow and quick results without
sacrificing quality. Throughout this course, we're going to dive into the world of chaos Corona and
freely S max and explored various
tools and features to optimize your renders for
the best possible results.
3. Product Render Studio with 3ds Max and Corona Renderer: This is a product render, and today we're
gonna be creating our very own studio and
creating our own product shot. Once complete, you'll
be able to use your studio over and over again to render products
for your portfolio or for your clients. If you're completely
new to freely S max, then have a watch of the
introduction to freely S max tutorial to make sure you're
familiar with the basics. The first thing we need
is a product to render and lucky for us cast
cosmos is now included, but corona, and this gives us access to thousands
of 3D models. You should have the
corona toolbar up here. And if you don't, you can just right-click on an empty space and find the corona toolbar and just make sure it's ticked on. And this is where
we'll find tons of handy tools and we'll be
using it quite a lot. And here you'll find cosmos. And if you click on 3D models, you'll see what a model is
broken down into categories. And have a look around
here for something that you'd like to
use and don't worry about it too much as we'll
have our scene setup and you'll be able to jump in
and switch out your product. So I'm going to head
into furniture, chairs. And I like to look
at this chair. So notice this blue
button in the top right. This means we can download our asset and once
it's downloaded, we can just hit Import and
it's imported into our scene. And it's blue tick mark
means is now downloaded. So you won't have to
download it again. So you can import it
quicker next time. Using out in the middle
mouse we can rotate. If we want to make
our Viewport one, then we can click down here. I'm just going to navigate. I'm holding down the middle
mouse button to pan out, middle mouse to spin around
and zoom in and out. Is the middle mouse rolling. So I'm just going to
set our camera up and then let's hit
the Camera Plus icon. And that's going to create
a camera from the view. And then we can click Start
interactive rendering. And this is where we're going
to see are rendered image. And right now it's
completely black. And that's because we don't
have any lights in our scene. And there's a few ways
we can light a scene. But for this studio, Let's use a HDRI. So we're going to
open up cosmos. And if we scroll down, you'll find HDRI is in here. Now, HDRI stands for high
dynamic range image, and they're usually
360 degrees and they contain lighting
information that can be used to light our scene. And notice we have a studio tab, and these are all
of the studios that are included in Cosmos. And you can download
the one you want to use and just hit Import. And now we can see
our product rendered. And up next we're going
to have a little dig around in freely S max. And I know it can
look a little bit intimidating as there's
so many buttons, but they rarely is. You're likely only going to use around 20 per cent of
these tools regularly. So try not to let the
interface overwhelm you. Most clients will want a
pure white background, and we can easily achieve
that by opening up our render settings and
heading down to the same tab. And down here you'll notice single map and that
is where our HDRI is. And if we turn on overrides, you can see that we've
made the background completely black and we can
change the color of this. So let's make that pure white. Now our background is
white and you're noticing some catalogs that
clients are happy with completely white backgrounds
with no shadows. And the shadows add some
realism to the images. So let's take a
look at doing that. Let's head over to the Modify
tab and click on plane. And I'm just going
to open up the keyboard entry drop-down. And in length, I'm going to
put 1,000 and in width 1,000. And you can jump around
these dialogue boxes just by pressing the
up and down arrows. And then I'm going
to hit Create. And you can see we've created
a plane and now view. And now you can see some
really nice shadows. And we can see some
light bouncing up underneath the chair. To wrap up, we want to add
a material to this plane so we can open up the
material editor or press M on the keyboard. And this is where we can create
and manipulate materials. And all we wanna do is create
a corona physical material, which is over here. And you can also
right-click materials and corona physical material. Unlike the rest of max, there's tons of
materials in here, but you're only really
going to be using the corona physical material
about 80% of the time. If we double-click on this, we can see what it looks like. And I'm just going to
click and drag and drop that onto our plane. And just maximize the viewport. And you'll notice that the image expands to the size
of your screen. Here we have some tone mapping, and this is one of my favorite
parts of the process. And we can do tons
of stuff in here. But the one thing we really want to do in here
is just turn off the aces OT to make sure that our
background is pure white. Also nice is stop
and render button, currently the images rendering, and we'll talk about
this some more later. But just let your image
render until it looks good. So if you notice it
has noise on it, then just let it render
a little longer. Then all we have
to do is hit Save. And you can type in
your product name and type dot JPG at the end. And this will save
your render as a JPEG.
4. Architectural Modeling in 3ds Max: Crafting Walls, Doors, and Windows: Alright, so these
are our floor plans. And in this video
we're going to take a look at quickly
getting this modeled. And you can grab the resources if you want to follow along. And before we do
anything, notice we have the potential to accidentally move these floor plans around. So we can right-click and free selected
and then notice we can actually select our
floor plans anymore. So let's go to the Create Tab. And we're going to create a box. And we're just going
to click and drag. And we've created
our first wall. But the thing is we
actually want to be snapping to our floor plans. So let's delete this
box and turn on snaps. And you can do this
by pressing S. Or you can go up here and
click on snaps toggle. If you right-click on
it and notice that I only have vertex selected, and that means that our box, we're only slept two vertexes. And if we go to options, we have snapped frozen on. This is what we
want to be using. And we've got enabled
constraints on. So set up your snaps like this. And then when we click and drag, you can see we are snapping
to our floor plans. Now there is another way you can do this and that would be to select the floor plans and
add an extrude modifier. But I found that sometimes
reduces issues with the mesh and I prefer
to modelling myself. So I know that we
have a clean mesh. So let's change the height to 250 cm is that's the
height we want our wars. And we'll go to the Modify
tab and add an Edit Poly. I'm gonna go to Polygon, select and select this polygon. And now we can hold Shift, and this means we use
in smart extrude. And we can just click and drag and snap this
to our floor plans. And if you remember
the old way of doing this using
extrude from down here, this would take some time, so
this is much, much quicker. In the perspective view,
we can press F4 to turn our wireframes and select that inside face,
click and drag. And we're just going
to go around all of the wars and use smart
extrude to create these. Great thing about smart extrude is when we meet another
part of the wall that's actually going to
cleanly connect these edges. So we can turn off polygon mode. And there we have
our wolves, cows. Cosmos is an asset library that is available
since Corona eight. And in here we have thousands
of free assets that we can use. In the search. I'm going to just
search for Windows. And we're going to use these
windows so we can just click this blue button
to download the asset. And I'm also going to
download these for our doors. And then the green button
means we can import them. And now we want to rotate them. So if I select our
doors and rotate, you can see it's not
actually snapping. So let's undo that. And we can go up
here and turn on Angular snaps, or
you can press a. Now notice that we can
rotate 90 degrees. So over in the top view, let's move this into position. If you ever clicking and
dragging and you're struggling, you can press S to turn off
the snaps to line these up. And I'm gonna hold shift and drag these down
to make another copy. We're going to make
this an instance. And that means any of
the changes we make to one of the doors will
happen to the other. Then we can select
r balls again. And we want to select the
face underneath our doors. And then in the left view, snapped his arm by pressing
and holding shift. We can snap that to
the top of our doors. And you can see back
in perspective, that's made easy work of
mine and our doors up. Now let's create some floor. So I'm going to turn off
of polygon select tool, go to the Create
tab and select box. And in the top view, we can click and drag
and that's going to snap to our wars. And M, rather than
pulling it up, I'm actually going
to pull it down. And let's change the
height to -10 cm. And then for the roof, Let's go to the left view
and holding Shift and clicking and dragging and less snap that to
the top of our wars. This time we'll make a copy. And in the Modify tab, let's change that from
minus ten to 10 cm. So now we've got a roof. So let's select our windows that we wanted to
put in our roof. And let's rotate
this by 90 degrees. And also 90 degrees. This way. We can move these in
position using the snaps, but notice that we can't
snap the top corner. We're going to go to a
hierarchy effect pivot. And if we zoom, ma'am, we can send this to the top right of our windows turn-off
effect pivot. And this will now snap
to offload plants. And then in the last year, Let's pull this
up into position. And I want to leave a slight
overhang here as well. Alright, so now let's make
a hole in our ceilings. So I'm going to
select our ceiling. And back in the Modifier
Tab will add an Edit Poly. Select edges, and I'll just
click and drag, select those. And then we want
to connect them. So rather than
hitting connected, there would only be able
to create one connection. So if we click on the Set ends, Let's make that to pay, okay? Select averts. And then we're
just going to snap those to the edges
of our Windows. And let's do the same again. But the other direction. This time, notice
if I hit Connect, remembers descends
from last time. So we can select the verts
and pushed him over. This, just make sure
they're lined up. Okay. I think we can
actually pull these up here. Alright, they can get and
then we can just select that top face versus ALM holding shift the smart
extrude weeks and just pull it through and release. And that has created a gap for our windows
in the ceiling.
5. Illuminating Interiors: Add Ceiling Lamps to Your 3ds Max Building: Alright, next up, let's find
some lights from Cosmos. I'm going to search
for CNN lamp. And let's use these ones. I've already gone downloaded, but you may just
need to click in the top right and download
them and less important. And in the left view, let's get them positioned. So I don't want them
all the way up here. I want them to
slightly overhang. So I'm going to turn
off snaps per person S and just have them
overhang a little bit. And then in the top view, we do actually want
these to snap. So again, we'll go to
hierarchy effect pivot, press S to turn on snaps and we're snap that
to the top left. Then we should be able to easily snap these into position. Holding shift, we can
make an instance. As I don't think the lights
will be changing too much. And I'm actually going to
create free copies of that. Then holding Shift, I'll
pull this one down, make that an instance. And same again over here. Great, So we've got some
lights in our scene. I'm not sure like we did
with the salient windows we want to replace
for our lights to go. So selecting our
ceiling, Let's go back. And with Edit Poly selected, we can start connecting
some of these edges. And I'm going to snap
them to our lights. If you haven't got a selection
and need to select more, you can hold Control and
that will select the others. Now if we right-click
and hide unselected, you can notice we've now
got sailing selected, so we want to go and just
select where our lights are. We can tell us snaps as well. It's made this a Louisiana. And I'm holding control to keep our current selection and
select some more lights. I think I've missed that
middle one actually, so let's unhide all. I missed. I missed two
middle two of them. Let's connect four times. I can zoom in and snap
these into position. Great. We'll go back to polygon. Hide unselected. And lucky for us it keeps
that last selection as well. So we can just hold control. And we've selected
all of our lights. So now over in the left view, I'm going to turn off
snaps and holding Shift. I'm just going to pull
these up a little bit. I mean, if we unhide all, we can see the top
spot lights and just make sure they're
coming through. I'm not actually holding
Shift now a minute. I only hold shift for the
initial smart extrude. If we turn off polygons, we can see we now have a model. And just quickly before we go, another way that we
can add the loops, especially for
these lights, e.g. it's used something
called Swift loops. So with the ceiling selected, we can select Edge and then press out one
on the keyboard. And you can see we
can now create loops. And this is really handy. If you want to move these, make sure you've got snaps on and you can start snapping
needs e.g. to your lights. And if you want
to select a loop, you can just double-click it and it's going to loop select. So that's also a quick way to do what we just
did with the lights. I'm just going to
undo all of this. So whichever way you choose, choose which runs fastest, I find connection quicker. But that might just be because I was using Max before us
were Phillips existed. But do try so with loops and
if it works quicker for you, then you can do it that way.
6. Mastering Camera Setup: Capture Your Scene Perfectly in 3ds Max: Alright, next up we're going
to want to add some cameras. And there's two ways we can do this if we were in
our perspective view and we want to zoom in and
position our camera somewhere. We can go to create
corona camera from view. And if we click that
nice in the top view, we've created a camera. But soon as we have a camera
in mind, we can delete that. And we can actually go
to create corona camera. And then in the top view, I'm just going to click and drag and position our
camera like this. Then over in the left view. Notice that our
cameras on the ground. So I'm just going to
right-click move camera. And if we moved it up, nice that we actually have
a camera target. So we can undo that. And we're going to
want to select this camera target as well. So we'll hold control
and select that. And now we can move
this up into position. And I like to keep my
cameras somewhere between chest and head high as I just filled out some
more natural view. I like the photographer
is going to do, and I think we're
just more used to seeing images like that. So we go back to
the respective view and press C on the keyboard. Notice that we're actually
just looking at a wall. And that's because our
cameras behind this wall. So somebody who can do
in a situation like this is select our camera, go to the Modify tab. And if you scroll down in here, you will see environment
and clipping. So we can enable that. And we can turn up this near. If you ever turn up a dialogue box and it's going really slow, you can actually hold Control and it's going to
speed things up. You can see this line here, and this is, let's say
we put 1 m in here. This is 1 m from the camera. And then notice that we can actually see through this wall. So anything between here and here is actually
going to be clipped. So this is really
useful if you're, say you're in a
very small bathroom or you're trying
to get an angle. This can be a really
useful thing to use. But in our case, we
got plenty of room, so we don't actually
need to use that. So I'm just going to bring
our camera into our room. We want to keep things as
real to life as possible. And you'd expect the photographer
to be standing here. If they were photographer, if they were photographers, if they were taking
photos of this room. And we can also go up
to our field of view. We can turn that up and
notice if I pulled it up, you can see more of the room. It can be tempting to
do something like this, but really try and keep it
as realistic as possible. I think these wider views, they start looking a
little bit unrealistic, so on but saying
like 55 in here. And then using the
middle mouse button, you can start panning
around and just position your camera
how you like it. We can change this later
so it's not set in stone, but that's how you can
set up your camera.
7. Natural Illumination: Harness Corona Sun and Sky Lighting in 3ds Max: Alright, so this is our room and if we want to create
a render from it, we're going to need
to add some light. So one thing to note is if I run an interactive render
from the corona toolbar, you'll notice we've got a light up here and this
has been brought in with that cosmos asset
we pulled in earlier. So if we go to it in a
top view and take a look, we can just about
see that light and now let's select
that and hit Delete. And now we have no light in our scene
and that's what we want. One of the easiest ways to let our scenes is to use a corona, sun and sky, which again we can find on the corona toolbar. And I will have to do is click
and drag and pull it up. And we can see we now
have light in our scene. If we head over to
the Create tab, we can add the
current sky as well. Notice when we jump around
to different viewports, that is the view
that gets rendered. And that's not what we
want. We want the camera to stay rendering if we went in
the top view for instance, and we wanted to move to sun. So what we can do is
head to render setup, or you can press F
on the keyboard. And shortcuts are really
going to speed up your work. So I would get used
to using these. And then as we jump
around these viewports and notice the view
to render changes. So what we wanna do
is select our camera, make sure we got
corona camera in here. And if we hit this padlock,
it's going to lock the view. And now we can go into any other viewport without
disrupting our render. Something else we want
to do is let's just grab a ceiling, floor and wars. And in the Modified tab, let's change these
from green to gray just so we can see
a little better, make it look a
little less matrix C. Now if we select our
son and we move it around, we can see how that
affects our Render. And over in the left view. Sorry, that's made at
the left view, press L. If we move this up and down, notice that the image gets
warmer as the sun gets closer to the horizon and
the higher in the sky, the image gets bluer. So let's position this. So you've got some light
coming in through those doors. And that looks pretty
good to me for now. We can always adjust this
much like the camera, like nothing is set in stone. So feel free to play
around with this.
8. Corona Materials: Enhance Walls, Floors, and Ceilings with Materials in 3ds Max: So this is looking good. So let's get some materials on these walls, floor and ceiling. And lucky for us, cosmos has loads of
materials built in that we can use straight out of the box or we can modify
them if we need. And these are gonna be great for whilst we're
adding our lighting. So let's go to Materials. And let's go to reward category. And we have this
white wall here, which looks pretty good to me. I've already downloaded it. If you haven't, you
can hit download. And notice this drop-down arrow. From here, we can turn
on real-world mapping. Now, real-world mapping
is important as it gives us the ability to work using
units of measurements. And these match those
of the real-world, e.g. centimeters. And it
keeps the proportions of the model or the material
similar to the real-world. And it means we don't have
to worry about scaling. And this will make sure our
renders are true to life. This is blue dot, that means that
real-world mapping is on and that's going to remain
on unless we turn it off. And you can also
see here is 150 cm. And what this means is the
texture that's used is 150 cm in the real-world. So let's select our
walls and click Import. And then we're going
to see that material applied to our walls. And notice they look funny. They look a bit stretched.
And this is because we used smart extrude to stretch
out walls around. And that means the
mapping has gone awry. So we can fix this
with a UVW map. So we can find the UVW map by clicking on the
modifier list. And these are all the
modifiers you can apply to your objects. And there's quite a lot of them. But others, as I've
mentioned before, you're likely only use about
20% of these regularly. So don't worry too much, then get overwhelmed by these. The fastest way to
find something in this list is just pressed
the first letter, what you're looking for. And we can select UVW map. Before we continue,
you may have noticed these two buttons
I've got set up here. And this is because I use
these modifiers often. And it saves time by
having them within reach. And you can set
us up by clicking the Configure
Modifier button here. And you can see there's lots of presets you can choose from, or we can configure
our own modifier set. In this pop up, we have the
list of all the modifiers and we can add buttons
or remove them. Now ourselves to two. And when we have to do is come over here and
drag and drop. So I use Edit Poly quite a lot. And also its pressure. You open, missed it. There is. And we can drag that
onto our second button. And then you can just type in your name and hit
Save. And Okay. Then you can select
your buttons from the list and then
just make sure you have Show buttons ticked on. And then you've got these
quick access buttons here. Now back to our UVW Map. And currently this
is on planar and z. And this means the
texture is getting projected from one
plane in the z, which is why it looks almost stripy because it's
getting stretched down. And we need to do to fix
this is turn it onto box. And then we'll have
it projected out from a box on to all sides. And just confirm you've got real-world map size on as well. And if we zoom in,
we can start to see the texture tower at
150 cm on the wool. So let's do the same
for the ceiling. But as we've done this before, we can actually
copy this modifier by right-clicking
and hitting Copy. And then let's
select our coelom. We can paste this on. And back in Cosmos. I'm just going to hit
Import and we now have that material
on our cylinder. Now let's get a
material on this floor. And again, I'm going to
use the same UVW map. We haven't really modified the floor base just to make sure. So back in Cosmos. Let's go to wood floor him and select our floor quite
like the look of this one. So we can download this. And you can see we
still got real-world on and we can just hit Import. We'd say that come
into our render.
9. Optimizing Your Scene: Fine-Tune Sunlight and Tone Mapping in 3ds Max: So this is looking pretty cool depending on where your
son is in the render, it might start
looking too dark or bright and this is where
we can use time map him. I can't overstate
the importance of the sun on your environment.
And this is key. If you're lighting is
not looking right, then it's because you haven't
done this simple step. So just imagine you walk into a room and there's
no lights turned on. This is how you want your
line to look at this stage. You can even get up now and
turn off all the lights in your room and make sure this is what you're getting if you ever struggled with
light and then turn off everything and start with your
environment light. And then you can
start building up the artificial
lights after that. And that's what we're gonna do. So we can use the simple
exposure to turn up the brightness of our
room or turn it down. So I think something like minus one looks as though we've just walked into his room and there's no other lights than the
sun coming in that window. So it sounds like
a nice down here, but we can soften
up our shadow edges by making this some bigger. So let's head to
the History tab. And I'm just going to hit
store current frame buffer. And then we can
stop this render. And then we can select our sun. And notice the size here. And I'm going to
turn up to five. So we've got a bigger sun. And we can start an
interactive render by clicking and holding and
then hitting star IR. And this is going to start
a new interactive render. So let's let that render
for a few frames. And then again, I'm going to hit store current the frame buffer. And if I left-click on this top one and right-click
on the bottom. You'll notice we've got a and B. And then we can use the slider
to compare our results. Now you can see we have
some nice soft shadows coming in through a window. Before we go, let's just make
our frame buffer full size. And I'm going to click and
start an interactive render. And then let this go until
most of the noise is gone. And then go over to here and hit Save and
just save it as a JPEG. And these images are great to keep hold of so you can look at your progress and you can
even make a making of later. So let that render out for
awhile and save a JPEG. And I'll see you in
the next lecture.
10. Design a Lifelike Kitchen: Incorporate Cosmos Assets into Your 3ds Max Scene: Alright, so let's
populate this kitchen and let's choose Cosmos today. This or that 3D models furniture
and kitchen furniture. And you can see I've already downloaded these
kitchen cabinets. And let's also bring in
these taller cabinets. I'm also going to want a fridge. So I'm going to bring
this one in as well. And we can select these three. And I'm just going to pull
them onto the back wall. And then we can just
kinda block out, start arranging this
stuff on the back wall. We're going to move a
lot of this around, but I'm just holding Shift and dragging this across this side. And another thing we can do is notice that is
fridges come in as a wire bounding box and we can change that to four mesh so we can actually see it. And I'm going to pull
that across as well. So this is a very
rough out version of what we want on
this back wall. So to begin with, let's let this sink in it. I'm going to use isolate and
this is a really quick way to hide everything else and
work on one object at a time. The great thing with the
cosmos assets is we don't actually just have to
use them as they are. We can make edits. We can do this by hand, duplicate to mesh, and that's
duplicated this to a mesh. And we no longer need
this corona proxy. So I'm going to hit
Delete on the keyboard. And then we can select this one, isolate it, and notice
it's now an editable mesh. So I'm going to right-click and change it to an editable poly. And you may be able to achieve the same things with
the editable mesh, but Edit Poly has a lot more options and this is the one I
use most of the time. So now we can select by
element and you can see we can select different parts
of this kitchen units. So I know that I want
to get rid of these, these two n sections and
this one on the end. So I've selected them
with holding control. And if I hold out, we
can de-select stuff. So now we've made
that selection. We can hit delete. And
then what we wanna do is bring these edges in to
line up with our cabinets. But something to notice is that these Cosmos assets
have textures on them. So if I select these
inverts and Parliament, notice that they start
to go out of proportion. It starts squash here. Something I wish I
knew a long time ago was this checkbox preserve UVs. So with that turned on, when we move that, nice
that the UVs are preserved. So I'll take shizonts
question and this is a really handy thing to know. With snaps on. We can snap that to the
end of our cabinet. We can do the same
on the other side. And now we've got a sink unit. I'm going to move
that over here.
11. Tailor Your Space: Modify and Personalize Kitchen Units in 3ds Max: Alright, so let's get to edit
in this unit on the left. And the first thing I'm gonna
do is duplicate it to mesh. And then I'm going
to hit Delete to delete the proxy version. And then let's isolate this selection and take a
look at what we've got. We've got the fridge.
It's gonna be like two cupboards wide. So I know for sure we're
going to be getting rid of this and we'll also get
rid of these bottom ones. So I'm just going to
hold control and select all the things that I don't
think we're going to need. We actually do want
this kick boards. I'm on 0 and we'll
keep hold of that. And I think it's going to hold out as a bit behind that
cupboard that will keep. Then I'll hit Delete. And then using our vertex, let's make sure
when editable poly. So that's another one of
them options you probably don't get in edible mesh
is to preserve UVs. Just going to keep our
textures looking good. Top view F3. And we're going to want
snaps on, so I'll press S. And let's just snap
that in line here. Suffrage is gonna go in here. And another thing we wanna do is move that handle
on the right over. So let's select that he's out. They selected just
find that quicker. To make selections. Let's pull it over. And now let's isolate
and grab our fridge. And isolate again, because we're going to want
to make some moves here. And let's select our butts. And we're still in
presented the UVs. And let's grab these handles. And I'm going to pull
them up to about here. And let's select these guys. And I'm going to want to pull
these up to the ceiling. And I'm going to leave
a slight shadow, a gap that just make things look a little
bit more realistic. Then we can turn off. That's another useful thing
tonight is if you press one on the keyboard,
select two edges. Free. Buddha's for polys
and five is elements. So that's a quick
way of navigating through selections as well. And I'll select our fridge
and let's pull that over. I'm going to turn on snaps
Venus and just line that up to the edge of our
left-hand cupboard. And then the last thing here is, I want to have a
piece of the cabinet, I guess is the word
down the side here. Let's select element
and select this guy. I'm going to hold Shift
and pull that across into it meets our middle unit. And another thing if you hold Control and then select verts, notice that all
of the votes that were in that element
has been selected. So again, another quick
way to change selections. So if I just say I didn't have anything selected and I was trying
to select these, it would be probably
a bit harder. So I can then say
what I do is if I've got that element that I want
selected, I'll hold Control. And then these guys, and that just makes
me even these across little bit easier. And then you can do the
same in the front view. I hold Control, select it
all diverts on that piece. Hold out, and then I've
selected them bottom ones. And let's just stop that
to the bottom there. I think that's our left-hand
side looking good. And just nice like
in the front view, we could tighten up these. So again, I'm using
that control select. Let's just snap these cross. And I'm also going to
get these kind of snaps, get these pretty much
flush with the edge there. And I think that is our
left-hand side, dumb.
12. Customizing and Arranging Kitchen Units in 3ds Max: Alright, so let's take a look
at this unit on the right. Let's duplicate it to a mesh. And then I'm going
to hit Delete. To delete the proxy version. We can right-click and convert
it to an editable poly. Before we do anything,
let's just make sure preserve UVs are on. So we keep our textures
looking in proportion. Now, I'm going to select these two N cabinets as
we won't be using them. We're going to hold 0 to unselect anything
behind this cabinet. And we're going to keep
that cake board as well. And let's select
these two handles and we can delete them. And over in our front view. Let's select these guys
and which snaps on? Snap these to the
edge of our cabinets. And then we can line this up with the edge of our
center, Ireland. And now let's bring in an oven. So we can just search
for oven in here. And this one is pretty good. So download it if you haven't downloaded it. And
we'll hit Import. And let's move this
into position. Going to turn on snaps
just to make it a little bit easier
to line this up. And it's a pretty big oven. It almost looks industrial size. So we can do is scale it down. And as I'm scaling this, notice down here, we're
seeing this move. So this is 100% and I think we want it at
around 80 per cent. So we can just type in
80 there and you can see it scales in proportion. I'm going to pull
that forward so it's in line with the cabinets. And I also want the bottom of it in line with this
cabinet on the right. I'm going to press S to snap. And we can snap that to
the center line here. And turn off snaps again. I'm just going to line that up. And now somebody's
high-end kitchen seem to have two ovens. So let's make a second. I'm gonna hold shift
and drag that across. I'm more of a
delivery man myself. So I don't need to ovens, but we'll make that an instance. Now for these cabinets, the designer will usually
send over the layout, but we don't have that, so we're just going to
have to eyeball it today. I'm going to select verts. In the front view. I'm going to start moving these
to line up with our oven. And the same in
this larger cabinet has pulled out across. And we can also select
the top cities cabinets. I'm going to snap them to
the center line again. And let's also select
the top of our cabinets. And we can snap that
cabinet tops on the left. And again, let's
select these guys. And I'm going to
turn off snaps this time and pull these up. So they're in line
with the other. I also want another set of
these bigger doors here. So let's select element and
just click and drag this, make sure we get the
handles as well. And I'm going to hold Shift. Hold Shift. I'm going to
hold Control and Shift. If you're using an
older version of Max, you may be able to use Shift. I think it has changed
quite recently, but that will clone
part of the mesh. And we want to align it
to the current elements so we can just say, Okay, and that's now part of this mesh style is
pulled out across. And again, I'm going
to have another piece like this over here, so we'll leave a slight gap. And let's also make
the similar size. I'm going to grab the
two handles as well. I'm pulling these
across into position. Now another thing you can
do with editable polys, you can hide or unhide selected. So we have an element selected. I can hit hide unselected. And now we can only see that. And that can make making
selections a little bit easier, just a good thing to know. And so there's
pulled out across. Then you need to go back
into element and unhide. All. Otherwise, it can get very confusing and you can think you've lost some of your model, but if you can't see it, then you might have hidden it. I'm going to turn off element. And I'm going to grab this side piece from
our left hand cabinet. I'm going to hold Control and
Shift to move this across. And we don't want to clone
into element this time we're actually going to
clone it to a new object. So we hit OK. And when I select that, you can see it's own
independent piece, although it is keeping the
pivot from the old model. So to fix this, we can just go to
hierarchy effect pivot and send it to Object. Now two pivots in the
middle of the object. And we can line that up with
the edge of our cabinets. It's going to move this oven
across a little bit as well. And the same on this one. We can always
shuffle these around later if there's too
much of a shadow gap. So I'm going to grab that
again this time because it's, because it's his own
independent element, we can hold Shift
and it will clone. Whereas if you were doing this in the Edit Poly
and say you just wanted to move one phase
and you hold shift, that wouldn't work, you'd need
to hold Control and Shift. I think this was updated
due to just smile extrude. That. Don't quote me on that. So we can just hold
Time and drag this across to put the edge on
our right-hand side cabinet. Then all we have to do
is select our cabinet. And let's attach
these two new pieces. And we can just make sure
everything's lined up. But that is pretty much the cabinet is on
the back wall done. Actually, one last thing I
forgot was these handles. So if we grab these two, Let's just move them up so they're in line with
the ones on the right. And then I think
we're actually done.
13. Elevate Your Kitchen Island: Refine Materials and Layout in 3ds Max: Alright, let's take a
look at bringing in this middle islands units and Cosmos Without a 3D
models furniture. And we'll go down to
kitchen furniture. And this is the island
we want to use. So let's bring that M. Download it again if you
haven't downloaded it. So nice to add
different materials on than the cabinets
we brought in earlier. We're going to take a look
at changing those materials. We're going to remove
the sync from it. And we're going to
add a cooking hop. But first let's position this. So I'm going to make sure
that it's in line with that sink unit at the back. Somewhere like that's
going to work. Nice. Camera view. If you press Control, Shift F, it's going to
turn on safe frames. And what this means is this
is the area to render. So you can see the difference down at the bottom
where this is placed. When you'd hit Render,
you'd probably expect that to be out of, out of view. Safe frames on is in view. And what this means is if
we go to the render setup, we can see we have
our output size here. If we change that to custom, you can see as I
begin to change this, this is actually what's
going to be rendered. So this is really
handy to keep in mind. It's very different. So if you had your output size like that and you hit Render, you're gonna get a rendered
it looks like this. It's a safe frames
is good to keep on in your camera
view so you know where objects are actually going to be in your
actual output. Let's change that back to HD. And that's Shift F to turn
on safe ramps up first, let's go to the Modify tab. Let's duplicate this to mesh
and we'll delete proxy. Then I'm going to
select our island. And I'm going to convert
that to an editable poly. So because these have
different materials on, what we're gonna do is
grab the materials from this back sink unit and we're going to
apply them to this. But before we do that, There's a couple of things
we need to do. So let's open the
material editor, which you can do by
pressing M on the keyboard. Or we can select
Material Editor up here. And it's two different modes. There's compact, which is
the older way, and slate. Slate is actually quicker, in my opinion and easier
to use as you can see, how the material is built
up in layers or nodes. So we're going to use
this going forward. And up here we have picked
material from object. So with that selected, we can click on our
back sink in it. And then we can see that this is the material that is applied
to our back sink in it. So what I'm gonna do is select
the in it holding Control, select the island G&A, and let's isolate these two. If we select the
backseat key in it, I'm just going to put out
the Modify tab so we can see more what's going on. I'm going to select element. And as I select these
different elements, notice that they have a
different material ID on here. So this countertop has
a material ID of two, and the material
that's applied has five different materials and
it's mostly sub material. So anything with
the material id2 will have granite
material applied. And that looks like this. If I select the cabinet door, we can see that that
has material Id1, which is this lack of material. And I'm going to close
this material browser, so we've got more room. Usually you'd be working
on a bigger screen or mobile screens even so you
can have this a lot larger, but let's just try and get as much real estate as possible. I'm going to turn off the
element and I'm going to pick material from
our island objects. So if we go into here, we can see that the
countertop is material ID free and the cabinets or ID1. So we actually need to, if we want to apply this
material to the island, we're actually going
to want to switch over and the material IDs. Otherwise, when we do
apply this material, we're going to notice
that the materials are in the wrong places. We're going to end up with, say, this granite tops is
going to be applied here. So let's switch that up. Also worth noticing here
is these white corners, and that means this is applied
to the selected object. And then notice that these are gray corners, I
guess is the word. This means it's in
the scene but not applied to the object. So when I select here, you can see that
it's highlighted. So that's how you know which
material is on which object. So now what we can do
is island selected. If we select one
of these cabinets, we can actually notice this ID1. And if we hit Select
id is going to select all of the id ones. When we apply, this material is going to have lack
of material one. So that's good for us. If we select here and select all of the id is currently
got metal selected, but we want it to be
this lack or one. So we're going to
change that to one. And the countertop is
currently set to id free. So if we select that, if we apply this, it
would have metal applied. So we would actually want
to change that to two. Now when we
right-click and assign material that I'll count, the top is using the granite
and all of this is white. And you'll notice I didn't apply any materials to the taps. And that's because we
already have a sink here and we have no need
for two sinks. And also notice now that this material doesn't
have any corners on it, as we're not using
that anymore and we're only using this material. So that keeps things
nice and clean, but only using this
multi sub material on all of our objects.
14. Polishing Your Scene: Tidy Meshes and Incorporate a Cooking Hub in 3ds Max: So now we can isolate and
with our islands selected, will isolate our selection. And we can remove these taps. I'm going to close up
the material browser. And we can just select all
of this and then holding 0, we can remove anything we don't want to delete
from the selection. I'm going to press P to go
to the perspective view. And I'm using alt and middle
mouse button to move around. And if we press F3, we can see our sink
and taps in here. So I'm just going to hit Delete and now we have deleted that. Alright, so let's clean
up this mess a little bit and we can turn on F4
to see the wireframe. And I'm going to
select the border. And in here, there is a
border we can select. So this just means
the edge of the mesh. And I'm going to hold control
and select the polygon. And you can see that
it's now selected all the polygons
around the edge. And using the grow option, we can actually grow
this and shrink it. So these are the polygons
we want to delete. So we'll hit Delete. And then we can select
these two edges. And we'll just bridge that gap. And now we can see that the texture on our
material is distorted. So we can fix that
using a UVW map. So if we select this element
and apply a UVW map, let's isolate everything, select this sinking
and isolate it. I'm going to now
change this back to top view using T
on the keyboard. And let's maximize the viewport. And I'm going to zoom out using the middle mouse
button and pan again, pressing the middle
mouse button. We can see the texture
on here is looking fine. If we select this object. And unusually, I'd like to use real-world map
on everything. But as this coming from Cosmos, we're going to have
to eyeball it. So let's turn off
road mapping and then we can see our
texture on here. We're going to want to
change that to box. And to start with, let's just put 100 cm in. Each of these cited
texture that we have on is now 100 by 100 cm wide. And when I compare it today, so as she lifts too big. So let's put in 50 cm. And that looks about right. So I'm going to just
right-click and collapse. And then we can see our texture is now the
same as the stinky in it. So let's minimize
that view again. And finally, let's bring
in a hope for our island. So I'm just going to
type in hop here. And again, I've already
downloaded this, but you can hit
download and hey, input to bring that in. And let's position this
line that up with the sink. And I'll turn on snaps, use an S and a snap that to
the top of our countertop. On isolate everything and our kitchens coming
together really well. Let's get a quick render
out so we can keep track of our progress
through this project. And as these are
quick snapshots, let's just use an
interactive render for now. So I'm going to hit interactive
render from the toolbar. Be aware that the
interactive render resizes to decide as a window. So I'm just going to
make that full screen. And let's just let that render until most of
the noise is gone. Fast. The noise is on by default and this white might look
a little bit blurry, but just give this
a little bit of time and it will
start to clean up. So that'll be fine for a work in progress shots I'm
going to hit Save. And let's save this
as kitchen progress, the JPEG and hit enter. And that's our renders saved. And something else. While we're talking about saving is I'd like to save at multiple
stages for the projects. So if we go to Save As and let's say we call this
kitchen and we'll call it 001. And we hit Save. I'd recommend saving it at the end
of each lecture. So then you can just
go File, Save As. And if you hit this Plus icon, it's going to save
as a plus one. So if I go to Save As again, you're nice and this
one and n plus one. So at the end of each lecture, just get in the
habit of going to File Save As and
hitting this plus icon. The reason I like to save multiple versions is
it's really handy and minimizes the risk of a fall getting corrupted
and you're just being reliant on one file. If you make a
mistake or something can always bounce back.
15. Elevate Your Exteriors: Enrich Outdoor Scenes with Cosmos Assets in 3ds Max: Now let's add some exterior. And this is firstly good. That's some visuals
outside of our windows, but it's also going
to up the Raiders. And when it comes
to having trees and leaves effect in our
lighting and shadows, I used to use 2D
images for this. And whilst this can work, if you can, I would recommend
using full 3D environments. And lucky for us, cosmos comes with some great
presets we can use. So I'm going to select the
top view and maximize it. And let's zoom out. And the first thing
that we're going to want to do is create a plane for where
we want our gross. I'm going to add snaps on with S and just create a
patch of garden. Then we can add an Edit Poly. And I'm going to select the
edges. We double-click. That's going to select the loop and use the Move tool
and holding Shift. I'm just going to bring
that back a little bit and also line up with
the edge of our house. And because we've extruded days, let's throw a UVW map on top. And that's already on
real-world, which is good. So let's open up the cosmos
browser and materials. And let's go to the
ground section, and let's add this. And then also in
here, if we go to 3D models and we go to presets, in here you see we've got some scattered presets and I'm going to use
this grass lawn. So download that. And I'm going to hit Import and let cosmos input
that into our scene. And now you can see
we actually have grass on our loan,
which is great. Now I'm going to create a
back wall for our garden. So we'll just
create a rectangle. And I'm going to
press page guides for perspective view and just pan around so we can see the size of this and then
we want to modify it. So let's make it 50 cm deep. Let's make it 260 cm high. And again, back in Cosmos, let's go to materials, bricks, and let's
add this brick wall. And you can see
where we've create that box for a world's
already ticked on, so we don't need to
add any UVs to that. Now I want to add some
bushes along this wall. I'll go back to the
top view by pressing T. This time we'll
create a rectangle. And this is going to be where our bushes
will be inside of. So I've create the rectangle. Back in Cosmos. Let's go to models, presets, and let's add
these wild bushes. And finally, let's add a tree line running
along this back wall. So I'm going to create
a line and create that. Again back in Cosmos. Now notice that does these blue lines on some
of these like here. And that means that these will distribute
along these lines, whereas these ones will
distribute across the object. So download that one and with our line
selected, import that. And that kind of shows
how quickly we can set up an exterior using
the presets in Cosmos. And you can always go in. If you move the shapes around is this guy will move with that. So you could resize
the size of u alone, the rectangle where
the bushes are. But let's jump back
to our camera view. And let's run an
interactive render for our progress shots. Yeah, let this run into
it becomes noise-free and then we'll save it out and we'll have another
work in progress.
16. Styling Your Space: Populate Scenes with Furniture and Props Using Cosmos in 3ds Max: Now the fun part, we can add some furniture and
props to our scene. So the first thing, obviously
I'm gonna go to Cosmos. And I know that there
are some stores in here that I want on
this breakfast bar. So got to 3D models,
furniture, chairs. And as he's nice stores,
I'm going to use this one. It's a little bit smaller than the Barstow and bring that in. And let's rotate that. Now we can rotate it one a0
and put it into position. But if I press a
and turn off snaps, I do like to just offset
these a little bit. It makes it look a
little bit less CG. So they're not just
everything's in straight lines, which can be a bit of
a giveaway that things are 3D. Holding Shift. I'll drag that across
and make an instance. And again, just add a bit
of variation to that. Then I also want to add some
tiles to this back wall. So in the front view, let's go to Create box and
press S to turn on snaps. And I'll create a box size of that space in the front view. And in the top view. We can snap this
to the back wall. And let's add some depth. So I'll put 1 cm in. And again, open up cosmos. This time let's go
to materials, tiles. And let's add this nice
tile to that area. And real-world is on and
real-world is on that box. So they're going to
show up just fine. And if you do want to see your
textures in the viewport, we can press M type
now Material Editor. And then we're going to
use to pick material from object and select that. And let's just move
that over here. And if you haven't got moved
children on when you move, Summing is just going to
move that node on its own. So I like to keep that on just to keep things
organized in here. And all we have to do
is go to the texture we want displayed in our pupil. Select it and show shaded
material in viewport. And there we can see our texture is looking pretty good
on that back wall. And I also want to add
a shelf along here. So I'm going to snap that to the Top Glove fridge and
drag that across here. That snap today, a good
God, I want it that big. But we're sort of on a minute. Let's go right-click move. And let's move that to the
back wall. The modifier. Let's make the height 25. And this length is
just make that free. And then its pulled it up and snap that to the
top of the fridge. So you've got a shelf. And I also want to add a
light here, shines down. So let's isolate the shelf and we'll maximize the viewport. And press Page
guides perspective. And I'm also going to
add five height segments and add an Edit Poly. And then I'll go
to the top view, pressing T and N Z for zoom. So if you're ever, if you're ever in a
position like this, z is a really handy tool
just to zoom the extents. Select the polygon,
I'm just going to select these front four faces. I'm gonna get to the front view. And this time holding 0. D select these guys. And now I only have these
bottom ones selected. And I'm gonna go to extrude. And I'm just going to
extrude that by 2 cm. And I, K, P, and Z to perspective and zoom. And here we can see our shelf. So let's add a material to this. I'm going to turn
off polygon mode. Open up cosmos. And this guy is a Wood. And I'm going to apply
this word is real-world, but we have made some
adjustments here. So if I press M on the keyboard, and let's select the material, like we did with the tiles. I'm going to select that
texture and show in viewport. We can see that texture
actually works quite nice. I'm the bit that we didn't
extrude and then where we did is stretched down. So we need to do is add a UVW
Map and change that to box. And that's all
looking pretty nice. One last thing that we can
do here is add a chamfer and let's crank it
out to like 0.25 cm. And that's just
softened up our shelf. So F4 and there's our
shelf on isolate that. And that's looking pretty good.
17. Bringing Your Scene to Life with Cosmos Assets in 3ds Max: Alright, so we can
really start adding lifetime scenes using Cosmos. And I've already been
through and decided on some of the assets
that I want to use. And you can see them
here in my likes. And if you do want
to like something, you can just hit this
icon in the bottom right. You can use these or you
can look for your own some good categories to
look in our accessories, tableware and food and
accessories, kitchen accessories. Go through and select
the objects you want, and then download them
using the top left, bottom. And then I'm just going
to go through and import all of these one-by-one. I'm just going to do
this all at once. And they're all going to
come in at 00 is zero. And when you're
choosing these assets, think about the story you
want to tell in the scene. I know that I want to have
like a little breakfast area set up on our coffee machine. I want some plants
by the window, and I want some
appliances on the shelf. Now all of our assets here. I'm also going to select the
seal in holding Control, select the window and
I'm going to hide them. This is going to make
place and stuff easier. I'm also going to
select this spotlight. And what we can do is go to
Edit and select similar. Or you can use Shift Control a, and that's going to select
all similar objects. So that's selected all
of our spotlights. And then I'm going
to hide those by right-clicking and
selecting hide selected. Now page goes into
perspective view. And let's see what we got. So I'm just going to start
moving these into position. And a really useful tool is the placement tool,
which is up here. And if you grab that,
you can see that we can easily place
objects onto services. Before we'd have to be
changing views and placing them you didn't have
left from top views. So I'm just going to roughly organize these where I want them and I'll go through
and tidy stuff up a little bit
better in a minute. Alright, so you can see how
easy that was to play stuff. It's an ideal and
they're all a bit wonky and probably
not rotated right, but using the placement
tool is a great start. Now I'm going to go through and rotate and position stuff, making sure that angle
synapses on in position stuff. I'm using the other views. So I'm just gonna go
through the other views per set on the
keyboard to zoom in on that object and make sure
it's in the right position. And we can also zoom
in perspective. Maybe turn on wireframe
if that's easier. And then you can
see where that's about intersecting
with the wall. And these will look pretty good. I might move that
up a little bit. I'll be nice to have
the camera view visible so we can kind of see how that sits
within our whole scene. The radio is having a
nightmare over there. So let's check him out. Turn off angle
snaps for that one. Oh, so don't be shy about
scaling objects up like these. Cutting boards. I do want them. Sorry, let's make sure that
scaling correctly. Daddy's cotton boll is that they actually won
them a bit bigger. Turn on ankle snaps. And I also have them leaning up against the
wall a little bit. Guys are all fine. Then over here, rotate
this bread a little bit. Sap that little breakfast area. This pan, I'm going to
scale down. Maybe like 70. See down there, rotate
it a little bit. Let's go over here to magazines. And I'm going to rotate them by 90 and S have them down there. And finally, this plan. Let's check it out
in the front view. Let's pull this up. Shifting that plant
pots too big. So I'm going to
do is go to scale and bring it down to like 70% of its current size and might need the perspective
view to align this one up. But let's get our plant and the plant pot. Now
it looks kinda good. And I think that all positioned
roughly pretty well. We can always we've
all heard this, like come back in and
move stuff around. Maybe let's move this
into frame a bit more. But yeah, that's not too bad. So add your accessories and what we'll do is
unhide everything. And let's run an
interactive render. Make that full size, and let that render
until the noise is gone. Save yourself a progress shot. Just remember that the noise is on and that's going to
make the image look blurry initially until some of the noise begins to reduce. So what you can do is
just let this run for a little while and then
save your image as a JPEG.
18. Discover 3D Model Treasures: Top Sources for Your Creative Projects: Something to keep
in mind is if you have specific models you need, then a great way to
find these are using online modal libraries
such as ever motion, turbo squid, or poly haven. Years ago we had tomato,
everything from scratch. But if you can find a
modal already online, then you're going to save
yourself a lot of time. And the skills and
modelling is still super valuable and is still needed. And because modelling
is a skill in itself, I've created another
course that's completely dedicated
3D modelling, which you can find on
my profile if needed.
19. Mastering Lighting Techniques: Corona Lights and IES for Interior & Exterior Scenes in 3ds Max: In this lecture, we're going
to add the interior or artificial lighting
and the southern sky, that environment light and the interior or non-real
or the artificial lights. So basically anything
that uses a bulb so we can create a kernel
light from the toolbar. I'm going to go to create light. And I'm just going to draw one under our spotlight over here. This I want to make a disk. It's round and facing
one direction, also not a sphere. And then I can move this up
towards where a light is. And back in the Modifier tab. Let's change this
radius to 2 cm. And I'm going to turn on targeted and that's
created a target. So let's pull that down
all the way to the ground. This allows us to point in the light in
certain directions. And another thing that
we can do is if we turn lights on here, now, we'll, now we can just select lights and not worry about selecting anything
else in our scene. So that's pretty handy
when we're doing lighting. And let's move that into
the center of this slide. And I'll select
that light again. And down here we can
select an IES light because I'm going to
select this down light. You can go through
and try some out. But I S follows our data files that
describe the intensity and the distribution of a light
on these can be used in previous max to accurately simulate real-world
lighting conditions. So we can see that our disk
is turned into this shape. So basically these are
different shapes of lights. One thing I want to do as
well is turn off visible directly as we don't actually want to see
the disk itself, we just wanted the
light emitting from it. And in a top view, I'm just going to maximize this viewport and select this
light and holding Shift. I'm going to drag
this across and position it and make
it an instance. I'll go around and do this
for each of our spotlights. She had two here. And holding can select this, sorry, I select this one and hunting and charts
select this one. And then holding shift
pulled out a cross. And let's actually make two instances because we've got another set of lights here. Then I'm going to select these two lights in
front of us sink in the perspective view or press P. I want to hold out and
de-select these spotlights. I'm just going to pull
them so they point towards the sink as I wanted to
illuminate the sink area. So you can see now I liked so
pointing towards the sink. And over in the render setup, you can press F ten as well. I'm gonna go to scene. I'm going to set up light mix. And there's a few
different options here. We can control
them by instances. So then we'd only
have four layers and groups or layers even. But in our case, we're going to use individual lights as we're going to control each
light individually. And I'll show you
how that works. Now. Let's run an interactive render. It might not full screen. I'm just going to let that
render for a little bit. I'm going to stop that render. And if we go over to light mix, we can see all of our
lights listed here. So I'm going to
toggle them all off. And now we have no
lights in our scene. And this is a really nice way to build up your lighting
in the scene. You can start with the
environment light. So when we turn that arm, we can see what this guy's doing. And if we turn on the sun, we can then see how the sun is casting the shadows in here
and the light's coming in. And if we turn on corona
like one which is here, we can see not a
lot's happening. So what we can do is
actually turn this up. So if I turn out to ten, Let's go really far so we
can see what's happening. We can see the shape
of that light. And that's the IAS
light inactions. So if you change your IS light, this shape is going to change. That's a bit too much
for what I want. So I'm going to keep that. Let's put down about ten. And what I'm gonna
do is go through and just see which
lights doing what, and then pump them
up accordingly. So this one, I really wanted
that quite intense and you can see what's happening
that's illuminating that area. And we really want to
draw the eye in to this old our props in here. This one, this is 50 and see, well we can do here. So that's looking pretty good. Coronal like four is over here. And because we've got
this sun coming in, I don't want to do too much to the ones to the spotlights
over here on the left. So I'm just going to
leave that as is five. Let's crank that up. You can see we're getting this
nice pocket of light here. I'm going to keep going
with that because I quite like what, how that's affecting the bread. Somewhere like that,
It's looking cool. Corona Lite six is
over on the left, so I'm going to leave
that 17 has put out 50. And we can say
that's kinda behind the camera and its costs
in these shadows here. I don't want that so intense, so let's put down 50. And number eight is over here. So I'm going to
leave that as well. So you can go through, you
can turn them on and off. You can see what's doing, what, when you're happy with
that, we're going to push this into the scene. And what this means is
you shouldn't really want to pump these up over five and then hit Render because
it could produce noise. So what you can do, I'm going to select Corona Lite one and we see
the intensities on 50. And then we times that
by ten in the light mix. So if I push these two the same, we should see this ten to 500 K that's been updated and
these are all one again. And if I run an interactive
render, it should lie, are saying exactly as we had when we had
the light mics on. So now I'm looking here. I think this one, which I believe was
Corona Lite too, is a bit too intense. I'm actually going to bring
that down a little bit. But that's how we can
play with light mix. Let's push that back into the scene and that's
going to adjust light to. And let's run it an interactive
render and let it run until the noise is gone and then save that for
your work in progress.
20. Illuminate Your Scene: Perfect Shelf, Bulb, and Oven Lighting in 3ds Max: Let's add some more
lights to our scene. So I want to lie that
goes along this shelf and we modelled the
shelf so we could put a light behind that earlier. We're also going to
add some bulbs to our spotlights and some
lights to our oven. So we'll go to the corona
toolbar, create light. And I'll create
that in a top view just about where to shelf is. And we actually want this to be a rectangle for the width. It's bake it to 20 says
about is a little bit less than the shelf as I don't want it to create these
hotspots on the edge. If it come all the way here, it would be really bright here and less so here I've made it. So it's kind of
about this lymph. And I just want it
like 1 cm in height. Let's just line that up. Let's
do that in the left view. So I'll pull that up here, make sure it's not
intersect in a wall. And let's rotate that
by about 45 degrees. That looks pretty good. So we've got these IES lights that are producing the lights. But as it stands, it doesn't actually look like the
lights are turned on. So to fix that, we can add some bulbs to each
of these spotlights. So again, let's
create a Corona Lite. And we'll create
that is going to be a rectangle because
that's what we lost years, but we actually want
that to be a sphere. And we only want that to be 0.2. And I'm going to move that into the center of our spotlight. Again. Let's move this
up into position. And we don't really want
it to intersect too much. Just underwear the bulb is and behind the
glass will be great. And then I'm going to
maximize the top view. Make sure we've only got
light selection on as well. And I'm holding Shift. Let's drag that across and make sure this is in the
right position. Will make this an instance. Before we do that, this is actually quite important consideration when
using light mix. Let's rename our lights. So we call this
spotlight, there are 01. And that's just going to help
us in the mix when we had that list of light. So holding shift, just
Instance these around. We won't actually see
these lights over here, but it's good practice
just to put them in. And if we change the camera
angle or something like that. Alright, so we've
got spotlights n. And I also want to add a light to these ovens to show up just like
been turned on. It will add a little bit
of life to our scene. So again, as create Corona Lite and make
that a rectangle. And let's make that about 40 cm. And we'll make it
about 3 cm high. And we'll position that
we use to front view, says F and Z to zoom in. Let's pull that up.
But that about here. And again, this name, this one, oven 001. And our instance sat across. And let's remember to name
our shelf light as well. And we'll open the render setup. And let's set the limits again. This time we can use
instance lights as I don't see the spotlights
being individually, I'm just going to
turn them all on. So let's generate and run
an interactive render. Let's let that render
for a little bit. I'm going to stop that
render to light mix. And let's start with our shelf. So what we can do there is just times that by five and we can
see what it's doing. Nothing that's actually
going to work great, but feel free to pump it up, pull it down. How
do you see fit? But that looks quite nice. I think five will do
for now, spotlights. So now you can see
the importance of naming our layers so you
can find them easier. Let's just turn, turn
these up by ten and you can see actually looks like
the spotlights are now on. Whereas before, you can
really make them out compared to the ceiling.
Let's turn that on. Then the other lights, Let's turn these right up. But I want to change
the blue in there. And we also want to turn off the visibility here so we don't actually see
the lights in here. Kinda like what we did
with the IES lights here. I want him to
illuminate the oven, but I don't actually
want to see them. So let's minimize that. And in the light setup, we can turn off visible directly and also because
it's behind glass, Let's turn off visible
and refractions. And before we do a render, I'm going to change the
material to black from blue. And also we can add a
color to this light. And if you're ever changing colors of artificial
light is really worth using Kelvin temperature as this is what we use
in the real-world. If you bring that up,
you'll see that goes blue and if you bring it down, it will go more orange. So I think something like 3,500 here and will give a nice
warm light in the oven. And then let's go to
the Material Editor. Let's make some space. And we're going to need to make sure we can select
everything, not just the lights. Now, we'll grab the
material from there. And in here you can see
this blue material. So what I'm gonna do
is just drag and drop this to replace that
as an instance. And that should now make
our interior oven black. So let's run an
interactive render and see how that's looking. So we've got this
shelf-life arm, we've got the spotlights on, and we have now eliminated
or oven as well. So when you're happy with that, which I am, I'm
going to stop that. I'm going to push these
into the same here, IK. And then I'm going to run
an interactive render. And I'm going to render that
into the noise is gone. And we'll save that out for another work-in-progress shot.
21. Sanity Check and Material Refinement in 3ds Max: Alright, so we've
been moving pretty quickly for this project. And before we move on and add some cameras and
create some renders, I just wanted to
do a sanity check is a few things I
want to change. A few things are misaligned, and some of the materials aren't looking as
good as I want it. So let's jump into the
perspective view using P. And I'm just going
to zoom in over here. And let's run an
interactive render. And because we've added the
noise rod and we haven't really been able
to see too many of the details. We've
just been doing. Test renders, Service CDS, wolves look pretty nice as is. But if we actually let
it render a bit more, we can see the
texture on this wall and it's pretty extreme and it's not exactly
what we want. So let's stop that render
and close the interactive. And we can stop the de-noising
from happening during interactive rendering by
going to the performance tab and just turning off fast
preview noise stria and render. Now it's not going to denoise, so we're going to see
more of those details, but it's going to
look more noisy. But this stage,
Let's switch it off. And I'm going to
jump into Cosmos. Let's go to materials. And this time I'm actually
going to go to concrete. And this concrete
why is quite nice. So I've downloaded that. And let's just select our
ceiling and our wars. And let's apply this
concrete white wall. And let's try to
interactive render again. And this time you're going
to notice it's not going to go is blurry or denoised. And so we might have to
wait a little bit longer. But already I can tell that
these walls and ceiling or looking much nicer and then got such an extreme
material on them. So I'm happy with that. So let's stop that. Cloud is the interactive render. And another thing
I noticed was on this shelf run interactive
renderer again, it was just the wood
grain wasn't lined up. It looked a little bit off to me and some real
noticeable nuts here. So what we're gonna do is change something
in the material and also realign this UVW map. Let's stop that. And I'm going to open
the material editor so you can press M
on the keyboard. And let's select the
word from our shelf. Things are getting a
bit messy in here, so I'll pull this
over, make some space. And in here you see that in-between
texture and our material, we have a corona uvw randomizer. And what this map does
is allow us to randomize textures quickly on
multiple materials. In this case, we just want
to turn off face material. And if you go through
and do that for each of the maps that have it. So there's another one here and another one on the normal. When we run the
interactive render again, that should have updated and we won't have the
same down the middle. Also want to move this not. So what we can do is just
move that over a little bit. With our shelf selected. I'm gonna go into
the Modify tab. And under UVW map, Let's select that gizmo. And let's find a way of showing everything on one
screen pulled up there. Let's close the material editor. And if I pull this up and down, we can see that the texture
on our shelf is moving. So we can move that until
we've got a nice position. I don't really want
to see any nuts on. There are very few. So let's just move that around until we get it in a place. We like. So I think something
like that's pretty nice. Again, no kind of
extreme textures, big knots in the middle there. I think that's going
to work just fine. And another thing I noticed was some of these items on the shelf on exactly
align properly. Some are going for the walk. So what I'm gonna do is select
the ceiling and hide that. And then we can go through to the front view
and zoom in on that. And you see we've just
got a few things that are a little bit on aligned. So I'm going to turn off, snap to a and just get these
sedan sitting on our shelf. It has little gaps here. Maybe that can go
up a little bit. P and Z, perspective and Zoom. We can also bring
out this shelf, a base in water. So let's pull that out. These guys can come
out a little bit and just make sure
everything is aligned. So when we do render, we'd add to come back in
and move stuff around. So I'm just making sure
everything's lined up nice and that is
all looking good. Let's unhide all go
back to the camera. And one last thing I
wanna do is because we instance these two chairs and their exact
clones of each other. So let's run another
interactive render. I'll make that full size. And this time I'm going
to use the region tool. So I've selected that
and click and drag. And now this is only going
to render our selected area. And this is useful if you just want to render a small part
to see what's happening. If we let that
render a little bit, we're going to notice that
we've got this wood grain. You see this notch here,
we can see it here. So we've got identical chairs. So we can easily fix this. So if I stop the render, let's just minimize
that for now. And we'll open the
material editor. And let's choose the material
that is on our stools. And then here, this is our word. We're going to use what
was on the shelf before. So the UVW randomizer,
so we've got two maps. Corona, Corona uvw randomizer. We'll plug our wood in and then we'll plug that into
our base object. And as I said earlier, the UVW map randomizer allows us to quickly
randomize textures. There are multiple objects, so you can see the instance
selected by default, and this is what we want
as this will randomize the texture by different
objects in the scene. So now if I just plug in
1.1 in the U and the V, and we can close that. And let's open our render again and run an
interactive render, which should now see
that the grain on our stools are different. And these are the small
things that are going to add that realism to our image. Now we can see we've
got the notch there, but we haven't got it over here and we've got the
wood grain here. So these are now two
different stores. So that is all good. I'm going to stop the
render and the region. Let's disable all. And let's run an
interactive render. And we haven't got a D
noise around this time, so we're going to have to let
it run a little bit longer. But let that render, save it out and I'll see
you in the next one.
22. Optimal Visualization: Master Camera and Render Settings in 3ds Max: So now on to one of
my favorite parts and that's becoming a
virtual photographer. So we already had
this cameras set up. I'm going to set up a couple of others and then
start some renders. So let's start an
interactive render, and I'll make that full screen. Now we can take a look at
some other time mapping. So the only thing
I'm really going to do in here is just add a look-up table and
you can enable that. And then we can choose which lookup table we want by pressing up and
down on the keyboard. And so go for it until you see something you
like the look of. And it doesn't have
to be this intensity. So if you'd like something, you can always then bring
down the opacity of the lookup table so
it's not as intrusive. So I had a little look
earlier and I quite like this guy here
on something like, Nope, point free, I
feel pretty good. But go free to choose your own. And then another
thing I'd like to do is add some vignette. And let's turn up. And if I turn that on and off, you can see what that's doing. There is a little bit over
saturated so we can pull down the saturation a
tiny bit as well. We can also play with the white
balance as well as touch. And I think sunlight that's
looking pretty nice. So I'm going to
stop that render. And let's now set up
some other cameras. So I'm going to press P
on the keyboard and z, and we're going to
zoom in on this bread. And then I'm just going
to create a camera view. I want say something like this where we can use the plus camera icon to create
a camera from the view. And then we can hide
this in a little bit more using the camera. We can obey the
camera a little bit and just SAP if you
like the look of. So saying like that
looks pretty cool. One thing I've noticed
is our cooker. Three are hubs are intersecting. So I've just selected that. I'll right-click select Move, and then I'll just use the
Move dialogue down here. And let's start an
interactive render. And then make this smaller so we can see what we're doing. And we can also
select our camera by clicking on the camera. And select Camera. Looks pretty nice, but we can also add some depth
fulfilled to this. And we just need to click
enable that fulfilled. And I'm going to
minimize the viewport. And in the top view, let's
select our cameras target. Now the target is what
is going to be in focus. So if I pulled up towards
our bot and our cup, we can see that this background
is now becoming blurry. So let's select
the camera again. And the f-stop controls the
amount of debt fulfilled. So the lower this number, the more blur and the
higher will be less blur. And if we hover over this, we will see that the
standard values used in photography listed here. So if you stick to these, you can get more
realistic results. So I've put in eight
and press Enter. We can see that the background
is a lot more blurry. And if I've put some again, like 22, it's gonna
be a lot less blurry. But I quite like 16. So that's another camera
angle for us to use. So I'm going to
stop that render. And just going back to our
previous camera angle, we run the interactive
render again. We want to enable bloom
and glare as well, which you can find here. If I let that render a minute and then turn on
blame and glare, you'll see this progress bar. And when it comes in,
you'll see we just get this nice little
glare on our image. And in some certain
hotspots as well. So I'm going to leave down
as well for our renders. And let's add a,
another camera angles. So I'm going to select
this guy p and z and set up a camera thing
sign like this could be cool. And of course you can
go into your on-camera and goes, Let's add, I'm going to have to close this because not a lot
of real estate on the screen add a camera, and let's change
this field of view to 60 so we can say more. And the depth of
field is already on. And saying else we can
do is use a vert tail. And that's just going to
straighten up our efforts. Although it didn't
really seem like we needed it than that, but I think that's
looking pretty good. Let's run an
interactive render and see if we've got another
camera angle there. That looks pretty cool. We can zoom in at such. And let's also make
sure there are targets, correct, but that looks great. Let's do one more
sharp. But basically using the tips I've
just shown you, you can go round, create
some camera angles, you lights and like
that might be cool. Quite like the idea of having
one around this angle. As add the camera will
select the camera. And let's change this
field of view to 45. And I'll zoom out. And as quite a cool shot, makes sure that fulfilled is on. And in a top view. What we can do is right-click
and select camera target. And then we can target what
we want to be in focus. So let's make the back wall in-focus and run an
interactive render. And that's quite
nice shot as well. Alright, so we've got
four shots there. Go through, create
as many as you like, and when you're happy
with the cameras. And all we need to do is
go to the render setup. And I want each of
our images at for k. So let's hit for
k by n. And that means the resolution is
going to be this amount of pixels wide and this
amount of pixels high. And then under scene, we want to set a noise limit. And if we turn on corona high-quality denoising than
a noise limit of five. It should work well. And now we have to do, Let's start with
camera once per se on the keyboard and
select Camera one. And I'll hit Render. And this will keep
rendering until it hits a noise limit of five
per cent, which is here. So just let that render
out and It's down-moves, save it, and we'll move
on to the next one. Alright, so that's
finished rendering and we can hit Save. And I'll just type in.
Cameras are 01 dot JPG. Enter, Enter, save that. And now I'll go to a camera viewport per
se on the keyboard, and we'll go to camera two. Again. I'll hit Render
and let that render out. So now I'll just go
through each camera, render them out and
save each image.
23. How to Use Multiple HDRIs in Chaos Corona Renderer for Stunning Lighting Effects: So another way we can let
our scenes is we've HDRI is something I like to do
is load multiple maps. So if I press F9
on the keyboard, we're going to open up
our render settings. If we go to scene. And down here, we'll
see that when I import a HDRI from cows cosmos, it comes in as a single map. And what we wanna do is load
multiple maps which is here. So next, I'm going to load the material editor by
pressing M on the keyboard. I'm going to drag in
the HDRI to here. And this might not be the
most optimal way to do this. If you know another way, I'd be happy to hear it. So brewing a sunset as well. And let's also bring
in another sunset. Now we can close cosmos and
we have free HDRI is here. And now we can go
to multiple maps. And let's change this to free. And then we're just going to
plug each one of these in. As an instance,
you've got sunset. I think that all sunsets
you can put day times in. You could get H2RAs
from HER a haven, e.g. but once you've
got your free end, we can help set up light mix, have them as instance. And now we can run an
interactive render. Now we can notice that it's very bright
and that's because we have all of our HDRI
rendering at once. So what we can do is
toggle everything off. You see we've got a hangover
from the bloom and glare. So what we can do is go to our post and turn
that off for now, and then back over in light mix. If we turn on the first one, we can see that is how
the first HDRI looks. This is the second one, and this is the third one. Very blue. I think that's
because we've got a post. We've got the white
balance in here. But this is a great way to random multiple versions
of your same render. You can turn all the liaison. We don't want our son
that's from earlier. But you can see we've now
got this lighting scenario. We can have this one. Or even this very blue sunset, which kinda looks pretty cool. The great thing about this is that if we stop
that and hit render, we can render the whole scene again until it reaches
a noise level we want, like we did before, but you only have to
render it once and you're gonna get free
images out of this. So you can put as many HDRI
is in here as you want. And this is a great way. Say you still working on
lighting with your client. You can send over multiple
versions without having to render all of these
at different times. So go ahead and load up some HER eyes and I look forward to seeing
what you come up with.
24. Where to Find High-Quality HDRIs for Chaos Corona Renderer: What's cosmos provides
us with some great HDRI. We can also use HDR rise from other libraries or
even create your own. And I gave a lecture at
Autodesk University that covers how I created a HDRI
for a Kia advert. And if you did want to use
a another source for HDRI, then I recommend poly haven and you can go down to H DRIs. And they have tons of great
high dynamic range images. And these are top quality and they cover a wide
range of environments. So it's really worth
getting in here and having a look around and try and some of
these out as well.
 Jake Denham ⭐, 3D Artist | Official V-Ray Mentor