Transcripts
1. Introduction to the course!: Welcome to the introduction
of 3D digital fashion. Whether you are a seasoned
fashion designer or just starting out in
3D fashion space. This course will
help you to take your design and learning
to the next level. The courts will give
you a workflow of a 3D fashion designer and save hundreds of hours in your 3D fashion
journey. How do I know? I have we said mine. So if I have to start
learning again, I will start from here. The goals are designed
for fashion students, entrepreneurs and
professionals to understand 3D and digital
fashion workflow, you will learn the different
stages of 3D fashion, like modelling, finishing, texturing, rendering
an animation, and how to combine all those stages to create stunning design
and digital work. So what you're really
for Join now and start your journey in 3D
digital fashion. Now.
2. 3D Fashion structure: Let me repeat myself. The overall idea behind doing this course is to understand, make you understand that how the workflow of a 3D fashion
designer looks like. And also before you even
start learning 3D, right, you need to go through this course to
understand how this is, how the structure is
really important for you. Just to understand
so that you can be more efficient in the
learning process. Now, let's look into the
different stages of 3D fashion. And I give you all the open-source software is less tall so
that you can use, achieve all those trees, all these stages of data. Let's, let's, let's
look into the stages. Okay, so big are five
stages of 3D fashion. The five stages are modelling, finishing, texturing,
rendering an animation. So these are the five
different stages. Now, modelling is about taking your basic shape and converting that basic shape
into a desired shape. So e.g. when I'm saying modelling, modelling looks very different in terms of journals and e.g. suppose you are a 3D artist, you are trying to
model a bottle. Maybe it's not important for you to exactly match the size side. But as a fashion designer, we are looking into the mood, reduce the ability side of it. So when I say modeling, we're also understanding
that cookie, whatever we are designing, we can also produce or fake. So we are also looking
into the producer side. So now when I say produce it and the T side of it now pattern-making
becomes important. If we have a basic
torso now we can take that basic torso and
we can edit the dots. We can give fullness
through the dots, right? We can edit and my ARC buttons tried to get our desired shape, get our desired dress. So that stage is
called modeling. And it's a very important stage. And one of the
importance of part of this stage is
called pattern-making. So whatever you are doing, you need to make
it precise, right? So e.g. if you are
changing the measurements, you are doing anything,
just make it precise. So that's for us,
that's is modelling. And now let's look
into the second stage. The second stage is called
finishing supported. Let's take a short, right? So once we have created the path as we
all just those patterns, when we stitch those patterns, we have seems like, so e.g. this is a scene, right? This France seems right. All of these buttons, right? All these things are
bought off finishing. So what I mean by finishing one sharp patterns
are ready now. You need to give seams, are on the edges. You need to provide zippers, you need to provide buttons, you need to provide all the
different kinds of trims. All these things comes
under finishing. Now finishing is a
very important part, but it's mostly, it's
a visual part, right? So you can't, so there is no matrics like there is
no exact measurement, but you have to see the sample. You have to create a
visual thing that you do. So you have to do that
visually and then you have to, like that's all you've
created design. So I, as I said, this is a basic
shirt. Let's see. In the upcoming videos we have a separate
video on finishing, so I'll show you how the
finishing process works. So no worries just right
now for the timings. Understand furnishings are
really important process because if you're
finishing this, not write your
garment is not going to look realistic, right? Perfect. Now the next stage is lecturing. So in the texturing stage, Erikson stages all
about giving fabrics, giving the feel how your
fabric looks, right? So e.g. a. Cotton is going to
behave separately versus bolting
visual tones also, but also in terms of V, even all these things, right? So how much it's going to shine, however, it's not going to sign. So all this part is
comes under texturing. Texturing is all about the
look and feel of the fabric. Now the next stage is congruent. During the fourth stage
is called rendering. Rendering is all about
creating stories. You create stories
through camera, you create stories through
lights you create, you create stories
through different pieces, like creating environments
and all these things. So this is about stoic
creating part, right? So you can render
in any software. We'll go in more depth
in upcoming videos. But it's more about
you have an object. You set up, the light
is set up the camera, you create an
environment, right? And take up, and you'll create a really nice image of it
or animation out of it. So that's all rendering
rendering is. It takes buying in
rendering a look. Because it's a
very visual thing. Everybody has their own
tastes and designing, right? So it's a little,
It's about you, like how you feel
about things, right? So it's more about communicating
through our right are, and what do you want to
communicate with those designs? So rendering is very
personal rights. Some people like it, that
some people like this, but you have to discover your own style and you
have to learn it right by, by watching other people's work and all these sticks perfect. Now the final stage is
called an emission. So now basically in
animation, so e.g. if you have an avatar, you
need to make that avatar move. It's called rigging, right? We'll go through like
what animation is, what rigging is
all these things. But it's like you
have an avatar, it's moving and you
haven't garment, or you are going to simulate
that garment on top of it. It's a very easy and
it's really fun. So it's not really
that complicated. But animation mostly takes to competence to picture one
or one is the Avatar, The second is that garment. And once those two things get combined together, it
looked really fun. So these are the five
different stages of the structure of
3D fashion, right? Mottling or second is finishing. Third is texturing, fourth is rendering and 50s animation. So you need to take care
of each of this segment. And now in the next site
and now the next videos, we are going to
individually go to these individual
parts of modeling, of finishing, texturing,
rendering an animation. And we're going to
discuss more in detail. Also, I show you the softwares. Also I'll tell you
different kinds of software that you can use. What are the alternatives? Everything. But when you are learning right, you need to keep
this in your mind that which stage you are in. Very important. If you are, if you're in
the stage of modelling, you are not thinking
about texturing. So don't think
about texturing and that particular time when
you are in finishing, don't think about modelling or don't think about
rendering, right? So all the stages are different. You have to think about
it also, but not exactly. You're not worrying
about all those things. So you have to be
individual stage in every individual stage has different softwares to achieve the best quality that you can. I'll show you that. So guys, let's meet in the
next next tutorial, right? Till then, these
are the structure. Keep this in your mind also, and I'll also put this whole
thing in the format and the article below so
you can read that also and keep this
structure in mind. Let's get going.
3. Stage 1: Modelling Process: Alright, so this is
the first part of the five different
sections that we have of learning 3D fashion. So first is modeling, second is finishing, third is texturing, fourth is rendering. And fifth, this
animation, right? In the first part,
we are going to understand that how
to do modelling. What are different
softwares that you need? What are the different
topics that you need to understand within the
modeling segment? Okay, so let's, let start. Modelling is about converting your basic shape into
your desired shapes. So that's what this modelling
is all about, right? And every 3D artists
does Imodium e.g. if you want to convert a
cylinder into a bottle, right? So that's process
called modeling. But for us as a
fashion designers, so our processes to take a basic shape that can
be a torso, right? And convert that basic
shape into a dress, right? So that's our desired
shape, right? And we do that by understanding the
pattern-making concept, right? So how do, how do you
convert the shape into a desired shape by undecided
like pattern-making, right? So these two things
are linked together. Before understanding
how this works, what we're going to do is we're going to see
that what other softwares that are required
for achieving the mortgage. So there are four
basic software that is available in the market
and everybody can try. So the force is Clue
and marvelous glue and maleness are saying they're
from the same company. It's just a usability. They have muted separate. So the interface,
everything is saying, if you use clue, you
can use marvelous, if you use mountainous, you
can use chlorides visable. Second is browse, where third is architects to cardiac
3D to Caltech an optics have been providing industry
with other softwares, other theories offers to
lead to add softness. And now they have
also started getting 3D because 3D is so important. Now look, I have used
all the force offers, but I will recommend that
if you had using it, if you haven't used
any other software and you want to try
the first software that you should go with clue. It's a very intuitive
software and you are going to understand
things in a way, much more smoother way, right? And one more thing guys, look, software are just the tools of achieving what we
want to do, right? So please don't be too much PEA focused on learning software. I think you should
learn the concepts. And once you have
learned the concept, you can always
change the software. So software and learning
is not a big TV. Understanding the
concept is a big team. That's it. So our purpose is modelling. And we have different
tools like glow browser, choose any tool and understand
the concept of modeling. We are not learning software. We're learning modelling, right? We're learning the
concept with a software. So perfect. So go with glue if you
haven't used anything else. But if you have
already used browser, you can go with drugs with a concept are going
to be the same. Perfect. Now, what are the
topics that you need to understand to do modelling? Meta topics is the garment
construction pattern-making. Like why garment
construction is important? Because look in fashion. If you have athleisure wear, if you have laundry where
if you have knitwear, if you have woven fabric
on these fabrics, all the construction of DES
types of fashion, right? It's, it's different, right? So we need to understand the construction process of the different kinds of comments. Because once we understand
the construction process, we also understand the
pattern making Cytotec different processes that
are involved, right? So how the seams are finished
and all these things. So this is going to help you all the different parts. Now. The second is pattern making pattern becomes
really important. So you need to understand how to manipulate a basic torso, how to manipulate a pattern, how to manipulate a diet, how to do gathering styles, lines for less yolk, spin ducks, all these things. And believe me, this
is a small story. When I was learning fashion pattern-making with the most
boring thing in my life. And I thought I was not
able to visualize because then you make patterns in the physical space like
by cutting papers. I don't I don't see I was not able to visualize it that how
it's going to look, what are the genius I'm doing. But it's very intuitive in 3D. And I'll show you just in a bit. I'll show you how
intuitive it does. So pattern-making becomes so
much fun or learning in 3D, it's amazingly fun and you
understand the concept. So when you are manipulating
a diet, your understanding, oh wow, this is happening.
So it's really cool. So if you hate pattern-making, you're going to love
pattern-making 3D, believe me, I used to hate it. Okay. Let me now quickly show you the basic interface of clue
3D software and how this, how you can use it, right? And also look, the idea behind the CDS is not that I'm going to teach you
how to use glue. The idea is that
I'm gonna give you a glimpse of what
does, what it does it, what it feels like
to work in 3D, and what are the
different components that you need to get
right, right, That sought. Whenever we learn
any new 3D software. So there are three things that
killed mosque to consider. The first thing is
understanding the interface, okay, So that's a
very important part. So forth. Whenever you open any 3D software and this
is going to be steak, same width, multiple sulfurs. Okay? So understand the
interface of it. Great. Once you have got the interface with the ones you know,
where are things? Maybe you don't know
which tool the cells, but you know, okay, this is, the stool is used
somewhere like this, right? So understanding the interface
becomes really important because that hype you
segment your things. And second is, how do we
navigate in the environment? Our because look,
navigation become important because in 3D software you
have 3D navigation, right? Like you can. Mostly a clue has two pieces, like they have a 2D window
and they have a 3D window, so it should become
important to navigate. And the third thing
is how to bring objects and how to
edit those objects. These three things domain common for all those news offer
that is started dawning. So let's go through
these three things in. So first the interface. So the interface you see here is like this is
a 2D pattern window. This is a 3D window. And all the tools listed
here we'll be using the 3D older tools illustrate here will
be used in the 2D. And all these internal, older tools that you see
inside the window will be used are four different
visual purposes, okay, So all the visual things will be controlled by this
inside whatever happening inside the thoughts are supported like we have this mesh here in
the bottom right. If you want to hide
this, you can hide this. So all the visual things are
controlled by these tool. Although visual
things controlled in this is what these
tools are very simple. Let me minimize these things. So let me finally
show you, okay. So you have these two windows. You have all these
tools used for this, all these tools they use for
this visual library history, we have five tabs,
library history, modular configurator, optic
browser and property editor. All these things are
linked with each other. So library, in library you have all
the assets faceless state. Okay, So like e.g. if you want to
bring in appetite, click to library, go to Avatar, click on female V2, just bring an avatar
and go to garments. And you can bring a garment also like we'll bring
our basic torso. And okay, so now you have a garment, you
have a basic torso. Perfect. Minimize. Whenever you bring
any assets or to the, to the window, to
the soft ferrite. All the objects are related
to that asset, right? So what are objects? So e.g. the fabric is one of
the object, right? If you drag a button, the button like all
these listed in the top, these are all the objects
that you get with acids. And whenever you click anything, it's property will be reflected
in the property data. So if you click on the pattern, it's property will
be in the pattern. Look proper data it
will take on the face. It's property in this
property editor. So we have, you have
clicked on the face now you can just see what are the different properties
and there will be some property
called color, right? You can change this color
to something like this. You see, you can change
the color, right? Dan. So you can see how
genes eye color. So in this way you
can apply, you can, this is how these three tabs and listed in the modular
configurator clue, has given you some modular
garments or a jacket, t-shirt short that you can use. Perfect. Now let's quickly do modeling. So when I say modelling, what do you need to
take care about? As I said, we have to be technically a
little bit correct. Right. So I'm not going to go in
kind of like a tutorial mood, right? I'm just
quickly doing it. But what I'm saying
is this, whenever you are editing anything, you have to be precise, right? So maybe we want to move this, or how much we
want to move this. This, this value is right
now is in centimeter. So maybe let's do
it or 20 cm side. Okay? And in the same way we
are going to move this also in 40 centimeter. Perfect. So let's play the simulation
and you can see the perfect. So now we have given
them to address right? Now let's change
the neck line also. So neckline, we're
going to select this point, drag
it, right-click, and we're going to move this
line by six or 9 ", right? So this is what we want. Also we want to do like
this is going to happen same because these two
patterns are linked together. So whatever you Change, make the change in
this, it's going to automatically happen here. Then second we're going to
drop it and we're going to make it forward, right? Perfect. I'll look if you have made changes and this is why
it's important, right? You can just drag
and drop things. So if you have made
changes on this side, you also have to make
changes on the site, right? So in the same way
you have to make changes here also, right? And you can just type four. Let me just control Z this, Let's just move this point
a little bit closer, right? Let's drag it. Let's make it perfect. Just a very simple, just
a very simple example. And then you can
just quickly change the curved lines, right? And you can just work
around with this leg, whichever works best,
best for you, right? So one more thing, e.g. you can now select this line. You can cut your
patterns, right? Again, guys, look, you can't
cut patterns from anywhere because at the end of the
day the Spartans had to go and the like, like
you know, right? How like a, once you
have made a pattern, it will go and you will
take that pattern, right? Either scissors or anything. In the mass production, there is some limitations
that how you can cut the pattern so you just need
to take care of Donald zone. But that's fine. Initially, just have fun style. They don't just make
things too complicated. But definitely you
have to take care. So normally like what
I should have done is I should have
converted these two dots. It was singled out tight then
I could have moved forward. It would be it would have been a way, much
more better way. Okay, so now we can add
some fullness to address. So you can click on this, you can click on this. And by the way, you can exactly
make a point here, right? So maybe you want, or you want to, you want the fullness
after like 2 ", right? So you can add a point
and you can do with that. So, but for the time being,
I'm just going to do this, select this right-click
and you can make it 12 " right fullness from here. And I'm going to just
do well benches from period I'm going to do
develop benches. Perfect. If you play this now, you can see you have fullness
to your chest, right? I'm not going to do in the back. Okay? So this is how you are capped
with particular patterns. And while editing your patterns, you have to understand
this concept of e.g. of pattern-making. I, so let me show you a very simple example of
direct manipulation, right? So you can right-click on this
and you can do rotate dot. So you can at this
point select this, select this move this
up, move it down. And now you see that you have
completely converted that into the arm hole, right? And this is so easy. This is so intuitive also n Now you can shift
your dots. So e.g. now what you can do,
you can either shift your doubt or you can make the dart convert that
data into the fullness, right? So you can move that data
in a very smooth way. And by doing it in
the physical form, it becomes really
difficult to understand, okay, if I'm doing this,
what's going to happen? But now you see all the
changes happening here. Take whatever you
make, the changes in the button that
automatically happens here. So the pattern-making
learnings is really fast. Okay, so that's it, guys, look, this is not a tutorial video, so I'm not going to
go for it though. But what I'm trying to
say to you is this, that we have to consider
the two aspects. We have to consider the
pattern-making aspect. We have to understand the garment construction
aspect because at leisure we are
going to construct it and little different way, then knitwear, then a woven fabric and all these
things. So that's it. That's all in the
modelling segment. And this is what you need to
take care about modelling. And the idea is that
you take a dress, simple torso, basic torso, and that convert that
into a beautiful dress. That's the idea. Okay, So guys are in the next
assignment, or, sorry, I always say unsigned int because I always give
assignments repeatedly. In the next video, we're gonna talk about how to
do finishing and finishing. Why finishing is such an
important topic grid. So let's catch up on
the next assignment. And yeah, I think
we're good to go. Bye-bye.
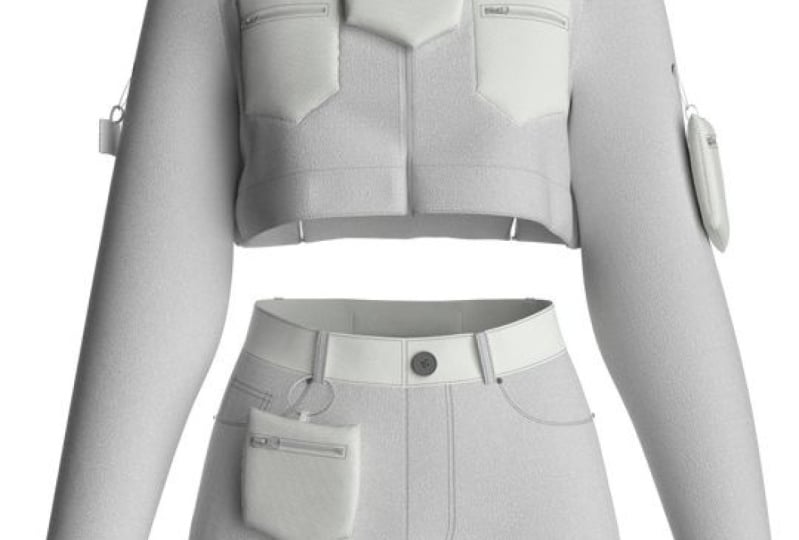
4. Stage 2: Finishing Process: Okay, So after modeling the second step in 3D designing process
is called finishing. Finishing is a very
important aspect of our 3D designing because it brings the realism
to your comments. Okay, so we'll try to see that how we can
bring that realism, do a simple handbag. Okay? So the first image
that you see here is clearly like the handbag
is designed like that. We have modeled at hand back. Now. It's missing
some things, right? It's missing the new system, missing those zippers, and
adopt stitches and everything. So the first image compared
to the second image, we give you an idea that
what finishing process is so they can address. And then finishing that
dress is by adding a trims, by adding seams and all
those finishing processes. So now let's understand what are the very important
topics for the, for the finishing
process, right? So the first important topic is garment seems
and construction. Look. E.g. at leisure wear garments
are designed differently. There seems a
finished differently, different kinds of
machines are used rate versus a knit wear garment
versus a woven garment, right? So different garments or
have different scenes. Those seams are finished by different machines and
the output is different. So you need to understand the construction process of a garment and different
kinds of comments. So that's the first
very important topic. Second is understanding
trims and accessories. So what are different
kinds of trims? What are different
kinds of zipper? What are the different
parts of zippers? How to change all these. So these are understanding
buttons, zippers, right? Or top stitches, different kinds of top stitches,
all these things. So leaning into lining
of sliders, beads, draw strings, labels, patches, all these things comes under
trims and accessories. So second topic that you need to understand is trims and XSLT. So once you combine these
two topics together, now you have a fairly
good understanding of how to finish a
government, right? So these are the two
important topics. So what we will do here is we'll try to
understand that okay, How assured is finished, okay? Specificity that how the
shirt color is finished, that you'd get an
idea that okay, How does that so I'm
going to quickly open, close and I'll try to
finish this short column. Okay, so let's jump into kilo. Let's go to modular
configurator. Let's try to bring a
simple short, right? Assured. Let's do word. Single click, single click, single click, single
click, and singles. Like I'm not eating here. Okay? What I'm doing here is
I'm showing you how to finish us simple
color of our short. Let's quickly go to avatars. Let's bring amino EBITDA also. Now, I'm going to quickly
hide this habitat so that if I play the simulation,
the garment on file. So let's do. The first thing is this data
thickness is not bound on, so I'm going to
just quickly turn on the thickness of the fabric. Okay? Now, the second thing,
as you can see, this color is not
looking that great. You can see there's
a top stitch in this carload when you
finish your color, right? So you stitch in the
opposite direction then you turn it
inside out, right? So that's what you do. So all these things are
missing properties. So first thing I'm going to
do is I'm going to quickly open up the color, right? I'm just quickly
going to delete this. I'm going to open this up right? At the same time. My uncle also going to open. Let's delete the seams also. Right now you can
see that the first, let me open the first packet. Not so perfect. This is what I wanted just to corners and it'll
open right now. The first thing is
that we can see is that our colon is
having no thickness. So let's add thickness forest. So you can select the pattern. You can go to the
property editor. Okay? How does this
everything works just like anything
that you select. All the properties of
that particular object will be listed in
the property editor. I'm going quickly hide this and just the proper
data will open. So now you've seen here
add on thickness, right? So I can just do it 2.5. So now you see right, you have a thickness. This thickness is different. And you can see that
it has a thickness. Just tried to reduce it
a little bit more 1.5 v. Now the next thing
that I'm going to do is now you see the
problem here is that the thickness edges are
really sharp, right? So we want to just smooth
doses are edges, right? So the next thing
that we're going to do is we're going
to quickly go to the top section
and we're going to turn on the curved
side geometry. So as soon as the
cough cytometry, this will be curved, right? The edges will be curved. And because the
follower is kind of, it's, it's turned inside, out. There is a line
in the thickness, as you can see here of HIV. I just going to quickly
duplicate that. So to replicate that you
can do double-sided. So once you turn this on, now you see here that it looks like it's
folded from inside. So nice. So this is a simple folding. Now the next thing, as
you can see here, this, you can see if tops to start
this going here, right? So we want to add
a top stitch also. I'll get it opposite
adding dots. That is quite simple. That we can go to the
top says section here, three top stitch and begins. What opposite? Now
look one more thing. Okay. If you see the color, the stitch don't like the stitches not
broken in the edge, right. So it's a complete stage. It's coming from
here, it's going up. Okay. So the stitches not like it will not break
right in the edges. So that's why we are
selecting a free stitching. Now, sorry, Fleet officers
now will go like this. And you can see you can't
see any top stitch, but you can see it
in the bottom right. The reason is
because this is the, this is the opposite, right? This is the backside
of the fabric. So you have to tell
explicitly into clue. I want to see the top
sinner backside also. So for that, what you can do, you can select the default
top stitch and you can come down and you can see configuration
phase, you can do both. So now inverse c in
both the phases, right? One last thing that we're
going to do because whenever the switch
happens, right? So there is some kind of
pressure that stitch, that threads apply, right? So there's a depth that goes. So what we're going to do, we're going to quickly
turn on the 3D also. So now you see that there's
a depth here that is going and you can control the intensity and
thickness by here. So we can do geo 0.10. This will be smaller. You can also change the density minus mu that's
going to come out. Positive means it's
going to go down, right? Okay, perfect. Now the last thing is because of garner need move
particles, right? So we're going to
just select this and we're going to quickly done. We're just going to add some
more pipe because right, so we're just going
to make it five. And if we play this now, you see this is a little
bit more, better. And this is how you
finish your color. Okay? So a very simple process. Nothing really complicated here. But even if you don't know this, just watch it or games. So what I mean by saying
that is that every step, once you model your
design or a garment, you need to finish
that garment, right? And that's finishing processes
requests some kind of an understanding of how the
government is constructed. What can we do? Different
trims and buttons. So e.g. this simple light, the button
can not be here, right? The button has to be here. Say this is wrong actually. So just to understand the different
technicalities of thing, That's all, that's all the
finishing processes about. And then to replicate
that, as I said, really finishing processes
are very visual process. So sometimes you need to have some reference
images like e.g. I. Was having the reference
image of a shirt. You also need to have
a reference image of a shirt or something that the garment that
you're trying to make, it will give you a very
good understanding of how things are working hard. Okay. So this is how you
finish a color of her shirt. And in the same way, you're
going to finish the black X, you're going to finish the cuff, you're going to finish the shoulders and
everything, and that's it. So this process is called furnishing and it's
a very important process. In the next process, we
can see how we apply textures and what's
the important of textures in the 3D process? And I'll revise it again. Okay? So there are five
different steps of 3D designing. So first is modelling. Modelling is like you have
taken a basic design, your converted that
basic design into your desired shape.
That's modelling. Second processes finishing
now you're adding trims, you're adding seams,
all those things. Now, after that you will
be doing texturing. After that we will be doing
rendering and then animation. All the steps. Okay, Great. We'll catch up on the
next next assignment. Tutorial is bear witness.
5. Stage 3: Texturing Process: Now in the third part, we are going to
understand that how textures are created in for your government and what are the different
components that are involved in texture creations? There are a lot of
open source softwares that are available from GitHub, from different
resources that you can use to create all
these textures. Okay? So, uh, don't worry about a specific
software in this, but understand the
concept so that you can use different open source
softwares to go forward. Now, let's quickly
understand that. What are the different
topics that you need to understand before learning
how to create those things. So first thing is the
fabric construction. So look the way
cottons are created, different kinds of Vive,
the polyester fabric. So understanding different
kinds of fabric, understanding
different structures we use structures, okay? Those are the really important things that you
need to understand. So e.g. just, let's understand
why one example, okay, so suppose if we are talking about the screen
printing process, so suppose you have a fabric
on top of that fabric, you apply the screen
printing, right? So whenever there's
a screen printing or surface printing
happening in a fabric, the bottom, the back side of the fabric will be
little faded away. So you need to understand
those concept that okay, What kind of different
fabrics are there, how those fabrics or
process and there are enough material out
there to understand, like just Google it, okay? And you will understand
so many different topics. So that's the first thing. So understanding different kinds of understanding different kinds of printing processes
or graft, right? If we give you a good idea that how this fabric is created. The second topic is now, how do you communicate
the information that a fabric has in 3D, right? And that met, that communication is done
by different maps. So I quickly show you what kind of different
maps are there. If you see the inmates, they are different
maps that are combined together in 3D so that
they will look realistic. They will give you
a fabric feet. I'll show you it also,
despite not just good, Let's go through some
of the basic maps. So first map is
called a base color. So base color is basically
it's a colorful image. By that, That's how
your fabric looks. So it's the colorful image
to add your fabric have. Now second is a normal map. So suppose you have created a simple striped
fabric in Photoshop. Now that, that fabric print, basically it's not going to look realistic because it doesn't have those bumps into
surfaces, right? It doesn't have the
right shirt to give to ingrain that we
restructure or K, the bumpiness we add normal map. I'm simplifying a
little bit more, but I hope you get my point. Now. The third map
is height map. So suppose you have an
embroidery or if you have an embossing done in the fabric. So how do you represent
the height or the width? I have added in the fabric? So that's called a height map. Next is opacity maps. Suppose you have a lace fabric, now you have an opacity. All right, so how do
you communicate that? Poet is roughness maps. So suppose if you
have a cotton fabric, it has a different roughness versus a polyester base fabric. So different maps have different roughness and that
is what you communicate. And the last is metallic maps
and you communicate any, suppose you have a
fabric in which data, so you have done embroidery
through metal, right? So obviously the
part that has metal, it's going to shine mood so
you need to communicate. So that's how you communicate
the metallic map, they don't melt, as
I said previously, also, there are multiple
open source software that you can use to communicate
these properties. Okay? So nobody's about it, just, just for the sake of
understanding that you have to always understand
that when you are creating a fabric, right? You have to understand different confidence and you have to communicate different
properties of fabric. Like high eat alike,
color, right? Normal map, right? Roughness, metallic
map, all these things. And these are basic maps, right? So you can create a
very realistic fabrics or by using all these things. Now, let me quickly
take you to another. It's a basic software sampler. And I'll show you they called these information are
included in a fabric. Okay? So right now if you see in this fabric
is really right, It's, it's, it, it looks like a fabric where it's
a very plain fabric. It doesn't look like
it doesn't give you a feeling of fabric, right? So suppose of the turn on
the VIF for this side. Now you have a structure here. And you can also
create a plain v, v, all these things
you can create. And now this looks a
little boring, right? Because it doesn't
have the brains. So suppose we want to put
a pattern on top of it. So now if we turn
on the pattern, now there is a pattern. Our fabric. Now this looks a little
bit more interesting. Okay? Suppose you, suppose
we have added a view, also want to add a different
kind of a V rated. This is a different
kind of view, and now we have also added some print. So look what's
happening here it is. You just have this fabric, okay? Suppose you have a
basic fabric, right? You can give it some
kind of a v like this. And then you can also turn on the patent rights are now
there's an image, right? And suppose we will add some metallic embossing
on top of it, right? So this is a metallic embossing. So now you can see that like
this is a little bit rough, like this surface versus this. This is more metallic. And this metallic
thing that is created, I can stick in the shape of that nominal amount
that is in the bottom. So this fabric is
created by each of their different maps that are associated with this fabric. And you can export all those
maps or you can create it. So e.g. you can create it individually also
when you can exclude. So what you need to remember
is a very simple stack. By creating textures, you need to communicate
different information. Those informations are
communicated with difference map that you can produce separately also or
by using a software, you can get all the
maps altogether. Okay, So there is a base. So let's go through it again. So it's a base color, so it's going to
communicate the color of the fabric and everything, all the pins and
everything, right? So base color, normal map, going to add some depth to your garment, sorry,
fabric, right? It's going to give you
two Avi you sat and we've all different kinds of
structures form, right? Height map is going to
communicate the height. Suppose that there is
an embroidery done. If there's an embossing them that it's going to communicate that opacity map is going
to communicate the opacity. The height map is a
black and white image. Like it's a black to white. It can be gray ovals. Okay, so it's a black and
white map saying that opacity. Then now we can see
roughness is also a black and white, right? Same goes with metallic luster. Metallic is black and white. So this is how they
are different maps. And you can get all these maps using open source software
is nobody's about it. Okay, so great. In the next, in
the next lecture, in the next tutorial,
we'll try to understand the next
property, okay? And that is rendering, like how rendering
is important, right? And what are different
components of rendering so that you can
take that also into picture. I'll say 1 mol. Again, this thing is, the overall idea is that when you are
learning 3D fashion, there are different competence. There are different
topics that you need to tackle individually, okay? So it's not like that you have learned like you
open close radio vows where software and you just create something and you just
put it out there, right? It gives you a very
shallow understanding of different components. So what we are
going through with this whole series
is I'm going to, I'm trying to help you to understand that these are
the different components. And you need to tackle
them one by one. So you can do like
you can tackle all them one on one goal, right? So you need to set
an unit to say, Okay, right now I'm
in modeling stage. I'm only going to
focus on modelling. Now second stage is finishing, so I'm only going to
sit and I'm going to focus on finishing. Okay. I'm not going to
focus on like how to create fabrics and
all these things. Once the finishing
is done now yours, you're going to sit and
you gotta only going to focus on texturing. And there are so many
resources out there, free resources out there
that you can choose, okay? Just that you need dying
to sit and you just need focus on a specific
thing, one specific needs. Now once the reaction is done, now you focus on rendering. Rendering is done now
you focus on animation. So one by one you need
to go and you need to tackle all those things. I hope that when I was
learning for the first time, I was just learning anything. I didn't have any
structure to my learning. And with this whole series, I want to give a structure
because I have really, I have not found any, unlike explaining
people explaining the different stages right. That you need to go through. So that's just my attempt to give you a better
understanding. Because you like if you had doing it for the first
time, don't don't. I knew this would you will feel like, can I do this or not? And this looks so difficult, like what are different maps? How to produce different maps? All of these things,
don't worry. Tackle everything one by one. Breathing is it's easy, it's possible. No worries. Okay, great. So we're going to catch up
on the next assignment. The next assignment
is going to be about rendering
lights camera action. Okay? Take care.
6. Stage 4: Rendering Process: Alright, so the next stage that we'll talk about the food state is
called the rendering. Right after this, we
just have ammunition. So now let's understand
what rendering is. It's a very important
stage because two of the major components
comes into the picture. First is light and
the camera, right? Because once you have created the things
you've applied texture to those garments, to
Avatar everything. Now the time is there to apply to do a rendering,
okay, to put the lights. And generally,
every 3D softwares give you this option
of rendering. In the same software. H ACLU has its own engine, browser has its own engine. I'm going to show
you the rendering in Blender because it's
more intuitive there, because you can see delights, you can see things
working in a way, much more, better way. So we'll go through blender. Okay, but before that, let's first understand
what rendering is. So now once you have
finished the bag, you've applied all the texture. So now you can see
that you can create some environment
and you can quickly arrange some objects
around that object, right? You can give a story, okay? Rendering is also about
its kidnapping story. Okay? So you have, you are
setting up the scenes, you are setting up giving
the dextrose and everything. Now you rendered
out a mess so that your design is way
much more interesting. There are major two
topics that you need to understand before
you tackle this topic. First is understanding
the environment. Look like Photoshop when you do, like when you do 2D art, there are so many resources
out day in the same way. By creating
environment, there are so many free resources
out there, e.g. there's a website called Sketchfab that's
completely free. You can have so many assets, like completely 3D assets
you can import into clue, into Blender, all 3D software. So their major, if our
mindset going to give you. Second is you have
bridge, right? By Unity, you can use that
It's completely free. They are more than 20,003 data
sources for the resources. So that is Blender kids. There's so many other resources, nobody's about it for
the HDR, HDR heaven. So there are so many website for individual things that you
can get completely for free. And that showed a 3D
communities also doing amazing. So first thing is understanding how to
create environment. And the second thing is
the lights in the camera, how liked affect your seat? And how to understand light. And light is a very, very, very crucial parts and you
need to get that thing right. Okay, now, let's
look into some of the rendered images that we have done while doing
the coast, right? So let's jump right, the dance jump that you can see on the image on the left, right. So you see right. Like I
could have also done it like I could have removed
this slide, right? Spherical, right. And I could have just made a
plane light, right? But the scene right, what I want to create,
I want you to read it. I want to create a stage, right? I want to make this woman,
she's flying, right? So the story that
you want to create, you do it with
environment, right? The floors are the dark
background delights and it's very important. So e.g. the same light condition
that you have used for the handbag will not
work for this image. That's where these two
things are really important. Okay? Next is sometimes
what you can do. You can create a little bit more elaborated
scene right on the, on the right hand
side you can see that you can create a
complete scene like so. You can see there's a table
lambda light is falling here. So there are multiple lights which are there in the scene, okay, there's not
just one light. So multiple lights create multiple scenes and they
could do different shadows. It brings realism to your fight. So what we're going
to do is we're going to quickly go into Blender or came and
gave him to see that how these are fighting bite, how the slides environment
holds, everything works. So this is my basic scene, this garment and avatars
exported from our clue, right? And now you see that this looks dull because
there is no texture. I applied everything right? So let me go to the
rendering mode. So in this rendering mode, What's happening here is
you see the light, right? This is my light. This light is projected
grade on this avatar. So I think quickly, if you want, I can hide this slide, okay, Now this has completely dark. I can bring different
kinds of light. So I can bring up ad, I can bring up a
point light, right? So this is my point light. Let's move it up. I can increase the intensity
of this light through 200. Okay? I can move the slide, right? So when you are
moving the slide, you're creating
different kinds of like you're getting
different shadows. You're creating all
these things so simple. This is the, this is the one way of looking into
this particular image. Right? Now, maybe this image
looks to you, okay? So what you can
do is you can put this slide a little
bit more far ahead. And like, yeah, like, like here, you can increase
the light a little bit. Fade. And you can click any again, go to the light and
increase the stroke. Are 1,200 Tibet up differently. You can also copy when mood light and you
can put it here, right? You have now two lights. As you can see, the
shadows are falling. So I want to create a US. I just created a soft tag array. So I can increase the radius
of the light rates and can see the shadows are
non die-hard. Okay? Control C, control V. And I can just quickly put
this arrow or the ten. And Let's see. Yeah. Okay. So this is
my scene and, uh, one more thing I
can do wish I can quickly I can quickly
bring one more plane data. This is, this is going
to look a little bit more interesting to show. Now. This is your read this. This is your complete see, okay. This is your one scene. Okay? Now compare this C, okay? Now, basically, now you can increase and
decrease the light. So you can select the
light, you can increase it. Don't worry about like
what's happening here, like how I'm using the light. Just look into the different
aspect of it, right? So okay. So what I have done is this that I'll show you the
another rendered image, okay, so that you get a
better idea what's happening. Look this image versus
this image. Okay? The images are same. It's just that the background. The lights, they are, they are having
different effect, different visual
effects side you can, I hope you're all
able to see it. So this is what light does. It Good Eats different
visual effects. And it gives us, it gives more story
to your work, right? So that's the light
does not just there to, just to make this space
brighten up like it. It's used for different things. Again, suppose this is your, this is your scene, right? You can go to the material
and you can add some. Just look, I am not
expecting you guys to understand like the blender because maybe you
haven't used it before. But what I'm trying to tell
you is this that every okay. Let me open that image again. Yeah. So the thing that I'm trying
to communicate with you is that lights play a very crucial role in
communicating that. What kind of story you
want to tell about the whole scene and
also the other objects, the background, these are
all play a very major role and it's not going to
come up on the first day. So the more visual
cues that you take, the more inspiration
that you take, it's going to get
better and better with the more work you did. Okay, so, but there
are few standards. There are few standards
that always work. So e.g. a. Plane light on
the top of the head, right. It always sobering time. The
studio lights like Toby, this to do that, I just set
up it always work, right? So there are few methods
which always work. You can set up like three
lights that there are different kinds of
setup, like e.g. in a studio, they are
different than setup. You can follow those and it will look good.
Okay, perfect. Now let me also show you
some other quick work so that you can Wiki understand more like
how those things are. Also, this is another
scene that is, and I'll show you the output of this particular image, right? So that you get a better idea. So this is the output
of this image. Okay? So what I wanted in this images, I wanted a background,
obviously, right? But I didn't want it
up, lean back on. I wanted some textures. I wanted some kind of
finishing date and I wanted the fluid because that's
what was visible. So now I have this object, these objects that you
see here, this object, all of these objects are
from Sketchfab and bridge. These are the two free
open-source platform that if in Jewish, okay, the garment is from clue, the hat is from Blender kit
and the avatar is from dad. So these are different
combination that I have used. Now. This pink that you
see here is a window. Basically, if I go to
the rendering mode, now you will be
able to see that. Great. So this is the window
and there is disliked. So there are different setups. Okay? So there is this one
setup of a light here. This is the light.
So if I hide this, you can see, right. So now it's a little
bit dark and dry, but I had given this light so that this piece is a
little bit more upright. Second is the, the sunlight. The sunlight is coming
directly from this area. This area, the sunlight is
coming directly from here. Okay? So if I suppose, if I take this pen and ink, if I move this panel here, now you can see there is no
light that is coming, right? There is very little
light that is coming here because it's
blocking the sunlight. So now there is this one moonlight form that
is called sunlight plywood. And different kinds
of, as I said, different kinds of
light forms that work. Okay, so now you see I have created this window
for the sun, right? And then there is also a point
light, which I have also. If I turn on this now notice space would become a
little bit more and prayed, they tax what I have done. And the final output, as I've already
previously shown you, is this is okay, where it is. Let me quickly try
to bring that. It's something like this. So I needed this back on. I needed the fluids. So
this is how you do it. Okay. So this is the second
kind of a setup and the final setup is File Open. I have already prepared
some projects file for you so that you can
understand and take away. Okay, So now this
is the next step. It's a very simple set
of data can you do? Let me hide the camera, which are very simple setup
that this is the light vape, simple plane like
this is a float. This is the basically and I can just move it a little bit
more forward actually. Yeah. So if I turn this on, if I turn that entering Lake
now you can see that a very, a very simple set of like
Nothing, Nothing much complex. Okay, so the output of this is going to look
something like this. Okay? Easy, simple. Now again, one last thing that I want to show you is this, that as I said, light plays a crucial part
in telling the story. Sometimes you want to
remove the background. You also want to bring a HDR
images to the background. You wanted to create a
kind of a field, right? So to give the background, the sky and all these things. So these images are
called HDR images. Okay? So you can get, there's a website called
a wavelength here. I've got a HDR heaven pre-op. So you can get a lot of 3D or let me open
that file for you. Let me show that. As toll on HDR. It should be heaven. It's, the name is see
it's spotty heaven now. So what you can do is you can
quickly come here, right? And you can see they give a lot of environments
to you, right? So it's completely
free. You can download and you can install
this environment. So these are different
kinds of environment that you can use are in the same way. There are multiple 3D
resources out there that you can obviously use
accommodated for feet. So what I mean vector with this, with this assignment over this particular
part for rendering, what I wanted you to communicate was satellites
are really important. Every software is going to find sample clue
is also going to have the setup of lights
that you can use. Indices in the browser also have this or every major software
is going to have it. So you need to take light into consideration of not just
illuminating the space. Okay. It's not like that.
So you need to take a light into consideration of what kind of story
you want to tell it. And then you need to use if you don't know what kind of
story you want to tell, origin or what kind of a story, but how to do that? So you can just go to,
go to online, right? Go to Google and just search, search the inspirational
image that you're like, Yeah, this is image that I
am looking forward. Then try to understand how the light must have
been set up right, like where the
other lights happy. And then go forward
that great guys. In the next and the final CVs
of this assignment series. Like what we're
going to do is we're going to understand how animations are created with what are the different
components of animation. And then I think this re-enter with this
whole structure, right? From modeling to finishing, to shrink, to rendering
to animation. This whole series right now
we haven't rendering stage. And then the final animation, animation is just
an extended version of rendering bonding.
So it's quite easy. So do all these things properly and understand
all if you don't, like, if you want to
revise something, you can go back, you
can quickly look. And then once you are
in a particular topic, right, then just
be in that topic. So e.g. if you are in
the stage of texturing, don't worry about rendering. All though those two
things are related because you live it
does being texturing. Don't worry too much
about rendering. If you are in
finishing, don't worry too much powder entering
or texture in tight, complete individual stages very nicely and then move on
to the next segment grid. So guys enjoy, we are
going to catch up in the final next assignment, or that this animation.
7. Stage 5: Animation Process: Okay, So we are now in the
final stage of our CDS. And this is animation. You can see the animation
on your screen console. Animation is an
extended version of a single image such that the
complete image is moving. Okay? So in animation there are, if you will see right in
this particular animation. So there are two things
that are happening. One is the avatar
is animated, right? And based on that
avatar animation that plots the garments are also animator to data to different parts and they
are done separately. Okay, so let's quickly
jump into how it works. So I'm going to quickly
show you a simple workflow of the same animation
that you have seen before. Let's
quickly see this. So this avatar is already
having an emotion. Ok, so now we are
giving the government, we are trying to play
the garment now. Look. Now once we add a lake, because this avatar is
also already having the motion right now once
we have given the garment, we have, like we have
done on the simulation. So based on the
motion of P Avatar, the Gamma tilde are
going to move, right? And this is happening
obviously include, you can also do this the
same thing in browser where to cut 3D or
any other software. So now you've got the
animation of the gamut. So before you had the
animation of the EBITDA, now you have the animation
of the garment odd. So now what you have done is you have taken
those two things together. You have put it on a blender. Or you can use Maya or whatever
3D software you're using. It's just that you need to
understand that you need to put those two things
together somewhere. And now based on that, what you had before this what we did, as
you can see here, we had just like we have
given the shoes and the shoes are going to move
according to the foot. Okay, So now, now you can see, now we have also animated
the football also, okay? And this is how the complete
animation looks like. So this is how a simple
admission and stack will look into one
more simple animation. So now let's look into this. So this is a very pretty
simple animation. It's called wind.
Okay, so the tool that we're using here is
called wind animation. Okay? So now you have this garment. You have given the
wind to it by now. So this is, this will
just simply garment. Okay? Now you have used this winter tool to move
it and now you can, you are bringing it to Blender. You're giving it animation, you are giving it textures, and now you play the
complete animation, right? That's how it works. I'll show you the
complete animation. Don't worry about
anything, okay, so this is how the things work, or same in blender,
that this is the hole. So you have to
animate the avatar. Second thing is you have to
animate the garment file. Then you have to bring
those two things together in any 3D or any other platform. Okay? Now, let's quickly understand what are the topics
that we need to get. So the first topic is
important as the avatar. How to create avatars, how to rig that amateur. So those are the two things. Now, then how to create the
rest of the animation, right, by going into clue, rendering
and all these things. So these are two
different topics. So avatar and rigging
is the friend thing and then animating the garment
is a separate thing. Okay, and those two things, we'll see how those
two things work. Now. If you open glue 3D software
or any other software, you will get avatars right? In this offered. You can take that avatar
and you can bring that avatar to a
software called Mixamo. This is by Adobe. It's a
completely free to look, a free online tool. So you can bring that avatar to this, the software, right? And then what you can, okay, lets you can upload
the character, right? And then what you can do
is you can search for any kind of animation and you can just apply that animation. So if I apply this MAN kick. So now you can see
that this is leaking, so this software is
helping you to rig it, okay, so you don't have
to individually do the aggregation and
you can combine different animations
all fit together. Okay, so that's also possible. So you can download this animation and you can also download this
animation, right? And you can just
combine this animation in particular software. So one of the software that I'm going to show
you to create avatar, to animate that avatar
is called dads. Again, it's a free software. Everybody can download this. So in das of you can, you can get different
kinds of avatars. And you can see like
this is our appetite. Okay? Now this avatar have these bones at h it can you see this triangular
things, right? So these are called bonds, okay? And based on these bones, basically you get you
get this rigging, the how this rig is created. This rig is created
based on the bones. Okay. So software recognizes. Or create its own
booth and then rigs. So suppose you have this avatar, you have this wound site, and you have imported
some animations from Mixamo right now
you have applied this. So this is a very
simple animation. You can see very
simple animations. And this is how you apply that you create
an animation OR gate. We'll create a simple animation. Now, what you do is you
take this animation to software like Blender or glue or any other
software right? Now. You just have the advertisement
have nothing ends. Okay? Now you're
going to take that to a clue or browse way
because you now, now you need to do
cloth simulation. Okay? So once you take that to clue, now what you need to do
is you need to bring it, bring the dominant flat file from Google blender and bring the avatar file from
a dash to Blender. And you have to combine all
those two parts together. So let me quickly
show you what's happening here, okay? Okay. So look at this, this
complete avatar. So this avatar is
a separate thing. This dominant is
a separate thing. So if I just hide
this, this, this, the, the avatar that you see right here is a
separate thing, okay? And this cloth is
a separate thing. So these two are not connected. So this avatar, this is
not connected at all. Okay? So what's happening
here is it's just that these two and these two things as sing it in such a way
that you feel like, okay, these two things add one day but these are not so
avatar is separate and the the garment file is separate garment file we have
we have created from clue, the admission of the garment Pi. The avatar is created from dies. Now, if you play
that US animation now you can see that these
two things up playing, right? And then goes the tic. Okay. Now, one last step. Okay. So this is your admission. So before this, if you see like if you want
to take our render, rendering is done on
one picture, right? So this is how you are
doing entering, okay? If you want to take the
complete animation, so every software is
going to give you this, um, where to take
the animation frog. Okay, so let me
show you quickly, or in blender, you have this output properties and
you can see the output. So you want a video file, okay? The format is MPEG4, right, where it will
save it, right? And then you can render, and you can render the animation. You can render that
image or you can enter the animation is you'll
enter the image. It's just that one single
frame will be rendered. If you'd enter the
animation that complete all the frames
together will be rendered. So that's how our
rendering works. Okay, so again, let's
quickly do a revision of a complete five-part or that
you need to understand. Okay? So in 3D creation rate, you can call it a 3D
fashion creation. There are five parts. The first part is modeling. The modeling stage. We are converting our basic shape into a desired shape and that conversion process and
really technical also, you can include, you must include pattern-making
concept on so, so if suppose you want
to add fullness to your comment right here to
understand pattern-making. That's the first
thing. So modeling process is unclear
technical process. You need to understand
pattern-making into consideration. So that first part is modelling, second part is finishing. Now finishing is about understanding the
garment construction. How does e.g. nuclear fabric seems look right? It seems unlike the edges. Edges. Okay, how did tooth edges look? Right? How does buttons and
zippers are pleased, right? You can't put buttons and
zippers every way you want. It had to be some
technicalities. How to put labels and
all these things. So now the second stage
of finishing is again, a little technical and technical meat like
it's a visual thing. But again, you need to
understand those visuals, how the rib fabric is going to look like
an island, right? So that's the second
stage is quite finishing. The third state is
called texturing, and you need to understand different properties of fabric. So how does a court and behave, how does a polyester
fabric became? What kind of different
waves are there? How does embroidery
and all these things play into the fabric, right? How does the screen-sharing
thing will happen? So how does the printing
happens on a fabric? And because of that printing, what happens to the
backside of the fabric? Okay? So every, every
topic has some kind of a technicality, right? And those technicalities or
not that difficult to do, even if you sit for
one or two day, you can understand those
topics very clearly. That stuff, That's a finishing, a texturing part, right? The third stage is
called rendering. In the rendering stage, again, you need to be
understanding how, how, what kind of a
story I want to tell. So based on that storytelling, you are going to
set up your lights. You haven't set up your camera, you're going to set
up the environment. The third and the final
thing is animation, right? So if I've connected the
anabolic environment just to bring some life to my design side, Let's
do some animation. So that's how you want to do
animation laid in animation, you need to understand
avatars, date, then how to give motions
to those avatars, fight, and then that motion had to
be conveyed to the garment. Also, how to convey that
motion to government, and how to bring all
things together. That's been animation. It sounds too much, but seriously like if
you go topic by topic, everything will
fall into picture, everything will fall into line and you will learn
it and you will enjoy it like I adding more than learning,
you're going to enjoy this. Okay? So, um, so
that's how the whole of the complete 3D
fashion journey of urine looks like and look, learning is like every
keep going on, right? It's just that what
I'm trying to do with this series is I'm trying to give you a
structure for your learning. Because when you give
structure to your learning, you learn really fast also. And you learn in a way much
more better. Wait a second. I have realized that I teach, I've taught more
than 2000s to Finch and what are the likely many
people already working. So they are doing this in
the side projects, right? So when you are
doing anything like you're just doing it or you have like weekly you have
three to 4 h on D for that particular
thing or one or two word. So now it becomes
really important to get a structure because
you don't have that much of time to waste. Your time is really
valuable in that sense if you are already
working somewhere, right? So you want to make it as
efficient as possible, not wasting too much of time. And if you waste
too much of time, like you always do tend
to lean that thing, then you don't complete it. That said, give a structure
to your learning. That I start with
modelling Grb2, finishing, prepare everything well, and
then start learning. It could be a ring
like this is fun, like this 3D thing
is complete, fine. Okay, I hope that guy is this. This whole series was informative and I
hope this will help. This is something that you need to watch before you
start learning 3D. Okay, you can learn 3D
from wherever you want, but please, please,
please go to the cities. It's really important. And if you share this with your
friends because this is a, I'm going to make this thing is completely for three, okay? Because I really
want everyone to go through these steps
before they start. So if any of your friend is
thinking to start, okay, 3D fashion journey, please do send this video to that person. And it's really
helped them also. So guys, really nice to have you and thank you
for taking our time. Enjoy life, keep
learning new things, take care, and bye guys.
 Vivek Pujari