Transcripts
1. Introduction: Katrina here, welcome
back to another tutorial. Gsarings are actually
super simple to make. We just create a spiral
with the wire and then spread it out to create
the petals of the flower. Then we will add
texture to the flower by shaping the petals
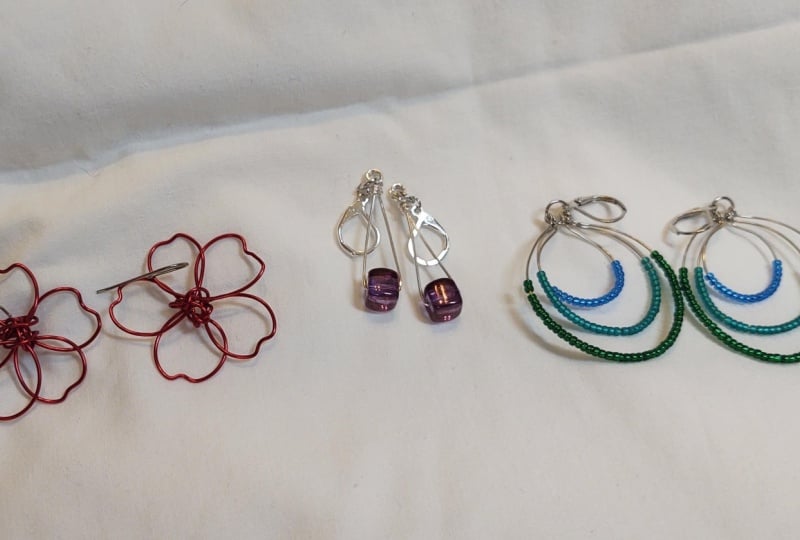
with our pliers. A classy and timeless design, these pendant earrings are very simple and
straightforward to make. Choosing a bead that fits on the wire that you have
decided to use for these earrings is one of the most important parts
of creating this earring. These earrings are
easily customized by changing the bead that
you use for your design. Bending wire next to our
bead, creating loops, and wrapping wire to secure
the earring are a few of the things that we will be doing to create these earrings. The movement the hoops add to these dingle earrings is
so fun and I love that we can change up the whole design by simply switching out
the beads that we use. We're going to be cutting three different lengths
of wire to create three different sizes of hoops that are
descending in size. Each of those wires will
then be shaped into three different sizes of hoops to which we
will add our beads. Once you finish the video and if you created
these earrings, I would love to see your design. So please share that with me in the Protex section
or the comments. If you don't follow me already, you can find me across most
social media platforms at Katie Rose Creates. You can find me on
Skillshare, Facebook, YouTube, Instagram, the
Thad Zap, and Pintris. If you enjoy this tutorial, then you should
definitely go check out the other videos that I have available for you on my page. Once again, thank you so
much for watching my videos. Now, let's go ahead and jump into creating these
wire earrings.
2. Flower Dangle Earrings: Welcome to this wire
jewelry tutorial. Today we're going to be making
these super cute flowers and turning them into earrings. To create the flowers, we will be using this 20 gauge wire, and this is a silver
plated copper wire. Of course, we need a pair of ear wires in whatever
style you like. Then we're going
to use a ruler and then a size two ring mandrel which is about a
half inch diameter. Pliers we will be using
are the Nylon jaw pliers, the wire cutters, and a
bent chain nose plier. To begin, we're going
to pull out a length of our wire and straighten it and smooth it out with
the Nylon jaw pliers. Next, we are going to
measure out 12 " of wire. Now, the ruler that I keep in my jewelry box is
only six inch ruler, but if you want to
grab a foot long ruler or if you have a
soft measuring tape, that would work a lot
better than measuring and then moving your ruler
like I had to do here. Once we have measured
out 12 " of wire, we're going to clip it off
with our wire cutters. Now we can begin
shaping the wire. Placing it onto
the ring mandrel, we are going to completely
wrap the wire around the mandrel five times to create five petals
for our flour. Wrap the wire tightly around
the ring mandrel so that it creates that small
circular shape. And then once we pull it
off of the ring mandrel, we can double check to make sure we have as many
petals as we need. The direction that we wrapped the wire is the direction that we are going to gently
spread apart the spirals. Compressing the spiral,
we are then going to gently pull and spread the circles apart so
that we can then bend the wire and spread those apart to create more of
a flower shape. Now that we have
spread the wire, we can see the individual petals and we just need to continue gently bending the wire so that it creates a
circular shape. Next, I want to secure
this end of wire. I'm going to use my
bent chains pliers and create a small hook at
the very tip of the wire. Then I'm going to take that
hook and attach the wire to itself and then secure it tightly by pinching it
closed with the pliers. Once we have secured
this end of wire, we then going to
go back and adjust the petals so that it
is in our flower shape. The way the letter B is
written where it has the long back and then the
two half circles is how these flower petals
are attached together so that back of each
petal is straight, so we need to bend
it a little bit so that it has a curve so that the flower petals sit more
nicely in a circular shape. Now we have this
long end of wire that is sticking out
the back of the flower. This is what we're
going to use to create the center of the flower and also secure all the
petals together. We're going to draw it up through the petal that
is right next to it. This is going to secure both
ends of the flower together, and then we're going to bring it down through the petal that is opposite of the one that
we just came up through. Then we're going to repeat
this criss crossing the wire, rotating our pattern,
but going up and down into the petals that are opposite or across
from each other. This does not have to
be perfect at all, and we're simply
wanting to make sure that we secure all
of the flower petals together while at the same time creating the center
of the flower. Continue wrapping the
wire and securing it, criss crossing it back
and forth from petal to opposite petal until you have come to the
end of the wire. Once we have reached
the end of the wire, we're going to take our
bent chainospliers, and we're going to hide
that end of wire and tuck it into the wrapping in
the center of the flower. Make sure that it is securely
hidden into the center of the flower so that that end does not stick out and won't
get snagged on anything. Here I gently bend
the wires just a little bit to create a
slight curve to the flower and then I'm going
to go back in with the bent chinos players and we're going to start
shaping the petals. On either side of the
center point of each petal, we are going to bend the wire down towards the
center of the petal. Creating this dent in our wire is going to give the flower
a more realistic look. After bending the
wire the first time, I want to go back around
the entire flour and sharpen those binds in the wire just to create a
little more definition. This flower shape
is so adorable, especially because it
reminds me of the wild rose, which is where I get the rose
in my name Katie rose from. Okay, now that we have
finished the flower, we can go ahead and
add the ear wire. Twisting the loop on the
ear wire to the side, placing it onto any petal, and then securing the ear wire, we have finished our
first flower dangle. Repeat all of these steps to create a second flower
so you can have an adorable matching pair don't forget when adding the
flower onto the ear wire. If you created your flower to
have a slight curve to it, make sure that cup of the curve is towards the front
of the ear wire, and that is going
to look super cute. Now you have completed these
wild flower dangle earrings. I hope you enjoyed
this tutorial. Thank you so much
for watching and I look forward to seeing
you in the next video.
4. Dangle Hoop Earrings: Katrina here, welcome
to Another Tutorial. Today we are going
to be creating these dangle earrings
featuring beaded hoops. Starting off, we're
going to be using a 22 gauge plated copper wire. This isn't a gun metal gray. Next, we have a set of stainless steel earring
wires as well as jump rings. Then we also have a ruler. Next, we have a random
bottle cap from something, I don't even know, but the
diameter of this is about 1 ". Besides this cap, I have a bottle and a ring
mandrel that gave me the three graduating sizes that I need to create the hoops. Next, I chose three colors of a set bead that is
an 11 ought size, which is similar to
a two millimeter. The pliers that we will be using are our Nylon jaw pliers, a pair of wire cutters. Then we have our
chain nose pliers as well as our
round nose pliers. To begin creating, we are
going to pull out a length of wire and smooth it down
with the Nylon jaw pliers. Placing it on the ruler, we're going to measure
it out at 5 ". This is going to be
our largest hoop. Marking the wire at
the five inch mark, we will then use our wire
cutters to snip it off. Smoothing another
length of wire, we're going to place
it on the ruler and measure it at 4 ", 1 " smaller than the last piece. Marking our wire at 4 " for the middle hoop, we
can then cut it off. Again, straightening the wire and then placing
it on the ruler, we're going to measure 3 " for the innermost
and smallest hoop. After cutting this
length of wire, we're then going to use
our chain nose pliers and our Nylon jaw pliers
to straighten out and smooth the wire
as much as possible. Taking care to smooth
out the wire ensures that our final design looks
clean and professional. Taking our shortest
length of wire, we're going to wrap it around our smallest diameter
object and create a circle. When bending your wire, make sure that you press both ends of the wire down so that they are bent into a circular
shape as well. To help you picture the size of earrings that we are making, my center hoop is about three quarters
of an inch diameter, which is approximately a
size eight or nine ring. Taking the next length of wire, we are going to place it onto whatever object you have next. On my bottle cap, I'm going to wrap the wire around making sure that I press the ends down so that they are
rounded over as well. Most jewelry wire
has a tendency to spring back after you have
wrapped it into a shape. You can see that the ends are not exactly next to each other. I'm going to press
the wire gently together from either
side and from top to bottom to help close
that gap a little bit so that it's not so much in
between the two ends of wire. Moving on to our longest length of wire and our biggest object, we're going to wrap
the wire around, creating a circle, pressing down the ends to create
the largest hoop. You'll notice how the
wire springs back. So this is where we go in with our fingers and gently
pressing the wire together, keeping the circular shape, but pressing the ends
closer together. Having shaped each wire, we are now going to use our roundness pliers to create a loop at one
end of the wire. Placing the wire into
the pliers near the tip, we're going to bend it
over and create a loop. When assembling the earrings, this loop is what we will use
to hook onto the jump ring. But for now, it's going
to be a safety measure to keep the beads on the
wire as we string them on. With the loop created at
the opposite end of wire, we won't have to worry
about losing any of the beads that we
thread onto the wire. At this point, let the
creative juices flow. You can use any color of feed, any size of feed as long as it fits onto the gauge of
wire that you are using. And how many beads you add onto the hoop is
totally up to you. I filled about a third
of the hoop with beads. Once you are satisfied with how many beads you have
added onto the hoop, we're then going to go back with our roundness pliers
and close off the hoop by creating a matching loop on the
other end of wire. I like to measure the loop
with my pliers to ensure that the second loop that I create is the same size
as the first one. Grasping the wire firmly in our pliers and then bending
it over to create the loop, we can then hold the hoop in our fingers to gently
press the ends together. Moving on to the
next length of wire, we're going to repeat
the same thing by creating a loop at
one end of the wire. A after creating this loop, we are then going to move onto the beads and start threading
on as many as we want. For this hoop, I also filled about a third of it with beads. After adding as many
beads as you want, we are then going
to go back with our round nose pliers and create a loop on the other end of wire to secure the beads
onto the hoop. Coming to our largest
length of wire, we're going to repeat all of these steps to create
a loop on the wire, add beads, and then create a second loop to secure
the beads onto the hoop. I love adding beads to wire jewelry designs because
you can make each piece unique simply by changing the color style or size of
bead that you are using. If you'd like to make
these earrings in the exact same
colors that I did, I will have the products linked for you in the description
of this video. I would also
encourage you to play around with this design
and make it unique to you. Change up the style
of the beads, change the color of the beads, and see what you
can come up with. Once we have added as many
beads as we would like, we are then going to take
Runs pliers and close off this hoop by creating an identical loop on
the second end of wire. After creating our
first three hoops, need to go and create three more matching hoops for
our second earring. Before assembly, we are going to take each hoop and press it with our fingers to bring those two ends of wire as
close together as possible. Gently pressing and shaping
the wire so that it maintains the circle shape but brings the two ends
of wire together. Then using the chain of pliers, we are going to go over
both ends of the wire, making sure that each loop is pressed down and aligned
with the other one. We want to do this
on every hoop. After this, we are going to grab the jump ring and using
our chain ofs pliers, we're going to grasp
the jump ring in the pliers and open it by
twisting it to the side. From smallest to largest, we are going to place one end of each hoop onto the jump ring. Once we have put one end of
each hoop onto the jump ring, we are also going
to add our earring. Make sure that the
front of the earring is facing the front of the hoops. Then carefully turning
the jumping around, I'm then going to
add the other end of each hoop in order
onto the jump ring. O. Once we have added all of the loops
onto the jump ring, we can then close
the jump ring and now we have finished
our first earring. Here you can see that I added the hoops in a different order, but it doesn't matter
how you put them onto the jumping as
long as they are all added in graduated sizes so that they can each hang
independently of each other. I would say the back
of the earring is the direction in which
we bent the loops. We're going to add our ear wire, making sure that the front of the ear wire is toward
the front of the earring. After adding the ear wire, we can then finish putting the rest of the loops
onto the jump ring. Now we have completed
these beaded dangle hoops. I hope you enjoy creating
these dangle earrings with me. Thank you so much
for watching and I look forward to seeing
you in the next video.
 Katrina Anderson, DIY wire jewelry and craft tutorials