Transcripts
1. Code a Lava Lamp: Hi, I'm Isaac and I make Innkeeper games. In this class, we'll create a completely digital lava lamp using shaders and the Godot game engine, which is a free and open source game engine. The goal here is play and experimentation. There are tons of possibilities for your lava lamp while you're coding it and after the fact. You can change things like the size and speed of the blobs, the background color, the foreground colors, the gradients, the glow of each individual blob, as well as the base itself. We'll be writing our lava lamp code using Godot shading language, which is very similar to GLSL, the popular OpenGL Shading Language. At the end of the class, we'll create a seamless looping GIF of your lava lamp project to share in the project gallery and elsewhere. As a bonus, I'll even show you how you can keep your lava lamp running on your desktop. This class serves as an introduction to 2D fragment shaders, which are often used in game development to achieve neat visual effects that run rapidly via parallel processing. Being able to write shaders is a valuable skill that can add a lot of flair to your game projects, and after you've created your lava lamp, you'll have a pretty good understanding of how they work. I'll be careful to explain every step in detail, but some previous experience with coding or game engines in general would be very helpful for your understanding. If you run into any issues, please let me know in the discussions tab and I'll be sure to help you out. With that, let's get started. Make sure you're following me here on Skillshare for more game development classes like this one. In our first lesson we'll observe a real lava lamp to figure out how we're going to emulate it with our shader code.
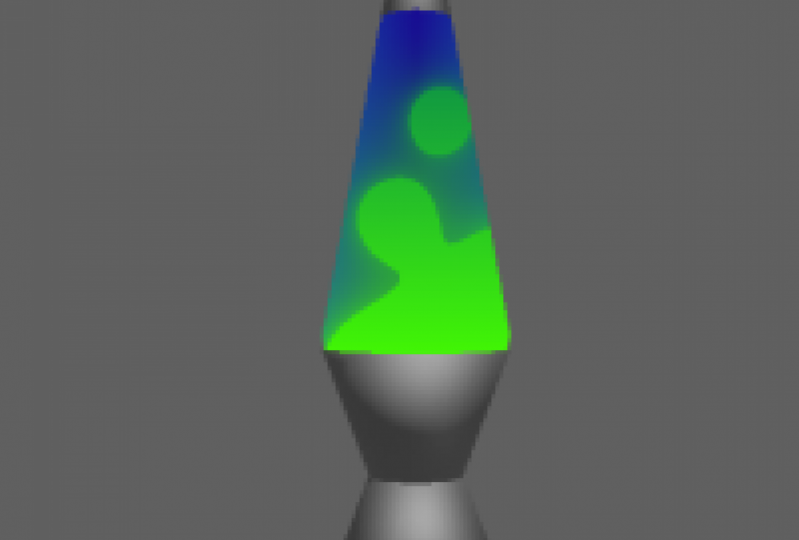
2. Observe a Lava Lamp Reference: Let's take a look at this lava lamp for reference before we start coding. One, the lava separates in a distinctive spherical blobs, stretching, separating, and fusing together. We'll use something similar to metaballs to achieve this effect. Two, the lava tends to flow quickly, up or down, slow down when it reaches an endpoint and eventually switches directions. We'll look at some mathematical functions that oscillate like this over time. Three, the lava is really bright at the bottom and a completely different color at the top. It seems to glow a little bit. We can try to use some gradients here to mimic that effect. Four, similarly, the alcohol solution is brightest at the edges of the lamp and darker at the middle. Again, we can try to use gradients here. We'll keep these ideas in mind as we start to code. In the next lesson, we'll download and setup Kidlo so we can get started.
3. Set Up the Engine: In this lesson, we'll download the engine and set up a basic project. If you don't already have the Godot game engine, you can get it at GodotEngine.org, click Downloads and find the download that matches your operating system and your system architecture. You can also download the engine from Steam. If you do, it'll come pre-loaded with a bunch of demos that you can check out to see how basic projects work. Go ahead and run the engine if you haven't done so already. If you downloaded the Godot image from the website, once you've extracted it from the zip file and try to run it for the first time, you might run into a security warning from your operating system. On Windows, you can reassure Windows Defender by pressing more info and then run anyway. Godot is open source software, so you're welcome to read over the code yourself if you'd like. This is Godot's project manager. If you download the engine from Steam, you'll find a bunch of demos here. Since I downloaded the engine from the website, I don't have anything here yet. I'm going to press this New Project button on the right. I'd like this project to be on my desktop so I'm going to type desktop here. You might need to press this "Browse" button to find a folder where you'd like to put your Godot project. Godot is saying, "Please choose an empty folder," because it thinks that I want to put the files directly on my desktop. It would want to put things like my sprites and textures right alongside the recycling bin, which is not what I want. Clearly, the desktop is not empty. It, at least, contains the recycling bin shortcut. I'm going to type Lava Lamp in the project name section and press this handy "Create Folder" button, and now Godot has created a folder called Lava Lamp on my desktop so all the project files for this project can live directly in that folder. Since I don't need this application to run in a web environment, I'm going to leave the default render option. In the next lesson, I'll press this button and we'll create our project structure and start writing our shader code.
4. Create a Sprite and a Shader: In this lesson, we'll set up a project structure and start writing some Shader code. I'm going to press the "Create & Edit" button. This is the Godot Editor. In the middle you'll see basically a representation of the current scene that you're creating. Over here on the left, we have the option to create the root node for this scene. In Godot, nodes represents small building blocks of games. They are nodes for creating images, characters, UI elements, animations, and more. Since we're focused on writing a Shader for this tutorial, we don't really need many nodes, but we do need at least one node that we can apply our Shader to. This node should also draw our level-line base when we get to that step. We can write 2D Shaders via materials for any node that inherits from a Canvas item. To show you what these nodes are, I'm going to press "Other Node". This is an entire tree that consists of ultimately all of the nodes that Godot has on offer. We're looking for things that inherit from Canvas item. Things that exist beneath this drop-down menu called Canvas item. I'm going to go for Node2D and all the way at the bottom Sprite, because I also want to render the lava lamp base and then render our Shader in a specific part of the base. I'm going to press "Create" to make a Sprite. Now you can see I have that Sprite over here on the left as the root node for my current scene. Over here on the right, we have access to more properties for the node that we just created. At the top here you can see these are properties that are specific to the Sprite node, just beneath that we have properties that are specific to all Node2Ds, and being that we have properties that are specific to all Canvas items. Of course, again, all nodes. Again, that's because if we go back and look at the tree, we have node at the very top of the tree, Canvas item beneath that, and Node2D beneath that. These are the properties for Sprites, these are the properties for Node2Ds, these are the properties for Canvas items, and these are the properties for all nodes. I'm going to press "Cancel" because I just wanted to show you the tree. Since I created a 2D node as the root node for the scene, Godot automatically switched us to the 2D view. This blue box here represents the size of the screen that'll happen when I press "Play" to debug the game. You can see that I have the Sprite selected, so this crosshair here represents the current location of the Sprite. It's not currently rendering any texture, and you can see that by seeing also that the texture is empty. I'm going to drag icon.png into the Sprite property, and now you can see that icon.png is being rendered as this Sprite's texture. We're just going to use icon.png temporarily to see how Sprites work and also to write our first Shader code just to overwrite the basic texture. You can see that the Sprite node now extends outside the blue box that we created. You can see that the Sprite now extends outside of the region, marked by the blue box so that means that a lot of this won't actually render on the screen. I'm going to run the game by pressing the "Play" button. It's going to complain because I haven't set a main scene. Because this is a very simple project for Shader demonstrations. To save my work, I'm going to do "Control S". You might do "Command S" if you're on a Mac. To save my work so far, I'm going to go to Scene and press "Save Scene". Since I haven't saved this scene before, it's asking me for a name. I'm just going to call it lamp.scn and press "Save". You can also now see that lamp.scn has appeared in the project files. If I were to press "Play" up here, Godot would warn me that I've never defined a main scene. This is because the way that games are usually structured in Godot, those are root seen that the game runs as the fundamental thing that all other scenes in nodes are children of. We haven't defined one of those yet, so we need to select it. I'll again choose lamp.scn which we just created, and press "Open". Because by default the origin of a Sprite is 00 the center of the object, you can see that the Sprite is being cut off in three of the four quadrants. I'm going to close that out. Going back to our project, we can look at offset and uncheck centered. Now you can see that the Sprite completely fits inside this blue box, which represents the size of screen that you'll get when you play the game. Now let's start writing some Shader code. I said earlier that we can write Shader code for any node that inherits from a Canvas item. I'll look here for the properties of all nodes that inherit from Canvas item, and beneath material, you can see that it currently says, material empty. I'll click this drop-down arrow and press "NewShaderMaterial". You'll see a preview of the basic material that we just created here in this sphere. I'm going to click on it, and then where it says Shader, I'm going to click the drop-down arrow and define a new Shader. Then I'll click the "Shader", and you can see it's opened up a small code window here. We currently have an error. It says that expected a Shader type at the beginning of Shader, valid types of our Canvas item, particles and spatial. We're writing a CanvasItemShader, so I'm going to write Shader type: Canvas item, and a semicolon to indicate that I'm done with the line. You can see that that made the error go away. It's important to note that what we're writing in here is not Judy script, which you might have used in a previous video tutorial from me. But a language specifically created for writing Shaders in Godot. It's similar to GSL if you've ever used that. Let's start by defining a fragment Shader that simply sets the color at every point covered by the Sprite to white. I'm going to zoom in a little bit on the Sprite by using the mouse wheel and hold down the mouse wheel to pin, just that I can see a little bit more clearly what I'm doing. Let's start by writing the fragment function. This function will write is going to be called by the engine at each individual point that our Shader runs on. First we write, "Void", because this function doesn't return anything back to the function that coded, and then we'll write, "Fragment", because we're implementing the fragment function. You can see that Godot tried to auto-fill for me. The fragment function doesn't take any parameters, so it's empty parentheses there. Then open curly bracket, Enter. Now this is the block of code that will run whenever the engine calls the fragment function. To set every individual fragment covered by the Sprite to white, I'll write color equals vec4, which means vector 4 or a collection of four numbers in this case. Then I'll write, 1.0, 1.0, 1.0, 1.0. What this means in this context, you can see that it just updated and is now completely demonstrating white is 1.0, which means completely red, 1.0 which means completely green, 1.0 which means completely blue, and 1.0 which means completely opaque. This is the Alpha value, so it's RGBA. When we say color equals white, what we're really saying is for every single point that this Shader runs on, I want the color at that specific point to be white. There's a shorthand way to do this which is to write vec4 and then just a single 1.0. I'm going to delete all these. You can see that that's fine. The engine is just populating 1.0 in all of the vec4 positions automatically. In the next lesson, we'll create some basic black and white blobs.
5. Create Some Blobs: In this lesson, let's create some basic black and white blobs. Let's start by setting the background color to black. Since the RGB value of black is 000, you might think that setting zero here would create a black background output. But in fact, since the Alpha value is also set to zero when we set all four components of the vector 4 zero, we get a black value with a fully transparent output. We do need to say 000, and then 1.0 on the Alpha. Now, we have our black background output. Now I want to add some white blobs. To do that, I need to override a color that we've just set here to white in the areas that we want our blobs to appear. First, I'm going to create a list that just contains the center points of each of those blobs, as well as the strength of that blob, relatively analogous to the size of the blob. Let's start by writing vec3, blob_centers, and I want this to currently have two elements for two blobs, and then add a semicolon for the nth line. Now I'm going to assign each of these blob centers to a point and a strength. For the 0th blob or the first blob in the list, I'll assign that equal to a vector3, and this is a relative coordinates here. If I say 1.0,1.0, and then print out a zero, this references 1.0 All the way across, 100 percent across the texture on the x-axis and 100 percent down the texture on the y-axis. I've currently set strength to zero. Let's say I want this maybe around here for 0.6 on the x and 0.6 on the y, or 60 percent across the texture in both directions. I'll set the strength to 0.5. I'm going to do something similar with the next blob center. Maybe I want this one to be a little bit more on the left. I'll say 0.5, 0.55, and then I want this to be a little bit bigger, let's say 0.6. Now we have defined the locations for two blobs about here and here. Remember that the fragment shader we're writing runs individually on every single point on this texture. What I want to do is for this current point that we're on, see how much it's influenced by these blobs centers using the strength. If it's influenced more than a certain threshold, we can set that color to white. Let's start by measuring the influence that each of the blobs has on this individual point. I'll say float for floating point value, and I'll type influence and set it to 0.0 to start. Next, I'll iterate through the list of blobs to measure how much this individual point is affected by each of them. I'll say for, open parenthesis, int i equals 0, because we want to start counting at zero, i less than blob_centers.length. We want i to stay less than two because this array only has the indices zero and one because it has two elements. Another semicolon, and I'll say i++, to increment i by one after each time we iterate through the blobs. I'll open some curly brackets here, and this is the code that will run for each of the blobs. First, let's calculate the distance from this blob center that we're currently on to the point that we're currently working on. I'll say float distance_to_blob_center, and I'll say distance for the built-in good old distance function. Open parentheses and a semicolon. The distance function wants two positions to measure the distance between. I'll say blob_centers, open brackets, and then i, because I want the blob that we're currently on, and then I'll say.xy to construct a vector with just the x-component and the y-component of the current vector. Blob_centers i, if we're on the 0th at this moment, will be 0.6, 0.6 and it'll be a vector too. Then I want to measure the distance between the current blob center and our current position, which is represented by the input uv. Now, this distance function is fine for now, since we currently have a square texture in the sprite. But later, we will want to use a rectangular texture for the sprite so that we can add our lava lamp base. Say the texture were actually this size, for example. Remember that for the positions that we're using here, blob centers xy and uv, it's relative to the overall maximum x and y. This is 1.0 on the x-axis, and even though it's now a rectangle, this is still 1.0 on the y-axis, since it's relative to the overall size. This means our distance function will be a little bit distorted. The further we get from a perfect square sprite texture. I'm going to divide each of these positions component-wise by texture pixel size. For the current texture, we're using icon.png. Texture pixel size is a vector too that contains 1 over 64 and 1 over 64. What this is actually doing here is multiplying component-wise a relative coordinate, represented between zero and 1.0, by the number of pixels in each direction. It's converting it from a relative coordinate into an absolute position on the texture. I'm going to scale a sprite back down to how it used to be by going under the node 2D transform drop-down, and resetting the scale. Now let's add some influence to this point based on its distance from the specific blob. Add a new line here and say influence plus equals to say that I want to add and reassign, and then I'll say blob_centers i, again, for the current blob. I'll say.z because we only want this third component, which we said represents the strength to this particular blog has. Your gut instinct might now be to multiply this by distance-to-blob-center. But remember that this means that the further the blob is from this specific point, the larger this value will be, and the larger the overall influence will become. We want the inverse of this. The points closest to the blob should be the most influenced by the blob and more likely to be white. What we actually want is 1.0 divided by distance-to-blob-center. I'll just capture that in parentheses, and this will give us the correct relationship between influence and the distance from the blob to the specific point. Now, this is where a little bit of magic is going to happen. We want to say if the influence is above a certain threshold, we want to change the color from what it currently is, black to white. I'm going to run if influence is above, say, 0.3, we want to set color to white. Remember, we have this nice shorthand. We can say vec4, and then fill all of those components with 1.0. There. Now we've got some little blobs that appeared on the screen. I'm going to zoom in and you can see how this is working a little bit more clearly. As we expected, we have an area of white around each of the blobs. It's always a good idea to make examples for yourself to test your code and make sure you're understanding how everything is working. Let's take an example point right between the two blob centers. If I look at the halfway points between these, that's about point 0.55 on the x-axis, 0.575 on the y-axis. That's somewhere right around here. Let's go through our code using that as an example. Since that's the current point we're looking at, its coordinates will be in the uv input. Now, let's run through our code. First, influence is set to 0.0, then for each of the blobs, we do this. Say for the first blob, this one here, we have distance-to-blob-center is the distance between blob centers i, so the current blob, again, this one.xy, so we just have the 0.6 and the 0.6, divided by texture pixel size. In this case, this means component-wise divided by 1 over 64 and 1 over 64, which is the same as multiplying or scaling this vector by 64. Then we have the same thing, but for uv instead of the blobs centers xy. So the uv, again, is currently 0.55 and 0.575. If we calculate the distance between those two things, we get about 3.578. Now we want to add to influence a value that corresponds to the current blob strength and our distance from the blob center. We replace the current blob z component, which is 0.5, multiply 0.5 times 1.0 over 3.578. If we do this, we get about 0.14. We add 0.14 to influence and then move on to the next blob. Now we're on this blob. Now we go through the same calculations again. We calculate the distance to the blob center, and since the point we chose to be uv is halfway between these two blobs centers, we know that it's just going to be 3.578 again. Then we add to influence the current blobs z component, which in this case is 0.6 now, and then multiply that by 1.0 over 3.578 again. What we get for the influence to add here is 0.17. We add 0.17 to the influence, and now we have 0.31 as our current influence, since 0.14 plus 0.17 is 0.31. Now, moving down our code, if influence is greater than 0.3, we set the color to white. Since influence is currently 0.31, it does evaluate true that that value is indeed greater than 0.3, and so we set the color to white. The point in the middle between these two blobs is indeed white. Just to double-check our math, we can also increase this 0.3 value. Say, I want it to be 0.31, and I can see that the point in-between these is no longer white. That's because 0.31 is not greater than 0.31, and also because we rounded a couple of times when we were talking about adding to the influence. The value that we rounded up to be 0.31 is not greater than point 0.31, so we don't set the color to white and it remains black, like we said it initially. Just because I might want to tweak this later, I'm going to replace it with a new variable that I'm going to call threshold and create a uniform up at the top above fragment. I'm going to declare a new uniform by writing uniform float threshold. I'm going to say by default, we're going to set that to 0.3, which is the value that we had before. But over here, there's a new thing, a new drop-down called Shader Param, and we have this new threshold uniform that we just defined, setup 0.3. Now, if I increase this value, you can see that indeed our shader updates. You can also click and hold down and drag in either direction, left or right, with the mouse to watch as that adjusts. That just makes it really easy to adjust the threshold from the editor instead of from our code. Clicking that reset button like I just did just sets it back to the value that you set equal to here, it's like a default. In the next lesson, we'll add a couple more blobs and animate them.
6. Animate the Blobs: In this lesson, we'll add a couple more blobs and animate them to start looking a little bit more like a lava lamp. To start, I'll increase the number of blobs centers I have. I'll set this to six instead of two just so that we now have six total blob centers. I'm just going to do Control C on this selection to copy and Control V to paste it a couple times. Depending on your operating system, you might need to use Command V or/and Command C instead of Control, and I'll just set this to 2, 3, 4, 5. Now we indeed have six total blob centers. You'll see that the blob size increased a whole lot here, and that's because we add for each of the blobs, some influenced the current point. Even for blobs that are way out here, really far away from any of the blob centers, they still get more and more influence just because we've added more blobs. They're more likely to be included in that range than they were before, simply because there are more. I'm going to zoom out a little bit using the mouse wheel just so that I can see a little bit more clearly what's going on, and I'm just going to move the x-coordinates a little bit to make sure I can see a little bit more clearly where each of these blobs are, because right now a lot of them have the exact same position. 0.6, 0.5. Let's say this is at 0.55, this one's at 0.45, this one at, I don't know, 0.62, this one's at, let's say 0.7. They should have spread out a little bit, as you can see. Now I want the y component of each of these blobs centers to depend on time. More specifically, I want a mathematical function that takes time as an input and returns to me a value between 0.0 and 1.0 based on the time that I gave it. Now there's a couple different ways to do this. Let's start by graphing sine x. Imagine that the x-axis is time and the y-axis is the y position of our blob. Sine x works pretty well for our needs, but it does have some negative values that it outputs so we'd end up with some blobs that go above our texture. To make sure that our blob center y-values stay between zero and one, we want the sine x term in positive. One option would be to only take the absolute value of sine x, but that gives us these corners, and if we again imagine that the x-axis is time, that means that when the blob hits one of these corners, it immediately bounces back and starts moving in the opposite y direction. This movement would be a little bit unnatural and it would look like the blob bounced off the top of the lamp and immediately started accelerating downward or vice versa. Again, there's a few different ways to handle this, but I prefer to use sine squared x or sine x times sine x. This eliminates the negative values since a negative value times a negative value is a positive value, and it smooths out these corners to make them a little bit more round. Now we have, say for example, a blob that starts at the bottom, quickly accelerates toward the top, slows down, and then picks up speed again as it goes back toward the bottom of the lamp. This is the perfect behavior we're looking for. To add a little bit of variation between blobs, I might also want to be able to control the initial offset and the speed. Since our x-axis is time here, the way that I can speed things up a little bit, is to multiply the x input by a speed factor. Similarly, if I want to offset time a little bit, I'll just add a little bit to the x. Now let's translate this into code. I'll define a new function that returns a float called oscillate, and the oscillate function that we're defining will take float x, float speed, and float offset. Adding my curly braces, and this is the code in here that will run whenever we call the oscillate function. Since we want sine squared x or sine x times sine x, I'm going to say, return how sine x times speed plus offset, and then I want to raise that whole thing to the second power, which is why it's contained in the power function. I'm going to write a semicolon to complete my expression, and those are basic oscillate function. Now I want to use this oscillate function using time as an input for each of my blob centers y positions. Could also apply as with the time input. All I have to do is replace the y component of each blob center with oscillate, time, and then maybe I want this to run at half speed with a 0.4 offset. Now you can see that I've got this blob that's animating back and forth between 0.0 on the y-axis and 1.0 on the y-axis using time as our input. I'll add something similar for the rest of these. Let's say oscillate time, I want this to go even slower, 0.2, and then, I don't know, 0.5 on the offset. Just keep doing this. Now you can see that all of my blobs are going back and forth in the y-axis using our oscillate function. Now it's probably a good time to tweak all of these values just to make sure you're comfortable with them, so you could maybe shift the blobs on the x-axis a little bit by changing their x-component, or shift them on the y-axis a little bit by changing their speed, their offset, and then also change the influence here. I like to make the strength of each blob a little bit bigger if they're going slower. The ones that I've set speed to 0.1, I'll increase the influence over the strength a little bit, so I'll say this is 0.8 and 0.8, and I can see that the slower moving blobs are a little bit larger. If you want to be able to tweak these values really quickly, you can define a uniform for each of them like we did for the threshold. I'm not going to do that just because it's a lot of different uniforms to define, but that is an option if you want the people to quickly adjust things like the speed, the offset, or the x position from the editor. I'm pretty happy with this as it is for the time being, so I'm going to move forward and start adding a little bit of color in the next lesson.
7. Add Colors: In this lesson, we'll add some colors to our lava lamp. Let's start by adding the background color that we observed earlier is brightest at the edges and darkest in the center. I'm going to make these colors uniforms so that I can quickly adjust them later if I want to. I'll write uniform vec4 since again, we represent colors with vector fours, and I'll write background_edge and I'll say colon, hint_color. This tells the editor that I want background edge to have the hint of a color picker. Even though it's a vector four, the four components are RGB and A. The editor now puts values into those four components depending on the color that I pick from a nice color picker, instead of having to enter numbers manually and that's just because we wrote hint_color here to tell the editor that this is a color. I want to set the background color at the edge to a nice magenta color. I want this to be all the way at 255. I want green to be at zero, and I want blue to be at 255. Now I have this magenta color that I hope to put at the edges, specifically the X edges of the lava lamp. Now, I'm going to write again, uniform vec4 background_center and again, this is a color. Now I've got another one that says, if I hover over background center, I'm just going to set that to a darker purple color and of course I can tweak these values later, these are just values that I'm setting for now. Now I'll define two more uniforms for what I want the colors of the blobs to be at the top and the bottom. Blob_top and is a similar color and now, it has appeared over as a color in the editor, I'm going to set this to be a nice vibrant red color and then, another uniform vec4 blob_bottom for what I want the blobs to be at the bottom and that's another hint_color. I've got yet another color picker down here and I'm going to set that to be a nice yellow. Let's start with setting the background color to a mixture between the background edge and the background center, creating a gradient. I'll start by going to where I'm currently setting the color to black, right here, and instead of using a vector for this constant, I'll set it to a mix, which is a linear interpolation function in Kidlo. Now I'll write background center, background edge because I want to mix between these two colors, and this will output a vector 4 into the color as we need. Then, let's say I'll start with 1.0 here. You can see that this completely set everything to be 1.0. We have the background edge color set everywhere where the black used to be. If I were to set this to 0.0, we now have totally the background center color instead. If I set it to 0.5, we have halfway between the background center and the background edge, and so on. If I change this variable, it changes what mixture I'm using between the two colors and I want that mixture, that last weight variable, to be dependent on how close I am or how far I am from the center of the lamp. The further I am from the center, the more I want to rely on background edge, and the closer I am to the center, the more I want to rely on background center. I'll say I want the absolute value of 0.5 minus the current x-position, which again, I can get the current position by saying UV and then,.x, and then I'll multiply this by 2.0. Let's test this to see how it's working. If I'm at the center, then my current x-position is 0.5. I'll do the absolute value of 0.5 minus 0.5, which is zero, and then multiply that by 2.0, which is zero, which means I'll be completely reliant on the background center color. It should be a dark purple and it is. Now let's test at 0.0. The absolute value of 0.5 minus 0.0 is 0.5, times 2, is 1. I should be completely reliant on the background edge color and I am. Similarly, if I try a position between 0.0 and 0.5 on the x, say 0.25, I'll have the absolute value of 0.5 minus 0.25, which is 0.25, times 2, which is 0.5. I I be halfway between background center and background edge, which you can see that I am. I can change these values however I want by now modifying the background edge and the background center color. I want the background edge color to be a little bit darker, so I'll just bring it down a bit. There you go. Now I want to do the same thing, but for the blobs. Down where we define the color of the blobs, if influence is greater than threshold, this is where we set the blob color to white. I'll instead use another mix, blob_top, blob_bottom and then, I want that to be dependent on where we are on the y-axis. The further I am from the top, the more I want to rely on the bottom. I'll just use UV.y so that if I'm at 1.0, I'll be completely reliant on the blob bottom color, which you can see that I am and if my UV.y is zero, I'm at the top of this bright, then I should be completely reliant on the blob top color, which you can see once a blob goes up here, that I'm reliant on that completely up there. This works fine. Now I want the blobs to glow a little bit and the way that I'm going to do that is to create a mix between the background color at the current position and the blob color at the current position. To do that first, I'm just going to store this mix here and I'm going to say, there's a new vec4 called current_blob_color and I'll set that to that mix, put the semicolon, and then I'll just replace this down here with current_blog_color. That's just to avoid having copied and pasted code. Now I'll create a new float called glow_multiplier, and I'll set that to whatever I've set my threshold to, times 10. This is pretty arbitrary and I encourage you to experiment with this value to see what kinds of results that you can get. But I'm going to use that glow_multiplier to create a mix that I'll assign to the current color. I'll say color equals mix between whatever the current color is, which is this gradient that we've set up here, and I want a mixture between that color and the current_blob_color at this position with a factor that depends on the glow_multiplier and the influence that the blobs have over the specific point I'm currently looking at. I'll say pow, glow_multiplier times influence, which is the influence of those blobs have on this current position, and then I'll raise that to say the fifth power, so 5.0, and then I'll add a semicolon. You can see that that added a nice little aura around the blobs. You can adjust this value 5.0 to your liking as well. But if I increase it to say, 25, the glow will disappear completely. Whereas if I reduce it by one, the same is not raising it to any kind of power, you can see that the glow is now massive. The reason for that, because normally, you'd think that raising something to a higher power would make it larger. The reason for that is that glow_multiplier times influence is often a value less than one. Multiplying a value less than one by another value less than one, of course, we'll shrink the value. For example, unless we're really close to the center of a blob, like if we're out in this glowy region, influence will be a pretty small number. Even multiplying it by threshold times 10, it's still less than one. So really, a value that's perfect is, I don't know, maybe somewhere around six or seven. Really what I'm trying to do here is just make something that just softens the edge a little bit. I like seven. Just that I can quickly tweak this, I'm going to make a new uniform float glow_power. I'll go back and make it have a default value of seven, which is what I had unassigned to down there, so now you can see it's restored the glow that I just had and now, I can just tweak this value so you can see that the smaller I make it, the bigger the glow gets, and the larger I make it, the more subtle that glow becomes. I still like a value around seven, just to soften that edge a little bit and I'm going to leave it like that for now. Again, though, tweaking and playing around with these numbers is all part of the process. I'm really curious to see what you can do by messing with this function a little bit. In the next lesson, we'll add a lava lamp base.
8. Add a Base: In this lesson, we'll switch to using a lava lamp base. To start, I'm going to replace this icon dot png that I'm currently using with the lava lamp base that you can find in the project resources section. You can also create your own lava lamp base. The important thing about this image is that it has one solid color that you want to replace with our lava lamp globe shader. To add your lava lamp base image to the Godot project, you can either drag the file into the file system here in the lower left corner, or you can add that file to your folder on your desktop representing the lava lamp project. I saved the lava lamp base image to my desktop so I'm just going to drag it into the file system in the lower left corner. Now you'll see that it says, "lava lamp base dot png" directly in the res folder of the file system. I'm going to click on my "Sprite" node, and where it says Texture here, I'm just going to drag the lava lamp base into the Texture. The lava lamp base image that I created is a much, much higher higher than icon dot png. It's got a ton more pixels, and if I zoom out using the mouse wheel, you can see that this is quite a long lava lamp now. You can also see that the blobs are very, very tiny now, and that's because we're scaling everything by texture pixel size, so the distance to blob center is pretty much huge wherever you go. To fix that, I'm going to create a new uniform float called max strength and I'll set it to 16 for now. I'm going to multiply max strength down here. Take the blob center strength for each blob, I'm just going to multiply it by max strength. Since all of these values for the strength component are no more than one, this is indeed the max strength that an individual blob will have. You can see that that made our blobs back to a normal size. But I can also go into my Shader Parameters and adjust this as I want to, to make them larger or smaller. I'll set it back to 16 for now or click the reset button. The next thing I'm going to do is just scale down the sprite so that it fits within this blue box, which currently represents the size of the screen. For now, I'll just set that to 0.4 and 0.4. I can see that that's still a little bit outside the box, so I'll type in 0.3 and 0.3. Now we're within the blue bounds, and we've got this basic lava lamp. But right now, since we're overwriting the color everywhere, we can't actually ever see the lava lamp base itself. This is why I said it's important that the lamp globe be one solid color. If I scroll up and look at the texture, I've created this lava lamp base and you can see that the area that I want to replace with my shader is perfectly magenta. In my fragment shader, what I want to do is first use the color of the texture at this current point, and then if the color of the texture at this current point is perfectly magenta, then do all of this stuff that we've already written. To do that, first I'll say, "color equals" and then Godot has a built-in texture function to read colors from textures, and then I'll say, "TEXTURE" all caps, and "UV" for this current position. Then if color is now equal to magenta, which is a vector 4 with 1.0 on the red, 0.0 on green, and 1.0 on blue, 1.0 on alpha, then within this, I want to do all of this stuff. I'm just going to do Control X or Command X to cut and paste that in here. Then I'm just going to add a tab indentation for formatting. You can see that now we have our basic level and you can see that the globe is only appearing on the areas that were magenta. You might see an unwanted magenta border around the globe of the lava lamp like I currently do. If you do, click the "Import" tab in the upper left-hand corner, make sure you have lava lamp base currently selected as what you're importing, and then make sure both Filter and Mipmaps are disabled. I have unchecked Filter and I'm going to press "Reimport". Now you can see that that unwanted magenta border is now gone and I have a perfect boundary between the gray of the background and my lava lamp globe. The next thing I want to fix is that currently our blobs can go all the way down to the bottom here, and we don't see them since they go outside where the globe is supposed to be. To fix this and make it so that our blobs only go back and forth within the context of this globe here, we need to make two new uniforms. I'll say "uniform float top" and I'll assign that to about 0.2. It looks like maybe this is 20 percent here through from the top to the bottom, maybe this is 20 percent through, so I'll say 0.2. Then uniform float bottom, if this is 0.2, maybe this is about 0.5 here. This looks like maybe it's about 0.6. I'll say 0.6 or about 60 percent through from the top to the bottom. This is what I'll currently go with for top and bottom, but since they're uniforms, again, down on our Shader Parameters, they're really easy to adjust. Now I want to make sure that our oscillate function only returns as y-values between our top and our bottom. What I'm going to say is times outside of the power, I'm going to say "times open parentheses, bottom minus top". Currently, these scales are sine function by 0.4 and then I'm going to add top to it. What this currently does is scale our sine function by 0.4 and then shift the function up so that it's minimum return value is 0.2. You can see that this new function will give us values between 0.2 and 0.6. Again, since these are uniforms, I can adjust their values in the Shader Parameter section. Maybe bottom is actually closer to, I don't know, 0.54. Then I can have the bottom be 0.54 and the blobs don't go beneath that level. I could also increase top to be maybe close to 0.5, and then you can see that the blobs won't go above that level. I'll reset those back to 0.2 and 0.6, but just know that you can mess with those if you use maybe a different base to get the value that perfectly oscillates the blobs between the top and the bottom. You might have also noticed that our gradient on the blobs doesn't take into account the new top and bottom yet. This value here at the bottom is definitely not equal to the color that we've set over here for our blob bottom. If I go down to where I am talking about that gradient here, I want to scale the weights that we're using for our mixed function here. Instead of just relying on UV dot y, which is one down here, I want one to be right here, and I want zero to be right here. What I need to do is take into consideration the top and the bottom of the globe. To do that, I'm going to say "UV dot y minus top". Now I've already made it so that the top of our lamp is now zero. Say if we're here and we're at 0.2, now we're subtracting top, which I've said to be 0.2, so now this is zero. I want to scale that by bottom minus top. You can see that now we've got the correct gradient. The reason for that is that so I'm at the top here, I've got 0.2, UV dot y is 0.2, 0.2 minus 0.2 is 0 so this evaluates to zero, so we're completely reliant on the blob top color. But if we're at the bottom, so UV is currently 0.6, which evaluates to one. You can also see that if I were to say move the bottom higher, I could make more and more of the lamp yellow, or if I move the top lower, I can make more and more of the lamp that red color. In the next lesson, we'll export frames of our lava lamp to PNG file.
9. Export Frames to PNGs: In this lesson, we'll export frames of our lava lamp to PNGs. Now make sure your lava lamp is just like you want it. So feel free to tweak all the colors and the top and the bottom and the strength and all of those sorts of things to make sure the lava lamp is exactly how you want it to be exported into a GIF. I'm going to decrease the max strength a little bit because I feel like now that I've crammed everything between 0.2 and 0.6, there's just a lot of the wax compared to a lot of the background colors. So I'm going to decrease max strength to maybe around 12, maybe a little bit more than 12. Let's try, 14. Yeah, that value looks about good to me, so I'll keep this value and move forward to try to make a GIF with this. What I want to do next is fit the window size here, this blue box down to be exactly the size of my lava lamp. I can do that by looking over here at the texture. I have 512 by 1584, and I currently have a scale of 0.3 and 0.3. I'm going to remember these numbers, and I'll go to project in the upper left corner, and then Project Settings. Scroll down to Window, and where it says width and height, I want my width to be 512 times 0.3. Then I want to my height to be 1584 times 0.3 and then close. You can see that my blue box, if I deselect this bright, is now the same as my Sprite outline, which is just what I want. Next, I'm going to go over to the upper left corner again and press Scene to switch to the scene tab. Click on "My Sprite" and press this button to add a new script. We're going to write a script that outputs PNG files for each frame that we render of the lava lamp. I'm okay with Lamp.gd being the name of this script so I'll press "Create." So I'm going to write a new function that saves frames to PNGs. Remember that we're working in gdscript now, which is not the same language we've been working in before, so things look a little bit different. I'll write a new function called Save frame by saying func save_frame (): enter. Now our code blocks are defined by indentation and not by curly brackets. So whenever save frame is called, I want to capture the texture that's currently being rendered out to the viewport and save it as a PNG. First, I'll create a variable to store the image data in. I'll say var image=. So to get this image, I want to get the current texture of whatever is being rendered out to the window. That's the very top viewport of the Godot game engine. So I'll say get_tree() to get the entire scene tree,.get_root() to get the very topmost element or the viewport, and then I'll say.get_texture() to get the texture of that viewport, and then.get_data(), to get the current image data of that texture. I need to convert this image into one that will preserve transparency. I'll do a new line and then I'll say image.converge to change the format of this image, image with a capital I dot RGBA8. So I want this one here, FORMAT_RGBA8. This format will indeed preserve the transparency that we want. Now I'll save the PNG, so I'll do image.save_png. For now I'll just type *frame.png* as a string. Now I want to call this function save frame whenever a new frame has been rendered. So in the ready function that's called when the node enters the scene tree for the first time, so when our game first begins, I'll replace pass with VisualServer.connect and I want this *frame_post_draw signal* and I want to connect to that signal to a method on this object, so I'll type self, and I want our new save frame method. So I'll type *save_frame* as a string. Now what this will do is every time the visual server tells us that it just drew a frame, it'll call the saved frame method on this object. So every time a new frame has been drawn, the saved frame method will get called, we'll get the texture from the current viewport, and save it as an image. Specifically to frame.png. I'll press the play button to render a new frame. I'll close out the window that popped up. You can see that now in the file system and the lower left corner, there's a new image called frame.png. I'll double-click it to get a preview. You can see over here on the right, we've got two problems. One, the background is not transparent, it's this gray color here, and two, it's been flipped upside down. First, let's fix the transparency issue. Go to Project, and then project settings in the left corner, and then under per pixel transparency in the Window tab, check per pixel transparency allowed and per pixel transparency enabled. Then press "Close." Then in our script before we connect to the visual server, we need to get our viewport again, which is exactly what we did here, get_tree() get_root(). So we'll say get_tree().get_root() and then.set_transparent_background(true) and we want to set that to true. I'll press the play button to render another frame, close out the Window that pops up, double-click frame.png and now you can see that indeed we've got a nice transparent background there. Depending on your system, yours might not be upside down, but mine is. So after I convert the PNG, but before I save it, I want to type image. flip_y, and I want to call the flip_y method on the image so it'll flip it upside down. I'll press the play button again to render yet another frame, close out the window that appears, and then double-click frame.png and now you can see that I have my very nice frame here. It's perfectly right-side-up, I got a background that is transparent, and generally it looks pretty good. But what I really want is a ton of individual frames to compile into an animated GIF. Right now we're just overriding frame.png every time. So I'm going to define a new member variable up at the top called var frame_count = 0 and I'll set it to zero to begin with. Now in order to control the number of frames that my output GIF is, I'm only going to save the frame if the frame count is beneath a certain level. Above the member variables section, I'm going to define a new constant that won't change, and I'll set that to MAX_FRAMES = 60 in all caps, and I'll set that to 60 for now. Then down in our save frame method, I'll type beneath image var image_name , and I'll assign that to an empty string for now. Now, just to make sure that our output frames are sorted in the correct order, I'll write for i in range (), and then I'll say the length of the string of MAX_FRAMES minus the length of the string of our current frame count. For each of these, I want to append a zero to the beginning of image name. Then outside this for-loop, I'll do image_name plus equals the string of the current frame count, and then plus. PNG. Then instead of saving the image as frame.png, I'll save it as (image_name). Lastly, I will add one to the frame count. Plus equals one. But I only want to save this PNG if our current frame count is lower than MAX FRAMES. So I'll only do all this if frame_count is less than MAX_FRAMES. Then since we're working with indentations, I'll highlight all of this and press Tab to indent it at all. So we're currently saving 60 frames of our lava lamp. But if Godot is getting 60 frames per second, that means our GIF is only 1 second long, so I wanted to reduce Godot's target frames per second. So in the ready function, I'll type engine, set target FPS, and I'll set that to 15. That means that Godot will target 15 frames per second and if we save 60 frames, that means we have about four seconds of lava lamp run-time. I'm actually going to go back and increase that a little bit more to make it 120 for eight seconds of lava lamp run-time. Then press the play button and let the window that pops up run for eight seconds or longer. Once it's been at least eight seconds, close that window out, and you'll see that Godot is importing all of our frames. So if I go down to our file system here in the lower left corner, you can see that we have all 120 frames starting at 000.png and going all the way to a 119.png. Now we want to convert all of these PNG files into a. GIF file that will animate.
10. Convert PNGs to a GIF: In this lesson, we'll convert our exported PNGs into a seamless animated GIF. Open up your web browser and go to a website that can generate animated GIFs from PNGs. I recommend using ezgift.com/maker. Once you're on the site, press "Browse" to upload your PNG images. Once you've selected your PNGs, press "Upload and make GIF," then you'll see all lava lamp PNGs here. If you scroll to the bottom, make sure you set delay time to zero and then press "Make a GIF". Once your GIF has loaded, press "Effects", then scroll down and where it says Animation Flow, tick the box next to Run to the end and reverse back to the start. Then press "Apply Selected" and your output GIF will loop seamlessly. Once you've done this, press the "Save" button and save your new GIF to your computer. This is a project that offers tons of opportunity for experimentation. The more you mess with it, the better understanding you'll have of how shaders work in the Godot Game Engine. I really encourage you to do that. In the next bonus lesson, we'll quickly go over how to leave your lava lamp burning in the corner of your screen while you get your other work done.
11. (Bonus) Add the Lava Lamp to Your Screen: In this bonus lesson, we'll quickly go over how you can run the lava lamp in the corner of your screen while you get your other work done. I'm going to start by commenting out this connect line to make it so that we're no longer exporting our frames. I use the pound or the hashtag symbol to comment the line. Then I'm going to go up to Project, Project Settings. Scroll down to Stretch Mode. I'm going to say ''2d'' and ''Close.'' Now if I press the ''Play'' button, I can resize my lava lamp. I can drag it around, and I can size it back how I want it. When you resize the window, the lava lamps aspect ratio gets a little bit off. To fix that go to Project, Project Settings and then where it says Aspect under Stretch, switch from ''Aspect Ignore'' to ''Aspect Expand.'' Now when you run the lava lamp, the lava lamp will always remain the same aspect ratio, but it can still increase in size. However, if I click the ''Godot Game Engine,'' or any other window, my lava lamp goes behind it. What I'm going to do is go to Project, Project Settings and then check ''Always On Top.'' If you don't want it to be re-sizable, you can uncheck ''Re-sizable,'' and if you'd like it to be borderless, you can check ''Borderless.'' I'm going to go ahead and do that for now. So now if I restart, you can see the lava lamp runs in the center of my screen and it doesn't have any of the Godot boundaries on it. I'm going to stop it by pressing the stop sign. Then we're going to Editor in the top-left corner, and then Editor Settings. In Editor Settings, if I scroll down to Run and then Window Placement, currently you can see Rect is set to Centered, which is why our lava lamp is running in the center of the screen. I can set this to custom position and then get the size of my display, which in my case is 1920 by 1080. So I can say 1920 minus the x-coordinate on our lava lamp's bright, so minus 153. Then we can say 1080 minus 475. I'd like to subtract a little bit more from that number just to account for this bar at the bottom here. So I'll subtract an additional 20 from 605. Then I press ''Close,'' ''Replay.'' Now you can see the lava lamp runs in the corner of my screen. I could even minimize Godot and have the lava lamp running on my desktop or I could open Firefox. The list goes on. Basically the lava lamp stays in the bottom right corner of my screen. If I want to make it so that I can move the lava lamp around, I'll just go back to Project, Project Settings and then uncheck ''Borderless'' and restart. Now if I want to, I can drag the lava lamp around to put it anywhere I want. But it still stays on top since ''Always On Top'' is checked so I can still minimize Godot and do other things. It's just that now I can also drag it around if it happens to get in the way. That is how to add a lava lamp to the bottom right corner of your screen, once you've already created it using the Godot Game Engine. I think it's a lot of fun, just a little bit of passive entertainment while you're doing your other work. Plus it's a pretty cool conversation starter if you happen to share a screen on a Zoom call or something. Thanks for checking out the bonus lesson. I'll see you in the next video for some final thoughts.
12. Final Thoughts: Thanks for checking out the class. If you haven't already, please be sure to post your lava lamp gift to the class project gallery. I really hope you've come away from this with a better understanding of how 2D fragment shaders work. I'd really appreciate any feedback you have. Please consider leaving a review here on Skillshare and follow me if you want more classes like this one. You can also let me know what you'd like to see next via the survey in the Discussions tab or on my Profile page. I'll see you next time.
 Isaac B., Software and Game Developer