Transcripts
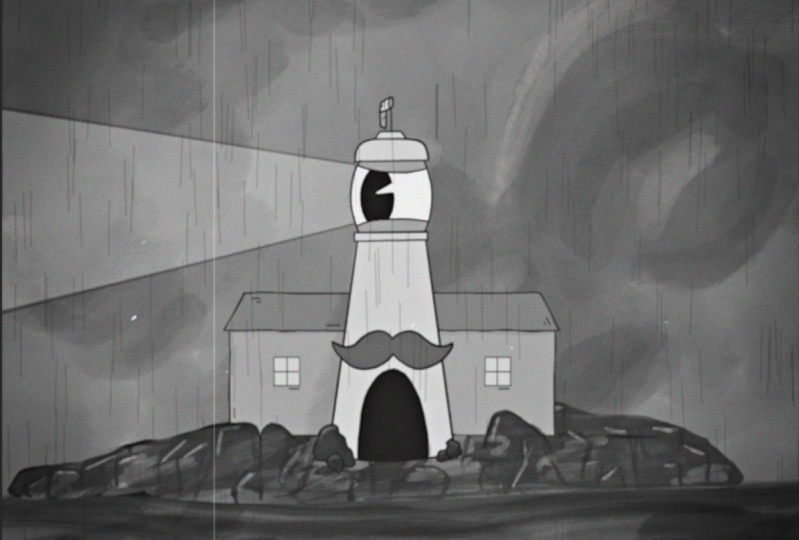
1. Trailer: Hey, I'm Jake Bartlett and this is a 1930's character animation. In this class, I'm collaborating with another Skillshare teacher, the one and only Jon Brommet. We've teamed up to bring you an incredibly fun set of classes to design and animate cartoon characters in this classic retro, superfun style. In Jon's class, you'll learn how to design and draw your very own classic 1930's-style cartoon character. In this class, I'm going to teach you how to take that artwork, prep it for after effects, animate it into a fun loop, degrade the quality so it looks like it's from the '30s, and share it with the world. This class is for anyone that wants to add a little bit of motion to their character design, even if they're not in this 1930's style. If you never used After Effects before, that's fine. I'll walk you through every step of the process to get your character moving. This class is going to be tons of fun. I can't wait to see your projects. I'll see you in class.
2. Artwork Prep - 1: The first thing you'll need to do to be able to start animating your character inside of After Effects is make sure that you've prepared your artwork properly. Now, hopefully, if you followed along with John's instructions, you should have already made some of the first steps toward getting a character illustration ready for animating in After Effects. But I have three separate amazing characters from John. These guys are absolutely awesome, and he's going ahead and giving me all the PSDs so that I can take them and animate them in After Effects. Now, I'm not going to show you the entire process for all three of these characters, but a few of them have some unique situations that will probably be beneficial for you to see how I handle them. So, I'll be jumping back and forth between these three characters through the whole class. The very first thing you should do with your character illustrations is make a duplicate of your PSD. So, I'm going to save a copy of this and I'm just going to put guitar and then put rig at the end. Rig is just the term that we use for an animatable character inside of After Effects. So, this way I know that this is not the original artwork, and I'll always have that original to come back to if I mess anything up. I'll click save. Now, as you can see, there are a lot of layers in this document and that's actually really great because we want as much flexibility with our characters as possible, but there are still more layers than we need. The goal of organizing your artwork for animation is to keep as many layers as you need for animation while keeping the total layers as small as possible. So, we're going to merge everything that we can and keep things separate that need to move around, and that's how you can think about this. The parts of the character that you want to be able to move need to be on their own layers. Everything else can be merged. For example, let's just take a look at the background. This is made up of a whole bunch of layers and I don't need all of these different layers. I can just select this background group and press Command or Control E and that will merge all of it. It's now one layer, which reduces the file size, makes the entire document cleaner and allows After Effects to process it much quicker. Same thing for the foreground people. Now, there are lots of different layers here that make up all of the different people. There's a highlights layer, there is a mid tones, and the shadows. I'm probably going to want to break up all of these people into their own layers. But to start, I'm just going to merge everything in this group together. So, Command or Control E again, that merges everything together. I'm going to turn the foreground and the background off for now, just so we can focus on this character and we're going to do the same process for the character as I did for the foreground and background. So, open that group up and we'll take a look at our layers. So, up here, we have Hand two, if you turn that on and off, that's the outlines and then Hand two fill. So, those two layers are never going to be separated. I'm never going to move the outlines away from the fill. So, I can go ahead and just merge those two together. So, I'll press Command E to merge those and there we have our hand. Then, the same thing for this hand, we've got left hand ink, left hand fill. So, I'm going to merge those two together. Then, we've got left arm ink which is just the left arm and we have two layers that are actually turned off, by turning those back on, it looks like we've got another hand pose and that's great. Again, we have the ink and the fill. So, I'll just merge those together and now we have a second pose for that right hand. Now, John gave me these two poses so that I could switch between them in my animation just to change things up a bit. So, I'm just going to push this up here and I'm even going to move this layer up to the top with the other one. Now, I'm going to come back and rename all of these, but for now, I'm just going to worry about emerging things together. All right. So, let's go down the line. We've got the left arm ink, then we've got the hat, that is actually up here. So, we've got the outlines for the hat, the fill for the hat. Let's merge those together. The tuning gears and that looks like it's just the outlines. Tuner fill, those can be merged together and I'm not planning on moving those around separately from the hat in the animation so I can actually merge those two together. Now, we have the entire hat on it's own. Then we've got the fretboard and neck outlines. We've got strings one original, that looks like it was probably something that John included or drew a first time and then revised it. So, I don't need that layer, I'll just delete it. We've got our strings, if I open up this folder, looks like he put each string on its own layer. Now, I don't need each string if I do end up animating these, I'm probably just going to animate them all together as a single unit. So, I select all of these layers and press Command E to merge them, and now I have my strings. Now, it looks like he added a mask on this group. If I disable it by Shift clicking on it, I can see those strings just go much further than they need to. So, I'm actually going to delete that mask and ungroup by pressing Command, Shift, G. It looks like these strings are going beyond where they need to. So, I'm just going to select the rectangle selection tool and draw a box right about here and press delete to get rid of that top part of the strings. Now, the bounding box ends right where it should. Then, I'll do the same thing down here. I don't need the strings to go beyond this mouth or the bridge of the guitar. So, I'll just select everything below that and again, delete. All right. Now, those strings are starting and ending exactly where they need to and I'll keep going down the line. So, you've got fretboard marker one, two, three, that's these little dots on the fretboard. All of those can be merged. We've got the fretboard fill and then up here again we had that fretboard outline. So, I'm going to merge those together. That can actually be moved below the strings so you'll never know that that is above or below them, and I'll select all three of these and merge them. So, there's our neck and fretboard, and honestly, I don't think the hat's ever going to move away from that neck either. So, this is my hat layer. I'm just going to move it down, merge those two together and now I have the entire neck, headstock, everything together on one single layer. All right. Continuing down the line, we've got the pupil. All right, that's great. We've got the eye outline, the monocle, those definitely can be merged together. I'm not going to merge the pupil because I may want to animate that. So, I'm going to keep it on its own layer and that will let me move it around like this. We've got the bridge mouth. It looks like that's an outline and for some reason there's something showing up down here on this bounding box. I'm not sure what, but just to be safe, I'm going to draw a box around it, invert it by pressing Command, Shift, I, and then deleting. Now, that bounding box looks like it snaps right to where it should be. There's our outlines and our fill, can merge those together. We've got the monocle string. I'm going to move that up so it's with the monocle. I doubt that I'm going to be animating that at all, but just to be safe, I think I'm going to keep it separate for now. We've got the pick guard and that's the outline, the pick guard fill, merge those two together. The body outline and the body fill, I'll merge those two together. Now, the pick guard is never going to move away from the body. So, I can go ahead and merge that into the body as well. For this particular character, I don't think I'm going to be moving the mouth around the body. Depending on your character design and what you have in mind for your animation, you may want to keep the mouth as a separate layer, so that you can move it around. In this case, I really want to preserve the look of the guitar, the strings are attached to the mouth, so I want to keep that bridge locked on position on the body. So, I'm actually just going to go ahead and merge that down to make this as simple as possible. While I'm at it, I think that the fretboard, the entire neck, and all of that, is going to be firmly attached to the body, too. So, that can merge into this body. Now, my entire guitar is one single layer and I've just got all these other parts coming off of it like the eye, the limbs, and those are the parts that really are going to be moving the guitar itself. All the contents of it, those are all staying right where they are. So, I'm just going to leave that all as one layer. All right. Now, we've got the eye fill, and if I turn that on and off, it looks like there's actually a hole in the body. So, I'm going to just solo the body by pressing Option or Alt on a PC and clicking on that eyeball, and I want to fill this hole in. So, I'm just going really quickly and roughly make a selection around that hole, and press I to bring out my eyedropper, and click on the guitar fill color and fill that in. All right, now that's solid, Option or I'll click on that guitar again and now we lose the white and that's just because the body is above this layer. So, I'll drag it down, and there we have our white. So, it looks like the way that John made this, there was just a hole through the body so that you could see the white. So, I now need to add in a fill for the eyelids so that the white doesn't show up where it shouldn't. So, I'm not going to make a new layer real quick and then switch my Elliptical Marquee Tool and make a shape around where these eyelids would be. Just so I can see clearly I'm going to turn off the left hand and I'll add to my selection for the bottom eyelid, and then I'll just fill with that body color and that's Option or Alt plus Delete on the keyboard to fill with your foreground color. That's looking fine, but now I need to contain it within this circle. Right now, it's overlapping other parts of the artwork. I'm just going to make one more circle selection right here, so it just goes within that monocle outline, invert my selection, Command, Shift, I, and then Delete. Now, that eyelid layer is just showing up right there. I think that could actually be part of the monocle that can all just be merged into one layer now and this is what that's looking like. Then we've got our eye fill below it, and the pupil. Then the pupil really could go below that monocle layer, but something I'm noticing now is that pupil is actually being cut off. If I solo it, you see that it doesn't extend beyond to complete the entire pupil. So, if I were to move this over here, you're going to see that cut off edge at the top and bottom. So, I want to really quickly just modify this and just extend this out and this is really rough. The chances of you seeing any of this is very small. So, I doubt anyone's ever going to notice that I'm the one who actually is extending this pupil out. I'm just going to fill it with black. So, now, it's nice and tall. I'll unsolo that. Now, I can shift it around as far as I want and it will always look right. Now, it does extend beyond the eyelid down here a little bit. If I push it too far to the right, but that's something I can address in After Effects if it becomes an animation issue. All right. Let's keep going down. We've got the white part of the eye, the body fill, and then we have some leg layers. So, let's see, we've got our left leg, and that's the actual limb that looks good. We've got her left shoe, that's the outline and the shoe fill. I'll merge those together, got a right leg, right shoe, outline right shoe fill, merge those. Then we have arm two and that looks like it's all on one layer. That's good. Got a second right arm. It looks like that must have been for the second pose because I moved the second hand up. I don't actually need a second layer for that arm. We'll just be moving the arm around in After Effects. So, I'm going to get rid of right arm. Okay, let me scroll back up and turn that left hand back on. Now that everything that can be is merged, I'm going to label everything properly and it's very important that you label things properly for this animation because we're going to be dealing with basically all of these layers in After Effects, and it's very easy to get unorganized and make everything much harder to deal with. So, let's just start naming the layers properly. We've got hand two fill, I'm going to rename this R for right hand two for the second pose, and then we got the other hand, R hand one, then we've got the L hand. l arm, think this is our strings. We've got the monocle, pupil, monocle string, and really, I don't think I'm going to be animating that separately now that I think about it. So, I'm just going to merge the monocle, the monocle string together. So, that's all one layer. I'm keeping the monocle separate from the body because I need the pupil to be able to go between those two layers. You've got the eye fill. Now, this does not need to move. So, I think I can merge that onto the body. I'll just rename this body and if I solo that, again this is what it looks like. We've got all of the elements that aren't going to be moving all merged onto that one layer. We've got our left leg, our left shoe. I'll rename that L shoe and while I'm at it, I'm just going to shorten this to L leg. Got our our R leg, R shoe, and then the R arm. There we go. Now, everything is nice and labelled, easily identifiable, and we have a lot fewer layers than when we started.
3. Artwork Prep - 2: Now, if you follow John's instructions for animation, you should have already drawn your character's arms in a straight out position. That's important for when we go to rig our characters for animation. But on this particular character, I don't have that. If I jump over to Mr. Liquor, you'll see that John actually did give me straight versions of the arms so that I can easily rig these inside of After Effects. But sometimes, as a motion designer, you may be given artwork by designer who didn't know they needed to draw these limbs out straight for you. You'll have to correct for that. Fortunately, Photoshop has a really handy tool that makes this a pretty easy task. So, I'm going to start by just soloing the right arm and we'll start with that one. Zoom in nice and close. I'm going to go up to edit, then down the puppet warp. Now, puppet warp allows you to distort any layer based on a mesh that it generates for the alpha channel of that layer. If I come up here and turn on show mesh, this is the mesh I'm talking about. I'll zoom in nice and close and you can see that it's just basically broken up the alpha of this layer into a bunch of triangles. Now right here, we have the density. If I turn this from normal to more points and see that the mesh gets a lot more detail. There's more points, more triangles and that's generally going to produce better distortion so I always turn mine up to more points. The next little drop-down is expansion. If I click and drag on this, I can adjust that value very quickly. You see, as I do this, it's just expanding out this mesh from the edges of the layer or you can shrink it as well. I don't know why you'd ever want to, but you can. Basically, you just want to make sure that your mesh is covering all of the pixels in your artwork. Now, this is a very solid layer so there's not much details to be missed. But if you're using a more textured brush, if there are any finer details, you may need to adjust this out a bit. I'm just going to leave it right around two pixels. Now that my mesh is set up, I can add pins anywhere on this mesh and distort it however I want. So, let me show you what I mean. I'll add a pin at the base, maybe one in the middle and then one at the end. I did this just by clicking on the mesh. Now, we can grab any one of these pins and move it around freely. This is really helpful for being able to straighten things out or simply just modifying an illustration pretty naturally. Now that I have my mesh set up, I'm actually just going to turn it off so we don't have to worry about looking at it. Now what I want to do is just straighten this limb out. You might think that all you need to do is move this one over and then move this one over and boom, we're done. But that's actually going to shrink the layer size. If you think about it, this is the arm and the arm is never going to be changed in size. So, I'd want to straighten this out by rotating it from the elbow, basically. So, if you imagine the distance between these two points never changing, I'd need to follow an arc, like a perfect circle using this as the center point to straighten that out nicely. So, it would need to travel along a path more like this in order to keep the proportions correct. But my ultimate goal is to have it straight up and down so I'm going to undo press command R to bring it my rulers and then just drag a guide out to line up with the base pin. Now, I can use that as a guide to line the other pins up too. So from here, I don't want to go straight over. I want to do a little bit of an arc, bring it up a little bit, pivoting around this pin. But I also want to be moving this pin so they stay the same distance from each other. So I'm going to shift click on it and then click and drag up a little bit. There we go. Now, this isn't a hundred percent precise, obviously. But trying to keep these pins the same distance will really help the character look the way that the illustrator intended it to. Then shift click on the elbow pin and then do the same thing here. I'm not going to go straight over. I'm going to try and arc it up to right about there. So, looks about there is good. I've got some like waviness happening and that's just the nature of the puppet warp tool, but you can add as many pins as you want to correct for this. So, just keep adding pins wherever you need to, to smooth out these points that are wobbly, sticking out weird, until you've got something that looks pretty straight. I think that's perfectly good. Now that I've got that all set, I'm just going click on the check box and now we have a straight arm. So, bent, straight, that looks awesome. I'm going to do the same thing for the left arm. Turn that on, go to edit, puppet warp, add my pins. This one is bent a lot more extreme, so I'm a line this guide up here with the top pin, select these two pins, click and shift click and adjust it just a little bit, deselect that one. Then I need to try and shoot for something that's the same distance from this point down here. So, this is a pretty big circle. I'm thinking somewhere around here. Let's see if I can just follow that arc and, again, this is not very precise but doing your best at trying to estimate that distance really will help your artwork look correct. All right, now we've got some pretty major bends in here. So I'm going to just adjust these, straighten them all out, and that looks pretty good. You can also use your arrow keys to tap these pins around instead of clicking and dragging. I think that's good. There we go, bent, straight. All right. Now that I have those, I'll turn on all my other layers for the character, and I want to basically just make a starting pose where these limbs are straight out to the side. So, I'll move my anchor point up here, rotate it to the side. Same thing with this arm. Move that anchor point down. Make sure it's right in the center, then rotate it down. I'm holding shift so that it locks to 45-degree increments. That's where my two arms are going to stick straight out. Pull this arm back up against the body, so it just touches it. Then I'll move the hands to go with it. So, we've got right hand one and two. I need those to come down, I'll just rotate them so that it looks like they're coming off the wrist properly. Something like that. Make sure the first hand that one needs to rotate a little bit. I'll move the anchor point and rotate it around there. The wrist is nice and square up against the arm. There I have my two hand poses. All right. Now we'll go to the left hand and do the same thing. Rotate it around. Squared up against the arm. There you go. All right. My arms are good and I'm quickly going to do the exact same thing for the legs. These are much less extreme bends, so it's not going to be difficult at all. Now, on this first leg, I actually forgot to follow the arc I just brought them in. That is actually a great example of showing you just how much you can shrink the limb if you don't try and keep the distance between pins accurate. The left leg is much shorter than the right leg. So I'm going to use the right leg as a guide and stretch that out just a little bit. All right, there are my legs, turn on all the other layers and I'll just shift these legs up a little bit so they line up where they're supposed to on the ankles. Looks like right about there, and there is good. All right. Now that all of that set up, my character artwork is all ready to go. All of the layers are labeled nicely. I can understand exactly what I'm looking at and the limbs are straightened out which is perfect for rigging. I'll just turn on my background and my foreground, save. Finally, if you have layers other than just what makes up your character in your PSD like I have this background in the foreground, make sure you group your character. That will help with organization once we go to import it into After Effects.
4. Artwork Prep - 3: But, before I start animating him. I want to take a look at Mr. Liquor, because he has a unique issue that is actually pretty major when it comes to animating. So, I'm going to save this as a rig real quick and then I'll just turn off all of the layers except for Mr. Liquor. Now, this is a very unique character because part of his body is semi transparent and his arms are kind of just attaching to the side here. Like I already showed you, John gave me right and left arms that are straight so I can rig them more easily. I'm just going to merge these together real quick so it's easier to see what's happening. If I rotate these and line them up where they need to go, it looks fine when the arm is straight out. I'm going to turn off the other arms just so this isn't so confusing. But, if I just bought this up against the glass, that's great nothing wrong there, but if I were to take this in after effects and then rotate it around where the shoulder would be which should be right around here and I rotate it down. We've got issues, right? The shoulder is broken. This line should still be attached right here to the bottle and this really wouldn't have been an issue for the guitar character because his limbs are so thin that if I were to rotate this, you're really not going to notice it pretty much looks natural and part of that is because the tip is a little bit rounded and that really helps. It's not perfectly flat and cut off. But, that's obviously not going to be the case for every character design. Mr. liquors arms are much thicker and they have more detail. So, I'm going to undo that rotation and what we need to do is basically just make it a perfect semi circle so that when it rotates, you don't really see that edge and this will make a lot more sense once we actually do this. So, let me solo this arm so that's all we can see and I'll make a new layer and I just want to make a perfect circle. So, I'm going to start making a selection and hold shift and make it about the same height as the arm, and that'll hold down spacebar at the same time so I can re-position this. I'll line it up right about here and I'm looking at the halfway points right here on these black outlines. That's kind of what I'm shooting for. Is right in the middle of there and then lining up the halfway point of this circle right where the actual arm ends. Now that I have that, I'm going to make a eyedropper selection of this gray color and fill it and then move that below the right arm and then add a stroke to this layer. So, double click on that to bring a layer styles and I want to add a stroke which is right here. Check that and then change the color to black. That way it matches the outline of the arm. Right now it's position on the outside. If I bring it to the center, that should line up fairly decently with the outline of the actual arm. Maybe turn the size down a little bit. Just trying to match the same width of the actual outline that John drew. I think that looks good so I'll click okay and then just shift it over to the right a tiny bit. Now, the rest of John's lines are textured. This one is not. But again this is a little tiny detail that when zoomed out, you're probably never even going to notice it was there. So, I can get away with that. If you're the one in charge of your character design, then by all means you should go ahead and do this for your character's limbs. But, again as an animator I may be given artwork that wasn't properly designed and this is how you can correct for that. Now t, hat I have those two layers, I can actually just merge them together. So, we've got our right arm now with the rounded cap. If I turn on all the other layers again and I'll just hide this right arm one more time. Now, we can rotate this right around this pivot point and the shoulder will always line up properly. It looks like it bends into the body nice and easy. So, that's how you should be preparing all of your characters limbs and it doesn't matter if it's an arm or a leg. If you can see that joint and it breaks when it rotates, this is how you can fix that issue. Now, another unique scenario that this character brings up is that the bottle is semi transparent. So, even if I were to move this below the rest of the body. I'll just put it all the way down at the bottom. You can still see through the glass to the back of that limb and really we want to be cut off right here. On top of that, if the arm is behind the bottle when we rotate this in and bend it, it's going to go behind the character instead of on top of it. So, those are issues that we can't really do anything about in photoshop, but that's actually okay we'll be able to correct for that in after effects and that is something that I will cover. For now, in the artwork prep phase, just make sure that all of your limbs have these nice half circles at the end rounding them off nicely. Another interesting issue that this character is bringing up is that he's filled with the liquid and I'm likely going to want to be able to control that separately from the actual bottle of the character. I might want to slash that around a little bit if he's moving. So, let me go down to that layer. It looks like it's a group liquid and inside we've got the liquid line and the liquid fill. So, I'm just going to solo this group and there's a mask on the group I'm going to disable it by shift clicking on it and it looks like that's just around, a completed oval and that's actually really beneficial. I want to preserve that and if I were to just rotate this group right now around where that top of the line is where the the liquid ends. You can immediately see this is a problem, because it's going to show empty parts of the bottle. So, to fix this I need to extend this bottom portion out so that when I rotate it we don't get these gaps that are showing through the glass. This is actually going to be really simple. All I have to do is make a new layer and a rectangular shape that just extends out to the sides and I'm lining this up right with the widest point of this top surface area. I'll just come down a little bit further than the bottom. Maybe go out to the edges quite a bit just for safety and then I'll make a eyedropper selection of this lighter brown color and fill and then make sure that it goes below the other layer so that that surface area is preserved. Then I just want to make sure that's nice and centered with the other layers. So, I'm just using my smart guides to line that up. Right there looks good and I can merge all these together. Re-enable that mask,turn on my other layers and now if I rotate this layer putting the anchor point right where it needs to be, you see that it looks like that like would is just sloshing around. I would have to really extremely rotate this to have any kind of issues. But, I'm guessing that if anything it'll just be the subtle little rocking back and forth movement. So, that's working perfectly. All right now that you've watched me prep some of this artwork and you've seen a couple of unique scenarios, you should be ready to go to start prepping your own artwork for animation. Remember to think through how you want to animate your character. If your character has eyebrows and you want them to be able to move, they need to be on their own layers. If your character's limbs aren't super stick thin like the guitar, you're going to want to make sure that you include these rounded caps. Think through all of those things and if you come across a feature that you're not sure if you're going to want to animate then stay on the safe side. Don't merge the layers together and instead group them. Because a group of Photoshop will show up inside of after effects as a similar item. It's called a pre-composition and you can think of them just like Photoshop folders. It just groups all the layers together and represents them as one layer. But, you'll still be able to access those layers within after effects if you decide you want to animate them. So, a good example of this might be the eyes on this moneybags characters. I don't know that I'm necessarily going to want to animate these pupils around separately from the eyes, but I also don't know that I won't want to. So, I could just take this layer along with the rest of the eyes. So, I'll take the outlines, merge that together, the whites of the eyes, grab the pupils, put it between that part and the whites of the eyes and then do the same thing for the left. We've got the outlines, we move that up. To fill for that, I'll merge those together. So, I've got the right eyelid, the left eyelid, the pupils and then the whites of the eyes. I'll just select all of those layers and group them and call this eyes and I'm doing this because I don't anticipate animating any of those layers inside of after effects but, I have the option to if I decide to later on. There's nothing wrong with grouping layers but if you know for a fact that you will not be animating a specific group of layers, just merge them. It makes the entire thing much more clean, smaller file sizes and quicker to render. All right, that's all for artwork prep. Go ahead and start doing the same process for your character and then we can move on to rigging in after effects.
5. AE Crash Course: Okay, your artwork should now be prepped for After Effects and you can go ahead and open it up. If you've never used After Effects before, I completely understand how overwhelming this program can seem. It's a very intimidating the first time you open it. But just like any piece of software, it will get easier as you use it. In this video, I'm going to just do a very quick run through of some basics of how this program works, how it's laid out so that you can follow along a lot easier for the rest of the course. If you've used After Effects before, if you're comfortable with it, you should already know everything I'm going to talk about in this video. You have my full permission to skip this and I'm not going to talk about anything regarding the actual character rigging yet. So, just skip to the next video if you already are comfortable with After Effects. If this is the first time you've opened it, this is what your After Effects should look like. I've set my layout to be the default set of panels. It may look slightly different because I'm recording this at such a small resolution, so I have much less screen real estate than you, but it should basically be the same. Now, you can have a lot of panels open in After Effects and they all do different things. The first thing I want to do is close the ones immediately that I do not need. The Libraries panel, never used it, going to close it. Character palette is for adding type just like in Photoshop or Illustrator, I'm not planning on doing that for any of these character animations, so I'm going to close that. Same thing for Paragraph. Tracker, you absolutely do not need for this class. Align, I doubt that we'll be needing it, so I'm going to close it for now. Effects and Presets, this is an important panel. We may be adding effects to some of our layers, so I'm going to leave that open. The Preview panel looks really complex, it's really just for controlling the playback of animations. I don't think we'll be needing that because the simple shortcut to preview is the Spacebar, so I'm going to close that. Definitely don't need the audio panel and we don't need the info panel. Okay. So, we've closed all but Effects and Presets and now it's just much cleaner. Let's take a look at the other panels we have open. The first one is the Project panel. This is the panel where you're going to be able to import all of your assets. This is something that you've got to think about a little bit differently than Photoshop or Illustrator. In Photoshop for example, you just open up documents. In After Effects, you have a project file and inside of that project, you can have access to assets that you import or create within After Effects. So, I could import my character artwork. I'll go and do that right now by right clicking on this panel and going to Import, File and then I'll just find my Guitar Rig. So, that's the artwork that I've prepared. I'll click on Open, and I'm going to get this dialog box asking me how I want to import it. Now, there are three different options, Footage and this is going to merge everything in my PSD into one layer and that's obviously not what I want. I want access to everything so, the other two options are Composition and Composition retain layer sizes. I want to choose the last one. The difference between these two is that a composition is going to give me access to all of the layers just like in Photoshop, but it's going to make the bounding box of every layer the size of the PSD. Retaining the layer sizes is going to keep the bounding box size to each individual layer, and that's what I want. Now, I didn't use any layer styles, but if you did, just make sure that editable layer styles is selected and then go ahead and hit Okay. Now, that's how we get our PSD into After Effects in a way that we can use. Right away, we have this composition and I know it's a composition because this type column right here is telling me that's what it is. This is the little icon for a composition in After Effects. You can think of a composition sort of like a document in Photoshop. If I double click on it, it's going to open up, we can see our artwork and taking a look over here at this panel, this is the composition viewer. This is giving us a live preview of what our document looks like. You can see that it even brought in the guides that I had in Photoshop. I don't need those right now, so I'm going to come up to View and uncheck Show Guides. If we take a look at our Project panel again, you'll notice that I also now have a folder inside of After Effects. If I twirl that down, these are all of the layers that make up the PSD. So, we've got the background, we've got the body, all the way down the line. So, every layer that makes up this character was imported in the After Effects and organized into this folder. The Composition is actually what's containing all of those layers just like the PSD did in Photoshop. Now, we're not seeing the entire image on this Composition viewer. So, I'm going to just click on this right here, our Magnification Ratio and click on fit and that will zoom out and fit my composition to the size of the viewer. I can resize this by just hovering right here between two panels clicking and dragging, and you can see that just zooms in and out. Now, this may look a little low resolution to you and that's because I have my resolution right here, this dropped down set to auto. So, it's automatically downsizing the resolution based on what magnification I have it set to. To zoom in, I can just press the period or greater than symbol on the keyboard and that zooms in to 20 percent, I can press it again and it goes to 33 percent. You can see, now I'm looking at it at half resolution. If I want to zoom into 100 percent, I'm just going to press the question mark or backslash button and that zooms to 100 percent and now I'm looking at it at full resolution. If I want to get back to zoom to fit, I am going to press Shift questionmark and there we go. Now, let's say I want to view my composition at a higher resolution, but stay at this fit magnification. Well, I can click on this resolution and change it to whatever I want. So, full, half and we'll see the quality update as I do that. I like to keep mine at auto and just know that at this scale, it's going to look a little less quality than it would normally, but that's actually going to help it process faster and render our previews more quickly. But that's how you zoom in with the period key or greater than symbol and you can zoom out by pressing the kama key or less than symbol and once again fit the comp to your viewer by pressing Shift questionmark. That's basic navigation of the composition panel and then down here at the bottom, we have our Timeline panel. Now, this is a kind of a combination of two different things. It's giving us our layers just like in Photoshop, but it's also giving us a timeline, it's showing us these layers represented across time and this is how we're going to be animating things, controlling different aspects of our character over time. Just like in Photoshop, if I were to move these layers around like say, move the foreground behind, the middle ground. Now, my character is on top of that, I can move the background on top of everything and we don't see anything behind it, that behaves exactly the same. If we take a look at our layers, we have a foreground, middle ground and background. Now, in Photoshop if you remember, I did not ungroup this folder. In fact, I'll just jump back over and look at the Guitar Rig PSD and we have a foreground, middle ground and background. Because I didn't ungrouped this, After Effects translated that as a composition on its own. You can have compositions within other compositions in After Effects and we're going to be using that feature in our characters. So, if I double click on middle ground, that opens up another tab, it opens up the composition that I just double clicked on and now I see all of the layers that make up this character, I can click and drag any one of these just like I did in Photoshop and have access to all of those individual layers. That's exactly how I wanted this set up, because I want my character and all the animation that I do to the character to be separate from the foreground and background, but we'll get into a lot more detail about that aspect in a little bit. All right, now, that we understand the layout of After Effects and how it handles things like layers and folders, I quickly want to show you how animation works in After Effects and I'll do that with this composition that we have opened right now. With any layer in After Effects, there's going to be this little twirled down arrow. If I click on that, depending on what type of layer it is, it'll have some options within it. The only one on this layer is Transform. If I open that up, it gives me a whole bunch of different properties that I can now modify. So, let's just take a look at the scale property that is set to 100 percent for the X and Y values and these are linked together. Now, to adjust this value, all I have to do is click and drag on these blue numbers and you can see that is scaling up and down my character. Now, I could do the same thing by coming up to the Composition viewer, grabbing one of the handles and clicking and dragging, but you can see that even though this is linked, they are being adjusted separately, it's not scaling proportionally. All I have to do to fix that is hold the Shift key, and now it does scale down proportionally. If I want to get back to the original, I can just click on these numbers once and type in 100 and press Enter and it goes back to 100 percent scale. Do the same thing for the rotation, the opacity, the position and finally, the anchor point. Now, the anchor point is moving the layer around, but you'll notice the anchor point itself is not moving. So, that's something to be aware of. If you want to move that anchor point without moving the layer, there's actually a tool in After Effects for this, it's called the Pan Behind or Anchor Point tool. I'll click on that. Then I can click and drag this Anchor Point around freely. Okay. So, that's great for being able to modify all these properties. If you take a look right here, we have all these little stopwatch icons. These are what allow you to animate. So, if I were to say just grab my character and I move him over and I'll hold Shift, so that it only moves on the horizontal axis. I'll move him right here. Then, I'm going to click on that stopwatch for the position property. So, click and that added what is called a key frame in my timeline. I can zoom in and out of my timeline by pressing the plus or minus keys. So, I am going to zoom in here nice and close so we can kind of see our whole second markers. So, this little blue indicator right here is called the Current Time Indicator. You can click and drag this around and kind of just scrub. As I'm doing this, you'll notice that these numbers over here are changing. This indicator determines what frame of the composition we're previewing in our Composition viewer. So, right now I'm at frame 20. So, we're looking at the 20th frame, but we can see that key frame that I had just set for the position is still all the way back to the beginning at frame zero. This is called timecode and it's very helpful for knowing exactly where you are in your animation and how long your animation is actually taking. If yours is not displaying in seconds, all you have to do is hold down Command or Control and click on those numbers. Now I'm displaying mine in frames, I can still see the timecode down here on the bottom left in seconds, but holding Command or Control and clicking will swap those two numbers. All right, back to the keyframe. Now, that I have that set, let's say I go forward one second. So, there we are at one second, and I want to move him to the other side of the screen. Well, I'll just click and drag while holding shift and we've got this kind of purple trail showing up now. That automatically added another keyframe. Now, this is how keyframes behave in After Effects. You set a keyframe and then you go to a different frame and modify it, it will automatically add another keyframe. This little trail here is called the motion path. This is telling you where this layer is going to travel between these two points in time. So, if I scrub between these two, you can see After Effects is animating this guitar across the screen for me. If I press the Spacebar, I can preview that animation. This little red indicator showing me what I'm previewing at that current time in the composition and if I wanted to just preview this part of the animation, I could actually set an outpoint for my work area and the work area is just the portion of the composition that After Effects will play back. That's set by this little blue line up here. Now, we can only see the endpoint, but if I press N on the keyboard, that automatically sets the outpoint. So, B on the keyboard for the end point and N on the keyboard for the outpoint. Then you can click and drag this wherever you'd like. All right. Now, that I have my work here is set, I'm going to press the Spacebar and that's just going to loop the playback. It'll keep previewing that animation until I stop it by pressing the Spacebar again. This is the foundation of animating in After Effects, it's all based on keyframes and you can do it with any property. So, I could rotate this guide back a little bit and go to the second part of the animation, rotate him forward, play that back and now he's kind of doing a cartwheel across the screen. But that is the absolute fundamental way of animating inside of After Effects. There's a whole lot more that you can do with keyframes in After Effects and if you're interested in learning more about it, I would suggest you take my class animating with ease while I cover animation much more in-depth. But for the purposes of this class, we're going to be keeping the animation very simple. So, as long as you understand how to set keyframes, how to adjust timing and play things back so you can preview what you're doing, you should be good to go. Another part of After Effects that I want you to understand before you move on to rigging is what's called a parent system. So, here inside of the actual character composition, I can move all of these layers around individually, but there are a bunch of layers that I'd like to stick with this body. So, things like the pupil, monocle, strings, in fact pretty much everything really should stick with the body. So, I'm going to select all of my layers by pressing Command A, and then deselect the body by pressing Command and clicking on the body, so it deselects that layer. Now, I want all of these layers to move with the body whenever the body moves. So, I'm going to parent them to that layer. To do this, we're going to look at our parent column. If you don't see this, it might be because this little button right here is not checked. So, make sure that is blue in the middle here, so that you can see your parent column. Then I am going to click and drag any one of these little twirly icons from the selected layers. This is called the parenting pickwhipp and it allows you to select any other layer as a parent for those selected layers. So, I am going to do that to the body. You see that now under these dropdown menus for all of those selected layers, the body layer is set as the parent. What this means is that now if I grab the body and I move it, everything else moves with it. If I rotate it, I just press W on the keyboard to switch the rotation tool, I can now click and drag and rotate. They're all going to follow that layer inheriting the transformed properties of the parent. Okay. So, that's great, but let's say I want to rotate the arm. You see the hand is not following it. Well, if I grab the hand and I parent that to the left arm, now when the left arm rotates, the hand follows it. Now, this is not rotating where I want it to, so I'm going to zoom in by pressing Z on the keyboard for the zoom tool and clicking a couple of times and then I'll press Y to bring up the Anchor Point tool. I'm just going to click and drag and set that rate at the shoulder point. So, that it now will rotate around that point instead of the middle of the layer. I press W to switch the rotation and now that hand is parented to the arm. So, parenting is a very powerful feature of the After Effects and it's going to make animating things much easier to do. All right, let's get to rigging.
6. Installing DUIK 15: Now that your artwork is prepped for rigging, we can actually bring it into after effects. In addition to after-effects, were going to be using a free script for after effects called Duik. That's really what makes character rigging inside of after-effects possible. Now since I originally recorded this class, there's been a new version of Duik released and the entire rigging process is completely different from what i'm going to teach you in this class. But it isn't necessary that you use the new version and the new technique in order to complete the project for this class. Instead of re-recording the entire class with the new version of Duik, i'm going to just stick to the way that I taught it originally and show you how to install the older version of the script, so that you can just continue following along the way that I originally taught it. Unfortunately, installing this older version isn't that easy to do, but i'm going to walk you through exactly how to do that right now. First of all, I included a link to the download for the version of Duik you should be using in the notes of the video right now. So look in the notes and click on that link and that should automatically start the download for you. It'll be a zip file that you should open up and that will give you this folder that says Duik version 15.5. All of these files need to be copied into the version of after effects that you're using. Now here's one other little small catch. This version of Duik actually doesn't work with CC2019, 16.0. Now, I realize i'm probably completely overwhelming you with a bunch of information that doesn't make a lot of sense. But here's how you can check to see what version of after effects you're running. Come up to your Creative Cloud Manager and find after-effects. Now I have a few versions installed, but click on the little arrow next to the after-effects icon. You'll see that my most recent version is 16.0.1. This Version 16.0.1. does not work with Duik 15.5. I've researched it and apparently Version 16.1, once it's released will, but if you're running 16.0 It's not going to work. What you're going to need to do is install a previous version of after effects. This is CC2018 or version 15.1.2. If you don't know how to install a previous version, just come up to this little drop-down up here, go down to manage and click on other versions. This will allow you to install previous versions all the way back up to CS6. Just installed version CC 2018 or version 15, whatever they have here, it's not showing up because I already have it installed. But that version will allow you to follow along with the rest of this class. Like I said, if Version 16.1 is available at the time that you're watching this, you should be able to install it. no problem. If you have the right version of after effects installed, then all you need to do is copy all of these files. I made a selection, copied them, and then go to your applications and find that version of after effects. I said, i'm going to be doing this on CC2018. Now if you're on a Windows machine, dislocation is going to be a little bit different, but you need to find where your after-effects version is installed and go to the scripts folder. Inside that scripts folder, there will be a script UI panels folder. This is where we want to paste everything. Now I have already pasted all these files in here, but I'll just do it again for good measure and I'll replace all of those files. Those will copy over and now we can open up after effects. Here's my CC 2018 version. Now that those files are installed, we can come up to window. Let me close this out. go up to window. Down, all the way down here to where your scripts live and find Duik, I'll click on Duik. That will open up the Duik panel and it's telling you that there's a new version of Duik. Don't worry about that. Just click on "Launch" and then you're probably going to get another little message here saying that Duik hasn't been able to finish the installation yet. Now again, I apologize for how complex it is to install this version of Duik, but the creators of Duik give very straight forward instructions on what to do from here. What i'm going to do is click "Next" to find the first step. This is going to tell us to open the file preset effects that XML, which is contained within the after-effects application. What i'm going to do is just bring my finder backup and scale it down a little bit. On the actual application right here i'm going to right-click and say show package contents. Now again, this is going to be different if you're on a Windows machine, but these instructions should update to whatever operating system you're using. Al l right, now that I can see the contents of my aftereffects application, I'll go into that contents folder, then resources, just following the instructions, then find the preset effects that XML. There we go down the list preset effects that XML. I'm going to copy this and paste it on my desktop just for a backup. I'm going to make a new Finder window, go to my desktop and paste, and this is what i'm going to edit. I'll click "Next." The next step is to copy the contents of the box below. I'm going to select all of it by clicking down here and pressing "Command A" and then copying by pressing "Command C." Then I'll click "Next." It says paste this text in the file preset effects XML just before the last line of slash effects. I'm going to open this up. My default application is actually called the BBEdit, but i'm going to just open it up in text edit just in case you don't have a code editor installed on your machine. I'm going to open it in just a basic text editor. I'm going to scroll all the way down to the bottom. Just before the last line slash effects, i'm going to drop down one line. I'm going to click just before that one and press "return"or "enter." Then in this new gap, i'm going to paste that code that I just copied. All right, now i'm going to save this, close it, and now I can copy that file which I copied to the desktop back into this application contents i'm going to paste. That is going to say, do you want to keep both replace? I'm going to say replace. You'll have to type in your administrator password. Now all I have to do is click finish installation now and Duik confirms that installation is complete. After-effects just needs to be restarted. To complete the installation at Duik restart after effects. I'll quit out of after effects and then open it up one more time. Now with that new code in that XML file, Duik should be completely installed for After Effects and we can move on to actually rigging a character. Let me click "Launch Duik" one more time. There we go. We have all of our Duik controls. Again I apologize for how round about this process is for installing this version of Duik to follow along with this class. But don't hesitate to reach out if you're having any issues installing it and I'll try and help you work through it. If you're interested in learning about the new version of Duik, then after you finish this class, go check out my rigging with Duik Bassel class. All right, let's move on to rigging.
7. Rigging - 1: Once you've installed Duik, you can open up After Effects. First thing I need to do is bring in my artwork. So, I'm going to right-click on my Project panel, go to Import, File, and then I'll start with my Guitar_RIG. Remember this is the rig that I prepared. Guitar is the original artwork. I'll click Open and make sure that my composition is set to Retain Layer Sizes and click OK. Now, just like backing up your original artwork PSD, I want to have a backup copy of this original composition just for reference and in case I mess anything up with the rigging process. So, I'll actually rename this Guitar_OG for original, and I'll duplicate this and just name it Guitar for my purposes and After Effects. So, I'll double-click on that to open up the composition. Inside, we have three layers: the foreground people, the background and the middle ground. Now, this middle ground composition is the one that I'll actually be using for rigging. So, I want to find this in my project. An easy way to do that is just to right-click, scroll down and say Reveal Layer Source in Project. That opens it up in my Project panel. I want to rename this. Instead of middle ground, I'm going to name it Guitar RIG. There you see it updates in my guitar comp. I can now double-click on it and have access to all of the actual character's layers. The first thing I want to do in this comp is change the dimensions. It's currently the same size as the document that I had in Photoshop, but I want to give myself more room to move this character around once I go to animate it. So, I'm going to go up to Composition, Composition Settings, and I'm going to change the width and height to be much larger. So, I'm going to uncheck the Lock Aspect Ratio and change the width to maybe 6,000 and the height to 6,000. I just like to do a square, so that there's a nice big margin around the entire character. Before I go any further, I'm going to change my frame rate from 30 frames a second down to twelve. The reason for this is because it's going to make my animations look a lot more authentic. Cartoons are generally animated at 24 frames per second, but to cut cost, studios started drawing half the number of frames and just playing them twice as long, effectively making their animations 12 frames per second. The only times the animators would generally jump up to 24 frames a second is if they needed a very fluid or smooth motion. But cutting the number of drawings in half obviously doubled production. So, that's what we're going to be working at, is 12 frames per second. I'll click OK, and now I've got a lot of room to work with. Next up, I want to group some of these layers. Because to be authentic to this cartoony classic style animation, characters a lot of times were very bendy and distorted, and that just gave a lot of charm to the character and the style of character animation. So, things like the strings, and the body, and all the layers on top of the body can really all be put into one composition, so that when I go to distort them, they all bend together. So, I'm going to select all of those layers, Strings, hold Shift and then click on the Body. These four layers right here, the Strings, Monocle, Pupil, and Body can all be put into their own composition. So, I'm going to pre-comp them by right-clicking, scrolling down and going to Pre-compose. I'll name this Body, then I'll click OK. Now, the bounding box has now been adjusted to be the same size as this composition. If I double-click on this composition, we see that it is in the exact same space as before. I want to bring this in a little bit so there's not quite so much space around it. So, I'm going to press command K to bring up the Composition Settings, lock that aspect ratio and then just scale this way down. I'm going to bring it in basically as close as I can to the top, something like that. Then I'll uncheck the Lock Aspect Ratio and adjust the width. The reason I'm doing it this way is because it's keeping the relative position of all the elements in the same spot. So, once I'm happy with that I'll click OK. The reason why I wanted that to relatively be in the same space is so that the position of the guitar doesn't move around in this comp. Now, this is still giving me a whole bunch of dead space at the bottom that I don't like. So, I want to crop my composition to that artwork. But like I said, if I crop off the bottom of this composition, it's going to effectively shift the position of the guitar over here. So, I need to know exactly where this guitar is for reference before I do that. So, I'm going to use a little feature in After Effects called a Snapshot. Just click on this little camera icon right here. We hear that camera shutter sound. Now, I can always reference that frame by clicking and holding on the Show Snapshot button. So, I`m going to go back into my body. To crop this, I'm going to use a feature called the Region of Interest, which allows me to draw a box just like the Crop tool, and I'll just size it to exactly where I want it to be. Then come up to composition, say Crop Comp to Region of Interest. That effectively crops the comp, and now my guitar moves back in my rig comp. But that's why we have the Snapshot. I'm just going to reference it, and then click and drag this guy back up, reference and just use my down arrow key to tap him down a little bit, zoom in to be more precise until he's exactly placed where he needs to be. There we go. That's perfect. Now, that pre-comp has the bounding box sized properly and it's in the exact right spot. All of the other layers can stay the way they are for now and I can start rigging.
8. Rigging - 2: Before I go any further, I really need to save my project. You need to get into the habit of saving regularly, and I haven't saved that all yet. So, I'm going to save, command-s, and name this guitar, and click save. All right. So, let's just start with what's probably the most complicated thing to rake, and that's the limb. We'll just get this out of the way, so you understand how it works, and you can do it on your own character, and then we'll move on to other details. I'm going to solo the left arm. So, to solo or layer, you just click on the solo switch. Now, that's all that I can see. Now, zoom in here nice and close. Now, I can't do anything to this layer, obviously, other than just kind of scale it, rotate it, but I can't bend it in any way by default. We're going to be using a tool called the puppet tool to allow us to distort this in very specific ways. This is a lot like the puppet warp tool in Photoshop, but it's much more robust here in After Effects. So up here, we've got this little pushpin icon. That's the puppet tool. I'm going to click on that. Then, start adding pins to my layer, just like we did in Photoshop. So, this is the wrist. I'll start there and click. I'll put one in the elbow, and that's kind of just halfway down the layer, which should be right where the anchor point is. Then, one at the shoulder. Now this tool is great. Just like in Photoshop, it allows you to distort the layer based on a mesh. If I show my mesh, there we go. It looks just like in Photoshop. I can adjust this expansion to make sure that it covers all of the pixels. You can control the triangles a lot more finely in After Effects than you can in Photoshop. I like to turn mine all the way out, because the finer the density of your mesh, the better the distortions are going to look. So, I suggest you turn that all the way up, and once your expansion and triangles are set, you can turn your mesh off, so you don't have to see it anymore. But now, I'm able to just distort this layer freely within After Effects, and that's really great. If I expand up my layers panel a little bit, we see that this added an effect to the layer called, puppet. Inside of that, we have mesh one, we controlled that down. See those properties that I adjusted up here? Then, inside of that, there's a deform and twirl down with three puppet pins. As I select these, you can see they are being highlighted, right there in the composition viewer. If I open each one of these up, I have a key frame set and I have positioned property for each. So, because I am able to add key frames to these properties, I can animate them. I'll zoom in here a little bit, and maybe go to 10 frames forward, and I could adjust this pin, push it up here, I could pull this one down, bend this one, and After Effects is going to animate that for me. That's great, except that I can't do much with these properties, which is great, but it is a bit limited. The reason for that is because, these are just properties on a single layer. So, I could do things like adjust the motion path, just like any vector path to control exactly how it gets from point A to point B, and I could ease the key frames, so that it starts off a little bit slower, and ends up a little bit slower, and it just eases into that motion. But, I can't do things like parent this pin to that pin, because they're not separate layers. You can only parent one layer to another, not one property to another, at least not very easily. On top of that, I have three separate properties to account for with one limb, and that's a lot to deal with, when animating a character. Because I have four limbs, so four times three is 12. That's 12 different key frames that I have to worry about any time I want to move those limbs. That is where Duik comes in. Fortunately, there is a much easier way to manage these puppet pins, and Duik makes the entire process so seamless and intuitive. So, I want to open up the Duik panel now. I'm going to come up to a window, scroll all the way down, and find Duik, and just click on it. It's going to open up the Duik panel, which you can dock anywhere you want in After Effects. So, I'm going to just push it right over here on top of my effects and presets, and make sure I can see it nicely. So, there are a whole bunch of controls. Don't worry, you do not need to know how all of them work. We're only going to be using a select few of them. The first one we're going to talk about is, Bones, right here. Now before we actually run the Bones part of this script, I first want to name all of my pins. It's very important to have unique names when you're rigging a character and when you're using Duik. There's going to be a lot of code generated in the background, and they depend on unique names. So, if I had puppet pin one, two and three on the left arm and the right arm, it's going to mess everything up. So, I need to specifically name this L wrist, L elbow and L shoulder. Now, you can name these whatever you want, as long as they make sense to you and they're unique from any other layers that you're going to name. All right. With those labeled, I can now select these three properties or the key frames themselves that will select the properties to. I'm going to click on the Bones button. Immediately, that updates and it generates three new layers. You can see they're showing up. They're green here, they're little squares, but they're exactly where those puppet pins were on the actual artwork. Now, if I grab this layer and move it, see that the pin is following it. Now, what's so great about this? Well, they're now external and individual layers. So, I can parent them to each other. So, the wrist will always follow the elbow, the elbow will always follow the shoulder. So, if I parent them in that way, I now have a parent chain. So, if I grab the shoulder and elbow, I can press the R key, bring up their rotations, and then rotate them together, and you see that now, this is bending in a very kind of cartoony way. But, the shoulder controls both the elbow and the wrist, and the elbow controls the wrist alone. So, I can very easily pose this however I want. So, that's extremely powerful. Let me zero these out and unsolo all of these layers, and then parent the hand to the wrist bone. Now, the hand is going to follow that pin too. So that's what's so powerful about the Bones feature if you do it, because it allows you to parent things to pins. But, I'm still having to worry about multiple properties just to get this arm to bend the way that I want. It's not that intuitive to be placing this hand where I want it based on rotation values. Fortunately, Duik has a script that will make this even easier, and it's called an IK system. IK stands for inverse kinematics. Again, you do not need to understand what that means. It's just a whole bunch of math. This is going to make our lives easier. To get the IK system to work with Duik, we need to first make a controller for this wrist. So, whatever we want to drive the distortion of the arm, needs the controller. In this case, for an arm, it's going to be a wrist. So, I'm going to select the wrist bone which is right where I want the wrist anchor point to be, and click on the controllers menu in Duik. This is going to open up another little set of controls. If yours doesn't look like mine, just make sure that your dropdown is set to this first option. These three check boxes are checked, and I'm going to leave my size to medium. This is allowing us to customize what our controllers going to look like. Color set to magenta, that should be nice and bright and it'll stand out from the rest of the character. Once all that's set, I'm just going to click on create, and there generates a controller. If you take a look at the name of the controller, it's just put C underscore, and then the rest of the layer name that I had selected, so the wrist, B for Bone L wrist, and that was the name of the pin. So, I can rename this to L wrist control, so it's easier to understand. Now, this does not do anything by default. It is a controller, but it's not controlling anything yet. That's because, we haven't generated our IK system yet. So the way to create an IK system, is to first select the layers that will be part of the IK system in a very specific order. This is very important that you select these layers in this specific order. I'll be doing this multiple times, just to reiterate, so you can get the hang of things. The first layer you select is the bone that is furthest away from the body. In this case, the wrist. Then, you want to select the other two bones on the way to the body. So from the wrist, we go to the elbow, shift click. Shift click on the shoulder to get to the body. Then finally, the controller that will drive the IK system. So, I'm going to hold command or control, and click on that L wrist control. So again, I went from the wrist, to the elbow, to the shoulder, and then the controller. Furthest away from the body, closest to the body and controller. With the layer selected in that order, I can now click on IK. Duik is going to ask me what kind of IK System I want. By default, it should be set to two-layer IK and goal, which is what we want. Then, I'm going to click on create. Now, nothing seems to have changed. That's actually a good thing. That means it worked. I can now grab this controller and move it. You see that the arm intuitively responds to wherever I move the wrist. Because I parented the hand to the wrist bone, it's also moving with that controller. So, I could just simply position this, right where I want it. I could rotate it by switching to the rotation tool, W on the keyboard. Rotate the controller which you see rotates the hand as well, and put that right where I want it, and the elbow is going to go exactly where it needs to, in order to bend properly. So now, all I have to worry about animating is the position and rotation of this controller. That is exactly why Duik makes character animation a breeze in After Effects compared to the default tools that come with After Effects. All right. Now that we did it with the left arm, let's move on to the right arm and do the exact same process again to reiterate how it all works. So, I'm going to solo the right arm layer. Collapse the left arm, so we have more room. Solo the right arm, zoom in, and set my puppet pins. I'll start at the shoulder and the elbow, and then the wrist. I'll press U with that layer selected, to bring up all the key frames and rename the pins. So, we've got the R shoulder, the R elbow, and the R wrist. I'll select those properties by selecting the key frames and click on the Bones button. So, it generates the bones I need to drive those pins. I'll parent the wrist to the elbow, the elbow to the shoulder, and then I need a controller for the IK system at that wrist positions. We'll have that layer selected. I'll click on controllers. All these settings are remembered from before. I'll click create. Now, I've got my big controller there, and that's all the way at the top of the list. I'll rename this R wrist control. I'll give myself some more room. I'm getting a lot of layers now so it's going to be a little bit cramped but what I want to do is select, for this bone from the body so the wrist, Shift click on the shoulder, and then we'll select the elbow as well, and then scroll to the top, command click on the Right Wrist control, and then click the IK system. It's going to ask me what kind of IK, again two layer IK and goal, it should be selected by default, I'll click "Create" and now if I move this controller around the arm bends just like it should. Undo and unsolo these layers, zoom out a little bit, and then I want to parent the hands to that wrist bone. So, I'll select those two hand layers, and another way to parent instead of using the pick whip, you could also just click on this drop down and find the Layer name. So, I want the bone right wrist. There we go. Now the hands follow the arm, that's perfect. Now don't worry about me having these two instances of the hand overlapping each other, we'll fix that in a little bit. But now the arms are working, let's move on to the legs and do these very quickly. So, I'm going to solo the left leg, I'm going to put pins into the leg, the hip, at the knee, and at the ankle. I'll press U to bring up those pins and rename them: L hip, L knee, and L ankle and I'll select all three of those keyframes and click on "Bones." I'll parent the ankle to the knee, the knee to the hip, and then create a controller at the ankle. Then I'll rename that ankle, L Ankle control and I'll select the furthest bone from the body, the ankle shift click on the hip, scroll up to the top, command click on the ankle control, and click IK and I'll click on "Create" and that should work just the same as the arms. Perfect. Unsolo those layers and parent the left shoe to the left ankle. That's working great. All right. One leg left, lets solo it, add a pin at the hip, one at the knee, and one at the ankle U to bring up the key frames, R hip, R knee, and R ankle. Select those keyframes and click the Bones button, parent the ankle to the knee, knee to the hip, create a controller for that ankle, and rename it R ankle control, select the furthest bone from the body, shift click on the closest bone to the body, command, click on the ankle control, and create an IK system. There we go. Our final IK limb is rigged. Unsolo those layers and parent the right shoe to the right ankle. So, there we go. Now, this is one issue that is coming up. The knee is bending in the opposite direction we want it to. So, let me undo. We need to find the effects controls for this controller layer. So, if I press E to bring up those controllers, I can double click on either of them and that will open up the effects controls panel. On this IK effect, the first option is clockwise. If I check that, now the knee is going to bend in the opposite direction. So, that's how you can change the direction of a bending limb. Now these two arms are worked out just fine. They're bending in the right direction, so I don't have to worry about that and the left leg is bending just fine as well. Now I'm going to take the bones for the shoulders and the hips and I'm going to parent them to the body. So, I'm going to select the body layer and now all of these joints are attached to the body. If I grab the body and move it around, you can see that all the limbs are staying attached to it and this is a lot of fun to play around with and just look at and see how all of that hard work you did for the IK systems is actually going to be very beneficial. So, I can rotate this guy around, do whatever I want and those limbs are going to stay attached. So, that's awesome. One more thing I want to do with these limbs to help the entire distortion just look a little bit cleaner, is pairing the original artwork layers to the root pen and by the root I mean the one that would be attached to the body. So, for the left arm, this would be the left shoulder bone. So, I'm going to parent it to that pin. The reason I'm doing this is so that the layer moves with the pin. If I didn't have that parented, the layer would always stay exactly where it is which in some cases is fine but it can sometimes lead to weird distortions. So, anchoring it to the pins will eliminate any of those weird distortions. So I'm going to do that quickly for all my limbs. Then this goes for anything that use the puppet tool on. It doesn't just have to be limbs. I'll parent the right arm to the right shoulder, the right leg to the right hip, and the left leg to the left hip. Finally, the last thing I want to do to these limbs before moving on is zero out their positions and what do I mean by that? Well, if I select this left hand controller and press the P key to bring up the position value, the current property value is 1646 by 3126. So, if I were to grab this and move it, I'm never going to remember those numbers to be able to get back to that neutral pose. But if I undo and I come up to this little button right here position zero, it do runs a little bit of clever magic and now my position value is zero. So, if I move this controller anywhere else and I want to go back to that neutral pose, all I have to do is type in 00 and I'm back. So, I'm going to do that for all of my controllers. I can do multiple layers at once, just select all three and now the position values for all of these are zeroed out and it will be very easy to get back to that neutral pose. All right. Now that you've watched me make these IK systems, I'd highly recommend that you stop watching any more lessons and go set up your character's limbs as well. That is assuming that your character actually has limbs. But if you're new to Duke, and especially if you're new to after effects, I know this is probably extremely complex looking to you and the reality is, it is. Character animation can be very complex. There are a whole lot of layers, a whole lot of setup that you need to do before you can start animating intuitively. So, you need to make sure that you're setting this up right now to eliminate any issues that might come down the line in animation. So go try rigging your IK systems yourself, make sure that they're working and once they are, zero out all your positions for your controllers and we can move on to rigging other parts of your character.
9. Rigging - 3: To give you another scenario because your limbs may not look like the guitars, where they're just sticks. This is a work in progress on the rig for Mr. Liquor, but his left arm here, obviously is much thicker than the guitars. Let's take a look at his arm when I bend it. So, if I position this about where the bow tie is, where he's grabbing that, his arm is not bending the way that the original illustration was. So let me just open that up real quick. If you remember, this is what it looked like, it was very nice and rounded. This is called a rubber hose limb. That's the traditional term for these bendy limbs that these classic cartoons had. We've got a much more angled bend here. It's still rounded, but it's not bending the way that it should. The other thing about it is it looks like the arm is much shorter when it's bent like this. The straight out version of the limb is probably longer than it should be. Fortunately that is completely correctable even after you've rigged the limb. So with this controller selected, up in my IK effect, I have this stretch twirl down. So, if you open that up, there are a few options. The one that I'm concerned with is auto shrink. What auto shrink is going to do is allow me to shorten the length of that arm as the controller gets closer to the body. You can see what's happening there. So, I can just custom fit this to be about the same bend as what John had in his illustration, and it looks like 50 percent is going to be great. So, if I stretch it back out here it's going to look just like it did, but as it comes closer to the body it just shrinks, and it's completely unnoticeable as it's happening, but it now produces a much more accurate bend to what John had. So, something around here, but if I zoom in here nice and close, we get this little issue. This little crease on the elbow pad,which should not be there. It should just be straight across. If you run into any issues like this, there is a way that we can correct for it. Now, this is a little bit more in-depth into the puppet tool, but it can come in handy if you're having issues. So, I'm going to click on the left arm artwork layer and I'm going to click in a hold on the puppet pin tool and come down to the puppet starch tool. Now, this tool has an icon of the spray bottle and you can kind of think of it like that, where you're spraying a part of this layer that you want to be stiffer. So, as I'm hovering over this, you see that the original mesh is actually showing up here where before I had moved with the controller. So, you're going to have to just use the outline as a reference to know where you're applying the starch, but fortunately we can adjust it after the fact. So, just like with pins, I'm just going to click about where I think this should be. So, the bone is right there on that crease. So, I'm going to put it right over that middle pin and it applies a red dot and then this purple highlight. Immediately, that crease has disappeared. You can see that's cleaned it up. Now, I got lucky and the settings that I used last, and the placement that I put this on happened to fix it exactly, but if we look up here at the controls, we have an amount and an extent. The extent is just how much of the mesh that it's affecting based on the point that you sprayed that starch on. So, pushing this way far out, you can see how much of the mesh it's covering and now my limb is distorted in a really weird way. That part is no longer bending nearly as much. The other value is the amount. You see that I have mine down incredibly low, it's point one, and that's because a little bit of starch goes a whole long way. If I were to turn this up to even just 10, the limb basically stiffens out perfectly straight. So, I don't know why this is so touchy, but keeping these values down low is highly recommended. So, point one seems to work just fine, and then turning my extent down very low also seem to be a good idea. So, I don't want it affecting very much at all just enough to smooth out that point of the mesh. Like I said, you can click and drag these around. So, if I were to move it, my crease is back and it's affecting other parts of the mesh, but if I would just leave it right back on top of that pin that smooths out the elbow patch and everything is good to go. So, that's how you can use the puppet starch tool to fix problematic issues with any of your artwork.
10. Rigging - 4: Okay, so I have my limbs rigged for the guitar, let's move on to the body. Now obviously, you're going to have a different character than I do. So, the rigging process for specific details of your character might be different than mine, but if you just want to be able to give your character's body a little bit of bend, some distortion, then following along with what I do is going to be very beneficial. Now, I'm sure you've noticed that I've gotten a lot more layers in my layer stack, now that I've added a bunch of bones and controllers and things are getting a little hard to navigate, especially with my screen real estate. So, I want to do a little bit of quick cleanup by selecting all of my bones and just moving them down to the bottom of the layer stack. Okay, and that way they're out of the way, I don't have to think about them anymore. So, I just selected all of them, clicked and dragged them down here, and I'm even going to just turn them off, turn off the visibility, so I can't see them anymore, and that way I won't accidentally grab any of them. And then scroll back up so I'm left with just my controllers and my artwork layers. Okay, now I'll scroll this back down and we'll focus on the body. So, remember, this contains all of the layers on top of it into one single precomp. That's very important because I'm going to be using the puppet tool on this layer and I want all of those layers to follow the same distortion mesh. So, let me solo this layer and I'm going to add some pins to the body. So, I'll select the puppet pin tool and I'll start with the hat. I'll just put one right at the top, then I'll put one probably right in the center of the eyeball, and then one down here at the base, maybe right about here at the base of the mouth. I'll press U to bring up the keyframes for that layer and I want to create bones just like I did for the limbs. So I'll name this Body-Top, Body-Mid and Body-Base. Those properties selected all create bones, and then I'll do a parent chain. So, the Top should be parented to the Mid, the Mid should be parented to the Base and I'll just rearrange these so that they're in descending order now. All right, so if I rotate the Mid, that Top pin is parented to it and it's going to rotate like that. That's great, and then the base controls both of those together. So, there we go, it's going to rotate everything together. Before I forget, I'm going to parent the body to that base bone just so we don't get any weird distortions if we push that mesh too far, but that's working great. Now, I can give this nice bendyness to the character and maybe have him go back and forth as he's strumming himself playing for that audience. That's just a really great distortion. That looks really nice. Okay, now that those bones are created I'll unsolo everything, and because my body is parented to this base bone, I could grab this base bone and move it around, the limbs are going to follow it. That's perfect. If I rotate the base, all the limbs are still going to update with that, no problem. Now, I actually want to make a controller for this bone. So, I'm going to have it selected, and click on the controllers, and then instead of making it medium sized, this is kind of going to be like the master control for the body. So, I'm going to make it big. Color can still be magenta and I'll click create. Remember this does not do anything until I parent something to it, but before I do any parenting, I first want to move it off of the body, because right now it's just overlapping the artwork, it's making it hard to see. So, I'm going to scroll up and rename it and I'll just call this body control. Then I'm going to press A to bring up the anchor point and just shift it way over to the side, and you see, this is moving the controller, but leaving the anchor point. I'm going to push it way over here. Something like that is fine, and then I want to parent the base bone to it. So, I'll click on the drop-down for the parent and change it to body control. Now, I can move this around, and it behaves properly. I can rotate it and he's going to rotate. Perfect. Now, to do a little bit of layer organization I'm going to get rid of some of these bones. The Mid, I'm actually going to leave because I'm going to want access to that rotation. So, I'll leave that right there, but I'll take the Top and the Base, turn those off, and then just put them down at the bottom of the list with the rest of the bones. There we go, and I'm going to move the body mid bone up to the top. The short keyboard, shortcut for that is Command, Shift, Right Bracket. In that way, I could easily grab that property for animating.
11. Rigging - 5: Okay, now all of my external rigs are set up, I just now need to rig up the strings so I can control them bending, and then the eye so I can move it left and right. This is a little bit trickier because it's inside of this Pre Comp, but it is still totally manageable. Let's start with the eyeball. The first thing I need to do is add a control within this main comp, the rig comp that will drive the animation of the eye, letting me shift it left and right. I'll do this through an effect. So, I need a layer to apply it to. Since the body control is the main control, I'll just apply it to that. So, I'll have that layer selected, come up to Effect, go down to Expression Controls, and choose Slider Control. Now on their own, Expression Controls do absolutely nothing. They just give you a value, I can change this, I can twirl this down to have an actual slider, but it's not going to do anything. It's just meant to drive other properties that I link to it. So, I want to rename this effect. I'll click on it and press Enter, and just call it, Eye Pos, P-O-S for position, and leave it at that for now. Now, I want to keep this effect control visible no matter what layer I have selected. If I click on other layers, I get that specific layers controls. So, I'm going to click on the body control and lock that Effects Controls Viewer. That way, I can select anything else and this will always be visible. With that done, I'm going to go into my body, Pre Comp, and I'm going to find the Pupil layer. I'll zoom in nice and close here. I want to be able to shift this left and right. So, I'll press P to open up the Position property and I don't need to move it on the Y axis, just left and right on the X axis. So, I'm going to separate these dimensions. Right click on Position and say, Separate Dimensions. Now I can individually control the X and Y properties. Now, I'm going to add an expression. If you've never used expressions before, its After Effects coding language and I realize that could probably sound like crazy talk to a lot of you. Why would we want to use code to animate? Well, we're using code in a way that's going to allow us to rig something in a way that makes animation easier. So, it's totally fine if you don't know how to code, it's totally fine if you've never used expressions, all you have to do is do what I do and you will end up with a rig that is working. To add an expression to any property all you have to do is hold down option or ALT and click on the keyframe stopwatch. The numbers will turn red, you'll get a new text box over here, don't worry about anything that's in it. All we have to do is grab this pick whip, and this is just like the parenting pick whip except it's called the expression pick whip, and it allows you to generate expression code for any property that you select. I can in fact even come up to the effects controls and select an effect. Remember this is the slider that we created in our guitar rig. So if I select this slider, After Effects is going to automatically fill out the code that it needs to reference that property, and just click off of that box and the expression is applied. Now, my pupil shifted over to the left and why is that? Well, because the exposition value is now zero. The reason for that is because that's what my slider is set to, but I turn this up a little, it moves. It's now 42.7 because my slider value is 42.7. If I put it to 100, now my value is 100. So, the slider is working on changing the position value, but it is not working in the way that we want it to, but how do we get this to work properly? Well, we need to zero out the position of that Pupil layer. So, let's just select that layer, click on Zero position, and now it's jumped back much closer to where it's supposed to be. If I put this to zero, it's now in its neutral position. If I go to 100, it shifts it over probably further than it needs to, so I'll just dial this back to maybe about there. Let's say that's about how far to the right I want to push it, but what if I want to push it to the left? I can't go to the left. Well, I could just click and drag the numbers to a negative value but that's not very intuitive compared to just moving the slider around. Fortunately, I can customize this slider. So, if I right click on Slider and say, Edit Value, I can adjust the range. Right now it's going from zero to 100, but I could change this to negative 100 to 100. Now if I click okay, I can move the slider in either direction at a value of 100 which translates to negative 100 pixels, or positive 100 pixels off of that zero neutral position. So, there we go, we've rigged up our eye and the only issue that's left is that if I push it all the way to the left, we see part of the pupil where we shouldn't. So, I'm just going to make a new solid layer above this Pupil layer by going to Layer, New, Solid, and I'll name it Matte, and then I'll just turn it off for a second and switch to my Ellipse Tool. Then I'll draw a mask, hold Spacebar to reposition it and get it to fit right around that monocle outline, and then set it as a track Matte for the Pupil. So, I'm going to come to my track Matte column, click on it and say, Alpha Matte. That will take the alpha channel of my Matte layer and apply it to the Pupil. Now I can shift it left or right as far as I want and it's always going to look the way that it should. All right, I'll set that back down to zero and that's all set up and ready to go. I'll close out of the body comp and now right here inside of my main rigging comp, even though I don't have access to that layer, I can move this slider around and it's going to shift the Eye around. So, that's how you can rig a layer that's not in your main rigs comp.
12. Rigging - 6: Now I'm going to use that same technique, but on the strings, and this is going to be a little bit different because if I go into this comp and take a look at the strings layer, I'll turn on my transparency right there, we'll see that we have six different lines on this one layer and that's going to produce some interesting results when we try and add some pins to it. So, let me close this out and we'll try adding some pins to the strings. I'm going to solo the layer, and then go to my puppet pin tool and just click to add a pin. And right away, we don't get the exact same result as what we had for any of the limbs and that's because After Effects doesn't exactly know where I wanted to place that pin. It's treating each one of these strings as its own individual mesh, and see as I highlight over each one of those, they're all different. Now, I could add a pin at the top of each one of these strings, and then one at the middle, and then one at the bottom so that I could add a little bend, but that's a lot of puppet pins and a lot more work than I really want to do or need to do because I don't need individual control over every string. So to fix that, I'm going to undo until I don't have the puppet tool on it anymore and unsolo the layer. Just take a look at this for a second. Now, at the top and at the bottom of the strings layer, there's this black line from another part of the artwork hiding all the tops and bottoms of the strings, so if I were to actually just connect all of the strings at the top and at the bottom, that will make all of them connected and the puppet tool will see it as a single mesh. So I'm actually going to edit this in Photoshop real quick by pressing command or control E, to edit the original. That opens up the PSD in photoshop. I can go to the strings layer and solo it and then zoom in nice and close on the top. Now, I want to connect these, but I don't want to add more than I need to this layer because I don't want it showing up in the artworks to where I would have to mask it out. So, what I'll do is just grab the rectangular marquee tool and drag a rectangle here, just really small, just enough to cover all the tips of these strings, and then fill that with black. Then I'll do the same thing for the bottom, again, you should not notice this because it's being covered up by other black artwork so you'll never see these pixels. Just do a thin line at the bottom as well, fill that in, and now everything's connected. Now that that's done, I can save the artwork and After Effects will automatically update it, there you go. New lines at the top and the bottom are there and now, I will try to add some puppet pins and see what happens. So, grab the puppet pin tool, click at the top, that automatically made a mesh. If I turn that on, there it is. It's now covering all six strings, that's perfect. I'll put one right in the middle and then I'll put one down at the base. All right, so now that I have my pins in place, I should be able to grab this middle pin, move it from side to side, and there I can bend the strings. Now, it is rotating the top and the bottom but I'm probably not going to be bending these strings nearly that much, probably just barely to the left, barely to the right. So, you're likely not even going to notice that. If I unsolo these layers, you can see that, that line I made is being hidden by the mouth and up top, it's being hidden by the hat, so no one will ever know that I put those little connecting lines on top of the strings. All right, now that I have my puppet pins, I need to create bones but really only for one of them, the one in the middle. The top and the bottom are basically just anchors to keep those parts of the layer where they need to be, and the middle pin is what I'm going to use to drive the animation. So, I will rename that pin, strings, and then select that key frame, click on bones, and now I have a bone to drive that pin. And then I want to rig this up the same way I did with the eye. So, I need to zero out the position of that bone, there we go, zero, zero. Now, I can separate the dimensions and control just the x value to give it some bend. Now, I need to go back to my guitar rig and I'll go ahead and put this control right on the body control as well, and I can actually just duplicate the eye position slider, so, command or control V, and then rename this, strings. And going from -100 to 100 might be more than I need, but we'll just leave that for now. I'll lock these effects control so we always see them, go back to this body comp and add an expression by holding option or alt on the keyboard, and clicking on the stopwatch, then grabbing the expression pick whip, and selecting the strings slider. After effects fills in the code, I'll click off of it, and now I can bend the strings left or right. Now, 100 is definitely more than it needs to bend, I'd say a maximum of 50 and I probably won't ever even need that, but I'll just set my range by right clicking, saying edit value, and change it to -50 to 50. In that way, that is the maximum I can bend the strings, but like I said, probably won't need to bend it more than just that much, 20 even is plenty to see that animation happening. All right, I'll set that back down to zero, close that out, and just double check to make sure that is working, it definitely is. All right, great. So I've got my eye control, my strings, my limbs, and the body bend itself. I can control the top part, I can rotate the entire body using this body controller. Great.
13. Rigging - 7: The only things left are these hands where I want to be able to switch between those two different poses. Then I want to rig up something similar to that with this foot so that I can have it tapping and I think I'm just going to use this left foot, flip it horizontally as its second pose. So, let's start with the hands. I'll zoom in here and select both hands, then I'll pre-compose them using the keyboard shortcut, Command Shift+C or Ctrl+Shift+C on the PC and I'll name this R Hand. I'll click 'OK' and once again, we get this bounding box the size of the comp. So, I'm going to need to crop it. So first, I'll just take my snapshot so I know exactly where that is. Go in there and then set my region of interest just like a crop tool to be about where I want it, around those hands. That looks pretty good. Then I'll go up to composition, crop comp to region of interest. That's going to shift the hand off of where it needs to be. So, I'll just drag it roughly where it's supposed to go, then use my snapshot as a reference for where that needs to line up. Looks like that's dead on. Now what I need is the ability to switch between the two layers. Being able to turn one off and the other on like light switch basically. To do this, we're going to use what's called time remapping and another slider control. First thing I need to do is set up the layers inside of this Pre-comp. So, I'm going to go into the right hand and what I want to do is trim the first layer to be 10 frames long. So, if I'm starting on frame zero, I want to go forward to frame nine so there's a total of 10 frames showing. So, I'll trim this layer down by holding down option or Alt and pressing the right bracket, that trims the outpoint the layer to the current frame. Then I'll go forward one frame so I'm on frame 10 now and just trim the endpoint manually by hand of the second layer to that point. Now, that layer is just going to exist for the rest of the comp that's totally fine. If you're rigging any object and like a hand, a foot, an eyeball, that has more than two poses, just spread each instance out by 10 frames. So, if I had a third hand, I would go up to frame 19, which is right here. I can see my frame counter right there and then I trim it to that. That way, these layers are both 10 frames long and you do that for as in many instances of the object you have and for the last one just let it trail off to the end of the comp, that's totally fine. All right now that setup, I'll close out this comp. It's all I have to do in there. Now, we see that for the first 10 frames, we have that hand and on frame 10, it switches to the next pose. All right. Now, what I need to do is right click on this layer, scroll down until I see time and say enable time remapping. Now, this just lets you display any frame from within this comp at a specific point in time in our rig comp and it gives us keyframes for the start and end of that comp so that it plays back between the start and end. But I could say take the first frame and leave it at the value of zero and then move forward three frames and change this value to frame 10. Now that hand is switched to the second post. If I wanted to go back to the first post, I could just go forward a couple of frames and copy and paste the first keyframe, and there you go. I can now switch between poses at any point in time. But I don't want to set the key frames on the time remap layer, I want to control these with a slider. So, I'm going to select the right wrist control. I'm going to add a slider to it. So, effect expression controls, slider control, and I'll name this R Hand pose. Then I'll lock this so I can still see it even though I click on the right hand layer and I'll add an expression. Option or Alt click on the stopwatch, grab the expression pick whip and reference that slider and then divide it by the frame rate. So, we've set our frame rate to 12 frames per second. So I'm going to say divided by 12, and then click Off. Now if I twirled on this slider, this hand pose should automatically change as soon as I get to 10. Once I cross 10, there you go it switches from pose to pose two. If I had more instances, it would change every 10 frames assuming that I staggered them 10 frames apart in this pre-comp. Okay, so that's working great. I don't need nearly this range so I'm just going to edit the value and change it down to 10 because I don't need to go anywhere past 10, I just need to go from 0-10. I'm quickly going to do the exact same thing for this foot and I'm going to borrow this left foot to do it. So, I'm going to duplicate this layer by pressing Command D, and I'm going to rename it R Shoe 2, I'll move it down above the first R Shoe and then press S to bring up the scale, unlink the proportions and set the x-axis to negative 100. Now, it is flipped. Here we go, we can see that it's flipped. I'll zoom in nice and close here, line up the heel nicely. Something like that. Don't want the two different heels to overlap and then I'll select both the R Shoe 2 and R Shoe and pre-compose them, Command Shift+C and call this R Shoe. Again, we have the issue of the bounding box. So, I will take a snapshot, go in and crop to my region of interest, and then just reposition it so it's in the right spot. There we go. Now I want to do the same thing that I did for the hands. I'm going to go into that pre-comp, set that R Shoe to only last for the first 10 frames, and then the second R Shoe to last for every frame after that. Let's close that out. Click on the right ankle control and add an expression control slider control. I'll rename that R Foot Tap, lock that so we always see it and then enable time remapping on the right shoe. So, right click time enable time remapping, then add an expression, pick whip, the slider and divide it by the frame rate. Now, I should be able to switch between both feet poses. There we go. Again, I only need these two so I'm going to change my range from 0-10 and there you go. I've got up and down on that foot tap and I can now animate that easily. With that, I have all the controls I need to animate my guitar character. So, for a little bit of organization, all I want to do is lock the layers that I don't need for animating. So, I'm going to just give myself a little bit more space under my layers and start locking the layers I don't need. So basically, all the artwork layers are now being driven by either bones or the puppet tool, or some kind of a controller. I should be able to lock all of those and have no issues. All of these bones down here should also be able to be locked. They're already turned off so I can't see them but I'll just lock them all. What I'm left with is these five controllers which a few of them have built in controls for other parts of the character, and then I have the mid body control which all I'm going to be using for is the rotation of that top half of the guitar. So since those are the only layers that I really need to see anymore, I can actually hide all these other layers so they're not cluttering up my timeline. To do this, I'm going to click on this little button right here to turn on my Layer switches, and then there's this column right here, this is the shy switch and it allows you to hide the layers from the timeline while still keeping them in your composition. So, I'm just going to enable this for all of the layers that are below this by clicking and dragging all the way down the line. Now, the Shy switch is enabled for all of those and I can click this guy right here, that is the shy enabler and all of those layers disappear so I'm not distracted. I have much more room to animate now and I'm only concerned with these controllers. I'm also going to rearrange these a little bit more logically. I've got the two ankles underneath the body in the mid that's great. The wrists are at the bottom though. Makes more sense to me to put those at the top since they are higher than the ankles. So, I'll just do that. Finally, I just want to zero out the position of this body control layer. So, click on that and now everything should be ready to go for animating this character.
14. Rigging - 8: All right. Let's just walk through the Mr. Liqour Rig really quickly so you can see how I set him up. Obviously, his shoulders are not set up yet. So, we're going to do that in a second. But, let's just take a look at how he's rigged. We've got the body control, which moves him all around. I can rotate him. Honestly, I don't think I'm going to be doing either of those types of animations, but I at least have that controller there and I can use it to contain other controls like the wink that lets me wink his right eye. The liquid, and this is an angle control, but you see how that's controlling the liquid within the bottle. This is just another type of expression control under effect expression control angle. That's great for rotations. Then I've done the same thing for the left and right eyebrows. This way, I can rotate them. I just shifted the anchor point within the precomp of the bottle to be at this point on each eyebrow. So, that's where they rotate around. Then I've got the bow tie, and this is actually going to drive both hands. So, I have posed the hands where they need to be to look like they're grabbing the bow. But then if I rotate it, or even scale it a little bit, it looks like he's stretching it or rotating it. All I have to do, is animate the rotation and scale that bow rather than worry about the position and rotation of these two hand controllers. Finally, I got this bottle mid bone, and if I rotate that it's going to give him some bend. Now, this is actually a little problematic because you see that it's rotating the base of Mr. Liquor. So, let's deal with that issue first. I`m going to unshy all of my layers and find that bottle layer. Now, you might think that using something like starch could help. So, I'm going to try that first. I'll just turn up the extent really far, maybe add a second bit right here. So, it covers the entire base, then rotate that bone again. But, we still get the rotation. It's not distorting anymore, but it's still bending. That's great. I do want it to stay rigid like that, but I don't want it rotating. So, how do we fix that? Well, on top of that starch, I'm going to add in two puppet pins just right on top of these two corners. So, one down here, one down here. Now, since those aren't parented to anything, when I rotate this bone it stays in place. That's perfect. I could also grab this controller and just move it around to kind of give this guy a little bit of bounce, and his base is always going to stay right where it is. Now that that's taken care of, I want to isolate the shoulder, so they don't overlap the bottle. So, they just end right here. To do that, I'm actually going to just duplicate the bottle layer, which is this layer. Because it has the puppet tool applied and all of the pins inside it are parented to bones, if I duplicate the layer, all of those pins are going to follow those bones even though it's duplicate. I can rename this now, "Bottle Matte" and put it just above the left arm. Then I'll unlock that arm and toggle my switches so I can see my track mattes, and then set this Bottle Matte to be the Alpha Inverted Matte for the arm. That way it's going to subtract all of the Alpha from that matte layer on top of the arm. So, I'll do that. You'll see that now it looks like it went behind the glass. The reason for that is because the glass is semi-transparent, and it's looking at the opacity of the pixels of this matte layer to apply to the opacity of this arm. So, what I need to do is actually make the glass fully opaque. After effects, this is pretty easy to do. I'm going to type in levels in my effects and apply the levels effect to that matte, and then I'm going to switch the channel from RGB to Alpha. Now, I'm affecting only the Alpha channel. If I grab this little arrow right here and bring it in, you see that this is being faded out. If I push it, just past this little tick mark here, this big line. See now it is fully opaque. If I turn it on you can see what it looks like now. It just got rid of all of that semi transparency, and it's hiding that shoulder perfectly. All right. Now that that's set up, I can do the exact same thing for the right arm. So, I'm just going to duplicate this matte, move it above the right arm, and then set the right arm as an Alpha Inverted Matte of that matte layer. There we go. Now, the arms look correct and I've solved the issue. I'll lock everything back up, turn on my Shy switch, and I'm left with just my controls. Now, Mr. Liquor is ready to animate. At this point, you should finish rigging your character, so that everything that you want to move is easily controllable and ready for animation.
15. Animating - 1: Now I need to plan out my animation a little bit. So, if you remember from the original artwork, we have the guitar in front of an audience onstage. So, he's obviously, he's performing and the way that John drew him was in a pose where he's playing himself. So, I'm definitely going to need to have his hands strumming across the strings. So, what I'm thinking is that while those hands are strumming, this hand is switching chord positions on the neck, I can also have his foot tapping to the beat probably the same strum rhythm and then I can also have him bouncing up and down just a little bit, so his knees are bending a little bit and maybe because I have this great bendyness to the neck, I can have him lean one way and then lean the other way. As well as having his eye move back and forth like he's looking around the audience as he's playing his song. So, as you approach your animations, think about what you want your character to be doing and try to keep it simple enough so that it can loop easily. Since he's going to be strumming and tapping his feet to a regular rhythm that will be really easy to loop because he can just repeat that strumming and swaying pattern over and over again. First step of this animation process is to pose him in the first position that I'm going to set keyframes for. So, I definitely need to get his hands in the right position, so I'll grab this left hand control and move it into a position that's like an upwards strum and I'm just basing this position on where his elbow lands. I think that looks pretty good and then I'll just rotate his hand in the direction that I want it to be. Maybe something like that that looks pretty natural, and then I'll place his right hand up on the neck where it needs to be, so something like this. That looks pretty good. I'd say that's pretty close to the way that John had him posed in his illustration as well. Then maybe I'll drop both of his hands as well as the body down. So, I'll just shift click on all of those controllers and use the arrow key, the down arrow key to just tap him down a little bit. Not even too much, just one little press on the down arrow really puts some bend into his knees and that looks like a more relaxed pose. All right, with all of that set, I'm going to add keyframes on the position and rotation of the hands. So, select those two and press Option or Alt, plus the P key and then Option or Alt and the R key to set both of those keyframes. I'm going to give myself a little more room disable the switches, I don't need to see all of that right now, and then I'll do the same thing for the body control. I'll just add a position keyframe and a rotation keyframe. I don't know that this is how I'm going to have him rotated but I know that it will be rotating him, so I'll just go ahead and add a keyframe now. All right, so let's plan out the strumming. I'll start with the left hand and then worry about the right hand next. Now, strumming happens pretty quickly, so I'm thinking we'll do maybe every other frame will be a complete strum. So, frame one is up, frame two is half way, frame three is down. So, I can press the page down key one, two times to advance two frames. I'll zoom in nice and close here, and then I'll just reposition this controller wherever I want the down strum to be and I'll rotate the hand as well. After Effects is adding the keyframes for me automatically since I've already added keyframes at the front. Then I can just scrub through to see what that looks like. Maybe I'm pushing it down further than it needs to be, so I'll just go back to that frame and then bring the hand up a little bit. That looks pretty good. I think that would work for a strum. Now I've set the first position, the second position, I need to get back to the first position. So, go two frames forward again and then just copy and paste the first two keyframes. Now, I want to preview this loop but if I were to do on this frame press the N key to set my work area outpoint, you see that that's including this frame in the work area. This frame is identical to the first frame, which means, it's going to play through the animation including the last frame and then replay the first frame again. So, I need to trim off one frame of my work area, so it doesn't display this pose twice every time it loops. All right, with that set, I'll press the Space bar and there we go. My guys arm is strumming. That looks great. Now that is a very quick loop. There's only four frames and it's only one strum. Now, I'm going to need a lot of strums throughout my loop. I'm not exactly sure how long the entire loop will be, but I'm going to have to duplicate these keyframes quite a bit. So, let me select all of them, copy and paste again. I'm thinking that maybe every two strums, the chord position could change. So, he goes strum one, strum two and on the way back up for the next strum, the hand can move to a different position. So, we've got one strum, two strums and from this point back to this point is when this hand can move. So, I'll go to this point in time, grab my right hand control and make sure to set two key frames. Now, to add keyframes on already keyframed properties, just click this little button right here that adds a new keyframe. So, at this point in time, I want the hand to still be at the first chord position. I move forward in time to just before he strums again and I'll change the chord position. So, maybe just drop the hand down a little bit, maybe rotate the wrist, bring the arm in so it looks like a different pose and I could even switch up the hand pose to the other drawing that John gave me. So, I'll go to the effects controls for this layer and set a keyframe on the right hand pose. Now that I have a keyframe there, I can select the layer and press U to display all of the keyframes for that layer and I'll back this keyframe up to the previous set of keyframes. Then on this frame where I want it to change, I'll just type in 10 and there we go, the hand updates. Now I need to readjust the position a little bit. That looks pretty good. So, we switch from this position to this position and we're changing up the hand pose so it looks pretty natural. All right. Now that we've done that, we need to hold that pose for two more strums. So, all of these keyframes make up two strum's, I'll copy them, go to the last key frame and paste and there we go, we have another set of two strums. So, maybe what I'll do is have four chord positions before it loops. So, starting at chord position one, moves to two, three, four and then back to one. On each one of those positions, it will have two strums. So, now that I have four strums, I should be able to copy everything and paste it one more time and have a total of eight strums. That should be the correct duration for my loop. So, let's see. We've got strum one, two chord change one, two and then at this point we need to change to the next chord. So, I'm going to set keyframes for all the properties that I'm going to be changing. Go to the next set of keyframes, change chord positions. Maybe I'll push this one back up, rotate it inwards, and change the hand pose back to the first pose, bringing in a little bit more. That looks pretty good. Now, we've got switching between chord one, chord two and chord three, but now that I look at that it actually chord three is very similar to chord one. So, I'm going to reposition this a little bit just to vary it up. Now, we've got one, two, three and we've got strum one, strum two. Set three more keyframes, move forward, and maybe bring the hand pretty far down the neck, change the pose to 10 frames and rotate it a little bit. Then strum one, strum two and finally, we need to get back to our first pose. So, I will set keyframes here. Move forward to the last frame and then copy and paste our first key frames and we didn't set a key frame for the pose so I'll just change that down to zero. For good measure, I'll add a keyframe at the front end as well. Now, if I play this all back remembering to trim off the last frame since it's identical to the first frame, I should be able to play this back and have it loop seamlessly. So, there we go. We have a seamless loop. The only thing I'm seeing is that the third chord pose is very similar to the second now because of the way that I position it. So, let's change up where the second one is. I think that'll be the easiest solution. So, from here to here, I'll push it maybe not quite as far down, move it up one fret, and see how that looks. Oh, and I forgot that I needed to change both this frame and this frame. So, it's drifting right now between those two values. I don't want that, so I'll copy, and then paste that frame here, and then play that back. Okay. I think that looks great. I'm very happy with that. All right. Now, let's move onto the body's animation. I think I want to have him bounce up and down a little bit, so I'll be using the body controller. I've already got key frames on the position and rotation. We'll just start with the position. Now, I think I'd like having him straight up and down on this up position of the hand. So, it won't be until the down strum that he's rotating and bending downwards. So, I think these two key frames are fine the way they are. I'll just move forward two frames, and then maybe drop him down one or two clicks on the down arrow, and then rotate him over a little bit. Now, the hands are not moving with it, and if I were to open up the rotation for the mid control and bend the neck, that's also throwing the hands off even further. So, what I actually want to do is undo that, and before setting any more key frames, parent both hands to a part of the body. Now, I want to parent each hand to the closest bone of the body to it, so that it stays in the relative same position. So, I want to parent this hand to the body mid-bone. But if I do that, it's going to mess with my position values, the zeroed-out position values. So, we take a look at the parenting as it is right now. The left wrist control is actually parented to a layer called Zero Left Wrist Control. So, this is how I do it because zero is out of position, and you don't have to understand how it works, but what we need to do is, find that layer and parent it to the body mid layer instead. So, I'm going to temporarily unshy my layers, and maximize the timeline panel while pressing the Tilde key. Just the little squiggly line just under the Escape key on your keyboard, top-left corner. Press that while hovering over the timeline. That maximizes the panel, then I want to scroll down to find this layer number 30, Zero L Wrist Control. There we go. I'll unlock in that, and I want to parent that to the body mid layer. Great. Now, I can lock that up again, press the Tilde again on the keyboard to bring that down. Now, if I rotate this layer, see that the hand is moving with it. That's great. Now, I need to do the same thing for this controller up here, but instead of parenting it to the mid bone, I need to parent it to the top bone where the hat is, since it's much closer to that point on the body. So, that layer is parented to layer 31. I'll maximize my timeline, scroll down to layer 31, there it is, R Wrist Control, and parent it to the body top layer. I'll lock that up, shy my layers once again, Tilde key to minimize that Timeline panel, and now, I should be able to rotate this, no problem, and the hands will stay relatively in the same position even if I bend it at the mid. So, there we go. That's working a lot better now. Okay. Now, that that's all setup, I'll go forward two frames, and set the first little bendy pose. I'll drop him down one or two clicks, shift him over to the right maybe just a little bit, and then rotate him over to the right. Doesn't have to be a lot because I'm also going to be rotating the mid. Now, I should have set a key frame for the rotation on the first frame. So, I'll just set one now and back that up two frames, and then increase the rotation on that mid bone. Something like that probably, and maybe I'll rotate him even a little bit further. There we go. Now, we're going to get this nice bendy motion. That's great. I want him to stay on that side, bending to that side for those two strums. So, just like we change the hand position, the chord position every two strums, I'll have him sway from the right to the left every two strums. But I also want him bouncing up and down in between those chord changes because I want to have a little bit more life to this character. I don't want him to freeze up every time he sways. So, we'll have him go down, and then two frames later, have him just bounce up a little bit, maybe even just one click on the keyboard, so there he's just got this little tiny bit of bounce, and then two frames forward, copy and paste the previous key frames, and then two frames forward, we're going to go back to the first two key frames. So, copy, paste, and I need to back up two frames. Make sure I set a key frame on the body mid rotation as well, and get that back to its original. So, copy and paste that. So now, he's going to lean down, bounce once, and then lean up again, at the same time that the hand is changing core positions. So, that's my basic little body rotation in bouncing loop, and I should actually be able to just copy all of these key frames and paste them again. Now, I can't do all of them at once. If I copy and paste, that actually duplicates both layers. So, when copying key frames, you have to do them one layer at a time. So, a copy and paste the body image first, and then the body control copy paste, and now, it's going to do the exact same thing twice. But I can use it as a framework for the leaning to the left. So, instead of leaning down into the left like this, I just want to basically invert this rotation value. Instead of five, I'm going to change it to negative five, and up here on the body mid rotation, instead of 10, I'll change it to negative 10, and then on the position, the x value is 20 pixels positive. I'm going to change it to negative 20 pixels, and now, it should lean over to the left as it comes to that pose. That looks great. Now, I do need to modify some of the other key frames. So, if I bounce up, will see that I goes back to positive 20, I'll just copy and paste this key frame here. So, it stays where it needs to, and then on this side, it leans back to the other direction. So, I'll copy both rotations on each of these layers. So, that stays preserved and then, he just needs to pop back up on this frame. So, I'll just grab that, bump them up one tap on the keyboard, copy and paste the position key frame here, and then he goes back to his neutral pose. So now, that should be looping properly. I basically just want to repeat that entire action again. So, I should be able to copy all of these, and paste, and there you go. It lines up perfectly with the rest of the animation, and I'll do the same thing for the body mid, copy paste, and play that back, there you go. Now, I have a nice perfectly looping animation of the guitar bouncing up and down, his hand moving up and down the neck, and strumming perfectly.
16. Animation - 2: Right now, I'm just going to add the tapping of the foot, that should be pretty straightforward. I basically, want it to happen in the same rhythm as the strumming of the guitar. So, I'll grab that controller, go to the effects controls and set a keyframe on the first frame. Press U to bring up that key frame and then go two frames forward, Change the value to 10. So, we taps on the down strum and go two frames forward again, bring it back up to zero and just repeat that pattern for the rest of the animations. So, I'll copy all three frames, paste, copy them again, paste and then copy them all one more time and paste. Now, if I play this back, we have his foot tapping to the beat. And it looks like, it's spending more time being up than down right now. So, what I actually want to do is convert these to a hold keyframe. I right click, say toggle hold keyframe. Now, there will be no values happening between the two keyframes. It doesn't animate between them, it just switches, as it gets to the next keyframe. Now, if I play this back, it looks more like he's doing it at a consistent rhythm. So, he's tapping his foot up and down. That looks great, Okay. Now, let's have his eye move back and forth as he's swaying as well. So, we'll click on the main body control and add a slider key frame on that eye position control. Then I'll press U one more time to bring up all the key frames. At this point and time, we do want him looking dead center but then going two frames forward, we want him to look to the right. So, twirl down that slider and set it to 100 or maybe not quite that far. Maybe, I'll do something more like 65 and that way he'll look from the center, to the right. I'll have him stay there until this frame right here. Add another keyframe, move forward until we get to the left leaning position and change this to negative 65. Now he's looking to the left. Will hold that, until this frame right here. Set a keyframe and then end up back on the right side. I'll just keep doing this manually until I've made it all the way through the loop. Go set keyframe, go forward. Change it to negative and then finally, it needs to go from this point right here to back at zero. Now, we can play this back and it will loop nicely. Now, he's looking left and right as he's swaying back and forth. Last thing I need to do, is animate those strings and that is also going to be in time with the strumming. So, I'll start with the strings by adding a keyframe, pressing U to bring up the keyframes for that layer. At this point, having added value of zero is good. These strings are going to vibrate very fast. So, I think I'm going to do this, every frame will be a different value. So, we'll go forward one frame and then they'll be pushed out maybe just by 20 then we'll go forward another frame and say maybe negative 12 and forward one more frame and say positive four and then back down to zero. That should give just enough movement, to make it look like the strings are being actually hit by the pick and I'll just repeat this animation copy and paste it over and over until it fills up the entire loop. Now if I play this back, you can see that the strings are moving, making it look like he's actually strumming them. He's bouncing up and down looking left and right and tapping his foot. And with that, I've animated my complete loop. And now, I can go in and just make a few adjustments to help everything feel a little bit smoother.
17. Animation - 3: Now, I want to clean up my animation a little bit. There are some keyframes in here that we don't actually need, and I want to just start with a few select properties. So, I press U to collapse everything and then select the Body Control and the Body - Mid. Now, these two values have Rotation keyframes, so I'm going to select all of those and take a look at this value rate here. It's a value of zero and on this side of it, we've got a positive 10, and on this side of it we've got a negative 10. Same thing for the Body Control, we've got negative five and positive five, and that's the same across the board for these three sets of keyframes. I don't actually need the Middle Rotation values because they're directly in the middle of these other two keyframes. So, if I delete them, they're going to stay zero because this is a positive 10 and this is a negative 10. So, halfway between should be right in the middle, zero degrees. So, I'm going to do that for the Rotation values on all of these and now I just have fewer keyframes to deal with. Then, I'll press U to bring up all of the keyframes one more time. Just like I did with the Foot Tap, I can set the R Hand Pose set of keyframes to hold keyframes. So, I'll right-click and say Toggle Hold Keyframe. Now, because the value does not change between this keyframe and this keyframe, this is identical, I can delete this keyframe right here, and it will never change until it gets to the next keyframe. So, it cuts down on the number of keyframes I actually need. In the same way, this value doesn't change, again, until this point goes from 10 to zero. So, I'll delete this one, delete this one, and delete this one, but my animation is still working. Now, that I have cut down all the extra keyframes, I want to smooth out the animation a little bit and give it a little bit more natural movement. It's still very rigid at this point and to do that I'm going to loop it by hand. What I mean by that is just copy and paste these keyframes, so they take up twice as much time, effectively making it loop twice instead of just this once. So, I'm going to maximize the timeline, tilde on the keyboard while the mouse is hovered over it, and then copy one layer at a time all of these keyframes. So, first layer copy, go to the last keyframe, and paste, copy, paste, copy, paste, copy, paste, copy, paste. Now, I have my entire animation looped twice by hand because of that I can now move this work area to any point I want between the two ends of the animation and it will always loop seamlessly. I'll show you what I mean, if I play this back, because the duration didn't change, the number of frames that is playing back didn't change, it will always loop. That's really great because now I can say back this up to maybe frame six, I'll start my loop there, and I can play around with some timing to get a little bit more fun looking animation. I collapse everything by pressing U on the keyboard and we'll start with the rotation of the body and the neck. So, I'll select those two controllers and press R to bring up the Rotation, and before I go any further I just want to delete these two keyframes because they are again zero values just based on the way that I had to loop this manually. I'll delete them and that point in time will still have a value of zero again because the keyframes on either side are just inverted versions of each other. All right, now that that's cleaned up, what I can do to play around with this a little bit is, for one, ease it. So, easing is just a way to smooth how quickly After Effects transitions from one keyframe to the next. So, I'm going to select all of these keyframes. right-click on them and say Keyframe Assistant, Easy Ease. It might be a little hard to notice but if you look at the swaying back and forth, especially on the neck, it's now smoother. If I undo, it's back to its little stiff jerky movement. Now, like I said it is subtle, so it might be a little hard to see but it definitely is there. So, let me redo, Command-Shift-Z, and I'm back to my eased movement. Now, that I have that I'm going to select all of the keyframes for the Mid and shift to them forward in time, one frame, by holding Option or Alt on a PC and pressing the right arrow key. Because I did that I now have a little bit of drag on the hat, the neck part. You can see that it just barely rotates a little bit slower than the rest of the body. This is called overlap and it's a really, really great way to add more realistic movement, more natural looking movement to your animations. Now, I only offset it one frame, if I offset at one more, we'll see that it's much more dramatic. Now, it's really lagging behind. I think that might be a little too much, so I'm just going to back it up to one frame and I think that looks great. I could do the same thing with maybe the Eyeball. I'll go to that Control, press U on the Body Control, find the Eye Position Slider, delete this middle keyframe. Again, we don't need any extra keyframes if we can get rid of them. I'll select all of them, right-click, Keyframe Assistant, Easy Ease, and then maybe drag it a little bit. Add some overlap, just one frame even and we'll see what that looks like. Now, it just has a little bit of that overlap that makes it look a little bit more natural. I really think that's all this character needed to help loosen it up a little bit and give it a little bit more natural movement. With that I think my character animation is done.
18. Animation - 4: Now that I have my animation complete, I need to add my character back into a scene. Put them on that stage. So, I'll open up the guitar comp. That's the one that has the foreground and the background in it, and he's already on the stage. That's great. The Guitar RIG comp is still in the proper place. I just need to set my work area to be at that same looping duration. So, if I double click on the Guitar RIG and find out which frames I need to be looking at, I'll just use my work area as a guide. I'll go to frame six, that should be where it starts, and because my Guitar RIG comp is in the Guitar comp, I can now just switch over there and the time will be at frame six. It preserves where you were within the pre comp. I'll set my in point for the work area by pressing B on the keyboard, then double click on that comp again, find the outpoint which is frame 37. Go back to my guitar, set the outpoint there, and now what I want to actually do is trim this Guitar Rig comp to that duration. So, I'm going to select it, and hold option or Alt and press the right bracket to trim to the outpoint, then go to the first frame, and then press option or Alt in the left bracket to trim the endpoint. Now, I can move this around and line it up to the beginning. That way, I'll always easily be able to see how long the loop should be. Now, if I play this back, I have my nice looping character on stage in front of his audience. Now, I want to add a little bit of movement to the characters as well, bobbing their heads, maybe swaying back and forth. Now, all of these people are on one single layer so I can't move individual characters around at this point. So, what I need to do is break them up. While I definitely could have done this in Photoshop so that I didn't have any more work ahead of me, it's pretty easy to do right here in After Effects. So, I'm putting a solo this layer and then just double click on the rectangle tool. That's going to add a mask around the entire layer, and for some reason it extends all the way out here, but that's okay. I'm going to actually just grab this point right here and hold Shift, so that it only moves to the left and right, and then just solo out this one person on the far left. Then, I'll simply rename this, Foreground-Person one, and then duplicate, command D. Then I'll grab this part of the mask right here, hold Shift while dragging and just move the mask, and I'll continue this for each character, but very quickly I'm able to single out each one of them. Just masking off the parts that I need or don't need. There's my last person right there. Okay, now that all of that is set up, I just want to move the anchor point of each layer to its corresponding person, and because they're masked off now, I can just simply right click on all of them while they're selected, put a transform, center anchor point in layer content, and that snaps the anchor points of each character to the center of those masks that I drew. That will make it a lot easier for me to now just press A to switch to the anchor point property and adjust the Y value to push it down to a little bit below the base of their layers. Then I'll switch to the selection tool, click and drag until they're back down where they're supposed to be at the base of the comp, and I can now rotate them just bobbing slightly back and forth. I might even push them down just a little bit more so I have a little bit more room to rotate them. There we go. Now, I can animate them. So, I'll unsolo everything so I can see the entire comp. I actually want to start this on the up strum. So, you can shift a layers contents around if the front end and back end are trimmed using the anchor point or pan behind tool. So, this is a neat little feature of After Effects. I'm going to select that tool and then click and drag until I get to the frame that I want to start my animation on. So, right there with the up position of that hand, it's just shifting the layer contents, preserving the in and out points. Now, that's going to line up right where I want it to. I'll just start with one of the people. This guy right here, and I'll set a rotation keyframe, option or Alt, plus the R key, and I'm going to change the value so that it's to the right, maybe five degrees. That looks pretty good. Then, I'll go forward one, two, three, four frames where the guitar is now leaning the opposite direction and I'll change this to negative five. So, now he leans from the right to the left as the guitar is swaying. It'll hold that keyframe for one, two, three, four frames and I'll add another keyframe and then go one, two, three, four more frames forward set it back to five. Then I'll go forward one, two, three, four frames, copy and paste to loop that, and now he's swaying back and forth with the guitar. I'll Easy Ease these keyframes. Right click keyframe assistant, Easy Ease, and now he's shuffling back and forth with the music. Now that I have those keyframes, I can actually just copy all of them and paste them to the rest of the people. So, I'll Shift, click on all of them at the first frame and paste, and now they're all going to rotate in unison with the music. Okay, so now my entire scene is animated. All of the motion and keyframes are set. So now, you should finish your own characters animation before moving on.
19. The Old Timey Look: All right. So, my characters are animated and it's ready to go, but it's way too clean. It doesn't look like it was animated in the '30s. So, I want to beat it up. I want to make it look like it's old, add in some dusts and scratches, and like it's being projected on an old film projector. I really want to degrade the quality to sell this look. So, I'm going to leave this Comp exactly as it is and I'm going to put it into another one. So, I'm going to just click and drag the Guitar Comp in my product panel, down into the new Composition button and that will preComposed that layer into a new Comp. I'm going to rename this, Guitar Grunge because we're going to grunge this up. Now that I'm in my new Comp, I need to think about the resolution. Because if I bring up my Composition settings, this is all still based on the size of the original PSD that I imported. So, it's massive. So, think about where are we going to be sharing this animation? If you're going to do an Instagram post or put it on YouTube, then you're probably going to want to do it in HD. Instagram's max resolution is 1080 by 1080. So, you should have at least a height of 1080. If you're going to put it on YouTube, then you're probably going to want to make it in HD Comp, so 1920 by 1080. I'll hit OK, and scale my artwork down. Now, this obviously was not created in a 16:9 aspect ratio. So, this actually doesn't fit very well in this HD Comp. So, I'd probably want to go into this, scale down the guitar, maybe push up the people a little bit, so that it fits a 16 by 9 Comp. But, I'm not planning on putting this on YouTube. I think if any place it'll go on Instagram, maybe on someplace like Dribbble. So, I'll just Undo to where we're back to the original size. Then go to my Composition settings, Lock the aspect ratio and make the height 1080. Then I'll scale this down, so that it fits the Comp. I'm just going to make sure it overlaps a little bit, so I don't have any transparent pixels behind it. In this way, if I posted it in Instagram, it will preserve the aspect ratio, or it could crop it to a square but I'll be meeting the max resolution for Instagram, getting the best quality out of it. All right. Now, I want to actually add some effects to this to make it look like an old timey projector, really faded old film. I'm going to be applying my effects through adjustment layers. So, I'm going to come up to Layer, New, Adjustment Layer. If you've never used one before, all it is, is a layer that will apply any effects that you put on it, to the layers below it. So, I'm going to start by just fading the color, making it look like it's old and not so crisp. So, I'm going to go up to my Effects and Presets Panel and search for an effect called Curves, just under Color Correction. I'll double click that to apply it to the Adjustment Layer. Then I just want to bring up the darks, so they're not quite so dark and bring down the brights, so that they are not quite so bright. That little bit just relief makes the whole thing look faded. A lot less contrast and I'll rename this Adjustment Layer Faded Color. I like working with Adjustment Layers like this because I can then just continue to stack them, one on top of the other and rearrange them very quickly and easily in my timeline. I'm going to add another adjustment layer by pressing Command, Option, Y or Control, Alt, Y on a PC. Now, I want to add a vignette. So, I want to darken the corners and I want to make it really strong because that's just like a signature look of an old projected movie and I can actually do that with a curves as well. So, I'm going to bring that out and I'm just going to bring the mids down, so it's much, much darker. But now, I only want that have to affect the corners, so I'm going to come up to my Ellipse Tool, click and drag from the center of the Comp, hold Command to scale from the center as well as Shift to make it a perfect circle and just bring that mask out to about the edges on either side. Then, I'll press F on the keyboard to bring up the feathering and just turn that feathering up, so it's nice and soft. Then change the Mask mode from Add to Subtract. So, it's taking away from the middle and just leaving the dark corners. So, that's before and after. I'll rename this Vignette and add another Adjustment layer, Command, Option, Y. Now, if I zoom in 100 percent, so we can see this full quality. Everything is still super clean and crisp. So, I want to blur it up a little bit, so it doesn't look so clean. I'm going to search for Gaussian Blur. There we go, Gaussian Blur, double click on that and then just blur it out a little bit. It doesn't need to be a ton. I don't want it to be completely out of focus, maybe just one or two pixels, somewhere in there to make the edges a little bit soft. I also want to make sure that I check, Repeat Edge Pixels. It's hard to see, but if I turn this up, you can see that it shows transparency around the edges. If I click on Repeat Edge Pixels, that fixes that issue. So, turn this back down to something around two. That looks good. Now that it's softer, I want to sharpen it up a little. So, I'm going to search for another effect called Unsharp Mask. There we go. I'll apply that and if I turn up the radius on this and turn up the amount, you can see that is really sharpening the edges and it's producing a very unique looking effect, where we get this halowy, glowing edges. Now, I'm probably pushing this too far, but I like to use this effect a lot because I think that it really does make it look like it's degraded footage. Now, this is also adding saturation to the overall image. So, I want to make sure that I bring it down below the faded color, because the layer stacking order does matter. You see that my image updated as I move that down. If I Undo, and you see we have our pearl whites again. If I Redo, it goes back to the faded colors. So, the layers stacking makes a difference. It starts at the bottom of the layer stack and then renders each layer on top of it. So, I'll just call this layer Blur/Sharpen. I think the amount is probably a little too much still, but the radius is pretty good. I think I like the way that's giving shadow here, a little bit of a halo on the inside. If I just turn that off and back on, you can really see what that's doing to the overall scene. Okay. Next, I want to add some grain, like some film grain. So, I'm going to add another adjustment layer and search for an effect called Noise. Very simple but I'll just apply that and turn the amount of noise up. Doesn't have to be extreme, but just something to give it a little bit of grit and I'm going to move that one just below the vignette. Now, this has the option to Use Color Noise or not. So, that is completely up to you. If you want to Use Color Noise or not. But the great thing about this effect is that, as I scrub through, you can see it is changing. It's animated by default. So, that looks a lot like film grain. So, I'll rename this Grain. Next, I want to add like a film and gate shutter. What I mean by that is, when the old projectors had film passing through them vertically, really quickly, sometimes it could jitter up and down. That was just a sign of lower quality projector, lower quality technology, and that's going to be a really great way to sell this effect. So, I'm going to add another Adjustment Layer option Command Y, and apply an effect called Offset. There we go. What this effect lets me do is, literally just offset the image in either direction. So, you can see that just tiles around and I can go on the X or Y axis. Now, I could animate this by hand, but that could take a lot of time and it might not look that natural. Instead, I'm going to let After Effects generate some random values for me and add in some jitteriness to this Y position. I'm going to do that using expressions. So, I'm going to twirl this layer open, go into the effects, into the offset, and there's my shift centered to Property. I'm going to Option or Alt, click on that stopwatch to add an expression. I'm just going to get rid of what's in there right now and type in wiggle(5,50) and then close parentheses and then I'll apply it. Let me explain what's going on here. The Wiggle expression will randomize whatever you apply it to. So, the two numbers represent the frequency or the number of times per second that it will wiggle around and the amplitude or the amount that it will wiggle every time that it does wiggle. So, right now it's going to wiggle five times a second at a maximum value of 50 in either direction. So, this could be positive 50 or negative 50, but it's never going to move more than that. If I play, you can see that instantly my frame is just going all over the place. The reason for that is because it's wiggling both in the X and Y values and that's not going to work, that's not the effect I want. I just want it to jiggle up and down. So, how do I target just the Y value? Well, this particular value is an array. An array just means that it has more than one number for the property. You can see they're separated by a comma, they just represent the X and Y position. In Expressions, we have to type out our code a little bit differently to be able to target each individual number. So, I'm just going to delete this for now and I'll show you how to write an array and an expression. You start by typing in opening square bracket and you type your first value. So, let's just say 10 for X then you separate the two numbers by a comma, just like they are right here. I'll say 20, for the second value and you close this off with a closing square bracket. So, this is how After Effects knows this is an array of numbers and I need to plug these two in to these two numbers. So, I apply this expression. There we go. Our X is now 10 and our Y is set to 20. Obviously, that's not what we want. I really just want the X value to stay what it was at. So, how do I get that to happen? Well, instead of 10, I'm going to type in value and then another opening square bracket, zero, and a closing square bracket. The reason I'm putting this zero in square brackets is because After Effects assigns a value to each array number. The first number has a value of zero, the second number has a value of one, and if there's a third number, it would have a value of two. So, I'm basically just saying for the first number, look at the value of the first number. Just put in whatever is already there. If I click Off, now it goes back to a10 and I can still click and drag this to change to whatever I want. Now, the second number is set to 20. Obviously, I don't want that. So, this is where I'm going to type in my Wiggle expression. I'll say Wiggle, open parentheses and we'll just do the same numbers, five, comma, 50, close parentheses, but I can't stop there. I have to tell it what number in this array am I wiggling. So, I have to do an open square bracket, type one because remember one is the value of the second number, zero, then one and then close bracket. Now, if I apply this, and play back, it's only wiggling randomly on that Y axis. That's perfect. Now, this might be moving a little bit more than you want it to. So, we can turn down the amplitude instead of 50, maybe I'll just do 15. Now, it's just a very slight jitter up and down, and maybe that's even too fast. So, I'll turn the number of times per second from five down to three. Now, it's much gentler, it's smoother. I actually didn't mind it being fast, so maybe I'll bump it up back to something like six. That little jitteriness just really looks like the old film projector. I like that. Now that we've set up the Vertical Jitter, let's add a little bit of blur to that. First, I'll just rename this Vertical Jitter, and I'm going to move that below the Vignette and the Grain. I don't want it touching either of those. I can actually move that one all the way down to the bottom, just above the Guitar, because I only want that to shift the position of the guitar. Let's go back to our Blur and Sharpen and duplicate this Gaussian Blur. Then, I'm going to drag it below the Unsharp Mask and set the blurriness back down to zero. Now, I only want this copy of the blur to affect the vertical position. So, I'm going to change it from Horizontal and Vertical to just Vertical. In this way, when I turn it up, you can see that it's just stretching it out vertically. The reason I'm doing it like this is because I want it to basically simulate motion blur in a random pattern as this vertical jitter is happening. So, I'm going to again add an expression, and I can do that right from the Effects Control panel, hold down option and click on the Blurriness. This value only has one number, so I don't have to worry about arrays or anything complicated like that. I'll just type in wiggle(6,15) just like the other expression, and I'll apply that and play this back. Now, if I zoom into 100 percent, you can see what that's doing to my overall animation. Now, that blur amount may not be quite enough, so I'll turn that up to maybe 30 and see how it works. That might have been a little too extreme, so I'll drop that back down to 20. I think that the vertical jitteriness might be a little bit too much, but that's the great thing about all these adjustment layers is, I can very easily just jump in and out and modify them as much as I want. To bring up the expressions on any layer, I'm just going to select it and double tap E. There, we find our wiggle expression, and I'll change the wiggle amount down to, say, 10 instead of 15. Now, it's much more subtle. So, now, another way that we can make this look even older and more aged is by adding dust and scratches. That's kind of a classic look for old-timey film. There are lots of really great high resolution, completely free to use stock footage that you can find online. I'll put together some links so that you can view them and choose which ones you want to use in the notes of this video as well as in your project tab. But I'm going to go ahead and import the one that I downloaded. That's this DIRT right here, and this is nice and big. It's even 4K, way bigger than I need, but I'll just drag it out into my comp. First of all, it's way too big, so I'm just going to scale it down until it fits the size of my comp. This has a black background with white dust and scratches, so I need to set the Blend Mode of this to Screen to filter out all of that black. Now, that's showing up over top of my entire image. This is just really helping sell the look. I think that's great. I'm just going to move it down below the Vignette and the Grain. That's good. I think there's only one other effect I want to apply, so I am going to do option command Y and search for Black and White. This is probably the most obvious way to make it look like it's an old film. So, I'll just rename this Black and White, and with that, I think I have completed my grunged up, old-timey film look. Now, again, you can mess with any of these numbers as much as you want. To degrade the image even further, I could come into the Blur and Sharpen layer and maybe turn the original blurriness up even more so that it's even less crisp. Maybe that's a little bit too much [inaudible] somewhere around three and a half, four, and then, turn the amount on my Unsharp Mask up, increase the radius a lot. You can mess around with this a lot to really produce something that you're happy with. Another really obvious effect that I forgot about until just now is, adding a flicker to the entire image so it just looks like it's on an old low-quality projector. So, one more adjustment there, option command Y. This time, we're going to use the Exposure effect. So, I'm going to search for that. It's under Color Correction. I just want to take the Exposure value and wiggle it back and forth like this. So, I'll click on the Exposure, type in wiggle, and I'll say open parenthesis maybe six times per second, comma, and then, one, because this value does not take much to change. One might even be too much, but we'll just close that out with the closed parenthesis and see what happens. I'll play this back, and that flicker is really extreme. But honestly, that gives it a pretty distinct look. It's totally up to you how you want it to look. I think I'm going to drop this down to maybe point five, cut that in half, and then, rename this flicker. I think that's great. Again, because these are all individual layers, you could just turn something off. Say, you want to keep the color version. Just turn off the Black and White. Maybe the overall image is a little too saturated. I could come to the Faded Color, add a Tint effect, double click, and then, turn the amount to tint down. So, just around 30 percent really gives it a lot more desaturated look, or, say, on the black and white version, maybe you don't want it to be pure black and white. You could add a tint by just enabling the Tint checkbox, and then, changing the color to something like a sepia tone, or maybe doing something more unique like blue or magenta to give it a completely unique look. There's a lot of different things you can do to mess around with the image and degrade the quality. I think I'll leave my tint off, keep it at the standard black and white. But putting all those effects together really makes a dramatic difference. If we [inaudible] just the original layer, this is where we started, and this is where we ended up.
20. Exporting Your Animation: Okay. I'm happy with the way this looks and I want to export it so that I can share it. Now there are a couple of different places I want to be able to post it. One of them is Instagram for sure, and then probably someplace like a Dribble as a GIF file, and potentially sharing that on Skillshare as well. There's a little bit different method for exporting a video for Instagram than there is for a GIF. Either way, I first want to start by putting this comp into another comp. So, I'm going to take that guitar grunge comp and drop it in a new composition again, and I'll rename this Guitar Output, and this will be my render comp. Again, the dimensions of this comp are inherited. So, it is 1080 tall. That's great, and I just need to make sure that I find the end frame of my loop that will be right here, and I'm going to trim this layer to that length. So, I'm going to hold down Option, and press the right bracket, and an Instagram video I believe has to be at least 10 seconds long. So, I need to loop this by hand until it reaches at least 10 seconds. So, I'm going to duplicate it, click and drag while holding Shift to snap, and just do this a couple times until I have it at least 10 seconds long, and you want to make sure that you complete that loop, so that it actually loops on Instagram. I'll select this last layer and press O to go to its outpoint, and then press N to set my work area. Not only does the work area determine how your preview plays back it also determines what part of the composition gets exported when you go to render. Okay, so if this is my Instagram post, I'm going to come up to composition and say add to Adobe Media Encoder queue. This is going to open up a separate piece of software called Adobe Media Encoder, which is Adobe's video compression software. It's okay if you've never used it before. We're going to use a preset, and it'll make a very high quality compressed video perfect for Instagram. It might take a little bit of time for the program to open up, but eventually you will see it pop up. All right, so Adobe Media Encoder opened up for me, and we see right here my After Effects project, Guitar Output. This is the render queue. You should have automatically opened up with the format of H.264, and the match source high bitrate preset. That's exactly how I want to render this, but if yours didn't show up like that, just click on this dropdown arrow, make sure you go to H.264, and right here you can find the 'Match Source - High bitrate' preset. Only other thing you need to do is make sure you know where it's going to output. So, I'm going to just stick mine right on the desktop, and I'm going to rename this Guitar IG for Instagram, and I'll hit Save, and then just hit the Play button to start your queue. It will take a little bit of time for Adobe Media Encoder to connect After Effects, but eventually it will start exporting, and you'll see a preview of your output rate here as well as an estimated time for the encoding. As you can see this will take a little bit of time to export, but that's just because it has to process all of the effects that we stacked on top of our character animation, which was very high resolution. So, just be patient take a little break. Go grab a glass of water, and when you come back it should be done. All right, now that it's done exporting, I can click on this right here to bring up the video file, and play it back, there we go. Looks great. Now it's only about 17 megabytes, so that's a great compression. I can now just transfer this to my phone using Dropbox or AirDrop, find it in my gallery directly through Instagram, and post it from there. Now, if I want to export this as a GIF, I'm going to jump back in After Effects, and I don't need to export multiple loops just one because a GIF is able to be looped. So, I'll just bring my work area back hold Shift to snap it to the outpoint of the first loop, and then I'll export this, but instead of through Adobe Media Encoder, this time I'm just going to say Add to Render Queue, and this is going to use After Effects as exporter, and the reason I'm doing this is because I don't need it to be compressed yet. So, I'm going to make sure my output module is set to lossless. That just means no compression at all, and then I'll rename this Guitar GIF, and I can still say that rate on the desktop, and then just click on Render. Again, we're going to see a preview of every frame rate up here, and a progress bar, an elapsed time, and which frame it's currently rendering. Now, that it's exported, I want to open it up inside of Photoshop. So, I'll jump over there, and go to File Open, find that Guitar GIF video file, and I can open that directly in Photoshop. You see I have a timeline down here and I can hit Play even play that back just like we did in After Effects, and now we want to crop my video. So, I'll grab my crop tool and change the ratio to be four by three. That's going to give me the dimensions of a Dribble post, and I click the check box. So, now it's cropped to the proper ratio, and I'll go up to File, Export, Save for Web (Legacy), and this will let me export it as a GIF. It might take a little bit of time to process all of those frames, but it will open up the Safe for Web dialog, and then I like to just start by clicking on the Preset dropdown, and go to the very top, GIF 128 Dithered. It's a very high quality preset, and then I need to change my image size. It's still pretty big it's 1080 pixels tall. I want to scale that down to 800 by 600, and that's the max resolution that you can post to Dribble. But, even that is still giving me a GIF that is 9.5 megabytes. That's really, really big for a single GIF. I would say try to keep it down to no larger than five megabytes, and on Skillshare, you can't even upload an image that's over two megabytes. So, you might want to even shoot for smaller. I think because this is so big I'm going to change my width and height down to 400 by 300, so that's half the resolution, and there we go. That drops it down to 2.39 megabytes. That's much more manageable, but I do want to be able to post this on Skillshare as well. So, how can we lower the file size. Well, we can actually just take out some of the colors. Right now there are 128. If I drop this down to 64, the quality changes a little bit, it drops a little bit, but now it is below two megabytes. So, I think I'm happy with those compression settings. I just want to make sure that my looping options are set to forever, and then click Save. I'll export this to the desktop, click Save, find it again, and there it is. It's two megabytes, preview it. It's looping perfectly. It's plenty decent quality, and ready to post online.
21. Thanks!: Congratulations! You've made it to the very end of the class, and now you should be able to make your very own character animation. Be sure to share your class project on Skillshare, and if you share it anywhere on social media, also tag me @jakeinmotion and John Brommet @johnbrommet. If you run into any issues, feel free to ask a question on the community page. I would love it if you left me a review for this class, so I can know how I'm doing, and if you're not already, be sure to follow me here on Skillshare, so you can always know when I post new content. Thank you so much for taking this class, and I'll see you next time.