Transcripts
1. Welcome: Deep in the underground
user interface of After Effects under layers of toggles through a
hidden door with a secret password
lies a magical world. A world where code
controls animation, where tedious tasks are
a thing of the past, and repetitive keyframes
are gone in a flash, and out of the darkness,
animation emerges. Complex effects are executed
with ease and continuous, repetitive or reactive
motion is a breeze. Welcome to the wonderful
world of expressions. An expression is
code that modifies an animatable property
written in JavaScript. Well, the thought of coding
might sound intimidating, the truth is you
don't need to be fun in JavaScript or have any programming experience to start using expressions
in your work. I'm Megan Friesth, and
I'm an explainimator, which is just to say that
I write, illustrate, and animate
educational animations mostly on health new
environment-related topics. In this class, I'll explain and demonstrate 11
different expressions, so you can understand what
they do and how to use them without actually needing to learn how to write JavaScript. You'll be able to start using these expressions in your
animations to work more efficiently and achieve
effects that would have been extremely tedious or
impossible before. Once you've gotten used to using these expressions in your work, you can move on to learning how to write your
own expressions for even more complex and
customized animations. This class is for motion designers who are
comfortable with the basics of After
Effects and are looking to level
up their workflow. If that's not yet, you check out some of my other
classes first. Whether you've never heard of expressions or have
only used a few, by the end of this class, you'll have 11 powerful
expressions and a noggin full of knowledge
of how and when to use them. If you're ready to unlock the wonderful world
of expressions, then let's get started. [MUSIC]
2. What to Expect + Class Project: [MUSIC] Here's what you
can expect in this class. For each expression, I'll first give you a bit of
background info, like what it does
and what properties it can be applied to. Then we'll go over the
anatomy of the expression. This class is not an intro
to JavaScript class. While I will explain what the expression does
and how to use it, we'll leave all of the
nitty-gritty details of JavaScript for later. This way, you'll be
able to ease into expressions and start
using them right away. As an example, I've used
a different expression to animate each letter of
the word, expressions. If you want to follow
along with me, you can download this
project file so that you can practice applying
these expressions. I'll also present use cases of many of the expressions so
you can get a better idea of how I really use
these expressions in my professional
motion design work. While you don't
necessarily need to watch the videos of
this class in order, I've chosen this order to
go from simple to more complex and some of the
expressions build on one another. The project for this
class is to use one or more expressions we'll cover in a project
of your choice. Because there are so many
different uses for expressions, this project is
really open-ended. If you realize that
a project that you previously animated could have used an expression to make something easier or work better, then you can go back
and reanimate it. Or maybe my examples
or use cases have sparked an idea for something
that you want to animate. Or maybe you just want to
create something abstract, like I have to explore all the possibilities
that expressions bring. No matter what you create, just include a note to say what expressions you've
used in the project. If you have any
questions along the way, feel free to post them in
the discussion section.
3. Expressions 101: [MUSIC] An expression is a small piece of
JavaScript code that you can apply to an
animatable property. That's any property with
the stopwatch icon. Expressions either
animate that property or modify how it's animated. They can be useful when
you want continuous, repetitive, or reactive motion. They can also be used
to automate animations, setup rigs, and avoid
excessive keyframes. The hidden door to access the place where you can
write expressions that I mentioned in the
intro is just to option click the stopwatch
of any property. From here, you'll get a
field where you can start typing or paste
an expression in. Also, once you open
that hidden door, you can find a library
of After Effects expressions from this icon with a circle and
the triangle inside. As you can see, we'll just
be scratching the surface. If you want to edit
an expression, just click it to go back
in and make changes. To remove an expression from a property option click
the stopwatch icon again. A handy keyboard shortcut
that I'm going to be using a lot in this class is
just to press "E" twice, to see all of the expression set on any properties
in your timeline. If you get an error message, which you probably
will at some point, it's not the end of the world. It won't destroy anything, but your expression
just won't do anything. Try to make sense of what the error message
is telling you. But if you can't understand
what it means, I get it. It's not written in the
most understandable way. Check to make sure
that you don't have any typos in your expression. Also, keep in mind
that capitalization matters and each line needs
to end with a semicolon. Sometimes something as simple
as that can cause an error. One of the most common errors with expressions is that it's looking for something specific and you haven't given it that. For example, if an
expression wants two values, one for the x position and
one for the y position, and you only gave it one
value, you'll get an error. Once you find the issue
and make the correction, the error will go away. With that said,
let's get started with our first
expression example.
4. Wiggle: The first expression is
the wiggle expression, and I chose it to
be first because it's the first one that
a lot of people learn. If you already know
the wiggle expression, don't just skip this
video because I've got some variations and
ways to customize it. The wiggle expression does
just as the name suggests, it creates random motion. It can be applied to many different properties
like the position, scale, rotation,
opacity, and more. Let's take a look at the
anatomy of the expression. First we have the main core of the expression which
is just wiggle. Then you have a
set of parentheses with two values inside. The first one is the frequency
or how often you want a new random number
to be generated for whatever property you're applying this wiggle
expression to. The second number
is the amplitude. How much you want the
wiggle value to fluctuate. If that explanation sounded
complicated, don't worry, because when we actually
apply the expression, it'll make a lot more sense. For this first example, I'm going to apply
the wiggle expression to these four little dots on the inside of this e.
It looks just like this. I'm going to apply the
wiggle expression to the position and the
scale of these dots, so that they just
wiggle around randomly. Just so you know, I have all of my already animated examples
as lowercase letters, and the ones that I'll be
working through with you, starting in the exact
same blank slate as you would know animation. These ones are designated
with capital letters. Let's just start with this
first blue dot right here. I'm going to open up
the position property, and then I'm just going to
option click on the stopwatch. This will bring up
my expression field where I can type in the
expression that I want. I'm going to type wiggle. Then After Effects
is probably going to start guessing what you mean. If it does guess what you
mean and it's highlighted, you can just hit "Enter"
to fill that in. Now I have the wiggle
expression here, and I have two parentheses
but nothing inside. If I click out of this and
just leave it as it is, I'm going to get an error
because After Effects needs to know what frequency
and amplitude I want. I need to put those in the parentheses just like
I was showing you before. Anytime you get an error, just make sure
that you're giving the expression what it needs. Also check for spelling and capitalization because
that does matter here. I need to put in the frequency
and amplitude that I want. Frequency is first, and I'm just going to say one. That's going to be
updating every one second, and then a comma, and then I'm going
to put my amplitude, let's say 50 pixels. This can go in the
x and y directions. Now when I click out, you can see that the error went away because I'm giving it something
that it can work with. Now if I play this back, you'll see that that blue
dot is wiggling around. If you want to try
out what other values look like in the
frequency and amplitude, you can just click back
in and change these. Let's make it wiggle a
little bit more often, but a little bit less. Keep in mind that
you can even put in decimals. If you want
a really slow wiggle, maybe for a background
object or something. I'm going to just
set mine back to one second and 50 pixels. Now I want to apply the same
expression to my green, pink and teal dots. Something that you can do to shortcut this process
is just click on the position property or whatever property you've
applied an expression to. Right-click, go to
Copy Expression Only. Then select the other layers that you want to apply that to, and just hit "Command
V" for paste. If you hit the P key to
bring up the position, you can see that those
numbers are now red, indicating that they're being controlled by an expression. If you toggle them down, you can see that
expression right in there. You can also use the
keyboard shortcut E E to see any expressions
applied to any layers. Now when I play this back, the position of all of these
is going to be wiggling. Now that we've got
the wiggle expression applied to the position
of all of these dots, let's also add the
wiggle expression to the scale property. I'm just going to
hit S for scale, and then I'm going to option
click on the stopwatch. Now I can type in my
wiggle expression here. Now when I play this back, you can see that it's actually stretching and
squashing this dot. It's not constraining
the proportions when it wiggles to scale, but I don't really like
the way that this looks. I want it to actually maintain the same proportions
and just scale the whole thing up and
the whole thing down. I'm going to need to use
the wiggle expression slightly differently in
order to achieve this. I need to specifically
tell After Effects to use the same wiggle value
that it comes up with for both the x and y scales. I'm just going to click into
this wiggle expression and delete this just to show
you something really quick. If you type a bracket
and then a value, let's say 100, comma, and then another value of 100, this is basically
going to tell After Effects what values you
want this to always be. This acts like an expression. You can see that the
numbers are still red and this blue dot is always going to be scaled at 100 percent. If I try to change
these numbers, they look like they're changing, but actually when I let go, it still snaps back to 100. This little format right here tells After Effects that we want the x-value to be 100 and
the y-value to be 100. But we don't have to put
actual numbers in here. We can do something a
little bit more tricky. I'm just going to delete
these two numbers, and I'm going to show
you something else. If I put in value and
then I'm going to do a bracket that it'll
auto-fill in the right bracket. I'm just going to do zero, and then I'll explain
why in a second. On the other one
for the y-value, I'm going to put value, brackets, with a one inside. Basically what this is doing
is calling up the value, which is what we have here. It's user-defined. If whatever you decide
the value is right here, is what's going to go
into here as the value. This zero in the brackets here refers to the x-scale value. Then for the y, I have value. That's going to be again
whatever is put in here. Then the one in the brackets
refers to the y-scale value. After Effects thinks of
the scale since there's two parts to it as
a list of values. In JavaScript, which is
the language that we use to write expressions
in After Effects, a list of things is
called an array. When you want to specify which thing in the
list that you want, you always start with zero being the first
thing in the list and then one being the second thing in
the list, and so on. Basically we start
at zero with arrays. That's the thing
to remember here. When you look at the x-scale
value or position value, anything with x is going to be the thing number
zero in the list. This right here, value, brackets and zero refers
to this number right here. Value, brackets, one is this value right here. If I click out at this, you can see that I
can change these. I can even unlock to
change them like this, and now these numbers are going to be whatever I set them to be because that's what this
is telling it to do. You might be thinking,
what is the point of this? Isn't that how
After Effects works if you didn't have
anything in here. Yeah, you'd be right, that's a pointless expression. But it's actually
not so pointless because instead of
putting in value here, we can put in our
wiggle expression. Let's look at how to do that. I'm going to click back and
I'm actually going to hit "Return" and then go
up to the first line. I'm going to use a little bit of shorthand to define
our wiggle expression. I'm going to set a variable
called w. A variable is basically something that holds something more complicated, so that way you can just
use the shorthand of the variable name to write something else that's
more complicated. This will make more sense when
we actually put it to use. I'm going to set my variable of w to my wiggle expression. W equals the wiggle expression. Then again, I need to put in my frequency and
amplitude numbers, and then I need to finish
this line with a semicolon. Just like when you write a sentence and you put
a period at the end, you need to add a semicolon to the end of any
line of JavaScript. Next, I'm going to
use this variable, which is like shorthand in this defining
brackets of my scale. Instead of value, I want to
do the wiggle expression, so I'm just going
to type w because w is equal to the wiggle. Now, let's move on
to the value for y. That's this piece right
here after the comma. For y, I want the same
value as x all the time, I want to maintain
the proportions, so x and y should
always be the same. I'm just going to type in
that w brackets zero again. This is going to make it so that the x and y values
are always the same. Now, when we click out of this, you can see that
the scale value is wiggling and it's
maintaining the proportions. Now, because I was
messing around with this, my original value was not 100 so my circle actually looks
a bit bigger than it should. I'm just going to set
these values back to 100 and now that
just fits in better. To finish off this example, we can just right-click
on "Scale", go to "Copy Expression Only", select the other dots
and hit paste to apply that expression to all
of the other layers. Now, we have both the
position wiggling and the scale wiggling
on all of the dots. What if you only wanted to
wiggle in one direction? If you are using the
position property, one thing that you could
do is just right-click on "Position" and go to
"Separate Dimensions", then you can just apply the wiggle expression to
one of the dimensions. Now, this is only going to
wiggle in the x-direction. I can still adjust the y-direction because
it's totally separate. But what if you have a
property that you want to wiggle that you can't
separate the dimensions on? I'm just going to undo this and the scale property is one that you can't separate
the dimensions of, it's just grayed out,
it's not an option. What we can do is use an expression to
separate the dimensions. This is going to be
very similar to when we maintained the
proportion on the scale. I'm just going to
option click on the stopwatch to bring
up my expressions, I'm going to define
that simple w variable so I don't have to write out the wiggle expression again, and I think it just
looks a little bit cleaner, easier to understand. I'm just going to do,
let's try like two, 100 for this, and then I'm going to do my
semicolon to end the line. I'm going to type
in the brackets to define the x and y scale values. Then let's have only the
y-value being wiggled; so for the x-value, I'm going to type in value, so that's referring to
whatever I have defined here and then I need to specify that this
is the x-value, so I'm just going to use the brackets and type in
zero because remember these scale values are a
list of things called an array and the first thing in the array is always
thing number zero. Then I'm going to do a
column and then we're going to use that wiggle
instead of value, so we'll just use w instead
of writing out with again, since we defined this
nice shorthand variable, and then I need the brackets to specify if I'm talking about x or y. I'm just going
to do one for y. Now, if I play this back, you can see that the x scale is always
going to be consistent, staying at 100 percent and just the y scale
value is wiggling. If you wanted to do this
the other way around, all you have to do is
put in value here for the y and then w here for x. What if you want the
wiggle expression to only choose positive numbers,
not negative numbers? For an example, I've set up this rectangle and I've
added the bend effect to it, and then I've added
the wiggle expression to the bend of the rectangle. Right now it wiggles
back and forth. When it wiggles to our left, it's wiggling in a
negative direction. Let's say that I only want
it to wiggle to the right, so only in positive directions. I can modify this
expression so that the wiggle expression can
only choose positive values. To do that, I'm first going to set up that variable
again for the wiggle. Now, I just have
this variable called w that's shorthand for my entire wiggle
expression just to make things clean
and easy to read, and then I'm going to
put that semicolon, again, to end the line. Now, I'm going to put in
a little piece of code that clamps things
to positive values. It's going to be Math with
a M, and then period, and then abs for absolute, like absolute numbers, and then a set of parentheses. Then inside of
those parentheses, I need to say what number I want to be clamped to
positive numbers only, and that is the wiggle
expressions number that it comes up with randomly. I'm just going to use w because w is equal to the
wiggle expression. Then when we click out of
this and play it back, you can see that it can only choose positive
numbers now, so the bend effect
is only going to be bending to the right because
that's the positive side. The examples that we've
looked at so far for the wiggle expression
have been abstract. Let's take a look at
some use cases of the wiggle expression in
some real-world projects. An example of a good time to use the wiggle expression
is when you want something to look
like it's floating or it's suspended in liquid. In this example, I've
added a very slight wiggle on the position of
these droplets, as well as the rotation of the droplet and on the little
squiggly mRNAs inside. Another use case of the wiggle expression is when you want background
elements to have just a little bit
of motion so that your scene looks a bit more
dynamic and less static. These little organelles have a little bit of wiggle on them. You can see that they're
rotating and moving around, but they're not doing
anything too dramatic because that's not the thing that we want to focus on in this scene, but they're just doing a little bit of movement to
make them look like they're suspended in fluid and just as an interesting
background element. We'll come back to
the wiggle expression at the end of class to create a looping wiggle by combining a few expressions you'll
learn throughout the class.
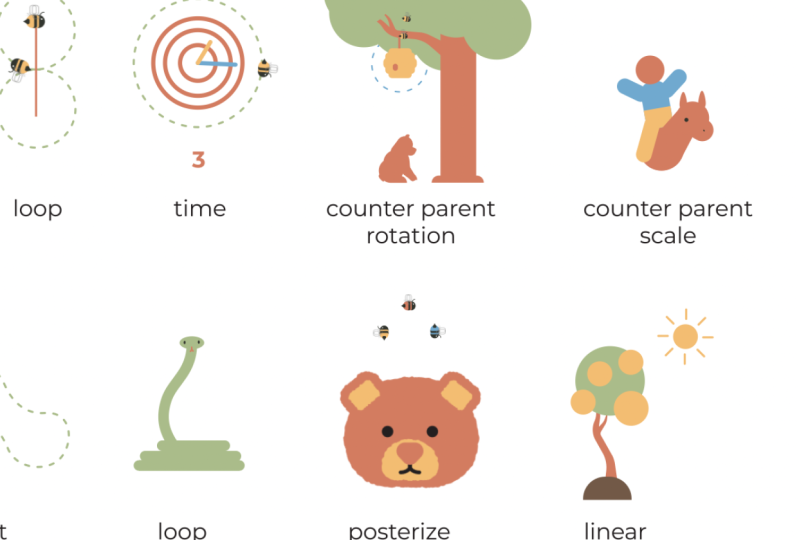
5. Loop: The loop expression is another one of those
expressions that many people learn as one of
their first expressions, and it's definitely the one
that I use most frequently. The loop expression is useful
for repeating an animation. You can apply the
loop expression to most properties and you can even apply it to timeRemap to
loop an entire composition. You can actually apply the loop expression
to an animation on the path property so we'll come back to that in
a separate video. The loop expression
has multiple options. You can get different
repetitive animation effects. For the first part of the loop
expression, the property, you have two different
options, loopOut or loopIn. For loopOut, the animation will repeat after the last keyframe. For loopIn, the animation will repeat before
the first keyframe. Let's look at those
side-by-side. The next part of the
loop expression is the type and there are
four to choose from; cycle, pingpong, continue, and offset. For all of the type examples, I'm just going to use
the loopOut expression, but you can
definitely use all of these different
types with loopIn. The first one is cycle. This one is going to play
through all of your keyframes. When it gets to
the last keyframe, it'll just play through all the keyframes
from the start again, so it looks like this. If you want to see
what this is doing in the graph editor just
for a good visual, if you click this
little icon right here and then go into
your graph editor, you can see the
dotted line portion is the portion that's being
controlled by expressions, and the solid line
is the keyframes. If you want to turn
off the portion of the graph that shows
the expression, just make sure you
turn it off here, and if you want to turn
off the whole graph, maybe you're seeing
graphs you don't expect. Keep in mind that
there's another icon right here that shows the graph. Next is pingpong, so this one is going to
play your keyframes, and then once it gets
to the last keyframe, it will play them in reverse and just back-and-forth
like this. Playing it through,
it looks like this. I've only used two keyframes, so it is like a pingpong match, but you can definitely use
more than two keyframes with this expression. Again, if we want to look at
this in the graph editor, it looks like this. The next one is continue, and this is probably the one
that I use the least often. Basically what continue
does is continues any speed that you have
on the last keyframe. I'll just play this through and then we'll look
at the graph editor. What this has done if we look at these in the graph editor, is the last keyframe had a speed of about 74 pixels
per second and so the motion is
just continue at 74 pixels per second
till the rest of time. If you want to adjust the
speed that it continues, you're going to need to
go into your graph editor and then just adjust this. Now it's going to shoot
off much quicker. Last but not least is offset. This expression just
builds on itself. What offset does is repeats
whatever is happening between these two keyframes again and again in the
same amount of time. Right now, we're at 1080 pixels, my second keyframe
is at 1180 so that's a difference of 100
pixels in 15 frames. It's going to start where
it left off and move 100 pixels the next 15 frames. If we look at this
in the graph editor, you can see that
it's just repeating the same thing over and over. This is super helpful
because if you have adjusted your graph editor or applied
some easing to your motion, then it will repeat this along with the motion so you can get this nice stepping motion with those same easing values and it'll just move all the
way across your screen. But of course, you
don't have to use the position property for this. If we look at the value graph, you can see how this
moves right across the screen using that
same easing value. Let's just play these all
back at once to compare. There's one more optional
piece of the loop expression, and that's the modifier. This is the number of keyframes
that you want to repeat. By default, if you
don't have a modifier, it's essentially like
putting a modifier of zero. This may seem counter-intuitive, but that actually means
that you're going to be repeating all of the keyframes. You can think of the modifier as the number of keyframes that
you only want to repeat. Let's take a look
at some examples to make this make more sense. In this first example, I have the circle drop down and then move in
this triangle shape. Let's say that I only want
to repeat the motion of this triangle shape
after the last keyframe. The triangle shape makes up
these four keyframes here. What I need to do is add
a modifier of three, because I need to loop
these four keyframes, and the modifier goes off of how many keyframes
you want to loop, excluding the last keyframe. I want to loop the
last keyframe and 1,2,3 other keyframes so the modifier is
going to be three. Let's just play that back to
show you what it looks like. In this next example, I've done something similar
but just using loopIn. In this one, I have the
circle move up and then across and I want
it to move up and down until it gets
to these keyframes. I want to just loop these two so that's going
to be the first one and one more so the
modifier is going to be one. It's always the first
or last keyframe and however many other
ones you want to loop. That however many other
ones you want to loop is the number that goes
into the modifier. Let's play this back to show
you what it looks like. In this example, the
circle is going down across and then I want it to
continue across the screen, doing that jumping
across motion. These first three
keyframes are from here, to here, to here, and then it's these keyframes, the ones that go across
that I want to repeat. I want to repeat the
last keyframe and one more before that so my
modifier is going to be one. Let's look at what
that looks like. Now let's apply the
loop expression to the x to create this look. First, let's work on
this little blue dot. I'm just going to go to
the position property. I have these two
keyframes set and I just want it to go back and forth
between these two keyframes. So I'm going to use
the type of ping-pong. So I'm just going
to option click on the stopwatch and do loop out because these keyframes are at the beginning
of the timeline, and I want the animation to continue looping
after the keyframes. Then for the type,
I'm going to do a pingpong and then
just click out. Then that little dot is just
going to go back and forth. Now let's work on the circle. So for this one, I already have the position
keyframes there, but if you're curious
about how I set them, basically what I
did was I copied the path of this
green diagonal shape. If you go down and copy
next to the stopwatch, that path property
and then paste it onto the circle position, then you get these keyframes
that are in that same shape. If your keyframes don't line up exactly where they're
supposed to be. If you have them all selected, you can move them all at
once and line them up. Then with these keyframes, you'll notice that
these I've set rove across time keyframes. You can see that right here. If you right-click on
one of the keyframes. This just means that if you adjust one of the
keyframes on the ends, you can adjust the timing of this whole animation and the keyframes in the middle
will adjust accordingly. I'm going to keep
mine at two seconds, but I'm going to select the first and last keyframes
to add some easing. You could do this by doing F9 or adjusting the graph
editor or using a preset. Now we have this motion. It adds a little bit of interest by having
some easing on it, but it's not looping. So we want this to play through all of the keyframes and then go back to the first keyframe and play them all the
way through again. Let's option click
on the stopwatch. Let's use loop out again
because we want these to repeat after the last keyframe for the rest of the timeline, and then quotes and cycle. Now let's play this all
back and see how it looks. What if you want to loop
an entire composition? So in this example, I have all of these
letters already animated, and I just want to make
them play over and over for longer than
four or two seconds. I want them to last 12 seconds. So what I'm going to do is
just do this example on the x because that's the one for the loop expression.
I'll just solo that. I'm going to right-click
with the layer selected, go up to time, and then enable time remapping. What this is going to
do is add this time remap property that we
can animate or adjust. But we actually want to add
the loop expression too. If I drag out my layer to
make it last the entire time, you can see that after the animation
ends at four seconds, it's just going to be nothing. So if I add the loop expression, it will continue to play after
four seconds just looping. But before we set
the loop expression, we actually have
to fix something. If we look at the
keyframe at 4:01, this x is already disappeared. What we need to do
is actually go to four seconds and set another keyframe on the
time remap property. Then we can delete
this one at 4:01. That way the x will
never disappear. If you don't do that step, you'll see one frame
where your x just disappears before it
starts looping again. Also notice that when we go into this x composition and go to
the composition settings, the duration is set to 4:01, and that's why the time
remap property set the keyframe at 4:01 and I intentionally set it
to 4:01 because you can't actually reach your
play head to four seconds. I just like to do it this way so that I can reach
to four seconds. Then in this composition where I'm looping the
other composition, I just know that I need
to set a new keyframe at four seconds or
however many seconds or whatever you're looping to, and then delete that one
at 4:01, or whatever 01. This makes sure that there's no blank frames in the
middle of the loop. Now it's time to set
the loop expression. I'm just going to option
click on the time remap stopwatch and type in loop out because I want this to continue after the
last keyframe here. We don't actually need anything in the
parenthesis because loop out cycle is the default
and I want the cycle type, so we can just click out of
that and then play this back. Also notice that when
the loop expression on the time remap property plays
again for a second time, so after this last
keyframe at four seconds, you'll see that the
timecode goes right to one. It doesn't go to zero, which is why I like to
make the duration of my composition 4:01
rather than four seconds, then this keyframe can be at four seconds rather than 03:29. Then it goes from
four seconds to one frame to start
the cycle again. That just makes more
sense to me than going 3:29 to 01 frame. If that was really confusing,
don't worry about it. If you just follow
these steps to set the loop expression,
it'll all work out. There are a ton of
different use cases for the loop expression. I've created a
whole another class about creating looping
animated scenes. If you want to learn more
about the loop expression and just how to loop
scenes in general, then definitely check that out. This is the scene
from this class, and I use the loop
expression a lot. You can see that a lot of these compositions
of the fish and even the seaweed are looping just with a loop out
cycle expression. Then when we go into a fish, you can see that I have the pingpong loop
expression used for fins moving back and forth
and things like that. Here's an example
of a good time to use the offset loop expression. I have this animation of a jellyfish swimming and
as it contracts its body, it should be moving faster at some points and slower
at some points. I've already adjusted
the easing on these keyframes to make
it look more realistic. So here's what that
speed graph looks like. I want this to happen as the jellyfish moves
across the screen, so it's going to be moving
slow and then speed up, and then slow, and speed up all the way
across the screen. I already have
this position set. This is animating off screen
and then onto screen. I want this to just continue, but all the way off screen. So I'm going to option
click on the stopwatch, do loop out quotes and offset. Now the jellyfish
will swim across the screen going slow and fast
at the appropriate times, thanks to these keyframes
that I've set up.
6. Time: [MUSIC] The time expression is useful for controlling
the animation of a property without
needing any key frames. It's a way to automate an
animation happening over time. I've most often seen it used on the rotation property or generators which
I'll explain later, but it can be applied to
many other properties too. The time expression outputs a single number,
time and seconds. If you want to use it
on a property like position or scale that
has two values to it, you'll need to be a bit more tricky with how you
write the expression. The time expression itself is pretty simple, it's just time. You can add operators, also known as math to it to
achieve different effects. Let's look at an example. In this example, we're
simply going to have this green shape move
like a clock hand around the P. This zigzag is actually not using
the time expression, I used loop out instead. We're not actually going
to animate the zigzag in this lesson because it's
not the time expression. Looking at my working example, the first thing that I've done is move the anchor point of this green rounded
rectangle shape to where I want it
to rotate around, then I'm just going to hit
"R" on the keyboard to get to my Rotation property and option-click on the stopwatch
and let's type in time. If we play this back, you'll notice that
it goes really slow. This is because it's only
doing one degree every second. Time is outputting the
time in seconds and so that's going to
equate to three seconds, so three degrees will
be our rotation. Let's speed this up a little
bit so it's not so slow. I'm just going to click
into my time expression and add some math
to speed this up. Now rather than just doing the math by myself and
figuring this out, I can actually just type
in the math directly into the expression so
it'll do it for me. I'm just going to do times because I want
this to go faster, so I'm going to multiply
time by something. I want to do 360 because
that's how many degrees are in one revolution
divided by let's say 4 because I know that my
timeline is four seconds long, so that'll give me something
that will loop perfectly. I'm just going to do
a set of parentheses because the order of operations matters
here when you're doing math inside
the expression, and then let's just
do 360 divided by 4. It's going to do
90 degrees every second and since
there's four seconds, 90 times 4 is 360. It'll do one revolution
in the four seconds. Sorry if that was a
lot of math but really this is actually a
way to simplify math, so let's just play that back. I think that looks like a
more appropriate speed. That's really all there is to this example; pretty simple, and pretty easy to automate things with
the time expression. A bonus of using the time
expression is that if I were needed to extend my
timeline for some reason, I don't have to adjust
any key frames. This is always
just going to keep rotating at the same speed, so it can be a really
efficient way to work. Let me show you
one other scenario that you might run into. What if you wanted the
rotation of your shape that's controlled by time to actually start at a different
rotation value? Well, you can't actually
adjust this value number here anymore when you have
the expression applied to it. What you need to do is add
something to your expression to give you control back
of this value field. To do that, just click
into the expression. I'm going to go to
the beginning of the expression and
type in value, and then plus, and then our expression. Now if I adjust this it'll actually allow me to adjust it, so I can choose whatever number here and then my expression
will be applied. Value just refers to
whatever is put in here. By essentially adding
value to the expression, we've allowed ourselves
control over this value field and then applied our expression to whatever value we have here. Now it's going to start at 144. If I play it back, it will still play at this rotation speed
with that expression. Earlier I mentioned that the time expression can be
useful with generators, so let's look at an
example of that. Here I just have a
basic circle shape and I'm going to go up
to Effects & Presets in grab the Turbulent Displace and just add that to my layer. Then in Effects controls I have a bunch of different
things that I can adjust. Right now this is not moving at all and I
just want to make the Turbulent Displace happen to this circle to make it animated, and morphing, and fluid-looking. To do that, I'm
just going to need to animate the evolution. Let's just option-click on
the stopwatch right up here in Effects controls since
it's already visible there. I'll actually open it up in the timeline so I can type
in my time expression. I know this is going
to be pretty slow, so let's just add times
100 and let's take a look. Just like that, pretty
simple and easy to set up. We have this morphing
organic-looking shape. This example just goes
to show that you can use the time expression to generate motion with things like effects. If you add an effect and then add the time
expression to that effect, you can just have the
effect going over time without having to
add any key frames. It's just a way to
automate that animation. Another use of the
time expression is to really efficiently
create counter. I have this text layer and I just want to make numbers count, so what I can do is toggle
down into my text layer. Then where it says Source
Text I'm just going to option-click on the
stopwatch and write in time. Now when we play
this back you'll see that the numbers
are counting, but it's also adding a bunch of decimal places and that
might not be what you want. But luckily, there's
an easy fix for that. If you just go back into
your expression and do.to and then F for fix, so you want.toFixed with
these parentheses here, then you want to put
in whatever number of decimal places you
want in the parentheses. Say you wanted one
decimal place put in 1, and then you'll see you
just get one decimal place. If you want no decimal
places, put in 0. Now it'll just output
whole numbers of the time in seconds
as my timeline place.
7. Counter Parent Rotation: [MUSIC] The Counter Parent
Rotation expression is useful when you want a layer to be parented to another layer, but you don't want
this child layer to inherit the parent's rotation. You can think of it
like a Ferris wheel. All of the little seats for people are attached
to the Ferris wheel, but you don't want them to just be glued on with no hinge. Because that way when the
Ferris wheel rotates, the people would fall
out at certain spots. Essentially, this expression is creating the Ferris
wheel effect. This expression is
going to be applied to the rotation property
of the child layer. There are a couple of ways to counter the parent's rotation, but this expression is
what I like to use. This expression is a bit more complicated than others we've gone over and I'm not going
to explain every piece of it. Since this is an intro
to expressions class. Once you get
comfortable with how and when to use
expressions like this, then you can dive deeper into understanding expression
language and writing your own expressions to achieve more complex or more
specific effects. But even if you never
get to this point, that's okay, this expression can still be a valuable tool. If you've ever needed to counter a parent's
rotation before, you might have tried parenting the rotation property of the child to the parent
rotation property, and then multiplying
by negative 1. The problem with this
method is that you can no longer adjust the
child's rotation value. Another simple expression to do this would be to use value minus parent dot
transform dot rotation. Now that'll work if your
child only has one parent, but this expression works when the child has
more than one parent. If there's a child, a parent, and a grandparent, not a technical
after-effects term, but you know what I mean. That's why I like to use this particular
counter-parent expression because if there's multiple
parents, it still works. Here's the example that
we're going to recreate. I know there's a lot of
spinning parts here, so let me just explain
what we're working with. We have a parent chain. You can think of the inner
circle as the grandparent, the outer circle as the parent, and this sandwiched in-between
circle as the child. Let's go into our
working example. On our center layer or
the grandparent layer, we have the time expression
to control its rotation. Then on the parent's circle, which is the bigger outer one, I have the loop expression
and some keyframes. The reason I didn't just control this with the
time expression as well, is because this has some easing on it so
that it'll create more of an interesting
movement rather than a linear just going
around in a circle thing. What we need to do is apply the counter parent rotation
expression to the child, which is this smaller
or medium-sized circle wedged in-between these
two other circles. If you scrub through
this, you can see that things are already animating but this child layer, this open circle that's
half pink, half-light blue, is rotating as it's parented and rotating around because
of what it's parented to. But I want to make it so that the pink is
always on the left. The blue is always on the right, no matter which way it rotates. To do that I'm going
to use obviously the counter parent
rotation expression. I'm just going to hit "R" on the keyboard to get
to the rotation. Then option-click
on the stopwatch. Then because this is an expression that's
a little bit harder to remember and type
out on the spot, I like to save it in a document of other
helpful expressions, so I've just copied that and
I'm gonna paste it in here. Then if we click out, just make this whole thing visible you can see
that expression here. Now if we play this back, you'll notice that this
wedged in half pink, half blue circle is not
going to be rotating itself. Although it will
be rotating around inside of here because
of its parents, and because of this expression. Now if for some reason you
wanted to rotate this circle, maybe you wanted the top to be pink and the bottom
to be the light blue, you could go into this
expression and just add plus value at the end. That way, adding plus value will give you control of
this value field here. Now I can just adjust this however I want it and then the expression
still works the same way. Besides animating
a Ferris wheel, here are some other use cases of the counter parent
rotation expression. In this example, coming from
another one of my classes. Here I have the pedal
parented to the crank arm, which is parented to this
chain-ring which is rotating. Then I have the foot
parented to the pedal. I need to counter the
parent of the pedal, which is the crank arms rotation on the rotation of the pedal. You can see that I've put in
my expression right here so that it works like
biking would work. You can also see that
I've added plus value at the end of the
expression and animated a few keyframes so that her feet just look a little bit more
natural on the pedals. Here's a close-up of
what this looks like. Here's another use case from
another one of my classes. On this little
avocado character. I have this highlight on
the seed of the character. This highlight is
being cast from an imaginary light source
coming up from over here. Casting this highlight
on the seed. When the character bends side-to-side or
rotates its body, the light source isn't changing so technically this highlight shouldn't actually move like it's glued onto the character. I have this seed highlight
parented to the seed, which is parented to the body. We have this child, parent, and grandparent
relationship. That's why I need
this expression. If I rotate the body or the grandparent,
you'll see that, that highlight on the
seed always stays in place as if it's being cast by this light source
and not just some, thing that's glued
onto my character. Another good use case of the counter parent rotation
expression is when you're animating
liquid in a container. In this example, I obviously
want the liquid to not rotate when the character moves his arm to rotate the picture, I want the liquid to stay level like it would
in real life. This situation
here is similar to when there's liquid
in this clear bag, we want the liquid to stay level even though the
container that it's in is rotating.This expression
can also be used on things like hair and
earrings that you don't want to necessarily be glued
on tight to a character. You want them to
hang with gravity. In this example, I've
applied the expression to the rotation of the earrings so that they just hang loosely. Then I've also added plus
value to the expression so that I could animate
the rotation on the earrings independently. The braid is animated
in a similar way.
8. Counter Parent Scale: The counter parent
scale expression is for when you don't want a child layer to scale
if the parent does. It's applied to the child
layer scale property. Like the counter parent
rotation expression, this one's a little bit more complex and I'm not going to
explain every piece of it. It's just one that you can save somewhere and then copy and paste when you want to use it. This expression can be useful
for spreading things out, or bringing them
closer together. In this example, the
little green dots are parented to the blue half circle and as the blue
half circle scales, the green dots don't scale but since they're parented to
the thing that scaling up, they get pushed away
from each other. Let's go into our
working example to recreate this effect. The first thing that I
want to do is take all of these green dots and just parent them to the
blue half circle. This blue half circle has the scale already
applied to it with these key frames
here and I'm also using loop out to repeat them. Right now this would
just look like this. The dots would also scale up as the half circle scales but if we don't want
that to be the case, if we want the dots to
stay the same size, we just need to apply that counter parents
scale expression. Let's just go into the scale
property of the first dot, option click on the
"Stopwatch" and then I have my expression already
copied so I'm just going to hit "Command
V" to paste. Now, you can see that in there. Now you can see that this first dot moves
with the parent, the blue half circle, but it doesn't scale up
like the other dots. Let's just select
where it says scale on this dot that we've
applied the expression to, right click and go to
"Copy Expression Only", and then select the
other dots and hit "Command V" to paste
that expression. If we hit "E E", you can see the
expression applied to all of those layers.
Let's play it back. Just like some of the other expressions
that we've talked about, if you still want to
be able to control the scale value with
these numbers here, you can just go into
your expression and add plus value and then you'll be able to
control this value here but still have the
expression applied. Here are a couple of use cases for the counter parents
scale expression. Like I mentioned, they're
good for spreading things out or shrinking
them back together. It can be good for
things like explosions. In this example, I have all of these letters parented
to this null. The null is scaling down and the letters have the counter parents scale
expression applied to them. As the null scales down
the letters come closer together before
they're cutoff and we have this little
confetti explosion.
9. Maintain Stroke Width: [MUSIC] What if you want to scale a shape but you want the stroke width
to remain the same? You could use an expression, but I actually think that
there's a better way. In your shape layer, all you
have to do is toggle down, go under Contents and then Ellipse or whatever
shape you have you. What you want to do is take the stroke and if
you have a fill, you want to pull both of
those out and then place them below the shape,
just like this. Then if you go under the shape and then under
transform the shape, then you have another
scale property that you can animate. This one is different
than the one that's just under Transform. If you use the one under
Transform and then the shape, and you scale this value, then your stroke width
is going to maintain that same width no matter
what you scale this to. This works because we've changed
the stacking order here. The way After Effects
processes things, this stroke width is not
affected by the scale anymore. I like this method of
just pulling the stroke out from the shape and
then scaling the shape. Because if you unconstrained the proportions, it still works. The stroke width will maintain
the same proportions. Whereas with other expressions, sometimes if you
unlock the scale, the stroke width can
get a little bit wonky. Or some expressions have
a problem where that if you scale it all the way
to zero, you get an error. While I just showed you
that you don't need an expression to maintain
the stroke width. There is a case where you actually would want
an expression. That's when you have
a child layer that you don't want it
stroke width to change, but its parent layer
is scaling up or down. This expression is applied to the stroke width property
of the child layer. Because this is a more
complicated expression, this is one that you
can just save somewhere on your computer and copy
and paste when you need it. In this example, this green dot is the parent layer
and it's scaling up, and this blue
smaller half circle has a stroke that I want
to maintain its width, even though it's parented to this green dot that scaling up. Here's what I want
it to look like. Here in our working example, this is what it
looks like if you don't have the
expression applied yet. I already have this half circle parented to the green dot. I just want to go into
the stroke width, [NOISE] and apply
the expression. This is one of those
ones that you just save somewhere on your computer
and then copy and paste in. Just paste that there, you can see that it's in there. Now while the scale is up, the stroke width is
not going to change.
10. Value At Time: While the value at
time expression can be used for many
different things. In this class, we're
going to focus on using it as a delay effect. You can use this for overlapping
animation or creating a fluid look where
children layers follow parent layers
with a delay. It can be used on
most properties. With this expression, you're
going to need to have something before the expression. Whatever property you
want to look at and then.valueAtTime and then
a set of parentheses. Inside of those parentheses,
you need a number. This number is the time that the value at time expression
is going to be looking at. If you wanted to create
a delayed effect, you could do time as
in the current time, and then minus some number for however long you want that
layer to be delayed by. Let's put this
expression to use. In this example, I have this
teal dot that's leading the way and it's moving in the shape of the S
and scaling slightly. Then I have this blue dot and this pink dot that
are following along doing the same exact thing but just a little bit later in time. I'm going to use the expression on the position and scale of the blue and pink dots
so that they just copy what the teal dot is
doing but just delayed. Let's go into our
working example. We already have the animation
on the first teal dot, and then we also have a second teal dot
that just makes it so that this loops and it just scales in underneath this one, which we're going
to move out of the way in just a second. You don't really need to worry
about the second teal dot. What we need to do is
go into the position of this blue dot and
apply our expression. Also if you're wondering
why I've trimmed this one frame forward in time. It's because when the
two dots overlap, sometimes you can get some
weird pixilation on the edges. This is just preventing that. What I want to do is first
use this pick whip next to the position to grab the position property
of the teal dot. Now this just means that
the blue dot is going to exactly follow the
position of the teal dot, which is what I want, but
I want it to be delayed. That's where the
expression comes in. If I toggle down next to position to get
to my expression, I can click into the expression
and add value at time. I'm just going to do dot value, then A for at and
then T for time. It'll probably
guess what you mean and you can just press "Enter". Then inside of
these parentheses, I want to tell it the amount that I want
it to be delayed. I'm going to use the current
time by just typing Time. Then minus. Let's do 0.1. Just a really small amount of time that we're going
to be delaying it by. Now let's see what
this looks like. That's already
looking pretty good. We can do the same thing on
the scale property here. I'm just going to
grab the scale, pick whip and parent
the teal dots scale. Then let's just toggle down
to reach our expression. Click in and do.valueAtTime, then we'll do time
minus 0.1 again. There's just a little
subtle scale at the beginning when it comes in. Now our blue dot is doing that same thing that
the teal dot is doing. Just 0.1 seconds delayed. Now I can do the same
thing with this pink dot to make another follower to this little waterfall
effect here. I'm just going to go into
the pink dots position. I can actually just copy this expression and option click the stopwatch
and paste it in there. But instead of this expression
copying the teal dot, I'm actually going to have
it copy the blue dot and then I can just keep the
same amount of time. I'm just going to type in where it said teal and just
replace that with blue because that's the
address for the blue dot. Now you can see that pink dot is offset from the blue dot
rather than the teal dot. I'll do the same thing
with the scale property. Option click the "Stopwatch", paste it in there, and then I'm going
to change teal to blue because that's the
name of the blue dot layer. This is the final look. A use case for the value at time
expression is to animate things in in a
staggered way like this. In this example, I've animated the scale property
of this first e, and then on all
the other letters. Instead of animating
with keyframes, I've just used the value
at time expression to copy the first
E scale keyframes, but a little bit delayed. I'm delaying this
by 0.2 seconds. Then another thing
that I've done here to make using this
expression really efficient is that I've used
index plus 1 for the layer. Instead of using the
actual layer name. The index just means the number that you see right
here here to the layer. This first E is index 11. By doing index plus 1, it's referring to this
layers index which is 10 and then plus 1 is 11. This X is going to copy this
E. Then on the next layer, this index is 9 plus one is 10. This P is going to copy this X. In that way, it just
creates a waterfall effect, but I get to use
the same expression on all the layers so it's easy to just copy
the expression and paste it all onto
all of the layers. Again the result is this.
11. Loop a Path Animation: [MUSIC] The loop expression doesn't work on
the path property. So here's a different
expression to use instead. This expression is obviously applied to the path
property of a shape. This expression is one that
you might just want to save and copy and paste
when you want to use it, but let me just give
you a simplified explanation of how it works. First, we have value at time which we covered
in the last video. It gets the value
of the property at whatever time we put
in the parentheses. To create a looping effect, the stuff in the
parentheses here is saying, use the current time for the remainder of time,
that there are key. Then go back to the beginning of time and do that all over. Let's look at an example. In this example, I'm animating the path of this zigzag line. Instead of animating a trim
path or a scale that would affect the way that the zigzag or the
stroke weight looks, I'm animating the actual path of the line shrinking
and then stretching. Here in our working example, you can see that I've used
the loop expression on this circle and on just
the size of the zigzag, just to make it
look a little bit more like a realistic spring. But I can't use the loop
expression on the zigzag path. If you try, you'll get an
error and it just won't work. Instead, let's use the other
special expression for looping an animation
on the path property. I'm just going to paste that in and then let's
watch that play. One thing to note is that
this expression works a little bit differently than
the loop expression does. If I were to move all of these
keyframes over to start, let's say 20 frames. You'll notice nothing happens
for the first 20 frames. Then it plays through and
then my loop expressions are going to start looping right away after the last keyframe. But this expression on the path animation is going to weigh 20 frames before
it starts looping. It's looping from the
beginning of the timeline, which is a little bit
different than how the actual loop
expression works. Just something to be aware of.
12. Posterize Time: The Posterize Time
expression is for reducing the frame
rate on one layer or property without changing the frame rate on the
entire animation. This can help you
achieve a more choppy, cartoony, or
stop-motion like look. It can be applied to
pretty much any property. The first part of the expression
is just posterizeTime, and then a set of parentheses. Inside the parentheses
you need a number. This number is the
frame rate that you want Posterize Time to use. You can think of this number
as the number of times per second that this value
is going to be updated. Whereas if you don't
use an expression, the number is updated
every single frame. With Posterize Time, this number will only
be updated the number of times that you put
in these parentheses. After that part of
the expression comes a semicolon and a new line. On the new line, we
need to put value. This way, the Posterize
Time expression knows what value we need to be updating at the frame
rate that we specify, and value refers to
the numbers that you set in the normal value
field of the property. In this example, I
wanted to make it look like this circle
was switching states. But in actuality,
it's actually just rotating with the Posterize
Time expression applied. Let's do that in our
working example. First notice that these
outer pieces of the circle that are different
colors are all parented to this inner circle, and the inner circle has
rotation keyframes on it. Without the Posterize
Time expression, it just looks like this. I want to make it not look
like it's rotating and just make it look like
these are switching places. I'm going to option click on the rotation stopwatch and
then type in posterizeTime, and then in those parentheses, let's have this
update three times because there's three
different pieces to this circle every second. Then go to the other
side of the parentheses, do a semicolon and a new
line and type in value. That way this value is just referring to whatever
we put in here, which is these keyframes. Now if we play this back, it just looks like it's jumping between these different states. We can look at the
graph editor to better visualize what the Posterize
Time effect is doing. If you just click
on this little icon right here next to
your expression, it'll show what it's doing
with the expression applied. Looking at the value graph here, you can see that the
expression causes this to just be
updated three times every one second
instead of just making the steady change that's represented with
the diagonal line. We can add the Posterize
Time expression to this blobby shape that we
use as an earlier example. The circle has the
turbulent displace effect applied to it to make it
into this flowing shape. I also use the time expression to make it just continue
to change over time. But if we want this to
look a bit more choppy and update less frequently
than every single frame, we can add Posterize Time. I'm just going to add this
before the time expression, so we'll do posterizeTime, and then let's make this
update twice every second. Instead of using value in the second part of
this expression, we're using the same
time expression. Now let's see what
this looks like. If you're looking for
something like this, Posterize Time is a great way to do it really efficiently. Plus keep in mind that you can even combine posterize time with other expressions to
create unique effects. A use case for Posterize Time is to give something in
animated texture. This can make it look
more hand-drawn. On this example, I've added the turbulent displace
effect so that the outer edge of my letter just has a little bit
of texture to it. Then to animate the
texture slightly moving to make this look like
this was hand animated, I've animated the turbulent
displaces random seed. Changing the random seed is very similar to changing
the evolution, which I did in an earlier video. It basically just
slightly changes this rough texture on the
outside of my letter. I've used an expression on the random seed to just generate this animation
automatically. Then I'm controlling
this animation with an expression
on the random seed. In here you'll see that I have a new expression
we haven't done, so consider this a bonus that's random and then
in parentheses 100. All this does is generate a different random
number every frame and the random number is going
to be between zero and 100 because I've put in 100
in the parentheses. Then I'm adding Posterize
Time to this expression so that instead of choosing
a new random number, every single frame
is just going to do it six times per second, because I've chosen
a frame rate of six. Altogether, that
gives it this look. Different from the
Posterize Time expression there's actually a
Posterize Time effect. You can apply this
effect to any layer and I've done that with
another example here. In this version, I've applied the Posterize Time effect to an adjustment layer that is going to affect all
the layers below it. This also has the
turbulent displace effect, and I've animated the
random seed as well. The only difference here
is that instead of using the Posterize Time expression
on the random seed, I'm just using the
Posterize Time effect on the adjustment layer. The difference with the
posterize time effect versus the expression is that
the effect applies to all of the animation
on the layer. Because I put this on
an adjustment layer, it's going to apply to everything below the
adjustment layer, which is just everything
in this comp. In addition to the
rough texture on the edge of my letter having
Posterize Time on it, the animation of the
letters drawing in is also going to
have Posterize Time. Let's look at a comparison
between the two. The top is using the
expression so that the Posterize Time is only
on the rough texture, and the bottom is
Posterize Time on everything because I use
the Posterize Time effect. You can see that this one on the bottom with the
effect is much more choppy to animate in because Posterize Time is
applied to everything. Another use of Posterize Time is to create animated textures. Of course, there are multiple ways that you could do this, but in this example I have a simple PNG grainy texture
of these little black dots, and so I've added Posterize
Time in combination with the wiggle expression
on both the position and rotation of this texture. Here's the effect of this. It just updates the look
of the texture twice every second because I put
in a frame rate of two in my Posterize
Time expression. Posterize Time can
be used to give something a more choppy
or cartoony look. On these letters, I've set up this little rig to
make them look 3D. Then I'm just animating the
3Dness of these letters, which is actually this
position property here. Then I'm using the Posterize Time expression to make it only update three times every
second instead of every frame. If I delete this
expression on the D, you can see what it's doing. It would just be
moving smoothly. But with the expression, it moves a bit more choppy.
13. Linear: [MUSIC] The linear expression is a way of linking
properties so that when one property's
value changes, it affects the value
of another property. It's a way of remapping
or interpolating values. There are two properties
involved when working with the linear expression: an input property and
an output property. You set the expression
on the output property. The two properties
involved can be on the same layer or
different layers, and they can be two
of the same property or two different properties. In this way, the linear
expression is like parenting two properties that couldn't otherwise be parented. Here's a visual to explain what the linear expression does. This linear expression is set on the blue circle scale property. The key frame position
of the pink shapes y position value controls
the circle scale. Technically where it
says y position in the expression is not the actual way that
you'd write this, but this is just simplified
for the sake of this visual. In the expression, I've
set it up so that when the pink shape is at 250 pixels, the circle scale
will be 30 percent and when the pink shape
is at 750 pixels, the circle will have a
scale of 70 percent. After effects, we'll interpolate
every value in-between. To write this expression, it starts with a type of interpolation we want,
which is linear. There's also an easy expression
that works similarly. Then, inside the parentheses, the first thing is
the input property. Next is the minimum
and maximum values of the input property, followed by the minimum
and maximum values of the output property. We're mapping the min
and max values of the input to the
min and max values of the output and
the expression will interpolate every
value in-between. This will all make
much more sense when we apply it to our example. In this example,
these two dots are controlling how
this exact looks. On the first dot, the
scale property is the input value for the
size of this zigzag. As I scale this down, you can see that the
zigzag is gone now, it just shrinks the
size of that zigzag, and as I scale it up, that zigzag increases in size. Then, for this second dot, the y position value controls how many zigzags
are on this line. As we lower the dot, there are going to
be less zigzags on the line until
it's just straight, and then as we raise the dot, there's going to be more zigzags on that line, more
back-and-forth. I've just key framed the
position of the second dot and the scale of the first dot to make the zigzag have
different looks. Essentially using the linear
expression, in this case, is like making controllers that control other layers
in your scene. Let's recreate this in
our working example. I'm going to go into
the diagonal line and go down into the
zigzag property. The size of this
zigzag, which is this, is going to be the
output value and the scale of this dot is
going to be the input value. I'm just going to option
click on the size property. Then let's just type in linear. Then inside the parentheses, the first thing that I need
is to define my input value. I need to somehow tell it that it's going
to be this scale value. How I'm going to do this,
just to make things a little bit cleaner
and easier to read, is to define this in a variable. I'm going to go before my linear expression and
create a new variable. You may have seen me just
use a letter before and not do var for
defining a variable. But just to be clear,
that's optional. But here I'm going to do it. Then I'm going to
call my variable dot, and then equals, and then I'm going to use
this pick whip next to the size to just grab
this scale property. It's put in the address
of this scale property. Now, my variable is assigned
this scale property. I just need the
semicolon and I can go back into the parentheses of the linear expression
and just write dot because that's shorthand
for this variable. Then make sure you don't
get these parentheses. Apparently there's
a dot function, but that's not what
we're using here. Then you're going
to put a comma. Next, we need to define the minimum value
for the input value, which is the scale of this dot. The minimum would be zero. You could clamp it to
something other than zero, but I'll just use zero
and then another comma. Then the maximum
value of the scale. Again, you could do
any number you wanted. But I'm just going to
do 100 percent scale, another comma. Then we're going to
do the minimum value of the size of the zigzag. So I'm going to do 0, and the maximum value
of this zigzag. Let's just do 12, which is what it is right now. That'll be our
max. Then clicking out of this expression,
we have an error. This is because we've defined the scale value as the input
value that we're looking at. But the expression is expecting one value and we've given
it the scale property, which has two values. That's where it's
getting tripped up. What we need to do is be
specific about whether we want the x scale value
or the y scale value. Since I'm just going to
have the proportions constraint anyways, this will be the same thing. What I'm going to do is just
go into this expression. I'll just delete
this whole thing and then redefine
this dot variable. I'm going to drag
the pick whip up to just the x value right here. Notice how now there's
this little zero in brackets which refers to
this specific scale value, the x scale value. Now, if we just put the
semicolon and click out of this, it will clear out that error. Now, when we play this back, the size of the zigzag
line will be affected by these key frames on the
scale property of the dot. Now let's use the
linear expression to have the position of this second pink dot control how many zigzags or ridges per segment or on
this diagonal line. The output value is going
to be ridges per segment, which again is this. Then the input value is
going to be the y position, which I've already separated
the dimensions for. I'm just going to option click on the ridges per
segment stopwatch, and remember how we needed that variable to define
the input value. So that's the first thing
that I'm going to do, so I'm just going to
do there and then dot. We can use the same variable
name because these are separate expressions on
separate properties. Then I'll just take
this pick whip next to ridges per segment and grab the y position value
and then do a semicolon, and then type in linear. Then the first thing is
defining the input value, so that's going to
be dot and comma. The minimum value of this dot is when it's
at the very top, and that's 190,
and then a comma. I've already checked what this position down
here of the dot is, and that's 890, so
that'll be our max. Then we need the minimum
and maximum values of the ridges per segment. Even though we call these
numbers the min and max, they don't literally
have to be the smallest and then
the biggest numbers. It's just whichever
way you want to map these two sets of values. I want to map this so that
the diagonal line has the most number of zigzags
when this dot is at the top. The dot at the top is
the minimum number, so I'm going to do the minimum number for the
ridges per segment at 12. Then when the dot is
at the bottom or 890, I want this exact line
to have no zigzags, so I'm going to put in a zero. To see how this
works, you can play around with it
yourself by adjusting the y position on the dot to see the effect
on the zigzag line, or you can just play it back to see what the key frames do. Here's an example of how I've used the linear
expression before. I was animating
this timeline and I wanted the animation
of going into each bubble to be rigged
so that I didn't have to set a bunch of key frames every time that I wanted
that to happen, every time I wanted to go
in and out of a bubble. You can see here that I
have this null that is controlling the timeline with
this in-out control slider. Now, setting up slider controls is a topic for another class. It's another way that you
can utilize expressions. But you can see what I'm
doing still in this example. Basically I'm using the
values from this slider in this linear expression
on the timeline, the actual gray line here, and this whole complex
little piece of code right here is really just
the simple address of this null and
the slider of it. I didn't set up a
variable this time, that's why this
looks really long. I just stuck the
whole thing in there. Then not only have I controlled the y position of this line, so the line coming down, moving off-screen as
we go into the bubble, but in each of these bubbles, I've used the linear
expression to control the zooming in and
opening up of the bubble. That's all controlled with this one slider so that
I can just animate this, and all of the bubbles
on my timeline will be animated accordingly.
14. Looping Wiggle: [MUSIC] For the last example we're going to combine expressions you've
learned throughout the class to create a
looping wiggle expression. Just like the wiggle expression, this can be applied on
pretty much any property. Here's a simplified explanation of how this expression works. The first part is just
setting up some variables so like you learned in the
wiggle expression video, we need the frequency of wiggles and the
amplitude of the wiggle. There's also a variable for how long you want the loop to take. These first three variables
are the things you can go in and change to create the looping wiggle
effect that you want. Next we set up a variable
called t to watch the time. It looks at what the
current time is and divides it by the remainder
of the loop time we set. This is used later to make
the wiggling loop overtime. Then we create two variables with two different wiggles that are going to get blended together to create
a seamless loop. If you're wondering why there's more in the parentheses of these wiggle expressions than just frequency and amplitude. It's because these are optional
things which are really called arguments that the
wiggle expression can use. Next is where the two
wiggles get blended together using the linear expression
that we covered earlier. Let's look at an example. In this example I have these four dots and
these two curves wiggling and the wiggle is looping so every time
it plays through, you don't see any jumps. It's just a seamless
looping wiggle. [NOISE] Let's apply that
to our working expression. I'm going to start with
the first blue dot and then just go into the position property
option, click the stopwatch. I already have my
expression copied, so I'm just going to paste
it in there because it's a long one and it's
easier just to have it on your computer
and copy and paste. Then you can go in and
adjust the frequency and amplitude numbers to get the wiggle look
that you want. Then you'll also want to
change the loop time. I actually want mine to loop over four seconds, so
we're all good there. Let's just see what
this looks like. Looks good. I'll just copy
the expression only by right-clicking on the
position and then paste it onto all
these other layers. On these two curves, I want to set a wiggle
expression on the rotation. I'm just going to go into
the rotation property. First let's copy this
expression again. Then option click and paste. Let's see if all those
settings look okay. I think I might just turn down the amplitude, maybe like 10. Let's copy this, right-click copy expression only and apply it to this one. Now when we play this back, everything is wiggling
and also looping. There's no weird jumps when it reaches the end of the timeline and starts
back at the beginning.
15. What's Next: [MUSIC] Congrats on
completing this class. You now have 11
powerful expressions to help you work more
efficiently in after effects. Keep looking out for places to use these expressions as you work and remember to share
these uses as a class project. Your class project can be
any animation that uses one or more of the expressions
covered in this class. To keep leveling up
your animation skills, click on my name above this video to check out
the other classes that I'm teaching and make sure that you're following
me on Skillshare, Instagram, and YouTube
for more classes, tips, and tutorials. Thanks so much for being here. Until next time,
happy animating. [MUSIC]