Transcripciones
1. Introducción a la edición 360 Photos: Hola, soy Chris Converse, y he juntado este curso para enseñarte uno de mis flujos de trabajo para
edición no destructiva y branding una foto panorámica spirit kal o a veces llamada una foto 3 60. Y vamos a estar usando una W foto de compras. Será después de efectos para hacer esto. Y no te preocupes. Si nunca has usado photoshop para after effects, voy a estar pasando por mi proceso paso a paso. Entonces estaremos empezando con la imagen inmobiliaria que tomé en un día mayormente nublado y empezaremos por quitar sin problemas el trípode y la mesa que solía colocar la cámara vista aquí en la parte inferior, además de retocar el césped, el patio y agregando en un nuevo cielo, luego potenciará la foto agregando al sol y luego haciendo ajustes de color para que coincida con este defecto y finalmente terminará en un logo bidimensional y distorsionará el logo para que coincida con los contornos del panorama esférico sin envolver. Cuando hayamos terminado, se previsualizará la experiencia final y luego se subirá nuestro panorama mejorado y se compartirá con el mundo. Ahora, este curso también incluye archivos de ejercicios, incluyendo mi foto original de 3 60 para que puedas seguir, aunque no tengas una cámara de 3 60. Entonces, antes de que
empecemos, sigamos adelante y discutamos el software que necesitarás para seguir adelante.
2. Software que necesitarás: Si quieres seguir junto con este curso, hay archivos de ejercicios que puedes descargar, y necesitarás tener las versiones creativas en la nube tanto de Photoshopped como de aftereffects instaladas en tu computadora y para after effects. Este necesita ser al menos el lanzamiento de 2018, que quedó disponible de Adobe en octubre de 2017. Esta versión presenta el nuevo editor de comp de VR, que es lo que permite agregar contenido o panorama esférico con un flujo de trabajo único y no destructivo. Ahora, si nunca has usado after effects antes del siguiente video, discutiremos la interfaz y cómo Aftereffects se relaciona con otras herramientas de diseño en la nube
creativa, incluyendo Photoshopped, Ilustrador y en Diseño.
3. Software que necesitarás: Si nunca has trabajado en después de efectos antes, entonces estás en un verdadero capricho. Creo que esta es una de las aplicaciones más divertidas para diseñar en. Y si estás familiarizado con photoshop, ya
conoces los conceptos básicos y after effects funciona de la misma manera que otras aplicaciones creativas de
diseño en la nube , incluyendo illustrator y en diseño. De hecho, los paneles principales y después de efectos funcionan de la misma manera que los paneles y otras aplicaciones. La única diferencia real es lo que se les llama el panel de la línea de tiempo, y las secuelas funcionan como el panel Capas en los otros APS. El panel de composición es similar al ilustrador de Lienzo y Photoshopped o Art Borden o a una página. Y en diseño, el panel del proyecto muestra archivos vinculados al igual que un objeto inteligente vinculado en Photoshop o el panel
Enlaces tanto en ilustrador como en Diseño. Y por último, un pre comp o una composición pre compuesta. Y las secuelas funcionan como un objeto inteligente en photoshop o un símbolo, un ilustrador que te permite tener múltiples instancias de la misma obra de arte a lo largo de tu layup. Y como mencioné, Aftereffects funciona mucho como photoshop en photoshop. Podemos aplicar efectos capas de puntera, luego especificar las propiedades. Aftereffects utiliza el mismo flujo de trabajo dedo aplicar efectos capas puntera en el panel de línea de tiempo. Ahora, cuando miras por primera vez la interfaz de secuelas, eso puede ser un poco intimidante pero para este curso sólo iban a estar usando unos cuantos paneles. El panel de línea de tiempo, que es donde encontraremos todas nuestras capas el panel de composición. ¿ Dónde crearán nuestros diseños? El panel de proyecto, que muestra que los archivos enlazados, así
como las composiciones y ilustraciones que pudimos haber creado y viene el pre que
se puede abrir o cerrar desde el panel de línea de tiempo o abrir desde el panel de proyecto. Ahora hay dos paneles más que no verás en las otras aplicaciones de diseño que
mencioné , y estos son los efectos y presets y los paneles de controles de efectos. El panel de presets efectivos funciona mucho como el menú de filtros en la tienda de fotos, donde se navega y aplica efectos y los controles de efectos Panel funciona mucho como los estilos de
capa, cuadro de
diálogo y photoshop donde se establecen las propiedades para los efectos que has aplicado. Y así ahora que hemos tenido una breve visión general, la mejor manera de aprender es buceando. Por lo que a continuación echaremos un vistazo a lo que se incluye en los archivos de ejercicios, y luego comenzaremos a editar son foto panorámica esférica.
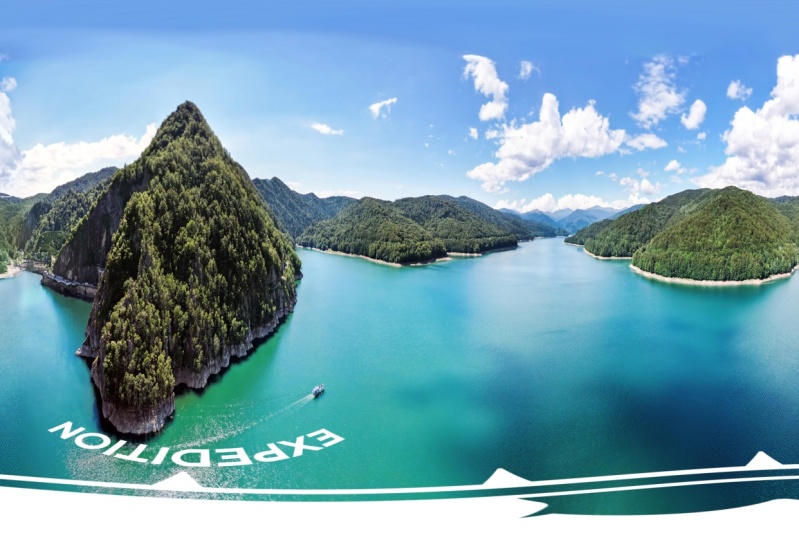
4. Acerca de los archivos de ejercicio: los archivos de ejercicio para este curso están disponibles para todos los miembros y contienen una serie de carpetas que creo que harán más fácil separar las etapas de la carpeta de flujo . A contiene la foto original de 3 60 que filmé en el lago más retiro, así
como la parte superior de otra foto de 3 60 tomada en un día diferente cuando el cielo estaba menos nublado. Y antes de seguir adelante, me gustaría agradecer a los amigos del lago mas retiro por brindarme
permiso por escrito para usar su logo para estos videos Ahora el logo que estoy brindando en los archivos de
ejercicios, sin embargo, es un logotipo ficticio, no el lago. Más logo de retiro para que puedas usar este logo de muestra a medida que sigas. O te animaría a usar tu propio logotipo durante el curso para ver cómo luce tu logo exhibido en un panorama esférico y continuando por los archivos. Las carpetas B y C están vacías estarán agregando archivos a medida que avancemos por el curso. Y por último, carpeta de contiene una copia del panorama esférico final. Por lo que una vez que tenga instalado el software requerido y una copia de los archivos de ejercicio, sigamos y empecemos a editar son panorama esférico
5. Asolar el área de trípode: para iniciar nuestro proyecto. Vamos a lanzar después de efectos y vamos a asegurarnos de que podamos ver todos los paneles de los que
hablamos antes. Entonces, una vez que hayas lanzado después de los efectos, subamos al menú de la ventana. Bajemos del dedo del pie del trabajo y elijamos pantalla pequeña. Eso nos va a dar nuestro panel de composición aquí en el centro. Nuestro panel de proyecto sobre a la izquierda son panel de línea de tiempo hacia abajo en la parte inferior y otra vez. En el lado derecho, veremos algunos paneles adicionales. Vengamos aquí y cerremos el panel de la biblioteca. Vamos a venir aquí y cerrar la vista previa y también cerraremos la información. Queremos asegurarnos de que tengamos abiertos los efectos y los presets, y el último panel que vamos a necesitar son los controles de efectos. Por lo que volvamos al menú de la ventana, Bajemos y activemos los controles de efectos. Ahora, en este espacio de trabajo, los controles de efectos van a estar junto al panel de proyecto Supply Click Project panel
verá todo el contenido del panel de proyecto, y los controles de efectos se mostrarán con todos los controles para cualquier efecto que aplicemos a nuestras composiciones. Y así ahora vamos a asegurarnos de que nuestro panel de proyectos esté mostrando. Vayamos al menú del archivo. Bajen a importar Elegir archivo y de los archivos de ejercicio, Vamos a la carpeta A y localicemos Lake More Retreat. Subrayar punto original j peg. A continuación, haga clic en Abrir. Eso va a vincular este archivo J pic al panel del proyecto. Composición Metacrítica. Hagamos clic y mantengamos este archivo. Arrástrelo y soltémoslo en el panel de composición. Esto creará automáticamente una composición exactamente del tamaño de la clavija J, que podemos ver aquí es de 5376 por 2688 píxeles en el centro aquí, solo
voy a alejarme un poco. Y así ahora que hemos creado una nueva composición, podemos ver la composición apareciendo aquí en el panel del proyecto. Y también podemos ver R J pic apareciendo como una nueva capa en el panel de línea de tiempo. Y ahora lo que vamos a necesitar hacer es aislar la mesa en el trípode, que está apareciendo aquí abajo en la parte inferior del panorama esférico sin envolver, y aislar estos para que ninguno de esos píxeles toque los bordes y para hacer esto. Vamos a necesitar activar a los competidores de VR. Entonces vayamos al menú de la ventana y elijamos editor de comp VR abajo en la parte inferior. Ahora, si recibes un mensaje de after effects indicando que necesitas habilitar scripts para escribir
archivos y acceder a su red, luego abre la sección Preferencias Generales y después de efectos, ubicada debajo del menú de edición en Windows o el menú de la aplicación AFTEREFECTS en el mag. A continuación, marque la casilla junto al texto que lee, Permitir que los scripts escriban archivos y accedan a la red, luego haga clic en Aceptar y luego vuelva a intentar abrir el editor de comp de PR desde el menú de la ventana. Y una vez que el editor de comp del espectador cargue, l redimensionar el mío un poco y luego haremos clic en Editar Actitud E para la composición que
vamos a elegir como más. Retiro para la comp con Let's Come In Here y cambie esto a 2200 pixels. Esto aumentará el tamaño de los ingresos de edición para que podamos aislar más fácilmente el trípode y luego bajar y hacer clic en Agregar a D Editar. Entonces una vez que eso abasteció, vamos a acercarnos a ser nuestros competidores sobre en el panel del proyecto , ya
ves ,
tenemos dos carpetas ,
una con Lake, Más retiro original VR para salida y otra para los sólidos Dentro de aquí. Veremos una serie de composiciones adicionales que se han creado. Podemos cerrar todos estos y abajo en el panel de línea de tiempo, dos de estos policías se abren el VR para editar uno y DVR a salida. En la composición de edición es donde vamos a poder agregar nuevas ilustraciones y la salida. Com, que aquí se
activará, nos mostrará los resultados de todas las ediciones siendo distorsionadas de nuevo en la esfera desenvuelta . Ahora bien, esta herramienta podría estar más bien gravando a una GPU o a la unidad de procesamiento de gráficos. Si ves este cuadro de diálogo aquí bajará y elegirá ignorar, haciéndonos saber que no tenemos suficiente RAM en nuestra GPU. Vamos a entrar aquí. Cambia la resolución de la mitad del dedo del pie completo y si hacemos clic atrás para editar y luego hacemos clic nuevo a la salida ahora verá la esfera desenvuelta. Ahora, si ves algunos mensajes dentro de aquí en rojo diciéndote que necesitas activar la aceleración de la GPU, sube al menú de archivos,
baja a la configuración del proyecto y en los efectos de renderización de video, asegúrate de tener activada la aceleración de GPU Mercury. Y ahora, para aislar el trípode, volvamos a la composición de edición. Acercaré un poco aquí. Te darás cuenta. En esta composición hay una cámara de VR apareciendo aquí. Subiremos a la barra de herramientas superior. Encontremos el peaje de la cámara. Si hacemos clic y mantenemos esto, hay una serie de diferentes opciones de cámara. Vamos a dejar aquí la máxima selección. Peaje unificado de cámara. Después mueve tu cursor dentro de la composición. Haga clic y arrastre y podrá mirar a su alrededor dentro de este panorama vehicular. Entonces lo que queremos hacer es desplazarnos hasta aquí para que podamos ver el trípode en la mesa completamente aislado dentro de las áreas. Y lo que quieres decir con eso es el trípode en la sombra. No toques los bordes de la composición aquí, y una vez que tengamos esta posición similar a ésta, estamos listos para guardar esto en photoshop. Ahora bien, si tu unidad de procesamiento de gráficos te permite ver esta vista en plena resolución, puedes subir al menú de composición para bajar a guardar, enmarcar como y elegir capas de Photoshopped. Después entra a los archivos de ejercicios, entra en retoque y vamos a nombrar a este lago más subrayado Retiro de subrayado Trípode underscore export y luego escogeremos seguro. Y ahora, sin embargo, si eres GPU sólo te permite ver la resolución a la mitad. Lo que vas a necesitar hacer es subir al menú de composición bajar a, digamos marco como y elegir archivo. Esto se va a abrir. Aftereffects es render cola, que podemos ver aquí abajo junto al módulo de salida. Demos click en el nombre Tienda de fotos. Vengamos aquí y comprobemos el cambio de tamaño. Queremos asegurarnos de que guardamos la resolución completa, que es 2200 por 12 38. Hagamos clic en Aceptar para la salida. Hagamos clic en el nombre del archivo. Voy a ir a los archivos de ejercicio saldrán a retocar y voy a entrar aquí y sobrescribir el archivo que creamos antes. Entonces ven aquí y es seguro, que fue reemplazado. Y luego bajamos aquí, Click Render ahora. La única diferencia en el archivo Photoshopped resultante es que si eres compatible con GPU, resolución
completa previsualiza el panel de capas en tus fotos arriba composición tendrá algunos grupos de
capas dentro de ella. Si tuvieras que usar la cola de render, que he hecho aquí tendrá un archivo Photoshopped de una sola capa. Ahora bien, esto no tendrá ningún efecto en el proyecto final. En ambos casos, conseguimos una exportación de resolución completa desde after effects, y aún podremos hacer todos nuestros retoques en photoshop. Y ahora, antes de continuar por Photoshopped para editar el trípode, vamos a guardar nuestro proyecto de secuelas. Entonces subamos al menú de archivos. Bajemos y elijamos Guardar. Entremos a los archivos de ejercicios. Vamos a retocar y vamos a nombrar a este lago Más subrayado Retreat Underscore modificó que un P, que significa proyecto de secuelas y luego elegir guardar. Y ahora el último comentario que quiero hacer está dentro de la composición Editar uno. Asegúrate de no cambiar la posición de la cámara Después de hacer nuestra tienda de fotos de edición, vamos a traer ese archivo fotográfico de nuevo a esta composición y tapar el trípode
6. Eliminación de tripod sin costura: ahora en nuestros archivos de ejercicios y carpeta B, tenemos un nuevo archivo de Photoshopped que obtuvimos de after effects. Entonces abramos esto en la tienda de fotos. En el panel Capas verá una carpeta correspondiente a cada una de las composiciones que estaba en la composición original de efectos secundarios Cuando exportamos esto. Algunos simplemente van a entrar aquí y quitar estas carpetas. ¿ Puede comandos shift G en el Mac o controlar shifty y windows? Basta con quitar los grupos. Ahora vamos a crear una nueva capa la parte inferior del panel de capas. A click nueva capa. Nombraremos esto retocado con esta capa seleccionada. Vamos a la barra de herramientas. Seleccionemos el pincel de curación puntual. Asegúrate de que también tienes activada la muestra de todas las capas. Y luego pasemos al lienzo y pinchemos y dibujemos área que abarcará
todo el trípode y la mesa y la sombra de la cámara. Una vez que tengas esa zona pintada, vamos con el ratón y luego Photoshopped sanará toda esa zona. Se reemplazará el trípode y la mesa, todo dentro de esa zona pintada con muestras de la zona circundante, que es toda la hierba Así que queremos asegurarnos dentro de este archivo que no toquemos ninguno de los píxeles en el bordes. Este azulejo en particular encajará perfectamente de nuevo en la esfera. Entonces antes de dejar a los votantes arriba, haré mi pincel un poco más pequeño. Voy a sacar esa hoja de ahí abajo y ver que va a algunas otras áreas. Vamos a sacar este panel de acceso que está en el suelo, pero lo vamos a hacer un poquito más tarde otra vez. No queremos tocar ninguno de los píxeles de borde en este archivo de la tienda de fotos. Por lo que de vuelta en el panel de capas, todas nuestras ediciones están ahora en esta capa de retoque por lo que siempre podemos volver y hacer cambios si es necesario. Entonces deja a ambos jugadores
encendidos, sube al menú de archivos y baja y elige guardar. Después cerraremos el archivo de la tienda de fotos. Entonces ahora hemos modificado esta foto shop Voy a quitar el trípode de esa capa separada. Por lo que a continuación reimportará esta tienda de fotos, amontonará de nuevo a nuestra composición de efectos secundarios y reemplazará el trípode existente en lavista de
cámaraactual vista de
cámara
7. Sustitución al tríodo desde el fondo de la esfera: ahora que hemos quitado el trípode del lago. Más Retreat Trípode Exportar Archivo fotoshopped Volvamos a después de que los efectos estaban dentro de la VR. Editar una composición. Subiremos al menú de archivos. Bajemos y elijamos importar, luego elijamos archivo en los archivos de ejercicios. Qué va a la carpeta B. Escojamos el lago Más retiro export dot psd. Con nuestro trípode retirado, hagamos clic en abrir. No por las opciones. Aquí. Vamos a elegir metraje. Sí tenemos la opción de elegir capas específicas. O si bajamos a la composición, en realidad
podemos traer múltiples capas a la vez dentro del archivo de secuelas. Pero en cambio, vamos a entrar aquí y simplemente elegir metraje, que tratará todas las capas del archivo de celda fotográfica es un gráfico individual. Escojamos abierto y ahora sobre el panel del proyecto. Vamos a hacer clic y arrastrar la exportación del trípode y arrastrémoslo a la derecha a nuestra composición, y debería encaja en su lugar y no ver los efectos de esta edición. Bajemos a la composición de salida de VR. Ahora veremos que esa nueva obra de arte se está distorsionando y mapeando en ese panorama
esférico desenvuelto Ahora, si notan esta composición en el panel de la línea de tiempo, aquí
hay un pequeño icono de efectos. Si llegamos a los controles de efecto, podemos ver los efectos del convertidor de VR que se están aplicando a esta composición. Y hay algunas cosas que podemos cambiar dentro de aquí. Una característica agradable bajo la vista de cámara de reorientación nos da la capacidad de cambiar el contenido de ese panorama esférico desenvolver. Entonces, por ejemplo, podemos entrar aquí y cambiar el pan cambiando los grados, y en realidad podemos mover o reorientar el panorama. Ahora bien, esta es una gran característica para tener dentro de aquí. No obstante, queremos hacer ese cambio dentro de Photoshopped porque hay ediciones adicionales que iban a hacer retoques adicionales. Nosotros queremos dio, y queremos asegurarnos de que todos los artículos que iban a estar retocando no toquen los bordes. Y si hacemos el cambio que queremos hacer ahora, este panel de acceso, por ejemplo, en realidad
vendrá por aquí y tocará el borde. Entonces de nuevo, vamos a hacer este cambio en la tienda de fotos. Pero quería que supieran que este plug in particular nos permite hacer algunos de estos cambios dentro de After effects, incluyendo rodar la lanza sin envolver en el eje Z o inclinarla en el eje X. Y así ahora que hemos reemplazado sin problemas el trípode, necesitamos exportar esto a un panorama totalmente nuevo. Ahora, igual que antes, Si estás mirando la resolución de media pantalla, vas a necesitar usar la cola de render. Y si estás mirando la vista previa a pantalla completa, puedes usar los reproductores Save s photo Shop. Entonces si estás viendo una vista previa de resolución completa, puedes ir composición, digamos marco como elegir reproductores de tienda de fotos. Y si estás viendo la media resolución como lo estoy viendo aquí, vamos a subir a decir frame como luego elegir archivo. Después en la cola de render, haga clic en una tienda de fotos, haga clic en redimensionar para asegurarnos de que obtenemos el tamaño completo, que es de 3 5076 por 6 2088 Haga clic en Aceptar, luego haga clic en el nombre del archivo para la salida. Acude a los archivos de ejercicios. Vamos a retocar. Y en cualquier caso, ya
sea que estés haciendo guardar como jugadores de la tienda de fotos o usando la cola de render, vamos a nombrar esto como más underscore retreat, underscore modified dot PSD Y luego haremos clic, guardar. Y al igual que antes, Si utilizaste los reproductores Guardar tienda fotográfica, obtendrás una serie de grupos de capas dentro del panel de capas de la tienda de fotos. Y si usas la cola de render como acabo de hacer aquí, obtendrás una sola capa de fondo dentro del panel de capas. Y de nuevo, Dado que ambas son exportaciones de resolución completa, esto no va a afectar el proyecto final. Y así ahora con nuestro panorama esférico modificado a continuación, podemos hacer más ediciones dentro de la fototeca.
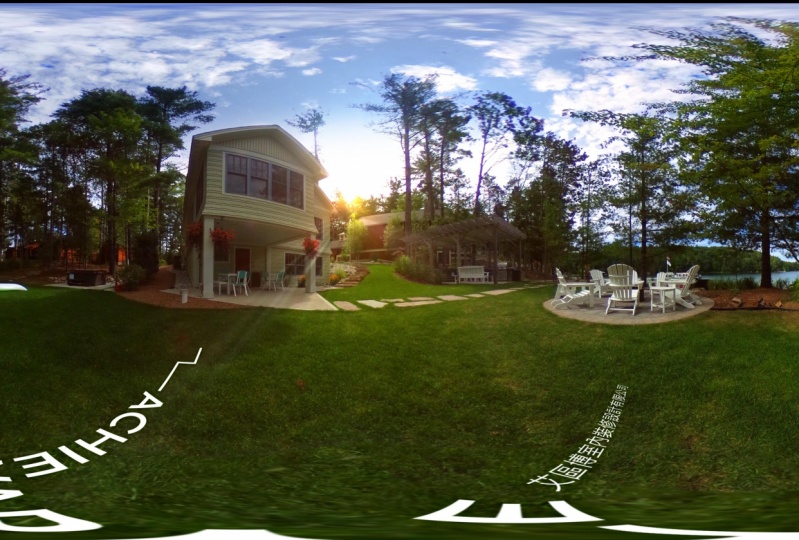
8. Retoque y restablecer el punto central de panorama: Por lo que en este punto tenemos un nuevo espíritu, kal Image con el que trabajar dentro de nuestra carpeta de retoque. Entonces abrimos, Blakemore, subrayado. Retreat underscore modificado punto PSD en photoshop Ahora en el panel de capas verá toda una serie de carpetas, igual que conseguimos antes cuando exportamos por primera vez nuestra composición de after effects. Entonces dentro de aquí, si encendemos y apagamos diferentes capas, podemos ver que las secuelas han unido todos estos elementos. Entonces, igual que antes, voy a eliminar todos los grupos de capas aquí. Por lo que nos acaban de quedar con las tres capas de arte individuales. Entonces, igual que antes, vamos a crear una nueva capa. Nombraremos esto retocado con esta capa seleccionada. Vamos a seleccionar de nuevo un pincel de sanación puntual. Asegúrate de que tenemos activada la muestra de todas las capas. Asume aparecer un poco y lo que quiero hacerlo. Simplemente entra aquí y limpia algunas de las zonas de la larga. Entonces al aumentar y disminuir el pincel, va a entrar aquí y simplemente pintar algunas áreas diferentes a lo largo del pasto para que el panel de acceso solo
pintará un área lo suficientemente grande como para cubrir todo el panel. Entonces suelta sujetar mi barra espaciadora para conseguir la herramienta de mano, y luego simplemente pasaré alrededor de la imagen y solo limpiaré diferentes áreas. Voy a quitar hojas adicionales. Voy a sanar algunos de los parches secos y de nuevo, solo sigue dando vueltas y solo encontrando pequeños puntos para arreglar y otra vez en el extremo derecho. Tenemos un poco de una bengala de lente de la cámara, así que solo entraré aquí y él va a esa zona también a continuación, voy a lapicar hasta el patio. Algunos aparecen un poco. Yo quiero arreglar un poco del mantillo aquí de las herramientas. Vamos a venir y seleccionar la herramienta de sello de clones. Vamos a subir a nuestros pinceles. Escojamos un cepillo suave, aumentemos un poco el tamaño de mi pecho, y voy a seguir el ángulo del patio aquí. Entonces voy a mantener la tecla de opción o Alton Windows. Voy a dar click para muestrear desde aquí. Voy a moverme y voy a empezar a pintar el mismo tipo de ángulo por aquí
al lado del patio. A continuación, volveré al pincel sanador spot, haremos el más pequeño Vamos a mirar un poco hacia arriba el patio, pagando a la derecha, golpeamos unos puntos más aquí arriba y luego alejamos y echamos un vistazo. Entonces ahora creo que esto se ve bien, y lo siguiente que quiero hacer es restablecer el panorama para que cuando esto se carga en un espectador, la casa esté cerca del centro del escenario. Entonces para hacer eso, pasemos al panel de capas. Seleccionemos nuestra capa de retoque tiró de la tecla Mayús. Seleccione todas las capas. Hagamos clic derecho convertir todos estos en un objeto inteligente. Entonces con esta capa se selecciona. Subiremos al menú del filtro. Bajemos a otro y bajemos y elijamos Offset. Eso es lo que vamos a hacer aquí es asegurarnos de que tengamos envolvente encendido debajo las áreas
indefinidas para el valor horizontal. Vamos a ajustar esto a 1800 píxeles y para vertical. Vamos a establecer este 20 Así que básicamente lo que esto está haciendo es tomar cualquiera de los píxeles que están siendo empujados fuera del borde y envolverlos al otro lado. Entonces ahora tenemos la casa más o menos en el centro del escenario. Por lo que en este punto hará clic en Aceptar, luego vaya al menú del archivo y elija guardar. Y ahora que ya terminamos de retocar el césped en el patio, continuación vamos a sumar un nuevo cielo.
9. Reposición del cielo: Ahora vamos a reemplazar el cielo en esta imagen, que realmente está volado de este día nublado con otro cielo de 3 60 que tomé en un día
diferente. Entonces para empezar, vamos al menú del archivo con nuestro archivo me gusta, más retiro modificado PSD archivo abierto. Bajemos y elijamos un lugar vinculado de los archivos de ejercicios. Entremos a los archivos originales. Vamos a elegir sky dot J peg y luego haga clic en colocar presionar retorno, y esto hará un nuevo archivo de objeto inteligente en el panel de capas. Ahora bien, el sol estaba justo aquí, y vamos a estar agregando un dedo del pie de un hijo nuestra imagen justo a la derecha de la casa. Entonces lo primero que haremos es usar el filtro molesto para mover el cielo para que el punto caliente aquí coincida donde vamos a colocar a nuestro hijo. Entonces con el Skylar seleccionado, bajemos al menú del filtro. Bajemos a compensar. Y lo que vamos a hacer es poner demasiado negativo el malestar horizontal. 1300. Ajusta la vertical a cero y asegúrate de que tenemos envuelta encendida. Podríamos ver el punto caliente aquí va a ser por ahí. Vamos a hacer clic en Aceptar, continuación, vamos a agarrar esta capa y moverla a la parte superior. ¿ Cuáles son las capas seleccionadas? Subiremos al menú de imágenes. Bajemos a los ajustes. Apliquemos saturación de matiz. Lo que tenemos que hacer aquí es de saturar esta imagen para que se vea más natural en la
imagen original . Posteriormente, cuando agregamos el sol y hagamos ajustes de color iban a realzar toda la imagen, lo que traerá de vuelta algo de este color. Entonces en la saturación U, bajemos la ligereza del dedo del pie. Llevemos esto hasta cerca de 32. Piensa como, OK, continuación, vamos a seleccionar el retoque que el Capa Commander controló J para duplicar esa capa. Vamos a mover esto por encima del cielo, y luego queremos establecer un modo de mezcla en la copia retocada. Entonces con esto seleccionado, vamos a llegar a los modos de mezcla. Bajemos y elijamos multiplicarnos. Lo que esto hará es tomar los píxeles más oscuros, que serán todos los árboles de esta zona y ayudar a superponer el detalle de los árboles de nuevo al cielo que acabamos de importar a continuación, con copia de retoque seleccionada, Vamos hasta el menú de capas. Bajemos y elijamos máscara de recorte crítico que recortará la capa de copia retocada en la capa del cielo. A continuación, seleccionemos la capa del cielo. Añadamos una máscara de capa. Asegurémonos de que tengamos blanco y negro en primer plano y fondo en las
muestras de color . Vamos a subir en orificio de ingredientes selectos. Asegúrate de que Damasco seleccionó y vengamos aquí. Vamos a conseguir nuestro cursor a mitad de camino por la altura de las ventanas. Vamos a dar click. Sostenga la tecla Mayús. Esto es realmente importante. Tenemos que asegurarnos de que el Grady Int sea una línea vertical perfecta para que los píxeles coincidan la derecha y a la izquierda y hagamos click y arrastre hacia arriba y aplique una gran máscara para que eso pueda ser un poco alto. Déjame volver y sólo hacer que eso no sea un suspiro del todo. Haz esto a alrededor de ahí mismo. Siguiente. Vamos a acercar la imagen con nuestras máscaras todavía seleccionadas. Elegiremos nuestra herramienta de pincel. Vamos a asegurarnos de que tenemos un cepillo suave seleccionado va a hacer que el pincel sea bastante grande, y queremos pintar algunas formas de enmascaramiento adicionales aquí para deshacernos del elenco azul de la casa. Por lo que va a dar un click un poco cerca del borde. Click y Dragon sólo una especie de pintura que de nuevo adentro. No quiero que ese elenco azul aparezca en el verde de la casa. Y así ahora que tenemos a este tipo agregado a la imagen, subamos al menú de archivos. Bajemos y elijamos Guardar. Una vez que esto guarde, cerremos nuestro archivo Photoshopped, y ahora estamos listos para crear un nuevo proyecto de secuelas basado en este nuevo panorama
esférico modificado y luego en nuestros efectos especiales, incluyendo el sol y nuestros ajustes de color.
10. Añadir un sol: Por lo que ahora estamos listos para crear un nuevo archivo de secuelas basado en nuestro
panorama esférico recién modificado . Entonces volvamos a After Effects. Ahora podríamos agregar otra composición y hacer toda una serie de ediciones dentro de este
archivo actual . No obstante, creo que es mucho más fácil simplemente trabajar con un nuevo archivo de proyecto, Así que este será el proyecto de nuestro panorama esférico modificado. Vamos a crear otra para hacer todas nuestras mejoras. Por lo que dentro de secuelas para cerrar un proyecto, subimos al menú del archivo y bajamos y elegimos la ropa. Proyecto guardar cambios. Vamos a decir guardar y after effects volverá por defecto a un nuevo proyecto sin título. Entonces para comenzar nuestro nuevo proyecto, vamos a subir al menú de archivos. Bajemos a importar Elegir archivo en la carpeta de retoque. Vamos a seleccionar como más Retreat modificado que PSD. Abramos eso. Vamos a traer esto en este metraje. Fusionar capas, haga clic. OK, ahora tenemos el proyecto vinculado en el panel del proyecto. Vamos a hacer clic y arrastrar una nueva composición creando. A continuación, vaya al menú del archivo. Elijamos guardar. Pongamos esto en la carpeta potenciadora y vamos a nombrar a este lago más retiro que e. P. Y no crear un hijo en esta imagen. Vamos a usar una capa de ajuste y en efecto, así que lo primero que haremos es subir al menú de capas. Bajemos a lo nuevo y elijamos capa de ajuste Eso nos va a dar una nueva capa aquí
abajo en la línea de tiempo. Ahora, estamos haciendo esto porque vamos a necesitar enmascarar este efecto porque los rayos solares que salen no pueden tocar la parte superior del lienzo, porque eso va a parecer extraño cuando esto se está mostrando en un espectador esférico. Por lo que queremos asegurarnos de poder enmascarar esto, razón por la
que tenemos que poner esto en una capa separada. Entonces, ¿qué? Se selecciona la capa de ajuste? Vamos a entrar en los efectos y presets. Vamos a entrar aquí y hacer un tipo de búsqueda en la palabra elevar. Estamos buscando este enchufe aquí llamado CC light race, así que vamos a hacer clic y arrastrar esto y soltarlo y aplicarlo a la capa de ajuste. Una vez que hagamos eso, veremos el control de efectos apareciendo por aquí junto al panel del proyecto y en el
escenario principal verá el efecto apareciendo aquí para que realmente podamos agarrar esto y moverlo. Y en cualquier lugar este efecto se cruza con los píxeles de la capa. Vamos a conseguir este efecto de estallido de luz. Entonces lo que vamos a hacer primero es que vamos a poner esto aquí abajo cerca de los árboles, y podemos empezar a ver algo del efecto de luz que ya está sucediendo. Entonces deja eso justo ahí por el momento. Pasemos a los controles de efecto para la intensidad. Vengamos aquí y pongamos esto en 165. Vamos a golpear la pestaña. Tecla para tocar hacia abajo. Bajemos al radio. Vamos a poner esto en 23 para la suavidad warp. Vamos a establecer este 20 Entonces por la forma vamos a bajar y poner esto en un cuadrado que nos va a dar la capacidad de agregar algo de rotación a Esto está bien para que podamos rotar este efecto alrededor. Esto ayudará a controlar dónde brilla la navaja de afeitar ligera. Por lo tanto, establece esto en 28 grados. Nos vamos a ir, permitir el color de la fuente y permitir el aclaramiento. color de la fuente significa es que donde se está aplicando este efecto. Los píxeles debajo van a ser el color del efecto. Ahora vuelve aquí al escenario principal. Voy a simplemente mover esto un poco solo para conseguir algunos de los rayos el ángulo alrededor. Escoge algo que se vea bonito. Y una vez que me gusta el efecto, volvamos a los controles de efecto. Vamos a hablar, un rayo de luz cerrado, y voy a golpear el comando D en el Mac o las ventanas Ian controladas y duplicar todo este efecto. Entonces básicamente, estoy aplicando el mismo efecto dos veces. Ahora. Para el segundo ejemplar, aquí y
pongamos la intensidad en 130. Hacer este poquito menos. Pero el radio bajará esto a 21 porque la forma se irá. Esto en una plaza dejará los grados de 28 pero vamos a bajar aquí para colorear desde fuente y sin marcar Esto. Ahora bajemos a la muestra de color. Demos click en la muestra de color y elijamos un color naranja medio para que se vea bien ahí mismo y luego haremos click. OK, eso podría ser un poco difícil de ver. Voy a acercar un poco aquí. Alrededor del 50% va a sostener esta barra espaciadora y haga clic y arrastre al igual que en la tienda de fotos podemos
panear alrededor. Entonces podemos ver cómo se ve este efecto en el escenario. Entonces ahora podemos mover el punto central de estos alrededor para especie de cambiar el color naranja, y se puede cambiar la intensidad para los rayos de luz que está trayendo el naranja o los rayos de
luz trayendo el blanco. Entonces voy a entrar aquí y aumentar mi intensidad a unos 140. Y estos también serán efectivos con base en exactamente dónde están los puntos centrales para
ambos efectos. Entonces una vez que eso se vea bien, voy a alejar el zoom. Ahora, lo último que tenemos que hacer es aplicar y enmascarar, así que seleccionaremos la capa de ajuste,
subiremos a la barra de herramientas. Vamos a seleccionar la herramienta de rectángulo. Y si haces clic y arrastras con la herramienta de rectángulo o alguna de las herramientas vectoriales, por qué tienes una capa seleccionada, va a crear una máscara. Entonces lo que voy a hacer es empezar en la esquina inferior izquierda fuera de mi área de composición . Voy a dar clic y arrastrar todo el camino a través de la derecha y voy a entrar en la imagen . Voy a llevar esto al punto donde la parte superior de la máscara estará justo alrededor de la parte superior de la casa. Y de nuevo, necesitamos asegurarnos de que los rayos de luz no estén tocando la parte superior de esta imagen. Por lo que ahora con la máscara creada en la ventana de composición, podemos ver este icono de máscara aquí. Si esto está encendido o es azul, esto significa que podemos ver la forma de la máscara, que es sólo un rectángulo hacia abajo en la línea de tiempo. Podemos ver el enmascaramiento ahora apareciendo debajo de la capa de ajuste. Vamos a activar las propiedades de la máscara. Encontremos la máscara Pluma. Desmarquemos el enlace y establezcamos el eje Y en unos 250 píxeles. Tipo 2 50 hit tab o return. Y lo que eso hará es apilar el efecto 125 píxeles por encima y 100 25 píxeles por debajo del borde
superior de esta máscara. Por lo que dándonos un resplandor de 250 píxeles de ese efecto ahora solo baja al panel de la línea de tiempo
y cierra todos estos para arriba. Y así ahora que tenemos el sol agregado a la imagen siguiente vamos a hacer algunos
ajustes de color para que el resto de la imagen coincida con ese nuevo efecto.
11. Hacer ajustes del color: Entonces ahora que agregamos al hijo a esta imagen, vamos a necesitar hacer algunos ajustes de color al resto de la imagen para que esto se vea más creíble. Entonces vamos a empezar por volver a los efectos y presets. Vengamos aquí y busquemos la saturación de Hue así que solo teclearé Hue. Eso lo veo apareciendo aquí, y queremos aplicar esto al archivo Photoshopped o a la capa base, no a la capa de ajuste. Entonces para hacer eso, podemos hacer clic y arrastrar y simplemente soltar esto justo encima del reproductor de la tienda de fotos en el panel de
línea de tiempo. Y una vez aplicado este efecto, subamos al panel Controles de efectos. Bajemos a dominar la saturación. Y aumentemos esto a cerca de 36. Eso va a calentar realmente los greens y las copas de los árboles y realmente hacer que parezca como si el sol en realidad está golpeando todo esto. Ahora eso va a noquear a algunos de los rojos también. Entonces, cerremos la saturación del matiz. Volvamos a los efectos y presets. Busquemos el equilibrio de color. Encontremos esto. Arrástrelo y soltémoslo encima de la capa de la tienda de fotos y luego, en los controles de efecto, Vamos a comprobar, preservar la luminosidad y luego llegaremos a sombra roja Balance. Pondremos esto en 11 y luego bajaremos para resaltar saldo rojo y pondremos esto cinco. Y así ahora hemos terminado de sumar nuestras mejoras. A continuación se agregará un logotipo para que podamos marcar esta imagen y colocará eso hacia abajo con el trípode solía ser.
12. Añadir un logotipo de logotipo de logotipo: Por lo que ahora estamos listos para añadir un logotipo a nuestro panorama esférico. Por lo tanto, volvamos a nuestro panel de proyectos. Siguiente. Vayamos al menú del archivo. Bajemos a importar Elegir archivo y de los archivos de ejercicio, vamos a la carpeta A y elijamos logo dot PNG. Como mencioné antes, no
estamos incluyendo el logo del lago Más retiro. En este curso en particular, tenemos un logo de muestra en su lugar, Sin embargo, te animaría a usar tu propio logo para que puedas ver cómo se ve tu branding dentro de la esfera. Entonces cuando tengas seleccionado un logotipo, bajemos y elijamos abrir. Siguiente. Vayamos al menú de la ventana. Bajemos inactivando DVR Comp editor. Vamos a dar click. Agregar a D Editar con composición. Escojamos Lago. Más retiro modificado para el ingenio de la comp. Llevemos esto hasta cerca de 2000 píxeles y luego haga clic. Agregar a T edit Y al igual que antes. Si recibes el error de efectos de GPU, haz clic en Ignorar. Cambia tu resolución tanto en la edición como en la salida a medio interruptor sobre la salida. Haga clic. Ignorar Todo establece este dedo del pie. Havas. Bueno, ahora puedo hacer click entre los dos Vamos a cerrar el editor de comp del espectador y en el Editar una composición. Suba y haga clic en el peaje unificado de la cámara. Hagamos click en pan. Yo quiero ver el fondo de este miedo donde quitamos el trípode. A continuación, cambiaré a mi herramienta de selección, luego de vuelta al panel del proyecto. Agarremos logo punto ping. Solo tienes que arrastrar y soltar esto en su lugar. Queremos asegurarnos de que el logo no toque ninguno de los bordes, así que vengo aquí y solo escalamos un poco. También va a girar esto hacia abajo en el panel de línea de tiempo. Vamos a alternar abrir las propiedades para topping de logotipo. Vamos a alternar transformación abierta. Encontremos la rotación. Vamos a hacer clic y arrastrar sobre los números. Simplemente gira esto un poco en algún lugar alrededor de 21 grados. cerca. Transformar siguiente. Es como un resplandor exterior solo para hacer esto un poco más visible contra la hierba, así que está bien. Haga clic en logo punto ping. Vamos a elegir estilos de capa elegir resplandor exterior, y esto funciona igual que el resplandor externo dentro de una tienda de fotos por lo que es toggle abrir sus propiedades para el resplandor exterior hacia abajo en el panel de línea de tiempo para el modo de mezcla, Vamos a subir y elegir Linear quemar Desplácese hacia abajo para el tamaño. Vamos a establecer esto en alrededor de 20 Pestaña de hit para el spread fijará esto en 10%. Toca de nuevo. Desplázate un poco hacia arriba. Con la capacidad vamos a establecer esto en 10% y luego para el color,
vamos a dar click en el color Swatch. A continuación, seleccionaremos el cuentagotas dentro de este cuadro de diálogo. Subamos aquí y seleccionemos un verde medio esta ligereza un poco. Entonces ella está bien. Entonces solo entraré aquí y cambiaré estas propiedades cerradas. Volvamos a la composición. Solo voy a escalarnos un poquito. Y luego, con eso en su lugar, volvamos al lago. Más retiro, composición
de salida. Y ahora podemos ver nuestro logo distorsionado para encajar en nuestro panorama desenvuelto. Y ahora, en este punto para decir sobre nuestro panorama final, vamos a necesitar usar la cola de render sin importar si se puede ver la
resolución completa o no. Esto se debe a que aplicamos en efecto a una capa de ajuste, y esa es una técnica que no es compatible dentro de una tienda de fotos. Y además, podemos renderizar la clavija J final de la cola de render. Entonces desde el interior de la composición de salida, vamos a subir al menú de composición de abajo a, digamos marco como elegir archivo para Módulo de Salida. Haga clic en una tienda de fotos. Cambiemos esto a la secuencia de Jay Peak, luego dentro de la sección de video bien puesta. Haga clic en las opciones de formato. Llevemos esto a cerca de una cualidad de nueve. Haga clic en Aceptar, vuelva a
hacer clic en Aceptar. Siguiente dar click en el archivo Output. Escojamos el escritorio y vamos a decir esto como mas punto de retiro j Peg. Entonces ella está a salvo, y luego bajamos aquí. Haga clic en Render y ahora con nuestra clavija J final en el escritorio, a
continuación nos aseguraremos de que tengamos los metadatos adecuados dentro para que podamos compartirlo en
redes sociales .
13. Preparar archivo JPEG final (con metadata): ahora que tenemos nuestro panorama final en el escritorio son como Marber Tree Dodge un archivo de cerdo. Vamos a hacer doble clic en esto y abrirlo en la tienda de fotos. Ahora, una cosa que necesitará para algunas plataformas de redes sociales son los metadatos adecuados. Ahora. Sitios como Facebook, por ejemplo, usarán los datos de la cámara, no del menú de archivos en la tienda de fotos. Si bajo a la información del archivo y luego selecciono los datos de la cámara, verás que faltan todos los datos de la cámara. Daré clic en Aceptar si volvemos a los archivos de ejercicios. Abramos el lago original Más archivo de retiro dentro de Titular A. Sube al menú del archivo. Baja al archivo info. Aquí verás todos los datos de la cámara. Por lo que tomé este disparo usando el Rico Fada. Entonces una cosa que podríamos dio es que podríamos volver a cambiar a la nueva mosca de J pic que creamos. Agarra la capa, mantén presionada la tecla Mayús, arrástrala al archivo original, luego elige exportar archivo web más seguro, establece la calidad en algún lugar alrededor de 80 o 90 y luego bajo metadatos, asegúrate de seleccionar todo, luego haga clic en guardar, luego en el escritorio nombrará esto como más subrayado Retreat guión bajo Prueba para guardar. Cerremos estos dos expedientes. Abramos nuestra copia de seguridad de archivo de prueba en Photoshop a una información de archivo, y veremos la información de la cámara apareciendo aquí. Y desafortunadamente, al momento de esta grabación, no
podemos editar los metadatos de la cámara dentro de una tienda de fotos. Tampoco podemos añadir algunos de los nuevos y emergentes ataques Met. Entonces en este punto, vamos a dar click. OK, cerremos nuestro archivo de prueba y vayamos a nuestro navegador para encontrar una herramienta en línea. Por lo que a la que me gusta se le llama la salida para dot net. Con este sitio cargado, desplazémonos hacia abajo. Agarremos nuestro archivo original como más retiro J pic, que no tiene metadatos en él. Arrástrelo y soltémoslo dentro de esta zona aquí, Desplácese un poco hacia abajo. Podríamos ver eso subiendo. Una vez que se cargue, podemos hacer clic en el botón exit dot me que va a abrir este cuadro de diálogo aquí donde podemos poner algunos datos adicionales. Entonces bajo la primera pestaña, salida General, vamos a entrar aquí y tuvimos la marca y el modelo de la cámara, así que empezaré a escribir Rico, eso aparecerá en un menú desplegable. A continuación, escriba Rico Fada y yo elegiré a Rico. Destino s suficiente Para la mayoría de los sitios de redes sociales, esto será suficiente. Todos los sitios de redes sociales tienen registros. De todas las 3 60 cámaras del mercado, Sin embargo, hay algunas nuevas etiquetas que están surgiendo. Subamos aquí y seleccionemos etiquetas de panel X M P G. Entonces nos desplazaremos hacia abajo. Estamos buscando el tipo de proyección. Vamos a teclear eco rectangular. Este es el formato sin envolver con el que hemos estado trabajando, donde el ancho es el doble del tamaño de la altura y luego bajemos y elijamos ir. Una vez hecho eso, podemos cerrar este cuadro de diálogo y luego aquí en la ventana principal, vamos a dar click en descargar, y eso va a descargar una nueva versión del archivo R J pic con todos los metadatos. Entonces comprueba esto. Abrámonos como más guión de retiro en Photoshop. Vayamos al menú del archivo. Elegir información de archivo debajo de los datos de la cámara verá que se inyectaron datos, y luego si bajamos a datos brutos, incluso
podemos ver a nuestro nuevo G Pano apareciendo aquí. Por lo que Photoshopped entiende y ve esos datos. No obstante, no
hay forma de que agreguemos eso dentro de una tienda de fotos. Por lo que usar ese sitio web nos dará la capacidad de agregar los datos de la cámara así como algún impuesto nuevo y emergente. Por lo que ahora eliminaré el Lago Marva Treat J Peg y el archivo de prueba. Voy a renombrar como Marv Retreat Dash a To Simply Lake More Retreat, cerrar mis archivos de ejercicios y ahora estamos listos para compartir esto en redes sociales.
14. Sube una panorámica esférica a Facebook: Ahora, para poder previsualizar la experiencia del usuario de nuestro nuevo panorama, vamos a necesitar un espectador. Muchos fabricantes de cámaras tienen sus propios visores para computadoras y dispositivos móviles, y no necesitas tener una cámara para ver las imágenes. Tengo una copia del Free Rico Theater Viewer, que puedes encontrar buscando app Rico Theater. Y puedo previsualizar el panorama simplemente arrastrando el J Peg a la ventana de la APP. Y una vez que me gusta la experiencia de usuario revisada que creamos en esta clase, estoy listo para compartirlo en línea. Al momento de esta grabación, muchas redes sociales están apoyando 3 60 fotos con televidentes propios construidos también. Por lo que para demostrar esto en la red social más popular, un login en Facebook y post RJ pig file como una nueva foto, Facebook luego lee los metadatos y luego activa su visor construido en 3 60, lo que permitirá a cualquiera explorar el imagen. Y si alguien está en un dispositivo móvil con un acelerómetro, también puede explorar la imagen moviendo su dispositivo alrededor. Y así con eso, hemos quitado a la perfección nuestro trípode reemplazado el cielo retocar la imagen y mejorarla con efectos
especiales y añadimos el logotipo con el fin de proporcionar una
experiencia de usuario de marca y más informativa . Y así con eso, concluiré este curso y como siempre, gracias por ver.
 Chris Converse, Designer & Developer