Transcripts
1. Trailer: Hi. My name, Miss Season. And I'd like to introduce to my brand new skill share class learning Lina. Cut. Now this class provides you with a comprehensive introduction to the art of creating a liner cut print, mainly printing a single one color piece. So what we do is we go through how you create a design and transfer this onto the block. How we then carved into this and use the tools, provide it, and then we then talk about inks and how we think and create a finished print. So this class is fantastic for anyone who is curious about Lina carts and how it works and how to use it. Or anyone that just wants to learn a brand new art. A brand new craft. Once you know the basics of liner card, you can produce Final Prince. You can produce greetings, cards, gift wrap or even print onto fabric was loads of places you could go with this. So this course is the basic introduction, and the great thing is, we also include a live recording or a workshop that I did a couple of years ago. So it's like you actually sat in a live line. Oh, cut workshop with me and some other students. So I look forward to seeing you on this course just hit in Rome on If you want to see what I'm up to and follow me, you can find me on Facebook And also on Instagram on Instagram. I'm at learning liner cuts. I look forward to seeing you in this class.
2. Introduction to the Class: hello and a huge warm welcome to this class. I'm really excited to join you here and share with you some of my knowledge all about Lina . Cut. Now the course is broken down into a number of videos that take you stage by stage, step by step through the process of how you go from an idea drawing a photograph, Whatever your initial design is all the way through the process explaining the tools and materials as we go through these stages to them producing you're finished print and you're finished. Print will be a single color print. Now, with in this class, I've also included a recording off a workshop that I did with a number of students a few years ago. So within this class, there are other students that around I'm teaching live and just filming it. So you get the feel of being in a live class as well as the separate videos that come beforehand explaining the process of preparing your liner cut block as well. So hopefully this course, what it does is it provides you with a really good grounding and foundation to understand what line a cut is, how you can use it how to hold the tools, use the tools. What kind of inks are available to you just to give you a really great foundation on how to produce lineup card prints. So if you've never done it before, this is the place to start. And I'm so pleased that you've joined me. So let's move on to our next video. We'll talk a little bit about who I am, and then from there will talk about Lina. Cutie is on work through the different stages of this line, of course, have a whole lot of fun.
3. About Me: Hello. So, in this video, I just wanted to introduce myself a little bit more to let you know who I am on why I'm teaching this line, of course, on skill share. So my name is Susan Yates, and I'm an artist and author and a tutor. I've got a number of classes on skill share and also on my own website. Magenta sky, magenta hyphen sky dot com. Now I love Lining card. I am a printmaker. I trained in university and final printmaking. So I studied for four years Fine art and I specialized in printmaking. I love Aled. Different types of techniques. But Lina cut is the one I kind of got a little bit hooked onto, primarily because when I finished university, I didn't have a fabulous studio. I just a very small space to work in. Online account was one of those techniques that gave me the opportunity to produce prints and to work, but on a small scale and without complicated equipment. So one of the huge benefits of working with line okay is that you do not have to have a printing press you can print by hand using a wooden spoon or Baron or something similar, and I will explain this later on in the course. So working in line and cut gave me the opportunity to produce prints at home in a small space on, and I just kind of got really hooked on it. And then in 2011 I wrote a book about Lina Cut, called Learning Lining. Cut Myself published this, so I did everything from writing it to typesetting to take photographs and then taking it to an independent publisher and getting it published on. I mainly did this to produce a book that would be an accompaniment to make any workshops that I talked. I was thinking I'd include the Bookers Workshop, have it is something that people could purchase, but it actually went a bit crazy, and it got really popular and became an Amazon number one bestseller, which completely surprised me. It was just a personal project because I loved Lina cuts in March, So since then I've been teaching lighter cut. I teach lots of other art courses as well. I ran courses on my own website. I run a 30 day sketchbook challenge. Andi I recently when I was on maternity leave, wrote another book called A Beginner's Guide to Lie. No Cart, which you on all these books, you'll find out on my website or on Amazon. So I love sharing my knowledge about Lina cuts. I still do my own line of cuts at home. I often use them to printed onto fabric, to print my own fabric designs or to produce greetings, cards or just fine art prints. So I do line a car on a regular basis. I teach. It's both online and in person. I'm really excited to share all the information within this course with you. So this course was filmed a couple of years ago on the workshop that I'm included was actually filmed in 2015. But Lina Khatib doesn't change. It's the same stuff that I'm teaching now that I was teaching five years ago. I've perhaps just got a little bit more aware of how to teach on and the technology which has developed quite a lot. So I'm really excited to share all this knowledge with you. I really hope it helps. Please do complete the project at the very end of the class as well, and share it on the resource is on projects section. So let's move on where I will introduce Lina, cut to you and then we'll begin to work through all these stages. Step by step, have fun.
4. Introduction to Linocut: line. A car is a form off relief printing on by relief printing. What we mean is that we have a substrate, a block. A plate doesn't matter water days, but with relief printing, you have something you called into its you take things out, make marks by cutting out, and then what's left in relief, as in the part that you don't cut into. The relief is what your income on then print. So relief printing is a negative form of printmaking, as in, it's the bit that you leave is the bit that prints. But like Potato Point, you may have done when you're a child. It's also a mirror image, so you have an image on a place. In this case, it's a block of line. Oh, when you print it, print, it will be a different way around toe what's actually on the line, oh itself. So it's negative way now. Be very careful, For example, when you're printing with texts, if you're cutting out letters onto a line of block, you need to make sure that the letters are a mirror image on your lineup block. It's that when you print it, they become the right way round. Now I'll show you some examples of prints on cut blocks a little bit later on, but it's worth. Just bear that in mind when you come to preparing an image for cutting it for actually, then printing. So all I know is a substance such as this. It's slightly bendy. It's smooth, lovely to cut into, UH, you need to make sure that your lineup is fresh, so I'd suggest buying it for a specialist printmaking supplier. If you buy it from an art shop, you'll find that perhaps it's been left on the shelf. It's been there for a little Ryan a while in a warm shop, and it might become dry or brittle. And then it becomes a little bit crumbly and perhaps difficult to work with. So I always suggest buying your lie. No fresh, just making sure it's nice and soft before working into. Some people will actually warm up their lineup before they cut into it, so that could be just placing on top of a radiator. It could be using a hair dryer just to soften it or leaving it in a warm room or airing cupboard. Just that it becomes lovely and pliable to work in, but like I know should be produced on. If you have sharp tools that you cut into it, it should be absolutely fine to cut into on work with. It takes a little bit of practice to get used to carving and get used to hold the tools and make marks if you're confident in it. But the process is fairly simple. So within this model, what I'm going to do is I'm going to talk about how we cut into lie. Oh, how we transfer images onto the block. Talk about the tools that you could use on talk about actually printing, inking up and printing. Your Linus will go through all of these different stages bits at a time.
5. Linocut Tools List: hello and welcome today. We're talking about lineup card. So first of all, I want to go through the materials and tools that are going to need to be able to complete this module. So to begin with, quite obviously, you're going to need some liner. So I know is a cork material mixed with linseed oil Andahazi and backing so you can get it in small pieces. Large pieces weaving rolls comes in slightly different colors, but I always recommend buying it from a specialist printmaking supplier. So three millimeters or five millimeters deep. I've got a couple of examples here. That's a great line out brown line here, um, either by its size that you want to be working on. Or you can buy in larger sheets such as this, and then cut it down to size using a Stanley knife ruler, which I will demonstrate later on in one of the videos, as well as the line oh itself. You're going to need a line of cutting tools which come in either fixed handles or in sort of kits like this, and you can get the cutters on the handle on. The cutters have lots of different sort of blades. So sometimes there is a good thing to begin with, you're going to need potentially a bench hook or cutting back to lean on a selection off rollers or roller that is big enough to cover your line of cuts. If I was using a small piece like this, I would have a roller this size that it's slightly wider than the line I'm working on. I'd also suggest having a piece of perspex on your table for when we're printing later on on Talk about printing with printing. So water based or oil based relief printing inks are great water based, a brilliant to start with because they dry quite quickly, they're easy to clean up on. We did talk about printing inks a little bit within one of the first modules. Motor one. I believe you'll also need things like other wooden spoon or use a liner cutting handle to burnish from the back of my hand burnishing. I'd also suggest having to hand sketch books or books for ideas you need some ideas to be working with to produce your works. Andi. I'd also suggest you have things like metal rulers, a craft knife and stuff like that. When it comes to printing, perhaps, and gloves to cover your hands on, we might be little things like cotton buds with final touching on. Also, cloths for cleaning up. Okay, there is a full materials and this that you'll need four liner cut within the pdf manual. So please feel free to download that on any questions about any of the tools and materials that you will need. Please do let us know.
6. Linocut Cutting Tools: Hello and welcome back in this video, let's talk to you about the tools that we use for cutting into line. So by my side here, selection off different tools that you could use for carving into Lina. Now line of tools coming up a complete range of tools that you could choose from. It depends which supplying you go to as to what they look like and how good they are, how they fit your hands for carving. So, for example, we have these ones which have a mushroom shaped handle. And then we have the cutting blade at the end with these ones, which are slightly different shape. And as you can see, they have a fixed end. So they have one blade, and that's the only blade in half with that. Well, to have these ones, which more sort of shaped like a pencil register wouldn't Dow with the cutting end in them's. We hold them like this, and then he could inside by sets of line oh, classes that come with a handle and then various different Nibs or cutting ends that you pop in, that you can then change and used to create different marks in the lineup, so these fixed and ones you might find cost you around 15 to £20 or a US equivalent on. You can buy them online from various printmaking suppliers. The key thing with liner cutting tools is they need to be sharp. This will stop your liner from tearing when you're carving, and it'll generally make the whole process of carving into line of so much easier. If your tools are sharp. Do you want to watch out for whether ends actually kind of blunt. We have a little chips or Nixon them, and with fixed ends you need to get them sharpened, which you can either do yourself or send them away to be sharpened. Um, or with these ones that you have a replaceable ends. You just throw away an end that has got blunt and popping a new one. Now all these tools have different ends. They come as either V shaped tools or sort of you gouges. They are to come very narrow or a lot wider. They're usually described by the width off the the actual carving area. So, for example, this is a one millimetre vein ing tool, so the shape of the U is one millimeter and we have wider tools such as thieves. This is around a six millimeter U shaped tours. It's much wider, much bigger. Corey. A big, chunky mark. So what we're cutting? You want to use a sort of general, maybe two millimeter three millet meter tool for doing a sort of general cutting. Outlining you want to use refined tools may be very fine. V tools for doing sort of tiny little sharp marks and a little feathery marks. Almost. And then these big tools will be used for clearing large areas of space. So where you have a print and you have a big area that needs to be completely clear of line . Oh, it will save you time. It'll be a lot easier if you use a big, chunky tools such as this one to carve away along that area of line. Oh, so you got a nice clean space. So when you're investing in tools, I would suggest maybe start by buying a set like this where you've got a range of tools from small to large at quite affordable price thes ones I buy from a company called Great Art dot co dot UK There UK supplier on there around £5.56 pounds. Four. Set the really great investment. Once you get into it, you might want to invest in some higher quality tools, and you tend to find their expensive the tool. Perhaps the better the quality of the steel at the end. Um, on these, like a set of the earlier they'll they'll cost you around 15 to £20. Andi, I would suggest, if you're going to invest in these, perhaps have a small a medium and a large Carter that will kind of give you a nice broad range of cuts. So a small one millimeter veiling tour is what I would use. I have a large five or six millimeter tool and then perhaps a V shape or a 2 to 3 millimeter tool somewhere in the middle so that you can do other types of marks. Now, one other thing I'd like to say about storing your tools is make sure that you don't store them, so the ends Airil bashing against each other. Make sure that you either keep the tools, perhaps in the plastic sleeves that they come in or in the boxes that the sets come in. Or you could buy or make even roll up places where each tool has a little bit, that it goes in and then you roll it up. So rollup holders, Alternatively, some of the tools come in a little stand and you can stand. The tools are kind of like a test tube holder, but it's it's for Lina cutting tools, and that will make sure these blades don't get damaged by bashing against other ones. And, of course, keep them in a dry environment where they're not going to get water on them. And they could perhaps get rusty or damaged. Um, if you look after your tools, they will last you, hopefully a very long time.
7. Linocut Cut to Size: quickly gonna show you how to cut to line a down from big piece to assume a piece. I start by marking out the size that I want to using a metal rumor. And I always use metal rulers because they're safer. So I'm going to cut a six by 4 15 centimeter by 10 centimeter couple off blocks from here. It's on marking this on the market in several places. It is literally just a pencil and a ruler. It's a drool, that's all. I don't need to find myself. Hey, okay for myself. A Stanley knife or a craft Nice. This is a retractable craft. Life can be bought in D I Y shops, and I just school along. Be careful with your fingers overseas when cutting with a start in life just to cough. I've run along this several times because my line I was a little stiff. Once I've schooled the line, I pick up the lining on my rake it on. Then I just drool the knife down here on That's Rex, the chassis in a book. I'm now going to divide this into two because we need to pieces, not just the one and again gets standing life score. It's a couple of times. Run the knife down the backs. I've got my piece of line, and it's as simple as that. One tip in terms off metal rulers tend to find is a good idea is to put strips is quite lucky. Now, a strict of masking tape down the back of your metal ruler on that stops it from slipping because metal rulers sometimes have a habit of sleeping when you're working, so I'd certainly put a piece of masking tape on the back. Rest it on, then you can score along, okay?
8. Linocut Transfer Design: Now there are a couple of ways that you can transfer a design onto a piece of line. The 1st 1 is simply take a pencil, take a piece of liner and sketch your design on. That's really simple. Alternatively, if you feel you're confident, just carve straight in and go for it. That's absolutely fine as well. Alternatively, if you have a sketch prepared, for example, so here is an example of a sketch that I've prepared, I've drawn it. I've done a little bit of coloring and hopefully strengthen it and know what I want to be caught and left. But I want to get this onto my line up. So what I've done here is I've done a tracing. This is my tracing off this particular print on its transport this onto the line. Oh, I didn't take no tracing. I take a piece of carbon paper, possibly one slightly larger than this, and lay it down on my lining. And then I turn my cup, my tracing paper around on transfer the design on now something that's really important here is to explain the back to front nous off Prince in relief printing. So this is the correct way around. This is a good example, because it's text text is really important to get wrong way around on the actual line. Oh, so this is the actual how I want it to look. My tracing paper could be turned anyway, so this is quite handy now if you look at the line Oh, compared to the paper, the liner is back to front. This is mirror image, so that when I think this up and I print it, it would be the correct way around. So all these letters on here, a back to front, they just look wrong. So you don't have to be very confident that you can just draw letters back to front on the line. Oh, from the start. Or you can trace your design and use carbon paper to trace it home. So it's completely up to you how you do it, whether you draw freehand or you have a sketch, a photograph on idea that you then use tracing paper on carbon paper. If you have brown lining like this, you might want to use something called trace down, which is pretty much carbon paper. But it comes in colors like white or blue. So perhaps white lines on the brown line. Oh, much better. Whereas actually, this black carbon paper shows up lovely on this grey liner. Okay, so hopefully that makes sense. I'd suggest Go off and find some sketches and designs. Get your sketchbooks together and find an image that you'd like to work with or one of several images you'd like to work with and have a go transferring your image onto your line of ready for cutting.
9. Linocut How Deep to Cut: it's been cutting into line. Oh, all the tools will make different marks on bond. There's no right or wrong in terms of the marks on bond, how they should be or how they should look. This Arli. No, it's It's a blank canvas, so you can create whatever marks, shapes and designs that you want to. The only thing you do make need to make sure is that the cuts deep enough that when you roll the income the top that the it doesn't go into the cuts. It can sometimes be hard to tell with a very fine cutter. Whether it's deep enough, in which case you perhaps do a test print check with time, you'll begin to know how deep to go. So I have some examples here off pieces of liner that have been cut into These are three millimeter for militant meter deep pieces of line. Oh, on would cut about half way down. So not so deep that I've come out the other side, but also not so shallow that when I roll the in corn, it's gonna fill up my carts. This piece of liner actually quite interesting because it is you can see, it's not a square, it's not a rectangular shape. And what I've done here is drawn a designer. Cut it out and then where this would have perhaps been a square piece. I've got a pair of scissors and cut around and snipped off the outside. So don't think that your design has to be square. It could be any shape that you want it to be. You can be completely free and creative with line. Oh, on as you can see all these pieces of line Oh, I have here a totally different shapes. And if you refer back to the video where I showed, you have to cut the line. Oh up You can cut the line Oh, to whatever someone's that you want to have it to work in, which is what is great about this product. It's really flexible. It is flexible in that way, but it's also flexible in terms of you can create exactly the correct shape that you want to work with for whatever sketch that you've made
10. Linocut LIVE 1 Intro: right. So just to explain who I am, I'm season from Agenda Sky. So I do. Lots of printmaking workshops are workshops all around the place. Venues like this tend to be one day workshops where I introduce a subject of democracy. We're going through line of carbon. We're be introducing, explaining what he is working through producing a couple of prints by the end of the day, which should be quite good and so written a book online. A cup, which I have here somewhere it looks stuff she says. I can't see. It's some West very, um, which is this one? So I've written recliner, so hopefully lots of information there. So to explain what liner cut is Lina cut is a form of relief printing on by relief printing . We have something it could be would be line. Oh, it could be. We get this sort of vinyl or man made substances as well that it's stuff that you can carve into you carve into its You make marks, got a few examples of cut blocks. Here you come into it, you make Marty take stuff away, and it's the stuff that's left in relief. That is What prints? That's a negative way of printing. So what we don't cut? What prints? What we cut becomes the color of the paper, the right whatever pay P print onto. So it's a little back to front, which is fun when you first attempting sizzle just slightly differently round. Because if you're used to doing, I don't know, drawing on stuff like that when you draw the line that you draw the line drawer with this, the line you cut is white. It's gonna slightly back to front, so it's just a slightly different way of thinking that sometimes takes a little bit of getting used to that. There were too much because, well, what through today I was a minor itself is quite nice to work into because it's a little bit soft. It's a little bit. It's not very soft. When you start carving, you think actually really tough. So it's a bit soft, is pliable. It's made of cork and linseed oil, so it's smooth. Has no grain would, for example, have a grain which when you work well, kind of, I want you to go set. It has like a character. A personality liner is lovely and smooth on. Even it comes in different colors and thickness is from different suppliers. So depending on where you buy it for me will be slightly different. Honestly, doesn't make a difference. To be honest, the only thing that might be different is the thickness of it. Because you get in three millimeters or five millimeters if it's secretly more expensive, because there's more stuff there and also allows more margin for error if it's fat because you've got MAWR depth to work into. If you're clear in a large space, you've got a little bit more margin of error for when you're in. Keep rolling. What? You hope you make more sense when we actually started rolling. So what we're gonna do today is we're gonna do hopefully three things we're gonna do a little test doesn't just get used to holding me Lina cutters and having a play literally. Don't worry about anything you're doing. But just get used to the tools and cut into them. Well, then look at doing a mark making tester. So something like this, perhaps a little smaller. We're gonna work this size, and this will be all about looking at how we can't remarks. We make just making patterns, basically looking at controlling the tools, maybe even trying to back for a text, because when you do text, it has to be mirror image, eso things like that. So just playing about but not worrying too much about the finished piece, which sometimes can kind of stop us from starting like when you're sort of all I've got a finished piece, it's got to be just right. Sometimes I find that can stop us just net going and having a play. So what's your mark making tester? And then we'll do a finished piece of some description as well. So hopefully he bought some ideas, cheers or whatever with you. Then we can work on a piece, um, to give you the liao off the room. I have a couple of books of student work, which is quite handy to look on diesel prince that people have done in workshops like this . So they're quite a good idea for this sort of thing that could be achieved. Or if you haven't got any work with you or ideas, they're quite good for inspiration. Sometimes Well, sometimes people look so that's fine to do as well. That's the rule here for you to sort of learn from. So these are quite good to look at all living things at the back of the room just so that their away from printing stuff. So feel free to look at any point. I also have a lot of books, different books, lots of books. So feel free again to look into these as well. Refer to them. They're quite good. Some of them are really good for demonstrating the techniques. Some really good for just looking at the pictures and looking. Other artists work for inspiration, especially in terms of kind of marks that are made into the line overs a lot of time. It's the what kind of marks that we make the creates of texture character to it. So some of these books really good in terms of gaining inspiration. So all this stuff is here for you to look up? Um, I don't wanna talk too much, because probably get bored of my voice. So what? I'm going to show you what we gonna do? You show you how we actually carved into a line of block and then I'll kind of hand over to you guys, and you can kind of crack on. So we have different tools for card until I know today we're going to use these. At the moment, I haven't handed out cutting blades because I want to demonstrate cuttings before I could be the sharp tools that might cut your hands. Safety, safety. So these little tools come in packs. You get handle, get five different cutting tools, and then you get a little wooden dowel, which is replacing the ends so you'd get a tool. You pop the nip in the end. If you want to change it used it wouldn't Dow to pop the end. It saves your fingers from doing that and potentially scratching yourself. So on these kids. So the ends that come with it, they're all slightly different. These ones come. Their number 1 to 5 will only use 1 to 4. Fifth One is a sort of knife on day, coming either little V shapes or little new shapes or bigger U shape. So they're all different sizes and the different the different tools and make different marks. Basically, some will do little fine marks. Some will make big, chunky cuts into the line. Oh, so they do slightly different things. Um, the number one until they are number one about the really tiny, really hard to see. But the number one tool is the finest to a slightly bigger three. It's like a bigger force that the widest. So I think four is a four millimeter U shaped stools and really nice old Chuckie. Knots without one on the one is a very fine veto. Also, make little tiny will speak type of marks with that. So with the tools popular bin Hammam goes into the palm of the hand and then you wrap the fingers around, you got a good firm grip on it. We don't want to hold it like a pencil because he won't really get any pressure because you need the pressure to be coming down from the shoulder through the arm, through the hands on, then round. But you do need the control with the fingers quite near the end of the need to give you the fine precision, so we need a little bit of power. With this in the board's hands of power goes through the rest on. Then the control comes from the fingertips. So what we do is we grab a piece of line, place it on to your desk, and anywhere in the rest doesn't matter. The key thing with this is not to cut towards your fingers towards your body. Um, or even a longer fingers. Sometimes you can kind of just scared and take a in your slice off, which hurts on fingers bleed a lot. So be really careful with fingers. The small piece, Actually, sometimes the harder it is to keep your fingers away cause you don't have much room. So the first ones that we're gonna do, the little ones be really, really careful. So when we're cutting, we've got this grip with the line in Qatar. We put it at around a 30 to 45 degree angle, so it's kind of slightly down. We're not stabbing right into it on. If we're too shallow, you find the back of the line of contact kind of damage the liner or scratch it. So you want to have that sort of angle. So you hold this case firmly with this hand. This isn't your 30 to 45 degree angle, and then just take a small amount out at a time. Crazy, and you get these lovely little bits that, like chocolate come out of these. But don't you just keep going and take a little bit more at a time? Um, now, how deep we go with these ones that we're working on today. There about three millimeters deep. I suggest going about halfway about a millimeter down you can. You kind of want to just go as far as you need to use that. When you roll the ink on the top, it doesn't go in those cuts, so it's too shallow, the ankle going in. You can't go too deep, although if you go, you could end up through the back. It doesn't really matter. It's just you're making hard work that you need to go on 1/2 way. So you just need to make sure that you've gone deep enough so that when you roll the ink over the surface, it doesn't fill in the gaps. I'd also suggest just doing small bits at a time. The hardest thing to do is a really big, straight long line, because at some point you'll have a little wiggle or it'll go skidding off. So even though in a piece there might be a long straight line, it's probably been created by little bits at a time. Little bits at a time and just keep going. Um, you could always take more out the thing you can't back in, so it's always good to do a little bit at a time and keep working on going. Does that kind of makes sense? Awesome. So, um, but it was too much more what I want to say to begin with all talk about cutting Now, when he gets doing the mark making test, explain what we're doing when we get in the print, get printing it in King. I'll explain those bits a bit of time. So what I'm gonna do, I'm gonna hand out the cutting blades and a handout ally. No, I'm just basically have ago. Honestly, doesn't matter what you do here. If you want to do a little design, just use a pencil and draw it on or you just want to test out the tools have ago with that as well. This is just an exercise of being comfortable with tools and no cutting hands that That's the human objective for this first aan den. Then I'll explain them out, making test later room. Cool. So let me hand these out costs around on. What I'll probably do is just put a handful of the costume lady in between everyone. Actually, I just pass around these pieces of liner. You can see ones that already and you want to see how things are cut you with, um, with their use of tools for doing, they would use different tools for leather. Aziz, especially designed for cutting into line, knows their tools. But I always say, Have a play. I mean, there's no reason why you couldn't know Try. I saw an item that I really liked him, and he said, Oh, I'm not shipping outside of America. Well, why should I pay how much money for it in the first place in your membership itself? I mean, probably with leather. They might use knives or something like that. Cartoon to leather, rob the's time using tools that have to be really shocked by the thoughts kind. Whether we thought it's almost tell. Yeah, yeah, I think my tears, I think a sharp knife. Okay, it might be the weight without. I'm just curious. Yeah, it looks similar. So you know the same. Yeah. I don't think it really matters what you come into because you get these. I mean, because you can use words. You can use things stuff, which is speedy half, which is much softer on this soft cut. So these are really something. You get this kind of blue vinyls, they print this well as yeah, I've only done a few bits of printing off. Use this soft cotton. They It works fine. It's just soft carbon t pressure wise. Yes, Children. Or if you do have problems with hands, basically, then it's soft. Carved into wood is the hardest stuff to carbon because it's quite solid. Line is kind of a nice What's it? Something in between that's called speedy Car. Feels like it be expensive. I think some of that stuff is way. What else is there? Similar properties. Time Listen, vinyl printing vine something. So if you look at any other printmaking, suppliers on line usually have line of words, all the different options that you can have a look at. So I probably saved by a little bit of like and try it free printed version. And you took it out and to see you, Actually, yeah, it's covered in it. So that was this one. Oh, wow. That was a credible. Had another color principle is enough. And then from the black was printed on top, it's another one.
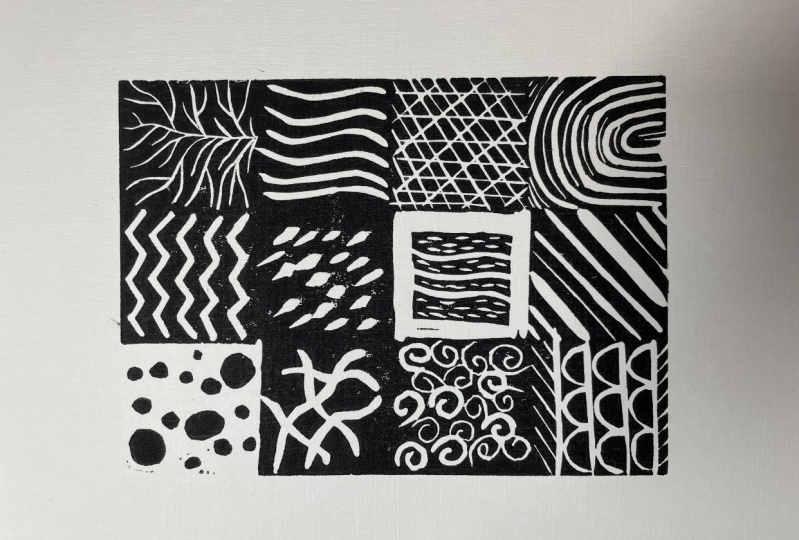
11. Linocut LIVE 2 Sampler: cutting, so hopefully we'll get more familiar with tools. How deep we go. Just got used to handling. We're gonna have ago doing a not making sampler. I love doing these even now, such as they just you can kind of switch your brain if you just have fun with grating patterns and marks and stuff like that. So what we're looking to do is create something. Will use a postcard sized piece of lineouts six by four or 10 C centimeters by 15 centimeters. I'm gonna divided up into sections, little squares or areas just using pencil and a ruler just drawing little squares out on each square. We want to create a different pattern or texture, trying to use a lot four of the different ends that are with those tools that we've got. Some of them will be really fine little dashes or dots. Some will be bigger dots or wavy lines or circles or whatever marks you can think off basically, So this one was an example of one I've done recently. There's another couple of examples in here. This one is up slightly different. Shaped one to the top is really fine little marks, so that's using a very fine vita like the number one there. This is using a one millimetre U shape. This is a mixture of 2 to 4 millimeter marks, and this is actually using a Stanley knife, so cutting in a swell that shows some different marks there. These are some examples of just let squares. So again lines, dots, dashes, big, chunky lines, kind of straight lines. You can create different textures using the tools and that kind of reason I like doing this is so that when you come to creating a finished piece, you've got, like, a palette of textures and tones and marks you can refer to. You use. So if you've got a piece where you want, doctor, you are my values that talks. That's how I achieved that. You can create little sections of texture and tone, Um, and it's also good when you're learning to just really experiment with the tools, and that's why I still do this now is to create different things that I could use later on . I just learn how to do different patterns, and just without worrying about a finished piece, I'm working in a large and then all. I'm gonna do this. So it's just a really good way to experiment and play. These are a couple of examples, Don, and by people in other workshops before just kind of labelled up what they used. So find tools, bigger tools, sometimes cut out a lot. Sometimes in Qatar, any on a couple have experimented with texts and letters, which is, if you're doing and let's is they need to be mirror image because whenever you print something, it'll be one way around on the liner. When you print, it will be the other way around. You trace, and you can do Yes, yes. So what you can do is I've got tracing paper a carbon paper here. So you've got something written down. Actually, this is a good example this text on So this is a, um, sort of sketch that I've done off just worth dude liner printing. I've been traced it, and then when I put it onto the liner, flip this this way around its carbon paper here, go over the back of it on here. There's lots of backwards Miriam is writing when I print. This idea is it'll kind of look like this. It's mirror image. So if you want to have a go, maybe a letter non o or eye on em like a letter. That lion s one that's gonna be our yeah, are something that's gonna need you to think mirror image. Then you use one of your squares to create a letter that could be quite fun. So what I'd say is, grab your life, doesn't mind. You might want to just in half and have six squares, or you might want to do eight. However you divide up totally up to you just waiting to square just really have a good creating something very different You don't even need to, like cut a line between the squares because where your texture ends, it will actually kind of just naturally create the square. I'm not something really important to think about when doing finished prints as well, because when we do designs and work, sometimes a tendency is if we've drawn a shape, we want to get the cutter and cut the shape were actually cut the line that we've drawn where it's actually sometimes what you might want to do is not cut the line drawn, but inside the line or outside the line. And the line is naturally created by where you've done your textures. And that's what's quite import. Can't remember when you're transferring an image and interpreting it and getting Houston counting. So So this is challenge number two. So let me pass these around. I have got pencils and rulers. Help yourself to those, um, jurors, many squares, as you suggest. At least six you might want to do is totally up to you. Um, usual. The tools make lots of remarks. Lots of times. With these, we're gonna do this one and then get your finished length around, so we go plenty fine. Are there some images that you people, you don't look really look great in that one? That's just too much detail. You can probably determine most things. Yeah, because you can interpret it. Teoh Um, yeah. Be used in the line of common something that's very to detail. You can get a lot of detail in relief printing line of me if it's very small, very detailed. You might wanna try wood engraving, for example, which is even finer. I quite like with line Oh, cut where you can kind of see that marks have been made. It's It's quite like if you're cutting out the back, I like it when you could still leave little bits because it creates tax. Jeff, it's too perfect. It's well, you could have taken a photograph or drawn it, or it's nice to use the quality of putting in the finished piece. Yeah, I mean, you can You can use anything. His inspiration for line. Oh, well, you can. You know what? It's photographs. If you said you take photographs and things photos, and even something that maybe looks very different lineup or has sort of washes of color or is very different to how lineup looks, you can still interpret the drawing of a design. So, yeah, look anywhere for ideas, be cuttings, magazines or leaves or sketches Or absolutely, that's where experience comes in, isn't it, Theo Opportunities? Yeah, I think everyone has different things that they like doing like a different subject matter that they enjoy
12. Linocut LIVE 3 printing: Okay, so we're now gonna go through printing I'm site for we have our lovely pieces of line up ready so a couple things before we start. First of all, you want to make sure that the liner is clean, that you don't have any little bits of line are kind of stuck in their bed. It's really sort of get rid of that and just make sure there's no little bits of the Hess ian at the edges. Much need to cut those off with a pair of scissors, if there is any, because sometimes what can happen is those little bits of Hesse and just pick up bits of ink, then unit with little tiny spots around the side. So essentially make sure this is all nice and clean when that hopefully, overseer carving is deep enough that we've got a difference between the relief on what's underneath. So we worked with the best inks coming tops or tubes of bottles like this easy, probably around 5 50 or £6 a bottle, so they're not super expensive. The good thing with water based inks is that they dry fairly quickly, so hopefully we're dumber prints. We can leave them to dry. And then by the time we go home now, drives have been no work together in a big kinkiness. There also easy to clean up. We don't need any chemicals or, um, oil or anything like that to clean up literally white water. So desk also make sure this is clean. Um, because we're costing on thinking in the same area. It's really easy to get into the line and shavings in a way. So just clear the desk mature, loving pain. But it also gets a dust. It's of anything that could get in your cause problems. So to clear a little spice Lovely. That was my hands just get stuck in. So once we've got that we need our ink on. I'm gonna put a blob of ink onto the surface. We don't eat too much. You guys really need slightly more than make. So I'm just gonna use a really tiny piece to demonstrate you might need about 50 p piece on , then What we do is we use a palette knife just to spread it out so that it's roughly the wits of your roller. I've even got a roller on. So I spread that out. Now our analysts have little stands so that when we're not using them, they can stand up. When we do use them, you flip them over us that we can actually use the rubber area again. Make sure there's no dust or bits of stuff on the surface of the roller as well. So then what I'm gonna do is pick up being gradually and roll it down so that it begins to cover the rollers just rolling out here on the surface. What I do is I pick it up, put it down a few times. I always say, Well, change direction slightly. I just keep going to got nice. Even covering a year old kids is right. So what I don't want it to be is really, really gloopy. And in key, because as soon as I put it onto here, it's gonna literally put into all those lonely cuts you've made. So you want it so nice and even on a partly go by sound as well, Or I can listen to how much it kind of snaps always like. You want that kind of nice, almost like Velcro, be type sound uneven covering just like this. You can see it even sort of covering once the role is covered evenly with then transferring the ink from the roller onto the liner to pick me up and place it across on. I'm gonna need to pick up and put down several times. I've got quite nice, small little piece here, so it's not going to eat up too much ink. Um, very light. I don't need to press hard for president. It's squishing the ink so really nice. And lights keep transfer in the ink from one side to the other. This piece of line knows Been traveling about me for quite a few years. It's very well printed. It's also a little a little bit wort, because I think the back has got wet at times in the back of this gets wet. When it dries, it's slightly walks. So when we clean the in cough tends, just wipe it with don't block rather than get it totally it. So if, for example, realigning is a little bit walked, that's why we need to make sure we go different directions. Uh, just watch out for edges and callers. They're really easy to Miss Side. What's happening here is the link is now sitting on the surface, but it's not going into the cuts that I made on here. Yours might be slightly easier to see because you're using the brown ink, the bombing brown line. The blacking will set, and you'll see the brown underneath a bit more. This is gray line oh, with blocking. So it's not as easy to see in the cuts and in sitting. So I think that's about right. What I always do is I tend to just depending where you are. The lighting guy tend to pick it up and have a little sort of look from different sides, just to see if it's covered enough. Spot a tiny little bit on the corner that I've missed. So just ensure that is covered, because I tend to find if you're somewhere where the lighting is artificial. Um, sometimes not as easy to see. So it's a good idea. Just move it and you can see the shine, and then you can see where you've missed in why you haven't So I think that's pretty ready . I'm just gonna leave my roller here now. Only two pieces of paper, Um, have a piece of backing paper on Pop that down the desk. What this is doing is just giving us a nice, clean background because you want me that I just put my land liner down face up of the Incas on top. When the backing is that, grab a second piece of paper on. I'm just gonna pop it down on top now because we're doing one color. We don't need to worry about registration or because we're not layering up several colors. We can just put some paper on talk, pull it off when we're done, and we kind of wanted to be straight. So if I put that in the center of the paper on line up piece of paper aside, I don't have to be too worried about it. But it'll mean that roughly it's in the center, not on a technical sort of squawk. So we use smooth paper for printing. It's not too thick, so this is actually just a cartridge paper. It's a nice, smooth paper that will absorbed Think basically, if you use something like a watercolor paper really textured, it won't show all of your detailed cause. The papers will like bubbly, and it doesn't quite work as well. So my smooth pain will be good now becomes burnishing, which is essentially rubbing on the back to transfer you lai No, to the paper. So I'm gonna use the line. Oh, cutting handle to do this because it's got a smooth wooden surface some people will use a wooden spoon is kind of traditionally used as well. So you can do this because we have these already remains will use these. Please take Carter's at the end. Consideration might end up accidentally stabbing yourself. So cut her out and then we just rub on the back here. This needs to be quite firm because what we're doing is really pressing the paper onto the ink to make it transfer up onto the paper on with, um, this sort of finished smoothies cartridge paper. We can kind of see the designed come through slightly as we press. And so always keeping hold of the line. Oh, with one hand so that the paper or the liner doesn't have a bit of a move. On the other hand down. Sometimes it's actually easier to stand and do it, so that you can actually press down through the shoulder through the home. So here I tend to find that person easier myself. Because I'm not the strongest person in the world Do not have the biggest muscles. So I tend to find that standing up. I get a bit more pressure down. Almost. See. Keep going. I'm gonna second motion down whatever works for you. Really? What happened? Registered mail. Tricky little bits. They really tend Teoh, Mister sometimes edges and corners. And I keep going. Keep going. Keep going. Proven to thank God which you can kind of see the image begin to appear that it's so I think that's so What I do is I take a little sneaky peak and I just lift up a court. I'm not lifting the whole thing. I'm just having a little sneaky peak of the quarter. Just checking. Um, if you think it looks all right, then we can We can go for it and we just literally peel the paper up. There's our friends. So what you're looking for is solid black where you want solid land on white, where your cuts are on hopefully without any little bits that messed So that's what put the backing paper that give us a nice clean outside. And then when you're if you're happy with it, you go. Yes, I'll put another couple of those. Just move your paper out of the way in cup again and off you go again. Bring paper back on your own. So what I'd say is, have a bash printing both your little test A piece on dure mark making sampler, perhaps Try printing a test of peace first, just get used to printing. And then I'd say points at least at least three or four of your mark making tester. So you've got a nice Siri's off prince on, perhaps Want to donate to my folder? Um, building up my student. Any questions that make sense? Awesome. So whenever you're ready, if you guys printing
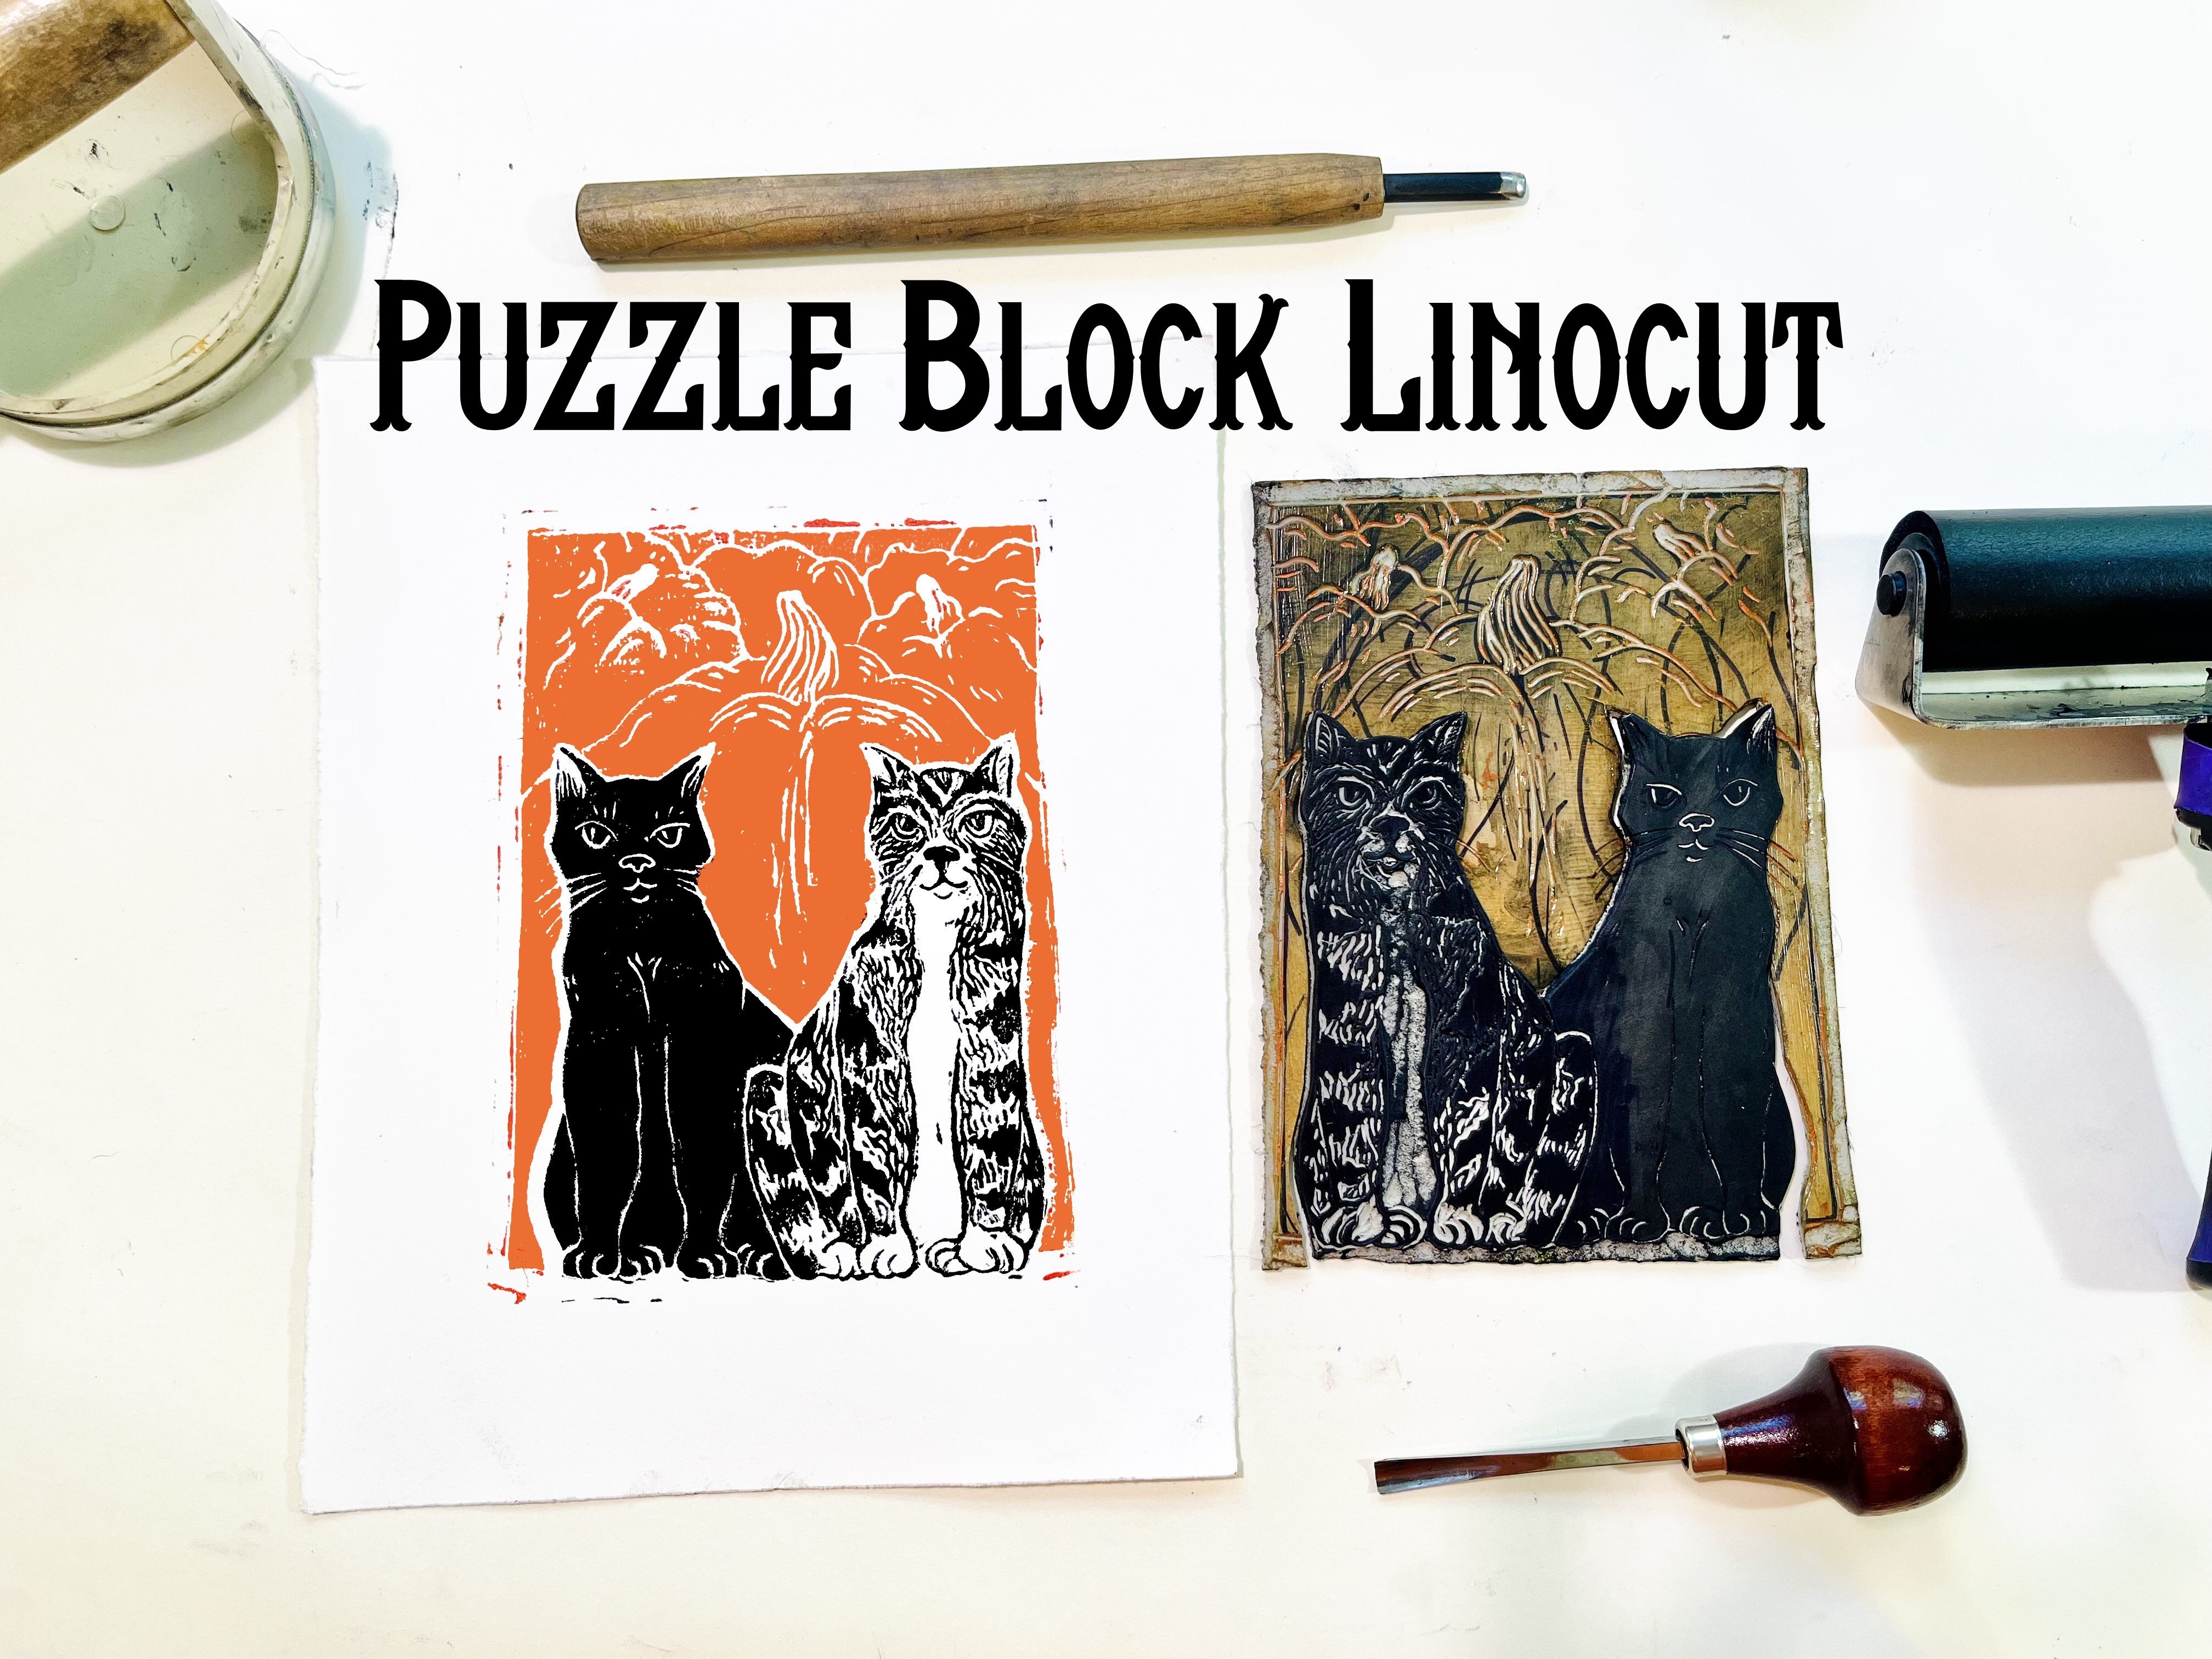
13. Linocut LIVE 4 finalpiece: right. So what we're gonna do next? It's produced like a finished piece or print of your own design. Basically, we're gonna work again, either in a postcard type size or if you do want to go back to a small piece, Well, whatever size you have to work on, um, talk about a couple of things in terms of image interpretation, because how interpret image is quite important doesn't none of these is sort of right or wrong. That's just different ways that you can do it. So this is quite a good example to show different ways you can touch with an image. So first of all, this is the same design. It's just been interpreted in three different ways. The first way is his little leaf shaped man type creature. We've drawn the man out and then, literally the line that we've drawn. We've cut out with Cutter and we get this white line drawing the second time again. We've drawn the man, but then we've cut away all of the outside or most of it. And then he stays in relief in the center, So he's a floating black shape. And then, on the final one again drawn the man and cut everything inside. See the floating white shape. So the three different ways we've got a white line. We've got a positive and a negative. You could also do Black line, which should be cutting away everything on just leaving a black line. Just take you a long time, so each one of these is a different way to interpret in image. Depending on your design, it might lean itself to one of these Thies to possibly slightly more printmaking. But more block printing in this tends to be what we inclined towards. When the first sex is like drawing, you draw a line you want to cut that light just It's just naturally how our brains work if you're if you've not done what printmaking or if you're used to drawing, for example. So it's certainly worth thinking about those. There's a few other examples here the other students have done again. You got a little cat putting different raise in the rub it in different ways. Skitch. This one is quite good to shake is this actually is a white line drawing this butterfly, but it kind of works with this image. This is, it works for it. So I'm not saying that just cutting out the lines that you draw this is wrong. More don't do that. I mean, certainly this image really works for this. Something is lovely because it's the positive negative. But just because of the nature off the image, she's been able to print it several times and create around the other thing that I like about this as well of the sort of marks around the edges. Because when she did it, I was like It just looks like the bird is flying because you've got all the sort of movements of so sometimes, actually, you don't have to cut it all out, so it's pure white. You can just leave these little bit zeal, strokes, these little cuts to create a texture and a background on this One thing also is quite nice here from the background. He's actually done a proof here and then cut. He didn't like this a bit more out, So this sort of bits that are left in the background also quite important. Essentially, this is a positive ways in this space is in black, but just not cut out everything around the edge, so there's a little bit of atmosphere going on. So these kind of worth thinking about in terms of planning your design, you can either, just with a pencil, drove straight home just drawing. What if you want to do bearing in mind the mirror image thing or you can use tracing paper . So I have got the original design for this, but this is tracing, so they would have been original sketch this had been traced on. Then you can see this is Yeah, that's just saying my round cool outfit glued on so wouldn't lose it. But I think it would have been that would have been the original drawer ring that have been traced that and then turned the tracing over so that when this prince, it ends up being the right way round. So if you've got a drawing already, you can trace it on trucks for on I've got tracing paper, carbon paper, Um or if you have a drawing already, if it's already on here, you compact. Just put the carbon paper straight on and go over it. It's sort of up to you how you put the image all next or if you're feeling brave, just call. So it's fine. Cool. That's it, Really? So it's pretty much a guarantee of line, as we did before. Draw, Cut, my friend, and we've got about an hour or so.
14. Additional Printing Demonstration: hello and welcome in this video. Going to demonstrate printing a simple line. Oh, cut block using some ink on twosome paper. So I got a line of cut block here I have pre cut. It's a simple flower shape on I've carved it out, and it's actually quite an irregular shape. It's a floating shape or block, but I'm just gonna think it up. Using this light orange color, I'm going to print it onto this paper over here to the income. Using is the cargo safe Wash ink by Cranfield. It's a It's a It's oil based but washable, which is really great because it finishes like a really lovely on oil based finished. But it's also washable with water when you're sort of cleaning up and washing your hands. I've chosen to go in an orange today, just a hopeful. It shows out nicely on the screen. You'll need a palette knife, a roller paper, your liner block, the ink and your need. Some space on your table, an area where you can think up and get a bit messy. So much glass cutting board. Here you can use any piece of plastic perspex marble, a plastic tray. Any kind of smooth plastic glass or marble surface will do absolutely fine. I'm just going to move the paper out of the way on. Begin by taking out printing ink, undoing the cap and squeezing a little bit out onto my printing surface, which today is my glass counting board. I use this because it is transportable. It has around edges, so it's safe to carry on bits. Just a nice small space when I'm doing small work like this. Okay, using my palette knife, I'm just going to spread the ink across so that it's roughly the size of my roller. I'm going to make sure my roller is clean, so there's no dust or anything stuck to it that would interfere with e ink. I'm also into quickly double check that my line oh, is clean, I say clean. This has been into before, so it's not entirely clean, but it doesn't have any bits of lining or dust all bits that are going into feet and create little white spots. A little dots with halos when we prints. This needs to be free of line. Oh, bits. Okay. Also needs to be dry used. It before. It needs to be completely dry. Gonna flip my roller up because this rubble has little stands, like going to begin by just drawing down the onto my surface, keeping the touch quite lights. So I'm not pressing very hard a tool. You can hear this lovely sound that's happening. He's turned the rule around a couple of times, pick up, put down, roll around Just so that what I'm doing is creating a completely even covering off the ink onto the roller. Okay, so from here and then going to transfer the ink onto my line. Oh, piece. Just gonna pop it here. I'm gonna keep it off my cutting board. This is gonna be my dry air where my paper will be. This is my messy, wet area. I'm just going to roll the ink pick up, put down, speak up, put down to cover my line. Oh, block with ink And I need to pick up the ink, pop it down onto the line. Oh, peace. Several times because I want this to have a really even covering Off Inc. The key thing here is not too much ink, because if I have too much ink it would get down into the cuts, it would get down into the grooves off the line of peace. And what I wanted to do is just sit beautifully on the top, just sitting there on the surface, off the liner on the relief and liner is a form of relief printing. So what we're printing is what has been left in beliefs of what We have no cut. So it's a little bit sort of back to front, but it's it's a really beautiful process. Okay, so I've picked up the ink, rolled it down several times. I'm just going to pick it up to bring a little bit closer. So hopefully you can see and move it just a little bit so you can see the texture off the ink on the surface. It also brings it up closer to my eyes so I can actually see that the ink is at the correct level that I'm gonna drop it back down again. I put roller to the side. I'm gonna get two pieces of paper. The 1st 1 I'm going to place here. I'm gonna put my line, oh Inc side up and I always do a great big arrow on the back of my line. Oh, just so that I know which way up my piece of liner is gonna go. So I'm gonna put him there just in the centre, not worried too much. It's just a one color print. It doesn't matter where on the paper it goes. But I was thinking the center is a is a good place to start. And then my printing paper, my smooth white paper, goes down on the top on I pop it down with confidence. I just place it straight down. Now this paper I'm using is a smooth white cartridge paper. It's nothing expensive. It's maybe 80 to 100 GSM, and I'm gonna get my trusty wooden spoon. I've got to mention at the start of the video, but here it is. Now it's one of the my well used pieces of equipment in the studio. I wouldn't spoon on this is called burnishing on. This is rubbing the back off the paper to encourage the ink transfer from the liner that is inside up down on my side here. That ink is transferring onto this top piece of paper, which is my printing paper. You may be able to see faintly very faintly through the paper, cause it's not a thick piece of paper. You can kind of see the ink. It's not bleeding through because the paper is not that thin. But I can kind of see where I've burnished and where I haven't. I'm keeping a firm grip on the line out with my left hand, impressing firmly with my right hand because I'm right handed, pressing the paper down, rubbing every single part of it so that what happens is the ink transfer. So this is a little bit of muscle work here, where you have to get the muscles out. We have to get them working on. We're basically replacing a printing press with this with a wooden spirits, and we're doing all the hard work that a printing press would do. This is such an accessible art film that can be done from home, so I think I've got everything. All I'm going to do is have a little sneaky peak. Just check that the Incas transferred because you're watching me on. Then I'm going to peel the paper up very carefully to reveal my finished print, which you can see here. Just move that one out the way and pop this one down so you can see that our piece of line Oh, is a mirror image. So this will have transferred like this. Okay, on what we're aiming for is nice, clean, crisp edges we want Inc. Where we wanting so on? The relief on where we've cut out is whether is knowing so where it remains the color off the paper. I have always have printed this piece in a different color before I've printed it in a red color. So you can see how, when you change the color off a piece, it really adds or something slightly different to its. You can experiment with different colors as well, once you've gained the art off printing successfully. Okay, Now the great thing with lie knows that once you've done one print, you can do a load more so I would pop this toe one side. I would grab my roller and I would start to you think up again, grabbing rolling it on, and I could prince a 2nd 1/3 1 a 4th 1 of 5th 1 For as many as I need to happen. Okay, so once you have finished your printing, I would remain recommend getting a damp cloth and wiping the ink off your line. Oh, don't run it under the tap because it will get wet here, and it might end up actually warping and getting sort of slightly bent. I would scrape away any excess ink with your palette knife, pop it into a scrap piece of paper and then get a damp cloth and simply wipe away this residue here, the roller as well. You can use a damp cloth to wipe off now with the set, the Cal Ago safe. Washington What I often then do is just use a little bit of oil on a cloth on. Just wipe the surface palette knife on the roller just to completely cleans that you haven't got too much residue of ink left and you won't. It's a nice clean surface, and that is basically cleaning up and printing your beautiful liner copies. So have a lot of fun with this, and I look forward to seeing what you guys produce yourselves.
15. Linocut Books: Hi, My name is Susan Yates, and I would like to show you my two books that I have written online. Oh, cuts Just show you the insides and also tell you the differences between the two, because that is a question that I get asked a lot. The first book is learning Line. Oh, cart on this, I wrote in 2011. And it's a comprehensive goodbye to the art of relief printing through Line A cut. So this book basically takes you step by step. This is my first copy June 2011 1st copy I ever received. It takes you step by step through getting started the basics of sort of mark making cutting on one color, pinpointing, then moves you through. Advanced techniques are adding different color layers on, then what you do with the finish line? Oh, cart. And there's also a few projects and resource is at the end. So let's go through written a little introduction all about Lina cuts, talking about the history of printmaking, what printmaking is, and also a section on where to get inspiration from four. Your liner cuts. There's lots of places that you can get your inspiration from sketchbooks, newspapers, idea sheets except Tre. I talk about the studio space, the layout, how you set up your printing area, all the different sections. I discuss the materials you need for liner cutting so you can see there's a lot of concept packed into the pages or this book I talked about paper lie. No, the cutters that you need Onda also about press or hand burnishing in this Chapter. Two, we go through the body six. So we go through preparing a block, cutting a block, printing a book mark making cutting tips. A few example. Works from other artists and myself. The angle for cutting on negative and positive cutting on also things like reprieve, repeat pattern on looking backgrounds. So the idea is, this section shows you all about creating a single color prints on also registration and different ways that you could do registration. Chapter three is this. Advanced Techniques sections. We talk about suicide print or reduction technique where you take a block and you reduce it so stage by stage, you build up layers of color and some beautiful examples there talk about using the key block system, which is a traditional Japanese system for lining, printing on other techniques and inking tips. I'm rolling up the blend, for example, so this is an instructional manual complete guide to everything you need to know about liner cuts, some suggestions and tips on then all about addition in your work, framing your work, um, and selling your work as well if you re sources at the back there. So it's a really comprehensive, detailed guide. Now my new book, Beginner's Guide to Minor Cuts, produced in 28 20 by Search Press, begins Got to line a book. Cut is a project based book, so let's open up the pages now. It's a slightly more updated books of the quality of the photos. It's not you better, but this basically takes you through 10 print projects. So we talk initially about how to use the book. There's an introduction again. Talk about what liner cut is and how we use it, and we talk a lot about the tools and materials here to talk about the tools we told that papers lie. No additional things that you're going to need. You can see rollers here and pens and scissors and things we look at printing inks, the different types of printing ink. Again, we do discuss your work surface, and there's a image of me here printing one of the projects from the book on. Then we go through all the stages, so we go through doing a basic line, a cup print. We look at cutting techniques and practices can. So the first little stage of the book shows you how to prince a liner cup prince, a couple of tips on making a cardboard registration board and also looking at cloning up. Then we move on to the projects, so each project has instructions, tools and materials. Onda finished example for you to look at. Plus is a few more ideas here in there. So this one is all about negative. Positive white line, black line, more ideas. We've got working from photographs, more ideas. We've got working with text because there's lots of different projects contained within this book. On for most of these, there is also a template at the very back. So I skip to the back. You will see there are some templates for you to use as well. So this book is project based, So you learn Lina carts. You get into it by following the instructions and doing the set projects within the book. So these two books make a great companion set because they provide you with different information project based technique based on TV's on my two lovely books online or cut. So if you're interested in them, you will find them on my website, www dot magenta hyphen sky dot com. But of course, you will also find them on Amazon, where you can buy them from there as well. And so I hope you enjoy these books and you find them useful in your journey into line a cut.
16. Project: hello and welcome back. So now that you've watched all of the videos explaining the process of liner car, I hope that you're feeling confident enough to have a go yourself. So what I'd like you to do is have a little practice doing some practice work on a scrap piece of liner cut, exploring your tools on just exploring what marks you can make. So let's call this a mark making sampler on a way to just create a little bit of tester with your your tools and materials to create a tiny little mark making sample in, cut up on, then print it. And then what I'd like you to do is create a single color print on. This doesn't have to be very big or very complicated. We're talking something around a postcard size so 10 centimeters by 15 or sort of six by four inches, a little small. One single color print is what final project will be. So, just to recap, that's a sort of two stage projects. A little mark, making some where you create some marks, trying out all of your tools. Just making Marx cross hatching circles, waves anything you want with a piece of line. Oh, in your liner cartes. You're just experimenting, getting used to handling the tools and practicing printing. And then the second stage is producing a final finished print on. I'd love to see what you get up, Teoh. So I'm really looking forward to seeing your finished prince have fun.
17. Thank you: It's what they're very under this scale ship last, I'd like to say a massive Thank you for joining me. I really hope you've enjoyed the content on learning line. Oh, come with me. Now, if you'd like to know more about who I am, if you'd like to follow me, you'll find me on Instagram at learning Lina Cuts on my website is magenta hyphen sky dot com. So on there I have a number of resource is available to you have got some free downloadable pdf fact sheets. I've written several books online. Oh, cut on. I also run a number of other online courses on a sketching monthly membership. So do you kind of come on over and find me? I write a regular block on in the studio, Susan, where I show you some of my processes. Andi, things that I get up to you artistically on a regular basis. So do you complete the project? Do you share with me and ask me questions if you'd like to. You always welcome to make contact email to message on. I will do the best as I captain respond and to help everybody out with any queries. they have to do with lining cuts. So thank you once again. And I look forward to seeing you on another course. Take care.
 Susan Yeates, Artist - Author - Teacher