Transcripts
1. Welcome :): Hi. Are you a coffee level? The first thing is, I need every morning is coffee
along with my book. And as a coffee lover, it is my pleasure to
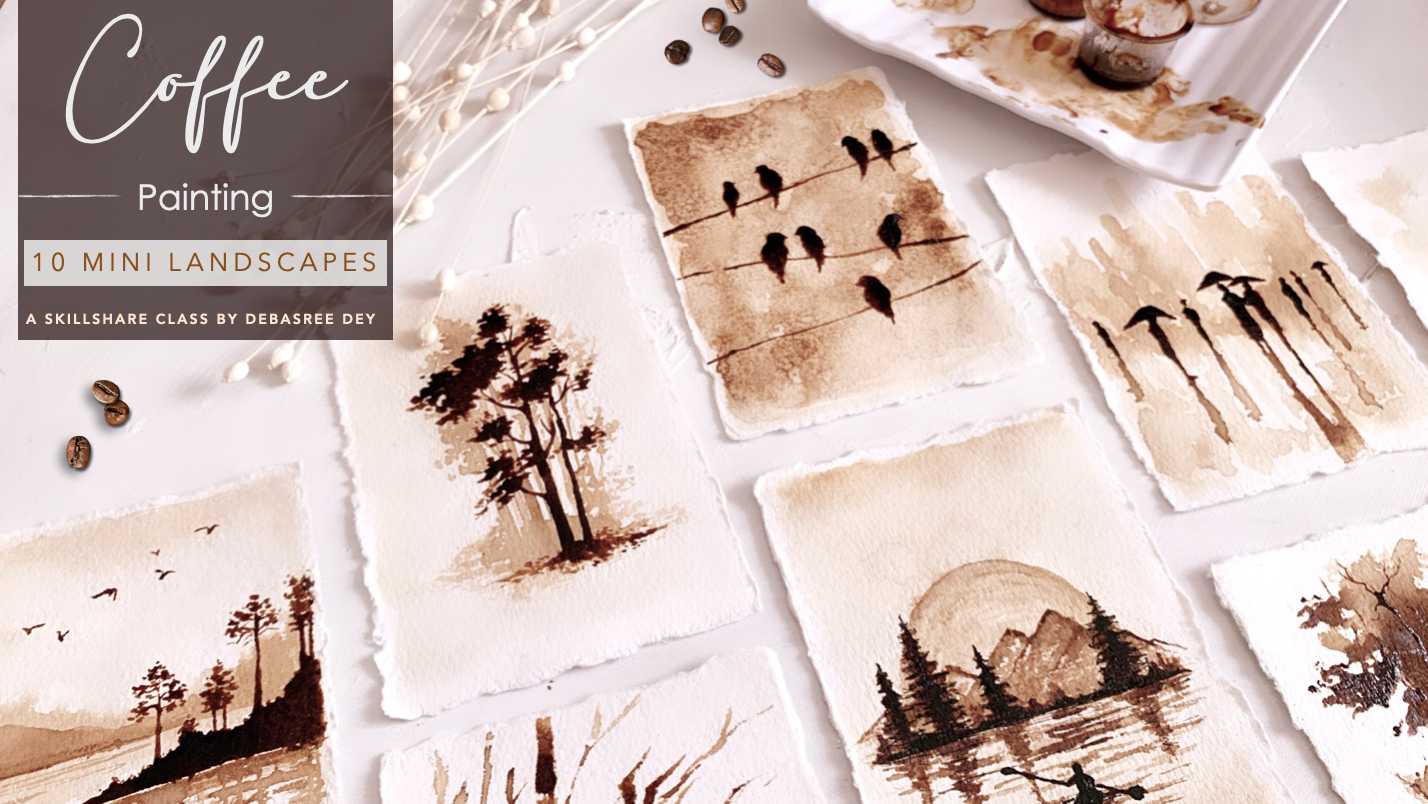
welcome you to this class. Well, I will teach you how to paint ten mini
landscapes with coffee. All you need is a
paper and a couple of paintbrushes, and
of course, coffee. I'm assuming you
want to copy that, but if not just by a small sachet of instant coffee powder
and you're good to go. I started getting
coffee painting during the lockdown of 2020 when most people were stuck at home with no access
to paint materials. So that they could create
magnificent Ottawa, excuse me, just copy. Coffee painting has the effects of watercolors and you can vary the sheets just by mixing different
proportions of watering. It doesn't affect us very much, unlike watercolor or
acrylic in the sense that it created amazing
glow in your paintings. Just by adding a week concentrated amount
of coffee paint. Hi, my name is Deepa street and I am an artist
spaced out in India. I have been teaching art
professionally since 2016, and I have taught close to 10 thousand people
in physical workshops. And I've talked to over
20 thousand people globally through
my online classes. I used to work as an IT
professional for over a decade. And finally, I decided to quit my corporate job to become
a full-time artist, to pursue my interest in art and to educate others about art. If you want to know
more about me, please visit my website, the bus rebate.com, or
connect with me on Instagram. I have divided this
class is to ten days. Each day. Just by spending
ten to 15 minutes, you will be able to create
ten beautiful landscapes. Or you can just see two ones and create oil ten of them at once. The choice is yours. I will start by teaching you how to create a good coffee paint. In altitude, the basics of
coffee painting techniques, using which you will be able
to paint, anything you like. After that, we will learn to
create ten mini landscapes. And finally, I will teach
you how to preserve all your coffee
paintings and create a beautiful coffee
booklet out of it. So I hope you are excited by now to join me
inside this class. And I'm so excited
to see you insight.
2. Coffee Painting Supplies: Hi. In this video, I am going to tell you
all the art supplies that you need for this beautiful
coffee painting class. Okay, so first thing first, you need some powdered
instant coffee. Okay? So this is the, these are the two ones that I have
used in this class. This is blue gold. I bought this 500 gram packet because I drink a lot of coffee. This is the other one,
got them in brew coffee. So you will see that I have done the mixing with
both the coffees, but I really like the
blue void one better than the Colombian real one in terms of the
darkness of the color. But you can train this
cafe also are just blue, whatever you have
at home and try out if you're getting a
quiet dark color. To be honest, in the past, I have tried liveness cafe and
we'd came out really good. But this time I didn't
want to buy anything and I just wanted to use
whatever I had at home. And I really liked
the old one. Okay. So does this mean then
you need some containers like this to create the
coffee color and store it. So these are the containers
that I store that comes with food delivery, which come with different types of sources and
ketchups and stuff. So I store them. So I prefer definitely something with a cover
because if you have a cover and you keep the coffee paint
stored with lead on, it stays as it is for a really long time
and it doesn't dry out. So you can see this color. This is the leftover after I finished this class
and it's been quite a few days and it's still
there and it's like pro properly liquid and
it's not dried. So all you have to do is
just keep the lid closed and storage plate for storing
for mixing your colors. So any plate is fine, whatever you have at home and the star is good
to have or you can use a spoon to start the coffee paint while
you are creating it. So that's all. And then you need some
watercolor paper. I am suggesting watercolor
paper because they, they look really good when you paint on watercolor
papers like this. But earlier I have done it on normal sketchbook paper as well and that also worked out fine. So I wouldn't say this
is the only paper, but this definitely gives
a very good effect. So these are the two
different types of papers, actually seemed kind of paper. This is in A6 and this is in A5. In this class, I have used this A6 ones because I want
you to create a meaning one. But if you want, you can buy these A51 and you can create
a bigger landscapes also. So I will link both
of them down below. You can buy whichever you want. And these are absolutely
gorgeous papers. You can use them for painting actually so that I
have that limit. They are really good. So yeah, some sort of paper and brushes. So for brushes, I
would recommend. So this is a new set of
brush that I have bought. It comes in a state
of nine items. So these are the remaining
brushes. For this class. I have used just two
to three brushes. This is the one I have used
for creating the background. This is a little
thicker as you can see, but you get this size
also in this set. If you don't have any brushes that how many for me to buy, I would recommend buying
this set of brushes, which is very inexpensive
and they have very tiny like peanut
brushes like this. Look at this one, this
is 00 and there is, I think one even
smaller than this also. This, this is really good. Look at this and
this is triple 0. So this is like
even, even thinner. So I didn't use this
one in this class, but this is a good segue
to have and you have all different sizes
of the bristles, so you can do all the finer
works with these brushes. And one more thing you'll
need is a gel pen. I have not used this
in all the paintings, but I have showed you
how to use a gel pen in a coffee painting
so you can use this this trick I have taught you in the painting
number one in day one. So you can watch that
to understand how you can use a gel pen
in the coffee painting. And I have also used this
watercolor paper pad. This is a 100% cotton rags and I don't know how
what is the GSM? It's not mentioned here, I think 120 GSM. Yeah. So this is how the paper is. I have a I didn't buy it, honestly, I had it at home. So I use this to show
you all the demo and all the techniques
of coffee painting. But if you don't have
something like this, you can just, if you are
buying this set of papers, you can use one of them to do your practice work
or you can do it on our sketchbook palette
paper as well. Since I had this one. So I just used it for
to show the techniques. Okay, so that's all you need for the coffee painting class. I hope you've gathered
all your art supplies. There isn't much that you need. And let's get started.
3. Preparing The Coffee Paint: In this video, we
are going to learn the basics of painting. Here, as you can see, I have two different
types of coffee in these two small jars that I got from I think our
dream online food. So the small ketchups and stuff, they come in this
model, cute bottles. I like to store them
for such purposes. So if you have them, it's fine. Otherwise you can mix it in
a bowl or a small glass, whatever you have a torque. Okay. Now the next thing, I have two different types
of coffee here. As you can see. This one is absolutely
fine grain, which is Colombian real brand, and this one is blue gold. These are the two
different types of coffee that I had at home. I didn't buy anything
for this class. Whatever you have at home. Try them off. If
you have multiple, just try all of them if you have just one,
that's also fine. The reason I wanted to both these coefficients
because I want to see if there is any difference
that comes up by doing the two different
types of brands, because earlier I
have done only with the blue gold colored in blue
is my new favorite brand. So this is the one
that I've been using as in drinking
a lot these days. And the smells are so
awesome right now. Alright, so now let's mix the coffee and
prepared the paint. The water that I
have understood from my experience is
rather than putting Goldwater a little hot
water is always good. So I have my now hot
electric cattle. I have it already pretty hot. And I am going to just start pouring absolutely less water. Do not make it to dilute. Okay. I think I had
it a little bit too much of water and
even less amount of water because we want absolutely the concentrated
amount of coffee. Alright. So I feel this is a
little more in this one. I will try it adding even
less amount of water. If you need more water, you
can always added later. Okay. Let me make this one. The smell is so good. Okay, this seems a
little bit more teacup. I'm going to start it a
little bit more and make sure that it blends in properly. Almost looks like a spreadsheet. The head. Okay. This is the
Colombian blue and this is the blue gold. And this one definitely
looks a lot darker to me. But I'm going to try it out or before and
see how it looks. Okay, so here goes
the two coffees. And here I have our
watercolor journal, as in a watercolor paper pad. This is what it is. I had it from a
really long time. And watercolor paper
is good because this is kind of like
watercolor technique. And I am going to take out one of the papers
from this. Okay? Alright, now let's try this out. Here. I have an acrylic
painting brush. I have only acrylic painting
brush because I'm an artist. I don't have watercolor brushes. But if you have
watercolor brushes, by all means try out
with a watercolor brush. I believe it's gonna be. I mean, I don't know how
watercolor brushes are. Definitely try it
out. Okay, first, I am going to try. Which 01:00 AM I
going to try first? Leaving tray, the lighter
one that I feel is light. Okay, So this is the
Columbian real one. And taking the absolute
concentrated amount, I'm adding more
concentrated among. Okay, you see, the more
wins a minute added more, it just became so concentrated. Okay. And now I'm going to wipe off just a bit in the people in their
plate that I have. You're okay. And just drag it off without
having a lot of water. Okay. Now, you can add a little
bit of water to it also and drag it down and
make it even lighter. See how light it can get. We want to see all the
properties of this, how dark or how
light it can get. So I'm just going to
add more amount of dark on the left side just
to see once it because, you know, right now it's wet. I just added it. Once it dries, we will know how dark or
how light it is still. At the moment. It's looking very dark and I quite like it. But let's find out what
happens after it dries. I'm washing off my
brush and I do though. The gold. Okay, this
is the blue cold. Okay, let's see. It was looking already quite
dark in the bottle itself. And yes, it seems like on
this a bit more darker to add some more. Okay. Same thing. I'm
just going to wipe off just a little bit on the plate and keep dragging this and make it more dilute
and see the color it gets. I am loving it. You see what's
happening here is it's just flowing towards the right. So I want it to flow
back to the left. I'm just going to push
it down back like this. Go back, go back, go back. Okay. That's fine. Okay. Now, let me just drag this one a little bit more
and see how light it can get. Pretty light. So as you can see,
I definitely liked the quality of blue
gold color a lot. This is becoming quite light, or maybe just
because it flew off. That also could be the reason. Or maybe I added a bit
too much of water, then can be so many
reasons for this, right? I just added a little
bit more to this and I'm going to let it dry and see what happens after this dries.
4. Coffee Painting Techniques: Okay, Well, the first
paper is drying. I'm going to show
you a couple of more things in
different new paper. So first of all, this is how
the water looks right now. I just watched it a couple of times while doing
the previous lesson. And this is how the water is. It's kind of like light
coffee column and see just using my brushes absolutely
clean. Right now. I'm just going to use this
water and add it on the paper. It's almost clean, but you getting a little
light shade of brown. And see this least amount of pain that I have
on the left here. I'm just taking that and
adding a nice shade of mix. So try this off and see how your coffee color and the brush works with
water on the paper. Okay, now let me start off with the bruise so I use both
and I really like this one, so I think I'm
gonna go with this. Okay? So there are two things. First is you'll apply
the color, coffee color, and then you drag it down and water and make it lighter
as it goes down or goes up. So basically you
are just learning to create different shades using this coffee color
light, dark to light. So this is going to be a
very interesting thing to do because this is what we're going to do
in our landscapes that we will learn to paint. And you can just add
a little bit here and there to create some
of the nice things. Whatever design you are
trying to create, right? So just practice it out. It's just fun to do it. Try out all the different
things that you can do. The next thing that I want to show is first thing
what I'm doing is applying a lot of water. And then I am taking a
little bit of coffee, mixing it on the plate. And I'm just chopping it. In some places. You see how it spreads onto
the water that is there. I really liked the spreading
of the colors like this. Okay. Another thing is, let me take a little bit
more of the paint. And this is basically
kind of a dry brushing. So the texture of
the paper is going to help me create dry brush
techniques like this, where the white paper after
brushing it on the paper, also the light
fixtures are visible. So it can be useful for
doing mountains like this. Very dry brush stroke it on the P part and you get
this beautiful textures. Okay, What more can I show you? What more can I show you? Okay, so when this lead dries, you can go on top of it and add more paint on the top if
you need to duck in it. It can be done very easily. It can be used to
create trees like this. Like if you're creating bushes. So one layer you can do a
little light like this. So basically in this lesson, I really want you
to focus on and see how much different
things you can do. I'm just trying out a few
things here and there. And seeing how the
color reacts to the watercolor paper and what all it allows
me to do, right? So try out all sorts of stuff. See how your brush reacts
to the color, to the paper. I'm just trying random stuff. I don't have anything
in particular in mind, just trying out different stuff. Okay. One more thing I
want to teach you is a very beautiful
effect that you can get with the coffee color. So all I'm doing is adding a lot of water and coffee color. Okay? I think this works
a little bit dark. It looks much better. So the technique is
first to add a lot of color like I have added here. And then you get some salt. So I have one small
down here of salt. This is Humana and being sold. And all I'm doing is taking
just a little bit amount of salt and sprinkling
it on top of this. And you see the saw, it helps create some
beautiful textures. Can you see that? Okay, let me do this on
the light one as well. So this is kind of like
the light one and we can experiment and find
out what happens when we add the salt
on the lightest ****. Oh yeah. We can even see the stuff
happening here as well. So how this picture looks, you will get to know once this has completely
dried and you can rinse off the dried salt, then you will get to see
finally how it is looking. Okay, that's all. So just try it out. Try out all different types
of whatever you want to do, whatever brush you have. I want to use one of
my liner brushes also and see what all the stuff I can do with a
small liner brush. So especially if I want to paint a tree. Nice and straight Adams, listen to this and see how, what happens to this. Okay? So that's somewhat, It's really fun to
experiment and see what your coffee can do
on watercolor paper. And it's really fun to see. I think there's some
salts here as well. But that's okay. We'll see what happens after HIS justly on my own and
just creating some stuff. So do check it out and
see what you can do. Just have fun with it. Just waste a page. Basically, this is my
wasted page, right? So it's not going to
keep it or anything. So just trade off and see what all it can happen
once the solid dries. I'm going to show you
how the texture looks. Look at this with a
small round brush. I can do so nice
textures, right? Okay, here it is after
it has completely dried. So I have to tell you that it took a long time to
dry it with a little sticky when it was wet and I had to like
leave it overnight. And today's the next step that I'm shooting because
it took a long time to dry. But after it has dried, you would see that this is, it's looking like it's wet,
but it's actually not. It has completely
dried and I can touch it for it without
feeling that stickiness. But when it was wet, a little bit wet
also, if I touch it, it would feel sticky and the color would
come into my hands. But right now it's completely
dried and here is the soil. I haven't taken it yet because I wanted to show
it to you while I do that. So check this out. I'm just giving it a rough nudge and taking off the salt
completely stuck to it. Actually, I kinda like
he's also like over here, you see the dark ones, they giving such good texture. So I don't really want
to take off all of it. Whatever is coming
off is what I will. Just get rid of it. Alright? Even this one has dried by now. So look at this is
looking beautiful. I absolutely loved this
one over this one, which is very obvious
because the color is dark or even if you
look at this side, the color is pretty
dark over here, then this honestly
not huge difference, but it's just personal choice. So I wanted to show
you is look at how it looks closer, right? You can see it's looks
like as if it's wet, but it's not because
I can touch it very nicely and show you that there is no color
coming off of it. But it is looking really glossy after it has dried and
it's looking really good. It's a very thick one
over here because there was a lot of concentration of
the coffee color over here. So it's looking very
thick and dense, and I absolutely love it. Alright, so now that you have understood all the basics
of coffee painting, Let's get to one landscape.
5. Coffee Painting - Day 1: Hi, I'm Dave one, we're going to learn this
pretty mini landscape of the mountain
trees and a boat, man rowing a boat. Alright, let's get started. I'm using this round
brush, size six, and I'm applying
some plain water first onto my watercolor paper. The coffee that I
have in this is a very dense pink color. And whenever I need to
dilute it and we'll add a little bit of water and
dilute it on the plate. So take absolutely
less amount of coffee. So even if you pick up the thick dense paint
from the coffee paint, just tap it off on the plate and just
use very less amount. At the moment, what
we're doing is adding a lot of water with a
tiny touch of coffee. Just to create the background. Survey, easy. Just spread the water and
add very tiny bit of coffee. Just make sure that you're not
adding too much of coffee. Because we don't want to create a very dark
black background. We want to keep the
background light. So make sure you add really
less quantity of the coffee. Okay, now I'm picking
up just a little bit of leftover coffee that I
had kept on the plate, which is little bit darker. I don't want it to
be absolute dark. The darkest amount that is
there in the coffee paint. I don't want so dark, but I want a little bit
darker shade than the one that I painted the background
with. A little bit dark. And I just created a horizontal line and
I'm creating the Sun. So all I'm going to do is
just go in the direction of the sun and add the color. It's not the absolute
darkest shade. I'm adding just one
shade darker than the background so that it looks prominent on
the background. Yet it's not a very dark because the foreground objects are going to be
even more darker. Good. Just gradually
increasing the darkness of the coffee on the border. Now I picked up quite
a bit dark amount of coffee and adding
the mountains. So as you can see, I'm gradually increasing
the intensity of the coffee paint and adding
the objects in the front. Just create any random
shape of the mountain. Doesn't really matter. What matters is that you fill up the mountain with a
very dry brush stroke that I taught you in
the techniques video. So take absolutely
less amount of paint if any of you
pick up little extra, you can just wipe it off on the tissue paper and it
absolutely less amount of paint and add it
on the mountains. Make sure you are not completely filling up the mountain area. Because the spaces that
you're not going to fill up is going to get
the look of the snow, which is basically the
lighter color, right? So just make sure you're not
completely covering it up with coffee paint and using
the dry brush stroke, you are leaving little bit of the paper from the
background to be shown. Alright, now I'm picking up
almost the same intensity of the coffee paint and adding the water lines in the
lake in the front. Just make sure while painting this water lines that you
are breaking the lines in between and you're not creating
one long horizontal line, and you're creating small lines. It doesn't have to be absolutely horizontal line make them a little wavy because it's water after all that
you're painting. Okay, now I'm going
to introduce you to a technique which is kind
of like a cheat sheet. So what I'm doing here is adding a little bit of darker
tone with a black gel pen. So if you have a black gel
pen at home, you can do this. So these are not going to do in any other of the paintings. I'm just doing it in this one. In the first one that you
understand how you can enhance your painting by
adding little darker tone. This can be achieved
by adding a very huge, strong, concentrated
coffee paint, which looks almost like black. But I'm teaching you how if
there is anything even well, we're going to paint the bugs. If you are having difficulty
doing it with the, with the brush, you
can always do it with a black gel pen because
it looks fantastic. So here I'm creating
the distant bushes. First with the pin. And then I'm going to go over it and add the coffee
paint on top of it. Before adding the plants, I was just, you know, just touching up a little bit of the mountain because
once the trees come up, I want him to go back
and do the mountain. So if you want to do any
changes to the mountain, this is the time to do it. Okay. Now I'm painting the rather skating the
tree with the pain. If you find it
difficult to do it, you can take a rough sheet
of paper, just do it with, uh, with your pen and just
see how it's looking. Do it a couple of times. Watching this, watching the way I'm doing it here and you
will be able to get it. It's very simple. This is just for giving the
structure of the trees. And then I'm gonna go over to it and we did with the coffee. Okay, now I'm dipping my
brush in the coffee beans and applying it directly
because right now I don't want to dilute it or, you know, tone down
the color at all. Right now I'm taking
the paint directly from the coffee paint mug
and a painting it directly onto the
trees because we want it as dark as possible. Right? So just go over your pain marks and fill it up with the coffee. So they're a little bit
of space left, left. As you can see, I haven't completely filled it up
while doing it with the pen. Those are the spaces that we're going to fill
up now with the coffee. Excuse me. Anytime you feel you
have picked up a bit too much of paint from
your coffee mug, then feel free to debit of on the plate
or the tissue paper. The reason I'm not doing it on the tissue
paper is because I don't want to waste the paint
if I keep it on the plate, it can be always used in the future by mixing
it with water. So that's the reason
I'm just tapping it on the on the plate and I can use it a little
later as well, so it's not going to get tested. You can see the trees
are starting to look really dark and bright and everything and almost the pen ink mark is almost not
visible, which is awesome. But even if it is
visible, it's black. It's going to get mixed up into the coffee
band, which is fine. Okay, Now it's time to paint all the reflections
of the trees. At this time, make
sure you're not using the absolute dark color of the coffee and you're diluting it with a little bit with water. So it gets that watery
reflection effect as well. And looks good. You are diluting the paint also by adding little bit of water. Okay, It's looking really good. Very dark and bright. And we can see all
the different shades of the coffee is very
visible in this painting. First the background,
the lightest layer, then the sun layer,
then the mountain layer in the tree layer. So everything is
very nicely visible. And just by increasing the darkness of the
coffee color we have, we have created a perspective
also in the landscape. I'm just adding a border line to the sun so that it doesn't look very mixed
up with the background. And just creating some
pictures into it. You don't like
what you just did. You can always dab it
off with a tissue paper. That is the best part because it's almost like watercolor. You can always just dab it
off with a tissue paper. Okay, Now it's time to paint
the boat and the boat man. So again, I'm doing it
with the black gel pen. You can, if you are not feeling very confident of doing it
directly on the painting, I would recommend that you just create this on a
graph sheet of paper. First. Look at the
way I'm doing it. Just do it on a paper and you
will get the confidence to come back and do it
on your painting. And just like the trees, I'm going to paint it
with the black gel pen. And then at the coffee
color on top of it. Again, I'm doing it only in this painting so that you
understand how you can do get the dark color by using black gel pen if you're not very confident
with the coffee. But in the next nine paintings, I am not going to do it
with the black gel pen. I'm going to do it
directly with the brush, but if you want, you can
always use this method. There is nothing wrong in it. Okay? Now I'm just creating
some reflection. Well, there you go. The painting is almost done. Now. I have lifted for
trying for a few minutes. And as you can see that the
trees are completely dried. And now what I'm doing is
adding another layer of coffee on top of it to make it look dark and to get that glossy coffee look
in the final painting. Because that gloss,
I really loved the glossy effect
of the coffee when it dries on the painting. And for that, you have to add another layer of coffee
once it has dried. And it looks so that, you know, you can give that cake, coffee, look in your paintings. So that is what I'm doing is
just the same, same step, just doing it once more. Well, there you go. The whole painting is done. Can you see how nice
the glossy effect of the coffee is looking on
the trees and the boat. So that's all for today.
I'll see you tomorrow.
6. Coffee Painting - Day 2: Hi, welcome to day two. For today, I have decided to
teach you this solo tree, which is not very much
of our landscape, but it's a very important
element of a landscape. So if you learn to
paint this tree, you will be able to create
anything that you want to create any landscape and
place this tree into it. So a lot of new techniques that you're going to
learn in this building. Right? So let's get started. I'm starting off with my
liner brush and starting to, to paint the trunk of the tree. So in this one, I'm not painting the background because I don't want to create
a complete landscape, so just painting the tree. So here I'm trying to
create the shape of the chunk with the liner brush. So I'm going couple of times because the chunk is quite dark. So I'm not really diluting
it with water and taking that dark coffee color
created in my cup. Now gradually
increasing the width of the tree trunk and also adding, starting to add the branches. So one thing that you need to make sure
where you are painting the branches that you are
going from inside, out. And you're using a liner
brush so that you can create really pointed branches
as you are going out. So if you're painting, trees are branches
for the first time, you might find it a
little difficult, but trust me, it's really not difficult if we
just do it once. So try it out on a
rough paper first. See how well you can create. One thing to make sure are
wanting to keep in mind while trying to paint branches is not to have too much of paint. If you have less amount of paint and keep your brush
dry on the tape, you will you will be able to create a really thin
lines like I'm doing. But if you have a lot of paint, it will create a big
blob of water and it will make your
branches pickup, right. So make sure you have
less pain, right? I mean, I won't really
say less amount of pain. Just the right amount of paint. So just pick up the brush and
because the coffee paint, try creating some lines on
our rough sheet of paper. Just create some
horizontal lines or vertical lines or
diagonal lines. And you will see how much, how well your brushes
responding to you and how nice lines
you're able to create. And then you can
come back here and start creating all
these branches. So it's a little
tedious process. I'll just go slowly and just create one by one
all the branches. There is no right
and wrong here. We can just create
any different kinds of branches as well. So have fun in the
process and watch, watch me doing the
branches and the branches. Just like the way I am doing. All you can do it
in your own way. Okay, now I'm just
adding little bit of water to the coffee band to end diluting it and creating little
bit of ground. The tree. Just to add little bit of
beauty to the painting. Okay, So now I'm done with
the branches and I switch to my liner brush to
this little bigger, round brush size six. And I'm adding all the
dark coffee tones in the places of the trees where we took the shadows
of the trees, which are mostly
towards the bottom. I'm adding the absolute
darkest layer, segmented coffee color. Now I'm adding little bit of
water and diluting it and taking it upward by not spoiling
the Internet dark spot. I'm just adding the
water on the side and dragging it on the sides to be able to create the lightest
shades of the coffee. What I recommend is you can
just watch the leaf spot a little bit and then
you can start painting. It's really easy. Just watch me once and
then pause it and do it. I'm creating little bit of like small leaf
textures on the side, rather like after painting
the whole globe of the paint, which is like the tick
condensed leaves, I'm just creating a few small
leaf textures on the sides, which adds a lot of depth into the painting by adding little
small leaves on the sides. I'm just going very
slowly on the side and creating all these
small, small leaves. Which adds a lot of beauty also. Rather than keeping like
one solid chunk of leaves. Now I'm taking the
absolute dark amount of the coffee paint
and I'm just adding little dark shades
just on top of the lighter diluted shades just to create the light and
shadow of the trees. So wherever I'm adding
the dark shapes, that is where the shadows of the leaves are being created. So I am keeping the
highlights on the top and I'm creating the shadows towards the bottom
of the leaves. Here again, I'm creating some of the small nose leaves
around on the sides. Do them slowly because these are going to create
the beauty of the painting. Okay, so that's it
for this layer. I'm going to let it dry now. And after a few minutes, once the dark shades
of the copy has dried, I'm adding one more layer
of dark, dark coffee color. My color was also over, so I prepared some more
of the coffee paint. And now I'm just
adding this time, not with the round brush, but with a small liner
brush because I want to have a controlled approach
while adding this. I don't want to add too much. I just wanted to add a
little bit here and there, just to create the dark
shadows. In some places. You can see how gotchas, the coffee color is looking. I'm going to let it dry. And once again see the color
has completely dried now. And now what I'm
going to do is add the branches once again
on top of the list. The thing that we added, but this time I'm
gonna do it with a very thick dark coffee
color, almost like black. So this is the place where
you can, if you want, you can do it with
a gel pen also. I am doing it with
the coffee colors so that once it dries, I, I like to see that glossy
effect of the coffee color. And that's why I'm just
highlighting the branches once again with the
dark coffee color. Okay. Well, I absolutely love
painting branches. It's very therapeutic for me. So I'm just going all over it and adding all the branches, small branches as well. But if you want, you can, you don't have to do this
much or you could just do it with a, with a pen. Or you can have fun
in the process. Rather than looking
for the outcome, just enjoy the process and just paint some more
branches here to there. So just painting little bit of the base ground and
the painting is done. You can see how nice
the chunks are looking because I've added
a thick amount of coffee paint on top of
this and once it dries, it's going to stay like
this, which is so good. All right. So thank you
for joining me on day two and I will see you tomorrow.
7. Coffee Painting - Day 3: Hello, hello, Welcome
to Day three. Today, I decided to teach
you this pretty buds, which are in itself a beautiful landscape
or a skyscraper. So you're going to learn how to paint this beautiful birds. And in itself, you will
create a beautiful painting. Alright, let's get started. I'm starting with the big
round brush, size five. And I'm creating
the background with a very diluted amount
of coffee paint. As you know, for
the backgrounds, we always want to do a light shade and
not a very dark one. And this, we actually
want to do a dark one. But for generally for
all the backgrounds will do a very light
shade of coffee color. And then we will paint the
actual objects on top of it. Here I'm just adding a few
darker tones on top of the lighter ones is to give some texture to the background, not just make it a
Catholic flat background. And I'm going to let it dry
for a couple of minutes. Because unless it is dried, you won't be able to paint
the objects on top of it. So as you can see, the
paper has completely dried and now I will start
painting the boards. Okay, so here I am doing it directly with the liner
brush on the paper. But what I want you to
do is watch me do it. And you can do it directly on your painting paper with black gel pen like
I did on day one, and then add a coffee
color on top of it. Or if you're feeling
bold enough, you can follow me and do painted directly with
the liner brush. And if you find it, if you find that
intimidating as well, you can watch can do is you can try it out
on a rough paper. Ain't the shape of the buds. Because if once you do it just
once on a sheet of paper, you will get the confidence
of able to do it, and you'll see that it's
not really very difficult. All you have to do is just watch my process and paint the boards. So there is not too much
that I can explain here. All I would request you
to watch the process, see the way I am going and creating the
shape of the birds. And you will be able
to do it on your own. It's really, really simple. I want you to understand that it's not
complicated because once I know from my past
teaching experiences, I have heard it so
many times where my students that painting
birds is so difficult. I want you to
understand that it's not if you just
follow the process. If you see how I am
going step-by-step, you will be able
to do it as well. One more thing to keep in mind while you're
painting the bird. Not to keep not to
paint it absolutely. The darkest coffee color. Yes, of course, that
is what I'm doing. But also too, if you
look at the tail, I have kept it a
little bit of diluted on one side because you want to add little bit of highlights
to the buds as well, right? So that's the, that's
pretty much the process, that's pretty much
the technique. I want you to watch
the directions I'm taking while creating
the shape of the bus. And then just do it on a piece of paper and then
do it on your painting. I'm sure you'll be able to
create some beautiful birds. Alright, so I'm going to let you watch and painted on your own. Me. Thank you. I hope you're seeing
by now that it's really not difficult
to paint these birds. If you follow the steps
that I'm doing with, you will be able to create
all these beautiful birds. So I'm actually excited
to see what you create. Because I always hear that painting was
a difficult and I, I wanted to say painting
birds are not difficult. It's really easy. Okay. So show me
what you just did. Alright, so now we're done
with the three paintings. So look at these birds, especially with
the coffee effect. How glorious they're looking. I thank you so much for joining me today and
I'll see you tomorrow.
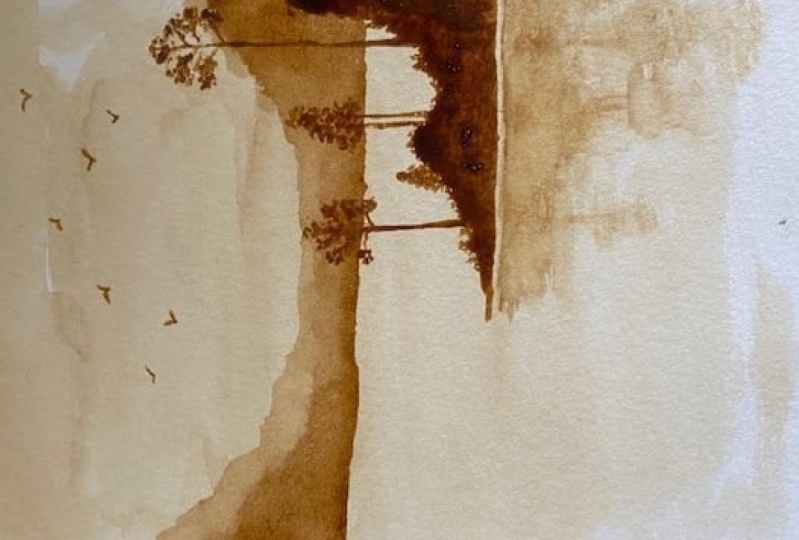
8. Coffee Painting - Day 4: Hello and welcome
to Day for today, I'm going to teach you
this pretty landscape. It's a very easy one
just by changing the darkness of the coffee paint you're going to create
so many perspectives. The tape in this landscape, and it's so easy yet
it looks so beautiful, so excited to teach you
this painting today. Alright, let's get started. So as always, we start by
creating the base color, the background color with
my round brush, size six. And I hear what I'm trying to
do is add a coffee color on the top and not added much to
us the center of the paper. And then I'm going to add little bit more dark again
towards the bottom. Here. Well, creating
the background itself. I'm creating some of the
water lines because I know there's going to be a lake in the bottom half
of the painting. I'm just creating some of
the water effects already by using the direction
of the water. Okay. Now, I just picked up
a little bit darker shade of the coffee paint and
creating the horizon line. And I'm creating the
distant mountain, as you can see
since I just added immediately after
adding the background, the color is kind of spreading
into the background. Background layer because it's like watercolor, it just blends. It's kind of like
wet on wet, right. So it's blending into each
other and I wanted that bleed. That's the reason I did not
stop and immediately added the darker layer because once this dries it looks most liked. This background mountain is kind of like blended into the sky. So that is the effect
I wanted to create. So I want it to bleed with
each other a little bit. Okay, Now, but now
I'm going to let it dry before adding
the next object. I want this layer to
dry so that I can add the darker layer of
mountain on top of it. Okay. It's been a few
minutes and as you can see, the complete
background has dried. And now I'm adding the little darker layer of the mountain in front of
these distant mountain. And I'm just increasing the intensity of
the coffee color a little bit more than
the previous layer. And then adding the mountain, the simple here on
the right side, well creating the mountain. I'm also making sure
that edge is a rough, rugged eight, which is almost like looks like the
trees over there. Rather than making a flat
edge of the mountain, I'm doing a little rugged inch. I'm just darkening the bottom
of the mountain little bit and adding little bit of
shadow to the mountain. Now with a darker tone, I'm adding the land in the front are rather on the
right side of the landscape. And this one is going
to be even more darker than the previous mountain
layer that we just did. This is That's why
I put this layer. I switched from my round brush, the liner brush
because I want to do it with lot of specifications
and minute detailing. So the pig round brush is going to be difficult
to do all of that. That's why I switched
to the liner brush. And I'm creating the land from the right with the liner brush. And I'm adding absolutely
the darkest layer of the coffee paint in here. Okay, So the land, it is almost done. And now before
painting the trees, I'm just going to create some of the water reflection
at below this land. And for this, I am not using the absolute dark
layer and just have turned out the color
a little bit with the water and adding
all these water lines. Now let's start
painting the trees. Okay, so for this I am taking the color directly
from my coffee cup. And because we want to
create absolutely dark, blackish color G. So I'm just creating the chunk and then adding some branches. And Bill, I'm going to
add some loose leaves. Don't want to add too much
because if you add too much, it becomes too
much clutter-free. So I'm adding very loose
leaves just a little bit. And that's the last piece
of tree that I'm doing. Almost all of them off with
a very similar technique. Just create a line and then add some loose
leaves on the top. Okay, So now all
the trees are done. And now I'm going to take a little diluted paint and create the reflections of all
the trees. At the bottom. For this, having a
little bit more water helps because you're creating
a reflection, right? So if you paint it with
water, it looks nice. It looks like almost
like the you know, the water is moving, which is what it is. That's my watercolor effects. Walks. Nice. Okay, now I'm going to paint the last
element of the landscape, which are the small birds. So now, by now, I hope you're already an
expert in painting birds, but here we're not going
to paint big birds. All we're going to do is just a few lines to
create the words. And one of the things to keep in mind when creating
this small versus you are creating V-shape just by bending the lines
rather than keeping it straight with just
spending the lines. So the buds are all, most, all of them are in
V-shaped, right? I'm just changing
the shapes here and there for some of the bus, not all of them and all of
them are absolutely these. Some of them are
almost like a line. But while painting
small buds, I have, I have noticed that keeping in mind always helps you
create beautiful birds. Okay, I just realized
that I forgot to do the reflection of
the tallest tree. So I'm just adding
that one and just darkening the reflections just a little bit more than before. Not too much dark anyway. Okay. Just adding one more dark
layer just below the land. And we are done with
our beautiful painting. Look at this gorgeous
coffee color in the land. And I absolutely loved
this glossy effect of the golf you're painting
at the end to do things. So so thank you so much for joining me today and
I'll see you tomorrow.
9. Coffee Painting - Day 5: Hello and welcome back. Today, on day five, I'm going to teach you
this beautiful painting. Okay? So this is the background. I've tried to create a
little stormy effect. And this bird is sitting
on a road outside. And I have also tried
to give an effect. As you can see, the buds are
looking a little soaked up, a wet because it's kind of like they have
got wet in the rain. So it's like a rainy day effect that I had tried to
create in this painting. Alright, so let's get started. I'm starting with my
big round brush and creating a darker background
this time because you know, we are going to create
a stormy background. So then adding a
lighter layer of background about adding quite
a lot of dark background. And as you can see, I'm trying to create some effect also on the background, right? So it's not like a
smooth blend background. I'm adding just a little bit, little dark colors somewhere and little lighter
shades in some places. Now, I'm going to let
it dry and then add another layer of dark
backgrounds on top of this. So this time I'm adding a lot of dark coffee color
in the background. Because I'm going to add the ostomy bag realm
and effect using salt. So I'm adding, adding the
coffee dark color with a, with a lot of water because
you have probably seen already in the techniques video that while I add the salt, you need to have quite a
bit of weight background. Otherwise the salt
will not be able to react to the background
if it is a try. So here is my soul and I'm adding just sprinkling
little bit here and there. So wherever there
is not much water, the salt is not going to react. So I'm adding some more of
water and adding more salt. Okay, That's all. Now.
I'm going to let it dry. I'm going to keep
it under the sun and let it dry because
unless and until it is dried you wouldn't be able to get rid of all the soil. So give it some
time, let it dry. Look at how beautiful the
textures are looking already just by sprinkling the
salt on top of the paper. The paper is completely dried. I kept it in the sun for some time and now it's time
to get rid of all the salt. So as you can see, I'm just rubbing on top of
the paper and getting rid of all the salt so
that the paper is smooth enough again so that I can paint all the
buds on top of it. So just drop your hand
or your finger on top of the paper and
you will be able to easily get rid of all
the solid from the people. Okay, All my cleaning
of the salt is done. And now let's start beating
all the bullets on top of it. Okay, so I have I'm using
my liner brush now and just creating the ropes are the
rods on the three lines first. And now I start
painting the boats. Like I said, I'm trying to create a little weight
birds here, right? Because they are sitting
outside in a stormy weather. So all I'm doing is alone. I don't want to create a crisp edge on the
border of the buds. So I'm using little
bit more of water on the side and giving them a
little wet look on the edge. So that's the beauty of painting
with watercolor effect. You can add that
watery effect on the side by adding little
bit more of water. So that's the effect
I'm trying to get. And I am making them sit in different directions so you can place your buds whichever
direction you want. You can just paint a couple
of them following my lead. And you will understand
that, you know, how easy it is to paint a
bird is just do one body, one head, and one
tail. That's it. These are the three
objects that you, three sections that you have
while creating the board. And you can do the beak in whichever direction
you want to make the bud look like it is
looking in that direction. That's pretty much it. There is no critical technique
here that I can teach you, but you can just watch
it and paint it. Again. If you find it
difficult to do with a brush, you can always do it first
with a black gel pen. You can, and then on top of that you can add
the coffee color. But the beauty of this
painting is going to be to have the coffee glossy
effect on the buds. When it dries, the buds are going to pop out a
lot on the painting, giving it away 3D
look of the painting, which is the beauty of
coffee painting, right? Getting that glossy look. So it's going to look really cautious when you paint
with coffee on top. Okay, Now that all the
birds have been painted, what I am going to do is go once again with good amount of the dark coffee color and
add a little like you don't, like, just add a blob of dark coffee color on top of the board to give them
the absolute dark color. And this time you can see
I'm just adding little bit of diluted effect
also on the side. While I'm adding the dark
coffee down in the center. Well, there you go. The whole painting
has been done. Look at the glossy
effect of the buds, how beautiful they are looking. I hope you injected
this painting. Thank you so much for joining
and I'll see you tomorrow.
10. Coffee Painting - Day 6: Hello and welcome to day six. Today we're going to learn this beautiful misty pine trees, which we're going to learn
to create in layers. And then create
some tree branches and buds to finish a
beautiful landscape. This time, again, there
is no background. So I'm going to start by
painting the misty pine trees. I am using a very dry brush
to create the textures of the land on which the
pine trees are going to. Stan. And I'm starting by doing the most distinct
pine trees first, which means that
I'm going to create absolutely light
colored binaries first and then add
the dark ones. So at this point I don't
have much water in my brush and I'm
taking pretty much dry strokes to create these
tree-like structures. And at the bottom I'm
just adding little bit of water just to blend
it into the background. Now, I am starting to paint all the trees on top of
the land I just created. Again, it's a very, very thin, diluted color. It's not very prominent one. And once it dries is going to become even
lighter so that we can end the dark layer
of trees in front of it. Okay, So I'm pretty much
done with my entire row of the pine trees and just
creating few of the branches. And now I'm going to
let this layer dry. Remember, unless
this layer dries, if I go on top of it, it's going to bleed into it
so I have to let it dry. So now the paper is
completely dried and I am adding a little
darker layer on top of it. And the technique of creating the trees are exactly the same. You go in as exact direction
from top to bottom. And you create this
beautiful pine trees. Now after painting the
pine trees at the bottom, I'm just going to
blend it in into the the bottom layer as if it looks like there
are clouds floating in-between the two layers
of the pine trees. And we're not going
to paint the clouds. That's why we are
diluting the bottom of the trees and blending
it into the background. Okay, now I'm going
to start painting the buds you have
already learned. By now. You have to try creating it in the V-shape and then make
the lines a little curvy. That's how you create the birds. Some of them you create in a
little different structure, but more or less,
they are all the buds are pretty much all
the same techniques. So just keep creating some of them more straight line age. Some of them live
in the v direction. And this way you can just follow me along and
create all the buds. Now the final element
of the painting, we're going to paint
some of the tree, tree branches popping out from the bottom right
corner of the painting. So you probably have learned how to paint three
branches by now. So just use your talent
and paint some branches. It doesn't have to be
exactly how I'm doing. And you can create some of the
branches in your own ways. But this is just adding a little bit more
element our painting. Alright, that's all. And we finished this
beautiful landscape. Again, how easy is that? Don't you think it's
such an easy painting? So quickly you can create
something so gorgeous. Let me know what you created. Show it to me by posting below. Thank you so much for
joining me today. I will see you tomorrow.
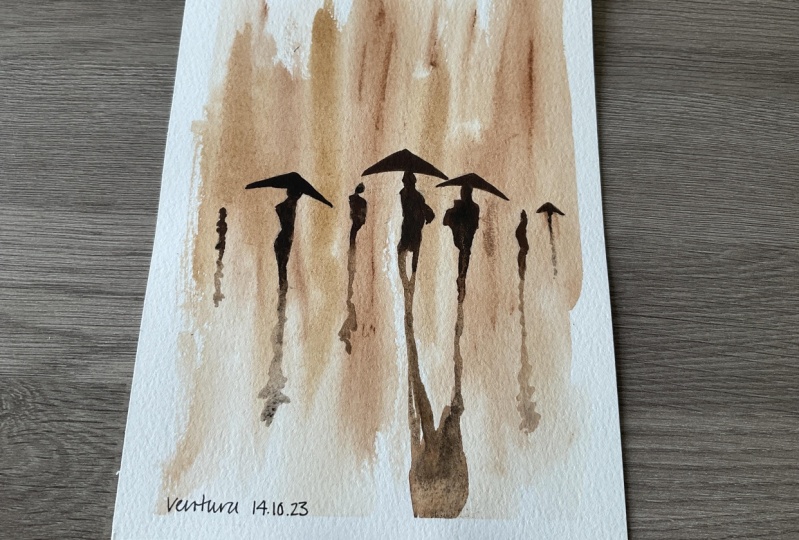
11. Coffee Painting - Day 7: Hello and welcome to Day Seven. I think this is one of my
most favorite painting. Painting a rainy day seen with a cityscape
in the background. Kind of like, you know, under the hazy
effect of the rain. Once again, I am creating
with my thick round brush, kind of diluted the coffee
bean, little lighter. And with that, I will start painting the
background cityscapes. I'm trying to paint
a block-by-block the buildings as
seen in a cityscape. And I'm keeping them absolutely light colors because I don't
want them to be too prominent because we're going
to go in the background and are we to look hazy at
the end of the painting? Now after creating almost all
the buildings and dragging all the pin down at the bottom and kind of blending
it into the background. Now I am creating the shape of the buildings prominently
for only a few of them, kind of trying to create a rectangular region
outlined to the blocks. No, I am creating the bottom of the cityscape and blending
it into the background. So this is going to be the watery it road
of this painting. So I'm not creating
it absolutely smooth. I'm trying to create
textures by adding little dark colors somewhere and the light colors in some places. No, I just did some
less flattering on top of the painting to create some of the reflection of the people that I'm going
to paint later for that, and also for the cities. All the buildings that
look the background. I'm creating some of the reflections on the road
by creating vertical lines. Now, I'm creating another
little darker layer of buildings in front
of the lighter one. Because the, just to show
the perspective, again, that little front one's a little bit more
darker cell creating another layer off diabetes. Okay, with that, the almost
entire background is done. Now I had to let it dry
because unless it is dried, I wouldn't be able
to paint the dark. Coffee colored are human
beings on top of it. Okay, so now the paper is dry. I've kept it out four
Good, five-minutes. And now with the liner brush
and the direct coffee band, I am going to create the umbrellas and the people
and the human bodies. Now, if you have never painted human bodies
in landscapes, it might, you might find
it a little difficult. But if you just watch my steps. The way I am progressing
for creating this painting, each of the human bodies. If you just watch it and do
it once on a rough sheet, you will get it right. Or if you're feeling
bold enough, you can directly try it on
your painting and I'm sure you'll be able to do
it absolutely as nice. Thank you. Just remember that to show the landscape when you are
painting smaller human means, that means that they are at a distance to show
that distinct ones, you have to paint
a smaller bodies, figures and the front ones
are going to be bigger. That's how you show the
depth of a landscape. Okay, now, all the
human bodies I've done, this was the last one. And now I'm going to pin
down the color and create the reflection just
like how we did the reflections of the
trees into the water. Exactly the same
technique labeling to create the reflection of
all these human bodies. So it's not going to be
with absolutely dark color, but a little lighter color
and with a lot of water. And that's it. We
finished our painting. Isn't that such an easy and
fun painting to create? I absolutely loved it
after I created it. And look at those
glossy human bodies, isn't that so amazing? I hope you had fun creating
this painting with me. Thank you so much
for joining me in this class and I'll
see you tomorrow.
12. Coffee Painting - Day 8: Hello and welcome back to day. Today I have decided to teach
you a very simple tree, which is a very important
element of any landscape. And how you can create the tape of the
landscape in the trees by changing the color of the coffee color by
diluting it with water. So this can be used to
create a forest landscape. Alright, so let's get started. So I'm starting off by painting a very light background to the whole painting
with lots of water. And rather than making
it one solid one, I'm trying to create
some light textures by increasing the color in some places and keeping
it light in some cases. I, so now I'm going
to let it dry. And once it is completely dry, I will add the trees. The paper has dried. It's been like five-minutes. And now I will start by painting the light section of the tree, which is like the
background color first, because we go always
from lighter to darker. So I mix the color, coffee color on my plate, mixed it with water and diluted. It is darker than the
background, of course, but it's not a very
absolute dark coffee color, which you probably have
started to understand by now, that we gradually grow from, go from light, lighter shade of the coffee to
the darker shade. So here I'm trying to paint the trunk of the tree
with a lighter color. While painting the tree trunks, I'm also painting a
little bit of leaves, also with the
lighter color which is going to go in
the background. I'm gradually going and
painting both at once, the branches and the leaves. Adding a few more
branches and the leaves. If you notice that not all
of them are the same colors, even though they are
lighter shade than the actual dark coffee color. I am changing the density of
the color in every branch. They are not absolutely same, some are lighter, some
a little bit darker. The reason I like
doing this is by changing the color
of the coffee. You show more adept
in your painting. Okay, so keep that in mind. Don't try to keep
everything the same color. It was more or less amount of water to change the shades
of the coffee color. So pretty much my background
layer of the trees are done. So this in itself
looks like a painting with disagree to go
all in the background. And once it dries, I am going to add the darker
layer of trees in the front. So now I'm going to let it
dry for like five minutes. Okay, So the paper
has dried now and I'm starting with the
dark coffee color. So notice that I'm not really
mixing a lot of paint, lot of water this time with
the coffee color and using the paint directly from the
coffee cup onto the paper. So now, now I'm pretty
much going to repeat the same steps as we did
in the previous one, but this time only
with a darker color. So I'm gonna go slowly, create the chunks, the branches, and a few leaves. I love the spot where
of creating the leaves. But while creating
the leaves also, I, what I like to do is rather than keeping it all the same sheets, I like to make it
dilute little bit of lighter in some of the places to show the highlights
in the leaves and not just one solid color. So creating the highlights and the shadows is
very important, changing the values of the
objects that you're painting. In some of the pieces. If you notice the leaves are a little bit lighter when I'm
not adding absolutely. The dark shade of coffee. Excuse me. Okay. The painting
is pretty much done. Now just before
finishing it off, what I like to do is just to give that glossy
effect of the coffee, I like to pick up
quite a big amount of coffee paint directly. Like I'm dropping
onto the darker areas because many tries it gives the painting that glossy effect. So here it is. You can already see the glossy
part of the trees. I hope you enjoyed
this and created a beautiful painting and
I'll see you tomorrow.
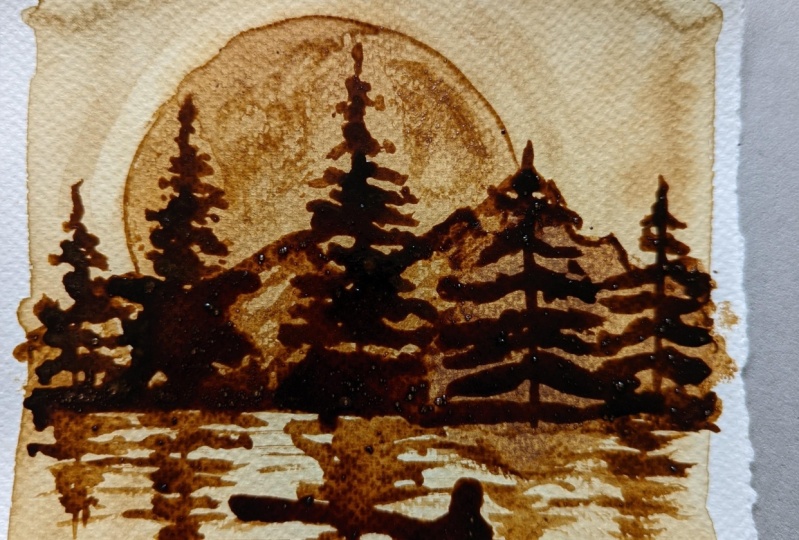
13. Coffee Painting - Day 9: Hello and welcome to D9. Today I have decided to paint this beautiful misty
pine on the mountain. And basically it's
a lot of folks are clouds floating around
in between the mountains. And as if the mountains have visible through the
clouds only a little bit. So it's a very nice, gorgeous landscape,
mini landscape. And I'm excited to
teach you this. Since most of it in this painting is going to
be clouds, which is white. So I'm not going to paint a
whole background to it and start off directly by
painting the mountains. Okay. So I'm starting by painting very lighter color
of mountain in the back. And these because,
why is it light? Because there are a lot of
clouds floating in France, so it's not going
to be very dark. So I'm adding the
lighter layer first and then I'm going to add
little darker layer later. Okay. Again, I'm adding the lighter
layer on the left side of the painting where
the dark mountains is going to come in front. And these are the
distant mountains of which are kind of light
because of the clouds, again floating on top of it. Let's go. Not, these are not
just mountains, but there are also
trees on top of it. So while doing the lighter
part of the landscape, I am also trying to create all the lighter color
of trees as well, which are on top
of this mountain. As you can see, I am gradually starting to increase the color, darkness of the
color a little bit. So it's not absolutely light. It's kind of like medium dark. Now I'm going on the
absolute darkest tone of the coffee color
and adding the one absolutely in the front. So right now I'm
painting the mountain and then I'm going to be
in the trees on top of it. Always remember to keep
not just a solid color but a mix of dark and
light, like I did heal. And now I'm adding the darker tone on
the distant mountain. Again. It's just going to
add a little bit to note the entire mountain
because some of it is light and some of
it is the shadows. Now I started painting the misty pines on
top of the mountains. This is my most favorite part. I think I love painting this
pine trees on the mountains. So keep painting them
one-by-one in a zigzag manner. You've already learned to
paint pine trees by now. We have painted
quite a bit of paint the pine trees in this class. So keep enjoying painting
them and go slowly. If you are not very comfortable
with painting pine trees, you can just practice
it a little bit on your rap sheets and you
will just get it right. Excuse me. Well, there it is. Almost
the entire painting is done. And now once again, I
picked up the paint, the paper, and adding the
darker layer of coffee. Again. I like doing this
because once it dries, this glossy effect of
the coffee bean remains. So before, just before
ending the painting, wherever I want the most
darkest layer of the coffee, I like dropping it on
the paper like this. Well look at this. The painting is done looking at the glossy effect
of the mountain, how beautiful it's looking. And I hope you enjoyed
painting this along with me, and I'll see you tomorrow.
14. Coffee Painting - Day 10: Hello and welcome
back to day ten, the last day of our attendees
journey of coffee painting. For the last day, I have kept my most favorite painting and this turned out to be better than I actually imagined. It's such a simple painting
yet it has such mu p in it. I mean, I absolutely
loved staring at this painting of this bamboo, bamboo tree with a
shoots and stuff. Let's get started. And I'm
sure by now you have become a master of coffee painting after painting all these
nine beautiful landscapes. So for this one, I am not going to give
you much instruction. I want you to follow along and do this painting
along with me. Because to be honest with you, They really isn't much
that I can tell you here. There is no technique as such, except the basic techniques that you've already understand. Understood by now that you
go by lighter layer to the darker layer and gradually increasing the
color of the coffee. So that is exactly the technique that I want to follow here. Um, and yeah, so just
watch it and have fun, watch the tutorial and keep
painting along with me. And I'm excited to
see what you create. Hello. Yes. Excuse me. So that's it. The plane
painting is done. I hope you followed
along with me and created this beautiful
mini landscape. Wait to see what you
did and I hope you had fun joining
me in this class, creating all this
beautiful mini landscapes.
15. Protecting your Coffee paintings: Well, hello, hello.
I am hoping that if you are breached
so far in the video, you have already created your beautiful collection
of coffee paintings. And I'm sure you are loving it, loving the smell of it. So every time I look
at these paintings, the smell just
entices me so much. Before I wrap up this class, I wanted to tell you
one quick thing about preserving your
coffee main things which is very important. Why it is important is you see this thick layers of coffee that we have
put on the paper. And what happens is once, right now, it's summer. So I'm telling you from my
experience of past year, I created all the
coffee paintings during summer and I just
kept them as it is, like lying in a box. And when monsoon came, what happened was all the
paintings started to melt. All the thick layer
of coffee studied melting by because it came in touch with the
humidity in the air. We have to protect our paintings from getting in touch with
the humidity of the air. That is why I have come up with this idea of
this plastic wraps. It's very easy to get it online. I will link the product below. So give this a plastic
crabs and you put them inside the plastic
wraps and you tape it off so that it doesn't it doesn't come in contact with the air containing the humidity. So this is very simple. I have put a one on one side and another one on another side. That's how, just
how I have done it. If you can come up with a
creative and other creative way of doing it please
by all means, do it. Just make sure that you're
keeping it inside some sort of envelope and it's not
directly in touch with the air. Okay, now, let me quickly
do this thing and show you what happens after putting all of them
in dysplastic graphs. Okay, now, all the
paintings have been put inside plastic transparent
drop, as you can see here. And now I am going to put
all of them together and simply folded behind with a
big folder with all of them. And this table on the slide. It's as simple as that. And why your coffee
painting book is ready. It's giving its protection
as required laws. It's creating such a
beautiful coffee booklet. I am sure you are going
to have so much fun showing this small
booklet off to your friends and family
once you create it. So please do it and
show me what you did. I am eagerly waiting to
see what you guys create. Thank you so much for
joining me in this class.
 Debasree Dey, Acrylic Artist & Educator