Transkripte
1. Einführung in den Kurs!: Planen Sie nicht, planen Sie zu scheitern. Es ist ein einfaches, aber leistungsfähiges Angebot ,
denn ohne Organisation können
Sie niemals erwarten, dass Sie
den Abschluss erreichen. Hey allerseits, Mein
Name ist Will und ich bin der Schöpfer hinter
meinem Brand Sprout, einer globalen Community, die es Einzelpersonen
ermöglicht durch den
Aufbau der richtigen Denkweise
ein erfüllteres Leben zu führen. Jetzt versuche ich das
aus verschiedenen Blickwinkeln zu tun. Und vielleicht haben Sie
mich von YouTube-Videos, einem wöchentlichen Newsletter,
diesen Online-Kursen oder vielen anderen
Plattformen in sozialen Medien gefunden. In der heutigen Klasse
werde ich Notion
verwenden, um euch beizubringen, wie
man eine Vielzahl von coolen
Tools organisiert, baut und kreiert, um dein Leben zu planen,
um es super einfach auszudrücken , wenn du noch nicht
kennst der Begriff ist, dass es sich um eine Projektmanagement
- und Produktivitäts-App handelt. Und für mich persönlich verwende
ich es für
buchstäblich alles, was ich mein Geschäft
geführt habe, verfolge meine Ausgaben, Pläne, andere Dokumente mit
Erstellern und vieles mehr. Meine Motivation für die
Erstellung dieses Kurses ist der persönliche Kampf mit dem Versuch zu verstehen,
wie Menschen, die
bereits erfolgreich sind, ihren Erfolg
erzielt haben. Und ich denke, dass diese Vorstellung ein
so wichtiges Werkzeug ist , weil es der einzige Ort ist, an dem Sie Dinge in
Ihrem persönlichen Leben und Ihrer Karriere, Ihren
Beziehungen usw.
organisieren können. wie man
es benutzt und du kannst es gut benutzen, es wird sich für dich sehr ändern
. Also arbeite ich seit
etwas mehr als einem Jahr daran,
meinen Notion-Arbeitsbereich aufzubauen , und es ist zu diesem Zeitpunkt ziemlich
kompliziert. Was ich
in diesem Kurs machen werde, ist,
die objektivsten
Teile davon zu nehmen . Und ich werde
sie alle für
dich aufschlüsseln , damit du verstehst,
wie du sie selbst bauen kannst. Bevor wir das tun, werden
wir jedoch tatsächlich
verstehen, wie man Notion benutzt. Wie man also Tabellen,
Seiten, Abschnitte erstellt, all die verschiedenen
Dinge, die Sie dort
tun können , um es hübsch
aussehen zu lassen, lassen Sie
es organisiert aussehen. Und so lernen
Sie schließlich, wenn Sie die Grundlagen lernen, auch ein paar coole Tools zu
bauen. Dann haben Sie ein tiefes
Verständnis dafür, wie man
Notion
einsetzt , und es wird Sie auf Ihren eigenen Kurs bringen können . Am Ende
aller Lektionen gebe
ich
dir ein Mini-Projekt, ein bisschen Hausaufgaben. Es sind sehr coole Hausaufgaben, obwohl
es nicht wie in der Schule ist. Diese Hausaufgaben werden darin bestehen
, dass Sie Ihren eigenen
Notion-Arbeitsbereich
entwerfen müssen . Und Sie
müssen nur einige Vorlagen und
Designs teilen und wie es auf diese Weise
mit der Klasse aussieht. Ich kann
Ihnen
nicht nur helfen, indem ich Ihnen
Tools, Vorlagen und Lehren
aus dem, was ich gelernt habe, gebe . Aber deine Klassenkameraden werden auch
dasselbe für dich tun können. Okay, willkommen zum Kurs. Jetzt ist es an der Zeit, zum ersten Teil zu gehen
, die Grundlagen
des Begriffes versteht. Wir sehen uns dort.
2. Teil 1 – Was ist die Notion/Wie verwendest du Notion?: Willkommen bei Teil Nummer eins. Die Grundlagen der Verwendung von Notion, Notion
ist sehr kurz eine Produktivität in einer
Projektmanagement-App, die Sie verwenden können, egal ob Sie ein Unternehmen sind
oder eine Einzelperson sind. Ich persönlich, wie ich
in der Einleitung sagte, verwende es für buchstäblich
alles in meinem Leben, sei es um die Verwaltung
meiner Geschäftsplanung, meine YouTube-Videos, das Schreiben in einer Tageszeitschrift, Überarbeitung mein ganzes
Leben und vieles mehr. Bevor wir uns mit all
den verschiedenen Grundlagen befassen, zeige
ich Ihnen einfach, wie Sie
sich anmelden können . Es ist super einfach. Du gehst einfach
zu „Notion Dot“. Es bringt Sie also direkt auf die Homepage
und klicken Sie dann auf diesen roten Button in
der oberen rechten Ecke , der besagt, dass Sie den Begriff kostenlos ausprobieren. Persönlich habe ich mich
mit meiner Google-E-Mail angemeldet. Und sobald Sie dort angekommen sind, Sie
die Möglichkeit, sich entweder als Unternehmen
anzumelden, für das
Sie bezahlen müssten, oder sich als Einzelperson anzumelden , für
die Sie nicht bezahlen
müssten der Begriff ist völlig kostenlos. Sie würden auf
die einzelne Schaltfläche klicken und dann haben Sie die Wahl ob Sie notion auf Ihrem
Desktop verwenden oder die App verwenden möchten. Persönlich lade ich die App herunter. Und so werden wir
genau dorthin gehen und der nächsten Lektion
beginnen
, in der
Seiten und Vorlagen integriert werden.
3. 1.1 Vorlagen entdecken: Willkommen bei Lektion 1.1
, in der Vorlagen
integriert werden können. Ich gehe also davon aus, dass wir inzwischen bereits unser
Notion-Konto erstellt haben. Wir wissen jetzt, was es ist. Hoffentlich hast du die App
heruntergeladen. Sobald Sie
die App heruntergeladen haben und Notion
vollständig verwendet haben, sehen
Sie
bereits eingegebene Seiten, wie die, die Sie gerade auf dem Bildschirm
sehen. Diese werden offensichtlich
als Vorlagen bezeichnet. Ich habe mein eigenes Notion-Setup das ich Ihnen später
zeigen werde, aber ich habe
ein völlig neues
kostenloses Konto erstellt , nur damit ich
das mit Ihnen machen und Ihnen
zeigen kann , wie man baut und anschaut
Dinge von Grund auf neu. Eines der wirklich
coolen Dinge an Notion ist die Verwendung von Vorlagen. Wenn Sie also sehen, wo sich die
Maus gerade befindet, klicke
ich auf diese
Vorlagenschaltfläche und es zeigt mir eine Vielzahl
verschiedener Vorlagen für eine
Vielzahl von verschiedenen Zwecken. Wenn Sie also ein Designer sind, können
Sie Dinge
wie unsere Roadmap verwenden. Wenn Sie ein Schüler sind,
gibt es buchstäblich Vorlagen für Klassenknoten,
die Ihre Noten berechnen und Platz für Ihre Mitbewohner schaffen.
Sie können hier einen
Lebenslauf erstellen. Sie können sich sogar Ziele setzen. Wenn Sie also nur diesen
Vorlagenbereich
durchstöbern ,
werden
Sie meiner Meinung nach
ein wenig motiviert, Notion zu verwenden, weil
es Ihnen Ideen für all diese Dinge gibt Sie normalerweise vorher nicht verfolgen
konnten, aber jetzt verfolgen können da Sie über die
Infrastruktur verfügen, um dies zu tun. Jetzt, als ich gerade angefangen
habe, habe ich das Gleiche gemacht. Ich habe zu den Vorlagen gesucht und ein paar
erstellt, die
mir wirklich gefallen haben. Und dann fing ich an, Dinge zu mischen und zu kombinieren und
herauszunehmen, die mir nicht gefallen haben, und Dinge
hinzuzufügen, die mir gefallen haben. Und das hat mich dazu gebracht meinen Arbeitsbereich herauszufinden. Obwohl ich Ihnen ein paar Vorlagen
zeigen werde und wie Sie Ihre eigenen Dinge
aus meiner persönlichen Erfahrung erstellen können, empfehle
ich
Ihnen, am Anfang ein paar davon herunterzuladen Vorlagen und das Hinzufügen zu Ihrem Workspace
, damit Sie einen
Überblick über die Funktionsweise von Notion erhalten. Es wird Sie nur in der
Lage sein, Sie in
eine fortgeschrittenere Perspektive
zu bringen , wie Sie Notion verwenden können. Wenn Sie gerade
mit einem Haufen leerer Seiten anfangen würden, dauert
es Jahre,
bis Sie herausfinden, was zu tun ist. Großartig. Sie haben also Ihre Vorlagen
durchsucht, Sie wählen die wenigen aus, von denen Sie
denken, dass es cool wäre
, um damit anzufangen. Sehen wir uns nun an, wie wir
einige Seiten und einige Abschnitte erstellen können .
4. 1.2 Seiten und Abschnitte: Willkommen zurück bei Lektion 1.2
, in der
Seiten und Abschnitte integriert werden können. Wenn wir nun zur Seite
Erste Schritte auf Notion zurückkehren, sehen wir, dass
es auf der linken
Seite und in der Seitenleiste eine Reihe von Registerkarten gibt. Dies sind im Wesentlichen Registerkarten, aber es sind auch Seiten. Wenn ich auf einen klicke, zum Beispiel das persönliche Zuhause, sehe
ich, dass
es zwei Abschnitte gibt. Es gibt den täglichen Bereich, es gibt einen Live-Bereich, und diese vier Dinge, diese Jahresziele,
Reisepläne, Rezepte, Filmliste, das sind
alles einzelne Seiten. Wenn du auf einen klickst, bringt es
dich in die Filmliste. Und wenn Sie dann zurückgehen, können
Sie im
sehr typischen Sinne auf die Rezepte
ganz anderes Layout klicken im
sehr typischen Sinne auf die Rezepte
ganz anderes Layout . Der Grund, warum wir
Seiten verwenden, besteht darin,
etwas tiefer zu graben , um
ein bisschen mehr Organisationen bereitzustellen . Denn wenn du nur eine 100
Tabs hättest, die deine Seitenleiste herunterlaufen würden, wäre
es nicht organisiert. Es geht darum, so
viel wie möglich zu organisieren. Ich möchte also tief in
jeden Tab auf jeder Seite eintauchen indem ich weitere Seiten hinzufüge und
weitere Abschnitte hinzufüge und so
organisiere. Wie
erstellen wir unsere Homepage? Nehmen wir an, wir sollten
eine ganz andere Seite erstellen, einen anderen
Tab hier in der Seitenleiste. Großartig, wir haben eine leere Seite, also nennen wir das
unsere Home-Rubrik. Wenn ich jetzt hier klicke, heißt
es, tippe den Schrägstrich
für Befehle ein. Wenn ich also auf den Schrägstrich klicke, bringt mich das zu einer
Vielzahl von Basisblöcken. Und das sind alles
verschiedene Dinge, die Sie einfach selbst einfügen können. Und so erstellen
Sie dieses Layout der Seite. Sie können ein Textfeld einlegen. Sie können eine neue
Seite, eine Aufgabenliste, eine Vielzahl von Überschriften,
Tabellen und Aufzählungslisten erstellen. Man sieht, dass
es wirklich viele Dinge gibt
, die man tatsächlich tun kann. Wenn ich den Schrägstrich
mache und auf die Seite klicke
, bringe ich auf eine neue Seite. Dies ist also eine Seite
innerhalb der Seite. Nennen wir
es jetzt unsere To-Do-Liste. Wenn ich also zurück zum
Home-Bereich gehe, sehe
ich jetzt,
dass ich eine Seite habe, auf die ich klicken kann. So würdest du eine Seite
erstellen. Und das nächste, was Sie tun würden wenn Sie einen Abschnitt machen möchten, ist dass
Sie den Schrägstrich
erneut drücken und eine Kopfzeile erstellen. Wenn Sie einfach anfangen, es zu tippen, werden
Sie sehen, dass
der Begriff dies erkennt und es bereits
automatisch für Sie angezeigt wird. Also H1, H2, H3 und H4. Nehmen wir an, wir
wollten ein H1 erstellen. Boom, ich drücke einfach die Eingabetaste. Ich hab eine Automatik. Wenn ich also
über morgendliche Zeitpläne sprechen möchte, kann ich jetzt einen Abschnitt haben. Und wenn ich einen Teiler hinzufügen möchte, tippe den Teiler ein. Und jetzt kann ich meine Seite ziehen. Verwenden Sie also diese vier Punkte, die sich nur auf der linken
Seite der Seite befinden. Du kannst es runterziehen. Jetzt. Es ist organisiert. Ich wollte das
Gleiche machen und ich
wollte über meinen
Abendplan sprechen. Könnte das Gleiche tun. Fügen Sie eine weitere Seite zur Do-Liste hinzu. Jetzt hätte ich morgens eine
To-Do-Liste, abends
eine To-Do-Liste. Das sind also nur die Grundlagen wie Sie eine
Seite und dann Abschnitte erstellen.
5. 1.3 Datenbanken erstellen: Willkommen zurück bei Lektion 1.3. Dieses Mal werden wir
Datenbanken durchgehen , die Tabellen,
Kanban-Boards, Kalender
und vieles mehr genannt
werden . Eine Datenbank ist also eine wirklich
großartige Struktur, die Sie
verwenden können, wenn Sie
mehrere Einträge
oder viele Informationen haben , die Sie in einem bestimmten Bereich
verstopfen möchten . Ein Beispiel dafür wäre, wenn Sie ein tägliches
Journal erstellen und Ihren gesamten monatlichen
Eintrag in einer Tabelle sehen möchten , oder wenn Sie beispielsweise Ihr Budget
verfolgen. Wie würden wir also einen von denen
erschaffen? Nun, lasst uns wieder auf die gleiche Seite gehen, die wir in der letzten Lektion
gemacht haben, die unseren morgendlichen Zeitplan, unsere To-Do-Liste oder den
Abendplan auf unserer To-Do-Liste enthält. Wenn ich zum Beispiel in die Morgendliche
To-Do-Liste gehe, klicke und erneut auf
den Schrägstrich drücke um die verschiedenen
Optionen
für grundlegende Blöcke herauszuholen . Jetzt wollen wir
keinen einfachen Tisch. Was wir stattdessen wollen, ist,
dass wir den ganzen Weg
zur Datenbank gehen und sehen, dass
Sie TableView,
eine Board-Ansicht, eine Galerieansicht haben . Sie haben eine Vielzahl von Verwendungszwecken. Was Sie jetzt tun, ist nicht so wichtig, weil Sie sie durchwechseln
können. Das zeig ich dir
in nur einer Sekunde. Hier ist ein Profi-Tipp. Wenn du hier in
die obere Leiste
gehst, siehst du den Teilen-Button, den Kommentar, die
Sterne, alles. Du klickst auf die drei Punkte. Sie werden sehen, dass Sie die Möglichkeit
haben zwischen
verschiedenen Schriftstilen
umzuschalten. Und Sie können Ihren
Text etwas verkleinern und
die Seite in voller Breite gestalten. Ich habe es geliebt, die volle Breite zu machen,
wenn ich einen
Tisch oder eine Datenbank erstelle, weil es mehr
Platz ist, desto besser. Jetzt habe ich eine leere Vorlage und was kann ich damit machen? Nehmen wir an,
wir werden
diese To-Do-Liste des Masters erstellen . Wie wir schon sagten, wir
wollten es tun. Jetzt habe ich eine Vielzahl
von verschiedenen Abschnitten , mit denen ich dies organisieren kann. Also habe ich zum Beispiel das erste Ding
, das der Name ist. Hier ist mein Ding zu tun. Wenn ich das eintrete, dann wird es mein Ding zu tun. Also mach mein Bett, putze mein Zimmer und Tagebuch. Jetzt habe ich drei
Einträge, die ich einfach alles in einem Bereich
verwalten kann . Ich bin sicher, du verstehst den
grundlegenden Kern einer Datenbank, aber um der Argumentation willen lehre
ich dich, als
wärst du ein Neuling. Und wenn Sie dann
auf die Eigenschaft klicken, wird „Eigenschaften bearbeiten“ angezeigt. Sie können hier grundsätzlich auswählen welche Art von Immobilie
Sie in dem Typ haben möchten. Du kannst einen Text haben,
es könnte eine Zahl sein. Sie können
Datumsangaben auswählen, Dateien, URLs und E-Mails von
Personen auswählen. Als könntest du es sogar
zu einer Formel machen. Das macht die Verwendung von
Notion wirklich cool,
ist, dass es bunt wird, es wird hübsch, aber es
wird auch wirklich organisiert. Ihre Zeit nicht zu
verschwenden, werde
ich
Sie also noch nicht durch den
gesamten
Board-Prozess führen . Wir werden warten, wir
machen eins zusammen. Lassen Sie uns dies also
als Auswahloption belassen. Und du könntest es wie
hoch, mittel, niedrig machen. Und das wäre nur, wenn ich es umbenenne, würde
ich es schaffen, sagen
wir Priorität. Was Sie also tun können, ist,
wenn Sie hierher gehen, Sie einfach den Mauszeiger auf
den Tabellen-Button. Es heißt „Ansicht hinzufügen“. Wenn ich auf Ansicht hinzufügen klicke, gibt
mir die Option für eine neue Ansicht. Es kann entweder ein Board, eine Zeitleiste der
Galerieliste oder ein Kalender sein. Dies sind genau dieselben Daten, außer dass sie an eine andere Ansicht
angeschlossen sind. Ein Kalender
funktioniert hier auf einer To-Do-Liste nicht wirklich. Es würde zum Beispiel nicht mit einem
Budget funktionieren. Aber es gibt definitiv
verschiedene Ansichten , die das Verständnis erleichtern
. Das letzte coole, was Sie
tun können, bevor wir zum
nächsten Abschnitt übergehen , ist, wenn Sie diese Berechnungsschaltflächen
sehen, Sie können darauf klicken und Möglichkeit
haben,
Ihre Sachen noch
weiter zu organisieren und die Summe zu sehen
Wert durch Klicken auf zählen Sie alles, was mir
die Gesamtanzahl der
Dinge sagt , die ich tun muss. Wenn ich zum Beispiel
diese Eigenschaft in eine Zahl umwandeln wollte . Angenommen, wenn ich auf die
Nummer und das Format klicke, habe ich einen
kanadischen Dollar verdient, konnte
ich 100,50
Dollar, zwanzig Dollar eingeben. Und wenn ich die
Gesamtkosten für alles wissen wollte , könnte ich die Summe nehmen. Und C, es würde mir die Gesamtberechnung alle
Kosten der zu tun zu
zählen. Das Letzte, was Sie tun
können, ist, wenn Sie auf die rechte
Seite der Tabelle
scrollen, können
Sie neue
Vorlagen sehen, die Sie erstellen können, aber wir werden später darauf eingehen. Sie können auch nach Daten filtern
und sortieren. So kann ich nach der
Priorität in aufsteigender Liste sortieren. Jetzt habe ich entschieden, dass alles, was hohe
Priorität hat, zuerst auftaucht. Alles, was niedrig ist
, wird zuletzt auftauchen. Meiner Meinung nach ist dies das
coolste Feature über Notion. Früher habe ich viele Dinge Excel gemacht und weil ich dann nicht
wusste, wie ich
ein Dokument in Excel teilen sollte, würde ich es
auf Google Sheets machen. Ich hatte manchmal an einem Excel
gearbeitet,
an Google
Sheets gearbeitet und einige
meiner Freunde arbeiteten
an verschiedenen Apps. Es war also nur ein wirklich
verwirrender Prozess Tabellen,
Boards und Organisation auf diese
Weise zu erstellen ,
Boards und Organisation auf diese
Weise . Mit der
Idee können Sie
all diese verschiedenen
Apps in eine integrieren . Nun werde ich sagen, wenn Sie
ein professioneller Excel-Benutzer sind, dh wenn Sie in Finanzen oder quantitativer Arbeit arbeiten oder was nicht, wird
dies dies nicht vollständig ersetzen und Sie
würden Ihr Excel immer noch nicht verwenden. Aber in Bezug auf die sehr
grundlegende Organisation, diese Datenbanken
, ermöglicht Ihnen diese Vorstellung, unser Genie
zu machen. Okay, das ist also der grundlegende
Kern, wie man
die Datenbank einrichtet und zum Beispiel
eine Tabelle verwendet. Jetzt gehen wir
zum nächsten Abschnitt über
, der noch
tiefer in ihn eingeht und eine Vorlage
in dieser Übergewichtigen erstellt.
6. 1.4 Vorlagen in Datenbanken erstellen: Willkommen zurück in der Klasse. Dies ist weniger als 1,4
, so dass eine
Vorlage innerhalb einer Datenbank erstellt wird. Warum also das? Nun, am Anfang haben wir
davon ausgegangen , eine einfache Vorlage zu erstellen
und diese Vorlage dann zu aktualisieren
, indem Seiten
erstellt und Abschnitte
erstellt haben. Und auf diesen Seiten haben
wir Tabellen
und Datenbanken,
Kalender erstellt, was auch immer
Sie sich entschieden haben. Jetzt möchten wir
Vorlagen hinzufügen, weil wir mehrere
Einträge haben möchten und wir eine gewisse Ähnlichkeit haben
und die Tiefe
der Daten, die wir
tatsächlich eingeben, erhöhen möchten. Es wird also sehr schnell sehr
kompliziert. Aber gleichzeitig lernen
Sie auch viel wie ich
wünschte, ich wüsste das
, als ich anfing. Ich gebe Ihnen nur eine
sehr schnelle Anleitung, wie Sie sich
auf das konzentrieren können,
was wichtig ist, okay, also sind wir gerade immer noch
in der To-Do-Liste , derselben Tabelle. Was ich jetzt tun werde, ist, dass wir uns vorstellen
werden, dass wir weitere Details hinzufügen
möchten den eigentlichen Aufgaben,
die wir erledigen
, weitere Details hinzufügen
möchten. Also lasst uns
die vorherigen Einträge löschen. Ich werde die Kosten entfernen weil es gerade etwas
verwirrend ist. Und wir werden noch
drei Dinge hinzufügen. Sagen wir also, das erste, was wir tun wollen, ist,
dass wir trainieren wollen. Das nächste, was wir tun wollen,
ist, dass wir uns strecken möchten. Danach
möchten wir unser Zimmer putzen. Wenn Sie sehen, wann ich mit
dem Mauszeiger über eine dieser Boxen fahre, habe ich die Möglichkeit, es
zu öffnen. Wenn ich es also öffne, bringt
es mich auf eine
völlig neue Seite. Und Sie sehen hier, drücken Sie die Eingabetaste, um mit
einer leeren Seite fortzufahren oder eine Vorlage zu
erstellen. Wenn ich jetzt auf Vorlage
erstellen klicke, kann ich eine Masterseite entwerfen. Sagen wir also, wir
machen es zum ersten Mal. Und jedes Mal, wenn wir ein Training haben
, das der Liste hinzugefügt wird, möchten
wir eine Vorlage erstellen. Was wir also tun werden, ist einen Header zu erstellen und es wird Übungen machen. Wir erstellen einen kleinen
Abschnitt wie diesen. Und dann zum Beispiel würdest
du einfach gehen und es dort
lassen. Das nächste, was Sie tun würden, ist, einen Abschnitt zu
erstellen, und Sie könnten Cardio machen, nur als Beispiel. Ich erfinde
das wirklich vor Ort. Du schaffst es. Sie können es tun, wie Sie es vorziehen
würden. Und dann gehen wir nach Zurück. Jetzt haben wir
hier eine kleine Vorlage, auf der Workout steht. Wenn ich also darauf klicke, wird
die Seite automatisch in genau diese Vorlage geändert . Und so
kannst du es erstellen. Du wirst sehen, dass
das Icon da ist. Das wird der nächste
Abschnitt sein, in dem wir uns
befassen werden, wie diese geändert werden können. Aber jedes Mal, wenn Sie etwas zu tun
haben wenn Sie
diese Schaltfläche „Öffnen“ drücken möchten, haben
Sie die Möglichkeit aus verschiedenen Vorlagen
auszuwählen. Sie können also einfach
die leere Seite auswählen oder ein Training machen oder
Ihre eigene Vorlage erstellen. Sie können fünf oder zehn
verschiedene Vorlagen haben. Und es kann
Ihnen nur helfen, Dinge prägnanter zu organisieren ,
je nachdem , welche Daten Sie angeben. Jetzt nur um dir ein
ganz kurzes Schnipsel
zu zeigen , wie es aussehen könnte. Ich gehe in meinen eigentlichen Arbeitsbereich und zeige dir den ganzen
Weg in meine sozialen Medien. Wenn ich etwas geplant habe, ist
dies buchstäblich eine Vorlage die ich für meine
YouTube-Videos erstellt habe. Dies ist also nur ein Beispiel dafür wie tief man Dinge nehmen
kann. Aber nochmal werden wir das
etwas später durchgehen.
7. 1.5 Alles schön machen: Willkommen zurück in der Klasse. Das sind weniger als 1,5, was alles hilft, die Dinge hübsch
und organisiert aussehen zu lassen. Jetzt gehen wir zurück zu
dieser Homepage, die wir zusammen erstellt haben,
und Sie werden wieder sehen, das Design ist sehr einfach,
sehr schwarz-weiß. Sagen wir, ich wollte ein bisschen Farbe
hinzufügen. Was ich tun könnte, ist, auf
die vier Punkte
links neben der Kopfzeile zu klicken , und Sie sehen die Option, die Farbe
zu ändern. Jetzt könnte ich die Farbe
des Textes ändern oder es kann einen Hintergrund
hinzufügen. Wenn ich also einen grünen Hintergrund machen würde, würde
ich ihn grün hervorheben. Umgekehrt, wenn ich Drehbuchschreiben
wollte, könnte
ich
das einfach machen und du kannst
das mit praktisch allem machen . Aber jedes Mal, wenn du Klartexte
schreibst, Hey,
da bist du sehr SCHLECHTER
Satz zum Tippfehler, aber du kannst das in
grüne Texte verwandeln und so Dinge
organisieren und farblich codieren. Eine andere Sache, die Sie tun
können, ist, dass Sie in Notion
tatsächlich verschiedene
Spalten erstellen können . Wenn Sie also nicht gerne
alles vertikal sehen, wie übereinander
gelegt, und Sie es
lieber nebeneinander haben
möchten, können Sie
Spalten erstellen. Wenn ich das also tatsächlich noch einmal
ziehe, muss
ich
diese vier Tasten drücken. Ich ziehe es zur Seite und
richte es an
meinen morgendlichen Zeitplänen aus. Und jetzt habe ich zwei Blöcke, aber die Sache ist, dass es nicht sofort richtig
synchronisiert wird. Also haben wir einen Drag. Benutzen Sie immer die
vier Punkte, wenn Sie
versuchen , etwas zu bewegen,
ziehen Sie alles. Und von dort aus können
Sie tatsächlich
zwei ausgewachsene
nebeneinander durchgebrannte Spalten erstellen . Und eine andere Sache, die Sie tun können,
ist, dass Sie die Icons ändern können. Die Icons sind eine sehr
spielerische und unterhaltsame Art Dinge
zu gestalten, die ich liebe Sie werden in der Seitenleiste sehen, dass
hier alles
ein Icon hat , außer der
Homepage, die wir entworfen haben. Wenn
ich also oben scrolle und auf den Home-Text
falle, kann
ich hier ein Symbol hinzufügen. Es geht
automatisch für mich ein, aber das
wollten wir natürlich ändern. Nehmen wir an, wir mögen
unsere Homepage sehr und wir möchten, dass sie wie ein Zuhause aussieht, weil
wir das sind, was wir entschieden haben. Es gibt deine Icons, sie
erscheinen in der Seitenleiste, aber sie werden auch oben angezeigt. Jetzt können Sie dies auch für
jede Seite tun, auf der Sie es entwerfen. Zum Beispiel
klicke ich auf die Seite, ich gehe in die To-Do-Liste. Dasselbe könnte
denken, dass es eine Avocado ist. Es ist eine Avocado. Ich kann auch hier rüberklicken, es auch zu einer Avocado
machen. Wann immer Sie möchten, können Sie wählen, aber
Sie können nicht nur ein Emoji aus der
Standard-iOS-Emoji-Liste auswählen. Sie können aber auch Ihr eigenes Bild
hochladen. Zum Beispiel, wenn ich auf meine persönlichen
Sachen
eingehen wollte , weiß ich es nicht. Sagen wir, ich wollte
es zu meinem Gesicht machen, hier ist mein Gesicht. Buchstäblich kann ich das einstecken. Jetzt ist das Icon für meine To-Do-Liste
nach einem Lowe's mein Gesicht. Die andere Sache, die Sie jederzeit
tun können, wenn Sie
eine Seite erstellen , ist, dass Sie
auch ein Cover hinzufügen können. Wenn ich also wieder
auf der Home-Header schwebe ,
habe ich Cover hinzugefügt. Es gibt automatisch
sein Bannerbild, aber ich kann es ändern. Und wieder kann ich es hochladen. Ich kann ein Bild wählen, wenn wir wieder mein Gesicht machen
wollen. Dann gehst du los. Da ist mein Gesicht geladen und dann
kann ich es neu positionieren. Es sagt also gruselig wie
es sein kann. Aber wenn Sie nicht
möchten, dass es Ihr Gesicht ist, können
Sie das
Cover ändern und dann
können Sie dieses Ding namens
Unsplash verwenden , was unglaublich ist. Ich bin, als ich
diese Vorstellung und den Unsplash
für eine Partnerschaft zum ersten Mal herausfand , war
ich ehrlich gesagt wirklich,
wirklich beeindruckt. Unsplash ist nur eine riesige Datenbank kostenlosen Bildern
, die Sie verwenden können, aber sie sind alle
sehr hochwertig. Sie können also suchen,
was immer Sie wollen. Also weiß ich keinen
Laufschuh, ich kann das aussuchen. Es ist ein 4k-Bild und
es ist dein neues Banner. Die Gelegenheit hier ist
wirklich unendlich. Sie können so viel tun, wie Sie
möchten, wenn Sie eine Vorstellung entwerfen. Sie können sich auch ändern. Wenn wir in
die Vorlagen zurückkehren, sollten wir annehmen, wir
wollten
eine neue Vorlage ändern und hinzufügen oder wir
wollten eine bearbeiten. Wenn ich auf die drei
Punkte klicke und bearbeite, kann
ich auch ein cooles
Icon hinzufügen, meine Vorlage. Jedes Mal, wenn
ich ein Training auswähle, wird
es automatisch aktualisiert, um
jemandem
ein solides Gewicht zu geben . So würden Sie einen
Organisieren Sie Ihren Notion-Arbeitsbereich gestalten . Und ich weiß, dass je hübscher es für viele
Leute
aussieht, einschließlich mir selbst, desto wahrscheinlicher
werden Sie
es benutzen und pflegen
und unterhalten wollen . Jetzt werden wir auf
den letzten Teil
der Grundlagen zur Verwendung von Notion eingehen , nämlich wie man
Seiten miteinander verlinkt.
8. 1.6 Profi-Tipp: Verlinkung von Seiten: Willkommen zurück in der Klasse. Dies ist weniger als 1,6
, so können
Seiten miteinander verknüpft werden und dabei viel Zeit
sparen. Das ist eine sehr kurze Lektion. Es ist ein wirklich guter Tipp, den ich ehrlich gesagt erst
vor ein paar
Wochen mit Notion wusste , und es ermöglicht Ihnen,
eine Seite zu erstellen und
den gleichen Link direkt einzugeben ,
um zu dieser Seite in einem Vielzahl an verschiedenen Orten,
wo immer Sie es brauchen. Nehmen wir an, wir
haben unsere Homepage hier Trauerplan. Und nur der Einfachheit halber werden
wir dies in eine
morgendliche To-Do-Liste umbenennen , damit ich sie zwischen
morgens und abends unterscheiden
kann. Nehmen wir zum Beispiel an, ich war in dieser
Leselisten-Vorlage und aus
irgendeinem Grund wollte ich wirklich
nur meinen
Morgen
zurückgreifen, um sagen
wir, ich lese ein
Buch namens Atomic Habits. Großartig. Dies ist ein Teil meines Morgens,
denn jeden Tag entscheidest du
, dass du lesen möchtest. Wie kann ich
die Liste
direkt mit dieser Seite verbinden ,
wenn ich nur bei eintippe Jetzt kann ich
eine Person, eine Seite,
ein Datum erwähnen , oder ich kann hier auch auf eine Seite
verlinken. Wenn ich weiterhin die Aufgabenliste der Seite eintippe
, werden
Sie sehen, dass die
Seite tatsächlich angezeigt wird. Jetzt habe ich diesen
direkten Empfehlungslink zu genau dieser Seite. Ich bin in der Leseliste, klicke
aber darauf und es bringt mich direkt zu meiner morgendlichen To-Do-Liste. Sie können dies mit jeder Seite machen. Sie können es
in Vorlagen einfügen. Sie können es überall dort platzieren, wo
Sie tippen dürfen, außer in einer
tatsächlichen Datenbank. Und es ist ein ganz einfacher Tipp, aber auch wirklich zeitsparende
Tipps. Großartig. Jetzt haben wir so
ziemlich alles behandelt
, was Sie meiner Meinung nach wissen
müssen die Grundlagen des Begriffes zu erlernen, Vorlagen zu verwenden, wie man sie findet, Sie wissen, wie man Seiten erstellt, wie man diese
Seiten in Abschnitte aufteilt. Und wenn Sie ein
vertikales Layout wünschen oder ein Side-by-Side-Layout wünschen jetzt ein Side-by-Side-Layout wünschen, wissen Sie, wie das geht. Sie haben auch verstanden,
wie Sie
eine Datenbank erstellen und sie
aus verschiedenen Ansichten sehen können. Erstellen Sie also eine Tabelle oder eine
Tafel oder einen Kalender und organisieren Sie Ihre
Daten dann auf diese Weise. Sie sind jedoch sogar noch weiter gegangen und können eine
Vorlage in
Ihrer Datenbank erstellen , um
zusätzliche Spezifität und Ihre Daten zu organisieren. Und natürlich weißt du, wie
man es hübsch aussehen lässt. Sie wissen, wie man ein Symbol hinzufügt, wie man ein Banner hinzufügt und wie
Sie Ihre Texte färben. Ich würde nur aus
persönlicher Sicht
sagen dass ich die Vorstellung
seit über einem Jahr benutzt habe, weißt
du, alles, was du jetzt
wissen musst , um loszulegen. Wir gehen in den zweiten Teil ein, was damit beginnt, dass
ich dir meinen Arbeitsplatz zeige. Und danach werden
wir
praxisorientiert und praktisch werden
und lernen, ein paar bemerkenswerte Tools zu erstellen , die
Ihnen am Ende helfen
sollten,
ein Profi bei der Nutzung dieser App zu werden und Ihre zu organisieren große
Macht, die man gemacht hat. Lasst uns jetzt zum zweiten Teil gehen.
9. Teil 2 – Mein Arbeitsbereich und Werkzeuge erstellen: Willkommen zurück in der Klasse. Dies ist Teil zwei, bei dem es
darum geht,
Ihren eigenen Notion-Arbeitsbereich
aufzubauen und einige Werkzeuge zu erstellen, die ich objektiv
garantiere, die dazu beitragen werden die Richtung
Ihres aktuellen Lebens zu
ändern. Jetzt beginne ich mit
dem zweiten Teil dieses Kurses, indem dich durch meinen
persönlichen Begriff Workspace bringe. Wenn Sie es sehen und sich davon eingeschüchtert fühlen,
wissen
Sie, dass ich
seit anderthalb Jahren daran arbeite
und es ändere. Es ist also wirklich ein langfristiges Spiel wenn Sie
etwas aufbauen, wenn Sie
Ihr ganzes Leben in
Ihrem Unternehmen und
alles in einer App planen , wissen
Sie, dass sich Ihre Persönlichkeit ändern
wird. Ihre Präferenzen
werden sich ändern. Denken Sie also daran für sich selbst und wenn
Sie sich das ansehen. Also lasst uns darauf eingehen. Wir
fangen mit der Homepage an. Ganz klar wollte ich
meinen Namen auf ein Bild setzen. Und so
ist meine Homepage, um ganz ehrlich zu dir zu sein, um ganz ehrlich zu dir zu sein, keine Seite, die
ich wirklich benutzt habe, aber sie sitzt einfach da. Ich habe dieses Ding
, bei dem ich mich entschieden habe wöchentliche Ziele
zu erreichen. Es ist irgendwie wie ein sehr breiter
Überblick über eine To-Do-Liste. Ich hätte diese Art von Aufgaben, dass es sich um Geschäft,
Kundenarbeit, Finanzen,
Gesundheit, YouTube handelte . Und dann würde ich nachverfolgen , ob es tatsächlich
passiert ist oder nicht. Und ich habe jede Woche
das Gleiche gemacht. Da Sie sehen können, welche
Daten ich aufnehme, ist
es der Daten ich aufnehme, ist 16. März, also verwende ich die Tabelle der wöchentlichen
Ziele nicht mehr
wirklich. Stattdessen verwende ich einfach dieses Zeitschriftenbuch und es hilft mir, es viel
besser zu verfolgen als online. Vorstellung muss nicht Ihre einzige Quelle
sein, aber ich
versuche wirklich, Ihnen
klar zu machen , dass es
Ihre einzige digitale Quelle sein sollte. Sie können es immer noch
mit physischen Dingen
wie Kalendern, Planern
und Zeitschriften kombinieren und was nicht. Ich habe eine Seitenleiste auf der
Homepage, die im Grunde nur alle verschiedenen Seiten
verlinkt
, die ich verwenden müsste. Und natürlich hat ich nur eine kleine Liste von Zielen
, die ich für dieses Jahr habe. Der nächste Abschnitt
wäre also die Finanzen. Jetzt werde ich nicht
sofort darauf
eingehen , weil es
sensible Informationen enthält, aber wir werden uns damit
befassen, wie Sie
Ihren eigenen Budget-Tracker
in ein paar Lektionen aufbauen können, im Wesentlichen behalte ich alle Geschäftsinformationen
, die ich hier habe,
alles, was
für die Buchhaltung wichtig ist. Und dann habe
ich auf der linken Seite das Budget
für jedes einzelne Jahr, habe
ich auf der linken Seite das Budget
für jedes einzelne Jahr ob es sich um geschäftliche
oder persönliche Ausgaben handelt, sie sind irgendwie wie
Gewinn- und Verlustrechnungen und es hilft mir persönlich zu verfolgen meine Ausgaben und hilft mir verstehen, ob ich zu viel
ausgebe, ob ich mehr ausgeben könnte und woher das Geld, das ich
verdiene, wirklich kommt. Egal, ob Sie
eine Einzelperson oder ein Unternehmen sind, dies ist wirklich empfehlenswert
und unterschätzt. Als Nächstes habe ich eine Zielseite. Ich benutze
das nicht wirklich, um ehrlich zu sein, sie waren ein bisschen zu
kompliziert für mich. Stattdessen habe ich nur persönliche Ziele und
Geschäftsziele
gesetzt und eine
Manifestation meines Lebens. Danach haben wir
die Social-Media-Seite. Hier
erstelle ich alle meine Inhalte, gesamte Planung
dafür, die Planung, die Organisation, das Skripting, alle Ideen, die sie aus diesem Abschnitt
stammen. Und so sieht es
ganz einfach aus, wenn man es sich nur kurz anschaut. Aber wenn du
die Notizen öffnest, weißt du, ich habe viele
verschiedene Seiten hier draußen. Auch hier Links zu den
Geschäftslizenzen, wichtigen Informationen, Medien, Kindern, solchen Dingen. Du kannst sie einfach hier reinwerfen. Systemvideoplanung für
Reisen, für Tiktok-Videos, ich habe eine Masterliste,
in der es sich um eine Tabelle handelt, und ich kann diese Videos
skriptieren und nachverfolgen, ob
sie veröffentlicht wurden
und wann sie waren veröffentlicht. Wenn ich jetzt eine Seite öffne, haben
wir ein Standardskript oder ob ich ein neues
erstellen wollte. Und ich habe ein neues Video gemacht, das öffne
ich. Ich habe mein Tiktok-Video mit
dem Tiktok-Symbol da drüben. Wenn ich darauf klicke, gibt es
mir nur diesen sehr kurzen Umriss. Dafür habe ich mich entschieden. Ich verwende diese Seite jedoch hauptsächlich
für meine YouTube-Videos, was eine sehr,
sehr komplexe Tabelle ist. Das hat mir viel
Zeit gekostet, um herauszufinden, ehrlich gesagt, ich habe es hauptsächlich
gelernt, indem
ich
andere YouTuber gesehen habe, die
ihre eigenen Notion-Workspace-Videos erstellt haben. Ich empfehle dringend, dass
Sie, wenn Sie ein Schöpfer
sind, zusätzlich zu sehen, was
sie tun. nur 23 oder vier von
ihnen ansehen, werden Sie dazu inspirieren,
Formate zu sehen , von denen Sie
denken, dass sie besser für
Sie sind , und leichter an
Ihren Augen arbeiten und was nicht. Danach habe ich
die Sprout-Seite. Hier habe ich
buchstäblich mein gesamtes Geschäft geführt. Ich habe verschiedene Produkte , die ich gerade hier
bauen möchte. Ich habe Listen mit Dingen für die Arbeit
meiner Markenidentitätskunden, die ich erledigen muss, um meine Reisen zu
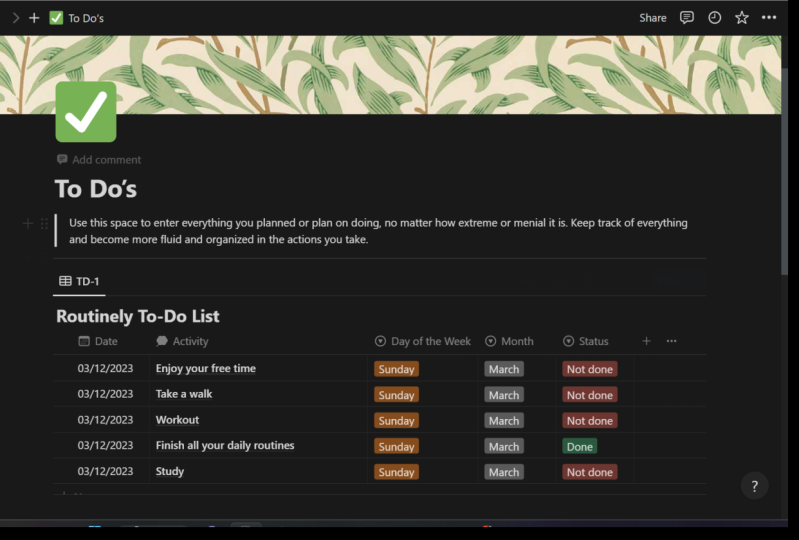
planen und so weiter. Danach haben wir
diese Mega-To-Do-Liste, die
ich euch in den früheren
Teilen dieses Kurses gezeigt habe. Dies ist eine Seite im Tab
, die ich selbst
erstellen wollte, damit ich nicht
fünf verschiedene Schaltflächen durchklicken muss , nur
um zu sehen, was ich tun muss. Und es ist eine Mega-Liste, die
verschiedene Arten von Aufgaben hat , die ich erledigen muss. Schreibe nur buchstäblich alles auf, was mir in den Sinn kommt, wie wenn ich unterwegs bin, laufe
ich herum und
denke an etwas, das ich wirklich tun muss
oder etwas, das ich sehe. Ich gehe in meine Vorstellung ein, ich gehe in meine Mega-To-Do-Liste. Ich habe hinzugefügt, ich habe in
der Art den Status, das Datum, die Priorität gesagt, und dann kann ich später noch einmal
nachsehen. Es ist nur eine Frage
, dass ich meine Jeans
tatsächlich bekommen habe ,
also ziehen wir das aus. Jetzt. Der letzte Abschnitt ist
die William-Sektion. Dies ist ein persönlicher Bereich , in dem ich mein ganzes Leben lang verwalte. Hier gehe ich also jährliche
Bewertungen, monatliche Bewertungen durch
und ich habe einige Tools zum
Selbstwachstum, und ich habe einige Tools zum
Selbstwachstum die ein
Morgenjournal, ein
Fitness-Tracker, ein Ess-Track
oder ein Sprachenlernen
und eine Leseliste sein würden Fitness-Tracker, ein Ess-Track . Das sind alles sehr
wichtige Dinge , die ich dir bald zeigen werde,
wie es geht. Das ist im Wesentlichen die Ansicht
der
Oberflächenebene dessen, wie mein
Notion-Arbeitsbereich aussieht. Jetzt werden wir uns damit
befassen, wie hier einige Tools erstellen können.
10. 2.1 Erstelle einen Budget: Willkommen zurück in der Klasse. Das wird also weniger als 2,1
sein. Und in der heutigen Lektion werden
wir
einen Ausgaben-Tracker
von ganz Grund auf neu erstellen . Am Ende
können Sie
dieses Tool haben, mit dem Sie alle Ihre Einnahmen und alle Ihre Ausgaben
verfolgen
und dann
einen großen Überblick über
Ihren Jahresgewinn sehen können Ihre Ausgaben
verfolgen
und dann
einen großen Überblick über
Ihren Jahresgewinn sehen . Jetzt zeige ich dir
kurz, was ich
für mein persönliches getan habe. So sieht es aus. Sie haben den ersten Abschnitt, der Ihr Jahresgewinn ist. Es hat insgesamt
Ihre Jahreseinnahmen, eine Summe Ihrer Ausgaben und dann Ihren Nettogewinn. Und dann haben Sie
zwei verschiedene Tabellen , die Ihren
Gesamtumsatz pro Monat organisieren. Es gibt also eine Tabelle
für jeden Monat, kostenlose Einnahmen, eine Tabelle für
jeden Monat für Ihre Ausgaben. Und jetzt werden wir genau
das
Gleiche von Grund auf neu erstellen . Also bin ich gegangen und klicke auf diese leere Seite namens Beispielbudgetvorlage, die
ich wieder auf die drei Punkte
hier geklickt habe und es erlaubt habe,
die gesamte Breite zu überschreiten
, damit Sie eine bessere Sicht auf
den gesamten Tisch. Und was wir
tun werden, ist, dass wir zusammen drei Tabellen
erstellen. Also gehen wir
in unsere Datenbank und erstellen ein TableView. Jetzt wird das mit nichts verbunden
sein. Und was wir
tun werden, ist, dass wir
es Ihren Jahresgewinn nennen werden . Danach
erstellen wir eine weitere Tabelle, und
wir nennen
es Ihre Einnahmen. Was wir also tun werden,
ist, dass wir zuerst
die Umsatztabelle erstellen werden. Und dann werden wir im Grunde eine exakte
Kopie davon
machen und es
in die Kosten danach umwandeln. Wir müssen also nicht
so viel von der Arbeit erledigen. Wir beginnen damit, dass unsere
erste Registerkarte als Quelle bezeichnet wird. Dies ist also
im Grunde genau das, was Ihre
Einnahmequelle ist. Du beschreibst es, sag,
woher es kommt. Als nächstes werden wir
etwas wirklich Cooles machen, was wir monatlich
organisieren werden. Also werden wir
eine neue Immobilie erstellen, und die Art der Immobilie wird
nur ausgewählt werden. Der Unterschied zwischen
select und multiselect besteht darin, dass Sie bei der Auswahl nur
eine Option haben können. Und genau das wird es
uns ermöglichen ,
die Einnahmen und
Ausgaben tatsächlich zu differenzieren und einen schönen Überblick über
die Arbeit jedes Monats zu erhalten. Wenn wir also Optionen hinzufügen, werden
wir
buchstäblich jeden einzelnen Monat
des Jahres zusammen hinzufügen . Und ich werde
das einfach umstellen und die
Reihenfolge umkehren , so dass die ersten Monate
des Jahres an erster Stelle stehen und die letzten Monate
der Jahresspalte dauern. Anstatt es das Gegenteil von dem zu haben, was
es gerade ist. Wenn Sie die Farben ändern
möchten, können Sie dies gerne tun. Sie klicken einfach auf die
vier Punkte neben einer
der Optionen und geben dann
was auch immer ein, wenn Sie möchten. Ich lasse es so, wie es
nur der Einfachheit halber ist. Und dann
fügen wir eine weitere Immobilie und wir
nennen es den Betrag. Und dieses Mal
wird der Typ eine Zahl sein. Jetzt sehen Sie, wenn Sie
den Typ als Zahl eingeben, erhalten
Sie auch ein Zahlenformat. Wir können das ändern und es
könnte ein Rubel oder eine Rupie sein. Eine könnte jede Währung sein mit der
Sie arbeiten,
oder eine einfache Zahl. Für mich arbeite ich in
kanadischen Dollar, also werden wir
es in kanadischen Dollar behalten und das werden wir etwas
verkürzen. Was ich jetzt tun werde, ist, dass ich unter
diesen verschiedenen
Eigenschaften schwebe , die ich für die Quellen habe, die ich mit allen zählen
werde. So kann ich
einem kurzen Überblick entnehmen , wie
viele Ressourcen, Einnahmen oder Ausgabenquellen
ich tatsächlich jeden Monat habe. Und dann für den Betrag, den
wir die Sonne machen werden, nur damit wir sehen können,
wie viel insgesamt verdient
hat oder wie viel wir letztendlich ausgeben werden. Ich mag es, alles
so organisiert wie möglich zu gestalten. Daher möchte ich immer
eine andere Eigenschaft einbeziehen , die ein Typ ist, und dies ist wieder eine Auswahl. Und die Optionen werden
nur
je nachdem, welche Art
von Arbeit Sie leisten, variieren . Angenommen, Sie machen Kundenarbeit, dann könnte das ein Typ sein. Oder wenn Sie auf YouTube Geld verdienen, wäre
das auch ein Typ. Oder wenn man Geld von der
Familie bekommt, ist das auch ein Typ. Nur als Beispiel könnten
Sie diese drei
Dinge tun, und so unterscheiden Sie welche Art
von Einnahmequelle Sie haben. Und
wenn Sie dann auf Ihre Jahre
und Monate
zurückblicken , können
Sie sehen, welche Art von Einkommen das
meiste Geld für Sie verdient hat. Danach haben
wir das Datum, an dem diese Einnahmen entstanden sind. Ich erstelle eine
Datumsspalte, sehr einfach. Sie klicken darauf und ermöglichen es
Ihnen, an jedem
Tag zu setzen , an dem der Umsatz
tatsächlich stattgefunden hat. Das ist perfekt. Jetzt können
Sie sehen, dass Sie
diesen Tisch haben, auf dem ich gerade hier
schwebe. Jetzt ist, was wir
tun werden, um es sehr cool zu machen. Was wir tun werden,
ist, dass wir mit der rechten Maustaste klicken und duplizieren. Wenn ich dupliziere, kann ich dies
jetzt in
den Monat umbenennen , in dem ich
dies gerne hätte. Also benenne ich das in Januar um. Und jetzt siehst du im Grunde, dass ich
Dinge monatlich organisiere. Nun, was wir tun
werden, damit Sie
sicherstellen, dass jede
Datenquelle , die Sie tatsächlich eingeben, in den richtigen Monat
fließt. Was ich also tun werde,
ist, dass ich zurück
zur Januar-Sektion gehe ,
der Original-Sektion, die wir gemacht haben. Ich klicke auf Filtern. Was ich mache, ist auf den
Monat zu klicken und der Monat ist Januar. Jetzt haben wir einen Filter, der die einzige Möglichkeit, Daten im
Monat Januar zu
sehen ,
wenn Sie auf Januar geklickt haben, die Auswahlregisterkarte für sie. Aus diesem Grund
sehen Sie
jedes Mal, wenn ich im Januar auf eine neue
Einnahmequelle klicke , automatisch aktualisiert,
damit der Monat gefüllt ist. So
weißt du das, wann immer du ab
Januar etwas einlegst, um irgendwie aufzutauchen. Umgekehrt, wenn ich
gerade
im Februar bin und vergessen
habe, dass ich im
Januar etwas tun
musste, und ich fügte hinzu dann wird es im
Januar-Sektion auftauchen. So
macht man die Dinge einfach organisiert. Dann
gehen wir in den Februar. Wir werden
das Gleiche tun. Wir werden den Filtermonat gehen, aber dieses Mal
wird es Februar sein. Da gehst du. Es
zeigt sich im Februar ,
Januar, Februar so. Dann werde ich dir nicht
zeigen, wie das geht, aber du klickst im Grunde mit der rechten Maustaste auf Duplikat
und
du wirst es März nennen, und dann wirst du
den Filter im März wieder ändern dass der Filter und der Monat
denselben übereinstimmenden Monat sind. Und du wirst sehen, dass es so
auftauchen wird. Ich werde dir nicht zeigen,
wie es für alle 12 geht. Stattdessen werden wir die Kostenregisterkarte
erstellen. Was wir also
tun werden, ist, dass wir den ganzen Tisch
nehmen, darauf klicken und
wir gehen zu Command D,
was bedeutet, dass wir ihn duplizieren
werden. Dies bringt uns
eine exakte Kopie dieser Tabelle und wir
nennen sie „Ausgaben“. Das einzige, was
ich zu
den Ausgaben hinzufügen werde ,
die ein bisschen
anders sein werden als die Einnahmen, ist nur die Karte, die Sie verwendet haben. Dies ist nicht wirklich
relevant, wenn Sie nur eine Kreditkarte
haben, aber wenn Sie eine Debitkarte haben,
Kreditkarten die Karte eines Elternteils verwenden
und eine Visitenkreditkarte verwenden, dann ist dies etwas, das möchten
auf jeden Fall
einbeziehen. Auch hier ist es eine Auswahloption. Sie könnten Amex, Visa, MasterCard, Debit machen,
was auch immer Sie verwenden. Auf diese Weise können
Sie jederzeit verfolgen, wo
Sie den größten Teil davon ausgeben. Vielleicht, woher Punkte
kommen oder vielleicht bezahlen Sie mit Sachen mit der falschen Karte
oder Ihrer Debit zu viel
oder so nicht. Ja, großartig. Also haben wir alle das Gleiche. müssen Sie genau
dasselbe tun Im Grunde genommen müssen Sie genau
dasselbe tun für Februar,
Januar, März. Wenn Sie jedoch Ihren
gesamten Umsatz-Tab mit
allen 12 Monaten erstellen , bevor Sie Ihre Ausgaben
kopieren, sparen
Sie Zeit wie diese. Jetzt haben wir die Einnahmen
an einer Tabelle abgeschlossen, wir haben die
Spesentabelle abgeschlossen, jetzt müssen wir nur noch
die Jahresgewinntabelle ausfüllen. Alles, was es von uns
verlangen wird, ist eine Reihe. Wir werden nennen,
wir werden
die erste Eigenschaft umbenennen , die
nur als
Prophet bezeichnet wird, um tatsächlich das zu tun was ich habe, ist sehr
komplex und um ehrlich zu sein, glaube
ich nicht, dass ich es empfehlen
möchte dass du es sofort versuchst. Was wir also tun werden,
ist, dass wir
die beiden verschiedenen Arten von
Immobilien für die
Gesamtumsätze und die Gesamtkosten ändern die beiden verschiedenen Arten von werden, aber sie werden keine Roll-ups mehr
sein. Stattdessen werden
sie kanadischer Dollar sein. Und die Gewinne werden Ihre Einnahmen abzüglich
Ihrer Ausgaben sein. Und das war's. Was wir also tun werden, ist, dass
wir alle unsere Einnahmen übernehmen werden. Sagen wir Geld von Mama. Mama gibt dir 20 Dollar. Großartig. Du wirst sehen,
dass das einige Auftauchen sind, sagen
wir mal Geld von YouTube
, das dir 100 Dollar einbringt. Sie haben also 120 Dollar , die als Ihre Einnahmen erscheinen
werden. Dann sagen wir mal. Aber neue Kamera im
Februar, 5 Tausend Dollar. Jetzt haben Sie im Januar und Februar einen
Umsatz von 120 US-Dollar , Sie haben 5 Tausend US-Dollar
an Ausgaben. Was Sie also tun können,
ist, alle
diese Gesamtsummenwerte in
Ihre Einnahmen und
Ausgaben einzufügen diese Gesamtsummenwerte in und Sie können
Ihren Gesamtgewinn verfolgen. Also da hast du es. So könnten
Sie Ihr Budget erstellen. Und von dort aus können Sie
nachverfolgen, wie viel Sie ausgeben und wie viel Sie jeden Monat
verdienen. Sie können diese Seite duplizieren und eine separate
für Ihr Unternehmen
erstellen. Und das war's.
Also lasst uns weitermachen.
11. 2.2 Eine To-Do-Liste: Willkommen zurück in der Klasse. In dieser Lektion werden wir
uns überlegen, wie
man eine Mega-To-Do-Liste erstellt. Jetzt haben Sie wahrscheinlich
irgendwann in Ihrem Leben eine Menge
To-Do-Liste
erstellt . Die Sache, die ich an der Verwendung von Notion
for To-Do-Liste liebe , ist, wie einfach es ist Dinge tatsächlich
zu organisieren und
herauszufiltern, damit Sie erkennen, was wichtig ist und dass Sie diese Dinge tatsächlich
tun. Wenn Sie Ihre
Aufgabenliste einfach in einer der Registerkarten vergraben ,
die bereits in
Ihrer Seitenleiste oder auf einer anderen Seite vorhanden sind. Ich garantiere,
dass du es nicht
finden wirst und du wirst
nichts tun , du wirst dich nicht
daran halten. Es wird einfach
eine weitere Platzverschwendung sein. Vertrauen Sie mir, ich war
dort und eines
der Probleme, einen Großteil
Ihres Lebens online zu
verwalten Ihres Lebens online zu verschiedene Registerkarten und nicht alles auf einmal sehen zu können. Sie möchten wirklich
sicherstellen, dass wenn Sie
etwas so Wichtiges
wie eine To-Do-Liste haben , jedes Mal direkt vor
Ihrem Gesicht liegt. Deshalb gehen wir
zurück in unseren Workspace und
machen ihn zu einem eigenen Tab. Also fangen wir mit
einer Mega-To-Do-Liste an. Jetzt werden Sie sehen, dass genau
diese Seite
nur ein bisschen höher existiert. Das liegt daran, dass ich es mit euch
neu erstelle. Wähle ein Icon aus. Ich
mag das Häkchen. Klingt nach einer sehr guten
Möglichkeit, den Überblick zu behalten. Und natürlich bin ich ein großer Fan
der Seiten in voller Breite, wenn wir einen Tisch
machen werden. Das ist unser nächster Schritt. Wir gehen hier in unsere
Datenbank, TableView. Es wird eine neue Datenbank sein. Dies wird
unsere Master-Liste sein. Es braucht also nur eine Ansicht, im Grunde nur die Tabelle. Und wir werden diese Tabelle so
organisieren , dass Ihre Artikel und Ihre Aufgabenliste nach ihrer wichtigen Kategorie
eingestuft werden . Lasst uns darauf eingehen. Zuerst. Wir benennen unsere
ursprüngliche Immobilie und nennen es unsere Aufgabe. Das nächste, was wir tun
werden, ist, dass wir diese markierte Eigenschaft
ändern werden . Wir werden
es in Priorität umbenennen. Und der Typ wird von
Multi-Select-Auswahl zur Auswahl wechseln . Und dann werden wir tief, mittel und hoch
gehen. Und ich werde
die Farben ändern, um zu reflektieren , dass Grün
eine hohe Priorität hat, mittel bis gelb,
niedrig bis rot sein soll. Das ist persönliche Präferenz. Natürlich kannst du es
ändern, wenn du willst. Wir machen es ein bisschen kleiner. Und was wir
sofort tun werden, ist, dass wir
auf die rechte
Seite des Tisches springen . Wir werden in Ordnung gehen. Wir sortieren es also sofort nach der Eigenschaft
in aufsteigender Ansicht. Jedes Mal, wenn Sie
etwas haben, das hoch ist wird
automatisch
nach etwas niedrigerem eingestuft . Wenn ich mich plötzlich
dazu entschloss, hoch zu gehen, dann wirst du sehen, wie es
wechselt und so weiter. Die nächste Eigenschaft, die
wir erstellen werden, ist ein Typ. Wie Sie wahrscheinlich sehen können, bin
ich ein großer Fan davon, die Dinge so
weit wie möglich zu
erklären , denn
je offensichtlicher etwas ist, desto wahrscheinlicher
werden Sie es tatsächlich tun. Für den Typ. Es kann sein, was immer du willst. Sie
müssen dies nicht unbedingt ausfüllen. So wie ich es habe, ist es
wie Geschäftsbetrieb, Finanzen, Privatleben,
YouTube usw.
Es gibt eine Vielzahl
verschiedener Dinge, die Sie setzen können. Sie können so viele
Optionen haben, wie Sie möchten, also überlasse ich Ihnen das, damit
Sie es herausfinden können. Und dann ist die nächste Eigenschaft
, die Sie
eintragen werden , der Status. Also das wird wieder
eine Auswahl sein und du
wirst nur zwei Optionen haben, also wirst du
nicht fertig oder fertig sein. Und wieder werden wir das deutlich
machen. Mukden Green wird nicht rot
machen. Was wir jetzt
noch einmal tun werden, ist, dass wir alles in Ihren Tischen
herausfiltern. Wenn ich diese
Statussache also wie erledigt oder nicht getan belasse
, nachdem ich
Dutzende und Hunderte verschiedener Elemente und
Aufgaben zu deiner To-Do-Liste hinzugefügt habe. Sie werden diese verrückte
lange To-Do-Liste haben und sie wird
irgendwann
überhaupt nicht organisiert werden. Was wir also tun werden,
ist, dass wir
einen Filter erstellen , damit er jedes Mal verschwindet, wenn Sie eine
Aufgabe beenden. Also klicken wir erneut auf
die rechte Seite
der Tabelle und drücken Filter. Und was wir tun
werden, ist,
dass wir auf den Status klicken. Wir wollen nur
Dinge zeigen, die nicht getan werden. Was bedeutet, wenn es irgendwann geschehen wird, werden Sie sehen, dass es verschwinden wird. wir also mach Bett, sagen
wir mal, putze mein Zimmer. Und sagen wir zum Beispiel die
Wäsche. Sagen wir, ich wasche am Ende die Wäsche und drücke
Fertig. Jetzt ist es weg. Es ist der Kaugummi. Sie werden es nicht wieder sehen, aber Sie können den
Filter des Status entfernen. Sagen wir, du löschst es und danach taucht
alles auf. Es ist nicht wirklich verloren. Man kann
es einfach nicht sehen, weil wir einen Filter
darauf gelegt haben , um alles zu
vereinfachen. Und sagen wir mal, mein Bett zu machen ist eine Knospe mit niedriger Priorität, mein Zimmer zu
reinigen ist hoch. Das wird zuerst auftauchen. Fantastisch. Das Letzte, was wir ganz einfach
machen werden, ist, dass
wir das Datum der Eingabe sein werden. Ich möchte das sagen, Es ist nicht unbedingt das
Wichtigste, aber es ist interessant,
denn wenn Sie Aufgaben
oder Gedanken haben ,
schlagen Sie einfach in diese To-Do-Liste ein, und es ist zwei Monate her seitdem du hast es geschafft oder seit
du darüber nachgedacht hast. Erstens, wenigstens ist es
da, aber zwei, du weißt, wie lange
du diesen Gedanken
durchgehalten hast und
nicht darauf gehandelt hast. Und es sollte dich hoffentlich motivieren,
damit anzufangen. Also gebe ich gerne wieder ein
Datum der Eingabe ein, wir werden eine
andere Art angeben. Jetzt können Sie bei
einer Art sehen, dass wir das
Datum der Eingabe aufsteigend gehen werden. Wenn Sie jetzt genau hinschauen, sehen
Sie, dass es ein Ranking gibt. Die Prioritätssorte ist zuerst, das Datum ist das zweite, was bedeutet, dass
es selbst wenn
dies am 16. März ist, das jüngste ist. Aber das habe ich im Februar gemacht. Es wird die Bestellung nicht
rückgängig machen weil die Priorität der
Reinigung meines Zimmers hoch ist, aber mein Bett zu machen ist niedrig. Wenn ich
sie jetzt beide hoch mache, werden
Sie sehen, dass sich das
Datum ändern wird. Das ist genau alles was du brauchst. Sie legen einfach eine ganze
Liste Ihrer Aufgaben auf, definieren sie nach ihrem Typ, um sie nach ihrer Priorität zu finden. Und dann,
wenn Sie es abschalten, verschwindet
es und Sie fügen dies
immer wieder hinzu, Sie verlassen Ihre Tab-Leiste. Vertrau mir, es ist perfekt.
12. 2.3 Ein tägliches Tagebuch erstellen: Willkommen zurück in der Klasse. In dieser Lektion lernen
wir, wie man ein tägliches
Tagebuch von Grund auf neu erstellt. Egal, ob Sie
daran interessiert sind oder nicht, dieses Journal tatsächlich zu
verwenden, ich empfehle Ihnen dringend
, es
zu tun und zuzuhören und
Sie schaffen es sowieso, denn in Bezug auf
Selbstverbesserung und Selbstwachstum Journaling war die tiefgründigste
Aktivität, die ich je benutzt habe. Ich mache es seit vier oder fünf Jahren
wirklich, sehr konsequent. Und als ich anfing, war
ich auf einem wirklich niedrigen
Punkt in meinem Leben. Und ich glaube wirklich
, dass das Journaling und Kanalisieren meiner eigenen Gedanken und Verstehen mehr über
mich selbst wirklich das war, was all diese Geheimnisse
für Wachstum
freigeschaltet hat, die ich hielt. Weißt du, ob
du ein Mann oder ein Mädchen bist, älter, jünger, es
spielt keine Rolle. Journaling, super wichtig, du musst
dich selbst kennenlernen. Ich muss sich selbst bewusst sein. Und wenn Sie das schaffen,
dann verspreche ich Ihnen, dass es Ihnen
hilft,
die richtige Denkweise aufzubauen , um den
gewünschten Erfolg zu erzielen. Vorstellung nochmal, ein sehr wertvolles
Instrument in dieser Hinsicht. Und so werden
wir heute Vorlage für eine Notion Journal erstellen. Gleichzeitig lernen Sie,
indem Sie dies erstellen, erneut, wie
Sie eine Tabelle verwenden und wie Filter
und Sortierungen
und alles verwenden. Sie werden aber auch
lernen, wie Sie Ihre eigene
Tabellendatenbankvorlage
entwerfen können . Es ist also eine sehr fruchtbare Lektion. Auch
hier habe ich mein
eigenes Morgenjournal in mir selbst geschrieben, Growth Tools, das
auf meiner persönlichen Seite steht. Was ich getan habe, ist nach unten
gegangen und einfach eine
Journalvorlage, eine
leere Seite, ein Bleistiftsymbol,
wieder drei Punkte in voller Breite zu erstellen leere Seite, ein Bleistiftsymbol, . Tabellen-Datenbank. Auch hier muss
ich die meisten Dinge ehrlich zu
Ihnen sein , die ich in Notion,
unseren Tabellendatenbanken, verwende. Das ist wirklich der beste
Teil des Begriffes für mich. Also haben wir unseren Tisch erstellt
und was wir
tun werden , ist, dass wir ihn monatlich
auflisten werden. Sagen wir also, wir
fangen mit Januar an. Oder wir werden
es hier tun, wenn wir
die erste Immobilie umbenennen und es den Tag nennen. Alles, was Sie
tun werden, wenn Sie
einen Journaleintrag eingeben , ist, dass
Sie buchstäblich das Datum,
Januar 12345, schreiben werden . Und hier
werden wir damit beginnen, die Eigenschaft umzubenennen. Es wird der
Wochentag sein. Das wird also jetzt eine andere Eigenschaft
sein. Wir machen es zu einer Auswahl
statt einer Multi-Select-Auswahl. Also werden wir Optionen hinzufügen. Also Sonntag, Samstag,
Freitag usw. werden
wir jeden
einzelnen Tag der Woche machen. Und dann
werden wir danach
nur noch ein Glücksniveau hinzufügen. Zufriedenheitsgrad des sehr
einfachen Zahlenformats. Und du kannst Emojis hinzufügen, wenn du das glücklicher machen
willst. Und du wirst
im Grunde nur ein Ranking auf zehn machen. Man fühlt sich wie ein
Eins, man fühlt sich wie eine Neun, man fühlt sich wie eine Bräune, man fühlt sich wie 7,6.
Es spielt keine Rolle. Was du tun wirst, ist, dein Gefühl
genau in dem Moment, in dem du ein Tagebuch
beginnst, auf
zehn zu schreiben . Danach
schreibst du das Highlight von gestern. Dies ist ein Textfeld. Du wirst eine
erstaunliche Sache schreiben , die gestern
passiert ist,
auch wenn nichts, was du für angenehm
hältst, passiert, aber vielleicht siehst du dir
eine gute Episode auf Netflix an oder du hattest
ein wirklich nettes Mittagessen. Das könnte etwas sein, das Sie Ihr Highlight aufschreiben
möchten. Und danach schreibe
ich einen Motor,
ein Motivationszitat an
sich selbst, Motivationsbotschaft. Manchmal ist dies ein Lieblingszitat, das
ich gerne einfüge. Manchmal bin ich wie
Reichtum, saug es auf. Es ist Zeit aufzuhören, hart mit dir selbst zu sein, hör
auf, traurig zu sein. Es gibt viele
positive Dinge auf der Welt, die vor sich gehen, konzentrieren Sie sich auf das Positive. Und jetzt haben
Sie im Grunde diese Übersicht , die Sie
jeden Monat
verfolgen können wie Sie sich
an welchen Tagen fühlen. Und Sie können auch
irgendwie zusammenfassen , was mit
Ihnen an jedem Tag des Jahres passiert ist. Wenn du also
deine Highlights
aufschreibst, wirst du sehen,
was dich glücklich gemacht hat, an
welchem Tag es passiert ist,
warum es dich glücklich gemacht hat, und dann hast du auch
dein Glücksniveau. Und am Wochentag stellen Sie
vielleicht fest, dass
Sie
sonntags glücklicher sind , aber montags mehr
****** frei. Als ob das ein Trend ist
, den Sie analysieren können indem Sie
diese Journaleinträge verfolgen. Im Moment bist du also golden. Aber was wir tun werden
, das wird das ändern. Wir werden es ein
bisschen komplexer machen, werden wir
eine weitere Eigenschaft hinzufügen wenn wir es den Monat nennen sollen. Nun, auch hier
wird dies eine Auswahl sein. Und was wir tun werden, ist genau das
Gleiche zu
tun, was wir getan haben. Und wir werden alle Monate für uns selbst nennen . Und der Grund, warum
wir
dies tun werden , ist, dass
wir anfangen werden , Filter für uns selbst zu
erstellen,
damit wir verschiedene
Monate
verfolgen können und keine
Reihe verschiedener
Cluster haben auf einer Seite. Wir haben den Monat hier. Dies ist Januar 2022, also ist dies der 1. Januar. Perfekt. Was wir
tun werden, ist einen Filter hinzuzufügen. Und wir werden
diesen Eintrag nur anzeigen , wenn er dem jeweiligen Monat
entspricht. Der Monat muss Januar sein. Wenn es nicht Januar ist, wird
es nicht auftauchen. Was wir nun sehr
ähnlich machen werden wie Sie,
als Sie das Budget gemacht haben,
ist, dass Sie dies
duplizieren werden. Es wird Februar werden. Sie werden genau
den gleichen Umriss haben, aber in dem Monat, in dem Sie
ihn in
Februar umstellen , und das ist
alles, was es sein wird. Es wird kein anderer
Eintrag aus einem anderen Monat sein. Kopieren Sie erneut Einfügen, Duplizieren. Du wirst
das für 12 Monate erstellen. Das letzte, was wir tun
werden, ist, dass wir in die erste Spalte gehen , unseren Tages-Tab, und wir
werden sie als Seite öffnen. Jetzt sehen Sie, wir haben das schon einmal
in Abschnitt 1
eingegangen , dass Sie Ihre eigene Vorlage
erstellen können. Um Ihre eigene Vorlage zu erstellen, klickt das
Quartal auf diese
Schaltfläche und es wird ein Journaleintrag
sein. Und was ich tun werde, ist, dass ich
einfach direkt
kopiere , was ich
in meine persönliche Vorlage geschrieben habe. Das ist es, was ich dir
empfehle. Wieder total subjektiv. Ich beginne damit, ein heute
einzubeziehen, ich fühle mich, dass
Sie in diesem Abschnitt einfach
Aufzählungszeichen von
Emotionen und Gefühlen aufschreiben werden . Es könnten nur Worte sein, es könnten Sätze sein. Und du hast nicht über
deinen Tag gesprochen. Wie war dein Tag? Wie fühlt man sich Was ist
los, was ist los? Sie verschwimmen
es im Grunde so, als wären Sie in einer Therapie, außer dass Sie
es sich selbst am Computer schreiben . Danach werden
Sie ganz einfach Ihr Glücksniveau
für Ihre Karriere, Ihre
sozialen Lebensbeziehungen, Gesundheit, Emotionen,
Ambitionen, wirklich die
wesentlichen Bestandteile von ein erfülltes Leben führen. Und danach schreiben
Sie einfach, was kann ich heute in
dieser Woche tun , um
eine dieser Bewertungen zu verbessern? Was sind ein paar Kleinigkeiten? Kann ich mehr trainieren? Kann ich mehr ein Tagebuch schreiben? Kann ich mich mit Freunden treffen? Wie können wir diese Zahlen verbessern damit sie
irgendwann höher werden. Danach erinnere ich mich
immer
gerne an zwei Ziele, die ich
für diese Woche, diesen
Monat, dieses Jahr habe . Auch dies geht auf die
Zielsetzung zurück, um sicher zu sein, dass
Sie auf dem Laufenden sind, sei es in einem geschäftlichen
Umfeld oder in Ihrem persönlichen Leben. Und dann
ist nicht zuletzt eine legitime Manifestation. Ein Satz, was ist
eine Sache , die Sie gerade nicht
haben
wollen? Für mich ist es oft so, als ob ich 100
Tausend Abonnenten will, aber manchmal ändere ich
es und sage, ich
möchte eine gute Tänzerin werden.
Man weiß es nie. Aber jetzt hast du diese Vorlage. Sie können genau hier sehen
, dass es sich um einen Journaleintrag handelt. Dies wird jederzeit angezeigt, wenn Sie einen neuen Eintrag erstellen
möchten. Wenn Sie
Ihre Tabellen kopieren, einfügen und
in die verschiedenen Monate duplizieren, bleibt
diese Vorlage bei Ihnen,
sodass Sie sie nicht jedes Mal erneut importieren
müssen. Im Wesentlichen war's das. Jedes Mal, wenn Sie Ihr Journal
eingeben, werden
Sie sehen, dass Ihre
Vorlage beim Öffnen der Seite genau dort ist. Und so kannst du es
jeden Tag der Woche eingeben und
nachverfolgen, wie es aussieht und sich anfühlt. Und ich garantierte, dass dies
das Beste ist, was Sie in Bezug auf Ihr persönliches
Wohlbefinden in Ihre
Notion-Vorlage
hinzufügen können in Bezug auf Ihr persönliches
Wohlbefinden in Ihre
Notion-Vorlage
hinzufügen . Ich mache es jeden Morgen für 20 Minuten und verändere mein Leben. Jetzt wissen Sie, wie Sie
eine Zeitschriftenvorlage auf
Notion erstellen , um danach zu kommen.
13. Schlussbemerkung – Vielen Dank für das Zuschauen!: Das fasst ziemlich zusammen, wie man
Notion einsetzt, um dein Leben zu organisieren, zu
planen und abzubilden. Ich habe Ihnen die Grundlagen gezeigt, wie Sie es von Grund auf neu
verwenden, Vorlagen
erstellen, Paiges
Abschnitte, Datenbanken alle notwendigen Dinge, die Sie benötigen, um die App
umgehen zu können und nutzen Sie Ihre
eigene Kreativität in Ihren eigenen Wünschen, um
die Seiten zu erstellen, die Sie möchten. Ich habe meinen
persönlichen Arbeitsbereich
mit euch geteilt , hat nichts
geändert. Es sieht genau so aus. Wenn Sie also
in diese Videos zurückkehren möchten, pausieren Sie es,
schauen Sie sich an, was ich getan habe, und sehen Sie
einfach das
Format der Dinge, dann können Sie anfangen, Ihre Ideen
zu entwickeln. Und es könnte eine gute Sache
für Inspiration sein ,
weil ich weiß,
dass ich das getan habe, als ich andere Begriffsvideos angeschaut habe. Dann habe ich dir endlich ein paar Tools
gezeigt, das Journal, die To-Do-Liste und auch den Budget Tracker. Dies sind drei Dinge, die für
Ihr persönliches Wohlergehen
und natürlich
nur für das Leben im Allgemeinen wirklich wichtig
sind Ihr persönliches Wohlergehen
und natürlich . Ich weiß also, dass es
viele verschiedene Apps und Tools für Produktivität
und Organisationen gibt. Ich ermutige
euch wirklich, Notion für mich zu benutzen. Ich betrachte mich als
lebenslanger Selbsthilfe-Süchtiger. Ich lese immer Bücher und höre Podcasts
und versuche herauszufinden , wie ich organisiert
und erfolgreich sein kann. Vorstellung war diese eine Sache, wirklich die einzige App. Als ich anfing,
es zu benutzen und mich darauf einließ, hat
es alles übernommen. Wenn Sie ihm also
genug Zeit geben und es völlig kostenlos
heruntergeladen haben, kostet das nichts. Dann denke ich, dass du es
wirklich genießen
wirst und es
wirklich geliebt haben. Vielen Dank, dass ihr mit mir auf diesem Kurs
mitgemacht habt. Wieder bin ich Will und ich bin der
Gründer meiner Marke Sprout. Und
wenn ihr einige dieser YouTube-Videos anschauen oder meinen Newsletter abonnieren
oder meine Website besuchen oder einfach nur
Kontakt mit mir aufnehmen wollt. All das wird
im
Abschnitt Über mich
dieses Kurses verlinkt Abschnitt Über mich und in meinem persönlichen
Profil auf Skillshare können
Sie all
diese Links direkt dort abrufen. Ja, wenn ihr anfängt, an Ihren
Arbeitsbereichen zu arbeiten, machen
Sie bitte Screenshots und teilen Sie sie und fügen Sie Ihre
eigenen Vorlagen den Projekten in
diesem Kurs hinzu, damit jeder andere, der sich ansieht
, das Gleiche. Und Sie können aus so
vielen verschiedenen Beispielen wählen und
vergleichen und kontrastieren und einfach nur von dem aufbauen, woran
Sie bereits denken. Ich hoffe, dass dieser Kurs,
obwohl er ziemlich kurz ist, Ihre Lebensrichtung ändern und Sie
auf einen besseren Weg bringen
kann , indem
er ein Werkzeug hat, das
für immer bei Ihnen sein wird, um Ihnen zu helfen, besser zu werden. Also danke euch sehr. Ich hoffe, du hast einen tollen Tag und wir
sehen uns das nächste Mal.
 Sprouht, YouTube Creator