Transcripciones
1. Conceptos de Canva de 1 _ introducción: ya sea blogger o dueño de una pequeña empresa o simplemente un profesional que necesita
demostrar a un empleador potencial que conoces tus cosas. Estar en línea es cierto en estar en línea a menudo significa tener realmente grandes visuales. Ahora a qué nos referimos con visuales. Me refiero a cosas como fotos, videos y gráficos. Ahora, como casi todo el mundo tiene acceso a un smartphone, tener fotos y videos realmente buenos no es tan difícil. Sólo necesitamos un poco de creatividad y algo de tiempo para practicar, y estás bien para ir. ¿ Qué pasa cuando se llega a los gráficos? Bueno, eso es lo que entra converso.
2. Conceptos de Canva n 1 _ Lo que es Canva: es herramienta muy fácil de usar, y fue diseñada para ser utilizada por cualquiera que necesite un trabajo de diseño gráfico. Y es especialmente útil si necesitas crear algunos gráficos regulares y
consistentes que compusiste en línea, tal vez para promocionar tu negocio, para promocionar un nuevo producto, tal vez solo un capricho para interactuar con tu público. Sea lo que sea que necesites tus gráficos a tiempo completo, te
puedo ayudar a lograrlo.
3. Conceptos de Canva n 1 _ Para quién es esta clase: ahora, antes de que te digas a ti mismo:
Oh, Oh, no. Y completamente desafío de diseño. Simplemente no puedo crear nada que ver con los gráficos. No te preocupes. Esto provoca creado con un principiante completo en la mía. Y quiero decir hombre más grande completo, te
voy a guiar a través de cómo configurar una cuenta privada. Y luego te voy a mostrar cómo iniciar un proyecto. Y luego te voy a guiar por el layout fuera de las herramientas y puedo va en lo que todos hacen en una base de muy alto nivel. En al final de esto, vamos a crear unas frases gráficas
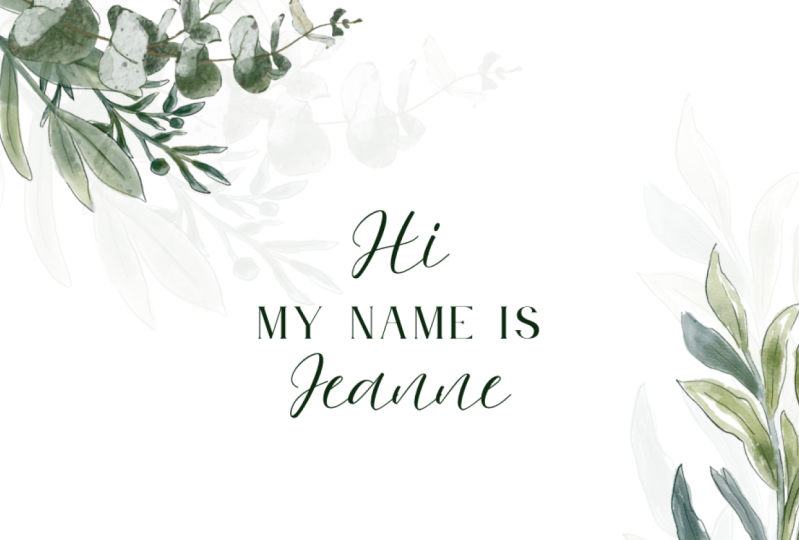
muy, muy simples. Hola, mi nombre es, y dicho eso, Hola, mi nombre es Joseph E. Y entonces cuando sea tu instructor para esta clase, que es convertir basicos
4. Conceptos de Canva de 1 _ Introducción: De acuerdo, ahora, empecemos con la Sesión uno en esta sesión, te
voy a guiar a través de la creación de tu país converso así en cualquier hermano que sea que estés usando y algunos hermanos hicieron que en realidad apoyara a convertir. Pero seguro, Mozilla y Chrome serán compatibles con Convert. Simplemente entra en tu navegador Web y busca Candra dot com, y debería abrir esto. Ahora, antes de entrar en la configuración real de una cuenta, echa un vistazo a esta cosa genial que convierte hace. Siempre que muevas el ratón por ahí, solo
encuentro esto así llamado y es así cuando abras esto, vas a encontrar si ya tienes una cuenta, solo
vas a ir a leer aquí y usar esto a Morgan si no tienes una cuenta que necesitarás usar este poco espacio por aquí Ahora, estas preguntas están realmente en adición para convertir. Creo que es solo para su investigación para ver quién exactamente está usando cuenta. Por lo tanto, seleccione lo que sea apropiado para usted. Yo sólo voy a ir con lo personal, que es ofensa familiar. Y entonces ahora, una vez que haces clic en eso, se
te ocurre esta opción, puedes usar cualquier cuenta que prefieras configurar,
Um,
a Um, cuenta de con va. Prefiero usar el correo electrónico porque simplemente creo que eso es más fácil. Pero puedes usar tu Facebook, o puedes usar Google. Entonces solo voy a seguir adelante y usar apuntarme con, ¿sabes? Está bien. Entonces una vez que estés aquí, solo rellena tus datos. Instrucciones completas. Realmente fácil. Es justo como establecer una configuración en un país. Facebook on. Una vez que hayas terminado, serás enviado directo al campamento por interfaz. Está bien, así que adelante y haz eso, y te veré pronto.
5. Conceptos de Canva de 1 _ lo que ves cuando inicies en Canva: Entonces una vez que hayas terminado de configurar en un country convert, vas a encontrar esta situación de pequeño cuestionario pasando esto de nuevo es solo para conversar para saber quién, exactamente una porción para que puedan personalizar lo que es que eres el que quieres hacer con ellos. Entonces para efectos de esto, que no veas con qué voy a ir, digamos que somos e dueño o gerente de negocios. Entonces, sólo vamos con eso. Basta con hacer click en eso. Y luego, ya que vamos a crear un simple pequeño gráfico al final de esto, digamos que vamos a crear una publicación de instagram, acuerdo? Entonces solo selecciona eso. Y una vez que hayas terminado con eso, Canadá se va a abrir ahora de nuevo, Convert sigue mejorando con el tiempo, así que le daremos un poco de Gheit. Sólo pasa por ello. ¿ Eso es eso ya jugar? Eso está hecho. Ahora, antes de que
lleguemos, empezamos a meternos en crear esto. Esto ahora normalmente es lo que verías al principio de tu experiencia de conversión. Pero normalmente, una vez que ya tengas una cuenta de Campbell, cuando
inicies sesión, normalmente te llevará primero a la página principal del convo. Aquí es donde todo suele empezar Ahora arriba en la parte superior. Aquí arriba tienen un montón fuera de plantilla centro, realmente las ciudades más pobladas. Pero esto no es todo lo que conversar tiene en tienda. Una vez que hayas terminado de crear algo, todas tus creaciones se almacenarán en este espacio por aquí así. Cada creación que alguna vez hagas en tu cacería de conducta poder acceder en el futuro desde cualquier lugar desde cualquier computadora, ya que eres capaz de conocer juego. Entonces si haces clic aquí abajo y más, ves que tienen todo categorizado en, como las redes sociales posaron documentos, blogueando cualquier libro, como Solo mira eso, solo
tienen una plétora fuera plantillas que puedes usar. Ahora, Para efectos de esto, vamos a ir con la publicación de Instagram como seleccionamos a Andi. Una vez que haces eso, ¿qué tipo de realmente hace es? Abrirá tu nuevo diseño en, luego tocas. Está bien, así que ahora vamos a entrar en nuestra publicación de instagram donde vamos a crear nuestro sencillo gráfico
6. Conceptos de Canva con la 1 _ herramientas y diseños: De acuerdo, estamos dentro de Chi va ahora en esta sección, te voy a mostrar las herramientas que el campamento A tiene a tu disposición cómo encontrarlas fácilmente sobre cómo puedes usarlas a medida que avancas. Ahora déjame guiarte por las capas off convert para que sepas exactamente dónde están ahora todas las herramientas. Por defecto, Convertir abre un proyecto con la pestaña de diseños abierta en la última mitad, puedes encontrar a mano plantilla diseñada profesionalmente que realmente solo puedes usar en reemplazar elementos. Cambio, por ejemplo, realmente solo te da un buen lugar para empezar ahora un buen puñado de ellos son
gratuitos . Como se puede ver, algunos de ellos están escritos libres. Pero ahora los que no escritos liberan los de los premium en los que puedes usar. Es realmente barato que no te va a costar más que tés de un dólar. La mayoría. La mayoría de estas plantillas, que es algo tan increíble de convertir en. Si no quieres exactamente hacer el conjunto solo reemplaza elementos, entonces realmente puedes usarlo como fuente de inspiración. Entonces para seleccionar realmente cuándo puedes simplemente hacer clic en él, o puedes seguir adelante y arrastrarlo y cambiará automáticamente. No se puede. Eres lienzo del blanco a los colores, así que volvamos a esto y eso fue seleccionado previamente. Entonces con algo como esto, solo
puedes seguir adelante y digamos que quieres ver mi nombre o algo así. Mi nombre es Sí, podrías. Es así como puedes seguir adelante y personalizarlo si no te gusta lo que estás haciendo aquí arriba en la parte superior izquierda es botón de deshacer, así que solo tienes que hacer click y hacer y hacer hasta que vuelva a querer. Entonces quiero hacerlo. Entonces volvemos a la derecha al lienzo en blanco para que pueda mostrarte más fuera de cámara tiene que ofrecer .
7. Conceptos de Canva n 1 _ Elementos: Ahora cuando vas al archivo que queda otra vez después de las capas, tienes tu pestaña de elementos. Ahora lo que son los elementos son solo piezas individuales que puedes usar para crear tus gráficos como más
te convenga. Por lo que la portada te ofrece fotos
gratis, cuadrículas gratuitas, formas de
amigos, líneas, ilustraciones, iconos, gráficos. Ah, un
montón de cosas, verdad. Entonces depende de ti solo experimentar y ver qué es lo que estás buscando. Entonces digamos, por ejemplo, que quieres crear un fondo cuadrado. Si solo haces clic en las formas, entonces volverás a ver las formas libres pre diseñadas. Simplemente, literalmente, hacen clic y arrastran cambio de color lo que sea que estés buscando. Entonces vamos a ver la plaza, por ejemplo. Entonces una vez que le hagas click, vendrá como negro porque contraste, ¿y qué? Tienes tu plaza aquí, solo
puedes cambiarla en forma. Digamos que quiero rectángulo cuando eso es tal vez estrecho y va hacia abajo para centrar fuera de la página. Una vez que tengas el rectángulo en el tamaño que quieras, podrías simplemente moverlo hasta que veas esas líneas de rejilla. Ve esas líneas moradas que te muestran en que tu elemento está centrado. Digamos que quieres que tu color sea rosa. ¿ Estás listo? Ten una paleta por defecto por aquí. Simplemente puedes dejar uno de esos si quieres o si buscas más, um, color
específico. Da clic aquí arriba en este signo más. ¿ Ya puedes moverte a través de esta rueda de color a este tipo de color selectivo que quieras ? Entonces, ¿qué tan genial es eso? A. Al igual que éste, Así que vamos con eso. Entonces sí, y otra cosa que puedes hacer al jugador en esto para que sea más interesante si quieres, es si vas a la parte superior justo por aquí, donde ves copiar, arreglar y este pequeño ícono aquí, eso es transparencia. Una vez que haga clic en eso, puede hacer que su cuadrado sea un poco más ligero. Digamos que solo quieres algo lavado todo el camino a este rosa realmente, realmente claro. Entonces esto es realmente impresionante poner sobre las imágenes si quieres, que crees como un tono de color diferente o simplemente como un exceso para esos gráficos de
Pinterest cool o si no quieres eso incluso poco más del 100%. Entonces, si encuentras que no te gusta exactamente lo que estás haciendo después de la transparencia, como puedes simplemente seguir adelante y borrar ese objeto encendido. Eso es eso. Y así es exactamente como funcionan todo el resto de estos. Por lo que una vez que hagas clic en las fotos gratuitas, te enterarás de las fotos que puedes usar. Digamos que quieres ST en imagen que dice, Hey, vamos Vicky. Entonces haga clic en esa imagen. Es completamente gratuito. Entonces tan solo tamaño para arriba así a partir de ahí, podemos seguir adelante y agregar texto a la imagen. Ah, y si solo haces clic y
arrastras, puedes reposicionar cada vez que sea lo que estás haciendo para que sea donde quieras que esté. Entonces, por ejemplo, cuando lo pongo así es un poco demasiado cielo y luego realmente no cuenta la historia, solo muévelo hacia arriba hasta que sea donde yo quería estar. Ya basta, en un próximo video, te
mostraré cómo manipular tipo de imágenes, así que sigamos adelante y eliminemos esto, y entraremos en el texto
8. Conceptos de Canva n 1 _ texto: otra vez. Cuando te metes en texto, siempre
hay una tonelada de plantillas que pueden usar que han sacado todo el saldo. Esto es lo que quiero enfatizar es un subtítulo. Tienen tantas opciones diferentes, y de nuevo son todas gratis. Entonces ese siempre es un buen lugar para empezar también. Entonces, por ejemplo, vayamos con este que dice noche de bistec. Por lo que si solo haces clic en
eso, aparecerá ahí mismo. Entonces aquí, lo que vas a hacer es tu click en la parte donde quieres agregar,
um, um, tu propio texto y simplemente teclear algo como mi nombre es tan en. Entonces Andi, eso es lo que haces por cada una de las partes individuales. Se puede cambiar lo que esto está cambiando lo que está encendiendo esto, igual que una imagen. Si arrastras esto hacia
fuera, va a cambiar su tamaño. Pero manténgalo proporcionado al mismo tiempo, que es algo que es realmente, realmente genial. Y otra vez lo puedes centrar. Una vez que veas esos carriles, pasemos ahora por la forma en que puedes personalizar tu texto. Digamos que no necesariamente te gusta este fondo en particular aparece donde tienen sus fondos y el viejo de forma gratuita como de costumbre. Pero si sí quieres tener un frente diferente, digamos que has tenido 1/2 un diseñador gráfico profesional te da un estilo frontal. Si no lo tienen aquí, entonces hay que actualizar a la versión de pago de Convertir. Y ahí es donde si ves, no tengas el fondo, dice, Sube tus propios fondos. Si haces click en esto, te
va a llevar a la opción de conversión pagada. Pero en su mayor parte, realmente se
puede crear una variedad fuera de las cosas con los teléfonos gratuitos. Entonces digamos, por ejemplo, que
quiero cambiar. Mi nombre
también lo es . Esta frontera que dice que había Noia. Creo que así es como dijo eso, Ver automáticamente que cambia eso. Ahora digamos que querías ser un grande,
más grande así que después de después de tu fondo es cuando vas ahora al tamaño de tu teléfono. Entonces solo juega con eso y ve qué es eso lo que es lo que te gusta. Si ahora quieres cambiar el color de lo que es lo que estás haciendo, solo
puedes seguir adelante y resaltar de nuevo. Esto es como la rueda de color en las formas. Y lo genial de Conda es recordar, seleccionamos este impresionante rosa caliente para la imagen que realmente dentro de tu dentro de tu proyecto . Mantendrá un registro de todos los colores de usados dentro de su proyecto para que podamos seguir adelante y seleccionar de nuevo este rosa caliente. Y bueno, tenemos Ah, rosa
caliente. Significado es que la situación está pasando. Entonces si quieres que este texto tuyo sea audaz, podrías ir adelante y audaz. Es si quisieras ser cursiva. No puedes depender del frente. Algunos fondos no están diseñados para ser cursiva por ejemplo, esta persona no lo es. Pero algunos fondos te permitirán cursiva. Y luego tenemos esto después de cambiar tu estilo tenemos como se va a
formar tu paraíso . Esto es igual que una palabra de Microsoft o cualquier otro tipo en ti tienes por lo que puedes dejar la línea
la puedes escribir una línea. Es centro aterrizó. Sea lo que sea que quieras este año te hace tener todo en todas gorras. Ahora este divertido comercio se convierte con todo todo en todas las gorras. Entonces encontremos algo que no venga sin policías. búsqueda puede ver. Entonces tengo este doble un seleccionado, que significa que todo aquí es todo gorras. Pero si soy seleccionado Walla, todo está en minúsculas. Y ahora tenía opciones de balas si quieres. Y ahora sí, vamos a espaciar en un video posterior. De acuerdo, así es como puedes usar un texto. Si no tienes ganas de usar una plantilla, entonces solo puedes seguir adelante y eliminar todo el grupo en. Y puedes usar las cosas desde cero. Puedes tener en un encabezamiento en el subtítulo en un poco de texto si quieres. Yo no suelo a Patrick cagarse a esto, porque no importa. Vas a seguir adelante y cambiar de nuevo estos elementos. Entonces digamos que mi nombre es Andi saldrá adelante y hará exactamente los mismos cambios conmigo antes de que mi nombre sea intercambio de 1 a 120 y luego de vuelta a un bonito rosa caliente. Y luego alineamos esto así para que no necesariamente tengas que usar el término placas. Las plantillas sí lo hacen. No soy más fácil para ti trabajar
9. Conceptos de Canva n 1 _ fondos: Y ahora, después del texto, ¿tienes tu opción de fondo? Entonces si no tienes un fondo agradable, fresco, fresco,
funky o solo quieres volver a llamar, camper te tiene ordenados. Entonces de verdad solo pasas a la escuela y ves la que te gusta otra vez, algunos les pagan con ellos, una gratis con los fondos, me parece que la mayoría de ellos están realmente pagados, así que por eso tal vez quieras a considerar. Pero en su mayor parte, probablemente no
estés usando estas marcas mucho tiempo. Entonces sigamos adelante y seleccionemos uno de estos antecedentes y veamos qué pasa. Entonces creo que iré con este. Ahora esa es una situación morada loca, caliente, caliente que no va del todo con mi rosa caliente. Entonces lo que podemos hacer es solo hacer click en él, y nos dará estas opciones y puede seguir adelante y digamos selectos están levantando el
rosa caliente ahora. Obviamente, eso no es muy práctico, porque de pronto no se puede ver nuestro texto para poder cambiar el color del texto. O podrías simplemente despejar con la capacidad, lo
cual voy a hacer en, y de repente tengo un bonito baño puesto. A ver, quieres que estos círculos sean más grandes, igual que la forma que te mostré. El cuadrado. Simplemente puedes seguir adelante y cambiar el tamaño de esto. Digamos que querías ser así de enorme. Puedes seguir adelante y hacer eso. Entonces hagámoslo. O digamos, por ejemplo, que desea que la capacidad que desea que esto siga siendo este vibrante rosa. Simplemente puedes volver atrás y dar click en el texto en sí. En. Ven a aparecer y cambiar el color. Digamos que esperemos y sí, mira, ya
tenemos dos miradas diferentes. Sí, así es como trabajas de tus baños y eso es todo. Entonces pasemos a las subidas.
10. Conceptos de Canva n 1 _ Suposiciones: algunos volviendo al archivo de Tyneside fuera de pantalla, se ve una nueva opción, dice sube. Ahora en realidad puedes subir tus propias imágenes en Can va. Andi. Sí, esa es una opción realmente genial. Aparecer. Ya ves, dice criatura en Fronteras otra vez. Esto es algo que realmente está disponible para la versión de pago, pero te lees. No hace que tu vida sea un poco más fácil, pero en su mayor parte, en realidad
puedes vivir sin ella. Por lo que podrías tener un click en subir tu imagen o simplemente Jackman desde tu escritorio. Soy un poco recortes electorales, así que solo arrastraré y soltaré. Entonces entro a mi buscador. Aquí está mi imagen. Entonces si solo haces clic en Dragón para imagen así, entonces lo verás. Subiendo. Ve poca cosa de agua fría, que a veces si estás cargando es lo suficientemente grande, hará que un submarino de Douglas algo lo diga. Eso es genial. Está bien, así que una vez las imágenes es va a comportarse más o menos como las imágenes en tu diseño . Si solo haces clic en tu imagen así, va a aparecer ahí mismo, y puedes volver a arrastrarla y jugar con ella y policía abreviada que quieras. Ahora, Como pueden ver, la imagen está completamente tapada nuestro texto, cual no queremos porque queremos ver nuestro texto. Entonces, ¿qué? Esto es cuando vas a la esquina superior derecha y donde ves la palabra organizar. Basta con hacer click en eso para que solo puedas dar click en atrás y se moverá eso sobre una espalda y repente tu texto está de vuelta al frente. Ahora no va a retroceder más allá del fondo, sin embargo, alguna vez
podrías eliminar tu fondo o si arrastras tu imagen hasta el final para cubrir el lienzo. De repente tu imagen ahora es tu fondo. ¿ Qué tan guay es eso? Y en realidad es así de sencillo.
11. Conceptos de Canva de 1 _ Herramientas finales: De acuerdo, Así que algunas cosas más que puedes notar con Con va Si vas a la parte superior derecha donde dice mi nombre es esto es muy en realidad labora tus proyectos. Ahora por defecto, siempre será
lo primero que escriba y desde lo primero dijeron
los detectives, mi nombre es eso lo que va a tomar. Pero si solo haces clic en
eso, te dará una nueva opción. Entonces vamos a llamar a esto viene lo básico parcheado uno. Y ahora has renombrado tu proyecto. Entonces después de que cambies el nombre de eso, vamos a saltarnos a Chef por ahora porque esto es realmente bueno si quieres colaborar en un proyecto. Pero como estamos haciendo esto a la par para nuestros propios fines personales, dejémoslo en paz por ahora. Entonces una vez que hayas terminado con el diseño, digamos que volvemos a hacer clic en esto. Vamos a fingir que esto está apagado. Conozco el diseño. Si quieres guardar tu diseño en una computadora, solo
dices descargar. Y así aquí te da opciones de impuesto de archivo. Entonces es Siempre te dará la más recomendada aquí. Selecciona PNG. Pero si haces click en este desplegable, ya
sabes, te
da la opción para J Peg PNG. Pdf para Web o un pdf para impresiones. Ahora bien, no estamos planeando imprimir esto o mandar bien ahora, ya que vamos a estar dejando esto como una imagen digital, sólo lo dejamos ya sea como una foto P y G o como una J. Tiendo a simplemente ir con P y G porque suele ser de calidad mucho mayor, pero sí te da un tamaño de archivo un poco más grande. Pero eso está bien. No es nada demasiado loco. Ahora, por aquí, se
puede ver de nuevo la opción de fondo transparente. Esto es algo que sólo está disponible en la versión pagada de cover on, y podemos llegar a eso en el futuro. Una vez que siguió tu show que has seleccionado para mucho, dure name hizo de la manera que quieres. Entonces solo tienes que hacer clic en descargar y así por lo general para darte esta linda cancha ya que se está preparando para descargar tu imagen. Así que sólo espera a que se ponga eso. Te dará la opción de guardarlo o previsualizar y hacer lo que sea que quieras. Ahora esto no es esto es suficiente. Sé lo que es así que solo voy a seguir adelante y cancelar en hechos divertidos. Mira a Carver ya está disponible en tu teléfono, lo cual es increíble, ya lo
sabes. Entonces hay un par de herramientas más que me gusta mostrarte antes de que nos metamos en diseñar nuestro proyecto
final al lado de la imagen que tú
estás creando, Ves estos pequeños iconos por aquí. Entonces el número uno acaba de hacer notas con el número de página que en, porque en realidad se pueden crear varias páginas dentro de convertir dentro del mismo proyecto. Y eso es realmente genial. Si digamos que quieres crear una serie fuera de los mismos pequeños gráficos, pero cada uno con diferentes colores o digamos que creaste un post y él lo hizo muy bien y quieres replicarlo para que solo puedas venir y duplicarlo usando este pequeño botón click . Entonces si haces clic en
eso, creará una copia exacta de esto, y así podrás leer. Repite lo que fue que hiciste eso fue, um, trabajar realmente bien para ti. Y luego si digamos que te encuentras creando una página y te das cuenta de que en realidad no gusta, puedes simplemente seguir adelante y eliminar esa página, entonces otra opción está en la parte inferior. Aquí dice, Agrega nueva página que te va a dar otro lienzo negro Ahora. Esto es realmente útil porque entonces se puede pagar dos diseños diferentes en. Puedes tenerlos uno al lado del otro, y puedes comparar y ver cuál te gusta. Andi le hizo la parte inferior derecha. Puedes cambiar el tamaño fuera de tu converse dentro de Con va on puedes verlos que es un más lado a lado,
por ejemplo. Entonces, cuando cuando tienes más de una página dentro de un proyecto en, ¿quieres guardar solo una de ellas? Cuando vas a descargar, en realidad
puedes seleccionar qué página quieres guardar. Entonces digamos que queremos ver solo la página uno. Seleccionarás la página uno y luego descargarás. O bien, si quieres guardar todas tus páginas, solo
tienes que hacer clic en todas las páginas y se descargará como un archivo zip, que luego podrás abrir y guardar tus imágenes individuales y utilizarlas como quieras. Entonces eso es para el diseño. Adelante y empecemos a trabajar en nuestro proyecto
12. Conceptos de Canva n 1 _ Proyecto final: OK, ahora es el momento de crear un proyecto de clase. Si lo deseas, puedes seguir adelante y usar las plantillas. Simplemente desplácese por las plantillas de conversión y vea lo que desea. Este proyecto simplemente iba a crear algo que diga Hola. Mi nombre es tan y así y así puedes usar la plantilla si quieres. Voy a usar la plantilla cuando usan algo muy simplemente usando formas y simplemente texto
viejo plano en. Pero si quieres usar este enfoque, realidad
es solo para ayudarte a flexionar un poco los músculos. Pero si de verdad solo quieres mojar los dedos de los pies y luego seguir adelante y claro con las plantillas , Así que déjame ir y coger una forma. Creo que quiero tener un triángulo. Sí, eso es lo que hacemos. Vamos con este triángulo de forma de aspecto raro. Apenas golpeó eso en la esquina, en realidad golpeó. Además, así, y entonces puedo simplemente colocarlo en algún lugar. Sí, es un poco peculiar de aspecto, creo que sí. Cambié el color a ese rosa caliente del que estábamos hablando antes. Basta con reducir la a pasividad a algo así. Está bien, eso está hecho. Entonces entraré en mi texto y veré Agregar encabezamiento y ver alto exterminio. Espera, quiero algo que se vea un poco juguetón. Entonces creo que iré con esto. No estoy tomando gorras pequeñas ni algo así. Entonces hazlo bonito y grande. Si esto, entonces sólo arrastra eso hasta algo ahí. Entonces diré subpartida de tratamiento. Ves, mi nombre es eso es cambiar el frente una perra a algo más serio, tal vez, um, veamos. Vámonos. De verdad lo hago un teléfono
agradable, muy bien tamaño. Pero no como porque alto solo para que no se levante demasiado, y yo centraré eso y luego bajaré esto un poco en el lenguaje justo ahí. Entonces lo que puedo hacer aquí es que puedo copiar esto. En realidad, se
me olvidó mencionar eso antes, pero sólo puedo copiarlo. Tengo algo que se ve bastante parecido y simplemente cambia el texto. Entonces mi nombre es Josephine, así que quiero podría querer maquillar esto. Es más pequeño. Eso no es tan grande como el nombre putt. De acuerdo, así que eso es un poco largo bastante bien, pero no me gusta cómo está pasando el triángulo, así que tal vez quiera hacerlo un poco más grande. A lo mejor así, Andi también podría rotar para que se sienta en algún lugar un poco agradable. Elegid eso. Entonces ahora está enmarcando mi nombre muy bien y como que le da un poco de énfasis de esa manera. ¿ Quién tipo de así? Cambiemos algo más la opacidad que no está tan oscuro. Está bien, Pero ahora creo que la parte superior está un poco demasiado vacía. Entonces lo que puedo hacer es copiar eso también. Um, darle la vuelta por
completo así y tal vez rascarlo hasta la cima así. A lo mejor pude ver Mira las bonitas sábanas superpuestas ahí mismo. Ahora vamos a darle la vuelta así. Actúa así un poco así. ¿ Listo? Así que así como eso, Wow, cuando miras eso ahora, el punto de esto no es crear algo que súper increíble. Eso es como ganar premios. Es solo para que creas algo y seguro que sabes lo que empecé con Con va y la parte más difícil de ello se hace. Así que adelante y crea tu único detectado dice hola mi nombre es porque definitivamente me
gustaría conocerte a medida que creas este proyecto en,
Sólo tienes que divertirte con él. Juega con tempo últimamente con las formas alegando con diseños. Sea lo que sea que te apetezca hacer, solo juega con él. Crea algo sencillo solo para que, ya
sabes, empezaras con camper.
13. Conceptos de Canva #1 _ consejos y trucos: unos cuantos consejos y trucos, cuanto más lo conviertas, solo presta atención a cualquier otro tipo de gráficos que veas. Míralos y mira a quién. ¿ De qué se trata este? Pero como o qué es de esto que no me gusta en el punto de eso va a ser a entrenar de
Canadá tu ojo para ver qué es lo que es, que lo que es y lo que no funciona. Y, sí, podrás mejorar en ello y solo seguir intentándolo una y otra vez y otra vez. Y confía en mí con el tiempo, te sorprenderás de lo que puedes crear. Así que disfruta tu proyecto ha creado el. No puedo esperar a verlo en el proyecto de clase de abajo.
 Josephine Tendo, Facebook Ads Strategist | Content Creator