Transcripts
1. What we will learn: no. Good afternoon. Good morning. Maybe on world, Whatever time you watching this, we are going to teach you how to create a looping animated gift as the one you can see on your screen There. Things has got awesome summer theme, But you Northern Hemisphere people probably suffering in the winter cold. And, yeah, we're gonna teach you how to create shape plays from Illustrator Falls, then animate shape players into looping gift. Let's a little tips and tricks in this class, and we hope that you have a lot of fun making it. Please post your projects up so we can have a look at them on comment on them and help you . Are you having any trouble? Were left to see what you guys do. Have a lot of fun and we'll see you in the first class.
2. Setting up your illustrator file: All right. So we're gonna start things off in Adobe Illustrator. I'm using Creative Cloud CC, but you can use any version of illustrating your life. These victims that have been created by one of our guys. You're even started. You could see what it looks like. That's in there. Your refund started. He's created these vector packs. One of them is the speech. I can't sit. We're gonna be using this speech. I can't sit in creating that looping gift. So they a couple points that I want to make sure that you guys know quite important that if you bring bad victors and after fix up sex really struggles to navigate through them on on a couple things that that I want to make sure that you follow. So that's the first thing is that that your strokes, uh, are good. You know, you that they make sure you're strikes remain strokes don't expand those. You don't know what expanding is. It's this when you expand on object here, you can kind of make it into, You know, Phil's essentially expanded from a stroke to a full now off to fix, like, really struggles because it sees that Okay, this is this is a line. This is a line, and it's very difficult to move the shape around now. You have to, like, select three different points in order to to move it well, that's tough. Where is if it's a struck? You can kind of shifted around in it, and it never changes its thickness. It's Wilson's animate eso. Please make sure that they're all your vectors or your strikes are strikes. Don't expand them. You know you might come into problems later. Maybe if you are creating victims yourself, make sure that you're using your strokes. And it's not bad to use fools every now and then. Like the back of the Embraer's here, the old souls. But they're quite easy to animate. You know I'm not going to really change the shape of that, whereas whereas this shape of the umbrella pole and I want, I want to move that into maybe the palm tree trunk or the surfboard, so you got to make sure that that's matching then. The second thing is just to make sure that your layers are world broken up, and each piece of art works on a separate layer on and naming them is also really important . I find that if you, if you just have shaped one shape to shapes, we ship forward gets really confusing, especially when you're breaking things up, living off to fix. And it's just good to make sure that all your artworks on different layers and his name properly. Um, yeah, if you if you want toe quickly, take a whole bunch of different things and make them into separate layers. If all the artwork is on one layer, for instance, like let's just take all the hard work and put it on one layer So you know when you're designing stuff often, you know you've just done it on the first layer. Now you can use this nifty little Europe down feature called Release Delays. You'll find it in your layers panel on the top, right? There's a little job done. Battle there. Quick, release two layers on what that's going to do to release all of your different shapes to laze. You can just drag that up, make sure that now the or different layers and at least don't have artwork anymore, so just get rid of them. But yeah, there you go to different layers. Now, get your name, all of them. But I've already done that. Some go backwards, they, um And now this files kind of ready for to fix. We've got all our strikes are good. We they're all in, lest on we can consult animating this and yeah, so let's let's bring this into after fix.
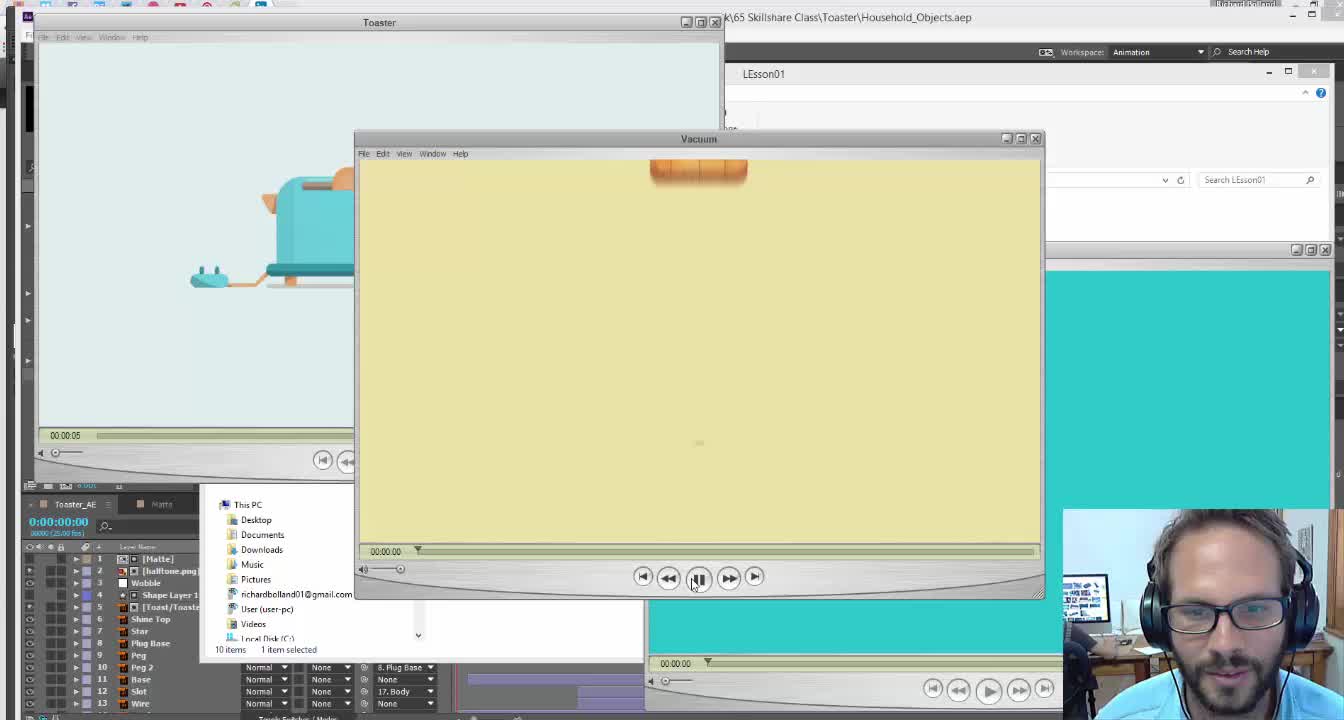
3. Converting to shapes: Okay, we are in opt if ICS Now, this is also oft effects CC 2015 and let's get going. Let's import that illustrator Father we saves. I'm gonna just double click on this Project Gray box here, and that's gonna import list data far. Now you want to make really sure that that your illustrator follows is important as a composition on the unit retain a layer sizes. If you bring in as footage, it's gonna just all murdered in tow. One on that's no good country. We animate that or BC it's more difficult. So we're gonna import this as composition retained layers import that cool. Now you can see here all are different layers that we've named in the previous sit They will come through That's pretty good on its already created a composition for us. So if we ever get up, you can kind of see the the correlation between illustrator or the latest. They're here all the layers here. The first thing we want to do now is these are layers we can't they don't have any shape information to them. I can't, like, select the little nodes on that. What we want to do is. You want to select everything. I'm just holding down shift click on the top layer. Hold down shift took on the bottom one, and that selects everything, or you can just control a control. A. Also select everything on right click and say, create shapes from Victor Layer. So if we click on that, it's gonna now it's changed. Its calculated along the different shape plays for us, and essentially, it's the same information that's come here. So if it's if it's a stroke in here, it's gonna be a strike in after fix on. So that's exactly what it's done. It's also kept all layers here for us, just in case we need them later, but we'll just they still up here so even delete him from our timeline. So minutes just select ALS. Those layers automatically, they get switched off, and I'm just gonna push back space on that. Deletes them. Um, so now our competition, it's it's set to 10 seconds ready. If you want to change that, you could go up to composition composition settings on who you update available, and so at the moment it's just 800 by 600 pixels. That's the best four matter if you want. Upload two dribbles of social media sites said to 10 seconds on 25 frames a second. That's good for now. Click. OK, now, what we want to do is just select the shapes that we want to use, so we not gonna use the tar. It's gonna push Delete on that delete tower. Delete Siegel lead slab like starfish. All the ones that we not use. We gonna use just these five shapes for now. Um, Andi, the first thing we want to do is just position them all in the center. Now, if you click on this window, I calling you Bring up your line, too. Now, what's your line? Toe does if you select everything, you can change a line, the layers to the composition. So it's gonna take the size of composition on. We're just gonna align them horizontally, aligned vertically. So now they will in the middle. That's exactly where we want them. Um, and now we can kind of stopped really kind of picking out which ones were going to do first
4. Animating the transition 01: we'll start with the ice cream. Then we'll move that into the the kind of palm tree and we'll go from the palm tree to the surfboard on the surfboard Teoh umbrella and eventually going to the ball and then back to the ice cream again. Um, for the sake of it, we can just kind of break. Please happened in terms of putting them on like a little timeline. So I'm just gonna if you select if you go right to the end, you kind of pull all these layers back. I'm gonna make it more two seconds on, not just just drag them into it. Doesn't need to. Perfect. We can change it a bit later. But it's the old two seconds and their five shapes then didn't That's gonna it's gonna work out. So you, if you put space bar, you can kind of play it on ice cream to Palm Tree, pumped to the surface board support to the umbrella on bread to the beach, bore and then back again. So we let our basic structure now, which is really nice. It's It gives us a good idea of what's gonna go into where on we can really start breaking up. What they what they look like. So now we can go to each separate layer and start breaking it up, even Mawr animating it. So we'll start with the ice cream. I just dropped on and go into the contents menu, and you can see all the different groups there. Now I'm gonna control and plus, to zoom in in space bar to kind of shifted around just so we can see a little bit. And you can start to see that these are little diagonal lines within the in the pastry. Um, I was in the pastry within the cutting at the two horizontal lines, and then you have the struck off the rectangle and solve the rectangles. So let's present two important things. A tangle struck. I think it's a stroke. Yeah, it is on the rig rectangle full. Uh, so those two things to animate on, then those are the little balls. Those two things there. Yeah, I said, right. Correct. So maybe it's good to to just name these bull. What's that? Little A full reflection. Three. Let's keep it at that. A man bull for re elect. Cool. I watched this. That's the full full full. So that's move that one underneath. Herbal struck. It's a reflection. Strike on full full fool's trick. Okay, maybe it's a good idea to just name so waken Call this bottom right bottom right. But I'm right. Bottom left bottomless. What a waste. Teoh for selection Top Strick top, uh, full tough. And then it seems like that is the Kern and that's the kind of full. It seems like we don't even need the cone full at the moment. Citadel Finance. So we now have the different kind of different shapes on, I think, to get from the ice cream cone into the palm tree, we're gonna essentially change this cone shaped from this kind of what's it upside down. Try and go into more cylindrical shed. And so if we drop this one down and jumped on the part, we get the path shape now on. This essentially controls the shape of the path so we can create a key frame by clicking on that will stop Watch on. This creates a key from which we can drag around. So say, saying we just wanted a box like couple frames. Um, we can get it. If we want an idea of that shape, we can just pull this one back frame. So just to show you what I'm doing, we just overlapping it slightly so we can kind of match the match. The shapes, some minutes just dropped this one down again. Um, selecting the path now waken we can start. Teoh, I'm just in a state. That little guy we can start to not pull this to kind of to match. Maybe I want to just just select this layer go down into transform on Just dropped this a pass ity down Just I know which what I'm working with. And we're not getting overlapped with colors. So I'm clicking back on to the ice cream layer, and I just want to kind of match up the same shape. It's just you just put that up there. So now if we way if we scroll, I'm seeing a zoo. Martin here, um, amusing that cult and middle school on my mouse and just going up and up and down. You hold on salt. So now we can see that those two shapes, they kind of blending into one another. Yeah, that works. Uh, so we can just take one frame back there. We can up capacity again. And what we should see now is like essentially, Yeah, that that works with two friends. Perfect. Now we gotta do is try to get rid of or at least change, get these diagonal lines into these kind of these are zone two lines on the palm trees. I'm just gonna go back and do exactly the same thing. So we got a little bit of a reference of what we working with. Um, these are all the diagonals. Yes, I'll start. The first thing we gotta do is just make sure that they are key friend. So I'm just gonna dropped on each one on a key. Frame them. I lost one. Call it if you hit the U Battle of the U later key. It's kind of gonna just take away everything that's not needed. Anything that's been animated, it kind of leaves and everything else kind of just hides. That's a clever key. Just Teoh be able to pull up what you need. So I'm just gonna drive all these key frames to where this one waas and then I'm gonna start to just pull down where these kind of stuff over that on may be. I want to do like, every 2nd 1 because it doesn't seem like they're going to be enough. Maybe that wonderful day. So now does these little two diagonal dies here? Then you worry too much about them. So now we can see that that that those two things are kind of taking check. We can bring in some other lines later just to make sure that that if Max is up, um, I want to change this rectangle. Now, I'm just gonna select group and pushed control A to select a lot. I mean, just push that up and that Is this a little bit of a neater space. So this rectangle these strikes, I'm also gonna just make them into a path. Go. But forward on. Well, I want to do is kind of like double click on the same player. And it kind of transform for you, and that's looking a bit better. Now we can actually go back into those just pushing you again to get those back up the's parts because we see friend them already, they're gonna they're gonna come up again. So let's start with the top line. You mean it's happening so fast that you're not going to see these little like issues, you know, um and let's try find that rectangle, fool. So there it is. They're just gonna make sure that it's that it's got a key frame when a drag that two, it starts. And then let's just make sure that it's okay, other things and always see that that that's taken pretty good shape. It's kind of forming. If we play that back at full speed, we can start to see it Really taking. Yeah, that looks pretty good. You can see there that, like we losing these little these little balls, which are going to be good to keep in will will bring those back in a little bit. Um, so now we've got that. What? What we want now is like almost these ice cream boards to to form coconuts at the top end. The way I like to do it is I'm gonna take these two bottom kind of clean balls and just put them up at the top so that it looks like a top heavy coconut. Um, so Let's just work with, like, all of these old guys, if you select well, you know, create a path out of all of them. So if you just select all of them and then double tap you, it's gonna they're gonna bring up all the all the animation or the layer information. When we can do now is just click on all the parts. So just scroll down and just click on all the pause that you can see. That's the currents. That's fine. So not hit you again twice. It's gonna bring up over the different parts. So all these new ones that don't have a beginning key frame diesel, diesel the ball. Um Now all we can do is just kind of be quite smart about this and weaken double double click on these legs and just kind of start to move the way we think. No. So maybe we want to move the We kind of wanna got the middle ground that maybe the top can be sitting over there. Um, the bottom line kind of come down, and now we just want to make sure that these are just double cooking on their shapes and that kind of does the job. That one. Come on. Good. Yeah. I think the else that you're here now, the biggest problem I noticed is that is that we want the kind of trunk to be We want these to come over the trunk and the easiest way to do that it's just to take this this top, this tough bull. Ah, So this little the group's dropped down on. So we every name in that top bull I'm just gonna drag so that the above, above the kind of above the base, we're gonna have to probably take just about everything. No, that works. It's looking pretty good. Let's just extend This ought a bit so that we can you can keep it. So now, anything left to do for versus to just finish off the usual lines there on and and work on these leaves coming out. So let's open up. Yeah, let's take a break now and we'll come back and finish it all
5. Animating the transition 02: All right, so we're back on. We are trying to know animate finish office animation of the Palm Tree. We've done the Ashman board turning into coconuts on Dash Cohen turning into the base of the tree trunk. Now let's let's open up the palm tree. Let's start, Teoh. Really get those palm tree lays. So listen, try a re order. This sets it makes more sense. So this is like the line off the trunk. Call that line trunk and it kind of goes along the way down Group 16. No, it's changed, but let's take that trunk all those lines drinks and just drop them at the bottom. For now, Quinn, and really need them. Um, in this trial, find Trump itself. Yeah, these two lines of the trunk itself. I'll be the strike in the Phil. I'm just gonna drop that right bottom, and it's just name them. So that we know is this That's the full trunk full, uh, clicking in tow on a truck struck. Yeah. I mean, remember, we've many. We can just switch. There's old. I'm not sure we'll need them because we're using the ice cream, the ice cream, the shape of the ice concurring that we've changed. So we don't really need another shape. That's exactly the same. Because we're using the ice cream. No, we want to kind of take away the all the trunks that we that we don't need. Um, so that's good from that friend there. And I think it's like every every 2nd 1 So that one we don't need I'm just switching off every 2nd 1 All right, down in the room. Where on you got cool. So these we don't need. So these are all the trunk lines that we've already created from the diagonal line of the ice Concurrent diesel diesel lines here, Uh, that's like in pretty good. Yeah, this guy's not needed. Um, this guy's not needed. Can these one of these little guys these strong find, I think there's just this little guy we don't need. All the leads that we're gonna use just now. There's a little guy, so I'm just bringing him down. Um, when we just call these lines for lack of a better word, I don't think that any more. What I realize is this tutorials. 90% meat renaming layers. So what I've done now is up. I'm just going ahead and renamed all the different leaves Services leaf. 12345678 on. What I'm gonna do is we don't actually need all of these different shapes. We can kind of just It's fine if it's in one group. So what I'm gonna do is is this little add box here it allows you to add, like, an empty group. Andi, just gonna drag that out so that it's above everything. Men. I'm gonna take these three leave, so that's basically just this top left one. I'm gonna just drag it into that group there. So now that's in its own group. And I'm gonna just name this now, like leaf one. I'm just gonna do the same for all of them. So, uh, just make sure that order them in there. Cool. Leave, too, on. I'm just gonna keep going like that. I'll come back when I'm done
6. Animating the transition 03: Okay, so I have no group total these together. So now they're all in their separate leaves. All right, so now what we can do So you can kind of see that the anchor points or shifted up there. So by by hitting this little button here, Pam behind two or the anchor point tool or by clicking why we can just take that and just drag it to where we want it to rotate. I'm gonna do the same for all of these different layers. Said they all kind of going to be rotating on the on the access where they are starting to grow. Um, that's fully five. Leave six, seven leave aids. Cool. So now if we going Teoh transform tool of this leaf one, we can see here that if we mess around with irritation, it's rotating nicely, so we can just keep it on zero for now. I was going to make it into a key frame I'm gonna scroll up on. I'm gonna just bend it down like that because we wanted to like, as its opening up, we kind of wanted to bend boom opening up and we're gonna do the same for the scale, so we're gonna go from 0% to 100%. So they got as its. So the clever little thing you can do now is just select that your scale and your irritation. Um, I'm gonna push control apple, see, And that's gonna It's gonna copy and then just applied Teoh rest of these leaves on whom the organizer they were going to come out on. What we can do now is just tap you that's gonna bring up or the keys. Um, and then we can just swap this around. So leave eight. Leave eight Here, leave six li four leave to we're just gonna change the in rotation And will the start rotations that could be from 100 20 instead of minus 118. Um, on What that's going to do is it's just gonna make it protect other way. So do so Now what would conduce to stretch that out, bring that down a little bit and just move off key frames? Well, then, that's just gonna overlap the laser, but more so you see here that going from the ice cream now to the pretty, pretty neato on now we just need animate these little these lines that are still still here . And we can just I understand, reopened this, So I'm gonna select all and they just close them. So it's these lines that we need animate, um, now a clever little trick instead of an animating the manually, like with a path to you can add this trump pause. So what Trump Pause does is essentially it begins on full with the started zero on the end at 100. And so you starting on zero inning on 100 it's giving you the whole thing. Now we just want to take that end and bring it down toe to zero again. So we're gonna keep friend the end. Just drag it up toe so that it's sitting at the end and drop this down to zero. Until now, as you can see here, it's this guy. Um, you can see him going there, so we're just gonna select those key frames a copy on go select all the other lines and paste them. So now they were going to be great, and we just kept you, and that will bring up all the key frames that are on the timeline on select all these end ones. So I think is all of those I'm just gonna drag these art because when you want them to come on, when the when it's finished. And I think this is it. Which one is it Not It's this guy. Let's see. Bring him up a little bit that he's getting that one. That feeling, that space Cool. So now it seems like, and I'm just gonna bring these these in slightly that they kind of. There you go. That's looking pretty good. Now, anything I want to do now is just were Komaki frames at the moment. All of these are just linear key frames, pretty boring. So I'm gonna just select all of them and I'm gonna attack if nine. And that's gonna make them into, uh, that's going to make him into Eazy e's on or you can right click on them key frame in tip relation and just make them busier. So they were. They were linear as a default and then making busier. And then that's going to smooth them out a little bit. Um, but I want them even more smoother than that. Someone a select all of them or that just the end ones. I'm gonna go into this graph editor here, which is gonna show me the speed off. We're looking at the speed of the key friends on this little button. Just makes everything kind of you can just view everything it takes all the key frames that are selected and puts them in a little neat little view for you. And I'm just gonna take these busy is because maybe we just selected the lost one. I'm just gonna drag them up. They're not gonna start first and then slow down. Ah, and you see, it's a much more to get back to back to the timeline. And it's a much more fluid kind of motion that that's looking pretty good. Now, what we can do is add a little embellishment, um, to just give a little bit more flavor to that. Andi, this is close all these up. So I hope everyone actually just understand that whole process, uh, taking these shape players, these groups within the shape layer on animating knows and then fiddling around with the key frames on making them making them smoother and more liquid. Um and yeah, um, to quickly do a little embellishment. I'm not going to select anything. Everything's gonna be de selected. I'm gonna take this little pain tool. And I'm just going to kind of poor little kind of spiral around this This tree. Um I don't want it to be a full someone just select that zero on, make it solid. Do they need to be a pixel sex? Something small on. Let's make it white lights. Quite cool. Ah, So now what I can do is just push, tap, enter and changes Teoh bearish or changing to 12. And then I'm gonna apply that same theory, Teoh. That same trim trim pods theory to this. So adding a trim pots. Andi, I can see that as I'm tweeting this, it's kind of going up and down. Um, someone a start with it on zero. I'm gonna scroll ahead, Andi, make it 200 now I'm gonna kind of want the the length of the line to be around. Maybe there. So that's where I'm gonna start starting. So it's always going to be around 10% of the whole thing on girl but further and make this 100. So it's gonna since you catch up on itself. And I'm just gonna drag this more to the middle of where These things up, I'm going to make it a little bit foster by dragging these key friends. And there you go. That looks pretty neat. And what you can do to make it extra special is you could even just know create the track matte to mosque when it goes behind these little things. So, uh, so we wanted to almost go behind this this kind so we can make, like, a little track map that looks something like that. Just change it full. My men, we wanted to also go behind. Yeah, let's create a little track there. And then yes. Uh, all we need to do now is just on this. I'm just changing toggling switches there and changing the trap after an Alfa so and also inverted. So now it's in a go behind there on we kind of We want this part to be gone by now. So we conduce. We can animate this this part here. So it's I think it's the shape one that we're dealing with, and I'm just pushing page up, page up and page down Texas a frame for it in a frame back. So that's about the frame you want. Like that. It's a kind of all good for now. And then from there we wanted to stop moving. So just going to scale this up so bad. And then again that way, the knots going from behind. And I'm just I'm almost just moving it out the way. So now, as you can see, it's very subtle. What? It's just kind of going behind. You know, it's not ideal. I could fix that age a little bit going behind the cone on the trunk. So now we have it looking pretty good. Cool. Stop this, Uh, this class will this section of the class now on carry on in the next one?
7. Finished timeline and making a gif: we have fast forward in time because I realized that this tutorial was going to go on for three hours. If I didn't just speed it upset, I finished animating the whole piece. Now I'm gonna just take you through some of the highlights on on what we did and so you can still see. Our beginning is still exactly the same, but now we transitioned it from the tree into the surfboard surfboard into the umbrella on . Lastly, the umbrella into the ball or the ball comes from behind the umbrella and then back into the into the ice cream. Uh, to make sure that it's a little gift. You can have two anticipate what the last frame will be, so it's almost like that's my locks frame because it's just before the ice cream ball falls into the top. Andi makes it just a nice salute. There's no like static moment, you know, it just starts again. So it's something to just consider when making your your, um, then to show you a bag that I use in order to get this first. The first effect here. It's called emotion, too. Um, it's a great little great plugging what? You could do this. Just click on this. First on, it gives you these Nieto little control panel where you can change the global position. Kind of changed. The birth offset. You wanted Teoh on the distance from the center. It doesn't. You don't have to make it into a strike. Um, it also doesn't need to be around it. You can make you could make them square like that. You can color pick different color. You could make them a lot smaller and that I kind of did it. You kind of started on. I just started on zero radius on, then made them the hikes thinner as a kind of birth. And that's really cool it with lots of amazing little things in this motion to That's just one of the 60 little plugging said that come part of this whole packets, that's really cool. Uh, and then the loss of thing is gifted. Gifted can make gifts within off the fix. You can click on the settings here changed, change the width size to anything, so let's make it 600 pixels. Colors good 25 frames a second. Save it as a video done on Let's make this into a gift so you can just click. Make if it added Teoh the red key. And then here comes no percent ready. 100% ready Where it is, Diane. Ah, you can cut coming. There it is. Made a gift or an off defict. Didn't have taken into Photoshopped or anything like that. Looking pretty good can apply that to dribble and boot you off without even opening a photo shop. Def. Getting really cool. Uh, and that's it. That's kind of the end of the school ship costs. And I would love to see what you guys come up with. Um, you make your own winter loops your summer loops holiday. Say anything. Just remember that it'll start with really good vector file on a Yeah, make sure that you've got some decent strokes in there on then it's all about converting to shape plays on after fix and really just taking your time perfecting some very neat animations on. Yeah, this is what all my friends look like, you know? Come on, they you can see it's not like it's not too bad for me. He friends. They are different, hurt more. They see like intricate I got with different parts of creating that umbrella coming down. But it's a lot of fun on that could make some really cool things. I enjoyed the parts. I love to see your projects. Please try your best uploading project and we will see it. We'll see you in the next class chance.
 Richard Bolland, Animation | Illustration | Motion Graphics