Transcripts
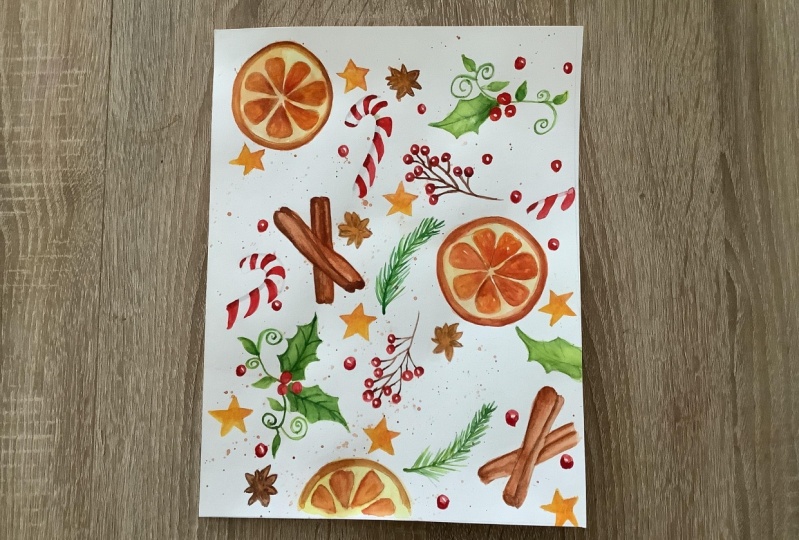
1. Christmas Pattern: Here to paint dry oranges, cinnamon sticks, estar en ese, along with other
typical elements of the states to create a
beautiful, festive Potter. Learning to paint them
is very useful things. They are always present
in any holiday piece. In addition, these
type of composition can be used for an
infinite of things, such as printing it on fabric, gift wrap, and as a
cover for netbooks. Hello my friends. My name is Diana and
I am an illustrator. Together with gut
D and our teacher, we created the article, the best place to find
inspiration and our tutorial that will help you bring out
your most artistic side. We know that an
excellent way to get us started and to improve
your drawing and painting skills is to reproduce a reference as
accurately as possible. When you do so, it means
that you understand how to use the drawing materials to
obtain the desired result. That is why we have created these series of three
tutorials where we show our painting process so that you learn
different techniques, become familiar
with the materials. And we will work on elements
within the same thing, but gradually increasing
its level of complexity. The first level is a
Christmas pattern, the second is a
Christmas ground, and the third is a portrait
of a Christmas morning. In all the tutorials, you will have the
drawing pattern. In addition to having
our support to answer any questions
in the discussion tab, you can find below this video
on your desktop computer. Hope you enroll so that
we can get down to work. See you in the next video.
2. The Materials: Hey, I'm so happy to see that you want to
take this class. Here are the materials
you will need along with the first step you need to follow before starting painting. First, you will need the
pattern of the drawing, which you will find
below in the projects and resources tab
on the right side, when you access it from
your desktop computer. Carbon paper or a sheet of
paper with graphite on it. You can use the highest B
range penciled you have. We use six B and HB pencil or one from the H series
since they don't leave too much graphite
dust, water colors. In each lesson, we will tell you the colors and the
brands that we use along with that reference
so that you can look for a similar tone palette
to mix the colors. Jars with water, it
is recommended to use 21 with clean water and the
other to clean the brushes. We use one because our cat loved to drink water from
where she's shooting. And it is easier to
control that she doesn't drink from a
jar instead of two. But if you use one like us, take care to change
the water constantly. Canson XL, watercolor
paper of 300 grams. I support and masking
tape to fix your sheet of paper so it doesn't bend when
you paint with watercolors. Brushes, we use a brush 8, 6, and U2 to select them with. Think about this space
that we are going to pain. What is the largest space? And based on that, we select the larger brush. Then we think about the smallest
details we need to pain. And based on that, we choose this smaller brush
for the medium brush, we simply use a number that is right in the middle
of both brushes. We make this common
because we paint in a half letter or a five. So if you make it
smaller or larger, the size of the brushes
may body color pencils. As with watercolor. In each lesson, we will tell you what colors and brands we
use along with a reference. So you can look for
a similar tone. Pencil sharpener, kneaded eraser. Now, follow these steps
before it's time to pain. Secure that paper to the
support with the masking tape. Transfer the drawing to your watercolor paper
for these uses, sheet of paper with
graphite or carbon paper. Then go over the drawing without applying pressure with
an H pencil and enroll over the kneaded eraser
to remove the excess of graphite and you will be
ready to start painting. See you in the next video.
3. The Background: Welcome to the first video of the tutorial Christmas pattern from the Series, a
traditional Christmas. Before starting out, I
want to mention that we have divided this tutorial
into three parts. The bad ground, the
secondary elements, and the primary element. We suggest you watch all
the videos before painting. And while you are painting, watch the videos related
to the part you are painting to refresh
what you have learned. Also, remember that if
you have any doubts, you can leave us a question in the discussion tab that you
will find below this video. In this video we are going
to paint the background that covers the splash and the smallest elements
of our composition, which are the varies, the stars. And the star. Underneath. Here is the list of the colors we use
on our painting. You don't need to use exactly
the same brands or tones. You just need to use a similar
tone to the one we use. If you want to get
a similar result, the water colors tones you
will need are bright yellow, bright red, dark red, brown, dark brown, black,
the color pencils, tones, you will need
our wine, white. Let's begin as splashed. Start by splashing the
background in brown. Prepare them, Make
sure why concentrated, but still make sure
it is water down so your splash is dark and
the drops are medium. It also helps to use
the large brush. The larger the brush, the more capable is handling
a large load of pain. And to splash, dab the brush with the handle
of another brush. The idea is to make it look like we sprinkled cinema before. It dries, wash the brush and use it moist to
clean the areas. You don't want them
to be a splat it like on the top of the
candy canes and leave. We are cleaning the splashes
because we want them to be in the background and
not on top of the element. If we leave them and paint
on top with a light color, they will be seen. Take into account that there will be times when
you will have to pass the web brush several
times to erase this platter. Well, berries, I start by
painting the smallest element, which are the berries. Paint them in red and leave a little blank space for the line to know where
to place the ally. We define it, that it
comes from the opera left side before they dry
with a dark red paint, the shadow on the opposite
side of the light. When you are done with them, let them dry to shape them, outline them with a
wine colored pencil. As we mentioned, we divided
this tutorial in three steps. To do so we pain
one part at a time. Now, we want to be
transparent with our process. And in reality, we
don't work like that. We like to paint everything
with watercolor first. Let it dry for a day, and then we start with
the color pencils. It makes more sense for us
to follow this process, since most of the times I am the one that paints
with water colors. So I want to focus on finish
my part and then the paint, the rest with the color pencils. However, we noticed
that it is easier to digest and to find the
content when we present it, focusing on one
part are at time. If you want to paint it as
we did on this tutorial, make sure to protect the drawing when you are painting
with color pencils. We then use a lot of color
pencils for this tutorial, so there won't be
much of a problem. A star's, the second
element to pain is the star painted
with bright yellow. Before it dries outline
then with brown using the tip of the
brush or a thin brush. This will allow both
paint to blend things. We don't want the
color to be uniform. To make it look less uniform, add a bit of a brown
on the ends of the stars and drag it to
the center carefully. Finally, once the star Dr. paint the lie with the
white colored pencil. For that, draw a line very
close to the edge on one of the side of each tip of the
upper left side of the star. Star and nice, the third element you are
going to paint is the star unease to not
lose thigh of the shape. You drew a star, but our line it with Brown
made one side of the point thicker than the opposite and paint a small triangle
inside each peak. Van with the same brown but more diluted paint inside
the star underneath, leaving the tips and
the center lighter. Let it dry and outline it with a fine brush
and dark brown, making one side thicker
than the other, and paint a petal shape on
the inside with both ends. Dark. Yeah. Once dry with the
white colored pencil, highlight the light
inside each petals shape. And here is the final result. Congratulations, you've finished the
background when you are ready for you in the next
video to paint more elements.
4. The Secondary Elements: Welcome to this second video of the tutorial Christmas pattern from the series at
traditional Christmas. In this video, we
are going to paint the secondary elements
of our composition. That are the cinnamon sticks, the candy canes,
and the berries. Let's begin. The
watercolor tones you will need are bright red, dark red, brown, dark
brown, gray, and black. The color pencil tones
you will need our phenyl, brick, medium brown,
gray, light gray, white. Cinnamon sticks, estar paint in the cinema estate
that is underneath, apply brown all over the state, then darken it from the bottom to the middle and from
the middle to the top. So you start creating volume. We always like to plan the order in which we are going
to paint the elements. We usually do it by relevance or by deploying
in which they are. If you apply a lot of pain, use your brush a bit moist to pick up the excess paint
and allow it to dry. You can also paint it in part, apply the vase only on
1.5 and before it dries, paint the shadow
with dark brown. To rescue the light, use your brush a bit moist
to remove some color. The other half. If you want a more vibrant look, once dry, repeat the steps with the
paint more concentrated. If the caller has been
extended where it shouldn't, you can press the area
with a paper towel to clean it and avoid the
color extended further. And finally, paint inside
the cinema mistake week. I'm mixture of dark brown
and black to give it depth. Now let's apply
the color pencils use a brick color to shape
the cinnamon sticks. Also use it to
brighten some areas. Pain the live with white color. If the white looks to a strong, deem it with cinnamon, dark and the darkest
shadows with medium brown. Apply a soft layer of
cinnamon to unify everything. Berries, like we did previously, paint them in red, leaving a blank spot for
the light at the top left. Then with dark red paint, the shadow on the opposite side. If the background is too
dry or use your brush moist with a bit of Fred
to blend the paint. Paint sticks in brown
with a thin brush. With dark brown paint, some shadows at the base of the berries and the
intersection of the sticks. As the details are very small, you don't need to
apply color pencils. Candy canes. First painting the
shadow with gray. Once dry paint, the red lines. Hello. Before it dries, paint
the shadow with dark red. Once dry, continue with
color pencils first, add more depth to the shadow with gray che, with a light gray on the opposite side of the
shadow to give volume. Lie on the red part with white. And here is the final result. Congratulations, you've finished the secondary elements when you are ready, See you in the next video to
pain, the primary elements.
5. The Primary Elements: Welcome to the third
and final video of the tutorial Christmas partner from this series at
traditional Christmas. In this video, we
are going to paint the primary element of our composition that
are the dry oranges, the holy, and the fur branches. Let's begin. The
water color tones you will need are dark green, light greenish, yellow,
mustard yellow, orange. By when the red, dark red, brown and dark brown, the colored pencils tones, you will need our light
orange, cinnamon, brick, medium
brown, olive green, apple green, and white. Dry oranges use a
mixture of mustard yellow with a little bit of
orange to pain the edge. With the wet brush
blend that inner edge with the same mixture. Pain the segment before it dries up
the same mixture, bug more concentrated and with more orange at both
ends of the segment. And join both ends,
drawing irregular lines. Apply the same mixture
to the orange peel. Add more orange to
them, make sure, and give a few touches of
color to the segments. And the orange
peel while you are adding the pain estar shaping
the edges of the segments. Do the same with the
rest of the oranges. Once dry and with orange paint, irregular lines
inside this segment. Imagine you are painting roots, paying the appeal
of the orange too. And brown to the mixture. And again, pain, irregular
lines inside the settlements, but this time in less quantity and concentrate them
towards the end. Add a bit of brown
to the tips of a couple of segments with
the brown mean sure. Pain, the appeal of the orange, dark and appeal with
mustard, yellow and orange, leaving a light line between
the pill and the segments. Also, be careful not to blend the brown edge too
much for that. Avoid touching it. Most of the times, paint some dots on
the pill with brown. Wait for them to dry. Abby to run a mixture of yellow, orange over it to blend them. While it is wet, add some brown spots
to make it look burn, let it dry to continue
with the color pencils, we find a segment
with light orange. Use white to lighten the area between the
segment and the peel. You see Naaman to
brighten the tone in some areas of both ends
of the segment and on the orange peel at lie to the segments with wide. Use brick to give more depth
to some areas of the appeal. With medium brown enhances
the burn area of the appeal. Use light orange to give more color inside
of the segment. Holy. Start by painting the berries as we
have done previously. Pain with greenish,
yellow, all the leaf. We decided to use
this color because we wanted to keep our
warm color palette. Before it dries. Dark green to the base
of the leaf and in some tips and spread it all
the way around the edge. Finally, with a theme
brush painting, these spirals in
greenish, yellow. Ones dry continue
with color pencils. Use olive green to draw the
beans of all the leaves. Make the stroke a little thicker at the intersection
of the veins. Use apple green to improve
the shape of the spirals. For branch a star by painting
with greenish yellow, short line from the
center outwards. The way we located the
drawing to film this tutorial makes it difficult for us
to paint them that way, but it is easier and
better to do them from the inside out so
that the tip if thinner. Once you do both thighs
pain, the steam. Once dry pain relief with dark green between
belief you painted. So it looked lift here
and pain over the theme. Let it dry to continue
with the color pencils, what you are going to do
is enhance the color. Use olive green to
draw this team. Then draw shorter leaf, especially on the empty areas. So it looks leaf fear. And with apple green
pin, longer leaf. And here is the final result. Congratulations you
finish the tutorial. Remember that this
does not end here. When you have your
drawing ready, take a picture or a scan it and share it
here as a project. For that, you need to
go to the Projects and Resources tab and click on
the button Create Project. This feature is only available right now for desktop computers. You then also share it
with us on Instagram or Facebook by tagging of us
when we add the stucco, sharing your work
is the best way to receive constructive
comments on your word. We are here to help you. Don't forget to watch the other tutorial from the series at
traditional Christmas, where we paint a Christmas
crown and a Christmas morning. Plus follow us on
Skillshare to get notified it when we upload a new
series of tutorials, if you like our paintings, I will like to invite you
to see all we have to offer obesity in our profile on Skillshare from your
desktop computer.
 Muy Artistico