Transcripts
1. Introduction: Hi and welcome to this training course on Autodesk Rivet architecture. On this course, I'm accompanied by my colleague. Steve was an excellent architect, and they're ever trainer. By the time you complete this course, you'll have the skills and knowledge to take a project from start to finish, as Steve takes us through the ins and outs off rivets, As with him, you work solely on one single project, so this course is constructed in the same man. If you don't have any previous experience with rivets or any other cat based software, don't worry. We will start from the beginning, building you up to be more than capable of creating your own rivet models. The course will start with the basics from the terminology used rivets toe the tools and the interface. We will then move on to building our projects, introducing a new tool and future as we progress. You'll learn all about that, um, elements such as the levels and grades, the structural components, such as the structural and architectural columns. You'll also learn the major and the minor components like the walls, windows, doors, floors, stairs, ceilings, curtain walls and roofs will then take it to the next level and learn how to create to the details out a tag. Components create schedules and legends create render images and video walk throughs. Finally, we will set up our sheets and send them to Prince. Together with the video lessons, you'll have access to the course notes and the training files to follow. So if you're ready to learn rivet, let's get started.
2. 1.1 The Start Screen: when we open up, the software were greeted with the start screen. The start screen is divided up into the project section in the family's section on The resource is starting with the project section. On the left hand side, we have open new on four variations of a template. If we select open, that will bring us into our common drive, where we can load in a past project. If we select new will start a new project. Once we do select new, we then do have to specify what type of template we're going to be using. We can also browse a specific template. We can create a new project from scratch, or we can create a project template below that we have the four different templates currently loaded into this software. We have a construction template, architectural template, structural and mechanical. So, depending on the reason you're using this software, whether it be for construction, purpose architectural, creating the structure or adding in the mechanical, this is where we then choose that template to the right of that, we have our recently opened documents, so it's a quick access in order for us to open up a pass project quickly. Below. That is the family's section. Again, we can click on Open, which will go into our common drive. Select new gin will open up our project section to the right of that again is the foremost recently opened families. Over to the right is the resource is section. Here we can find out what's new. We can get some help. We can watch some quick tip videos. We can go into the auto desk up store. The rev it community is a form where if you're having any issues, you confined it some tips as more than likely the issue. You you're having someone else's have in the past and will have posted the information of how they resolve the situation. Then the bottom left word says Auto Desk Rabbit. If we click on that will bring us to the auto Desk website where again you can find out some tips and so forth
3. 1.2 File Tab, Quick Access, Info Centre: with this course, I'll only be using the architectural template in a metric format. Okay, to get started, we're not going to go and cook on the architectural template on the first thing we'll do whenever we open up. A new project is we're going to save it to save our project will go to file save, then the save as dialog box will appear. At this point, you should save it other to your desktop or created a new folder on your common drive to save the project into Well, then we'll name our project. For now, though, I'm quite happy with Project One and then we'll click on Save. The first thing I'm going to be looking at is our file tub within the file tub. It's very similar to the majority of programs nowadays, where we have new to create a new project we can open or going to our common drive. We can save like we've just done save ours export and so on. When we could get to the bottom and having nothing selected in there, you can see the various different projects that I've recently opened on. The one of the top is our current drawing. Whenever we open up new projects, it's going to pull this project down the list. So if I wanted that project to always be on my recently opened documents section, there's a small little pin to the right. Inside, we click on that. It's gonna pin it to the recent documents, and it will always be displayed down the bottom. Here we have our options. Onda. We can exit rabbits or the exit the program, then just above the file tab. We have a quick access panel. So the quick access panel is just a panel which contains some tools and features that we're going to use time and time again. I'm able to open up a new project. Saved my current. I have undo redo my actions I'm able to print. Then I have my measurements to which will measure between two points. My dimension to I can tag category have some text this little three D house here that will bring me into my three d view. I have a section view thin lines close hidden windows on switch windows. Each one of these tools were going to go over again and again throughout the project. so you get a full understanding of how each one works. If I wanted to add in a specific tool or subtract them out at the very end, as it'll drop down arrow where I can have and subtract various tools, we can also change the position so I can show below the ribbon. Then in the center here, this is displaying our project name as well as the current view that were on over to the right. We have what is known as the Info Centre. So if I wanted to find out some information, I can type it into the search bar here on. I'll bring me to that information. They were able to access the auto desk a 3 60 This is a very useful application with Rev it . So if I'm working on a floor plan or I generate some images, I can upload it to my A 3 60 And then when I go on site or meet a client, I can log into my A 3 60 from any PC, and I can show my work. It's a cloud based system that auto desk have created very useful to so the writer that with the shopping cart that will bring you into the auto desk app store, where you'll find a lot of different plug ins and so on for the software. And then, finally, is the help area, so that will bring you again onto their online system, where you can find out any information of what you need to help in.
4. 1.3 Tabs, Ribbons and Panels: auto desk of Very cleverly organized all of our tools in a series of tabs on ribbons to every series of tabs along the top. So within each tub is what is called a ribbon. So this top section here that is known as a ribbon on each one of the ribbons will be a Siri's off panels. So in the architecture top within this architecture ribbon, we have our build panel, circulation panel, model panel, rumen area and so on. So all of the tools and so forth have been grouped nice and neatly together in their own specific panels again throughout the course, we're going to go through each one of the tabs on each one of those panels so you can get to grips with each one of the tools. But for the majority of the course, we're gonna be sticking with the architecture tab. So everything you see on screen now is what we're going to be building our model with. So within the panels themselves. You also noticed some of the tools will have a small little arrow beneath it that will reveal additional tools for that specific tool
5. 1.4 Properties Palette and Project Browser: next, we're going to be looking at the property's palette, which is over here on the left hand side as well. We'll be looking at the project present. If neither of those two are open at the moment, it's not a problem if you go to our view top at the top at the very end, there's the user interface so we can click on that. In there, you'll see our project browser on our properties. So does make sure that they're both turned on these two palettes or something that you're going to be using day in day out so you'll always have them turned on. So the properties polit will display the properties off. Either the current view of nothing is selected. It will also take on the properties off any element that you have selected. So, for example, I'm going to draw a wall in the drawing space. No, the wall has been drawn. If I selected your notice, the Properties Palace is now displaying the properties off that wall. The first thing here you'll see, is called the type selector of With the Arrow There, it now displays the various types of walls that we can choose from these walls will be loaded into your project by default. So when there were to select one from the library that is using the type selector below that, we're able to select the edit type of the model does we can edit the wall type itself below the edit type? We have a few different headings. We have our constraints heading our structural heading, dimensions on identity data as well as the phasing. So when the property section is where we can edit whatever component we have selected as we progress in the course, we'll go into a lot more detail about what each individual heading does. So if I had double escape, I d select that wall you're noticing. The properties public now displays the properties off the view that I'm currently in so you can see there's the Properties. Pilot has never changed its headings and so on on its now displaying the properties of the current view, Select the wall, I'm going to delete it. Next is the project browser. The project browser just contains all of the various views the schedules sheets on groups off the current project. What we're going to focus mainly on for the next while will be our floor plans. Where you can see here we're currently on level zero. So the remaining headings there you'll slowly pick up over the next couple of videos.
6. 1.5 Status Bar, View Controls, Selection Toggles and Context Menu: Next we have the Starters bar, which is down in the bottom left hand corner where currently says Ready. If you're familiar with auto card, this is almost like the command line. All that will do is just display information about how to use that tool. It would also give us some tips and hints on what the next step will be. So to give you an example, if I choose my Walter, it's asking me to click to Enter Wall Start Point. So our click it's now telling me to enter the wall and point, and it also is telling me that space bar flips the orientation. So if you're ever unsure of what your next step is, just referred them to the status bar. Next is the view controls, which is down here in the left hand corner. The first thing there, in our view controls, is the scale with rabbits when we're creating our view. So currently we're on our level zero if you refer over to a project browser, so we apply the scale to this actual view again. If you're familiar with AutoCAD, so in your model space you'll have a scale of 1 to 1 and then in your paper space. That's where you'll create your view ports on, then scale on your sheet. So with rabbit, what you do is you apply all off your visualizations and scale ings, etcetera to that specific view. So it's currently said to want toward hundreds. If you selected, you'll see our list are typical list of scales. If what you want isn't there again, just selecting custom, we can create a new scale. Next is the detail level. For this I'm going to place a small wall with the detail level. We have three options. We have coarse, medium and fine. That was referring to the level off detail currently associated with that wall. So right now we're able to see brick cavity block and plasterboard. We can adjust that level of detail if we want to display nothing. So if I change over to course, we'll just get a great out hutch. We have our medium on fine Minimum. Finer would generally have the same detail finish. But if we were to display, for example, a door or a window which would have more detail than a wall, then you again you'd see the variances between the medium. Fine. So the purpose of that if I go back to our course level. If we were doing just typical sale plans or planning drawing, we don't want to show the full detail level off the current wall, so we'll just use the course. Next is the visual style for this. I'm going to go into my three D view. If you want to follow along, we'll go up to the quick access toolbar at the top. On There is the three D View will select that, and there's the three D View off my wall. So our next option, the visual style. There we have our wire frame, hidden line shaded, consistent colors. Unrealistic that is referring to the visual style off this wall. So if I revert that back to wire frame, you'll see becomes a transparent ball. We have our hidden line, where it's no longer transparent. Shaded will introduce colors. We have a consistent color with no shading. We have a realistic, which was a realistic image off the brickwork. No, obviously, the wire frame is going to use up a lot less off the CPU usage than the realistic mode. So for general modeling. It's always best to either use wire frame or hidden line. If you were to model in realistic all the time, your computer's gonna be very slow on. It's a possibility off the software crashing. So while modeling, we'll stick with the hidden line. Next we have the sun, so we're able to display the sun in the project. We're able to put it to a specific location. This is something we will, of course, cover in this course. Once you have set up your son, you can then turn on your shadows so we can also have that shadow was cast by changing the sun settings. Then we have our quick access to render our image. Then we have quick access here to show our crop, make our car visible. If we're happy with our three D view, we can actually lock this view in position and then use that for print or putting into a sheet later on. Next we have the glasses symbol on. That is a temporary hide or isolate. So if we wanted to temporarily hide on object or to isolate the object to solely work on that, we would use the glasses the small light bulb beside it is how we can then reveal what's hidden in the drawing on. The remaining views were not going to cover in this course. Then over on the bottom lights on corner, we have what I called selection toggles. I'm gonna go back to level zero in my project browser, so it's double click on level zero to go back. So to go over the selection toggles the 1st 1 There is a select links, So when we link in a drawing or cat farms on, we can use this to select from. If we have created an underlay we wanted to then selected, we'll use the select underlay if we have pinned any elements in the drawing. This is where we can select them. The next one is called Select Element by face. This is basically were able to select an element by its face. So if we had a floor slab, we can click on the actual face off the floor slab instead of clicking on the edge on the floor slab. There we have drag elements on selection. What this does is it allows you to dragon element without selecting it, so you just have to click and hold on. You can drag it. If it's turned off, you have to click it to select it, and then you can drag it. The next displays the background processes, so if anything is happening in the background, it will be displayed here. Next is the selection filter, with the selection filter wearable to highlight multiple elements, and we can and filter out things that we don't want to be included in not selection. We also have the context menu. We access that by right clicking. When we right click, it will open up the context menu. Andi. I will just displace some various options. It also depends on what's currently selected. So if I select the wall and then right click, you'll notice I get a different variation off options.
7. 1.6 Navigating the Drawing Area: The main area here is known as the drawing area. This is where we're going to create our model. In order to navigate this model, we use our palm on zoom to pan the drawing, which means basically grabbing it and moving it left to right. We'll click on hold in the wheel. Once we click and holding the wheel, you'll see the pound symbol. We then move the mouse left right up and down and were able to pan the view to zoom with a scroll, the wheel in and out, in and out. If you zoom out too far, just double click on the wheel that will zoom extents so everything will be centralized. We go over to our three d view, so open the quick access will select the default three view to navigate a three D view. It's the same rule. Click and hold in the wheel as well. We can scroll the wheel to zoom in and out in orderto orbit. The view we need to hold in shift hold in the scroll wheel, and then we can move the cursor toe orbit around an object to make the object centralized. When we orbit of who selected and then orbit in the top right? We have the View Cube, which is another way that we can navigate the view so we can either click and select. If you cube itself, we can also rotate the view as well. I'll go back now to my level zero, and I will just create a couple of additional wells. So we have to selection methods. We have our Windows selection on a crossing selection, a Windows selection If you start from the top left, click on hold in the mouse. If I drag my cursor over, we've just created our windows selection so you can see the solid gray line. So if I wanted to select this wall, the wall only becomes selected ones. It's entirely inside my selection window. Same with the other walls. You can see that they don't become highlighted in blue until they're entirely inside the window. I'm press escape to do select second selection method is called a crossing selection, so getting to the bottom right hand corner moving up to the top left. The difference between the two is the object just needs to touch the crossing window to become selected, so the Windows selection, the object must be entirely inside the window on the crossing selection. The object only needs to touch off the crossing selection.
8. 1.7 Contextual Tab: Next, we have what's known as the contextual tab. The contextual tabal Onley appear when you select a tool, so as an example, if I select my wall to will notice we're on the architectural tab, we have the architectural ribbon. So when I select my wall, too, you'll notice that the tab will change. We're now on what is known as the green contextual top so it says, modify dash place wall. So every time we select a certain to or component, the actions which we can carry out with that tool will be displayed. So when we're creating a wall were shown the draw panel, which shows various methods with which we can draw a wall, as well as the contextual tab on the contextual panel. We'll also get on options bar. So again, this options bar is specific to the wall, and if we were to change the tool, the options would vary for that too, so double escaped to finish. If I then select door contextual tab will appear, The two panels in which I can use for that door only appear as well as the options bar for that door. So this process is the same for every tool. And you'll notice that as we're progressing in the in the project, this will repeat again and again.
9. 1.8 Terminology: most of the terms used to identify objects and rabbit are common industry standard terms. However, some terms are you need to rabbit understanding. The following terms is crucial to understanding the software in rev it. The project is the single database of information for your design. The building information model or what is known has been the project file contains all of the information for the building design, from the geometry to the construction data. This information includes components used to design the model views of the project on drawings off the design By using a single project file. Rabbit makes it easy for you toe alter the design have changes affected in all associated areas. Beat the plan, view, elevation section, views, schedules and so forth. Having only one file to track also makes it easier to manage the project. You build a river project by adding what I called elements Rev. It uses three types of elements in the project model elements which are doors, walls and stairs, data elements which are grids and levels or view specific elements which are tags. Texan dimensions elements of then organized into groups called categories. Now a category is a group of elements with similar properties and functionality. For example, all of the walls and rev it are grouped into the walls category. The same applies for our doors, windows and columns. Each category is in further organized into what are called families. Our family is simply a subgroup, which further source the elements in a category into a specific group based on a property. For example, the columns category is broken up into a round column family on a rectangular column family . Each family can have several types. A type can be a specific size of a family, such as a 450 millimeter round column or a 600 millimeter Rounds column. These columns will have identical type properties other than the dimensions, and consequently are grouped into the same private family. Each time you place an element into rabbit, you placed what's referred to as an instance off. The element instances are the actual items or known as individual elements that are placed into the project. I have specific locations in the building known as model instances, or on a drawing sheet known as annotation instances. So if you have 10 columns of the same type, and you want to change the properties of just one column, you can edit the properties for just that. One instance on the changes will only affect the individual element still confusing. Don't worry. Everything will make sense as we progress through the course on build on our Model.
10. 2.1 Introduction to Walls and Wall Panel: we're now going to look at the wall Tool. Walter was located in the architecture top within the builds panel. 1st 1 is our wall to so the wall till will create a non structural element in our model Will kick wants to open up the tool. And here you see, our green contextual top appears with their draw panel. Are options for that wall tool as well. The modification section is open. The first thing we're gonna look at is the draw panel. The drop panel will display our options of how which we can draw our wall itself with the option of drawing by a line. A rectangle we have are inscribed polygon or circumscribed polygon. Our circle start in radius, Arc Center and arc, Tangent and arc fill a dark pick lines on and pick faces. So depending on how you want to draw your wall, this is where you were. Then choose that option to draw by line. I know it's selected as its highlighted in blue when I come into the drawing area to get my wall started. If we refer them to the status bar, it's telling me to click to enter wall Start point to get started all simply left. Click once with the Mass. I will enter my start point for my wall. Well, then move my cursor in the direction which I want to draw on my wall. I can also at an angle. Why move my cursor Still, to specify the finish point again, I'll just left Click with the mouse, so to specify a length when I'm creating a wall when I start my wall and move the cursor in the direction in which I want my wall to be created, your notice that there is a blue dimension. This is known as a temporary dimension. So as I increased the length of the wall, you'll see that the dimension is well increases. So right now it is increasing in increments off 100. If I zoom in, those increments decreased down to 20 again. If I zoom in more those increments and are going up in fives. So that is one method off specifying a distance. We can also move the wall in the direction which we want to create it and then manually type in my distance on the keyboard off. 3000. I'm pressing. Enter so there we have The length of that wall is 3000. So that is a second option of how we can specify the length of a wall. The third option, which is what rev it is based around the first thing we'll do is just place the wall and then afterwards will come back on and revise it so we will place the wall. They will come back, selected, then using the temporary dimensions. That's where we will then revise that distance and change its length as well. If you wanted to add in an angle, well, just specify our start point at an angle again, roughly with the dimensions which we want. Then, once it placed, will come back, select the wall. Here we can change the distance on their we can change or I'm go. So this is the basics of how we're going to model our project. The next method of which we can draw a wall is by rectangle. To start, our rectangle will click once on the screen, moving the cursor away in the opposite direction. I'm clicking again on double escape. So as we have done before, the best method is to place the wall first, and then we'll come back and revise. Those dimensions will select one side. Our temper dimension appears, and we can adjust the length again, citing the top. We can then adjust the wit. This is the best method for modeling with rabbit. The next drawing method is the inscribed polygon. So first we will specify our start point, which essentially is thes center off our polygon, moving the cursor in the direction we want to go, then specifying our radius. So I've just move my cursor in the correct direction as well, moving up in the increments to arrive at 3000 and then I'll click to place that is now on inscribed polygon. Same method for the circumscribed. The difference between the two. If you'll see in the center of the circumscribed, there's an outline off a circle, so the circumscribed means that the polygon sits on the outer face off that circle, while the inscribed sits on the interface. Off that circle on the next drawing method is by circle, but we will click to specify the center point click again to specify our radius. Then afterwards we can come back to adjust. The rate is itself. You'll also notice that it's not a complete circle is actually two curves joined together so we can delete one out. Have a remaining curve. Next method is the start end radius. This will be creating an arc. So we'll specify our start and endpoint by clicking the mouse Ochlik ones for a start point , clicking again for our endpoint and then, lastly, will specify R Ark for radius. The next method is the center and arc, so we'll specify the center point, then the end point and then, lastly, the actual ark itself. The next method is the tangent end arc, so this creates an arc of the end of a line. Next is the fillets arc. This creates a round corner between two intersecting lines. Next method is pick lines. This is very useful to so as an example, I'm going to draw some model line. So in the architecture top, there's my model line. Gonna draw a few lines, then with the pick lines, too, then simply have to select the line for the wall to then be attached to it. This is very useful when we import CAD files will simply use the PICC line tool to attach it to the lines well, quite quickly. Build up our model. Lastly, is pick faces. The pick faces method applies when we create a conceptual mass. We can then apply a wall to that face. When we're modeling a project, we are presented with multiple modeling AIDS. These age will appear on almost all of the components, which we will use. So if I draw my first wall on draw another wall above it, first thing we'll get is our temporary vertical dimension. So you'll see that there's a dashed blue line that is telling me that that wall, when I started will be snapped directly above it. I can also use the temper dimension to specify the distance before I've even started. So Click wants to start move my curse in the direction on again. I'm presented with that vertical dimension on Click. So now I know that both of those walls are started the same point as well. Have the same length wanted a place of our then select one of the walls. Not only am I presented with the temper dimension to change the length, I can also change its position relative to the closest component, which is the wall below. So it's currently 2500 between each of those location lines so I can increase that or decreases well. We have the grips, which I can click and drag to extend at length. I can also add an angle with those grips as well as the temporal dimension. Hello, Does another dimension symbol, if selected, will make that temper dimension into a permanent, to mention to then remove it will selected until leaders, I deleted it using the delete key on the keyboard. So another feature is this flipping out? So our location line is currently set to the interior face so I can flip it, using these arrows across that location line with the temporal dimension on the right hand side, it has to grips as well, so this temper dimension is currently set to the internal face. If I wanted to change the position of that's temper dimension, I will click and drag it. Once the face becomes highlighted in blue, I can then let go of the mouse for the temper dimension to change again. Click and drag the grip until I see the highlighted do line on, then let go
11. 2.2 Wall Options Bar: Next, we will look into the walled option bar in conjunction with using the drawing panel here. We must also make changes in the options bar. When we're drawing the wall, we want to constrain it to certain levels. As we're currently drawing on, Level zero are based constraint for our wall will be level zero. We must then specify which level the wall is going to be constrained to. So at the moment, we only have level zero as our base constraint on a level one is our next level up. So to get a good view of what I'm about to do, I'm going to open open elevation view in the project browser. We have our elevations heading. If we click on the expansion button there we have our east elevation. So if we double click on that, that opens up our east elevation. Here we have our level zero, which we see in our floor plans under level warm again. It's in our floor plans in the project browser. So if we go back to our level zero, I would like to have both of those views open at the same time. So, in order to do that I'm going to type in W T. Which stands for window tile on. By doing that, it's going to open a both views on the screen. So type in wt here on the left hand side, we have our four plan level zero. On the right hand side, we have our east elevation. So making sure that our level zero is active by simply clicking on the tile. Well, now go back to the wall too. I'm going to be using my job. I line from the drop panel. I'm now getting onto the options bar. So the first option here it says height. It may say depth on yours, but if I hit the drop down arrow, we can go between the two. So whether we draw by Heitor by depth simply means that as we're drawing currently on level zero. So there's our level zero. If I have height selected by base level will be constraint to level zero. So my wall will go above level zero on connect to level one. If I change over to depth, my wall will be constrained that level zero on go below my level zero. So that's the difference between the height on the depth Next ones we have specified that we're gonna use height. Well, then select the next option, which is where we want to constrain it to. So we're currently on level zero. So our next level is level one. So if we constrain it to level one, I'm drawn our wall there you will see on the right outside in our east elevation, our walls based constraint is level zero on its top. Constraint is level one when we constrain this wall. If I go to my east elevation and select my level on a five, change the level the wall because it's been constrained to that level, it will move with the level. If I select unconnected, I'm then able to specify a height. If I give this a height of 4000 draw on my wall, you're noticed that on the east elevation that there is my wall based constraint Nevil zero unconnected with a height off 4000. So if I change my 1st 4 level because the wall is not constrained to that level, the height doesn't change. So now we just want to have our level zero open. So if we double talk on the top of the window tile. Bring us back into a level zero for the next option, which is the location line. I'm going to change my detail level toe medium. So come down here to the view controls and select medium, so our next option is the location line. If we hit the drop down arrow, you can see we have six different options with the first, which is the wall centerline to zoom in, using my scroll wheel when I click to start on, move my cursor in the direction I want to draw on my wall, you'll notice. In the center there's a dashed light blue line that is my location line on as it set towards centerline, you'll notice it's the center point off that wall. It's also represented by the blue grips either side. So if I change it to finish face exterior when I draw my wall, the dashed line is on the outer face off my wall again, represented by the blue grips either side as well. We have finished face interior, so there's are dashed blue line on. The interface is running along the plasterboard of the wall again blue grips Either side the other options which we have our core centerline, core face, exterior, encore face interior. What they're referring to as the core is when we create a wall, we must specify what the core off that wall is. The core is generally the structural part off your component. So the block work here would be the Corp off our wall to show you how that's represented. I'm going to select it. I'm gonna go to edit type on, edit the structure. I'm show preview. Don't worry about what I've just done. We're going to a lot more detail about this in a later video. But for now, I'm just going to show you this as a small preview. So you have a better understanding about what a core boundary is. So here is a section view of the wall which has been created. There's our brickwork, which is represented here. Next is the insulation. There's our concrete block. Andi are plasterboard finish and you notice on the either side off our concrete block. We have our core boundaries. So this here is our exterior core boundary this blue line here and here's our internal core boundary which is this blue line here. So the purpose off creating the core boundaries, which is when we have two intersecting walls. You noticed that the block work joins together ignoring the brickwork so the block work will cut right through the brick as well as the insulation. So all components have been created in this manner. So when we go to draw a wall when we change our location line to the core centerline, when I place my wall, you notice that the dashed blue line is in the center point of that block work. So it's in between those two core points and we have core face exterior again. When I draw the wall, you notice my location. I'm is on the external face of the block work. We have the internal face of the block work. Our next option is chain. When we draw by line having the chain feature turned on when we click our start point and then are finished, point will automatically start a new line segment. So this is known as a chain. If I turned chain off when I draw a line segment, that is a singular line segment on it will not continue as a change. Next option is the offset. We're gonna change my location line to finish face interior. So when I draw my wall, that dashed line is on the face of the plasterboard when I attach an offset. So what change my offset to 1000. Then when I draw my wall, you're noticed that there's my dashed blue line, which would be on the face of the plasterboard on my wall is now off, set up by 1000. If the wall is in the incorrect location and you wanted to flip it to the other side of the location line, press the space bar to flip the wall to the other side of the location. Mind next is the radius, So when it's turned on, we have a radius specified. When we draw two intersecting walls, it will generate a radius between those two intersecting walls. Andi, lastly, is join status, so when we draw two intersecting walls, they'll automatically join on the core. Boundaries will meet if we have joined starters on disallow. When we do the same, the walls do not join, so the core boundaries do not meet. If you want to the walls to join. Simply select the wall on your notice. This symbol here, that symbol is your joint symbol. So once you click on that, the walls will then join together.
12. 2.3 Wall Properties palette: Now we're going to look over the properties off a wall so we will select our wall to when we can look here in the Properties section. The first thing we see is the type selector. So with the arrow, this is where we will select the type of wallop which we want to draw, So there's lots of different variations in here that are provided to us by auto desk. You will be creating your own wall types in the future, but as a good basis and a good start point, it's always it's great to get to know the wall types provided by auto desk. So if we select the wall exterior one or two brick 50 air cavity, 45 insulation, 100 block on 12 plasterboard, then we can draw a wall with rev it. Once you've drawn the wall, we can always go back and revise it and change the type that we've drawn. So if we simply selected again it the type selector on, we can change the type thought any point throughout our modelling process, we can change the wall type once we have the wall selected, the properties pilot will then take on the properties off that wall, so the first heading is the constraints. Our 1st 1 is the location line, so it's currently set to finish face interior. So now we have a better understanding of what they are, so we're up to change that now. If needs be, you then have our base constraint, which is set to level zero. So again, if I open up our east elevation, you'll see our base constraint. Level zero. It's on level zero. The next option is based. Offset is set to zero, so it's sitting on level zero. We can added an offset. So if I add in 200 you'll see that our wall has offset up level zero by 200. Bring that back to zero. When we make a change in the properties pilot, the effects will not take place until we either press supply or move the cursor into the drawing. The reason is that we can make multiple changes in the properties pilot before everything takes effect. It was a quick way of doing things because if we were to do multiple things on the model was updating each time, it will delay the process so next is the top constraint, which is currently set unconnected. Here we can select it and reverted back to level one again, moving my cursor into the model. You'll see the wall will not be constrained to level one again. We have an offset so I can add enough set of 200 now offset above 200. If I got in a negative figure, it will go below the line. Next is the dimensions heading, so it will give us a length figure as well as the area on volume off that wall.
13. 3.1 Align, Offset, Mirror: So now we're gonna look at some different types of modification tools. There's two ways that we can access this. We can either go straight to the modified top of the top on in here. We have a modification panel or when we have placed one element into the drawing when we selected the modified top automatically appears. So the 1st 2 we're gonna look at is the align tool. What I'm going to do is just quickly place a component back in the architecture top stick with the 1st 1 that appears here, which is a furniture desk. Just place it into the drawing. I'm then going to place another components just above it, and I'm just scrolling in with the mouse wheel to zoom in. Now that we have two components place, I'm simply going to use the online tool to align the top table to the position of the bottom table so we'll select the top table and you'll notice that the modify contextual tab will appear. Then here's a modified panel first, still is the aligned to So select my align tool, select my point of reference and then select the line I want to align it to on double escape to finish. Okay, so next I'm gonna go over the offset till for this, I'm going to place a wall like so and to access the officer to it again. I can either select my wall or go to modify top. Quickest way again is to simply select the wall. Modified panel will appear. And here is my offset to. So when I select the two in my options bar here as well specified the distance, it's currently set to 1000. So leave it at that. When I condemned to the wall, You see, I get the temporary line to the right. If I move my cursor to the left on side of the wall, you'll see it will get my temporary line to the left. That's just showing little preview where where the world will be offset to. So if I click on the right hand side of the wall, offset my wall by 1000 across, so I'm gonna delete those additional walls next. I want to use the mirror. Until so we have two different mirroring tools. The first is mirrored by pick access. What that does is we will select our component on. We'll pick and access for two mirror across to. So select our desk. Select out, mirroring by pick access to select the wall, and you will see that there is a dashed blue line that's running it right down the wall centerline. I selected my desk full mirror across the axis for the second mirroring tool mirrored by draw access. I select my component Select Mir Draw access instead of now picking the axis. I have to draw my access off reflection, so that's just by clicking one's to start. I know you'll see. I got my dash. Do lines like another drop straight down at 90 degrees? Or I can draw on angle like Greece up to, say 45 degree angle. You see, my desk has never offset across that axis of reflection by 45 degrees.
14. 3.2 Move, Copy, Rotate, Trim Extend: earlier on, I showed you how to use the drag feature by selecting a component. You'll notice that the cursor now because has the drag symbol so I could drag the desk. This isn't very accurate, so, to be more accurate will use the moved to itself. So to use the move to again will select our component. Select the move to in the Options Bar. Here we have three different options, which are covered in a few months. But to get us started, we will just click for a start point, move the cursor in the direction we want to go. We can also specify an angle, and we can physically type in a distance as well. I'm click to place. If I wanted to be more accurate and where I place that component again, I'll have it selected. Select the move to and from my start point. If I snap to the corner of the desk, I can move the desk no more accurately again looking for them a snap point on the edge of the desk. So when moving again, we have the couple of options here. First is constrained. If you're familiar with auto car, that simply Ortho mode. So when I moved the desk, I will only be able to move it in zero degrees 90 1 80 or to 70. So I'm constrained to those angles. So next, with the move to waas, the disjointed. So what this means is for an example, if I touch and join a wall to the current war here. So he says, they're joined together. If I was to select it and try to move that I was expanded or I move it open position. But again, it's still joined to the original wall. So if I wanted to move my new wall by itself, I would select disjointed, so select destroying. Click on, Move on there now separate last. See? It's not highlighted at the moment, but the last one is multiple. In some occasions when you move something, it's done. Once. If you wanted to move something multiple times, you'd select that, and then you have to move that object multiple times. So next is the copy to so again will select my desk. This here is a copy tool selected. I'm here again. I've got my three options constrained. This joint is not highlighted, but multiple is so once the tourist selected are then collect from my start point click again from my endpoint and I've copied my object across. If I wanted to copy something across multiple times, select my copy too. Turn on multiple and I can now copy multiple times. And we're aware of what constrained means were copying at zero degrees 91 80 to 70 again if we wanted to copy something with more accuracy Selector copy till selective base point and select are finished point get into snapping from one edge to the other. Next is the rotates tool. So again selecting the component. Well, here we have the rotate to So once I selected to my point of rotation automatically will go to the center point off the components. So I'm first going to show you how to be confused this one, And then I'll show you how we can place it where we wanted to be. So they start ready of rotation will appear, which is this line here. So that's where we would think to start our ray of rotation. So with one click or places, I can then move my cursor to place the Endre off rotation. This is where I will specify the angle to rotate again. We could just follow the input on the screen, or we could manually type it in. I'm clicking to finish. I'm just going to on do so again, selecting the desk, using the rotates to. So if we didn't want the ray of rotation to start in the center point, we can move that point. We have a couple of different ways we can do it in the options bar. We can go and click on place. We can also come down to the grip, click and drag it to a new location. We can also click on Space Bar on, then specify the new point once we place our point. It's then again the same case off specifying the start point, all in the cross around, clicking again to specify the rotation. Okay, so I'm gonna just panned down to the lower half to get some more space. I'm going to draw in some walls. In this scenario, here we have two walls not joining. Instead of clicking, using the grip to drag up on extended T, join them, we can use our trim on extend so we can select with lower wall on in the modified panel. Here we have our trim on extend. So by selecting this to, we'll be able to extend this mall up on trim away this excess piece. So it's the opposite if you're familiar with card. So with rabbit, we select the walls we want to keep. So again, I'll select the wall. Use my Truman extend on, select the walls I want to keep. If I simply wanted to extend up the lower wall will select the wall. And here we have two other futures we have Truman extend. A single element will select the wall that I want my lower wall to extend to and then the wall that I want to extend. Copy this over. Also like the Truman extend multiple elements. Well, then select the wall. I want my lower walls to extend to, and then the walls that I want to extend. And then, if I wanted to trim or that excess piece, use my Truman extend like so
15. 3.3 Split element, Pin, Array, Scale, Delete: next, we have our split element to so with this wall. If I wanted to spend it up into specific segments, I do use my split elements still, So select split element. And then you noticed my cursor is now a little spread element to, and then I can simply click on the wall to spend it up into specific elements I could then selective and delete. There is a quicker way of doing this, of course, so I'll just undo what I've done when I select my split elements to in the options Bar. If I tick on delete inner segment now, when I place my segments, the intersection deletes beside that. We have split with Gap, where we then in the options bar, specified a gap entering 100 millimeters for an example. Every time I click, it will automatically generate 100 millimeter gap between those elements. Next, we have little pins. So if I'm happy with the position off my walls, and I didn't want them to move because it's quite easy to accidentally click and drag an element away. So what we can do is we can pin them in place of the camp removed so a quick way to pin everything is to use my object selection and then selecting the pin tool. I don't notice. Each segment now has its own little pin. So when I click and tried to drag my camp so on payments, quite simply clicking on that little pin, then I can just on then I can reap in. So I'm going toe on pain when I've drawn to move on. Next, we'll look at the delete, too, so it's a little red X. So this remove any little element that we don't want in the project. So select my tool, selecting the element on pressing enter. We also have the option selected. Easy to leave keys on the keyboard. So again, within this highlight selected Tilly key on the keyboard. Next, we're gonna look at the array tool going to come up, drag one of the desks away from a select the desk, select the array to First, we select the type off array, whether it be a linear arraign or a radio array. Do you want them to remain grouped and associate with each other? How many do you want to be involved in that array? Next is how we start the right, Whether we start by placing the second component or the last component. I'm want to place the second component, then the array will continue on. After that. If we place the last component, everything will be arrayed insect to that again. We can constrain them if we need to be, so we'll do a quick example here. Find it up the array to 10. First, I'm going to use the move to second. So with this, I just click on, Move my desk into the second position that I want my desks to be. And then after that, you'll see it will array to a total of 10. I have the final option off increasing or deep decreasing that here. So again, I'll use the Rachel all right up to 12. But this time I'll place the last death. So when I select the last desk off, click the desk, moving into the position being its last position, and then everything will array inset to that. So next for these scale, what I'm going to do just quickly dropped Whoa! And we have two different types of scale. So one us like my element selecting scale. We have graphical Andi New Miracle. So first I want to show you is the graphical scale. I'm going to first select each three of the walls. I do this by clicking on one wall, holding down control on selecting all three. Then I'll select scale remain graphical, so the graphical scaling requires three clicks. The first click determines the origin on the next two clicks to find scale vectors. So I want to increase the size of this opening in the wall. Some quick first click here determines my origin. Next we'll look again. You'll notice that the war will start to expand out. So given that final third click, which is my finished point, we notice that the war has increased in opening size. So next is the scale factor by numerical again, I'll select the wall. I want to scale selecting the scale till toggle over to numerical, so to scale numerically first, you gotta enter in your scale so we'll leave it up to and then we got to specify the origin off the scale. So stop point. So why used? This is my start point. We'll click on my wall has increased in distance by scale factor off to so I wouldn't want to double this again. Again, I can click on scale you miracle scale factor to on my origin on again. It's increased in then Why to So that's it for the modified panel. We will be incorporating these tools throughout the project. So if you're unsure of any of the tools, not to worry, because I will be going back over them again and again as we start to develop a project.
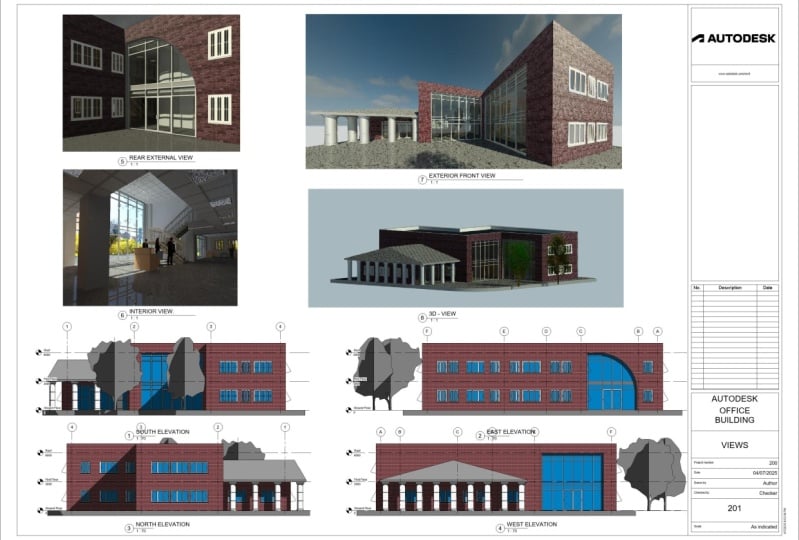
16. 4.1 Building Levels: Okay, so now we're going to start to develop our project first. The most important thing is we got to determine what our levels are and then our grid system. So first we're gonna look at levels to do so We'll go to our elevation view. So if we come up to project browser on the left hand side and there's our elevation heading will expand that, and we consider it east, north, south or west. It's not important, because again, we're working on one single project, So double click on East on by default will have level zero and level off zero on level one other level off 4000. We are working in metric. So this is 4000 millimeters. So first thing I'm gonna do is just select one of the levels. And then here we get a series of information, which is typical Teoh. Nearly all of the components I will be using. So there's some familiarity is here that when we were using the wall, So, for example, there's a temporary to mention we have some padlocks and so on. We'll go through each individual point now. So 1st 1 on the left hand side we have a little box with a tick on the right hand side. We have a box with nothing inside. So fight on tick, you notice that the bubble disappears. If I take on the right inside, the bubble will reappear. So it's just to change the position of the bubble from left to right. Next. This here is the actual elevation bubble itself. This is just a default symbol has been provided by auto desk. You can, of course, create your own. Implement them to your own drawings. Next is a open grip, so it's an open blue circle there. If you click and drag, we can extend our levels so they can extend them out or attract. You'll also notice that there's a dashed blue line, which is a temporary vertical dimension so all of the levels are locked onto each other. If we wanted to move one level by itself without being locked, dealers will simply click on the padlock. It's not unlocked from the lower level, and I can now move it freely. So market back to level zero. Quite simply, click the grip, move it over so I get that temporary virtual dimension once that appears. I'll let go on. It's been padlocked again, another locked together. Next we have where we have never won. This is the name off our level. Below that, there were 4000. That's the actual level itself. The dusty line here is the actual level line. Again. We're the similar artist on the left inside, so there's are open gripper padlock, so to adjust the level first, I'll select the level I want to move. I have two options. I can either select the level texts where we have 4000. I can then enter in a new level, pressing Enter or I can use the temporary dimension Select. I'm bringing back up to 4000 again. There's another option again. Once I select the level, you'll notice my properties part of changes and takes on the properties of the level in there as well. I can change the elevation. We'll select 4000. Bring it back to 3000 for the properties to take effect of that level would either come down to press supply or simply move the cursor into the drawing. And then those changes will take effect. So to create a new level, I'll just press escape to come back out of that. So we've got nothing selected. I'm gonna pan up in my architecture tab down the very anti of the second last panel in there, we have our level. We'll select my level two. You'll see The contextual top appears with our modification as our draw panel. So these air different ways that we can place our level in the options bar Here we have, Ah, a couple of options that I'll go over in a few moments just to get us started first, all line up with the vertical to temporary vertical dimension. Click wants to start move my cursor to the next point game when I see that temperate vertical dimension click again to place on escape to finish So because I pressed escape once and still inside the level tools off a press escape again I'm back into the main model . So to make changes to this level, I'll click on the level I want my bubbles to be on the same side So will come to my show High double box air ticket on on the left Take it off on the right. Okay, so I'm gonna pan up again, so I won't go into a bit more detail off placing the level so again, pressing escaped from back. The main model clicking on my Level two and in here I'll go over my options. So the very 1st 1 there is make plan view, and that's turned on right now. So when I place my level to hear, if you come over to the project browser under the floor plans, we have level zero. Never one on Now we have Level two. So if I turn out off on place another level, Level three again, I'll just turn my balls on. Level three has been created. You'll see in the project browser on the floor plans. It doesn't exist as well. Your notice that it's now black when we create a level on its blue. It means that it's an active floor plan. When it's black. It is not an active floor plan, so the reason that we would create these levels would be safe for roof ridges, ive details and so on so we can place levels in the drawing for us too attached to, but we won't generate floor plans. There's other ways that we can do that as well. So I'm gonna delete level three Aiken. Create a new level without creating a floor plan by simply selecting the level two. Using the copy tool on copying up again, we get level for I don't notice that it's black, so the level hasn't been created. So if I use a copy tool on copier level, it will not automatically be a floor plan. If I wanted to copy my Level two up and to make it a floor plan, I can select it in the modify sexually of create on There's Create Similar. So this works with all components, not just level. So if we wanted to create a similar wall, create a similar door floor, anything that we put into the project, we simply selected select a great, similar tool. And then we can places and you'll notice it's turned blue on my floor plan. It's now level five selected until leads. So we got I'm gonna place another level when we have the make plan View turned on will select the Options bar here. Andi, it's just give me the option off. What type of plan views do I want to be created so by default will always have seating plan , floor plan and structural plan. You can determine if you want those to be selected or not. So press OK now If I place my new level, you know my floor plans. We have level six, my ceiling plans. We have level six on my structural plans. We have a level six as well. There's level two that we created earlier. So if you're creating a new level, you can If you only wanted one of the other you can simply to select under lead. No selecting delete level six as well when placing a level when we draw weaken out an offset. So if I have been on service 8000 when I drawn place, my level is offset below 2000 right now. So if I hit the space bar, it will be 1000 of both. Okay, So for our project, we're gonna have three different levels. Are ground floor level zero our first floor of level 3000 on a roof level at 6000. So first want to change our level heights. So level zero believe it. Zero level one will change to 3000 on level two will change to 6000. So if I select the level, we can almost like the text or the temperature mention. So obviously I'll make that 3000 has been have level three at 3000 plus 3000 will make 6000 or you can select the text 6000 and change it there. Next, we'll change our level text. So again, select level zero on three. Type in ground floor. When I press enter or click away from the text, I'll get this little pop up. Would you like to rename corresponding views? So if I press? Yes, my level zero in the project browser will change to be ground floor. If I select no Level zero Will will remain as level zero in the project browser but will change in the model. So I wanted to change in the project brother as well. So press guess No notice my floor plans and they're changed to ground floor. Do the same for level one. Changes to first floor like another press enter or click away again. I'll get the pop up pressing Yes, on for you Top will just make that roof one click away on Yes So in my model at the bottom of the ground for first court roof level. In my floor plans, though it's organized alphabetically. So first floors first, the ground floor and roof. So this isn't something I want to happen. So one little way around it is to change the name on adding a new miracle value at the front of the text. Someone aside in one. Yes, I want to change again first. Yes, Office three. Yes, so now in my project browser, my floor plans that organized how I want them to be. Then I can extend that all three together by using a grip on their all attached well when we're creating our levels. If we have one level on top of the other, for example, what I'll do is I'll just quickly copy this above. If my Texas overlaying another text, be it for whatever reason. What we can do is we can out in an elbow so we can read the text clearly on level seven. There. If I selected, we have that little symbol there, which is our elbow. So if I click little generating an elbow by default, it will always go down So what I can do is just grab that grip on, drag it up on any just its position even more. But under the seven, like so So the level itself doesn't actually changes. It's still 69 to 0, but just I've moved the bubble on text away from the roof level so I can read it clearly. Then, to remove the elbow. I'll come on the out of grip here on just pull it down until I feel it jump. When it does, almost let go on the elbow was removed, so just select that level seven on delete. So if we double click the wheel, it will zoom extents and bring our levels into the picture.
17. 4.2 Grid System: next, we're gonna add our grid system. So to do that, we'll go over to our ground floor plan. So back over to the project. Browser floor plans on double click on ground floor. So to place our grid, it's in the architecture tub again, down the very end in the DOT on panel. So we just placed our level the middle that is our grid. So I clicked. Activated, too, on the contextual teibel appear. So this is a couple of methods of how we can place it by the by straight line. We need to start and radius center and arc PICC line as well when were placing, and we cannot an offset. So the place the grit again. It's like placing a level click wants to start drag the cursor on click again to finish press escape just to come out of the drawer. Function escape again to finish the grid. So if I select my grid, you notice again. We have the same features as the levels. So we have Our tick box is there for a bubble. The open grip there to extend on. There's the elbow with the grid again. Oh, bead by defaults we'll start with one. When I placed my next level will automatically be to before this project, we're gonna start with vertical grids alphabetically. So if we just select the text by clicking on our text will appear like so type in a again pressing and to the finish I'm escape. Once I've done that, I go back to the grid click. So right now, I've just been prompted to save project. So when rev it rare to specify how often we want the software to prompt us to save, I have set mind to 30 minutes so every 30 minutes or get the seal display screen and it's gonna prompt me to save. So what does select save And again I'm just gonna place my grid so lining up with the end So I get that temporary, brittle dimension quick to start on click to finish It's automatically named itself Be So press escape So again when I when I select be you'll see I got my temperature mentions my padlock my grip again So all same features. So what I'm going to do now is going to start to place all of the horizontal grid lines where I'm getting this information from is from the PdF 001 grid system in there. I've given you all of the dimensions between each one of the grid lines. So first up between A and B, it's 2000. So to change the distance between A and B, I want to move grid line be so I select Grid Landy and you'll see that on my temper dimensions. It's 39 hundreds. Or select apps and change it to 2000 like another press escape on the keyboard or just click away on the screen. So next I'm gonna place grid line, see. So again, I'll click on grid Click to place click to finish I'm escape. So again I click on the grid used the temper dimensions here to enter in 6000 or to speed things up. Your notice between C and D is 3600. So when I go click on grid, I'll hover over to get my vertical dimension. I can move my cursor up until I see 3600 displayed in a temple to mention. So when I click to start in place, I know that that is no place accurately a 3600 again Next between detainees 4400. So same method moving the cursor until they get 4400. I think on cook again to finish again. Last is between E and F is 8000 like thank you. So there we have eight f at the moment. Ignore the elevation bubbles. We can move them later. Next, we're gonna move on to grid lines. 123 and four. So same processes before click on grid picked to start Quick to finish. You'll notice it will automatically take on G but we want to relabel them as 1234 So we'll select g text. Enter one. And now every time you place a new grid or water might be 23 and four. So great line between one and two of 7000. So again, just leaving my curse or quality that comes to 7000. Click to place Nexus 8000 on 7200 because I'm zoomed out quite a lot. It's in my temperature. Mentors is jumping from 7000 to 8000. So how I can go into increments of 100 zoom in. You can see the temper dimensions are now going in increments off 100. So 7200 is what I'm looking for. Victor, start click to finish on your notice again. My bubbles are 1234 So next I'm gonna just move those elevation bubbles out off the way. So I got two options. Oh, click. Once it's highlighted, I'll get the drag symbol and then I'll just click and drag it away. You can drag you can also, with the arrow keys on the keyboard to adjust the position double tap on the wheel to zoom extents so that we just have to extend out our horizontal grid line on the virtual. Well, we could just extended slightly again. This is just a position of the bubble.
18. 5.1 Structural Column: now that we have our grid, when I'm gonna apply some structural columns to the grid. So to do that, we're in the architecture top. We're in here in the builds panel on There is our column. So if I click and select my column, you'll see that the contextual tab appears my various different methods of placing them again. I have my options bar for further adjustments. So first off is my placement panel, so I can have them either vertical place or at a slant. If we wanted to do the multiple times. If we select upgrade on selected, the grid itself will place a column on each intersection or we also have at columns. So if you were to place architectural columns, which will do in a few moments, you can also play structure columns at those points. Next is tag on placement. So every time you place a column, a tiger will automatically appear you will become more familiar tags as we work our way through the project in the options bar there we have. If we take on, we can rotate the column after replace it, and then the same with our walls on next is the constraints. So if we have depth when we place a column, it will start on a ground floor level and it will go below so it will go into our basement level. If I change out to life now, my column will be placed at the ground level and we'll go above next is just specifying those constraints are now. You can see our floor level so we have our ground floor for us. For roof on the few sect unconnected weaken. Specify a height, so we'll specify our height at first floor. Andi Next. If you open up the pdf 002 column layout in there, we'll show you the position off each of the columns, so the first position is a to So if I can't, there's my A grid becomes highlighted in blue on to also become blue. So when both of them are highlighted in blue, when I click, my column will automatically be centered at that intersection. Same again for the next one. We have a three again, both off. Those grid lines are highlighted in blue so quick and it is centered. B. We have one to three see is one to three four. De is one to three. He is to three four on F is three on Day four. Double escape to finish. Best way to view this is we will go on toggle over two or three D view now, just to see what we've done on the quickest and easiest way to do that is to go to the quick access to a bar at the top, select the three D house, and that will generate our three D view. So to navigate the three D view is again we'll click and hold the wheel to pawn scroll in and out with the wheel, so move the wheel in and out on If we want to orbit, hold down shift hold in the wheel time we can orbit. If you wanted to orbit around a particular spot, select a component. Hold on shift holding the wheel on. Now, everything will orbit around component. So there's our columns. So to come out of the three d view, you've got two options. We can close down that windows by clicking clothes, or we can just go back double clicking on the ground floor
19. 5.2 Architectural Columns: Next we will place architectural columns. So the difference between the structure columns on the architectural columns So the structural column adds a vertical load bearing element to the building model. Well, the architectural columns are purely for aesthetics, so they will not be included in any loading calculations to select. The architectural column will come back to architecture. Town builds panel We have our column to When there's a little arrow underneath, we'll click on the arrow. First is the structure column, which we've just used next is the architectural, So we'll select that again. You'll see the contextual tabal appear so that the top changes green. A few options we can use. I won't go into detail about. They are just get rid. Of course, cover this in the course. Next is the options bar. Again, we can wrote it after placement. How we wanted to be constrained on room bounding is something we'll cover again later on course. But with the structure of column, What we did is we used the column, which has been provided to us by auto desk. So, like the default one in the type selector. What we want to do is you want to change our architectural column, as you see here in the type selector on the left hand side, in the properties palette, it's currently set to columns rectangular for 50 by 600 millimeters. I want to change that to 600 by 600 and how we do that is will select the type selector, and in there we have three different types, so we have our 4 50 by 4 50 or 50 by 606 106 100. So when you select that, I'm never going to just place that architecture column over the points at which the structural columns were so again. Same process. Once both grid lines become holiday blue, were quick to place again. Refer to pdf 002 column layout for those positions. And if you wanted to get a better look at what you've drawn, click on a three D view again and there's our architectural columns. No close up down. So with the architectural columns, they're just a blank canvas. So what that means is when we attach a wall to that architectural column, that architectural column takes on the properties of whatever wall abuts to that. So later on, we're gonna draw our external wall around those columns. When we hit off, it will automatically take on the property so it will turn into a block. Plasterboard, brickwork. Whatever way, put to it. So it saves us time detail ing around every single structural column in the project.
20. 5.3 Placing External Walls: Now that we have all of the architectural on structural columns place on the grid whenever to draw our external wall. So to follow along, if you open a pdf 003 external walls. So for goto our wall to again on being prompted to save. So yes, I'm going to save So in my type selector, what I'm going to do now is change the type. So by default, I'm cut the external wall. 102 mil brickwork 75 insulation 100 block 12 plasterboard. When we're gonna be using today is the wall exterior one or two brick 50 air, which is our cavity 45 insulation, 100 block on 12 plasterboard. So click to select. So I'm gonna draw our wall today. We're gonna be using our line in the options bar. We're going to specify are constraints under haIf constrain them to the first floor level. We're going to specify a location nine as the core face exterior. So to briefly run over the course of our wall and to show you where our core centerline is our core face exterior under interior. What I'll do is I'll quickly just open up at a browser. This is a little cover letter on the course, But just to give you an idea, where are cores are? So here's our makeup of the wall on there, you see, is our course on our core band. AIDS are positioned around our main structure, which is our concrete block so that they're highlighted. And blues are concrete block, which is the main structural element off our wall. So a bull that we have our external or exterior face for a core boundary, which is that blue line on our interior core boundary, which is that blonde again? So we're going to specify a wall location on to be the outer face of that block work, which would be this section here going to change our location. Line to wall face Exterior? Yes. I wanted to be in a chain. I don't have any offset. No radius. And yes, I want them to join. So to get started, I'm gonna come down to grid line F three, the types to the outer corner off that architectural column Click wants to start. If I move my cursor up your skirt brickwork is on the left inside the block work is on the right hand side off my core boundary. If I was to go around the right hand side of the building, you can see that it's been mirrored across on that. My blockers on the outside of the building, my brick is on the inside. If I wanted to run this way around the building, I could just simply press space bar to flip it, go back and run around in a clockwise manner. So coming up on just clicking on the bottom left hand corner off this column again, bottom left hand corner when I get that square symbol that that is my snap symbol. So I know that I'm attaching to the edge. So I'm gonna run right up to grid line to leaving the columns on the left hand side. For now, me across down. Just follow what's on the pdf. So when I come to the end, when I could do is just simply come up to the wall. Want to get that dashed line to click in place, and they'll automatically join and now, over to the left on side of the building. I can just click on the other side of that column again place and you'll see that they will automatically join together on again. The block work will run straight through the brickwork going to the next boundary, which is the block again against something that will repeat again and again. And there's our external walls place again. We can use a three D view to check it out.
21. 5.4 Placing Internal Walls: next one out in our internal walls for goto our wall to we can just go to our type selector and change the type. So if we just scroll down to wall partition 12 plasterboard 70 mil stud on 12 plasterboard again If you now open up the pdf 004 internal walls, you can follow along. First off, I'm gonna go to my grid line. See? My drawing matter will be byline constrained to hide. First floor my location on. I'm gonna leave on for wall centerline For now, Cheney ists are going to go from the center. Point off that column directly across and touched to the other face. As you can see the pdf, all of those walls are equally spaced between each other. So what we can do is just hover over the edge of that wall will get a triangle which is our midpoint on Same again much. We get the triangle. It's the midpoint. So they're all equally spaced. Go to the right hand side. So with the rev it what we want to do is we just want a place, everything first on afterwards, we can come back on position it with more accuracy. So I'm just gonna draw in roughly where I think everything is. I think so. And then afterwards. Then I can go in and make sure that those dimensions are correct. So 1st 1 here, the distance from the face of that plasterboard on the X on the wall to the face of the plasterboard off the partition is 2100. So if I select my partition because I want to move my partition, if I said that the X on the wall of my external wall will move, so we'll select my partition, the temporal dimension will appear and you can see there. It's 2137.5, such with just its position. I'll select the text changed 2100 on press enter. This will here. Is that the Centrepoint? Same here. So these will see are 2000 down. So fights like my middle wall. You can see my temper. Dimension is 2302.5. If your temporal dimension is snapping to the column like so we can adjust its position. So with that blue grip are click drag and moving up to the face of the plasterboard on Let go. Now I can change the text to 2000 to change this wall down here. If I know enter 2000 here, it's going to move the wall. That's highlighted. So you got to make sure that you select the correct wall before you move it. So I'm gonna undo that. Now that we want to move this wall, I'll select this wall here. Now I'll change my temper. Dimension click away. So next want to do this nice curved wall here? So to do that, I'm just gonna again just roughly draw on the walls where I think they belong. There's another one there, so drawn those nice straight walls. Afterwards, we can add in those curves. So the first thing is the distance between the vertical partition on the external wall can see that set to 2,802,800 Succumbed to my temper dimensions. Change that to 2800 is the next one. To get that curd between the two walls, we go to our wall tool select fitted arc. Select the two walls. If we get that warning symbol, if you just go across to the other side. We can place it on. It will generate on the other side. Once it's placed, we can then select it on change. The radius, which is 2200. What is the same for the bottom? Select 12 Not so we generate those nice curves. So with our partitions on grid lines, see here we can see that the partition is cutting right into the brick. I'm going to the block. Work again. The reason for this is because of our wall boundaries. So the metal stud in between here has its own boundaries as well as our block work. So there, two boundaries connecting to each other. So the brick is completely ignored, as well as the plasterboard for our partition. So when in the real world this isn't gonna happen, we're not gonna have a metal stood cutting right to a brick. So what we can do is weaken. Disallow the joint off that wall on pull it back. So what we'll do is we'll select the wall on right click on the grip on their we have disallowed join, and then we'll just click and drag the grip away. Touch it to the face of the brickwork. This is a symbol. Here is the joining symbol. So if I ever wanted them to rejoin on this click and we'll rejoin.
22. 5.5 Using the Equality Constraints: Okay, so next we're going to place the architectural calls around the left hand side of the building. So we go to the build panel, dropped an hour of the column, will go to architectural. We go to the type selector, and so we only have three different types of choose from. So what we need to do is win to load in the other problems from the library. So this library, when we download the software, is automatically installed on your PC on all of these components aren't automatically in every single drawing because the file size would be too big. So there's an external library off all of different components that we will load in from to access that will click on the load family. We're in the green contextual tab off Our architectural column will set on low family, so this will open up our UK library on there. We have our columns solder on. In there. You can see a different types off columns that we can select when we're choosing today's the metal clad press open to bringing from the library into the project and then just click to place. Once we have one place we'll place a more accurate it again using the temper dimensions if you referred to the PdF 005 external columns. This is where you'll find the positions of each of the columns. So from the face we have about 1000 and from the lower face again, it's 1000. So against all I'm doing is clicking on the blue grip, dragging it down. So I wanted to be re select, changing to 1000 so sent to the center. It's 1000 to each face and you notice on the pdf will be four columns in total along the top half here. So it was. Now, click on the column. Use a copy, too. I'm gonna click above it just as my start point on having multiple selected every time I click our place. A new column now that have the four place what I'm going to do with human, too. Adjust the position off the last column, and as you'll see in the pdf, it's again. It's a meter away from each face, so this temperature mentioned here is latching on here, So what I'll do is click the Blue Grip, click and drag until I get the blue line on the accent or face on, let go When there is 1000 it should automatically be 1000 from years. Well, so I don't know what the position is between each of the columns, but with rabbit, I'm able to equally space. Um, anyway, so in rev it there's a feature that I'm able Teoh you, which is called the Quality Constraint. And I can use that feature two equally space the columns. So like How will do that is I'll use my aligned to mention tool. So we got to the quick access panel at the top. Select a line dimensions on because I want my dimension one to go along the horizontal axis . When I hover over the column, I've gotta pick up that vertical blue line. If I go for the horizontal blue line, I'm going to go down to make a vertical dimension one. So because I want to do a horizontal dimension run. I look for the vertical blue line on the center point, so quick ones to get my centrepoint click again for the next one, remaining in the dimension to like look again for the next CenterPoint look again for the next column. Once I've done all four, I'll move my cursor up to position, then to place the dimension run, just move away, making sure I'm no highlighting anything. Like if I click now, because that's blue on making new dimension. So I don't want to do that. So I'll just move my cursor away and click again when nothing is selected. And that's my dimension one placed giving me a dimensions between each of the columns. Now two equally spaced, Um, doesn't eq you with the red dash. If I click that little equally space, the columns now, we don't want this on our plans all the time, so what we can do is we can select it. Clicking the delete key by doing this will get a warning that dialogue box. It's just saying we have deleted the dimension one, But do we still want to remain constrained? I e. D. We wanted to remain equally spaced or not, so we can keep it constrained by pressing. Okay, well, we can click on unconstrained, which means that the columns are free to move now and they won't be equally spaced. So I want to keep them constrained. So press OK. Next, we'll do the vertical run. So on the vertical room we have a total of eight columns. So will select one. It was my copy tool again was confident. Age time. So I got one, too around eight. So next it's about positioning the last column correctly. So yes, it's Ah, meter from this face here, but it is 1900 from this face. So using the blue grip, just click and drive. Place it on the external face there. I can change that to 1900. And now that I have the position off the last one, I can use the same aligned to mention tool because I'm doing a vertical distance and I have to get a horizontal blue line. So there's my vertical. There's my horizontal again, just clicking. Once place using my wheel on the mess to pan on Once I've got the last one, just moving the dimensions in the correct position, moving the cursor away from any other objects over on Select Andi left. Click with the mouse, so I select you to mention one. There's a EQ you quick to place and all equally space. The columns again. Once I delete three dimensional, I get the warning dialog box again. Off press. OK, Next. I just need to copy down those three from above. So if I select one usually hold down the control key to select the other two, I can a copy priest.
23. 5.6 Placing the Ground Floor Slab: Now our project is starting to take shape. We have our levels are grids. You said our external walls, internal walls, Andi, some additional architectural columns. Next, we're going to create a floor at the ground floor level. So to get started again, we're in the architecture top to build panel. Here we have our floor to ever hit the drop down arrow. You'll see a couple of different types what we can use architectural, which is what we're going to use today. A structural is not something recover in this course on the other two as well. So simply just click on the icon itself. It will bring us into the great floor boundary you'll see again the contextual top changes first noticed in the first panel. There is our mold panel. We have a red X on a green tick, so this will appear with certain components that when we place any floors and roofs and so on. Basically, what this means is when we're finished, we have to either select the Red X to cancel what we've done or the green tick to continue into finish cover were happy with what we've drawn. You cannot move forward unless you select either one of those two. So that's very important to remember. Next we have the boundary line. And again there's our draw panel, which were familiar with by now again drawing byline rectangle circle and so on again, we have the pick lines. Onda. We now also have this new tool which is called a pick. Wald. It's best practice to use that the pick walls to because by using this to or we have to do is select each one of the walls to create our floor boundary on. What it will do is it will look for the boundary off the wall itself. So the floor will cut through the block, work and so on and go to the external face. This become more parent when, when we draw our floor, not cut a section to to see see that happen? They're in the options bar. We can create an offset on the extend inte wall into the core will have that takedown again . What? That is when we create the floor, it will extend in through the wall on attached to the core itself. So we're gonna do is gonna change over our floor type we have the type selector by default will have four different types to ground floors on to upper. So if we go for the first on the ground bearing slab having the pick walls tool active on, then we'll simply just click on the walls on escape wants to finish. So what we have John is our boundary line represented by that pink line. So the banjo on most contain a closed loop, represented the outside perimeter off the floor. It can also contain other closed loops, which to find openings in the floor. It is very important to remember, though, that we must have one single closed loop. So we kind of any additional lines or anything like that. I will show you that in a few moments. So as you see here, we have a single closed line running around. And then these three lines here are in fact, additional lines. So five press green tick to finish. I'll get a warning symbol here telling me that I cannot complete it because the lines cannot intersect each other. The highlighted lines are coming detected, so whatever it will do is will highlight the problem lines as orange so you can resume into right away to see where the problem is. So to fix the problem with this press, continue on. What we need to do is put out this intersection on. I will use the spread element tool for that sort select but element in the modified panel to save myself time. I'm going to click on Delete inner segment, and then when I hover over where I want to cut, you'll see out the curse of all kind of jump on attached to it. Once I can see that happen or just click wants to start click again. It has created the opening on Escape Wants to finish. Now we have one single closed loop, which one I press in Tick. The software is happy with that. We can continue on escape again to finish. So what for then further wanted to edit my floor. As you can see, when I hover over, I cannot select it. The reason being is down here in the selection modes, my select elements by face is turned off, so if I turn out on now, I can select the face off the floor. Wanted selected in my property section I can change the type I can change the constraint of I want. But I also have the option here off editing the boundary. So if I click on that back into the editor, if I zoom in, we can see the pink line running around the outside off the block work, which is a core face exterior. So if I wanted to change the location off that line, Aiken simply selected once on only with the pick worlds to Will I be given this flip arrows here. So I click on the flipping arrow. It will jump to the interface of the core boundary when I can hit the hours again to flip it back out. We can also adjust its position using the temporary mention there, So 100 pull up to the interface of the brickwork. So to bring it back, I could just click and drag back to the exterior face green tick to finish. So what I'm gonna do is turn off select elements by face, the reason being I can accidentally click on the floor slab which can get in the way. So if I turn up off
24. 5.7 Placing a boundary footpath: So next. What we're going to do is we're gonna place another floor slab. What? It will be our boundary path. So we're gonna create a footpath around the building. We are going to use the same floor slab as we've done for the inner part of the building. Later on, in the course, I'm gonna show you how we can change the properties off that floor slab. So just display a concrete slab. For now, though, we're gonna leave it as the default ground floor. Parents love so same process. We're going to click on the floor tool. This time, I'm going to use the PICC line. I'm gonna go around the outside off the building, and again, we have to remove this segment here. So we used the split element again having to elite inner segment turned on click Click. So that's the inner side of the footpath. We now have to draw the outer side to create a footpath. You can also open up the pdf 007 path. So the pas itself is gonna be an offset off two meters from the inner boundary. So if you use the offset tool in the modified panel we can change the offset. Number 2 2000 causing enter on. What I'm going to do is just simply hitting the top, right? Bottom on left. I'm not going to do each individual segment. The reason being I'm going to use my trim and extend to just tidy up those corners, just saving myself a bit of time. Now that we have the outer boundary drawn, we're gonna do a small fill it on the its upright on bottom, left hand corner of her path. So to do that, I'm just gonna go back to my draw panel. We're going to select the fill it arc. We can just select the two lines, but will automatically generate that. Fill it. We can try and get it to 5000 or we can simply click to place afterwards. Come back, select The curve changed to 5000. We can also select the fit by arc. Go to the options bar, turn on the radius, change to 5000. So now only selected to lines in the bottom left hand corner. A lot of monetary generator. So now we have are out of bounds. You, John, on our inner boundary, John just the press green take to finish. There's a footpath around the boundary looking good to your three D view, and you can pan around over to see what we've drawn again. You can select the outer for path on the inner floor.
25. 6.1 Placing Doors from the Type Selector: the next component. We're gonna look at our doors, so open the build panel beside wall. We have the door tool. So if we select our door tool again, you'll see our contextual teibel appear. You green top of the top. We have our panels. Here first is the mode, which is a load family again. That Lord family will just bring us into the library on a common drive. Modern place isn't something one of cover in this course on glasses the tag on placement. So every time we place a door, they will automatically tag each door, tagging something we'll cover later on. In this course, the options bar there is referring to are tags. So this is how we can manipulate our tags. So we go to our properties pilot first thing we have our type selector on by default, we have two doors loaded into the project. 1st 1 is an external door type. The second is an internal door type simply represented by E x t for external. On I N. T. For internal in the properties panel itself is just a basic information about the constraints. So the sill height off the door. We want to be 00 sold on our ground for level the construction type. What materials and finishes are on the tour We canal in some comments about that door itself. We'll go into a lot more detail about this later on. In our course here, we can also specify had height. So to get started, we're going to go to our type selector. We're going to select the 9 10 by 2110 door. So click moving to the drawing. I'm gonna place our first door here on grid line. See? So, as you see, my cursor has the morning symbol cause I cannot place a door randomly in the project, doors as well as windows must be hosted on a wall. Certain components must be hosted on certain other components. But when we put in lifestyle on beholds it and ceilings So if I hover my cursor over my wall, you see the door will appear find Move my cursor below the wall itself. You'll see the door. Handing will change on as well to place that if I go left and right, you'll see the temper Dimensions will change. So how close I want to be to the Jason partition. So give me a rabbit. The best thing to do is just place it first and come back afterwards too adjusted. So now that the door is placed, if I click again to select it, you'll see we have our temper dimensions. Both sides. Well, we have two different flipping hours. We can change hunting like so we're gonna place each of the doors 200 from the adjacent partition. If we wanted to do some minor adjustments to the door position, we can use our arrow keys. I'm just going left right on the arrow keys on the keyboard. To be more accurate, use those temper dimensions. So next we want to open up the 008 doors. Pdf publican start to place the door 9 10 by 2110. Around that project, they're represented by the number one. So we have two ways now we can go back to insert those doors. We cannot select the door usar create similar, or we can also use our door tool. And it's the last selected so we can just go in place best to just place the doors on. Then afterwards will come back on just their position. So once we have all of those 9 10 doors placed well, then just place a more I could do so. Yeah. 200. I want you to flip this store 200 again. So when I select this door on, I flip it. You'll notice the temper. Dimensions also flip. So to get the temperature mention that I want about just press escape, select the door again. I know my correct temper dimension will appear in the same for here. We can also select it. Use our mirror pick access. I'm flip it to the side. So now we have all of our 9 10 doors in the project.
26. 6.2 Loading Doors from the Library: next you'll see in the plan that we have two of the door types, a 15 10 by 2110 on a 14 10 by 2110. So if I go to the door tool type selector you'll see in the internal door types, they don't exist. Right now. What we need to do is we need to bring those doors in from our library. So to do that, we'll go to load family. Then you'll scroll down to our doors folder. We have four different sub folders as our door among Greece. So that is, our door knobs injures and so on. Next to the external doors, there's our internal door forward. So if we double click on the internal doors, if I select the top on, use the arrow keys, you can see the preview off the different types off doors that we have. If you don't have these in your library, it's probably best to look back and make sure that you have installed your library correctly because they should be there, wants you load in the UK library. So the door that I'm going to insert is a double door. So here we have got eight options. 1 to 8. You can choose any one of those. 1 to 8. The actual type itself is not important as long as it's a double door. So you have the option there to go from 1 to 8. I'm just gonna stick with one. Once we have the door selected, press open and you're now notice It's in my type selector. So I hit the drop down arrow. There's my doors. Internal, double one. I've got two different types. 15 10 in 18. 10. So I will select the 15. 10 on. If you refer to the pdf, they're represented by the number two. So wherever we have the number two is where we're gonna have those doors. We've got one here on one of the curve scape to finish. So this one here is 700 from the column on the other is just in the center
27. 6.3 Creating a new Door Type: so last. We just have that 14 10 by 2110 which is represented by number three. If I go back to the door to, you'll notice that we only the 15 10 and 18 10. So what we need to do is we need to edit the type of crater own door type. So on the 15 10 would have that selected on. What we're going to do is when a select edit type So when the property is pilot right now, we've just selected AR 15 10 door to create our own type. We're going to select edit type. So in here, the type properties off this door. I'm not gonna go into a lot of detail about this right now. We will cover this as we go to the course. But if we scroll down to the dimensions that there are the parameters of the door which you create when you when you build your own doors. So when there's the width at 15 10 now, we're not going to change the value off this door because we want to 15 10 to remain in the project as of 15 10. So what we need to do is we need to duplicate this. Give it a new name on That would be our own, that we can then change the values so we'll go over to the top right here. We have a duplicate select that will automatically by default give it to at the end. So we just selected to lead change it to a 14 10 by 2110 on press. OK, so now you see at the top here we have our family, which is our door, the internal double one, which is our door that we've selected. We've now just created a new type of the 14 10 by 2110. So now all we need to do is just change the parameter value. So if we scroll down to our dimensions, there's our with still 15 10. So the selective value change it to 14 10 press OK, I know you can see in our type selector there is our new 14 10 by 2110. It's very important. Remember to duplicate. If you don't, you're gonna change the parameters and values off the original door on. It's gonna upset what we've already put into the drawing. So that would place our 14 10 door and you notice when I go to place on the wall, it will automatically sent to the door for me so you can see kind of jolts a bit. So I now know that that door, if you look at my temperature mentions it centered between the column on the adjacent partition. Double escape to finish, then we have. So we have our three different door types in our drawing. So before we move forward, what we're going to do is one of rename these doors and give them a unique name. This will become more clear towards the end. So the 1st 1 is the 9 10 door that we have inserted. What we're going to do is gonna rename that, give it a door type one. So DT 01 So how we can change the type is we just select the door at a type rename relieve the actual width and height will just type in DT Dash 01 before press. OK, so now everything remains the same. Always. Jenna's just renamed it. I'm a press. OK, so because I changed that one type fight, select the other door You'll also notice that the name it has been renamed So each one of these doors, they're all in the intent of the same properties. And if you change one type, I will change all the others. So will now change the 15 10 door again, selecting the door at the type of the properties Rename will change it to DT Dash zero to on Press. OK, announce a d t dash 02 for door type zero to That's okay. Again. If I select the other one, you'll see as well been renamed last able to select our 14 10 rename. Not as well. Two DT Dash 03 for us. Okay, okay.
28. 6.4 Adding a Wall Opening: Okay, so next what we're going to do is under in a structural opening. So in this section here, we want to have to go between one building on the other. So I'm gonna show you a couple of different methods that we can do that. The first being weak. Incredible opening the second way we can edit the actual profile of that wall so we can put out a section of the wall on 30. We're going to use the structural opening component. So this is just basically a door itself. So it has the same properties as an actual door. It just doesn't have any frame or door itself. So it's just a blank opening. So the first method that we're going to use is a wall opening, too. So that is in the architecture top in the opening panel here, there's our wall. But to get a good view off what we're going to be doing, I'm gonna place a section view. So I used the section views all the time in the project just to get a quick elevation of what I'm doing. You can also place elevation views if you want, but I just find personally that the section views a lot quicker, lot cleaner and so on, So to place it, it's appearing the quick access panel on There's Our section view so clicked activators. So the place my section view click once one click against a place So I started. The bottom went up. If you go from the top down, the view will be the opposite way. We can honestly flipped out. So if you select your section view, you'll see there's are flipping arrow, you conflict of you as well as that. You see the dashed blue line. That is what will be included in the view. So if I wanted all of these columns to be in the view, then I'd leave it where it is. If I didn't only wanted just a small section behind, it was dragging behind. I know everything behind will not be included in that view. Same goes for the with as well. Aiken cycle through the different section heads here. I'm used the grips to extend it out. If the section view is quite long and you didn't want everything to be on display, a little elbow there couldn't have. When we can shorten it down. That's the basics of a section view. So I was going to leave that one on. Every time I place a section view if you come over to the project browser, scroll down. There's our sections heading expanded, not a Section one. So to open up the actual section view, we cannot a double click on Section one on there is a section view. You can also double top on the beak again, not a section view. So we need to do is just expand at this crop view so we can see our view. Have you select the rectangle we get the four grips top bottom left and right, you just click and drag. What I can do now is like an have multiple windows open at the same time to see what I'm looking at, but we're looking at on the screen is called a window tile. If I minimize, you'll see I've got two currently open if I open another. So there's three different window tiles. But of you, all of the different window tiles have become again back up to the quick access. There's our switch windows that we click on that will just display what current window tiles are open. If there's too many open, you can select close our window tiles or clothes. Hidden windows. If there's too many open, you could have 10 15 20 open at once. What you can do is click on the clothes hidden windows that will close all of you, the windows apart from the one that's currently open. So the different window tiles that I want to be open on my ground floor almost opened a three D view on the section view and then to display all of the different window tiles at once. I want type in WT on the keyboard. W T. If the window tell that you want to be displayed isn't on the larger side when you conduce , Just select the header at the top and then w t sacked the head or again. Wt. I'll just rotate the views. So what I want is to have the three D view on the right hand side. Someone just click on the header on just toggle through until it's displayed. Like so there are consuming so that there is the area where I want to place my wall opening . Zoom in slightly and again there in my section view, this is the area I want to at my wall opening on same in the floor plan next to go to the opening panel, Select the wall opening. Then it was click on the three D header there. First I got to select my wall, so just click on the wall itself. And now I simply have to draw the rectangle on the wall again, just placing it anywhere at the moment. So we're not concerned about the hike on the with, and then we have our opening. Once it's placed. Now I can click on my section view. Select the opening. If you can't select the opening first time, just hover over where the edge of the opening is on. Just click on the tab key once and twice on your seats. Now, toggling between everything that's around the cursor that applies to everything, we will use that feature again and again so I can select the opening. Once I have the opening selected, I've got my grips that I could just extend out. So that is one method off, creating an opening the downfalls to this. If I go, my ground for plan. You'll see that the external wall remains open. So what I mean by that is the brickwork doesn't return into the block work or the block Work doesn't return into the brick. Same below. So there is a small downfall to that. So next if you just select the opening on the leaders
29. 6.5 Editing the Walls Profile to create an opening: on. The next method we're going to do is the edits. Profile editing The profile is exactly the same as editing the boundary off our floor. So to do that, go to select our wall on in the contextual tub, there's our edit profile. Select Edit profile. It won't allow me to edit the profile and plan view. It's asking me which view wouldn't like me to go for me to edit profile. So the best view is the section, So C section one open view. If I zoom out, you'll see there again is our single closed loop. That's what I'm going to do is I'm going to draw the opening myself in the draw panel on used the line tool to select the lower end, give a height of, say, 2200 touching to the column bringing back down. Now you can see the three D view there. I have my closed loop, but at the moment these three lines are now just in addition, so if I green take to finish, it will say it cannot complete because of its intersection problems and so on. So I'll click on Continue, Andi, I need to delete this lower segment here, so that lower segment there, I use the spread element to spit. I'm it's removed so that you can see in the treaty viewed a single closed loop so green take to finish and there's my opening again. If I go to the plan of you again, you can see that the wall itself doesn't return in on itself. So what we need to do is to will remove that opening two ways you can either just undo on doing do or go back into the profile editor. Delete what with John. Bring it back to be a closed loop green tick to finish. There's a wall back.
30. 6.6 Adding a Structural Opening to the wall: So the last Met that I'm gonna show you, which is the one we're gonna be using, is going to use the structural opening tool. So, as I said before, the structural opening component is essentially a door. So if we go to our door to again, it's not on the types electricity need to bring it in from the library, so we'll go load. Family Open up the Doors folder. There's a structural sub folder. There's a door opening for us open on the type selector, their displays a couple of different variations. So what we'll do is we'll just quickly place it into the wall escape on. What we're going to do is want to create our own type with their own width and height, so the height will be 2200. But I just gotta work at the wit, so it's going to go between the top column on Lower column to find out the distance between those two columns, I'm going to use my distance tool, which is the little ruler in the quick access panel. So once I have it turned on select from one face to the other, and there's my distance off three meters x. We're going to select the structural opening. We're not going to go to edit type. We don't want to change the prominence off this particular type. We want to remain as it is, so we'll select. Duplicate on First will give the wit 3000 times 2200. That's okay on in here in the dimensions panel we have our rough with which is 95. So we'll change that to 3000 on the height of 2200. Impress Okay, when there's are opening. So the last thing to do is just a position it correctly. So I use my move till because that's an accurate move. Select my start point on finish. So in there, that is now my structural opening. And as you can see, the brickwork returns back into the block. Work on the plasterboard again also overlaps. They're my three d view. We have the nice opening now between the two sections of the buildings when we can have closed down the section view. I mean, when I go back to our ground for a plan. So to do that, we can either go double click here or double 50 Heather, we're back into a ground floor plan. We've now finished with the section view here so we can select it. I hit delete on keyboard. We were given a warning dialog box. Just warnings that were about to do the dissection on the view in the project Riser will also be deleted. So I'm I show that I want to do that. Yes, I am so press. Ok, You see, the sections are gone now from the project rather
31. 6.7 Placing Windows: never gonna move on to the window component. So beside the door component to we have our window component. So going clicked open in the types of actor. We just have one window in the product itself. So we need to do is go to our load family to bring in more windows, so to know which one knows we want to bring in if you go to. Pdf 010 windows, so figure to load family scroll down to the end and there's our Windows folder. It's not important now. Which kind of window you you bring into the project. I lived it up to you at the window that I will be using is down below. It's a Windows triple plane, but again, it's not important. Which one do you bring in again? If you go to the top, you can just use the arrow keys to scroll down. Look into preview box on the right inside to display the different types of Windows. The window that I'll be using is the Window triple plane. I'll impress Open. That's now in my type selector. There we have a few variations off the types we want to bring in two different types into the project we have in 18 10 by 12 10 and 9 10 by 12 10 18 10 is represented by number one on the 9 10 is represented by number two. So I'm gonna select my 18 10 on come down to the bottom half here. So again, like Theodore, you can see that the warning similar touch to my cursor because a window like a door, can only be hosted on a wall. So once I hover over a wall, I get a preview of where the window be placed. So a little trick to know where the exterior face on the window sill off that window is you can tell up by the temper dimensions. So if I hover over the wall having a cursor down the lower half into my temperature mentions air outside. So I know now that when I place this window, the external face of the window is placed to the external side. If I move my cursor above the wall, the temperature matches go inside on my windows. Incorrect. So it was quick ones to place on Zoom in. If you place the window incorrectly. It's not a problem just selected. And there's are flipping arrow. Once the windows in place, though, the temperature mentions do go inside the building. So now what I want you to do is to place all of the 18 10 windows around the building. Just try and get them was equally spaced as possible. Then afterwards, we'll get the nine tens. So I'm not too worried about the positioning of all of your windows because again, this building will be built. It's not gonna We don't have to be 100% accurate, as long as I can show you how you can develop and build a model. Okay, so when you have all of your 18 10 windows placed, then move on to the 9 10 windows. So now we have all of our 9 10 Windows placed the next stage like we did with the doors. What is gonna select one? Rename it again. It's become more parent when we get to the end, of course. So we go to our 18 10 window selected in the Properties Pilot. We're going to go to edit type select rename, and we'll call it W T Dash 01 enter for the 9 10 will select it at a type rename. We w T Dash zero to
32. 7.1 Increasing Top Constraint: We've now created the ground floor plan. We've created the outer footpath boundary, the ground floor slab external walls, the windows on internal doors as well as our internal partitions. The next stage of the project, we're going to build up on create the first floor to get a better view of what we're going to be doing. I'm going to open up my three d view. So up the top here, the quick access panel selecting the three D house toe open up my three d view as well to demonstrate the increase in height. I'm also going to open up on elevation view. So anyone for now when the East elevation opens, I'm going to reposition my levels or select one of my levels. Zoom in, grabbing the open grip. I'm dragging it to the side. So I want all three of my views to be open simultaneously. So what I'm going to do is use my window tall feature by simply typing in wt in the keyboard. So we have our east elevation, our three d view on our Ground four plan. So I want my three d view to be on the larger side. So to rotate my views All select heading wt If the view you want isn't in the correct location again, just selecting the heading on wt. So there's my three d view. I have my ground for plan on my east elevation, So I'm gonna work on my three d view as it will be easier to demonstrate what I'm about to do. When we drew our external walls on the ground floor plan, there was constraints attached to them. So if I was to select one, come to my properties palette on the left hand side, you'll see that my base constraint is ground floor on my top. Constraint is first for level, so my wall, when I place it started on the ground floor on, came up to the 1st 4 level. So you can also see here in the elevation view. It's attached to the ground for level on has brought up on. Does it now touch to the first floor level? What we're going to do is select one side of the building to increase the height up to the roof level while maintaining the left hand side of the building down the 1st 4 level to select the ground. Four walls will select one. You can hold down the control key and then select each one off the walls individually, or we can do a quick select how we do that as well. Cover over one of the walls. It'll become highlighted in blue Well, then click once on the top key that will then highlight all of the external walls that are joined together. But at the moment, they're simply highlighted. They aren't selected yet to finally select, um, one left click on the mouse on those walls and have selected you can see in a three D view . They're all selected the ground for plan as well as the East elevation. Now we're going to increase the height from our first for up to the roof level simply by changing our top constraint. Now that they're all selected will go over to the properties palette, come down to our top constraint. Click on the drop down arrow on change up to all three roof. Any changes we make in the Properties pilot will not take effect until we either click on, apply or simply move our cursor inside the drawing space. There, we see that the constraint has now been increased up to the roof level
33. 7.2 Placing the First Floor slab: Now that we've increased our walls up to the roof level, when are gonna build our first floor slab in the project browser under floor plans, we can now double click on first floor. There we can see our external walls and then below that in like gray. We can see the external walls, the partitions, those architectural columns and so on. That's simply just the ground for underlay this week and turn off how we do so we'll go to the property section, ensuring that were in the properties of the view. If we have something selected, the properties palate will take on those properties In order for the properties pilot to take on the properties of the view, double top escapes or nothing is selected on the problems. Pilot will now display the views properties. Next, we will scroll down to the heading underlay on our first option. There is a range base level on our base levels currently showing the ground floor, which is the grade out outline on our plan. If we select none, we won't see the ground for being spread anymore. Now that we have are clear working space, we can create our first floor slab. Same processes drawing in the ground. Force Lab will goto. Our build panel will select floor again. We have the same contextual TOB. We must select one of these modes to finish how we draw. We have our options bar with the offset on extend into all core. The difference between the first floor slab on the ground floor is obviously we must go to our type selector and change over the slab type. Reason being is we don't want a ground for bearing sub as our first floor slab. So in the type selector, we have four different types to being the ground force lab. The remaining two a person is a concrete floor. On the second is a timber for, so we will select the floor upper 1 60 mil concrete. Next we go to the draw panel when the drawing method we're going to choose is the pick walls. Once we have it selected will just select each one of the external walls. As we are creating a boundary, it's always best just to place it first green take to finish to ensure that everything is in order when we place a slab that has any components underneath it. We're gonna get these pop ups. The problem was saying would you like the walls that go up to this forest level toe attached to its bottom? So when we put in that 1 60 mil slab, any warlike comes up to the underside of that. We want to connect to the underside of the slab, or do you want to cut right through it? So if we select yes, any wall it goes up to that floor will attach to the bottom of the slab. If we select known any warlords below that slab, simply just going to cut right through. So we're going to select? Yes. The next problem is asking the floor or roof overlaps the holiday walls. Would you like to join the geometry on? Cut the overlapping volume out of the wall. What that means is when the floor slab meets that external wall, do you want to slap to cut into the wall itself or not? So, yes, we do select. Yes. Even idea off that I'm going to place a section view. So there we can see the floor slab cutting into that block work. So the block right now sits on top of that slab and comes up to the underside. Well, we can see the partition coming to the underside of the slab. Now that we know that the boundary of that's lab works and everything is OK, you want to go back into editors? So if you can't select the slab like I can't at the moment, come down to select elements by face, which is this tool here, turn that on. So now we are able to select the slab. You can either press enter double tap or click on edit boundary in the contextual top. And what we're gonna do is we will open up this area here because this is gonna be a double height lobby. If you open up the pdf 011 for us floor, you'll get the dimensions off this opening selected here on this dimension. Here's 6388 green tick to finish on again. We'll get the same pop ups. Go to the three d view spin around there. We could see our opening
34. 7.3 Adding a Shaft Opening to the slab: in this scenario to access the first floor, we have opened up that floor slab by pulling it back. This obviously won't apply to every single project by pulling the slab back. Later on, we're gonna be placing a stairs to come up to this lab. This obviously doesn't apply to every scenario earlier on we created on opening in the Wall . What we're gonna be doing now is doing the same method book reading a shaft, opening in the slab itself, sticking with the architecture Tabor in the opening panel. Earlier, we used the wall opening. We're not going to use the shaft opening. It was select that they are green contextual top again. Our molds here to accept or council on a draw panel. Again, we can do by chain offset radius against similar commands. The method that which we're going to draw our shaft today. I'm going to just use the rectangle tool, so select the rectangle drawing on the slab on green tick to finish. Now, if we go over to our three d view, we hope to see the shaft which we created to adjust the shaft. If you hover over with the cursor, we can see a three D visual ization off that shaft. If you can't just hover the cursor over the edge of the shaft, Andi hit the top key. Each time you said at the top, it's gonna find a different component around the cursor. Once the shop then appears, click to select it to adjust the shaft. We cannot use the grips like so to put it right through the building. Or, once it selected, we can come to the property section. I'm we can use the constraints. So, for example, if we constrain to the ground floor of zero, have the top constraint it first floor on increase up by 300 is our shop. So right now it's sitting on the ground floor level, so it's not cutting through the ground floor slab. I change the base. Offset to minus 500. It now comes through the ground floor slab. The shaft opening is best used for your stare cores, risers, smoke shafts and so on. We're not finished with the shaft opening so we can leave it out of the project as we're not gonna be going forward with this
35. 7.4 Selection Filter and Aligned to Selected Levels: Now that we've increased our top constraints, we've placed our first floor slab and created the opening for the stairs. The next stage is to bring up all of our columns as well as our windows. On our first floor loud is a copy off our ground floor layout instead of us going around placing all of these windows again, as well as redrawing those internal partitions and placing those doors were able to use a selection filter to select what we want, then copied to the clipboard. I'm well to pace it upper level to the exact position off the ground floor. What I'm going to do is closed in any hidden windows that I have currently open. I'm going to open up my grand for plan hitting WT for my window tile so we can see in the three D view are changes taking effect. Next, we'll go over to the ground floor plan and will start to use our selection filter. Earlier, I showed you the two different methods, all creating a selection. We like to go to the top left corner, dragged down to the bottom right to make a selection window, or we start in the bottom right, moving up to the top left, creating a crossing window. For this method, I'm going to use the crossing window on. What we're going to do is highlight this side of the building, ignoring the left hand side, starting from the bottom right hand corner, click ones and drag over this section of the building. Trying not to get any of the information on the left hand side included Andi letting go. Once we've made the selection, architectural top appears on our selection panel appears in. There is our filter was select filter. The filter panel here displays everything that's currently selected. It also counts them force, which is a great tool if we're trying to count certain objects in the project. First off, as an example, I'm just going to select my columns. So instead of decelerating each one, I can come to the right hand side on select check non, and then I want my columns to be selected as well as my structural columns. Once I have them ticked on of them, press apply and you'll see that they are now highlighted in blue on press. OK, now that we have all of our columns, highlighters. What we're going to do is do the exact same as we did with our external walls. Were going to increase our top constraint to the roof level. We'll come over to the properties pilot under constraints, go to the top level heading if they drop down arrow and select roof again. The changes won't take effect unless we press supply or simply move our cursor into the drawing they can see on the three d view. All of the columns have increased in height up to the roof level. As I said earlier, the first floor plan layered is a copy off the ground floor plan layout. Again, we're going to use our selection filter, so click and hold. Drag the cursor over the building. Try not to get the left inside again. But if you do, we can de select it. Andi let go. Next, we'll go to our filter. I'm more check none, So everything's turned off. Now we can use our filter to audience the components that we wanted to copy up to our first floor. We've already done our column, so we'll leave that off. We want to bring our doors up elevations. we don't floors. No grid's columns of use. No, we do want our walls and windows. I want to have those three selected our doors. Walls on windows. Well, press supply. Impressive. Okay, But as we've selected walls, both the external and the internal fall into the same category, so they're both highlighted. We don't want the accident wants to be copied up because then they'll be duplicated over each other. So we need to de select those external walls. So to de select a component, hold down the shift key. When you hold down the shift key, you'll see a little negative symbol appears on my cursor. We can then select the external walls and what we don't to be selected. If you accidentally select one of the partitions to re selected, hold down the control key and I will bring it back into the selection. So hold on the shift to de select hold on control. Two included in the selection as well. These structural opening. We don't want to be included as well. This window here, we don't thought to be included as well. So although we have included are our windows, our internal partitions on our internal doors. Once they're selected, we'll go to our clipboard. And here we have our foot on copy. So we want to select Copy the clipboard on all of our windows. Internal partitions indoors and out. Added to our clipboard on our paste. Icon appears now. Have you had the arrow under the paste? Begin to the different options we have. If you choose the paste from clipboard, this is him to just gonna pay. Salute those elements into the clipboard for you to that place yourself. Next is the aligned to selected levels your Europe to paste multiple elements from one level to a number of levels. Next is aligned to selected views, period to paste your selected elements into a specific view. Next is aligned to current future to pace elements that were cutter copied from one view into another. Next is the aligned to same place. This will place the elements to the same place from where they were caught, a copied, and then we have aligned two picks level little pace to selected elements into an elevation or a section view. We're going to use the aligned to selected levels. So we've highlighted our ground floor elements. We then add them to our clipboard. When are going to align them toe our first floor plan so we'll select aligned to selected levels. Then all of the levels that are currently in the project will be displayed within yourself to select. Um, so we'll select our first floor press. OK, there. You can see in the three D view all of our windows internal doors on internal partitions have never copied upto a first floor.
36. 8.1 Stair by Component: So now that we've built our first floor, so what gonna do is one Install the stairs. So first we'll go back to our ground for a plan. On in the architecture top, we have a circulation panel. There's our stare, so we will select stare. So when here we have again are most So we got the red X to finish green, tick complete and one except next, A different type of components. We have Ah, straight stair. We have a full step spiral center ends there. L shape under U shape. These are pretty fine components with the stair there. The UK building regs are built into the stairs. So all we have to do is when we draw our stairs. Why no one ground floor. So the base constraint will automatically be the ground floor. So the next level up will be the next level in our floor. Plans for the project rather so automatically go to first floor. It's going to calculate the goings and risers, referring back to the UK building regs and work out how many you actually need. So that's a quickly place when I'm going to use these straight stairs. Click wants to start, Move my cursor around and you can see if I zoom in in great texture. It says that I've got to rise is created and two remaining. So when I continue, move my cursor, the seats How many have operated on how Maney are remaining? So the finish of you just run the cursor all the way to the end of stairs Click to place. So now we've created our stairs We're still in the editor mode. So to completely finish everything we've got a selected green tick something. If you go to our three d mode. See, there are other stare. So using the straight one If I wanted to draw in a U shape or unusual shape if I click to start, specify how many rises I want to create. So at the moment I've got five click again. So I've done a five run stare. So remaining in the stair creation mode wherever I click again to start, the software will generate a landing between those two points and as another eight, so clicking again, Andi will generate the landing between green tick to finish so I can do 10 steps, clicking again, completing to finish off the 18 green tick to finish. So it's sticking with straight. Run the options I have here in the options bar. I've got more location line. So right now, when we created the stairs the run mistress on the center, we can change it to the exterior support on the left hand side, you run on the left hand side run center, which we've been using the wrong to the right hand side or the exterior support to the right hand side. So if I go exterior support left, you see the location line on the left hand side off the run can also specify an offset. So when I run my location line, it will be 1000 below. I can also specify the wit off my run. So by default it will be 1000. So if I increase out to say 3000 want to make my stairs? The width of the stairs is now 3000 on Last thing is the automatic landing. So I didn't want that land him to appear. Each time I click my mouse, I can turn that off. So with the full step spiral has changed the with. I wouldn't specify the center point just moving the cursor out. Then to specify the radius again. I can change the width offset and so on. Next about the center end spiral. So specifying the center point on the end. Once I stressed by the end and I'll move my cursor on to specify how Maney rises I want to create, I can start again. I'm again. The landing will automatically generate. Then I have the l shaped wind er again. I've got all my options here. But this one would reasonably clicking. Place it same again with the U Shape Wonder.
37. 8.2 Stair by Sketch: so obviously not every building will be the same. We can just stick to those figures of having a meter wide and so on. For example, we're drawing on old existing building that could be 150 years old, where these building regs aren't violent. We need to then create our own specific stare when we can do that by using the create sketch, which is a little pencil symbol there, we can click on that to start to generate our own unique stairs. There are three parts to drawing the stairs, and it's important to do each individual step. So the 1st 1 is drawing the boundary of the stairs, the nexus to draw the individual risers and then to specify the stair path. So first, we must specify our boundary again. We have the typical Joel panel. I just wanna use my line till for this one of draw a line off 40 to 50 you'll see at the bottom of the line and says Zero rises created 18 remaining, so I've just drawn one boundary to the flight. I need to draw the other side so quick way understand, offset it over by 1000. So there we have both boundaries to the stairs. So next now we must draw in the rises to the stairs. So we then toggle over to our riser again we have. Do you draw panel? We have our options bar on a draw in the first riser. First thing you notice is the color difference. So the boundary lines are green. The riser lines are black. Next, I'm going to offset laps, rise aligned by 2 50 and create my run. You could notice every time I'm creating a wiser line down the bottom corner. Here, it's displaying Hemery have created and how many are remaining. So there is the boundary to my stairs and the individual rises. It's very important not to get those two lines mixed up because the software won't know what you're trying to create. So the last step is to specify the stair path I was clicking center. I'm running it up. The direction of the run is an important because once created, were able to change the direction of the stairs quite easily. Green tick to finish and we're still in the editor mode. So green tick again to finish, and there is upstairs. You'll notice that the railing will automatically generate whenever we create a stairs. If you don't happy with the direction, just select the stairs and there's a flipping arrow and also with the opposite direction. So, like all of the components, these stairs are just types, so we can change the stair type by selecting the actual stairs, going to the type selector. And we have some defaults there from Auto desk. So if I that changed from a private stairs to concrete stairs was well, we're creating stairs in the Properties section. There were specify the desired number off risers. We can up the tread depth if needs be, and also we can specify the tread riser start number. So if we have multi story building with multiple stairs, we can then change the stock number here.
38. 8.3 Creating project stair: So we're gonna downs when the creditor, our own U shaped stairs. We're gonna do that by using the stable sketch I've tried to follow along. So we use our star too. We're gonna click on Create Sketch. First, we're going to place our boundary. So when he's our line to to start, pick to get it started entering a distance off 2000. So that was one of our runs. We will now offset that up by 1000. So the distance between them or 1000 the length is 2000 offset it up now by 100 So offset it on the Oprah side by 100 on again, off set by 1000. So here we have one run will create our landing here on to the next run. So if the landing, it's important that we actually use two separate lines for the boundary. So for the landing itself, I'm going to start off with the end of the flight click come out by 1000 like up 2100 pick attacks to the bottom of the flight again. The reason I didn't do that as one continuous line is the software needs to know where the brake is because they're obviously to separate angles. We're gonna create our rises here, landing on, then rises again. So in to close off this boundary section here because this will be our landing space. So last Bhamjee line and close it off. So the dimensions off the stairs. 2000 1000 This here is 2100 2000 based at a 1100 to 1000. Next one used the riser so changing over to the riser, using the line each one. So we're offset again by 2 50 And just to save some time, I'm going to select one hold on control and select the other. So both are highlighted. Use my copy too. Turn on multiple selected previous riser as my start point click on my end point is the next riser. But I can continue on clicking, making sure I'm getting that square symbol meaning that it's a snapping point unfinished so that we have our rises going up the stairs. Our landing I'm rises again. Last is to specify or stare path, start on a flight, then a lot of close the landing again, then a stair path like so. And then I will use my Truman Extend just too tied up those lines. So you concede on the bottom There, I've got 18 rises created, zero remaining green tick to finish. Now I'm still inside the modifier where I could do further modifications again. I can just select the stairs in here. I'm out to change the constraints construction. So whether or not begins with the riser ends with the riser, but in some additional information as well. Finally, I would choose the green tick to finish Go to the three d view. There was the stairs again. We can select the stairs and using the flipping arrow. So we go back to the ground floor and selected. We got the arrow that we can flip the direction. What we need to do is going to select our stairs and want a change. The stereotype. So once the stairs, it's like to go to the type selector. Choose the institute concrete. Lastly, we just gonna place it so open about ground floor. The location of the stairs will be at this point here if you open up. Pdf 012 stair location First. I need to do is to rotate the stairs so clicking on the stand itself rotate to my start point. I'm finished. Then using my move tool snapping to the top left hand corner, flying it over. I'm hitting the upper right hand corner of that column. I want to go to my three d view. There's my stare. So next we just need to extend out that landing so we can reach the top of our stairs. So we go to our first floor plan. Women every select, our floor, Go to edit boundary. If you open up the pdf 013 landing, you'll see the dimensions for the landing itself. So just to get started again, we're just gonna draw a line Not sure of the dimensions, but it best serves to draw in quickly. You can just trim it up, and then afterwards, we can then specify the correct dimensions. So first things first is the 1700 so just make sure that your temper dimensions are actually snapped onto the correct lines. We can change the 17 hundreds 15. So now that we're happy with that green take to finish
39. 8.4 Placing a Railing: so next we need to do is to place a railing around the balcony. So remaining in the first floor plan when you go back to architecture tub circulation panel and there's the rating tool. So it's like the railing tool, and what I'm gonna do is use the line tool another than offset of 100. I'm just going to draw a line around the boundary to create the railing. Now, when I do, I'm going to stop with this column. The reason being if I then draw another line like so they're two separate lines. So if I try to finish, I can't do that. So it must be again one continuous line, so I'll draw that one line granted to finish on There's my rarely. We'll draw another reading on the opposite side of the column granted to finish go into a three D view on they're still writing so that really there is a default again by auto desk . So we can, of course, change that if we selected, we can go to our type selector when there's four different options that we can choose from . Of course, we can make our own
40. 8.5 Creating a Railing: So what we're going to do now is we're going to create our own railing. So how we do that is we will select the default rating. Just make sure you're on the 1100 railing provided by Auto Desk. So just so we're all in the same stop point. Well, then go to at a type. We're gonna leave the type properties for this. We're not gonna make any changes here. We are going to select adjudicate, and I'm going to give it a name off New railing. 1100 millimeters are impressed. Okay, So once we have created the new type, we can start to edit the structure of the reigning. So, one of the construction heading here we have the first on which is rail structure in the value section there will click on edit that'll bring of the edit rails. So to get a preview of what we're doing down the bottom left hand corner is a preview putting. So it's like that in theirs are really on our way. We're going to do is one insert a couple of new railings. I will click on insert. There's only wearing to get a preview of what we've inserted. Will press apply? Guinness was a default profile. So what we'll do is we'll give that a name. Oh, bottom rail. So the next column here is the height of that rail. So right now it's set to zero soldiers on the base. If I change that to, say, 500 clicking apply, see it will go up the Y axis by 500. The next column is the offset, and the offset is referring to the movement along the X axis. Or why type in 100 we'll go to the right. If I had a negative figure to that, it will go to the left. The next column is the actual profile itself. So it's set to the default, which is a 50 by 50 railing if he scrawled onto the handrails. There we have a circular, 30 circular, 40 elliptical rectangle on square, so I'm gonna give you a good guidance on how to create this bullets. It's up to you what you choose. There's no right or wrong for this railing. What I'm going to do is have one bottom rail are fighting 90 zero, offset on the 150 by 50 per supply and that's my reading down the bottom. I want to insert a new Raelian. Call it top rail. The height will be 1000. I will be the same profile press supply. So the last column is the material. This is something. I'm not gonna go into much detail now. So now that we've created are horizontal rails, we can impress and apply for us, okay? And we're back to our type properties. Next over. Ballast replacement again. Click on edit. So the first heading here we have the main pattern. So stop main pattern of what we have that's currently set to the 25 mil square on the distance between them is to 75. So if we were to go into the ballast, her family heading there there we have a few Tiven options. Square 25 20 mil rounds 25 still flat. Right up right on a grace panel. We can, of course, create our own and import ease into this library and select them at a later date. But that's not something Will, too, at the moment. So for the purpose of this project, I'm just going to select the steel flat, upright 50 by 12 if I press supply. So this column here is the base. So it's set to host. If I hit the little arrow, I've got a few options. I could go to the top rail, which is the one that we created just now. A game bottom rail, which we just created for the top element, which is that section there. So for the base, I wanted to start from the bottom rail power supply. You see, it will jump up to the bottom rail if you wanted. Beacon added an offset. Well, see, it's offset up from the bottom rail. Only about zero began saying for the top. I wanted to go up to the top rail with the top off set of zero, and we wanna have 90 mil for the distance between each next below that we have the beautiful options for the stairs. So do we want to use the banister portrayed on the stairs? How many busters we want portrayed? It's on so we can change that. Here. We can also change the balance of family talk on down below. We have the posts, so we have the start post corner on end. So there's our start post. There's our end post on the quarter pole So we have two weddings joining together. What post do you want to be displayed? Somali The Masai ears again? We got the base host offset Wellings again. Same properties is above I'm press OK back into the type properties A couple of prominence that we can change. I have to commend to our top rail heading that you want to use the top rail. Yes. What is the height? What is the type we can have in some additional data as well? So happy with that You press OK Those are new reigning to change over the other Raining again would have selected Goto a type selector on change it over to the new one on for the stairs again we can select the railing. Change it over
41. 9.1 Introduction to roofs by Footprint: the next stage of the project, we're going to start to look at routes. So to show you the different variations of the different roof types, what I know to do just move across to one side, have a blank space. I'm going to draw a couple of shapes using my wall tool. It was copying the same shape crust. I also draw on l shaped building. So there we have typical shape of a building, so go back to my ground floor plan. These walls are constraint from the ground floor up to the first floor, so when we draw the roof, it's going to attach to the first floor. So to draw, a roof will come to the build panel on. There's the roof tool well selected. When we get this warning box, this explains that we've created the roof on the lowest level so you can see we're on our ground floor. Sociales warnings. Do we really want to create on the ground on the lowest level or tried to move the actual roof itself up? Definitely. Drop down arrow, you can see, are so there are levels that we can choose from. So if I select first floor press. Yes, we can still create the roof on the ground floor, but the roof itself will be attached to the first floor level. So now we're in the creation moment. You can see our contextual top appears again. We must finalize our actions by the Red X or green Tick. Here we have our draw panel there before again in the options park. A couple of options. So same like the floor slab. The best option here would be to use the pick walls again. The reason being is it'll touch to the boundary off the walls. So having that selected on a zoom into the first building and just select each of the walls now, I can't continue on selecting each one to create multiple roofs again because they're two separate closed loops. So find out tried to finish. I get the warning message saying I can't so you can only have one of the single closed loops within the roof boundaries. Just a small tip. Best thing to do is to attach to your walls first, create the boundary on don't do any further steps. Best thing to do is just green tick to finish just to make sure that the actual footprint has attached correctly to the walls again, you're saving your time. If you continue on for the next 5 to 10 minutes editing that roof once we go to finish, if there are any issues with the boundary, we've just wasted our time, so I can see the roof has kind of disappeared again. It's because one our ground floor. So if I go to my three d view there, we can see our roof. So I'll just open up my grand for plan. I have a three d view so we can see. So I'm gonna place rooms on all of these buildings. Aiken do this on the ground floor and again was getting that little warning message, or I can go to my first floor plan. But as you can see, I can. I can't see the walls below. This is because of my underlay. So if you come to the underlying heading in the property section, we can change the range base lower to ground floor and will be up to see the ground floor walls. And I can select my roof again using the pick walls, just selecting the walls green tick to finish, same again, just pressing Enter to come back into the roof tool. And then we have our rooms over the building. So now for the first time, just I'm going to leave it as is so have a basis to work from. So I'm gonna move over to the second building and you can notice when I selected to conceal becomes selected in the three D view against because we're working on one single model. So to edit the roof itself, I can either select it, go to the contextual tab and click on edit footprint or weaken Double Top to go into the editor. So the footprint is represented again by this single closed loop. Same liquidy walls on floors. So if you wanted to edit them in any way, if we simply select one, were given some information here, first being the top, that's our slope. And then it's a slope off that side of the roof. We have our flipping arrows, which jumps between the boundaries, and here we have a temper dimension where we cannot an offset. So if I I didn't say 300 it will offset in 300. We can also move it out. 300. So 1st 1 I'm going to do is I'm going to change the slope of this I to 60 degrees on. Also, let's look to the front by 60 degrees green tick to finish. Now you see, Now we have 60 degrees to the front and rear on 30 either side. So I want to move over to the next roof. So with this one, I'm going to leave the rear on front of the roof as 30 degrees. What I'm going to do is create a gable end either side. How I do that, I'll select the line, which I want to change in my options bar here. I have defines Slope, so having that turned on means that I'm able to define a slope. If I own ticket, I'll do both sides so that both sides will no longer have a slope green tick to finish on that have created a gable end. So I'll move onto the next roof. I can do all three to find smoke, so with roofs, as long as you have your boundary, correct the case of running around the footprint of the building assigning the correct slope or on taking define slope to create the roof shape you'll see on the L shaped as well . It will automatically create the hip converge. So coming back to the 1st 1 at the footprint. So I'm gonna add in an overhang on to quickly select all of those four. I can either use the selection window or again hover over one top, the top key and then left click on the most. They're my options bar. I can added an overhang. Green tick to finish. We now have an overhang for the roof. So for the second building there, I'm gonna convert this into a flat roof. How I do that again, I'll select each one of the slopes. Select defines slope so none of the sides have a slope green tick to finish. And there we have our flat roof. Now we don't want our flat roof to extend all the way to the external face. So if I double top to go back in, if I select one of the sides of I usually flipping hours, we'll see the footprint now flips onto the internal face off the external wall again. This is not something that we want. We want our roof to sit on the core boundary, which is the block work. So to add the core boundary into the footprint well, just highlight each one of the walls again. So again, hovering over one line topping the tab key left, click on the mouse In the options bar here, we have extend into wall I corps. So if we take that on no. When we select the line and the flipping arrows will extend inside, sitting over the block work see more clearly here on the ground floor plan. So now the footprint off our flat roof extends right to the external face off that block Work green tick to finish. So lastly, with the gabled end roof, we can see here that are walls no longer meet the underside of the roof. So instead of editing the footprint of that wall on trimming it to the underside of that roof, what we can do is we can select the wall in the contextual tab. There we have modify wall and there we have attach top slash base. So I select that once I select the tool, the next stage is to select the roof. So where you want thought, Walter, extend up to animal automatically extend up. You can see as well the we need to extend this of us well again. Select the wall. A touch top base. Select the roof. I'm same with the other side. Select the wall. Select Attach top base. Select the roof on. Same at this side when we can do for this roof as well. So again, our roofs are just simply components. If we select one of the rules, we can go to our type selector and we have a couple of default roofs. So for the pitched roof will, obviously was the two pitched. Now we have one flat roof that we can change too flat.
42. 9.2 Pitched roof by Footprint: Okay, so next What we're going to do is we're gonna odd a roof to, ah, lower ground floor section here. To do that, we'll go to our first floor plan. If you can't see this section here on the first floor plan, you can go to the underlay section on, turn your ground for plan on or again simply, you can go back to your ground for plan. When you activate the roof to you will be prompted with that warning box. Do you want to start on the first floor? So we'll do that method now. So select my roof, too. I have my low most level notice on one. Yes. So because we have our columns around the outside of the building, which we want our roof to sit on, we won't use the pick worlds tool because the pick walls tool wants to attach to a wall. It doesn't reference a column, So what I'll do is our first. I'll do the pick walls tool so you will see what will happen. It doesn't eat some tidying up so green take to finish to my first floor. So now I know that my foot print is Okay, So if I extend that out to the outside of those columns granted to finish, I go to my three d view. We see the side of the roof there droops over so it's attached to the wall. Anything that that then goes past it, the slope will follow. So that's where we're getting this unusual shape. So we'll select the roof until leaders go back to the ground floor. And now we're going to use the roof tool again. Yes, we wanted to be on our first floor, so this time we're gonna just drop by a rectangle, So have any connection to the walls. So we use our rectangle to come down to the bottom. Writer was roughly place it over the columns when we can. Finally, just afterwards. So I used my rectangle tool to place it over the columns, touching it to the face of this exterior wall. Touch it over to the outside of the columns, so I just click to selected and then dragged it until the touches to the outside of the column. Once it's on the face of the column again, I'm gonna select it on moving out by 300 so to do that, I selected one of the lines. I went to my move to just clicked anywhere on the screen for my start point move the cursor in the direction I wanted to go on. Then I entered in 300 again for the lower end. Select the line used to move to click for my stop point and moved down 300. So if you want to refer to the PdF 015 pitched roof, we'll get the slopes for this roof itself. So starting at the top, our slope is 15 and the bottom is also 15. Left hand side is 60 on the right hand side does not define the slopes that will select the line. Come to the options bar will take off. Defines slope. You'll also find this information in the properties pilot here on the left hand side. So there's are defined slope weaken ticket on. We cannot offset. It's also telling me the current slope in length so green take to finish, not go to the three D view on there. We have our roof. Next. I'm just gonna change it to a different pitched roof time, so I'll select the roof. Come to my type selector. Select the drop down arrow and I'm gonna use the last roof pitched 38 tiled 25 Batic century.
43. 9.3 Flat roof by Footprint: So next I'm going to put a flat roof on the main section of this building so we can go to our roof plan. And again, if you don't see the lower walls will just go to our property section, scroll down to underlay. Change our range based level to first floor. Next will select a roof tool for this. Yes, we will use our pick walls tool and we're gonna draw flat roof. So I wanted to extend into the wall core also to speed it up. I'm going to tick. Define slope off because again it will be a flat roof. So I'm in the walls too. Using my pick walls. I UnTech defines slope I take on extend to walk or I'm all right. But we can also change the the roof types of change to roof flat felt So now we just select the walls themselves before we do anything green tick to finish. OK, so the footprint is okay, So I will select edit footprint to go back into it. Just a double check. Everything's okay so that we can see it inside the corps boundaries, so that's exactly where we want it to be. everything looks good if it's not just selected and use your flip hours green tick to finish, have you go to our three D view? There's are flat roof, so the last thing we need to add to this roof is a power pit. To do that, we're going to select each one of the walls, getting quick ways. Toe hover over one, hit the tab key left, click on the mess so all of the walls are now selected and we're just going to adjust the constraints. So we come to the properties palette. Our top constraint is set to roof level, which is perfect two. Below that we have top offset. So what the top off said we cannot A. We can increase the height of the wall above the roof level, so it's, Carney said. 20 If we change that to 1000 press supply and I will see our wall will come above the roof . So just added our power pit to the roof so you can not notice that the walls are just disappearing into the roof. There's no definition between the two, so we can change that. We can go to our modified tab in the geometry panel we have joined. So if we select join, I might also take on multiple joints so we can do it multiple times. It's a case of just selecting the roof, selecting the wall, selecting the roof, selecting the wall. We can run around the building. UN escaped. So now we can see a definition between the two. So I'll do is I'll just highlight the roofs that we've drawn on Lytham.
44. 9.4 Roof by Extrusion: next I'm going to show you is a roof by extrusion. So we've just drawn roof by footprint. So in a plan view we've drawn the footprint. We've made it Have a pitch, be it flat roof and so on. So we can also draw unusual shapes by using the extrusion to so first thing again, I'm just going to draw, draw small shape. This will be my building for the roof. By extrusion, we do not draw in a plan view, so we'll need to either go into our elevation view or section view. So I'm gonna use my section view if the section views point in the wrong direction to select it Hit the flipping arrow, double talking on the beak to open up the section view on there's thes side of my building . So with the roof to all of you to drop down arrow, we've been drawing roof by footprint. Next is the roof by extrusion So I select that So next it's asking me what work plain do I want to work too? So because we're working in three D, it wants to know what surface on my working from So what we can do is we can pick a plane, okay? And then selecting the face off that brickwork. Next. It's asking me my roof reference level and offset. So, yes, I want my roof to be on my roof level with no offsets or press. OK, so we're now going to draw our extrusion shape on how the extrusion works. It will draw one single line again. It will be represented by a pink line so it doesn't need to be closed. It would just be one single line, like we drew the railings. So never got to create the roof profile just again using our tools from the drop panel here . What I'm going to use is the spline tool. So this blind to is very much like car. So every time we click, replace a vertex which will then credit curve between each one of those vortexes. So we'll click to start. Every time I click, I'll get a small curve between each point finished, enter the finish. So there is my profile. When I hit my green tick to finish the roof itself. What extrude out on? Because we said our reference plane on the face of that brickwork will go in that direction . Green tick to finish there we have our roof extrusion using the grips again. I can extended out or retracted And of course, I couldn't double top to go back in to change the shape of it. If it's not satisfactory as well, we can select it. Goto our type selector and change the type.
45. 10.1 Introduction to Curtain walls: the next stage of the project, we're gonna be looking out curtain walls. The curtain wall is an exterior wall that is attached to the building structure which does not carry the floor or roof loads off the building. So to get started with the curtain wall, we'll go back into our build panel on the curtain wall is within the wall to itself. So selective wall To what? The type selector we see the first heading there is our basic wall which we've been using the internal external walls from If we scroll down the next heading here is curtain wall. So we have to re options. We have a kurta mall, empty curtain wall, exterior glazing on curtain wall storefront. So the curtain wall empty. It has no grids. It has no mullions. There are no rules associated with this type of wall. This wall tie provides the most flexibility with the curtain While exterior glazing This one has presets. So the grid rules can be changed. If the settings are not suitable. Next down is the storefront. This also has presets. This curveball not only has presets, but it also has millions attached to them. Begin the grid on the 1,000,000 rules can be changed if the settings are suitable. So I'm gonna select the credible empty you see here. I got my contractual top. How I could draw the curtain wall itself. I've got my options bar again. Just like praising him also against best find the height depth. What? Never. I wanted to be constrained to my location. Nine. Chain on senate. Someone I want to get to the front of the building Just click. Wants to start look again to place. That's my empty kurta. More so if I hover over the curtain wall I'm giving this hate type symbol that in itself represents the actual curtain wall. Later on, we're going to be adding in millions glazing panels, doors and so on. So if you ever wanted to click and drag the curtain wall somewhere else, that is the symbol you look for because you can actually grab a 1,000,000 pull it away from the curtain wall, leaving the actual curtain itself in the same position. So that's the symbol that we want to look for. So I trick that can drag it around. Well, once it selected your notice, we got to grips. We have our temper to mention where we can change the with only also the permanent dimension as well. We have the flipping hours to flip it inside and out. So next I'm gonna place the curtain wall exterior glazing so back into the wall tool Come down to the exterior Replacing this place is the same and as well, a place the storefront once a place I want to go into my three d view So on the left I got my curtain wall empty The middle is my curtain wall exterior Glazing on to the right Is my credit more storefront So again each one like same like the empty They've got the same properties where in my plan view if I select each one again But the temperature mentions permit to mention flipping arrow And if I wanted to move and try again it's the same same properties If I wanted to change the height selected as long as I have it unconstrained So at the moment my top constraint is first floor So if I click on unconnected how you have my blue grip that I could just extend it up Same with all three, So I noticed the difference between the three. The empty is obviously empty, the exterior grazing house, but we called line segments, but it will equally spaced those segments as best as possible on with E storefront. It has the segment as well. We can easily attach our millions to it, and you'll see that there are equally spaced as well. So to go into the exterior glazing, if I select the curtain wall itself again selecting the actual curtain wall or get this representation of Rennes or get that dashed blue line around it selected come into my property section here. If I scroll down and help to change the vertical grid in itself. So it's justification. It's angle and offset is what is the horizontal grid. For further go into the edit type in here this again, more prominence for me to change. So with the vertical grid, the layer itself, we could have a fixed distance, so always equally spaced them all. We can also change to a fixed number of maximum spacing, minimum spacing, the spacing itself. This is where we can adjust it so we can change out to a meter so all would be a meter between each one saying that the horizontal grid for the vertical mullions horizontal millions we have to change the actual profile off, which, when we put in on the same identity data that we can add in. So, for example, I can select the storefront. Karen and I can change the angle so it's 45 degrees so we can change the angle of the segments themselves. So that's the basis of the curtain wall. Um, when we're creating our own curtain wall, which we will do on the empty section here, what we'll do is we'll place segment onto the curtain wall, which are these dashed blue lines. Once those dashboard lines are placed onto the curtain wall, then it will divide that up into what I called panels on each one of those panels. We can change so by default would be pleased we can change him into a solid panel on as well. There's multiple family types in the Bible that we can change them, too, so that could be a window that could be a door someone. And then once we've done the panels in the last stages to attach a 1,000,000 to that
46. 10.2 Constructing a Curtain wall: So what I'm going to do now is I want to take the empty curtain wall. I'm gonna attach a couple of segments to that, change a couple of panels within those segments on, then attach millions to those segments. And then once I've shown you that we're going to create three different types for our building first is we must select it. So I'm selecting the curtain more empty again. I don't want to make any changes to this actual criminal. Empty swimmers create our own. And to do that work, click on at a type ju pick eight. I just call it cut more test. I'm press. OK, so now that is now our curtain wall that we can do whatever we want to it. So first things first is we will attach our segments. Which again are the dust blue lines to do that were in the build panel, and then we have curtain grid, so select the curtain grid. So when I hover over the vertical side of the curtain wall, I'll get a horizontal segment. When I hover over the horizontal side of the curtain wall, I'll get a vertical segment. So I am. We can just click to place, just putting the men randomly front out so that there are segments again with the segments we can select them, use my arrow keys and I can shift them around. We can, of course, make them equally spaced on. We can do that using the aligned to mention tools we've done before. If there's an area where I want to segments to join together, what I can do is I can select the segment I want to edit. When I do that, the contextual tab will appear with a curtain grid panel, so select add slash remove segments, and then I just click and you'll see that the two panels of I've joined together to bring a backup to select the segment again. They're now back to being two separate panels. I could run up the curtain wall to remove those sections off the segment. So once we're happy with our segments, the next stage is to adjust the panels themselves. So when we hover over, all we can do is select the segments. So in order to select, the panels will hover over a corner, hit the top key and continue to hit the tab Key until the panel I want selected becomes selected. Click once on the the mouse for it to become selected, then you'll see in our type selector, it is saying System panel placed so we can change it over to a solid if you want. If we change over our visual starts a realistic, we'll get a better view of what we're doing. So I commend to the visual controls here under selected The Realistic Mode. And then the last stage, then, is to apply millions to all of the segments. So in the build panel was the last one there, which is 1,000,000. We'll select that we have three different ways we can apply. The millions weaken do grid lines, so every segment that we click on will credit grid line or we can use the grid line segments or just every little small segment section becomes a grid line or we can use the all grid lines. So I just highlight on it will select every single segment to them, become a 1,000,000. Okay, so that's the basics Off the curtain wall
47. 10.3 Curtain Wall Entrance: we're going to do now is going to create curtain walls together. So what I'll do is I'll just select those and delete. Um, go back to my ground floor plan. I commend to the front of the building just so. Or it could be on the side. It's up to yourself. So you have a clean drawing space. When I get to our wall tool, we're going to select the curtain wall empty. Before we draw, we're going to go to edit type Jew prick eight. We're gonna rename to curtain wall entrance for us. Okay, on and just place it. Okay, So for this curtain wall, these will be the dimensions of the curtain wall. So first off the with is 6445 So will change the wit of our Kurt Hummel 26445 Now that we've only with the next step will be to create a section view right in front of our curveball. So we get a nice, clean elevation off the curtain wall. What I'll do is just reduce the adept of you so we don't see any of the building behind and double tap the week. Just open it up and there's our curtain wall. So our high tears six meters or 6000. So what we'll do is we can select our curtain wall, come to the properties section, change our top constraint to unconnected when we got two options We can change the own connecting height here to 6000 or once be change our top constraint on connected. We can use the temper to mention here. So I, with his 6445 are height is 6000. So next we're gonna add in our segment. So the first we're gonna do is out in the center one. So to do that, we'll go to our curtain grid, hover over the horizontal edge on we'll get that vertical segment. I notice my temperature mentions are already equally spacing Mike Me either side. So I know that that segment is centered. So click once place off for a segment. Next we have either side by a meter so we could go curtain grid again. Just placing them either side. I'm once they're placed, will then select it change the temperature mention 2000 either side, then the next vertical segments are equally space between the remainder so again when I hover over the horizontal section from getting an equally spaced segment either side. So next we're not in the 2200 up 500 up 300. Same again. 2200 up 500 up 300. So curtain grid over. Over the vertical side first dim is 2200 up 500 up 300. And then again, 2200 up 500 So that we have up 2200 or 500 3 22 105 100 300 Lastly, there were just remove this inner segment here, so we'll select the segment wanted selected them. We get the ad removed and select the area. Want to remove? So that's what I'm gonna do. Is one out in a panel a different panel in here. So in order to select the panel over over the edge, just click on the tab key once at a time. Ondas running through each one off the panels. Once a panel that we want to change becomes highlighted in blue click ones with the mouse to make this election. So we go to our properties palette there on the type selector under system panel. We only have glazed and solid, but we want to import more from the library. So in order to do that double escape, go to the insert tab at the top. Then we'll go to load from family almost like load family. So it's the same UK library we've been using from before, some of it into curtain wall panels. I never have a couple of more panels, so there's an empty glazed, multi glazed or pick and so on. So what I want you to do is to select any one of those double doors again. It's not important which one. Or you could select the revolving doors up to yourself. So I used the any one of the double doors. I'm going to select the 1st 1 cross okay, announced in our project. So now we just have to select our panel. We're gonna wanna hover over that segment, selecting the tab key until the panel becomes highlighted. Left click with the mouse on out selected. Go into the type selector and there you can see, is our glass double door. So select that again. Don't click on the gray section here. That's just the heading the actual component is just below it. So select on their way Ever panel changed that We go back to architecture Tub on last, we're going to apply the millions to all of our segments. So select 1,000,000 again. We could do it individually. Everyone wanted to weaken go all good lines. If you go to the type selector, they'll see the different types off millions that we can select again. It's up to you if you want to choose something different, but I'm just gonna stick with the 50 by 1 50 again. If you want to use something else that's okay. I'm going to use the all grid lines, selectee segments and I said, We're done. So go to our three d view that there is our curtain wall. So the last thing to do is to just inserted into the building. If you're below the pdf 017 Curtain walling, you'll see the position, all the curtain wall itself. I'm going to let the section view so again, remembering when we want to move the curtain wall, you've got to look for that hate symbol. Click on that is the curtain wall itself. Then you can click and drag, so I wanted to place it in front of the wall. So if I now click and drag that onto the wall, the current wall will just disappear into the wall will say that the heart of walls overlapping and so on. And if I go to my three d view, we can't see the curtain wall because it's inside the ball. So there's one last step that we need to do to make sure the curtain wall cuts out the wall itself. To do that, we'll select the Quran wall, go to edit type on 2nd 1 down there, automatically in bed. So right now it's got no tickets, not turned on. So if we take that on for us, okay, and now when we drop and drag it into the building, it'll automatically put at the wall. To make the final adjustments, you can again make sure selecting the hate symbol, use the arrow keys and shifted up and down left and right. So the final position off the credible is an extremely important, so just get a roughly where you want it to be, because the our accused to shifted left and right up and down. So on the door itself is an act of door. So if you click on it, we have our flipping hours to flip the door inside and out, and we want to then copy this curtain wall from this position over to do the wall as we have in the pdf. So again selecting the curtain wall using the copy tool. Copy it out and then second it again, using the rotate tool rotated around and again, Click Dragon job. That's our first curtain wall.
48. 10.4 Curtain Wall Rear: So the next credit Wallace to the rear here. So we'll start the same process over again. We'll go to our wall to curtain wall. Also liked empty. Well, then go to at a type duplicate renamed to curtain Wall. Rear for us. Okay, on. Just to save us in the future, we're going to automatically in bed and turn that on now for us. Okay, well, then we can draw a curtain wall. So this here is the footprint off our curtain wall in this one, we actually have a curve. The first thing we're gonna do is we're going to get our wit on. Ah, height corrects or with his 52 to 3. So will select the change our witch to five 2 to 3. They will place a section view in front of the curtain wall, flipping it around again, reducing the depth of you If it's in the building. Double tap the big. From there, we have our curtain wall, so the height is six meters. So we'll select our curtain wall, come to our top constraint, select unconnected change to six meters. So to create this curve as you'll see here, the lines are pink, and that is the footprint off the curtain wall so we can select the curtain wall, go to edit profile. I'm going to use my fill it arc tool with the radius of 4000. So is my fill it arc tool with the radius of 4000 green tick to finish. And then next. This is what we'll do again. Same like before. Not even the segments up. 2200 503 100 off 2200 503 100. So for the center point there, So we get a meter either side, so we'll go to our curtain grid. There was a select, our first segment, equally spaced, correct and then a meter either side and then up 2200 503 100. And so on. So 2200 503 100 of 2200 503 100. Next, we'll remove this inner segment here. So again we'll just select the segment I'd remove on select. And again we're gonna put in a double door here. So to select a panel so hover over the segment hitting the top key once it's highlighted and selected, then go to our type selector changing over to a double door. I'm finally place millions. When you see all grid line click. You gonna get some issue here? It's only because of the curve. It's not a problem. Just press escape. So last thing to do is to go back to our ground for plan. We can select it. Click and drag on, drop it into place. There we have our curtain wall to the rear. So when this level here Europe to see the slab behind the glazing, so what we can do is we can actually change that panel to a solid panel So you could do with a three D view again. Just putting the cursor over the panel, selecting the top key until the panel becomes highlighted. Click with the mouse. We can change it over to solid. Same again tab.
49. 10.5 Curtain wall front: Well, then, one Mawr curtain wall out to the frontier. So again we'll go to Wal. Selecting Kratom will empty at a type Jew pick eights. We'll call this one front pressing okay, automatically in bed will turn on for us. Okay, So with the in the options bar, we will change straight away to unconnected on the height is 2600. So we can change unconnected hide straightaway to 2600 on bill draw on the weight is 5700 So selected change on which to 5700 And then lastly place a section view in front of our curtain wall changing the depth of you. And here we have our second. So first off will do the center one. Then again a meter either side And then he critics based between again next on the horizontal We have equally space in between and then 400 above once we haven't drawn in. Then we can delete these inner segments here on the outer sections here. So it's like the segment Click, click Delete. So like this segment, click, click delete on this one. So, like the segment click, click, click, Click Next We'll just again put in that double door, so again hover over the segment. Top top tab unchanged to class door on than applying mullions. It's rectal eat, Select the Cornwall click and drag drop, and then this. Position it again, just using the arrow keys and sat to shifted around.
50. 11.1 Introduction to Reflected Ceilings: So now we're gonna look up placing ceilings in our building. So when we've been building our model and say the ground floor, we've been using the ground for plan in our project browser to create our seedings. We should talk it over to our seating plans, expand the seating plans, and there we have our ground first on roof plan. So you double clicked. Open up our ground for plan on the ceilings. Ground floor plan is simply the actual ground floor plus 2600 by default above. So our ceilings, When we draw our actual ceilings on the plan, they will automatically be placed 2600 above the ground for level. We can obviously a adjust this after we've place it. So the place, the ceiling, we'll go to our ceiling tool on here. In the contextual tab, we have two options. One being automatic ceiling. This second is sketch ceiling. Well, the first thing we're gonna do is go to our type selector and change over our ceiling type to a 600 by six under grid. Here in the property section, in the constraints, you can see the level were working on his ground level on our height offset is 2600. So when there is where we can now change the height of our ceiling again, we can do that after we've place it. At first, we're going to start off using the automatic ceiling, and then afterwards we're going to use the sketch ceiling where we cannot place the automatic ceiling. I'm going to select my automatic seeding. Zoom in here to the left on side of the building. When I placed the cursor inside the room, you'll see that there is a solid red line that showing that I can now place that automatic ceiling without any issues. Same again for the right hand side. If I now go for this more one on the left, you see that it's spilling inside the other room, and if I zoom in, you'll see an issue is with the architectural column. You can see that the red line is running around the inside of the room. Want to get to the architectural column? It spills into the next room, so there's two ways we can get around this one we can other than go to UC sketch ceiling or we can click the partition on, pull it over to the external wall and then we go to use our automatic ceiling, were able to place it then afterwards just pulling back that partition. So again with the automatic ceiling again, If I'm going to use it in the lower end here, it's gonna spill in. What I can do now is I can show you to how to use the sketch ceiling. So it was talking off to the sketch ceiling again because we're placing a boundary. Were inside the boundary editor where we've got a right ex green tick. We have our draw panel here on our options bar so we could use our line tool just a tracer on the outside. We can also use our PICC line till or pick wall pick wall till May or may not give us the right edge as well. Is that the right boundary? So what I'll use here is the PICC line till on the selectee lines around the boundary of the room. Then afterwards, we just need to do some tidying up because there's too many lines and giving most of that single closed loop. So is Truman extend there we have it just green tick to finish. Move to the next room ceiling again, try to place the automatic ceiling. And again, we've got an issue with the architectural columns, both here and here. So what I could do is I'm gonna drag that over to the external wall. I'm place the ceiling and then dragged them back against continuing on doing each one of the officers again for the lower right Andrew, make any concedes spilling in past that architectural column. So for this one again, I'll use the sketch ceiling. You see pic lines on a run, a lonely inside face off the room on, then trim to finish. So for the lobby, I don't want to place us healing in the entire lobby because remember that this here is an open area. So if we go to our ceiling sketch and we're gonna run a ceiling underneath the walkway here , I'll just trace around it now with the line tool. So just running around the inner boundary for those curves, I'll use the PICC line. I went back to the line till never have so that there will be our ceiling green take to finish. To get a better idea, can open up the pdf 0 to 0 ceiling
51. 11.2 Adjusting the Ceiling position: so that there is our ceiling grid mapped out of 600 by 600 and when it's placed, it will automatically center the ceiling griddle automatically. Space both ends. If you wanted to adjust the position off the ceiling tracks, select one of them on Ebola, Susie Arrow keys and we can shift him around. So if you wanted a 600 tile to be right, that in the corner can use the move tool to shift us well. If you want it all of the seating tracks to run through and be in the same position as the next room, we can use the align to as well, so we'll select the Align tool. Select a reference line on what we want to move to it.
52. 11.3 Creating the First Floor Ceiling Plan: so I'm going to go up to the first floor plan on a game will put in the ceiling so you can try automatic ceiling where you can on where you can't use the sketch again. You can open up the pdf 012 ceiling.
53. 11.4 Adding Components to the Ceiling: next we're going to do is go back to him to the ground for a ceiling plan, and we're going to touch some light fixtures to the ceiling itself. To do so. We go to the Bills panel selectee component in the types of doctor there. There's some components already loaded, but we don't have the light fixtures loaded, so we go to the load. Family got into lighting, architectural internal, and there we have all over different light fixtures. So as we have praised a ceiling, we don't touch light fixtures that have been designed for the ceilings, like these few here. So the floor lamps will only attached to a floor and so on. So the light that I want to insert is the trough for is down towards the end. Select open on. If I go to the type selector, there's a truck for on. What I want to use is the 606 100 on four lamps. It's just kind of your standard office light and just roughly put it onto the grid. Once is placed on the grid and then lose my move tool to place it more accurately. On that, I mean a copy it like So. So there we have a couple of light fixtures fitted, and I was there, all attached to the ceiling grid themselves again if I just click on the great itself. So any one of those grid lines and using my arrow keys, you can see I can shift the ceiling grid on the lights because they're fitted to that ceiling grid will move with it. So how does continue on placing some more light fixtures around the building? Okay, so that should be our ground floor set up again. You can copy them up to the first floor. Why again? Using the same process we used before. So if we select one of the lights you can right click go to select all instances, Invisible view. Then using the shift key, I could hold down, shift, click and drag on, do select all of the lights on the left hand side and then copied to clipboard and then pace it to the first floor. There. We ever like fixtures on the first floor for the lobby. What I'll do is all hang some pendant lights, which again are just in the lively. So we'll go back to the component on the architecture tab. We'll go to load family lighting, architectural internal. We have three pendant lights. I'm gonna use pendant light number three. So with these, I'm just going to play some randomly, like so next. What I'm gonna do is go to my three D view and there's my pendant lights. But what I want to do is I want to individually select them. Andi increased their plant to get a better view of those pendant lights in the lobby. What I can do is Aiken Press double escape. So when the properties pilot, I've got the properties of the view, I can then scroll down to the extent heading on tick on section box. What that does is it puts a section box of round the entire project. And when I selected you see, I've got some grips which I can pull back on. It opens up the building for me. So it's just a nice, easy way. Teoh chop the building up or to get a nice view inside the building. They can see our ceiling partitions running up to the underside of the slab, sitting on top of the slob. And there are pendants, so I'm gonna do is just simply select dependents are moved on to the dimensions in the properties. I'm just increased the plant. I'm just going out in some random lens for these pendants. Just give a nice feature like So. So then to turn that section box off, just go back into the extents ticket back. I never back to a regular three d view.
54. 11.5 Example of Rendered ceiling components: so all of these lights that we have placed in the drawing are actual active lights. What? That means we can turn them on and off. So when we go to create three D visual renders, we have full control over those lights. We also can control what color they emit. How maney lumens wattage so on. So just to give you a quick idea off that what I'm going to do is go to my ground for plan . I want to place a three d camera. It's not something I'm going to go into much detail now. We will cover this in the course. - So there you can see in the quick render that each one of the lights are turned on in there. Remember to control each one of those lights so I can turn them on and off. I condemn them down and so on. It's not something we'll go into much detail now, but just purely just to give you an idea of why we place those lights
55. 12.1 Setting up a Callout: So now that we've built the basics of the model, we're now at a stage that we can start to detail what we've drawn so any kind of junction between a floor, a wall, roofs and so on. We can start a detail on a scale of 1 to 51 to 10 but again as well. Working with one single model, we don't need to redraw where our floor on wall intersect. We conceivably pull that information out of the model toe work on. So what we're going to be using is something called a call out. You can either use the call it in a plan, view or section on what will be using today's will be using a college on a section view. So you want to come down to the bottom right hand corner off the building, place a section view through the building like so want to place the view will double click on the beak and what we're going to be adding detail, too, is this section here. So where are floor intersects our external wall? We'll also be adding some detail to the window head. So how we can place our call that view. We will go to our view tab at the top in here and there creates panel. There's our call it. So we have two different options. Here we have the rectangle. We also have sketch so we can sketch a unique shape for our call it what we'll be doing today. We're just using the rectangle. I want to catch the rectangle like I've drawn and there is our coloured bubble. So what I want to do is just bring the collar bubble over to the left hand side. So it was clicking on the grip. Just click and drag over to the other side. The group in the center allows me to outer landing to the call of bull so that there is an actual view in itself. If you come down to our project browser under our sections heading, there's a section one would be placed on the ground for planned on the bottom right hand corner, and there's our section one colored so double top that will bring us into our colored view . So the first thing we need to do is just change the scale. We don't want to scale to be at 1 to 50 we get out to say 1 to 10. Next we go to our detail level will change over to fine so we can see the different patterns off the different elements. Now how we cannot detail to this view if we now go back to the annotate top of the top, we have our very own detail panel in this detail panel will allow us to draw in this two d view so we'll be able to draw lines hatching these components here. They will bring us into the library where we can select two D components or they're no longer three d component there now to de component. We cannot in revision clouds with the revision cloud when we will place a revision cloud on a point of which we've made a change to the drawing. So when we place our vision cloud, we can out information to the actual revision cloud, which will then appear on the revision box on our sheet detailed group What that is, we can get multiple components, singular components and group them together similar to like a block in card. So there, together as a group that we can move around on insulation we can add in our insulation
56. 12.2 Masking and Filled Regions: So what the detail line will cover that in a few moments is a bit more information that we need to do before we can use the detail line we're going to do to get started. We're going to go to Masking Region will be our first tool that we're going to use. So under region hit the side arrow, there's are masking region. So when we open that up again because we're in a or creating a boundary, we got to read X green tick as a draw panel options bar. What we're going to do with this masking regions were simply gonna mosque out the hatching behind, so it doesn't appear, and I can do that using my rectangle tool. So I'm just gonna go over the hatching and I didn't notice I'm going above the crop view, but that doesn't matter, because if I do go above it, it won't be visible on this. Move it out to be in line on same with the other side. So first thing you notice is the lines actually black, they're not pink. So if they're black, Aiken have multiple lines that aren't connected in the same action. So my green tick to finish. What I've done is I've masked the information behind it. So as well as region masking region, we have a filled region which is just like encounters are hatching. So again, once we entered, we've got the green tick Red X, a draw panel, our options bar. So what I'm gonna do is use my use my rectangle again to draw over the concrete slab romantic to finish. And there it gives me a crosshatch Phil so I can select that. Go to my type selector and I'm able to change that. It true different types. What I'll do is I'll just make it a solid black. So all I did was I selected the hatch one to the type selector, and I changed it to a solid black.
57. 12.3 Detail Components and Repeating Detail Components: so another. We've mastered the hatching behind. We've added a hatch over the concrete slab. Next, when we're going to do is gonna I didn't components like our brickwork, so I got out in brick and run it up the building and same with the block work. But instead of bringing in one brick and copying it up through the building, what we can do is we can use a repeating detail component by default. The brickwork will be selected on Also make sure that it is a section brickwork because we also have a plan. Brickwork, so obviously in plan view will use the plan. So there's our section brickwork in the drop panel, just the two different ways that we can place the brick next. What is attached to the top of the window head. Run it right up the building again, just clicking outside of the crop view because again it wont be seen. So it's not important. I'm not. There is our repeating brick, so we'll do the same for the block work, so it's block work 100 millimeters, and that's our block work. So now that we have used the repeating component, we can now just go to a detail component, which is just the single elements. So then go to our type selector. We can see a few different different components we can choose from. First we're gonna use there is the wall tie so detail item, multi section, pull it out and displace it between the brick on the block. On that I can I'm gonna copy it up. Like so as well. All the components that we can use if they're not in the type selector we go to our load family once or in the library will go to detail items on in here. This is all of the two D details that we can choose from. So the one I'm going to go in to choose from is in the F Masonry folder thing into F 30 and there's lentils. I'm gonna choose the open back, steal little on here. We have a menu to choose the type off little that we want to bring in. So we have the different columns there. There's our inner Leif with cavity on the external toe length as well. It's a depth. So our inner Leif with is 100 millimeters on our cavity is 95 so we'll scroll down because they were on 48. So if you come down, 88 will do. So we come up to 188 when we can choose the 1 40 So the one I'm going to use today is the c G 9100 by 1 40 So the inner Leif 100 cavity with 88 external told that 95 depth of 1 40 press OK and I can drop it into place, I want to say and then again, just using my our keys to adjust its position. Well, what I'm gonna look for is a window head section, so go back into the component load. Family detail items l for Windows L 10 on 3rd 1 down. We have Peter Adams fixed window head section open in place as well. If you go back to the component load family detail items. If you go to K linings, she things dry, partitioning que 10 and in there we have the gypsum sheeting section open. I'm a choosy 12.5. That's okay. Like so So that we complacent over the existing possible that's there. So as well with the ceiling here, we can go to again, back into component. We have a ceiling tie with ceiling board, so there's are suspended ceiling section, so we have ah, suspended ceiling section. The ties are a bit too long, so we just have to go to selected edit the type. Go to suspension cable lent. So if you choose it down to 135 Ondas well, we can go get ceiling board so open. No, he is the 19 by 600 by 600. You can place it in, so there's a lot of different detail. Items in there in the component section shows a case of going through one day and seeing what's in there again. These are just supplied by auto desk over time and start to build your own library, and you can save that in a separate file. Access it through the load family as well. There's multiple, different family types we have to download from the Internet, but any cancer to develop your library itself
58. 12.4 Placing Insulation: So next we'll look over the insulation. We have our draw panel. How? Weaken. Jaw it in the options bar. This is where we can specify what insulation we're gonna insert. So the moment we've only got 45 millimeters of insulation, we don't to be chained or having offset. We will change the location line to near side, zoom in to this point on this again, run up through the building.
59. 12.5 Using the Detail Line and Creating a Line Style: So next we'll look at the detail line. So back in the detail panel, we have detail line. So this is where we can draw detail on soul, just basic lines that's gonna be used in the two D view. If you wanted to draw something in a three D view, you have to use what's called a model. I'm so when drawing a model and we have the same draw panel, we have our options. Bar Teoh make some adjustments. We also have the line style panel. So when there's a different types of line styles, same. If you're familiar card. It's the same types there. So we got dash dot, dot dash tin so on. So the lines is just a normal thickness. Lines we have medium line thin and wide. So if you wanted to create your own line styles, we've got to go to the managed tab in the managed time. We have additional settings. In. Here is where you can alter the patterns, different line waits, line patterns. You can change the color tags and so on. So this is rail change. Those certain aspects we're gonna look at now is the line styles right Now we just have one category which is line. So if you want to expand that there's all of our different line styles. We want to create a new one. So we're gonna select nude in the bottom right hand corner on this one. We're gonna call D P M for damp proof membrane impress. Okay, so now we've greater new line Now specify the line projection, which is just it's thickness line color and its line pattern. So one is the thinnest on. We can go up as far as 16. So for this line, we're gonna have a line start of four. The color itself will bring up just the index color again. If you're familiar Workout, it's the same set up. Are we going to select red? Next is the line pattern. So again selects solitude The arrow as a different types, off line patterns so that when we want to use is the dash. So we've got a new line star. We have DPM line projection off four flying color red line pattern dash press supply press . OK, so then we go back to Architectural Tabor, we've started to draw our line. We can I go to the line stalls and there is our DPM, So I'm gonna draw money in just above the lentil. I took it in there into the mortar, so it's the same thickness as all of the other lines. The reason being is because they're thin. Lines is turned on. So we turned 10 lines off, so I think it's best. Always leave thin lines turned onto so everything. You can see everything a bit more clearly.
60. 12.6 Adding Text with Leaders: So now that we've added some detail to our call, it next stage is to use our text toe, label it up. So to add text to our detail will go to our text panel which is just beside the detail panel. Never we select text will open up our contextual tub The different panels we have here First office Just replace it so we'll have no leader attached to it at all. Here we come places straight single leader We can have a curved leader and so on. There is our justification of the actual leader justification off the text And here we can check your spelling on final place A piece of text in the properties pilot There on the top selector there's are different text styles So the textile I want you to use today is the 2.5 millimeter aerial textile. So to start with the text, we'll just click on the screen on what that does. It will open up the text editor so we never have to Could copy paste change the bold italic underline We could do subscript superscript change the casing from upper to lower but we can Adam bullet points so on. Then find at the end is where will close. So what we're gonna do is want to start to add in some text. So if we say 1.3 millimeter break another, we've added in the text. If I then re select the text, what I can do now is I can add leaders to it. So once the Texas selected in the leader panel there, I can just click on the plus embody, consider an ad in multiple different leaders again hitting the negative symbol beside that just removes the last leader. Once the leaders place, if you move the arrow into position, then the middle one would add the landing. We have a rotate option there so we can rotate the text around and we can move the text as well. We can change where the leader, it's the text. So if we have multiple bits off text here, we can change where the leader hits the text. So I'm going to do now is gonna add multiple texts and leaders to start to detail this drawing instead of using the text tool again. I'm simply gonna copy out the previous one and copy it down, then double top on the new text on start to labels. I got 50 mil cavity and then we have a labeled like this.
61. 12.7 Adding Break Lines: So then, just to continue on tidying up the detail, what I'm going to do is import another component from the family from the library. So I'm gonna go to detail items. Well, this I'm going to go to annotations in the annotations. There's a brake line. If I place it just above you, notice that the break liner has a masking region behind it that you can extend to remove any information so I can then copy it over. - So that is the brake line.
62. 13.1 Introduction to Dimensions by Individual References: we're not going to start the place dimensions around the building, So the location of the dimensions are in the annotate top. The first panel there, the dimensions panel, it was. While he can go quick access at the top and just select aligned to mentions, so does the run. Through them, we have a line, which is the 1st 1 So the line dimension plays the dimension between parallel references or multiple points. So there would be the best option to use when running around any object, because it would align the dimension part out to the model. If you wanted to get a linear dimension, so you'd have to say 0 91 80 to 70 degrees. You didn't then use your linear to mention the anger goes between two angled lines. The radial dimension will give us a radius off a circle arc. Er, curve, same into diameter will give us a diameter. Our Clint will give us the total length oven arc. The spot elevation will display the elevation off a selected point. Same with the spot coordinates on your planet's I plan. If you want to find out what coordinate the corner of a building was placed out to your user spot. Coordinate. You can also use the spot slope to place the slope off your roof or slab so on get to get a start. I'm gonna choose the aligned dimension. So once you select one of the dimensions your set of the choice to go back and change to a different dimension down here in the type selectors are different types of dimensions we can choose from on a stick with the diagonal 2.5 aerial. Here in the options bar, we have a couple of options which will go into a lot more detail in a few moments. So first thing we're gonna do is we're gonna dimension the grid line. So to give us a bit more room, what I'm going to do is extend the grid line itself. So just select the grid line so that the open grip and just pull it back same with the left hand side so that we have more space to add dimension. So now gonna go back, choose my align dimension to get me started First thing, I'm going to select grid line one. I'm going to die. Mention between grid line one and grid line two's or select grid line to. But what I want to do is continue on down through each of the grid lines. So I remain in the dimension tool on Just click on each grid line, have them select, so you can see they're all joined in the same run. So the next step is into positioned the dimensions where you'd like them to be located on, then finally to place them your click away from everything on the screen. So if I was to adhere, are out another dimension, same here. So just move the cursor away from anything else was not selected on click. If I press enter s gave space part, it'll just undo everything I've done. We're gonna do the same again for the left hand side a B c D. Enough aligned them to where I want the dimensions to be on click to place. So that's the kind of the basics off the dimension, frosted anger and the building itself. On Dimension. Each individual opening could take quite a long time, especially large project. So we're able to do a quicker way of dimension in the building to go back into the aligns dimension in the options bar. Here we have our drop down menu, so first off, that's where we can select what we want to dimension. So we wanted to start from the ball centerline, the face of the wall, the center of the core or the face off the core. So what we want to do now is going to go for our wall faces. So when I go to Dimension, I get the face of the wall on the opening onto the face of the wall. It will take us quite a bit of time to do that.
63. 13.2 Dimension by Entire Wall: so one of the select and delete that So go back into the line. Dimension will have wall faces selected A next to that we have picks or currently is on individual references. So right now we're just selecting individual references each time. So if I had to drop down arrow, we can choose entire walls. When that selectivity see the options, putting here becomes highlighted so we can use it. And I was going to define what references we want to select. Yes, we want all of the openings to be dimension, but not to the center. So we don't go to the center of the windows and doors. We'll just go for the wits. Currently, we will just ignore the intersection for walls and grades because we don't have to be included. So press OK now I just do click on the wall. It will automatically dimension the entire wall on. The only thing left for me to do is the same as we've done before. So position the dimension run. Why I wanted to be moved the cursor away from anything so nothing can be selected on click . I gave it the wall beside click on the wall move the dimension one up will automatically snap to the other dimension run. Move the cursor away from anything else on click so we can run around the building doing exactly the same.
64. 13.3 Witness Lines: There's one thing that you will notice when you do the entire walls. It skips over the curtain walls so each one of the curtain walls is not included within you . Dimension run. So what we need to do is we need to go back and edit our dimension. So what we need to do is where we want our dimension to be included. We'll select the dimension run by doing that. The contextual TOB. We have the edit witness lines so we can add and subtract dimension. So if I select that touched, my cursor is the dimension are then select the openings and they're added to the run. If you wanted to remove them, hold on shift. I'm click. So again, like all the others, if I press escape or enter like so it will also remove the witness lines I've added. So what I need to do I place my witness lines Move the cursor away from the dimension one again on click. So you do the same for here. Move the cursor away on click
65. 13.4 Modifying a Dimension: so the dimension themselves, you see, we got the extension line tick the text that itself is just simply a style. In the intermediate course, I show you have to create specific dimension styles as most of them recover in the intercourse. So we're I have to tidy it up so we can pull those extension lines up. Change the font color on the tickers. Well, if there's any text that's unclear or of its overlapping with another piece of text, you can select the text on. There's a small grip underneath it of you. Click and drag pull it away and there will be a leader attached to the text.
66. 14.1 Introduction to Tags: So now we've begun the process of annotating are drawing. We have placed sometime mentions the next annotation tool. We're going to look at our tags. Tigers an annotation for identifying elements in a drawing every category in the family library as attack, sometimes automatically load with the default rather temperate, while others you need to load. If desires, you can make your own tagging the family editor by creating annotation, symbol family. I have made my own tags for this project. This is something that we cover in the intermediate course. The reason being is the rev. Attacks aren't up to scratch. They don't display a lot of information on, so we don't get the full benefit off using the tags within a tag. There are water called Labels on that label will look for information about that family on . The information for the family is within the type properties. So, for example, if I zoom into the door here, if I select my door good at a type into the type properties in here, all the type parameters with the values, so when we place the tag, the tag will look for information that I specify. So for example, I can specify that I want my tag to look for the width and height of that door as well. I can look for further information, like a description about the door, What type Mark and so on. So all the tigers doing is looking for that information, and then it displays it for any type form. So to access the tags that I have made at this point, you should have downloaded the files like the pdf's and so on. So in there there is a folder. The folders name is tags. I'm have three different tags within the folder. First we're going to look at is the door tag fr. So what you need to do is double click on the door tag, and that will bring you into the door tag. Family editor. So again for the introduction course, I'm not going to go into a lot of detail about how we construct these. But just quickly, each piece of that text is not simply just a piece of text. It is an actual label on. That label is looking for information that I specify. Soto, load the door tags into our project will come up to the main ribbon here. The modified panel. We have two options we have load into project on load into project enclosed. If we wanted to further edit the tag, you'd simply just click on load into project. It will do so on this drawing will remain open if you use the load into project and close it a little detargeting to the project and is gonna close down this drawing. So that's what we're gonna do today. So in a select on load into project Andi close and then press escape. So now our tag is in the drawing itself on how we can start the tagging process. We'll go to the annotate tab there. We have a tag panel. What we're gonna be looking at today are the tag by category and tag all. So if we use the tag by category, I don't like individual components as we select him. As long as we have correctly attached the correct label on specified the right information , the correct tag will appear. Of course, we're able to do this a lot quicker on the way we do. That is the tag. Also, we select toggle in here is where we specify what tags we want to be displayed. So first on, there are the door tags that will take that on. Because we've now loaded the tag into the project. It's the 1st 1 that's displayed, but have you selected was a drop down arrow on those? 1st 3 are the default one supplied by auto desk. Let me simply press supply press. OK, come back to the drawing so you can see each individual door now displays a tag.
67. 14.2 Adding information to the Tags: so many to do now is we need to add some more information to the actual door. Type itself for that to them be displayed in the tag. So you can see here we've got 41 at the top. We have our wit and hide to their correctly displayed on a question mark at the bottom. So first off in the top, where it says 41 what I want to be displayed there is the actual type of door. So the door type And when I selected, we labeled it d T Dash 01 So I want DT ducks. They want to be displayed there onto the bottom where the question mark is, I want my fire rating to be displayed. So next will select the door. We cannot go to at a type and in here we're gonna enter the information. So here in the type properties, if we scroll down to the type mark, there's are 41 which is being displayed at the moment. So when I created my tag the first label that I specified for my door type, I told my label to go to the type mark in the type properties on display the value off that parameter. So the value of the primary type mark is 41. So I want you to highlight that and change to D T Dash 01 for our door type one for us. Okay, Now you'll see the tags for all of our door types. DT 01 will now display that information. Next is the question mark, which is my fire rating. So again, we'll select the door, select at a type on for the tag. I told the tag to look in the identity data and specify the fire rating. So there is an actual parameter for fire rating included in this dorm. So we doesn't simply toe odd in the fire rating herself. So there we go. Fire rating is F D 30. Yes, press OK, on their again, we'll see our tigers displaying that information and again because all of these duties there once they're all the same type. So when we change one, all of them update and then we'll move over to door type to I will do the same as we've done with to attack one. So we'll select our door, go to at a type and again I told the door time to look for the type mark on display the information I'm not DT zero to You'll see both door types to now, despite information on again just update the fire rating two f d 30 s since we talked to fire writing in already for one. If you hit the arrow key, it will be displayed so it doesn't we can end selected from the menu. And then lastly, we have DT 03 So again, select the door at it. The type scroll down to type Mark changed to DT Dash 03 While you're there, you can also change the fire writing and then we can adjust the position off the tag again . I go into a lot more detail about tagging in the intermediate course. So it was a brief introduction about tagging in the intercourse. So next what we can do is change the information here for our external door. So we could do is we can select the double doors in the curtain wall when I go to add a type same process, go into the type mark on this is an external door type, so I'm gonna call it E T T. Dash 01 on this will not have a fire rating. So I'm gonna just out in a full stop just to get rid of the question mark. Now, obviously, the correct way to do this would be courageous. A brands new tag. I'm just remove the fire rating label. So the only information in the tag is the door type on the width and height, so you'll just simply remove that label from your door attack. But again, that's something we won't cover in the intercourse. So to select the tag on shifted down using the arrow keys, Same with the other.
68. 14.3 Placing Window Tags: So next we're going to do the exact same but for the window tag. So if you go back into the folder on open up the window tag and then simply loaded into project in close, I'm once you've done that, then go back to the tag. All, which is in the annotate tab tag panel. Select tangle than the last one is our window tags and again, since we just loaded in the window tag from the common drive it's displayed for us. So then press OK and all the windows are tired, so just select each one just to get them in the correct position. So once the tags are rearranged, the clearer come back down to the bottom section. Here I'm going to update the information. So currently we're just getting a 1 55 18 10 by 12 10 which is our width and height. So it's out in a label first, so we'll select R W T 01 window. Think of at a type, but again will come down to the type mark. And there were typing W t 01 within the type properties go down to identity data type mark W T 01 press. OK, You see, all of the W T zero once have been updated, so it is the same for the W T zero to same back down to the type mark. It was also updated. So next is the information of the top, which is 1 16 to 17 18 3 So a component has two different types off marks. It has just what is called a mark on a type mark. So the difference between the two is a mark is specific to that singular element. So this window here has its own specific mark, which is one which in the properties is one the next mark. 16. There's the identity Daughter is 16 so each individual window has their own mark, but as a type. So this is window type one, which is the 18 10 by 12 10. They have their own as a group. They have their own type mark. So when we changed our type marked W T 01 every single one of them updated so labels them as a group is a type market, then each individual window has a mark. So how starts with one and this one is No. 16. The next one is to is this was the first window that I inserted. There's the SEC amended that I inserted on. This is the 16th win of the Ryan certain. So that's how they're labeled. So what I want to do is I want to select each of the windows and change the type mark to w 0.1 for window one. Then we have w 0.2 for window to W doctor, 03 for Windows three. And so what? I'm gonna run around the building and do the same thing. Reason is, so later on, we're able to reference each individual window. - So we started with window one and worked away around and got to window 25. So when we create our own tags in the next class, I will show you how you can create a sequential tag. So we'll place one then every time we place an additional tag will automatically update So saving us doing this in the future
69. 14.4 Placing Wall Tags: So next we can also insert the wall tag. So we go back into the folder over of the wall tag on, loaded into the project on clothes. So now we've inserted the wall tag into the into the project. So next we're gonna do is when a little different. We're going to go tag by category. We place our tag on a couple of walls. As you can see, before I actually click to place. I get a preview of my tag. I'm currently there's a leader attached, so I don't want that to be attached. So I come to the Options bar here. There's my leader or the Spawn. Take that. So now when I hover over the wall and get the preview, the tag doesn't have a leader, so I'll do the same for the just a couple of partitions on the external wall. The information that the Wall Tigers looking for is again this type mark so we can do is select our external wall, go to at a type scroll down to the type mark, and if we have our wall type US A, they will be displayed within the tag on our partition will be be. I could see the other attacks have been updated. You can open up the pdf 0 to 4 tags which will display what we've just done.
70. 14.5 Applying Tags to First Floor: So if we go over to the first floor plan and again we can take our doors or windows on the walls as you can see how my plan, I'm able to see the light fixtures on the ground floor. So again, to turn that off, come to underlay on select non and then all at once I can select toggle what my door tags on my window tags press OK, and again I can go tag by category to place some wall tags. And then it's the same process of those running around the building. But just in the position of each of the tags, so on the ground floor are last window was Window 25. So we'll change this one to Window 26. We can work our way around the building again.
71. 14.6 Creating a Room and Placing Room Tags: So next we're gonna be placing rooms which we can tag into our model. We have built actual rooms in the model. The software doesn't understand that that it is an actual room. So we must place what is known as a room within the room itself. So to place a room, we'll come back to the architecture top our room and area panel and there is our room. So if we select that in our contextual time, we have three options here we have place rooms automatically. So any room bounded in the model by walls, floors or seedings, it'll automatically generate a room within that space. The issue with this is like we had earlier on with the ceiling. Sometimes the bounding of the room is a little off. So there's a couple of examples of that in this project that will show you next. We have highlight boundaries, so that highlights all the bounding elements. In the current view. On the last one, there is tag on placement. So whenever we place a room, it'll automatically be tagged. So I'm gonna do is zoom in on the actual room itself. So the room itself is the actual blue line on the X in the center, so that is the actual room itself. So to get started for come over to the top left hand corner room and see when I hover with inside that bounded room, I'm able to place the room itself. So you do that that blue line is hitting the each one of those partitions and the external wall as well is going around the architectural column. So I clicked to place once I placed the room the Tigers automatically generated on it displays the number one room that also gives me the area in meters and square feet. So that is the tag. On the room is the X and you nasty. It's highlighted in blue, so that is the actual room itself. On the text is just the tag. So if you wanted to select the actual room, if it's not displaying when you're running the Kresser around, the tag again was hitting. The top key will display the room, so that's a place in another room I want I'm placing the room. You can see the tag gives me that temporary vertical dimension, which is just telling me that the tags are now aligned. I go to the next room. So once I know that the room itself isn't spilling out into another room, I'm happy to place it. So this room down the bottom right is the one that's going to give us some trouble. So what? I placed the room inside the bounded room. You can see that it's spilling out into the lobby. So again, the reason being is the architecture column, where the architectural column meets the external wall. The boundaries just aren't meeting correctly. So if we press escape, I'll show you how to get around that in a few moments. But first we want to come back up to the room three. So in this scenario where you have an office space, if we had an officer was shared by two different companies on there wasn't a physical barrier or physical wall between those two offices. What we can do is we can add in what's called a room separator. Divide that room up to give us those accurate readings. So in the room and area panel, we have room separator. We select that they ever just of the same draw panel in our contextual top on the options bar again. Same features that we should be aware by now. So what I'm gonna do is just draw in the room separator just right across the center like that. The noted by a dashed blue line. I know if I hover my mouse around to try and find the room. So there we have one room on that tigers displaying the information for that room below. Someone move it down. So there's the room now cut into two. Using the room separator on this room now just requires on actual room to be placed. She also room again on that. Complacent. So now we have two separate rooms, but within the same office. So for the with the room separator, we can also use that to help us out down here, where the column meets the external wall. We can use the room separator just to give an edge to that corner. Like so. So when we have drawn in that edge, when we go to place a room, the room separator will stop the room from spilling out into the lobby so we could go place our room. And I always say it's not spilling into the lobby itself so we can have a place it if you accidentally delete the tag or when you place your rooms, they're not. The rooms aren't tagged automatically, so you can see the room still exists. But isn't There isn't a tag in the room and area panel. There's our tag room, so we'll just go on placing your tag over the room. So I like to come back up to Room one. The tag itself is just from the type family. It's a specific type. So if we select the tag, come to our type properties. We have a couple of different variations of what we can display. So we have just name and number name number with both areas name number with metric areas or name only. Again, this is just simply a tag created in the family editor so we can create our own at a later date. And if you wanted to change the information on the tag selected, I wanted highlighted in blue, then just click on the text. So what we're going to do now is we're gonna name each one of the rooms on how I want you to label him is to double up on some of the room. So? So room one will be store room room to the office. Room nine will be office on three. Will be office from four. Will be meeting room one. Room seven will be twits on room 10. I called counting, so we'll do the same for the first floor for us. We place our rooms again. I'm gonna call it meeting room, office, office, toilets. We can say common room.
72. 14.7 Creating a Room Legend: we're gonna place a legend on the plan, which is a color field legend. So it's gonna color code, all of the rooms. So the access that will go to the annotate tab second, last panel is a color field legend. 1st 2 legends are for the Emini side. So what? We will skip over those master. There's the color feel legend. So select that they could see a touch to my cursor is the actual legend itself. So I'm gonna place it down below here and then were asked for a bit of information. What do we want the legend to display? So the 1st 1 is a space type, So the type that we want to display are the actual rooms themselves, and then the color scheme. What we wanted to be by going to buy the department by the room name or the room number. So we're gonna go by room name press. Okay, calculating. So that's pull all the information that we have displayed in the tags. It's displayed in the legend and is now color coded each off the rooms. Americans like the legend to shift it down into place, so it's a bit Tidier. so that we can see the offices have the same color storerooms, Different meeting room toward it in canteen. If you're not happy with the colors, we kind of course, change that. So we'll go to our legend, will select our legend in the contextual top will click on the game first column here. This is where we can go back and change this game if you want. So we're not happy with my room by room. We can change the category to space on the H V A C zones if he wanted and then by department room name a room number. So same as we have done before next weaken display whether we wanted to be visible on the legend, Then we can change the color we can also attach. They feel pattern to that if we want to to so right out solid we make that a hatch crosshatch and so on. And there's a preview of the colors that we have chosen off the top. Here, we have to change the title. So I'm gonna change my title to room legend. I'm press OK, You do the same for the first floor again call feel legend click to place change two rooms by room name. Press OK again. This is represented on the pdf 0 to 6 color fill.
73. 14.8 Creating a Room Schedule: So after we've created our room legends, we can also create a room schedule to create a schedule. Leave two options. Either go to the view tab at the top. In the creates panel, we have our schedules. 1st 1 there is the schedule slash quantities. We're gonna click on that or in the project browser. There is a heading for schedules and Qantas again, Just right. Click a mocha con new. So when we do that, we'll be showing the new schedule dialog box where we will choose what category we want to schedule. So we want to do the rooms. All this cool down two rooms, select impress. Okay, this will bring up the schedule properties and in here we've got a series of tabs, but they need to start the series of information that we need to input into the schedule, which will then extracted out of the model to display in a schedule. So the first thing there, it's asking to select the available fields from where we want them to get the information from whether it's the room information or the project information. Right now, we wanted to extract from the room information which we placed earlier on so below. Here we have the available fields which contains the information about the room. For more money to do is to go down to the list on select the information that we want to be displayed in the schedule which will be displayed here in the right onside. So the first thing that we want to be displayed is the level. So we'll select the level and then with the green arrow in the center will select that to bring it over to the right hand side. We also want to display the name again. We'll bring it over. We want the area to be displayed, the count on any comments that we want to make about that room. So you notice all of the other different types of fields that are available to us. We can enter that information in the actual room itself. So if we select the room, go to the properties, we can enter that information about the room which we can then extract out of it using our fields here. So one the actual schedules that will be displayed, it is done in order. So if they're not in the correct order like I have here. It's not a problem. Just select the field that's not in the correct place. And use the arrow keys to shift it into place. So once we're happy with that will impress. Okay, it'll generate our room schedule. So first thing in the top, you'll notice It says room schedule to the reason it has room schedule to is because when we placed our rooms earlier automatically, rabbit will create a room schedule for us. It doesn't display all of information. So that's why we wanted to make a new one. Like we can just right Click that until eat. If you want to change the heading, we can. We can. I'm gonna put on my caps and call it room schedule. The schedules themselves contain a lot off property is very similar to excel. What? We run quickly through the ribbon. They're gonna just e columns, the rose, the title and header, the appearance and so on. So we're going to be creating a couple of schedules, be it a room schedule door schedule on the window schedule. So with each one that we will create, it will be a little bit more advanced on the one before. So what? This one? I'm gonna leave all the information as it is. All that we're going to do is just change the actual appearance off the schedule itself. So first thing going to do is want to add a nice, thick border to the header. To do that will come to the appearance panel on There's our borders will select the borders . There's our line styles. Earlier on, we created the DPM. So if we wanted to create a different wine cellar, game will go back to the manage tab, Change the line style, create one there and it will be displayed in this box here. What I will do today has refused the wide lines on select outside so wide lines and outside on the impress. Okay, because you get a nice thick box around the outside as well, selecting inside the cell I'm going out in some shading my color box. Choose the gray press OK as well I'm going to click on a and dry to the bottom corner there just a heart at all of the cells I got. I want to go to border for this. I'm gonna change it from thin mines to medium lines just to beef it up a little bit again, choosing outside and inside impress Okay as well. We want to select B, C, D and E. I'm going to change the alignment. So first will change the house of the horizontal alignment to center and as well you have the option to change the vertical alignment to top, middle and bottom. So just leave that, as is, so that there is the first shadow we've created. That's our room schedule.
74. 14.9 Creating a Door Schedule: next one we're going to move on to is one of create a nice door schedule. So So how will do that again? Will either go to the scheduling quantities in the project browser. Right. Click on and new. That's why you can go back to the view tab, select the schedules and do it that way as well. So in the new schedule dialog box, we go down to our doors impress. Okay. Again, we're showing the schedule. Property. So what? We want to bring into this one. So first we have comments, counts, description finish fire rating. All right. Level mark type mark on with. So now we just need to reorganize these. The 1st 1 will be the type. Mark is the blue arrows to shift it up into place. Next will be level then with whites. Fire rating description, finish count, comments on Mark, then. OK, Same as before. We're gonna edit the appearance off the schedule itself. So first all selected text change it to cops and then out in some shading. Same color change the border to wide lines. Andi increased the border with lines from me thin lines to medium lines inside and out. So what we're gonna do now is we're going to start to organized the schedule, so it's a bit neater on Weaken Group certain doors together so we don't have all the information displayed. First I'm gonna do is tied it up. As you can notice. In the center there we have an unusual door which is 56 grand for 001 on Mark 12. The quickest way to figure out which door that is is to select it. Come up here into the ribbon and we have highlighted model. So click on that. Don't bring us into the model, then you select clothes. So the door in question is the structural opening that we created earlier. So first thing I want to do is just remove the tag so it's not displayed. So now we know that it's the structural opening that's giving us an issue. So if we go back to our door schedule, what we're gonna do is use our filtering options to filter that door out on the schedule. So we come over here to our properties palette, scroll down, two other. Then there is the fields, which is the first dialog box that we were shown when we create the schedule. So that's where we can go back into it. Next is filter, so we'll select at it on no matter which one. That we choose their of the edit. It will bring up the same box. We can just go back to the fields if we wanted to their sorting grouping So again there is the story and grouping tag seem to the formatting on appearance. We'll stay on the filter tub. What we'll do now is will filter out this door. So the way that will filter it is we're going to use the mark off that store. So the mark currently off that door is 12. What I'm going to do is out a unique mark to that door. So I know what it is so I can filter it out. I want to cancel that. I have two ways that I can I can change the mark. I can either do it here in the schedule itself or back in the ground for plan. I can select it, come down to properties and there's the mark again. So what I'm going to do is I'm gonna change the market and the schedule. I'm going to give it a unique name off a all cops, cause I know that no other door or window will ever have that mark because I've specified that. So that's why I'm giving it a unique mark. So if you go back to our filter so back in the properties in the left hand side filter edit so I'm gonna go filter by and there are all of my fields So I'm gonna filtered by Mark. And so I have a couple of options there. What I can filter by what I want to choose is does not equal. So anything that does not equal this will remain on a father and type in the Triple A like we have here press okay, and it's now been filtered out off our schedule. Next thing we're gonna do is we're going to go to the sorting and grouping, so we're gonna sort the schedule out and group them together so you can click on any one of those to bring us back into that dialogue box. But what we're going to be doing is using the sorting and grouping tab. So the first thing we're gonna start this by is the level and I want each one of my levels but the ground and first word to have its own header. So all display, Yes, I want a header. Then I wanted to be sorted by the width. So we'll select my with then if I scroll down to the bottom here, I've got the grand totals. So if I turn that on, it will display the grand total of how Maney doors are in the project. And lastly, we have itemized every instance. So having that turned on means that every single door will be itemized on the schedule given account of one. If we turn that off, any door that's repeated will be grouped together on the count will be displayed. A little press. OK, negative. Their shadow has become a lot smaller. So first off, it's grouped together by grand on first floor. So first it's grouped by our level. Next, it's sort of by the wit, so the smallest first and they're no longer itemized. So all of the 9 10 doors are grouped together on the count is displayed. So the next thing I want to do is the level column here. The reason I added it in at first was just so I could get the grand first word to be displayed. So I don't want to remove that out of the schedule on as well as the mark. But instead of deleting them because we want the mark column toe, obviously everyone is probably is to remain so that triple A canned state out of the schedule. So we're just gonna hide them. So we're not going to go over to the formatting in the properties panel here. First, we're gonna select is the level itself. So there's the level. Come to the right hand side in here. We can change the heading than its orientation. It's alignment. We can also then change of it's shown. So we turn on hidden. It's going to disappear as well. We want the mark to disappear, so welcome down, select mark as well. We'll also take hidden field so they're both are now removed on. Lastly, here in column A it's displayed type mark. We know that these are door types, so if we select the text and highlighted and just change it, the text to your type never going to the last adjustments to the actual appearance. So we want A, B, C, D, E, f, G and H. I want them to be aligned in the center as well. In the finished column here, I'm going out in some finishes to those doors. So door 12 and three, I want them to be oak on E d. T. 01 What is the door within the curtain wall? So we'll make that out of medium DT is there 12 and three? There are locals. Well, so another provided in the finish. We can just sit the drop down arrow on, select the finish. If you have any final comments about the doors, then we cannot them in here as well. They're in the description panel. We cannot in a description about that door so we can change it to external double door. So when we change the information of the description about that is gonna promised, we want it to be applied to all elements of that type, which, yes, we do. What on the bottom left hand corner, concede the grand total. There was 21 so we know $21 in total
75. 14.10 Creating a Window Schedule: next, we'll do the windows. So again, my click on the schedule quantities. So, like new scroll down to windows, he feels for the windows. We've got type mark level with hide description. Count on comments on there now organized correctly impress. Okay, there's a window schedule, so we'll go back into our schedule properties. So there's nothing here that we want to filter out, which is great. Next we go to the sorting and grouping. So again, we want to sort of buy level. We want our headers to to be displayed next. Wanted to be sorted by the with We want a grand total to be displayed on. We don't want every instance to be itemized and then press OK, well, then go to the four morning. We're gonna hide the level we can change the type Mark two when no type let me could have just its appearance. So again, I'll change that to Windows schedule in caps on some shading ticker border as well. Change the border here to the medium lines inside and out as well for B, c, d, e and F and want to change the alignment more centered on. We're gonna out in a description. So these windows will be a you PVC triple pane. It's that you PVC triple pane
76. 14.11 Creating a Door and Window Legend: Okay, so next What we're gonna do is we're gonna create legends. We're gonna create a legend off our doors and windows that we have in the project. To do that, we can either go to project browser there, right click legend on and click on New. Well, we could go back to the view top create when there's are legends there. So first thing we're shown is the dialogue boxes to enter in the information we can either injured and now or the later date it's it's not a problem. First thing will be the name. So it would be our door on a window legend. We can choose a scale here again. If not, we can choose. The custom on the scale will be using is a 1 to 20 on press OK on this year's are legend drawing space where we will place our components so to place in the component will go to the annotate tab here in the detail panel. Earlier on, we were using the detail component on the repeating detail component Just below that is the legend component. So we will open that in here in the options bar. First, we have our list off families that are in the actual project himself. Next is the views over the different ways we can display. It's a floor plan elevation from the back in the host length. So what the host lend, if I choose for an example, just a typical wall Right now that wall's length is 914 millimeters 9140.4. So that's where I could change the length of that wall. 22 minutes. Hope that with the host lenders referring to We're Gonna do is we're going to add in all of our doors and windows so the external door type one are three door types on our two window types. So if we scroll up first thing on the left hand side is the name of the families or go to doors, then we'll find the first the external door type one. So the extent of your type one here is the doors double class one. So we didn't rename that when we placed it. So if we now go back to Stubble, Escape will go back to our ground for plan. Open up the ground floor. There's our e t T 01 If we selected go to at a type rename on type of e t 01 So we've renamed the external door component itself when I go back to our door and window legend. So back to the project President Legends Double Top Dorm Window. Open up our legend component. Go back to the family selection and come down and there's r E d t dash 01 So we'll select it. So I want to change our view to elevation Front on the host length is 1950. I'm click to place, so we'll do the same again Legend component on bring in d T 01 DT zero to on d. T 03 as well. We will bring in our window types. I will scroll down to window type one window type two So the next time want to do is gonna add in some information to our legend. If you want to open up the pdf 0 to 70 on W legend, this is what we're aiming for. So what I've done is that place a couple of dimensions. I've done a floor level with dashed line of other than some text. So this is this is our next task. So first thing we want to do is line all of the doors up, so they're on the same line. What we'll do is go to the second door. Click on drag until we get that temporary dimension on same at the windows. So you want to place a detail line as my floor level. So go back to the detail panel, select detail line, go to line styles and use this hidden line not the hidden lines, but the hidden. I also want to copy that down to the underside of the window sill, and I know that all of my windows are 900 mil from the ground floor level. So I'm going to select the line, use the move to on moving down 900. So there's my floor level on my window above it. Next, I'm gonna add some dimensions to all of the doors and windows. So in the dimension panel there, correctly aligned when we want the heights on wits, remember that if I want a vertical dimension, I've got to get the horizontal blue line so they have the dimensions placed. Next, we're gonna place some text below. So when are text panel will select text that was quick underneath. So I'm going to turn on my bones. Andi underlined as well as my caps. So my 1st 1 there is the external door type on the door type is e d T dash 01 on the highlighters. Andi, turn off bold and italics as well. What I would like to do is go back to my schedule. Open up the door schedule. I look at the quantity, so I've got four of those. So I wanna do is out in the quantity like so, Andi, I'm not gonna copy it below every all the door having multiple on. So you could do it multiple times and then we have a door type one type two type three that would change the quantities or go back to the door schedule. So door type one, we've got 11. Time to we have four. Yeah, on door type three. We have to when we can copy the text down below that, we have our window types on negative to my window schedule. So window type one have 21 im window type two got 22. And for now that is our door and window schedule later on, we're going to adjusted mawr when we finally place it on a sheet. For now, that is our schedules on legends.
77. 15.1 Introduction to Shadows and Sun settings: So now what we're going to be doing is adjusting the Cernan it sun's path on the shadows that it creates. So first off to turn the shadows on if we come down to the view controls down the bottom here they have like a grey sphere that is our shadow turned it on was your casting shadows for a better view of what we're doing. We turn on our three D view, but one of the three d view of return on our shadows on a gamma compressed w t two display our window tiles. So now that we have our shadows turned on, the next thing going to do is I didn't our son part. I could show you how we can adjust its position around that path. So to do that will come down to where the shadow icon is. And beside that is the some part. So we click. We have three different options here, the first, and as the sun settings themselves on below. That is just where we actually turn the sun path on off. So we turn it on. What the warning is explaining is the sun will not display because relative to view selected in some settings. What was I to do? Would you either use the specified project, location, date and time Instead, we can do this if we have specified our projects location and then we can then specify the date and time ourself. The project location is something we have uncovered yet, and this is something we will cover in the intermediate course. Our second option is to continue it current settings, which is what we'll do. So we'll continue to current settings and then we will change them yourself. They will get a compass around the plan. Well, we can turn it on in the three D view as well. So again, select the sun turning the sun path on press. OK, so next we'll click back on the sun and then we'll go to our son settings. And here in these sunsetting dialog box, our first section is the solar study. So we have a few options. Weaken Set the sun to be in the still position. Either Somewhat move. We can lock into one position. So next is the single day where we can determine the start position off the sun along a specified access than to the finish point. Next is the multi day. So instead of tracking Theseus one on one particular day, we have the option of doing it over a couple of days. And last is the lighting option where we could just specify a specific angle. We want that some to be. So what I'm gonna do, I'm gonna focus on the single day solar study within the single day. So the study, we have a few presets. So first is the in session. So what we're doing right now? So that's little settings there. Next is the one day, so to study. So this is the name we're going to focus on in a few minutes where we can create an actual solar study from the sunrise to sunset and see how the shadows are cast upon the building next to be a summer solstice. Solar studies. So, obviously the sun will be at a higher position when it runs along the axis, when the soldiers will be there at the lower position and so on. So these are presets provided by auto desk
78. 15.2 Creating a One-Day Solar Study: So we go back to our one day solar study on the right inside them, the next boxes are settings. So first on is the location. So right now it was set to London. If you hit the boxer of the three dots in there, we can specify the location of our project. So, for example, of it in London, we can give an accurate location. We could also pick up the house. I can't move around to the position of I want to be. So for us to get out in your project, address them, want to in the location than finally positioning. So when you enter in the project address and give a specified location, then the the longitude and latitude coordinates off the select locations, compared to an excellent database on the closest World Meteorological Organization. Whether station is selected on this is where the data is generated from. So after that is the date itself. So we could choose a specified date. Or you can select today at the bottom underneath that we have the time because we have a single day solar study. We have the two times so we're getting specify the start time of when we want our solar story to begin on our finished time, we could do our sunrise to sunset. So today in London, the sun will rise at 3 49 in the morning on set at eight minutes past eight. Below that, we have our time intervals. What will see? The larger the time, the quicker the sort of studies. So if we reduce it under 15 minutes, we got a bit more information out off the study itself. On here, we can specify the grand plane. So as we wanted to be at our our ground for level. So we'll press apply for us, okay? And they will see on our compass we have the start point for these son on each one of these circles. Here is an hour and inside is a 15 minute intervals on for our solar study to begin, we'll go back down to the sun symbol and we now have the option to preview the solar study press OK on a little options bar appears here. When there we can adjust the amount of frames per second. There's our date and time on. Here's our controls. So when we pressed play we'll see the sun move around the building. I'm sunrise to sunset to that effect in the three D view for when I go to a three d view Go back, We can go to the sun settings. We can choose that single day, one day sort of study. There's all the settings that we just entered, so I go back to OK, now go back. Click on the Sun Preview Solar study on press plate.
79. 15.3 Introduction to Rendering and Rendering first image: Now we're gonna be looking at how to render a two D image. So first thing is, we need to actually generate a two D image. So in order to generate a two D image, what we need to do is place a camera. So we have two ways of place in the camera. We can go to our view tab in the create panel. We have our default three d view arrow underneath. We have the camera. So again we could do the same thing in the quick access to about is the arrow beside these people to relieve you most elected camera. So when we have the come were selected, you can see it's a touch to my cursor. Here we have our options bar where first thing is the perspective. So when were credited to a D view, we wanted to be realistic and how perspective So, yes, we want that to be turned on if we turned it off. The view that will get will be the same as if we were to use our defaults. Three d view when it's turned off Europe to specify a scale. That's why we can't selected at the moment next is the offset on where it's all set from. So it's currently when I place my camera, it will be 17 50 from the ground level, which is kind of an average I height. So that's why they've set it to 17 50. So to place the camera, I'm gonna place it in this section here, zoom in with first click of the camera will place the position of the camera. So click ones. Now, when I move my cursor away from the camera, it displays my field of view. Further, I move my cursor, the further will be my field of view. Then to place it, I'll click again and it will bring me into my two D view so that we have generated our first to the image. So we have a rectangular box around the image. That's just a crop view. So if we wanted to change or resize our crop, what is have just selected too hard at it on theirs are grips. We can just pull and drag it up. So after we've resized our crop, if we're not happy with the position of our camera, we'll be conduce. We can open a part ground for plan again, I'm gonna type in wt so I can see both views. My camera's here, but it's clearly not displayed. So what I need to do is go into my project browser on all of my camera. Views will be organized under the three D View. Heading on there will see highlighter because it's currently open three D View, too. There's my three D view, too. So when the project browser have you expand three D views, we'll find our view. So in order to see the camera, we have to right click on view, too fourth down from the top of show camera so the cameras now been displayed. So if I wanted to rotate the position of my camera, coming out of the center is a shorter line. At the end is a pink circle, so I could do is click and drag that I can rotate my camera position as well. At the end off the view, there's an open circle. If I click and drag that, I can reduce my field off of you. If you wanted to increase the height or decrease the height, I'll go to my properties palette. Scroll down to the camera heading and there's my eye elevation. So fight decreased out to 1200. My I elevation reduces. I continue to have to say 1000. So the camera's been is now 1000 up from the ground floor level as well below that is the target elevation. So there is my target on that currently is set to 17. 50. So my cameras are a meter on. My target is at 17. 50. So right now, I'm kind of looking up at an angle. So if I increased out to say 2500 see, the camera will rotate upwards. So my target is now looking up. It's on. Now go back, double click on the header. Go back into my view. I'm just gonna change my crop slightly. So now we have set up R two D image. The next step first to do is we gotta prepare our image for render. So what we're going to do is go to our detail level, increases to fine, then go to the visual style and put it too realistic. So next we turn on our shadows. If you're not happy with how the shadows are displayed we'll go over to the sun settings on what we can do to adjust the position of the sun is, quite simply, just changing the time. So if I bring up back to say, 10 o'clock in the morning press supply on same nine Okay, so eight o'clock in the morning looks looks pretty good. So a press OK, so now that I'm happy with my shadows and everything, the next step is to render. So in order to render this image will come here into the view top in the presentation panel . We have three different tools. Here we have the render rendering cloud and render gallery, so the renders what we will be doing in a few moments below. That is the render in cloud. So when you sign up to auto desk, you're given 99 credits, which you can use in the cloud in order to to render images. If you have created a two D image which you want to render but the follows two large on your PC can't handle it. You can send it straight to auto desk by the cloud. They'll render it for you who cost you X amount of credits on the note. You made it back to you below. That is the render gallery, so all of your renders will be stored within this gallery. So if you want to go ahead now and we'll select the render. So in the render box, the first option there is the actual render itself. When we've changed, all of our rendering settings will finally go to press render. Before we do that, though, I want to go through all of the settings so forth and there's the region. If I know that the render might take quite a long time, I'm able to do a small section off the image to make sure that what I've done is correct. So what? I turn on region. I get the little region box, but I can reduce down in size one unhappy with my region. I could end select render, and it will render that small section below. That is the quality off the render, so we'll change that by the settings. So we didn t render quality settings. We have a few options to choose from. Draft medium high, best custom on. We can add it as well, with the quality setting options on the render dialog allows you to specify the desired quality for the render image. So when you want to present a designed to clients, you typically want a high quality rendered image. However, high quality rendered images can be slow to generate, So for testing purposes, you may want to just generate a draft quality image quickly. So I'm gonna open up the edit box. If we choose the custom in here. Now, we are able to customize our render quality, so first option is the light and material accuracy. First option is a simplified version, so it's an approximate material and shadow display. On the advanced is the precise material on shadows. Below that, we have the duration off the render sold render levels. So Orender Level one will be the draft render. Level five is the medium 10 is best and so on. It goes up and up so you can go up as far as 40 now if it takes four or five minutes to do a draft version, which will be level one. So if you're if you're trying to render something at level 40 it's gonna take you a couple of hours. If you only had a specific amount of time for you to render. For example, if you're leaving the office at six o'clock, we want to show the client your drawings at 10 o'clock so you can render by time so you can specify the method minister you want it to render. You can, of course, let the software decide and choose the until satisfactory. So for this exercise, I'm going to stick with draft. Next is the output setting. So how's the resolution going to appear? Will it be on a screen, or are you going to print it? You know that we have our lighting section in the schemes. Here we have three options off exterior and three options off interior. So the exterior we have the son only We have the sun as well as the artificial lights or lights that we have displayed. Or we can have only the artificial lights on same again for the interior. So son only son artificial on artificial only if we were to choose the artificial lights in here way up to change their brightness or turn them on and off. If you're unhappy with Sun's position here in the sun settings. If we select the box with the three dots here will bring us back into the sun settings below. That is the background section hero to choose. If we have clouds or no clouds, we can specify a color in the background. We can also specify an image once we have created our render image. The next section here were able to adjust the exposure so we'll look into that in more detail. When we do create an image, then here we have to save the image to the project so will be saved here in the project browser or we can export it to our common drive. Okay, so for this exercise, I'm going to change my quality. Setting to draft resolution is on screen. My lighting will be exterior son Andi artificial the background. I wanted to be very cloudy When will select render So they're on level one that took 16 seconds on my PC. If you've got a high performing PC will do it in a matter of seconds. Just a small tip before you do render. It's probably best to save, just in case the computer does crush. So now that we have are rendered image. We know how the option off adjusting the exposure off our image so we can select a just exposure. So in here we can make a darker or brighter we can change the highlights. How dark or light? The shadows are saturation and white point, if we've changed, a lot of the settings were not happy with him. We can, of course, we set it back to the original. And if you're not happy with the settings you've made just selective reset to bring it back . And then there was press. Okay. On last year, we're gonna save it to project. I'm gonna call mine Render view to sew, to save it, to prod, save to product as view, too. Press OK and you'll see Now there's a renderings heading in the project browser with my view, too. We can also export it onto the common drive Unsavory in your folders. We can also go between the actual model image on our rendered image. Down here at the bottom, we have show model on shell render
80. 15.4 Rendering second image: So next we're going to place another three D view The three D view we're gonna be placing is with inside the lobby, like so. So once we have created our camera view again, increase the detail, able to find a visual style too realistic, we can also turn on our shadows. We can then adjust our sun setting. We can bring some sunshine into the lobby as well. Is that what I want you to do is I want you to populate the lobby with components. So we're gonna go back to our ground for plan. I want to go to our architecture time. There's our component place, a component, And in here there's a couple of again some components loaded in already. The ones that I want to use here. There's a couple of trees, so I'm just gonna place a few trees around the outside, and then we're going to start a place him components inside like desks, people, more lamps and so on. So I'm gonna choose some trees and just place them around the outside of the building. And then we go back into place. Component will now go to load family on in here there's a few different components that we can play. So the first thing I'm gonna go to is the furniture folder. So double click on the furniture, I'm gonna go to tables and it's up to you what you want to choose to put into the lobby itself. I'm just gonna put in a few. You can follow me or you can just out in what you like. So I'm gonna going out in a reception desk. So in the library, I'm gonna be looking into the furniture folder to place people into the model. I'm gonna go to Entourage, and in there we have a male and female. So if you plays one in, when you go back to place, that another person go to the type selector and you have a choice of four. - Okay , so from the library, I've just placed a couple off couches, a coffee table. Some people here is a reception desk and two chairs. Once you're happy with what you've placed in, we couldn't go back to our camera view. So we come to the heading three D views. There is our three d view three. So before we render what I'm going to do, We're gonna place an image in the background. So how we do that, it will go into our render. So go to view, presentation, render, then go to the background section, Select image. You want to open the folder with the pdf's tags and so on. And then there is the city landscape. So if we press open when we have a preview on their weaken skate if you want when we press okay, we don't actually see a preview on the until we render it. So I've got my quality setting. Said to draft my resolution, said to screen the lighting, I'm choosing exterior son Andi artificial. The reason I'm choosing that are not the interior sound artificial. If I choose the interior stone on artificial, it's gonna be too bright inside, so it's gonna be overexposed. So I'm gonna choose the exterior son and artificial. So now we'll choose the render so we can see all of our internal lights are on. We can see our background image, the shadows cast through the main curtain wall. You can, of course, go on, adjust the exposure so you can increase the brightness Change the highlights. Make the shadows a bit docker. Once you're happy, Well, then save it to project. I'll call this one view three
81. 15.5 Introduction to Walkthroughs: Now that we've created two D rendered images, the next I'm going to do is look at walk throughs, which will create a video walk through around the building. So the credit Walter, we cannot go to the quick access again. Going to default. Three D view in the little arrow on There's Our Walk Through or Again It's in the view top create panel dropped in our again. It's a walk through so we could see our contextual top appears. We must hit the green take to finish in our options. Bother again. We have the option off turning off the perspective, which we can then create a scale again are offset is our level from the ground floor level . So with the walk through, what we first must do is create the path which are camera will follow now. Every time we click with the mouse sock like once we place a camera, so click again. Every time I click, I place a camera. So once we're happy with the path, we'll go to the green tick on finish. So just in case you press escape on you lose the walk through the wall to hasn't been deleted the walk through still exists. If you go to a project browser, scroll down, you'll now see we have a walk throughs heading. We can expand that on. There is ah, walk through. So if we right click show camera will bring back up the path So now we want to edit the walk trousseau in the contextual TOB. There's our edit Walk through. When we're in the editor, we'll see. Here we are able to players, we can open it or we could reset camera in the options bar. Here we have the various controls, which will cover later on, and here we have the frame. So right now it's on the very last frame frame 300 off 300. So to edit the first camera, we're gonna revert that back to frame one. You see our cameras now at the start point so that just like we adjusted the position of the camera for our rendered will do the same here. So we must now rotate and adjust each camera to focus where we want it to be. So I'm going to use that small group in the center to click and drag on. Position it in the view off the building, then dragging out to extend to see more of the building. And we must do that with each off the cameras around the path. So to get to the next camera, which is the orange circle here, I'll go back to the edit, walk through tub on here, I'll go to next key frame, so that would have jumped to the next camera. And again, I'll just reposition the camera. No. So the next key frame again, I'm going around the building, selecting next key for him every time to go to the next camera, repositioning every single one to point at the building on. Once we have positioned all of our cameras correctly. Well, then go back to our frame. Andi changed to one of 300. So what we want to do is open up the actual walk through. So I go back to the edit walk through tab. We will then select open walk through again. We just have that crop box. So it just expanded out. Once we're happy with this, what I'm not going to do, I'm not going to change my detail level or my visual style. The reason being. If I change my visual style too realistic, it's gonna slow everything right down and it's going to render as the video progresses, so it's gonna be very slow. So I'm just gonna leave it on hidden line just for this exercise. Nor am I going to turn on the shadows again. It's going to slow everything right down. So once we're happy with our crop with endless up to play the video. So in the walk true sexual murders click play. - So how we can increase the speed or decrease the speed is just adding more frames. So here we have frame one off 300. So if we click on the 300 it opens up the walk through frames. So if we change the total off frames to, say 800 that's gonna increase the number of frames and slow the video down. So as well within this dialog box here, right now, every single key frame has a uniform speed. So if I turned that off, I'm able to select each one of the key frames, and I can increase the speed or decrease speed. So if we come into a particular area that you want to camera to slow down. You can select it on and decrease the speed. Here. We'll leave that on for now. Press. Okay, so now we have We're back to frame one off 800. So we play again. You'll see that the video itself is much slower. So I'm gonna stop the operation going to open up the ground floor plan.
82. 15.6 Modifying a Walkthrough: what I'm going to show you is how we can edit the path, add more cameras or remove more cameras. So having the walk through selected so we can add it again. If you can't go to the walk through, right click and show camera in the past it appear then make Insect had walked through somewhere in the editor. So in the options bar here, under controls, we currently have active cameras. So we're currently just changing the cameras. So here we can change the part. So if I change over to path, I could have grab the camera positions on change the actual path, shape itself if I wanted to add in more cameras or key frames Oh God, in a key frame like so And we can, of course, remove the key friend. So when you have mawr key frames out of it, and then we can change the part again on once, you're happy with your additions and subtractions and so on we go back to the and it walked through, go back to frame one, and then again, we've got to go back to the active camera on changed positions on. Then we can open the wall true and press play again or to stop it. So that is one of our walk through that will be doing again. All of the pots and so on are shown on the P. D EFS.
83. 15.7 Creating a Walkthrough over two levels: If we're gonna create our second water, we're gonna be going up onto our first floor level. So what we need to do for this one is we need to actually open up the first floor level and have a beside the ground for So if we open up our 1st 4 level, use a W t for window tile. So when we're actually placing our path for the water, we can't enforce you just change up to our first for level. So it's best to have both off the plans open at the same time. So we're up to see where we are going. So we're gonna back up to the quick access and select the walk through. I'm gonna start down here in the canteen on work my way out the door, around the trees, through the front entrance to the reception into the meeting room, on stopping at the bottom of the stairs. So now I have a comer place at the bottom of the stairs. I now need to change my offset. So, Aiken land here at the half landing, so the ground to first floor level is three meters. So half titus 1500. Add that to the 17. 50 gives us the 30 to 50. So now I place my camera at the half landing. I know that I'm level now before I click again to be at the top of the stairs. I must change back to the 17. 50. But as well, I must change the offset from. So I must change my level over to first floor now. So although I'm still drawing it on the ground floor plan, it is actually being placed on the first floor. So now watch my first floor plan, Undersea, where I'm going. That's my part. So I'm happy with my part. I'm gonna green tick to finish. And now we have the same process as before. We'll go to at it, walk through, revert back to camera one and adjust the rotation off each camera. - Okay , so now we're happy. We've adjusted all of our cameras again. We'll go back to frame one. Go back to edit, walk through TOB, select open. Walk through on again. Just adjust the crop. I'm going to increase the number of frames to 600 on press play. - So when you walked through is complete what we have to do is you can for the final stage. You can, of course, then turn on your shadows. You're realistic visual start and so on on. You can then export it out and save it onto your common drive. So we go to file export. There's images on D animations on. There is a walk through as well. When you do your solar study as well, that's where you can export it on. Those images are the renders that we've just done. So exactly walk through here. You can adjust what frames you want to actually pull out of it so you don't have to do every single frame you can do just a small range. How many frames per second you want on the former when here's your visual style, where you can go up to for render finish
84. 16.1 Opening a Sheet and overview of the Title-block: without the stage where we can put our views onto sheets on send them off a print. So first we're gonna look at sheet and setting up sheets. If you come over to our project browser school down, we have sheets heading on, always by default. In this temperate, you'll have one sheet there that a 100 unnamed double tap that this year will open up our title block. This is an A one title block again because we're using an auto desk template. This is their auto desk title block. You will, of course, be creating her own title blocks in the future. I'm within these title box there. Active dynamic title looks. So here we have a revision panel or, as I showed you in the I don't take top. Here are revision cloud when we place where Vision Cloud, we can attach information to that revision cloud, which will be displayed here in this panel. Down here, we're able to specify the project name, which will change all of the title blocks to have the same name. The title itself is specific to. That drawing declined as well. All of the title blocks will update to display the client Do you drawn by checked by is specific to the drawing. The date again is something you would set. The scale is set when you bring interview. The scale of that view is then displayed. The project number again, isn't it will be shown the same across all title blocks. The drawing number again a specific to the drawing on the revision will appear when we start to add revision clouds.
85. 16.2 Setting up a Sheet part 1: so the first sheet that we're going to set up will be a floor plans sheet. So first thing we'll do is we'll change our title block. So the project name what? I'm gonna call the project name of the office building. The title off this sheet will be floor plans. The client, I would say Auto desk Don't buy. Have your initials checked as well. Date. I will leave the scale. As I said, you can't change when we bring in a view the scale update automatically. We'll have a project number at 200 on our drawing number will start at 200 so you can see the project browser. The information is updated first office. The drawing number, which is 200 on the title off the sheet floor plans. So next we just need to odd views to the sheet on. We do that by scrolling up the project browser, and there's our floor plans. So what we need to do is just click and drag them onto the sheet. So click hold on, dragged the ground for a plan onto the sheet. When I let go, the image would appear so let us our ground floor view. What we need to do is we need to do some tidying up off the view itself, so we'll automatically get a title attached to the view, and that title corresponds back to the name. So there's our ground floor on our scale. If I go back to the ground for a plan is said to 1 to 100 so our scale will automatically be at the bottom as well. In the title block, you'll see it now displays scale A 100. The title itself will expand the entire length of the image. So if you want to reduce that down, click on the image once and you'll get the blue grip. Just click and drag it back. If you wanted to move the title itself, double escape and then you can click on the title, and then you can adjust the position. So then two further tidy up the plan instead of going back to the ground floor plan all all the time in the project browser. So when I double click, I open up the actual ground for a plan so I cannot edit saving me, going back to the floor plans in the project browser. So what I'm going to do is I'm gonna hide some information. I'm going to reduce down those grid lines, so I'm able to fit on another floor plan. So first thing is this section view here. I don't want that to be displayed. So what I'm going to do is come down to my visual controls down the bottom. Here, I have to tools first how I can hide certain objects and next is where I can reveal them. So what I need to do first is select the object I want to hide selected glasses and I have four option there have isolate the category. So every single section view will then become isolated where I could hide the entire category. So again, any and all section views in the current drawing will be hidden. Or I could just do these specific element. So if I select isolated element, only the section view will be revealed. Never want to hide it against selected sunglasses and hide element. Once I'm happy with what I've done. If I click back on the glasses, I can reset the temporary hide on will bring back to section view or I can apply my changes and it will be temporarily hidden. So if I wanted to reveal those objects again, I'll go back down to the light bulb. It will display what's hidden in the project. I can select it. Go to the contextual tab, select on hide element on clothes. I know it's back in the project. For now, though, I am going to fight us. Well, I'm going to bring the dimensions in a bit closer. Can just doing some tidying up. - So now that I have reduced down the grid lines and dimensions, what I'm going to do now is I'm gonna place a cropping view around this to remove some information from the drawing so certain parts of the drawing won't be displayed. So to turn on the crop view to go to the properties palette book scroll down to the extent So we're gonna turn on all three. There we got Cropped view crop Region visible Andi annotation crop. So we have to separate triangles there. So we have got the inner black rectangle that is the actual crop view itself. Then we have an outer dashed rectangle as well. That's known as the annotation crop So if I had any text that was outside off the crop window that I still wanted to remain displayed, I could do so by having the text within the annotation crop. So I'm just gonna pull in the crop view just so I can remove those elevation bubbles from view. So now that we have cropped the view this outer crop views so that will actually be printed unless return it off so we can keep the crop active, I that it will remove any information we don't want. But if we don't want the actual rectangle crop view to be printed, if you come to crop region visible, if we turn it off, the crop view itself will be removed. So once we're happy without changes to come back out of the view, we have got a double click outside of the title block. So now when we select the image, we can move it into a better position as well. We construct our title block, I'm being inside the drawing on. So next we're going to bring in the first floor plan. So same again. Click, drag and drop again. Just get into a rough position where you want it to be and then select the image to reduce the title name down Ondas. Well, with the first floor plan, I want to open up the view itself turn on the cropping view just like in hide the elevation bubbles and again when I'm finished just turned the crop region visibility off And then again to finish DoubleClick outside the title block. Yes, I'm gonna just adjust my but just the position of the view that as well, the title. So that's our first sheet created.
86. 16.3 Setting up a Sheet part 2: we're going to now create a another elevation sheet. So to do that, we're gonna go down to the sheet section, and again we have two options. We can right click on sheets, click on new or go to the View tab on. In there, we have a sheet composition panel. That's where again we can create a new sheet. So when we select new sheet, it will open up this box here where we can choose our title block from onto the A. One is currently loaded, so press OK and you'll notice in the title block. Our project remains as office building. Our client remains as auto desk, and it's also sequentially updated are drawing number to read 201 Our project number as well remains at 200. So next I'm going to pull all of the elevations onto the sheet. So click on Drug East Place. Click and drag north south on west. So again, these elevations need a little bit of work to tidy them up. But first thing first, you'll notice that the East elevation we have caught out some of the building, so I opened up the East elevation Well, see there that some of the building has been caught out. So what I'm gonna do, we need to open up the ground floor plan. So I'm gonna window tile it so we can see what we're doing on because I made the changes in the sheet where I added in the crop and I hid the elevation bubbles. It isn't displayed here, so whatever changes you make on the sheet take effect on the view itself. So first thing is, I need to turn the crop view off. So now I'm able to see my elevation bubbles again. You'll also notice that the elevation bubbles have updated, so it's currently showing the actual sheet number inside the bubble on the view on the sheet. So again, there's a sheet number on the elevation view. So I need to adjust my elevation bubble so I can see the entire building. So if I select the bubble, we'll see there's two lines. We have one solid blue line on one dust blue line. So the solid blue line is the start. Off. My view on the dashed blue line is the end of my view. So what I need to do is just pick it up, drag it in front of the building. I may have to clearly see the front as well. If I wanted to only show a partial section of the front. Just pull back the dashed blue line Onda, we can you can no longer see the right hand side. So if we do the same for all the views, just making sure that the start and finish point off our views are correct and they will go back to the elevation drawing. So next what I need to do is to adjust the levels themselves as well. I need to hide the section view. I don't want that to be displayed while we can reduce the title down and then finally just putting the elevations in place. So I'm gonna go. He's was, you know what himself. So once again, when you're moving the elevations around, we'll get the temporary alignment again, which will align the the levels themselves to align the buildings more. What we need to do is add in what is called a guide grid. So places a grid onto the sheet just to give us some guidance on the alignment. So in the sheet composition panel. We'll select guide grid. You're prompted. If you want to give it a name, I'm gonna leave it as is on the God good is displayed. If you wanted to adjust the spacing between each one of those grids, well, then selected in the properties product, there's our guide spacing set to 25 mil. If we reduce that down to 10 mil so then we select our elevations, we can adjust them to be in mind with a certain line, and then afterwards you consume you to select the grid and elite. So what? The title I'm gonna add in some more text changing from just south to south elevation. So how I changed the Texas I'll select the select the title Go to the Properties pilot on Then I had in elevation do the same for all four views. And then I'm gonna position the titles correctly again. Your notice when I moved the titles, get you temporary alignment line just to tell me that everything is lined up correctly as well. You'll see the views are 342 and one. We can change that into selecting the title. And there's a detail number three If I type in one, it won't allow me. There's already an elevation one. So what I'll do is I'll just type in one on a full stop to No, I can changes to three for, and then I just go back over to the west and just to lead at the full stop himself. So next, what I'm gonna do is we can cast shadows over the elevations. So we double top inside, we can turn on the shadows. Medical right in this elevation. So over to the next one again, turn the shadow zone same again. We kind of course, have the realistic view on this as well. For now, I was gonna leave on the shadows.
87. 16.4 Adding Render views and Callouts to Sheet: So we're gonna build upon this as well. We're gonna add in some more detail to this. So what I want to do is out in my render views. So in the renderings heading, just click and drag both in to adjust the size. Just double click inside, select the image and there's there's Our crop in Minnesota has reduced the image down in size. I complacent over the other to get a rough idea off a similar size. So select the image to reduce the title, and then we can reposition the title again on next. What I'm going to add on a swell will be our detail color that we play that we created. So again it's click and drag it into the drawing. I want to change the name to the detail one I got. I want to change the numbering as well, - not our elevation sheet
88. 16.5 Loading an A2 Title-block: on. So next we're going to create another sheet, but this one will be on a two title block. So to create that will again go to our sheet. New. So in the title box, we only have the A one loaded in. So we need to go to load, which will open up our library. We'll go down to the end where we have title blocks and there we have a zero to a four. We want to use the A to press open on. Okay, So that now is our A to sheet. We're gonna change the title to you're on window legend again. You see the drawing numbers been updated. The project remains his office block in the client is auto desk. So we're gonna bring onto this drawing will be our door and window legend again. We need to do some adjustments to this. What I'm gonna do is completely remove the title itself from this image. If I select the view, come to the type properties and there we have no title, so just remove that. So I just need to double click to go back inside. And now I'm back into the view, so Now I can adjust the position off everything. So next, what I'm gonna do is gonna drop in my door and window schedule. So we go to the our schedule heading. Expand that out and we're dropping our door schedule on our window schedule. So again, we need to do some adjustments to the schedule. So if you just click the schedule once we have a little grips here on your noticed that because of the text, it's creating a double space or a double line. So if you just expand out to grip until it reduces down like so sounds OK on saying for the window and again, just so position everything neatly That is our dorm window schedule.
89. 16.6 Duplicating views: So when we're creating our floor plans or elevations and so on, we create that one single view like we have our ground floor plan, that's of you. Everything we do to that view is views Pacific so that when we place it onto a sheet, all that information is with that view. So if I wanted to place my ground floor plan that I have placed onto my ground for sheet, if I try and place onto, say, the elevation drawing, I can't. So what I'll do is I'll go to my elevation sheet, which we needs a name. So my ground floor view is already on the floor plans sheet. So find out, trying click and drag it on. I get this warning symbol. So it says that this view is already placed on Sheet 204 plans to place a similar view on a sheet. You can use the Jew picket viewer Jupiter with detail in command to create a copied view. You can also is difficult as positive pendant command to create a new view that is tied to the original view, allowing you to spit and crop these dependent views across multiple sheets. So what I need to do to create a Jew. Pick it off that ground floor because I go to the ground floor on right click on There is my to placate view as well. You can select the view on the create panel. There's my trooper Could views as well. So what? The difficult view. It will create a view that contains only the model geometry from the current view, so it will not include any annotations, dimensions or details. If you make any changes to the original model, that view will automatically update as well. If used, the Jew picket with detail ING. It will duplicate not only the model but will also include all of those annotations, dimensions and so on. Whatever changes you make to the Jew picket with detail, Yngve, you will not affect the original. If used the duplicate as a dependent, it will duplicate the model with the text, annotations and so on. But this view is dependent on the original view, So any changes made it to this view, or the original will take effect in in both. So now, if I said I ju picket wood detail ing, I never get a Jew picket view in the project browser on the floor Plans Day, you can see is My Jew picket view and I can change a So, for example, I'm going to change to a course unknown. I go back to my floor plans I can click, drag and drop this floor plan onto the view. For now, have two views off the same model, both now independent of each other, cause I've changed the view level to course on one, and it has not taken effect on the other. So this is how we can place multiple views off the same model.
90. 16.7 Page Setup and Printing: So now that we have our sheets set up, the last thing to do is to print them. So to do so, we'll go to file. But we have print, so we select the arrow. Here we have three options. We have print, print preview on print set up. So if we go straight into print, first section here is the actual printer information, so there will select our printer. What I've done is, I've just downloaded a pdf creator called Cute. Pdf writer. I just found this the easiest to work with if you're not connected to a printer so that you can then change the properties off that printer or PDF creator, then sprayed the starkest the type where it's located. And if you have any comments about that, you can place him here. So within the file section, you got two options. You can combine multiple selected views sheets into one single file, or you can create separate files. Here's where we'll name the actual file itself. This is the print range section, so first option. There is current views of what is currently being displayed. We can choose a small portion off the current view or weaken selective you itself in the options section here we can choose him any copies we want to print to into reverse the order. And so on. The last thing there's our settings which is are set up for the actual page. So we're going now to our set up under Their first thing is our printer. The name will be the print set up name. So right now said to default toe only change our settings here we can save as on Neymar prince set up next will be the paper. So the paper size we're working within a one. So we go to ISO a one. This is referring to your printer. So what do you want? The printer To find the paper under the paper placement. We can have the image on the center or we can offset it from a specific corner. Next is the zoom so we can have it either fit to page or always best practices zoom to 100% if you fit to page, the scale that you've been working on will be incorrect. We have the orientation. So whether it's a portrait landscape in here in our colors, where we'll choose whether the lines will be blunder grayscale or full color press. OK, select our preview or print. I never have our print preview. I want you happy with the settings then Senator print.
 Ozgur Gorgun, Adobe & Maxon Certified Instructor