Transcripts
1. Introduction: My name's Chuck Anderson. I'm an artist designer and photographer here in Chicago, and one of my favorite types of work to do has always been to work with photography, to go out and shoot photos, and then come back and manipulate the pictures, throw them in Photoshop and make crazy stuff out of it, and the client really wants it to look really amazing, and they'll say, "make it pop," that's always the cliche thing that I get told like, "here, we have this box with our product inside, make it pop." Just take this sort of blur image and really turn it into something that's exciting and kind of catches you. So that's really what I love to do, just taking the simple and make it complex, make it crazy, make it fun and interesting. So, Surreal art or Surreal photography, for me, it's always been about creating a scene that seems impossible, or something that you look at and there's something about it that couldn't have been done naturally or in camera, and it kind of makes people look twice. I'm going to walk you through three different projects. So, we're going to kind of use the same idea of manipulating photography, but I'm going to share three different scenes. One is going to be very architectural, it's very much about the buildings. And the other thing we are going to talk about is more of landscape, clouds and big sky, kind of things. And then, the third one is something that's more just anybody can do anywhere inside. So, I'm going to be using flowers as an example, I'm going to be shooting some flowers and manipulating those to create this sort of crazy still life, and changing the colors, flipping the image around, and having to sort of create this really cool image. I'm going to be using an iPhone, I'm going to using a handful different apps, I'm going to be using Visco cam for color and tone, I'm going to be using Photoshop touch, program called Snap seed, that's another one that kind of controls color, and tone, and light and everything, and a couple others might pop in if it feels like it might be worth using it. Really, it's just a phone or a computer and Photoshop, whatever you've got. If you're taking this class, you probably got one of these tools, you probably have access to. So, that's all that matters. You're going to go out whether you're in a city, whether you're in the suburbs, whether you're living in a farm, whether you're traveling, home town, it doesn't really matter. The point is, that you get out, take the most well composed picture you can, take angles from all over the place. Look around you. Take a picture of what's in front of you. Turn around, take a picture of what's behind you. Get more sky in the shot, get less sky in the shot. Just get stuff. Get pictures. Get that imagery. Because, you never know what's going to come in handy to use down the road later on when you're editing that stuff. So, we're going to just go in and really fine tune and edit these pictures to create some really surreal fascinating scenes out of your photos. Whether those photos start out amazing, and you want to make them even crazier, whether they start off really plain and simple and you just want to add some brand new life to them. And then, of course at the end post stuff on Instagram, on Twitter, on Facebook, wherever. The goal is to share this stuff, show people what you're making and just have fun with it, get that feeling of being proud of something you've made. This is really just kind of giving you some ideas and inspiration to use your own photos wherever they're taken and whatever they're of, and have some fun with them, and that's what we're going to be talking about
2. Project Assignment: Create a Surreal Work of Art: This skillshare class is really about taking pretty ordinary photography, or it could be good photography, or a just a okay photo, or whatever, and turning it into something totally new, and making an impossible, or surreal. So, some of the things you're going to learn in this class, a little more specifically, you're going to walk through three different projects. So, we're going to use the same idea of manipulating photography, but I'm going to share three different scenes. Three different settings. One's going to be very architectural. It's very much about the buildings, and the structures. Other thing we're going to talk about is, more of landscape, clouds, and big sky kind of thing. So, that's especially good if whether you're in the city, really wherever, but especially, maybe you live in the middle of America, and you're surrounded by a cornfield, and stuff, that's perfect for this. Creating a sky that's full of surreal galaxies, and stars, and clouds, that weren't there before in the picture. Then, the third one is something that's more just you, anybody can do anywhere inside. I'm going to be using flowers as an example, and we're shooting some flowers, and manipulating those to create this crazy, still life type of thing, and changing the colors, flipping the image around on top of itself, and that's the kind of thing you could do with flowers, you could do with clouds, you can take these steps, and these techniques that I'm going to be sharing, and really spread them across all sorts of different images, all sorts of different photography. There's a person in the photo, maybe there's not, maybe it's a building, maybe it's cloud, or a flower, or whatever, this is really just giving you some ideas and inspiration to use your own photos, wherever they're taken, and whatever they're of, and have some fun with them. As far as time goes, and how much time you're going to need to complete these projects, that can be really up to you. I've spent hours working on one picture on my phone, and then scrapping it at the end. Then, I spent 10 minutes working on a picture, and it started off being like the perfect picture, and everything went great, and I loved it, and it took 5-10 minutes. So, I wish I could say it, it just took this amount of time, I would probably say, no more than an hour generally for these, but once you're on your phone, who knows how long you were shooting, and taking pictures. That's, again, one of those things that's completely up to you, and whatever you'd like to do with it. If you get tripped up, if you feel stuck, if you decide to go take pictures, and you're hitting a wall, and you're not sure what to do, just remember, this is supposed to be you having fun. There's no rules. We're not designing a logo, we're not working on a grid here, we're not making a website, this doesn't have to comply to standards, or going to look at the world around us, wherever you are, it doesn't matter, the city, suburban, rural area, it's about getting out, taking pictures, and just remembering the important thing is take the best picture you can, if you're a photographer, if you're not a photographer, whatever you consider yourself, just get the best picture you can to begin with, that's important of course. But the real fun is going to happen when we look at those pictures, and we go through, we find our favorite one, and then we decide, all right, this is the one I'm going to edit. We play with those colors, we manipulate the photo, add layers to it, make some mistakes along the way, figure out what we want, edit stuff out, add more stuff in, again, play with the colors, tones, angles of everything, rotate, duplicate layers, all this stuff, and then just go from there.
3. Shooting: As you can see here in Chicago right now, we've got some amazing views, cool haze up in the sky. I think one thing that's really important is when you go out and shoot, when you're taking your pictures, a lot of what this class is going to be about it. It's going to be about what you do with the photos after you take them. So, you don't have to worry so much about getting it perfect because today's a perfect example of why that's true. We're going to be doing a lot of manipulation with the photos and doing a lot of stuff to it after the fact. So, another really important thing for me is making sure when I go out somewhere, I take pictures from all angles. Right here with the city, or the river and everything. I'm going to take some shots there and the street here and everything. It just kind of looked like full 360 degrees. Make sure to capture everything around you because you get back you never know which one you're going to like, especially when you start like playing and manipulating with the photos and everything. So, I keep a case on my phone. It's kind of up to you when you're shooting. It's going to get wet no matter what on a day like this. So, a lot of the stuff I'm going to be doing is going to be symmetrical. The setting is really good like frame your shot up really nicely. We're going to be flipping pictures later, flipping it upside down. So you have some sky, and make sure not to cut your buildings off at the top. You want to leave a little bit there. Always look both ways. Make sure you get your mom with you. Be a little careful when you're taking pictures in the street, obviously. Especially the architectural stuff, the lines are really important. It's really important to have everything like crisp and clean because otherwise it's going to feel really blurry picture later is not much you can do about that even when you manipulate it. Make sure to go out clear, put bunch of space on your phone or your camera before you go, too, of course. The worst thing that happens is you get out and you see a cool spot, you can't take it because you've got a bunch of videos of you and your family hanging out at Christmas and stuff. Any stuff around you, you can find to keep it straight. Again, especially doing anything with like architecture, or like straight lines, anything you can do to help line it up, help rest it if you don't have a tripod with you. Getting different exposures too. In this shot right now that I'm getting, there's a lot of bright light coming through. Those kind of holes over there. If I expose it on that, my whole shots are super dark, and if I expose right in the middle, it's a lot brighter. When I've gone back to manipulate photos and work on things that I didn't really like the picture to begin with and then I started playing around with it and I realized it was the perfect shot to kind of mess with. I really like when I have a chance to get something where it's, where you're kind of getting both inside and outside, and you're getting a little bit of the sky, kind of outdoors, and if you have a chance to shoot like bridges and overpasses and highways, it's kind of nice to get both things. It can be really cool and kind of start flipping the pictures around to have that stuff overlaid on top of each other, sort of real nature and clouds and trees and everything, and then the lights and the bridge. Again, you can do this wherever you are, and whatever city you're in, suburbs, city. I mean, you can go find a tunnel, a bridge, a small little downtown. I've lived in a lot of suburbs and have small downtown areas and I've gotten some really cool pictures there. You don't have to be in Chicago. You don't have to be in New York or some huge city. I would definitely say, even if you're shooting with Instagram in mind, don't just shoot in square. You can edit it later, but I've had so many times where I've shot pictures in squares, and I just wish I'd had that one little extra sliver. That might seem like a silly suggestion and kind of basic but if you forgot to do that, you might be screwed later on. Just something to keep in mind. Going to be shooting people, too. A lot of times, you might have a stranger who just walked into the shot, that's great. If you have a friend with you, and they can kind of be your prop, that's awesome. Buy them a drink, buy them a coffee, or you can use yourself. If you have a tripod, you can set that up with your own camera or whatever. But it's really cool that you have a person in the picture for a lot of this stuff, kind of create this surreal world around them. You can miss a little more cinematic in human, so it's not just architectural stuff. So, we've got our friend down here at the end. So, you want to try and isolate them behind like a more blank background so that their silhouette stands out and then they're not sort of become a part of the jumbled surroundings if you're taking pictures like this because then it can be kind of pointless. I know as a photographer, you would be walking around and see something and you think it looks cool and you think like that's okay, I don't need to take that shot. No, that's not a good one. Just take it anyway. If you've got the space on your camera, on your phone or whatever, just take the picture. You might be glad about it later if you end up using it for anything at all. I'm kind of in awe right now because I love Chicago but I've never really seen it from this specific vantage point just kind of being up high, and so I'm kind of just like taking it in. That's a good point, good little suggestion if you're out taking pictures. You ever see something that looks really amazing, like this particular specific, very specific view. Give yourself a minute to enjoy it, and take pictures. I think it's kind of a beginner mistake to just take a picture and line up your composition just straight in the center and not really think about moving your camera around. If you just point your camera at the thing and then just move it around, you might see something you didn't see before. When you were thinking about the rule of thirds. You might want to keep the water in the very bottom and have more sky. Do something that's like it's dead center, and then do on where it's mostly sky. Make sure you do all of those because you're never going to know until later when you sit down and actually have a chance to look at stuff, especially when it's this cold out to know which one was the best shot, to know which one you're going to want to use the most. So, I want to do that now. When you get something where the water's really in the frame. A little more up towards the sky. The clouds are really cool right now, and then even more sky. It's definitely been a lot of situations where I've gone and taken pictures thinking that I knew what the best shot was and I get back and look at it and it's not even close to being the best option. The best option was the one that I just took because I didn't think it'd be important. But I took it anyway. I was able to use it. If you're shooting with something like really know in the horizon, I personally like to get people facing out to it. I just like the idea of looking out. But again, there's really no rules for any of this stuff. It's not has to be one way or the other. So, you can definitely have someone looking out, have them looking at you, have them turn, jump, do whatever for our purposes today. Just going to have it be real, nice and simple. But again, have fun with the stuff.
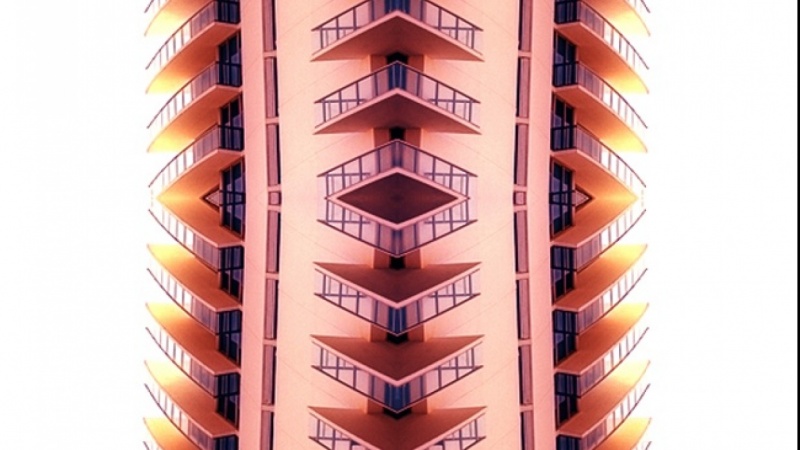
4. Editing Architecture: So, we shot a lot of photos today, went out and took a ton of pictures around Chicago, and basically what you do is going to just go through your photos and just look at what you got. You got all these different shots. I really, really enjoyed shooting today. In this tunnel and under the bridge some really cool shots of the city with this haze going on here. So, this is kind of the one I think I want to choose. So, I'm just going to zoom in make sure everything looks sharp. Everything looks nice and straight my lines are already nice and even. So, that's what I'm going to do that third one the tunnel right there. So, the first thing I'm going to do is open this up in VSCO cam and now you've got all these presets. I'm just going to go to the one that I know I like and see how that looks. So, I really like this E series in VSCO called Essence and there's E1 through E8. So, I'm just going to click around those I really like that set. There's really no rules, no rhyme, or reason you'd pick whatever you like, whatever looks good for your photo. We're just kind of following this basic outline and you can fill in all the gaps and stylistically in whatever way you prefer. I'm going to go in and choose E7 for my image. So, I'm going to go ahead and refine it a little bit. I like a more punchy contrasted photo. So, I'm going to pull the contrast up a little bit on this one. Rise the exposure a little bit. This one's really dark. I think I could probably lighten this up a bit and get it, looking a little better. You got shadows here. So, you can see what happens if you blow that out, look pretty bad and keep it really simple. We'll just pull the shadows up a little bit just to kind of increase the detail in the image. Make the darks not so dark and then highlights, then pull that up, it'll pull the highlights actually down. So, you can kind of see the light in the top there, is a good example over that kind of dims a little bit just kind of flattens it out, takes the white high points out of it. So it's looking a little green. I'm going to change the tint. Make it a little more red, so we're going to go ahead and save this out, all right. So, now, we're going to bring this image into Photoshop touch and that's really where kind of the magic is going to happen with manipulating these images. So, the first thing we're going to do here with this, especially the architecture stuff, lines are kind of the most interesting thing about architectural structures in the city. So, I'm going to duplicate this layer so you can hit this bottom right this layers palette and I'm going to hit plus duplicate layer. So this other pallet hit done, and then this other pallet, this the button right here, this is going to bring up your layer options, you got opacity blend mode. Now, dark and multiply lightened screen, all the typical things from Photoshop. So, I'm going to go ahead and choose lighten because that's really going to knock all the darks out of the image. So I've chosen lighten I'm going to transform here and I'm going to hit flip. Now, what we've done is basically created a perfectly symmetrical composition using the same photo on top of itself. So, I'm going to turn that on and off to show you kind of what that looks like with that layer off. Off, on, pretty simple. So then you can go up here to this end transform and then that's where you can move your layer around. Now, I could keep it like this but it's almost so close to the original composition, and I really want to go for something that's a little more surreal. So, I'm going to start moving this around you're going to see what this looks like when it's all punching out all the darks, all the shadows from the image. So, it's on lighten right now the blend mode I'm just moving this around. So you can really see what that's doing. So, that's perfectly centered and it shows you the X and Y coordinates up on top X zero, Y zero. So right now, it's perfectly centered. If I start moving that to the left a little bit, it's going to throw off the X-axis. I like this a lot. I like the idea of kind of two tunnels and creating this whole sort of new scene that wasn't there before. So let's zoom in a little bit to show you what's happening. So, there it is duplicated on itself and I'm just moving it over a little bit. Now, we've got completely, almost two completely new tunnels that sort of merge onto the same street and kind of create this totally different sort of new environment basically. So, one thing I want to do is kind of go in and fix one little detail so that doesn't look so Photoshopped or so obvious what's happening in the picture. What I like to do is kind of create this surreal scenes and then edit it just enough so that it looks a little more convincing I guess. So I'm going to go in and zoom in here and then the bottom left here you have all these different brush and tool options I'm going to go to the second row there's eraser, paint, effects, spray. I'm going to go to the eraser and I'm going to turn the brush size down to about 100. Then I'm going to erase away this. I'm going to turn that on and off to see what I'm doing here. I'm going to start erasing away this overlayer here because I really want these two points to kind of meet up perfectly. This is the kind of thing where there's apps out there that will mirror your images for you. But this really lets you get in there and sort of fine tune everything and get it perfect just kind of the way you would if you were working on a computer. If you have fat fingers, this might be hard but you can just go in there and erase away a little bit from the other side. I'm going to do the same thing with the bottom layer. I'm going to erase away the exact same part just so that that edge meets up just perfectly right there. Cool. So, we're going to export saved to camera roll and then choose this one choose jpeg. Okay. All right. Now, I'm going to open this app up called Lenslight and you got to be really careful when using a lot of apps. You're going to be really tempted when you download apps that do special effects to go really overboard with them and do stuff that just looks like you used a cheesy app. The goal is to use these tools as tools not as crutches you really don't want to just be adding crazy lens flares all over. Let's make sure we center it just perfectly. So, just make sure that everything lines up and it's perfectly symmetrical where you're cropping it. I'm going to hit effects down here. There's effects and then edit and layers so you're going to have different layers of this light so effects. Now, I have all these different lights I'm going to choose this one, you can choose whichever one you want and that basically just going to add, you can move all over the place, you can see it's this flare here. So, I'm going to put it right at the vanishing point on the right, and we've got this kind of light bursts coming from that one vanishing point and I'm going to hit Edit, and you'll see what happens when I crank the brightness way down to basically turns it off all the way back up, kind of blows it out and then click Advanced and then the scale you can really go crazy with that and that's not what I want to do and I want to go that crazy or pull it all the way down, so it's not there. I'm going to pull it up just a little bit over halfway and then you can see what happens with aspects that's going to make it either skinnier or taller. So, I'm just going to make it tall or wider I'm just going to keep it focused right in the middle. The source again this is not a good example to see what that doesn't artifacts. Some of the options have more streaks and kind of flares with them you can turn that down I'm going to turn that down just a little bit. Edit, I'm going to choose a different color so you can kind of just the tone of the light you're getting. So I'm going to go ahead and you get this whole color wheel, you can really do whatever you want. I'm going to do I think this red color there. I'm going add a second layer here and plus. I'm just going to choose that same exact flare which the Sol Invictus one but again there's all these different options. Again here, it's own here is that on its own right here I'm just going to setting you're right on that spot. So, I'm going to save the image and I'm going to bring this back into VSCO one more time, we're going to give it a pass with color and tend to tighten everything up. All right. So, after you're kind of looking at a bunch of different options, I'm going to go with this E8, you can see the difference and right now it's this is really yellow color to it. I'm going pull it up and it's going to kind of neutralize the shadows up in the top there, you can kind of see what it's doing as I crank it up. I'm going to put it about 10 and I don't like how blown out this looks and how faded, so I'm going to go in and pull the contrast that a little bit and then save and obviously you can just put that directly to Instagram or whatever else you want and then go ahead and check that out. So, that's really about it for the architectural and just remember if you get a really busy shot, and there's tons of lines, you don't have to do too much to make it even a little more surreal by just duplicating the layer on top of itself and flipping it one way or the other, you can kind of get this whole new look. In Photoshop Touch, it's nice because you can go in there and really kind of smooth out some of the details, you can really erase away a little things to make symmetry and not so perfect and just kind of get it a little more fine-tuned. Going back and forth between a couple of different apps and again just remembering to just get out and shoot, take these pictures, and just have fun with them.
5. Editing Still Life: This is really, basically, still life photography. So, I got really hooked on doing this a long time ago. I got really interested in collages of flowers and collages of just stuff I could take pictures of in my apartment, at home. Basically, here, we've just got a bouquet of flowers, bought from Trader Joe's, pretty simple. So, I'm just going to go ahead and take a photo straight down at these flowers. You can't see the vase, you can't see whatever is underneath it, and it's okay to have some edges and stuff. We're going to crop all that out, but the main thing is to just have this dark backdrop. As you can see, there's really no hick special setup here. We got this hoodie over a little table and that's all there is to it. So, it can be really super thrown together, don't worry about having the perfect studio, the perfect setup, the perfect office to do this stuff. That's completely irrelevant. It's just about you getting these pictures together so that you can work with them. So these flower photos, you've got all these shots here that you're going to go through and find the best one. So, I'm going to use this one. First thing we're going to do for this flower mandala thing is, this is going to be cropped to a square. So, let's go ahead and rotate that and make sure that we pick a composition that we like. Let's start with this rotation right here. Go ahead and crop around that. So, you want to crop so that your stuff is right just all inside this square here and you're not getting any of that other, like this stuff up here, the sides, just cut that out. Have it just be on this perfect black backdrop. All right. So, here in VSCO camera, we're going to edit the colors a little bit to set the stage for when we start messing around with the actual image itself. So, the first thing I'm going to do for these, I really like to use this F2 filter a lot. For me, for this type of shot, it looks so cool. It really completely neutralizes the background. All the blacks get this same wash over them. So, their background, any of the shadows within the flowers, all become very flush, very neutralized, very much the same. So, you can see it does that no matter what. Black and white is cool for these too. C1 makes everything really nice and dark. Go ahead and pull the contrast up a little bit. So that's this third one right here and it darken everything up a little bit, that looks good. Then just play with the exposure. Make sure everything looks just like you want it. We won't even need to worry about the colors in here after we've chosen that preset. We're going to be changing those in Photoshop Touch. So, this looks good. So, let's just keep that simple. Minimal editing in here. Go ahead, check mark that and then save it to your camera roll. So, the next step is we're going to open up Photoshop Touch. Go ahead and add the picture from your photo library, from your camera roll, the one that we just saved out. All right. So here we go. So now we've got this picture. So, I'm looking at it again and you may need to do this you may not, but I'm going to go ahead and rotate this again. I don't like this first one I'm starting with. I'm going to go to here, I like that. I'm going to go ahead and duplicate this layer similar to what we're doing with some of these other ones. We're going to really use the same photo on top of itself and create some interesting compositions with that. So, once you've duplicated that, you can go ahead and go up here, transform, I'm going to flip that. So now, again, we're duplicating the same thing on top of itself. You go ahead and choose your blending mode. So down here in the layers palette, blend mode. Now, since we're working in such a dark palette here with a dark background, you're going to see what happens when we choose darken, which again if you show up here, you go to transform, move that around, it completely knocks out all highlights and is only keeping the darkness in there. So, you can see when I move that around, what you're dealing with here and when you perfectly overlay, you're getting this perfectly symmetrical composition. I'm going to go ahead and choose lighten. It's really bizarre. It does a really nice job of perfectly knocking out all the darks and you're just getting this, everything blends just perfectly together. So, I like to go in, then go up here, this is all your color sections for your adjustments. So, go ahead and you're going to edit the color balance. I like this mirrored image. Now we've got this perfect composition, this mandala flower pattern thing. But I want to create imperfect symmetry. So, I'm going to edit the colors for just this second layer and keep the first layer intact. So, we're going to basically have this perfect mirror, but the second layer is just going to have slightly different colors. So, it's just going to create a little more interest in the image. If you tap the numbers themselves, you can get this little keypad here, hit zero, check, we'll go right back to the default. So, for this one, I'm going to pull the reds down. I'm going to make that right side where I flipped, not just the right side but the top layer that I just flipped. It's going to get really blue, then pull it down, not all the way. Then go ahead and the greens, adjust that a little bit. Pull the greens down. That's looking really cool, I like that a lot. All right. So, I'm gonna hit this checkmark right here. Let's zoom in and take a look at this a little bit more closely and see what we've got. So, yeah. So, we've got this perfectly mirrored image, but just one of them is color shifted and it just makes this beautiful pattern that I love to mess with. It's just fun to me. Part of this is really just the process, part of it is just really going in and tweaking colors and having fun with this image until it looks exactly like you want it. Let's go ahead and hide that bottom layer, see what you just did there. So, I pulled out a lot of the reds, caps on the blues, on the greens a little bit. So it made this more purple image. Then, we'll hide that one and then show the bottom one, there is a base layer. For me, I am really happy with this. It's pretty simple. Just two layers, mirroring it, flipping it around and then just editing the color of that. So, now that I've saved that, the finishing touches for this for me really just ends up back in VSCO cam. I'll go ahead and open that image backup and I'm landing again in this E series in VSCO, which for some reason, I just really like how these look. So, I like their colors from the original one, but I do like the tones that it's getting using this one. So, I'll pull it down a little bit. It will use, that looks good. Go into the tools, see if this needs any exposure, changes brightening up or anything. Since I really want this totally knocked out and just like it's floating in space, I'm going to pull the exposure down just a touch, just a one here. You can mess with your saturation, all that stuff. That's crazy looking super bright circusy colors. I'm going to pull the saturation up just a tad, just to maybe two. So, we're going to go ahead and save that out. Now the fun part. I'm going to post this on Instagram and share. There we go. So, it's live and then just watch the likes roll in.
6. Editing Big Sky: All right. So, for this specific lesson we're doing something that's more of a big sky and overlaying some different photos instead of just duplicating the same photo to create a completely new surreal composition. I have some photos earlier that we took when we were out and just going to go through those here. Now, I really, really love the idea of someone standing looking at a sky and just being in awe of it just as it is, but I also like the idea of making it look like they're standing there staring for a better reason because they've never seen anything like it, very literally. Let's go ahead and start off by adding this in Vsco and just tweak the colors a little bit. Open that up. I like this one HP2, which is the height piece filter. Now, really what we're doing here is we're going to be editing the skylight. So, I want to keep that pretty nice and clean. I don't want to make it too dark. We're going to go ahead and export that out, save it to camera roll. So, the first thing we're going to do for this image is going to open this app called, I think it's pronounced screw it, SKRWT. This app is basically to get your lines straightened and your horizon lines fixed and it's really especially good for buildings. If you like to take a picture up the buildings and the buildings are going out like that, you can really flatten it out and skew it. So it's just nice and perfect. For this one, I just want to really make sure that everything's nice and clean lined up. So, I'll rotate this in here and this really precise. So, I get this grid and it looks like it needs to all just shift up just a little bit. So, you can kind of see as I rotate this. I'm going to use the ground that she's standing on as my point of reference. So, I'm going to end up rotate but like one negative, like half a degree. So, hardly at all, but just a little bit. I'll just go ahead and save that out. Again, using all different apps I think is really important, figuring out a suite of apps for yourself that you can use for different things. So, doing color and one thing, doing composition and another, rotating in one or whatever. All right, I'm going to open up Photoshop Touch. We're going to bring that image in. Now, I'm going to duplicate this layer again and do the same thing where you're using the same photo as a resource on top of itself and duplicate that transform, flip it horizontally. I'm just going to keep this layer selected, choose my blending modes. So, let's choose lighten and I'm using the eraser tool here. So that's down here, bottom left to get this column of options, second one right there. Erase all these other tools, so keep it on the eraser. Then brush size, go up to 200 just keep it at that. So, we're only erasing away a portion of that image from the one that we just duplicated, over top of her so that we keep the silhouette perfectly. I'm going to zoom out in a second. Be really careful as you're erasing away because I'm erasing and what you see here happening in the background, is I erase it. Let me do a little more to show you. So, I'm starting to erase the sky and then more of the original underlying images coming through and then we're being left with this kind of ugly thing here. So, undo, top right, take that back. I just want a really nice clean erasing away of that overlay part. That's right on top. So, earlier while I was out I made sure to take some photos of the sky itself because I knew I'd want to use that as a resource later on. So, go ahead down here plus photo layer. Again, this is just like basically pasting an image in Photoshop onto itself. So, photo library and then you can add in any photo that you want that you've taken. So, here's other pictures that we took today. Here's a really nice intense sky. So, I'm going to choose that and that's going to overlay it on there. You can see you can scale it up, make it bigger, smaller, whatever. Let me put that right there. All right. So, now we have this sky. I'll go ahead and change the blending mode and I'll put it to darken. Let's go ahead and choose up here and then fade and now basically, all fade is going to do is these two points and it's going to erase from wherever you pull those points from a to b. You can see it doing that. So, I just want to make sure that's really clean. So, I'm going to just have that flow nicely over here, so it's not overlapping any of the buildings. So, now let's go ahead and let's color this a little bit, make a little more interesting. I'm going to color balance, pull the red out, pull the red up. Here I'm just adjusting the levels a little bit and really you just want to tweak this stuff until you get something that matches or just goes with the flow of the rest of your image. So, it's looks pretty good. All right, one thing I want to do here just to try out is duplicate this original layer and I'm going to make that much much bigger. A reason that I'd like to say and really encourage you to just be taking pictures all the time is because when you're doing stuff like this and you're on your phone, you basically got this whole library of images. So, it's really worth going back and looking at what you've taken in the past. Even if it's not from that shoot it doesn't really matter. The fact is that it's your picture, you own it, you can do whatever you want with it. If you want some clouds you don't have to go on Google and steal some picture. I really discourage doing that. Start taking pictures and build up a library of images that you can use. That's really important. So, I'm flicking through here looking for some old photos because I know I have some old cloud photos and here they are. So, I'm just adding this layer in this photo layer, and then it gives me a chance to rotate it or flip it or whatever. So, I'm going ahead and rotate it, scale it up. Now, we get this nice cloud texture that we're going to be able to use to overlay on top of all this. Turn this layer on and set it to screen or lighten. So, you can really knock all the darks out of this top layer. So, go ahead and choose screen. Now, that keeps it really hazy. So, go ahead and choose layers and we're going to pull the darks way down and that's going to start to really bring out just the sort of leftover cloud elements. You can pull the little highlights up a little bit, turn the darks down a little bit, and just fine tune it until it is just right. Now, on the bottom here in Photoshop Touch in the levels, you can choose different levels. You have your RGB and then you have individual red, green, and blue. All right, that looks good. So, now I'm just going to flip this layer on until it lands in the way that I like. Just to save battery and time just go ahead and delete your hidden layers that you're not using anymore. That's always a good thing to keep in mind. So, now let's add one more empty layer and now we're going to go up here &, and add a gradient. Now, you can see down on the bottom here, Photoshop Touch has different gradient options, circles, all that. A little up here and add this gradient up to the top. Create the sun, and then that's its own layer and so you'll be able to see when I move this around, it just cuts off and that's its own whole layer. Go ahead and choose screen. Choose overlay, just kind of click around till you get something that you like. Linear dodge will really blow it out, pull the opacity down 100 percent. This is looking pretty cool. I'm liking where this is at right now. So, let's go ahead and hit done. We're going to save this project and then we're going to pull this back into Vsco and just clean up the colors. So, we're going to import this in here. Now, we're just going to start clicking around different presets and see what we like here. I kind of like this K2 on here. Cool, I like this one right here. So, once you had all your colors and tone and tint and saturation everything kind of tweaked and you choose a preset that you like, after you put this image together it neutralized all the differences from the layers that we've added and uniformed everything. So, go ahead and we'll save that one out. Let's just check it out a little more close up in your camera roll. So, there you go. So we've kind of created this sort of surreal sky that's in a landscape setting. So, that's our final imagery here. Nice and simple, pretty easy to create. Doesn't take too long to do stuff like this. Just the real fun and the time that takes is just being out and shooting pictures all the time.
7. Conclusion: To wrap everything up, really the biggest piece of advice I can say, just kind of a step one really is just have fun and get out and take pictures. For this specific class, I'm really just wanting to encourage you to be creative in-between times. When you're out, you've got your phone with you, you're just taking pictures, making things, that's what this is all about. There's no rhyme or reason, no rules. These three approaches that I've talked about you can live anywhere, city, suburbs, can be inside, wherever, just keep in mind that it's really about what you're going to do with the photos after you take them. The better the photo, the better the final output for sure, but don't get too caught up on that, just take pictures. This is encouraging you to be creative and stay inspired to make things. So, instead of playing games, this is honestly the kind of thing that I do when I'm just killing time on my phone, and I look through my photos and like, "Oh, that one looks like it might be fun to edit." it's just really everyday pictures that you can elevate and make a lot more interesting. So, just push yourself, try and make your composition number 1. Especially if you're going to be doing stuff for Instagram, you have this square to work with. So, just keep in mind the symmetry of that square if that's your main output, then just keep that in mind. Don't try and force something that's too panoramic or taller, whatever work within that, just work with it instead of against it. A couple of simple apps, really simple basic tools, and then this is really stuff that's practice for the next level of work. As I said, this can really affect your workflow when you're on a computer. Try and remember to not only have your phone on you, but bring your camera around with you, a point-and-shoot SLR, whatever you've got, and take pictures of the same things on your phone. Just in case you love what you do on your phone, you got it in a higher resolution. Let's try and be diligent with that and make sure you take pictures all the time. I hope you like it, too. I hope it's a lot of fun. I hope I encouraged you to stay creative and inspired and just always want to make stuff regardless of what the world around you is, you can really be anywhere for this. Yeah, just have fun, experiment. Experiments are really the root of some of the best work you're ever going to do, and that's really what it's all about.
8. What's Next?:
 Chuck Anderson, Artist & photographer. NoPattern Studio: Chicago